Spring AI Alibaba 【四】
1. 文生图
1.1 Spring AI 的介绍
它被设计为一个简单且便携的界面,用于与各种专门用于图像生成的 AI 模型进行交互,允许开发人员以最少的代码更改在不同的图像相关模型之间切换。 这种设计符合 Spring 的模块化和可互换性理念,确保开发人员能够快速调整他们的应用程序以适应与图像处理相关的不同 AI 功能。
此外,借助输入封装和输出处理等配套类的支持,图像模型 API 统一了与专用于图像生成的 AI 模型的通信。 它管理请求准备和响应解析的复杂性,为图像生成功能提供直接且简化的 API 交互。
Spring Image Model API 构建在 Spring AI 之上,提供特定于图像的抽象和实现。
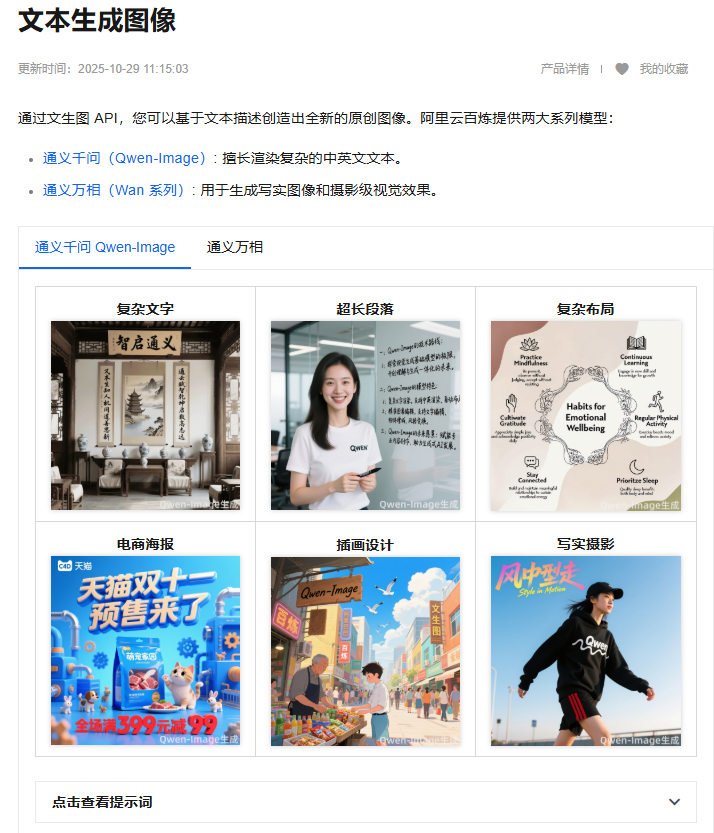
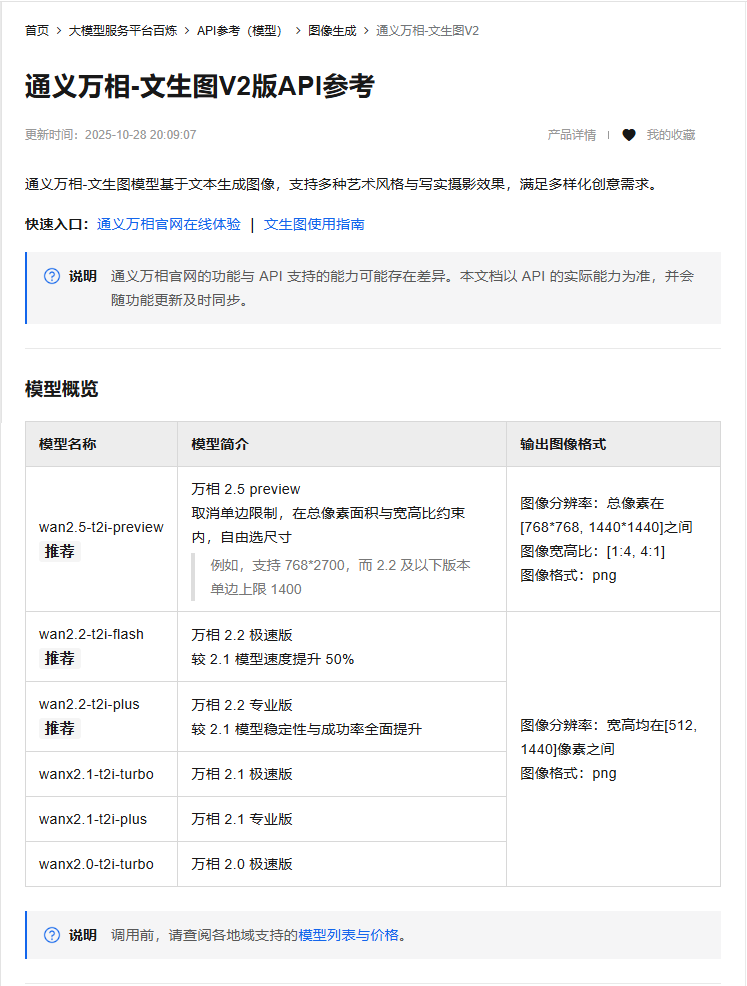
1.2 阿里百炼的介绍
1.3 编码实战
1.3.1 新建Module
可以命名为 Text2image
1.3.2 修改POM文件
在依赖配置节点修改为以下配置:
<dependencies><dependency><groupId>org.springframework.boot</groupId><artifactId>spring-boot-starter-web</artifactId></dependency><!--spring-ai-alibaba dashscope--><dependency><groupId>com.alibaba.cloud.ai</groupId><artifactId>spring-ai-alibaba-starter-dashscope</artifactId></dependency><!--lombok--><dependency><groupId>org.projectlombok</groupId><artifactId>lombok</artifactId><version>1.18.38</version></dependency><!--hutool--><dependency><groupId>cn.hutool</groupId><artifactId>hutool-all</artifactId><version>5.8.22</version></dependency><dependency><groupId>org.springframework.boot</groupId><artifactId>spring-boot-starter-test</artifactId><scope>test</scope></dependency></dependencies><build><plugins><plugin><groupId>org.springframework.boot</groupId><artifactId>spring-boot-maven-plugin</artifactId></plugin><plugin><groupId>org.apache.maven.plugins</groupId><artifactId>maven-compiler-plugin</artifactId><version>3.11.0</version><configuration><compilerArgs><arg>-parameters</arg></compilerArgs><source>21</source><target>21</target></configuration></plugin></plugins></build><repositories><repository><id>spring-milestones</id><name>Spring Milestones</name><url>https://repo.spring.io/milestone</url><snapshots><enabled>false</enabled></snapshots></repository></repositories>1.3.3 编写配置文件
在resources目录下新建application.properties配置文件,内容如下:
server.port=8009# 设置响应的字符编码
server.servlet.encoding.charset=utf-8
server.servlet.encoding.enabled=true
server.servlet.encoding.force=truespring.application.name=Text2image# ====SpringAIAlibaba Config=============
spring.ai.dashscope.api-key=${DASHSCOPE_API_KEY}
1.3.4 编写主启动类
新建主启动类,并编写如下内容:
import org.springframework.boot.SpringApplication;
import org.springframework.boot.autoconfigure.SpringBootApplication;@SpringBootApplication
public class Text2imageApplication {public static void main(String[] args){SpringApplication.run(Text2imageApplication.class, args);}}
1.3.5 编写业务类
新建子包controller,并在其中新建业务类 Text2ImageController
import com.alibaba.cloud.ai.dashscope.image.DashScopeImageOptions;
import jakarta.annotation.Resource;
import org.springframework.ai.image.ImageModel;
import org.springframework.ai.image.ImagePrompt;
import org.springframework.web.bind.annotation.GetMapping;
import org.springframework.web.bind.annotation.RequestParam;
import org.springframework.web.bind.annotation.RestController;/*** @Description 知识出处* https://help.aliyun.com/zh/model-studio/text-to-image?spm=a2c4g.11186623.help-menu-2400256.d_0_5_0.1a457d9dv6o7Kc&accounttraceid=6ec3bf09599f424a91a2a88b27b31570nrdd*/
@RestController
public class Text2ImageController
{// img modelpublic static final String IMAGE_MODEL = "wanx2.1-t2i-turbo";@Resourceprivate ImageModel imageModel;/*** http://localhost:8009/t2i/image* @param prompt* @return*/@GetMapping(value = "/t2i/image")public String image(@RequestParam(name = "prompt",defaultValue = "高山与草原") String prompt){return imageModel.call(new ImagePrompt(prompt, DashScopeImageOptions.builder().withModel(IMAGE_MODEL).build())).getResult().getOutput().getUrl();}
}
1.3.6 测试
启动主启动类后,在浏览器中请求如下地址:
http://localhost:8009/t2i/image
等待片刻,浏览器会返回生成的图片地址,复制该地址进行访问,会弹出下载图片对话框,保存到指定位置后,就可以看到刚才生成的图片:


注意,此时控制台会报运行时异常:
java.lang.RuntimeException: Image generation still pending
.......
去Spring AI Alibaba 的github项目issue提了bug之后,开发团队给出的回复是,进行请求时,图片生成较慢,服务在没有立即得到返回信息时就会报该错误,需要自己捕获处理。
2. 文生音
2.1 Spring AI 的介绍
音频 API 提供了一个基于 OpenAI 的 TTS(文本转语音)模型的语音端点,使用户能够:
-
讲述一篇书面博客文章。
-
生成多种语言的口语音频。
-
使用流媒体提供实时音频输出。
2.2 阿里百炼文生音的介绍
语音合成-CosyVoice/Sambert,又称文本转语音(Text-to-Speech,TTS),是将文本转换为自然语音的技术。该技术基于机器学习算法,通过学习大量语音样本,掌握语言的韵律、语调和发音规则,从而在接收到文本输入时生成真人般自然的语音内容。
2.2.1 SSML标记语言支持说明
当前SSML(Speech Synthesis Markup Language,语音合成标记语言)功能仅适用于cosyvoice-v2模型,使用时需满足以下条件:
-
使用DashScope SDK 2.20.3 或更高版本
-
仅支持同步调用和异步调用(即SpeechSynthesizer类的
call方法),不支持流式调用(即SpeechSynthesizer类的streamingCall方法)和Flowable调用。 -
使用方法与普通语音合成一致:将包含SSML的文本传入SpeechSynthesizer类的
call方法即可
2.2.2 SpeechSynthesizer类
SpeechSynthesizer类提供了语音合成的关键接口,支持以下几种调用方式:
-
同步调用:提交文本后,服务端立即处理并返回完整的语音合成结果。整个过程是阻塞式的,客户端需要等待服务端完成处理后才能继续下一步操作。适合短文本语音合成场景。
-
异步调用:将文本一次发送至服务端并实时接收语音合成结果,不允许将文本分段发送。适用于对实时性要求高的短文本语音合成场景。
-
流式调用:将文本逐步发送到服务端并实时接收语音合成结果,允许将长文本分段发送,服务端在接收到部分文本后便立即开始处理。适合实时性要求高的长文本语音合成场景。
2.2.2.1 同步调用
同步提交语音合成任务,直接获取完整结果。
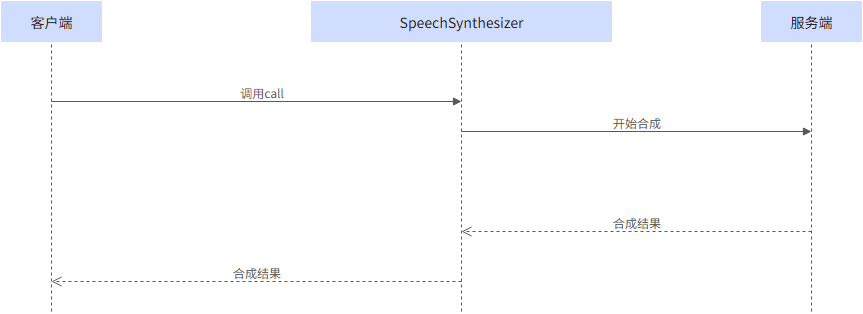
实例化SpeechSynthesizer类绑定请求参数,调用call方法进行合成并获取二进制音频数据。
发送的文本长度不得超过2000字符(详情请参见SpeechSynthesizer类的call方法)。
重要 每次调用
call方法前,需要重新初始化SpeechSynthesizer实例。
2.2.2.2 异步调用
异步提交语音合成任务,通过注册ResultCallback回调,逐帧接收实时语音分段数据。
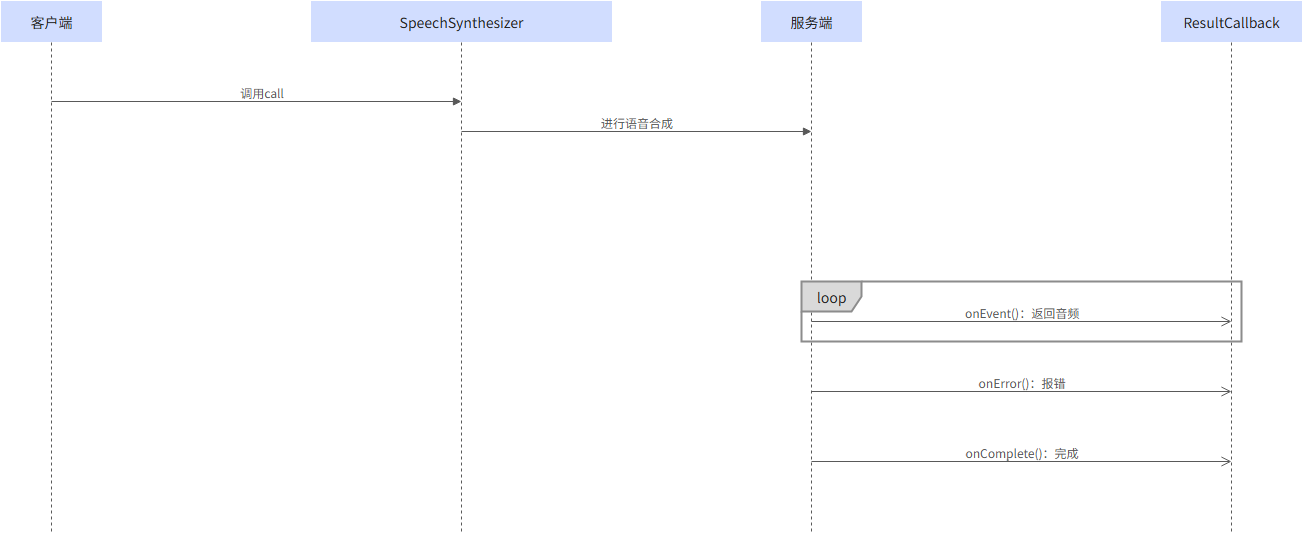
实例化SpeechSynthesizer类绑定请求参数和回调接口(ResultCallback),调用call方法进行合成并通过回调接口(ResultCallback)的onEvent方法实时获取合成结果。
发送的文本长度不得超过2000字符(详情请参见SpeechSynthesizer类的call方法)。
重要 每次调用
call方法前,需要重新初始化SpeechSynthesizer实例。
2.2.2.3 流式调用
分多次提交文本,通过注册ResultCallback回调,逐帧接收实时语音分段数据。
说明
-
流式输入时可多次调用
streamingCall按顺序提交文本片段。服务端接收文本片段后自动进行分句:-
完整语句立即合成
-
不完整语句缓存至完整后合成
调用
streamingComplete时,服务端会强制合成所有已接收但未处理的文本片段(包括未完成的句子)。 -
-
发送文本片段的间隔不得超过23秒,否则触发“request timeout after 23 seconds”异常。
若无待发送文本,需及时调用
streamingComplete结束任务。服务端强制设定23秒超时机制,客户端无法修改该配置。
-
实例化SpeechSynthesizer类
实例化SpeechSynthesizer类绑定请求参数和回调接口(ResultCallback)。
-
流式传输
多次调用SpeechSynthesizer类的
streamingCall方法分片提交待合成文本,将待合成文本分段发送至服务端。在发送文本的过程中,服务端会通过回调接口(ResultCallback)的
onEvent方法,将合成结果实时返回给客户端。每次调用
streamingCall方法发送的文本片段(即text)长度不得超过2000字符,累计发送的文本总长度不得超过20万字符。 -
结束处理
调用SpeechSynthesizer类的
streamingComplete方法结束语音合成。该方法会阻塞当前线程,直到回调接口(ResultCallback)的
onComplete或者onError回调触发后才会释放线程阻塞。请务必确保调用该方法,否则可能会导致结尾部分的文本无法成功转换为语音。
2.2.2.4 请求参数
通过SpeechSynthesisParam的链式方法配置模型、音色等参数。配置完成的参数对象传入SpeechSynthesizer类的构造函数中使用。
| 参数 | 类型 | 默认值 | 是否必须 | 说明 |
|---|---|---|---|---|
| model | String | - | 是 | 指定模型。 不同版本的模型编码方式一致,但使用时须确保模型( |
| voice | String | - | 是 | 指定语音合成所使用的音色。 支持默认音色和专属音色:
⚠️ 使用声音复刻系列模型合成语音时,仅能使用该模型复刻生成的专属音色,不能使用默认音色。 ⚠️ 使用专属音色合成语音时,语音合成模型( |
2.3 编码实战
2.3.1 新建Module
新建子模块Module,可以命名为 Text2Voice
2.3.2 修改POM文件
在依赖配置节点修改为以下配置:
<dependencies><dependency><groupId>org.springframework.boot</groupId><artifactId>spring-boot-starter-web</artifactId></dependency><!--spring-ai-alibaba dashscope--><dependency><groupId>com.alibaba.cloud.ai</groupId><artifactId>spring-ai-alibaba-starter-dashscope</artifactId></dependency><!--lombok--><dependency><groupId>org.projectlombok</groupId><artifactId>lombok</artifactId><version>1.18.38</version></dependency><!--hutool--><dependency><groupId>cn.hutool</groupId><artifactId>hutool-all</artifactId><version>5.8.22</version></dependency><dependency><groupId>org.springframework.boot</groupId><artifactId>spring-boot-starter-test</artifactId><scope>test</scope></dependency></dependencies><build><plugins><plugin><groupId>org.springframework.boot</groupId><artifactId>spring-boot-maven-plugin</artifactId></plugin><plugin><groupId>org.apache.maven.plugins</groupId><artifactId>maven-compiler-plugin</artifactId><version>3.11.0</version><configuration><compilerArgs><arg>-parameters</arg></compilerArgs><source>21</source><target>21</target></configuration></plugin></plugins></build><repositories><repository><id>spring-milestones</id><name>Spring Milestones</name><url>https://repo.spring.io/milestone</url><snapshots><enabled>false</enabled></snapshots></repository></repositories>2.3.3 修改配置文件
在resources目录下新建application.properties配置文件,内容如下:
server.port=8010# 设置响应的字符编码
server.servlet.encoding.charset=utf-8
server.servlet.encoding.enabled=true
server.servlet.encoding.force=truespring.application.name=Text2voice# ====SpringAIAlibaba Config=============
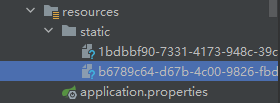
spring.ai.dashscope.api-key=${DASHSCOPE_API_KEY}此外,还需要在resources目录下新建目录static,用于存放生成的音频文件。
2.3.4 编写主启动类
新建主启动类,并编写如下内容:
import org.springframework.boot.SpringApplication;
import org.springframework.boot.autoconfigure.SpringBootApplication;@SpringBootApplication
public class Text2voiceApplication {public static void main(String[] args) {SpringApplication.run(Text2voiceApplication.class, args);}}
2.3.5 编写业务类
新建子包controller,并在其中新建业务类 Text2VoiceController
import com.alibaba.cloud.ai.dashscope.audio.DashScopeSpeechSynthesisOptions;
import com.alibaba.cloud.ai.dashscope.audio.synthesis.SpeechSynthesisModel;
import com.alibaba.cloud.ai.dashscope.audio.synthesis.SpeechSynthesisPrompt;
import com.alibaba.cloud.ai.dashscope.audio.synthesis.SpeechSynthesisResponse;
import jakarta.annotation.Resource;
import org.springframework.web.bind.annotation.GetMapping;
import org.springframework.web.bind.annotation.RequestParam;
import org.springframework.web.bind.annotation.RestController;import java.io.FileNotFoundException;
import java.io.FileOutputStream;
import java.io.IOException;
import java.nio.ByteBuffer;
import java.util.UUID;@RestController
public class Text2VoiceController {@Resourceprivate SpeechSynthesisModel speechSynthesisModel;//voice modelpublic static final String BAILLIAN_VOICE_MODEL = "cosyvoice-v2";//voice timberpublic static final String BAILLIAN_VOICE_TIMBER = "longyingcui";//龙应催@GetMapping("/t2v/voice")public String voice(@RequestParam(name = "msg",defaultValue = "温馨提示,支付宝到账100元请查收")String msg){// 此处地址需要更改为自己存放音频文件的地址String filePath = "E:\\Spring AI Alibaba\\code\\SpringAIAlibaba\\Text2voice\\src\\main\\resources\\static\\"+ UUID.randomUUID() + ".mp3";//1.语音参数设置DashScopeSpeechSynthesisOptions options = DashScopeSpeechSynthesisOptions.builder().model(BAILLIAN_VOICE_MODEL).voice(BAILLIAN_VOICE_TIMBER).build();//2.调用大模型语音生成对象SpeechSynthesisResponse response = speechSynthesisModel.call(new SpeechSynthesisPrompt(msg,options));//3.字节流语音转换ByteBuffer byteBuffer = response.getResult().getOutput().getAudio();//4.文件生成,保存到本地try(FileOutputStream fileOutputStream = new FileOutputStream(filePath)) {fileOutputStream.write(byteBuffer.array());} catch (FileNotFoundException e) {throw new RuntimeException(e);} catch (IOException e) {throw new RuntimeException(e);}return filePath;}
}
2.3.6 测试
启动主启动类后,在浏览器中请求如下地址:
http://localhost:8010/t2v/voice

找到该文件后可以听到使用选定音色根据给定内容生成的音频。