LVGL3(Helloworld)
1 HelloWorld
用的lvgl/examples/get_started/lv_example_get_started_1.c
代码:
/*** @file main.c**//**********************      INCLUDES*********************/#ifndef _DEFAULT_SOURCE#define _DEFAULT_SOURCE /* needed for usleep() */
#endif#include <stdlib.h>
#include <stdio.h>
#ifdef _MSC_VER#include <Windows.h>
#else#include <unistd.h>#include <pthread.h>
#endif
#include "lvgl/lvgl.h"
#include "lvgl/examples/lv_examples.h"
#include "lvgl/demos/lv_demos.h"
#include <SDL.h>#include "hal/hal.h"/**********************      DEFINES*********************//***********************      TYPEDEFS**********************//***********************  STATIC PROTOTYPES**********************//***********************  STATIC VARIABLES**********************//***********************      MACROS**********************//***********************   GLOBAL FUNCTIONS**********************/#if LV_USE_OS != LV_OS_FREERTOSint main(int argc, char **argv)
{(void)argc; /*Unused*/(void)argv; /*Unused*//*Initialize LVGL*/lv_init();/*Initialize the HAL (display, input devices, tick) for LVGL*/sdl_hal_init(320, 480);/* Run the default demo *//* To try a different demo or example, replace this with one of: *//* - lv_demo_benchmark(); *//* - lv_demo_stress(); *//* - lv_example_label_1(); *//* - etc. *///lv_demo_widgets();lv_example_get_started_1();while(1) {/* Periodically call the lv_task handler.* It could be done in a timer interrupt or an OS task too.*/uint32_t sleep_time_ms = lv_timer_handler();if(sleep_time_ms == LV_NO_TIMER_READY){sleep_time_ms =  LV_DEF_REFR_PERIOD;}
#ifdef _MSC_VERSleep(sleep_time_ms);
#elseusleep(sleep_time_ms * 1000);
#endif}return 0;
}#endif/***********************   STATIC FUNCTIONS**********************/
实际代码:
#include "../lv_examples.h"
#if LV_BUILD_EXAMPLES && LV_USE_LABEL/*** Basic example to create a "Hello world" label*/
void lv_example_get_started_1(void)
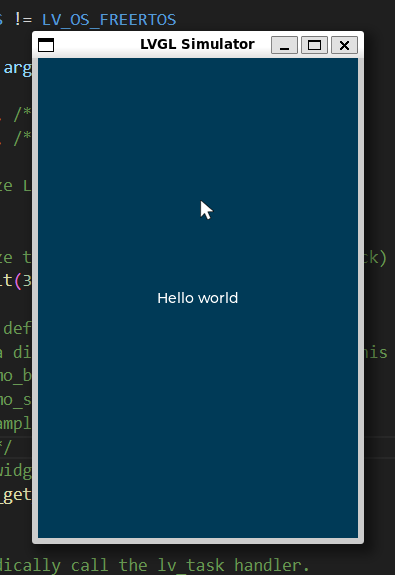
{/*Change the active screen's background color*/lv_obj_set_style_bg_color(lv_screen_active(), lv_color_hex(0x003a57), LV_PART_MAIN);/*Create a white label, set its text and align it to the center*/lv_obj_t * label = lv_label_create(lv_screen_active());lv_label_set_text(label, "Hello world");lv_obj_set_style_text_color(lv_screen_active(), lv_color_hex(0xffffff), LV_PART_MAIN);lv_obj_align(label, LV_ALIGN_CENTER, 0, 0);
}#endif从代码看还是不难,第一部分就是init,设置分辨率,之后就是sleep。
第二部分就是对界面具体的设置。只有5行。
第一行就是设置背景,第二行是创建一个字符串,第三行是设置字符串内容。第四行是设置字符原色,第五行是设置字符位置。
好了,代码看起来真的不难。就是环境折腾好久。。。
2 Button
经常做界面的朋友都知道,GUI其实最本质的功能就是信息交互。交互一个是输入一个是输出。上面的text可以用来输出,输入呢?和机器打交道,传统的其实没有文字,因为传统的计算机不怎么懂文字(AI除外),其实最常用的就是按键。
正好里面有第二个示例就是按键的。
/*** Create a button with a label and react on click event.*/
void lv_example_get_started_2(void)
{lv_obj_t * btn = lv_button_create(lv_screen_active());     /*Add a button the current screen*/lv_obj_set_pos(btn, 10, 10);                            /*Set its position*/lv_obj_set_size(btn, 120, 50);                          /*Set its size*/lv_obj_add_event_cb(btn, btn_event_cb, LV_EVENT_ALL, NULL);           /*Assign a callback to the button*/lv_obj_t * label = lv_label_create(btn);          /*Add a label to the button*/lv_label_set_text(label, "Button");                     /*Set the labels text*/lv_obj_center(label);
}
可以看到,代码也很简单。
第一行是创建一个按键。
第二行设置按键的位置。
第三行设置按键的带下。
第四行设置按键事件的处理。
第五行创建文字,这里是按键上的文字。
第六行设置文字的内容。
第七行是设置按键上文字的位置。
按键的回调:
static void btn_event_cb(lv_event_t * e)
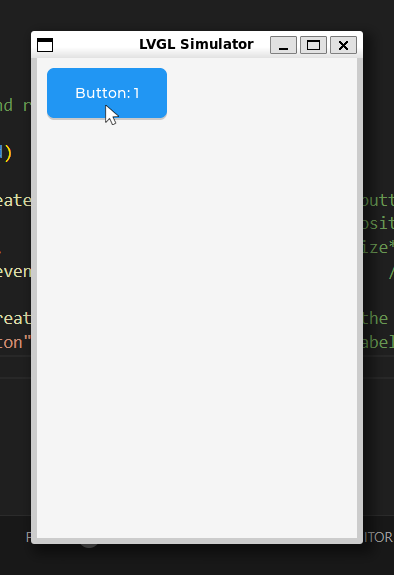
{lv_event_code_t code = lv_event_get_code(e);lv_obj_t * btn = lv_event_get_target_obj(e);if(code == LV_EVENT_CLICKED) {static uint8_t cnt = 0;cnt++;/*Get the first child of the button which is the label and change its text*/lv_obj_t * label = lv_obj_get_child(btn, 0);lv_label_set_text_fmt(label, "Button: %d", cnt);}
}代码其实也很简单。首先是获取按键的指针,然后获取按键的事件,然后一个自加一的变量。最后将按键的字符串改写。这里是获取按键的第一个子对象获得字符串指针。不知道这个第一个是怎么定义的,是第一个加进去的吗?就是lv_label_create(btn)。目前还不清楚,后面再试试吧。
好了,效果如下: