基于PyTorch的YOLOv5目标检测模型训练脚本详解
YOLOv5训练流程
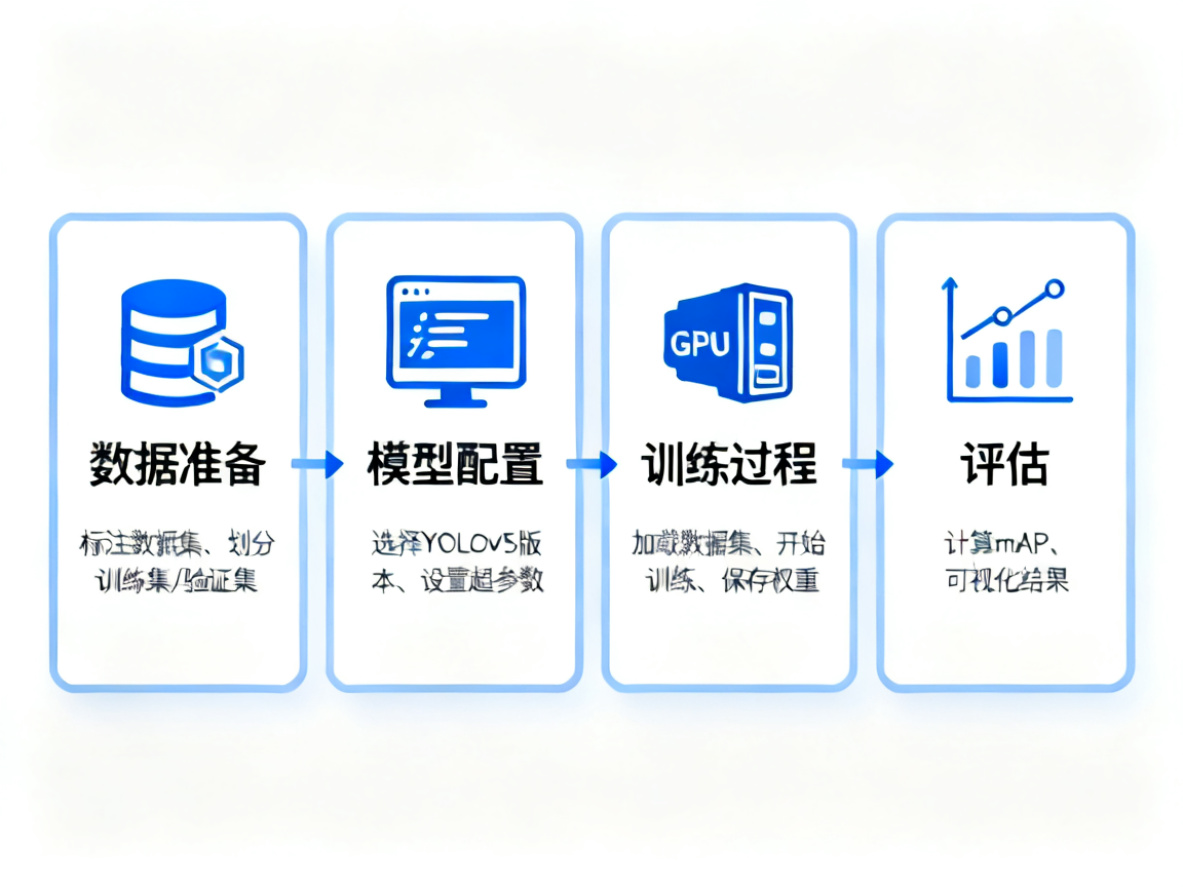
YOLOv5训练流程主要包含四个关键步骤:数据准备、模型配置、训练过程和评估。本文将按照这个流程逐步讲解。
1.环境配置
1.1 基本环境要求
YOLOv5的训练环境需要满足以下基本要求:
- Python >= 3.8.0
- PyTorch >= 1.8.0
- CUDA >= 10.2 (GPU训练)
- 其他依赖库见requirements.txt
1.2 安装步骤
首先克隆YOLOv5仓库并安装所需依赖:
git clone https://github.com/ultralytics/yolov5  # 克隆仓库
cd yolov5                                      # 进入目录
pip install -r requirements.txt                # 安装依赖
1.3 requirements.txt内容解析
YOLOv5的requirements.txt文件包含了所有必要的依赖库,主要包括:

2. 数据集准备
2.1 数据集格式
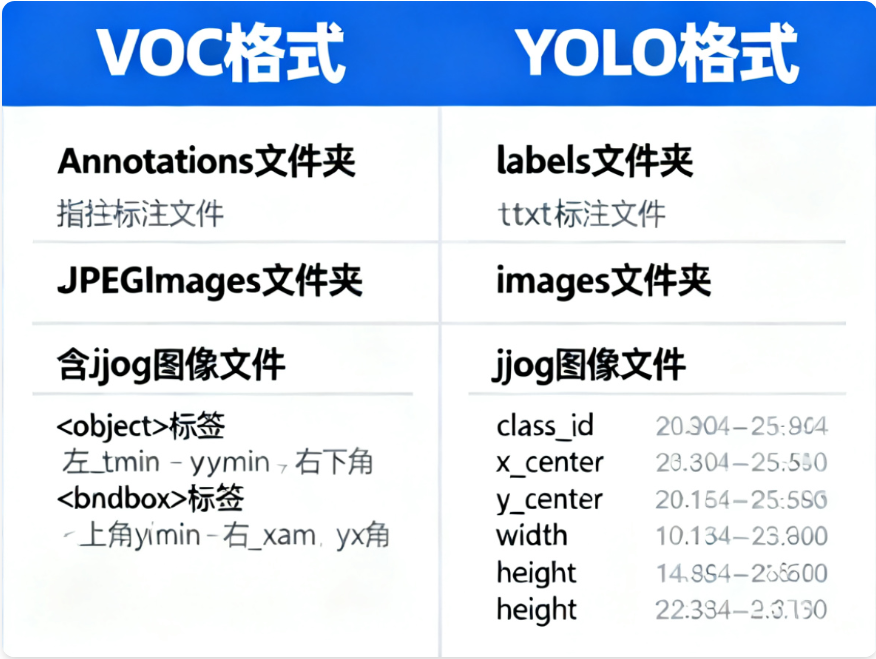
YOLOv5支持多种数据集格式,最常用的是YOLO格式和VOC格式。以下是两种格式的对比:
2.2 数据集目录结构
推荐的数据集目录结构如下:
dataset/
├── images/
│   ├── train/
│   │   ├── img1.jpg
│   │   ├── img2.jpg
│   │   └── ...
│   ├── val/
│   │   ├── img1.jpg
│   │   ├── img2.jpg
│   │   └── ...
│   └── test/
│       ├── img1.jpg
│       ├── img2.jpg
│       └── ...
└── labels/├── train/│   ├── img1.txt│   ├── img2.txt│   └── ...├── val/│   ├── img1.txt│   ├── img2.txt│   └── ...└── test/├── img1.txt├── img2.txt└── ...
2.3 YOLO格式标签说明
YOLO格式的标签文件是纯文本文件,每行代表一个目标,格式如下:
<class_id> <x_center> <y_center> <width> <height>- class_id:目标类别ID(从0开始)
- x_center:目标中心点x坐标(相对于图像宽度的比例,范围0-1)
- y_center:目标中心点y坐标(相对于图像高度的比例,范围0-1)
- width:目标宽度(相对于图像宽度的比例,范围0-1)
- height:目标高度(相对于图像高度的比例,范围0-1)
2.4 数据集配置文件
需要创建一个YAML格式的数据集配置文件,例如custom_data.yaml,内容如下:
# 训练集和验证集的路径
train: ../dataset/images/train/
val: ../dataset/images/val/
test: ../dataset/images/test/# 类别数量
nc: 2# 类别名称
names: ['class1', 'class2']
2.5 VOC格式转YOLO格式
如果你的数据集是VOC格式(XML文件),可以使用以下脚本将其转换为YOLO格式:
#!/usr/bin/env python3
# -*- coding: utf-8 -*-
import xml.etree.ElementTree as ET
import os
from os import getcwdsets = ('train', 'val', 'test')
classes = ("class1", "class2")  # 改成自己的类别def convert(size, box):dw = 1. / size[0]dh = 1. / size[1]x = (box[0] + box[1]) / 2.0y = (box[2] + box[3]) / 2.0w = box[1] - box[0]h = box[3] - box[2]x = x * dww = w * dwy = y * dhh = h * dhreturn (x, y, w, h)def convert_annotation(image_id):in_file = open('Annotations/%s.xml' % (image_id))out_file = open('labels/%s.txt' % (image_id), 'w')tree = ET.parse(in_file)root = tree.getroot()size = root.find('size')w = int(size.find('width').text)h = int(size.find('height').text)for obj in root.iter('object'):difficult = obj.find('difficult').textcls = obj.find('name').textif cls not in classes or int(difficult) == 1:continuecls_id = classes.index(cls)xmlbox = obj.find('bndbox')b = (float(xmlbox.find('xmin').text), float(xmlbox.find('xmax').text), float(xmlbox.find('ymin').text),float(xmlbox.find('ymax').text))bb = convert((w, h), b)out_file.write(str(cls_id) + " " + " ".join([str(a) for a in bb]) + '\n')wd = getcwd()
print(wd)for image_set in sets:if not os.path.exists('labels/'):os.makedirs('labels/')image_ids = open('ImageSets/Main/%s.txt' % (image_set)).read().strip().split()list_file = open('%s.txt' % (image_set), 'w')for image_id in image_ids:list_file.write('%s/images/%s.jpg\n' % (wd, image_id))convert_annotation(image_id)list_file.close()
2.6 数据集划分
使用以下脚本将数据集划分为训练集、验证集和测试集:
import os
import random
import argparseparser = argparse.ArgumentParser()
parser.add_argument('--xml_path', default='Annotations', type=str, help='input xml label path')
parser.add_argument('--txt_path', default='ImageSets/Main', type=str, help='output txt label path')
opt = parser.parse_args()trainval_percent = 0.9
train_percent = 0.8
xmlfilepath = opt.xml_path
txtsavepath = opt.txt_path
total_xml = os.listdir(xmlfilepath)num = len(total_xml)
list_index = range(num)
tv = int(num * trainval_percent)
tr = int(tv * train_percent)
trainval = random.sample(list_index, tv)
train = random.sample(trainval, tr)if not os.path.exists(txtsavepath):os.makedirs(txtsavepath)ftrainval = open(txtsavepath + '/trainval.txt', 'w')
ftest = open(txtsavepath + '/test.txt', 'w')
ftrain = open(txtsavepath + '/train.txt', 'w')
fval = open(txtsavepath + '/val.txt', 'w')for i in list_index:name = total_xml[i][:-4] + '\n'if i in trainval:ftrainval.write(name)if i in train:ftrain.write(name)else:fval.write(name)else:ftest.write(name)ftrainval.close()
ftrain.close()
fval.close()
ftest.close()
3. 模型训练
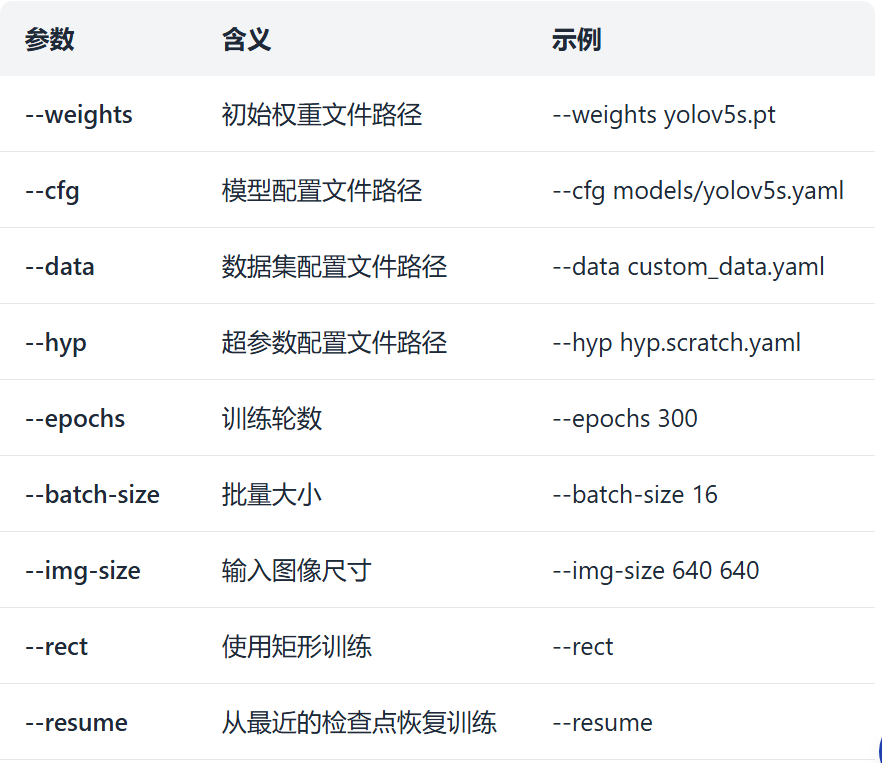
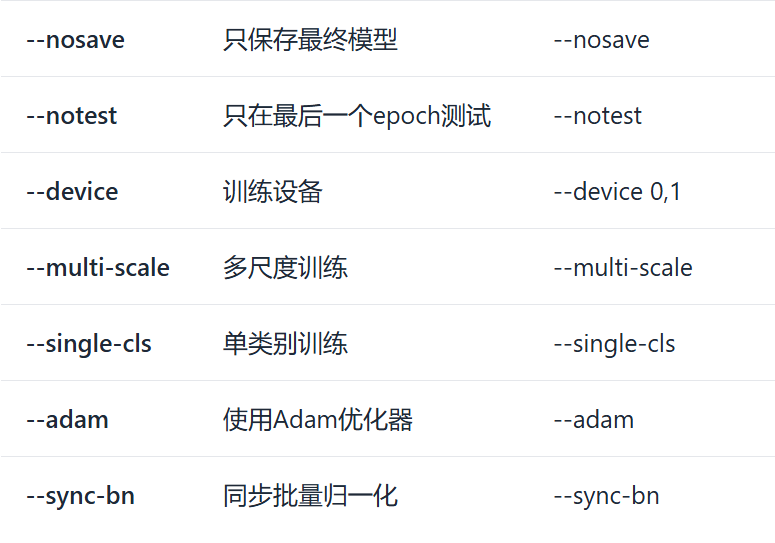
3.1 训练参数详解
YOLOv5的训练参数众多,以下是一些关键参数的详细说明:
3.2 模型配置文件
YOLOv5提供了多种预定义的模型配置文件,位于models目录下:
• yolov5n.yaml - Nano模型(最小最快)
• yolov5s.yaml - Small模型
• yolov5m.yaml - Medium模型
• yolov5l.yaml - Large模型
• yolov5x.yaml - X-Large模型(最大最准)
如果使用自定义数据集,需要修改配置文件中的nc(类别数量)参数:
# parameters
nc: 2  # number of classes
depth_multiple: 0.33  # model depth multiple
width_multiple: 0.50  # layer channel multiple# anchors
anchors:- [10,13, 16,30, 33,23]  # P3/8- [30,61, 62,45, 59,119]  # P4/16- [116,90, 156,198, 373,326]  # P5/32# YOLOv5 backbone
backbone:# [from, number, module, args][[-1, 1, Conv, [64, 6, 2, 2]],  # 0-P1/2[-1, 1, Conv, [128, 3, 2]],  # 1-P2/4[-1, 3, C3, [128]],[-1, 1, Conv, [256, 3, 2]],  # 3-P3/8[-1, 6, C3, [256]],[-1, 1, Conv, [512, 3, 2]],  # 5-P4/16[-1, 9, C3, [512]],[-1, 1, Conv, [1024, 3, 2]],  # 7-P5/32[-1, 3, C3, [1024]],[-1, 1, SPPF, [1024, 5]],  # 9]# YOLOv5 head
head:[[-1, 1, Conv, [512, 1, 1]],[-1, 1, nn.Upsample, [None, 2, 'nearest']],[[-1, 6], 1, Concat, [1]],  # cat backbone P4[-1, 3, C3, [512, False]],  # 13[-1, 1, Conv, [256, 1, 1]],[-1, 1, nn.Upsample, [None, 2, 'nearest']],[[-1, 4], 1, Concat, [1]],  # cat backbone P3[-1, 3, C3, [256, False]],  # 17 (P3/8-small)[-1, 1, Conv, [256, 3, 2]],[[-1, 14], 1, Concat, [1]],  # cat head P4[-1, 3, C3, [512, False]],  # 20 (P4/16-medium)[-1, 1, Conv, [512, 3, 2]],[[-1, 10], 1, Concat, [1]],  # cat head P5[-1, 3, C3, [1024, False]],  # 23 (P5/32-large)[[17, 20, 23], 1, Detect, [nc, anchors]],  # Detect(P3, P4, P5)]
3.3 超参数配置
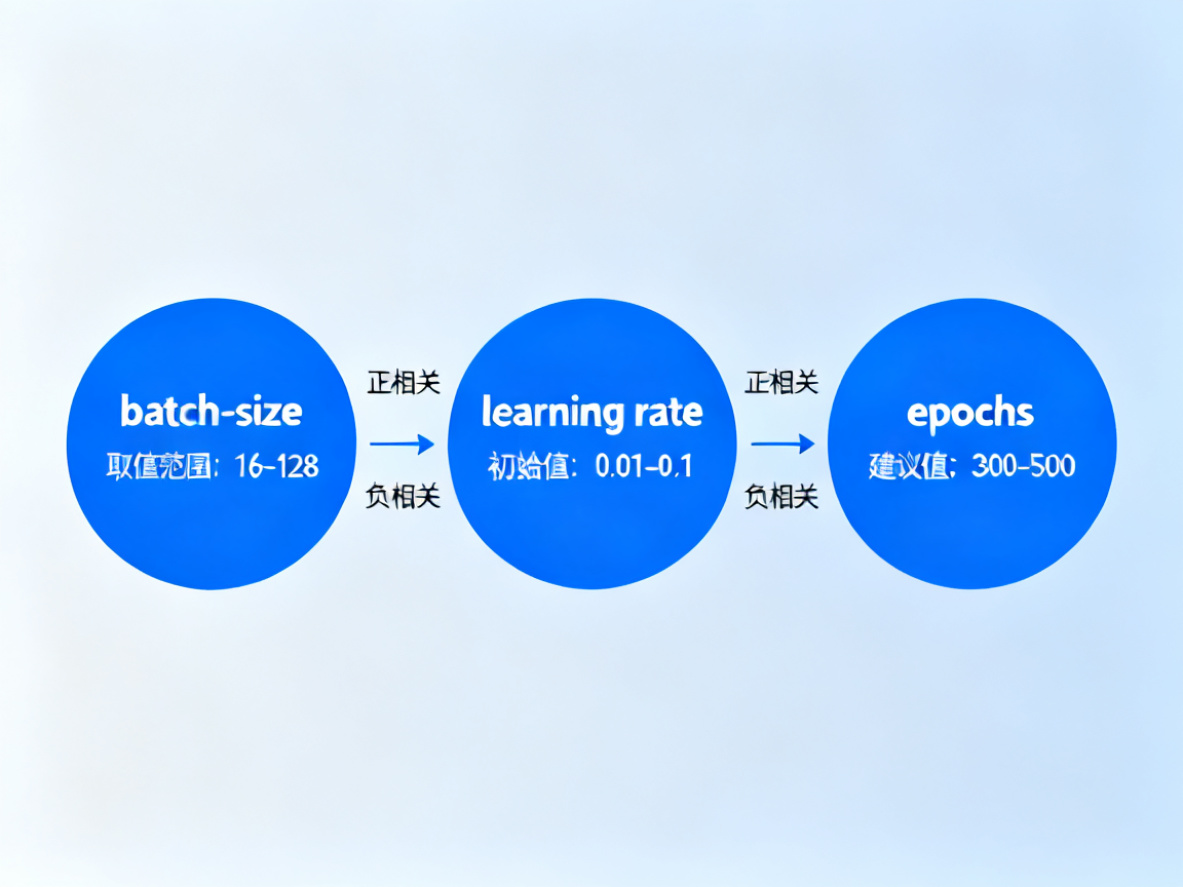
超参数配置文件(如hyp.scratch.yaml)包含了训练过程中的各种超参数:
# YOLOv5 🚀 by Ultralytics, AGPL-3.0 license
# Hyperparameters for low-augmentation COCO training from scratch
# python train.py --batch 64 --cfg yolov5n6.yaml --weights '' --data coco.yaml --img 640 --epochs 300 --linear
# See tutorials for hyperparameter evolution https://github.com/ultralytics/yolov5#tutorials
lr0: 0.01  # initial learning rate (SGD=1E-2, Adam=1E-3)
lrf: 0.01  # final OneCycleLR learning rate (lr0 * lrf)
momentum: 0.937  # SGD momentum/Adam beta1
weight_decay: 0.0005  # optimizer weight decay 5e-4
warmup_epochs: 3.0  # warmup epochs (fractions ok)
warmup_momentum: 0.8  # warmup initial momentum
warmup_bias_lr: 0.1  # warmup initial bias lr
box: 0.05  # box loss gain
cls: 0.5  # cls loss gain
cls_pw: 1.0  # cls BCELoss positive_weight
obj: 1.0  # obj loss gain (scale with pixels)
obj_pw: 1.0  # obj BCELoss positive_weight
iou_t: 0.20  # IoU training threshold
anchor_t: 4.0  # anchor-multiple threshold
# anchors: 3  # anchors per output layer (0 to ignore)
fl_gamma: 0.0  # focal loss gamma (efficientDet default gamma=1.5)
hsv_h: 0.015  # image HSV-Hue augmentation (fraction)
hsv_s: 0.7  # image HSV-Saturation augmentation (fraction)
hsv_v: 0.4  # image HSV-Value augmentation (fraction)
degrees: 0.0  # image rotation (+/- deg)
translate: 0.1  # image translation (+/- fraction)
scale: 0.5  # image scale (+/- gain)
shear: 0.0  # image shear (+/- deg)
perspective: 0.0  # image perspective (+/- fraction), range 0-0.001
flipud: 0.0  # image flip up-down (probability)
fliplr: 0.5  # image flip left-right (probability)
mosaic: 1.0  # image mosaic (probability)
mixup: 0.0  # image mixup (probability)
copy_paste: 0.0  # segment copy-paste (probability)
3.4 多GPU训练
YOLOv5支持多GPU训练,可以显著提高训练速度。以下是多GPU训练的几种方式:
3.4.1 DataParallel模式(不推荐)
这种方式速度较慢,几乎无法加速训练:
python train.py --batch 64 --data coco.yaml --weights yolov5s.pt --device 0,13.4.2 DistributedDataParallel模式(推荐)
这种方式可以有效利用多GPU资源:
python -m torch.distributed.run --nproc_per_node 2 train.py --batch 64 --data coco.yaml --weights yolov5s.pt --device 0,1其中--nproc_per_node指定使用的GPU数量,--batch是总的批次大小,会平均分配到每个GPU上。
3.4.3 多机器训练
如果有多台机器,可以进行分布式训练:
python -m torch.distributed.run --nproc_per_node G --nnodes N --node_rank R --master_addr "192.168.1.1" --master_port 1234 train.py --batch 64 --data coco.yaml --cfg yolov5s.yaml --weights ''其中:
• G:每台机器的GPU数量
• N:机器数量
• R:机器编号(从0开始)
• master_addr:主机器的IP地址
• master_port:主机器的端口号
3.5 训练命令示例
以下是几个常用的训练命令示例:
3.5.1 基础训练命令
python train.py --img 640 --batch 16 --epochs 300 --data custom_data.yaml --cfg models/yolov5s.yaml --weights '' --name custom_yolov5s3.5.2 使用预训练权重
python train.py --img 640 --batch 16 --epochs 100 --data custom_data.yaml --cfg models/yolov5s.yaml --weights yolov5s.pt --name custom_yolov5s_finetune3.5.3 恢复训练
python train.py --img 640 --batch 16 --epochs 300 --data custom_data.yaml --cfg models/yolov5s.yaml --weights runs/train/custom_yolov5s/weights/last.pt --resume3.5.4 超参数进化
python train.py --img 640 --batch 16 --epochs 100 --data custom_data.yaml --cfg models/yolov5s.yaml --weights yolov5s.pt --evolve 100 --name custom_yolov5s_evolve4. 训练过程可视化
YOLOv5提供了多种可视化工具,帮助监控训练过程和分析模型性能。
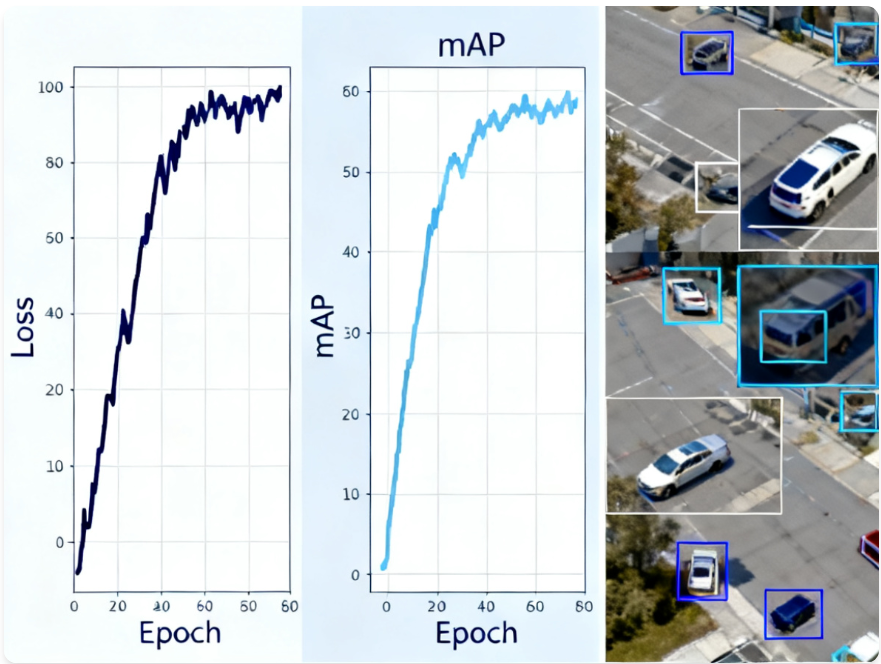
4.1 TensorBoard可视化
YOLOv5默认集成了TensorBoard,可以实时监控训练过程中的各种指标:
# 启动TensorBoard
tensorboard --logdir runs/train
在浏览器中访问http://localhost:6006即可查看训练过程中的损失、准确率、mAP等指标。
4.2 Weights & Biases可视化
YOLOv5还支持Weights & Biases(wandb)进行更高级的可视化和实验跟踪:
# 安装wandb
pip install wandb# 初始化wandb(首次使用需要创建账号并获取API Key)
wandb login# 使用wandb进行训练
python train.py --img 640 --batch 16 --epochs 300 --data custom_data.yaml --cfg models/yolov5s.yaml --weights '' --name custom_yolov5s --wandb project custom_project
训练过程中,可以在wandb.ai网站上查看实时的训练指标、GPU使用情况、预测结果等。
4.3 特征图可视化
使用YOLOv5提供的特征可视化工具,可以查看网络各层的特征响应:
# 从utils.plots导入特征可视化函数
from utils.plots import feature_visualization# 在模型前向传播过程中调用
def forward_once(x, model):# 前向传播并收集特征图features = []for m in model.model:x = m(x)  # 前向传播if m.__class__.__name__ in ('Conv', 'C3', 'Bottleneck'):  # 关注卷积层features.append((m.__class__.__name__, x))# 可视化第3个卷积层的特征图feature_visualization(features[2][1],  # 特征图张量module_type=features[2][0],  # 模块类型stage=2,  # 网络阶段n=16,  # 显示16个特征图save_dir=Path("runs/features")  # 保存目录)return x
4.4 标签分布分析
使用YOLOv5提供的标签分析工具,可以检查数据集的标签分布情况:
from utils.plots import plot_labels# 加载数据集标签
labels = np.loadtxt("dataset/labels.txt", dtype=np.float32)# 生成标签分析报告
plot_labels(labels=labels,  # 标签数据names=class_names,  # 类别名称save_dir=Path("runs/analyze")  # 保存目录
)
5. 模型评估
5.1 评估指标
YOLOv5使用以下指标评估模型性能:
• Precision (P):精确率,预测为正例的样本中实际为正例的比例
• Recall (R):召回率,实际为正例的样本中被预测为正例的比例
• mAP@0.5:IoU阈值为0.5时的平均精度
• mAP@0.5:0.95:IoU阈值从0.5到0.95,步长为0.05时的平均精度
5.2 评估命令
使用以下命令评估训练好的模型:
python val.py --weights runs/train/custom_yolov5s/weights/best.pt --data custom_data.yaml --img 640 --iou 0.65 --half评估结果将包含每个类别的精确率、召回率、mAP等指标,以及混淆矩阵。
5.3 混淆矩阵分析
混淆矩阵可以帮助分析模型在不同类别上的表现:
from utils.metrics import ConfusionMatrix# 创建混淆矩阵
confusion_matrix = ConfusionMatrix(nc=nc, conf=conf_thres, iou_thres=iou_thres)# 更新混淆矩阵
confusion_matrix.process_batch(detections, labels)# 绘制混淆矩阵
confusion_matrix.plot(save_dir=save_dir, names=names)
(混淆矩阵可以直观地显示模型将一个类别错误分类为另一个类别的情况。)
6. 模型推理
6.1 单张图像推理
使用训练好的模型对单张图像进行目标检测:
python detect.py --weights runs/train/custom_yolov5s/weights/best.pt --img 640 --conf 0.25 --source data/images/test.jpg6.2 视频推理
使用训练好的模型对视频进行目标检测:
python detect.py --weights runs/train/custom_yolov5s/weights/best.pt --img 640 --conf 0.25 --source data/videos/test.mp46.3 摄像头实时推理
使用训练好的模型进行摄像头实时目标检测:
python detect.py --weights runs/train/custom_yolov5s/weights/best.pt --img 640 --conf 0.25 --source 06.4 批量推理
使用训练好的模型对文件夹中的所有图像进行批量推理:
python detect.py --weights runs/train/custom_yolov5s/weights/best.pt --img 640 --conf 0.25 --source data/images/ --save-txt --save-conf其中--save-txt选项可以保存检测结果的文本文件,--save-conf选项可以保存每个检测框的置信度。
7. 常见问题与解决方案
7.1 内存不足问题
问题:训练过程中出现CUDA Out of Memory错误。
解决方案:
• 减小批量大小(--batch-size)
• 减小输入图像尺寸(--img-size)
• 使用更小的模型(如yolov5n.yaml代替yolov5s.yaml)
• 启用半精度训练(--half)
• 清理缓存(torch.cuda.empty_cache())
7.2 训练不收敛问题
问题:训练过程中损失值不下降或波动较大。
解决方案:
• 检查数据集标注是否正确
• 调整学习率(--lr0)
• 增加训练轮数(--epochs)
• 检查数据增强参数是否过于激进
• 使用预训练权重进行微调
7.3 检测框不准确问题
问题:模型检测结果不准确,检测框偏移或漏检。
解决方案:
• 增加训练数据量
• 优化数据集标注质量
• 调整锚点大小(anchors)
• 调整置信度阈值(--conf)
• 使用更大的模型
7.4 类别不平衡问题
问题:数据集中某些类别的样本数量远少于其他类别,导致模型对少数类识别效果差。
解决方案:
• 增加少数类样本数量
• 使用数据增强技术扩充少数类样本
• 调整类别权重(cls_pw)
• 使用Focal Loss(设置fl_gamma>0)
8. 性能优化建议
8.1 数据增强策略
合理的数据增强可以提高模型的泛化能力:
• 使用Mosaic数据增强(mosaic=1.0)
• 适当调整HSV颜色空间增强(hsv_h, hsv_s, hsv_v)
• 使用随机旋转、平移和缩放(degrees, translate, scale)
• 使用MixUp数据增强(mixup>0)
8.2 超参数优化
使用YOLOv5的超参数进化功能可以自动优化超参数:
python train.py --img 640 --batch 16 --epochs 100 --data custom_data.yaml --cfg models/yolov5s.yaml --weights yolov5s.pt --evolve 100 --name custom_yolov5s_evolve超参数进化会使用遗传算法优化超参数,以提高模型性能。
8.3 模型量化与加速
训练完成后,可以对模型进行量化和加速,以提高推理速度:
# 导出为ONNX格式
python export.py --weights runs/train/custom_yolov5s/weights/best.pt --include onnx --img 640# 导出为TensorRT格式(需要安装TensorRT)
python export.py --weights runs/train/custom_yolov5s/weights/best.pt --include engine --img 640 --device 0
量化后的模型可以在保持较高精度的同时,显著提高推理速度。
8.4 模型剪枝与蒸馏
对于资源受限的场景,可以使用模型剪枝和蒸馏技术减小模型大小:
• 使用YOLOv5提供的剪枝工具
• 使用知识蒸馏技术,用大模型指导小模型训练
• 使用量化感知训练(QAT)
结尾
本文详细介绍了基于PyTorch的YOLOv5目标检测模型训练过程,包括环境配置、数据集准备、训练参数设置、训练过程可视化、模型评估和推理等内容。通过本文的学习,您应该能够独立完成YOLOv5模型的训练和部署。
YOLOv5是一个功能强大且易于使用的目标检测框架,通过不断优化数据集、超参数和训练策略,可以获得更高精度和更快速度的目标检测模型。