Linux系统--线程的同步与互斥
大家好,今天我们来继续学习线程相关的部分:线程的同步与互斥。那么话不多说,我们开始今天的学习。
目录
线程同步与互斥
1. 线程互斥
1-1 进程线程间的互斥相关背景概念
1-2 互斥量mutex
1-3 互斥量实现原理探究
1-4 互斥量的封装
2. 线程同步
2-1 条件变量
2-2 同步概念与竞态条件
2-3 条件变量函数
2-4 ⽣产者消费者模型
2-4-1 为何要使⽤⽣产者消费者模型
2-4-2 ⽣产者消费者模型优点
2-5 基于BlockingQueue的⽣产者消费者模型
2-5-1 BlockingQueue
2-5-2 C++ queue模拟阻塞队列的⽣产消费模型
2-6 为什么 pthread_cond_wait 需要互斥量?
2-7 条件变量使⽤规范
2-8 条件变量的封装
2-9 POSIX信号量
2-9-1 基于环形队列的⽣产消费模型
3. 线程池
3-1 ⽇志与策略模式
3-2 线程池设计
3-3 线程安全的单例模式
3-3-1 什么是单例模式
3-3-2 单例模式的特点
3-3-3 饿汉实现⽅式和懒汉实现⽅式
3-3-4 饿汉⽅式实现单例模式
3-3-5 懒汉⽅式实现单例模式
3-3-6 懒汉⽅式实现单例模式(线程安全版本)
3-4 单例式线程池
4. 线程安全和重⼊问题
5. 常⻅锁概念
5-1 死锁
5-2 死锁四个必要条件
5-3 避免死锁
6. STL,智能指针和线程安全
6-1 STL中的容器是否是线程安全的?
6-2 智能指针是否是线程安全的?
线程同步与互斥
1. 线程互斥
1-1 进程线程间的互斥相关背景概念
临界资源:多线程执⾏流共享的资源就叫做临界资源临界区:每个线程内部,访问临界资源的代码,就叫做临界区互斥:任何时刻,互斥保证有且只有⼀个执⾏流进⼊临界区,访问临界资源,通常对临界资源起保护作⽤原⼦性:不会被任何调度机制打断的操作,该操作只有两态,要么完成,要么未完成
1-2 互斥量mutex
⼤部分情况,线程使⽤的数据都是局部变量,变量的地址空间在线程栈空间内,这种情况,变量归属单个线程,其他线程⽆法获得这种变量。但有时候,很多变量都需要在线程间共享,这样的变量称为共享变量,可以通过数据的共享,完成线程之间的交互。多个线程并发的操作共享变量,会带来⼀些问题。
下面我们举一个例子:
#include <stdio.h>
#include <stdlib.h>
#include <string.h>
#include <unistd.h>
#include <pthread.h>
int ticket = 100;void* route(void* arg)
{char* id = (char*)arg;while (1) {if (ticket > 0) {usleep(1000);printf("%s sells ticket:%d\n", id, ticket);ticket--;}else {break;}}
}
int main(void)
{pthread_t t1, t2, t3, t4;pthread_create(&t1, NULL, route, "thread 1");pthread_create(&t2, NULL, route, "thread 2");pthread_create(&t3, NULL, route, "thread 3");pthread_create(&t4, NULL, route, "thread 4");pthread_join(t1, NULL);pthread_join(t2, NULL);pthread_join(t3, NULL);pthread_join(t4, NULL);
}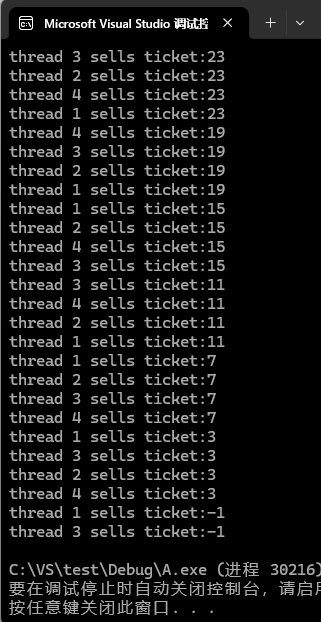
通过结果我们可以看到,票已经被卖到了负数,以及出现了许多重复的数字,这也就说明再卖票过程中这些线程是同时进行的,那为什么会导致这样的情况呢?我们来分析一下
if 语句判断条件为真以后,代码可以并发的切换到其他线程usleep 这个模拟漫⻓业务的过程,在这个漫⻓的业务过程中,可能有很多个线程会进⼊该代码段--ticket 操作本⾝就不是⼀个原⼦操作
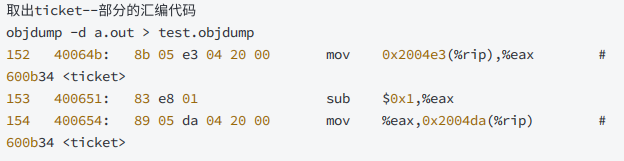
-- 操作并不是原⼦操作,⽽是对应三条汇编指令:load :将共享变量ticket从内存加载到寄存器中update : 更新寄存器⾥⾯的值,执⾏-1操作store :将新值,从寄存器写回共享变量ticket的内存地址
我们知道,CPU的执行是有时间片的,假设一下,当线程1先占用CPU,运行到一半的时候,时间片到了,虽然寄存器会保存线程1的上下文片段,但是等线程2占用CPU时,由于线程1并没来得及将ticket值写回,所以线程2的初始值还是100。这样一来,就解释了出现重复值以及负数的问题。
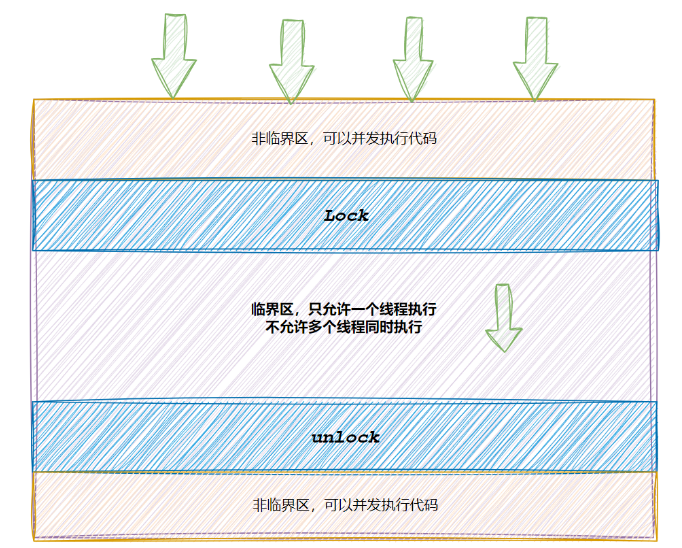
代码必须要有互斥⾏为:当代码进⼊临界区执⾏时,不允许其他线程进⼊该临界区。如果多个线程同时要求执⾏临界区的代码,并且临界区没有线程在执⾏,那么只能允许⼀个线程进⼊该临界区。如果线程不在临界区中执⾏,那么该线程不能阻⽌其他线程进⼊临界区。
pthread_mutex_t mutex = PTHREAD_MUTEX_INITIALIZERint pthread_mutex_init(pthread_mutex_t *restrict mutex, const pthread_mutexattr_t *restrict attr);参数:mutex:要初始化的互斥量attr:NULL使⽤ PTHREAD_ MUTEX_ INITIALIZER 初始化的互斥量不需要销毁不要销毁⼀个已经加锁的互斥量已经销毁的互斥量,要确保后⾯不会有线程再尝试加锁
int pthread_mutex_destroy(pthread_mutex_t *mutex);int pthread_mutex_lock(pthread_mutex_t *mutex);
int pthread_mutex_unlock(pthread_mutex_t *mutex);
返回值:成功返回0,失败返回错误号互斥量处于未锁状态,该函数会将互斥量锁定,同时返回成功发起函数调⽤时,其他线程已经锁定互斥量,或者存在其他线程同时申请互斥量,但没有竞争到互斥量,那么pthread_ lock调⽤会陷⼊阻塞(执⾏流被挂起),等待互斥量解锁
所以我们改进上⾯的售票系统:
#include <stdio.h>
#include <stdlib.h>
#include <string.h>
#include <unistd.h>
#include <pthread.h>
#include <sched.h>
int ticket = 100;
pthread_mutex_t mutex;
void* route(void* arg)
{char* id = (char*)arg;while (1) {pthread_mutex_lock(&mutex);if (ticket > 0) {usleep(1000);printf("%s sells ticket:%d\n", id, ticket);ticket--;pthread_mutex_unlock(&mutex);// sched_yield(); 放弃CPU}else {pthread_mutex_unlock(&mutex);break;}}
}
int main(void)
{pthread_t t1, t2, t3, t4;pthread_mutex_init(&mutex, NULL);pthread_create(&t1, NULL, route, "thread 1");pthread_create(&t2, NULL, route, "thread 2");pthread_create(&t3, NULL, route, "thread 3");pthread_create(&t4, NULL, route, "thread 4");pthread_join(t1, NULL);pthread_join(t2, NULL);pthread_join(t3, NULL);pthread_join(t4, NULL);pthread_mutex_destroy(&mutex);
}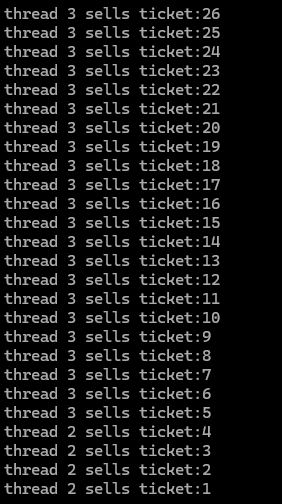
这回可以看到,重复值和负数的问题都被解决了,那此时当CPU中时间片到了时是怎么一个情况呢?当线程1运行到时间片结束后,CPU要切换执行其他线程,当线程2占用CPU执行代码,执行到加锁这一步的时候会发现锁仍在线程1那里,所以线程2就会被阻塞,线程3,4也是如此,知道线程1再次占用CPU进行解锁,其他线程才能继续运行。
1-3 互斥量实现原理探究
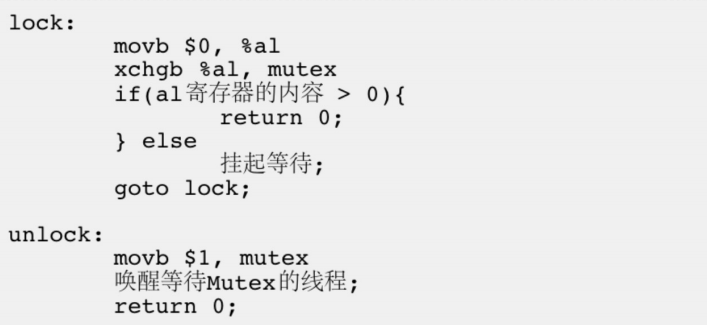
经过上⾯的例⼦,⼤家已经意识到单纯的 i++ 或者 ++i 都不是原⼦的,有可能会有数据⼀致性问题为了实现互斥锁操作,⼤多数体系结构都提供了swap或exchange指令,该指令的作⽤是把寄存器和内存单元的数据相交换,由于只有⼀条指令,保证了原⼦性,即使是多处理器平台,访问内存的 总线周期也有先后,⼀个处理器上的交换指令执⾏时另⼀个处理器的交换指令只能等待总线周期。 现在我们把lock和unlock的伪代码改⼀下
1-4 互斥量的封装
#pragma once
#include <iostream>
#include <string>
#include <pthread.h>
namespace LockModule
{// 对锁进⾏封装,可以独⽴使⽤class Mutex{public:// 删除不要的拷⻉和赋值Mutex(const Mutex&) = delete;const Mutex& operator =(const Mutex&) = delete;Mutex(){int n = pthread_mutex_init(&_mutex, nullptr);(void)n;}void Lock(){int n = pthread_mutex_lock(&_mutex);(void)n;}void Unlock(){int n = pthread_mutex_unlock(&_mutex);(void)n;}pthread_mutex_t* GetMutexOriginal() // 获取原始指针{return &_mutex;}~Mutex(){int n = pthread_mutex_destroy(&_mutex);(void)n;}private:pthread_mutex_t _mutex;};// 采⽤RAII⻛格,进⾏锁管理class LockGuard{public:LockGuard(Mutex& mutex) :_mutex(mutex){_mutex.Lock();}~LockGuard(){_mutex.Unlock();}private:Mutex& _mutex;};
}
2. 线程同步
2-1 条件变量
当⼀个线程互斥地访问某个变量时,它可能发现在其它线程改变状态之前,它什么也做不了。例如⼀个线程访问队列时,发现队列为空,它只能等待,只到其它线程将⼀个节点添加到队列中。这种情况就需要⽤到条件变量。
2-2 同步概念与竞态条件
同步:在保证数据安全的前提下,让线程能够按照某种特定的顺序访问临界资源,从⽽有效避免饥饿问题,叫做同步竞态条件:因为时序问题,⽽导致程序异常,我们称之为竞态条件。在线程场景下,这种问题也不难理解
2-3 条件变量函数
int pthread_cond_init(pthread_cond_t *restrict cond,const pthread_condattr_t *restrict attr);参数:cond:要初始化的条件变量attr:NULLint pthread_cond_destroy(pthread_cond_t *cond)int pthread_cond_wait(pthread_cond_t *restrict cond,pthread_mutex_t *restrict mutex);参数:cond:要在这个条件变量上等待mutex:互斥量,后⾯详细解释int pthread_cond_broadcast(pthread_cond_t *cond);
int pthread_cond_signal(pthread_cond_t *cond);我们先使⽤PTHREAD_COND/MUTEX_INITIALIZER进⾏测试,对其他细节暂不追究然后将接⼝更改成为使⽤ pthread_cond_init/pthread_cond_destroy 的⽅式,⽅便后续进⾏封装
#include <iostream>
#include <string.h>
#include <unistd.h>
#include <pthread.h>
pthread_cond_t cond = PTHREAD_COND_INITIALIZER;
pthread_mutex_t mutex = PTHREAD_MUTEX_INITIALIZER;
void* active(void* arg)
{std::string name = static_cast<const char*>(arg);while (true) {pthread_mutex_lock(&mutex);pthread_cond_wait(&cond, &mutex);std::cout << name << " 活动..." << std::endl;pthread_mutex_unlock(&mutex);}
}
int main(void)
{pthread_t t1, t2;pthread_create(&t1, NULL, active, (void*)"thread-1");pthread_create(&t2, NULL, active, (void*)"thread-2");sleep(3); // 可有可⽆,这⾥确保两个线程已经在运⾏while (true){// 对⽐测试// pthread_cond_signal(&cond); // 唤醒⼀个线程pthread_cond_broadcast(&cond); // 唤醒所有线程sleep(1);}pthread_join(t1, NULL);pthread_join(t2, NULL);
}
这里线程启动之后会先进行加锁,随后通过pthread_cond_wait函数进行阻塞,此时由于线程被阻塞,先将锁释放,这样其他线程也能运行。当使用pthread_cond_signal/pthread_cond_broadcast两个函数进行唤醒时,对于唤醒成功的线程还会重新加锁,所以我们还需要手动释放锁。
2-4 ⽣产者消费者模型
2-4-1 为何要使⽤⽣产者消费者模型
⽣产者消费者模式就是通过⼀个容器来解决⽣产者和消费者的强耦合问题。⽣产者和消费者彼此之间不直接通讯,⽽通过阻塞队列来进⾏通讯,所以⽣产者⽣产完数据之后不⽤等待消费者处理,直接扔给阻塞队列,消费者不找⽣产者要数据,⽽是直接从阻塞队列⾥取,阻塞队列就相当于⼀个缓冲区,平衡了⽣产者和消费者的处理能⼒。这个阻塞队列就是⽤来给⽣产者和消费者解耦的。
2-4-2 ⽣产者消费者模型优点
解耦⽀持并发⽀持忙闲不均
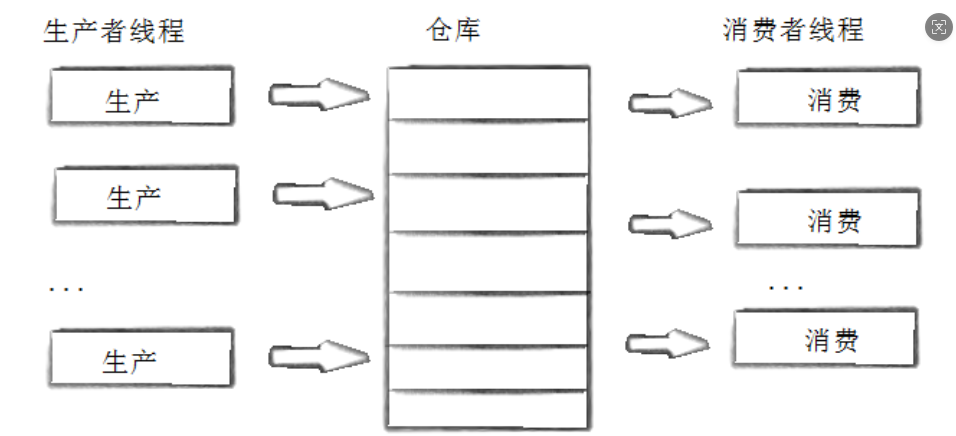
这里的仓库就是一个阻塞队列,这样一来,只要阻塞队列里有空间,就可以进行生产,只要阻塞队列里还有数据,就可以进行消费,两类线程间的关联就变弱了,也就可以并发进行,从而使效率变高。
理论化的理解“321” 原则
3 种关系:
生产者之间:竞争关系,互斥关系
消费者和消费者之间:互斥关系
生产者和消费者之间:互斥和同步
2 种角色:
生产者角色和消费者角色(线程承担)
1 个交易场所:
以特定结构构成的 “一” 内存 “空间
2-5 基于BlockingQueue的⽣产者消费者模型
2-5-1 BlockingQueue
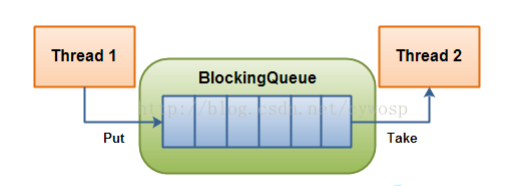
在多线程编程中阻塞队列(Blocking Queue)是⼀种常⽤于实现⽣产者和消费者模型的数据结构。其与普通的队列区别在于,当队列为空时,从队列获取元素的操作将会被阻塞,直到队列中被放⼊了元素;当队列满时,往队列⾥存放元素的操作也会被阻塞,直到有元素被从队列中取出(以上的操作都是基于不同的线程来说的,线程在对阻塞队列进程操作时会被阻塞)
2-5-2 C++ queue模拟阻塞队列的⽣产消费模型
#ifndef __BLOCK_QUEUE_HPP__
#define __BLOCK_QUEUE_HPP__
#include <iostream>
#include <string>
#include <queue>
#include <pthread.h>
template <typename T>
class BlockQueue
{
private:bool IsFull(){return _block_queue.size() == _cap;}bool IsEmpty(){return _block_queue.empty();}
public:BlockQueue(int cap) : _cap(cap){_productor_wait_num = 0;_consumer_wait_num = 0;pthread_mutex_init(&_mutex, nullptr);pthread_cond_init(&_product_cond, nullptr);pthread_cond_init(&_consum_cond, nullptr);}void Enqueue(T& in) // ⽣产者⽤的接⼝{pthread_mutex_lock(&_mutex);while (IsFull()) // 保证代码的健壮性{// ⽣产线程去等待,是在临界区中休眠的!你现在还持有锁呢!!!// 1. pthread_cond_wait调⽤是: a. 让调⽤线程等待 b. ⾃动释放曾经持有的_mutex锁 c.当条件满⾜,线程唤醒,pthread_cond_wait要求线性// 必须重新竞争_mutex锁,竞争成功,⽅可返回!!!// 之前:安全_productor_wait_num++;pthread_cond_wait(&_product_cond, &_mutex); // 只要等待,必定会有唤醒,唤醒的时候,就要继续从这个位置向下运⾏!!_productor_wait_num--;// 之后:安全}// 进⾏⽣产// _block_queue.push(std::move(in));// std::cout << in << std::endl;_block_queue.push(in);// 通知消费者来消费if (_consumer_wait_num > 0)pthread_cond_signal(&_consum_cond); // pthread_cond_broadcastpthread_mutex_unlock(&_mutex);}void Pop(T* out) // 消费者⽤的接⼝ --- 5个消费者{pthread_mutex_lock(&_mutex);while (IsEmpty()) // 保证代码的健壮性{// 消费线程去等待,是在临界区中休眠的!你现在还持有锁呢!!!// 1. pthread_cond_wait调⽤是: a. 让调⽤进程等待 b. ⾃动释放曾经持有的_mutex锁_consumer_wait_num++;pthread_cond_wait(&_consum_cond, &_mutex); // 伪唤醒_consumer_wait_num--;}// 进⾏消费*out = _block_queue.front();_block_queue.pop();// 通知⽣产者来⽣产if (_productor_wait_num > 0)pthread_cond_signal(&_product_cond);pthread_mutex_unlock(&_mutex);// pthread_cond_signal(&_product_cond);}~BlockQueue(){pthread_mutex_destroy(&_mutex);pthread_cond_destroy(&_product_cond);pthread_cond_destroy(&_consum_cond);}
private:std::queue<T> _block_queue; // 阻塞队列,是被整体使⽤的!!!int _cap; // 总上限pthread_mutex_t _mutex; // 保护_block_queue的锁pthread_cond_t _product_cond; // 专⻔给⽣产者提供的条件变量pthread_cond_t _consum_cond; // 专⻔给消费者提供的条件变量int _productor_wait_num;int _consumer_wait_num;
};
我们先设计一个只有单生产单消费的阻塞队列,当阻塞队列为空时,消费线程阻塞;当阻塞队列为满时,生产线程阻塞,直到条件改变。生产线程生产后,会唤醒消费线程消费;消费线程消费后,会唤醒生产线程生产。
但事实上,多生产多消费的模型同样可以使用,首先我们也就保证了生产和消费间的互斥关系,而对于不同的生产线程和消费线程之间,由于锁的存在,还是互斥进行的,因此多生产多消费时只需要增加生产线程和消费线程的数量就够了。
2-6 为什么 pthread_cond_wait 需要互斥量?
条件等待是线程间同步的⼀种⼿段,如果只有⼀个线程,条件不满⾜,⼀直等下去都不会满⾜,所以必须要有⼀个线程通过某些操作,改变共享变量,使原先不满⾜的条件变得满⾜,并且友好的通知等待在条件变量上的线程。条件不会⽆缘⽆故的突然变得满⾜了,必然会牵扯到共享数据的变化。所以⼀定要⽤互斥锁来保护。没有互斥锁就⽆法安全的获取和修改共享数据。
// 错误的设计
pthread_mutex_lock(&mutex);
while (condition_is_false) {pthread_mutex_unlock(&mutex);//解锁之后,等待之前,条件可能已经满⾜,信号已经发出,但是该信号可能被错过pthread_cond_wait(&cond);pthread_mutex_lock(&mutex);
}
pthread_mutex_unlock(&mutex);
由于解锁和等待不是原⼦操作。调⽤解锁之后, pthread_cond_wait 之前,如果已经有其他线程获取到互斥量,摒弃条件满⾜,发送了信号,那么 pthread_cond_wait 将错过这个信 号,可能会导致线程永远阻塞在这个 pthread_cond_wait 。所以解锁和等待必须是⼀个原⼦操作。int pthread_cond_wait(pthread_cond_ t *cond,pthread_mutex_ t * mutex); 进⼊该函数后,会去看条件量等于0不?等于,就把互斥量变成1,直到cond_ wait返回,把条件量改成1,把互斥量恢复成原样。
释放锁是为了让其他线程能修改共享资源(比如生产者唤醒后入队);唤醒后重新获取锁,是为了保证后续操作(如消费数据)的排他性,避免数据竞争。
2-7 条件变量使⽤规范
pthread_mutex_lock(&mutex);
while (条件为假)pthread_cond_wait(cond, mutex);
修改条件pthread_mutex_unlock(&mutex);pthread_mutex_lock(&mutex);
设置条件为真
pthread_cond_signal(cond);
pthread_mutex_unlock(&mutex);2-8 条件变量的封装
#pragma once
#include <iostream>
#include <string>
#include <pthread.h>
#include "Lock.hpp"
namespace CondModule
{using namespace LockModule;class Cond{public:Cond(){int n = pthread_cond_init(&_cond, nullptr);(void)n; // 酌情加⽇志,加判断}void Wait(Mutex& mutex){int n = pthread_cond_wait(&_cond, mutex.GetMutexOriginal());(void)n;}void Notify(){int n = pthread_cond_signal(&_cond);(void)n;}void NotifyAll(){int n = pthread_cond_broadcast(&_cond);(void)n;}~Cond(){int n = pthread_cond_destroy(&_cond);(void)n; // 酌情加⽇志,加判断}private:pthread_cond_t _cond;};
}为了让条件变量更具有通⽤性,建议封装的时候,不要在Cond类内部引⽤对应的封装互斥量,要不然后⾯组合的时候,会因为代码耦合的问题难以初始化,因为⼀般⽽⾔Mutex和Cond基本是⼀起创建的。
2-9 POSIX信号量
POSIX信号量和SystemV信号量作⽤相同,都是⽤于同步操作,达到⽆冲突的访问共享资源⽬的。但POSIX可以⽤于线程间同步。
信号量本质上就是一个计数器,是用来对待定资源的预定,线程想要访问资源,都必须先申请信号量
#include <semaphore.h>
int sem_init(sem_t *sem, int pshared, unsigned int value);
参数:pshared:0表⽰线程间共享,⾮零表⽰进程间共享value:信号量初始值int sem_destroy(sem_t *sem);功能:等待信号量,会将信号量的值减1
int sem_wait(sem_t *sem);
功能:发布信号量,表⽰资源使⽤完毕,可以归还资源了。将信号量值加1。
int sem_post(sem_t *sem);/
上⼀节⽣产者-消费者的例⼦是基于queue的,其空间可以动态分配,现在基于固定⼤⼩的环形队列重写这个程序(POSIX信号量):
2-9-1 基于环形队列的⽣产消费模型
多线程使用资源有两种情景:
1. 将目标资源整体使用[ mutex + 2元信号量 ]
2. 将资源分成不同的“块”,分批使用[ 信号量 ]
2元信号量就是只有1或0的两态信号量,第一种场景就类似我们上面写的阻塞队列,而第二种场景就是我们接下来要学的环形队列
环形队列采⽤数组模拟,⽤模运算来模拟环状特性
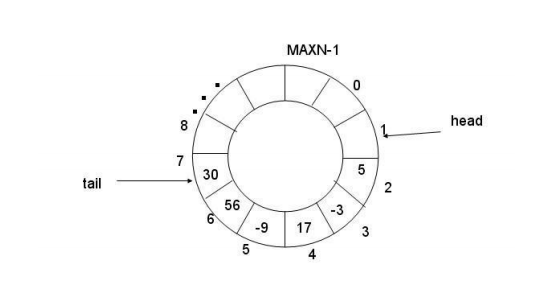
环形结构起始状态和结束状态都是⼀样的,不好判断为空或者为满,所以可以通过加计数器或者标记位来判断满或者空。另外也可以预留⼀个空的位置,作为满的状态
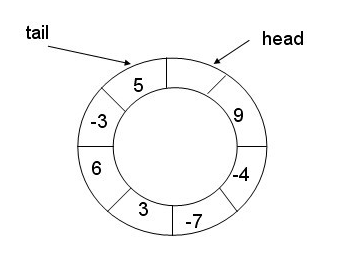
但是我们现在有信号量这个计数器,就很简单的进⾏多线程间的同步过程
还是和阻塞队列一样,我们先写一下单生产单消费的:
RingQueue.hpp
#include<iostream>
#include<string>
#include<vector>
#include<pthread.h>
#include<semaphore.h>using namespace std;template<typename T>
class RingQueue {
public:RingQueue(int cap):_cap(cap),_rq(cap),_p_step(0),_c_step(0){sem_init(&_p_sem, 0, _cap);sem_init(&_c_sem, 0, 0);//pthread_mutex_init(&_p_mutex, nullptr);//pthread_mutex_init(&_c_mutex, nullptr);}~RingQueue(){sem_destroy(&_p_sem);sem_destroy(&_c_sem);//pthread_mutex_destroy(&_p_mutex);//pthread_mutex_destroy(&_c_mutex);}void EnQueue(T& in){sem_wait(&_p_sem);//pthread_mutex_lock(&_p_mutex);_rq[_p_step] = in;_p_step++;_p_step %= _cap;//pthread_mutex_unlock(&_p_mutex);sem_post(&_c_sem);}void Pop(T* out){sem_wait(&_c_sem);//pthread_mutex_lock(&_c_mutex);*out = _rq[_c_step];_c_step++;_c_step %= _cap;//pthread_mutex_unlock(&_c_mutex);sem_post(&_p_sem);}
private:vector<T> _rq;int _cap;sem_t _p_sem;int _p_step;sem_t _c_sem;int _c_step;//pthread_mutex_t _p_mutex;//pthread_mutex_t _c_mutex;
};
在环形队列中,只有为空和为满的时候生产和消费才会访问同一块空间,也就是说,在不为空和满的情况下,生产和消费是可以并行的。那么当队列为空时,我们让生产者先运行,在队列为满时,我们让消费者先运行,这样就把两个临界点处理了。
我们看回代码,在构造函数中,生产者起始可以生产的数量为队列大小,消费者可以消费的数量为0。队列为空时,消费者无法进行消费,所以在申请信号量的时候会阻塞,在生产者生产后才能运行。队列为满时,生产者无法进行生产,所以在申请信号量的时候会阻塞,在消费者消费后才能运行,这也对应了前面说的为空为满时让一个先运行。
在多生产多消费时,我们还要处理生产消费它们之间的互斥关系,所以要加锁。但代码中把锁放在了申请释放信号量之间,信号量把对临界资源是否存在?就绪?等的条件,以原子性的形式,呈现在访问临界资源之前就判断了,不存在多次调用的问题。
如果资源可以拆分,使用sem
如果资源是整体使用的,使用mutex
3. 线程池
下⾯开始,我们进⾏⼀个线程池的设计。在写之前,我们要做如下准备
准备线程的封装准备锁和条件变量的封装引⼊⽇志,对线程进⾏封装
下面我们就来进行一下对线程,锁和条件变量的简单封装:
Thread.hpp
#pragma once#include<iostream>
#include<string>
#include<pthread.h>
#include<functional>
#include<cstdint>namespace ThreadModule {std::uint32_t cnt = 0;using threadfunc_t = std::function<void()>;enum class TSTATUS{THREAD_NEW,THREAD_RUNNING,THREAD_STOP};class Thread{private:static void* run(void* obj){Thread* self=static_cast<Thread*>(obj);pthread_setname_np(pthread_self(),self->_name.c_str());self->_status=TSTATUS::THREAD_RUNNING;if(!self->_joined){pthread_detach(pthread_self());}self->_func();return nullptr;}void SetName(){_name="Thread-"+std::to_string(cnt++);}public:Thread(threadfunc_t func):_status(TSTATUS::THREAD_NEW),_joined(true),_func(func){SetName();}void EnableDetach(){if(_status==TSTATUS::THREAD_NEW) _joined=false;}void EnableJoined(){if(_status==TSTATUS::THREAD_NEW) _joined=true;}bool Start(){if(_status==TSTATUS::THREAD_RUNNING) return true;int n=pthread_create(&_id,nullptr,run,this);if(n!=0) return false;return true;}bool Join(){if(_joined){int n=pthread_join(_id,nullptr);if(n!=0) return false;return true;}return false;}private:std::string _name;pthread_t _id;TSTATUS _status;bool _joined;threadfunc_t _func;};
}#pragma once #include<iostream>
#include<string>
#include<pthread.h>namespace LockModule{class Mutex{public:Mutex(const Mutex& mutex)=delete;const Mutex& operator=(const Mutex& mutex)=delete;Mutex(){int n=pthread_mutex_init(&_mutex,nullptr);(void)n;}void Lock(){int n=pthread_mutex_lock(&_mutex);(void)n;}void Unlock(){int n=pthread_mutex_unlock(&_mutex);(void)n;}pthread_mutex_t* GetMutexOriginal(){return &_mutex;}~Mutex(){int n=pthread_mutex_destroy(&_mutex);(void)n;}private:pthread_mutex_t _mutex;};class LockGuard{public:LockGuard(Mutex& mutex):_mutex(mutex){_mutex.Lock();}~LockGuard(){_mutex.Unlock();}private:Mutex &_mutex;};
}Cond.hpp
#pragma once
#include<iostream>
#include<string>
#include<pthread.h>
#include"Lock.hpp"namespace CondModule{using namespace LockModule;class Cond{public:Cond(){int n=pthread_cond_init(&_cond,nullptr);(void)n;}~Cond(){int n=pthread_cond_destroy(&_cond);(void)n;}void Wait(Mutex& mutex){int n=pthread_cond_wait(&_cond,mutex.GetMutexOriginal());(void)n;}void Notify(){int n=pthread_cond_signal(&_cond);(void)n;}void NotifyAll(){int n=pthread_cond_broadcast(&_cond);(void)n;}private:pthread_cond_t _cond;};
}
下面我们来学习一下日志:
3-1 ⽇志与策略模式
IT⾏业这么⽕, 涌⼊的⼈很多. 俗话说林⼦⼤了啥⻦都有. ⼤佬和菜鸡们两极分化的越来越严重. 为了让菜鸡们不太拖⼤佬的后腿, 于是⼤佬们针对⼀些经典的常⻅的场景, 给定了⼀些对应的解决⽅案, 这个就是设计模式
日志认识
计算机中的⽇志是记录系统和软件运⾏中发⽣事件的⽂件,主要作⽤是监控运⾏状态、记录异常信息,帮助快速定位问题并⽀持程序员进⾏问题修复。它是系统维护、故障排查和安全管理的重要⼯具。
时间戳⽇志等级⽇志内容
⽂件名⾏号进程,线程相关id信息等
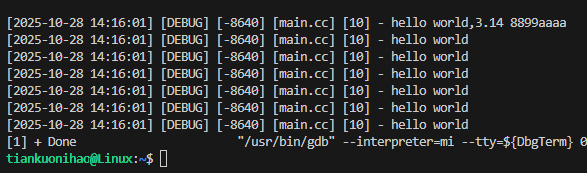
[可读性很好的时间] [⽇志等级] [进程pid] [打印对应⽇志的⽂件名][⾏号] - 消息内容,⽀持可
变参数
[2024-08-04 12:27:03] [DEBUG] [202938] [main.cc] [16] - hello world
[2024-08-04 12:27:03] [DEBUG] [202938] [main.cc] [17] - hello world
[2024-08-04 12:27:03] [DEBUG] [202938] [main.cc] [18] - hello world
[2024-08-04 12:27:03] [DEBUG] [202938] [main.cc] [20] - hello world
[2024-08-04 12:27:03] [DEBUG] [202938] [main.cc] [21] - hello world
[2024-08-04 12:27:03] [WARNING] [202938] [main.cc] [23] - hello world
日志等级一共有五级,从低到高依次是:
DEBUG,
INFO,
WARNING,
ERROR,
FATAL
下面我们来实现一下日志:
#pragma once#include <iostream>
#include <string>
#include <fstream>
#include <memory>
#include <ctime>
#include <sstream>
#include <filesystem>
#include <unistd.h>
#include "Lock.hpp"namespace LogModule
{using namespace LockModule;const std::string defaultpath = "./log/";const std::string defaultname = "log.txt";enum class LogLevel{DEBUG,INFO,WARNING,ERROR,FATAL};std::string ToStringLogLevel(LogLevel level){switch (level){case LogLevel::DEBUG:return "DEBUG";case LogLevel::INFO:return "INFO";case LogLevel::WARNING:return "WARNING";case LogLevel::ERROR:return "ERROR";case LogLevel::FATAL:return "FATAL";default:return "UNKNOWN";}}std::string GetCurrTime(){time_t tm = time(nullptr);struct tm curr;localtime_r(&tm, &curr);char timebuffer[64];snprintf(timebuffer, sizeof(timebuffer), "%4d-%02d-%02d %02d:%02d:%02d",curr.tm_year + 1900,curr.tm_mon + 1,curr.tm_mday,curr.tm_hour,curr.tm_min,curr.tm_sec);return timebuffer;}class LogStrategy{public:virtual ~LogStrategy() = default;virtual void SyncLog(const std::string &message) = 0;};class ConsoleLogStrategy : public LogStrategy{public:void SyncLog(const std::string &message) override{LockGuard LockGuard(_mutex);std::cerr << message << std::endl;}~ConsoleLogStrategy(){}private:Mutex _mutex;};class FileLogStrategy : public LogStrategy{public:FileLogStrategy(std::string logpath = defaultpath, std::string logfilename = defaultname): _logpath(logpath), _logfilename(logfilename){LockGuard LockGuard(_mutex);if (std::filesystem::exists(_logpath))return;try{std::filesystem::create_directories(_logpath);}catch (const std::filesystem::filesystem_error &e){std::cerr << e.what() << '\n';}}void SyncLog(const std::string &message) override{LockGuard lockguard(_mutex);std::string log = _logpath + _logfilename;std::ofstream out(log.c_str(), std::ios::app); // ×·¼Ó�9’1ʽif (!out.is_open())return;out << message << "\n";out.close();}~FileLogStrategy(){}private:Mutex _mutex;std::string _logpath;std::string _logfilename;};class Logger{public:Logger(){UseConsoleStrategy();}~Logger(){}void UseConsoleStrategy(){_strategy = std::make_unique<ConsoleLogStrategy>();}void UseFileLogStrategy(){_strategy = std::make_unique<FileLogStrategy>();}class LogMessage{public:LogMessage(LogLevel type, std::string filename, int line, Logger &logger): _type(type), _curr_time(GetCurrTime()), _filename(filename), _line(line), _logger(logger){std::stringstream ssbuffer;ssbuffer << "[" << _curr_time << "] "<< "[" << ToStringLogLevel(type) << "] "<< "[" << _pid << "] "<< "[" << _filename << "] "<< "[" << _line << "]"<< " - ";_loginfo = ssbuffer.str();}template <typename T>LogMessage &operator<<(const T &info){std::stringstream ssbuffer;ssbuffer << info;_loginfo += ssbuffer.str();return *this;}~LogMessage(){if (_logger._strategy){_logger._strategy->SyncLog(_loginfo);}}private:LogLevel _type;std::string _curr_time;pid_t _pid;std::string _filename;int _line;Logger &_logger;std::string _loginfo;};LogMessage operator()(LogLevel type, std::string filename, int line){return LogMessage(type, filename, line, *this);}private:std::unique_ptr<LogStrategy> _strategy;};Logger logger;#define LOG(level) logger(level, __FILE__, __LINE__)#define Enable_Console_Log_Strategy() logger.EnableConsoleLogStrategy()#define Enable_File_Log_Strategy() logger.EnableFileLogStrategy()
}#include"Log.hpp"
#include"ThreadPool.hpp"
#include<memory>using namespace LogModule;int main()
{std::unique_ptr<LogStrategy> strategy = std::make_unique<ConsoleLogStrategy>(); // C++14//std::unique_ptr<LogStrategy> strategy = std::make_unique<FileLogStrategy>(); // C++14strategy->SyncLog("hello log!");Logger logger;logger(LogLevel::DEBUG, "main.cc", 10) << "hello world," << 3.14 << " " << 8899 << "aaaa";logger(LogLevel::DEBUG, "main.cc", 10) << "hello world";logger(LogLevel::DEBUG, "main.cc", 10) << "hello world";logger(LogLevel::DEBUG, "main.cc", 10) << "hello world";logger(LogLevel::DEBUG, "main.cc", 10) << "hello world";logger(LogLevel::DEBUG, "main.cc", 10) << "hello world";logger(LogLevel::DEBUG, "main.cc", 10) << "hello world";return 0;
}输出结果:
3-2 线程池设计
⼀种线程使⽤模式。线程过多会带来调度开销,进⽽影响缓存局部性和整体性能。⽽线程池维护着多个线程,等待着监督管理者分配可并发执⾏的任务。这避免了在处理短时间任务时创建与销毁线程的代价。线程池不仅能够保证内核的充分利⽤,还能防⽌过分调度。可⽤线程数量应该取决于可⽤的并发处理器、处理器内核、内存、⽹络sockets等的数量。
需要⼤量的线程来完成任务,且完成任务的时间⽐较短。 ⽐如WEB服务器完成⽹⻚请求这样的任务,使⽤线程池技术是⾮常合适的。因为单个任务⼩,⽽任务数量巨⼤,你可以想象⼀个热⻔⽹站的点击次数。 但对于⻓时间的任务,⽐如⼀个Telnet连接请求,线程池的优点就不明显了。因为Telnet会话时间⽐线程的创建时间⼤多了。对性能要求苛刻的应⽤,⽐如要求服务器迅速响应客户请求。接受突发性的⼤量请求,但不⾄于使服务器因此产⽣⼤量线程的应⽤。突发性⼤量客户请求,在没有线程池情况下,将产⽣⼤量线程,虽然理论上⼤部分操作系统线程数⽬最⼤值不是问题,短时间内产⽣⼤量线程可能使内存到达极限,出现错误.
创建固定数量线程池,循环从任务队列中获取任务对象,获取到任务对象后,执⾏任务对象中的任务接⼝浮动线程池,其他同上
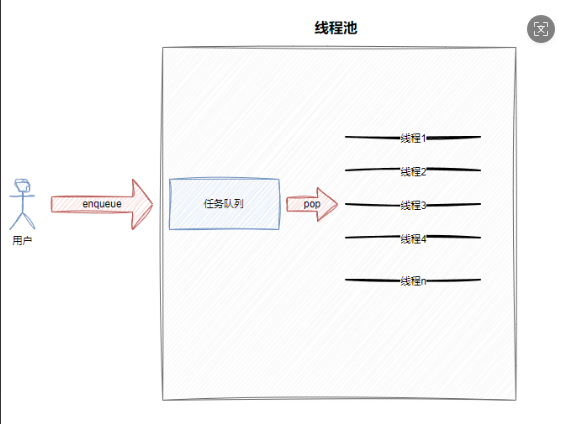
那么事实上这里的线程池就是一个单生产多消费的一个模型,下面是该线程池的代码:
#pragma once#include <iostream>
#include <string>
#include <vector>
#include <queue>
#include "Log.hpp"
#include "Cond.hpp"
#include "Lock.hpp"
#include "Thread.hpp"namespace ThreadPoolModule
{using namespace LogModule;using namespace CondModule;using namespace LockModule;using namespace ThreadModule;static const int gnum = 5;template <typename T>class ThreadPool{public:ThreadPool(const ThreadPool<T> &) = delete;ThreadPool<T> &operator=(const ThreadPool<T> &) = delete;ThreadPool(int num = gnum): _num(num){for (int i = 0; i < num; i++){_threads.emplace_back([this](){HandlerTask();});}}void WakeUpOne(){_cond.Notify();LOG(LogLevel::INFO) << "唤醒一个休眠线程";}void WakeUpAllThread(){LockGuard LockGuard(_mutex);if (_sleepernum)_cond.NotifyAll();LOG(LogLevel::INFO) << "唤醒所有的休眠线程";}void Start(){if (_isrunning)return;_isrunning = true;for (auto &thread : _threads){thread.Start();LOG(LogLevel::INFO) << "start new thread success: " << thread.Name();}}void Stop(){if (!_isrunning)return;_isrunning = false;WakeUpAllThread();}void HandlerTask(){char name[128];pthread_getname_np(pthread_self(), name, sizeof(name));while (true){T t;{LockGuard lockguard(_mutex);while (_taskq.empty() && _isrunning){_sleepernum++;_cond.Wait(_mutex);_sleepernum--;}if (!_isrunning && _taskq.empty()){LOG(LogLevel::INFO) << name << " 退出了, 线程池退出&&任务队列为空";break;}// 一定有任务t = _taskq.front(); // 从q中获取任务,任务已经是线程私有的了!!!_taskq.pop();}//t(); // 处理任务,需要在临界区内部处理吗?1 0}}bool Enqueue(const T &in){if (_isrunning){LockGuard LockGuard(_mutex);_taskq.push(in);if (_threads.size() == _sleepernum){WakeUpOne();}return true;}return false;}void Join(){for (auto &thread : _threads){thread.Join();}}~ThreadPool(){}private:std::vector<Thread> _threads;int _num;std::queue<T> _taskq;Cond _cond;Mutex _mutex;bool _isrunning;int _sleepernum;};
}
3-3 线程安全的单例模式
3-3-1 什么是单例模式
3-3-2 单例模式的特点
某些类, 只应该具有⼀个对象(实例), 就称之为单例
3-3-3 饿汉实现⽅式和懒汉实现⽅式
吃完饭, ⽴刻洗碗, 这种就是饿汉⽅式. 因为下⼀顿吃的时候可以⽴刻拿着碗就能吃饭.吃完饭, 先把碗放下, 然后下⼀顿饭⽤到这个碗了再洗碗, 就是懒汉⽅式.
3-3-4 饿汉⽅式实现单例模式
template <typename T>
class Singleton {static T data;
public:static T* GetInstance() {return &data;}
};
只要通过 Singleton 这个包装类来使⽤ T 对象, 则⼀个进程中只有⼀个 T 对象的实例.
3-3-5 懒汉⽅式实现单例模式
template <typename T>
class Singleton {static T* inst;
public:static T* GetInstance() {if (inst == NULL) {inst = new T();}return inst;}
};第⼀次调⽤ GetInstance 的时候, 如果两个线程同时调⽤, 可能会创建出两份 T 对象的实例.但是后续再次调⽤, 就没有问题了
3-3-6 懒汉⽅式实现单例模式(线程安全版本)
// 懒汉模式, 线程安全
template <typename T>
class Singleton
{volatile static T *inst; // 需要设置 volatile 关键字, 否则可能被编译器优化.static std::mutex lock;public:static T *GetInstance(){if (inst == NULL){                // 双重判定空指针, 降低锁冲突的概率, 提⾼性能.lock.lock(); // 使⽤互斥锁, 保证多线程情况下也只调⽤⼀次 new.if (inst == NULL){inst = new T();}lock.unlock();}return inst;}
}
注意事项:
1. 加锁解锁的位置
2. 双重 if 判定, 避免不必要的锁竞争
3. volatile关键字防⽌过度优化
3-4 单例式线程池
#pragma once
#include <iostream>
#include <vector>
#include <queue>
#include <memory>
#include <pthread.h>
#include "Log.hpp"    // 引⼊⾃⼰的⽇志
#include "Thread.hpp" // 引⼊⾃⼰的线程
#include "Lock.hpp"   // 引⼊⾃⼰的锁
#include "Cond.hpp"   // 引⼊⾃⼰的条件变量
using namespace ThreadModule;
using namespace CondModule;
using namespace LockModule;
using namespace LogModule;
const static int gdefaultthreadnum = 10;
// ⽇志
template <typename T>
class ThreadPool
{
private:// 是要有的,必须是私有的ThreadPool(int threadnum = gdefaultthreadnum) : _threadnum(threadnum),_waitnum(0), _isrunning(false){LOG(LogLevel::INFO) << "ThreadPool Construct()";}void InitThreadPool(){// 指向构建出所有的线程,并不启动for (int num = 0; num < _threadnum; num++){_threads.emplace_back(std::bind(&ThreadPool::HandlerTask, this));LOG(LogLevel::INFO) << "init thread " << _threads.back().Name() << " done";}}void Start(){_isrunning = true;for (auto &thread : _threads){thread.Start();LOG(LogLevel::INFO) << "start thread " << thread.Name() << "done";}}void HandlerTask() // 类的成员⽅法,也可以成为另⼀个类的回调⽅法,⽅便我们继续类级别的互相调⽤!{std::string name = GetThreadNameFromNptl();LOG(LogLevel::INFO) << name << " is running...";while (true){// 1. 保证队列安全_mutex.Lock();// 2. 队列中不⼀定有数据while (_task_queue.empty() && _isrunning){_waitnum++;_cond.Wait(_mutex);_waitnum--;}// 2.1 如果线程池已经退出了 && 任务队列是空的if (_task_queue.empty() && !_isrunning){_mutex.Unlock();break;}// 2.2 如果线程池不退出 && 任务队列不是空的// 2.3 如果线程池已经退出 && 任务队列不是空的 --- 处理完所有的任务,然后在退出// 3. ⼀定有任务, 处理任务T t = _task_queue.front();_task_queue.pop();_mutex.Unlock();LOG(LogLevel::DEBUG) << name << " get a task";// 4. 处理任务,这个任务属于线程独占的任务t();}}// 复制拷⻉禁⽤ThreadPool<T> &operator=(const ThreadPool<T> &) = delete;ThreadPool(const ThreadPool<T> &) = delete;public:static ThreadPool<T> *GetInstance(){// 如果是多线程获取线程池对象下⾯的代码就有问题了!!// 只有第⼀次会创建对象,后续都是获取// 双判断的⽅式,可以有效减少获取单例的加锁成本,⽽且保证线程安全if (nullptr == _instance) // 保证第⼆次之后,所有线程,不⽤在加锁,直接返回_instance单例对象{LockGuard lockguard(_lock);if (nullptr == _instance){_instance = new ThreadPool<T>();_instance->InitThreadPool();_instance->Start();LOG(LogLevel::DEBUG) << "创建线程池单例";return _instance;}}LOG(LogLevel::DEBUG) << "获取线程池单例";return _instance;}void Stop(){_mutex.Lock();_isrunning = false;_cond.NotifyAll();_mutex.Unlock();LOG(LogLevel::DEBUG) << "线程池退出中...";}void Wait(){for (auto &thread : _threads){thread.Join();LOG(LogLevel::INFO) << thread.Name() << " 退出...";}}bool Enqueue(const T &t){bool ret = false;_mutex.Lock();if (_isrunning){_task_queue.push(t);if (_waitnum > 0){_cond.Notify();}LOG(LogLevel::DEBUG) << "任务⼊队列成功";ret = true;}_mutex.Unlock();return ret;}~ThreadPool(){}private:int _threadnum;std::vector<Thread> _threads; // for fix, int tempstd::queue<T> _task_queue;Mutex _mutex;Cond _cond;int _waitnum;bool _isrunning;// 添加单例模式static ThreadPool<T> *_instance;static Mutex _lock;
};
template <typename T>
ThreadPool<T> *ThreadPool<T>::_instance = nullptr;
template <typename T>
Mutex ThreadPool<T>::_lock;
4. 线程安全和重⼊问题
线程安全:就是多个线程在访问共享资源时,能够正确地执⾏,不会相互⼲扰或破坏彼此的执⾏结果。⼀般⽽⾔,多个线程并发同⼀段只有局部变量的代码时,不会出现不同的结果。但是对全局变量或者静态变量进⾏操作,并且没有锁保护的情况下,容易出现该问题。重⼊:同⼀个函数被不同的执⾏流调⽤,当前⼀个流程还没有执⾏完,就有其他的执⾏流再次进⼊,我们称之为重⼊。⼀个函数在重⼊的情况下,运⾏结果不会出现任何不同或者任何问题,则该函数被称为可重⼊函数,否则,是不可重⼊函数。
多线程重⼊函数信号导致⼀个执⾏流重复进⼊函数
常⻅的线程不安全的情况1. 不保护共享变量的函数2. 函数状态随着被调⽤,状态发⽣变化的函数3. 返回指向静态变量指针的函数4. 调⽤线程不安全函数的函数常⻅的线程安全的情况1. 每个线程对全局变量或者静态变量只有读取的权限,⽽没有写⼊的权限,⼀般来说这些线程是安全的2. 类或者接⼝对于线程来说都是原⼦操作3. 多个线程之间的切换不会导致该接⼝的执⾏结果存在⼆义性
常⻅不可重⼊的情况1. 调⽤了malloc/free函数,因为malloc函数是⽤全局链表来管理堆的2. 调⽤了标准I/O库函数,标准I/O库的很多实现都以不可重⼊的⽅式使⽤全局数据结构3. 可重⼊函数体内使⽤了静态的数据结构常⻅可重⼊的情况1. 不使⽤全局变量或静态变量2. 不使⽤ malloc或者new开辟出的空间3. 不调⽤不可重⼊函数4. 不返回静态或全局数据,所有数据都有函数的调⽤者提供5. 使⽤本地数据,或者通过制作全局数据的本地拷⻉来保护全局数据
可重⼊与线程安全联系函数是可重⼊的,那就是线程安全的(其实知道这⼀句话就够了)函数是不可重⼊的,那就不能由多个线程使⽤,有可能引发线程安全问题如果⼀个函数中有全局变量,那么这个函数既不是线程安全也不是可重⼊的。
可重⼊与线程安全区别可重⼊函数是线程安全函数的⼀种线程安全不⼀定是可重⼊的,⽽可重⼊函数则⼀定是线程安全的。如果将对临界资源的访问加上锁,则这个函数是线程安全的,但如果这个重⼊函数若锁还未释放则会产⽣死锁,因此是不可重⼊的。
如果不考虑 信号导致⼀个执⾏流重复进⼊函数 这种重⼊情况,线程安全和重⼊在安全⻆度不做区分但是线程安全侧重说明线程访问公共资源的安全情况,表现的是并发线程的特点可重⼊描述的是⼀个函数是否能被重复进⼊,表⽰的是函数的特点
5. 常⻅锁概念
5-1 死锁
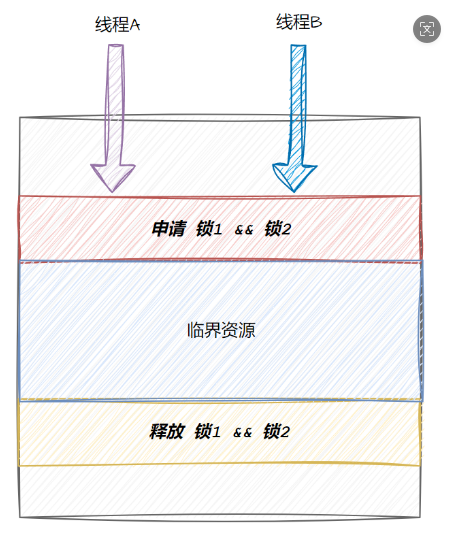
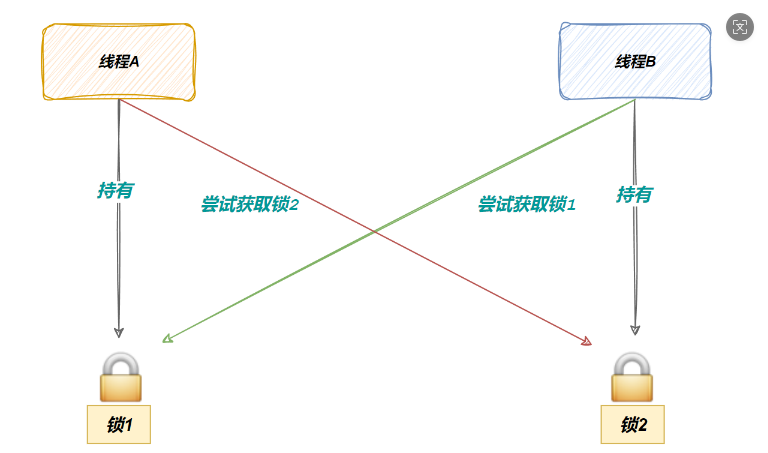
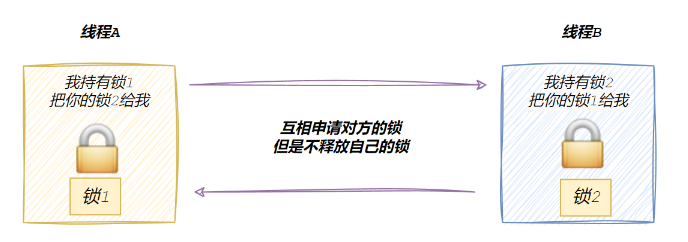
死锁是指在⼀组进程中的各个进程均占有不会释放的资源,但因互相申请被其他进程所站⽤不会释放的资源⽽处于的⼀种永久等待状态。为了⽅便表述,假设现在线程A,线程B必须同时持有锁1和锁2,才能进⾏后续资源的访问
5-2 死锁四个必要条件
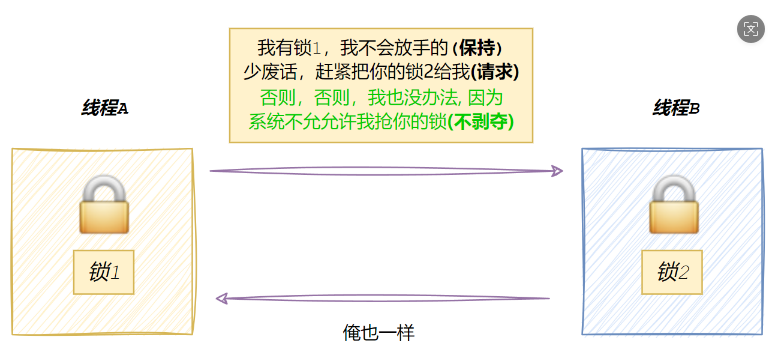
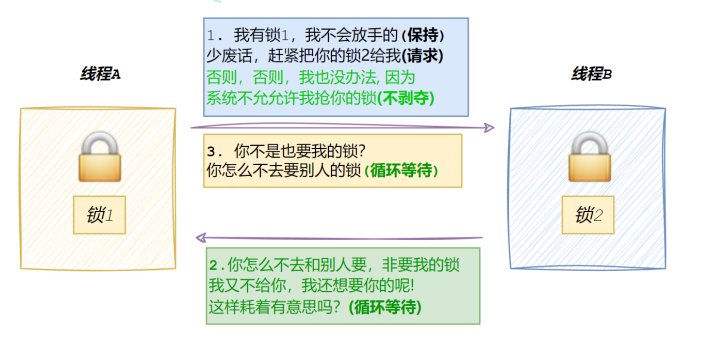
互斥条件:⼀个资源每次只能被⼀个执⾏流使⽤请求与保持条件:⼀个执⾏流因请求资源⽽阻塞时,对已获得的资源保持不放

5-3 避免死锁
破坏死锁的四个必要条件破坏循环等待条件问题:资源⼀次性分配, 使⽤超时机制、加锁顺序⼀致
#include <iostream>
#include <mutex>
#include <thread>
#include <vector>
#include <unistd.h>
// 定义两个共享资源(整数变量)和两个互斥锁
int shared_resource1 = 0;
int shared_resource2 = 0;
std::mutex mtx1, mtx2;
// ⼀个函数,同时访问两个共享资源
void access_shared_resources()
{// std::unique_lock<std::mutex> lock1(mtx1, std::defer_lock);// std::unique_lock<std::mutex> lock2(mtx2, std::defer_lock);// // 使⽤ std::lock 同时锁定两个互斥锁// std::lock(lock1, lock2);// 现在两个互斥锁都已锁定,可以安全地访问共享资源int cnt = 10000;while (cnt){++shared_resource1;++shared_resource2;cnt--;}// 当离开 access_shared_resources 的作⽤域时,lock1 和 lock2 的析构函数会被⾃动调⽤// 这会导致它们各⾃的互斥量被⾃动解锁
}
// 模拟多线程同时访问共享资源的场景
void simulate_concurrent_access()
{std::vector<std::thread> threads;// 创建多个线程来模拟并发访问for (int i = 0; i < 10; ++i){threads.emplace_back(access_shared_resources);}// 等待所有线程完成for (auto &thread : threads){thread.join();}// 输出共享资源的最终状态std::cout << "Shared Resource 1: " << shared_resource1 << std::endl;std::cout << "Shared Resource 2: " << shared_resource2 << std::endl;
}
int main()
{simulate_concurrent_access();return 0;
}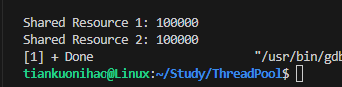
一次性同时申请两把锁就能避免死锁问题了。
6. STL,智能指针和线程安全
6-1 STL中的容器是否是线程安全的?
原因是, STL 的设计初衷是将性能挖掘到极致, ⽽⼀旦涉及到加锁保证线程安全, 会对性能造成巨⼤的影响.⽽且对于不同的容器, 加锁⽅式的不同, 性能可能也不同(例如hash表的锁表和锁桶).因此 STL 默认不是线程安全. 如果需要在多线程环境下使⽤, 往往需要调⽤者⾃⾏保证线程安全
6-2 智能指针是否是线程安全的?
对于 unique_ptr, 由于只是在当前代码块范围内⽣效, 因此不涉及线程安全问题.对于 shared_ptr, 多个对象需要共⽤⼀个引⽤计数变量, 所以会存在线程安全问题. 但是标准库实现的时候考虑到了这个问题, 基于原⼦操作(CAS)的⽅式保证 shared_ptr 能够⾼效, 原⼦的操作引⽤计数.
有关于线程的同步与互斥到这里我们就全部学习完了,Linux系统部分到此也结束了,下一次让我们开启关于Linux网络部分的学习,让我们下次再见!