一站式搭建WordPress网站与Nginx RTMP流媒体服务
一站式搭建WordPress网站与Nginx RTMP流媒体服务
- 第一部分:安装 WordPress (LAMP 环境)
- 1. 更新系统
- 2. 安装 MySQL
- 6. 下载并配置 WordPress
- 3. 创建 WordPress 数据库
- 设置 WordPress 目录权限:
- 4. 安装 Apache (Nginx)
- 目前 IP 访问
- 未来添加域名的升级方案(先跳过)
- 文件结构组织
- 5. 安装 PHP 及扩展
- 6. 验证访问:在浏览器访问 WordPress
- 第二部分:安装和配置 Nginx RTMP 服务
- 1. 安装依赖和编译工具
- 2. 下载 Nginx 和 RTMP 模块源码
- 3. 编译并安装 Nginx with RTMP
- 4. 生成自签名 SSL 证书
- 5. 创建必要的目录和文件
- 6. 配置 RTMP 服务
- 7. 创建 systemd 服务文件
- 8. 启动服务并验证
- 9. 测试 HTTPS 访问
- 10. 使用示例
- 搭建RTMP视频流播放网站方案
- 防火墙设置
- 步骤 1:创建新网站目录
- 步骤 2:创建新的 MySQL 数据库
- 步骤 3:安装 PHP-FPM 和相关扩展
- 步骤 4:配置 PHP-FPM 套接字
- 步骤 5:正确安装 WordPress 到视频流站点
- 步骤 6:验证虚拟主机配置
- 步骤 7:启用必要模块
- 步骤 8:完成 WordPress 安装
- 在 WordPress 启用
- 目录结构说明
第一部分:安装 WordPress (LAMP 环境)
1. 更新系统
sudo apt update && sudo apt upgrade -y
2. 安装 MySQL
sudo apt install mysql-server -y
sudo mysql_secure_installation
按提示设置 root 密码并完成安全配置
6. 下载并配置 WordPress
cd /tmp
wget https://wordpress.org/latest.tar.gz
tar -xzvf latest.tar.gz
sudo mv wordpress /var/www/html/
sudo chown -R www-data:www-data /var/www/html/wordpress
3. 创建 WordPress 数据库
mysql -u root -p
CREATE DATABASE wordpress;
CREATE USER 'wpuser'@'localhost' IDENTIFIED BY 'your_strong_password';
GRANT ALL PRIVILEGES ON wordpress.* TO 'wpuser'@'localhost';
FLUSH PRIVILEGES;
EXIT;
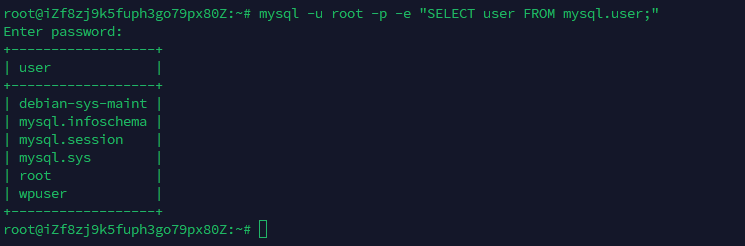
mysql -u root -p -e "SHOW DATABASES;"
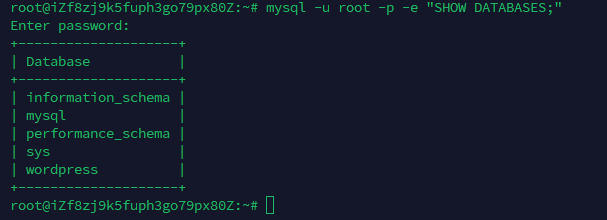
mysql -u root -p -e "SELECT user FROM mysql.user;"
设置 WordPress 目录权限:
sudo chown -R www-data:www-data /var/www/html/wordpress
sudo find /var/www/html/wordpress -type d -exec chmod 755 {} \;
sudo find /var/www/html/wordpress -type f -exec chmod 644 {} \;
4. 安装 Apache (Nginx)
二者选择其一
Apache,一个开源的、跨平台的网页服务器软件。它的主要工作是把网站上的网页(HTML文件)、图片、CSS、JavaScript等资源,通过网络传递给用户访问的浏览器。
Apache和Nginx都是非常优秀的Web服务器,但它们的设计理念和适用场景有所不同。简单来说,Nginx更擅长处理高并发静态请求,通常作为反向代理和负载均衡器的首选;而Apache在处理动态内容、模块丰富性及.htaccess目录级配置方面更具优势
目前 IP 访问
- 安装
sudo apt install apache2 -y
sudo systemctl enable apache2
- 配置 Apache 虚拟主机
-
IP 地址访问的特殊性:
当使用 IP 地址而非域名访问时,Apache 会自动使用默认虚拟主机(即 000-default.conf)创建新的 wordpress.conf 虚拟主机对 IP 地址访问不起作用,除非明确指定该 IP -
配置优先级问题:
当请求通过 IP 地址访问时,Apache 会优先匹配 000-default.conf即使您创建了 wordpress.conf,它也不会被用于 IP 地址请求 -
简化配置:
对于单站点服务器(特别是使用 IP 访问的情况),直接修改默认配置更简单可靠避免了虚拟主机匹配规则带来的复杂性
当前配置(使用 IP 地址)
sudo vim /etc/apache2/sites-available/000-default.conf
添加以下内容(替换 IP 地址 ):
<VirtualHost *:80># 使用服务器 IP 地址ServerName <-IP 地址->ServerAdmin webmaster@localhost# 修改为 WordPress 安装目录DocumentRoot /var/www/html/wordpress# 添加 Directory 块配置 WordPress 权限<Directory /var/www/html/wordpress>Options FollowSymLinksAllowOverride AllRequire all granted# 安全增强<IfModule mod_headers.c>Header always set X-Content-Type-Options "nosniff"Header always set X-Frame-Options "SAMEORIGIN"</IfModule></Directory># 日志设置(添加 WordPress 专用日志)ErrorLog ${APACHE_LOG_DIR}/wordpress_error.logCustomLog ${APACHE_LOG_DIR}/wordpress_access.log combined# 性能优化FileETag None<IfModule mod_headers.c>Header unset ETagHeader set Cache-Control "max-age=0, no-cache, no-store, must-revalidate"</IfModule>
</VirtualHost>
- 应用配置
# 测试配置语法
sudo apache2ctl configtest
# 应输出 "Syntax OK"# 启用重写模块
sudo a2enmod rewrite headers# 重启 Apache
sudo systemctl restart apache2
完成 — 继续第5步
未来添加域名的升级方案(先跳过)
步骤 1: 创建新的虚拟主机配置
sudo nano /etc/apache2/sites-available/yourdomain.conf
内容如下:
<VirtualHost *:80># 使用您的域名ServerName yourdomain.comServerAlias www.yourdomain.com# WordPress 目录(保持不变)DocumentRoot /var/www/html/wordpress<Directory /var/www/html/wordpress>Options FollowSymLinksAllowOverride AllRequire all granted</Directory># 重定向 HTTP 到 HTTPS(强烈推荐)RewriteEngine OnRewriteCond %{HTTPS} offRewriteRule ^ https://%{HTTP_HOST}%{REQUEST_URI} [L,R=301]# 日志设置(使用域名区分)ErrorLog ${APACHE_LOG_DIR}/yourdomain_error.logCustomLog ${APACHE_LOG_DIR}/yourdomain_access.log combined
</VirtualHost><VirtualHost *:443>ServerName yourdomain.comServerAlias www.yourdomain.comDocumentRoot /var/www/html/wordpress# SSL 配置 - 使用 Let's Encrypt 证书SSLEngine onSSLCertificateFile /etc/letsencrypt/live/yourdomain.com/fullchain.pemSSLCertificateKeyFile /etc/letsencrypt/live/yourdomain.com/privkey.pem# 安全增强头Header always set Strict-Transport-Security "max-age=63072000; includeSubDomains"Header always set X-Content-Type-Options "nosniff"Header always set X-Frame-Options "SAMEORIGIN"# PHP 配置<FilesMatch \.php$>SetHandler "proxy:unix:/run/php/php8.1-fpm.sock|fcgi://localhost"</FilesMatch><Directory /var/www/html/wordpress>Options FollowSymLinksAllowOverride AllRequire all granted</Directory>
</VirtualHost>
步骤 2: 获取 SSL 证书 (使用 Certbot)
# 安装 Certbot
sudo apt install certbot python3-certbot-apache -y# 获取证书
sudo certbot --apache -d yourdomain.com -d www.yourdomain.com# 设置自动续期
sudo certbot renew --dry-run
步骤 3: 切换站点配置
# 禁用默认站点
sudo a2dissite 000-default.conf# 启用新域名配置
sudo a2ensite yourdomain.conf# 启用 SSL 模块
sudo a2enmod ssl rewrite headers# 重启 Apache
sudo systemctl restart apache2
步骤 4: 更新 WordPress 设置
- 登录 WordPress 后台 (http:// IP地址 /wp-admin)
- 进入 “设置” > “常规”
- 更新以下两项为您的域名:
- WordPress 地址 (URL): https://yourdomain.com
- 站点地址 (URL): https://yourdomain.com
- 保存更改
步骤 5: 配置 .htaccess 重定向 (可选但推荐)
sudo nano /var/www/html/wordpress/.htaccess
添加以下规则(在 WordPress 规则之前):
# 重定向旧IP访问到新域名
<IfModule mod_rewrite.c>RewriteEngine OnRewriteCond %{HTTP_HOST} ^xx\.xxx\.52\.13$RewriteRule ^(.*)$ https://yourdomain.com/$1 [L,R=301]
</IfModule>
文件结构组织
/etc/apache2/sites-available/
├── 000-default.conf       # 当前IP访问配置
├── yourdomain.conf        # 未来域名配置
└── fallback.conf          # 备用配置(可选)/var/www/html/
└── wordpress/             # WordPress 安装目录
# 保留所有配置,只需启用/禁用
sudo a2dissite 000-default.conf
sudo a2ensite yourdomain.conf
5. 安装 PHP 及扩展
sudo apt install php libapache2-mod-php php-mysql php-curl php-gd php-mbstring php-xml php-zip -y
sudo systemctl restart apache2
6. 验证访问:在浏览器访问 WordPress
应该看到 WordPress 安装界面
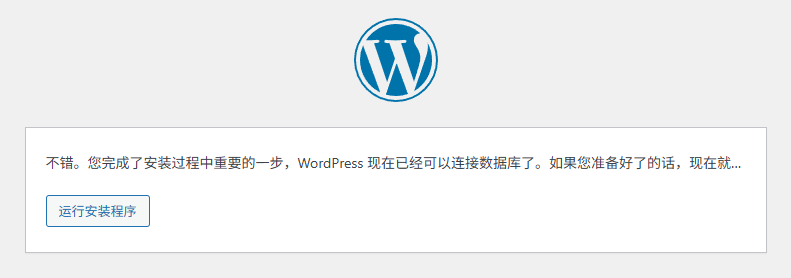
配置WordPress 数据库,查看安装的 MySQL
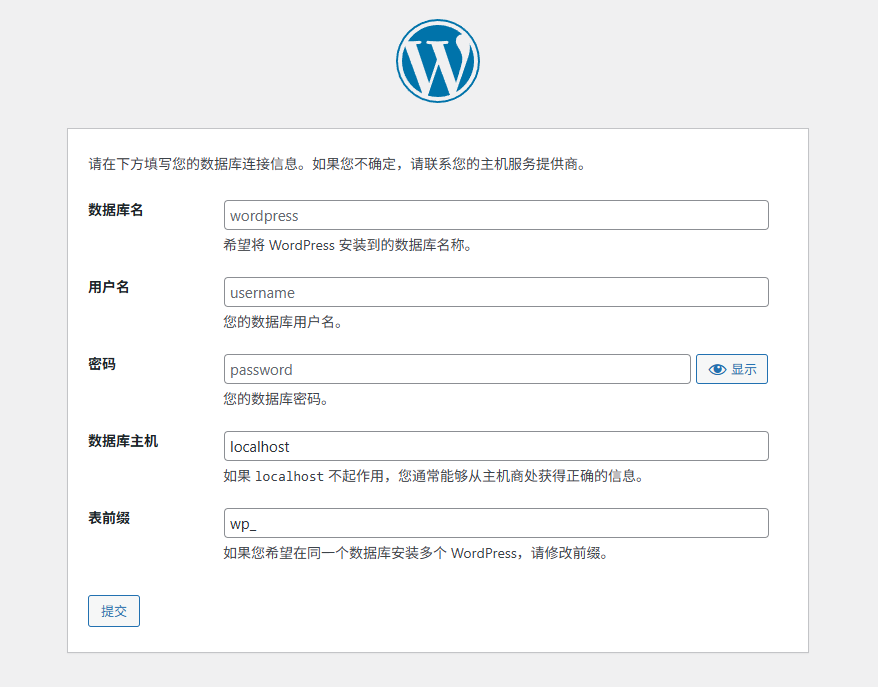
完成
第二部分:安装和配置 Nginx RTMP 服务
目的:Nginx RTMP 安装和配置流程,与现有的 Apache/WordPress 服务共存
1. 安装依赖和编译工具
sudo apt update
sudo apt install -y build-essential libpcre3 libpcre3-dev libssl-dev zlib1g-dev git
2. 下载 Nginx 和 RTMP 模块源码
Nginx(发音为"engine x")是一个高性能的开源Web服务器,同时也可作为反向代理、负载均衡器和HTTP缓存使用。
RTMP 的全称是 Real-Time Messaging Protocol,即实时消息传输协议
# 创建构建目录
mkdir ~/nginx-rtmp-build
cd ~/nginx-rtmp-build# 下载 Nginx 最新稳定版
wget https://nginx.org/download/nginx-1.24.0.tar.gz
tar -zxvf nginx-1.24.0.tar.gz# 下载 RTMP 模块
git clone https://github.com/arut/nginx-rtmp-module.git
3. 编译并安装 Nginx with RTMP
cd nginx-1.24.0# 配置编译选项(注意:只编译 RTMP 模块,包含 HTTP 模块 添加 SSL 支持)
./configure \--prefix=/usr/local/nginx-rtmp \--add-module=../nginx-rtmp-module \--with-http_ssl_module \--with-http_stub_status_module
-
添加了 --with-http_ssl_module 以支持 HTTPS
-
添加了 --with-http_stub_status_module 用于状态监控
# 编译并安装
make -j$(nproc)
sudo make install
# 检查安装文件
ls -l /usr/local/nginx-rtmp/sbin/nginx# 检查版本和模块
/usr/local/nginx-rtmp/sbin/nginx -V
4. 生成自签名 SSL 证书
# 创建 SSL 目录
sudo mkdir -p /usr/local/nginx-rtmp/conf/ssl
cd /usr/local/nginx-rtmp/conf/ssl# 生成私钥
sudo openssl genrsa -out server.key 2048# 生成 CSR
sudo openssl req -new -key server.key -out server.csr -subj "/CN=rtmp-server"# 生成自签名证书(有效期1年)
sudo openssl x509 -req -days 365 -in server.csr -signkey server.key -out server.crt# 设置权限
sudo chmod 400 server.key
sudo chown -R www-data:www-data /usr/local/nginx-rtmp/conf/ssl
5. 创建必要的目录和文件
# 创建日志目录nginx-rtmp logs
sudo mkdir -p /usr/local/nginx-rtmp/logs
sudo chown -R www-data:www-data /usr/local/nginx-rtmp/logs
sudo chmod -R 755 /usr/local/nginx-rtmp/logs# 创建 HTML 目录(存放 stat.xsl)
sudo mkdir -p /usr/local/nginx-rtmp/html
sudo wget -O /usr/local/nginx-rtmp/html/stat.xsl https://raw.githubusercontent.com/arut/nginx-rtmp-module/master/stat.xsl
sudo chown -R www-data:www-data /usr/local/nginx-rtmp/html
sudo chown www-data:www-data /usr/local/nginx-rtmp/html/stat.xsl
# 创建 PID 目录
sudo mkdir -p /run/nginx-rtmp
sudo chown www-data:www-data /run/nginx-rtmp# 创建日志目录
sudo mkdir -p /var/log/nginx-rtmp
sudo chown www-data:www-data /var/log/nginx-rtmp# 创建 HLS 目录(如果启用了 HLS)
sudo mkdir -p /var/www/hls
sudo chown www-data:www-data /var/www/hls# 创建 PID 文件目录
sudo mkdir -p /var/run/nginx-rtmp
sudo chown www-data:www-data /var/run/nginx-rtmp
6. 配置 RTMP 服务
# 创建配置文件
sudo vim /usr/local/nginx-rtmp/conf/nginx.conf
# 全局配置块
worker_processes auto;
error_log /usr/local/nginx-rtmp/logs/error.log warn;
pid /run/nginx-rtmp/nginx.pid;events {worker_connections 1024;
}# RTMP直播流核心配置
rtmp {server {listen 1935;chunk_size 4096;max_connections 100;# 定义名为"live"的直播应用application live {live on;record off;# HLS流媒体配置hls on;hls_path /var/www/hls;        # HLS切片存储路径hls_fragment 3s;hls_playlist_length 60s;hls_nested off;                # 新增:启用嵌套目录结构}}
}# HTTP服务配置
http {# SSL/TLS优化配置ssl_session_cache shared:SSL:10m;ssl_session_timeout 10m;# HTTP服务器(状态监控和HLS分发)server {listen 8080;server_name _;# 删除全局root设置,避免冲突# RTMP状态监控页面location /stat {rtmp_stat all;rtmp_stat_stylesheet stat.xsl;add_header X-Frame-Options "SAMEORIGIN";add_header X-Content-Type-Options "nosniff";}# 状态页样式表location /stat.xsl {root /usr/local/nginx-rtmp/html;expires 1d;add_header Cache-Control "public, max-age=86400";}# HLS流媒体端点 - 修复配置location /hls {# 关键修复:使用alias而不是rootalias /var/www/hls;# MIME类型声明types {application/vnd.apple.mpegurl m3u8;video/mp2t ts;}# 禁用缓存add_header Cache-Control no-cache;# 允许跨域访问add_header Access-Control-Allow-Origin *;# 禁用访问日志access_log off;}# 根路径访问限制location / {return 404;}# 访问日志设置access_log /usr/local/nginx-rtmp/logs/access.log combined;}# HTTPS服务器server {listen 8443 ssl;server_name _;# 删除全局root设置,避免冲突# SSL证书配置ssl_certificate /usr/local/nginx-rtmp/conf/ssl/server.crt;ssl_certificate_key /usr/local/nginx-rtmp/conf/ssl/server.key;# 安全协议配置ssl_protocols TLSv1.2 TLSv1.3;# 修复加密套件配置ssl_ciphers ECDHE-ECDSA-AES128-GCM-SHA256:ECDHE-RSA-AES128-GCM-SHA256:ECDHE-ECDSA-AES256-GCM-SHA384:ECDHE-RSA-AES256-GCM-SHA384;ssl_prefer_server_ciphers on;# HLS流媒体端点 - 修复配置location /hls {# 关键修复:使用alias而不是rootalias /var/www/hls;types {application/vnd.apple.mpegurl m3u8;video/mp2t ts;}add_header Cache-Control no-cache;add_header Access-Control-Allow-Origin *;access_log off;}# HTTPS访问日志access_log /usr/local/nginx-rtmp/logs/https_access.log combined;}
}
7. 创建 systemd 服务文件
sudo vim /etc/systemd/system/nginx-rtmp.service
[Unit]
Description=Nginx RTMP Streaming Server
After=network.target[Service]
Type=forking
PIDFile=/run/nginx-rtmp/nginx.pid
ExecStartPre=/usr/local/nginx-rtmp/sbin/nginx -t -c /usr/local/nginx-rtmp/conf/nginx.conf
ExecStart=/usr/local/nginx-rtmp/sbin/nginx -c /usr/local/nginx-rtmp/conf/nginx.conf
ExecReload=/usr/local/nginx-rtmp/sbin/nginx -s reload
ExecStop=/usr/local/nginx-rtmp/sbin/nginx -s quit
PrivateTmp=true
User=www-data
Group=www-data[Install]
WantedBy=multi-user.target
8. 启动服务并验证
# 重新加载 systemd
sudo systemctl daemon-reload# 启动服务
sudo systemctl start nginx-rtmp# 检查状态
sudo systemctl status nginx-rtmp# 验证端口监听
sudo ss -tulnp | grep -E '1935|8443'
出现,代表成功
root@iZf8zj9k5fuph3go79px80Z:/usr/local/nginx-rtmp/logs# sudo systemctl status nginx-rtmp
● nginx-rtmp.service - Nginx RTMP Streaming ServerLoaded: loaded (/etc/systemd/system/nginx-rtmp.service; disabled; vendor preset: enabled)Active: active (running) since Sat 2025-08-02 23:11:05 CST; 10s agoProcess: 29445 ExecStartPre=/usr/local/nginx-rtmp/sbin/nginx -t -c /usr/local/nginx-rtmp/conf/nginx.conf (code=exited, status=0/SUCCESS)Process: 29446 ExecStart=/usr/local/nginx-rtmp/sbin/nginx -c /usr/local/nginx-rtmp/conf/nginx.conf (code=exited, status=0/SUCCESS)Main PID: 29447 (nginx)Tasks: 3 (limit: 1834)Memory: 3.2MCPU: 43msCGroup: /system.slice/nginx-rtmp.service├─29447 "nginx: master process /usr/local/nginx-rtmp/sbin/nginx -c /usr/local/nginx-rtmp/conf/nginx.conf"├─29448 "nginx: worker process" "" "" "" "" "" "" "" "" "" "" "" "" "" "" "" "" "" "" "" "" "" "" "" "" "" "" "" "" "" "" "" "" "" "" "" "" "" >             └─29449 "nginx: worker process" "" "" "" "" "" "" "" "" "" "" "" "" "" "" "" "" "" "" "" "" "" "" "" "" "" "" "" "" "" "" "" "" "" "" "" "" "" >
Aug 02 23:11:05 iZf8zj9k5fuph3go79px80Z systemd[1]: Starting Nginx RTMP Streaming Server...
Aug 02 23:11:05 iZf8zj9k5fuph3go79px80Z nginx[29445]: nginx: the configuration file /usr/local/nginx-rtmp/conf/nginx.conf syntax is ok
Aug 02 23:11:05 iZf8zj9k5fuph3go79px80Z nginx[29445]: nginx: configuration file /usr/local/nginx-rtmp/conf/nginx.conf test is successful
Aug 02 23:11:05 iZf8zj9k5fuph3go79px80Z systemd[1]: Started Nginx RTMP Streaming Server.root@iZf8zj9k5fuph3go79px80Z:/usr/local/nginx-rtmp/logs#
9. 测试 HTTPS 访问
访问状态页面(替换您的 IP):
https://x.xxx.xx.xx:8443/stat
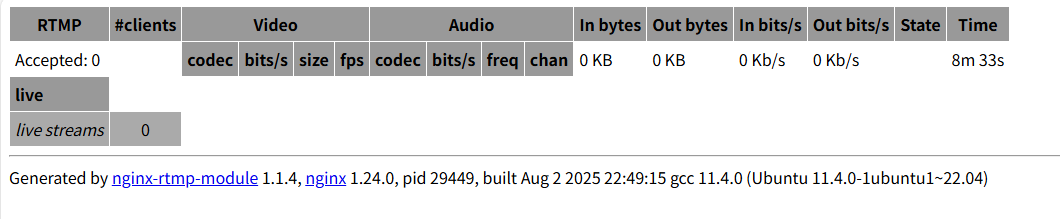
http://替换您的 IP:8080/
测试状态页面(如果启用):
http://xx.xxx.xx.xx:8080/stat
10. 使用示例
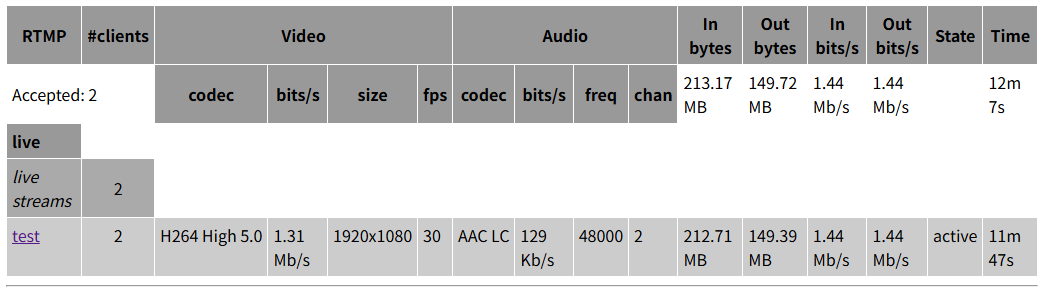
- 推流(使用 OBS):
服务器:rtmp://xx.xxx.xx.xx/live
流密钥:任意名称(如:mystream)
- 播放流(使用 VLC):
打开网络串流:rtmp://xx.xxx.xx.xx/live
搭建RTMP视频流播放网站方案
或者做备份网站
防火墙设置
开启阿里云端口设置
步骤 1:创建新网站目录
sudo mkdir -p /var/www/stream_site/public_html
sudo chown -R www-data:www-data /var/www/stream_site
步骤 2:创建新的 MySQL 数据库
sudo mysql -u root -p
在 MySQL 提示符下执行:
CREATE DATABASE stream_wpdb;
CREATE USER 'stream_wpuser'@'localhost' IDENTIFIED BY '你的强密码';
GRANT ALL PRIVILEGES ON stream_wpdb.* TO 'stream_wpuser'@'localhost';
FLUSH PRIVILEGES;
EXIT;
- 修改端口配置文件
sudo vim /etc/apache2/ports.conf
修改为:
Listen 80
Listen 4443  <IfModule ssl_module>Listen 443
</IfModule><IfModule mod_gnutls.c>Listen 443
</IfModule>
- 创建 SSL 证书 (自签名)
sudo mkdir /etc/apache2/ssl
sudo openssl req -x509 -nodes -days 365 -newkey rsa:2048 \-keyout /etc/apache2/ssl/stream_site.key \-out /etc/apache2/ssl/stream_site.crt \-subj "/CN=x.xxx.xx.13"
- 创建虚拟主机配置
sudo vim /etc/apache2/sites-available/stream_site.conf
<VirtualHost *:4443>ServerName x.xxx.xx.xxDocumentRoot /var/www/stream_site# SSL 配置SSLEngine onSSLCertificateFile /etc/apache2/ssl/stream_site.crtSSLCertificateKeyFile /etc/apache2/ssl/stream_site.key<Directory /var/www/stream_site>Options FollowSymLinksAllowOverride AllRequire all granted</Directory># 安全头Header always set Strict-Transport-Security "max-age=63072000; includeSubDomains"Header always set X-Content-Type-Options "nosniff"Header always set X-Frame-Options "SAMEORIGIN"ErrorLog ${APACHE_LOG_DIR}/stream_site_error.logCustomLog ${APACHE_LOG_DIR}/stream_site_access.log combined
</VirtualHost>
- 启用必要模块和站点
sudo a2enmod ssl
sudo a2ensite stream_site
sudo systemctl restart apache2
步骤 3:安装 PHP-FPM 和相关扩展
sudo apt update
sudo apt install php8.1-fpm php8.1-mysql php8.1-curl php8.1-gd php8.1-mbstring php8.1-xml php8.1-zip -y
步骤 4:配置 PHP-FPM 套接字
sudo vim /etc/php/8.1/fpm/pool.d/www.conf
找到并修改以下行:
user = www-data
group = www-data
listen.owner = www-data
listen.group = www-data
listen = /run/php/php8.1-fpm.sock
启动并启用 PHP-FPM
# 启动 PHP-FPM 服务
sudo systemctl start php8.1-fpm
sudo systemctl enable php8.1-fpm# 验证套接字文件
ls -l /run/php/php8.1-fpm.sock
# 应该看到类似:srw-rw---- 1 www-data www-data 0 Aug  4 01:23 /run/php/php8.1-fpm.sock# 如果不存在,手动创建目录并设置权限
sudo mkdir -p /run/php
sudo chown www-data:www-data /run/php
sudo chmod 775 /run/php
sudo systemctl restart php8.1-fpm
步骤 5:正确安装 WordPress 到视频流站点
# 进入视频流站点目录
cd /var/www/stream_site/public_html# 下载并安装 WordPress
sudo -u www-data wget https://wordpress.org/latest.tar.gz
sudo -u www-data tar -xzvf latest.tar.gz --strip-components=1
sudo -u www-data rm latest.tar.gz# 设置权限
sudo chown -R www-data:www-data /var/www/stream_site
sudo find /var/www/stream_site -type d -exec chmod 755 {} \;
sudo find /var/www/stream_site -type f -exec chmod 644 {} \;
步骤 6:验证虚拟主机配置
bash
sudo vim /etc/apache2/sites-available/stream_site.conf
重新配置为:
<VirtualHost *:4443>ServerName 替换您的 IPDocumentRoot /var/www/stream_site/public_html# SSL 配置SSLEngine onSSLCertificateFile /etc/apache2/ssl/stream_site.crtSSLCertificateKeyFile /etc/apache2/ssl/stream_site.key<Directory /var/www/stream_site/public_html>Options FollowSymLinksAllowOverride AllRequire all granted# 启用目录索引DirectoryIndex index.php index.html# 重写规则配置<IfModule mod_rewrite.c>RewriteEngine OnRewriteBase /RewriteRule ^index\.php$ - [L]RewriteCond %{REQUEST_FILENAME} !-fRewriteCond %{REQUEST_FILENAME} !-dRewriteRule . /index.php [L]</IfModule></Directory># 安全头配置Header always set Strict-Transport-Security "max-age=63072000; includeSubDomains"Header always set X-Content-Type-Options "nosniff"Header always set X-Frame-Options "SAMEORIGIN"# PHP 处理配置<FilesMatch \.php$>SetHandler "proxy:unix:/run/php/php8.1-fpm.sock|fcgi://localhost"</FilesMatch>ErrorLog ${APACHE_LOG_DIR}/stream_site_error.logCustomLog ${APACHE_LOG_DIR}/stream_site_access.log combined# 日志级别设置LogLevel warn
</VirtualHost>
步骤 7:启用必要模块
sudo a2enmod rewrite headers proxy_fcgi
检查配置语法:
sudo apache2ctl configtest
# 应该看到 "Syntax OK"
重启 Apache:
sudo systemctl restart apache2 php8.1-fpm
步骤 8:完成 WordPress 安装
访问
https://x.xxx.xx.xx:4443/wp-admin/install.php
在 WordPress 启用
后台 → 插件 → 已安装的插件
找到 “HLS Player” → 点击"启用"
使用 Video.js 手动嵌入(无需插件)
创建播放页面
后台 → 页面 → 新建页面
标题:视频直播
切换到"文本"编辑模式
目录结构说明
网站根目录为 /var/www/stream_site/public_html,这是视频流站点的根目录。目录结构应该如下:
/var/www/
├── hls/                # RTMP 生成的 HLS 流文件
├── html/               # 主网站目录
│   └── wordpress/      # 原始 WordPress 站点
└── stream_site/        # 新视频流站点└── public_html/    # 新 WordPress 文件位置
/var/www/stream_site/
└── public_html/               # 网站根目录├── index.php              # WordPress主文件├── wp-admin/              # WordPress后台管理├── wp-content/            # 主题、插件和上传文件│   ├── themes/            # 主题目录│   ├── plugins/           # 插件目录│   └── uploads/           # 媒体上传目录├── wp-includes/           # WordPress核心文件├── .htaccess              # Apache重写规则└── wp-config.php          # WordPress配置文件(安装后生成)