Python如何写Selenium全攻略
目录
1、环境准备
2、浏览器驱动自动下载的地址
3、简单代码演示
4、如果自动下载浏览器驱动缓慢可以更改下载地址
Firefox 浏览器(GeckoDriver)
5、如何在cmd运行Selenium程序
6、选择器基础操作
2.1 id选择器
2.1.1 find_element() 和 find_elements()的区别
2.2 class name选择器
2.3 tag name 选择器
2.4 name 选择器
2.5 css Selector 选择器
2.6 Xpath 选择器
7、WebElement对象的find_element或者find_elements
8、延时
8.1 强制延时
8.2 隐式等待
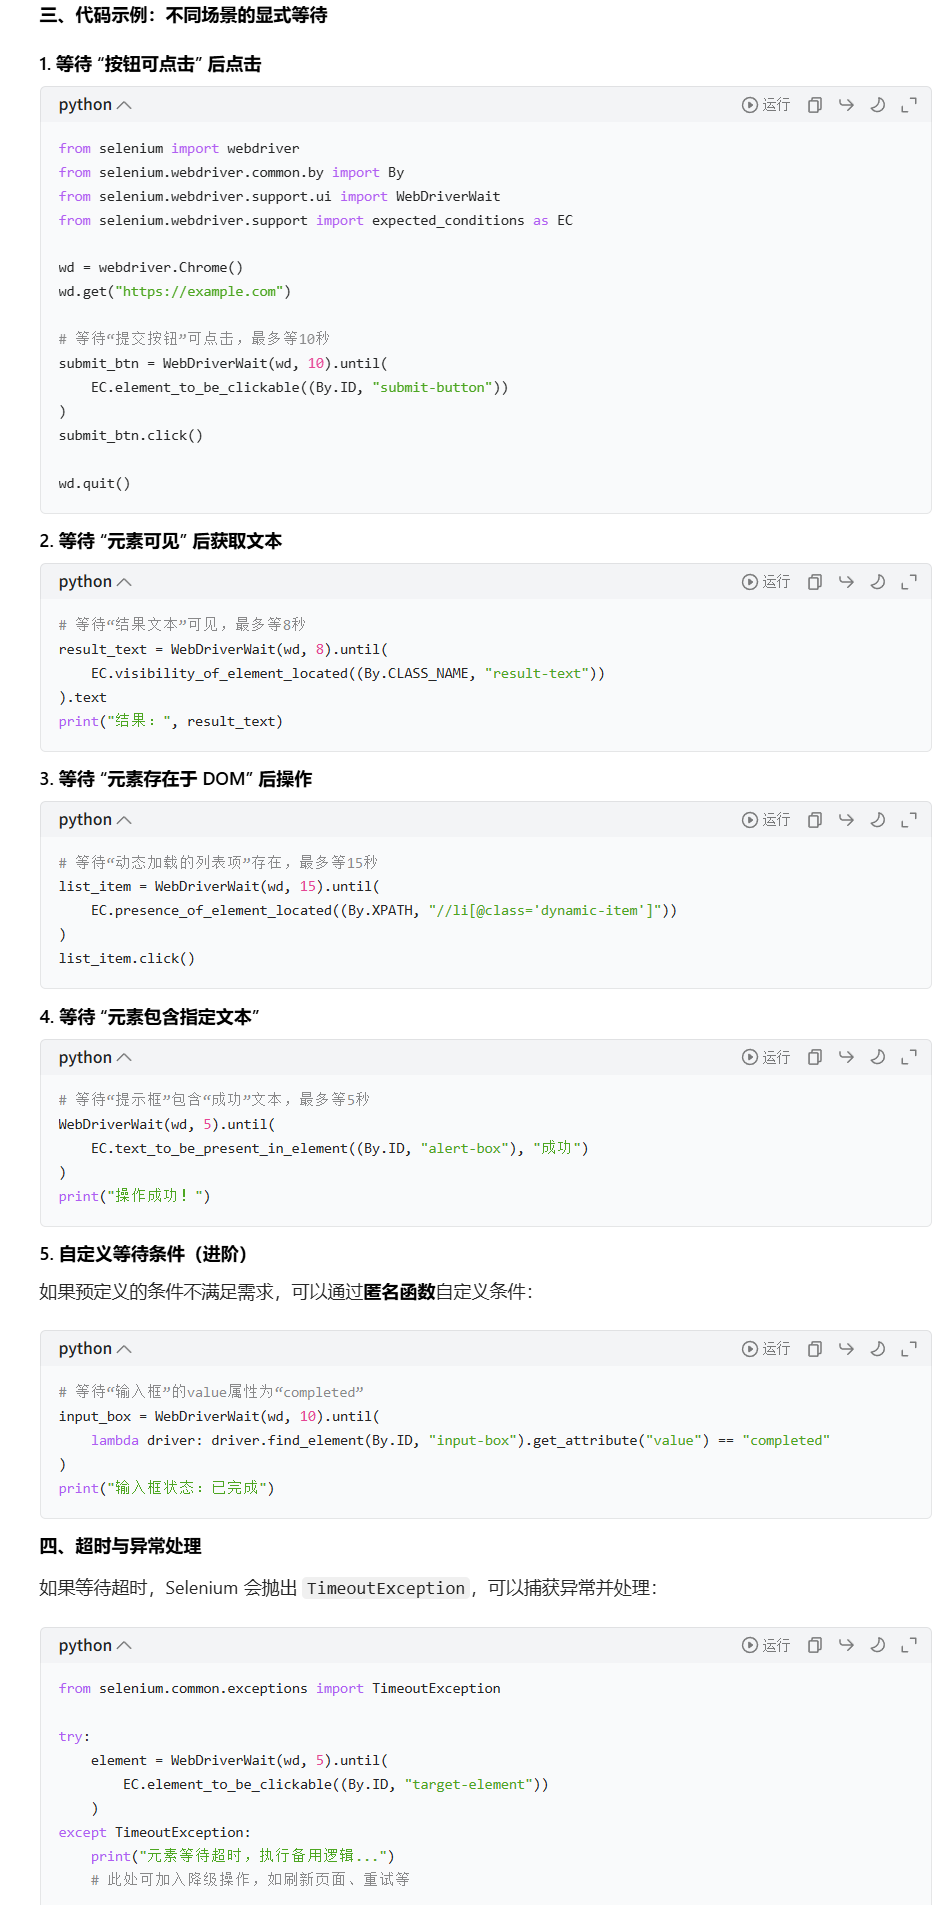
8.3 显示等待
9、常用的操作
9.1点击click()
9.2 输入文本send_keys()
9.3 获取文本内容text
9.4 获取元素等信息get_attribute()
9.5 获取title名 .title
9.6 获取页面id current_window_handle
9.7 获取所有页面id
9.8 窗口大小
9.9 屏幕截图
9.10 上传文件
9.11 手机模式
10、frame切换
11、窗口页面切换
12、复选框checkbox
13、下拉框 select
13.1 Select 单选框
13.2 Select的一系列方法
13.3 Select 复选框
14、ActionChains模拟鼠标操作
14.1 操作试例
14.2 ActionChains 类的常用方法及作用列表
15、冻结页面
16、弹出对话框
16.1 alert对话框
16.2 confirm对话框
16.3 prompt对话框
前言:
这是博主在学习记录笔记中拷贝的Python写Selenium部分,所以比较适合大家复习,由于比较简单没有特别详细的介绍
1、环境准备
在控制台输入
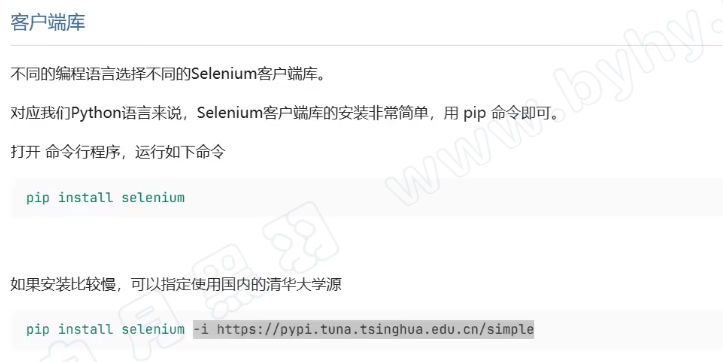
下载Chrom浏览器驱动
chromedriver.storage.googleapis.com/index.html
2、浏览器驱动自动下载的地址
博主的是:C:\Users\用户名\.cache\selenium
3、简单代码演示
from selenium import webdriverwd = webdriver.Edge() # 自动下载浏览器驱动wd.get("https://www.baidu.com/index.php?tn=75144485_1_dg&ch=9")input("敲回车退出")4、如果自动下载浏览器驱动缓慢可以更改下载地址
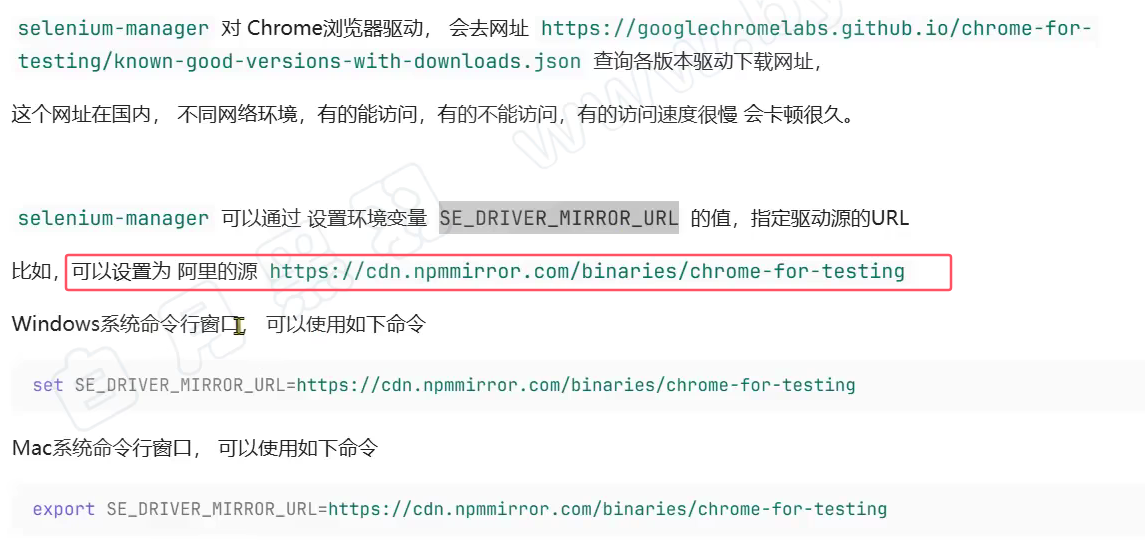
但是这个只对当时的cmd窗口有效,我们可以手动在代码中设置镜像路径:
import os# 注意要在导包之前, 【手动控制镜像】
os.environ['SE_DRIVER_MIRROR_URL'] = \'https://cdn.npmmirror.com/binaries/chrome-for-testing'from selenium import webdriverwd = webdriver.Chrome() # 自动下载浏览器驱动wd.get("https://www.baidu.com/index.php?tn=75144485_1_dg&ch=9")input("敲回车退出")如果仍然有问题考虑手动下载驱动:
💡
Chrome 浏览器(ChromeDriver)
官方下载地址 http://chromedriver.storage.googleapis.com/index.html
版本匹配:需与 Chrome 浏览器版本对应,可通过浏览器地址栏输入 chrome://version/ 查看版本号。
注意事项
• 若下载新版无对应驱动,推荐访问 Chrome for Testing 镜像站:https://googlechromelabs.github.io/chrome-for-testing/。
Microsoft Edge 浏览器(EdgeDriver)
官方下载地址 https://developer.microsoft.com/en-us/microsoft-edge/tools/webdriver/
• 严格版本匹配:驱动版本需与 Edge 浏览器版本完全一致(通过 edge://settings/help 查看版本)。
Firefox 浏览器(GeckoDriver)
官方下载地址 https://github.com/mozilla/geckodriver/releases
• 选择与 Firefox 版本兼容的驱动(通常最新版即可)。
下载好的驱动放到Path里面,这样之前的代码就不需要改动了,wd = webdriver.Chrome() # 自动下载浏览器驱动,会去Path目录下找是否有相应的驱动
查找Path路径:
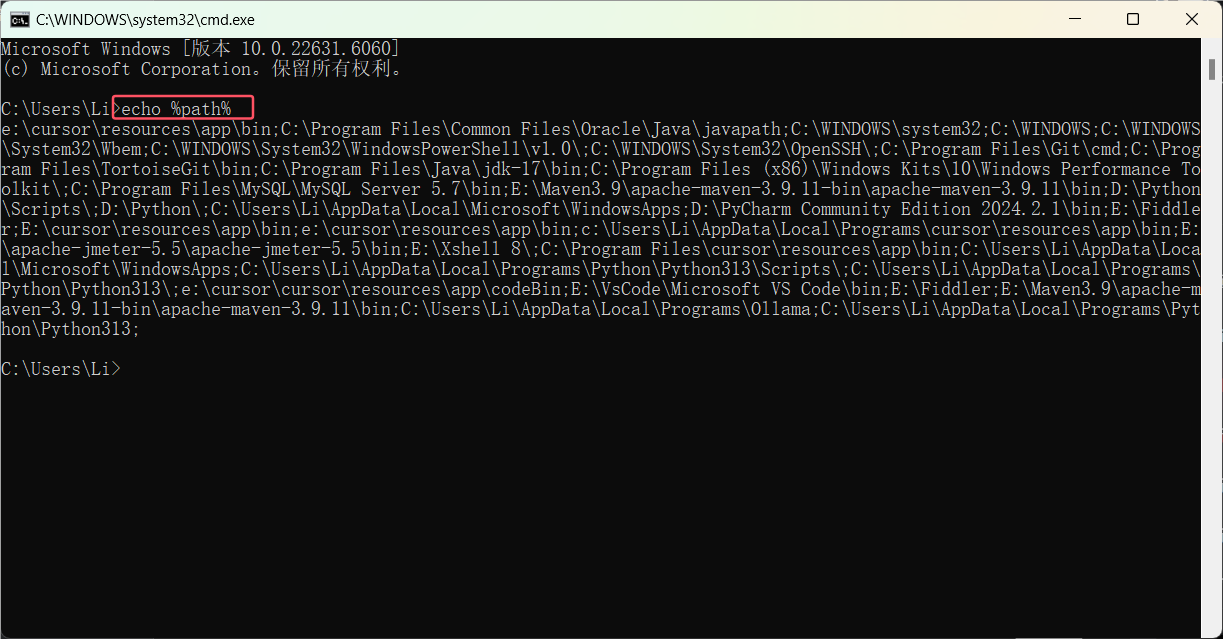
手动配置路径:
# 自动下载浏览器驱动
from selenium import webdriver
from selenium.webdriver.chrome.service import Service # 新加的
wd = webdriver.Chrome(service=Service(r"C:\Users\Li\.cache\selenium\chromedriver\win64\141.0.7390.122/chromedriver.exe"))wd.get("https://www.baidu.com/index.php?tn=75144485_1_dg&ch=9")input("敲回车退出")
5、如何在cmd运行Selenium程序
如果是第一次运行Selenium程序需要下载:
在cmd中输入
pip install selenium验证是否安装成功
pip list | findstr selenium在.py文件夹下,运行 文件名.py

但是有可能cmd中运行的程序有一些浏览器驱动的日志,会妨碍我们观察自己的日志,我们可以把这部分代码过滤掉
#加上参数,禁止chromedriver 日志写屏
options = webdriver.ChromeOptions()
options.add_experimental_option('excludeSwitches', ['enable-logging'])
6、选择器基础操作
使用By需要导入包:
from selenium.webdriver.common.by import By2.1 id选择器
通过id选择,唯一、简洁、稳定性高,最推荐使用
#找到输入框
element = driver.find_element(By.ID, "kw")
#导包
from selenium import webdriver
from selenium.webdriver.common.by import By #加上参数,禁止chromedriver 日志写屏
options = webdriver.ChromeOptions()
options.add_experimental_option('excludeSwitches', ['enable-logging'])
# 下载驱动
driver = webdriver.Chrome()print("成功进入")#访问网页
driver.get("https://www.byhy.net/cdn2/files/selenium/stock1.html")#找到输入框
element = driver.find_element(By.ID, "kw")
#输入\n 会自动回车
element.send_keys("四川\n")input("回车退出程序")
#关闭浏览器
driver.quit()2.1.1 find_element() 和 find_elements()的区别

2.2 class name选择器
用与class类型的定位,class在HTML中不是唯一的,不建议使用
#                                  CLASS_NAME  选择器
elements = driver.find_elements(By.CLASS_NAME, "name")
#导包
from selenium import webdriver
from selenium.webdriver.common.by import By#加上参数,禁止chromedriver 日志写屏
options = webdriver.ChromeOptions()
options.add_experimental_option('excludeSwitches', ['enable-logging'])
# 下载驱动
driver = webdriver.Chrome()print("成功进入")#访问网页
driver.get("https://www.byhy.net/cdn2/files/selenium/stock1.html")
# CLASS_NAME 选择器
elements = driver.find_elements(By.CLASS_NAME, "name")for e in elements:print(e.text)input("回车退出程序")
#关闭浏览器
driver.quit()结果:
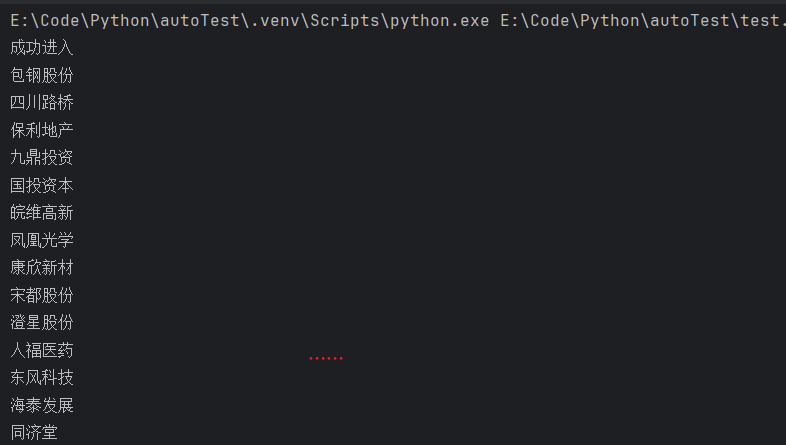
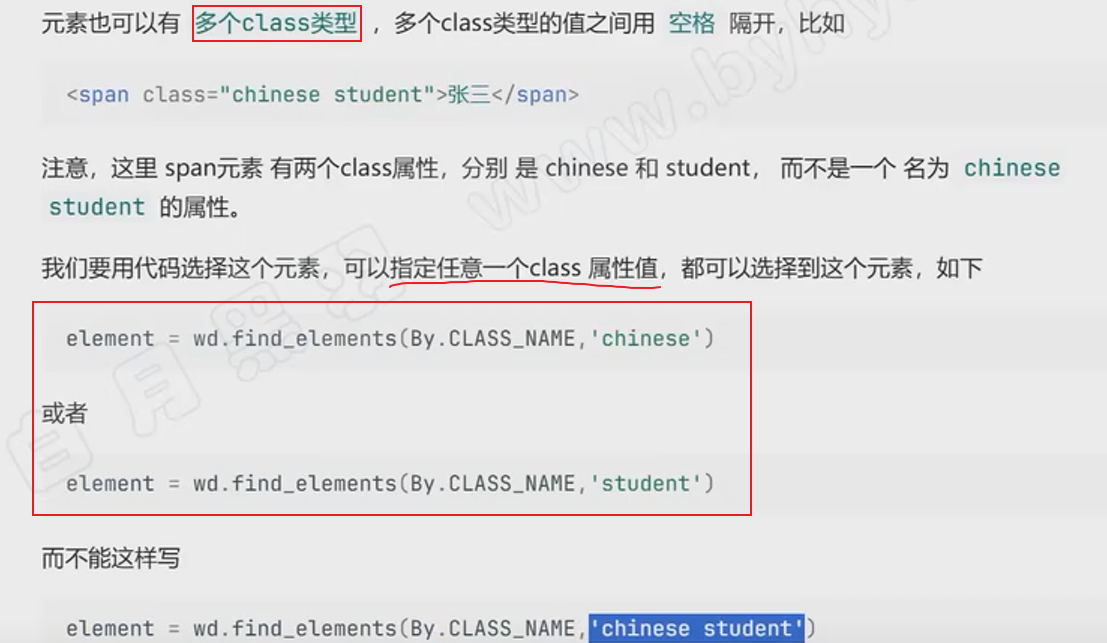
当元素有多个class类型:
2.3 tag name 选择器
用标签定位,例如:<span> <dev>等,需要保证只使用了一个,不建议使用
#                                  TAG_NAME 选择器
elements = driver.find_elements(By.TAG_NAME, "button")
#导包
from selenium import webdriver
from selenium.webdriver.common.by import By#加上参数,禁止chromedriver 日志写屏
options = webdriver.ChromeOptions()
options.add_experimental_option('excludeSwitches', ['enable-logging'])
# 下载驱动
driver = webdriver.Chrome()print("成功进入")#访问网页
driver.get("https://www.byhy.net/cdn2/files/selenium/stock1.html")
# TAG_NAME 选择器
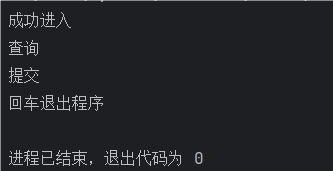
elements = driver.find_elements(By.TAG_NAME, "button")for e in elements:print(e.text)input("回车退出程序")
#关闭浏览器
driver.quit()结果:
2.4 name 选择器
由于在HTML中name可以重复名,所以我们使用的使用一定要确保name是唯一的!
driver.get("https://dict.youdao.com/result?word=attribute&lang=en")
element = driver.find_element(By.NAME, "keywords").get_attribute("content")
print(element)
import time#导包
from selenium import webdriver
from selenium.webdriver.common.by import By
from selenium.webdriver.support.ui import WebDriverWait
from selenium.webdriver.support import expected_conditions as ECoptions = webdriver.ChromeOptions()
options.add_experimental_option('excludeSwitches', ['enable-logging'])#下载驱动
driver = webdriver.Chrome()
# 隐式等待
driver.implicitly_wait(10)driver.get("https://dict.youdao.com/result?word=attribute&lang=en")
element = driver.find_element(By.NAME, "keywords").get_attribute("content")
print(element)input("回车退出")结果:

2.5 css Selector 选择器
这个选择器是有一些语法的,但是一般通过浏览器复制就可以了,所有我懒不想写了:
在控制台中选中元素,然后右击选择“复制selector”就行了
from selenium import webdriver
from selenium.webdriver.common.action_chains import ActionChains
from selenium.webdriver.common.by import By
from selenium.webdriver.support.ui import WebDriverWait
from selenium.webdriver.support import expected_conditions as EC
import timedriver = webdriver.Chrome()
driver.implicitly_wait(5)driver.get("https://www.baidu.com/")es = driver.find_elements(By.CSS_SELECTOR, "#s-hotsearch-wrapper")for e in es:print(e.text)input("回车退出")
2.6 Xpath 选择器
这个选择器是有一些语法的,但是一般通过浏览器复制就可以了,所有我懒不想写了:
在控制台中选中元素,然后右击选择“复制Xpath”就行了
from selenium import webdriver
from selenium.webdriver.common.action_chains import ActionChains
from selenium.webdriver.common.by import By
from selenium.webdriver.support.ui import WebDriverWait
from selenium.webdriver.support import expected_conditions as EC
import timedriver = webdriver.Chrome()
driver.implicitly_wait(5)driver.get("https://www.baidu.com/")es = driver.find_elements(By.XPATH, '//*[@id="s-hotsearch-wrapper"]')for e in es:print(e.text)input("回车退出")
7、WebElement对象的find_element或者find_elements
💡
webdriver.find_element() 返回的对象 element 也可以使用find_element()/ find_elements(),
只是element 的区域是你选择的标签内部的区域 例如:
<script>
<div></div>
<div></div>
<div></div>
<span></span>
</script>
这里面的元素标签就是element 涵盖的区域,而 webdriver 读取到的是全局的
element = driver.find_element(By.CLASS_NAME, "search-result")
# 在 search-result 下的所有元素 都可以通过 find_elements 或者 find_element 访问
es = element.find_elements(By.TAG_NAME, "div")
#导包
from selenium import webdriver
from selenium.webdriver.common.by import By#加上参数,禁止chromedriver 日志写屏
options = webdriver.ChromeOptions()
options.add_experimental_option('excludeSwitches', ['enable-logging'])
# 下载驱动
driver = webdriver.Chrome()print("成功进入")#访问网页
driver.get("https://www.byhy.net/cdn2/files/selenium/stock1.html")element = driver.find_element(By.CLASS_NAME, "search-result")
# 在 search-result 下的所有元素 都可以通过 find_elements 或者 find_element 访问
es = element.find_elements(By.TAG_NAME, "div")for e in es:print(e.text)input("回车退出程序")
#关闭浏览器
driver.quit()
如果要读取全局的文本:
elements = driver.find_elements(By.TAG_NAME, "html")for e in elements:print(e.text)8、延时
8.1 强制延时
import time
time.sleep(3)
8.2 隐式等待
在驱动下载后就可以加上,功能是在每一次find_element 或者 find_elements 的时候,每隔 半秒 查找一次元素。直到超出你设定的时间,单位:秒
# 下载驱动
driver = webdriver.Chrome()
#隐式等待 做用于全局
driver.implicitly_wait(10)
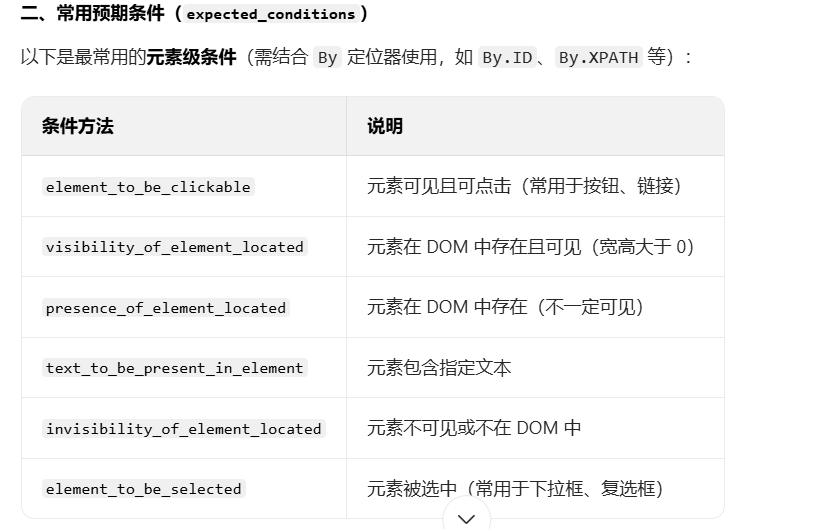
8.3 显示等待
只作用与一个元素,定制化高
关键代码:
from selenium.webdriver.support.ui import WebDriverWait
from selenium.webdriver.support import expected_conditions as EC# 显示等待
text = WebDriverWait(driver, 10).until(EC.visibility_of_element_located((By.ID, "1")) #有两层()
)# 输出文本
print(text.text)
#导包
from selenium import webdriver
from selenium.webdriver.common.by import By
from selenium.webdriver.support.ui import WebDriverWait
from selenium.webdriver.support import expected_conditions as EC#加上参数,禁止chromedriver 日志写屏
options = webdriver.ChromeOptions()
options.add_experimental_option('excludeSwitches', ['enable-logging'])
# 下载驱动
driver = webdriver.Chrome()
#隐式等待 做用于全局
driver.implicitly_wait(10)print("成功进入")#访问网页
driver.get("https://www.byhy.net/cdn2/files/selenium/stock1.html")driver.find_element(By.ID, "kw").send_keys("四川\n")
# 显示等待
text = WebDriverWait(driver, 10).until(EC.visibility_of_element_located((By.ID, "1")) #有两层()
)# 输出文本
print(text.text)input("回车退出程序")
#关闭浏览器
driver.quit()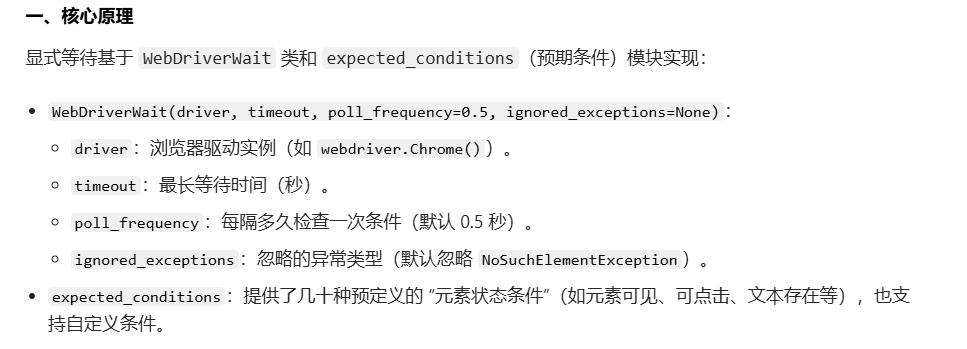
9、常用的操作
9.1点击click()
driver.find_element(By.ID, "go").click()9.2 输入文本send_keys()
driver.find_element(By.ID, "kw").send_keys("四川")9.3 获取文本内容text
element = driver.find_element(By.ID, "1")print(element.text)9.4 获取元素等信息get_attribute()
💡
在get_attribute()方法中输入不同的字符串有四种效果:
- 输入标签属性名,可以获取到该属性的值
- 输入outerHTML,可以获取选中区域的所有HTML内容
- 输入innerHTML,可以获取选中元素内部的HTML内容
- 输入value,可以获取到输入框中,自己输入的内容

text = driver.find_element(By.ID, "kw").get_attribute("placeholder")
print(text)
结果:

💡
这是获取HTML中元素的值
也可以用来获取整个选中的HTML:

在get_attribute方法输入outerHTML
driver.get("https://www.byhy.net/cdn2/files/selenium/stock1.html")element = driver.find_element(By.ID, "1").get_attribute("outerHTML")
print(element)
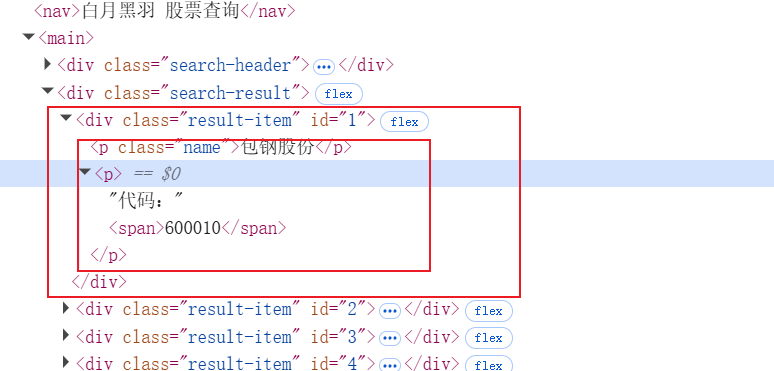
💡
那如果换成输入innerHTML,就只会答应选中标签内部的信息
element = driver.find_element(By.ID, "1").get_attribute("innerHTML")
print(element)
结果:

💡
如果是value,那就是我们(用户)输入的数据,进行返回
# 输入四川
driver.find_element(By.ID, "kw").send_keys("四川")
# 获取输入的值
element = driver.find_element(By.ID, "kw").get_attribute("value")
# 打印输入的值
print(element)
结果:
并且我们之前学习的.text 是无法获取输入框中咱们自己输入的数据的
9.5 获取title名 .title
print("title :" + driver.title)9.6 获取页面id current_window_handle
driver.current_window_handle9.7 获取所有页面id
driver.window_handles9.8 窗口大小
# 获取窗口大小
print(driver.get_window_size())
# 改变窗口大小
driver.set_window_size(200 ,200)
9.8 获取URL地址
print(driver.current_url)9.9 屏幕截图
driver.get_screenshot_as_file("E:\Code\python-learn\\test.png")9.10 上传文件
# 先定位到上传文件的 input 元素
ele = wd.find_element(By.CSS_SELECTOR, 'input[type=file]')# 再调用 WebElement 对象的 send_keys 方法
ele.send_keys(r'h:\g02.png')
9.11 手机模式
from selenium import webdriver# 配置手机模拟参数:指定要模拟的移动设备名称(此处为iPhone 14 Pro Max)
# deviceName参数支持多种常见设备,如"Pixel 7"、"iPhone 13"、"iPad Pro"等
mobile_emulation = { "deviceName": "iPhone 14 Pro Max" }# 初始化Chrome浏览器配置对象
chrome_options = webdriver.ChromeOptions()# 将手机模拟配置添加到浏览器选项中
# 这一步是核心:通过experimental_option启用移动设备模拟模式
chrome_options.add_experimental_option("mobileEmulation", mobile_emulation)# 以配置好的手机模式启动Chrome浏览器
driver = webdriver.Chrome(options=chrome_options)# 访问目标网页(此时网页会自动适配手机版布局)
driver.get('http://www.baidu.com')# 暂停程序,方便查看手机版网页效果(按回车继续)
input()# 关闭浏览器
driver.quit()
10、frame切换
由于有时候HTML内部嵌入了一个HTML,那么WebDriver的范围就涵盖不到内嵌HTML中的元素:
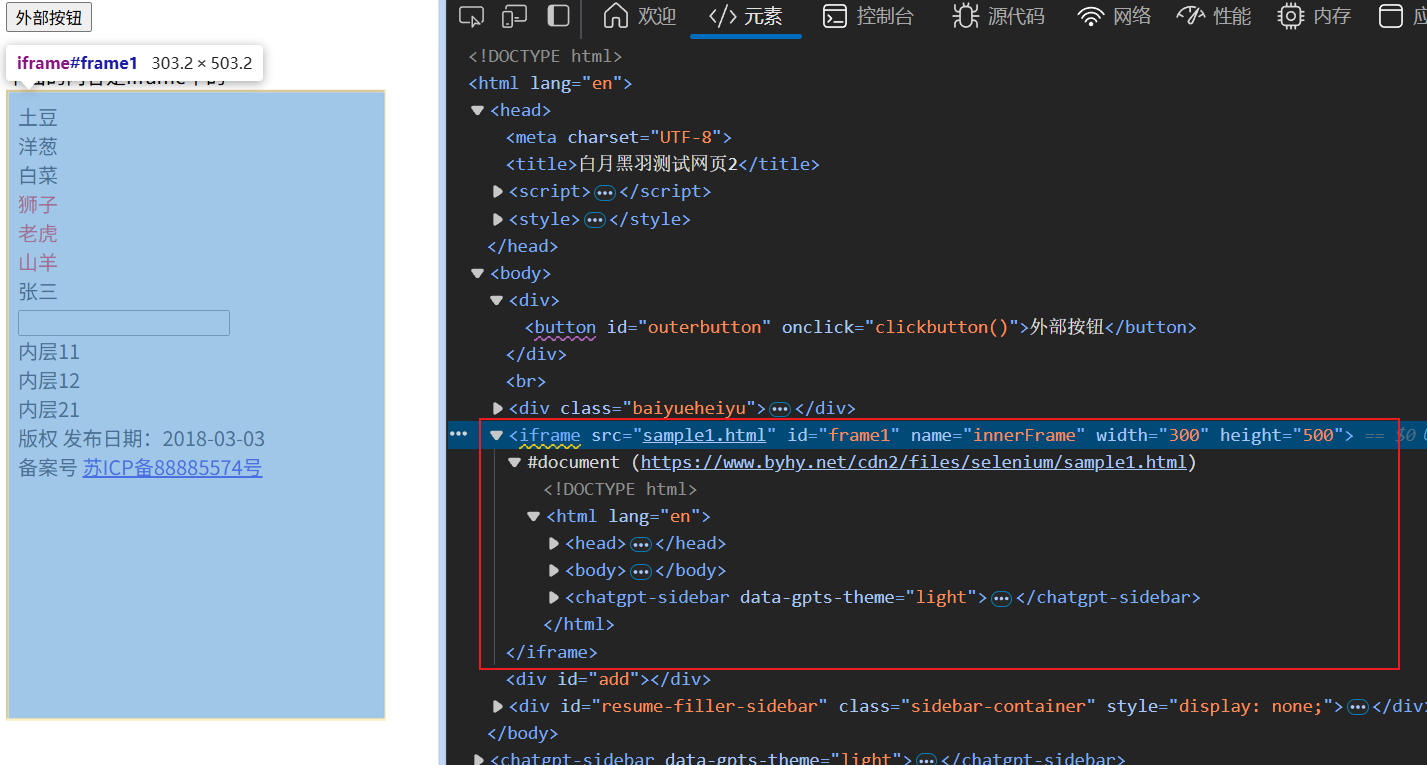
那么直接进行元素定位是定位不到的:
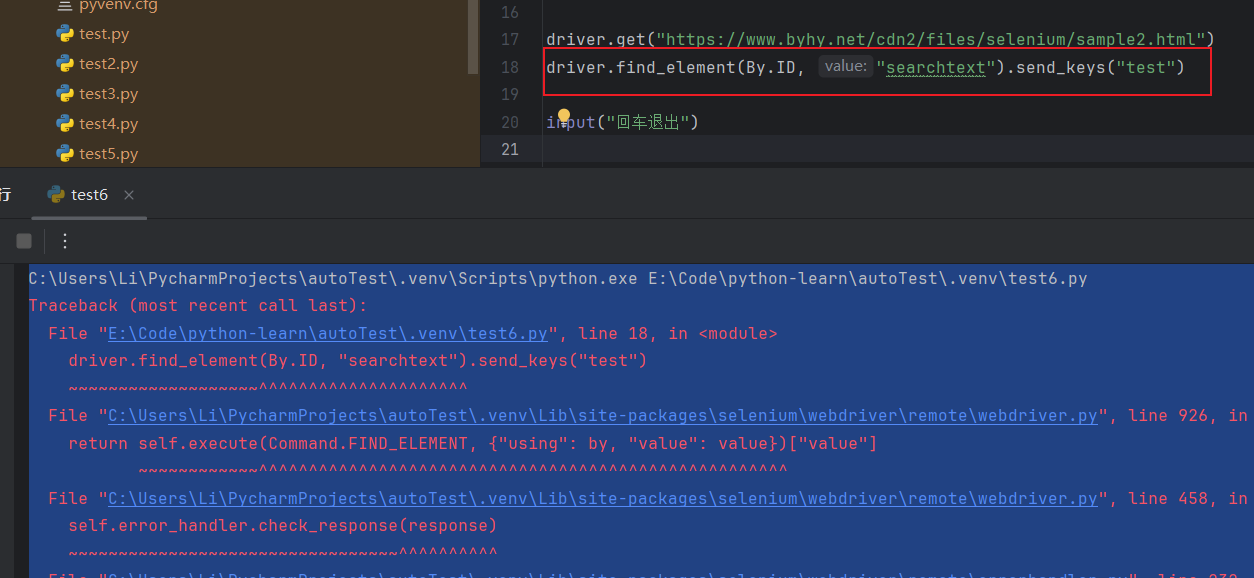
那么就需要这样一段代码切换到内存html中:
#driver.switch_to.frame('内存html标签的主要标志')
driver.switch_to.frame('frame1')
主要标志:例如:id和name,我也检查了name的名字是唯一的,所以可以使用

完整代码:
import time#导包
from selenium import webdriver
from selenium.webdriver.common.by import By
from selenium.webdriver.support.ui import WebDriverWait
from selenium.webdriver.support import expected_conditions as ECoptions = webdriver.ChromeOptions()
options.add_experimental_option('excludeSwitches', ['enable-logging'])#下载驱动
driver = webdriver.Chrome()
# 隐式等待
driver.implicitly_wait(10)driver.get("https://www.byhy.net/cdn2/files/selenium/sample2.html")
# 切换到内存HTML
driver.switch_to.frame('frame1')driver.find_element(By.ID, "searchtext").send_keys("test")input("回车退出")
结果:
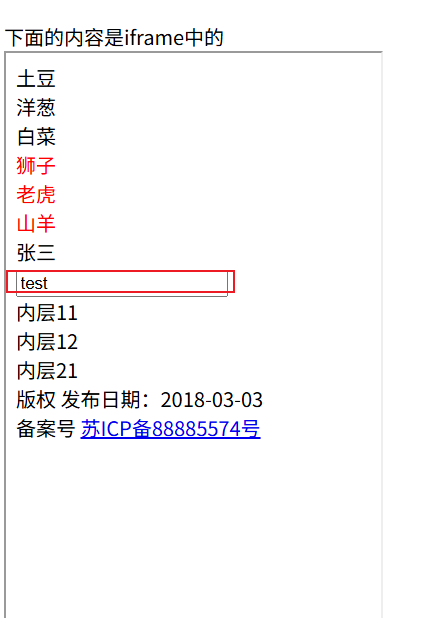
那么如果要切换回外层的HTML就使用:
driver.find_element(By.ID, "outerbutton").click()完整代码:
import time#导包
from selenium import webdriver
from selenium.webdriver.common.by import By
from selenium.webdriver.support.ui import WebDriverWait
from selenium.webdriver.support import expected_conditions as ECoptions = webdriver.ChromeOptions()
options.add_experimental_option('excludeSwitches', ['enable-logging'])#下载驱动
driver = webdriver.Chrome()
# 隐式等待
driver.implicitly_wait(10)driver.get("https://www.byhy.net/cdn2/files/selenium/sample2.html")
# 切换到内存HTML
driver.switch_to.frame('frame1')driver.find_element(By.ID, "searchtext").send_keys("test")# 切换为外层HTML
driver.switch_to.default_content()driver.find_element(By.ID, "outerbutton").click()input("回车退出")
11、窗口页面切换
当打开新的窗口,需要切换页面才可以对新页面进行操作。
当需要关闭新页面回到旧页面,也需要切换回原来的窗口,才可以继续操作
核心代码:
# 获取当前页面id
mainWindow = driver.current_window_handle
# 获取打开页面的id
targetWindow = None
for e in driver.window_handles:if e != mainWindow:targetWindow = e
# 关闭窗口
driver.close()#切换窗口
driver.switch_to.window(mainWindow)
所有代码:
import time#导包
from selenium import webdriver
from selenium.webdriver.common.by import By
from selenium.webdriver.support.ui import WebDriverWait
from selenium.webdriver.support import expected_conditions as ECoptions = webdriver.ChromeOptions()
options.add_experimental_option('excludeSwitches', ['enable-logging'])#下载驱动
driver = webdriver.Chrome()
# 隐式等待
driver.implicitly_wait(10)driver.get("https://www.byhy.net/cdn2/files/selenium/sample3.html")print("title :" + driver.title)
# 获取当前页面id
mainWindow = driver.current_window_handle
print("当前窗口id" + mainWindow)driver.find_element(By.CSS_SELECTOR, "body > a").click()# 获取打开页面的id
targetWindow = None
for e in driver.window_handles:if e != mainWindow:targetWindow = e# 切换窗口
driver.switch_to.window(targetWindow)print("当前窗口id" + driver.current_window_handle)time.sleep(2)
# 关闭窗口
driver.close()#切换窗口
driver.switch_to.window(mainWindow)driver.find_element(By.CSS_SELECTOR, "#outerbutton").click()input("回车退出")
12、复选框checkbox
由于复选框可以有多个选项,那么我们如何来确定哪些被选了呢?
可以通过具体的一个特征例如name都为teachers1,然后:checked。配合find_elements可以了
radio框(单选框)和这个原理一样,我就不多说了

核心代码:
# 获取所有以选中的选项
eles = driver.find_elements(By.CSS_SELECTOR, "[name=teachers1]:checked")
import time#导包
from selenium import webdriver
from selenium.webdriver.common.by import By
from selenium.webdriver.support.ui import WebDriverWait
from selenium.webdriver.support import expected_conditions as ECoptions = webdriver.ChromeOptions()
options.add_experimental_option('excludeSwitches', ['enable-logging'])#下载驱动
driver = webdriver.Chrome()
# 隐式等待
driver.implicitly_wait(10)driver.get("https://www.byhy.net/cdn2/files/selenium/test2.html")# chekbox选项框driver.find_element(By.CSS_SELECTOR, "#s_checkbox > input[type=checkbox]:nth-child(3)").click()eles = driver.find_elements(By.CSS_SELECTOR, "[name=teachers1]:checked")for e in eles:print(e.get_attribute("value"))结果:

13、下拉框 select
13.1 Select 单选框
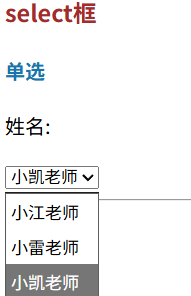
获取选项框中被选中的选项。
需要导入一个新的对象Select
核心代码:
from selenium.webdriver.support.select import Select# 获取当前选中的选项
select = Select(driver.find_element(By.ID, "ss_single"))for se in select.all_selected_options:print(se.text)input("回车退出")
💡
select.all_selected_options解释:
返回的是所有选项的webelement元素,所以要查看文本得使用 .text
所有代码:
import time
#导包
from selenium import webdriver
from selenium.webdriver.common.by import By
from selenium.webdriver.support.ui import WebDriverWait
from selenium.webdriver.support import expected_conditions as EC
# 导入Select类
from selenium.webdriver.support.select import Selectoptions = webdriver.ChromeOptions()
options.add_experimental_option('excludeSwitches', ['enable-logging'])#下载驱动
driver = webdriver.Chrome()
# 隐式等待
driver.implicitly_wait(10)driver.get("https://www.byhy.net/cdn2/files/selenium/test2.html")# select框(下拉框单选)
# # 点击其中一个选项
# driver.find_element(By.CSS_SELECTOR, "#ss_single > option:nth-child(2)").click()# 获取当前选中的选项
select = Select(driver.find_element(By.ID, "ss_single"))for se in select.all_selected_options:print(se.text)input("回车退出")
13.2 Select的一系列方法

13.3 Select 复选框
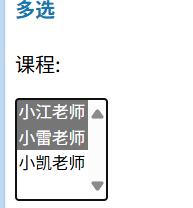
核心代码:
# Select 复选框
select = Select(driver.find_element(By.ID, "ss_multi"))# 清除所有的选项
select.deselect_all()# 选择选项
select.select_by_visible_text("小江老师")
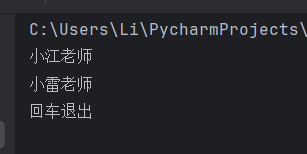
select.select_by_visible_text("小雷老师")# 查看选择的所有元素
for se in select.all_selected_options:print(se.text)input("回车退出")
全部代码:
import time#导包
from selenium import webdriver
from selenium.webdriver.common.by import By
from selenium.webdriver.support.ui import WebDriverWait
from selenium.webdriver.support import expected_conditions as EC
# 导入Select类
from selenium.webdriver.support.select import Selectoptions = webdriver.ChromeOptions()
options.add_experimental_option('excludeSwitches', ['enable-logging'])#下载驱动
driver = webdriver.Chrome()
# 隐式等待
driver.implicitly_wait(10)driver.get("https://www.byhy.net/cdn2/files/selenium/test2.html")# Select 复选框
select = Select(driver.find_element(By.ID, "ss_multi"))# 清除所有的选项
select.deselect_all()# 选择选项
select.select_by_visible_text("小江老师")
select.select_by_visible_text("小雷老师")# 查看选择的所有元素
for se in select.all_selected_options:print(se.text)input("回车退出")
结果:
14、ActionChains模拟鼠标操作
14.1 操作试例
完成以下两个动作:

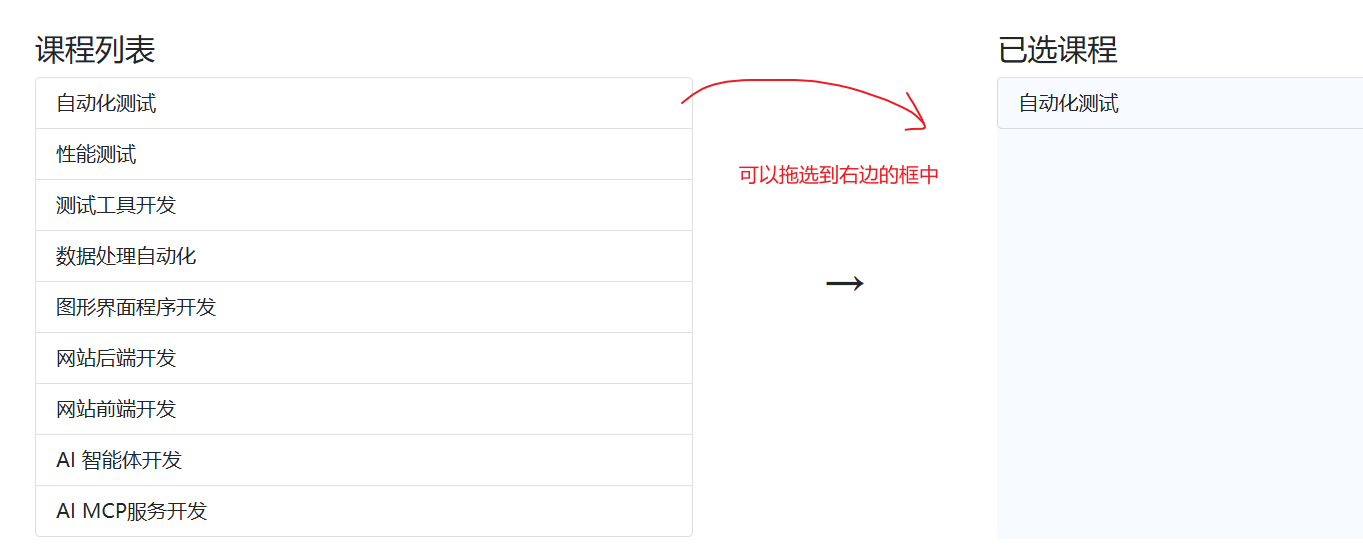
核心代码:
# 需要导入包
from selenium.webdriver.common.action_chains import ActionChains
ac = ActionChains(driver)
# 鼠标选停
ac.move_to_element(driver.find_element(By.ID, "navbarDropdown")
).perform()
time.sleep(3)for i in range(1,6):#鼠标拖放ac.drag_and_drop(# 拖动的元素driver.find_element(By.ID, "course-" + str(i)),# 放到的位置driver.find_element(By.ID, "selected-courses")).perform()time.sleep(1)
全部代码:
import time#导包
from selenium import webdriver
from selenium.webdriver.common.by import By
from selenium.webdriver.support.ui import WebDriverWait
from selenium.webdriver.support import expected_conditions as EC
from selenium.webdriver.common.action_chains import ActionChainsoptions = webdriver.ChromeOptions()
options.add_experimental_option('excludeSwitches', ['enable-logging'])#下载驱动
driver = webdriver.Chrome()
# 隐式等待
driver.implicitly_wait(10)driver.get("https://www.byhy.net/cdn2/files/selenium/sample4.html")ac = ActionChains(driver)# 鼠标选停
ac.move_to_element(driver.find_element(By.ID, "navbarDropdown")
).perform()
time.sleep(3)for i in range(1,6):#鼠标拖放ac.drag_and_drop(# 拖动的元素driver.find_element(By.ID, "course-" + str(i)),# 放到的位置driver.find_element(By.ID, "selected-courses")).perform()time.sleep(1)input("回车退出")
14.2 ActionChains 类的常用方法及作用列表
| 方法 | 作用说明 |
| 基础点击操作 | |
|
| 点击元素(默认点击当前鼠标位置,若指定 |
|
| 按住元素不松开(可用于拖拽、长按等场景)。 |
|
| 释放之前按住的元素(配合 |
|
| 双击元素(如双击文本选中、打开文件等)。 |
|
| 右键点击元素(弹出右键菜单)。 |
| 鼠标移动操作 | |
|
| 鼠标悬停到指定元素上(如显示下拉菜单、tooltip 提示)。 |
|
| 从当前鼠标位置沿 x 轴(水平)和 y 轴(垂直)移动指定像素(正数向右 / 下,负数向左 / 上)。 |
|
| 以指定元素为基准,偏移 x、y 像素后移动鼠标(如点击元素边缘)。 |
| 拖拽操作 | |
|
| 拖拽元素:从 |
|
| 拖拽元素:从 |
| 键盘操作 | |
|
| 向当前聚焦的元素输入文本或按键(如 |
|
| 向指定元素输入文本或按键(无需提前聚焦)。 |
| 其他操作 | |
|
| 暂停指定秒数(用于等待交互完成,单位:秒)。 |
|
| 清除当前 |
|
| 执行所有已添加到 |
💡
注意:
1、ActionChains 的方法需要通过 perform() 触发执行,例如:
from selenium.webdriver.common.action_chains import ActionChainsactions = ActionChains(driver) actions.move_to_element(menu).click(submenu).perform() # 先悬停菜单,再点击子菜单2、方法可链式调用,按顺序执行动作,适合模拟连续的用户操作(如拖拽 + 释放、悬停 + 点击等)。
15、冻结页面
有的下拉框只要你鼠标移动开,下拉框就消失了,我们就定位不到。可以使用下面这串代码,输入在控制台中,5秒后页面就会冻结住
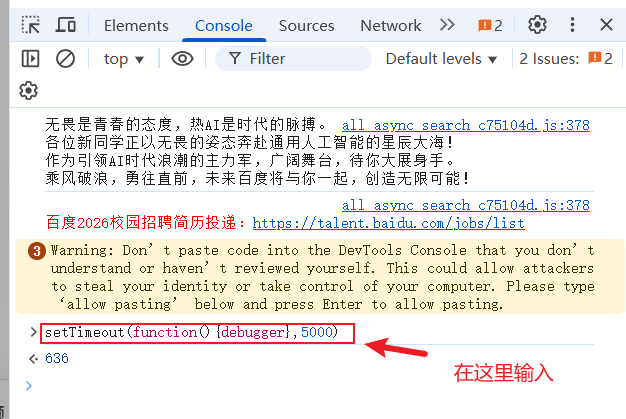
setTimeout(function(){debugger}, 5000)16、弹出对话框
浏览器原生态的对话框不属于HTML元素,是不能通过定位去操作的
16.1 alert对话框
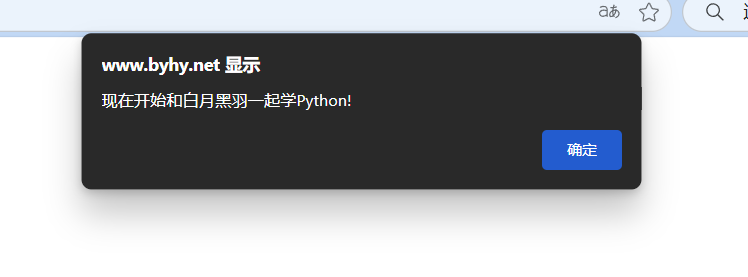
关键代码:
# 切换到弹窗
alert = driver.switch_to.alert
# 打印弹窗内容
print(alert.text)
# 确认
alert.accept()
全部代码:
from selenium import webdriver
from selenium.webdriver.common.action_chains import ActionChains
from selenium.webdriver.common.by import By
from selenium.webdriver.support.ui import WebDriverWait
from selenium.webdriver.support import expected_conditions as ECdriver = webdriver.Chrome()
driver.implicitly_wait(5)driver.get("https://www.byhy.net/cdn2/files/selenium/test4.html")driver.find_element(By.ID, "b1").click()# 切换到弹窗
alert = driver.switch_to.alert# 打印弹窗内容
print(alert.text)# 确认
alert.accept()input("回车退出")
16.2 confirm对话框
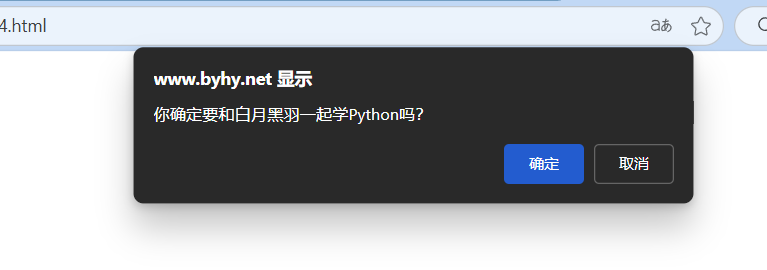
核心代码:
# 切换到对话框
alert = driver.switch_to.alert
# 点击取消按键
alert.dismiss()
# 点击确认按键
alert.accept()
全部代码:
from selenium import webdriver
from selenium.webdriver.common.action_chains import ActionChains
from selenium.webdriver.common.by import By
from selenium.webdriver.support.ui import WebDriverWait
from selenium.webdriver.support import expected_conditions as ECdriver = webdriver.Chrome()
driver.implicitly_wait(5)driver.get("https://www.byhy.net/cdn2/files/selenium/test4.html")
# 弹出对话框
driver.find_element(By.ID, "b2").click()
# 切换到对话框
alert = driver.switch_to.alert
# 打印对话框内容
print(alert.text)
# 点击取消按键
alert.dismiss()
# 再次弹出对话框
driver.find_element(By.ID, "b2").click()
# 点击确认按键
alert.accept()input("回车退出")
16.3 prompt对话框

核心代码:
# 切换到弹窗
alert = driver.switch_to.alert
# 打印弹出的默认内容
print(alert.text)
# 输入数据
alert.send_keys("test")
# 确定
alert.accept()
# 取消
alert.dismiss()
全部代码:
from selenium import webdriver
from selenium.webdriver.common.action_chains import ActionChains
from selenium.webdriver.common.by import By
from selenium.webdriver.support.ui import WebDriverWait
from selenium.webdriver.support import expected_conditions as EC
import timedriver = webdriver.Chrome()
driver.implicitly_wait(5)driver.get("https://www.byhy.net/cdn2/files/selenium/test4.html")# 点出弹框
driver.find_element(By.ID, "b3").click()
# 切换到弹窗
alert = driver.switch_to.alert
# 打印弹出的默认内容
print(alert.text)
time.sleep(2)
# 输入数据
alert.send_keys("test")
# 确定
alert.accept()
# 重新点出弹窗
driver.find_element(By.ID, "b3").click()
time.sleep(2)
# 取消
alert.dismiss()input("回车退出")
