浅谈 OpenAPI Schema—— 接口契约的标准语言
在当今以 API 为核心的系统架构中,接口定义(API Specification) 是连接前后端、系统与系统之间的桥梁。而在所有接口描述规范中,OpenAPI(原 Swagger) 逐渐成为了事实上的行业标准。
本文将带大家逐步理解 OpenAPI Schema 的核心概念、结构组成与实际工程应用,以便能够在项目中高效编写、维护和利用 API 规范。
一、什么是 OpenAPI?
OpenAPI 是一种基于 JSON 或 YAML 的接口描述规范,用于定义 RESTful API 的 输入、输出、路径、参数和响应格式。它是“机器可读”的文档,既能被开发者阅读,也能被自动化工具解析,用于:
- 自动生成接口文档
- 自动生成前后端 SDK 或 Mock 服务
- 驱动 API 网关与测试平台
- 作为智能体(如 Dify、LangChain、ChatGPT Plugins)的工具 Schema
二、OpenAPI Schema 的结构剖析
首先,在本地或服务器上使用 FastAPI 编写一个轻量级 HTTP 服务,用于提供天气数据接口。
from fastapi import FastAPI, Query
from fastapi.middleware.cors import CORSMiddlewareapp = FastAPI(title="Weather Proxy")# 启用 CORS,允许跨域访问
app.add_middleware(CORSMiddleware,allow_origins=["*"], allow_credentials=True, allow_methods=["*"], allow_headers=["*"],
)@app.get("/health")
async def health():return {"status": "ok"}@app.get("/weather")
async def weather(city: str = Query("东京"), units: str = Query("metric")):sample = {"city": city,"temperature": 26.1 if units == "metric" else 79.0,"humidity": 0.68,"windspeed": 3.4,"units": units,}return {"ok": True, "data": sample}# 运行命令:
# uvicorn app:app --reload --host 0.0.0.0 --port 8088
程序=“实现”,OpenAPI=“契约”。
FastAPI 能把实现里的类型与约束导出成契约;而像 Dify 这样的平台只认识契约,按契约来调用我们的实现,保持“实现”与“契约”同步(加上平台所需的 servers / x- 扩展),就能让智能体稳妥地把自然语言转成正确的 API 调用。
OpenAPI 文档本质上是一个 JSON/YAML 对象,下面我们还是通过查询天气这个例子来介绍其组成部分:
{"openapi": "3.1.0","info": {"title": "Weather HTTP Tool","description": "查询天气(HTTP)。指向真实的后端天气服务。","version": "v1.0.0"},"servers": [{"url": "http://<your_ip_address>:8088"}],"paths": {"/weather": {"get": {"operationId": "get_weather","summary": "根据城市查询天气","description": "根据输入的城市名与单位返回当前天气数据。","parameters": [{"name": "city","in": "query","required": true,"description": "城市名称(例如:东京/Beijing)","schema": { "type": "string", "minLength": 1 }},{"name": "units","in": "query","required": false,"description": "单位:公制(metric,°C)或英制(imperial,°F)","schema": { "type": "string", "enum": ["metric", "imperial"], "default": "metric" }}],"responses": {"200": {"description": "查询成功","content": {"application/json": {"schema": { "$ref": "#/components/schemas/WeatherResponse" }}}},"400": { "description": "请求参数错误" },"500": { "description": "服务内部错误" }},"tags": ["weather"],"x-timeout-ms": 8000}}},"components": {"schemas": {"WeatherResponse": {"type": "object","required": ["ok", "data"],"properties": {"ok": { "type": "boolean", "description": "是否成功" },"data": {"type": "object","required": ["city", "temperature", "humidity", "windspeed", "units"],"properties": {"city": { "type": "string", "description": "城市名" },"temperature": { "type": "number", "description": "温度(随 units 变化)" },"humidity": { "type": "number", "description": "相对湿度(0~1)", "minimum": 0, "maximum": 1 },"windspeed": { "type": "number", "description": "风速(m/s 或 mph)" },"units": { "type": "string", "enum": ["metric", "imperial"], "description": "度量单位体系" }}}}}}}
}
1️⃣ openapi
指定规范版本,如 3.0.0 或 3.1.0。版本不同,语法和功能上会有差异。
2️⃣ info
描述接口的基本信息:
info:title: "Weather API"version: "v1.0.0"description: "用于查询城市天气的接口"
它相当于接口文档的“封面页”,包含标题、版本、描述、联系人、许可证等元信息。
3️⃣ servers
定义服务的基础 URL,可包含多个环境:
servers:- url: "https://api.example.com"- url: "http://localhost:8080"
这在测试、预发布和生产环境中尤为实用。
4️⃣ paths
OpenAPI 的核心部分,用于定义所有 API 路径及其方法(GET/POST/PUT/DELETE):
"paths": {"/weather": {"get": {"operationId": "get_weather","summary": "根据城市查询天气","description": "根据输入的城市名与单位返回当前天气数据。","parameters": [{"name": "city","in": "query", # 表示参数的来源位置 query表示查询参数,即 URL 后的 ?key=value 形式"required": true,"description": "城市名称(例如:东京/Beijing)","schema": { "type": "string", "minLength": 1 }},{"name": "units","in": "query","required": false,"description": "单位:公制(metric,°C)或英制(imperial,°F)","schema": { "type": "string", "enum": ["metric", "imperial"], "default": "metric" }}],"responses": {"200": {"description": "查询成功","content": {"application/json": {"schema": { "$ref": "#/components/schemas/WeatherResponse" }}}},"400": { "description": "请求参数错误" },"500": { "description": "服务内部错误" }},"tags": ["weather"],"x-timeout-ms": 8000}}}
每个方法下可以定义:
- parameters:请求参数(query/path/header/body)
- responses:响应结构
- operationId:函数标识符(可用于 SDK 生成)
- tags:接口分组
- x-timeout-ms 等扩展字段(用于自定义行为)
注:在 OpenAPI 中,每个参数都必须指定一个 in 字段,用来说明它出现在 HTTP 请求的哪个部分。
常见的几种取值如下:
| 取值 | 含义 | 示例 | 实际 HTTP 表现 |
|---|---|---|---|
query | 查询参数 | /weather?city=Tokyo&units=metric | URL 后的 ?key=value 形式 |
path | 路径参数 | /user/{id} | /user/123,通过路径变量传入 |
header | 请求头参数 | Authorization: Bearer <token> | 放在 HTTP 头部 |
cookie | Cookie 参数 | Cookie: session_id=abc123 | 放在 Cookie 里 |
上述四种取值分别对应的例子如下:
openapi: 3.0.3
info:title: Params Demo APIversion: "1.0.0"
servers:- url: https://api.example.compaths:# 1) in: query —— /weather?city=Tokyo&units=metric/weather:get:summary: 根据城市查询天气parameters:- name: cityin: queryrequired: truedescription: 城市名称schema:type: stringminLength: 1- name: unitsin: queryrequired: falsedescription: 单位体系schema:type: stringenum: [metric, imperial]default: metricresponses:"200":description: 成功# 2) in: path —— /user/{id}  → /user/123/user/{id}:get:summary: 获取用户信息parameters:- name: idin: pathrequired: true            # path 参数必须显式 required: truedescription: 用户 IDschema:type: integerformat: int64responses:"200":description: 成功# 3) in: header —— Authorization: Bearer <token>/me:get:summary: 查看当前用户资料parameters:- name: Authorizationin: headerrequired: truedescription: Bearer 令牌,例如 "Bearer eyJhbGciOi..."schema:type: stringresponses:"200":description: 成功# 4) in: cookie —— Cookie: session_id=abc123/dashboard:get:summary: 查看仪表盘(需要会话 Cookie)parameters:- name: session_idin: cookierequired: truedescription: 会话标识schema:type: stringresponses:"200":description: 成功
5️⃣ components/schemas
这部分定义了数据结构,可以在多个接口中复用:
"components": {"schemas": {"WeatherResponse": {"type": "object","required": ["ok", "data"],"properties": {"ok": { "type": "boolean", "description": "是否成功" },"data": {"type": "object","required": ["city", "temperature", "humidity", "windspeed", "units"],"properties": {"city": { "type": "string", "description": "城市名" },"temperature": { "type": "number", "description": "温度(随 units 变化)" },"humidity": { "type": "number", "description": "相对湿度(0~1)", "minimum": 0, "maximum": 1 },"windspeed": { "type": "number", "description": "风速(m/s 或 mph)" },"units": { "type": "string", "enum": ["metric", "imperial"], "description": "度量单位体系" }}}}}}}
在响应中引用方式如下:
$ref: "#/components/schemas/WeatherResponse"
这样可避免重复定义,让接口更加模块化、可维护。
三、Schema 的类型系统
OpenAPI Schema 基于 JSON Schema,支持完整的数据类型定义:
| 类型 | 描述 | 示例 |
|---|---|---|
string | 字符串 | "Tokyo" |
number | 数值(浮点) | 26.3 |
integer | 整数 | 42 |
boolean | 布尔值 | true |
array | 数组 | ["A", "B"] |
object | 对象 | { "key": "value" } |
可配合常见约束使用:
schema:type: stringminLength: 1maxLength: 64pattern: "^[A-Za-z]+$"
这套约束在生成文档和自动化校验时非常强大,能在前端或 SDK 层提前发现无效输入。
四、在 Dify / LangChain / API Gateway 中的应用
OpenAPI Schema 已经成为 智能体系统、工具生态和网关配置的核心格式。例如:
- 在 Dify 中,开发者可以通过上传 OpenAPI Schema 创建自定义工具;
- 在 LangChain 中,可以通过 Schema 自动生成
RequestsGetTool; - 在 API Gateway(如 Kong、Apifox、Postman) 中,可直接导入 Schema 自动生成可调用接口文档。
以 Dify 为例,当我们上传如下 Schema:
{"openapi": "3.1.0","info": { "title": "Weather Tool", "version": "1.0.0" },"servers": [{ "url": "http://<your_ip_address>:8088" }],"paths": {"/weather": {"get": {"operationId": "get_weather","summary": "查询天气","parameters": [{ "name": "city", "in": "query", "required": true, "schema": { "type": "string" } }],"responses": {"200": {"description": "成功","content": {"application/json": {"schema": { "$ref": "#/components/schemas/WeatherResponse" }}}}}}}},"components": {"schemas": {"WeatherResponse": {"type": "object","properties": { "city": { "type": "string" }, "temperature": { "type": "number" } }}}}
}
系统会自动识别 /weather 接口并将其转化为可被智能体调用的“工具函数”,实现自然语言触发外部 API 的能力。
五、最佳实践与注意事项
- 始终保持版本号明确:
3.1.0是当前主流版本; - 为每个接口提供
summary与description; - 为每个字段添加
type与约束条件; - 使用
components/schemas统一管理数据结构; - 通过 lint 工具校验 Schema(如 Swagger Editor、Speccy);
- 为自动化生成留出扩展字段(如
operationId、x-timeout-ms); - 避免将 OpenAPI 当作纯文档,而要作为“可执行契约”。
六、结语
OpenAPI Schema 的价值不仅在于规范接口,更在于它让 接口成为智能化系统的一等公民。在现代 AI 驱动的系统中,一个设计良好的 OpenAPI Schema 不仅能帮助前后端解耦、减少沟通成本,更能让智能体自动理解并调用外部服务,实现“自然语言 → API 执行”的自动化链路。
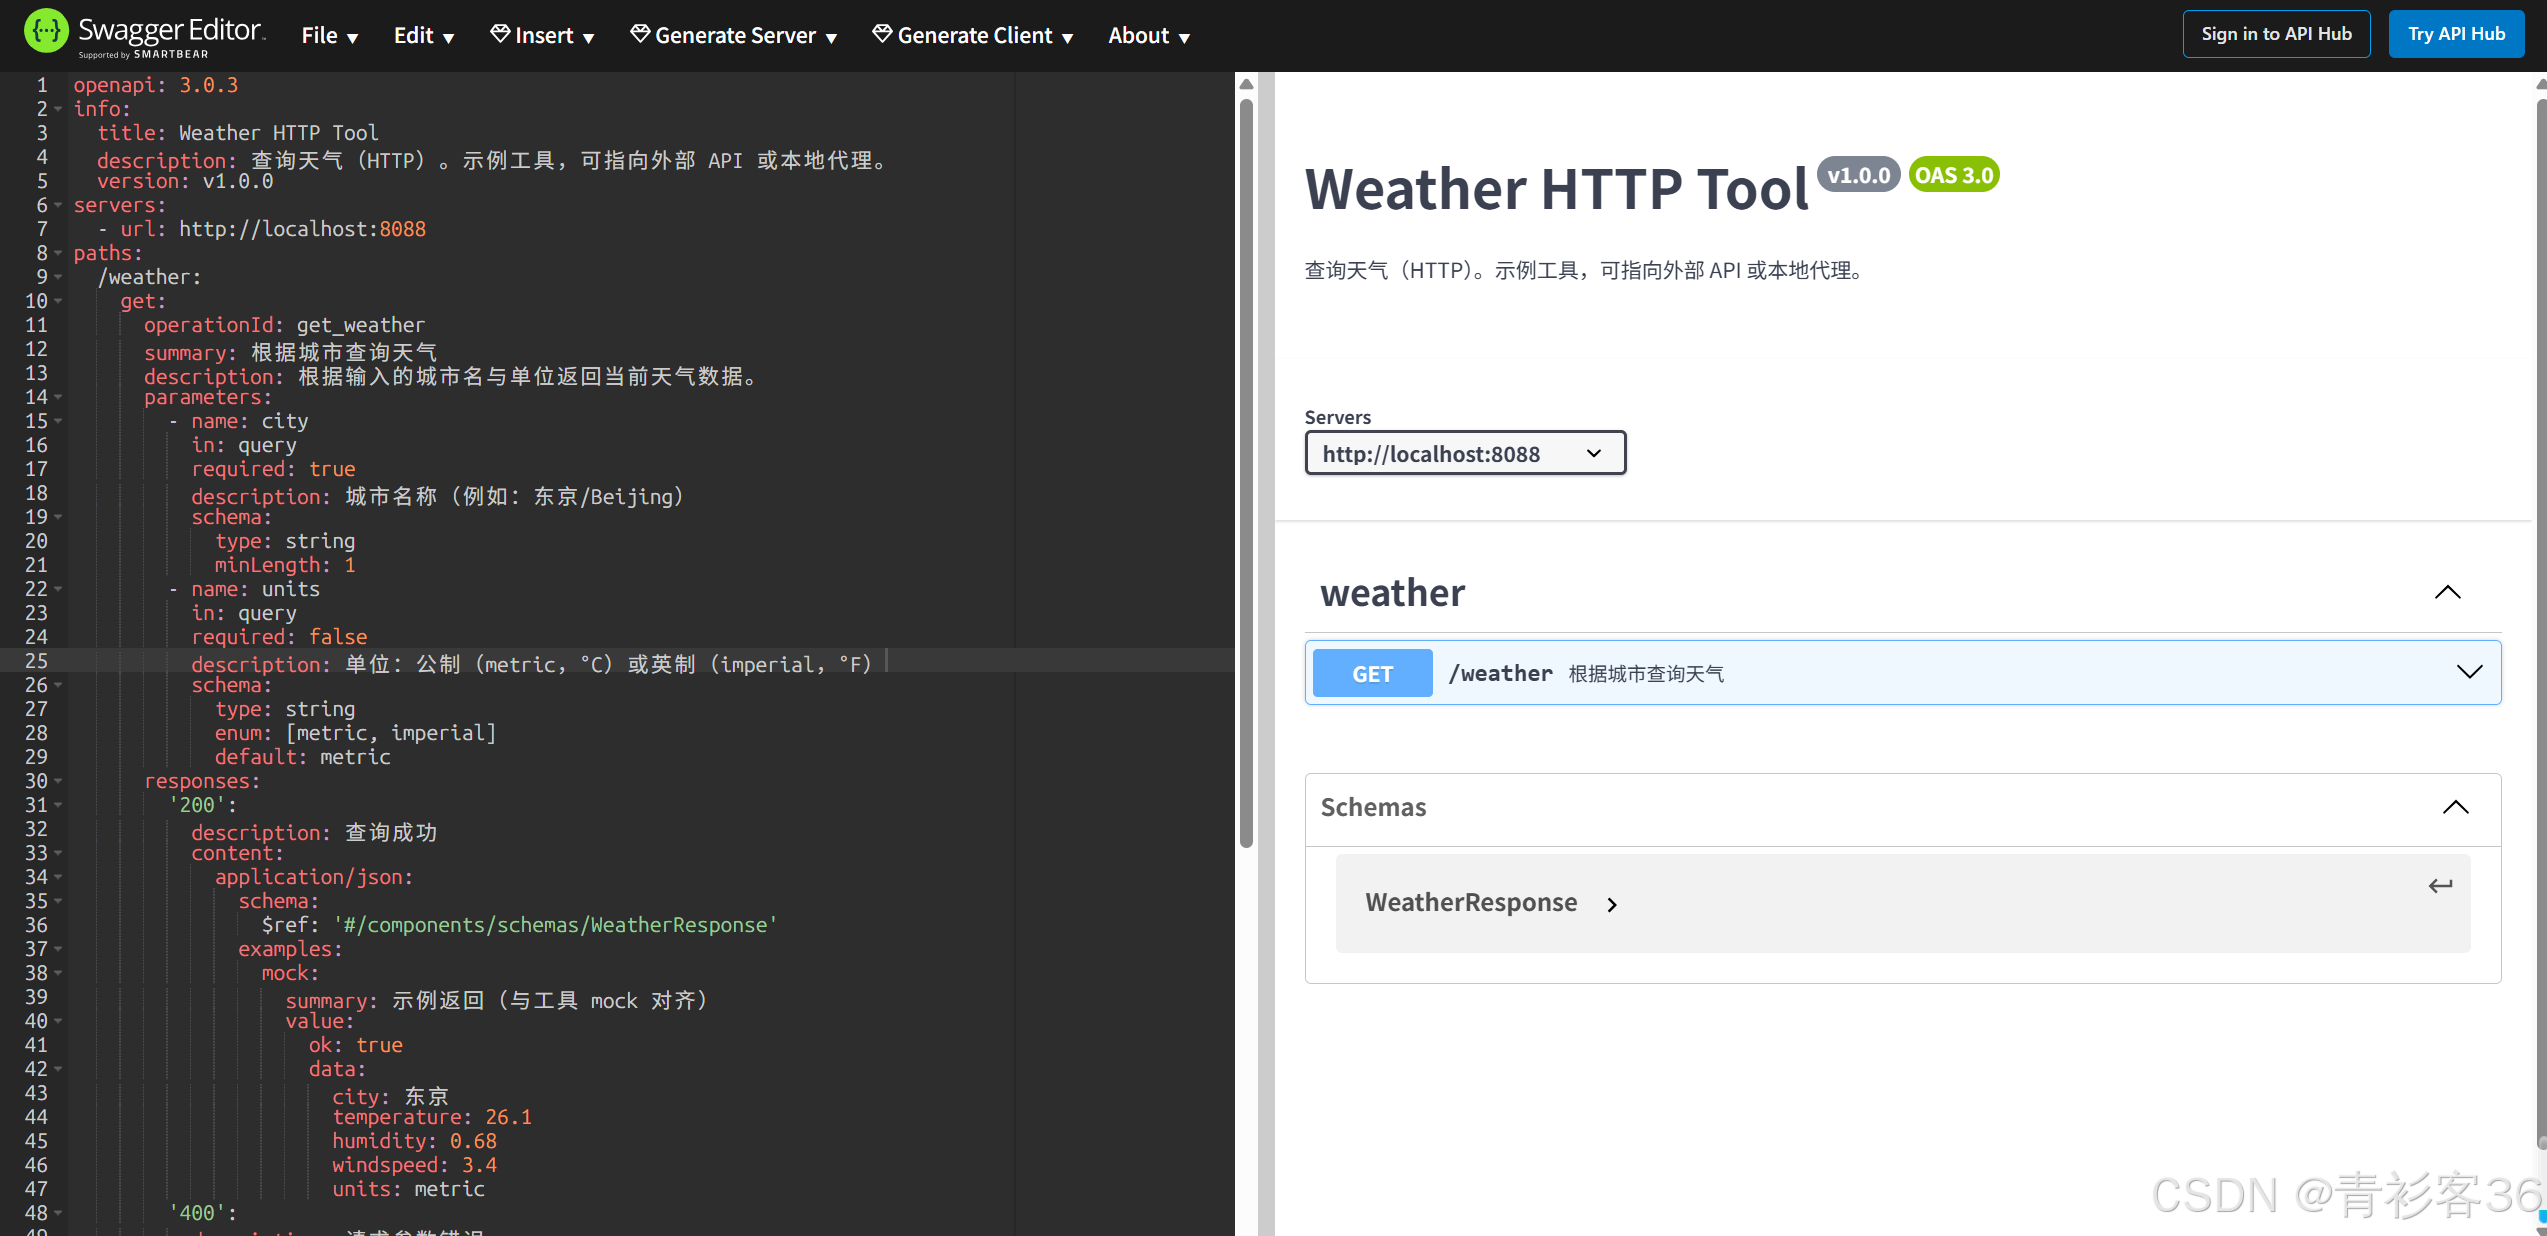
笔者碎碎念:大家可以在 https://editor.swagger.io/ 在线编辑自己的OpenAPI Schema,实时查看渲染出的界面效果。这样可以对某个字段起到什么作用有一个更加清楚的认识hh~
(不过这个在线编辑器貌似不支持3.1.0的版本,有些语法提示报错,大家可以改为3.0.3的版本再进行编辑)
参考链接:
https://openapi.apifox.cn/
https://editor.swagger.io/