01-ELK安装ES,ES-head
01-ELK安装ES,es-head
ElasticStack
-
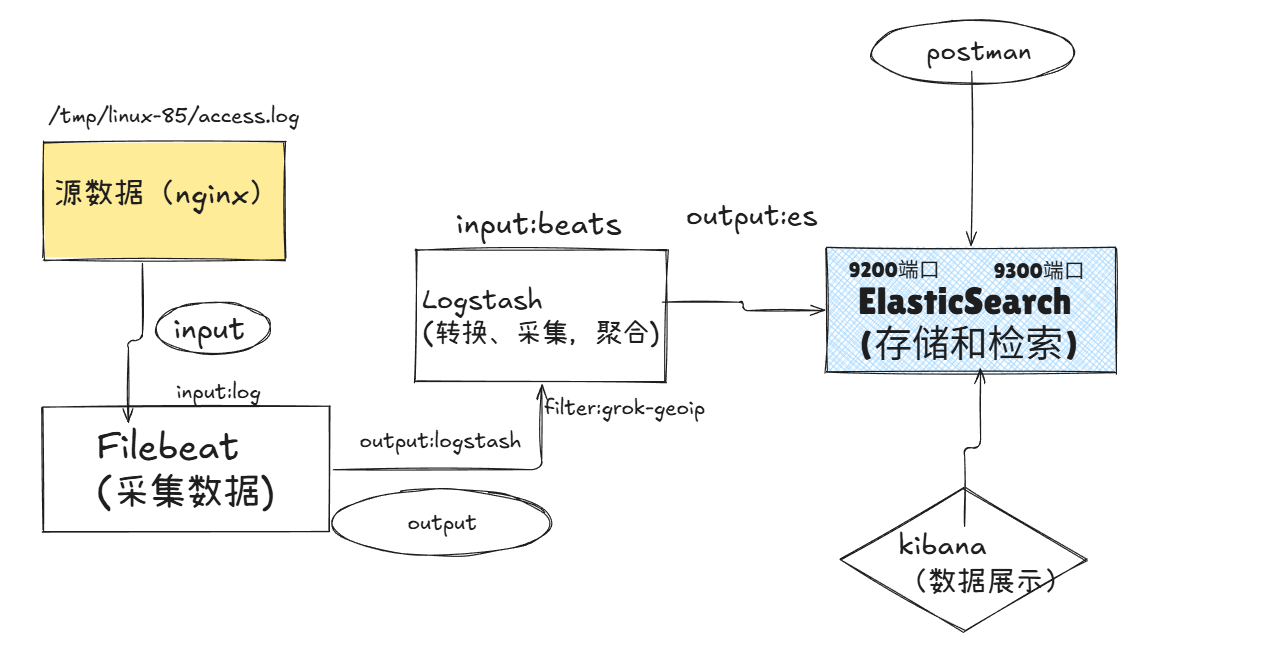
EleasticSearch:用于日志的存储和检索
-
filebeat:用于日志的搜集
-
logstash:日志的转换,可以用于日志的采集
-
kibana用于日志的展示
-
TB级别日志的处理
- kafka
- zookeeper
1.es是什么
https://www.elastic.co/cn/
https://www.elastic.co/cn/elastic-stack/1. 从事运维,开发,大数据的人员需要学习ElasticSearch数据库
2. 需要配置日志分析架构,配置ELK技术栈
lunce搜索引擎
https://lucene.apache.org/core/Apache Lucene™ 是一个完全用 Java 编写的高性能、全功能搜索引擎库。
它是一种适用于几乎所有需要结构化搜索、全文搜索、分面、跨高维向量的最近邻搜索、拼写更正或查询建议的应用程序的技术。简单说,以前要做日志搜索,需要写很多java代码,操作lucene这个库,需要深入理解索引原理。
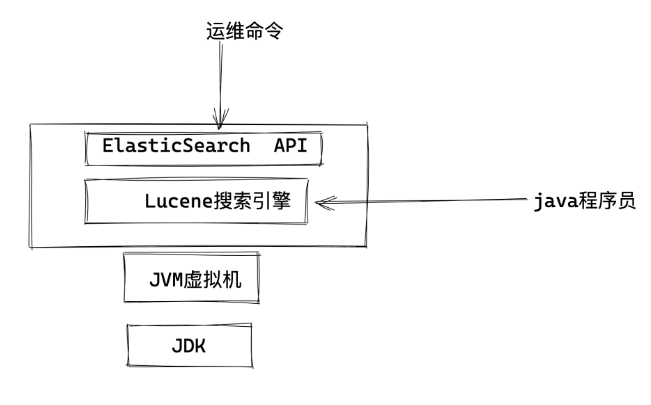
什么是ES
ElasticSearch是一款强大的,开源的,分布式的搜索引擎,简称es,他提供了实时的搜索和聚合分析两大功能
可是es可以构建的搜索引擎,从而帮助我们从海量的数据中快速的找到想要的内容
elatic是灵活的,有弹性的。
开始安装
单点部署:(1)下载ES软件包
https://www.elastic.co/cn/downloads(2)老男孩线下同学下载
curl -o elasticsearch-7.17.5-x86_64.rpm http://192.168.15.253/ElasticStack/softwares/rpm/elasticsearch-7.17.5-x86_64.rpm(3)安装es
rpm -ivh elasticsearch-7.17.5-x86_64.rpm (4)修改es的配置文件 这里注意一下
vim /etc/elasticsearch/elasticsearch.yml
...
# ES服务监听对外暴露服务的地址
network.host: 0.0.0.0
# 指定ES集群的节点IP
discovery.seed_hosts: ["10.0.0.101"]
# 指定参与master选举的节点
cluster.initial_master_nodes: ["10.0.0.101"](5)启动es服务
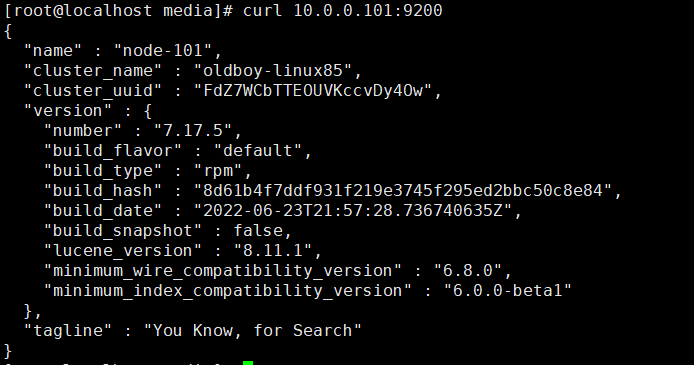
systemctl enable --now elasticsearch
- 验证服务是否启动
[root@localhost media]# ss -tnl
State      Recv-Q     Send-Q           Local Address:Port           Peer Address:Port     Process
LISTEN     0          511                    0.0.0.0:5601                0.0.0.0:*
LISTEN     0          128                    0.0.0.0:22                  0.0.0.0:*
LISTEN     0          2048                         *:9200                      *:*
LISTEN     0          2048                         *:9300                      *:*
LISTEN     0          128                       [::]:22                     [::]:*
出现重点
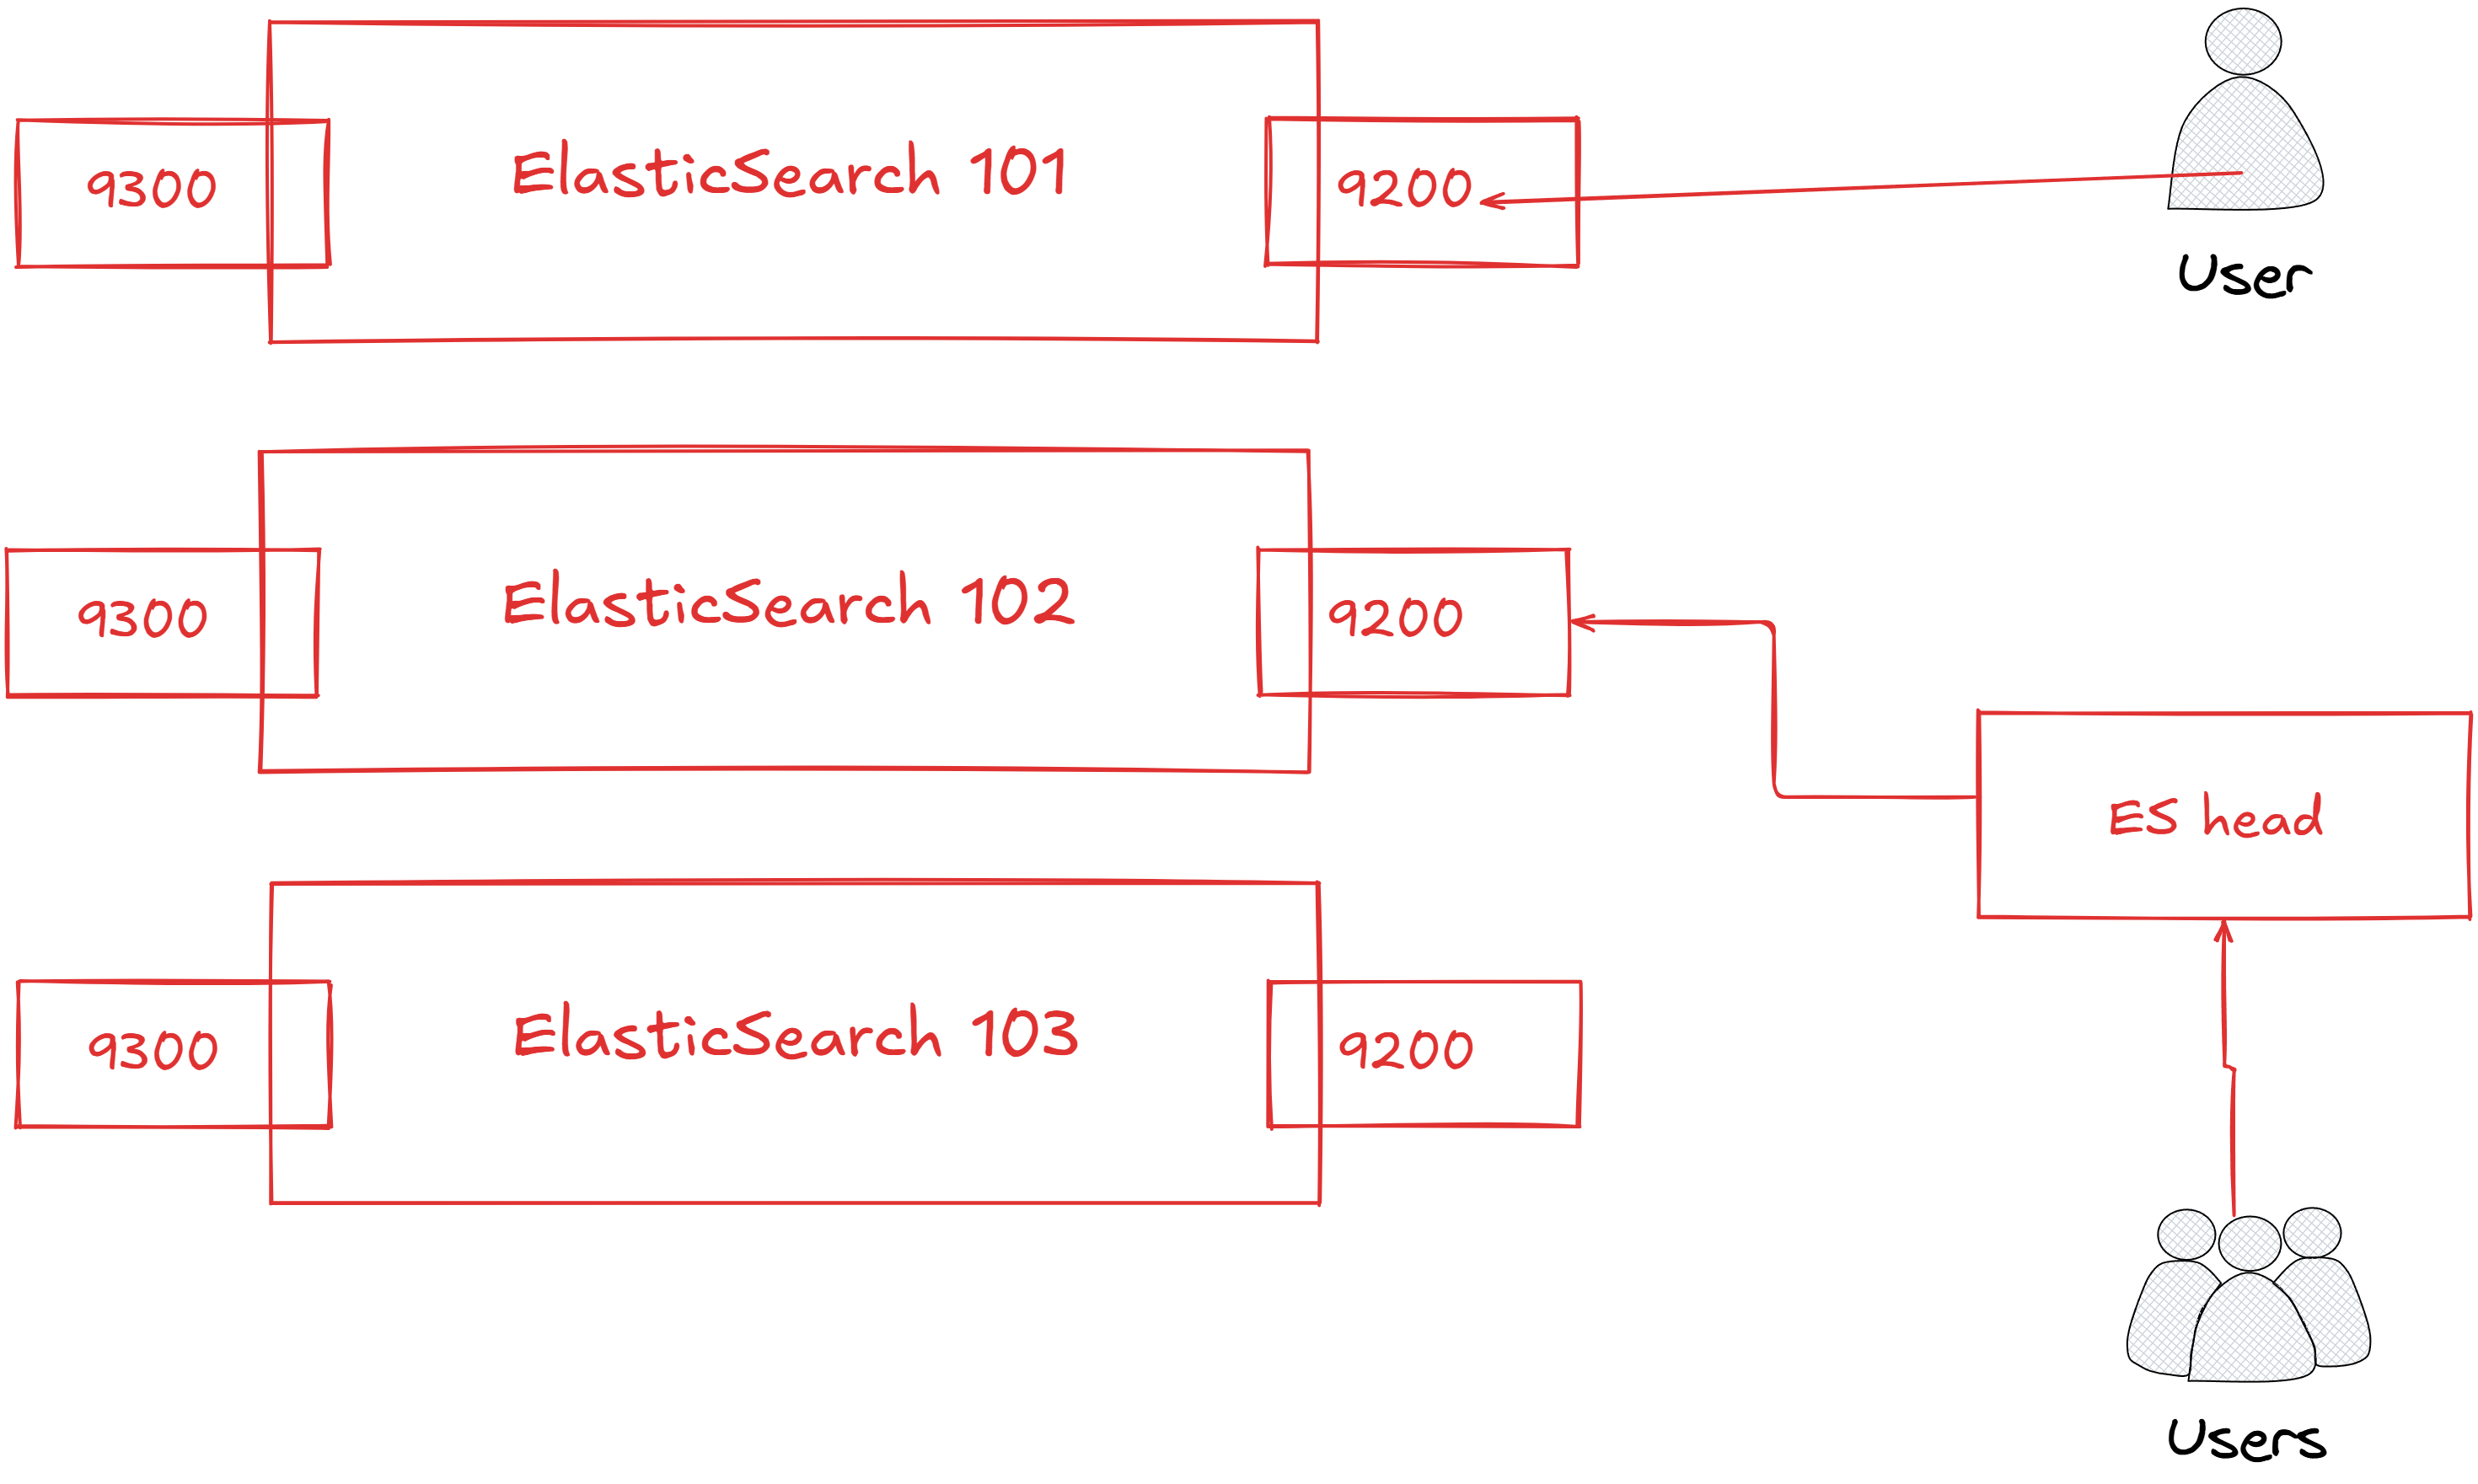
问:这两个端口的作用
- 9200
- 对外提供http/https服务,可以理解为客户端提供服务
- 9300
- 对es内部集群进行数据通信传输端口,走的是tcp协议
集群部署
	(1)下载ES软件包
https://www.elastic.co/cn/downloads(2)下载
curl -o elasticsearch-7.17.5-x86_64.rpm  http://192.168.15.253/ElasticStack/softwares/rpm/elasticsearch-7.17.5-x86_64.rpm(3)所有节点安装es
rpm -ivh elasticsearch-7.17.5-x86_64.rpm (4)elk101.oldboyedu.com做数据清空
systemctl stop elasticsearch.service
rm -rf /var/lib/elasticsearch/* /var/log/elasticsearch/* /tmp/*	(5)修改es的配置文件(修改,养成好习惯先复制一份在修改)
vim /etc/elasticsearch/elasticsearch.yml
...
# 指定ES集群的名称
cluster.name: oldboyedu-linux85
# ES服务监听对外暴露服务的地址
network.host: 0.0.0.0
# 指定ES集群的节点IP
discovery.seed_hosts: ["10.0.0.101","10.0.0.102","10.0.0.103"]
# 指定参与master选举的节点
cluster.initial_master_nodes: ["10.0.0.101","10.0.0.102","10.0.0.103"](6)将配置文件分发到其他两个节点
scp /etc/elasticsearch/elasticsearch.yml  10.0.0.102:/etc/elasticsearch/elasticsearch.yml
scp /etc/elasticsearch/elasticsearch.yml 10.0.0.103:/etc/elasticsearch/elasticsearch.yml- 验证集群节点是否正常
[root@localhost media]# curl 10.0.0.101:9200/_cat/nodes?
10.0.0.102 42 93 0 0.20 0.43 0.23 cdfhilmrstw * node-102
10.0.0.101 61 94 0 0.00 0.00 0.05 cdfhilmrstw - node-101
10.0.0.103 44 87 0 0.25 0.45 0.24 cdfhilmrstw - node-103看出主节点是node-102
- 尝试将102挂掉
[root@localhost media]# curl 10.0.0.101:9200/_cat/nodes?
10.0.0.101 77 96 0 0.00 0.00 0.02 cdfhilmrstw * node-101
10.0.0.103 69 88 0 0.00 0.14 0.16 cdfhilmrstw - node-103
看到这我们已经完成了ES的搭建
常用的一些ES-APi
# 查看api的方式
[root@localhost media]# curl 10.0.0.101:9200/_cat
=^.^=
/_cat/allocation
/_cat/shards
/_cat/shards/{index}
/_cat/master
/_cat/nodes
/_cat/tasks
/_cat/indices
/_cat/indices/{index}
/_cat/segments
/_cat/segments/{index}
/_cat/count
/_cat/count/{index}
/_cat/recovery
/_cat/recovery/{index}
/_cat/health
/_cat/pending_tasks
/_cat/aliases
/_cat/aliases/{alias}
[root@localhost media]# curl 10.0.0.101:9200/_cat/health/
1760418107 05:01:47 oldboy-linux85 green 3 3 40 20 0 0 0 0 - 100.0%
[root@localhost media]# curl 10.0.0.101:9200/_cluster/health/
{"cluster_name":"oldboy-linux85","status":"green","timed_out":false,"number_of_nodes":3,"number_of_data_nodes":3,"active_primary_shards":20,"active_shards":40,"relocating_shards":0,"initializing_shards":0,"unassigned_shards":0,"delayed_unassigned_shards":0,"number_of_pending_tasks":0,"number_of_in_flight_fetch":0,"task_max_waiting_in_queue_millis":0,"active_shards_percent_as_number":100.0}[root@localhost media]# yum install jg -y 太难看了,因此我们用一款图形化工具
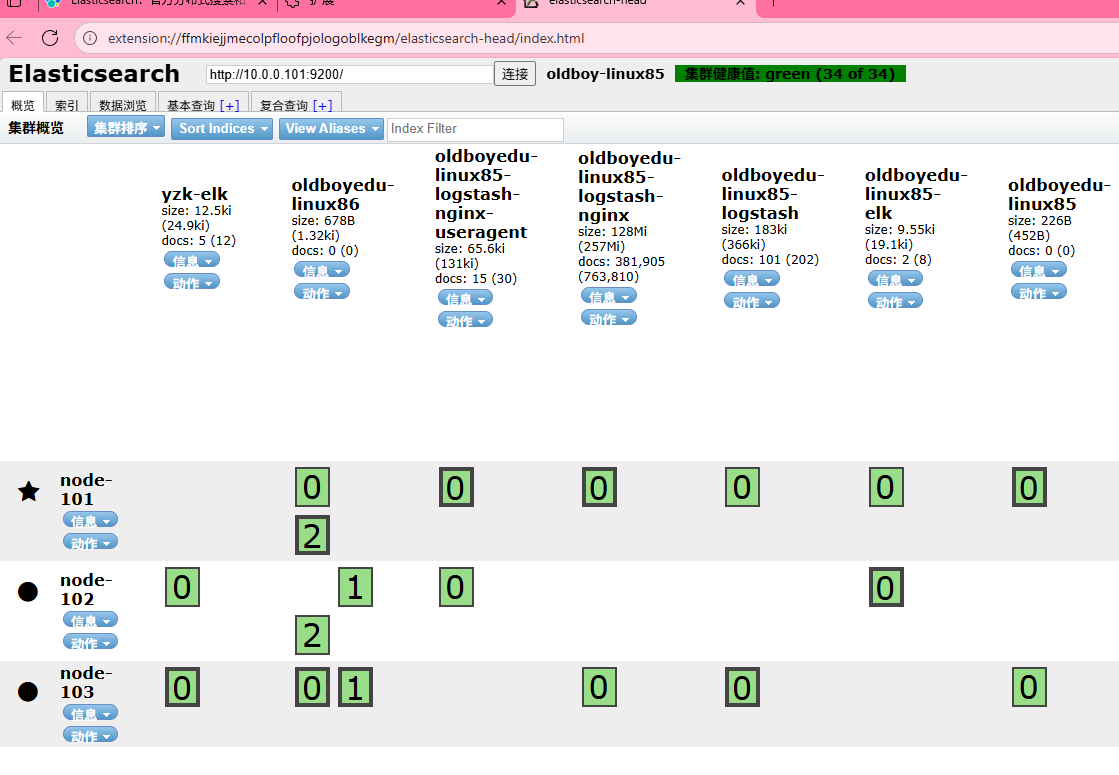
ElasticSearch Head图形化工具
连接10.0.0.101:9200