前端框架学习指南:提升开发效率
目录
一、为什么要学习前端流行框架?
1. 开发效率大幅提升
2. 组件化开发模式
3. 数据驱动视图
4. 现代开发体验
二、框架 vs 库:本质区别
1. 控制反转(Inversion of Control)
2. 职责范围不同
3. 现实世界比喻
三、MVC 和MVVM设计模式
1. MVC设计模式
3.1.1基本概念
3.1.2 各组件的职责
3.1.3. MVC 数据流向
2. MVVM设计模式
3.2.1. 基本概念
3.2.2. 各组件的职责
3. MVC 与 MVVM 对比
4,. vue.js中的MVVM
5、总结
MVC:
MVVM:
四、Vue基本代码和MVVM之间的对应关系
核心特性对应:
编辑
Vue 实例与 MVVM 对应关系
响应式流程:
五、总结
一、为什么要学习前端流行框架?
1. 开发效率大幅提升
- 代码量减少:从手动操作DOM到声明式编程
- 可维护性增强:数据与视图分离,结构清晰
- 开发速度提升:减少重复性DOM操作代码
2. 组件化开发模式
- 复用性:一次开发,多处使用
- 可维护性:每个组件独立维护
- 协作性:多人同时开发不同组件
- 测试性:单个组件独立测试
3. 数据驱动视图
- 自动更新:数据变化 → 视图自动更新
- 减少bug:避免手动DOM操作带来的错误
- 逻辑清晰:专注于数据处理,而非视图操作
4. 现代开发体验
- 热重载:代码保存后立即看到变化
- TypeScript支持:类型安全
- 开发工具:浏览器调试插件
- 构建工具:Webpack、Vite等优化开发流程
二、框架 vs 库:本质区别
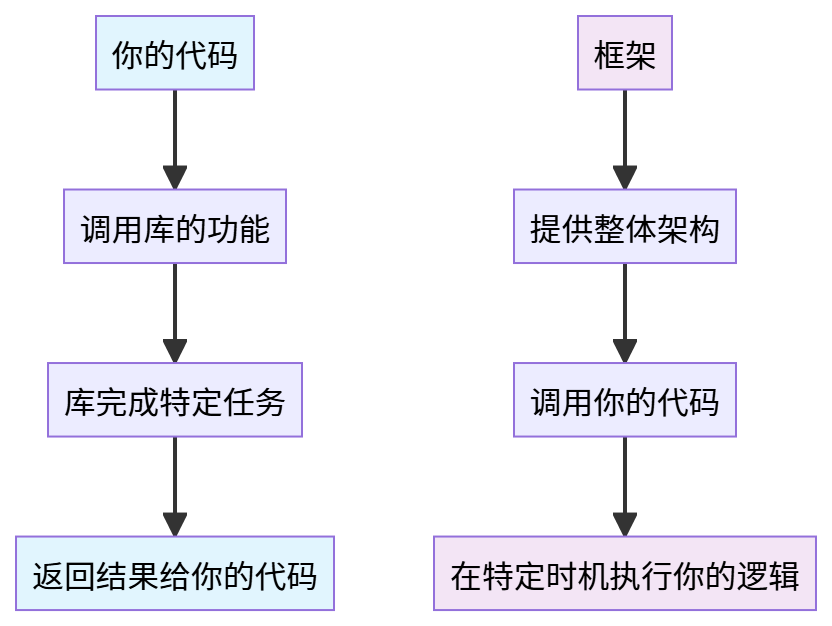
1. 控制反转(Inversion of Control)
库(Library): 你控制流程,调用库的功能
// 使用jQuery(库)的示例
// 你决定什么时候调用什么函数$(document).ready(function() {// 你控制执行时机$('#btn').click(function() {// 你决定如何处理点击var text = $('#input').val();// 你调用库的方法$('#output').text('你好,' + text);});
});
2. 框架(Framework): 框架控制流程,调用你的代码
// 使用Vue(框架)的示例
// 框架控制执行流程,你只是填充具体逻辑new Vue({el: '#app', // 框架控制挂载时机data: {      // 框架管理数据响应式message: 'Hello Vue!'},methods: {   // 你提供方法,框架决定何时调用showMessage() {console.log(this.message);}},mounted() {   // 框架在特定生命周期调用你的代码// 框架告诉你:现在组件挂载完成了this.showMessage();}
});
2. 职责范围不同
库: 解决特定问题
// 日期处理库 day.js
import dayjs from 'dayjs';// 只负责日期处理这个特定领域
const today = dayjs();
const formatted = today.format('YYYY-MM-DD');// 图表库 Chart.js
// 只负责图表绘制
const chart = new Chart(ctx, {type: 'bar',data: chartData
});
框架: 提供完整解决方案
// Angular框架提供完整解决方案
import { Component, NgModule } from '@angular/core';
import { BrowserModule } from '@angular/platform-browser';
import { FormsModule, ReactiveFormsModule } from '@angular/forms';
import { HttpClientModule } from '@angular/common/http';// 包含:组件系统、路由、状态管理、HTTP服务、表单处理等
@Component({selector: 'app-root',template: `<h1>{{title}}</h1>`
})
export class AppComponent {title = 'My Angular App';
}@NgModule({declarations: [AppComponent],imports: [BrowserModule, FormsModule, HttpClientModule],bootstrap: [AppComponent]
})
export class AppModule { }
3. 现实世界比喻
| 概念 | 比喻 | 说明 |
|---|---|---|
| 库 | 工具箱 | 你自己建房,从工具箱选择合适的工具使用 |
| 框架 | 预制房屋框架 | 提供房屋结构,你在框架内填充具体内容 |
| 你的代码+库 | 厨师+厨具 | 厨师(你)决定做什么菜,如何使用厨具(库) |
| 框架+你的代码 | 流水线+工人 | 流水线(框架)控制流程,工人(你)完成特定工序 |
三、MVC 和MVVM设计模式
1. MVC设计模式
3.1.1基本概念
- MVC(Model-View-Controller):是一种将应用程序分为三个核心组件的设计模式
- Model(模型):管理数据和业务逻辑
- View(视图):负责UI显示和用户界面
- Controller(控制器):处理用户输入,协调Model和View
3.1.2 各组件的职责
Model
// 用户模型示例
class UserModel {constructor() {this.users = [];this.loadUsers();}// 业务逻辑:加载用户数据loadUsers() {// 模拟从服务器获取数据this.users = [{ id: 1, name: '张三', email: 'zhang@example.com' },{ id: 2, name: '李四', email: 'li@example.com' }];}// 业务逻辑:添加用户addUser(user) {user.id = this.users.length + 1;this.users.push(user);return user;}// 业务逻辑:获取所有用户getUsers() {return this.users;}
}
View
<!-- 用户列表视图 -->
<div id="userView"><h2>用户列表</h2><ul id="userList"><!-- 用户列表将通过JavaScript动态生成 --></ul><button id="addUserBtn">添加用户</button><!-- 添加用户表单 --><div id="userForm" style="display: none;"><input type="text" id="userName" placeholder="姓名"><input type="email" id="userEmail" placeholder="邮箱"><button id="submitUser">提交</button></div>
</div>
controller
// 用户控制器
class UserController {constructor(model, view) {this.model = model;this.view = view;// 绑定事件处理this.bindEvents();// 初始渲染this.renderUserList();}// 绑定UI事件bindEvents() {document.getElementById('addUserBtn').addEventListener('click', () => {this.showUserForm();});document.getElementById('submitUser').addEventListener('click', () => {this.addUser();});}// 渲染用户列表renderUserList() {const userList = document.getElementById('userList');const users = this.model.getUsers();userList.innerHTML = users.map(user => `<li>${user.name} - ${user.email}</li>`).join('');}// 显示用户表单showUserForm() {document.getElementById('userForm').style.display = 'block';}// 添加用户addUser() {const name = document.getElementById('userName').value;const email = document.getElementById('userEmail').value;if (name && email) {this.model.addUser({ name, email });this.renderUserList();this.hideUserForm();}}// 隐藏用户表单hideUserForm() {document.getElementById('userForm').style.display = 'none';document.getElementById('userName').value = '';document.getElementById('userEmail').value = '';}
}// 初始化应用
const userModel = new UserModel();
const userController = new UserController(userModel);
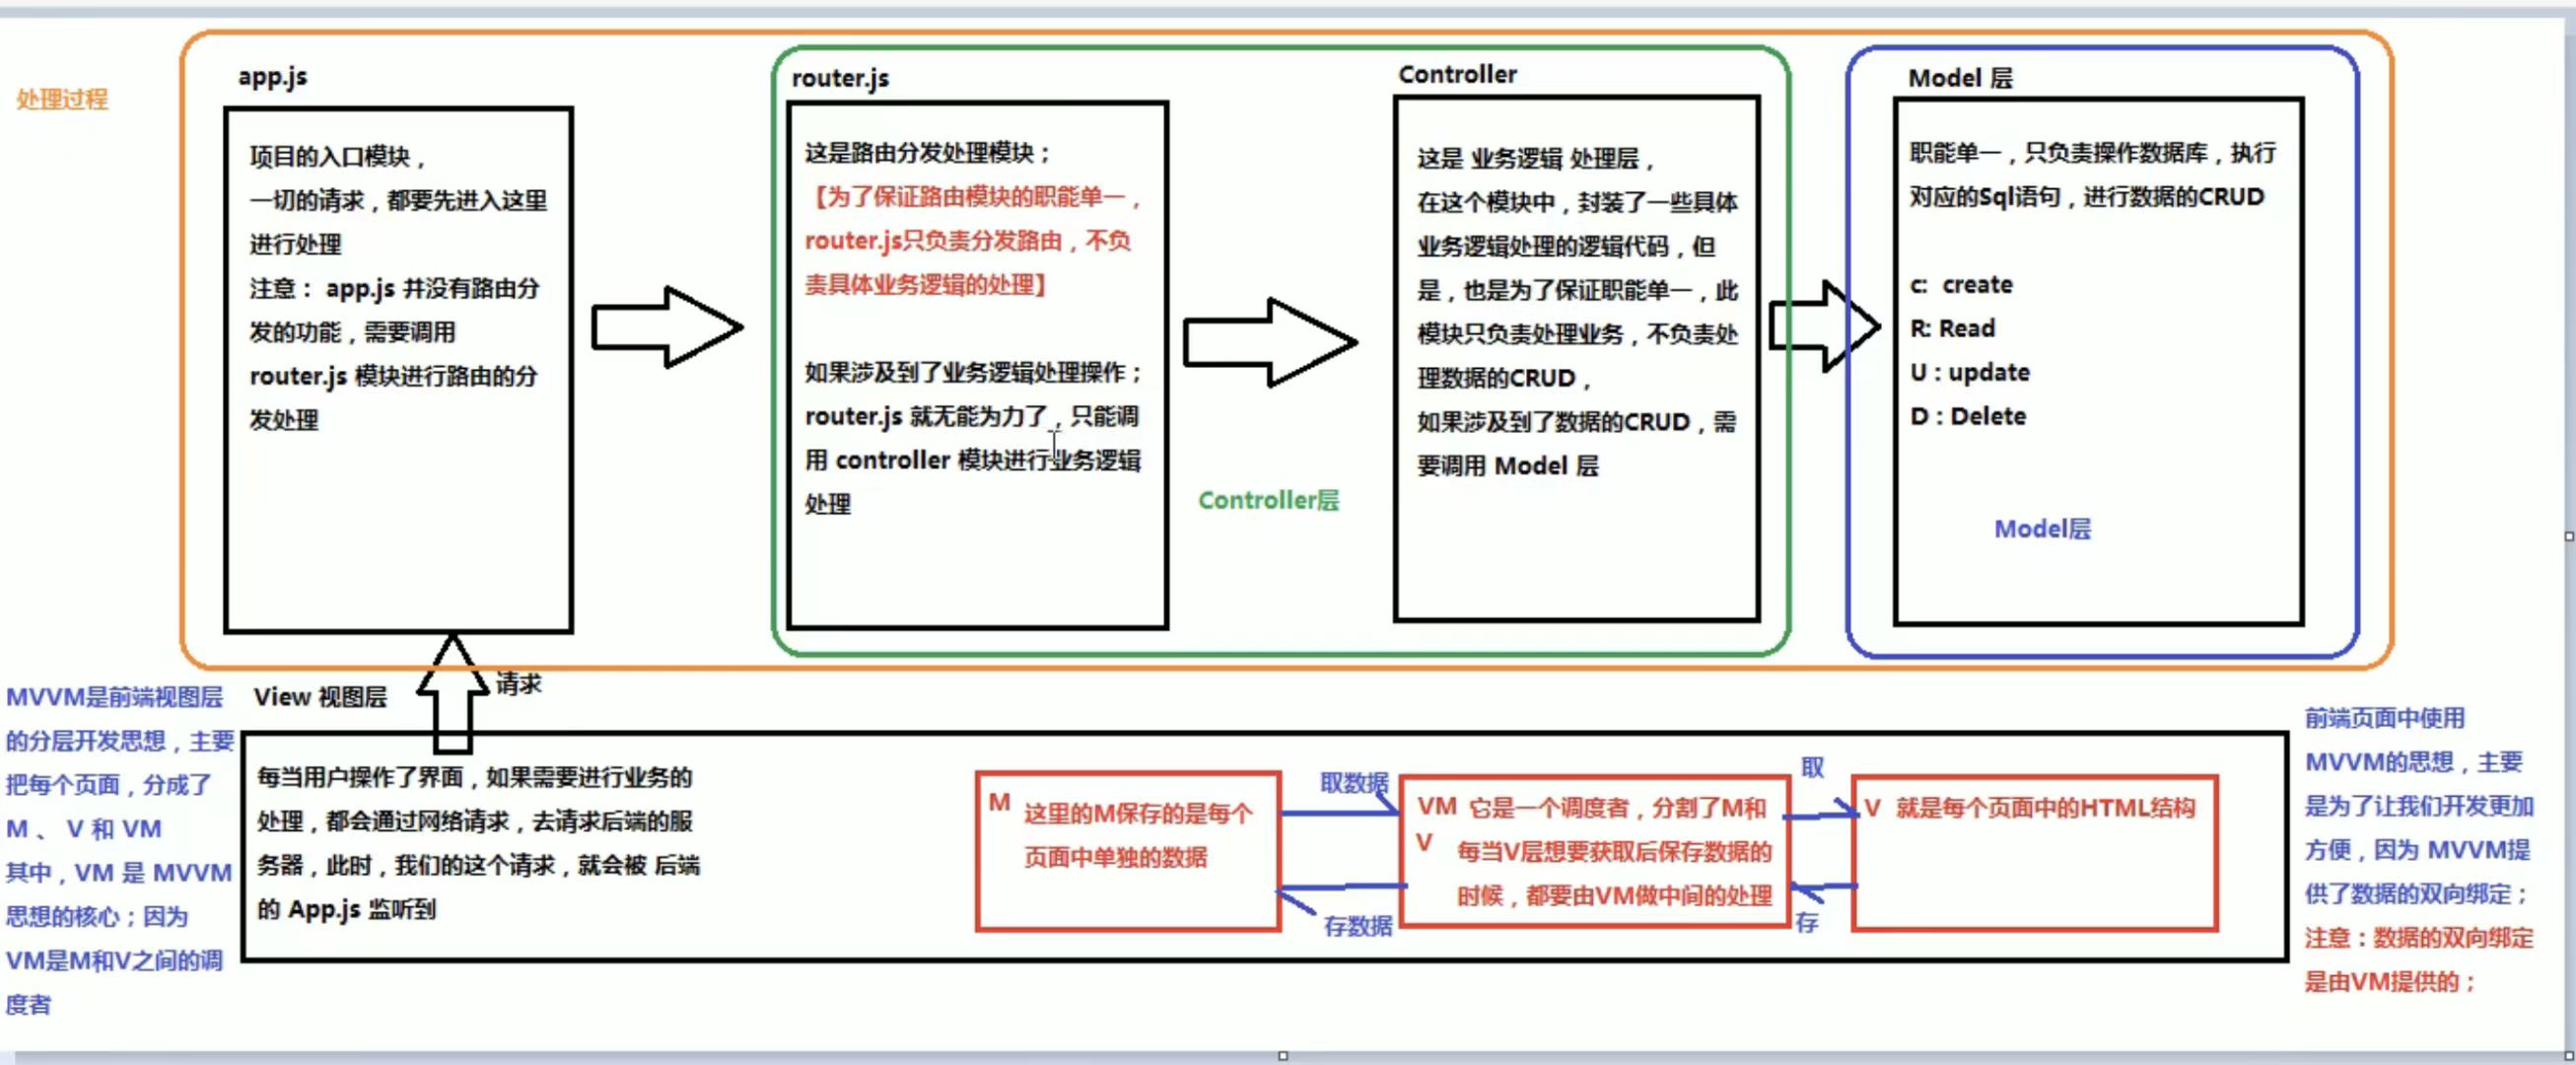
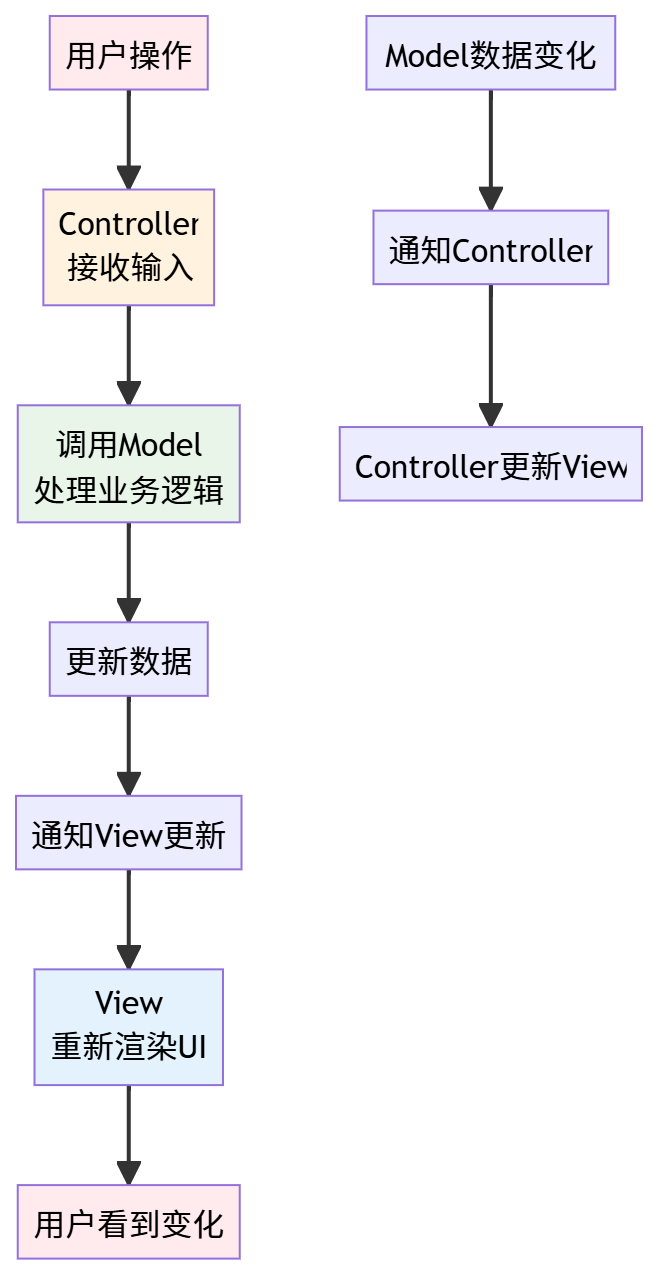
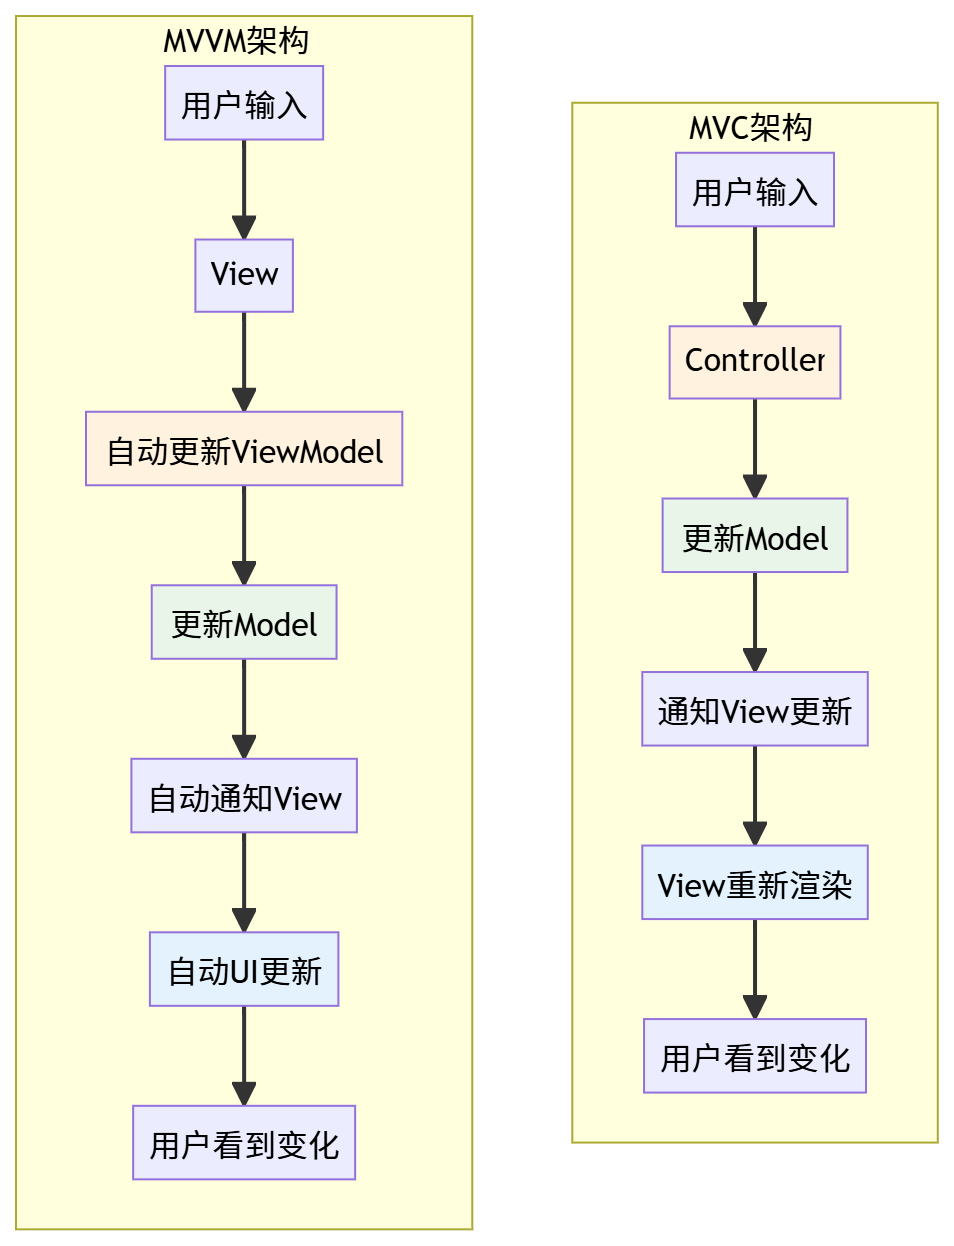
3.1.3. MVC 数据流向
2. MVVM设计模式
3.2.1. 基本概念
MVVM(Model-View-ViewModel):是MVC的改进版,特别适合现代前端框架
- Model(模型):管理数据和业务逻辑
- View(视图):负责UI显示
- ViewModel(视图模型):作为View和Model之间的桥梁 ,提供数据绑定
3.2.2. 各组件的职责
model和view同MVC一样
viewModel
// Vue实例作为ViewModel
const app = new Vue({el: '#app',data: {users: [],          // 视图数据showForm: false,    // UI状态newUser: {          // 表单数据name: '',email: ''}},created() {// 初始化时加载数据this.loadUsers();},methods: {// 加载用户数据loadUsers() {// 这里应该调用Model的方法// 模拟数据加载this.users = [{ id: 1, name: '张三', email: 'zhang@example.com' },{ id: 2, name: '李四', email: 'li@example.com' }];},// 添加用户addUser() {if (this.newUser.name && this.newUser.email) {const user = {id: this.users.length + 1,name: this.newUser.name,email: this.newUser.email};this.users.push(user);this.newUser = { name: '', email: '' };this.showForm = false;// 这里应该调用Model的addUser方法// userModel.addUser(user);}}}
});
数据绑定机制
// 简化的数据绑定实现原理
class SimpleViewModel {constructor() {this.data = {};this.bindings = {};}// 定义响应式属性defineReactive(obj, key, val) {const that = this;Object.defineProperty(obj, key, {get() {return val;},set(newVal) {if (newVal === val) return;val = newVal;// 通知所有绑定更新that.notifyBindings(key);}});}// 添加数据绑定addBinding(key, element, property) {if (!this.bindings[key]) {this.bindings[key] = [];}this.bindings[key].push({ element, property });}// 通知绑定更新notifyBindings(key) {if (this.bindings[key]) {this.bindings[key].forEach(binding => {binding.element[binding.property] = this.data[key];});}}
}// 使用示例
const viewModel = new SimpleViewModel();
viewModel.defineReactive(viewModel.data, 'message', 'Hello MVVM');// 建立数据绑定
const inputElement = document.createElement('input');
const textElement = document.createElement('p');viewModel.addBinding('message', inputElement, 'value');
viewModel.addBinding('message', textElement, 'textContent');// 数据变化自动更新视图
viewModel.data.message = 'Hello Data Binding';
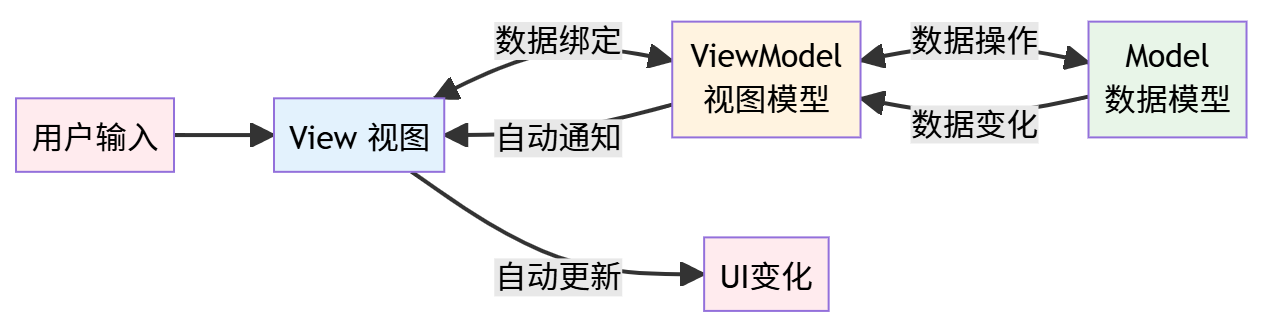
3.2.3. MVVM数据流向
3. MVC 与 MVVM 对比
| 特性 | MVC | MVVM |
|---|---|---|
| 核心组件 | Model-View-Controller | Model-View-ViewModel |
| 数据流向 | 单向:View → Controller → Model → View | 双向:View ↔ ViewModel ↔ Model |
| 职责分离 | Controller处理业务逻辑和协调 | ViewModel处理视图逻辑和数据绑定 |
| 代码量 | Controller容易变得臃肿 | ViewModel更专注于视图逻辑 |
| 测试难度 | 需要模拟用户交互 | 更容易单元测试 |
| 适合场景 | 传统Web应用 | 现代富客户端应用 |
架构对比
优缺点
MVC的优点
- 职责分离清晰
- 多个view可以共享一个model
- 便于团队协作开发
MVC的缺点
- controller容易变得过于庞大
- 视图和模型间存在一定耦合
- 需要手动更新DOM
MVVM的优点
- 双向数据绑定,减少DOM操作
- 视图和模型完全解耦
- 更好的可测试性
- 开发效率更高
MVVM的缺点
- 数据绑定可能带来性能问题
- 学习曲线较陡峭
- 调试复杂度较高
4,. vue.js中的MVVM
// Vue组件是典型的MVVM实现
const app = new Vue({el: '#app',         // Viewdata: {             // ViewModelmessage: 'Hello Vue!',users: []},methods: {          // ViewModel方法addUser() {// 操作数据,视图自动更新this.users.push({ name: this.newUserName });this.newUserName = '';}},created() {         // 生命周期钩子// 初始化数据(Model操作)this.loadUsers();}
});
5、总结
MVC:
- 核心:Controller作为中间人协调View和Model
- 数据流:单向流动,需要手动更新视图
- 适用:传统服务端渲染应用
MVVM:
- 核心:ViewModel通过数据绑定连接View和Model
- 数据流:双向自动绑定,视图自动更新
- 适用:现代富客户端单页面应用
四、Vue基本代码和MVVM之间的对应关系
MVVM 组件 Vue 对应部分 职责说明 Model data对象存储应用程序的原始数据状态 View 模板 (HTML) 定义用户界面的结构和布局 ViewModel Vue 实例 连接View和Model,处理业务逻辑
核心特性对应:
- 数据绑定:
{{ }},v-bind,v-model实现数据响应式- DOM监听:
v-on,@事件实现用户交互响应- 指令系统:
v-if,v-for,v-show等控制视图渲染- 生命周期:
created,mounted等钩子管理组件生命周期
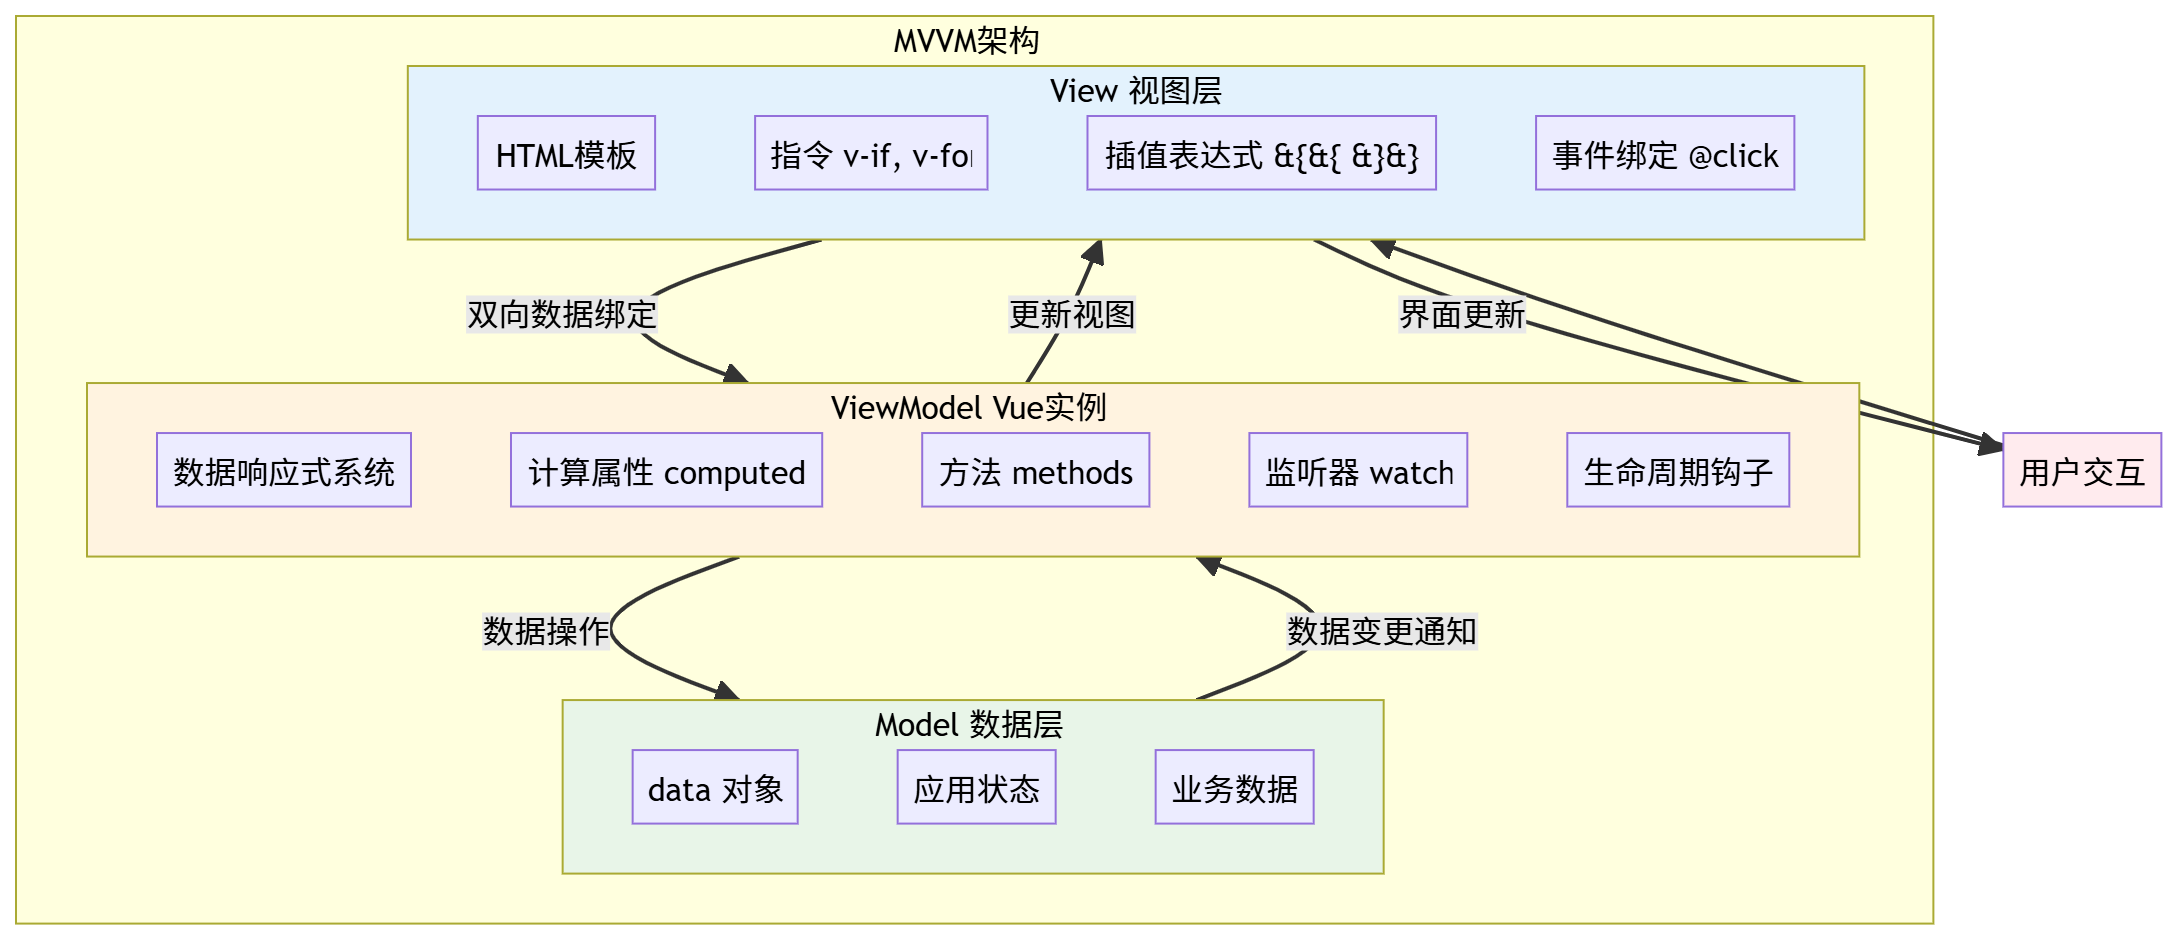
Vue和MVVM之间的对应关系图解
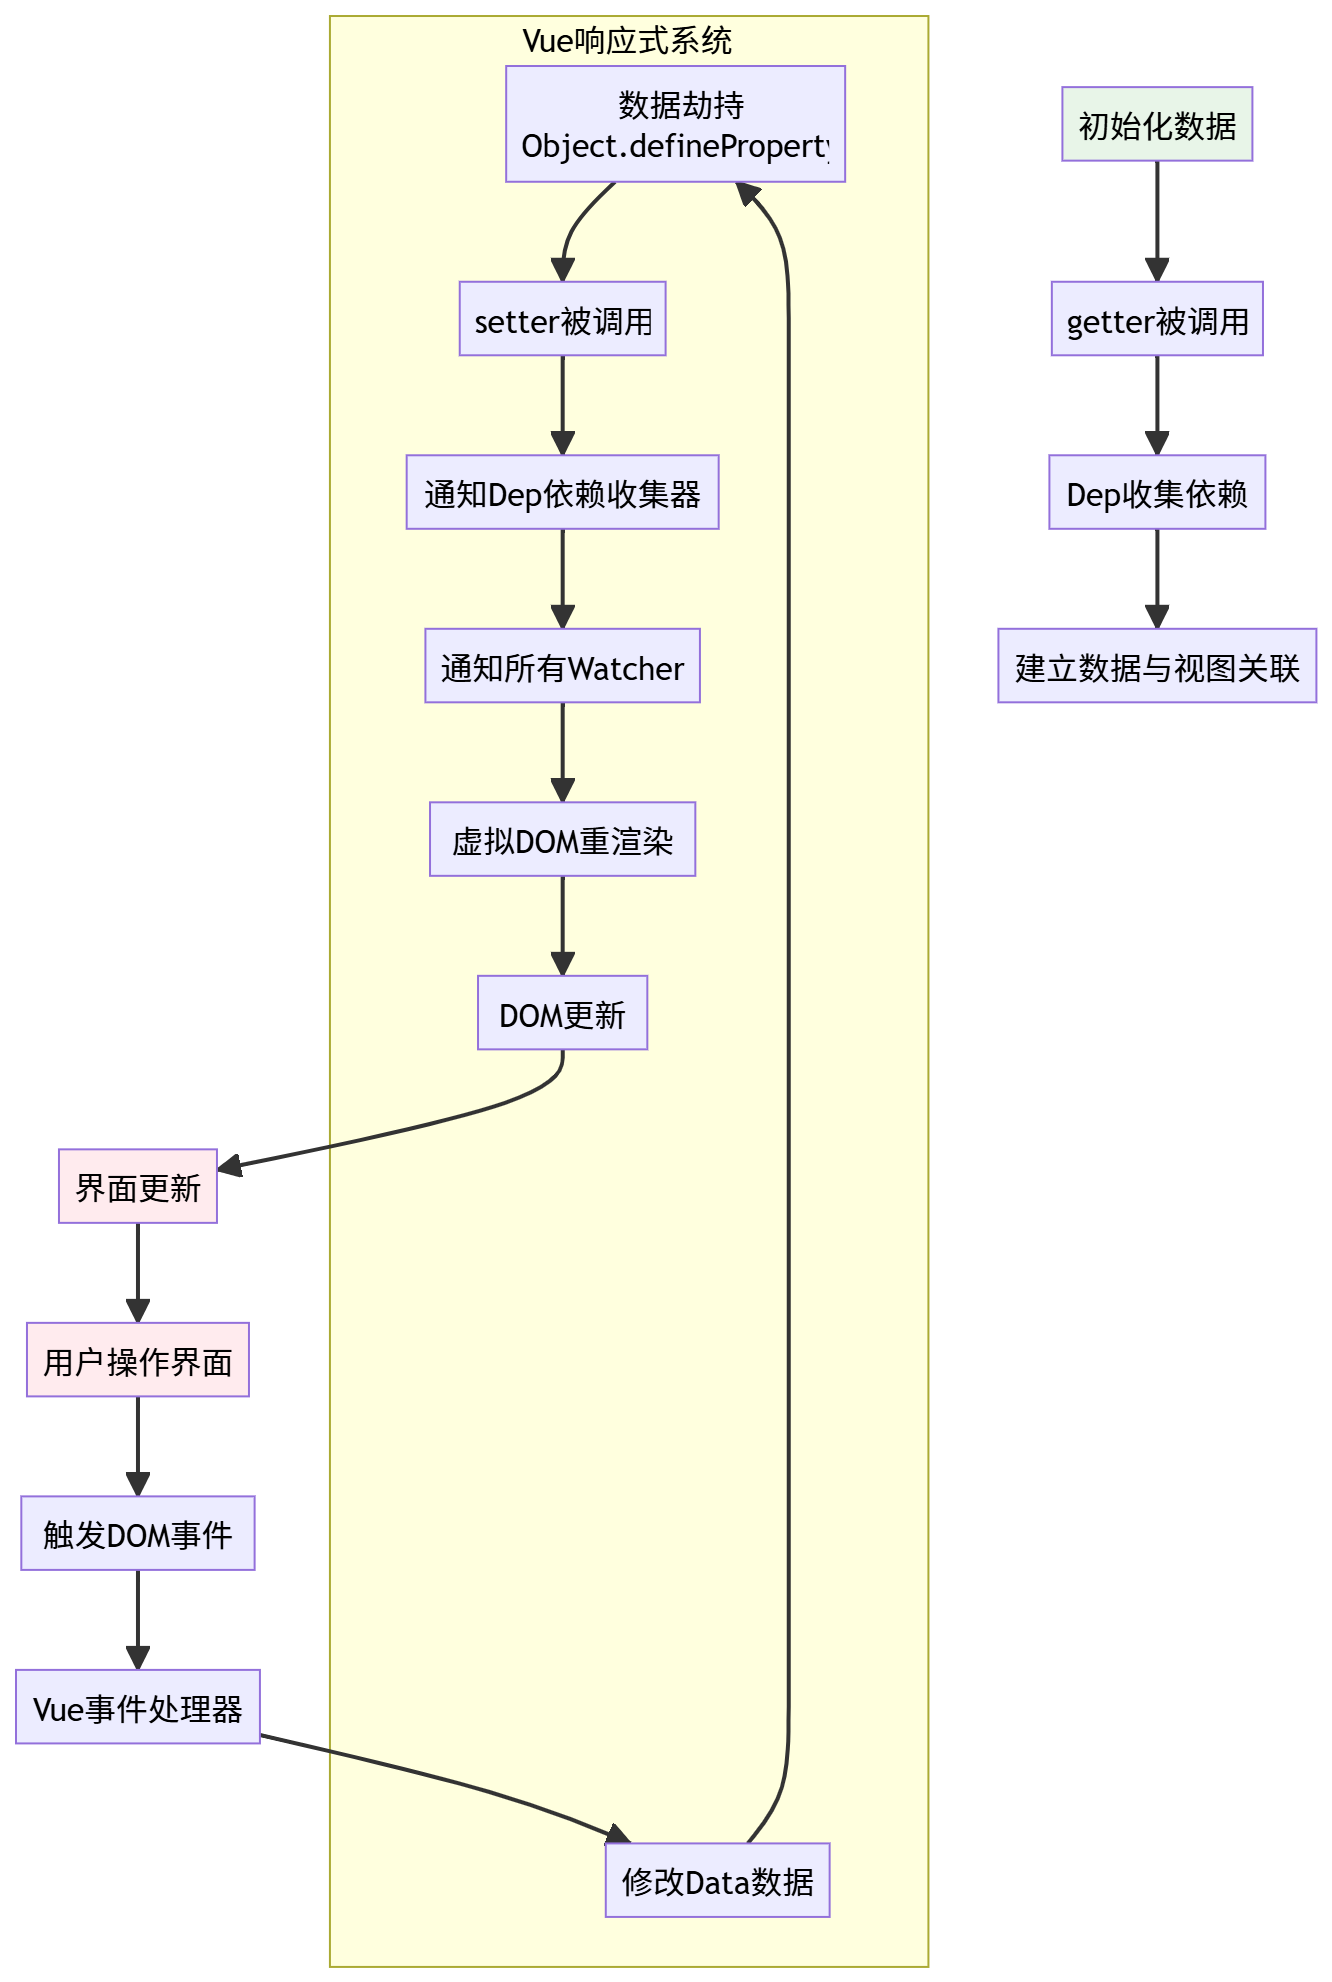
Vue 响应式数据流详细图
Vue 实例与 MVVM 对应关系
<!DOCTYPE html>
<html lang="zh-CN">
<head><meta charset="UTF-8"><meta name="viewport" content="width=device-width, initial-scale=1.0"><title>Vue与MVVM对应关系</title><script src="https://cdn.jsdelivr.net/npm/vue@2.6.14/dist/vue.js"></script><style>body {font-family: 'Segoe UI', Tahoma, Geneva, Verdana, sans-serif;max-width: 1000px;margin: 0 auto;padding: 20px;background-color: #f5f7fa;color: #333;}.container {display: grid;grid-template-columns: 1fr 1fr;gap: 20px;margin-top: 20px;}.code-block, .visualization {background: white;border-radius: 8px;padding: 15px;box-shadow: 0 2px 12px rgba(0, 0, 0, 0.1);}h1, h2, h3 {color: #2c3e50;}h1 {text-align: center;border-bottom: 2px solid #3498db;padding-bottom: 10px;}.mvvm-block {padding: 15px;border-radius: 6px;margin-bottom: 15px;}.view { background-color: #e3f2fd; border-left: 4px solid #2196f3; }.view-model { background-color: #fff3e0; border-left: 4px solid #ff9800; }.model { background-color: #e8f5e9; border-left: 4px solid #4caf50; }.code {background: #272822;color: #f8f8f2;padding: 12px;border-radius: 4px;overflow-x: auto;font-family: 'Fira Code', monospace;}.highlight {background-color: #ffeaa7;padding: 2px 4px;border-radius: 3px;font-weight: bold;}.arrow {text-align: center;font-size: 24px;margin: 10px 0;}.interaction {display: flex;gap: 10px;margin-top: 15px;}input, button {padding: 8px 12px;border: 1px solid #ddd;border-radius: 4px;font-size: 14px;}button {background: #3498db;color: white;cursor: pointer;border: none;}button:hover {background: #2980b9;}.user-list {margin-top: 15px;}.user-item {padding: 8px;background: #f1f1f1;margin-bottom: 8px;border-radius: 4px;display: flex;justify-content: space-between;}.vip {background: #ffeaa7;border-left: 3px solid #fdcb6e;}</style>
</head>
<body><h1>Vue 与 MVVM 对应关系可视化</h1><div class="container"><div class="code-block"><h2>Vue 代码实例</h2><div class="code">
// Vue实例 - ViewModel<br>
new Vue({<br>
el: <span class="highlight">'#app'</span>, // 连接View<br>
<br>
// Model - 数据层<br>
data: {<br>
title: '用户管理系统',<br>
newUser: { name: '', email: '' },<br>
users: [<br>
{ id: 1, name: '张三', email: 'zhang@example.com', isVIP: true },<br>
{ id: 2, name: '李四', email: 'li@example.com', isVIP: false }<br>
],<br>
nextId: 3<br>
},<br>
<br>
// ViewModel - 计算属性<br>
computed: {<br>
vipUsersCount() {<br>
return this.users.filter(user => user.isVIP).length;<br>
}<br>
},<br>
<br>
// ViewModel - 方法<br>
methods: {<br>
addUser() {<br>
this.users.push({<br>
id: this.nextId++,<br>
...this.newUser,<br>
isVIP: false<br>
});<br>
this.newUser = { name: '', email: '' };<br>
},<br>
toggleVIP(user) {<br>
user.isVIP = !user.isVIP;<br>
}<br>
}<br>
});</div></div><div class="visualization"><h2>MVVM 架构解析</h2><div class="mvvm-block view"><h3>View (视图层)</h3><p>负责UI显示和用户交互</p><p><strong>对应Vue:</strong> HTML模板、指令、插值表达式</p></div><div class="arrow">↓ ↑</div><div class="mvvm-block view-model"><h3>ViewModel (视图模型层)</h3><p>连接View和Model,处理视图逻辑</p><p><strong>对应Vue:</strong> Vue实例、计算属性、方法、监听器</p></div><div class="arrow">↓ ↑</div><div class="mvvm-block model"><h3>Model (数据层)</h3><p>管理应用程序的数据和业务逻辑</p><p><strong>对应Vue:</strong> data对象、应用状态</p></div><h3>数据流向说明:</h3><ol><li>View通过指令绑定ViewModel中的数据和事件</li><li>用户操作触发ViewModel中的方法</li><li>ViewModel方法修改Model中的数据</li><li>Model数据变化通过响应式系统通知ViewModel</li><li>ViewModel更新View中的显示</li></ol></div></div><div id="app"><h2>{{ title }}</h2><div class="interaction"><input v-model="newUser.name" placeholder="用户名"><input v-model="newUser.email" placeholder="邮箱"><button @click="addUser">添加用户</button></div><p>VIP用户数量: {{ vipUsersCount }}</p><div class="user-list"><div v-for="user in users" :key="user.id" :class="['user-item', {vip: user.isVIP}]"><div>{{ user.name }} - {{ user.email }}<span v-if="user.isVIP">(VIP)</span></div><button @click="toggleVIP(user)">{{ user.isVIP ? '取消VIP' : '设为VIP' }}</button></div></div></div><script>new Vue({el: '#app',data: {title: '用户管理系统',newUser: { name: '', email: '' },users: [{ id: 1, name: '张三', email: 'zhang@example.com', isVIP: true },{ id: 2, name: '李四', email: 'li@example.com', isVIP: false }],nextId: 3},computed: {vipUsersCount() {return this.users.filter(user => user.isVIP).length;}},methods: {addUser() {if (this.newUser.name && this.newUser.email) {this.users.push({id: this.nextId++,...this.newUser,isVIP: false});this.newUser = { name: '', email: '' };}},toggleVIP(user) {user.isVIP = !user.isVIP;}}});</script>
</body>
</html>Vue的响应式系统基于三个核心概念:
- 数据劫持 - 使用Object.defineProperty()劫持数据属性的getter和setter
- 依赖收集 - 在getter中收集依赖(Watcher)
- 派发更新 - 在setter中通知所有依赖进行更新
响应式流程:
初始化阶段:
- Vue遍历data对象的所有属性
- 使用Object.defineProperty设置getter/setter
- 每个属性都有一个Dep(依赖收集器)实例
编译阶段:
- 编译模板,遇到插值表达式或指令时创建Watcher
- Watcher读取数据,触发getter,Dep收集当前Watcher
更新阶段:
- 数据变化时触发setter
- setter通知Dep,Dep通知所有Watcher更新
- Watcher更新对应的视图
五、总结
通过上面的图解和代码示例,我们可以清楚地看到:
- View层对应Vue的模板部分,负责显示和用户交互
- ViewModel层对应Vue实例,负责连接View和Model,处理视图逻辑
- Model层对应Vue的data对象,负责存储应用数据
Vue通过响应式系统实现了数据的双向绑定:
- 数据变化时,视图自动更新(Model → View)
- 用户操作时,数据自动同步(View → Model)