Point and Spot Lights Lights with Limited Influence
支持更多光源类型,而非仅定向光。
引入实时点光源与聚光灯。
烘焙点光源与聚光灯的照明和阴影。
每个对象最多渲染8个其他光源。
本教程是创建自定义可编程渲染管线系列的第九部分,新增了对实时与烘焙点光源、聚光灯的支持,但尚未实现实时阴影。
本教程基于Unity 2019.2.21f1创建,并升级至2022.3.5f1版本。
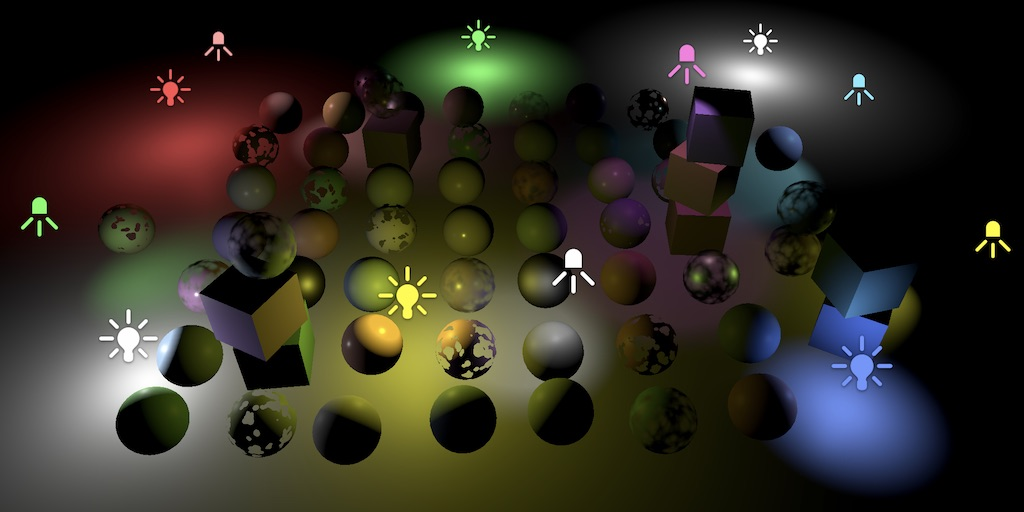
A party of point and spot lights 一组点光源与聚光灯
1. Point Lights 点光源
目前我们仅处理过定向光,因为这类光源可无限远距照射并影响所有物体。而其他光源类型则有所不同:它们并非假设位于无限远处,因此具有具体位置且光照强度会发生变化。这就需要额外的工作来进行设置和渲染,为此我们将创建独立的代码来实现。我们首先从点光源入手,这类光源是无限小的点,会均匀地向所有方向发射光线
1.1 Other Light Data 其他光源数据
与定向光类似,我们仅能支持有限数量的其他光源。场景中通常包含大量非定向光源,因为它们的有效照射范围有限。在任意给定帧中,通常只有部分其他光源可见。因此,我们设置的最大支持数量针对的是单帧画面,而非整个场景。如果可见光源数量超出上限,部分光源将被直接忽略。
Unity会根据重要性对可见光源列表进行排序,因此只要可见光源保持不变,被忽略的光源也是确定的。但若因摄像机移动或其他变化导致可见光源发生改变,就可能出现明显的光源闪烁现象。因此,我们不应将最大数量设置得过低。让我们在Lighting中定义另一个常量,将同时可见的其他光源上限设置为64个
const int maxDirLightCount = 4, maxOtherLightCount = 64;正如处理定向光时一样,我们需要将其他光源类型的数量与颜色数据发送至GPU。此时还需额外传递光源的位置信息。请添加对应的着色器属性名称与矢量数组字段以实现此功能
static intotherLightCountId = Shader.PropertyToID("_OtherLightCount"),otherLightColorsId = Shader.PropertyToID("_OtherLightColors"),otherLightPositionsId = Shader.PropertyToID("_OtherLightPositions");static Vector4[]otherLightColors = new Vector4[maxOtherLightCount],otherLightPositions = new Vector4[maxOtherLightCount];在SetupLights方法中,需在统计定向光数量的同时记录其他光源的数量。遍历完可见光源列表后,将所有数据发送至GPU。但若最终不存在其他光源,则无需传递相应数组数据。此外,场景中可能仅存在其他光源而无定向光,因此定向光数组的传递同样可以省略。但需要注意的是,光源数量数据必须始终保持传递
void SetupLights () {NativeArray<VisibleLight> visibleLights = cullingResults.visibleLights;int dirLightCount = 0, otherLightCount = 0;for (int i = 0; i < visibleLights.Length; i++) {…}buffer.SetGlobalInt(dirLightCountId, dirLightCount);if (dirLightCount > 0) {buffer.SetGlobalVectorArray(dirLightColorsId, dirLightColors);buffer.SetGlobalVectorArray(dirLightDirectionsId, dirLightDirections);buffer.SetGlobalVectorArray(dirLightShadowDataId, dirLightShadowData);}buffer.SetGlobalInt(otherLightCountId, otherLightCount);if (otherLightCount > 0) {buffer.SetGlobalVectorArray(otherLightColorsId, otherLightColors);buffer.SetGlobalVectorArray(otherLightPositionsId, otherLightPositions);}}在着色器端,同样需要在Light中定义其他光源的最大数量及新数据
#define MAX_DIRECTIONAL_LIGHT_COUNT 4
#define MAX_OTHER_LIGHT_COUNT 64CBUFFER_START(_CustomLight)int _DirectionalLightCount;float4 _DirectionalLightColors[MAX_DIRECTIONAL_LIGHT_COUNT];float4 _DirectionalLightDirections[MAX_DIRECTIONAL_LIGHT_COUNT];float4 _DirectionalLightShadowData[MAX_DIRECTIONAL_LIGHT_COUNT];int _OtherLightCount;float4 _OtherLightColors[MAX_OTHER_LIGHT_COUNT];float4 _OtherLightPositions[MAX_OTHER_LIGHT_COUNT];
CBUFFER_END
同时,我们预先定义一个稍后需要使用的GetOtherLightCount函数
int GetOtherLightCount () {return _OtherLightCount;
}
1.2 Point Light Setup 点光源设置
在Lighting中创建一个SetupPointLight方法,用于设置点光源的颜色和位置。该方法参数与SetupDirectionalLight一致。颜色设置方式相同。位置设置与定向光的方向设置类似,区别在于需要获取局部到世界矩阵的最后一列而非第三列
void SetupPointLight (int index, ref VisibleLight visibleLight) {otherLightColors[index] = visibleLight.finalColor;otherLightPositions[index] = visibleLight.localToWorldMatrix.GetColumn(3);}现在我们需要调整SetupLights中的循环逻辑,使其能够区分定向光和点光源。循环不应在达到定向光数量上限时立即终止,而应跳过超出的定向光并继续处理后续光源。同时,我们还需对其他光源应用相同的处理逻辑,并考虑其最大数量限制。接下来将使用switch语句来实现这一逻辑
for (int i = 0; i < visibleLights.Length; i++) {VisibleLight visibleLight = visibleLights[i];//if (visibleLight.lightType == LightType.Directional) {// SetupDirectionalLight(dirLightCount++, ref visibleLight);// if (dirLightCount >= maxDirLightCount) {// break;// }//}switch (visibleLight.lightType) {case LightType.Directional:if (dirLightCount < maxDirLightCount) {SetupDirectionalLight(dirLightCount++, ref visibleLight);}break;case LightType.Point:if (otherLightCount < maxOtherLightCount) {SetupPointLight(otherLightCount++, ref visibleLight);}break;}}1.3 Shading
目前着色器已具备支持点光源所需的全部数据。为实际运用这些数据,我们在Light中添加GetOtherLight函数,其参数与GetDirectionalLight一致。此时光源方向会随片段位置变化,需通过将表面位置到光源的射线归一化来计算。当前尚未支持阴影功能,因此衰减值固定为1。
Light GetOtherLight (int index, Surface surfaceWS, ShadowData shadowData) {Light light;light.color = _OtherLightColors[index].rgb;float3 ray = _OtherLightPositions[index].xyz - surfaceWS.position;light.direction = normalize(ray);light.attenuation = 1.0;return light;
}
为应用新的光照计算,请在GetLighting方法中定向光循环之后,添加遍历所有其他光源的循环。尽管两个循环相互独立,但必须为它们的迭代变量使用不同名称,否则在某些情况下会触发着色器编译器警告。因此,第二个循环我将使用j而非i作为迭代变量
float3 GetLighting (Surface surfaceWS, BRDF brdf, GI gi) {ShadowData shadowData = GetShadowData(surfaceWS);shadowData.shadowMask = gi.shadowMask;float3 color = IndirectBRDF(surfaceWS, brdf, gi.diffuse, gi.specular);for (int i = 0; i < GetDirectionalLightCount(); i++) {Light light = GetDirectionalLight(i, surfaceWS, shadowData);color += GetLighting(surfaceWS, brdf, light);}for (int j = 0; j < GetOtherLightCount(); j++) {Light light = GetOtherLight(j, surfaceWS, shadowData);color += GetLighting(surfaceWS, brdf, light);}return color;
}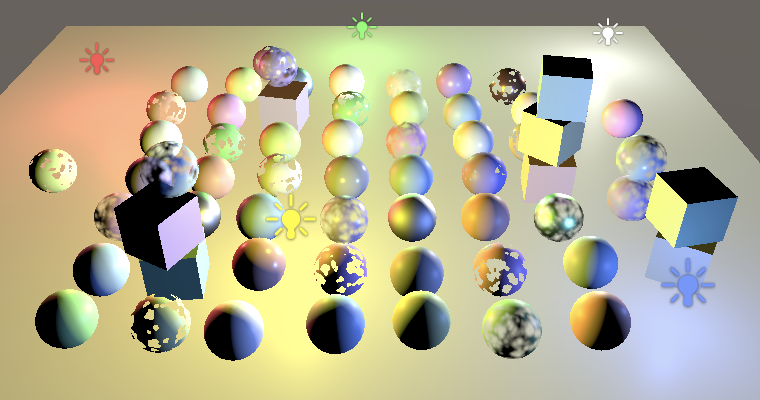
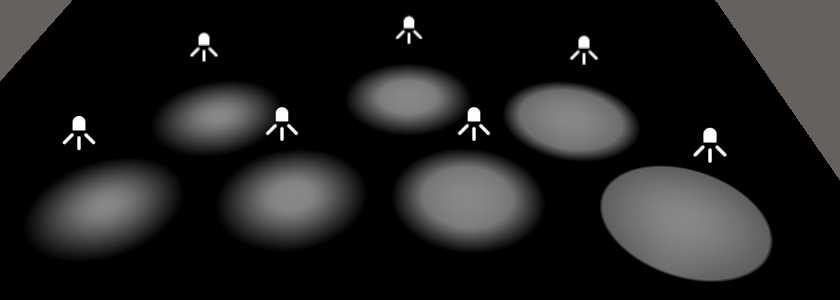
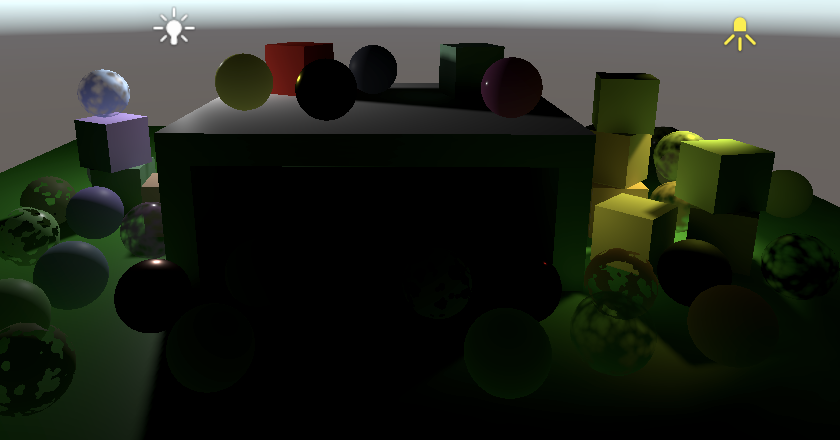
Only point lights; no environment lighting 仅有点光源;无环境光照
1.4 Distance Attenuation 距离衰减
目前我们的点光源已能正常工作,但亮度过高。随着光线远离光源会逐渐扩散,传播越远能量越分散,亮度也随之衰减。光照强度遵循公式 i/d²,其中 i 为配置的强度值,d 代表距离,这一规律被称为平方反比定律。需要注意的是,当距离小于1时,实际强度将超过配置值——越靠近光源位置,亮度会急剧增加。
此前我们推导得出:最终使用的光照颜色代表从纯白漫反射表面片段正对光源时观察到的数值。这对定向光成立,但对于其他光源类型,该结论仅精确适用于距离光源单位距离处的表面片段
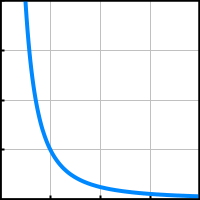
Distance attenuation curve 距离衰减曲线
通过计算光源距离的平方值,并取其倒数作为衰减系数来实现距离衰减。为避免潜在的除零错误,需将平方距离的最小值设置为一个极小的正数
float distanceSqr = max(dot(ray, ray), 0.00001);light.attenuation = 1.0 / distanceSqr;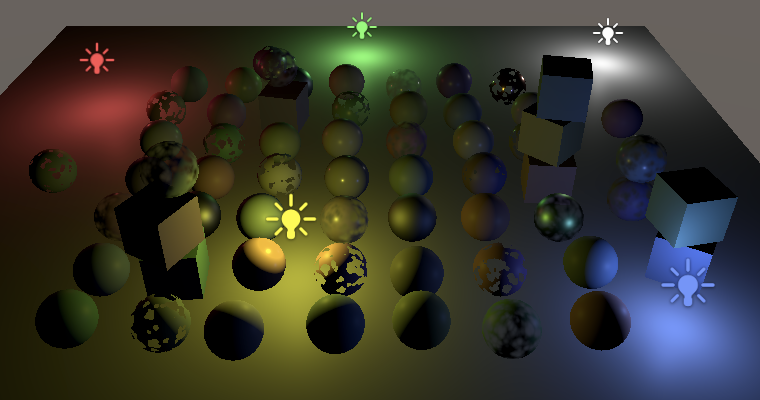
Light fades with distance 光线随距离衰减
1.5 Light Range 光源范围
尽管点光源强度会快速衰减,但从理论上讲,其光线仍会影响所有物体——即便通常难以察觉。漫反射会迅速变得不可见,而镜面反射在更远距离处仍可被感知。
为使渲染更切实际,我们将设置最大光源范围,超出此范围的光照强度将被强制归零。这种做法虽不符合物理真实,但若不加限制,所有光源无论距离远近都将始终被视为可见光源。通过添加范围参数,点光源将被限定在由其位置和范围定义的包围球内。
我们不会在球体边界处突然切断光照,而是通过应用范围衰减来实现平滑淡出效果。Unity通用渲染管线和光照贴图系统采用的公式是 max(0, 1 - (d²/r²)²)²(其中r表示光源范围),我们将沿用相同函数
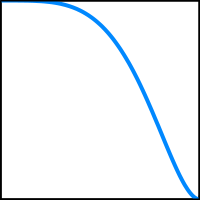
Range attenuation curve 范围衰减曲线
我们可以将光源范围存储在位置向量的第四分量中。为减少着色器中的计算量,建议存储1/r²而非原始范围值,并同样注意避免除零错误
void SetupPointLight (int index, ref VisibleLight visibleLight) {otherLightColors[index] = visibleLight.finalColor;Vector4 position = visibleLight.localToWorldMatrix.GetColumn(3);position.w =1f / Mathf.Max(visibleLight.range * visibleLight.range, 0.00001f);otherLightPositions[index] = position;}接下来将范围衰减计算集成到GetOtherLight函数中
float distanceSqr = max(dot(ray, ray), 0.00001);float rangeAttenuation = Square(saturate(1.0 - Square(distanceSqr * _OtherLightPositions[index].w)));light.attenuation = rangeAttenuation / distanceSqr;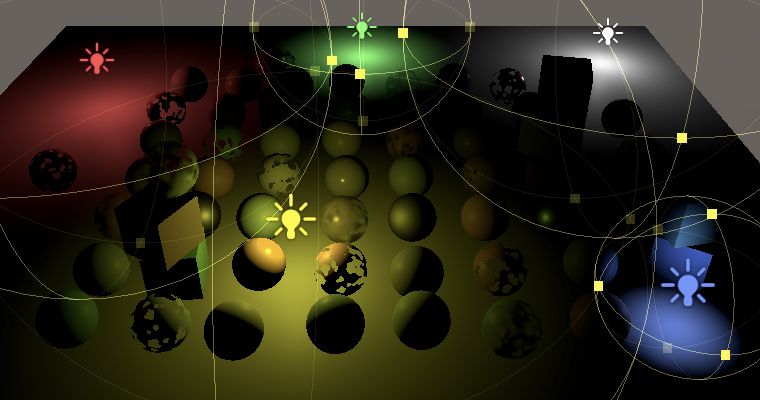
Range and distance attenuation 范围衰减与距离衰减
2. Spot Lights 聚光灯
我们还将支持聚光灯。点光源与聚光灯的区别在于后者的光线被限制在锥形区域内——实质上,聚光灯是一个被开孔遮蔽球体包围的点光源,孔洞的大小决定了光锥的尺寸
2.1 Direction 方向
聚光灯既具有位置属性也具备方向属性,因此需要在Lighting中添加着色器属性名称及其他光源方向的数组
static intotherLightCountId = Shader.PropertyToID("_OtherLightCount"),otherLightColorsId = Shader.PropertyToID("_OtherLightColors"),otherLightPositionsId = Shader.PropertyToID("_OtherLightPositions"),otherLightDirectionsId = Shader.PropertyToID("_OtherLightDirections");static Vector4[]otherLightColors = new Vector4[maxOtherLightCount],otherLightPositions = new Vector4[maxOtherLightCount],otherLightDirections = new Vector4[maxOtherLightCount];在SetupLights中将新增数据发送至GPU
buffer.SetGlobalVectorArray(otherLightPositionsId, otherLightPositions);buffer.SetGlobalVectorArray(otherLightDirectionsId, otherLightDirections);创建SetupSpotLight方法,该方法作为SetupPointLight的副本,但需额外存储光源方向。与定向光类似,我们可以使用局部到世界矩阵取负后的第三列来获取该方向
void SetupSpotLight (int index, ref VisibleLight visibleLight) {otherLightColors[index] = visibleLight.finalColor;Vector4 position = visibleLight.localToWorldMatrix.GetColumn(3);position.w =1f / Mathf.Max(visibleLight.range * visibleLight.range, 0.00001f);otherLightPositions[index] = position;otherLightDirections[index] =-visibleLight.localToWorldMatrix.GetColumn(2);}接下来在SetupLights循环中增加对聚光灯的条件分支处理
case LightType.Point:if (otherLightCount < maxOtherLightCount) {SetupPointLight(otherLightCount++, ref visibleLight);}break;case LightType.Spot:if (otherLightCount < maxOtherLightCount) {SetupSpotLight(otherLightCount++, ref visibleLight);}break;在着色器端,将新增数据添加至Light的缓冲区中
float4 _OtherLightPositions[MAX_OTHER_LIGHT_COUNT];float4 _OtherLightDirections[MAX_OTHER_LIGHT_COUNT];接下来在GetOtherLight中应用聚光灯光锥衰减。我们首先简单地使用聚光灯方向与光线方向的饱和点积值——这将使光照在聚光角度达到90°时衰减至零,从而照亮光源前方的所有物体
float spotAttenuation =saturate(dot(_OtherLightDirections[index].xyz, light.direction));light.attenuation = spotAttenuation * rangeAttenuation / distanceSqr;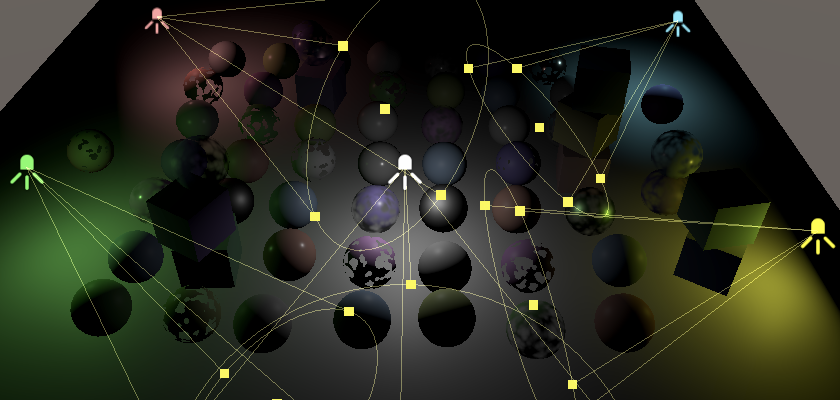
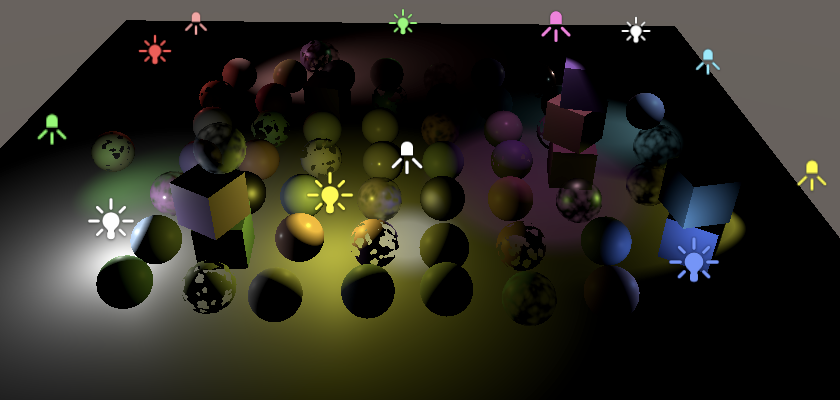
Spot lights 聚光灯
2.2 Spot Angle 聚光角度
聚光灯通过角度参数控制光锥的宽度。该角度从光锥中心线开始测量,因此当前我们看到的90°角效果正是按此方式计算。除此之外,还存在一个独立的内角用于控制光照衰减的起始位置。通用渲染管线与光照贴图系统通过在饱和点积值之前进行缩放与偏移处理,再对结果取平方来实现这一效果。具体公式为:saturate(da + b)²,其中d表示点积值,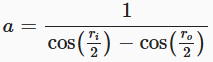
![]() 此处的
此处的 和
分别代表内角与外角的角度值(以弧度为单位)
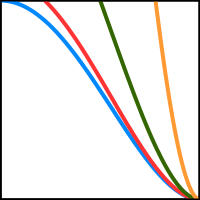
Angle attenuation with inner 0°, 20°, 45°, 70° and outer 90°
该函数亦可表示为 saturate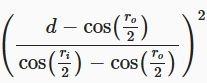
但通过这种分解方式,我们便能在Lighting中预先计算a和b的值,并通过新增的聚光角度数组将它们传递至着色器
static intotherLightCountId = Shader.PropertyToID("_OtherLightCount"),otherLightColorsId = Shader.PropertyToID("_OtherLightColors"),otherLightPositionsId = Shader.PropertyToID("_OtherLightPositions"),otherLightDirectionsId = Shader.PropertyToID("_OtherLightDirections"),otherLightSpotAnglesId = Shader.PropertyToID("_OtherLightSpotAngles");static Vector4[]otherLightColors = new Vector4[maxOtherLightCount],otherLightPositions = new Vector4[maxOtherLightCount],otherLightDirections = new Vector4[maxOtherLightCount],otherLightSpotAngles = new Vector4[maxOtherLightCount];在SetupLights中将该数组数据复制到GPU。
buffer.SetGlobalVectorArray(otherLightDirectionsId, otherLightDirections);buffer.SetGlobalVectorArray(otherLightSpotAnglesId, otherLightSpotAngles);接下来在SetupSpotLight方法中计算这些数值,并将其存储在聚光角度数组的X和Y分量中。外角可通过VisibleLight结构体的spotAngle属性获取,而内角则需要先通过light属性获取对应的Light游戏对象,该对象则包含innerSpotAngle属性可供调用
void SetupSpotLight (int index, ref VisibleLight visibleLight) {…Light light = visibleLight.light;float innerCos = Mathf.Cos(Mathf.Deg2Rad * 0.5f * light.innerSpotAngle);float outerCos = Mathf.Cos(Mathf.Deg2Rad * 0.5f * visibleLight.spotAngle);float angleRangeInv = 1f / Mathf.Max(innerCos - outerCos, 0.001f);otherLightSpotAngles[index] = new Vector4(angleRangeInv, -outerCos * angleRangeInv);}Why isn't the inner angle stored in VisibleLight?
为何内角不存储在VisibleLight中?
可配置的内角是Unity近期新增的功能。VisibleLight结构体未包含该属性,可能是因为这会改变结构体大小并需要重构Unity内部代码。
回到着色器部分,在Light中添加新的数组
float4 _OtherLightDirections[MAX_OTHER_LIGHT_COUNT];float4 _OtherLightSpotAngles[MAX_OTHER_LIGHT_COUNT];接下来在GetOtherLight中调整聚光灯光锥的衰减计算
float4 spotAngles = _OtherLightSpotAngles[index];float spotAttenuation = Square(saturate(dot(_OtherLightDirections[index].xyz, light.direction) *spotAngles.x + spotAngles.y));light.attenuation = spotAttenuation * rangeAttenuation / distanceSqr;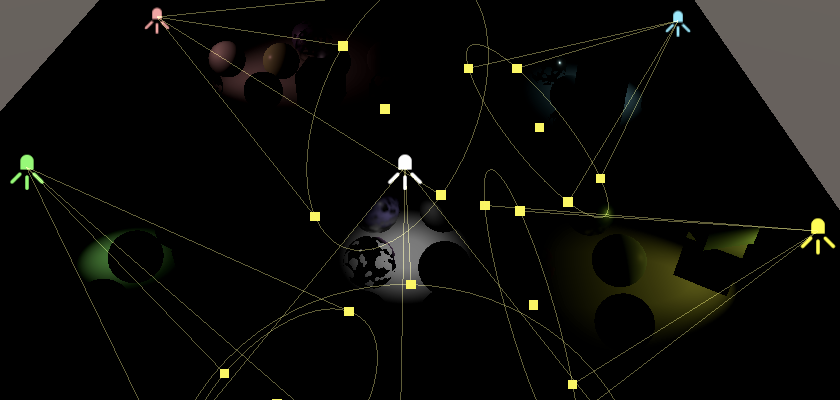
Angle attenuation in use 启用角度衰减
最后,为确保点光源不受角度衰减计算的影响,需将其聚光角度值设置为0和1
void SetupPointLight (int index, ref VisibleLight visibleLight) {…otherLightSpotAngles[index] = new Vector4(0f, 1f);}2.3 Configuring Inner Angles 配置内角参数
聚光灯始终具有可配置的外角参数,但在通用渲染管线推出之前并不存在独立的内角设置。因此,默认的光源检视面板并未公开内角参数。渲染管线可对光源进行深度定制,这意味着我们能够通过重写默认光源检视器来实现该功能。
具体操作是创建继承自LightEditor的编辑器脚本,并为其添加CustomEditorForRenderPipeline属性。该属性的首个参数必须设为Light类型,第二个参数则需指定我们要为其重写检视器的渲染管线资源类型。
接下来我们创建名为CustomLightEditor的脚本,将其放置在Custom RP/Editor文件夹中。同时为其添加CanEditMultipleObjects属性,以确保在选中多个光源时该编辑器仍能正常工作。
using UnityEngine;
using UnityEditor;[CanEditMultipleObjects]
[CustomEditorForRenderPipeline(typeof(Light), typeof(CustomRenderPipelineAsset))]
public class CustomLightEditor : LightEditor {}
为替换检视器界面,我们需要重写OnInspectorGUI方法。但为了以最小工作量实现内角参数的公开,我们首先调用基类方法以正常绘制默认检视界面
public override void OnInspectorGUI() {base.OnInspectorGUI();}随后我们需要确认当前是否仅选中了聚光灯类型。可以通过一个便捷的settings子类属性来实现——该属性提供了对编辑器选中项的序列化属性访问权限。利用该属性检查确保未混合选择多种光源类型且当前类型为LightType.Spot。若条件满足,则调用settings的DrawInnerAndOuterSpotAngle方法,在默认检视界面下方添加内外聚光角度滑块控件。最后调用ApplyModifiedProperties方法以应用通过该滑块所作的任何修改。
base.OnInspectorGUI();if (!settings.lightType.hasMultipleDifferentValues &&(LightType)settings.lightType.enumValueIndex == LightType.Spot){settings.DrawInnerAndOuterSpotAngle();settings.ApplyModifiedProperties();}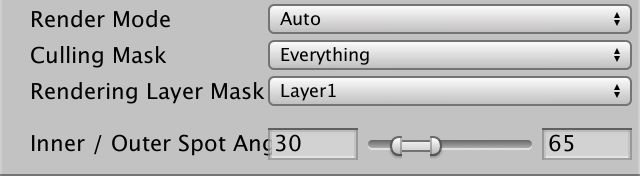
Different inner angles
3. Baked Light and Shadows 烘焙光照与阴影
本教程暂不涉及点光源与聚光灯的实时阴影实现,但我们将为这两种光源类型提供烘焙支持
3.1 Fully Baked 完全烘焙
要点亮烘焙点光源与聚光灯,只需将其光照模式设置为烘焙模式。需注意,这些光源的阴影类型默认设置为无,若需生成带阴影的烘焙效果,请将阴影类型调整为其他选项
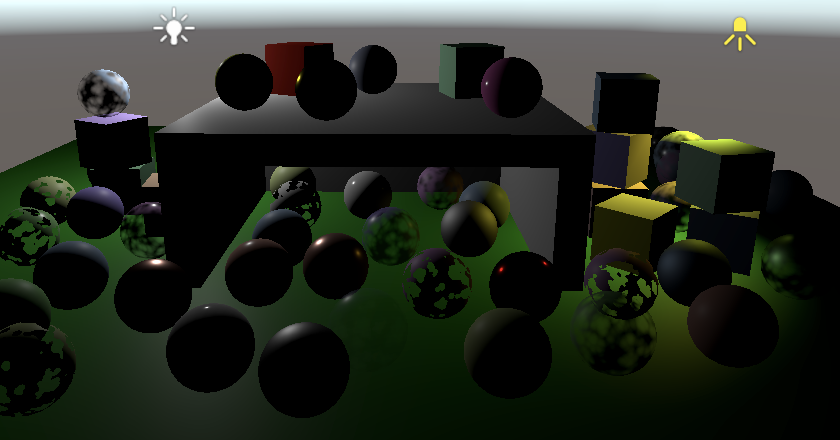
Realtime and baked, only one point and spot light 实时与烘焙混合模式下的单点光源与聚光灯
虽然这已满足烘焙这些光源的基本要求,但实际表明烘焙后的光照亮度过高。这是因为Unity默认使用了不正确的光照衰减计算方式——该方式沿用了旧版渲染管线的匹配结果
3.2 Lights Delegate 光源委托
我们可以通过向Unity提供委托方法,指示其采用不同的衰减计算方式——该方法将在编辑器中进行光照贴图烘焙前被调用。具体实现步骤:将CustomRenderPipeline转换为分部类,并在其构造函数的末尾调用一个当前尚未实现的InitializeForEditor方法
public partial class CustomRenderPipeline : RenderPipeline {…public CustomRenderPipeline (bool useDynamicBatching, bool useGPUInstancing, bool useSRPBatcher,ShadowSettings shadowSettings) {…InitializeForEditor();}…
}
接着为其创建另一个编辑器专用的分部类——就像处理CameraRenderer时一样——并在其中为新方法定义存根。除了UnityEngine命名空间外,我们还需要使用Unity.Collections和UnityEngine.Experimental.GlobalIllumination。这将导致LightType出现类型冲突,因此需显式指定使用UnityEngine.LightType
using Unity.Collections;
using UnityEngine;
using UnityEngine.Experimental.GlobalIllumination;
using LightType = UnityEngine.LightType;public partial class CustomRenderPipeline {partial void InitializeForEditor ();
}
仅在编辑器环境下,我们需要重写光照贴图器设置光源数据的方式。这需要通过为其提供一个委托方法来实现,该方法负责将输入光源数组的数据传输至NativeArray<LightDataGI>类型的输出数组中。该委托的类型为Lightmapping.RequestLightsDelegate,由于无需在其他地方复用,我们将使用Lambda表达式来定义该方法
partial void InitializeForEditor ();#if UNITY_EDITORstatic Lightmapping.RequestLightsDelegate lightsDelegate =(Light[] lights, NativeArray<LightDataGI> output) => {};#endif我们需要为每个光源配置LightDataGI结构体并将其添加到输出数组中。由于需要针对不同光源类型使用特殊代码,因此将在循环中使用switch语句实现此逻辑。默认情况下,我们会在光源数据上调用InitNoBake方法并传入光源实例ID,这将指示Unity不烘焙该光源
static Lightmapping.RequestLightsDelegate lightsDelegate =(Light[] lights, NativeArray<LightDataGI> output) => {var lightData = new LightDataGI();for (int i = 0; i < lights.Length; i++) {Light light = lights[i];switch (light.type) {default:lightData.InitNoBake(light.GetInstanceID());break;}output[i] = lightData;}};接下来,针对每种支持的光源类型,我们需要构建专用的光源结构体:调用LightmapperUtils.Extract方法(参数为光源对象和该结构体的引用),随后在光源数据上调用Init方法(以引用方式传递结构体)。此操作需覆盖定向光、点光源、聚光灯和区域光四种类型
switch (light.type) {case LightType.Directional:var directionalLight = new DirectionalLight();LightmapperUtils.Extract(light, ref directionalLight);lightData.Init(ref directionalLight);break;case LightType.Point:var pointLight = new PointLight();LightmapperUtils.Extract(light, ref pointLight);lightData.Init(ref pointLight);break;case LightType.Spot:var spotLight = new SpotLight();LightmapperUtils.Extract(light, ref spotLight);lightData.Init(ref spotLight);break;case LightType.Area:var rectangleLight = new RectangleLight();LightmapperUtils.Extract(light, ref rectangleLight);lightData.Init(ref rectangleLight);break;default:lightData.InitNoBake(light.GetInstanceID());break;}在Unity 2022中,我们还可配置聚光灯的内角参数与衰减模式
case LightType.Spot:var spotLight = new SpotLight();LightmapperUtils.Extract(light, ref spotLight);spotLight.innerConeAngle = light.innerSpotAngle * Mathf.Deg2Rad;spotLight.angularFalloff =AngularFalloffType.AnalyticAndInnerAngle;lightData.Init(ref spotLight);break;由于本渲染管线不支持实时区域光,若场景中存在此类光源,我们将强制将其光照模式设置为烘焙模式
case LightType.Area:var rectangleLight = new RectangleLight();LightmapperUtils.Extract(light, ref rectangleLight);rectangleLight.mode = LightMode.Baked;lightData.Init(ref rectangleLight);break;以上只是我们必须包含的样板代码。这一切的核心意义在于:现在我们可以将所有光源数据的衰减类型统一设置为FalloffType.InverseSquared。
lightData.falloff = FalloffType.InverseSquared;output[i] = lightData;为使Unity调用我们的代码,需要创建InitializeForEditor的编辑器版本,其中通过调用Lightmapping.SetDelegate方法并传入我们的委托作为参数来实现。
partial void InitializeForEditor ();#if UNITY_EDITORpartial void InitializeForEditor () {Lightmapping.SetDelegate(lightsDelegate);}当我们的渲染管线被销毁时,还需清理并重置委托。这需要通过重写Dispose方法来实现:先调用基类实现,再执行Lightmapping.ResetDelegate
partial void InitializeForEditor () {Lightmapping.SetDelegate(lightsDelegate);}protected override void Dispose (bool disposing) {base.Dispose(disposing);Lightmapping.ResetDelegate();}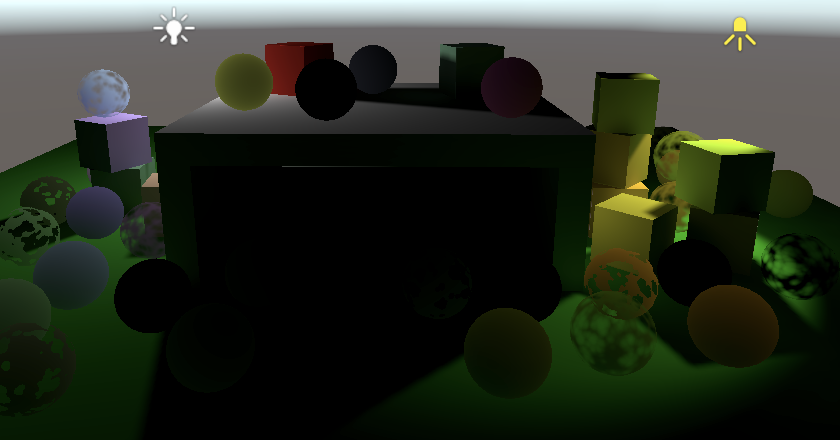
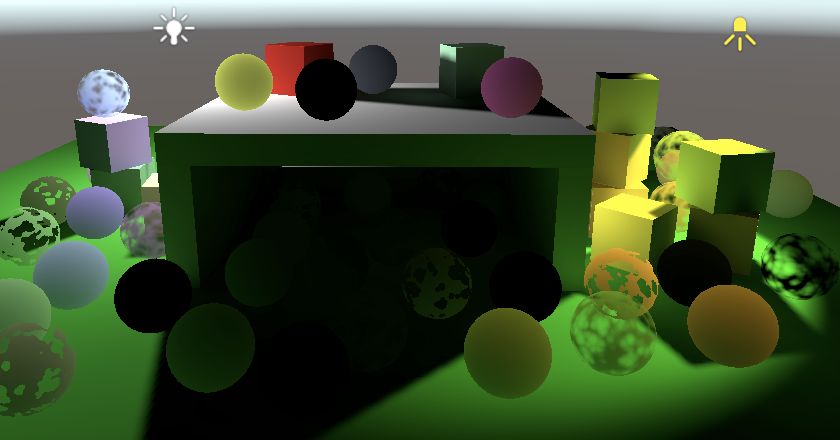
Baked with correct falloff 采用正确衰减模式的烘焙效果
3.3 Shadow Mask 阴影遮罩
点光源与聚光灯的阴影同样可烘焙至阴影遮罩中,只需将其光照模式设置为混合模式。每个光源会分配到一个通道,这与定向光的处理方式相同。但由于这些光源的作用范围有限,只要光照区域互不重叠,多个光源便可共用同一通道。因此阴影遮罩理论上可支持任意数量的光源,但每个纹理素最多容纳四个通道。若多个光源在尝试占用同一通道时出现区域重叠,系统将把次要光源强制切换至烘焙模式,直至冲突消除

Shadow mask with a point and a spot light 包含点光源与聚光灯的阴影遮罩
public Vector4 ReserveOtherShadows (Light light, int visibleLightIndex) {if (light.shadows != LightShadows.None && light.shadowStrength > 0f) {LightBakingOutput lightBaking = light.bakingOutput;if (lightBaking.lightmapBakeType == LightmapBakeType.Mixed &&lightBaking.mixedLightingMode == MixedLightingMode.Shadowmask) {useShadowMask = true;return new Vector4(light.shadowStrength, 0f, 0f,lightBaking.occlusionMaskChannel);}}return new Vector4(0f, 0f, 0f, -1f);}在Lighting中添加着色器属性名称及阴影数据数组
static intotherLightCountId = Shader.PropertyToID("_OtherLightCount"),otherLightColorsId = Shader.PropertyToID("_OtherLightColors"),otherLightPositionsId = Shader.PropertyToID("_OtherLightPositions"),otherLightDirectionsId = Shader.PropertyToID("_OtherLightDirections"),otherLightSpotAnglesId = Shader.PropertyToID("_OtherLightSpotAngles"),otherLightShadowDataId = Shader.PropertyToID("_OtherLightShadowData");static Vector4[]otherLightColors = new Vector4[maxOtherLightCount],otherLightPositions = new Vector4[maxOtherLightCount],otherLightDirections = new Vector4[maxOtherLightCount],otherLightSpotAngles = new Vector4[maxOtherLightCount],otherLightShadowData = new Vector4[maxOtherLightCount];在SetupLights中将其发送至GPU
buffer.SetGlobalVectorArray(otherLightSpotAnglesId, otherLightSpotAngles);buffer.SetGlobalVectorArray(otherLightShadowDataId, otherLightShadowData);并在SetupPointLight与SetupSpotLight中配置相关数据
void SetupPointLight (int index, ref VisibleLight visibleLight) {…Light light = visibleLight.light;otherLightShadowData[index] = shadows.ReserveOtherShadows(light, index);}void SetupSpotLight (int index, ref VisibleLight visibleLight) {…otherLightShadowData[index] = shadows.ReserveOtherShadows(light, index);}在着色器端,向Shadows添加OtherShadowData结构体与GetOtherShadowAttenuation函数。我们再次采用与定向阴影相同的实现方式,区别在于仅需处理阴影强度与遮罩通道参数。若阴影强度为正值,则始终调用GetBakedShadow函数;否则按无阴影情况处理
struct OtherShadowData {float strength;int shadowMaskChannel;
};float GetOtherShadowAttenuation (OtherShadowData other, ShadowData global, Surface surfaceWS
) {#if !defined(_RECEIVE_SHADOWS)return 1.0;#endiffloat shadow;if (other.strength > 0.0) {shadow = GetBakedShadow(global.shadowMask, other.shadowMaskChannel, other.strength);}else {shadow = 1.0;}return shadow;
}
在Light中添加阴影数据,并在GetOtherLight中将其纳入衰减计算
CBUFFER_START(_CustomLight)…float4 _OtherLightShadowData[MAX_OTHER_LIGHT_COUNT];
CBUFFER_END…			OtherShadowData GetOtherShadowData (int lightIndex) {OtherShadowData data;data.strength = _OtherLightShadowData[lightIndex].x;data.shadowMaskChannel = _OtherLightShadowData[lightIndex].w;return data;
}Light GetOtherLight (int index, Surface surfaceWS, ShadowData shadowData) {…OtherShadowData otherShadowData = GetOtherShadowData(index);light.attenuation =GetOtherShadowAttenuation(otherShadowData, shadowData, surfaceWS) *spotAttenuation * rangeAttenuation / distanceSqr;return light;
}
Point and spot light with baked shadows 带烘焙阴影的点光源与聚光灯
4. Lights Per Object 基于对象的光源数量限制
目前所有可见光源都会在每个渲染片段上进行计算。这对定向光来说没有问题,但对于超出片段作用范围的其他光源类型,这种计算则是不必要的开销。通常每个点光源或聚光灯仅影响所有片段中的一小部分,因此大量计算被白白浪费,可能严重影响渲染性能。
为了在保持高性能的同时支持多光源渲染,我们必须设法减少每个片段需要计算的光源数量。现有多种技术方案可供选择,其中最简单的是使用Unity的逐对象光源索引机制。
该机制的原理是:Unity会判断哪些光源对每个物体产生影响,并将这些信息发送至GPU。随后在渲染每个物体时,我们只需计算相关光源的作用,忽略其他无关光源。这意味着光源判定是基于物体级别而非片段级别。这种机制对于小型物体通常效果良好,但对大型物体则存在局限——因为若某个光源仅影响物体的局部区域,该光源计算仍会覆盖整个物体表面。此外,系统对每个物体所能接受的光源数量存在上限,因此大型物体更容易出现光照缺失。
鉴于逐对象光源索引机制存在上述局限且可能导致部分光照缺失,我们将其设为可选功能。这样既能方便地进行视觉效果对比,也能更灵活地评估性能表现
Unity的逐对象光源索引代码确实多次出现故障吗?
是的,自Unity 2018以来该功能已多次失效,有时甚至持续数月,引发大量程序错误。这也是我们将其设为可选功能的另一重要原因
4.1 Per-Object Light Data 逐对象光源数据
向CameraRenderer.DrawVisibleGeometry方法添加布尔参数,用于指示是否启用逐对象光源模式。若启用,需在绘制设置的逐对象数据中激活PerObjectData.LightData与PerObjectData.LightIndices标志位
void DrawVisibleGeometry (bool useDynamicBatching, bool useGPUInstancing, bool useLightsPerObject) {PerObjectData lightsPerObjectFlags = useLightsPerObject ?PerObjectData.LightData | PerObjectData.LightIndices :PerObjectData.None;var sortingSettings = new SortingSettings(camera) {criteria = SortingCriteria.CommonOpaque};var drawingSettings = new DrawingSettings(unlitShaderTagId, sortingSettings) {enableDynamicBatching = useDynamicBatching,enableInstancing = useGPUInstancing,perObjectData =PerObjectData.ReflectionProbes |PerObjectData.Lightmaps | PerObjectData.ShadowMask |PerObjectData.LightProbe | PerObjectData.OcclusionProbe |PerObjectData.LightProbeProxyVolume |PerObjectData.OcclusionProbeProxyVolume |lightsPerObjectFlags};…}需向Render方法添加相同参数,以便将其传递至DrawVisibleGeometry
public void Render (ScriptableRenderContext context, Camera camera,bool useDynamicBatching, bool useGPUInstancing, bool useLightsPerObject,ShadowSettings shadowSettings) {…DrawVisibleGeometry(useDynamicBatching, useGPUInstancing, useLightsPerObject);…}同时,我们也必须在CustomRenderPipeline中记录并传递该模式参数,如同处理其他布尔选项一样
bool useDynamicBatching, useGPUInstancing, useLightsPerObject;ShadowSettings shadowSettings;public CustomRenderPipeline (bool useDynamicBatching, bool useGPUInstancing, bool useSRPBatcher,bool useLightsPerObject, ShadowSettings shadowSettings) {this.shadowSettings = shadowSettings;this.useDynamicBatching = useDynamicBatching;this.useGPUInstancing = useGPUInstancing;this.useLightsPerObject = useLightsPerObject;…}…protected override void Render (ScriptableRenderContext context, List<Camera> cameras) {for (int i = 0; i < cameras.Count; i++)) {renderer.Render(context, cameras[i],useDynamicBatching, useGPUInstancing, useLightsPerObject,shadowSettings);}}最后,在CustomRenderPipelineAsset中添加该切换选项
[SerializeField]booluseDynamicBatching = true,useGPUInstancing = true,useSRPBatcher = true,useLightsPerObject = true;[SerializeField]ShadowSettings shadows = default;protected override RenderPipeline CreatePipeline () {return new CustomRenderPipeline(useDynamicBatching, useGPUInstancing, useSRPBatcher,useLightsPerObject, shadows);}
Lights per object enabled
4.2 Sanitizing Light Indices 光源索引净化
Unity会简单地为每个对象创建包含所有活动光源的列表,并大致按重要性排序。该列表包含所有光源(无论是否可见)以及定向光。我们需要对这些列表进行净化处理,仅保留可见非定向光源的索引。这一操作将在Lighting.SetupLights中完成,因此需为该方法添加逐对象光源参数,并相应修改Lighting.Setup以传递该参数
public void Setup (ScriptableRenderContext context, CullingResults cullingResults,ShadowSettings shadowSettings, bool useLightsPerObject) {…SetupLights(useLightsPerObject);…}…void SetupLights (bool useLightsPerObject) { … }随后在CameraRenderer.Render中,将模式参数添加为Setup方法的实参
lighting.Setup(context, cullingResults, shadowSettings, useLightsPerObject);在Lighting.SetupLights中,开始遍历可见光源之前,需从裁剪结果中获取光源索引映射表。通过调用GetLightIndexMap方法并传入Allocator.Temp参数,即可获得临时的NativeArray<int>数组,其中包含的光源索引与可见光源索引及场景中所有其他活动光源相匹配
NativeArray<int> indexMap =cullingResults.GetLightIndexMap(Allocator.Temp);NativeArray<VisibleLight> visibleLights = cullingResults.visibleLights;仅当使用逐对象光源模式时,我们才需要获取这些数据。由于原生数组是结构体类型,在其他情况下我们将其初始化为默认值,这不会引发任何内存分配
NativeArray<int> indexMap = useLightsPerObject ?cullingResults.GetLightIndexMap(Allocator.Temp) : default;我们仅需保留所包含的点光源与聚光灯索引,其他所有光源的索引都应跳过。通过将所有其他光源的索引设置为-1,我们将这一信息传达给Unity。同时,还需调整剩余光源的索引以匹配我们的索引体系。请注意,仅当成功获取索引映射表时,才执行新索引的设置操作
for (int i = 0; i < visibleLights.Length; i++) {int newIndex = -1;VisibleLight visibleLight = visibleLights[i];switch (visibleLight.lightType) {…case LightType.Point:if (otherLightCount < maxOtherLightCount) {newIndex = otherLightCount;SetupPointLight(otherLightCount++, ref visibleLight);}break;case LightType.Spot:if (otherLightCount < maxOtherLightCount) {newIndex = otherLightCount;SetupSpotLight(otherLightCount++, ref visibleLight);}break;}if (useLightsPerObject) {indexMap[i] = newIndex;}}我们还需剔除所有不可见光源的索引。若启用逐对象光源模式,请在首个循环结束后继续执行第二个循环来完成此操作
int i;for (i = 0; i < visibleLights.Length; i++) {…}if (useLightsPerObject) {for (; i < indexMap.Length; i++) {indexMap[i] = -1;}}完成调整后,我们必须通过调用裁剪结果上的SetLightIndexMap方法,将修改后的索引映射表传回Unity。此后索引映射表便不再需要,应通过调用Dispose方法将其立即释放
if (useLightsPerObject) {for (; i < indexMap.Length; i++) {indexMap[i] = -1;}cullingResults.SetLightIndexMap(indexMap);indexMap.Dispose();}最后,当启用逐对象光源模式时,我们将使用不同的着色器变体。通过适时启用或禁用_LIGHTS_PER_OBJECT着色器关键字来标识该状态
static string lightsPerObjectKeyword = "_LIGHTS_PER_OBJECT";…void SetupLights (bool useLightsPerObject) {…if (useLightsPerObject) {for (; i < indexMap.Length; i++) {indexMap[i] = -1;}cullingResults.SetLightIndexMap(indexMap);indexMap.Dispose();Shader.EnableKeyword(lightsPerObjectKeyword);}else {Shader.DisableKeyword(lightsPerObjectKeyword);}…}4.3 Using the Indices 使用索引数据
为使用光源索引数据,请在我们的Lit着色器的CustomLit通道中添加相关多重编译指令
#pragma multi_compile _ _LIGHTS_PER_OBJECT所需数据属于UnityPerDraw缓冲区的组成部分,由两个real4类型的数值构成,必须直接在unity_WorldTransformParams之后定义。首先是unity_LightData,其Y分量包含光源数量信息。随后是unity_LightIndices,这是一个长度为2的数组。两个向量的每个通道各存储一个光源索引,因此每个对象最多支持八个光源索引
real4 unity_WorldTransformParams;real4 unity_LightData;real4 unity_LightIndices[2];若已定义_LIGHTS_PER_OBJECT,请在GetLighting中对其他光源使用替代循环方案。此时光源数量需通过unity_LightData.y获取,而光源索引则必须从unity_LightIndices的相应元素和分量中提取。通过将迭代器除以4可定位正确向量,再取模4运算即可获得对应分量
#if defined(_LIGHTS_PER_OBJECT)for (int j = 0; j < unity_LightData.y; j++) {int lightIndex = unity_LightIndices[j / 4][j % 4];Light light = GetOtherLight(lightIndex, surfaceWS, shadowData);color += GetLighting(surfaceWS, brdf, light);}#elsefor (int j = 0; j < GetOtherLightCount(); j++) {Light light = GetOtherLight(j, surfaceWS, shadowData);color += GetLighting(surfaceWS, brdf, light);}#endif然而,尽管最多只提供八个光源索引,但系统返回的光源数量并未考虑此限制。因此我们必须显式地将循环迭代次数限制为八次
for (int j = 0; j < min(unity_LightData.y, 8); j++) { … }此时着色器编译器可能会提示整数除法与取模运算效率较低(至少在针对D3D编译时)。使用无符号等效运算可获得更高效率。我们可在执行运算时将j强制转换为uint类型,以此向编译器表明可忽略该值的符号特性
int lightIndex = unity_LightIndices[(uint)j / 4][(uint)j % 4];
Lights-per-object disabled and enabled 逐对象光源模式禁用与启用状态对比
请注意,启用逐对象光源模式会降低GPU实例化效率,因为系统仅能对光源数量与索引列表完全匹配的对象进行分组。但SRP批处理器不受此影响,因为每个对象仍会获得独立的优化绘制调用。
The next tutorial is Point and Spot Shadows.