开源 C++ QT QML 开发(七)自定义控件--仪表盘
文章的目的为了记录使用QT QML开发学习的经历。开发流程和要点有些记忆模糊,赶紧记录,防止忘记。
相关链接:
开源 C++ QT QML 开发(一)基本介绍
开源 C++ QT QML 开发(二)工程结构
开源 C++ QT QML 开发(三)常用控件
开源 C++ QT QML 开发(四)复杂控件--Listview
开源 C++ QT QML 开发(五)复杂控件--Gridview
开源 C++ QT QML 开发(六)自定义控件--波形图
开源 C++ QT QML 开发(七)自定义控件--仪表盘
推荐链接:
开源 C# 快速开发(一)基础知识
开源 C# 快速开发(二)基础控件
开源 C# 快速开发(三)复杂控件
开源 C# 快速开发(四)自定义控件--波形图
开源 C# 快速开发(五)自定义控件--仪表盘
开源 C# 快速开发(六)自定义控件--圆环
开源 C# 快速开发(七)通讯--串口
开源 C# 快速开发(八)通讯--Tcp服务器端
开源 C# 快速开发(九)通讯--Tcp客户端
开源 C# 快速开发(十)通讯--http客户端
开源 C# 快速开发(十一)线程
开源 C# 快速开发(十二)进程监控
开源 C# 快速开发(十三)进程--管道通讯
开源 C# 快速开发(十四)进程--内存映射
开源 C# 快速开发(十五)进程--windows消息
开源 C# 快速开发(十六)数据库--sqlserver增删改查
本章节主要内容是:仪表盘实现了一个汽车速度表风格自定义控件,参数可设置,数据可实时更新。
1.代码分析
2.所有源码
3.效果演示
一、代码分析
1. 角度计算函数
angleRange 计算属性
readonly property real angleRange: {if (endAngle > startAngle) {return endAngle - startAngle} else {return 360 - startAngle + endAngle}
}
功能:计算仪表盘的总角度范围
逻辑:
正常情况:endAngle - startAngle
跨0度情况:360 - startAngle + endAngle(如135°到45°)
示例:startAngle=135, endAngle=45 → 角度范围 = 270°
valueToAngle(val) 函数
function valueToAngle(val) {var normalizedValue = (val - minValue) / (maxValue - minValue)return startAngle + normalizedValue * angleRange
}
功能:将数值转换为对应的角度
计算步骤:
(val - minValue) / (maxValue - minValue) → 归一化到[0,1]
normalizedValue * angleRange → 映射到角度范围
startAngle + ... → 加上起始角度偏移
示例:val=50, min=0, max=100, start=135, angleRange=270
→ normalizedValue = 0.5
→ 角度 = 135 + 0.5 × 270 = 270°
2. 绘图函数分析
2.1 背景圆弧绘制
PathAngleArc {centerX: root.width / 2centerY: root.height / 2radiusX: Math.min(root.width, root.height) / 2 - 10radiusY: Math.min(root.width, root.height) / 2 - 10startAngle: root.startAnglesweepAngle: root.angleRange
}
参数说明:
centerX/Y:圆弧中心点(仪表盘中心)
radiusX/Y:半径(取宽高最小值,-10留边距)
startAngle:起始角度
sweepAngle:扫过的角度范围
2.2 阶段颜色段绘制
PathAngleArc {centerX: root.width / 2centerY: root.height / 2radiusX: Math.min(root.width, root.height) / 2 - 25  // 更小的半径radiusY: Math.min(root.width, root.height) / 2 - 25startAngle: valueToAngle(modelData.from)  // 段起始角度sweepAngle: valueToAngle(modelData.to) - valueToAngle(modelData.from) // 段角度范围
}
关键点:
半径比背景小15像素,形成环形效果
每个颜色段独立计算起始和结束角度
2.3 刻度生成系统
主刻度生成
transform: Rotation {origin.x: majorTick.width / 2origin.y: Math.min(root.width, root.height) / 2 - 5angle: root.startAngle + index * (root.angleRange / root.scaleMajor)
}
旋转计算:
origin:旋转原点(刻度底部中心)
angle:每个刻度的角度 = 起始角度 + 索引 × 角度间隔
次刻度生成
angle: root.startAngle + index * (root.angleRange / (root.scaleMajor * root.scaleMinor))
间隔计算:总刻度数 = 主刻度数 × 次刻度数
2.4 刻度值定位函数
x: root.width / 2 - width / 2 +(Math.min(root.width, root.height) / 2 + 20) *Math.sin((root.startAngle + index * (root.angleRange / root.scaleMajor)) * Math.PI / 180)y: root.height / 2 - height / 2 -(Math.min(root.width, root.height) / 2 + 20) *Math.cos((root.startAngle + index * (root.angleRange / root.scaleMajor)) * Math.PI / 180)
极坐标转换公式:
x = centerX + radius × sin(angle)
y = centerY - radius × cos(angle)(Y轴向下为正)
参数:
半径:Math.min(width,height)/2 + 20(在圆环外20像素)
角度转换为弧度:angle * Math.PI / 1802.5 指针绘制函数
PathLine {x: root.width / 2 +(Math.min(root.width, root.height) / 2 - 30) *Math.sin(valueToAngle(root.value) * Math.PI / 180)y: root.height / 2 -(Math.min(root.width, root.height) / 2 - 30) *Math.cos(valueToAngle(root.value) * Math.PI / 180)
}PathLine {x: root.width / 2 - 5 *Math.cos(valueToAngle(root.value) * Math.PI / 180)y: root.height / 2 - 5 *Math.sin(valueToAngle(root.value) * Math.PI / 180)
}
指针三角形计算:
指针尖端:在半径-30的位置
指针尾部点1:从中心向左偏移5像素,垂直于指针方向
指针尾部点2:自动闭合形成三角形
3. 主窗口控制函数
3.1 速度控制函数
onClicked: {currentSpeed = Math.max(0, currentSpeed - 10)  // 减速,不低于0if (dashboardLoader.item) {dashboardLoader.item.value = currentSpeed  // 更新仪表盘}
}
3.2 预设值函数
onClicked: {currentSpeed = 50  // 中间值if (dashboardLoader.item) {dashboardLoader.item.value = currentSpeed}
}
3.3 仪表盘加载回调
onLoaded: {item.value = currentSpeeditem.minValue = 0item.maxValue = 100item.title = "阶段速度仪表盘"item.segments = [ ... ]  // 自定义颜色段
}
4. 数学原理总结
4.1 极坐标系统
x = centerX + r × cos(θ)
y = centerY + r × sin(θ)
但代码中使用的是:
x = centerX + r × sin(θ) // 因为0°指向右侧
y = centerY - r × cos(θ) // Y轴反转,-cos使0°向上
4.2 线性映射公式
角度 = startAngle + (value - minValue) / (maxValue - minValue) × angleRange
4.3 边界处理
Math.min(width, height):确保圆形适应各种容器
Math.max(0, ...) / Math.min(100, ...):限制速度范围
这个仪表盘通过精密的数学计算实现了完整的极坐标可视化系统,每个组件都基于中心点和半径进行精确定位。
二、所有源码
dashboard.qml文件源码
import QtQuick 2.12
import QtQuick.Shapes 1.12Item {id: root// 可配置属性property real value: 0                    // 当前值property real minValue: 0                 // 最小值property real maxValue: 100               // 最大值property real startAngle: 135             // 起始角度property real endAngle: 45                // 结束角度property real scaleMajor: 10              // 主刻度数量property real scaleMinor: 5               // 每个主刻度中的次刻度数量property string title: "速度"             // 标题// 阶段颜色配置property var segments: [{from: 0, to: 30, color: "#91c7ae"},{from: 30, to: 60, color: "#63869e"},{from: 60, to: 90, color: "#c23531"}]// 文本颜色property color textColor: "white"property color scaleColor: "white"width: 300height: 300// 计算角度范围readonly property real angleRange: {if (endAngle > startAngle) {return endAngle - startAngle} else {return 360 - startAngle + endAngle}}// 将值转换为角度function valueToAngle(val) {var normalizedValue = (val - minValue) / (maxValue - minValue)return startAngle + normalizedValue * angleRange}// 绘制仪表盘背景Shape {id: backgroundanchors.fill: parentShapePath {id: backgroundPathstrokeWidth: 0fillColor: "transparent"startX: root.width / 2startY: root.height / 2PathAngleArc {centerX: root.width / 2centerY: root.height / 2radiusX: Math.min(root.width, root.height) / 2 - 10radiusY: Math.min(root.width, root.height) / 2 - 10startAngle: root.startAnglesweepAngle: root.angleRange}}}// 绘制阶段颜色Repeater {model: root.segmentsShape {id: segmentShapeanchors.fill: parentShapePath {strokeWidth: 20strokeColor: modelData.colorcapStyle: ShapePath.FlatCapfillColor: "transparent"PathAngleArc {centerX: root.width / 2centerY: root.height / 2radiusX: Math.min(root.width, root.height) / 2 - 25radiusY: Math.min(root.width, root.height) / 2 - 25startAngle: valueToAngle(modelData.from)sweepAngle: valueToAngle(modelData.to) - valueToAngle(modelData.from)}}}}// 绘制刻度Repeater {model: root.scaleMajor + 1// 主刻度Rectangle {id: majorTickx: root.width / 2 - width / 2y: 10width: 2height: 10color: root.scaleColortransform: Rotation {origin.x: majorTick.width / 2origin.y: Math.min(root.width, root.height) / 2 - 5angle: root.startAngle + index * (root.angleRange / root.scaleMajor)}}}Repeater {model: root.scaleMajor * root.scaleMinor// 次刻度Rectangle {id: minorTickx: root.width / 2 - width / 2y: 10width: 1height: 5color: root.scaleColortransform: Rotation {origin.x: minorTick.width / 2origin.y: Math.min(root.width, root.height) / 2 - 5angle: root.startAngle + index * (root.angleRange / (root.scaleMajor * root.scaleMinor))}}}// 绘制刻度值Repeater {model: root.scaleMajor + 1Text {text: Math.round(root.minValue + index * (root.maxValue - root.minValue) / root.scaleMajor)color: root.textColorfont.pixelSize: 12x: root.width / 2 - width / 2 +(Math.min(root.width, root.height) / 2 + 20) *Math.sin((root.startAngle + index * (root.angleRange / root.scaleMajor)) * Math.PI / 180)y: root.height / 2 - height / 2 -(Math.min(root.width, root.height) / 2 + 20) *Math.cos((root.startAngle + index * (root.angleRange / root.scaleMajor)) * Math.PI / 180)}}// 绘制指针Shape {id: pointeranchors.fill: parentShapePath {id: pointerPathstrokeWidth: 0fillColor: "#fff"startX: root.width / 2startY: root.height / 2PathLine {x: root.width / 2 +(Math.min(root.width, root.height) / 2 - 30) *Math.sin(valueToAngle(root.value) * Math.PI / 180)y: root.height / 2 -(Math.min(root.width, root.height) / 2 - 30) *Math.cos(valueToAngle(root.value) * Math.PI / 180)}PathLine {x: root.width / 2 - 5 *Math.cos(valueToAngle(root.value) * Math.PI / 180)y: root.height / 2 - 5 *Math.sin(valueToAngle(root.value) * Math.PI / 180)}}}// 中心圆点Rectangle {width: 10height: 10radius: 5color: "#fff"anchors.centerIn: parent}// 显示当前值Text {id: valueTexttext: root.value.toFixed(1)color: root.textColorfont.pixelSize: 24font.bold: trueanchors {horizontalCenter: parent.horizontalCentertop: parent.verticalCentertopMargin: 20}}// 显示标题Text {text: root.titlecolor: root.textColorfont.pixelSize: 16anchors {horizontalCenter: parent.horizontalCentertop: valueText.bottomtopMargin: 5}}// 显示单位Text {text: "km/h"color: root.textColorfont.pixelSize: 12anchors {horizontalCenter: parent.horizontalCentertop: parent.bottomtopMargin: -30}}
}
main.qml文件源码
import QtQuick 2.12
import QtQuick.Window 2.12
import QtQuick.Controls 2.12Window {id: mainWindowwidth: 800height: 600visible: truetitle: "自定义仪表盘 - 刻度在外"color: "#1e1e1e"// 当前速度值property real currentSpeed: 0// 定时器,每1秒更新数据Timer {id: dataTimerinterval: 1000running: truerepeat: trueonTriggered: {console.log("当前速度:", currentSpeed.toFixed(1) + " km/h")}}Column {anchors.centerIn: parentspacing: 30// 仪表盘 - 使用加载器动态加载Loader {id: dashboardLoadersource: "dashboard.qml"width: 350  // 稍微加大以容纳外部刻度height: 350onLoaded: {item.value = currentSpeeditem.minValue = 0item.maxValue = 100item.title = "阶段速度仪表盘"// 可以自定义阶段颜色item.segments = [{from: 0, to: 30, color: "#91c7ae"},{from: 30, to: 60, color: "#63869e"},{from: 60, to: 90, color: "#c23531"},{from: 90, to: 100, color: "#d48265"}]}}// 控制按钮区域Row {anchors.horizontalCenter: parent.horizontalCenterspacing: 20// 减速按钮Button {text: "-"font.pixelSize: 24width: 60height: 60background: Rectangle {color: parent.down ? "#555555" : "#333333"radius: 30border.color: "#666666"border.width: 2}contentItem: Text {text: parent.textfont: parent.fontcolor: "white"horizontalAlignment: Text.AlignHCenterverticalAlignment: Text.AlignVCenter}onClicked: {currentSpeed = Math.max(0, currentSpeed - 10)if (dashboardLoader.item) {dashboardLoader.item.value = currentSpeed}}}// 当前速度显示Rectangle {width: 180height: 50color: "transparent"border.color: "#444444"border.width: 2radius: 8Text {anchors.centerIn: parenttext: "当前速度: " + currentSpeed.toFixed(1) + " km/h"color: "white"font.pixelSize: 16font.bold: true}}// 加速按钮Button {text: "+"font.pixelSize: 24width: 60height: 60background: Rectangle {color: parent.down ? "#555555" : "#333333"radius: 30border.color: "#666666"border.width: 2}contentItem: Text {text: parent.textfont: parent.fontcolor: "white"horizontalAlignment: Text.AlignHCenterverticalAlignment: Text.AlignVCenter}onClicked: {currentSpeed = Math.min(100, currentSpeed + 10)if (dashboardLoader.item) {dashboardLoader.item.value = currentSpeed}}}}// 控制面板Row {anchors.horizontalCenter: parent.horizontalCenterspacing: 15// 重置按钮Button {text: "重置"width: 80height: 40background: Rectangle {color: parent.down ? "#555555" : "#333333"radius: 5border.color: "#666666"border.width: 2}contentItem: Text {text: parent.textfont.pixelSize: 14color: "white"horizontalAlignment: Text.AlignHCenterverticalAlignment: Text.AlignVCenter}onClicked: {currentSpeed = 0if (dashboardLoader.item) {dashboardLoader.item.value = currentSpeed}}}// 设置最大值按钮Button {text: "最大值"width: 80height: 40background: Rectangle {color: parent.down ? "#555555" : "#333333"radius: 5border.color: "#666666"border.width: 2}contentItem: Text {text: parent.textfont.pixelSize: 14color: "white"horizontalAlignment: Text.AlignHCenterverticalAlignment: Text.AlignVCenter}onClicked: {currentSpeed = 100if (dashboardLoader.item) {dashboardLoader.item.value = currentSpeed}}}// 中间值按钮Button {text: "中间值"width: 80height: 40background: Rectangle {color: parent.down ? "#555555" : "#333333"radius: 5border.color: "#666666"border.width: 2}contentItem: Text {text: parent.textfont.pixelSize: 14color: "white"horizontalAlignment: Text.AlignHCenterverticalAlignment: Text.AlignVCenter}onClicked: {currentSpeed = 50if (dashboardLoader.item) {dashboardLoader.item.value = currentSpeed}}}}}// 状态显示Text {anchors {bottom: parent.bottomright: parent.rightmargins: 10}text: "仪表盘大小: " + dashboardLoader.width + "x" + dashboardLoader.height +" | 量程: 0-100 | 刻度位置: 外部"color: "#888888"font.pixelSize: 12}// 说明文本Text {anchors {bottom: parent.bottomleft: parent.leftmargins: 10}text: "刻度外部显示"color: "#91c7ae"font.pixelSize: 12}
}
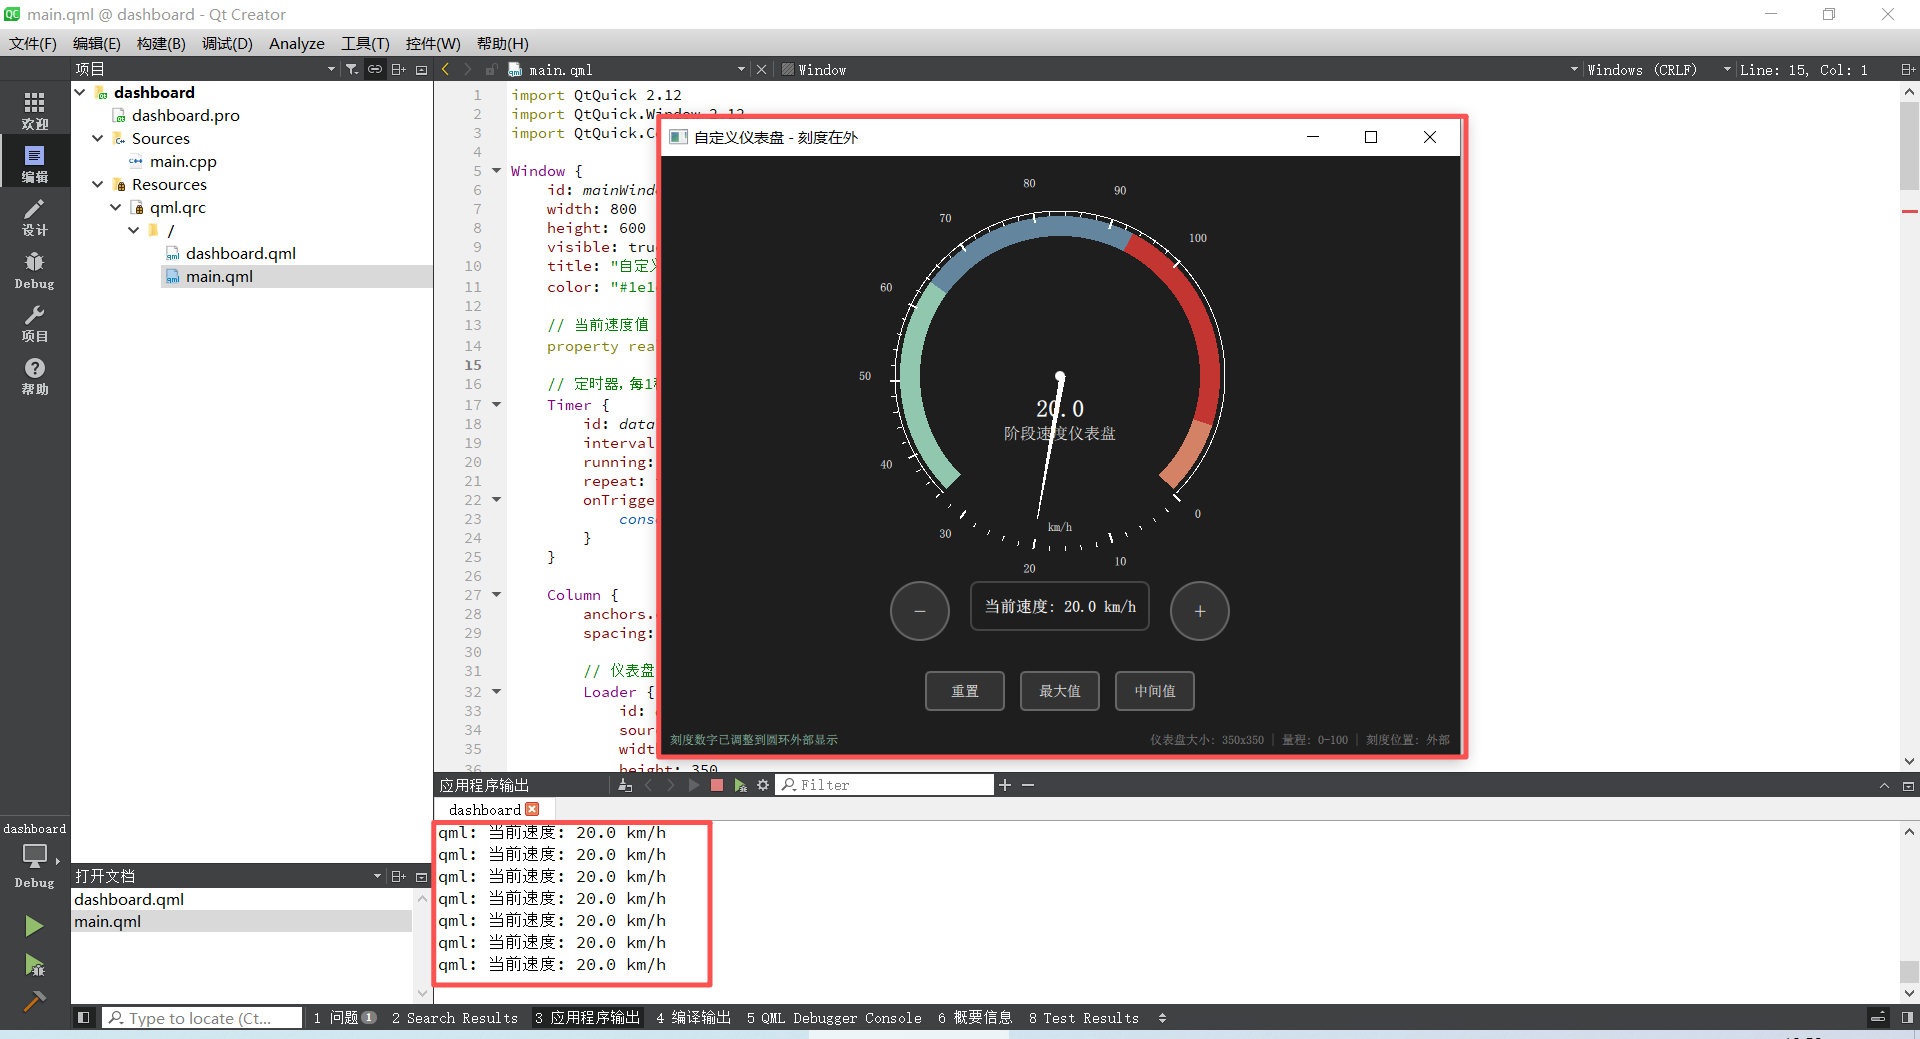
三、效果演示
每1s回刷新速度,点击+-,速度会+-10。