Python 日历记事本完整开发教程(自绘日历版)
项目简介
本文将详细讲解如何使用Python的wxPython GUI框架开发一个功能完整的日历记事本应用。该应用支持选择年月、记录每日待办事项、美观预览、背景自定义以及PDF导出等功能。
特别说明:本教程使用自绘日历方式,完全不依赖 wx.calendar 模块,避免了安装问题,更加灵活可控。
技术栈
- wxPython: 跨平台GUI框架,用于构建用户界面
- ReportLab: PDF生成库
- PIL (Pillow): 图像处理库
- Python标准库: calendar、json、datetime等
一、项目架构设计
1.1 核心类结构
项目包含两个主要类:
CalendarDiary (主窗口类)
├── 数据管理 (JSON读写)
├── UI界面构建
├── 自绘日历实现
├── 事件处理
└── PDF导出功能PreviewFrame (预览窗口类)
├── 日历图像生成
└── 可视化展示
1.2 数据存储设计
使用JSON格式存储数据,结构如下:
{"2025-10-01": {"morning": "晨跑 30分钟","noon": "团队会议","evening": "学习Python"},"2025-10-02": {"morning": "","noon": "午餐约会","evening": "看电影"}
}
二、主窗口类详解
2.1 初始化方法
def __init__(self):super().__init__(None, title="美观日历记事本", size=(1200, 800))self.data_file = "diary_data.json"self.diary_data = self.load_data()self.background_image = None# 初始化日期today = datetime.now()self.current_year = today.yearself.current_month = today.monthself.selected_date = Noneself.init_ui()self.Centre()
关键点:
- 调用父类构造函数创建窗口框架
- 定义数据文件路径
- 加载历史数据
- 初始化当前年月和选中日期
- 构建UI并居中显示
2.2 UI界面构建
2.2.1 布局管理器
wxPython使用Sizer进行布局管理,主要类型:
- BoxSizer: 水平或垂直排列控件
- GridSizer: 网格布局
- FlexGridSizer: 灵活网格布局
本项目使用BoxSizer的嵌套结构:
main_sizer = wx.BoxSizer(wx.VERTICAL)  # 主垂直布局
├── toolbar_sizer (wx.HORIZONTAL)      # 顶部工具栏
├── content_sizer (wx.HORIZONTAL)      # 主内容区├── left_panel (自绘日历)└── right_panel (记事区域)
2.2.2 工具栏设计
toolbar_sizer = wx.BoxSizer(wx.HORIZONTAL)# 年份选择
self.year_choice = wx.Choice(panel, choices=[str(y) for y in range(2020, 2031)])
self.year_choice.SetSelection(self.current_year - 2020)
self.year_choice.Bind(wx.EVT_CHOICE, self.on_year_month_change)# 月份选择
self.month_choice = wx.Choice(panel, choices=[f"{m}月" for m in range(1, 13)])
self.month_choice.SetSelection(self.current_month - 1)
self.month_choice.Bind(wx.EVT_CHOICE, self.on_year_month_change)
wx.Choice控件特点:
- 下拉选择框,占用空间小
SetSelection()设置默认选中项(索引从0开始)GetStringSelection()获取当前选中的文本Bind(wx.EVT_CHOICE, handler)绑定选择变化事件
三、自绘日历实现(核心技术)
3.1 创建日历面板
# 创建自定义日历
self.calendar_panel = wx.Panel(left_panel, size=(400, 400))
self.calendar_panel.SetBackgroundColour(wx.Colour(255, 255, 255))
self.calendar_panel.Bind(wx.EVT_PAINT, self.on_paint_calendar)
self.calendar_panel.Bind(wx.EVT_LEFT_DOWN, self.on_calendar_click)
关键点:
- 使用
wx.Panel作为画布 - 绑定
wx.EVT_PAINT事件进行绘制 - 绑定
wx.EVT_LEFT_DOWN处理点击事件 - 设置白色背景色
3.2 绘制日历(核心算法)
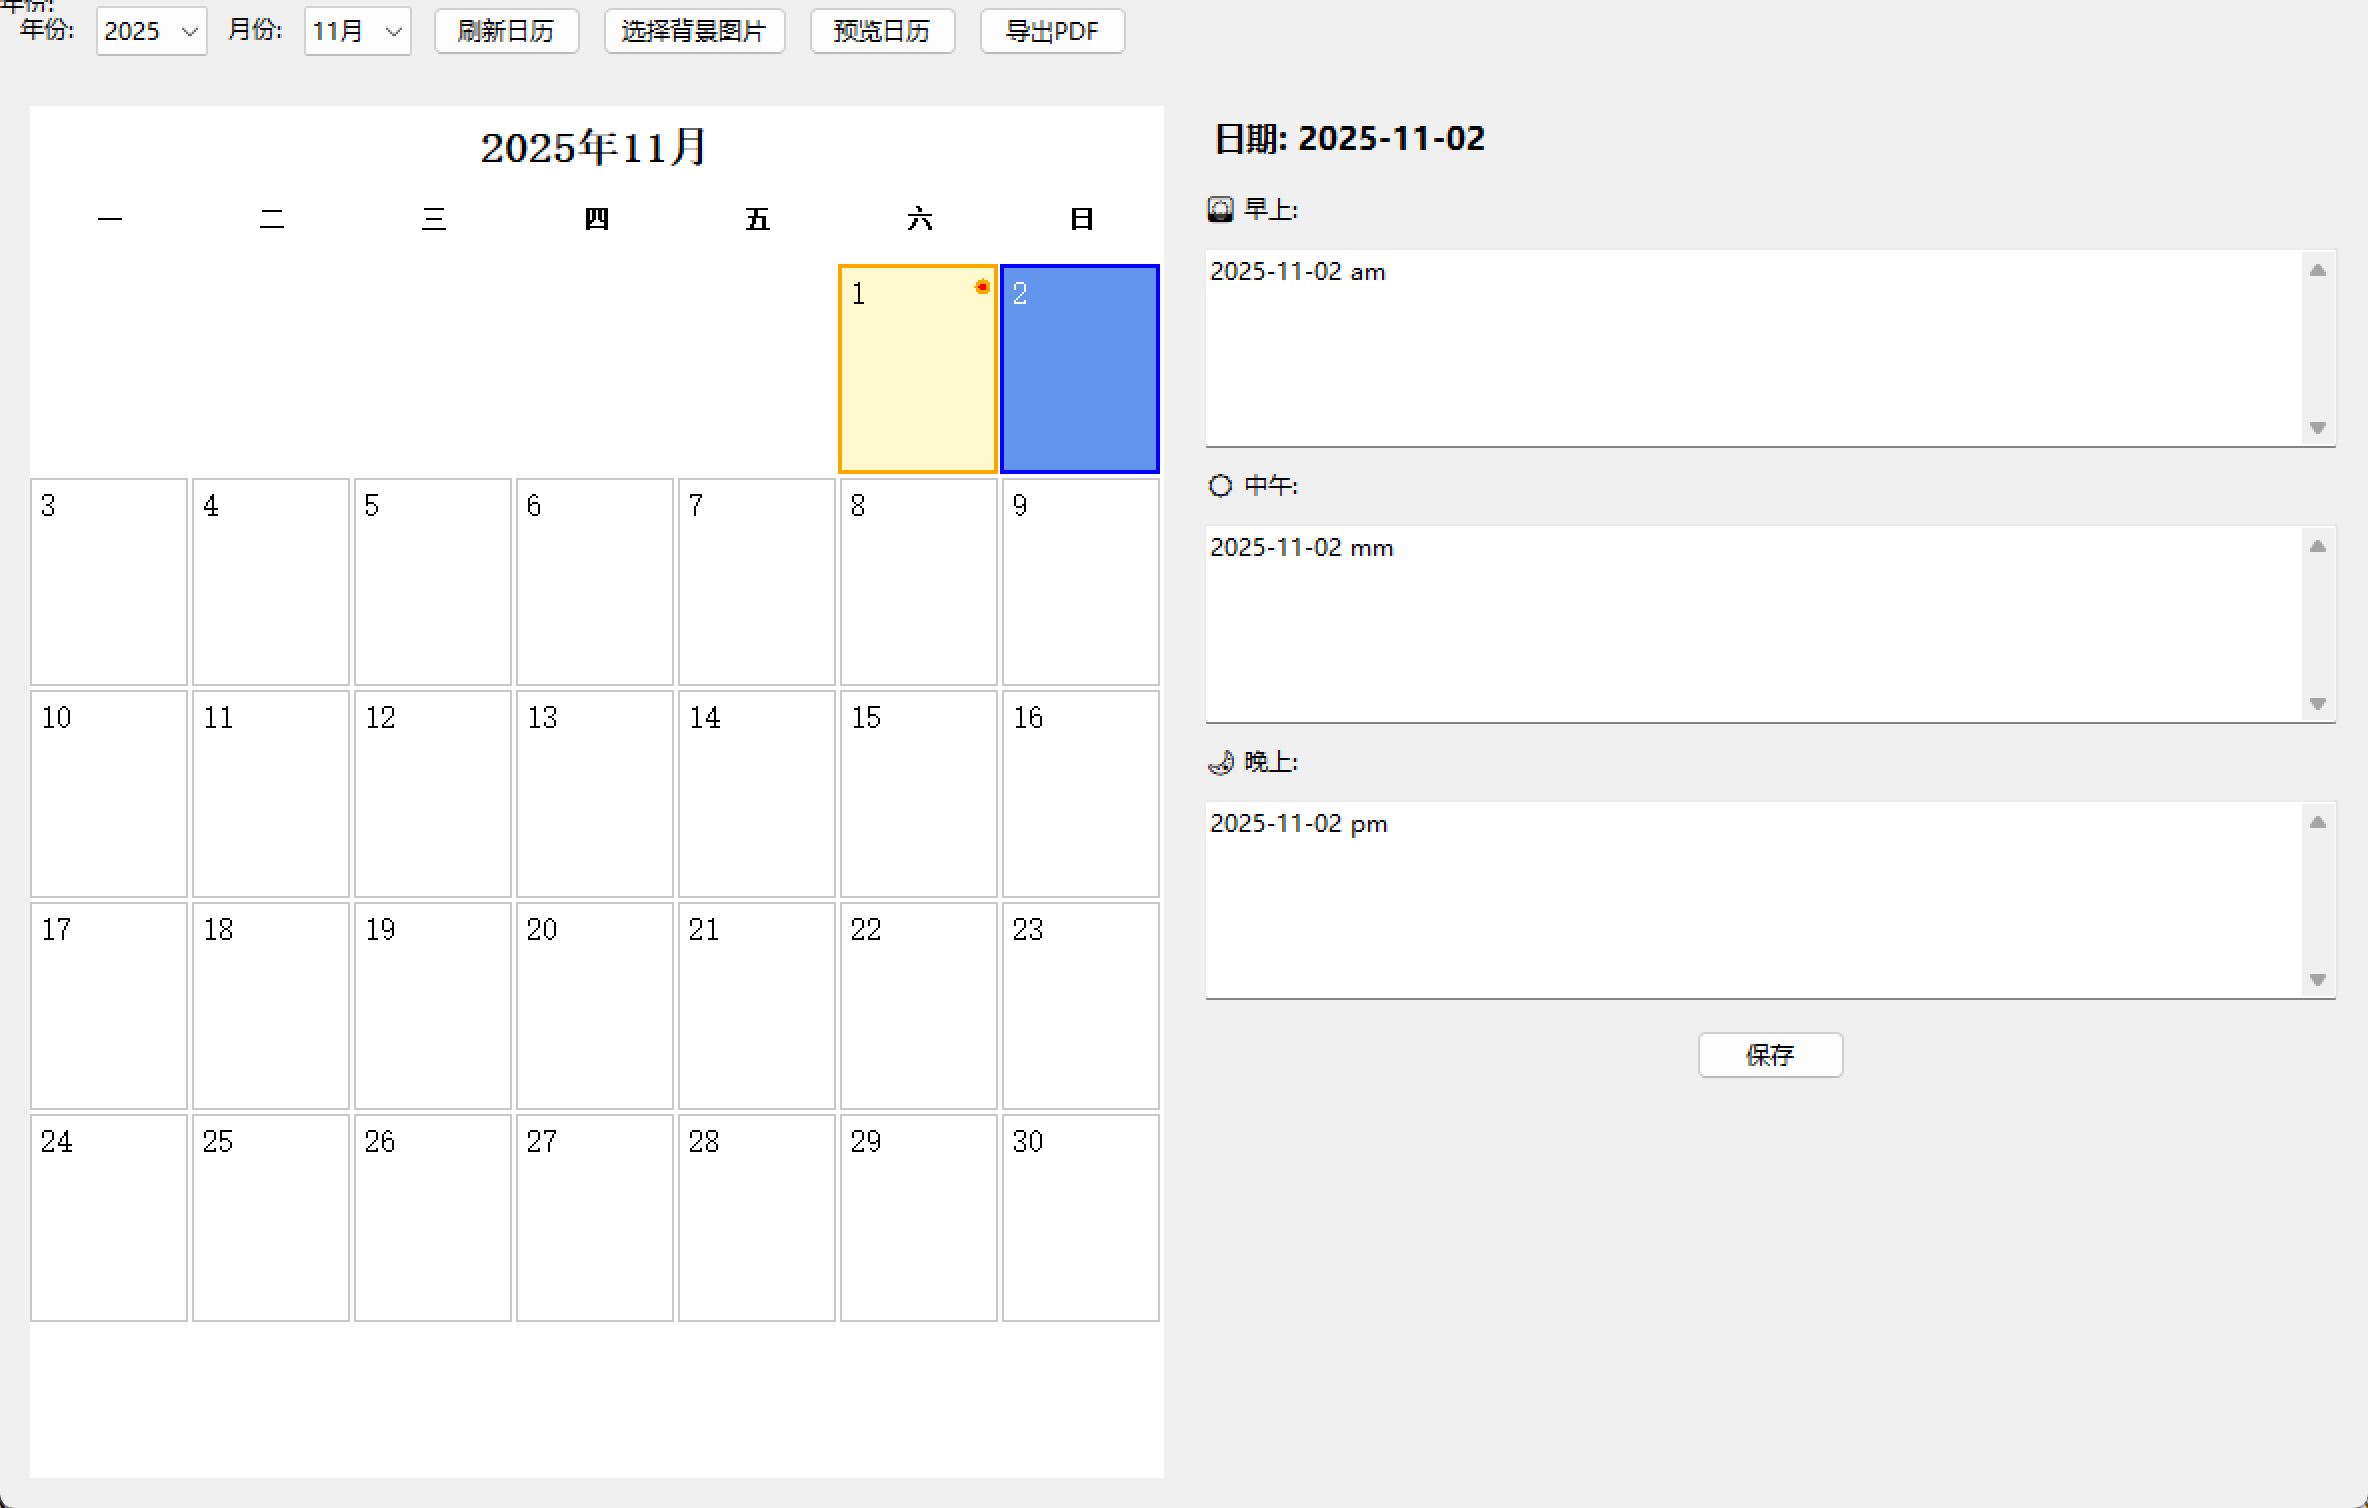
def on_paint_calendar(self, event):dc = wx.PaintDC(self.calendar_panel)dc.Clear()width, height = self.calendar_panel.GetSize()# 1. 绘制标题dc.SetFont(wx.Font(16, wx.FONTFAMILY_DEFAULT, wx.FONTSTYLE_NORMAL, wx.FONTWEIGHT_BOLD))title = f"{self.current_year}年{self.current_month}月"tw, th = dc.GetTextExtent(title)dc.DrawText(title, (width - tw) // 2, 10)# 2. 获取日历数据cal = calendar.monthcalendar(self.current_year, self.current_month)# 3. 计算单元格大小start_y = 50cell_width = width // 7cell_height = (height - start_y) // (len(cal) + 1)# 4. 绘制星期标题dc.SetFont(wx.Font(10, wx.FONTFAMILY_DEFAULT, wx.FONTSTYLE_NORMAL, wx.FONTWEIGHT_BOLD))weekdays = ['一', '二', '三', '四', '五', '六', '日']for i, day in enumerate(weekdays):x = i * cell_width + cell_width // 2tw, th = dc.GetTextExtent(day)dc.DrawText(day, x - tw // 2, start_y)# 5. 绘制日期单元格dc.SetFont(wx.Font(12, wx.FONTFAMILY_DEFAULT, wx.FONTSTYLE_NORMAL, wx.FONTWEIGHT_NORMAL))for week_idx, week in enumerate(cal):for day_idx, day in enumerate(week):if day != 0:x = day_idx * cell_widthy = start_y + 30 + week_idx * cell_height# 绘制单元格(见下节详解)self.draw_calendar_cell(dc, x, y, cell_width, cell_height, day)
wx.PaintDC 核心方法:
Clear(): 清空画布SetFont(): 设置字体SetBrush(): 设置填充画刷SetPen(): 设置边框画笔DrawText(): 绘制文本DrawRectangle(): 绘制矩形DrawCircle(): 绘制圆形GetTextExtent(): 获取文本尺寸
3.3 单元格样式绘制
def draw_calendar_cell(self, dc, x, y, cell_width, cell_height, day):# 检查是否有记事date_str = f"{self.current_year}-{self.current_month:02d}-{day:02d}"has_events = (date_str in self.diary_data and any(self.diary_data[date_str].values()))# 检查是否是选中的日期is_selected = (self.selected_date and self.selected_date == date_str)# 根据状态设置不同样式if is_selected:# 选中:蓝色背景 + 蓝色粗边框dc.SetBrush(wx.Brush(wx.Colour(100, 149, 237)))dc.SetPen(wx.Pen(wx.Colour(0, 0, 255), 2))elif has_events:# 有记事:黄色背景 + 橙色粗边框dc.SetBrush(wx.Brush(wx.Colour(255, 250, 205)))dc.SetPen(wx.Pen(wx.Colour(255, 165, 0), 2))else:# 普通:白色背景 + 灰色细边框dc.SetBrush(wx.Brush(wx.Colour(255, 255, 255)))dc.SetPen(wx.Pen(wx.Colour(200, 200, 200), 1))# 绘制矩形dc.DrawRectangle(x, y, cell_width - 2, cell_height - 2)# 绘制日期数字day_str = str(day)tw, th = dc.GetTextExtent(day_str)if is_selected:dc.SetTextForeground(wx.Colour(255, 255, 255)) # 白色文字else:dc.SetTextForeground(wx.Colour(0, 0, 0)) # 黑色文字dc.DrawText(day_str, x + 5, y + 5)# 如果有记事,显示红色小圆点标记if has_events and not is_selected:dc.SetBrush(wx.Brush(wx.Colour(255, 0, 0)))dc.DrawCircle(x + cell_width - 10, y + 10, 3)
颜色设计理念:
- 🔵 选中状态:蓝色(Cornflower Blue)突出当前操作
- 🟡 有记事:黄色(Light Goldenrod Yellow)醒目提醒
- ⚪ 普通日期:白色(White)干净简洁
- 🔴 记事标记:红色小圆点(Red Dot)快速识别
3.4 处理点击事件
def on_calendar_click(self, event):width, height = self.calendar_panel.GetSize()x, y = event.GetPosition()# 获取日历数据cal = calendar.monthcalendar(self.current_year, self.current_month)# 计算单元格尺寸(与绘制时一致)start_y = 80cell_width = width // 7cell_height = (height - 80) // (len(cal) + 1)if y < start_y:return # 点击在标题区域,忽略# 计算点击位置对应的周索引和天索引week_idx = (y - start_y) // cell_heightday_idx = x // cell_width# 验证索引有效性if 0 <= week_idx < len(cal) and 0 <= day_idx < 7:day = cal[week_idx][day_idx]if day != 0: # 0表示非当月日期# 构造日期字符串self.selected_date = f"{self.current_year}-{self.current_month:02d}-{day:02d}"self.date_label.SetLabel(f"日期: {self.selected_date}")# 加载该日期的数据if self.selected_date in self.diary_data:data = self.diary_data[self.selected_date]self.morning_text.SetValue(data.get("morning", ""))self.noon_text.SetValue(data.get("noon", ""))self.evening_text.SetValue(data.get("evening", ""))else:self.morning_text.SetValue("")self.noon_text.SetValue("")self.evening_text.SetValue("")# 重绘日历以显示选中状态self.calendar_panel.Refresh()
坐标计算原理:
点击坐标 (x, y)
↓
week_idx = (y - start_y) // cell_height  # 第几周
day_idx = x // cell_width                 # 星期几
↓
day = cal[week_idx][day_idx]              # 获取日期数字
3.5 年月切换处理
def on_year_month_change(self, event):# 从下拉框获取新的年月self.current_year = int(self.year_choice.GetStringSelection())self.current_month = self.month_choice.GetSelection() + 1# 触发重绘self.calendar_panel.Refresh()
Refresh() 方法说明:
- 触发
wx.EVT_PAINT事件 - 自动调用
on_paint_calendar()方法 - 实现日历内容更新
四、核心功能实现
4.1 数据保存功能
def on_save(self, event):if not self.selected_date:wx.MessageBox("请先选择日期", "提示", wx.OK | wx.ICON_WARNING)return# 保存到字典self.diary_data[self.selected_date] = {"morning": self.morning_text.GetValue(),"noon": self.noon_text.GetValue(),"evening": self.evening_text.GetValue()}# 持久化到文件self.save_data()# 重绘日历(显示红点标记)self.calendar_panel.Refresh()wx.MessageBox("保存成功!", "提示", wx.OK | wx.ICON_INFORMATION)
4.2 数据持久化
def load_data(self):if os.path.exists(self.data_file):with open(self.data_file, 'r', encoding='utf-8') as f:return json.load(f)return {}def save_data(self):with open(self.data_file, 'w', encoding='utf-8') as f:json.dump(self.diary_data, f, ensure_ascii=False, indent=2)
JSON参数解析:
ensure_ascii=False: 保存中文而非Unicode转义indent=2: 格式化输出,缩进2个空格
五、PDF导出功能
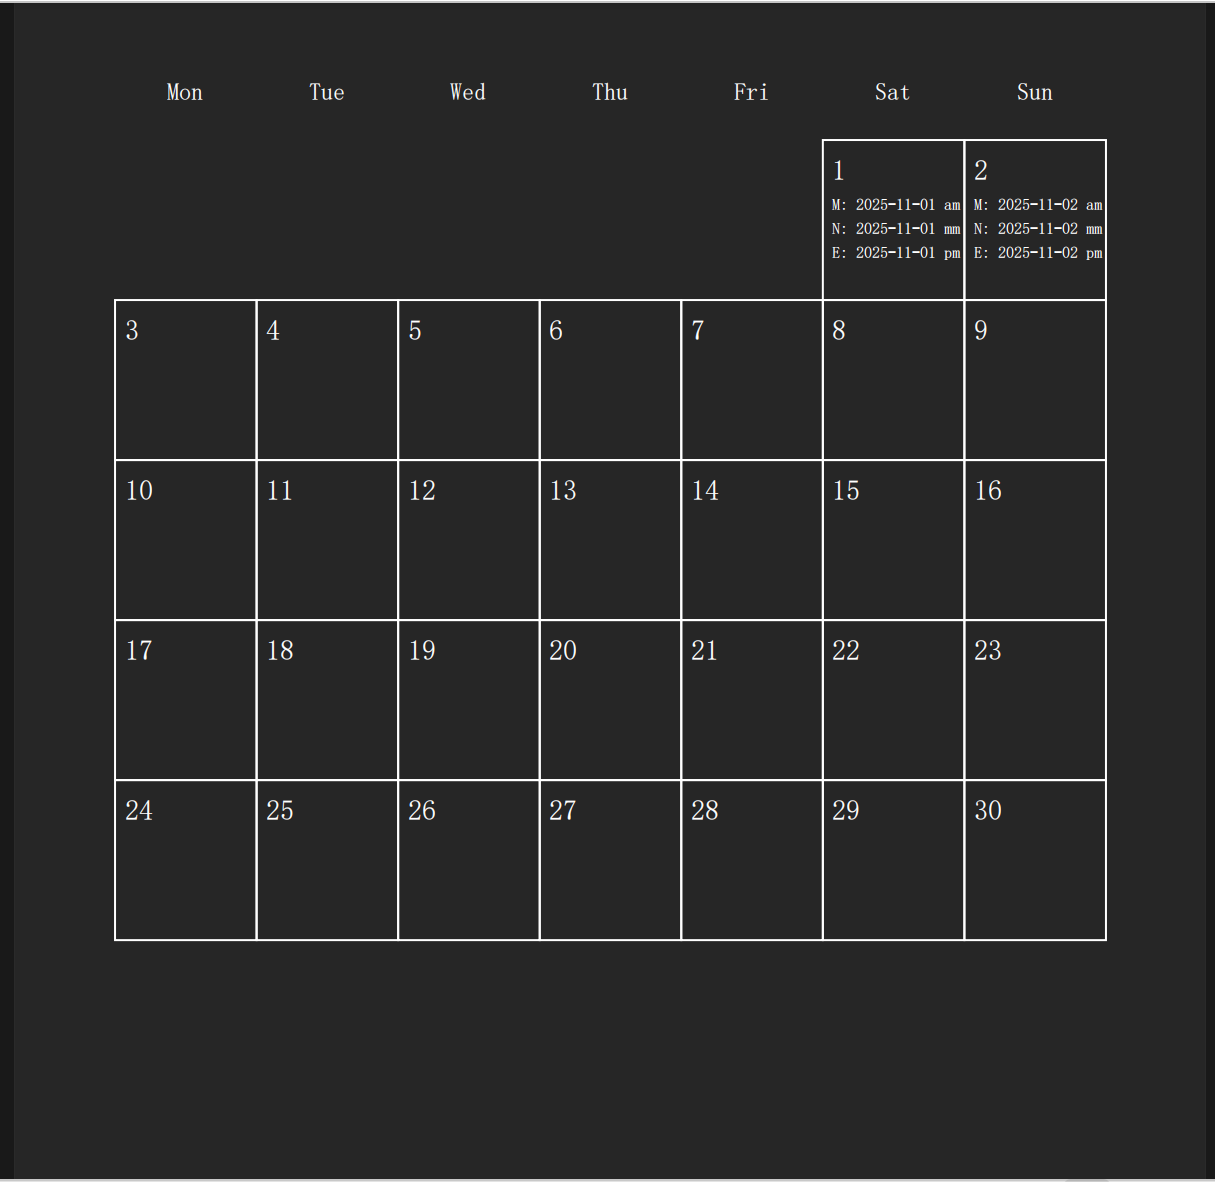
5.1 PDF生成基础
def export_to_pdf(self, filename, year, month):c = pdf_canvas.Canvas(filename, pagesize=A4)width, height = A4# 尝试注册中文字体try:pdfmetrics.registerFont(TTFont('SimSun', 'simsun.ttc'))font_name = 'SimSun'except:font_name = 'Helvetica'# 标题c.setFont(font_name, 20)title = f"{year} Year {month} Month Calendar"c.drawCentredString(width / 2, height - 50, title)
ReportLab核心概念:
Canvas: PDF画布对象pagesize: 页面尺寸(A4、Letter等)- 字体注册:支持中文需要TrueType字体
5.2 绘制PDF日历网格
# 获取日历
cal = calendar.monthcalendar(year, month)# 绘制日历网格
start_x = 50
start_y = height - 100
cell_width = (width - 100) / 7
cell_height = 80# 星期标题
c.setFont(font_name, 12)
weekdays = ['Mon', 'Tue', 'Wed', 'Thu', 'Fri', 'Sat', 'Sun']
for i, day in enumerate(weekdays):c.drawCentredString(start_x + i * cell_width + cell_width / 2, start_y, day)start_y -= 20# 绘制日期和记事
c.setFont(font_name, 10)
for week_idx, week in enumerate(cal):for day_idx, day in enumerate(week):if day != 0:x = start_x + day_idx * cell_widthy = start_y - week_idx * cell_height# 绘制边框c.rect(x, y - cell_height, cell_width, cell_height)# 绘制日期c.setFont(font_name, 14)c.drawString(x + 5, y - 20, str(day))# 获取当天记事并绘制date_str = f"{year}-{month:02d}-{day:02d}"if date_str in self.diary_data:data = self.diary_data[date_str]c.setFont(font_name, 8)y_offset = 35if data.get("morning"):text = data["morning"][:20] + "..." if len(data["morning"]) > 20 else data["morning"]c.drawString(x + 5, y - y_offset, f"M: {text}")y_offset += 12if data.get("noon"):text = data["noon"][:20] + "..." if len(data["noon"]) > 20 else data["noon"]c.drawString(x + 5, y - y_offset, f"N: {text}")y_offset += 12if data.get("evening"):text = data["evening"][:20] + "..." if len(data["evening"]) > 20 else data["evening"]c.drawString(x + 5, y - y_offset, f"E: {text}")c.save()
ReportLab坐标系统:
- 原点(0,0)在左下角
- Y轴向上增长
- 单位是点(point),1英寸=72点
六、预览功能实现
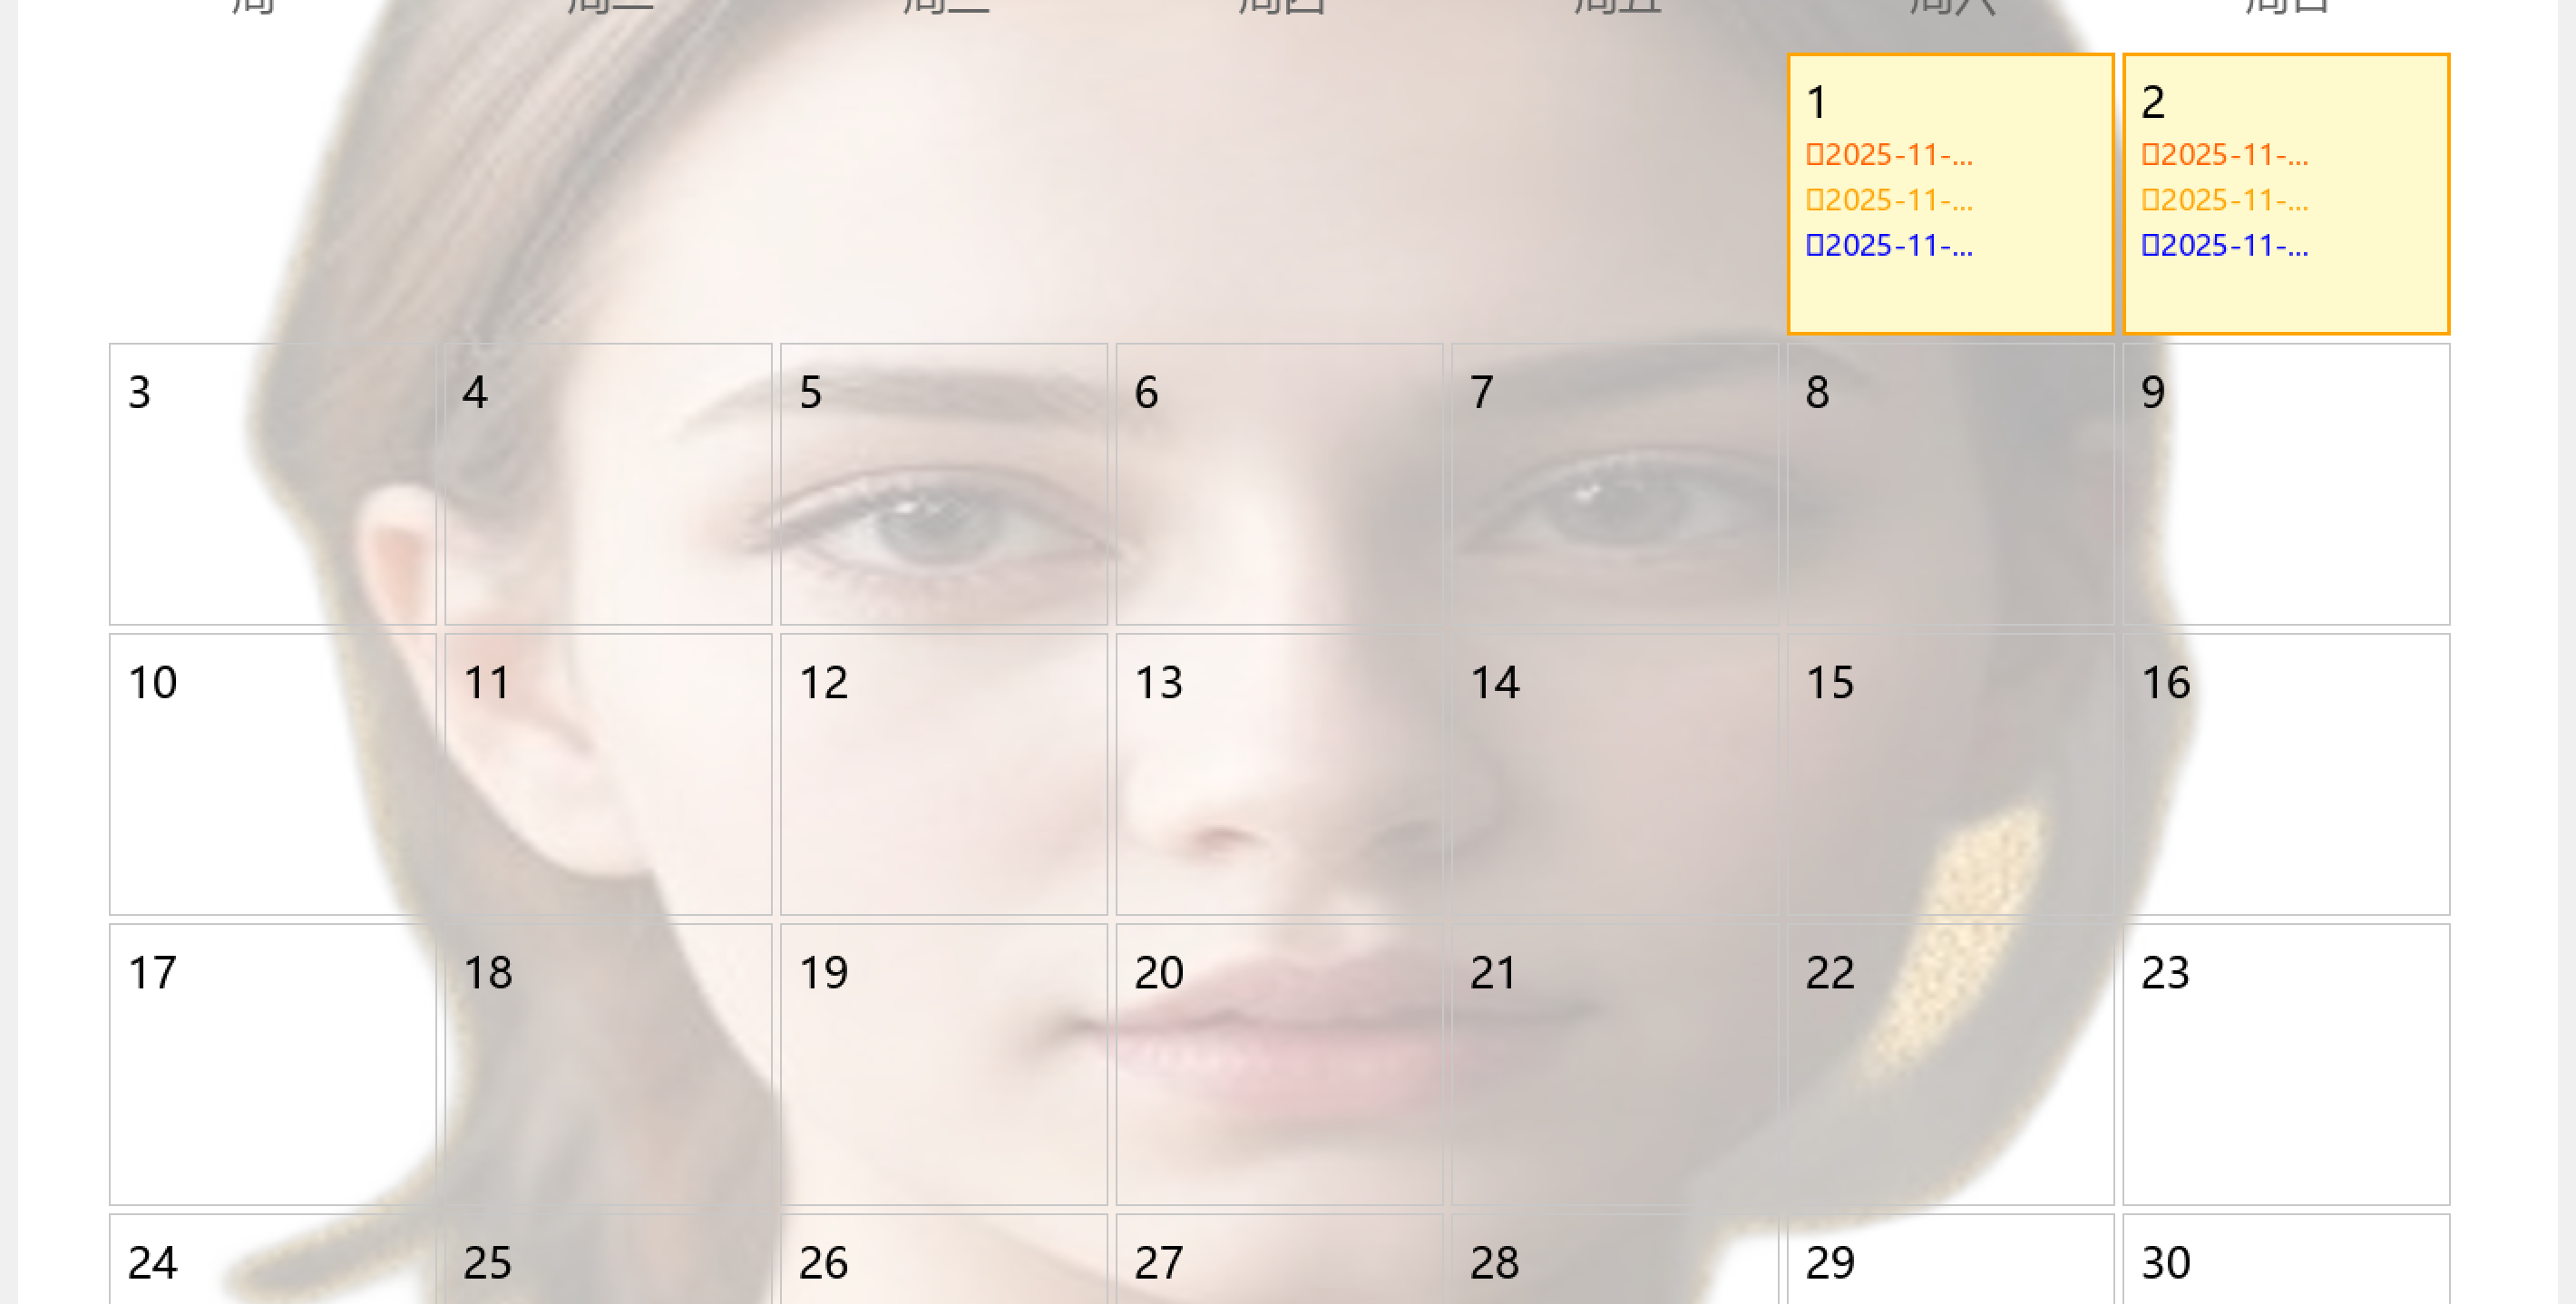
6.1 预览窗口架构
class PreviewFrame(wx.Frame):def __init__(self, parent, year, month, diary_data, background_image):super().__init__(parent, title=f"{year}年{month}月日历预览", size=(1000, 800))# 创建日历图像img = self.create_calendar_image()# 转换为wx.Imagewx_img = wx.Image(io.BytesIO(img), wx.BITMAP_TYPE_PNG)bitmap = wx.Bitmap(wx_img)# 显示img_ctrl = wx.StaticBitmap(panel, bitmap=bitmap)
图像处理流程:
- PIL创建图像 → 2. 保存到内存(BytesIO) → 3. 转换为wx.Image → 4. 转换为wx.Bitmap → 5. 显示
6.2 使用PIL绘制日历
def create_calendar_image(self):img_width, img_height = 1400, 1000# 处理背景图片if self.background_image and os.path.exists(self.background_image):img = Image.open(self.background_image).convert('RGBA')img = img.resize((img_width, img_height))overlay = Image.new('RGBA', img.size, (255, 255, 255, 180))img = Image.alpha_composite(img, overlay)else:img = Image.new('RGB', (img_width, img_height), color=(240, 248, 255))draw = ImageDraw.Draw(img)
PIL图像模式:
RGB: 红绿蓝三通道RGBA: 红绿蓝+Alpha透明通道alpha_composite(): 混合两个RGBA图像
6.3 字体处理
try:title_font = ImageFont.truetype("msyh.ttc", 48)date_font = ImageFont.truetype("msyh.ttc", 24)text_font = ImageFont.truetype("msyh.ttc", 16)
except:title_font = ImageFont.load_default()date_font = ImageFont.load_default()text_font = ImageFont.load_default()
常见中文字体文件:
- Windows:
msyh.ttc(微软雅黑),simsun.ttc(宋体) - macOS:
PingFang.ttc(苹方) - Linux:
WenQuanYi*.ttf(文泉驿)
6.4 绘制美观日历
# 标题
title = f"{self.year}年{self.month}月"
bbox = draw.textbbox((0, 0), title, font=title_font)
title_width = bbox[2] - bbox[0]
draw.text((img_width // 2 - title_width // 2, 30), title, fill=(50, 50, 150), font=title_font)# 获取日历
cal = calendar.monthcalendar(self.year, self.month)# 绘制日历网格
start_x = 50
start_y = 120
cell_width = (img_width - 100) // 7
cell_height = (img_height - 200) // len(cal)# 星期标题
weekdays = ['周一', '周二', '周三', '周四', '周五', '周六', '周日']
for i, day in enumerate(weekdays):x = start_x + i * cell_width + cell_width // 2bbox = draw.textbbox((0, 0), day, font=date_font)text_width = bbox[2] - bbox[0]draw.text((x - text_width // 2, start_y), day, fill=(100, 100, 100), font=date_font)start_y += 50# 绘制日期单元格
for week_idx, week in enumerate(cal):for day_idx, day in enumerate(week):if day != 0:x = start_x + day_idx * cell_widthy = start_y + week_idx * cell_height# 判断是否有记事date_str = f"{self.year}-{self.month:02d}-{day:02d}"has_events = (date_str in self.diary_data and any(self.diary_data[date_str].values()))# 不同样式绘制if has_events:draw.rectangle([x, y, x + cell_width - 5, y + cell_height - 5], fill=(255, 250, 205),      # 浅黄色填充outline=(255, 165, 0),     # 橙色边框width=2)else:draw.rectangle([x, y, x + cell_width - 5, y + cell_height - 5], outline=(200, 200, 200), width=1)# 绘制日期draw.text((x + 10, y + 10), str(day), fill=(0, 0, 0), font=date_font)# 显示记事预览if has_events:data = self.diary_data[date_str]y_offset = 45if data.get("morning"):text = "🌅" + (data["morning"][:8] + "..." if len(data["morning"]) > 8 else data["morning"])draw.text((x + 10, y + y_offset), text, fill=(255, 100, 0), font=text_font)y_offset += 25if data.get("noon"):text = "☀️" + (data["noon"][:8] + "..." if len(data["noon"]) > 8 else data["noon"])draw.text((x + 10, y + y_offset), text, fill=(255, 165, 0), font=text_font)y_offset += 25if data.get("evening"):text = "🌙" + (data["evening"][:8] + "..." if len(data["evening"]) > 8 else data["evening"])draw.text((x + 10, y + y_offset), text, fill=(0, 0, 255), font=text_font)# 保存到内存
buffer = io.BytesIO()
img.save(buffer, format='PNG')
buffer.seek(0)
return buffer.read()