Unity游戏基础-2(初识场景~项目构建)
本教程开始分享教学内容:Unity游戏基础,部分内容会包括Blender建模基础,Shader基础,动画基础等等,教程面向:建模、技术美术、游戏前端、游戏后端基础,适合美术与设计(数媒、环设、动画、产设、视传、绘画)专业、计算机(计算机科学与技术、软件工程、数媒)的同学学习。
场景是游戏或者3D程序的基础,内容在此显示,摄像机是输出场景的物体
加入3D对象(3D Object)
在层级Hierarchy里面,打开SampleSence,右键空白,选择3D对象,点击平面(Plane)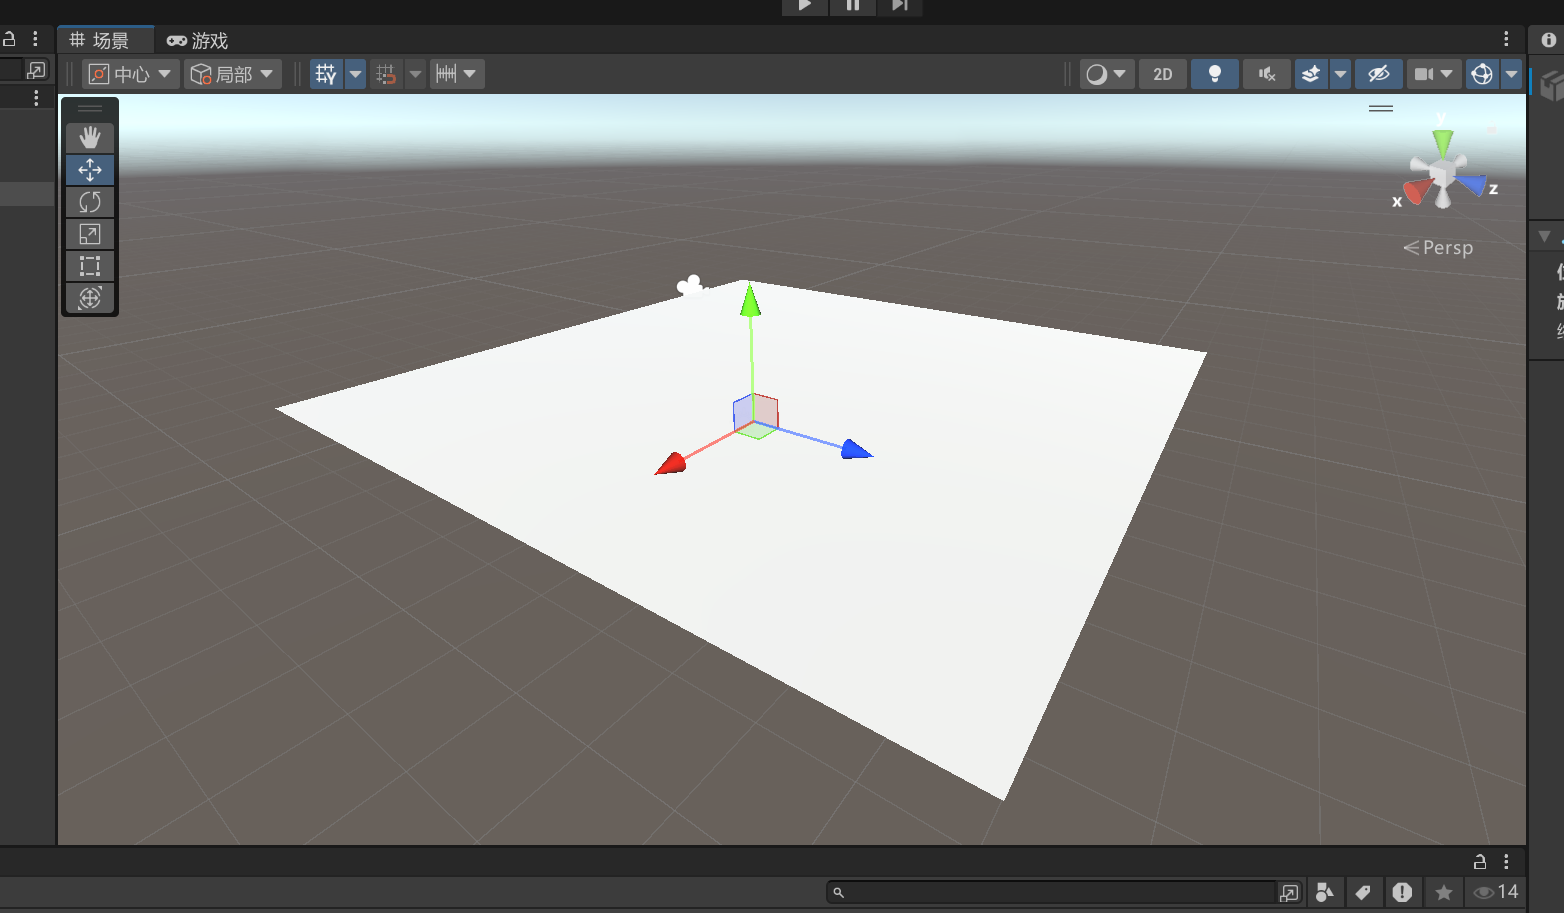
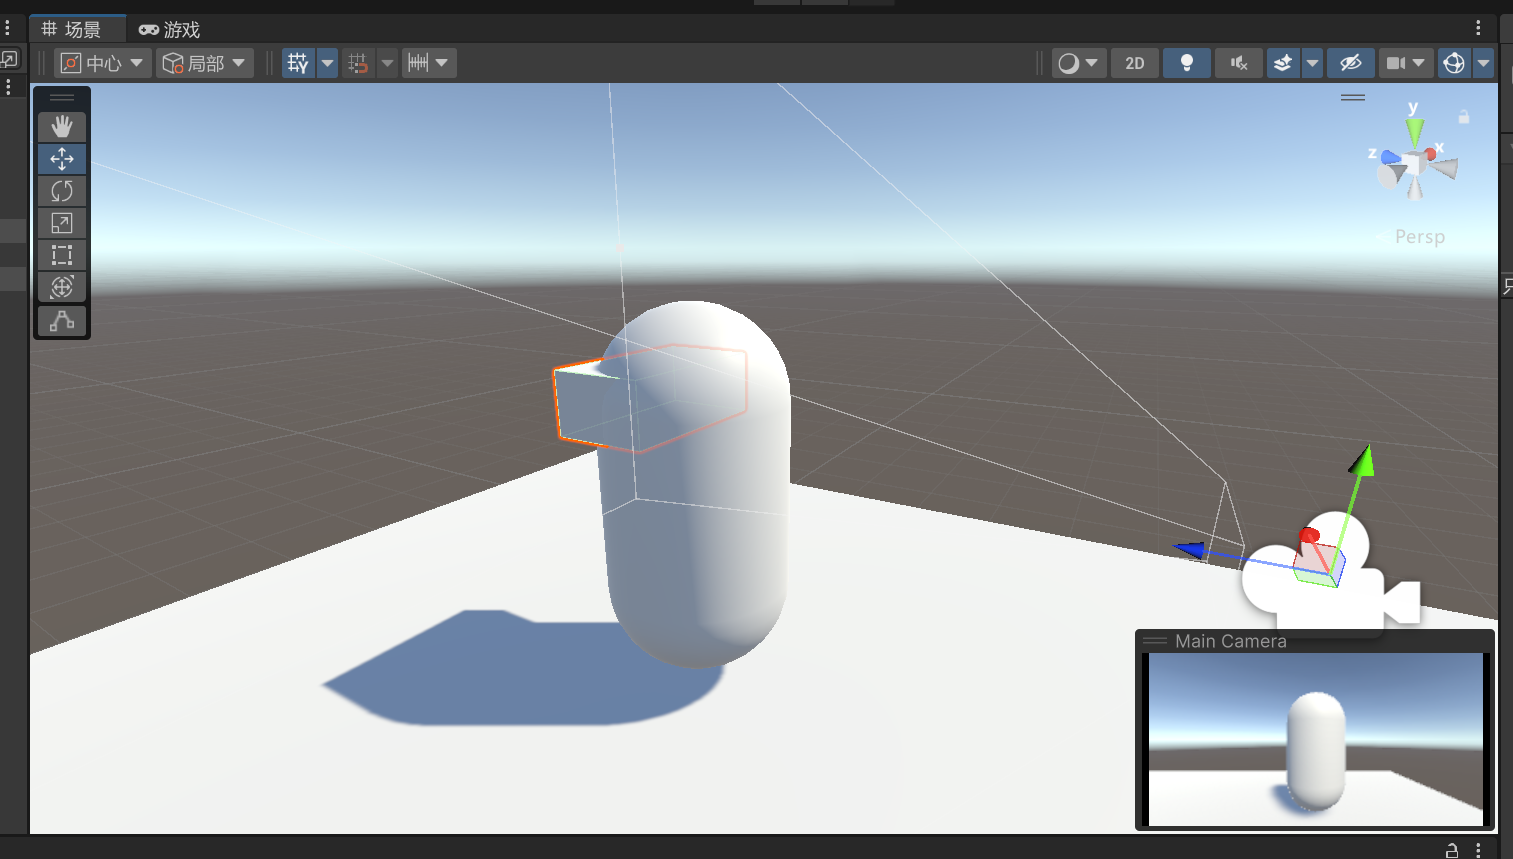
添加一个胶囊Capsule,重命名为Player,把MainCamera拖到Palyer上面,这样player旋转camera也会旋转
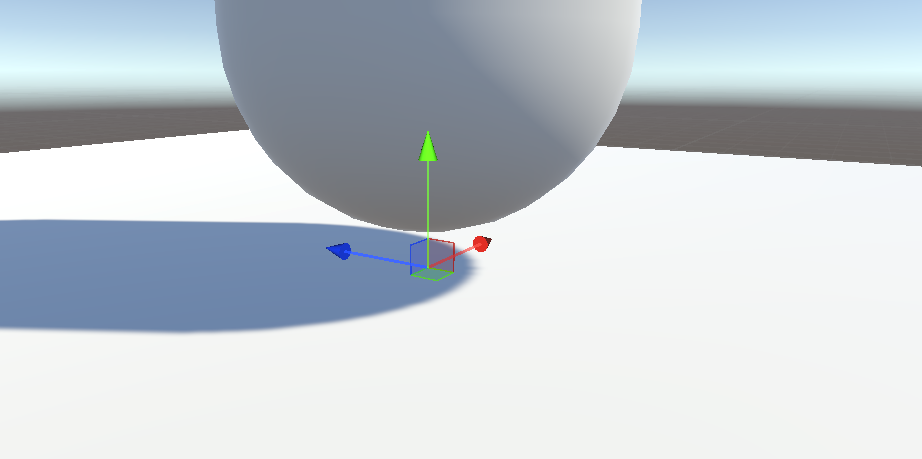
添加一个空物体,重命名为GroundCheck,移动到Player,并且调整位置到player胶囊体的下面(悬空),就像这样:
添加一个立方体,面朝Z轴正方向,放在胶囊体前面,摄像机放在Z轴负方向
控制角色
在Access下新建一个文件夹,重命名为Script,我们要在里面编写脚本
新建2个脚本,重命名为CameraController和PlayerMovement,顾名思义了就是控制摄像机的和控制角色的,后期在添加UI设置时会用到本教程第三个脚本
编写脚本:(完整移动,缩放,旋转,碰撞)
using System.Collections;
using System.Collections.Generic;
using UnityEditor.Rendering;
using UnityEngine;public class PlayerMovement : MonoBehaviour
{public float moveSpeed = 5f;public float rotateSpeed = 10f;public float jumpHeight = 1f;public float gravity = -9.8f;public float pushPower = 3f;public Transform groundCheck; // 将你在脚底创建的空物体拖拽到这里public float groundCheckRadius = 0.2f; // 检测范围的半径public LayerMask groundMask; // 在Inspector中设置为“Ground”层private CharacterController controller;private Vector3 playerVelocity;private bool isGrounded;private Transform cameraTransform;void Start(){controller = GetComponent<CharacterController>();cameraTransform = Camera.main.transform; // 获取主摄像机变换}void Update(){if (CameraController.isleave)return;// 检查角色是否着地isGrounded = Physics.CheckSphere(groundCheck.position, groundCheckRadius, groundMask);if (controller.isGrounded){HandleJump();CheckSpeed();}HandleMovement();}void CheckSpeed(){if (Input.GetKeyDown(KeyCode.LeftShift)){moveSpeed = 15f;}else if (Input.GetKeyUp(KeyCode.LeftShift)){moveSpeed = 5f;}}void HandleMovement(){// 获取输入float horizontal = Input.GetAxis("Horizontal");float vertical = Input.GetAxis("Vertical");// 根据摄像机方向计算移动方向Vector3 camForward = Vector3.Scale(cameraTransform.forward, new Vector3(1, 0, 1)).normalized; // 忽略摄像机俯仰角Vector3 moveDirection = (camForward * vertical + cameraTransform.right * horizontal).normalized;// 应用移动速度Vector3 movement = moveDirection * moveSpeed * Time.deltaTime;controller.Move(movement);// 如果需要角色朝向移动方向,可以取消注释下面的代码if (moveDirection.magnitude > 0.1f){Quaternion targetRotation = Quaternion.LookRotation(moveDirection);transform.rotation = Quaternion.Slerp(transform.rotation, targetRotation, rotateSpeed * Time.deltaTime);}// 应用重力playerVelocity.y += gravity * Time.deltaTime;controller.Move(playerVelocity * Time.deltaTime);}void OnControllerColliderHit(ControllerColliderHit hit){Rigidbody hitRigidbody = hit.collider.attachedRigidbody;// 如果碰撞的对象没有刚体、是运动学刚体,或者被卡在下面,则不推动if (hitRigidbody == null || hitRigidbody.isKinematic || hit.moveDirection.y < -0.3f){return;}// 计算推动方向(主要在X和Z轴)Vector3 pushDir = new Vector3(hit.moveDirection.x, 0, hit.moveDirection.z);// 给被碰撞的刚体一个速度来实现推动效果hitRigidbody.velocity = pushDir * pushPower;}void HandleJump(){if (Input.GetButtonDown("Jump") && isGrounded){playerVelocity.y = Mathf.Sqrt(jumpHeight * -1f * gravity); // 计算跳跃速度}}}
using System;
using System.Collections;
using System.Collections.Generic;
using Unity.VisualScripting;
using UnityEditor.Rendering;
using UnityEngine;public class CameraController : MonoBehaviour
{public Transform target; // 玩家角色public float distance = 5.0f; // 默认相机距离public float minDistance = 1.5f; // 最小相机距离public float maxDistance = 15.0f; // 最大相机距离public float zoomSpeed = 2.0f; // 缩放速度public float rotationSpeed = 5.0f; // 旋转速度public float minVerticalAngle = -20.0f; // 垂直旋转最小角度public float maxVerticalAngle = 80.0f; // 垂直旋转最大角度public float collisionOffset = 0.2f; // 碰撞偏移量public LayerMask collisionLayers = ~0; // 碰撞检测层(默认所有层)public static bool isleave;private float currentX = 0.0f;private float currentY = 0.0f;private float targetDistance;private Vector3 cameraDirection;/// <summary>/// 鼠标/// </summary>private void CursorController(){        // 优先判断:只要UI界面打开,就解锁并显示鼠标if (ButtonsEventHandler.isopen){Cursor.lockState = CursorLockMode.None;isleave = true;return;}if (Input.GetKeyDown(KeyCode.LeftAlt)){Cursor.lockState = CursorLockMode.None;isleave = true;}if (Input.GetKeyUp(KeyCode.LeftAlt)){//Debug.Log(ButtonsEventHandler.isopen);Cursor.lockState = CursorLockMode.Locked;isleave = false;}}void Start(){// 初始化当前旋转角度Cursor.lockState = CursorLockMode.Locked;Vector3 angles = transform.eulerAngles;currentX = angles.y;currentY = angles.x;targetDistance = distance;cameraDirection = (transform.position - target.position).normalized;}void Update(){CursorController();}void LateUpdate(){if (target == null)return;if (isleave)return;// 处理鼠标输入HandleInput();// 计算相机旋转和方向Quaternion rotation = Quaternion.Euler(currentY, currentX, 0);Vector3 direction = rotation * Vector3.back;// 碰撞检测和避免HandleCameraCollision(direction);// 应用相机位置和旋转transform.position = target.position + direction * targetDistance;transform.LookAt(target.position);}void HandleInput(){// 鼠标旋转控制//if (Input.GetMouseButton(0)) // 右键按住旋转//{currentX += Input.GetAxis("Mouse X") * rotationSpeed;currentY -= Input.GetAxis("Mouse Y") * rotationSpeed;currentY = Mathf.Clamp(currentY, minVerticalAngle, maxVerticalAngle);//}// 鼠标滚轮缩放float scroll = Input.GetAxis("Mouse ScrollWheel");if (scroll != 0){distance -= scroll * zoomSpeed;distance = Mathf.Clamp(distance, minDistance, maxDistance);}}void HandleCameraCollision(Vector3 direction){RaycastHit hit;// 定义一个小的偏移量,将射线起点从角色中心向后移动,避免与自身碰撞float selfAvoidanceOffset = 1f;Vector3 rayStartPoint = target.position + direction * selfAvoidanceOffset;float rayLength = distance - selfAvoidanceOffset;// 从调整后的起点发射射线if (Physics.Raycast(rayStartPoint, direction, out hit, rayLength, collisionLayers)){// 如果检测到碰撞,调整相机距离targetDistance = Mathf.Clamp(hit.distance - collisionOffset, minDistance, maxDistance);}else{// 没有碰撞则使用预设距离targetDistance = distance;}}}
现在会处于一个报错的状态,没事,我们再来写一个脚本ButtonsEventHandler
using System;
using System.Collections;
using System.Collections.Generic;
using TMPro;
using Unity.VisualScripting;
using UnityEngine;
using UnityEngine.UI;[Serializable]
public class Config
{private static int SelectIndex;private static bool isfull;
}public class ButtonsEventHandler : MonoBehaviour
{public static Config cfg;public  TMP_Dropdown resolutionDropdown; // 在Inspector中关联你的ResolutionDropdownpublic Toggle fullscreenToggle; // 在Inspector中关联你的FullscreenTogglepublic GameObject SeetingForm;/// <summary>/// 指示设置窗口是否开启/// </summary>public static bool isopen = false;private static int SelectIndex = 0;private static bool isfull = false;/// <summary>/// 获取所有支持的分辨率/// </summary>private static List<Resolution> sizes = new List<Resolution>();// Start is called before the first frame updatevoid Start(){        SeetingForm.SetActive(false);LoadSize();resolutionDropdown.onValueChanged.RemoveListener(OnDropdownValueChanged);resolutionDropdown.onValueChanged.AddListener(OnDropdownValueChanged);fullscreenToggle.onValueChanged.RemoveListener(onToggleValueChanged);fullscreenToggle.onValueChanged.AddListener(onToggleValueChanged);}private void onToggleValueChanged(bool check){isfull = check;}private void OnDropdownValueChanged(int newIndex){SelectIndex = newIndex;}void LoadSize()//加载所有分辨率{resolutionDropdown.ClearOptions();//清空列表sizes.Clear();List<string> size1 = new List<string>();foreach (var s in Screen.resolutions){sizes.Add(s);size1.Add(s.width + "x" + s.height + " " + s.refreshRateRatio);Debug.Log(s.width + "x" + s.height + " " + s.refreshRateRatio);}resolutionDropdown.AddOptions(size1);//全部加载分辨率}// Update is called once per framevoid Update(){if (Input.GetKeyDown(KeyCode.Escape)){OnButtonPress();}}public void OnButtonPress()//打开或关闭设置界面,打开就加载分辨率{if (isopen){SeetingForm.SetActive(false);isopen = false;Cursor.lockState = CursorLockMode.Locked;CameraController.isleave = false;}else{SeetingForm.SetActive(true);isopen = true;Cursor.lockState = CursorLockMode.None;CameraController.isleave = true;LoadSize();}}public void Apply(){FullScreenMode mode;if (isfull){mode = FullScreenMode.FullScreenWindow;}else{mode = FullScreenMode.Windowed;}Screen.SetResolution(sizes[SelectIndex].width, sizes[SelectIndex].height, mode, sizes[SelectIndex].refreshRateRatio);}public void Cancel(){SeetingForm.SetActive(false);isopen = false;}public void Close(){Application.Quit();}}
挂载脚本
将 PlayerMovement直接拖到Hierarchy窗口里面的Player上面,然后在Inspector窗口里发现了你的脚本
修改Plane的图层,点击Plane,在inspector里面找到图层下拉列表,添加一个Ground层
点击Player,把groundcheck空物体拖到脚本的Ground Check
设置GroundMask为Ground
设置成功的样子Inspector
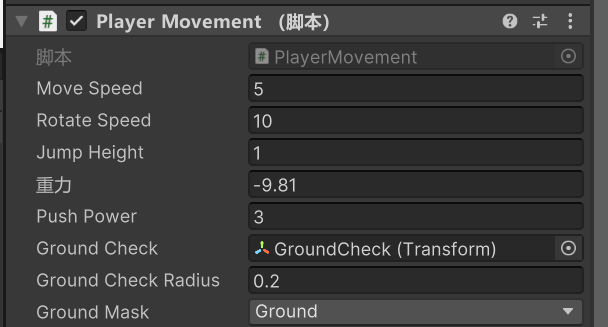
player的
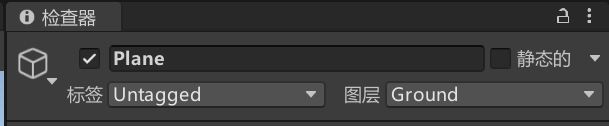
Plane的
挂载CameraController
把CameraController拖到Main Camera上,把目标(Target)设置为Player

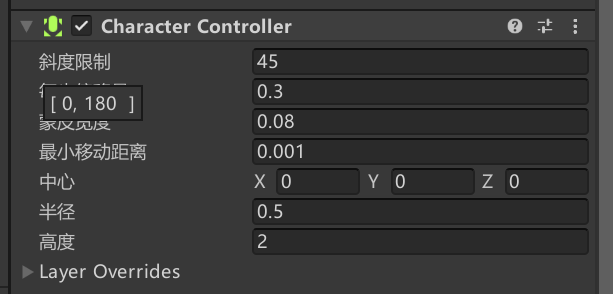
为Player添加组件(Add Component),搜索Character Controller
完成!
点击上面的小三角开始调试
现在按WASD就可以移动你的胶囊体了
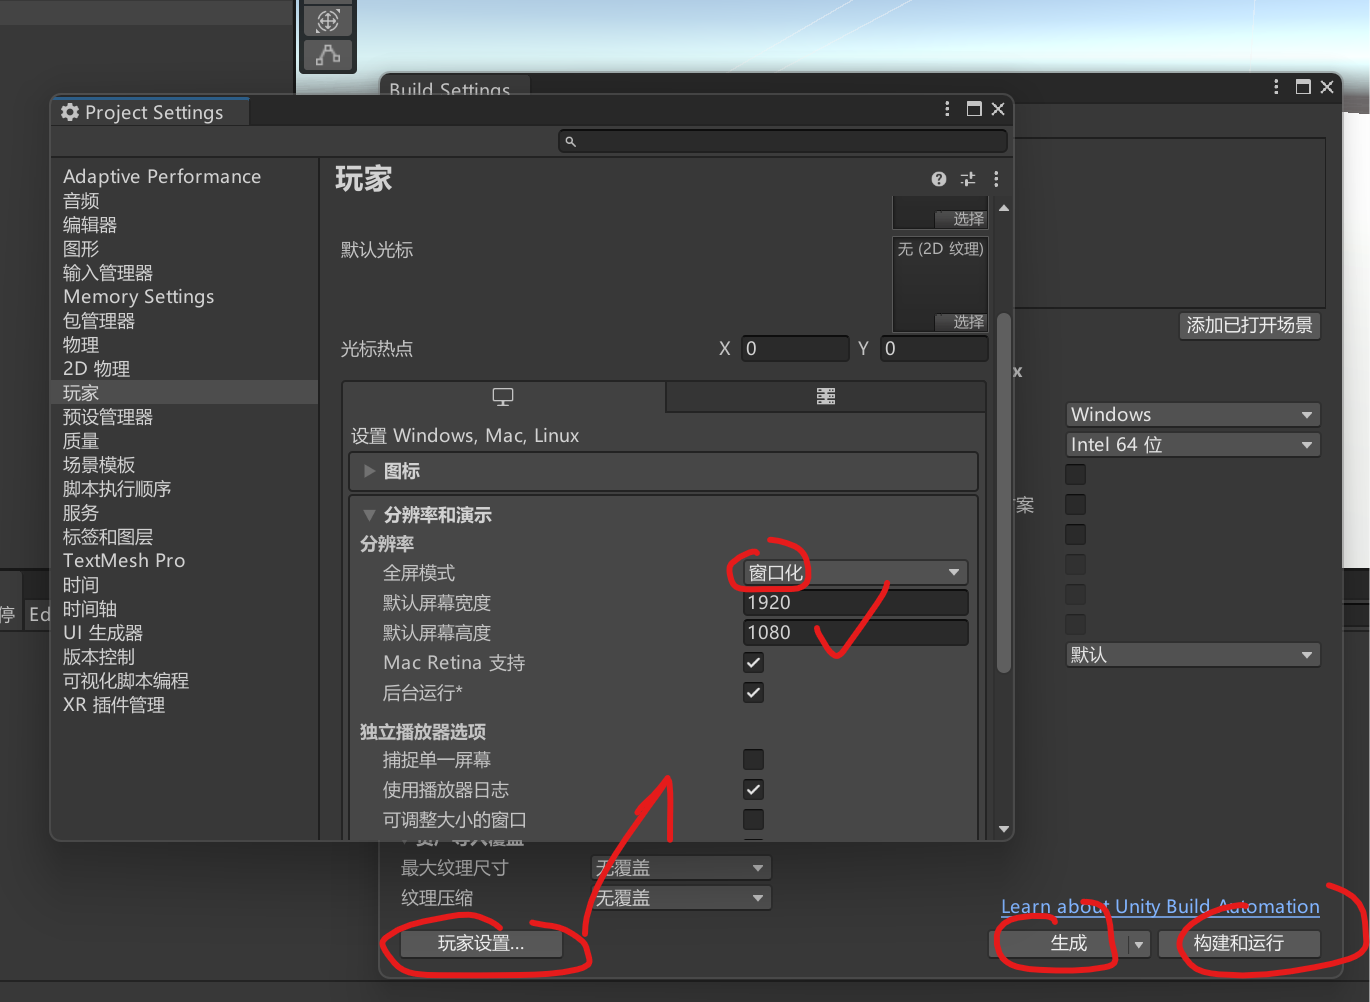
构建项目:Ctrl+B开始游戏(直接新建文件夹Bin)
(报错的话删除脚本里面没有使用的命名空间,通常是灰色的)
生成设置Ctrl+Shift+B,下一节我们教学分辨率自定义设置