图漾相机C++语言---Sample_V1(4.X.X版本)完整参考例子(待完善)
文章目录
- 1.新的看图软件
- 1.1 深度图滤波设置
- 2.属性配置
- 2.1如何查看SDK版本?
- 2.2 SDK中区分新旧相机接口
- 3.适配所有相机参考例子
- 4.新(`4.X.X`)旧(`3.X.X`)SDK主要区别
- 4.1 `3.X.X`版本SDK基本概念
- 4.1.1 SDK3.0接口介绍(TYParameter.h)
- 4.1.1.1 System
- 4.1.1.2 Interface
- 4.1.1.3 Device
- 4.1.1.4 Component
- 4.1.1.5 Feature
- 4.1.1.6 FrameData
- 4.2 `4.X.X`版本SDK基本概念
- 4.2.1 SDK4.0接口介绍(TYParameter.h)
- 4.2.1.1 Common
- 4.2.1.2 Command
- 4.2.1.3 Interger
- 4.2.1.4 Float
- 4.2.1.5 Boolean
- 4.2.1.6 Enumeration
- 4.2.1.7 String
- 4.2.1.8 ByteArray
- 4.2.2 SDK4.0新增功能点介绍
- 4.3 SDK4.0和SDK3.0功能点对比
- 5.常见问题FAQ
- 5.1 黑灯工厂下,单纯依靠相机自带的参曝光、增益,无法拿到可用的RGB图,该怎么解决?
- 5.1.1 针对无泛光的散斑相机,客户无法加补光灯
- 5.1.2 针对无泛光的散斑相机,客户增加补光灯
- 5.1.3 .针对有泛光的散斑相机,可开启泛光
- 5.1.4 TOF相机,使用相机IR图
- 5.2 TOF相机IR图增强方式
- 5.2.1 IR图线性拉伸
- 5.2.2 扩展比例对图像的像素值进行线性变换
- 5.2.3 基于标准差的线性拉伸
- 5.2.4 基于对数变换的非线性拉伸
- 5.2.5 基于直方图的非线性拉伸
- 5.2.6 Gamma校正
- 6.补充学习资料
- 6.1 Low-level视觉之弱光图像增强及常规图像增强
- 6.2 Genicam SFNC协议
主要梳理了图漾官网C++语言 4.X.X版本的例子
1.新的看图软件
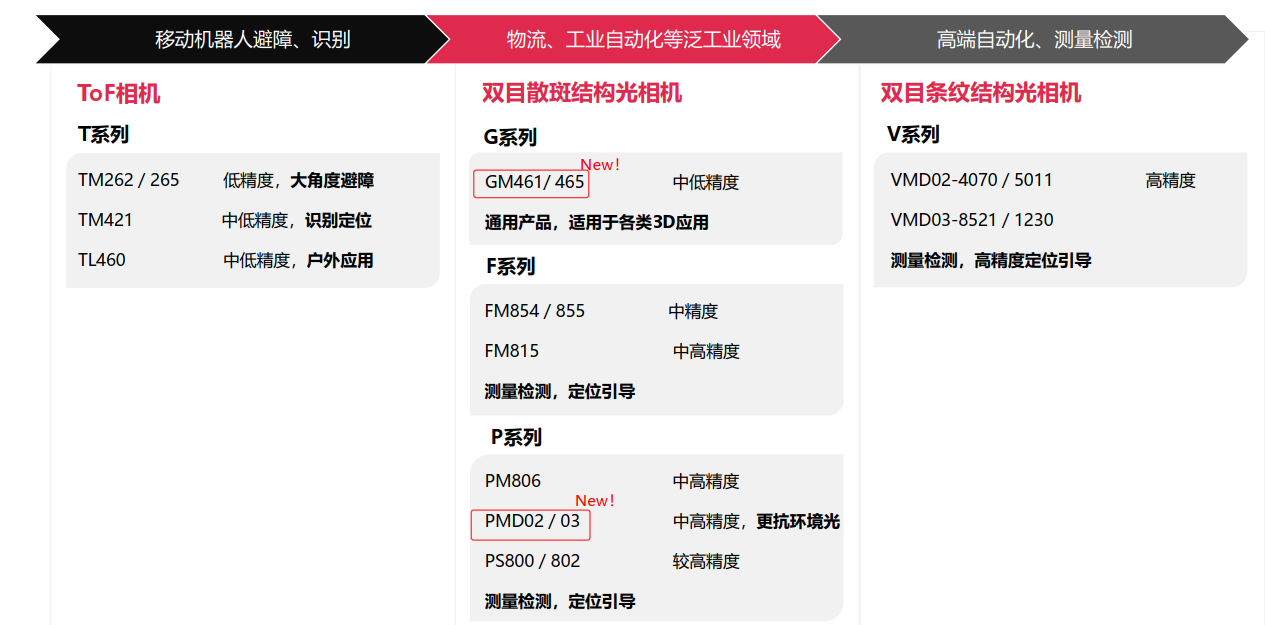
目前官网上并未发布新的看图软件,如在使用图漾GM461/465和PMD002/003等新相机时,建议联系图漾技术,获取新版本看图软件(也是兼容旧相机的),而其他型号的相机,仍建议使用官网的PercipioViewer软件:
而新的看图软件界面,如下图所示:

注意:新看图软件,当前仅支持Windows10/11 64位系统。
1.1 深度图滤波设置
建议再开启相机取流前,打开散斑滤波设置开关

2.属性配置
具体的属性设置可参看如下链接:
API 及属性说明
2.1如何查看SDK版本?
查看相机SDK版本方式1,进入到SDK版本以下路径,如下图:

2.2 SDK中区分新旧相机接口
if (TYIsNetworkInterface(selectedDev.iface.type)){LOGD(" - device %s:", selectedDev.id);if (strlen(selectedDev.userDefinedName) != 0) {LOGD(" vendor : %s", selectedDev.userDefinedName);} else {LOGD(" vendor : %s", selectedDev.vendorName);}LOGD(" model : %s", selectedDev.modelName);LOGD(" device MAC : %s", selectedDev.netInfo.mac);LOGD(" device IP : %s", selectedDev.netInfo.ip);LOGD(" TL version : %s", selectedDev.netInfo.tlversion);if (strcmp(selectedDev.netInfo.tlversion, "Gige_2_1") == 0) {use_new_apis();}else {use_old_apis();}}else {TY_DEV_HANDLE handle;int32_t ret = TYOpenDevice(hIface, selectedDev.id, &handle);if (ret == 0) {TYGetDeviceInfo(handle, &selectedDev);TYCloseDevice(handle);LOGD(" - device %s:", selectedDev.id);} else {LOGD(" - device %s(open failed, error: %d)", selectedDev.id, ret);}if (strlen(selectedDev.userDefinedName) != 0) {LOGD(" vendor : %s", selectedDev.userDefinedName);}else {LOGD(" vendor : %s", selectedDev.vendorName);}LOGD(" model : %s", selectedDev.modelName);use_old_apis();}
3.适配所有相机参考例子
既可以适用之前的FM851-E2/FM855等相机,也可以正常打开图漾新的GM46X、PMD等新相机
相机的规格书可查看如下链接:
图漾相机的规格书
具体代码如下:
#include <limits>
#include <cassert>
#include <cmath>
#include "../common/common.hpp"
#include <TYImageProc.h>
#include <chrono>//深度图对齐到彩色图开关,置1则将深度图对齐到彩色图坐标系,置0则不对齐
//因彩色图对齐到深度图时会有部分深度缺失的区域丢失彩色信息,因此默认使用深度图对齐到彩色图方式
#define MAP_DEPTH_TO_COLOR 0
//开启以下深度图渲染显示将会降低帧率
DepthViewer depthViewer0("OrgDepth");//用于显示渲染后的原深度图
DepthViewer depthViewer1("FillHoleDepth");//用于显示渲染后的填洞处理之后的深度图
DepthViewer depthViewer2("SpeckleFilterDepth"); //用于显示渲染后的经星噪滤波过的深度图
DepthViewer depthViewer3("EnhenceFilterDepth"); //用于显示渲染后的经时域滤波过的深度图
DepthViewer depthViewer4("MappedDepth"); //用于显示渲染后的对齐到彩色图坐标系的深度图//事件回调
void eventCallback(TY_EVENT_INFO *event_info, void *userdata)
{if (event_info->eventId == TY_EVENT_DEVICE_OFFLINE) {LOGD("=== Event Callback: Device Offline!");// Note: // Please set TY_BOOL_KEEP_ALIVE_ON OFF feature to false if you need to debug with breakpoint!}else if (event_info->eventId == TY_EVENT_LICENSE_ERROR) {LOGD("=== Event Callback: License Error!");}
}//数据格式转换
//cv pixel format to TY_PIXEL_FORMAT
static int cvpf2typf(int cvpf)
{switch(cvpf){case CV_8U: return TY_PIXEL_FORMAT_MONO;case CV_8UC3: return TY_PIXEL_FORMAT_RGB;case CV_16UC1: return TY_PIXEL_FORMAT_DEPTH16;default: return TY_PIXEL_FORMAT_UNDEFINED;}
}//数据格式转换
//mat to TY_IMAGE_DATA
static void mat2TY_IMAGE_DATA(int comp, const cv::Mat& mat, TY_IMAGE_DATA& data)
{data.status = 0;data.componentID = comp;data.size = mat.total() * mat.elemSize();data.buffer = mat.data;data.width = mat.cols;data.height = mat.rows;data.pixelFormat = cvpf2typf(mat.type());
}// save XYZ format pointcloud
static void writePointCloud_XYZ(const cv::Vec3s* pnts, size_t n, const char* file)
{FILE* fp = fopen(file, "w");if (!fp) {return;}for (size_t i = 0; i < 6000; i++){if (pnts[i][2] < 6000){fprintf(fp, "%hd %hd %hd\n", pnts[i][0], pnts[i][1], pnts[i][2]);}}fclose(fp);
}//回调数据
struct CallbackData
{int index;TY_DEV_HANDLE hDevice;TY_CAMERA_INTRINSIC* intri_depth;TY_CAMERA_INTRINSIC* intri_color;TY_CAMERA_CALIB_INFO depth_calib;TY_CAMERA_CALIB_INFO color_calib;float scale_unit;bool saveOneFramePoint3d;int fileIndex;bool isTof;
};
CallbackData cb_data;//通过内参实训深度图转点云,方式供参考
//depth to pointcloud
//对齐后输入的是RGB的内参,depth是对齐后的depth
cv::Mat depthToWorld(float* intr, const cv::Mat &depth)
{cv::Mat world(depth.rows, depth.cols, CV_32FC3);float cx = intr[2];float cy = intr[5];float inv_fx = 1.0f / intr[0];float inv_fy = 1.0f / intr[4];for (int r = 0; r < depth.rows; r++){uint16_t* pSrc = (uint16_t*)depth.data + r * depth.cols;cv::Vec3f* pDst = (cv::Vec3f*)world.data + r * depth.cols;for (int c = 0; c < depth.cols; c++){uint16_t z = pSrc[c];if(z == 0){pDst[c][0] = NAN;pDst[c][1] = NAN;pDst[c][2] = NAN;} else {pDst[c][0] = (c - cx) * z * inv_fx;pDst[c][1] = (r - cy) * z * inv_fy;pDst[c][2] = z;}}}return world;
}//输出畸变校正的彩色图,并实现深度图对齐到彩色图
static void doRegister(const TY_CAMERA_CALIB_INFO& depth_calib, const TY_CAMERA_CALIB_INFO& color_calib, const cv::Mat& depth, const float f_scale_unit, const cv::Mat& color, cv::Mat& undistort_color, cv::Mat& out, bool map_depth_to_color
)
{// do undistortionTY_IMAGE_DATA src;src.width = color.cols;src.height = color.rows;src.size = color.size().area() * 3;src.pixelFormat = TY_PIXEL_FORMAT_RGB;src.buffer = color.data;undistort_color = cv::Mat(color.size(), CV_8UC3);TY_IMAGE_DATA dst;dst.width = color.cols;dst.height = color.rows;dst.size = undistort_color.size().area() * 3;dst.buffer = undistort_color.data;dst.pixelFormat = TY_PIXEL_FORMAT_RGB;ASSERT_OK(TYUndistortImage(&color_calib, &src, NULL, &dst));// do registerif (map_depth_to_color) {out = cv::Mat::zeros(undistort_color.size(), CV_16U);ASSERT_OK(TYMapDepthImageToColorCoordinate(&depth_calib,depth.cols, depth.rows, depth.ptr<uint16_t>(),&color_calib,out.cols, out.rows, out.ptr<uint16_t>(), f_scale_unit));}else {out = depth;}
}//帧处理
void frameHandler(TY_FRAME_DATA* frame, void* userdata)
{CallbackData* pData = (CallbackData*) userdata;LOGD("=== Get frame %d", ++pData->index);std::vector<TY_VECT_3F> P3dtoColor, P3d;//对齐到color的点云cv::Mat depth, color, ir,p3d, newP3d;std::vector<cv::Mat> depths;auto StartParseFrame = std::chrono::steady_clock::now();//解析帧parseFrame(*frame, &depth, &ir, 0, &color);//拿深度图和color图auto ParseFrameFinished = std::chrono::steady_clock::now(); //计算程序耗时 auto duration2 = std::chrono::duration_cast<std::chrono::microseconds>(ParseFrameFinished - StartParseFrame); LOGI("*******ParseFrame spend Time : %lld", duration2);//填洞开关,开启后会降低帧率bool FillHole = 0;//星噪滤波开关,深度图中离散点降噪处理bool SpeckleFilter = 0;//时域滤波bool EnhenceFilter = 1;//参与时域滤波的图像数量int depthnum = 1;//IR图线性拉伸 //result=(grayIr-min(grayIr))* 255.0 / (max(grayIr) - min(grayIr))bool IR_LinearStretch = 0; //IR图通过扩展比例对图像的像素值进行线性变换 // result=src*multi_expandratiobool IR_LinearStretchMulti = 0;//IR图基于标准差的线性拉伸 // result=grayIr*255.0/(std_expandratio*std(grayIr));bool IR_LinearStretchStd = 0; //IR图基于对数变换的非线性拉伸 //result = log_expandratio * log2(src)bool IR_NoLinearStretchLog2 = 0;//IR图基于直方图的非线性拉伸 // result=equalizeHist(src)bool IR_NoLinearStretchHist = 1;//深度图处理if (!depth.empty()){if (pData->isTof){TY_IMAGE_DATA src;src.width = depth.cols;src.height = depth.rows;src.size = depth.size().area() * 2;src.pixelFormat = TY_PIXEL_FORMAT_DEPTH16;src.buffer = depth.data;cv::Mat undistort_depth = cv::Mat(depth.size(), CV_16U);TY_IMAGE_DATA dst;dst.width = depth.cols;dst.height = depth.rows;dst.size = undistort_depth.size().area() * 2;dst.buffer = undistort_depth.data;dst.pixelFormat = TY_PIXEL_FORMAT_DEPTH16;ASSERT_OK(TYUndistortImage(&pData->depth_calib, &src, NULL, &dst));depth = undistort_depth.clone();}if (FillHole){//深度图填洞处理DepthInpainter inpainter;inpainter._kernelSize = 10;inpainter._maxInternalHoleToBeFilled = 1800;inpainter._fillAll = false;inpainter.inpaint(depth, depth, cv::Mat());depthViewer1.show(depth);}if (EnhenceFilter){depths.push_back(depth.clone());LOGD("depths_size %d", depths.size());if (depths.size() >= depthnum){// filter//LOGD("count %d ", ++cnt);LOGD("depthnum count %d ", depthnum);std::vector<TY_IMAGE_DATA> tyDepth(depthnum);for (size_t i = 0; i < depthnum; i++){mat2TY_IMAGE_DATA(TY_COMPONENT_DEPTH_CAM, depths[i], tyDepth[i]);}//使用时域滤波TY_IMAGE_DATA tyFilteredDepth;cv::Mat filteredDepth2(depth.size(), depth.type());mat2TY_IMAGE_DATA(TY_COMPONENT_DEPTH_CAM, filteredDepth2, tyFilteredDepth);struct DepthEnhenceParameters param = DepthEnhenceParameters_Initializer;param.sigma_s = 0; //空间滤波系数param.sigma_r = 0; //深度滤波系数param.outlier_rate = 0; //以像素为单位的滤波窗口param.outlier_win_sz = 0.f;//噪音过滤系数TYDepthEnhenceFilter(&tyDepth[0], depthnum, NULL, &tyFilteredDepth, ¶m);depths.clear();//显示时域滤波后深度图渲染depthViewer3.show(filteredDepth2);}}else if (!FillHole&&!SpeckleFilter){//显示原深度图渲染depthViewer0.show(depth);//原点云p3d = depthToWorld(pData->intri_depth->data, depth);}}//对TOF的IR图进行解析if (!ir.empty()){ //IR图畸变校正TY_IMAGE_DATA src1;src1.width = ir.cols;src1.height = ir.rows;src1.size = ir.size().area() * 2;src1.pixelFormat = TY_PIXEL_FORMAT_MONO16;src1.buffer = ir.data;cv::Mat undistort_ir = cv::Mat(ir.size(), CV_16U);TY_IMAGE_DATA dst1;dst1.width = ir.cols;dst1.height = ir.rows;dst1.size = undistort_ir.size().area() * 2;dst1.buffer = undistort_ir.data;dst1.pixelFormat = TY_PIXEL_FORMAT_MONO16;ASSERT_OK(TYUndistortImage(&pData->depth_calib, &src1, NULL, &dst1));ir = undistort_ir.clone();cv::Mat meanvalue, stdvalue;cv::Mat result;double minVal, maxVal;//IR图线性拉伸if (IR_LinearStretch){cv::Mat meanvalue, stdvalue;cv::meanStdDev(ir, meanvalue, stdvalue);//线性拉伸一般使用默认值double std_expandratio = 6;double use_norm_std = stdvalue.ptr<double>(0)[0];double use_norm = use_norm_std * std_expandratio + 1.0; cv::minMaxLoc(ir, &minVal, &maxVal);ir.convertTo(result, CV_8UC1, 255.0 / use_norm);cv::imshow("IR_LinearStretch", result);cv::imwrite("IR_LinearStretch.png", result);}//通过扩展比例对图像的像素值进行线性变换if (IR_LinearStretchMulti){//对应对应PercipioViewer软件中的digital gain,范围(2,20),默认值为8,数值越大,图像越亮。double multi_expandratio = 8; ir.convertTo(result, CV_8UC1, multi_expandratio / 255.0);cv::imshow("IR_LinearStretchMulti", result);cv::imwrite("IR_LinearStretchMulti.png", result);}//基于标准差的线性拉伸 //result=equalizeHist(src)if (IR_LinearStretchStd){ //对应PercipioViewer软件中的std gain,范围(2,20),默认值为6,数值越小,图像越亮。double std_expandratio = 2;cv::meanStdDev(ir, meanvalue, stdvalue);double use_norm_std = stdvalue.ptr<double>(0)[0];double use_norm = use_norm_std * std_expandratio + 1.0;double minVal, maxVal;cv::minMaxLoc(ir, &minVal, &maxVal);ir.convertTo(result, CV_8UC1, 255.0 / use_norm);cv::imshow("IR_LinearStretchStd", result);cv::imwrite("IR_LinearStretchStd.png", result);}//IR图基于对数变换的非线性拉伸 //result = log_expandratio * log2(src)if (IR_NoLinearStretchLog2){int rows = ir.rows;int cols = ir.cols;result = cv::Mat::zeros(rows, cols, CV_8UC1);//对应PercipioViewer软件中的log gain,范围(5,50),默认值为20,数值越大,图像越亮。double log_expandratio = 15;for (int i = 0; i < rows; i++){uint16_t* in = ir.ptr<uint16_t>(i);uint8_t* out = result.ptr<uint8_t>(i);for (int j = 0; j < cols; j++){uint16_t inone = in[j];int outone = log_expandratio * log2(inone);outone = outone < 255 ? outone : 255;out[j] = uint8_t(outone);}}cv::imshow("IR_NoLinearStretchLog2", result);cv::imwrite("IR_NoLinearStretchLog2.png", result);}//IR图基于直方图的非线性拉伸 // result=equalizeHist(src) if (IR_NoLinearStretchHist){cv::Mat ir8;double minVal, maxVal;cv::minMaxLoc(ir, &minVal, &maxVal);// 线性拉伸到0-255范围ir.convertTo(ir8, CV_8UC1, 255.0 / (maxVal - minVal), -minVal * 255.0 / (maxVal - minVal));cv::equalizeHist(ir8, result);cv::imshow("IR_NoLinearStretchHist", result);cv::imwrite("IR_NoLinearStretchHist.png", result);}}//彩色图处理cv::Mat color_data_mat, p3dtocolorMat;if (!color.empty()){//显示原彩色图//imshow("orgColor", color);cv::Mat undistort_color, MappedDepth;if (MAP_DEPTH_TO_COLOR){auto BeforedoRegister = std::chrono::steady_clock::now();//彩色图去畸变,并将深度图对齐到彩色图坐标系doRegister(pData->depth_calib, pData->color_calib, depth, pData->scale_unit, color, undistort_color, MappedDepth, MAP_DEPTH_TO_COLOR);//数据格式转换cv::cvtColor(undistort_color, color_data_mat, CV_BGR2RGB);//生成对齐到彩色图坐标系的点云,两种方法//方法一:生成点云放在TY_VECT_3F---P3dtoColorP3dtoColor.resize(MappedDepth.size().area());ASSERT_OK(TYMapDepthImageToPoint3d(&pData->color_calib, MappedDepth.cols, MappedDepth.rows, (uint16_t*)MappedDepth.data, &P3dtoColor[0], pData->scale_unit));//方法二:生成点云放在32FC3 Mat---p3dtocolorMat//p3dtocolorMat = depthToWorld(pData->intri_color->data, MappedDepth, pData->scale_unit);auto AfterdoRegister = std::chrono::steady_clock::now();auto duration3 = std::chrono::duration_cast<std::chrono::microseconds>(AfterdoRegister - BeforedoRegister);LOGI("*******do Rgb Undistortion--MapDepthToColor--P3D spend Time : %lld", duration3);//显示畸变校正后的彩色图imshow("undistort_color", undistort_color);//显示对齐到彩色图坐标系的深度图depthViewer4.show(MappedDepth);}else{//彩色图去畸变,不对齐的深度图doRegister(pData->depth_calib, pData->color_calib, depth, pData->scale_unit, color, undistort_color, MappedDepth, MAP_DEPTH_TO_COLOR);//显示畸变校正后的彩色图imshow("undistort_color", undistort_color);//方法一:生成点云放在TY_VECT_3F---P3dtoColorP3d.resize(MappedDepth.size().area());ASSERT_OK(TYMapDepthImageToPoint3d(&pData->depth_calib, MappedDepth.cols, MappedDepth.rows, (uint16_t*)MappedDepth.data, &P3d[0], pData->scale_unit));//方法二 pointcloud in CV_32FC3 format//newP3d = depthToWorld(pData->intri_depth->data, depth, pData->scale_unit);}}//保存点云//save pointcloudif (pData->saveOneFramePoint3d){char file[32];if (MAP_DEPTH_TO_COLOR){LOGD("Save p3dtocolor now!!!");//保存对齐到color坐标系XYZRGB格式彩色点云sprintf(file, "pointsToColor-%d.xyz", pData->fileIndex++);//方式一点云保存writePointCloud((cv::Point3f*)&P3dtoColor[0], (const cv::Vec3b*)color_data_mat.data, P3dtoColor.size(), file, PC_FILE_FORMAT_XYZ);//方式二点云保存//writePointCloud((cv::Point3f*)p3dtocolorMat.data, (const cv::Vec3b*)color_data_mat.data, p3dtocolorMat.total(), file, PC_FILE_FORMAT_XYZ);}else{LOGD("Save point3d now!!!");//保存XYZ格式点云sprintf(file, "points-%d.xyz", pData->fileIndex++);//方式一点云保存writePointCloud((cv::Point3f*)&P3d[0], 0, P3d.size(), file, PC_FILE_FORMAT_XYZ);//方式二点云保存//writePointCloud((cv::Point3f*)newP3d.data, 0, newP3d.total(), file, PC_FILE_FORMAT_XYZ);}pData->saveOneFramePoint3d = false;}//归还Buffer队列LOGD("=== Re-enqueue buffer(%p, %d)", frame->userBuffer, frame->bufferSize);ASSERT_OK( TYEnqueueBuffer(pData->hDevice, frame->userBuffer, frame->bufferSize) );
}int main(int argc, char* argv[])
{std::string ID, IP;TY_INTERFACE_HANDLE hIface = NULL;TY_DEV_HANDLE hDevice = NULL;TY_CAMERA_INTRINSIC intri_depth;TY_CAMERA_INTRINSIC intri_color;int32_t resend = 1;bool isTof = 0;for(int i = 1; i < argc; i++){if(strcmp(argv[i], "-id") == 0){ID = argv[++i];} else if(strcmp(argv[i], "-ip") == 0) {IP = argv[++i];} else if(strcmp(argv[i], "-h") == 0){LOGI("Usage: SimpleView_Callback [-h] [-id <ID>]");return 0;}}LOGD("=== Init lib");ASSERT_OK( TYInitLib() );TY_VERSION_INFO ver;ASSERT_OK( TYLibVersion(&ver) );LOGD(" - lib version: %d.%d.%d", ver.major, ver.minor, ver.patch);int fetch_timeout = 0;std::vector<TY_DEVICE_BASE_INFO> selected;//选择相机ASSERT_OK( selectDevice(TY_INTERFACE_ALL, ID, IP, 1, selected) );ASSERT(selected.size() > 0);//默认加载第一个相机TY_DEVICE_BASE_INFO& selectedDev = selected[0];//打开接口和设备ASSERT_OK( TYOpenInterface(selectedDev.iface.id, &hIface) );ASSERT_OK( TYOpenDevice(hIface, selectedDev.id, &hDevice) );//for debug//TYSetBool(hDevice, TY_COMPONENT_DEVICE, TY_BOOL_KEEP_ALIVE_ONOFF, false); //不同型号相机具备不同的参数属性,可以使用PercipioViewer看图软件确认相机支持的参数属性和参数取值范围TY_STATUS status = TY_STATUS_OK;//使能彩色相机
//try to enable color cameraLOGD("Has RGB camera, open RGB cam");ASSERT_OK(TYEnableComponents(hDevice, TY_COMPONENT_RGB_CAM));//设置彩色相机像素格式和分辨率LOGD("=== Configure feature, set RGB resolution");//方法一:直接设置像素格式和分辨率//ASSERT_OK(TYSetEnum(hDevice, TY_COMPONENT_RGB_CAM, TY_ENUM_IMAGE_MODE, TY_IMAGE_MODE_YUYV_640x360));//yuyv支持1280x720,640x360//方法二:通过枚举相机支持的图像模式,结合图像宽度选定分辨率,不关注像素格式if (TY_COMPONENT_RGB_CAM){std::vector<TY_ENUM_ENTRY> image_mode_list;status = get_feature_enum_list(hDevice, TY_COMPONENT_RGB_CAM, TY_ENUM_IMAGE_MODE, image_mode_list);for (int idx = 0; idx < image_mode_list.size(); idx++){TY_ENUM_ENTRY& entry = image_mode_list[idx];//选择其中一个分辨率if (TYImageWidth(entry.value) == 640){LOGD("Select RGB Image Mode: %s", entry.description);int err = TYSetEnum(hDevice, TY_COMPONENT_RGB_CAM, TY_ENUM_IMAGE_MODE, entry.value);ASSERT(err == TY_STATUS_OK || err == TY_STATUS_NOT_PERMITTED);break;}}}//读取彩色相机标定数据//TY_STRUCT_CAM_CALIB_DATA内参是相机最大分辨率的内参//TY_STRUCT_CAM_INTRINSIC内参是相机当前分辨率的内参LOGD("=== Get color intrinsic");ASSERT_OK(TYGetStruct(hDevice, TY_COMPONENT_RGB_CAM, TY_STRUCT_CAM_INTRINSIC, &intri_color, sizeof(intri_color)));LOGD("=== Read color calib data");ASSERT_OK(TYGetStruct(hDevice, TY_COMPONENT_RGB_CAM, TY_STRUCT_CAM_CALIB_DATA, &cb_data.color_calib, sizeof(cb_data.color_calib)));//彩色相机硬ISP功能,仅RGB图像格式为YUYV是支持硬ISP的。//3A Control only for hardware ISP//获取RGB是否支持自动曝光,自动白平衡属性bool hasAUTOEXPOSURE, hasAUTOAWB;ASSERT_OK(TYHasFeature(hDevice, TY_COMPONENT_RGB_CAM, TY_BOOL_AUTO_EXPOSURE, &hasAUTOEXPOSURE));ASSERT_OK(TYHasFeature(hDevice, TY_COMPONENT_RGB_CAM, TY_BOOL_AUTO_AWB, &hasAUTOAWB));if (hasAUTOEXPOSURE){ASSERT_OK(TYSetBool(hDevice, TY_COMPONENT_RGB_CAM, TY_BOOL_AUTO_EXPOSURE, true));//turn on AEC 自动曝光}////开启自动曝光后,可绘制局部ROI//TY_AEC_ROI_PARAM aec_roi_param;//aec_roi_param.x = 233;//aec_roi_param.y = 424;//aec_roi_param.w = 394;//aec_roi_param.h = 228;//ASSERT_OK(TYSetStruct(hDevice, TY_COMPONENT_RGB_CAM, TY_STRUCT_AEC_ROI, &aec_roi_param, sizeof(TY_AEC_ROI_PARAM)));if (hasAUTOAWB){ASSERT_OK(TYSetBool(hDevice, TY_COMPONENT_RGB_CAM, TY_BOOL_AUTO_AWB, true));//turn on AWB 白平衡,校正图像色彩}//获取RGB支持的属性bool hasRGB_R_GAIN, hasRGB_B_GAIN, hasRGB_EXPOSURE_TIME;ASSERT_OK(TYHasFeature(hDevice, TY_COMPONENT_RGB_CAM, TY_INT_R_GAIN, &hasRGB_R_GAIN));ASSERT_OK(TYHasFeature(hDevice, TY_COMPONENT_RGB_CAM, TY_INT_B_GAIN, &hasRGB_B_GAIN));ASSERT_OK(TYHasFeature(hDevice, TY_COMPONENT_RGB_CAM, TY_INT_EXPOSURE_TIME, &hasRGB_EXPOSURE_TIME));if (hasRGB_R_GAIN){ASSERT_OK(TYSetInt(hDevice, TY_COMPONENT_RGB_CAM, TY_INT_R_GAIN, 400));//设置RGB数字增益R通道[0,1024]}if (hasRGB_B_GAIN){ASSERT_OK(TYSetInt(hDevice, TY_COMPONENT_RGB_CAM, TY_INT_B_GAIN, 400));//设置RGB数字增益B通道[0,1024]}if (hasRGB_EXPOSURE_TIME){ASSERT_OK(TYSetInt(hDevice, TY_COMPONENT_RGB_CAM, TY_INT_EXPOSURE_TIME, 500));//设置RGB曝光时间[0,1080]}//使能深度相机//try to enable depth camLOGD("=== Configure components, open depth cam");int32_t componentIDs = TY_COMPONENT_DEPTH_CAM;ASSERT_OK( TYEnableComponents(hDevice, componentIDs) );//使能IR相机//try to enable ir camLOGD("=== Configure components, open ir cam");ASSERT_OK(TYEnableComponents(hDevice, TY_COMPONENT_IR_CAM_LEFT));//设置深度图分辨率LOGD("=== Configure feature, set depth resolution");//方法一:直接设置分辨率 depth16_640x480\320x240\160x120//ASSERT_OK(TYSetEnum(hDevice, TY_COMPONENT_DEPTH_CAM, TY_ENUM_IMAGE_MODE, TY_IMAGE_MODE_DEPTH16_640x480));// //方法二:通过枚举相机支持的图像模式,结合图像宽度选定分辨率,不关注具体分辨率if (TY_COMPONENT_DEPTH_CAM) {std::vector<TY_ENUM_ENTRY> image_mode_list;status = get_feature_enum_list(hDevice, TY_COMPONENT_DEPTH_CAM, TY_ENUM_IMAGE_MODE, image_mode_list);for (int idx = 0; idx < image_mode_list.size(); idx++) {TY_ENUM_ENTRY &entry = image_mode_list[idx];//try to select a resolutionif (TYImageWidth(entry.value) == 640) {LOGD("Select Depth Image Mode: %s", entry.description);int err = TYSetEnum(hDevice, TY_COMPONENT_DEPTH_CAM, TY_ENUM_IMAGE_MODE, entry.value);ASSERT(err == TY_STATUS_OK || err == TY_STATUS_NOT_PERMITTED);status = TYEnableComponents(hDevice, TY_COMPONENT_DEPTH_CAM);break;}}}//读取深度相机内参和深度相机标定数据LOGD("=== Get depth intrinsic");ASSERT_OK(TYGetStruct(hDevice, TY_COMPONENT_DEPTH_CAM, TY_STRUCT_CAM_INTRINSIC, &intri_depth, sizeof(intri_depth)));LOGD("=== Read depth calib data");ASSERT_OK(TYGetStruct(hDevice, TY_COMPONENT_DEPTH_CAM, TY_STRUCT_CAM_CALIB_DATA, &cb_data.depth_calib, sizeof(cb_data.depth_calib)));//*************************************************// you can set TOF camera feature here.ASSERT_OK(TYHasFeature(hDevice, TY_COMPONENT_DEPTH_CAM, TY_STRUCT_CAM_DISTORTION, &isTof));if (isTof){bool hasIR_HDR;// Set DEPTH_QUALITY 2对应medium模式,medium:深度值抖动幅度中等,输出帧率中等。4对应high模式,high:深度值抖动幅度小,输出帧率低int quality = 2; // 2,4 LOGD("Set DEPTH_QUALITY %d", quality);ASSERT_OK(TYSetEnum(hDevice, TY_COMPONENT_DEPTH_CAM, TY_ENUM_DEPTH_QUALITY, quality));// Set TOF_CHANNEL 设置 ToF 深度相机调制频道。不同调制频道的调制频率不同,互不干扰,设置成4为双波段,对黑色成像较好,但是深度图容易弯曲int channel = 0; // 0,1,2,3,4LOGD("Set TOF_CHANNEL %d", channel);ASSERT_OK(TYSetInt(hDevice, TY_COMPONENT_DEPTH_CAM, TY_INT_TOF_CHANNEL, channel));// Set TOF_MODULATION_THRESHOLD 小于此阈值的像素点不参与计算深度,即像素点的深度值赋值为 0。int modulation = 600;LOGD("Set TOF_MODULATION_THRESHOLD %d", modulation);ASSERT_OK(TYSetInt(hDevice, TY_COMPONENT_DEPTH_CAM, TY_INT_TOF_MODULATION_THRESHOLD, modulation));// Set FILTER_THRESHOLD 用于设置 ToF 深度相机的飞点滤波阈值。滤波阈值设置越小,过滤的飞点越多。int filter = 0; //(0,100) LOGD("Set FILTER_THRESHOLD %d", filter);ASSERT_OK(TYSetInt(hDevice, TY_COMPONENT_DEPTH_CAM, TY_INT_FILTER_THRESHOLD, filter));// Set TOF_JITTER_THRESHOLD 用于设置 ToF 深度相机的抖动过滤阈值。阈值设置值越大,深度图边缘抖动的深度数据过滤得越少。bool hasJITTER_THRESHOLD = false;ASSERT_OK(TYHasFeature(hDevice, TY_COMPONENT_DEPTH_CAM, TY_INT_TOF_JITTER_THRESHOLD, &hasJITTER_THRESHOLD));if (hasJITTER_THRESHOLD){int jitter = 6; //(1,10) 针对黑色托盘,点云边缘缺失时,可适当增加该值LOGD("Set TOF_JITTER_THRESHOLD %d", jitter);ASSERT_OK(TYSetInt(hDevice, TY_COMPONENT_DEPTH_CAM, TY_INT_TOF_JITTER_THRESHOLD, jitter));}// Set EXPOSURE_TIME (60,240000)bool hasleftIR_Exposure;ASSERT_OK(TYHasFeature(hDevice, TY_COMPONENT_IR_CAM_LEFT, TY_INT_EXPOSURE_TIME, &hasleftIR_Exposure));if (hasleftIR_Exposure){ASSERT_OK(TYSetInt(hDevice, TY_COMPONENT_IR_CAM_LEFT, TY_INT_EXPOSURE_TIME, 240000));}//开启HDR功能,需要先关闭Depth Stream,之后将 depth quality 设置为 high,之后再打开Depth Stream,设置HDR ratioASSERT_OK(TYHasFeature(hDevice, TY_COMPONENT_IR_CAM_LEFT, TY_BOOL_HDR, &hasIR_HDR));if (hasIR_HDR){ASSERT_OK(TYSetBool(hDevice, TY_COMPONENT_IR_CAM_LEFT, TY_BOOL_HDR, true));//设置开启HDR功能}////set TY_INT_MAX_SPECKLE_SIZE //bool hasMAX_SPECKLE_SIZE = false;//ASSERT_OK(TYHasFeature(hDevice, TY_COMPONENT_DEPTH_CAM, TY_INT_MAX_SPECKLE_SIZE, &hasMAX_SPECKLE_SIZE));//if (hasMAX_SPECKLE_SIZE)//{// int speckle_size = 50; //(0,200) //噪点面积小于该值将被过滤// LOGD("Set MAX_SPECKLE_SIZE %d", speckle_size);// ASSERT_OK(TYSetInt(hDevice, TY_COMPONENT_DEPTH_CAM, TY_INT_MAX_SPECKLE_SIZE, speckle_size));//}////set TY_INT_MAX_SPECKLE_DIFF //bool hasMAX_SPECKLE_DIFF = false;//ASSERT_OK(TYHasFeature(hDevice, TY_COMPONENT_DEPTH_CAM, TY_INT_MAX_SPECKLE_DIFF, &hasMAX_SPECKLE_DIFF));//if (hasMAX_SPECKLE_DIFF)//{// int speckle_diff = 100; //(100,500) //相邻像素视差大于该值将被视为噪点// LOGD("Set MAX_SPECKLE_DIFF %d", speckle_diff);// ASSERT_OK(TYSetInt(hDevice, TY_COMPONENT_DEPTH_CAM, TY_INT_MAX_SPECKLE_DIFF, speckle_diff));//}}//*************************************************//获取所需Buffer大小LOGD("=== Prepare image buffer");uint32_t frameSize;ASSERT_OK( TYGetFrameBufferSize(hDevice, &frameSize) );LOGD(" - Get size of framebuffer, %d", frameSize);//分配两个Buffer,并压入队列LOGD(" - Allocate & enqueue buffers");char* frameBuffer[2];frameBuffer[0] = new char[frameSize];frameBuffer[1] = new char[frameSize];LOGD(" - Enqueue buffer (%p, %d)", frameBuffer[0], frameSize);ASSERT_OK( TYEnqueueBuffer(hDevice, frameBuffer[0], frameSize) );LOGD(" - Enqueue buffer (%p, %d)", frameBuffer[1], frameSize);ASSERT_OK( TYEnqueueBuffer(hDevice, frameBuffer[1], frameSize) );//注册事件回调bool device_offline = false;;LOGD("=== Register event callback");ASSERT_OK(TYRegisterEventCallback(hDevice, eventCallback, &device_offline));uint32_t accept_percent = 90;LOGD("Set acceptable ratio to %d", accept_percent);ASSERT_OK(TYSetInt(hDevice, TY_COMPONENT_DEVICE, TY_INT_ACCEPTABLE_PERCENT, accept_percent));//设置触发模式/*bool hasTrigger;ASSERT_OK(TYHasFeature(hDevice, TY_COMPONENT_DEVICE, TY_STRUCT_TRIGGER_PARAM, &hasTrigger));if (hasTrigger){LOGD("Disable trigger mode");TY_TRIGGER_PARAM trigger;trigger.mode = TY_TRIGGER_MODE_OFF;ASSERT_OK(TYSetStruct(hDevice, TY_COMPONENT_DEVICE, TY_STRUCT_TRIGGER_PARAM, &trigger, sizeof(trigger)));}*///触发模式设置bool hasTrigger;ASSERT_OK(TYHasFeature(hDevice, TY_COMPONENT_DEVICE, TY_STRUCT_TRIGGER_PARAM, &hasTrigger));if (hasTrigger) {TY_TRIGGER_PARAM trigger;//trigger.mode = TY_TRIGGER_MODE_OFF;//连续采集模式 LOGD("=== enable trigger mode");trigger.mode = TY_TRIGGER_MODE_SLAVE;//软触发和硬触发模式ASSERT_OK(TYSetStruct(hDevice, TY_COMPONENT_DEVICE, TY_STRUCT_TRIGGER_PARAM, &trigger, sizeof(trigger)));//bool hasDI0_WORKMODE;//ASSERT_OK(TYHasFeature(hDevice, TY_COMPONENT_DEVICE, TY_STRUCT_DI0_WORKMODE, &hasDI0_WORKMODE));//if (hasDI0_WORKMODE)//{// //硬触发模式防抖// TY_DI_WORKMODE di_wm;// di_wm.mode = TY_DI_PE_INT;// di_wm.int_act = TY_DI_INT_TRIG_CAP;// uint32_t time_hw = 10;//单位ms,硬件滤波,小于设定时间的电平信号会被过滤// uint32_t time_sw = 200;//单位ms,软件滤波,连续高频触发情形,小于设置周期的后一个触发信号将被过滤// di_wm.reserved[0] = time_hw | (time_sw << 16);// ASSERT_OK(TYSetStruct(hDevice, TY_COMPONENT_DEVICE, TY_STRUCT_DI0_WORKMODE, &di_wm, sizeof(di_wm)));//}}//网口相机,启用丢包重传功能//for network onlyLOGD("=== resend: %d", resend);if (resend) {bool hasResend;ASSERT_OK(TYHasFeature(hDevice, TY_COMPONENT_DEVICE, TY_BOOL_GVSP_RESEND, &hasResend));if (hasResend){LOGD("=== Open resend");ASSERT_OK(TYSetBool(hDevice, TY_COMPONENT_DEVICE, TY_BOOL_GVSP_RESEND, true));}else {LOGD("=== Not support feature TY_BOOL_GVSP_RESEND");}}//开始采集LOGD("=== Start capture");ASSERT_OK( TYStartCapture(hDevice) );//回调数据初始化cb_data.index = 0;cb_data.hDevice = hDevice;cb_data.saveOneFramePoint3d = false;cb_data.fileIndex = 0;cb_data.intri_depth = &intri_depth;cb_data.intri_color = &intri_color;float scale_unit = 1.;TYGetFloat(hDevice, TY_COMPONENT_DEPTH_CAM, TY_FLOAT_SCALE_UNIT, &scale_unit);cb_data.scale_unit = scale_unit;cb_data.isTof = isTof;//循环取图LOGD("=== While loop to fetch frame");TY_FRAME_DATA frame;bool exit_main = false;int index = 0;while(!exit_main){auto timeTrigger = std::chrono::steady_clock::now();//发送一次软触发while (TY_STATUS_BUSY == TYSendSoftTrigger(hDevice));//获取帧,默认超时设置为10sint err = TYFetchFrame(hDevice, &frame, 3000);auto timeGetFrame = std::chrono::steady_clock::now(); auto duration = std::chrono::duration_cast<std::chrono::microseconds>(timeGetFrame - timeTrigger); LOGI("*******FetchFrame spend Time : %lld", duration);if( err != TY_STATUS_OK ){LOGD("receiving data timeout");fetch_timeout++;LOGD("... Drop one frame");continue;}if (err == TY_STATUS_OK) {LOGD("Get frame %d", ++index);int fps = get_fps();if (fps > 0) {LOGI("***************************fps: %d", fps);}}frameHandler(&frame, &cb_data);int key = cv::waitKey(1);switch (key & 0xff){case 0xff:break;case 'q':exit_main = true;break;case 's':cb_data.saveOneFramePoint3d = true;//图片显示窗口上按s键则存一张点云图break;default:LOGD("Pressed key %d", key);}TY_CAMERA_STATISTICS st;ASSERT_OK(TYGetStruct(hDevice, TY_COMPONENT_DEVICE, TY_STRUCT_CAM_STATISTICS, &st, sizeof(st)));LOGI("Statistics:");LOGI(" packetReceived: %" PRIu64 " ", st.packetReceived);LOGI(" packetLost : %" PRIu64 " ", st.packetLost);LOGI(" imageOutputed : %" PRIu64 " ", st.imageOutputed);LOGI(" imageDropped : %" PRIu64 " ", st.imageDropped);std::cout << "fetch timeout" << fetch_timeout << std::endl;}ASSERT_OK( TYStopCapture(hDevice) );ASSERT_OK( TYCloseDevice(hDevice) );ASSERT_OK( TYCloseInterface(hIface) );ASSERT_OK( TYDeinitLib() );delete frameBuffer[0];delete frameBuffer[1];LOGD("=== Main done!");return 0;
}4.新(4.X.X)旧(3.X.X)SDK主要区别
4.1 3.X.X版本SDK基本概念

4.1.1 SDK3.0接口介绍(TYParameter.h)
4.1.1.1 System
1.TYInitLib/TYDeinitLib/TYLibVersion
2.TYSetLogLevel/TYSetLogPrefix/TYSetLogPrefix/TYRemoveLogFile/TYRemoveLogFile/TYRe moveLogFile
3.TYUpdateInterfaceList/TYGetInterfaceNumber/TYGetInterfaceList/TYHasInterface/TYOpenInter face
4.1.1.2 Interface
1.TYCloseInterface
2.TYUpdateDeviceList/TYUpdateAllDeviceList/TYGetDeviceNumber/TYGetDeviceList/TYHasDe 3.vice/TYOpenDevice/TYOpenDeviceWithIP
4.TYForceDeviceIP
4.1.1.3 Device
1.TYGetDeviceInterface
2.TYCloseDevice/TYGetDeviceInfo
3.TYGetComponentIDs/TYGetEnabledComponents/TYEnableComponents/TYDisableComponents
4.TYGetFrameBufferSize/TYEnqueueBuffer/TYClearBufferQueue/TYFeatchFrame
5.TYStartCapture/TYStopCapture/TYSendSoftTrigger
6.TYRegisterEventCallback/TYRegisterImuCallback
7.TYGetDeviceXMLSize/TYGetDeviceXML
4.1.1.4 Component
1.TYGetDeviceFeatureNumber/TYGetDeviceFeatureInfo
4.1.1.5 Feature
1.TYHasFeature/TYGetFeatureInfo
2.TYGetIntRange/TYGetInt/TYSetInt
3.TYGetFloatRange/TYGetFloat/TYSetFloat
4.TYGetEnumEntryCount/TYGetEnumEntryInfo/TYGetEnum/TYSetEnum
5.TYGetBool/TYSetBool
6.TYGetStringLength/TYGetString/TYSetString
7.TYGetStruct/TYSetStruct
8.TYGetByteArraySize/TYGetByteArray/TYSetByteArray/TYGetByteArrayAttr
4.1.1.6 FrameData


4.2 4.X.X版本SDK基本概念
Deivce/Interface/System和SDK3.x一致

4.2.1 SDK4.0接口介绍(TYParameter.h)
4.2.1.1 Common
1.TYParamGetToolTip/TYParamGetDescriptor/TYParamGetDisplayName
2.TYParamGetType/TYParamGetAccess/TYParamGetVisibility
4.2.1.2 Command
1.TYCommandExec
4.2.1.3 Interger
1.TYIntegerSetValue/TYIntegerGetValue
2.TYIntegerGetMin/TYIntegerGetMax
3.TYIntegerGetStep/TYIntegerGetUnit
4.2.1.4 Float
1.TYFloatSetValue/TYFloatGetValue
2.TYFloatGetMin/TYFloatGetMax
3.TYFloatGetStep/TYFloatGetUnit
4.2.1.5 Boolean
1.TYBooleanSetValue/TYBooleanGetValue
4.2.1.6 Enumeration
1.TYEnumSetValue/TYEnumSetString/TYEnumGetValue/TYEnumGetString
2.TYEnumGetEntryCount/TYEnumGetEntryInfo
4.2.1.7 String
1.TYStringSetValue/TYStringGetLength/TYStringGetValue
4.2.1.8 ByteArray
1.TYByteArrayGetSize/TYByteArraySetValue/TYByteArrayGetValue
4.2.2 SDK4.0新增功能点介绍
新增UserSet功能
增加了数据流流控
4.3 SDK4.0和SDK3.0功能点对比
1.XML修改为直接符合GenICam标准的格式
2.删除struct类型,全转换成分散的feature
3.增加Command类型
4.删除Resend开关,修改逻辑为如果Device支持,则默认开启
5.设备寄存器是保留的,直到掉电或者调用DeviceReset
6.删除原有的ImageMode,拆分为Width/Height+Binnig和PixelFmt, 其中width/height为属性,与sensor硬件相关, 其他分辨率通过binning来实现,目前BinningHorizontal和BinningVertical为绑定关系,暂时不支持只一个方向binning;
5.常见问题FAQ
5.1 黑灯工厂下,单纯依靠相机自带的参曝光、增益,无法拿到可用的RGB图,该怎么解决?
5.1.1 针对无泛光的散斑相机,客户无法加补光灯
尝试让客户把深度图做颜色渲染,之后存带渲染的深度图,之后拿渲染过的深度图做模型训练,实测可行性一般
5.1.2 针对无泛光的散斑相机,客户增加补光灯
在车上加补光灯,如在使用FM851-E2相机时,AGV车上添加了补光灯,此时RGB较暗的问题可解决。
5.1.3 .针对有泛光的散斑相机,可开启泛光
如FM855-E1-G相机,相机自身带RGB泛光,在黑暗环境下,开启泛光,RGB较暗的问题可解决。

而FM855-E1-G相机,在实际黑暗环境下,拍摄黑托盘成像如下:

5.1.4 TOF相机,使用相机IR图
之前SDK提供的五种提升IR对比度的方式,实测下来,只有基于LinearStretchStdProcesser标准差和NoLinearStretchHistProcesser直方图的线性拉伸这两种较为有效。
5.2 TOF相机IR图增强方式
1.首先需要使能IR组件
//使能IR相机LOGD("=== Configure components, open ir cam");ASSERT_OK(TYEnableComponents(hDevice, TY_COMPONENT_IR_CAM_LEFT));
2.解析图像
//解析图像帧parseFrame(*frame, &depth, &ir, 0, &color);//拿深度图和color图
3.校正IR图像畸变
//IR图畸变校正TY_IMAGE_DATA src1;src1.width = ir.cols;src1.height = ir.rows;src1.size = ir.size().area() * 2;src1.pixelFormat = TY_PIXEL_FORMAT_MONO16;src1.buffer = ir.data;cv::Mat undistort_ir = cv::Mat(ir.size(), CV_16U);TY_IMAGE_DATA dst1;dst1.width = ir.cols;dst1.height = ir.rows;dst1.size = undistort_ir.size().area() * 2;dst1.buffer = undistort_ir.data;dst1.pixelFormat = TY_PIXEL_FORMAT_MONO16;ASSERT_OK(TYUndistortImage(&pData->depth_calib, &src1, NULL, &dst1));ir = undistort_ir.clone();
4.对IR图进行后处理
//IR图线性拉伸 //result=(grayIr-min(grayIr))* 255.0 / (max(grayIr) - min(grayIr))bool IR_LinearStretch = 0; //IR图通过扩展比例对图像的像素值进行线性变换 // result=src*multi_expandratiobool IR_LinearStretchMulti = 1;//IR图基于标准差的线性拉伸 // result=grayIr*255.0/(std_expandratio*std(grayIr));bool IR_LinearStretchStd = 0; //IR图基于对数变换的非线性拉伸 //result = log_expandratio * log2(src)bool IR_NoLinearStretchLog2 = 0;//IR图基于直方图的非线性拉伸 // result=equalizeHist(src)bool IR_NoLinearStretchHist = 0;
5.2.1 IR图线性拉伸
cv::Mat meanvalue, stdvalue;cv::Mat result;double minVal, maxVal;//IR图线性拉伸if (IR_LinearStretch){cv::Mat meanvalue, stdvalue;cv::meanStdDev(ir, meanvalue, stdvalue);//线性拉伸一般使用默认值double std_expandratio = 6;double use_norm_std = stdvalue.ptr<double>(0)[0];double use_norm = use_norm_std * std_expandratio + 1.0; cv::minMaxLoc(ir, &minVal, &maxVal);ir.convertTo(result, CV_8UC1, 255.0 / use_norm);cv::imshow("IR_LinearStretch", result);cv::imwrite("IR_LinearStretch.png", result);}
5.2.2 扩展比例对图像的像素值进行线性变换
//通过扩展比例对图像的像素值进行线性变换if (IR_LinearStretchMulti){//对应对应PercipioViewer软件中的digital gain,范围(2,20),默认值为8,数值越大,图像越亮。double multi_expandratio = 8; ir.convertTo(result, CV_8UC1, multi_expandratio / 255.0);cv::imshow("IR_LinearStretchMulti", result);cv::imwrite("IR_LinearStretchMulti.png", result);}
5.2.3 基于标准差的线性拉伸
if (IR_LinearStretchStd){ //对应PercipioViewer软件中的std gain,范围(2,20),默认值为6,数值越小,图像越亮。double std_expandratio = 2;cv::meanStdDev(ir, meanvalue, stdvalue);double use_norm_std = stdvalue.ptr<double>(0)[0];double use_norm = use_norm_std * std_expandratio + 1.0;double minVal, maxVal;cv::minMaxLoc(ir, &minVal, &maxVal);ir.convertTo(result, CV_8UC1, 255.0 / use_norm);cv::imshow("IR_LinearStretchStd", result);cv::imwrite("IR_LinearStretchStd.png", result);}5.2.4 基于对数变换的非线性拉伸
if (IR_NoLinearStretchLog2){int rows = ir.rows;int cols = ir.cols;result = cv::Mat::zeros(rows, cols, CV_8UC1);//对应PercipioViewer软件中的log gain,范围(5,50),默认值为20,数值越大,图像越亮。double log_expandratio = 15;for (int i = 0; i < rows; i++){uint16_t* in = ir.ptr<uint16_t>(i);uint8_t* out = result.ptr<uint8_t>(i);for (int j = 0; j < cols; j++){uint16_t inone = in[j];int outone = log_expandratio * log2(inone);outone = outone < 255 ? outone : 255;out[j] = uint8_t(outone);}}cv::imshow("IR_NoLinearStretchLog2", result);cv::imwrite("IR_NoLinearStretchLog2.png", result);}
5.2.5 基于直方图的非线性拉伸
if (IR_NoLinearStretchHist){cv::Mat ir8;double minVal, maxVal;cv::minMaxLoc(ir, &minVal, &maxVal);// 线性拉伸到0-255范围ir.convertTo(ir8, CV_8UC1, 255.0 / (maxVal - minVal), -minVal * 255.0 / (maxVal - minVal));cv::equalizeHist(ir8, result);cv::imshow("IR_NoLinearStretchHist", result);cv::imwrite("IR_NoLinearStretchHist.png", result);}5.2.6 Gamma校正
待补充
6.补充学习资料
6.1 Low-level视觉之弱光图像增强及常规图像增强
1,Low-level视觉之弱光图像增强及常规图像增强
6.2 Genicam SFNC协议
2.GIGE 协议摘录 —— GVCP 协议