图像分割:PyTorch从零开始实现SegFormer语义分割
图像分割:PyTorch从零开始实现SegFormer语义分割
- 前言
- 环境要求
- 相关介绍
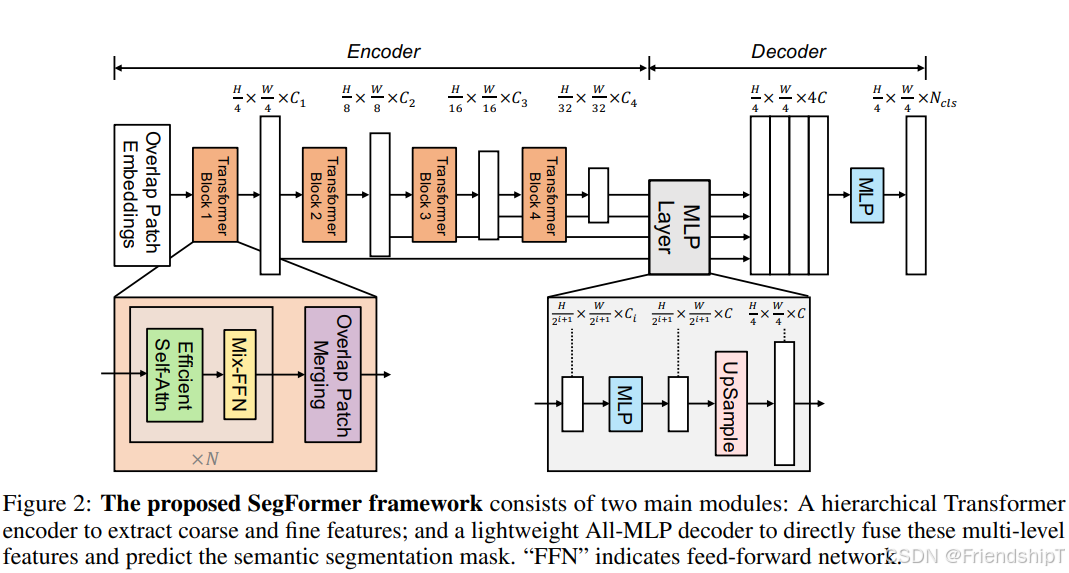
- SegFormer核心模块:编码器(MiT)和解码器(All-MLP解码器)。
- 编码器(MiT):
- 分层结构,产生多尺度特征(通常有4个阶段,每个阶段特征图尺寸递减)。
- 每个阶段由多个Transformer块组成,每个块包含:
- 重叠块嵌入(Overlapped Patch Embedding)
- 高效自注意力(Efficient Self-Attention)
- 混合前馈网络(Mix FeedForward Network)
- 解码器(All-MLP):
- 将多尺度特征上采样到相同尺寸并拼接。
- 通过多层感知机(MLP)得到分割结果。
- 具体实现
- 导入相关库
- 准备数据集
- 定义网络模型
- 训练验证
- 推理预测
- 主函数
- 输出结果
- 完整代码
- 参考
前言
- 由于本人水平有限,难免出现错漏,敬请批评改正。
- 更多精彩内容,可点击进入Python日常小操作专栏、OpenCV-Python小应用专栏、YOLO系列专栏、自然语言处理专栏、人工智能混合编程实践专栏或我的个人主页查看
- Ultralytics:使用 YOLO11 进行速度估计
- Ultralytics:使用 YOLO11 进行物体追踪
- Ultralytics:使用 YOLO11 进行物体计数
- Ultralytics:使用 YOLO11 进行目标打码
- 人工智能混合编程实践:C++调用Python ONNX进行YOLOv8推理
- 人工智能混合编程实践:C++调用封装好的DLL进行YOLOv8实例分割
- 人工智能混合编程实践:C++调用Python ONNX进行图像超分重建
- 人工智能混合编程实践:C++调用Python AgentOCR进行文本识别
- 通过计算实例简单地理解PatchCore异常检测
- Python将YOLO格式实例分割数据集转换为COCO格式实例分割数据集
- YOLOv8 Ultralytics:使用Ultralytics框架训练RT-DETR实时目标检测模型
- 基于DETR的人脸伪装检测
- YOLOv7训练自己的数据集(口罩检测)
- YOLOv8训练自己的数据集(足球检测)
- YOLOv5:TensorRT加速YOLOv5模型推理
- YOLOv5:IoU、GIoU、DIoU、CIoU、EIoU
- 玩转Jetson Nano(五):TensorRT加速YOLOv5目标检测
- YOLOv5:添加SE、CBAM、CoordAtt、ECA注意力机制
- YOLOv5:yolov5s.yaml配置文件解读、增加小目标检测层
- Python将COCO格式实例分割数据集转换为YOLO格式实例分割数据集
- YOLOv5:使用7.0版本训练自己的实例分割模型(车辆、行人、路标、车道线等实例分割)
- 使用Kaggle GPU资源免费体验Stable Diffusion开源项目
- Stable Diffusion:在服务器上部署使用Stable Diffusion WebUI进行AI绘图(v2.0)
- Stable Diffusion:使用自己的数据集微调训练LoRA模型(v2.0)
环境要求
Package                Version      Editable project location
---------------------- ------------ ----------------------------------------------
addict                 2.4.0
aliyun-python-sdk-core 2.16.0
aliyun-python-sdk-kms  2.16.5
certifi                2025.8.3
cffi                   2.0.0
charset-normalizer     3.4.3
click                  8.3.0
colorama               0.4.6
contourpy              1.3.2
crcmod                 1.7
cryptography           46.0.1
cycler                 0.12.1
einops                 0.8.1
filelock               3.14.0
fonttools              4.60.0
fsspec                 2025.9.0
ftfy                   6.3.1
huggingface-hub        0.35.1
idna                   3.10
jmespath               0.10.0
kiwisolver             1.4.9
Markdown               3.9
markdown-it-py         4.0.0
matplotlib             3.10.6
mdurl                  0.1.2
mmcv                   2.1.0
mmcv-full              1.2.7
mmengine               0.10.7
mmsegmentation         0.11.0
model-index            0.1.11
numpy                  1.26.3
opencv-python          4.6.0.66
opendatalab            0.0.10
openmim                0.3.9
openxlab               0.1.2
ordered-set            4.1.0
oss2                   2.17.0
packaging              24.2
pandas                 2.3.2
pillow                 11.3.0
pip                    23.0.1
platformdirs           4.4.0
polars                 1.33.1
prettytable            3.16.0
psutil                 7.1.0
pycparser              2.23
pycryptodome           3.23.0
Pygments               2.19.2
pyparsing              3.2.5
python-dateutil        2.9.0.post0
pytz                   2023.4
pywin32                311
PyYAML                 6.0.3
regex                  2025.9.18
requests               2.28.2
rich                   13.4.2
safetensors            0.6.2
scipy                  1.15.3
setuptools             60.2.0
six                    1.17.0
tabulate               0.9.0
termcolor              3.1.0
terminaltables         3.1.10
timm                   1.0.20
tomli                  2.2.1
torch                  1.13.1+cu116
torchaudio             0.13.1+cu116
torchvision            0.14.1+cu116
tqdm                   4.65.2
typing_extensions      4.15.0
tzdata                 2025.2
ultralytics            8.3.203
ultralytics-thop       2.0.17
urllib3                1.26.20
wcwidth                0.2.14
yapf                   0.43.0
相关介绍
- Python是一种跨平台的计算机程序设计语言。是一个高层次的结合了解释性、编译性、互动性和面向对象的脚本语言。最初被设计用于编写自动化脚本(shell),随着版本的不断更新和语言新功能的添加,越多被用于独立的、大型项目的开发。
- PyTorch 是一个深度学习框架,封装好了很多网络和深度学习相关的工具方便我们调用,而不用我们一个个去单独写了。它分为 CPU 和 GPU 版本,其他框架还有 TensorFlow、Caffe 等。PyTorch 是由 Facebook 人工智能研究院(FAIR)基于 Torch 推出的,它是一个基于 Python 的可续计算包,提供两个高级功能:1、具有强大的 GPU 加速的张量计算(如 NumPy);2、构建深度神经网络时的自动微分机制。
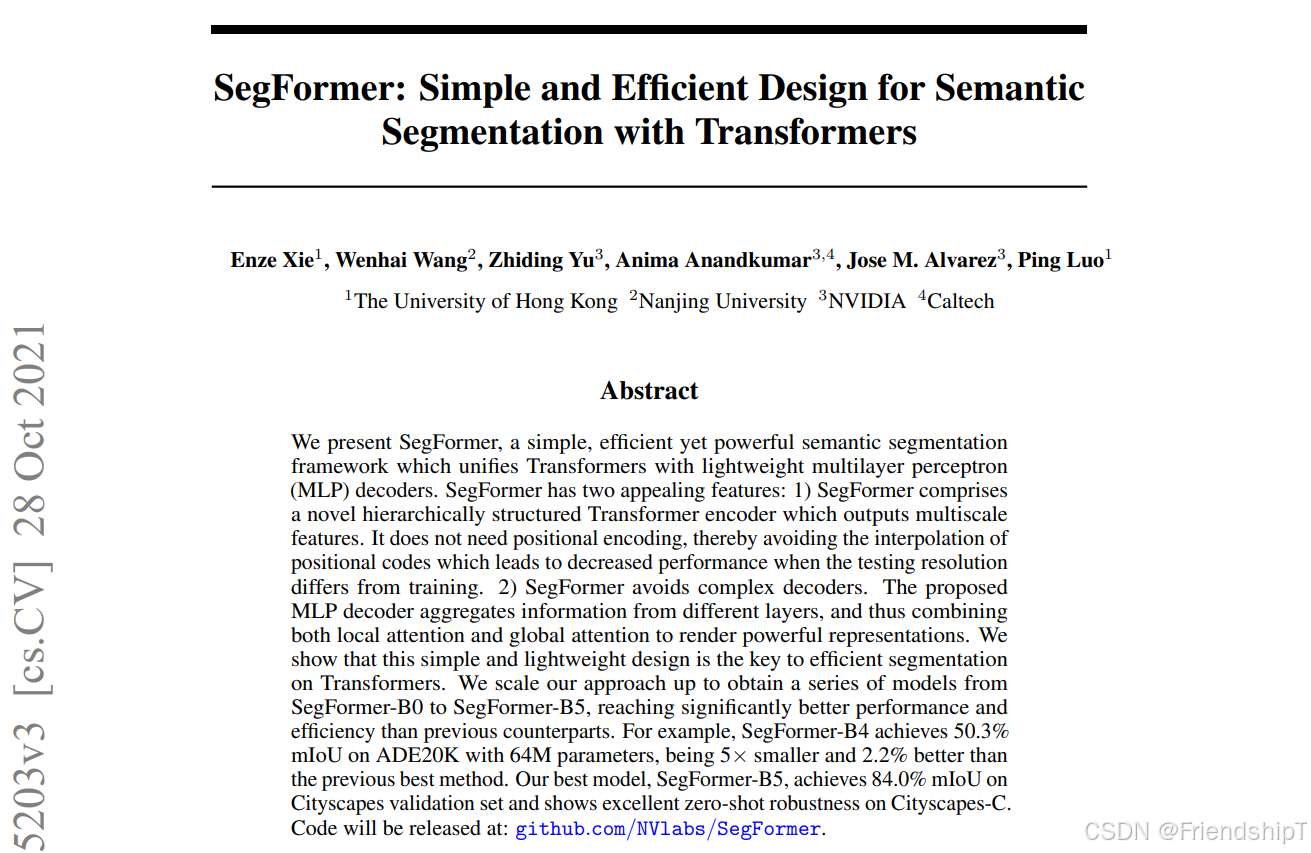
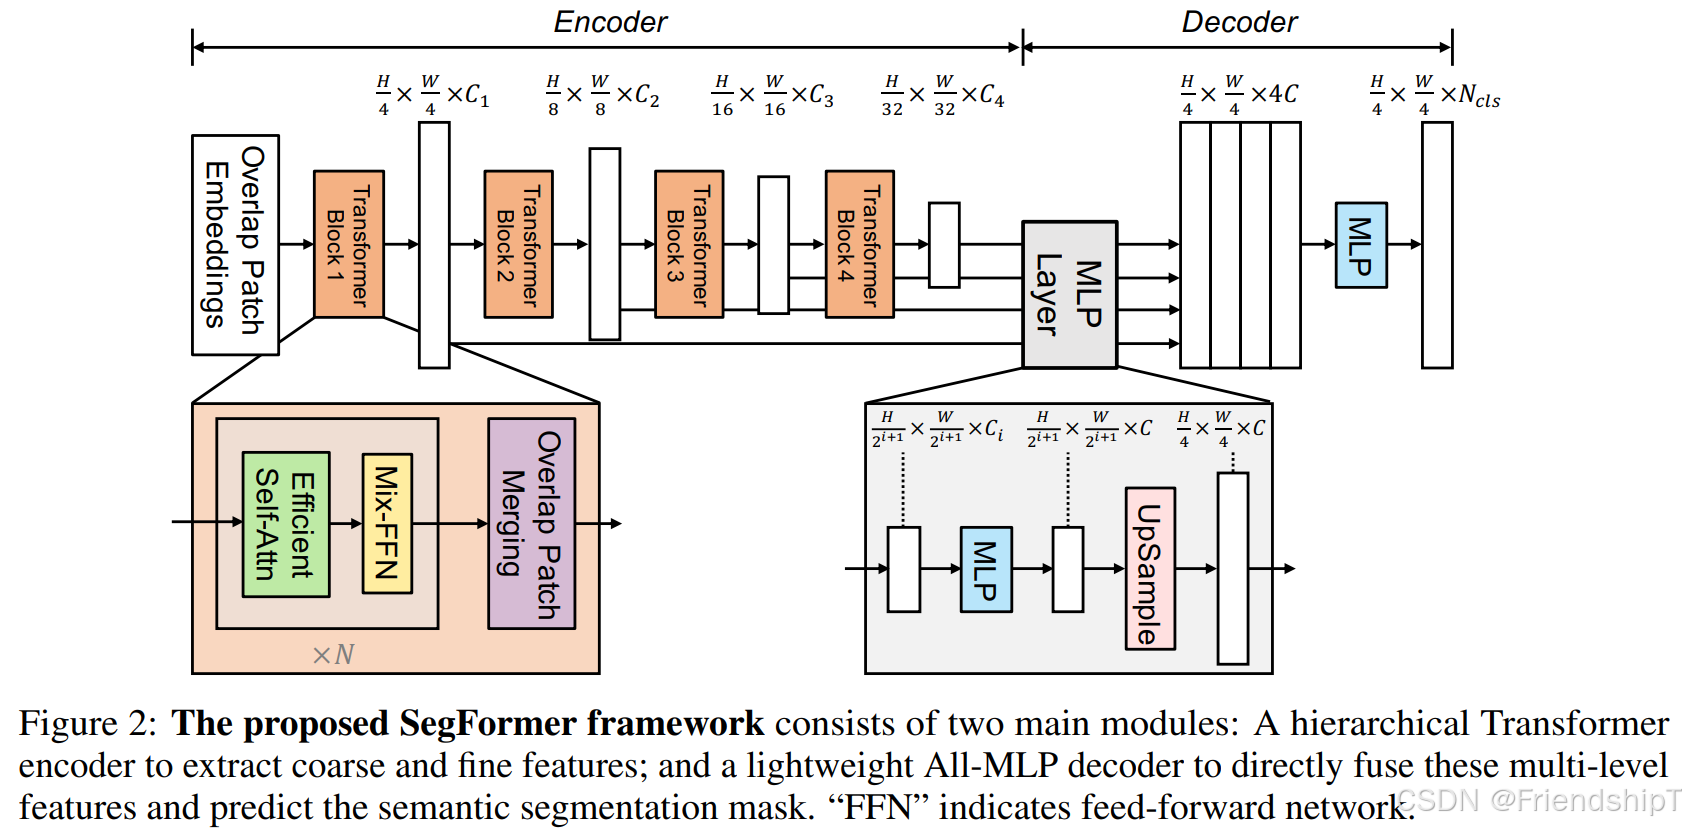
- SegFormer 是一个简单、高效但功能强大的语义分割框架,它将 Transformers 与轻量级多层感知器 (MLP) 解码器结合在一起。
- SegFormer 有两个吸引人的特点:
- SegFormer 包含一个新颖的分层结构变换器编码器,可输出多尺度特征。它不需要位置编码,从而避免了位置编码的插值,当测试分辨率与训练分辨率不同时,插值会导致性能下降。
- SegFormer 避免了复杂的解码器。所提出的 MLP 解码器汇聚了来自不同层的信息,从而将局部注意力和全局注意力结合起来,呈现出强大的表征。
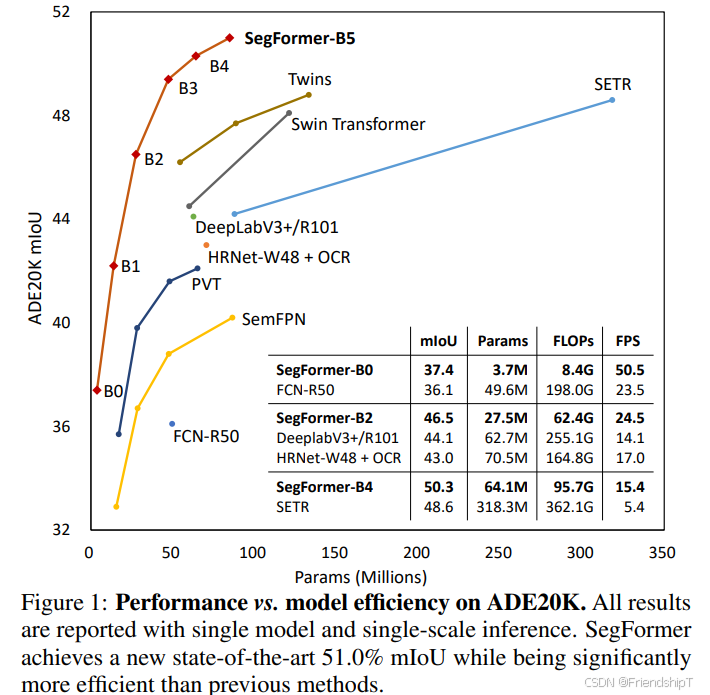
- 这种简单轻便的设计是在 Transformers 上实现高效分割的关键。通过扩展,获得了从 SegFormer-B0 到 SegFormer-B5 的一系列模型,其性能和效率明显优于之前的同类产品。
- 例如,SegFormer-B4 在 64M 参数的 ADE20K 上实现了 50.3% 的 mIoU,比之前的最佳方法小 5 倍,好 2.2%。最佳模型 SegFormer-B5 在 Cityscapes 验证集上实现了 84.0% 的 mIoU,并在 Cityscapes-C 上显示了出色的零点稳健性。
- 官方源代码: https://github.com/NVlabs/SegFormer.git
- Enze Xie, Wenhai Wang, Zhiding Yu, Anima Anandkumar, Jose M. Alvarez, Ping Luo. SegFormer: Simple and Efficient Design for Semantic Segmentation with Transformers. 2021
SegFormer核心模块:编码器(MiT)和解码器(All-MLP解码器)。
class Segformer(nn.Module):def __init__(self,*,dims=(32, 64, 160, 256),heads=(1, 2, 5, 8),ff_expansion=(8, 8, 4, 4),reduction_ratio=(8, 4, 2, 1),num_layers=2,channels=3,decoder_dim=256,num_classes=4):super().__init__()dims, heads, ff_expansion, reduction_ratio, num_layers = map(partial(cast_tuple, depth=4), (dims, heads, ff_expansion, reduction_ratio, num_layers))assert all([*map(lambda t: len(t) == 4, (dims, heads, ff_expansion, reduction_ratio, num_layers))]), 'only four stages are allowed, all keyword arguments must be either a single value or a tuple of 4 values'self.mit = MiT(channels=channels,dims=dims,heads=heads,ff_expansion=ff_expansion,reduction_ratio=reduction_ratio,num_layers=num_layers)self.to_fused = nn.ModuleList([nn.Sequential(nn.Conv2d(dim, decoder_dim, 1),nn.Upsample(scale_factor=2 ** i)) for i, dim in enumerate(dims)])self.to_segmentation = nn.Sequential(nn.Conv2d(4 * decoder_dim, decoder_dim, 1),nn.Conv2d(decoder_dim, num_classes, 1),)def forward(self, x):H, W = x.shape[-2:] # 原始输入高宽layer_outputs = self.mit(x, return_layer_outputs=True)fused = [to_fused(output) for output, to_fused in zip(layer_outputs, self.to_fused)]fused = torch.cat(fused, dim=1)out = self.to_segmentation(fused)# 关键修复:上采样到原始输入尺寸out = F.interpolate(out, size=(H, W), mode='bilinear', align_corners=False)return out
编码器(MiT):
- 论文中的MiT:
- 分层设计的Transformer编码器
- 4个阶段,每个阶段下采样2倍
- 使用重叠块嵌入(Overlapped Patch Embedding)
class MiT(nn.Module):def __init__(self,*,channels,dims,heads,ff_expansion,reduction_ratio,num_layers):super().__init__()# 四个阶段的下采样配置stage_kernel_stride_pad = ((7, 4, 3), (3, 2, 1), (3, 2, 1), (3, 2, 1))# 对应论文中的阶段1-4dims = (channels, *dims)dim_pairs = list(zip(dims[:-1], dims[1:]))self.stages = nn.ModuleList([])for (dim_in, dim_out), (kernel, stride, padding), num_layers, ff_expansion, heads, reduction_ratio in zip(dim_pairs, stage_kernel_stride_pad, num_layers, ff_expansion, heads, reduction_ratio):get_overlap_patches = nn.Unfold(kernel, stride=stride, padding=padding)overlap_patch_embed = nn.Conv2d(dim_in * kernel ** 2, dim_out, 1)layers = nn.ModuleList([])for _ in range(num_layers):layers.append(nn.ModuleList([PreNorm(dim_out, EfficientSelfAttention(dim=dim_out, heads=heads, reduction_ratio=reduction_ratio)),PreNorm(dim_out, MixFeedForward(dim=dim_out, expansion_factor=ff_expansion)),]))self.stages.append(nn.ModuleList([get_overlap_patches,overlap_patch_embed,layers]))def forward(self,x,return_layer_outputs=False):h, w = x.shape[-2:]layer_outputs = []for (get_overlap_patches, overlap_embed, layers) in self.stages:x = get_overlap_patches(x)num_patches = x.shape[-1]ratio = int(sqrt((h * w) / num_patches))x = rearrange(x, 'b c (h w) -> b c h w', h=h // ratio)x = overlap_embed(x)for (attn, ff) in layers:x = attn(x) + xx = ff(x) + xlayer_outputs.append(x)ret = x if not return_layer_outputs else layer_outputsreturn ret
分层结构,产生多尺度特征(通常有4个阶段,每个阶段特征图尺寸递减)。
class MiT(nn.Module):def __init__(self, *, channels, dims, heads, ff_expansion, reduction_ratio, num_layers):# 四个阶段的下采样配置stage_kernel_stride_pad = ((7, 4, 3), (3, 2, 1), (3, 2, 1), (3, 2, 1))# 对应论文中的阶段1-4
每个阶段由多个Transformer块组成,每个块包含:
重叠块嵌入(Overlapped Patch Embedding)
- 论文创新点:
- 使用卷积而不是ViT的线性投影
- 保持局部连续性
get_overlap_patches = nn.Unfold(kernel, stride=stride, padding=padding)
overlap_patch_embed = nn.Conv2d(dim_in * kernel ** 2, dim_out, 1)
高效自注意力(Efficient Self-Attention)
- 论文创新点:
- 序列缩减机制,降低计算复杂度
- 使用reduction_ratio对K,V进行下采样
class EfficientSelfAttention(nn.Module):def __init__(self,*,dim,heads,reduction_ratio):super().__init__()self.scale = (dim // heads) ** -0.5self.heads = headsself.to_q = nn.Conv2d(dim, dim, 1, bias=False)self.to_kv = nn.Conv2d(dim, dim * 2, reduction_ratio, stride=reduction_ratio, bias=False) # 关键:序列缩减self.to_out = nn.Conv2d(dim, dim, 1, bias=False)def forward(self, x):h, w = x.shape[-2:]heads = self.headsq, k, v = (self.to_q(x), *self.to_kv(x).chunk(2, dim=1))q, k, v = map(lambda t: rearrange(t, 'b (h c) x y -> (b h) (x y) c', h=heads), (q, k, v))sim = einsum('b i d, b j d -> b i j', q, k) * self.scaleattn = sim.softmax(dim=-1)out = einsum('b i j, b j d -> b i d', attn, v)out = rearrange(out, '(b h) (x y) c -> b (h c) x y', h=heads, x=h, y=w)return self.to_out(out)
混合前馈网络(Mix FeedForward Network)
- 论文创新点:
- 使用3×3深度可分离卷积增强局部特征提取
- 替换标准MLP
class MixFeedForward(nn.Module):def __init__(self,*,dim,expansion_factor):super().__init__()hidden_dim = dim * expansion_factorself.net = nn.Sequential(nn.Conv2d(dim, hidden_dim, 1), # 升维DsConv2d(hidden_dim, hidden_dim, 3, padding=1), # 深度可分离卷积nn.GELU(),nn.Conv2d(hidden_dim, dim, 1) # 降维)def forward(self, x):return self.net(x)
解码器(All-MLP):
- 论文创新点:
- 简单的MLP结构,无需复杂设计
- 多尺度特征融合
将多尺度特征上采样到相同尺寸并拼接。
# 多尺度特征融合
self.to_fused = nn.ModuleList([nn.Sequential(nn.Conv2d(dim, decoder_dim, 1), # 统一通道数nn.Upsample(scale_factor=2 ** i) # 上采样到1/4尺度) for i, dim in enumerate(dims)])
通过多层感知机(MLP)得到分割结果。
self.to_segmentation = nn.Sequential(nn.Conv2d(4 * decoder_dim, decoder_dim, 1), # 特征融合nn.Conv2d(decoder_dim, num_classes, 1), # 分类头)
具体实现
导入相关库
import os
import torch
import torch.nn as nn
import torch.optim as optim
from torch.utils.data import Dataset, DataLoader, random_split
import torchvision.transforms as transforms
from torchvision import models
import numpy as np
import matplotlib.pyplot as plt
from PIL import Image
import cv2
from tqdm import tqdm
import torch.nn.functional as Ffrom math import sqrt
from functools import partial
import torch
from torch import nn, einsum
import torch.nn.functional as Ffrom einops import rearrange, reduce
from einops.layers.torch import Rearrange# helpersdef exists(val):return val is not Nonedef cast_tuple(val, depth):return val if isinstance(val, tuple) else (val,) * depth
准备数据集
# ============== MockSegmentationDataset ==============
class MockSegmentationDataset(Dataset):def __init__(self, size=256, num_samples=1000, num_classes=4):self.size = sizeself.num_samples = num_samplesself.num_classes = num_classes# 图像变换self.image_transform = transforms.Compose([transforms.Resize((size, size)),transforms.ToTensor(),])def __len__(self):return self.num_samplesdef __getitem__(self, idx):# 使用固定模式而不是完全随机,让模型容易学习rng = np.random.RandomState(idx)  # 固定随机种子,让数据可重复# 生成更结构化的背景img = np.full((self.size, self.size, 3), 128, dtype=np.uint8)  # 固定灰色背景seg_map = np.zeros((self.size, self.size), dtype=np.uint8)# 固定位置和尺寸的形状,减少随机性positions = [(self.size//4, self.size//4),      # 左上(3*self.size//4, self.size//4),    # 右上  (self.size//4, 3*self.size//4),    # 左下(3*self.size//4, 3*self.size//4),  # 右下]# 为每个样本固定选择2个形状,确保类别平衡shape_indices = [idx % 3 + 1, (idx + 1) % 3 + 1]  # 循环使用类别1,2,3for i, cls in enumerate(shape_indices[:2]):  # 只画2个形状pos = positions[i]if cls == 1:  # 圆形cv2.circle(seg_map, pos, 25, int(cls), -1)cv2.circle(img, pos, 25, (255, 0, 0), -1)  # 红色elif cls == 2:  # 矩形pt1 = (pos[0]-25, pos[1]-20)pt2 = (pos[0]+25, pos[1]+20)cv2.rectangle(seg_map, pt1, pt2, int(cls), -1)cv2.rectangle(img, pt1, pt2, (0, 255, 0), -1)  # 绿色elif cls == 3:  # 椭圆cv2.ellipse(seg_map, pos, (30, 15), 45, 0, 360, int(cls), -1)cv2.ellipse(img, pos, (30, 15), 45, 0, 360, (0, 0, 255), -1)  # 蓝色# 应用图像变换img = Image.fromarray(img)img = self.image_transform(img)# 直接转换为tensor,不应用与图像相同的变换seg_map = torch.from_numpy(seg_map).long()return img, seg_map
定义网络模型
# ============== SegFormer模型定义 ==============
class DsConv2d(nn.Module):def __init__(self, dim_in, dim_out, kernel_size, padding, stride=1, bias=True):super().__init__()self.net = nn.Sequential(nn.Conv2d(dim_in, dim_in, kernel_size=kernel_size, padding=padding, groups=dim_in, stride=stride, bias=bias),nn.Conv2d(dim_in, dim_out, kernel_size=1, bias=bias))def forward(self, x):return self.net(x)class LayerNorm(nn.Module):def __init__(self, dim, eps=1e-5):super().__init__()self.eps = epsself.g = nn.Parameter(torch.ones(1, dim, 1, 1))self.b = nn.Parameter(torch.zeros(1, dim, 1, 1))def forward(self, x):std = torch.var(x, dim=1, unbiased=False, keepdim=True).sqrt()mean = torch.mean(x, dim=1, keepdim=True)return (x - mean) / (std + self.eps) * self.g + self.bclass PreNorm(nn.Module):def __init__(self, dim, fn):super().__init__()self.fn = fnself.norm = LayerNorm(dim)def forward(self, x):return self.fn(self.norm(x))class EfficientSelfAttention(nn.Module):def __init__(self,*,dim,heads,reduction_ratio):super().__init__()self.scale = (dim // heads) ** -0.5self.heads = headsself.to_q = nn.Conv2d(dim, dim, 1, bias=False)self.to_kv = nn.Conv2d(dim, dim * 2, reduction_ratio, stride=reduction_ratio, bias=False) # 关键:序列缩减self.to_out = nn.Conv2d(dim, dim, 1, bias=False)def forward(self, x):h, w = x.shape[-2:]heads = self.headsq, k, v = (self.to_q(x), *self.to_kv(x).chunk(2, dim=1))q, k, v = map(lambda t: rearrange(t, 'b (h c) x y -> (b h) (x y) c', h=heads), (q, k, v))sim = einsum('b i d, b j d -> b i j', q, k) * self.scaleattn = sim.softmax(dim=-1)out = einsum('b i j, b j d -> b i d', attn, v)out = rearrange(out, '(b h) (x y) c -> b (h c) x y', h=heads, x=h, y=w)return self.to_out(out)class MixFeedForward(nn.Module):def __init__(self,*,dim,expansion_factor):super().__init__()hidden_dim = dim * expansion_factorself.net = nn.Sequential(nn.Conv2d(dim, hidden_dim, 1), # 升维DsConv2d(hidden_dim, hidden_dim, 3, padding=1), # 深度可分离卷积nn.GELU(),nn.Conv2d(hidden_dim, dim, 1) # 降维)def forward(self, x):return self.net(x)class MiT(nn.Module):def __init__(self,*,channels,dims,heads,ff_expansion,reduction_ratio,num_layers):super().__init__()# 四个阶段的下采样配置stage_kernel_stride_pad = ((7, 4, 3), (3, 2, 1), (3, 2, 1), (3, 2, 1))# 对应论文中的阶段1-4dims = (channels, *dims)dim_pairs = list(zip(dims[:-1], dims[1:]))self.stages = nn.ModuleList([])for (dim_in, dim_out), (kernel, stride, padding), num_layers, ff_expansion, heads, reduction_ratio in zip(dim_pairs, stage_kernel_stride_pad, num_layers, ff_expansion, heads, reduction_ratio):get_overlap_patches = nn.Unfold(kernel, stride=stride, padding=padding)overlap_patch_embed = nn.Conv2d(dim_in * kernel ** 2, dim_out, 1)layers = nn.ModuleList([])for _ in range(num_layers):layers.append(nn.ModuleList([PreNorm(dim_out, EfficientSelfAttention(dim=dim_out, heads=heads, reduction_ratio=reduction_ratio)),PreNorm(dim_out, MixFeedForward(dim=dim_out, expansion_factor=ff_expansion)),]))self.stages.append(nn.ModuleList([get_overlap_patches,overlap_patch_embed,layers]))def forward(self,x,return_layer_outputs=False):h, w = x.shape[-2:]layer_outputs = []for (get_overlap_patches, overlap_embed, layers) in self.stages:x = get_overlap_patches(x)num_patches = x.shape[-1]ratio = int(sqrt((h * w) / num_patches))x = rearrange(x, 'b c (h w) -> b c h w', h=h // ratio)x = overlap_embed(x)for (attn, ff) in layers:x = attn(x) + xx = ff(x) + xlayer_outputs.append(x)ret = x if not return_layer_outputs else layer_outputsreturn retclass Segformer(nn.Module):def __init__(self,*,dims=(32, 64, 160, 256),heads=(1, 2, 5, 8),ff_expansion=(8, 8, 4, 4),reduction_ratio=(8, 4, 2, 1),num_layers=2,channels=3,decoder_dim=256,num_classes=4):super().__init__()dims, heads, ff_expansion, reduction_ratio, num_layers = map(partial(cast_tuple, depth=4), (dims, heads, ff_expansion, reduction_ratio, num_layers))assert all([*map(lambda t: len(t) == 4, (dims, heads, ff_expansion, reduction_ratio, num_layers))]), 'only four stages are allowed, all keyword arguments must be either a single value or a tuple of 4 values'self.mit = MiT(channels=channels,dims=dims,heads=heads,ff_expansion=ff_expansion,reduction_ratio=reduction_ratio,num_layers=num_layers)# 多尺度特征融合self.to_fused = nn.ModuleList([nn.Sequential(nn.Conv2d(dim, decoder_dim, 1), # 统一通道数nn.Upsample(scale_factor=2 ** i) # 上采样到1/4尺度) for i, dim in enumerate(dims)])self.to_segmentation = nn.Sequential(nn.Conv2d(4 * decoder_dim, decoder_dim, 1), # 特征融合nn.Conv2d(decoder_dim, num_classes, 1), # 分类头)def forward(self, x):H, W = x.shape[-2:]  # 原始输入高宽layer_outputs = self.mit(x, return_layer_outputs=True)fused = [to_fused(output) for output, to_fused in zip(layer_outputs, self.to_fused)]fused = torch.cat(fused, dim=1)out = self.to_segmentation(fused)# 关键修复:上采样到原始输入尺寸out = F.interpolate(out, size=(H, W), mode='bilinear', align_corners=False)return out
训练验证
# ============== 训练函数 ==============
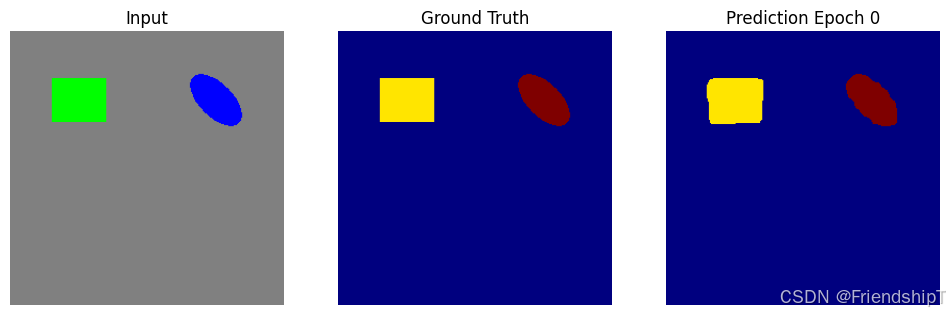
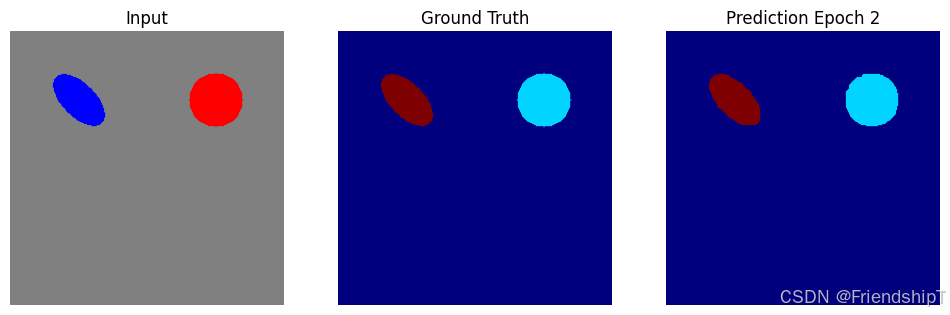
def get_segformer(model_name='b0', num_classes=4, decoder_dim=256):config = {'b0': dict(dims=(32, 64, 160, 256), num_layers=(2, 2, 2, 2)),'b1': dict(dims=(64, 128, 320, 512), num_layers=(2, 2, 2, 2)),'b2': dict(dims=(64, 128, 320, 512), num_layers=(3, 4, 6, 3)),'b3': dict(dims=(64, 128, 320, 512), num_layers=(3, 4, 18, 3)),'b4': dict(dims=(64, 128, 320, 512), num_layers=(3, 8, 27, 3)),'b5': dict(dims=(64, 128, 320, 512), num_layers=(3, 6, 40, 3)),}if model_name not in config:raise ValueError(f"Unsupported model: {model_name}")cfg = config[model_name]ff_expansion = (4, 4, 4, 4) if model_name == 'b5' else (8, 8, 4, 4)return Segformer(dims=cfg['dims'],heads=(1, 2, 5, 8),ff_expansion=ff_expansion,reduction_ratio=(8, 4, 2, 1),num_layers=cfg['num_layers'],decoder_dim=decoder_dim,num_classes=num_classes)def train_model(model, train_loader, val_loader, num_epochs=10, learning_rate=1e-4, device='cuda'):model = model.to(device)criterion = nn.CrossEntropyLoss()optimizer = optim.Adam(model.parameters(), lr=learning_rate)train_losses = []val_losses = []for epoch in range(num_epochs):# Trainingmodel.train()train_loss = 0.0for images, labels in tqdm(train_loader, desc=f"Epoch {epoch+1}/{num_epochs} - Training", leave=False):images, labels = images.to(device), labels.to(device)optimizer.zero_grad()outputs = model(images)# 确保输出和标签维度匹配# outputs: [batch, num_classes, H, W]# labels: [batch, H, W]loss = criterion(outputs, labels)loss.backward()optimizer.step()train_loss += loss.item() * images.size(0)train_loss /= len(train_loader.dataset)train_losses.append(train_loss)# Validationmodel.eval()val_loss = 0.0with torch.no_grad():for images, labels in tqdm(val_loader, desc=f"Epoch {epoch+1}/{num_epochs} - Validation", leave=False):images, labels = images.to(device), labels.to(device)outputs = model(images)loss = criterion(outputs, labels)val_loss += loss.item() * images.size(0)val_loss /= len(val_loader.dataset)val_losses.append(val_loss)# 每2个epoch可视化一次训练样本的预测if epoch % 2 == 0 or epoch == num_epochs - 1:model.eval()with torch.no_grad():# 取一个训练样本sample_img, sample_label = next(iter(train_loader))sample_img, sample_label = sample_img[:1].to(device), sample_label[:1].to(device)output = model(sample_img)pred = torch.argmax(output, dim=1).squeeze(0).cpu().numpy()# 可视化plt.figure(figsize=(12, 4))plt.subplot(1, 3, 1)plt.imshow(sample_img[0].cpu().permute(1, 2, 0))plt.title('Input')plt.axis('off')plt.subplot(1, 3, 2) plt.imshow(sample_label[0].cpu(), cmap='jet', vmin=0, vmax=3)plt.title('Ground Truth')plt.axis('off')plt.subplot(1, 3, 3)plt.imshow(pred, cmap='jet', vmin=0, vmax=3)plt.title(f'Prediction Epoch {epoch}')plt.axis('off')plt.savefig(f'train_debug_epoch_{epoch}.png', dpi=100, bbox_inches='tight')plt.close()print(f"Debug visualization saved to train_debug_epoch_{epoch}.png")print(f"Epoch {epoch+1}/{num_epochs}, Train Loss: {train_loss:.4f}, Val Loss: {val_loss:.4f}")return model, train_losses, val_losses
推理预测
# ============== 推理函数 ==============
def load_model(model_path, model_name='b0', num_classes=4, device='cuda'):"""加载训练好的模型"""model = get_segformer(model_name=model_name, num_classes=num_classes)# 加载模型权重checkpoint = torch.load(model_path, map_location=device)model.load_state_dict(checkpoint)model.to(device)model.eval()print(f"模型加载成功,参数数量: {sum(p.numel() for p in model.parameters() if p.requires_grad)}")return modelprint(f"模型加载成功,参数数量: {sum(p.numel() for p in model.parameters() if p.requires_grad)}")return modeldef predict(model, image_path, device='cuda'):model = model.to(device)model.eval()# 加载并预处理图像transform = transforms.Compose([transforms.Resize((256, 256)),transforms.ToTensor(),])image = Image.open(image_path).convert('RGB')image = transform(image).unsqueeze(0) # Add batch dimension# Move to deviceimage = image.to(device)# Predictwith torch.no_grad():output = model(image)# Get prediction (argmax along channels)pred = torch.argmax(output, dim=1).squeeze(0).cpu().numpy()return image.squeeze(0).cpu().numpy(), pred# ============== 可视化函数 ==============
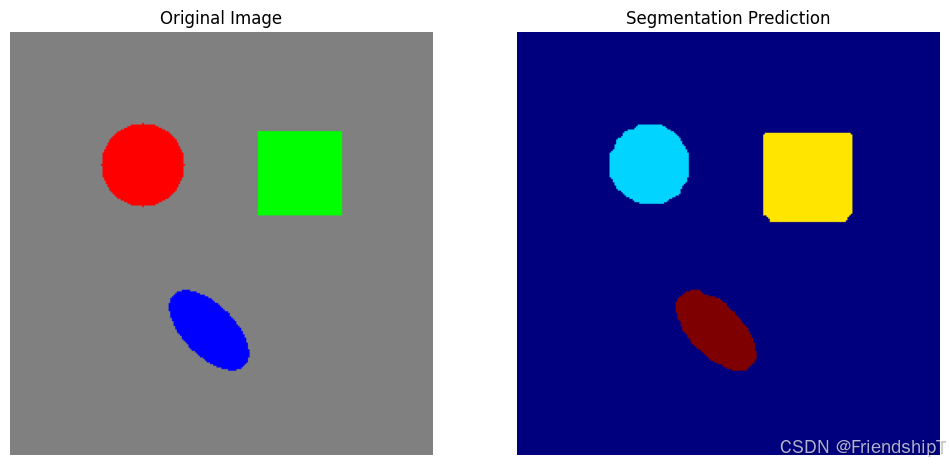
def visualize_results(original, prediction, save_path=None):plt.figure(figsize=(12, 6))plt.subplot(1, 2, 1)plt.imshow(np.transpose(original, (1, 2, 0)))plt.title('Original Image')plt.axis('off')plt.subplot(1, 2, 2)plt.imshow(prediction, cmap='jet', vmin=0, vmax=3)plt.title('Segmentation Prediction')plt.axis('off')if save_path:plt.savefig(save_path, dpi=100, bbox_inches='tight')print(f"Visualization saved to {save_path}")else:plt.show()def generate_sample_image_and_label(save_img_path="sample_image.png", save_label_path=None, size=256):"""生成一张带几何形状的模拟图像和对应的标签图(可选保存)。- 背景: 类别 0- 红色圆: 类别 1- 绿色矩形: 类别 2- 蓝色椭圆: 类别 3"""# 创建灰色背景图像img = np.full((size, size, 3), 128, dtype=np.uint8)label = np.zeros((size, size), dtype=np.uint8)# 1. 红色圆(类别 1)center1 = (80, 80)radius1 = 25cv2.circle(img, center1, radius1, (255, 0, 0), -1) # 红色cv2.circle(label, center1, radius1, 1, -1)# 2. 绿色矩形(类别 2)pt1 = (150, 60)pt2 = (200, 110)cv2.rectangle(img, pt1, pt2, (0, 255, 0), -1) # 绿色cv2.rectangle(label, pt1, pt2, 2, -1)# 3. 蓝色椭圆(类别 3)center2 = (120, 180)axes = (30, 15)cv2.ellipse(img, center2, axes, 45, 0, 360, (0, 0, 255), -1) # 蓝色cv2.ellipse(label, center2, axes, 45, 0, 360, 3, -1)# 保存图像cv2.imwrite(save_img_path, cv2.cvtColor(img, cv2.COLOR_RGB2BGR))print(f"Sample image saved to {save_img_path}")if save_label_path:# 保存标签为可视化灰度图(0~255 映射)label_vis = (label * 60).astype(np.uint8) # 0,60,120,180 便于肉眼区分cv2.imwrite(save_label_path, label_vis)print(f"Label visualization saved to {save_label_path}")return img, label
主函数
# ============== 主程序 ==============
if __name__ == "__main__":# 设置随机种子torch.manual_seed(42)np.random.seed(42)# 创建模拟数据集dataset = MockSegmentationDataset()# 划分训练集和验证集train_size = int(0.8 * len(dataset))val_size = len(dataset) - train_sizetrain_dataset, val_dataset = random_split(dataset, [train_size, val_size])# 创建DataLoadertrain_loader = DataLoader(train_dataset, batch_size=4, shuffle=True, num_workers=2)val_loader = DataLoader(val_dataset, batch_size=4, shuffle=False, num_workers=2)# # 初始化模型b0# model = Segformer(#     dims=(32, 64, 160, 256), # 各阶段通道数 [C1, C2, C3, C4]#     heads=(1, 2, 5, 8), # 各阶段注意力头数#     ff_expansion=(8, 8, 4, 4), # FFN扩展因子#     reduction_ratio=(8, 4, 2, 1), # 序列缩减比例#     num_layers=2, # 各阶段层数#     decoder_dim=256, # 解码器统一维度#     num_classes=4 # 分割类别数# )model_name = 'b0'  # 可选 'b0', 'b1', 'b2', 'b3', 'b4', 'b5'model = get_segformer(model_name, num_classes=4)os.makedirs(model_name, exist_ok=True)print(f"Model parameters: {sum(p.numel() for p in model.parameters() if p.requires_grad)}")# 训练模型device = 'cuda' if torch.cuda.is_available() else 'cpu'print(f"Using device: {device}")model, train_losses, val_losses = train_model(model, train_loader, val_loader, num_epochs=5, # num_epochs=10,  # 增加到10个epochlearning_rate=1e-4,device=device)# 保存模型torch.save(model.state_dict(), f'{model_name}/segformer_model.pth')print(f"Model saved to '{model_name}/segformer_model.pth'")# 测试推理print("\nTesting inference on a sample image...")# 生成一个结构清晰的模拟图像用于推理sample_img, sample_label = generate_sample_image_and_label(save_img_path="sample_image.png",save_label_path="sample_label.png",  # 可选:保存标签用于对比size=256)sample_img_path = "sample_image.png"# 加载模型model = load_model(f'{model_name}/segformer_model.pth', model_name=model_name, num_classes=4, device=device)# 进行预测original, prediction = predict(model, sample_img_path, device=device)# 可视化结果visualize_results(original, prediction, save_path=f"{model_name}/segmentation_result.png")print(f"Inference completed. Result saved to '{model_name}/segmentation_result.png'")
输出结果
Model parameters: 7718244
Using device: cuda
Debug visualization saved to train_debug_epoch_0.png
Epoch 1/5, Train Loss: 0.1226, Val Loss: 0.0077
Epoch 2/5, Train Loss: 0.0052, Val Loss: 0.0037
Debug visualization saved to train_debug_epoch_2.png
Epoch 3/5, Train Loss: 0.0031, Val Loss: 0.0026
Epoch 4/5, Train Loss: 0.0022, Val Loss: 0.0019
Debug visualization saved to train_debug_epoch_4.png
Epoch 5/5, Train Loss: 0.0017, Val Loss: 0.0015
Model saved to 'b0/segformer_model.pth'Testing inference on a sample image...
Sample image saved to sample_image.png
Label visualization saved to sample_label.png
模型加载成功,参数数量: 7718244
Visualization saved to b0/segmentation_result.png
Inference completed. Result saved to 'b0/segmentation_result.png'

完整代码
import os
import torch
import torch.nn as nn
import torch.optim as optim
from torch.utils.data import Dataset, DataLoader, random_split
import torchvision.transforms as transforms
from torchvision import models
import numpy as np
import matplotlib.pyplot as plt
from PIL import Image
import cv2
from tqdm import tqdm
import torch.nn.functional as Ffrom math import sqrt
from functools import partial
import torch
from torch import nn, einsum
import torch.nn.functional as Ffrom einops import rearrange, reduce
from einops.layers.torch import Rearrange# helpersdef exists(val):return val is not Nonedef cast_tuple(val, depth):return val if isinstance(val, tuple) else (val,) * depth# ============== MockSegmentationDataset ==============
class MockSegmentationDataset(Dataset):def __init__(self, size=256, num_samples=1000, num_classes=4):self.size = sizeself.num_samples = num_samplesself.num_classes = num_classes# 图像变换self.image_transform = transforms.Compose([transforms.Resize((size, size)),transforms.ToTensor(),])def __len__(self):return self.num_samplesdef __getitem__(self, idx):# 使用固定模式而不是完全随机,让模型容易学习rng = np.random.RandomState(idx)  # 固定随机种子,让数据可重复# 生成更结构化的背景img = np.full((self.size, self.size, 3), 128, dtype=np.uint8)  # 固定灰色背景seg_map = np.zeros((self.size, self.size), dtype=np.uint8)# 固定位置和尺寸的形状,减少随机性positions = [(self.size//4, self.size//4),      # 左上(3*self.size//4, self.size//4),    # 右上  (self.size//4, 3*self.size//4),    # 左下(3*self.size//4, 3*self.size//4),  # 右下]# 为每个样本固定选择2个形状,确保类别平衡shape_indices = [idx % 3 + 1, (idx + 1) % 3 + 1]  # 循环使用类别1,2,3for i, cls in enumerate(shape_indices[:2]):  # 只画2个形状pos = positions[i]if cls == 1:  # 圆形cv2.circle(seg_map, pos, 25, int(cls), -1)cv2.circle(img, pos, 25, (255, 0, 0), -1)  # 红色elif cls == 2:  # 矩形pt1 = (pos[0]-25, pos[1]-20)pt2 = (pos[0]+25, pos[1]+20)cv2.rectangle(seg_map, pt1, pt2, int(cls), -1)cv2.rectangle(img, pt1, pt2, (0, 255, 0), -1)  # 绿色elif cls == 3:  # 椭圆cv2.ellipse(seg_map, pos, (30, 15), 45, 0, 360, int(cls), -1)cv2.ellipse(img, pos, (30, 15), 45, 0, 360, (0, 0, 255), -1)  # 蓝色# 应用图像变换img = Image.fromarray(img)img = self.image_transform(img)# 直接转换为tensor,不应用与图像相同的变换seg_map = torch.from_numpy(seg_map).long()return img, seg_map# ============== SegFormer模型定义 ==============
class DsConv2d(nn.Module):def __init__(self, dim_in, dim_out, kernel_size, padding, stride=1, bias=True):super().__init__()self.net = nn.Sequential(nn.Conv2d(dim_in, dim_in, kernel_size=kernel_size, padding=padding, groups=dim_in, stride=stride, bias=bias),nn.Conv2d(dim_in, dim_out, kernel_size=1, bias=bias))def forward(self, x):return self.net(x)class LayerNorm(nn.Module):def __init__(self, dim, eps=1e-5):super().__init__()self.eps = epsself.g = nn.Parameter(torch.ones(1, dim, 1, 1))self.b = nn.Parameter(torch.zeros(1, dim, 1, 1))def forward(self, x):std = torch.var(x, dim=1, unbiased=False, keepdim=True).sqrt()mean = torch.mean(x, dim=1, keepdim=True)return (x - mean) / (std + self.eps) * self.g + self.bclass PreNorm(nn.Module):def __init__(self, dim, fn):super().__init__()self.fn = fnself.norm = LayerNorm(dim)def forward(self, x):return self.fn(self.norm(x))class EfficientSelfAttention(nn.Module):def __init__(self,*,dim,heads,reduction_ratio):super().__init__()self.scale = (dim // heads) ** -0.5self.heads = headsself.to_q = nn.Conv2d(dim, dim, 1, bias=False)self.to_kv = nn.Conv2d(dim, dim * 2, reduction_ratio, stride=reduction_ratio, bias=False) # 关键:序列缩减self.to_out = nn.Conv2d(dim, dim, 1, bias=False)def forward(self, x):h, w = x.shape[-2:]heads = self.headsq, k, v = (self.to_q(x), *self.to_kv(x).chunk(2, dim=1))q, k, v = map(lambda t: rearrange(t, 'b (h c) x y -> (b h) (x y) c', h=heads), (q, k, v))sim = einsum('b i d, b j d -> b i j', q, k) * self.scaleattn = sim.softmax(dim=-1)out = einsum('b i j, b j d -> b i d', attn, v)out = rearrange(out, '(b h) (x y) c -> b (h c) x y', h=heads, x=h, y=w)return self.to_out(out)class MixFeedForward(nn.Module):def __init__(self,*,dim,expansion_factor):super().__init__()hidden_dim = dim * expansion_factorself.net = nn.Sequential(nn.Conv2d(dim, hidden_dim, 1), # 升维DsConv2d(hidden_dim, hidden_dim, 3, padding=1), # 深度可分离卷积nn.GELU(),nn.Conv2d(hidden_dim, dim, 1) # 降维)def forward(self, x):return self.net(x)class MiT(nn.Module):def __init__(self,*,channels,dims,heads,ff_expansion,reduction_ratio,num_layers):super().__init__()# 四个阶段的下采样配置stage_kernel_stride_pad = ((7, 4, 3), (3, 2, 1), (3, 2, 1), (3, 2, 1))# 对应论文中的阶段1-4dims = (channels, *dims)dim_pairs = list(zip(dims[:-1], dims[1:]))self.stages = nn.ModuleList([])for (dim_in, dim_out), (kernel, stride, padding), num_layers, ff_expansion, heads, reduction_ratio in zip(dim_pairs, stage_kernel_stride_pad, num_layers, ff_expansion, heads, reduction_ratio):get_overlap_patches = nn.Unfold(kernel, stride=stride, padding=padding)overlap_patch_embed = nn.Conv2d(dim_in * kernel ** 2, dim_out, 1)layers = nn.ModuleList([])for _ in range(num_layers):layers.append(nn.ModuleList([PreNorm(dim_out, EfficientSelfAttention(dim=dim_out, heads=heads, reduction_ratio=reduction_ratio)),PreNorm(dim_out, MixFeedForward(dim=dim_out, expansion_factor=ff_expansion)),]))self.stages.append(nn.ModuleList([get_overlap_patches,overlap_patch_embed,layers]))def forward(self,x,return_layer_outputs=False):h, w = x.shape[-2:]layer_outputs = []for (get_overlap_patches, overlap_embed, layers) in self.stages:x = get_overlap_patches(x)num_patches = x.shape[-1]ratio = int(sqrt((h * w) / num_patches))x = rearrange(x, 'b c (h w) -> b c h w', h=h // ratio)x = overlap_embed(x)for (attn, ff) in layers:x = attn(x) + xx = ff(x) + xlayer_outputs.append(x)ret = x if not return_layer_outputs else layer_outputsreturn retclass Segformer(nn.Module):def __init__(self,*,dims=(32, 64, 160, 256),heads=(1, 2, 5, 8),ff_expansion=(8, 8, 4, 4),reduction_ratio=(8, 4, 2, 1),num_layers=2,channels=3,decoder_dim=256,num_classes=4):super().__init__()dims, heads, ff_expansion, reduction_ratio, num_layers = map(partial(cast_tuple, depth=4), (dims, heads, ff_expansion, reduction_ratio, num_layers))assert all([*map(lambda t: len(t) == 4, (dims, heads, ff_expansion, reduction_ratio, num_layers))]), 'only four stages are allowed, all keyword arguments must be either a single value or a tuple of 4 values'self.mit = MiT(channels=channels,dims=dims,heads=heads,ff_expansion=ff_expansion,reduction_ratio=reduction_ratio,num_layers=num_layers)# 多尺度特征融合self.to_fused = nn.ModuleList([nn.Sequential(nn.Conv2d(dim, decoder_dim, 1), # 统一通道数nn.Upsample(scale_factor=2 ** i) # 上采样到1/4尺度) for i, dim in enumerate(dims)])self.to_segmentation = nn.Sequential(nn.Conv2d(4 * decoder_dim, decoder_dim, 1), # 特征融合nn.Conv2d(decoder_dim, num_classes, 1), # 分类头)def forward(self, x):H, W = x.shape[-2:]  # 原始输入高宽layer_outputs = self.mit(x, return_layer_outputs=True)fused = [to_fused(output) for output, to_fused in zip(layer_outputs, self.to_fused)]fused = torch.cat(fused, dim=1)out = self.to_segmentation(fused)# 关键修复:上采样到原始输入尺寸out = F.interpolate(out, size=(H, W), mode='bilinear', align_corners=False)return out# ============== 训练函数 ==============
def get_segformer(model_name='b0', num_classes=4, decoder_dim=256):config = {'b0': dict(dims=(32, 64, 160, 256), num_layers=(2, 2, 2, 2)),'b1': dict(dims=(64, 128, 320, 512), num_layers=(2, 2, 2, 2)),'b2': dict(dims=(64, 128, 320, 512), num_layers=(3, 4, 6, 3)),'b3': dict(dims=(64, 128, 320, 512), num_layers=(3, 4, 18, 3)),'b4': dict(dims=(64, 128, 320, 512), num_layers=(3, 8, 27, 3)),'b5': dict(dims=(64, 128, 320, 512), num_layers=(3, 6, 40, 3)),}if model_name not in config:raise ValueError(f"Unsupported model: {model_name}")cfg = config[model_name]ff_expansion = (4, 4, 4, 4) if model_name == 'b5' else (8, 8, 4, 4)return Segformer(dims=cfg['dims'],heads=(1, 2, 5, 8),ff_expansion=ff_expansion,reduction_ratio=(8, 4, 2, 1),num_layers=cfg['num_layers'],decoder_dim=decoder_dim,num_classes=num_classes)def train_model(model, train_loader, val_loader, num_epochs=10, learning_rate=1e-4, device='cuda'):model = model.to(device)criterion = nn.CrossEntropyLoss()optimizer = optim.Adam(model.parameters(), lr=learning_rate)train_losses = []val_losses = []for epoch in range(num_epochs):# Trainingmodel.train()train_loss = 0.0for images, labels in tqdm(train_loader, desc=f"Epoch {epoch+1}/{num_epochs} - Training", leave=False):images, labels = images.to(device), labels.to(device)optimizer.zero_grad()outputs = model(images)# 确保输出和标签维度匹配# outputs: [batch, num_classes, H, W]# labels: [batch, H, W]loss = criterion(outputs, labels)loss.backward()optimizer.step()train_loss += loss.item() * images.size(0)train_loss /= len(train_loader.dataset)train_losses.append(train_loss)# Validationmodel.eval()val_loss = 0.0with torch.no_grad():for images, labels in tqdm(val_loader, desc=f"Epoch {epoch+1}/{num_epochs} - Validation", leave=False):images, labels = images.to(device), labels.to(device)outputs = model(images)loss = criterion(outputs, labels)val_loss += loss.item() * images.size(0)val_loss /= len(val_loader.dataset)val_losses.append(val_loss)# 每2个epoch可视化一次训练样本的预测if epoch % 2 == 0 or epoch == num_epochs - 1:model.eval()with torch.no_grad():# 取一个训练样本sample_img, sample_label = next(iter(train_loader))sample_img, sample_label = sample_img[:1].to(device), sample_label[:1].to(device)output = model(sample_img)pred = torch.argmax(output, dim=1).squeeze(0).cpu().numpy()# 可视化plt.figure(figsize=(12, 4))plt.subplot(1, 3, 1)plt.imshow(sample_img[0].cpu().permute(1, 2, 0))plt.title('Input')plt.axis('off')plt.subplot(1, 3, 2)  plt.imshow(sample_label[0].cpu(), cmap='jet', vmin=0, vmax=3)plt.title('Ground Truth')plt.axis('off')plt.subplot(1, 3, 3)plt.imshow(pred, cmap='jet', vmin=0, vmax=3)plt.title(f'Prediction Epoch {epoch}')plt.axis('off')plt.savefig(f'train_debug_epoch_{epoch}.png', dpi=100, bbox_inches='tight')plt.close()print(f"Debug visualization saved to train_debug_epoch_{epoch}.png")print(f"Epoch {epoch+1}/{num_epochs}, Train Loss: {train_loss:.4f}, Val Loss: {val_loss:.4f}")return model, train_losses, val_losses# ============== 推理函数 ==============
def load_model(model_path, model_name='b0', num_classes=4, device='cuda'):"""加载训练好的模型"""model = get_segformer(model_name=model_name, num_classes=num_classes)# 加载模型权重checkpoint = torch.load(model_path, map_location=device)model.load_state_dict(checkpoint)model.to(device)model.eval()print(f"模型加载成功,参数数量: {sum(p.numel() for p in model.parameters() if p.requires_grad)}")return modeldef predict(model, image_path, device='cuda'):model = model.to(device)model.eval()# 加载并预处理图像transform = transforms.Compose([transforms.Resize((256, 256)),transforms.ToTensor(),])image = Image.open(image_path).convert('RGB')image = transform(image).unsqueeze(0)  # Add batch dimension# Move to deviceimage = image.to(device)# Predictwith torch.no_grad():output = model(image)# Get prediction (argmax along channels)pred = torch.argmax(output, dim=1).squeeze(0).cpu().numpy()return image.squeeze(0).cpu().numpy(), pred# ============== 可视化函数 ==============
def visualize_results(original, prediction, save_path=None):plt.figure(figsize=(12, 6))plt.subplot(1, 2, 1)plt.imshow(np.transpose(original, (1, 2, 0)))plt.title('Original Image')plt.axis('off')plt.subplot(1, 2, 2)plt.imshow(prediction, cmap='jet', vmin=0, vmax=3)plt.title('Segmentation Prediction')plt.axis('off')if save_path:plt.savefig(save_path, dpi=100, bbox_inches='tight')print(f"Visualization saved to {save_path}")else:plt.show()def generate_sample_image_and_label(save_img_path="sample_image.png", save_label_path=None, size=256):"""生成一张带几何形状的模拟图像和对应的标签图(可选保存)。- 背景: 类别 0- 红色圆: 类别 1- 绿色矩形: 类别 2- 蓝色椭圆: 类别 3"""# 创建灰色背景图像img = np.full((size, size, 3), 128, dtype=np.uint8)label = np.zeros((size, size), dtype=np.uint8)# 1. 红色圆(类别 1)center1 = (80, 80)radius1 = 25cv2.circle(img, center1, radius1, (255, 0, 0), -1)  # 红色cv2.circle(label, center1, radius1, 1, -1)# 2. 绿色矩形(类别 2)pt1 = (150, 60)pt2 = (200, 110)cv2.rectangle(img, pt1, pt2, (0, 255, 0), -1)  # 绿色cv2.rectangle(label, pt1, pt2, 2, -1)# 3. 蓝色椭圆(类别 3)center2 = (120, 180)axes = (30, 15)cv2.ellipse(img, center2, axes, 45, 0, 360, (0, 0, 255), -1)  # 蓝色cv2.ellipse(label, center2, axes, 45, 0, 360, 3, -1)# 保存图像cv2.imwrite(save_img_path, cv2.cvtColor(img, cv2.COLOR_RGB2BGR))print(f"Sample image saved to {save_img_path}")if save_label_path:# 保存标签为可视化灰度图(0~255 映射)label_vis = (label * 60).astype(np.uint8)  # 0,60,120,180 便于肉眼区分cv2.imwrite(save_label_path, label_vis)print(f"Label visualization saved to {save_label_path}")return img, label# ============== 主程序 ==============
if __name__ == "__main__":# 设置随机种子torch.manual_seed(42)np.random.seed(42)# 创建模拟数据集dataset = MockSegmentationDataset()# 划分训练集和验证集train_size = int(0.8 * len(dataset))val_size = len(dataset) - train_sizetrain_dataset, val_dataset = random_split(dataset, [train_size, val_size])# 创建DataLoadertrain_loader = DataLoader(train_dataset, batch_size=4, shuffle=True, num_workers=2)val_loader = DataLoader(val_dataset, batch_size=4, shuffle=False, num_workers=2)# # 初始化模型b0# model = Segformer(#     dims=(32, 64, 160, 256), # 各阶段通道数 [C1, C2, C3, C4]#     heads=(1, 2, 5, 8), # 各阶段注意力头数#     ff_expansion=(8, 8, 4, 4), # FFN扩展因子#     reduction_ratio=(8, 4, 2, 1), # 序列缩减比例#     num_layers=2, # 各阶段层数#     decoder_dim=256, # 解码器统一维度#     num_classes=4 # 分割类别数# )model_name = 'b0'  # 可选 'b0', 'b1', 'b2', 'b3', 'b4', 'b5'model = get_segformer(model_name, num_classes=4)os.makedirs(model_name, exist_ok=True)print(f"Model parameters: {sum(p.numel() for p in model.parameters() if p.requires_grad)}")# 训练模型device = 'cuda' if torch.cuda.is_available() else 'cpu'print(f"Using device: {device}")model, train_losses, val_losses = train_model(model, train_loader, val_loader, num_epochs=5, # num_epochs=10,  # 增加到10个epochlearning_rate=1e-4,device=device)# 保存模型torch.save(model.state_dict(), f'{model_name}/segformer_model.pth')print(f"Model saved to '{model_name}/segformer_model.pth'")# 测试推理print("\nTesting inference on a sample image...")# 生成一个结构清晰的模拟图像用于推理sample_img, sample_label = generate_sample_image_and_label(save_img_path="sample_image.png",save_label_path="sample_label.png",  # 可选:保存标签用于对比size=256)sample_img_path = "sample_image.png"# 加载模型model = load_model(f'{model_name}/segformer_model.pth', model_name=model_name, num_classes=4, device=device)# 进行预测original, prediction = predict(model, sample_img_path, device=device)# 可视化结果visualize_results(original, prediction, save_path=f"{model_name}/segmentation_result.png")print(f"Inference completed. Result saved to '{model_name}/segmentation_result.png'")
参考
[1] Enze Xie, Wenhai Wang, Zhiding Yu, Anima Anandkumar, Jose M. Alvarez, Ping Luo. SegFormer: Simple and Efficient Design for Semantic Segmentation with Transformers. 2021
[2] https://github.com/NVlabs/SegFormer.git
[3] https://github.com/bubbliiiing/segformer-pytorch.git
- 由于本人水平有限,难免出现错漏,敬请批评改正。
- 更多精彩内容,可点击进入Python日常小操作专栏、OpenCV-Python小应用专栏、YOLO系列专栏、自然语言处理专栏、人工智能混合编程实践专栏或我的个人主页查看
- Ultralytics:使用 YOLO11 进行速度估计
- Ultralytics:使用 YOLO11 进行物体追踪
- Ultralytics:使用 YOLO11 进行物体计数
- Ultralytics:使用 YOLO11 进行目标打码
- 人工智能混合编程实践:C++调用Python ONNX进行YOLOv8推理
- 人工智能混合编程实践:C++调用封装好的DLL进行YOLOv8实例分割
- 人工智能混合编程实践:C++调用Python ONNX进行图像超分重建
- 人工智能混合编程实践:C++调用Python AgentOCR进行文本识别
- 通过计算实例简单地理解PatchCore异常检测
- Python将YOLO格式实例分割数据集转换为COCO格式实例分割数据集
- YOLOv8 Ultralytics:使用Ultralytics框架训练RT-DETR实时目标检测模型
- 基于DETR的人脸伪装检测
- YOLOv7训练自己的数据集(口罩检测)
- YOLOv8训练自己的数据集(足球检测)
- YOLOv5:TensorRT加速YOLOv5模型推理
- YOLOv5:IoU、GIoU、DIoU、CIoU、EIoU
- 玩转Jetson Nano(五):TensorRT加速YOLOv5目标检测
- YOLOv5:添加SE、CBAM、CoordAtt、ECA注意力机制
- YOLOv5:yolov5s.yaml配置文件解读、增加小目标检测层
- Python将COCO格式实例分割数据集转换为YOLO格式实例分割数据集
- YOLOv5:使用7.0版本训练自己的实例分割模型(车辆、行人、路标、车道线等实例分割)
- 使用Kaggle GPU资源免费体验Stable Diffusion开源项目
- Stable Diffusion:在服务器上部署使用Stable Diffusion WebUI进行AI绘图(v2.0)
- Stable Diffusion:使用自己的数据集微调训练LoRA模型(v2.0)