2025-9-28学习笔记
目录
设备管理(续):
功能实现:
从物联网平台同步产品列表
查询所有产品列表
注册设备:
分页查询设备列表:
查询设备详细数据:
查看设备上报的数据(设备影子):
微实战:
修改设备:
删除设备:
提交代码:
同步和异步:
消息队列:
AMQP:
设备数据转发:
创建数据转发规则:
Java SDK接入示例:
SDK改造:
线程池相关配置:
接收设备端数据:
设备管理(续):
功能实现:
将device表导入到若依的代码生成功能当中,将生成的代码拷贝到idea当中,然后将DeviceController当中除了查询的方法,其他方法都删除掉:
DeviceController:
package com.zzyl.nursing.controller;import com.zzyl.common.core.controller.BaseController;
import com.zzyl.common.core.page.TableDataInfo;
import com.zzyl.nursing.domain.Device;
import com.zzyl.nursing.service.IDeviceService;
import io.swagger.annotations.Api;
import io.swagger.annotations.ApiOperation;
import io.swagger.annotations.ApiParam;
import org.springframework.beans.factory.annotation.Autowired;
import org.springframework.security.access.prepost.PreAuthorize;
import org.springframework.web.bind.annotation.GetMapping;
import org.springframework.web.bind.annotation.RequestMapping;
import org.springframework.web.bind.annotation.RestController;import java.util.List;/*** 设备Controller* * @author Le1Yu* @date 2025-09-28*/
@Api("设备管理")
@RestController
@RequestMapping("/nursing/device")
public class DeviceController extends BaseController
{@Autowiredprivate IDeviceService deviceService;/*** 查询设备列表*/@ApiOperation("查询设备列表")@PreAuthorize("@ss.hasPermi('nursing:device:list')")@GetMapping("/list")public TableDataInfo<List<Device>> list(@ApiParam("查询条件对象") Device device){startPage();List<Device> list = deviceService.selectDeviceList(device);return getDataTable(list);}
}
效果展示:
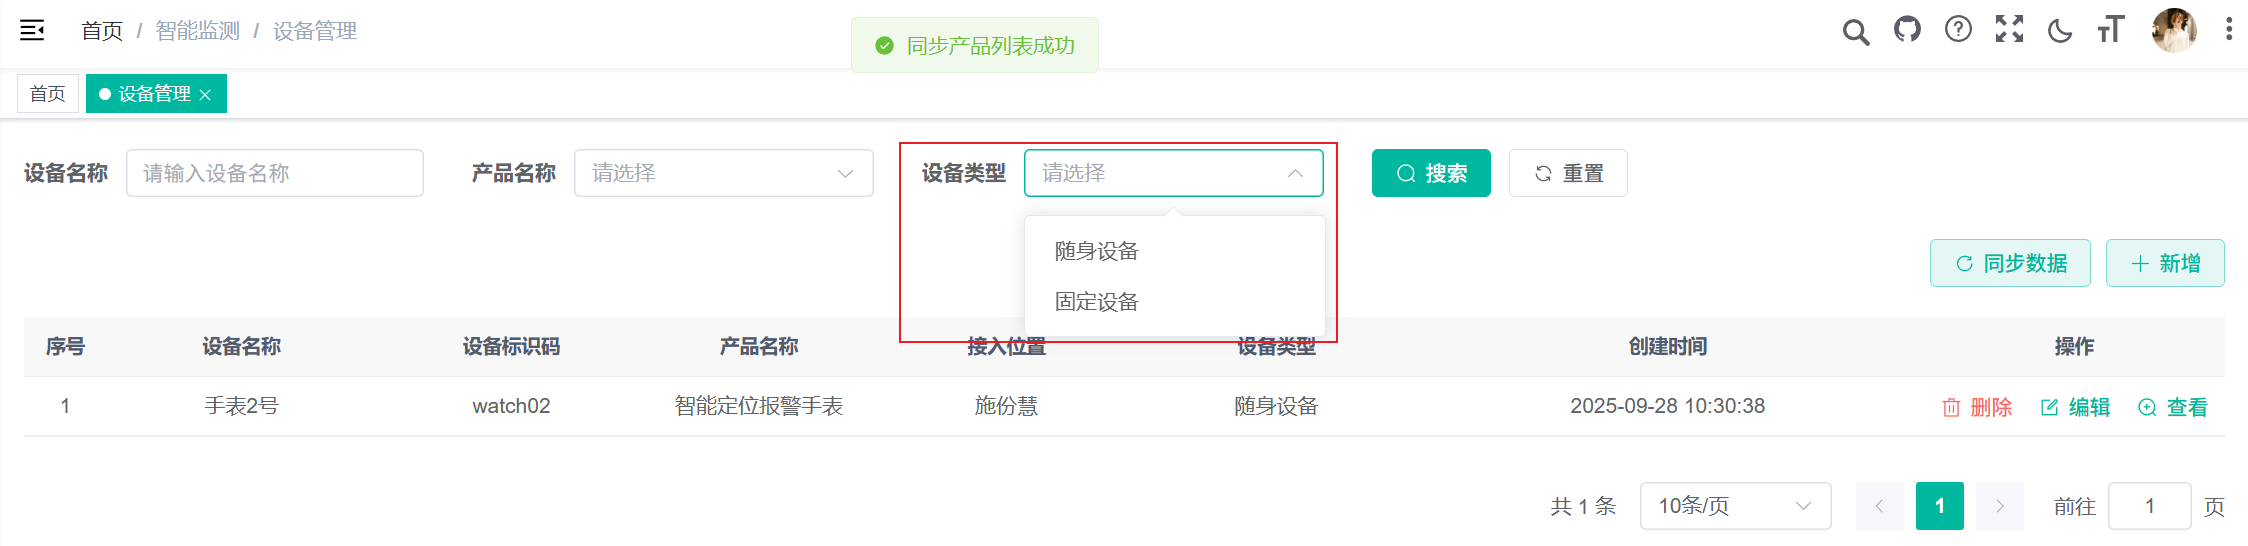
从物联网平台同步产品列表
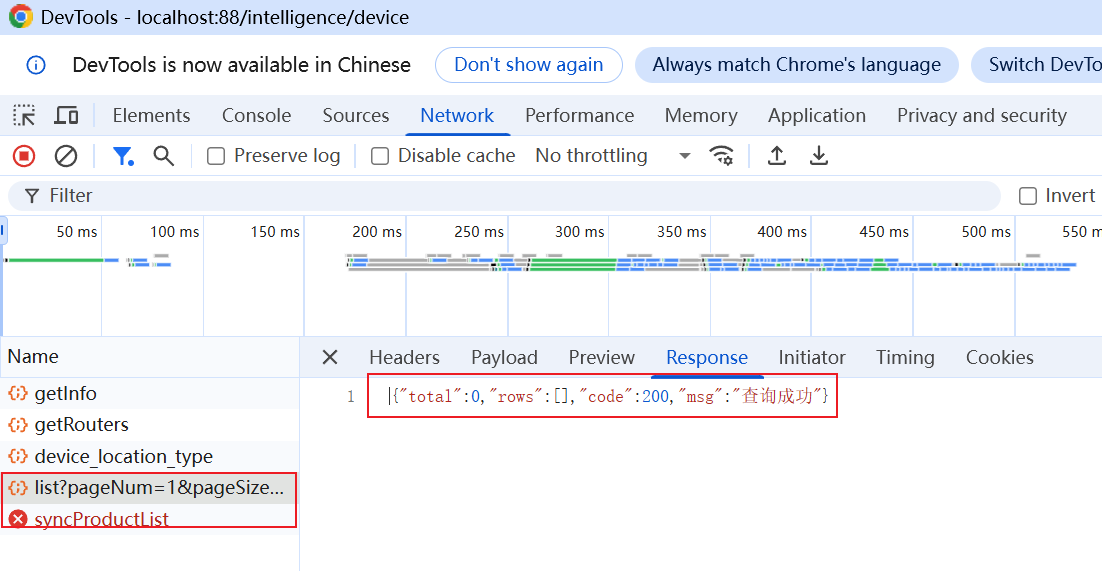
解决syncProductList接口报错问题:
DeviceController:
@PostMapping("/syncProductList")
@ApiOperation(value = "从物联网平台同步产品列表")
public AjaxResult syncProductList() {deviceService.syncProductList();return success();
}
IDeviceService:
/*** 从物联网平台同步产品列表*/
void syncProductList();
DeviceServiceImpl:
@Autowired
private RedisTemplate<String, String> redisTemplate;@Autowired
private IoTDAClient client;/*** 同步产品列表*/
@Override
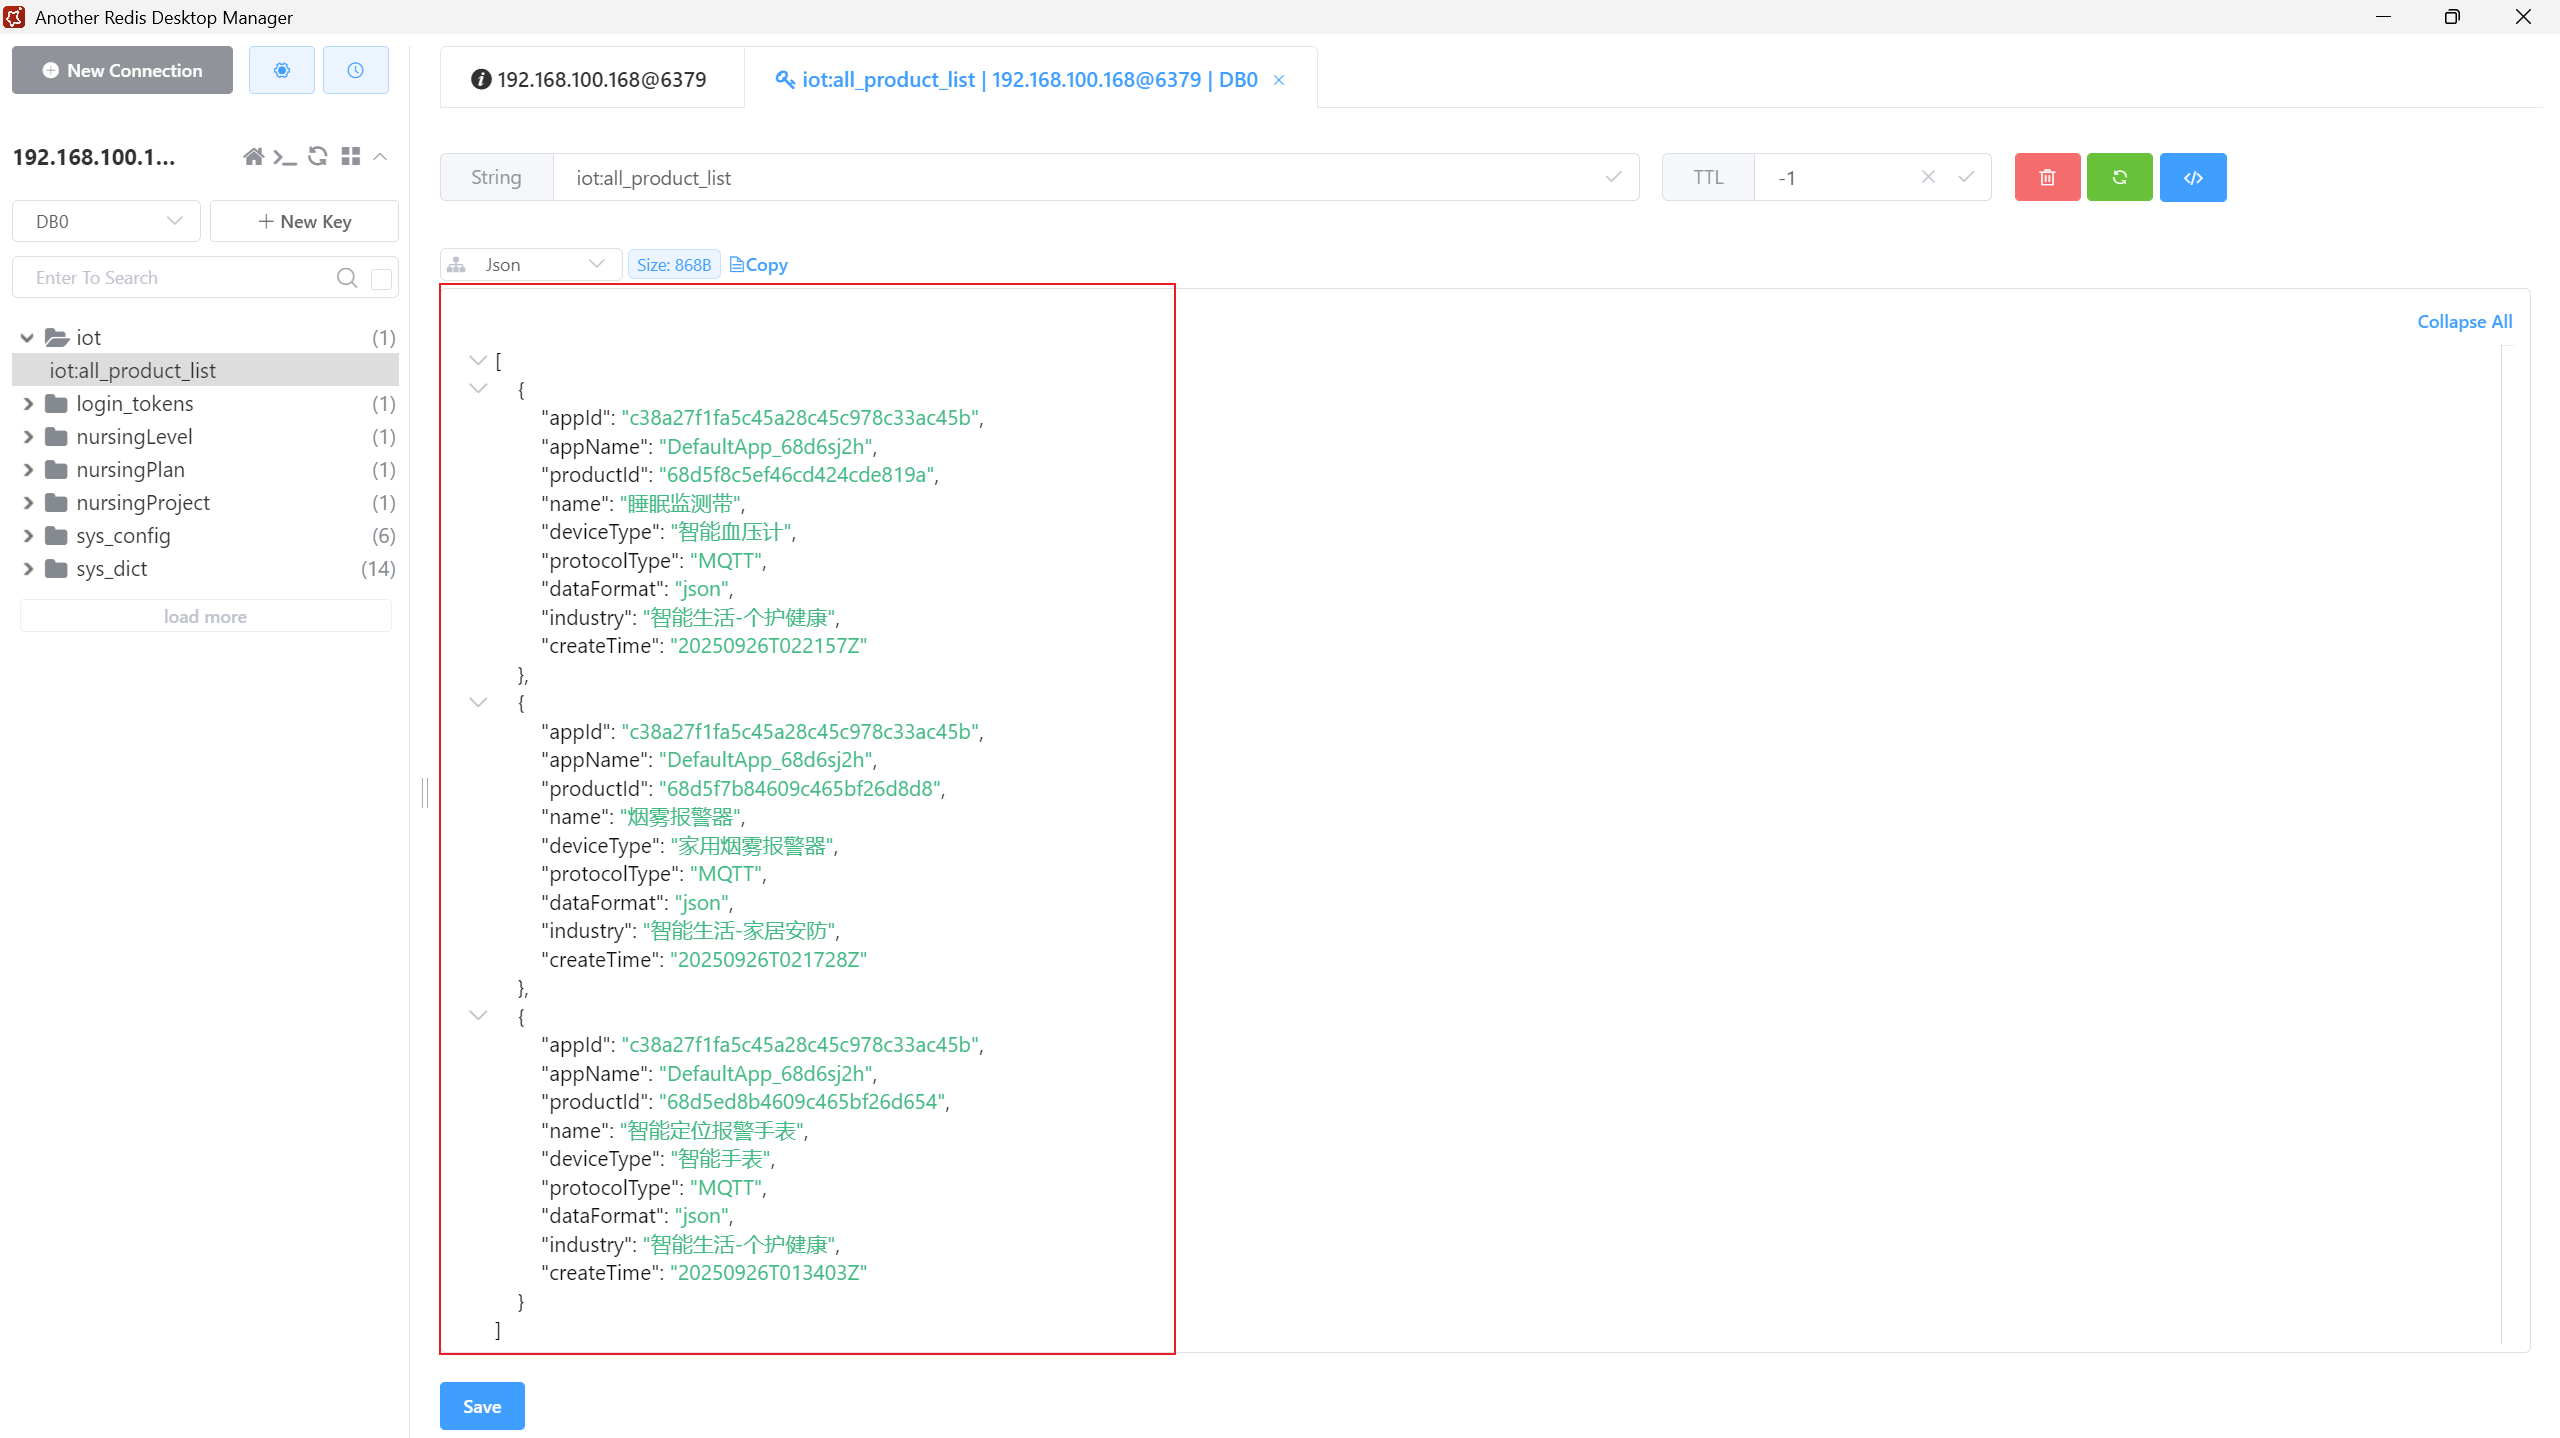
public void syncProductList() {// 请求参数ListProductsRequest listProductsRequest = new ListProductsRequest();// 设置条数listProductsRequest.setLimit(50);// 发起请求ListProductsResponse response = client.listProducts(listProductsRequest);if(response.getHttpStatusCode() != 200) {throw new BaseException("物联网接口 - 查询产品,同步失败");}// 存储到redisredisTemplate.opsForValue().set(CacheConstants.IOT_ALL_PRODUCT_LIST, JSONUtil.toJsonStr(response.getProducts()));}CacheConstants:
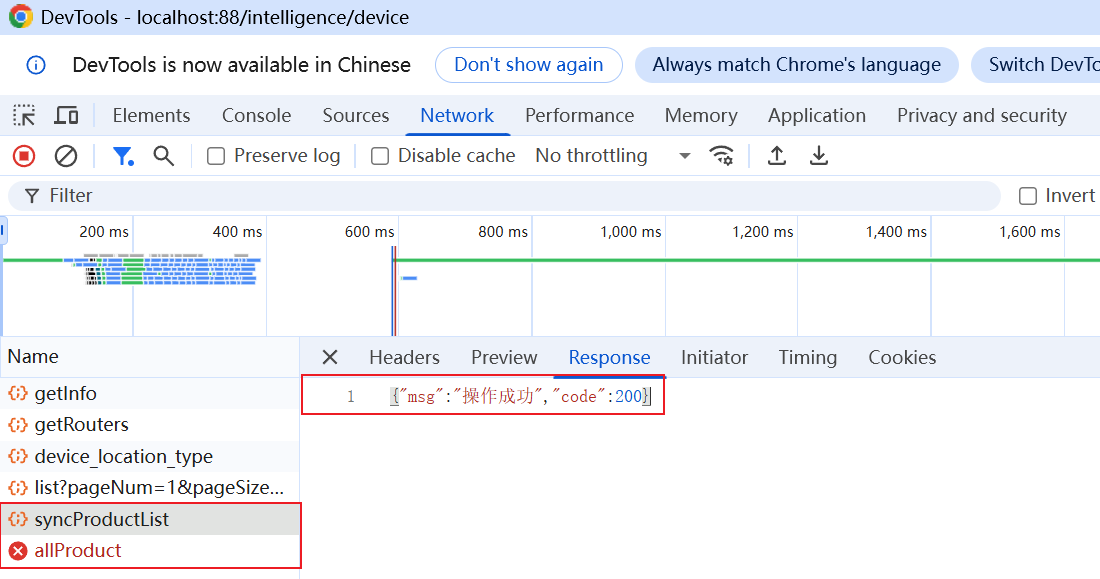
/*** iot所有产品列表缓存key*/public static final String IOT_ALL_PRODUCT_LIST = "iot:all_product_list";效果展示:
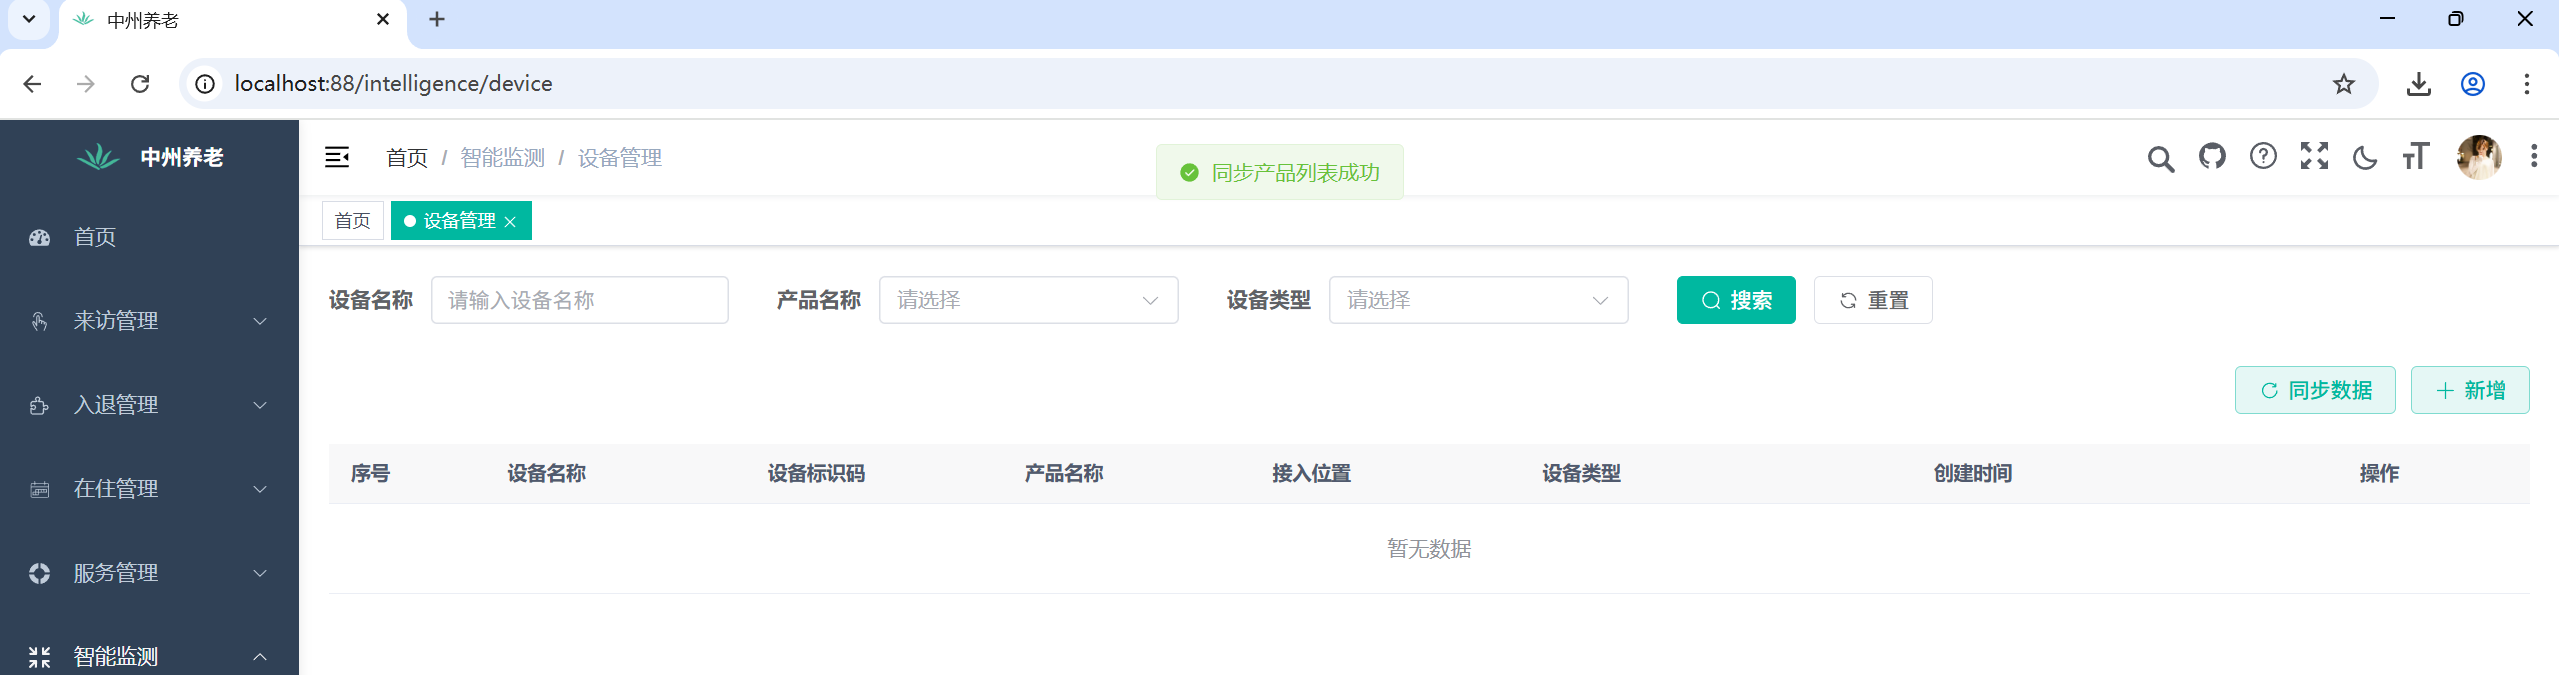
查询所有产品列表
DeviceController:
@GetMapping("/allProduct")@ApiOperation(value = "查询所有产品列表")public R<List<ProductVo>> allProduct() {List<ProductVo> list = deviceService.allProduct();return R.ok(list);}新建ProductVo:
package com.zzyl.nursing.vo;import io.swagger.annotations.ApiModel;
import io.swagger.annotations.ApiModelProperty;
import lombok.Data;/*** 产品信息响应模型** @author itcast**/
@Data
@ApiModel("产品信息响应模型")
public class ProductVo {/*** 产品的ProductKey,物联网平台产品唯一标识*/@ApiModelProperty("产品的ProductKey,物联网平台产品唯一标识")private String productId;/*** 产品名称*/@ApiModelProperty("产品名称")private String name;
}
IDeviceService及其实现类:
/*** 查询所有产品列表** @return 产品列表*/
List<ProductVo> allProduct();/*** 查询所有产品列表** @return*/
@Override
public List<ProductVo> allProduct() {// 从redis中查询数据String jsonStr = redisTemplate.opsForValue().get(CacheConstants.IOT_ALL_PRODUCT_LIST);// 如果数据为空,则返回一个空集合if(StringUtils.isEmpty(jsonStr)){return Collections.emptyList();}// 解析数据,并返回return JSONUtil.toList(jsonStr, ProductVo.class);
}
效果展示:
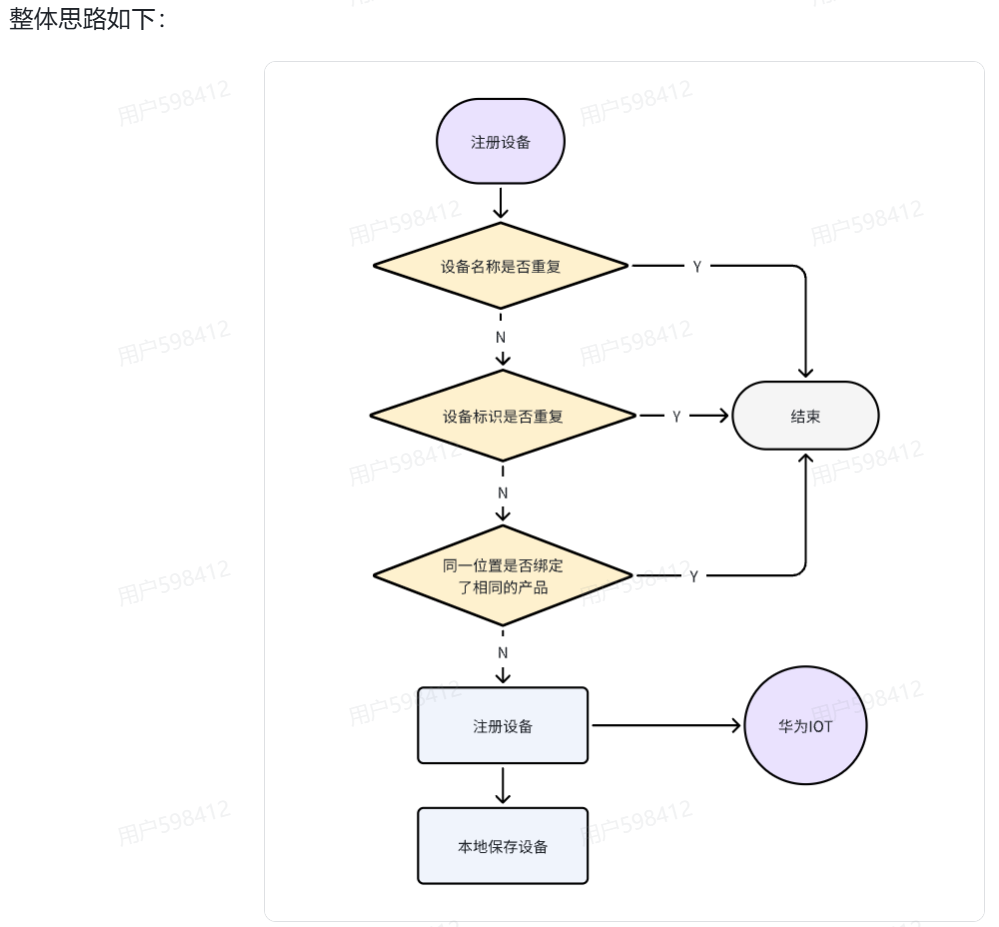
注册设备:
DeviceController:
@PostMapping("/register")
@ApiOperation(value = "注册设备")
public AjaxResult registerDevice(@RequestBody DeviceDto deviceDto) {deviceService.registerDevice(deviceDto);return success();
}
新增DeviceDto:
package com.zzyl.nursing.dto;import io.swagger.annotations.ApiModel;
import io.swagger.annotations.ApiModelProperty;
import lombok.Data;@Data
@ApiModel(value = "设备注册参数")
public class DeviceDto {private Long id;/** 备注 */private String remark;/*** 设备标识码,通常使用IMEI、MAC地址或Serial No作为node_id*/@ApiModelProperty(value = "设备标识码", required = true)private String nodeId;@ApiModelProperty(value = "设备id")public String iotId;@ApiModelProperty(value = "产品的id")public String productKey;@ApiModelProperty(value = "产品名称")private String productName;@ApiModelProperty(value = "位置名称回显字段")private String deviceDescription;@ApiModelProperty(value = "位置类型 0 老人 1位置")Integer locationType;@ApiModelProperty(value = "绑定位置")Long bindingLocation;@ApiModelProperty(value = "设备名称")String deviceName;@ApiModelProperty(value = "物理位置类型 -1 老人 0楼层 1房间 2床位")Integer physicalLocationType;
}
IDeviceService:
/*** 注册设备* @param deviceDto*/void registerDevice(DeviceDto deviceDto);DeviceServiceImpl:
/*** 注册设备* @param dto*/
@Override
public void registerDevice(DeviceDto dto) {// 判断设备名称是否存在long count = count(Wrappers.<Device>lambdaQuery().eq(Device::getDeviceName, dto.getDeviceName()));if(count > 0) {throw new BaseException("设备名称已存在,请重新输入");}// 判断设备标识是否存在count = count(Wrappers.<Device>lambdaQuery().eq(Device::getNodeId, dto.getNodeId()));if(count > 0) {throw new BaseException("设备标识码已存在,请重新输入");}// 判断同一位置是否绑定了相同的产品count = count(Wrappers.<Device>lambdaQuery().eq(Device::getProductKey, dto.getProductKey()).eq(Device::getBindingLocation, dto.getBindingLocation()).eq(Device::getLocationType, dto.getLocationType()).eq(dto.getPhysicalLocationType() != null, Device::getPhysicalLocationType, dto.getPhysicalLocationType()));if(count > 0) {throw new BaseException("该老人/位置已绑定该产品,请重新选择");}// 注册设备--->IoT平台AddDeviceRequest request = new AddDeviceRequest();AddDevice body = new AddDevice();body.withProductId(dto.getProductKey());body.withDeviceName(dto.getDeviceName());body.withNodeId(dto.getNodeId());// 秘钥设置AuthInfo authInfo = new AuthInfo();String secret = UUID.randomUUID().toString().replaceAll("-", "");authInfo.withSecret(secret);body.setAuthInfo(authInfo);request.setBody(body);AddDeviceResponse response;try {response = client.addDevice(request);} catch (Exception e) {e.printStackTrace();throw new BaseException("物联网接口 - 注册设备,调用失败");}// 本地保存设备// 属性拷贝Device device = BeanUtil.toBean(dto, Device.class);// 秘钥device.setSecret(secret);// 设备id、设备绑定状态device.setIotId(response.getDeviceId());save(device);
}
效果展示:
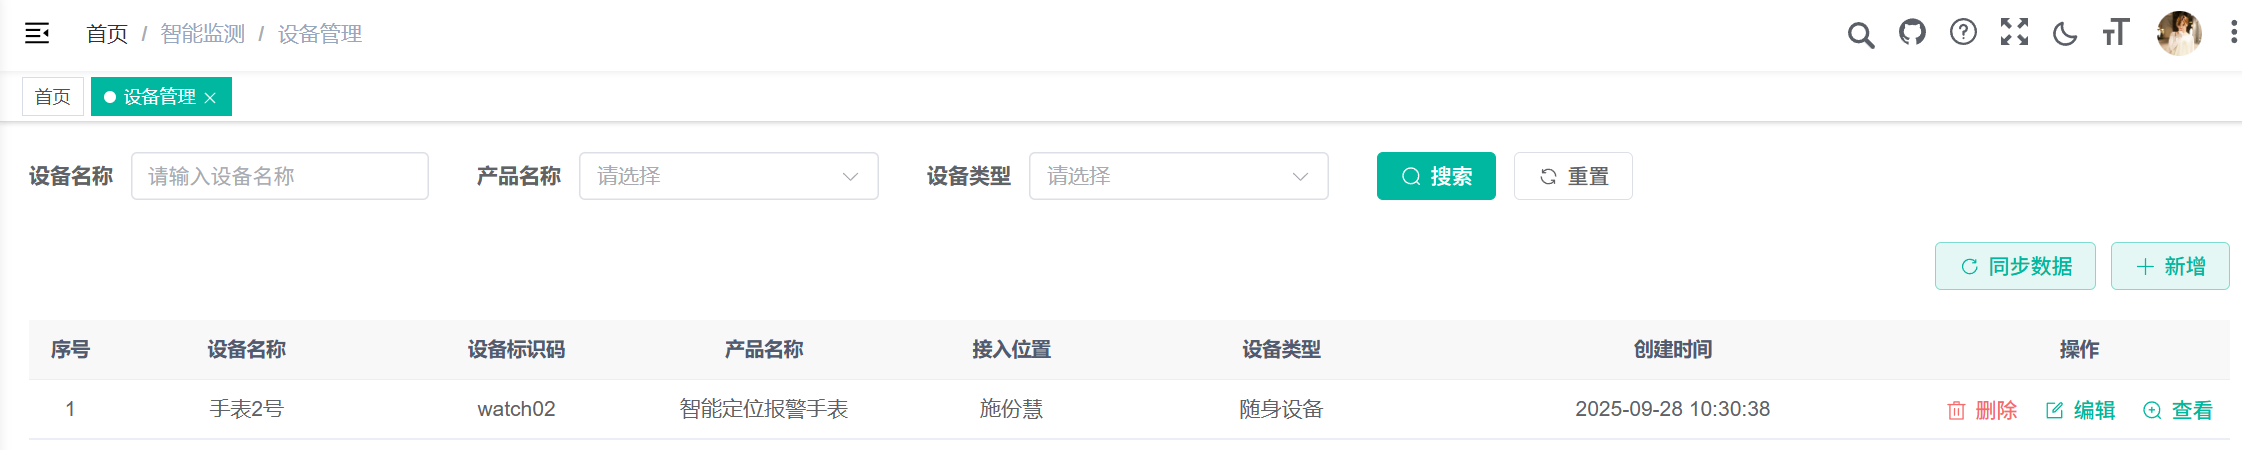
分页查询设备列表:
该接口的基本功能已经实现,现在我们做一个数据字典的优化:
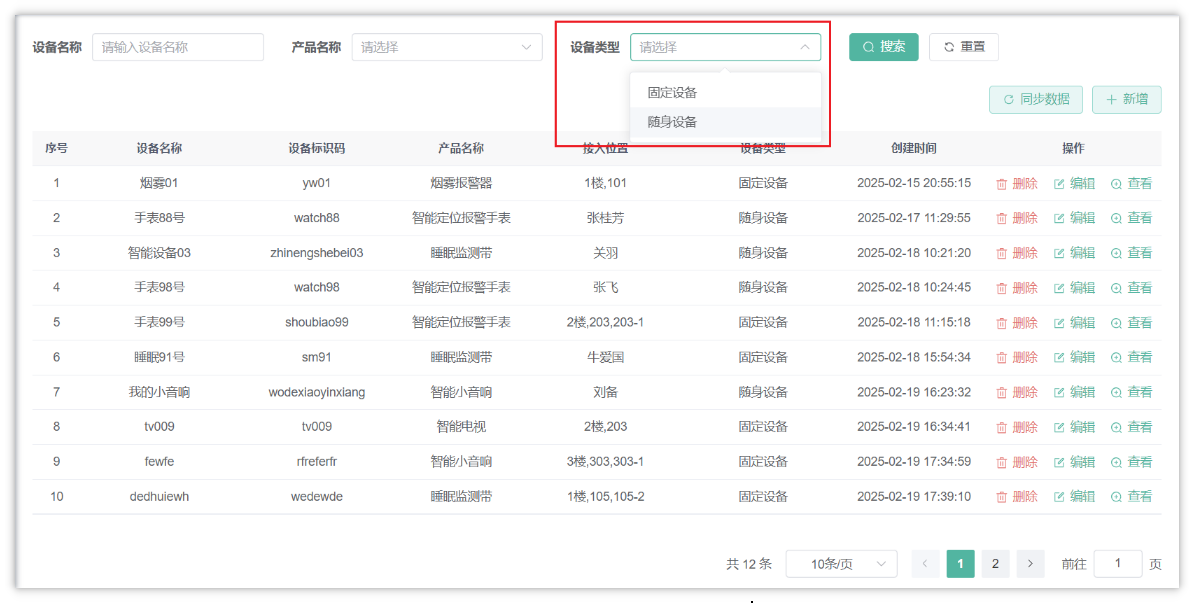
在若依系统下找到系统管理-字典管理-新增,填写完信息后生成字典,然后点击字典类型进入到字典当中,开始新增字典标签及其键值
效果展示:
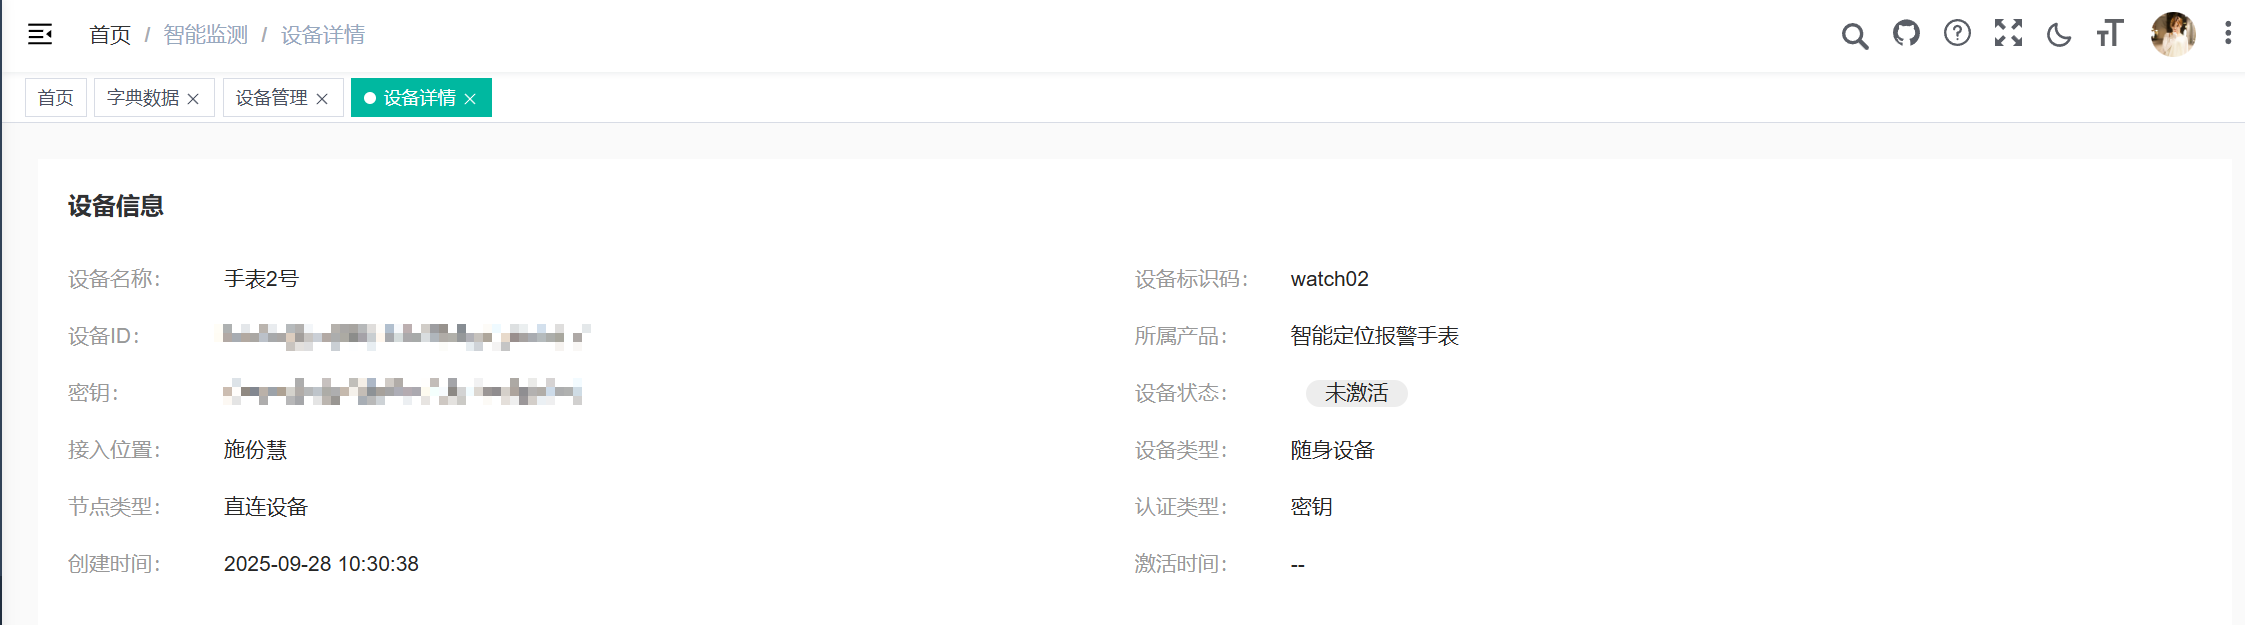
查询设备详细数据:
DeviceController:
/*** 获取设备详细信息*/
@GetMapping("/{iotId}")
@ApiOperation("获取设备详细信息")
public AjaxResult getInfo(@PathVariable("iotId") String iotId) {return success(deviceService.queryDeviceDetail(iotId));
}
DeviceService:
/*** 查询设备详情* @param iotId* @return*/
DeviceDetailVo queryDeviceDetail(String iotId);新增DeviceDetailVo:
package com.zzyl.nursing.vo;import com.fasterxml.jackson.annotation.JsonFormat;
import com.zzyl.common.annotation.Excel;
import io.swagger.annotations.ApiModel;
import io.swagger.annotations.ApiModelProperty;
import lombok.Data;import java.time.LocalDateTime;/*** @author itcast*/
@Data
@ApiModel("设备详情响应模型")
public class DeviceDetailVo {/*** 设备id*/@ApiModelProperty(value = "设备id")private Long id;/*** 物联网设备id*/@ApiModelProperty(value = "物联网设备id")private String iotId;/*** 设备名称*/@ApiModelProperty(value = "设备名称")private String deviceName;/*** 设备标识码*/@ApiModelProperty(value = "设备标识码")private String nodeId;/*** 设备秘钥*/@ApiModelProperty(value = "设备秘钥")private String secret;/*** 产品id*/@ApiModelProperty(value = "产品id")public String productKey;/*** 产品名称*/@ApiModelProperty(value = "产品名称")public String productName;/*** 位置类型 0 随身设备 1固定设备*/@ApiModelProperty(value = "位置类型 0 随身设备 1固定设备")private Integer locationType;/*** 绑定位置,如果是随身设备为老人id,如果是固定设备为位置的最后一级id*/@ApiModelProperty(value = "绑定位置,如果是随身设备为老人id,如果是固定设备为位置的最后一级id")private Long bindingLocation;/*** 接入位置*/@ApiModelProperty(value = "接入位置")private String remark;/*** 设备状态,ONLINE:设备在线,OFFLINE:设备离线,ABNORMAL:设备异常,INACTIVE:设备未激活,FROZEN:设备冻结*/@ApiModelProperty(value = "设备状态,ONLINE:设备在线,OFFLINE:设备离线,ABNORMAL:设备异常,INACTIVE:设备未激活,FROZEN:设备冻结")private String deviceStatus;/*** 激活时间*/@ApiModelProperty(value = "激活时间,格式:yyyy-MM-dd HH:mm:ss")@JsonFormat(pattern = "yyyy-MM-dd HH:mm:ss", timezone = "GMT+8")private LocalDateTime activeTime;/*** 创建时间*/@ApiModelProperty(value = "创建时间,格式:yyyy-MM-dd HH:mm:ss")@JsonFormat(pattern = "yyyy-MM-dd HH:mm:ss", timezone = "GMT+8")private LocalDateTime createTime;/*** 创建人id*/@ApiModelProperty(value = "创建人id")private Long createBy;/*** 创建人名称*/@ApiModelProperty(value = "创建人名称")private String creator;/** 位置备注 */@ApiModelProperty(value = "位置备注")private String deviceDescription;
}
DeviceServiceImpl:
@Override
public DeviceDetailVo queryDeviceDetail(String iotId) {// 查询本地设备数据Device device = getOne(Wrappers.<Device>lambdaQuery().eq(Device::getIotId, iotId));if(ObjectUtil.isEmpty(device)) {return null;}// 调用华为云接口查询设备详情ShowDeviceRequest request = new ShowDeviceRequest();request.setDeviceId(iotId);ShowDeviceResponse response;try {response = client.showDevice(request);} catch (Exception e) {throw new BaseException("物联网接口 - 查询设备详情,调用失败");}// 属性拷贝DeviceDetailVo deviceVo = BeanUtil.toBean(device, DeviceDetailVo.class);deviceVo.setDeviceStatus(response.getStatus());String activeTimeStr = response.getActiveTime();// 日期转换if(StringUtils.isNotEmpty(activeTimeStr)) {// 把字符串转换为LocalDateTimeLocalDateTime activeTime = LocalDateTimeUtil.parse(activeTimeStr, DatePattern.UTC_MS_PATTERN);// 日期时区转换deviceVo.setActiveTime(DateTimeZoneConverter.utcToShanghai(activeTime));}return deviceVo;
}
新增工具类DateTimeZoneConverter:
package com.zzyl.common.utils;import java.time.LocalDateTime;
import java.time.ZoneId;
import java.time.ZoneOffset;
import java.time.format.DateTimeFormatter;
import java.util.Optional;/*** 日期时区转换工具类*/
public class DateTimeZoneConverter {// 预定义常用时区public static final ZoneId UTC_ZONE = ZoneOffset.UTC;public static final ZoneId SHANGHAI_ZONE = ZoneId.of("Asia/Shanghai");// 私有构造防止实例化private DateTimeZoneConverter() {}/*** 转换LocalDateTime时区(明确时区上下文)* @param sourceTime 源时间(无时区信息)* @param sourceZone 源时间所在的时区* @param targetZone 目标时区* @return 转换后的LocalDateTime*/public static LocalDateTime convert(LocalDateTime sourceTime, ZoneId sourceZone,ZoneId targetZone) {return sourceTime.atZone(sourceZone).withZoneSameInstant(targetZone).toLocalDateTime();}/*** 安全转换方法(Optional包装)* @param sourceTime 可为null的源时间* @param sourceZone 源时区* @param targetZone 目标时区* @return Optional包装的转换结果*/public static Optional<LocalDateTime> safeConvert(LocalDateTime sourceTime,ZoneId sourceZone,ZoneId targetZone) {return Optional.ofNullable(sourceTime).map(time -> convert(time, sourceZone, targetZone));}/*** UTC转上海时区的快捷方法* @param utcTime UTC时间的LocalDateTime* @return 上海时区本地时间*/public static LocalDateTime utcToShanghai(LocalDateTime utcTime) {return convert(utcTime, UTC_ZONE, SHANGHAI_ZONE);}/*** 带格式解析的完整流程* @param timeStr 时间字符串* @param pattern 格式模式(需匹配timeStr)* @param sourceZone 字符串对应的时区* @param targetZone 目标时区* @return Optional包装的转换结果*/public static Optional<LocalDateTime> parseAndConvert(String timeStr,String pattern,ZoneId sourceZone,ZoneId targetZone) {try {LocalDateTime sourceTime = LocalDateTime.parse(timeStr, DateTimeFormatter.ofPattern(pattern));return Optional.of(convert(sourceTime, sourceZone, targetZone));} catch (Exception e) {return Optional.empty();}}
}
效果展示:
查看设备上报的数据(设备影子):
DeviceController:
/*** 查询设备上报数据*/
@GetMapping("/queryServiceProperties/{iotId}")
@ApiOperation("查询设备上报数据")
public AjaxResult queryServiceProperties(@PathVariable("iotId") String iotId) {AjaxResult ajaxResult = deviceService.queryServiceProperties(iotId);return ajaxResult;
}
IDeviceService及其实现类:
/*** 查询设备上报数据* @param iotId* @return*/
AjaxResult queryServiceProperties(String iotId);@Override
public AjaxResult queryServiceProperties(String iotId) {ShowDeviceShadowRequest request = new ShowDeviceShadowRequest();request.setDeviceId(iotId);ShowDeviceShadowResponse response = client.showDeviceShadow(request);if(response.getHttpStatusCode() != 200) {throw new BaseException("物联网接口 - 查询设备影子,调用失败");}List<DeviceShadowData> shadow = response.getShadow();if(CollUtil.isEmpty(shadow)) {List<Object> emptyList = Collections.emptyList();return AjaxResult.success(emptyList);}// 获取上报数据的reported (参考返回的json数据)DeviceShadowProperties reported = shadow.get(0).getReported();// 把数据转换为JSONObject(map),方便处理JSONObject jsonObject = JSONUtil.parseObj(reported.getProperties());// 遍历数据,封装到list中List<Map<String,Object>>  list = new ArrayList<>();// 事件上报时间String eventTimeStr = reported.getEventTime();// 把字符串转换为LocalDateTimeLocalDateTime eventTimeLocalDateTime = LocalDateTimeUtil.parse(eventTimeStr, "yyyyMMdd'T'HHmmss'Z'");// 时区转换LocalDateTime eventTime = DateTimeZoneConverter.utcToShanghai(eventTimeLocalDateTime);// k:属性标识,v:属性值jsonObject.forEach((k,v) -> {Map<String,Object> map = new HashMap<>();map.put("functionId", k);map.put("value", v);map.put("eventTime", eventTime);list.add(map);});// 数据返回return AjaxResult.success(list);
}
微实战:
修改设备:
DeviceController:
@PutMapping@ApiOperation("修改设备")public AjaxResult updateDevice(@RequestBody Device device){deviceService.updateDevice(device);return success();}DeviceServiceImpl:
/*** 修改设备* * @param device 设备* @return 结果*/@Overridepublic int updateDevice(Device device){//- 修改IoTDA平台上的设备名称UpdateDeviceRequest request = new UpdateDeviceRequest();request.setDeviceId(device.getIotId());UpdateDevice body = new UpdateDevice();body.setDeviceName(device.getDeviceName());request.setBody(body);try {client.updateDevice(request);} catch (Exception e) {throw new BaseException("调用IoT平台修改设备失败");}//- 修改本地存储的设备信息boolean flag;try {flag = updateById(device);} catch (Exception e) {throw new BaseException("该老人/位置已绑定该类型的设备,请重新选择绑定位置");}return flag ? 1 : 0;}删除设备:
DeviceController:
@DeleteMapping("/{iotId}")public AjaxResult deleteDevice(@PathVariable("iotId") String iotId){deviceService.deleteDeviceById(iotId);return success();}DeviceServiceImpl:
/*** 删除设备信息* * @param iotId 设备主键*/@Overridepublic void deleteDeviceById(String iotId){//- 先从IoTDA平台删除设备DeleteDeviceRequest request = new DeleteDeviceRequest();request.setDeviceId(iotId);try {client.deleteDevice(request);} catch (Exception e) {throw new BaseException("调用IoT平台删除设备失败");}//- 再删除本地存储的设备remove(Wrappers.<Device>lambdaQuery().eq(Device::getIotId, iotId));}提交代码:
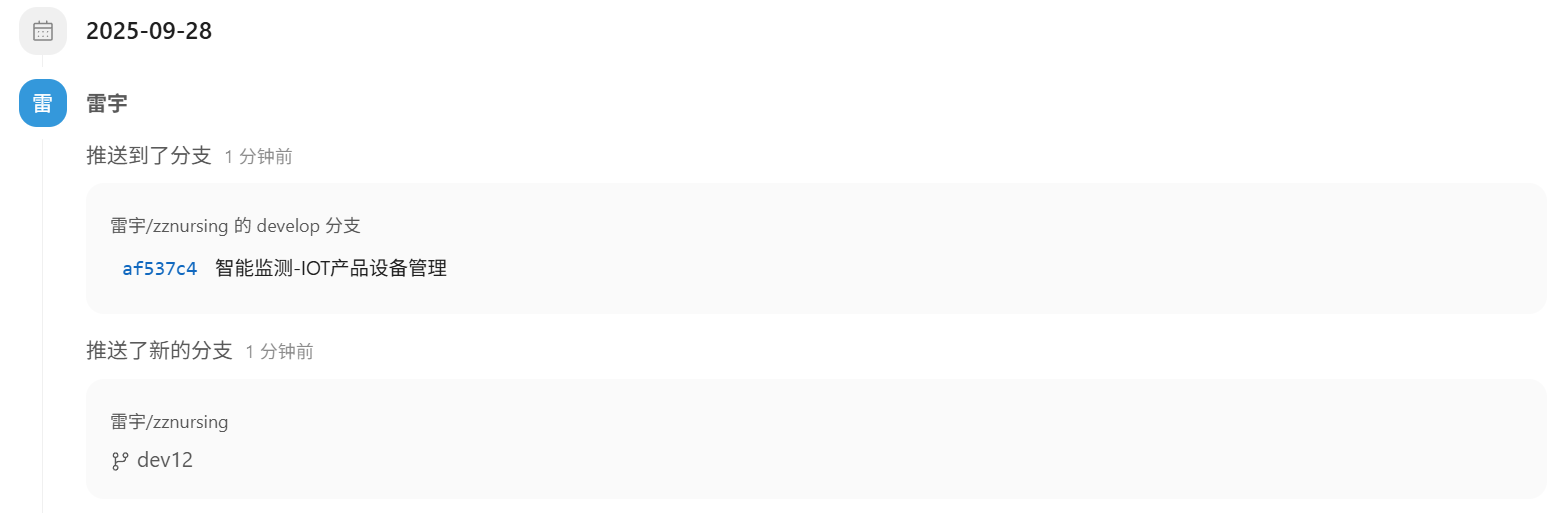
同步和异步:
-
同步(Background Synchronous)是指任务在后台进行处理,但其他任务需要等待任务完成后才能执行;同步请求下,任务1完成后才能执行任务2,任务2需要等待任务1的完成。这种顺序执行的方式称为同步。
-
异步(Asynchronous)是指任务的提交和执行是相互独立的,任务的执行不会阻塞程序的继续执行;异步请求下,任务1和任务2可以并行执行,彼此之间相互独立,不需要等待对方的完成。这种并行执行的方式称为异步。
消息队列:
-
broker:负责接收、存储和分发消息的中间件组件,实现了发送者和接收者之间的解耦和异步通信
-
生产者:负责将消息发送到消息队列中
-
消费者:负责从消息队列中获取消息并进行处理
-
队列:负责存储消息
-
topic:消息的分类
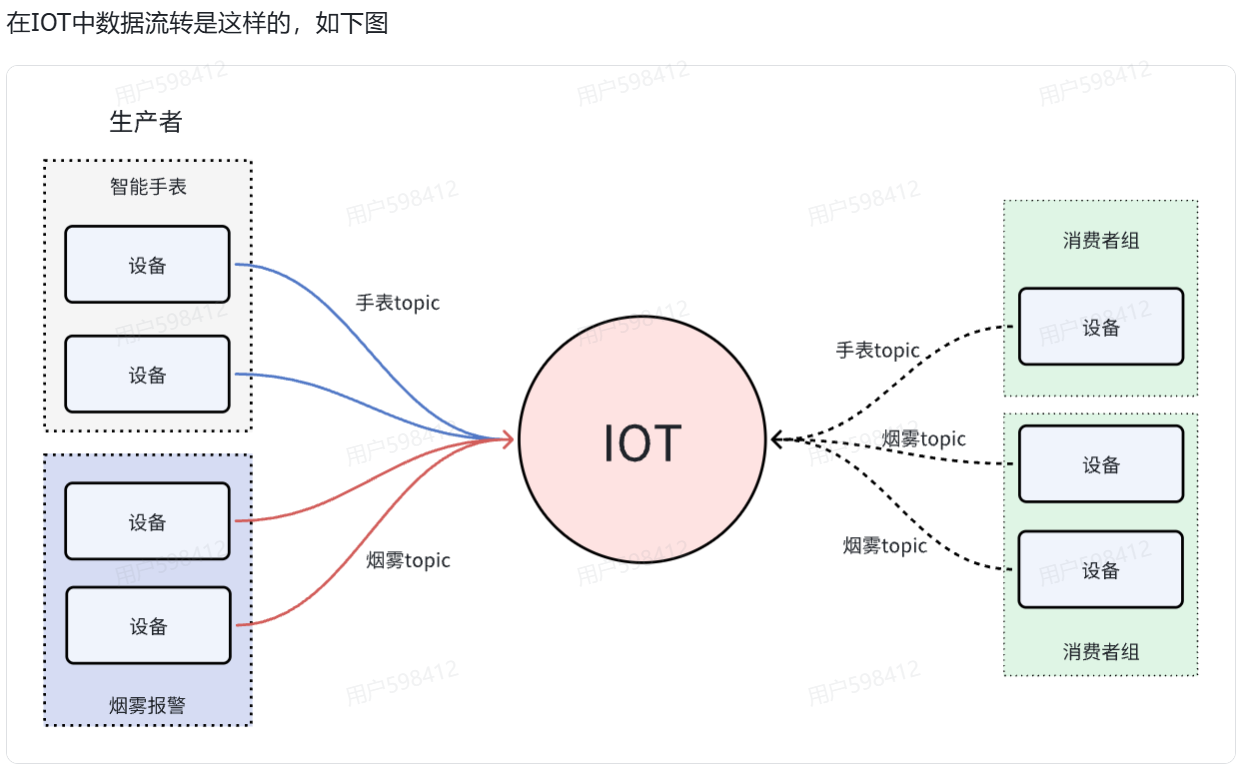
-
生产者:设备负责将消息发送到IOT中(队列)
-
每个产品可以绑定不同的topic来对消息进行分类,比如有手表topic、烟雾topic
-
IOT本身相当于是一个队列
-
消费者可以从指定的topic中获取数据
-
如果有多个消费者都要接收同一类消息,可以设置多个消费者,称为消费者组
AMQP:
咱们现在已经清楚了消息队列的基础概念,在IOT中是用AMQP来接收和处理消息的。
AMQP全称Advanced Message Queuing Protocol,是一种网络协议,用于在应用程序之间传递消息。它是一种开放标准的消息传递协议,可以在不同的系统之间实现可靠、安全、高效的消息传递。
AMQP协议的实现包括多种消息队列软件,例如RabbitMQ、Apache ActiveMQ、Apache Qpid等。这些软件提供了可靠、高效的消息传递服务,广泛应用于分布式系统、云计算、物联网等领域。
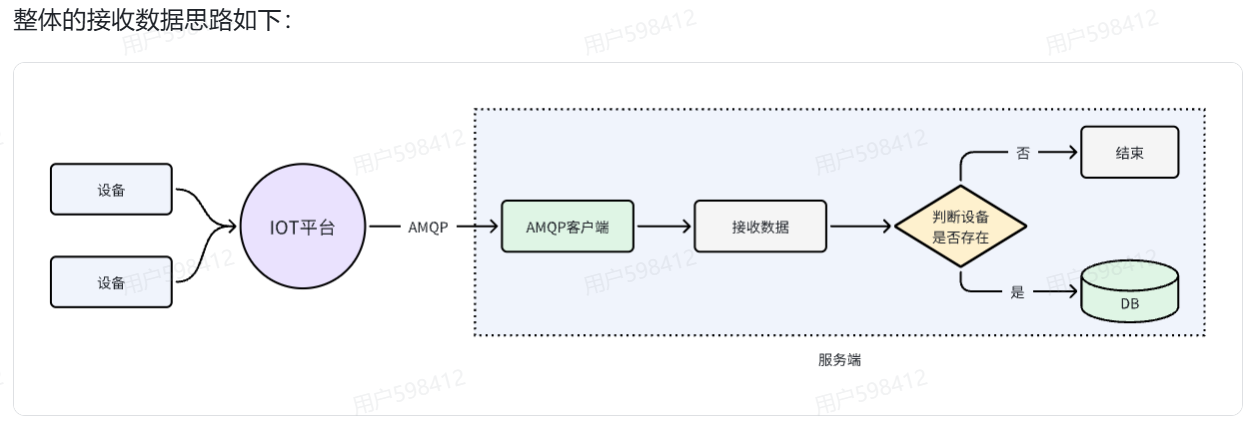
设备数据转发:
设备接入物联网平台后,可以通过自定义Topic或产品模型将数据上报给平台。在控制台上设置订阅后,平台会将包括设备生命周期变更、属性上报、消息上报及状态变更等信息,通过订阅推送的方式转发到您指定的服务器。

-
订阅(AMQP): 用户可以通过控制台或调用API创建订阅,以获取设备的变更信息,如设备状态、数据上报等。订阅时需要指定具体的AMQP消息通道。
-
推送: 一旦订阅成功,物联网平台会根据用户选择的数据类型,自动将相关变更推送到指定的AMQP消息队列中。用户使用AMQP客户端(Apache Qpid)连接到IoT平台即可接收这些更新信息。
按照上述流程,咱们需要在IOT平台中创建转发规则,才能让AMQP客户端接收到数据
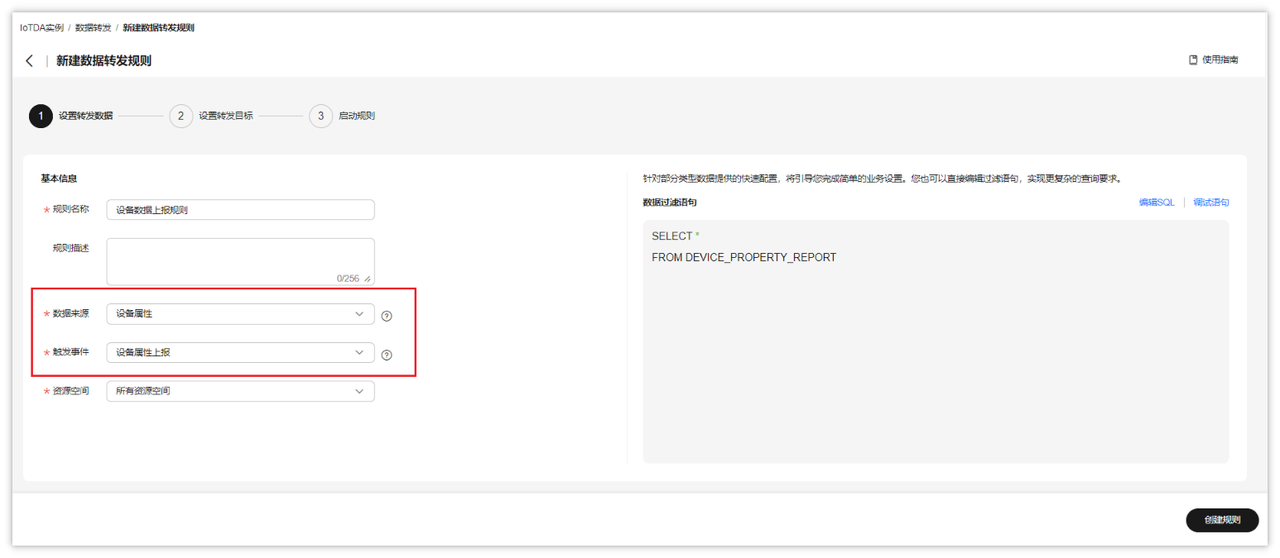
创建数据转发规则:
-
找到规则->数据转发->创建规则
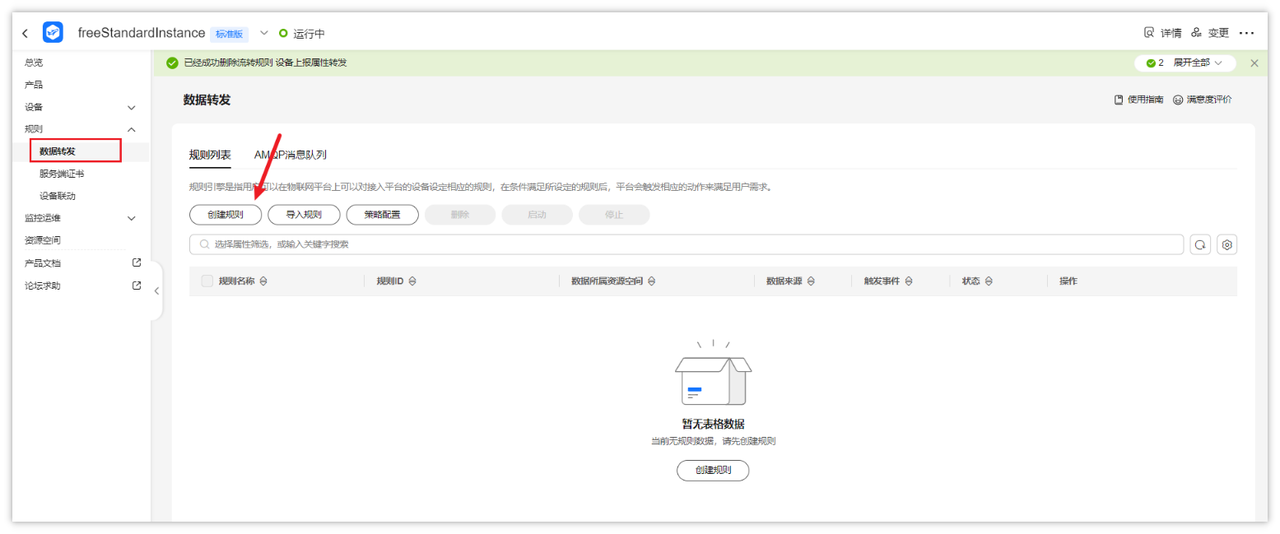
-
创建规则,其中数据来源为:设备属性;配置完成后,点击右下角的 [创建规则]
-
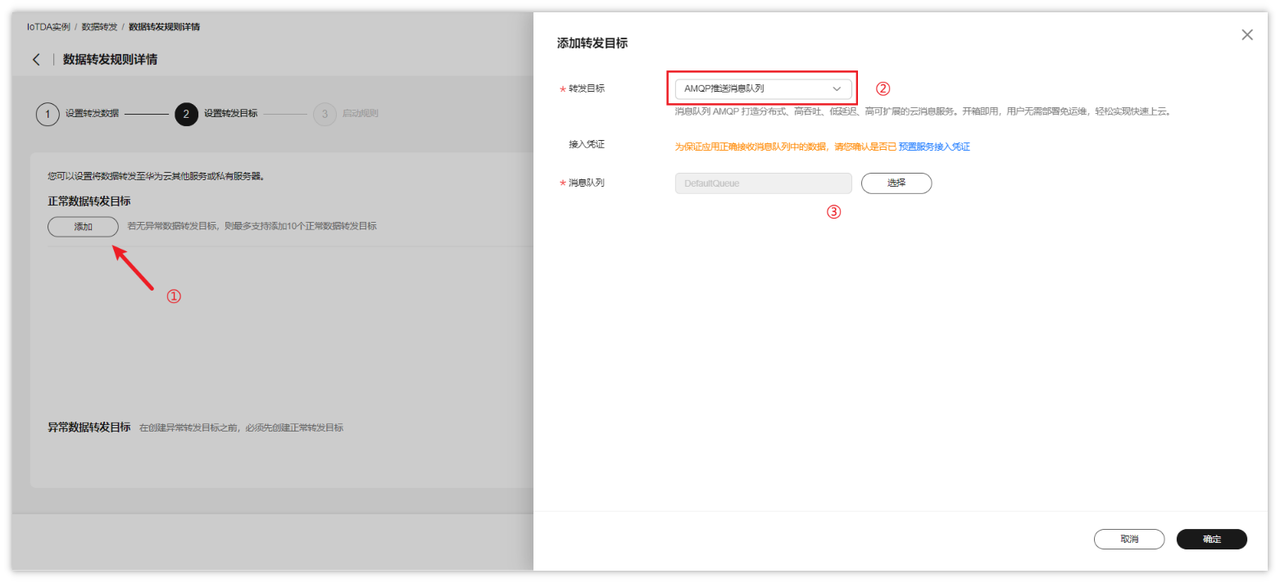
添加转发目标,转发目标选择:AMQP推送消息队列
-
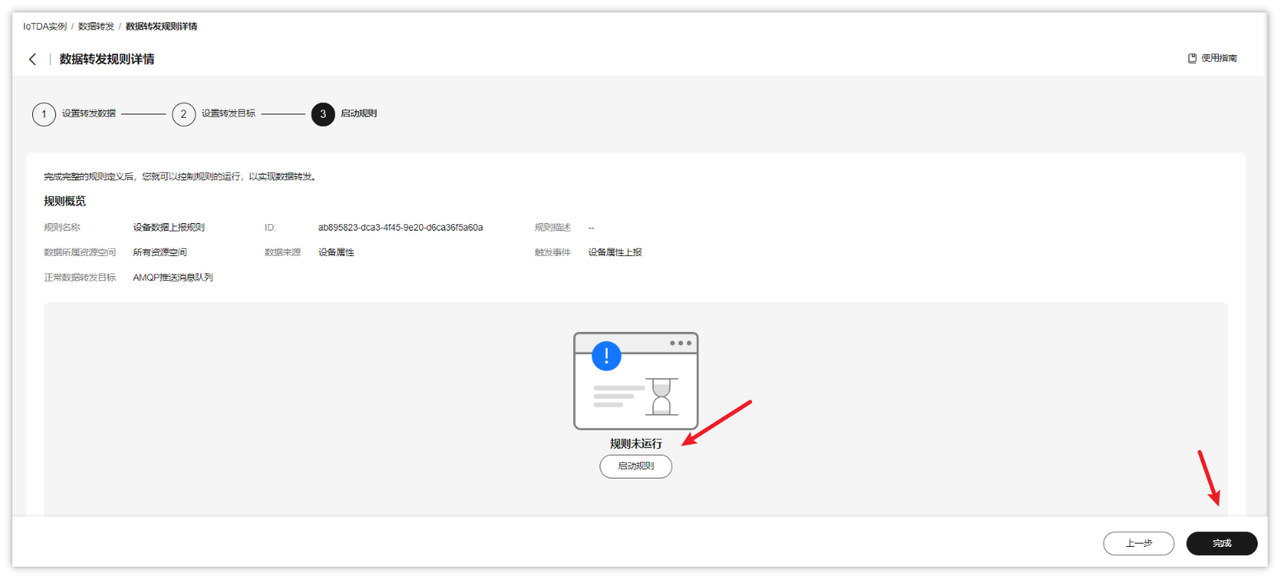
上述操作完成后,可以启动规则
Java SDK接入示例:
下载sdk代码:
下载地址:https://developer.obs.myhuaweicloud.com/manage/amqp/amqp-demo.zip
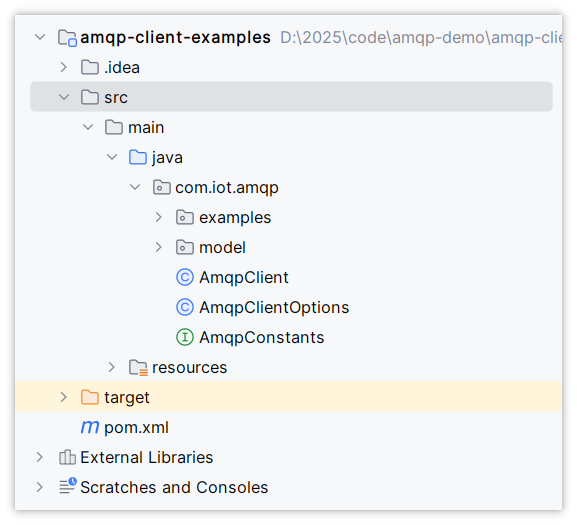
使用idea打开刚刚下载的amqp-demo中的amqp-client-examples代码目录,如下图:
修改连接参数:
AmqpConstants:
package com.iot.amqp;public interface AmqpConstants {/*** AMQP接入域名* 参考:https://support.huaweicloud.com/usermanual-iothub/iot_01_00100_2.html#section2*/String HOST = "****.iot-amqps.cn-north-4.myhuaweicloud.com";   // eg: "****.iot-amqps.cn-north-4.myhuaweicloud.com";/*** AMQP接入端口* 参考:https://support.huaweicloud.com/usermanual-iothub/iot_01_00100_2.html#section2*/int PORT = 5671;/*** 接入凭证键值* 参考:https://support.huaweicloud.com/usermanual-iothub/iot_01_00100_2.html#section3*/String ACCESS_KEY = "*********";/*** 接入凭证密钥* 参考:https://support.huaweicloud.com/usermanual-iothub/iot_01_00100_2.html#section3*/String ACCESS_CODE = "**************************";/*** 默认队列*/String DEFAULT_QUEUE = "DefaultQueue";
}
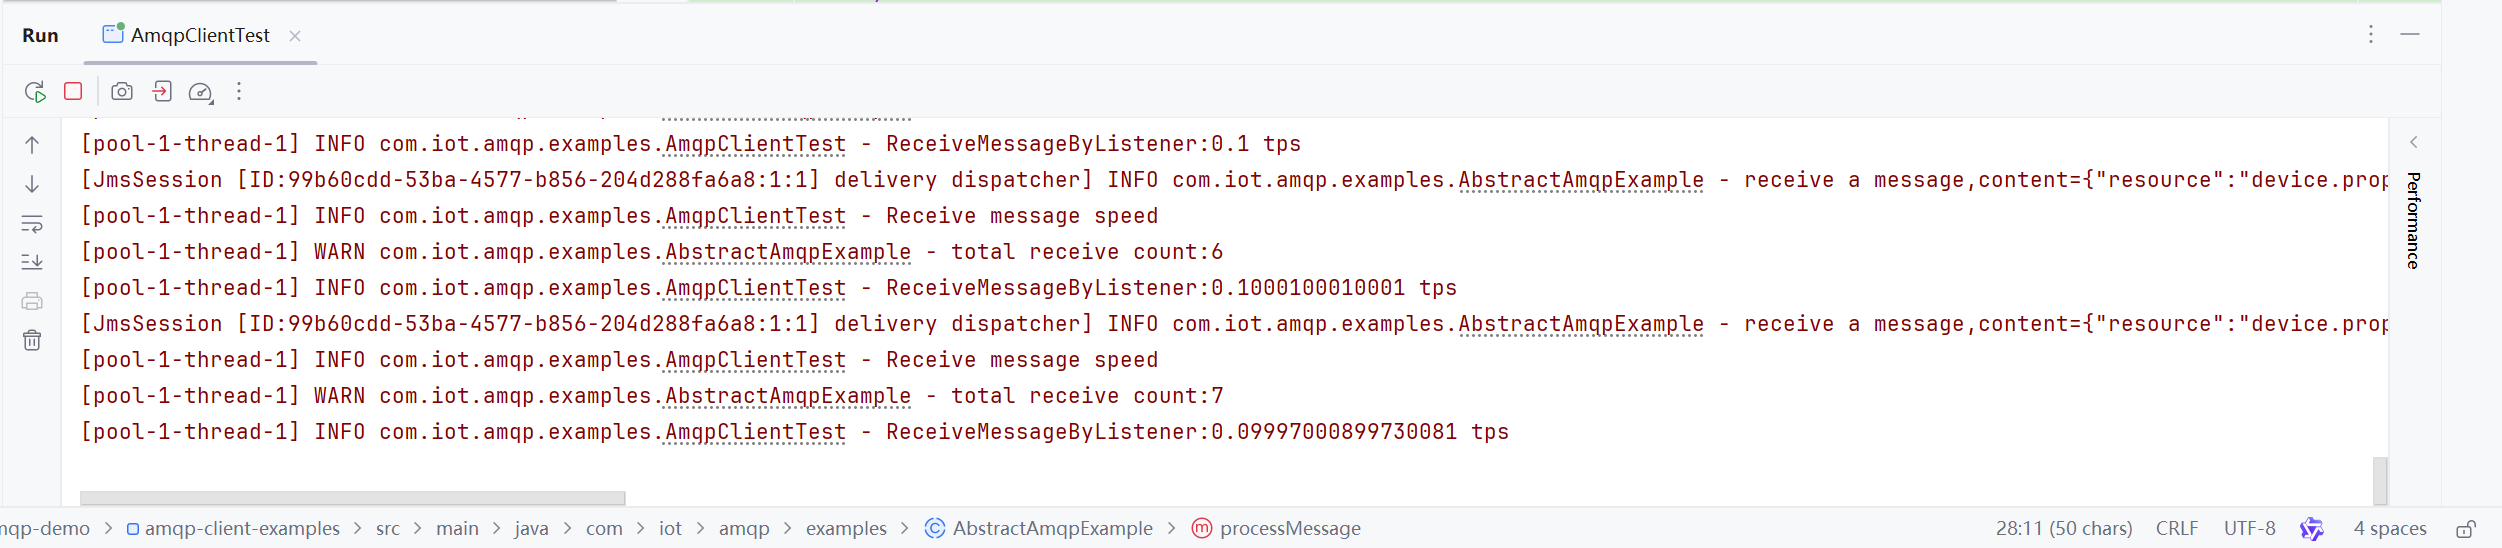
放开AbstractAmqpExample中的打印消息的代码,如下图:
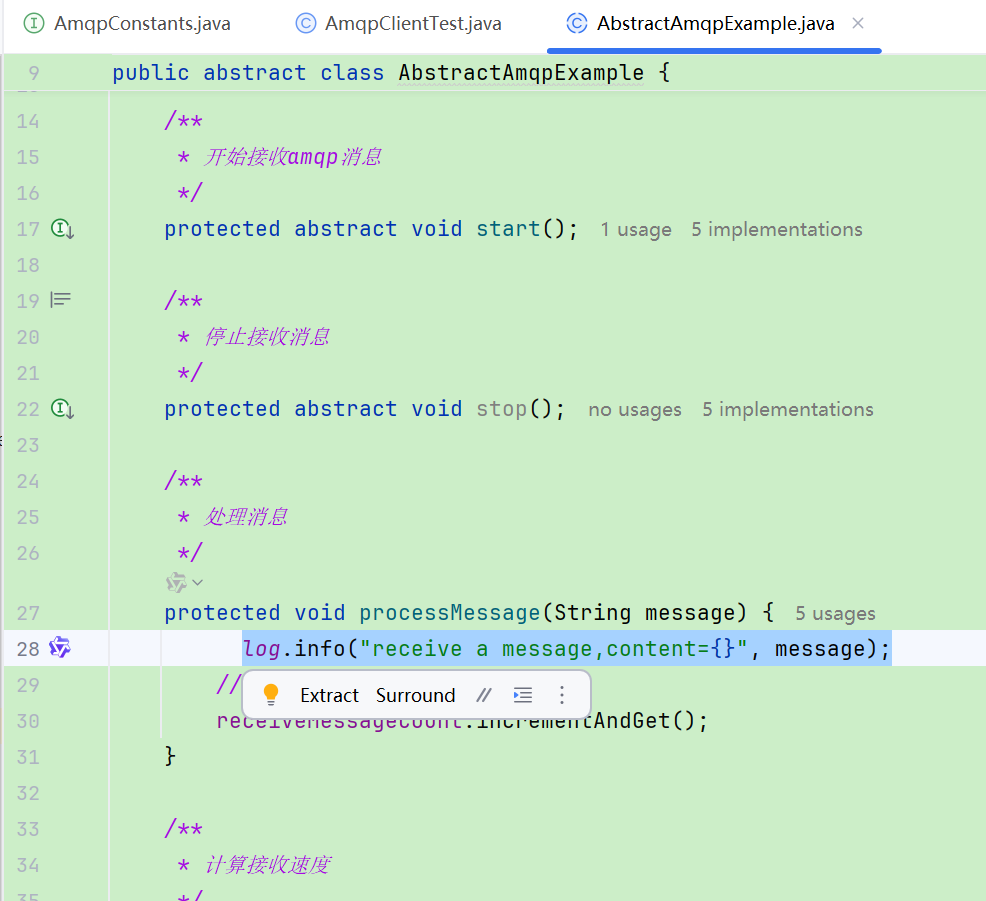
效果展示:
SDK改造:
SDK中提供的这个工具类,只是官网提供的参考代码,咱们需要将其改造后集成到自己的项目中,改造思路如下:
-
导入对应的依赖
-
所有的可变参数,如HOST、ACCESS_KEY、ACCESS_CODE、DEFAULT_QUEUE统一在配置文件中维护
-
在项目中根据项目需求配置线程池
-
让Spring进行管理和监听,一旦有数据变化,马上消费,可以让这个类实现ApplicationRunner接口,重新run方法
在zzyl-nursing-platform模块中导入依赖:
<!-- amqp 1.0 qpid client -->
<dependency><groupId>org.apache.qpid</groupId><artifactId>qpid-jms-client</artifactId><version>0.61.0</version>
</dependency>
实现ApplicationRunner接口之后的AmqpClient:
package com.zzyl.nursing.task;import cn.hutool.core.text.CharSequenceUtil;
import com.zzyl.framework.config.properties.HuaWeiIotConfigProperties;
import lombok.extern.slf4j.Slf4j;
import org.apache.qpid.jms.*;
import org.apache.qpid.jms.message.JmsInboundMessageDispatch;
import org.apache.qpid.jms.transports.TransportOptions;
import org.apache.qpid.jms.transports.TransportSupport;
import org.springframework.beans.factory.annotation.Autowired;
import org.springframework.boot.ApplicationArguments;
import org.springframework.boot.ApplicationRunner;
import org.springframework.scheduling.concurrent.ThreadPoolTaskExecutor;
import org.springframework.stereotype.Component;import javax.jms.*;
import java.net.InetAddress;
import java.net.URI;
import java.net.UnknownHostException;
import java.text.MessageFormat;
import java.util.HashMap;
import java.util.Map;
import java.util.UUID;
import java.util.stream.Collectors;/*** @author itcast*/
@Slf4j
@Component
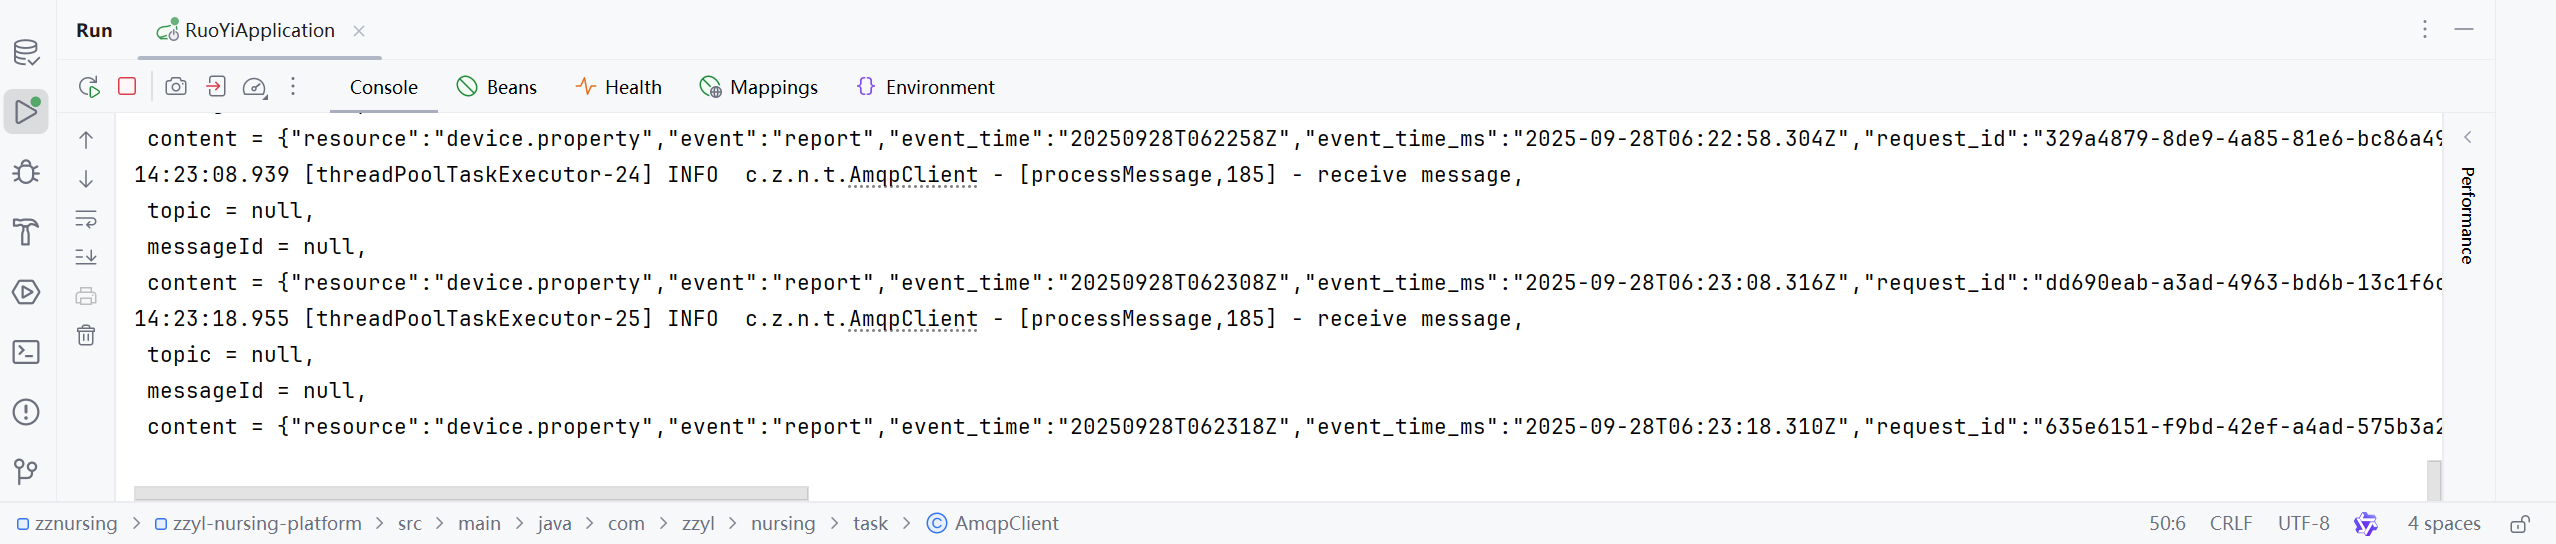
public class AmqpClient implements ApplicationRunner {@Autowiredprivate HuaWeiIotConfigProperties huaWeiIotConfigProperties;// 业务处理异步线程池,线程池参数可以根据您的业务特点调整,或者您也可以用其他异步方式处理接收到的消息。@Autowiredprivate ThreadPoolTaskExecutor threadPoolTaskExecutor;// 控制台服务端订阅中消费组状态页客户端ID一栏将显示clientId参数。// 建议使用机器UUID、MAC地址、IP等唯一标识等作为clientId。便于您区分识别不同的客户端。private static String clientId;static {try {clientId = InetAddress.getLocalHost().getHostAddress();} catch (UnknownHostException e) {e.printStackTrace();}}@Overridepublic void run(ApplicationArguments args) throws Exception {start();}public void start() throws Exception {// 参数说明,请参见AMQP客户端接入说明文档。for (int i = 0; i < huaWeiIotConfigProperties.getConnectionCount(); i++) {// 创建amqp连接Connection connection = getConnection();// 加入监听者((JmsConnection) connection).addConnectionListener(myJmsConnectionListener);// 创建会话。// Session.CLIENT_ACKNOWLEDGE: 收到消息后,需要手动调用message.acknowledge()。// Session.AUTO_ACKNOWLEDGE: SDK自动ACK(推荐)。Session session = connection.createSession(false, Session.AUTO_ACKNOWLEDGE);connection.start();// 创建Receiver连接。MessageConsumer consumer = newConsumer(session, connection, huaWeiIotConfigProperties.getQueueName());consumer.setMessageListener(messageListener);}log.info("amqp is started successfully, and will exit after server shutdown ");}/*** 创建amqp连接** @return amqp连接*/private Connection getConnection() throws Exception {String connectionUrl = generateConnectUrl();JmsConnectionFactory cf = new JmsConnectionFactory(connectionUrl);// 信任服务端TransportOptions to = new TransportOptions();to.setTrustAll(true);cf.setSslContext(TransportSupport.createJdkSslContext(to));String userName = "accessKey=" + huaWeiIotConfigProperties.getAccessKey();cf.setExtension(JmsConnectionExtensions.USERNAME_OVERRIDE.toString(), (connection, uri) -> {// IoTDA的userName组成格式如下:“accessKey=${accessKey}|timestamp=${timestamp}”String newUserName = userName;if (connection instanceof JmsConnection) {newUserName = ((JmsConnection) connection).getUsername();}return newUserName + "|timestamp=" + System.currentTimeMillis();});// 创建连接。return cf.createConnection(userName, huaWeiIotConfigProperties.getAccessCode());}/*** 生成amqp连接地址** @return amqp连接地址*/public String generateConnectUrl() {String uri = MessageFormat.format("{0}://{1}:{2}",(huaWeiIotConfigProperties.isUseSsl() ? "amqps" : "amqp"),huaWeiIotConfigProperties.getHost(),String.valueOf(huaWeiIotConfigProperties.getPort()));Map<String, String> uriOptions = new HashMap<>();uriOptions.put("amqp.vhost", huaWeiIotConfigProperties.getVhost());uriOptions.put("amqp.idleTimeout", String.valueOf(huaWeiIotConfigProperties.getIdleTimeout()));uriOptions.put("amqp.saslMechanisms", huaWeiIotConfigProperties.getSaslMechanisms());Map<String, String> jmsOptions = new HashMap<>();jmsOptions.put("jms.prefetchPolicy.queuePrefetch", String.valueOf(huaWeiIotConfigProperties.getQueuePrefetch()));if (CharSequenceUtil.isNotBlank(clientId)) {jmsOptions.put("jms.clientID", clientId);} else {jmsOptions.put("jms.clientID", UUID.randomUUID().toString());}jmsOptions.put("failover.reconnectDelay", String.valueOf(huaWeiIotConfigProperties.getReconnectDelay()));jmsOptions.put("failover.maxReconnectDelay", String.valueOf(huaWeiIotConfigProperties.getMaxReconnectDelay()));if (huaWeiIotConfigProperties.getMaxReconnectAttempts() > 0) {jmsOptions.put("failover.maxReconnectAttempts", String.valueOf(huaWeiIotConfigProperties.getMaxReconnectAttempts()));}if (huaWeiIotConfigProperties.getExtendedOptions() != null) {for (Map.Entry<String, String> option : huaWeiIotConfigProperties.getExtendedOptions().entrySet()) {if (option.getKey().startsWith("amqp.") || option.getKey().startsWith("transport.")) {uriOptions.put(option.getKey(), option.getValue());} else {jmsOptions.put(option.getKey(), option.getValue());}}}StringBuilder stringBuilder = new StringBuilder();stringBuilder.append(uriOptions.entrySet().stream().map(option -> MessageFormat.format("{0}={1}", option.getKey(), option.getValue())).collect(Collectors.joining("&", "failover:(" + uri + "?", ")")));stringBuilder.append(jmsOptions.entrySet().stream().map(option -> MessageFormat.format("{0}={1}", option.getKey(), option.getValue())).collect(Collectors.joining("&", "?", "")));return stringBuilder.toString();}/*** 创建消费者** @param session session* @param connection amqp连接* @param queueName 队列名称* @return 消费者*/public MessageConsumer newConsumer(Session session, Connection connection, String queueName) throws Exception {if (connection == null || !(connection instanceof JmsConnection) || ((JmsConnection) connection).isClosed()) {throw new Exception("create consumer failed,the connection is disconnected.");}return session.createConsumer(new JmsQueue(queueName));}private final MessageListener messageListener = message -> {try {// 异步处理收到的消息,确保onMessage函数里没有耗时逻辑threadPoolTaskExecutor.submit(() -> processMessage(message));} catch (Exception e) {log.error("submit task occurs exception ", e);}};/*** 在这里处理您收到消息后的具体业务逻辑。*/private void processMessage(Message message) {String contentStr;try {contentStr = message.getBody(String.class);String topic = message.getStringProperty("topic");String messageId = message.getStringProperty("messageId");log.info("receive message,\n topic = {},\n messageId = {},\n content = {}", topic, messageId, contentStr);} catch (JMSException e) {throw new RuntimeException("服务器错误");}}private final JmsConnectionListener myJmsConnectionListener = new JmsConnectionListener() {/*** 连接成功建立。*/@Overridepublic void onConnectionEstablished(URI remoteURI) {log.info("onConnectionEstablished, remoteUri:{}", remoteURI);}/*** 尝试过最大重试次数之后,最终连接失败。*/@Overridepublic void onConnectionFailure(Throwable error) {log.error("onConnectionFailure, {}", error.getMessage());}/*** 连接中断。*/@Overridepublic void onConnectionInterrupted(URI remoteURI) {log.info("onConnectionInterrupted, remoteUri:{}", remoteURI);}/*** 连接中断后又自动重连上。*/@Overridepublic void onConnectionRestored(URI remoteURI) {log.info("onConnectionRestored, remoteUri:{}", remoteURI);}@Overridepublic void onInboundMessage(JmsInboundMessageDispatch envelope) {}@Overridepublic void onSessionClosed(Session session, Throwable cause) {}@Overridepublic void onConsumerClosed(MessageConsumer consumer, Throwable cause) {}@Overridepublic void onProducerClosed(MessageProducer producer, Throwable cause) {}};
}效果展示:
线程池相关配置:
在目前若依的项目中已经提供了线程池的配置ThreadPoolTaskExecutor
类的位置:com.zzyl.framework.config.ThreadPoolConfig:
package com.zzyl.framework.config;import com.zzyl.common.utils.Threads;
import org.apache.commons.lang3.concurrent.BasicThreadFactory;
import org.springframework.context.annotation.Bean;
import org.springframework.context.annotation.Configuration;
import org.springframework.scheduling.concurrent.ThreadPoolTaskExecutor;
import java.util.concurrent.ScheduledExecutorService;
import java.util.concurrent.ScheduledThreadPoolExecutor;
import java.util.concurrent.ThreadPoolExecutor;/*** 线程池配置** @author ruoyi**/
@Configuration
public class ThreadPoolConfig
{// 核心线程池大小private int corePoolSize = 50;    //修改为Runtime.getRuntime().availableProcessors() * 2;// 最大可创建的线程数private int maxPoolSize = 200;// 队列最大长度private int queueCapacity = 1000;// 线程池维护线程所允许的空闲时间private int keepAliveSeconds = 300;@Bean(name = "threadPoolTaskExecutor")public ThreadPoolTaskExecutor threadPoolTaskExecutor(){ThreadPoolTaskExecutor executor = new ThreadPoolTaskExecutor();executor.setMaxPoolSize(maxPoolSize);executor.setCorePoolSize(corePoolSize);executor.setQueueCapacity(queueCapacity);executor.setKeepAliveSeconds(keepAliveSeconds);// 线程池对拒绝任务(无线程可用)的处理策略executor.setRejectedExecutionHandler(new ThreadPoolExecutor.CallerRunsPolicy());return executor;}/*** 执行周期性或定时任务*/@Bean(name = "scheduledExecutorService")protected ScheduledExecutorService scheduledExecutorService(){return new ScheduledThreadPoolExecutor(corePoolSize,new BasicThreadFactory.Builder().namingPattern("schedule-pool-%d").daemon(true).build(),new ThreadPoolExecutor.CallerRunsPolicy()){@Overrideprotected void afterExecute(Runnable r, Throwable t){super.afterExecute(r, t);Threads.printException(r, t);}};}
}
线程池核心参数和原理
-
corePoolSize 核心线程数目
-
到底多少合适?
-
对于IO密集型的项目,一般设置核心线程数为:CPU核数 * 2
-
对于计算密集型的项目,一般设置核心线程数为: CPU核数 + 1
-
-
-
maximumPoolSize 最大线程数目 = (核心线程+临时线程的最大数目)
-
keepAliveTime 生存时间 - 临时线程的生存时间,生存时间内没有新任务,此线程资源会释放
-
unit 时间单位 - 临时线程的生存时间单位,如秒、毫秒等
-
workQueue - 当没有空闲核心线程时,新来任务会加入到此队列排队,队列满会创建临时线程执行任务
-
threadFactory 线程工厂 - 可以定制线程对象的创建,例如设置线程名字、是否是守护线程等
-
handler 拒绝策略 - 当所有线程都在繁忙,workQueue 也放满时,会触发拒绝策略
-
AbortPolicy:直接抛出异常,默认策略;
-
CallerRunsPolicy:用调用者所在的线程来执行任务;
-
DiscardOldestPolicy:丢弃阻塞队列中靠最前的任务,并执行当前任务;
-
DiscardPolicy:直接丢弃任务;
-
-
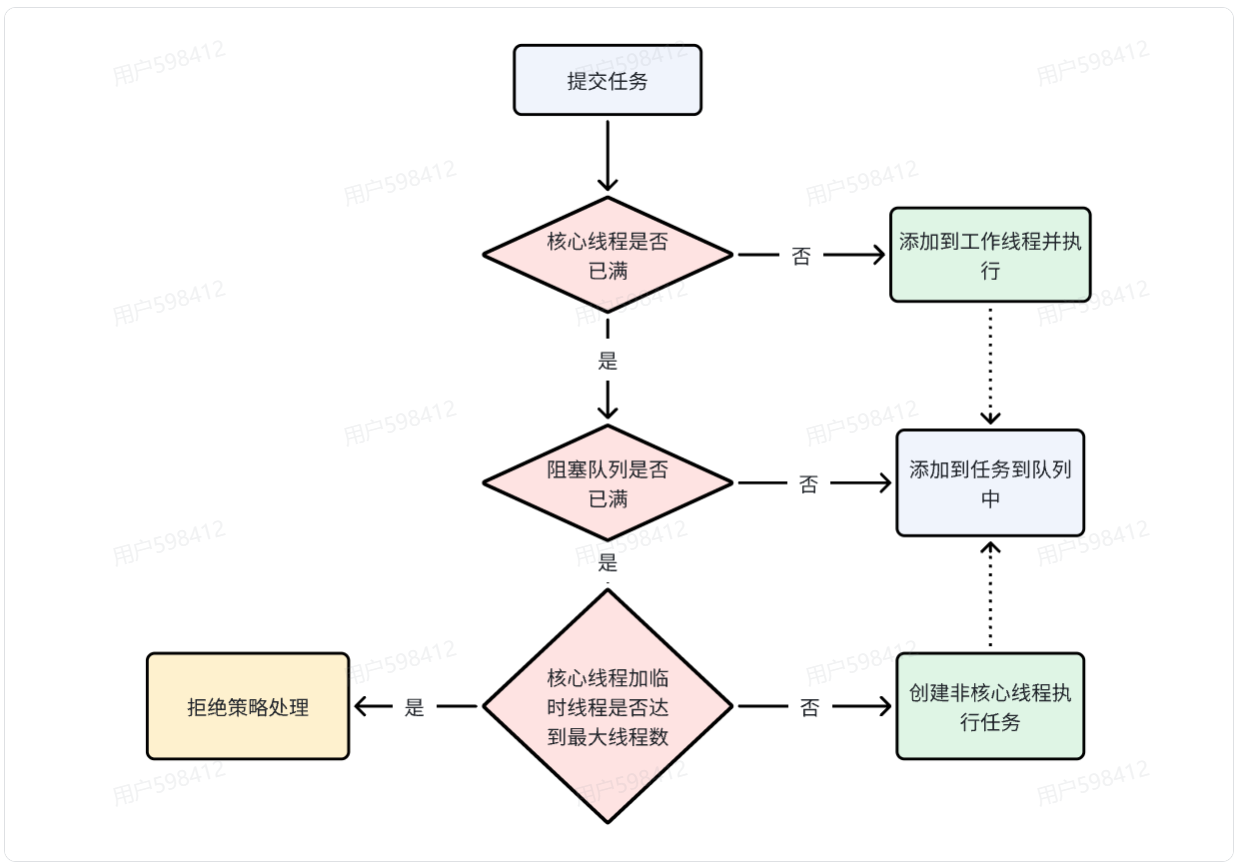
执行流程(原理)
接收设备端数据:
使用若依的代码生成功能生成代码:
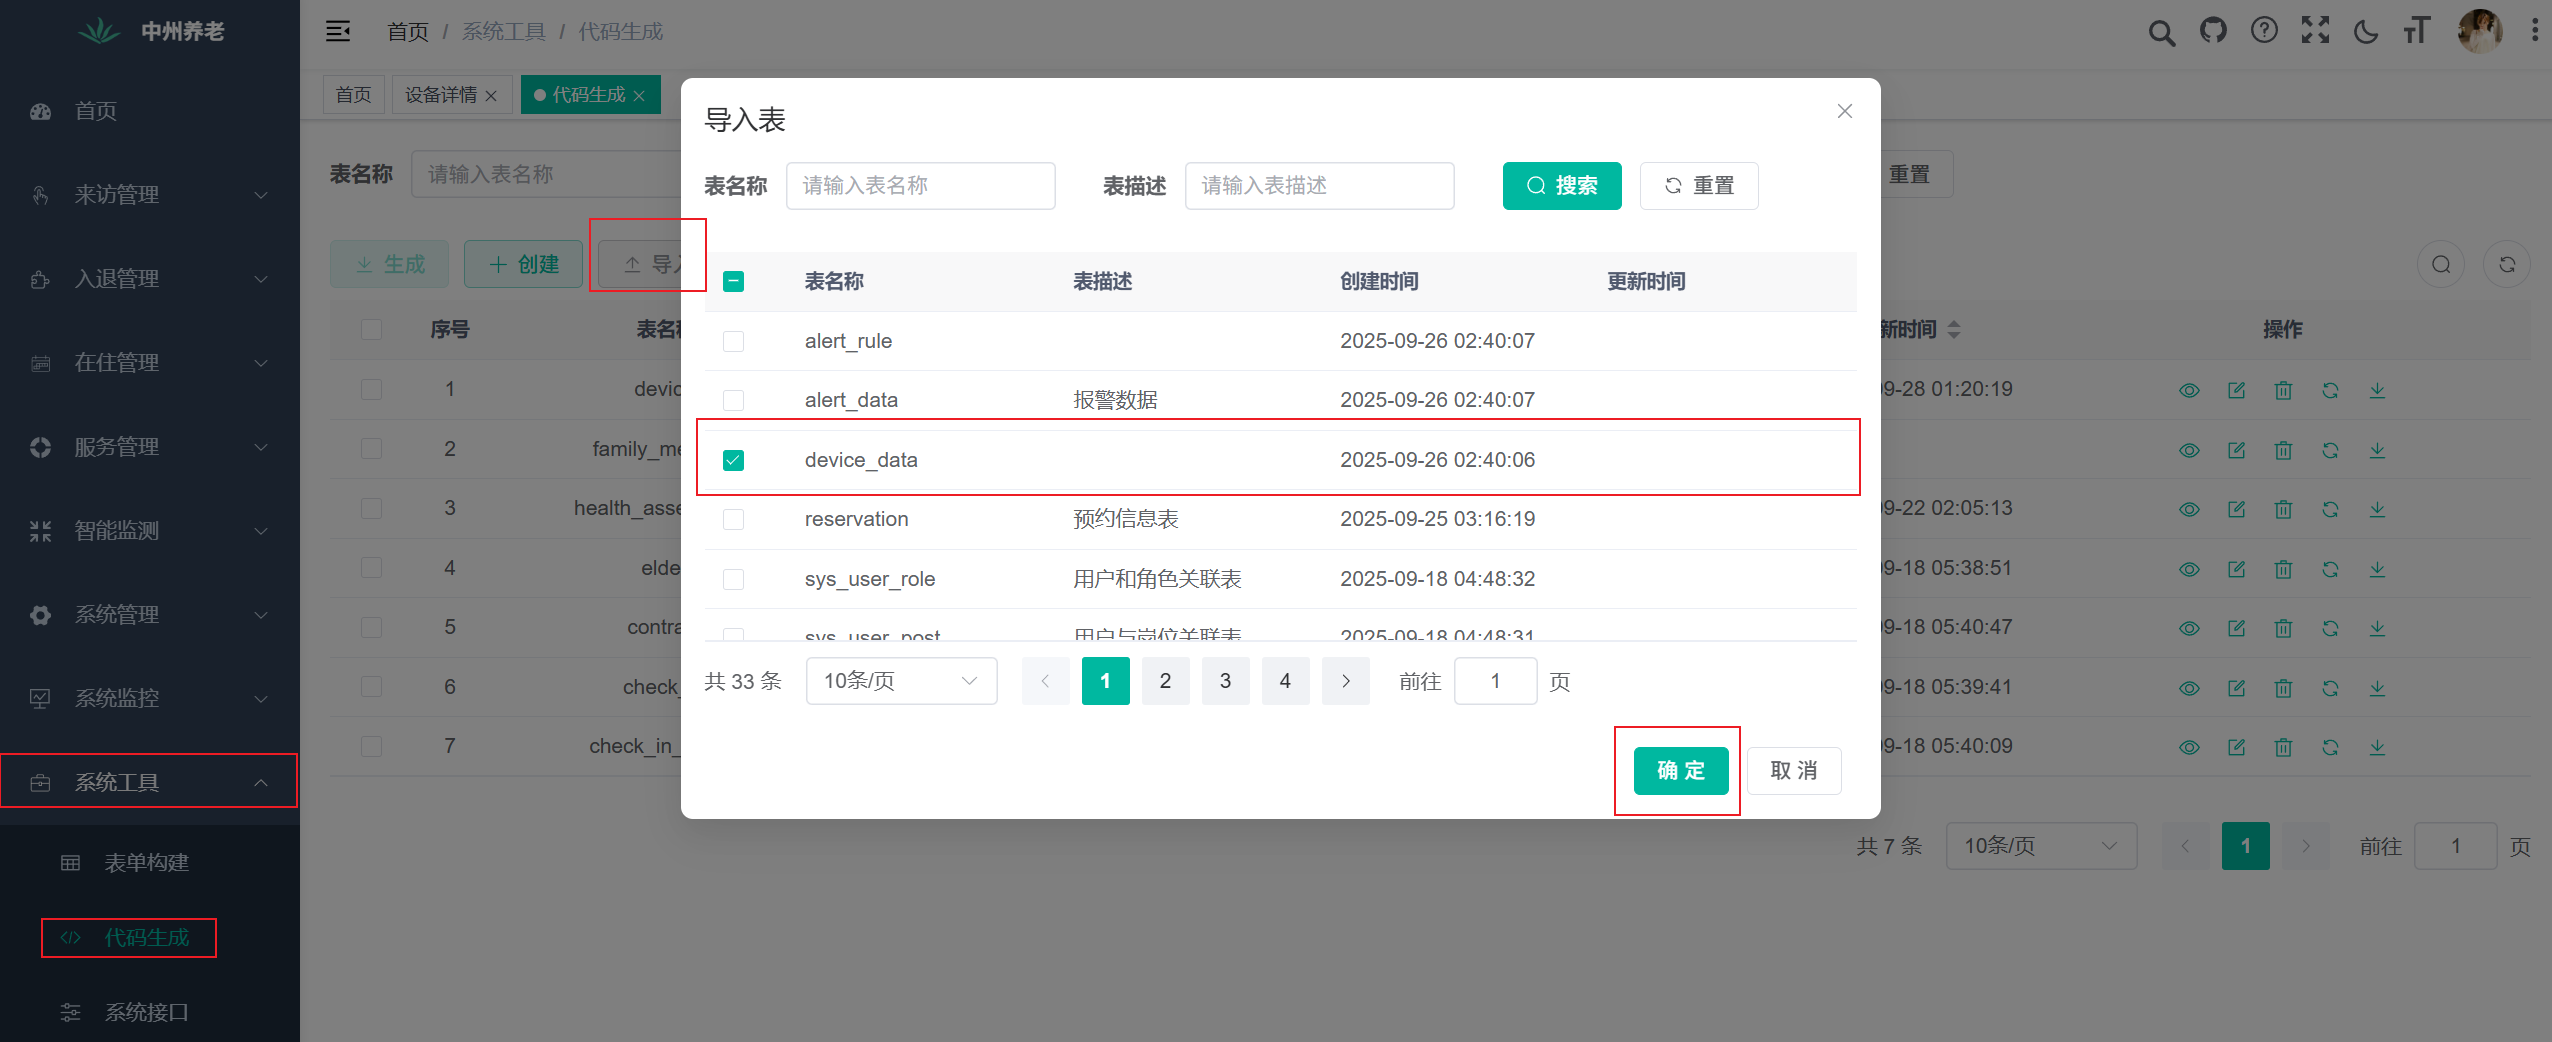
点击编辑修改表描述以及生成功能名称,完成后生成代码并拷贝到自己的项目当中;
最后修改DeviceData表,添加三个注解,方便使用构建者设计模式来构建对象,如下图:
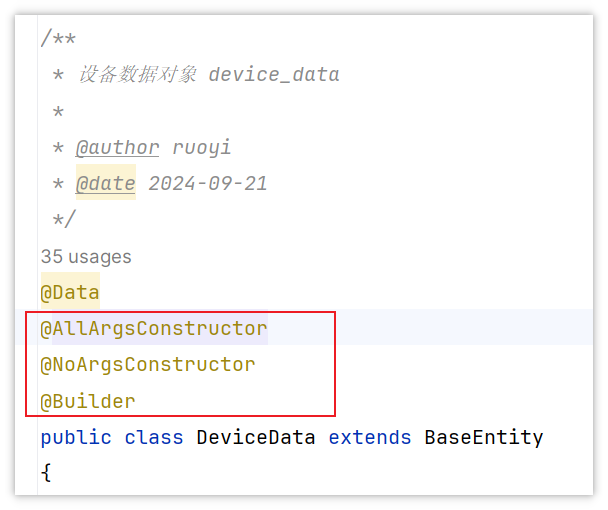
未完待续,下一篇讲解具体的功能实现