计算机视觉进阶教学之dlib库(二)
简介
在计算机视觉的进阶学习中,dlib 库是一款不可多得的 “瑞士军刀”—— 它以简洁的 API 封装了复杂的机器视觉算法,尤其在人脸分析、特征提取等领域表现突出,既能满足科研实验的快速验证需求,也能支撑工业级项目的落地开发。如果你已经掌握了 OpenCV 的基础操作,却在人脸关键点定位、疲劳检测、人脸追踪等进阶场景中感到困惑,那么这篇系列教学将为你搭建从 “基础” 到 “实战” 的桥梁。
上一篇博客我们讲了dlib库实现表情识别与疲劳检测,今天我们来进行性别年龄的预测
计算机视觉进阶教学之dlib库(一)
一、dlib—人脸应用实例—性别年龄预测
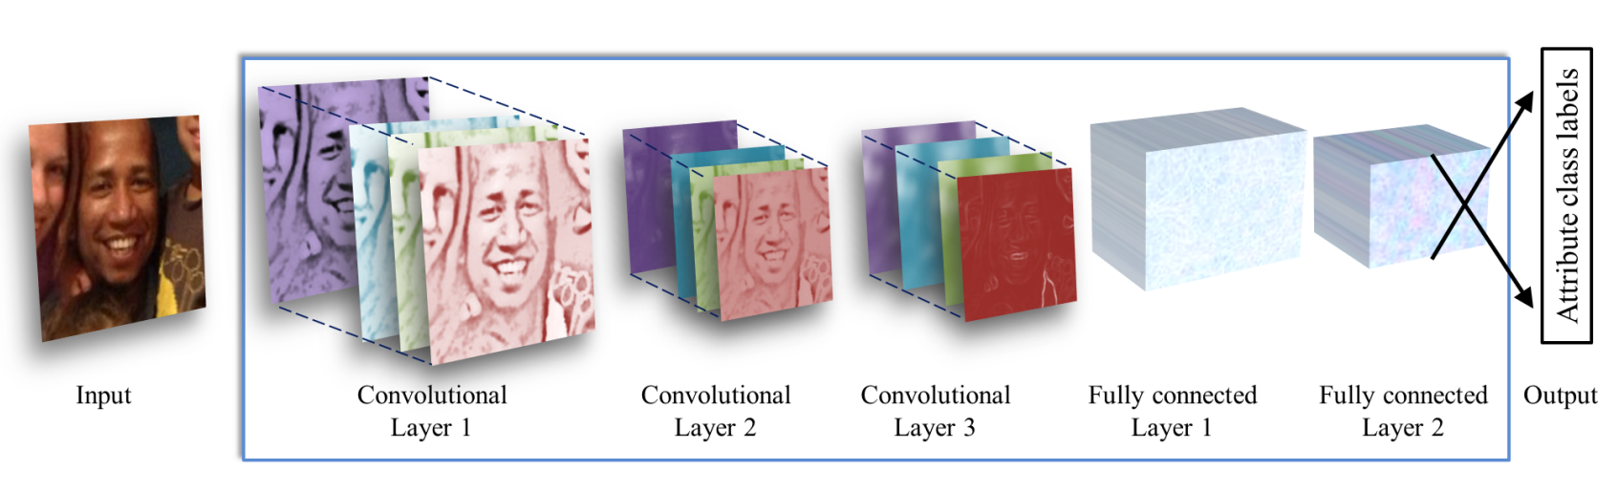
网络结构图像首先被裁剪为227*227输入网络。
- 卷积核1:96×3×7×7+ReLU+max pooling3 × 3,stride=2,normalization,输出为96×28×28 。
- 卷积核2: 256×96×5×5+ReLU+max pooling3×3,stride=2,normalization,输出为256×14×14 。
- 卷积核3: 384×256×14×14+ReLU+max pooling3×3。
- 4、全连接:512个神经元+ReLU+dropout
- 5、全连接:512个神经元+ReLU+dropout
- 6、output:根据年龄或性别映射到最后的类。
模型下载地址:https://github.com/GilLevi/AgeGenderDeepLearning
模型下载地址https://github.com/spmallick/learnopencv/blob/master/AgeGender/opencv_face_detector_uint8.pb
代码实现
1. 导入所需库
import cv2          # OpenCV库,用于图像处理、视频捕获、模型加载和推理
from PIL import Image, ImageDraw, ImageFont # PIL库,用于处理图像,特别是解决OpenCV无法直接显示中文的问题
import numpy as np # NumPy库,用于处理图像数据的多维数组cv2: 核心库,负责所有与计算机视觉相关的操作。PIL: Python Imaging Library,一个强大的图像处理库。因为 OpenCV 的cv2.putText函数对中文字体的支持不佳,所以这里用 PIL 来绘制中文文本。numpy: 几乎所有科学计算的基础,OpenCV 处理的图像本质上就是 NumPy 数组。
2. 模型初始化
# 模型文件路径
faceProto = "opencv_face_detector.pbtxt"
faceModel = "opencv_face_detector_uint8.pb"
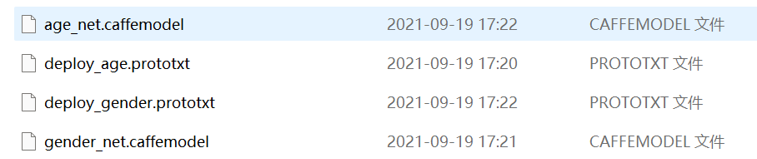
ageProto = "deploy_age.prototxt"
ageModel = "age_net.caffemodel"
genderProto = "deploy_gender.prototxt"
genderModel = "gender_net.caffemodel"# 加载网络模型
ageNet = cv2.dnn.readNet(ageModel, ageProto)
genderNet = cv2.dnn.readNet(genderModel, genderProto)
faceNet = cv2.dnn.readNet(faceModel, faceProto)- 模型文件:
.prototxt/.pbtxt文件:定义了神经网络的结构(层、输入、输出等)。.caffemodel/.pb文件:包含了训练好的模型权重(weights)。
cv2.dnn.readNet(model, config): 这是 OpenCV 加载深度学习模型的核心函数。model: 权重文件路径。config: 配置文件路径。
- 这里我们加载了三个模型:
faceNet: 用于人脸检测。ageNet: 用于年龄预测。genderNet: 用于性别预测。
3. 变量初始化
# 年龄段和性别标签
ageList = ['0-2岁', '4-6岁', '8-12岁', '15-20岁', '25-32岁', '38-43岁', '48-53岁', '60-100岁']
genderList = ['男性', '女性']
mean = (78.4263377603, 87.7689143744, 114.895847746) # 模型训练时使用的均值,用于预处理ageList和genderList: 这些列表中的字符串顺序与模型输出的概率向量顺序一一对应。例如,genderNet输出一个长度为 2 的向量,如果第一个值最大,就对应genderList[0](男性),如果第二个值最大,就对应genderList[1](女性)。-
mean: 在将人脸图像输入到年龄和性别模型之前,需要进行标准化处理,即减去这个预定义的均值。这是因为模型在训练时也是用同样的方式处理数据的。
4. 自定义函数 getBoxes
def getBoxes(net, frame):frameHeight, frameWidth = frame.shape[:2] # 获取高度、宽度blob = cv2.dnn.blobFromImage(frame, scalefactor=1.0, size=(300, 300),mean=[104, 117, 123], swapRB=True, crop=False)net.setInput(blob) # 调用网络模型,输入图片进行人脸检测detections = net.forward() # 四维:批次,第一个表格,行数,列数faceBoxes = [] # faceBoxes存储检测到的人脸xx = detections.shape[2]for i in range(detections.shape[2]):# confidence中每一行保存了7个数据,第3个数据表示置信度,第4,5,6,7分别表示人脸归一化后的坐标位置confidence = detections[0, 0, i, 2]if confidence > 0.7: # 筛选一下,将置信度大于0.7侧保留,其余不要了x1 = int(detections[0, 0, i, 3] * frameWidth)y1 = int(detections[0, 0, i, 4] * frameHeight)x2 = int(detections[0, 0, i, 5] * frameWidth)y2 = int(detections[0, 0, i, 6] * frameHeight)faceBoxes.append([x1, y1, x2, y2]) # 人脸框的坐标# 绘制人脸框cv2.rectangle(frame, (x1, y1), (x2, y2),(0, 255, 0), int(round(frameHeight / 150)), lineType=6)# 返回绘制了人脸框的帧frame、人脸包围框faceBoxesreturn frame, faceBoxesdetections是一个 4D 张量,形状为(1, 1, N, 7),其中 N 是检测到的对象数量。- 每个检测到的对象由 7 个值描述:
[image_id, label, confidence, x1, y1, x2, y2]。 - 我们遍历所有检测结果,只保留置信度(
confidence)大于 0.7 的人脸,以过滤掉低可信度的检测。 - 将归一化的坐标(
x1, y1, x2, y2)乘以图像的实际宽高,得到像素坐标。 - 将人脸框坐标存入
faceBoxes列表。 - 使用
cv2.rectangle在原图上绘制绿色的人脸框。
5. 自定义函数 cv2AddChineseText
def cv2AddChineseText(img, text, position, textColor=(255, 0, 0), textSize=30):# 完善中文显示函数if (isinstance(img, np.ndarray)): # 判断是否OpenCV图片类型img = Image.fromarray(cv2.cvtColor(img, cv2.COLOR_BGR2RGB))# 创建一个可以在给定图像上绘图的对象draw = ImageDraw.Draw(img)# 字体的格式fontStyle = ImageFont.truetype("simsun.ttc", textSize, encoding="utf-8")# 绘制文本draw.text(position, text, textColor, font=fontStyle)# 转换回OpenCV格式return cv2.cvtColor(np.asarray(img), cv2.COLOR_RGB2BGR)- 格式转换:
img = Image.fromarray(cv2.cvtColor(img, cv2.COLOR_BGR2RGB))- 将 OpenCV 的 BGR 格式图像转换为 PIL 库可以处理的 RGB 格式,并创建一个 PIL
Image对象。
- 将 OpenCV 的 BGR 格式图像转换为 PIL 库可以处理的 RGB 格式,并创建一个 PIL
- 创建绘图对象:
draw = ImageDraw.Draw(img)。 - 加载中文字体:
fontStyle = ImageFont.truetype("simsun.ttc", textSize, encoding="utf-8")。simsun.ttc是宋体字库,通常在 Windows 系统中存在。你需要确保这个字体文件路径是正确的,否则会报错。在 Linux 或 macOS 上,你需要指定一个已安装的中文字体路径,例如/usr/share/fonts/opentype/noto/NotoSansCJK-Regular.ttc。
- 绘制文本:
draw.text(position, text, textColor, font=fontStyle)。 - 格式转回:
return cv2.cvtColor(np.asarray(img), cv2.COLOR_RGB2BGR)。- 将绘制好文本的 PIL
Image对象转回 NumPy 数组,再将颜色通道从 RGB 转回 BGR,以便 OpenCV 后续处理和显示。
- 将绘制好文本的 PIL
6. 主程序:视频捕获与实时处理
cap = cv2.VideoCapture(0)  # 装载摄像头
while True:_, frame = cap.read()frame = cv2.flip(frame, flipCode=1)  # 镜像处理# 获取人脸包围框、绘制人脸包围框(可能多个)frame, faceBoxes = getBoxes(faceNet, frame)if not faceBoxes:  # 没有人脸时检测下一帧,后续循环操作不再继续。print("当前镜头中没有人")continue# 遍历每一个人脸包围框for faceBox in faceBoxes:# 处理frame,将其处理为符合DNN输入的格式x1, y1, x2, y2 = faceBoxface = frame[y1:y2, x1:x2]blob = cv2.dnn.blobFromImage(face, 1.0, (227, 227), mean)  # 模型输入为227*227,参考论文# 调用模型,预测性别genderNet.setInput(blob)genderOuts = genderNet.forward()gender = genderList[genderOuts[0].argmax()]# 调用模型,预测年龄ageNet.setInput(blob)ageOuts = ageNet.forward()age = ageList[ageOuts[0].argmax()]result = "{},{}".format(gender, age)  # 格式化文本(年龄、性别)frame = cv2AddChineseText(frame, result, position=(x1, y1 - 30))  # 输出中文性别和年龄cv2.imshow("result", frame)# cv2.imshow("face", face)if cv2.waitKey(1) == 27:  # 按下Esc键,退出程序break
cv2.destroyAllWindows()
cap.release()
二、总结
实现表情识别+疲劳检测+性别年龄预测
import numpy as np
import dlib
import cv2
from sklearn.metrics.pairwise import euclidean_distances
from PIL import Image, ImageDraw, ImageFont# 年龄性别检测
faceProto = "opencv_face_detector.pbtxt"
faceModel = "opencv_face_detector_uint8.pb"
ageProto = "deploy_age.prototxt"
ageModel = "age_net.caffemodel"
genderProto = "deploy_gender.prototxt"
genderModel = "gender_net.caffemodel"
# 加载网络
ageNet = cv2.dnn.readNet(ageModel, ageProto)  # 模型的权重参数、模型的配置,年龄
genderNet = cv2.dnn.readNet(genderModel, genderProto)  # 性别
faceNet = cv2.dnn.readNet(faceModel, faceProto)  # 人脸
# ===========变量初始化=============
# 年龄段和性别
ageList = ['0-2岁', '4-6岁', '8-12岁', '15-20岁', '25-32岁', '38-43岁', '48-53岁', '60-100岁']
genderList = ['男性', '女性']
mean = (78.4263377603, 87.7689143744, 114.895847746)  # 模型均值def eye_aspect_ratio(eye):# 计算眼睛纵横比A = euclidean_distances(eye[1].reshape(1, 2), eye[5].reshape(1, 2))B = euclidean_distances(eye[2].reshape(1, 2), eye[4].reshape(1, 2))C = euclidean_distances(eye[0].reshape(1, 2), eye[3].reshape(1, 2))ear = ((A + B) / 2.0) / C  # 纵横比return eardef cv2AddChineseText(img, text, position, textColor=(255, 0, 0), textSize=30):# 完善中文显示函数if (isinstance(img, np.ndarray)):  # 判断是否OpenCV图片类型img = Image.fromarray(cv2.cvtColor(img, cv2.COLOR_BGR2RGB))# 创建一个可以在给定图像上绘图的对象draw = ImageDraw.Draw(img)# 字体的格式fontStyle = ImageFont.truetype("simsun.ttc", textSize, encoding="utf-8")# 绘制文本draw.text(position, text, textColor, font=fontStyle)# 转换回OpenCV格式return cv2.cvtColor(np.asarray(img), cv2.COLOR_RGB2BGR)def drawEye(eye):  # 绘制眼眶凸包eyeHull = cv2.convexHull(eye)cv2.drawContours(frame, [eyeHull], -1, color=(0, 255, 0), thickness=-1)# 计算嘴的宽高比
def MAR(shape):A = euclidean_distances(shape[50].reshape(1, 2), shape[58].reshape(1, 2))B = euclidean_distances(shape[51].reshape(1, 2), shape[57].reshape(1, 2))C = euclidean_distances(shape[52].reshape(1, 2), shape[56].reshape(1, 2))D = euclidean_distances(shape[48].reshape(1, 2), shape[54].reshape(1, 2))return ((A + B + C) / 3) / D# 计算嘴宽度、脸颊宽度的比值
def MJR(shape):M = euclidean_distances(shape[48].reshape(1, 2), shape[54].reshape(1, 2))  # 嘴宽度J = euclidean_distances(shape[3].reshape(1, 2), shape[13].reshape(1, 2))  # 下颌的宽度return M / Jdef getBoxes(net, frame):frameHeight, frameWidth = frame.shape[:2]  # 获取高度、宽度blob = cv2.dnn.blobFromImage(frame, scalefactor=1.0, size=(300, 300),mean=[104, 117, 123], swapRB=True, crop=False)net.setInput(blob)  # 调用网络模型,输入图片进行人脸检测detections = net.forward()  # 四维:批次,第一个表格,行数,列数faceBoxes = []  # faceBoxes存储检测到的人脸xx = detections.shape[2]for i in range(detections.shape[2]):# confidence中每一行保存了7个数据,第3个数据表示置信度,第4,5,6,7分别表示人脸归一化后的坐标位置confidence = detections[0, 0, i, 2]if confidence > 0.7:  # 筛选一下,将置信度大于0.7侧保留,其余不要了x1 = int(detections[0, 0, i, 3] * frameWidth)y1 = int(detections[0, 0, i, 4] * frameHeight)x2 = int(detections[0, 0, i, 5] * frameWidth)y2 = int(detections[0, 0, i, 6] * frameHeight)faceBoxes.append([x1, y1, x2, y2])  # 人脸框的坐标# 绘制人脸框cv2.rectangle(frame, (x1, y1), (x2, y2),(0, 255, 0), int(round(frameHeight / 150)), lineType=6)# 返回绘制了人脸框的帧frame、人脸包围框faceBoxesreturn frame, faceBoxesCOUNTER = 0  # 闭眼持续次数统计
# 上疲劳下微笑
detector = dlib.get_frontal_face_detector()  # 构造脸部位置检测器
predictor = dlib.shape_predictor("shape_predictor_68_face_landmarks.dat")  # 读取人脸关键点定位模型cap = cv2.VideoCapture(0)
while True:_, frame = cap.read()frame = cv2.flip(frame, flipCode=1)  # 镜像处理# 获取人脸包围框、绘制人脸包围框(可能多个)frame, faceBoxes = getBoxes(faceNet, frame)if not faceBoxes:  # 没有人脸时检测下一帧,后续循环操作不再继续。print("当前镜头中没有人")continue# 遍历每一个人脸包围框for faceBox in faceBoxes:# 处理frame,将其处理为符合DNN输入的格式x1, y1, x2, y2 = faceBoxface = frame[y1:y2, x1:x2]blob = cv2.dnn.blobFromImage(face, 1.0, (227, 227), mean)  # 模型输入为227*227,参考论文# 调用模型,预测性别genderNet.setInput(blob)genderOuts = genderNet.forward()gender = genderList[genderOuts[0].argmax()]# 调用模型,预测年龄ageNet.setInput(blob)ageOuts = ageNet.forward()age = ageList[ageOuts[0].argmax()]result = "{},{}".format(gender, age)  # 格式化文本(年龄、性别)frame = cv2AddChineseText(frame, result, position=(x1, y1 - 30))  # 输出中文性别和年龄faces = detector(frame, 0)  # 获取人脸for face in faces:  # 循环遍历每一个人脸shape = predictor(frame, face)  # 获取关键点# 将关键点转换为坐标(x,y)的形式shape = np.array([[p.x, p.y] for p in shape.parts()])rightEye = shape[36:42]  # 右眼leftEye = shape[42:48]  # 左眼rightEAR = eye_aspect_ratio(rightEye)leftEAR = eye_aspect_ratio(leftEye)ear = (leftEAR + rightEAR) / 2.0if ear < 0.3:COUNTER += 1if COUNTER >= 50:frame = cv2AddChineseText(frame, text="!!!危险!!!", position=(250, 250))else:COUNTER = 0drawEye(leftEye)drawEye(rightEye)info = f"EAR: {ear[0][0]:.2f}"frame = cv2AddChineseText(frame, info, position=(0, 30))mar = MAR(shape)  # 计算嘴部的宽高比mjr = MJR(shape)  # 计算"嘴宽/脸颊宽"result = "正常"  # 默认是正常表情print("mar", mar, "mjr", mjr)  # 测试一下实际值,可以根据该值确定if mar > 0.5:  # 可更具项目要求调整阈值。result = "大笑"elif mjr > 0.45:  # 超过阈值为微笑result = "微笑"# frame = cv2AddChineseText(frame, result, (50, 100))#输出中文# cv2.putText()#输出英文mouthHull = cv2.convexHull(shape[48:61])  # 嘴型构造凸包frame = cv2AddChineseText(frame, result, mouthHull[0, 0])  # 多人脸cv2.drawContours(frame, [mouthHull], -1, color=(0, 255, 0), thickness=1)cv2.imshow("Frame", frame)if cv2.waitKey(1) == 27:break
cv2.destroyAllWindows()
cap.release()