极简 Go 语言教程:从 Java 开发者视角 3 小时入门实战
为什么 Java 开发者要学 Go?
在云原生时代,Go 语言已成为容器编排、微服务架构和高性能后端的首选语言之一。作为 Java 开发者,你可能已经习惯了 JVM 的强大生态,但在面对高并发、低延迟的场景时,Go 的轻量级线程(goroutine)和原生并发模型展现出独特优势。
本文专为 Java 开发者设计,通过对比你熟悉的 Java 语法和编程模式,快速掌握 Go 语言核心特性。我们将跳过 Hello World 式的基础,直接深入实战开发中最常用的 Go 语言特性,让你在最短时间内具备 Go 项目开发能力。
环境搭建与开发工具
安装 Go
Go 语言官网提供了各平台的安装包,最新稳定版本为 1.22.5(截至 2025 年 9 月):
# Linux系统示例
wget https://dl.google.com/go/go1.22.5.linux-amd64.tar.gz
sudo tar -C /usr/local -xzf go1.22.5.linux-amd64.tar.gz
echo 'export PATH=$PATH:/usr/local/go/bin' >> ~/.bashrc
source ~/.bashrc# 验证安装
go version
推荐开发工具
- GoLand:JetBrains 专为 Go 开发的 IDE,提供卓越的代码提示和调试功能
- VS Code + Go 插件:轻量级选择,适合习惯 VS Code 的开发者
项目结构
Go 项目结构与 Maven 项目有显著差异,标准布局如下:
myproject/
├── go.mod      // 类似pom.xml,声明依赖和模块信息
├── go.sum      // 依赖校验信息
├── main.go     // 程序入口
├── internal/   // 私有代码,不对外暴露
│   └── utils/  // 内部工具包
└── pkg/        // 可对外复用的代码└── api/    // API相关代码
基础语法对比
变量声明与初始化
Java 中我们这样声明变量:
import lombok.extern.slf4j.Slf4j;@Slf4j
public class VariableDemo {public static void main(String[] args) {// 声明并初始化String message = "Hello Java";int count = 10;boolean flag = true;// 先声明后初始化double price;price = 99.99;log.info("Message: {}", message);}
}
Go 语言提供了更简洁的方式:
package mainimport "fmt"func main() {// 声明并初始化(类型推断)message := "Hello Go"count := 10flag := true// 先声明后初始化(显式类型)var price float64price = 99.99fmt.Printf("Message: %s\n", message)
}
核心差异:
- Go 使用
:=进行短变量声明,自动推断类型 - Go 变量声明后默认初始化(数值类型为 0,字符串为空,布尔为 false)
- Go 没有
public/private关键字,通过首字母大小写控制可见性(大写导出,小写私有)
基本数据类型
Go 的基本数据类型与 Java 有相似之处,但也有重要区别:
package mainimport "fmt"func main() {// 整数类型(明确长度)var a int8 = 127    // 8位有符号整数var b uint16 = 65535 // 16位无符号整数var c int = 1000    // 取决于系统架构的有符号整数// 浮点类型var pi float64 = 3.1415926535// 布尔类型isActive := true// 字符串(默认UTF-8编码)name := "Go语言"fmt.Printf("Type of name: %T, Value: %s\n", name, name)
}
与 Java 对比:
- Go 的整数类型有明确长度(int8, int16, int32, int64),Java 的 int 固定 32 位
- Go 的
rune类型对应 Java 的char,但用于表示 Unicode 码点 - Go 字符串是不可变的字节序列,与 Java 类似,但原生支持 UTF-8
控制流语句
条件语句
Java 中的 if-else:
import lombok.extern.slf4j.Slf4j;@Slf4j
public class IfDemo {public static void main(String[] args) {int score = 85;if (score >= 90) {log.info("优秀");} else if (score >= 60) {log.info("及格");} else {log.info("不及格");}}
}
Go 中的对应实现:
package mainimport "fmt"func main() {score := 85if score >= 90 {fmt.Println("优秀")} else if score >= 60 {fmt.Println("及格")} else {fmt.Println("不及格")}// Go特有的if初始化语句if num := 10; num%2 == 0 {fmt.Println("偶数")}
}
注意:Go 的 if 语句条件不需要括号,但必须有大括号,即使只有一行代码。
循环语句
Java 的 for 循环:
import lombok.extern.slf4j.Slf4j;@Slf4j
public class LoopDemo {public static void main(String[] args) {// 普通for循环for (int i = 0; i < 5; i++) {log.info("i: {}", i);}// 增强for循环String[] fruits = {"苹果", "香蕉", "橙子"};for (String fruit : fruits) {log.info("水果: {}", fruit);}}
}
Go 的循环语句更简洁,只有 for 一种形式:
package mainimport "fmt"func main() {// 类似Java的普通for循环for i := 0; i < 5; i++ {fmt.Printf("i: %d\n", i)}// 类似while循环j := 0for j < 5 {fmt.Printf("j: %d\n", j)j++}// 无限循环// for {//     fmt.Println("无限循环")// }// 遍历数组/切片fruits := []string{"苹果", "香蕉", "橙子"}for index, fruit := range fruits {fmt.Printf("索引: %d, 水果: %s\n", index, fruit)}// 只需要值,忽略索引for _, fruit := range fruits {fmt.Printf("水果: %s\n", fruit)}
}
关键点:
- Go 没有
while和do-while,所有循环都用for实现 range关键字提供了便捷的集合遍历方式,类似 Java 的增强 for 循环- 可以使用
_忽略不需要的返回值(Go 不允许声明未使用的变量)
函数与方法
函数定义
Java 中的方法:
import lombok.extern.slf4j.Slf4j;
import org.springframework.util.StringUtils;@Slf4j
public class FunctionDemo {/*** 计算两个整数的和* * @param a 第一个整数* @param b 第二个整数* @return 两个整数的和*/public static int add(int a, int b) {return a + b;}/*** 拼接两个字符串* * @param s1 第一个字符串* @param s2 第二个字符串* @return 拼接后的字符串,如果输入为空则返回空字符串*/public static String concat(String s1, String s2) {if (!StringUtils.hasText(s1)) {return s2;}if (!StringUtils.hasText(s2)) {return s1;}return s1 + s2;}public static void main(String[] args) {int sum = add(3, 5);log.info("3 + 5 = {}", sum);String result = concat("Hello", "World");log.info("拼接结果: {}", result);}
}
Go 中的函数:
package mainimport "fmt"/*** 计算两个整数的和* * @param a 第一个整数* @param b 第二个整数* @return 两个整数的和* @author ken*/
func add(a int, b int) int {return a + b
}/*** 拼接两个字符串* * @param s1 第一个字符串* @param s2 第二个字符串* @return 拼接后的字符串,如果输入为空则返回空字符串* @author ken*/
func concat(s1, s2 string) string { // 参数类型相同时可以合并声明if s1 == "" {return s2}if s2 == "" {return s1}return s1 + s2
}func main() {sum := add(3, 5)fmt.Printf("3 + 5 = %d\n", sum)result := concat("Hello", "World")fmt.Printf("拼接结果: %s\n", result)
}
函数特性对比:
- Go 函数支持多返回值,这是与 Java 最显著的区别之一
- Go 函数参数可以合并声明类型,更简洁
- Go 没有
static关键字,函数是否属于类型取决于是否定义为方法
多返回值
Go 的多返回值特性非常适合处理函数执行结果和错误信息:
package mainimport "fmt"/*** 除法运算* * @param a 被除数* @param b 除数* @return 商和余数,以及可能的错误* @author ken*/
func divide(a, b float64) (float64, float64, error) {if b == 0 {return 0, 0, fmt.Errorf("除数不能为0")}quotient := a / bremainder := a % breturn quotient, remainder, nil
}func main() {// 正确调用quotient, remainder, err := divide(10, 3)if err != nil {fmt.Printf("错误: %v\n", err)} else {fmt.Printf("10 ÷ 3 = %v, 余数: %v\n", quotient, remainder)}// 错误调用q, r, e := divide(5, 0)if e != nil {fmt.Printf("错误: %v\n", e)} else {fmt.Printf("5 ÷ 0 = %v, 余数: %v\n", q, r)}// 忽略某些返回值res, _, _ := divide(8, 2)fmt.Printf("8 ÷ 2 = %v\n", res)
}
在 Java 中,我们通常需要用自定义对象或异常来实现类似功能,相比之下 Go 的多返回值更加直观:
import lombok.Data;
import lombok.extern.slf4j.Slf4j;@Slf4j
public class DivisionDemo {@Datapublic static class DivisionResult {private double quotient;private double remainder;}/*** 除法运算* * @param a 被除数* @param b 除数* @return 包含商和余数的对象* @throws IllegalArgumentException 当除数为0时抛出* @author ken*/public static DivisionResult divide(double a, double b) {if (b == 0) {throw new IllegalArgumentException("除数不能为0");}DivisionResult result = new DivisionResult();result.setQuotient(a / b);result.setRemainder(a % b);return result;}public static void main(String[] args) {try {DivisionResult result = divide(10, 3);log.info("10 ÷ 3 = {}, 余数: {}", result.getQuotient(), result.getRemainder());} catch (IllegalArgumentException e) {log.error("错误: {}", e.getMessage());}}
}
方法
Go 中的方法与函数类似,但方法是与特定类型关联的函数,类似于 Java 中的实例方法:
package mainimport "fmt"// 定义一个结构体,类似Java中的类
type Circle struct {Radius float64
}// 为Circle类型定义方法(值接收者)
func (c Circle) Area() float64 {return 3.14159 * c.Radius * c.Radius
}// 指针接收者,用于修改结构体内容
func (c *Circle) Scale(factor float64) {c.Radius *= factor
}func main() {circle := Circle{Radius: 5}fmt.Printf("圆的面积: %.2f\n", circle.Area())circle.Scale(2)fmt.Printf("缩放后的半径: %.2f\n", circle.Radius)fmt.Printf("缩放后的面积: %.2f\n", circle.Area())
}
与 Java 对比:
- Go 的方法定义需要指定接收者(receiver),类似 Java 中的
this - 值接收者与指针接收者的区别:值接收者操作副本,指针接收者操作原对象
- Go 没有类继承,但可以通过结构体嵌套实现类似功能
复合数据类型
数组与切片
Java 中的数组:
import lombok.extern.slf4j.Slf4j;
import org.springframework.util.CollectionUtils;import java.util.Arrays;
import java.util.List;@Slf4j
public class ArrayDemo {public static void main(String[] args) {// 固定长度数组int[] numbers = new int[5];numbers[0] = 1;numbers[1] = 2;// 初始化数组String[] fruits = {"苹果", "香蕉", "橙子"};log.info("水果数量: {}", fruits.length);// 转换为列表List<String> fruitList = Arrays.asList(fruits);if (!CollectionUtils.isEmpty(fruitList)) {for (String fruit : fruitList) {log.info("水果: {}", fruit);}}}
}
Go 中的数组和切片(更常用):
package mainimport "fmt"func main() {// 数组(固定长度)var numbers [5]intnumbers[0] = 1numbers[1] = 2fmt.Printf("数组长度: %d\n", len(numbers))// 初始化数组fruits := [3]string{"苹果", "香蕉", "橙子"}// 切片(动态长度,类似Java的ArrayList)var veggies []stringveggies = append(veggies, "胡萝卜")veggies = append(veggies, "黄瓜", "西红柿")fmt.Printf("蔬菜数量: %d\n", len(veggies))// 从数组创建切片fruitSlice := fruits[1:3] // 包含索引1,不包含索引3fmt.Println("水果切片:")for _, fruit := range fruitSlice {fmt.Printf("- %s\n", fruit)}// 切片容量与长度nums := make([]int, 3, 5) // 长度3,容量5nums[0] = 10nums[1] = 20nums[2] = 30fmt.Printf("nums长度: %d, 容量: %d\n", len(nums), cap(nums))nums = append(nums, 40)fmt.Printf("添加元素后 - 长度: %d, 容量: %d\n", len(nums), cap(nums))
}
核心概念:
- 数组长度固定,声明后不可变
- 切片是动态的,可以通过
append函数增长 - 切片有长度(当前元素数量)和容量(可容纳的元素数量)
- 当切片容量不足时,
append会自动扩容(通常翻倍)

映射(Map)
Java 中的 Map:
import com.google.common.collect.Maps;
import lombok.extern.slf4j.Slf4j;
import org.springframework.util.CollectionUtils;import java.util.Map;@Slf4j
public class MapDemo {public static void main(String[] args) {// 创建MapMap<String, Integer> scores = Maps.newHashMap();// 添加元素scores.put("张三", 90);scores.put("李四", 85);scores.put("王五", 95);// 检查是否包含键if (scores.containsKey("李四")) {log.info("李四的分数: {}", scores.get("李四"));}// 遍历Mapif (!CollectionUtils.isEmpty(scores)) {for (Map.Entry<String, Integer> entry : scores.entrySet()) {log.info("{}: {}", entry.getKey(), entry.getValue());}}// 删除元素scores.remove("王五");log.info("删除王五后,是否还存在: {}", scores.containsKey("王五"));}
}
Go 中的 Map:
package mainimport "fmt"func main() {// 创建Mapscores := make(map[string]int)// 或者直接初始化// scores := map[string]int{//     "张三": 90,//     "李四": 85,// }// 添加元素scores["张三"] = 90scores["李四"] = 85scores["王五"] = 95// 检查是否包含键if score, exists := scores["李四"]; exists {fmt.Printf("李四的分数: %d\n", score)}// 遍历Mapfor name, score := range scores {fmt.Printf("%s: %d\n", name, score)}// 删除元素delete(scores, "王五")if _, exists := scores["王五"]; !exists {fmt.Println("王五已被删除")}
}
Map 特性对比:
- Go 的 map 没有内置的排序,遍历顺序不固定
- Go 通过
value, exists := map[key]模式检查键是否存在 - Go 使用
delete内置函数删除元素 - 两者都不允许重复键,新值会覆盖旧值
结构体(Struct)
结构体是 Go 中实现数据封装的主要方式,类似 Java 中的类:
package mainimport "fmt"// 定义结构体
type User struct {ID       intUsername stringEmail    stringAge      int
}// 结构体方法
func (u User) Greet() string {return fmt.Sprintf("Hello, my name is %s", u.Username)
}// 指针接收者方法,用于修改结构体
func (u *User) UpdateEmail(newEmail string) {u.Email = newEmail
}func main() {// 创建结构体实例user1 := User{ID:       1,Username: "张三",Email:    "zhangsan@example.com",Age:      30,}// 访问字段fmt.Printf("用户名: %s, 年龄: %d\n", user1.Username, user1.Age)// 调用方法fmt.Println(user1.Greet())// 修改字段user1.UpdateEmail("new.zhangsan@example.com")fmt.Printf("更新后的邮箱: %s\n", user1.Email)// 匿名结构体(临时使用)tempUser := struct {Name  stringScore int}{Name:  "临时用户",Score: 95,}fmt.Printf("临时用户: %s, 分数: %d\n", tempUser.Name, tempUser.Score)
}
与 Java 类对比:
- 结构体没有构造函数,通常通过工厂函数创建实例
- 结构体字段默认是导出的(大写)或私有(小写)
- 结构体可以嵌套,实现类似继承的功能
- 没有
class关键字,结构体更轻量
面向对象特性
Go 不是纯粹的面向对象语言,它没有类和继承的概念,但通过结构体、接口和组合实现了类似的功能。
接口(Interface)
Java 中的接口:
import lombok.extern.slf4j.Slf4j;@Slf4j
public class InterfaceDemo {// 定义接口public interface Shape {double calculateArea();double calculatePerimeter();}// 实现接口public static class Circle implements Shape {private double radius;public Circle(double radius) {this.radius = radius;}@Overridepublic double calculateArea() {return Math.PI * radius * radius;}@Overridepublic double calculatePerimeter() {return 2 * Math.PI * radius;}}public static class Rectangle implements Shape {private double width;private double height;public Rectangle(double width, double height) {this.width = width;this.height = height;}@Overridepublic double calculateArea() {return width * height;}@Overridepublic double calculatePerimeter() {return 2 * (width + height);}}public static void main(String[] args) {Shape circle = new Circle(5);log.info("圆面积: {}", circle.calculateArea());log.info("圆周长: {}", circle.calculatePerimeter());Shape rectangle = new Rectangle(4, 6);log.info("矩形面积: {}", rectangle.calculateArea());log.info("矩形周长: {}", rectangle.calculatePerimeter());}
}
Go 中的接口是隐式实现的,不需要显式声明:
package mainimport "fmt"// 定义接口
type Shape interface {CalculateArea() float64CalculatePerimeter() float64
}// 圆结构体
type Circle struct {Radius float64
}// 实现Shape接口(隐式)
func (c Circle) CalculateArea() float64 {return 3.14159 * c.Radius * c.Radius
}func (c Circle) CalculatePerimeter() float64 {return 2 * 3.14159 * c.Radius
}// 矩形结构体
type Rectangle struct {Width  float64Height float64
}// 实现Shape接口(隐式)
func (r Rectangle) CalculateArea() float64 {return r.Width * r.Height
}func (r Rectangle) CalculatePerimeter() float64 {return 2 * (r.Width + r.Height)
}// 接收Shape接口的函数
func PrintShapeInfo(s Shape) {fmt.Printf("面积: %.2f, 周长: %.2f\n", s.CalculateArea(), s.CalculatePerimeter())
}func main() {var shape Shapeshape = Circle{Radius: 5}fmt.Print("圆 - ")PrintShapeInfo(shape)shape = Rectangle{Width: 4, Height: 6}fmt.Print("矩形 - ")PrintShapeInfo(shape)
}
接口特性对比:
- Go 的接口实现是隐式的,不需要
implements关键字 - Go 接口只定义方法签名,不包含字段
- Go 支持空接口
interface{},可以表示任何类型,类似 Java 的Object - Go 接口可以嵌套组合成新的接口
组合(Composition)
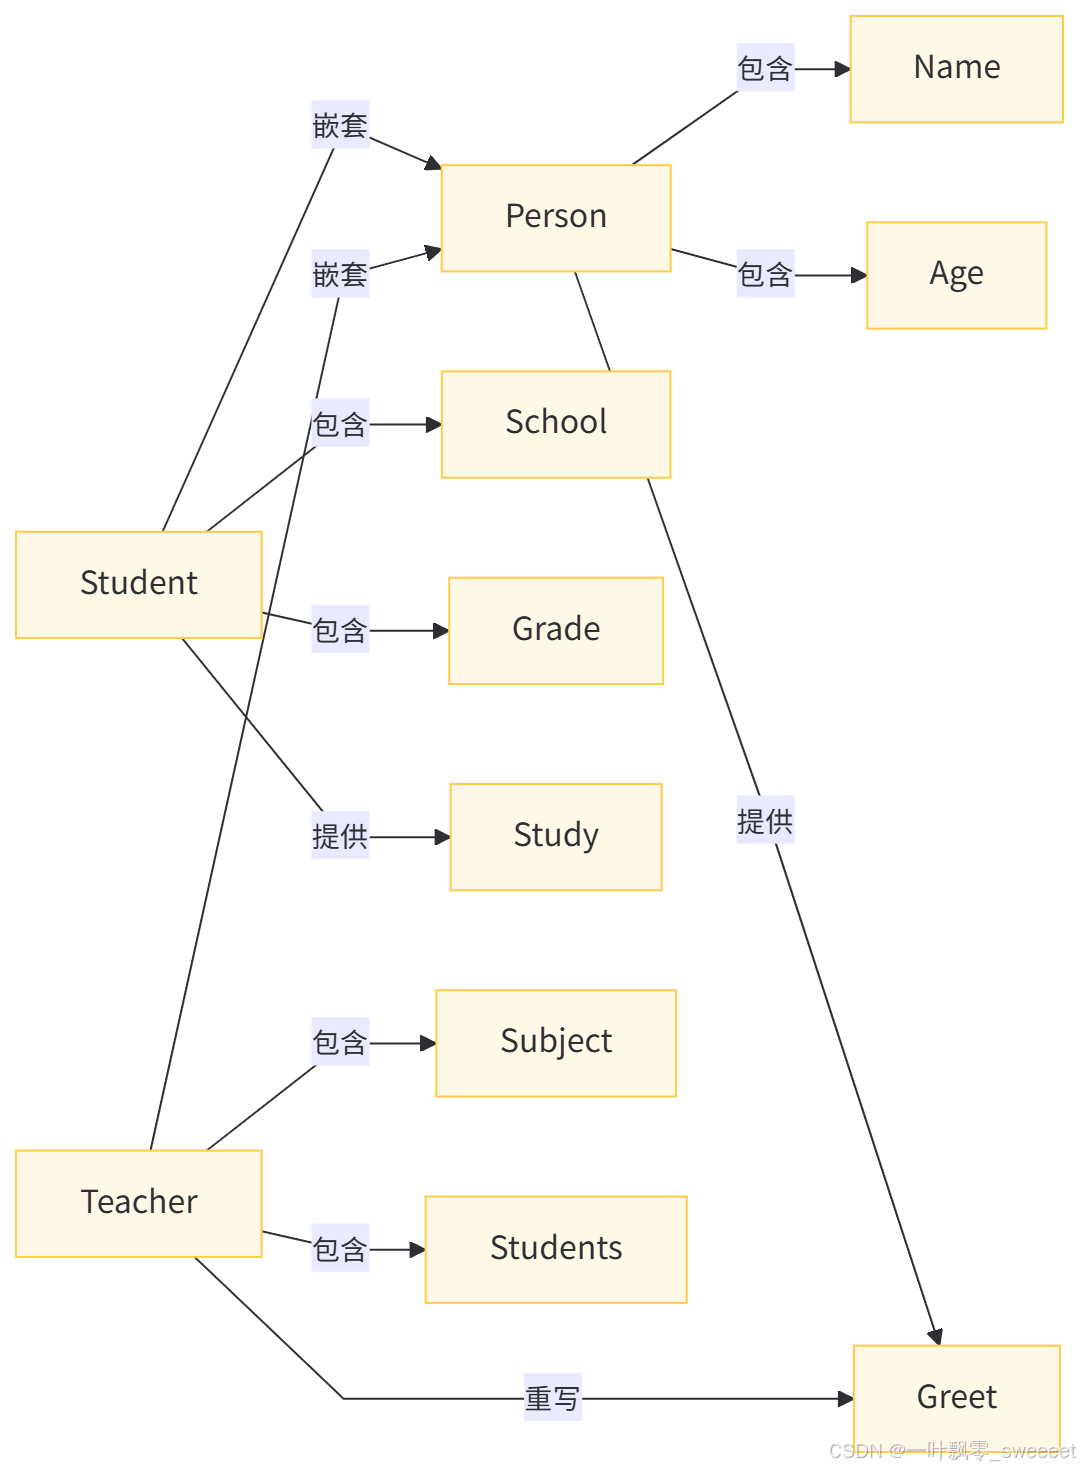
Go 通过结构体嵌套实现代码复用,替代了传统的继承:
package mainimport "fmt"// 基础结构体
type Person struct {Name stringAge  int
}func (p Person) Greet() string {return fmt.Sprintf("Hello, I'm %s", p.Name)
}// 学生结构体,嵌套Person
type Student struct {Person  // 匿名嵌套,获得Person的字段和方法School  stringGrade   int
}// 教师结构体,嵌套Person
type Teacher struct {Person   // 匿名嵌套Subject  stringStudents int
}// 为Student添加新方法
func (s Student) Study() string {return fmt.Sprintf("%s is studying at %s", s.Name, s.School)
}// 重写Person的Greet方法
func (t Teacher) Greet() string {return fmt.Sprintf("Hello, I'm %s, teaching %s", t.Name, t.Subject)
}func main() {student := Student{Person: Person{Name: "张三",Age:  15,},School: "第一中学",Grade:  9,}fmt.Println(student.Greet())  // 继承自Personfmt.Println(student.Study())  // Student自己的方法fmt.Printf("年龄: %d\n", student.Age)  // 继承自Person的字段teacher := Teacher{Person: Person{Name: "李四",Age:  35,},Subject:  "数学",Students: 45,}fmt.Println(teacher.Greet())  // 重写的Greet方法fmt.Printf("教授科目: %s\n", teacher.Subject)
}
与 Java 继承对比:
- Go 使用组合而非继承实现代码复用
- 嵌套结构体的字段和方法可以直接访问,类似继承
- 可以重写嵌套结构体的方法(同名方法会覆盖)
- 可以嵌套多个结构体,实现多 "继承" 效果
错误处理
Go 的错误处理机制与 Java 的异常处理有很大不同,Go 采用返回值方式处理错误,而非异常抛出。
基本错误处理
Java 的异常处理:
import lombok.extern.slf4j.Slf4j;
import org.springframework.util.StringUtils;@Slf4j
public class ErrorHandlingDemo {/*** 除法运算* * @param a 被除数* @param b 除数* @return 商* @throws ArithmeticException 当除数为0时抛出* @author ken*/public static double divide(double a, double b) {if (b == 0) {throw new ArithmeticException("除数不能为0");}return a / b;}/*** 用户登录* * @param username 用户名* @param password 密码* @return 登录是否成功* @throws IllegalArgumentException 当用户名或密码为空时抛出* @author ken*/public static boolean login(String username, String password) {if (!StringUtils.hasText(username)) {throw new IllegalArgumentException("用户名不能为空");}if (!StringUtils.hasText(password)) {throw new IllegalArgumentException("密码不能为空");}// 实际登录逻辑...return "admin".equals(username) && "password".equals(password);}public static void main(String[] args) {try {double result = divide(10, 0);log.info("结果: {}", result);} catch (ArithmeticException e) {log.error("除法错误: {}", e.getMessage());}try {boolean success = login("", "123456");log.info("登录成功: {}", success);} catch (IllegalArgumentException e) {log.error("登录错误: {}", e.getMessage());}}
}
Go 的错误处理:
package mainimport ("errors""fmt"
)/*** 除法运算* * @param a 被除数* @param b 除数* @return 商和可能的错误* @author ken*/
func divide(a, b float64) (float64, error) {if b == 0 {return 0, errors.New("除数不能为0")}return a / b, nil
}/*** 用户登录* * @param username 用户名* @param password 密码* @return 登录是否成功和可能的错误* @author ken*/
func login(username, password string) (bool, error) {if username == "" {return false, errors.New("用户名不能为空")}if password == "" {return false, errors.New("密码不能为空")}// 实际登录逻辑...return username == "admin" && password == "password", nil
}func main() {result, err := divide(10, 0)if err != nil {fmt.Printf("除法错误: %v\n", err)} else {fmt.Printf("结果: %v\n", result)}success, err := login("", "123456")if err != nil {fmt.Printf("登录错误: %v\n", err)} else {fmt.Printf("登录成功: %v\n", success)}
}
错误处理对比:
- Go 使用返回值传递错误,Java 使用异常抛出
- Go 错误处理更显式,强制开发者处理可能的错误
- Go 1.13 + 支持错误包装(
fmt.Errorf("...: %w", err))和错误判断(errors.Is、errors.As) - Java 的异常可以中断程序执行流程,Go 的错误需要显式检查
自定义错误类型
Go 允许定义自定义错误类型,以便更精确地处理不同错误情况:
package mainimport ("fmt"
)// 自定义错误类型
type ValidationError struct {Field   stringMessage string
}// 实现error接口
func (e *ValidationError) Error() string {return fmt.Sprintf("字段 %s 验证失败: %s", e.Field, e.Message)
}type DatabaseError struct {Operation stringErr       error // 包装的底层错误
}func (e *DatabaseError) Error() string {return fmt.Sprintf("数据库操作 %s 失败: %v", e.Operation, e.Err)
}// 模拟用户验证
func validateUser(username, email string) error {if username == "" {return &ValidationError{Field: "username", Message: "不能为空"}}if len(username) < 3 {return &ValidationError{Field: "username", Message: "长度不能小于3"}}if email == "" {return &ValidationError{Field: "email", Message: "不能为空"}}if len(email) < 5 || email[len(email)-4:] != ".com" {return &ValidationError{Field: "email", Message: "格式不正确"}}return nil
}// 模拟数据库操作
func saveUser(username, email string) error {// 模拟数据库错误if username == "admin" {return &DatabaseError{Operation: "saveUser",Err:       fmt.Errorf("用户名 %s 已存在", username),}}return nil
}func main() {username := "ad"email := "test"// 验证用户if err := validateUser(username, email); err != nil {// 判断错误类型if valErr, ok := err.(*ValidationError); ok {fmt.Printf("验证错误: %s\n", valErr.Error())} else {fmt.Printf("未知错误: %v\n", err)}return}// 保存用户if err := saveUser(username, email); err != nil {if dbErr, ok := err.(*DatabaseError); ok {fmt.Printf("数据库错误: %s\n", dbErr.Error())fmt.Printf("底层错误: %v\n", dbErr.Err)} else {fmt.Printf("未知错误: %v\n", err)}return}fmt.Println("用户保存成功")
}
并发编程
Go 语言的并发模型是其最强大的特性之一,相比 Java 的线程模型更加轻量和高效。
Goroutine 基础
Java 的线程:
import lombok.extern.slf4j.Slf4j;@Slf4j
public class ThreadDemo {public static void printNumbers(String threadName) {for (int i = 1; i <= 5; i++) {log.info("{}: {}", threadName, i);try {Thread.sleep(100);} catch (InterruptedException e) {log.error("线程被中断", e);Thread.currentThread().interrupt();return;}}}public static void main(String[] args) {log.info("主线程开始");// 创建并启动线程Thread thread1 = new Thread(() -> printNumbers("线程1"));Thread thread2 = new Thread(() -> printNumbers("线程2"));thread1.start();thread2.start();// 等待线程完成try {thread1.join();thread2.join();} catch (InterruptedException e) {log.error("主线程被中断", e);}log.info("主线程结束");}
}
Go 的 Goroutine:
package mainimport ("fmt""time"
)func printNumbers(name string) {for i := 1; i <= 5; i++ {fmt.Printf("%s: %d\n", name, i)time.Sleep(100 * time.Millisecond)}
}func main() {fmt.Println("主线程开始")// 启动goroutine(在函数调用前加go关键字)go printNumbers("Goroutine 1")go printNumbers("Goroutine 2")// 等待goroutine完成(实际开发中使用sync.WaitGroup)time.Sleep(1 * time.Second)fmt.Println("主线程结束")
}
Goroutine 与线程对比:
- Goroutine 启动成本远低于线程(KB 级内存 vs MB 级)
- 一个程序可以轻松创建数万甚至数十万 Goroutine
- Goroutine 由 Go 运行时调度,而非操作系统
- Goroutine 切换成本低,效率更高
同步与通信
Go 提倡 "不要通过共享内存来通信,而要通过通信来共享内存",这是与 Java 线程模型的重要区别。
使用 WaitGroup 等待 Goroutine
package mainimport ("fmt""sync""time"
)func worker(id int, wg *sync.WaitGroup) {// 通知WaitGroup工作已完成defer wg.Done()fmt.Printf("工作者 %d 开始工作\n", id)time.Sleep(time.Second) // 模拟工作fmt.Printf("工作者 %d 完成工作\n", id)
}func main() {var wg sync.WaitGroup// 启动5个工作者for i := 1; i <= 5; i++ {wg.Add(1) // 增加等待计数go worker(i, &wg)}// 等待所有工作者完成wg.Wait()fmt.Println("所有工作都已完成")
}
通道(Channel)通信
通道是 Goroutine 之间通信的主要方式:
package mainimport "fmt"// 计算平方并发送到通道
func square(num int, ch chan int) {result := num * numch <- result // 发送结果到通道
}func main() {// 创建一个整数通道results := make(chan int, 3) // 带缓冲的通道,容量3// 启动多个goroutine计算平方go square(2, results)go square(3, results)go square(4, results)// 从通道接收结果res1 := <-resultsres2 := <-resultsres3 := <-resultsfmt.Printf("2² = %d\n", res1)fmt.Printf("3² = %d\n", res2)fmt.Printf("4² = %d\n", res3)close(results) // 关闭通道
}
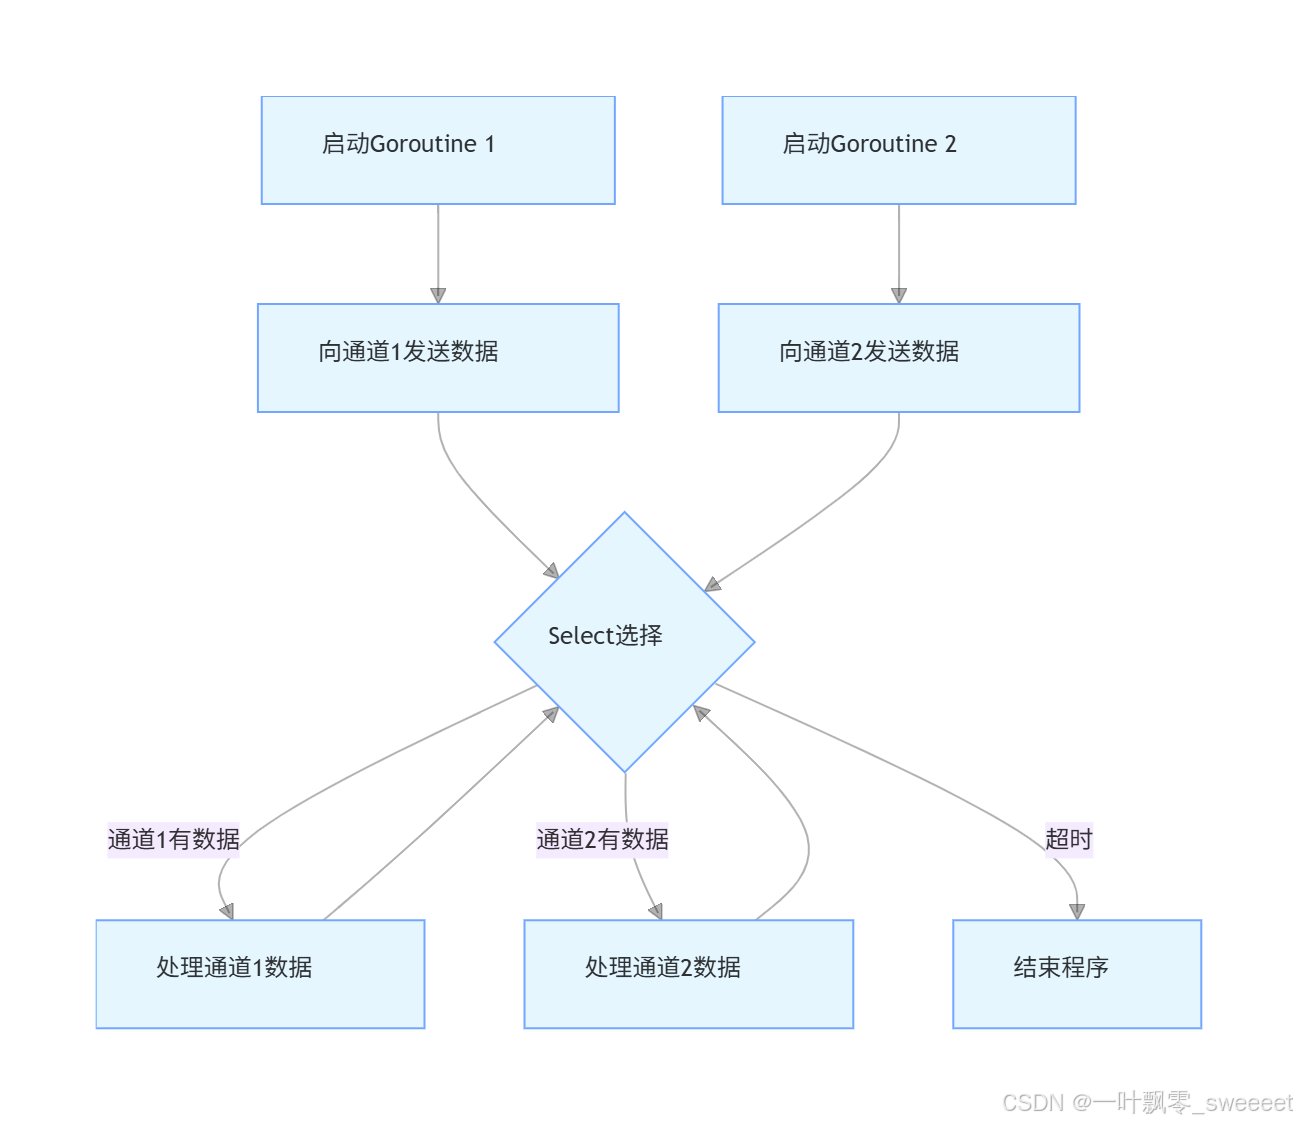
带选择的通道操作
使用select可以同时处理多个通道操作:
package mainimport ("fmt""time"
)func produce(ch chan int, id int) {for i := 0; i < 3; i++ {ch <- id*10 + itime.Sleep(time.Millisecond * 500)}close(ch)
}func main() {ch1 := make(chan int)ch2 := make(chan int)go produce(ch1, 1)go produce(ch2, 2)// 使用select同时监听两个通道for {select {case num, ok := <-ch1:if !ok {ch1 = nil // 通道关闭后设置为nil,不再接收break}fmt.Printf("从通道1接收: %d\n", num)case num, ok := <-ch2:if !ok {ch2 = nil // 通道关闭后设置为nil,不再接收break}fmt.Printf("从通道2接收: %d\n", num)case <-time.After(1 * time.Second):fmt.Println("超时")return}// 检查是否所有通道都已关闭if ch1 == nil && ch2 == nil {break}}fmt.Println("所有数据接收完毕")
}
互斥锁
虽然 Go 提倡使用通道通信,但在某些情况下仍需要使用互斥锁:
package mainimport ("fmt""sync""time"
)type Counter struct {value intmu    sync.Mutex // 互斥锁
}// 安全地增加计数器值
func (c *Counter) Increment() {c.mu.Lock()         // 加锁defer c.mu.Unlock() // 确保解锁c.value++
}// 安全地获取计数器值
func (c *Counter) GetValue() int {c.mu.Lock()defer c.mu.Unlock()return c.value
}func main() {var counter Countervar wg sync.WaitGroup// 启动10个goroutine,每个增加1000次for i := 0; i < 10; i++ {wg.Add(1)go func() {defer wg.Done()for j := 0; j < 1000; j++ {counter.Increment()time.Sleep(time.Nanosecond) // 增加并发冲突概率}}()}wg.Wait()fmt.Printf("最终计数: %d\n", counter.GetValue()) // 应该是10000
}
包管理与依赖
Go 的包管理经历了多个阶段,目前(Go 1.11+)使用go mod作为官方包管理工具,类似于 Java 的 Maven 或 Gradle。
初始化项目
# 创建项目目录
mkdir go-demo
cd go-demo# 初始化模块
go mod init github.com/yourusername/go-demo
这会创建go.mod文件,类似于pom.xml:
module github.com/yourusername/go-demogo 1.22
添加依赖
# 添加依赖
go get github.com/gin-gonic/gin@v1.9.1  # Web框架
go get github.com/go-sql-driver/mysql@v1.7.1  # MySQL驱动
go.mod文件会自动更新:
module github.com/yourusername/go-demogo 1.22require (github.com/gin-gonic/gin v1.9.1github.com/go-sql-driver/mysql v1.7.1
)
同时生成go.sum文件,记录依赖的校验和,确保依赖的完整性。
更新与移除依赖
# 更新依赖到最新版本
go get -u github.com/gin-gonic/gin# 更新到特定版本
go get github.com/gin-gonic/gin@v1.9.0# 移除未使用的依赖
go mod tidy
实战示例:RESTful API 服务
下面我们实现一个完整的 RESTful API 服务,对比 Java Spring Boot 和 Go Gin 框架的实现方式。
Java Spring Boot 实现
首先是 Maven 依赖(pom.xml):
<?xml version="1.0" encoding="UTF-8"?>
<project xmlns="http://maven.apache.org/POM/4.0.0" xmlns:xsi="http://www.w3.org/2001/XMLSchema-instance"xsi:schemaLocation="http://maven.apache.org/POM/4.0.0 https://maven.apache.org/xsd/maven-4.0.0.xsd"><modelVersion>4.0.0</modelVersion><parent><groupId>org.springframework.boot</groupId><artifactId>spring-boot-starter-parent</artifactId><version>3.2.5</version><relativePath/></parent><groupId>com.example</groupId><artifactId>user-api</artifactId><version>0.0.1-SNAPSHOT</version><name>user-api</name><description>User API with Spring Boot</description><properties><java.version>17</java.version></properties><dependencies><dependency><groupId>org.springframework.boot</groupId><artifactId>spring-boot-starter-web</artifactId></dependency><dependency><groupId>org.springframework.boot</groupId><artifactId>spring-boot-starter-data-jpa</artifactId></dependency><dependency><groupId>com.mysql</groupId><artifactId>mysql-connector-j</artifactId><scope>runtime</scope></dependency><dependency><groupId>org.projectlombok</groupId><artifactId>lombok</artifactId><version>1.18.30</version><scope>provided</scope></dependency><dependency><groupId>org.springdoc</groupId><artifactId>springdoc-openapi-starter-webmvc-ui</artifactId><version>2.3.0</version></dependency><dependency><groupId>com.baomidou</groupId><artifactId>mybatis-plus-boot-starter</artifactId><version>3.5.5</version></dependency><dependency><groupId>org.springframework.boot</groupId><artifactId>spring-boot-starter-test</artifactId><scope>test</scope></dependency></dependencies><build><plugins><plugin><groupId>org.springframework.boot</groupId><artifactId>spring-boot-maven-plugin</artifactId><configuration><excludes><exclude><groupId>org.projectlombok</groupId><artifactId>lombok</artifactId></exclude></excludes></configuration></plugin></plugins></build>
</project>
实体类:
import com.baomidou.mybatisplus.annotation.IdType;
import com.baomidou.mybatisplus.annotation.TableId;
import com.baomidou.mybatisplus.annotation.TableName;
import io.swagger.v3.oas.annotations.media.Schema;
import lombok.Data;import java.time.LocalDateTime;/*** 用户实体类** @author ken*/
@Data
@TableName("users")
@Schema(description = "用户实体")
public class User {@TableId(type = IdType.AUTO)@Schema(description = "用户ID")private Long id;@Schema(description = "用户名")private String username;@Schema(description = "邮箱")private String email;@Schema(description = "创建时间")private LocalDateTime createdAt;@Schema(description = "更新时间")private LocalDateTime updatedAt;
}
Mapper 接口:
import com.baomidou.mybatisplus.core.mapper.BaseMapper;
import com.example.userapi.entity.User;
import org.apache.ibatis.annotations.Mapper;/*** 用户数据访问接口** @author ken*/
@Mapper
public interface UserMapper extends BaseMapper<User> {
}
Service 接口与实现:
import com.baomidou.mybatisplus.extension.service.IService;
import com.example.userapi.entity.User;/*** 用户服务接口** @author ken*/
public interface UserService extends IService<User> {
}
import com.baomidou.mybatisplus.extension.service.impl.ServiceImpl;
import com.example.userapi.entity.User;
import com.example.userapi.mapper.UserMapper;
import com.example.userapi.service.UserService;
import org.springframework.stereotype.Service;import java.time.LocalDateTime;/*** 用户服务实现类** @author ken*/
@Service
public class UserServiceImpl extends ServiceImpl<UserMapper, User> implements UserService {@Overridepublic boolean save(User user) {// 设置创建时间和更新时间if (user.getId() == null) {user.setCreatedAt(LocalDateTime.now());}user.setUpdatedAt(LocalDateTime.now());return super.save(user);}
}
控制器:
import com.baomidou.mybatisplus.core.conditions.query.QueryWrapper;
import com.example.userapi.entity.User;
import com.example.userapi.service.UserService;
import io.swagger.v3.oas.annotations.Operation;
import io.swagger.v3.oas.annotations.Parameter;
import io.swagger.v3.oas.annotations.media.Content;
import io.swagger.v3.oas.annotations.media.Schema;
import io.swagger.v3.oas.annotations.responses.ApiResponse;
import io.swagger.v3.oas.annotations.responses.ApiResponses;
import io.swagger.v3.oas.annotations.tags.Tag;
import lombok.RequiredArgsConstructor;
import lombok.extern.slf4j.Slf4j;
import org.springframework.http.HttpStatus;
import org.springframework.http.ResponseEntity;
import org.springframework.util.StringUtils;
import org.springframework.web.bind.annotation.*;import java.util.List;/*** 用户控制器** @author ken*/
@RestController
@RequestMapping("/api/users")
@RequiredArgsConstructor
@Slf4j
@Tag(name = "用户管理", description = "用户CRUD操作")
public class UserController {private final UserService userService;@Operation(summary = "获取所有用户")@ApiResponses(value = {@ApiResponse(responseCode = "200", description = "成功获取用户列表",content = {@Content(mediaType = "application/json",schema = @Schema(implementation = User.class))})})@GetMappingpublic ResponseEntity<List<User>> getAllUsers(@Parameter(description = "用户名模糊查询") @RequestParam(required = false) String username) {log.info("获取用户列表,用户名筛选: {}", username);QueryWrapper<User> queryWrapper = new QueryWrapper<>();if (StringUtils.hasText(username)) {queryWrapper.like("username", username);}List<User> users = userService.list(queryWrapper);return ResponseEntity.ok(users);}@Operation(summary = "根据ID获取用户")@ApiResponses(value = {@ApiResponse(responseCode = "200", description = "找到用户",content = {@Content(mediaType = "application/json",schema = @Schema(implementation = User.class))}),@ApiResponse(responseCode = "404", description = "用户不存在")})@GetMapping("/{id}")public ResponseEntity<User> getUserById(@Parameter(description = "用户ID") @PathVariable Long id) {log.info("获取用户,ID: {}", id);return userService.getById(id).map(ResponseEntity::ok).orElseGet(() -> ResponseEntity.notFound().build());}@Operation(summary = "创建新用户")@ApiResponses(value = {@ApiResponse(responseCode = "201", description = "用户创建成功",content = {@Content(mediaType = "application/json",schema = @Schema(implementation = User.class))}),@ApiResponse(responseCode = "400", description = "无效的请求数据")})@PostMappingpublic ResponseEntity<User> createUser(@Parameter(description = "用户信息") @RequestBody User user) {log.info("创建用户: {}", user.getUsername());if (!StringUtils.hasText(user.getUsername()) || !StringUtils.hasText(user.getEmail())) {return ResponseEntity.badRequest().build();}userService.save(user);return ResponseEntity.status(HttpStatus.CREATED).body(user);}@Operation(summary = "更新用户信息")@ApiResponses(value = {@ApiResponse(responseCode = "200", description = "用户更新成功",content = {@Content(mediaType = "application/json",schema = @Schema(implementation = User.class))}),@ApiResponse(responseCode = "400", description = "无效的请求数据"),@ApiResponse(responseCode = "404", description = "用户不存在")})@PutMapping("/{id}")public ResponseEntity<User> updateUser(@Parameter(description = "用户ID") @PathVariable Long id,@Parameter(description = "更新的用户信息") @RequestBody User user) {log.info("更新用户,ID: {}", id);if (!userService.existsById(id)) {return ResponseEntity.notFound().build();}if (!StringUtils.hasText(user.getUsername()) || !StringUtils.hasText(user.getEmail())) {return ResponseEntity.badRequest().build();}user.setId(id);userService.save(user);return ResponseEntity.ok(user);}@Operation(summary = "删除用户")@ApiResponses(value = {@ApiResponse(responseCode = "204", description = "用户删除成功"),@ApiResponse(responseCode = "404", description = "用户不存在")})@DeleteMapping("/{id}")public ResponseEntity<Void> deleteUser(@Parameter(description = "用户ID") @PathVariable Long id) {log.info("删除用户,ID: {}", id);if (!userService.existsById(id)) {return ResponseEntity.notFound().build();}userService.removeById(id);return ResponseEntity.noContent().build();}
}
主应用类:
import org.springframework.boot.SpringApplication;
import org.springframework.boot.autoconfigure.SpringBootApplication;/*** 用户API应用主类** @author ken*/
@SpringBootApplication
public class UserApiApplication {public static void main(String[] args) {SpringApplication.run(UserApiApplication.class, args);}
}
配置文件(application.properties):
# 服务器配置
server.port=8080# 数据库配置
spring.datasource.url=jdbc:mysql://localhost:3306/user_db?useSSL=false&serverTimezone=UTC&allowPublicKeyRetrieval=true
spring.datasource.username=root
spring.datasource.password=password
spring.datasource.driver-class-name=com.mysql.cj.jdbc.Driver# MyBatis-Plus配置
mybatis-plus.configuration.map-underscore-to-camel-case=true
mybatis-plus.mapper-locations=classpath:mapper/*.xml# Swagger配置
springdoc.api-docs.path=/api-docs
springdoc.swagger-ui.path=/swagger-ui.html
Go Gin 实现
首先初始化项目并添加依赖:
mkdir go-user-api
cd go-user-api
go mod init github.com/yourusername/go-user-api
go get github.com/gin-gonic/gin@v1.9.1
go get github.com/go-sql-driver/mysql@v1.7.1
go get gorm.io/gorm@v1.25.6
go get gorm.io/driver/mysql@v1.5.2
go get github.com/swaggo/files@v1.0.1
go get github.com/swaggo/gin-swagger@v1.6.0
go get github.com/swaggo/swag/cmd/swag@v1.16.1
数据库模型(model/user.go):
package modelimport ("time""gorm.io/gorm"
)// User 用户模型
// @Description 用户信息实体
type User struct {ID        uint           `gorm:"primarykey" json:"id"`Username  string         `gorm:"size:50;not null" json:"username"`Email     string         `gorm:"size:100;uniqueIndex;not null" json:"email"`CreatedAt time.Time      `json:"created_at"`UpdatedAt time.Time      `json:"updated_at"`DeletedAt gorm.DeletedAt `gorm:"index" json:"-"`
}
数据库连接(db/db.go):
package dbimport ("fmt""github.com/yourusername/go-user-api/model""gorm.io/driver/mysql""gorm.io/gorm""log"
)var DB *gorm.DB// InitDB 初始化数据库连接
// @author ken
func InitDB() {// 数据库连接信息username := "root"password := "password"host := "localhost"port := "3306"dbName := "user_db"// 构建DSNdsn := fmt.Sprintf("%s:%s@tcp(%s:%s)/%s?charset=utf8mb4&parseTime=True&loc=Local",username, password, host, port, dbName)// 连接数据库var err errorDB, err = gorm.Open(mysql.Open(dsn), &gorm.Config{})if err != nil {log.Fatalf("数据库连接失败: %v", err)}// 自动迁移数据表err = DB.AutoMigrate(&model.User{})if err != nil {log.Fatalf("数据表迁移失败: %v", err)}log.Println("数据库连接成功")
}
控制器(handler/user_handler.go):
package handlerimport ("net/http""github.com/gin-gonic/gin""github.com/yourusername/go-user-api/db""github.com/yourusername/go-user-api/model"
)// GetAllUsers 获取所有用户
// @Summary 获取所有用户
// @Description 获取系统中的所有用户,支持按用户名模糊查询
// @Tags users
// @Accept json
// @Produce json
// @Param username query string false "用户名模糊查询"
// @Success 200 {array} model.User
// @Router /api/users [get]
// @author ken
func GetAllUsers(c *gin.Context) {username := c.Query("username")var users []model.Usertx := db.DB// 如果提供了用户名参数,添加模糊查询条件if username != "" {tx = tx.Where("username LIKE ?", "%"+username+"%")}result := tx.Find(&users)if result.Error != nil {c.JSON(http.StatusInternalServerError, gin.H{"error": result.Error.Error()})return}c.JSON(http.StatusOK, users)
}// GetUserById 根据ID获取用户
// @Summary 根据ID获取用户
// @Description 通过用户ID获取用户详细信息
// @Tags users
// @Accept json
// @Produce json
// @Param id path int true "用户ID"
// @Success 200 {object} model.User
// @Failure 404 {object} gin.H{"error": "用户不存在"}
// @Router /api/users/{id} [get]
// @author ken
func GetUserById(c *gin.Context) {var user model.Userid := c.Param("id")result := db.DB.First(&user, id)if result.Error != nil {c.JSON(http.StatusNotFound, gin.H{"error": "用户不存在"})return}c.JSON(http.StatusOK, user)
}// CreateUser 创建新用户
// @Summary 创建新用户
// @Description 创建一个新的用户账号
// @Tags users
// @Accept json
// @Produce json
// @Param user body model.User true "用户信息"
// @Success 201 {object} model.User
// @Failure 400 {object} gin.H{"error": "用户名和邮箱不能为空"}
// @Router /api/users [post]
// @author ken
func CreateUser(c *gin.Context) {var user model.Userif err := c.ShouldBindJSON(&user); err != nil {c.JSON(http.StatusBadRequest, gin.H{"error": err.Error()})return}// 验证必要字段if user.Username == "" || user.Email == "" {c.JSON(http.StatusBadRequest, gin.H{"error": "用户名和邮箱不能为空"})return}result := db.DB.Create(&user)if result.Error != nil {c.JSON(http.StatusInternalServerError, gin.H{"error": result.Error.Error()})return}c.JSON(http.StatusCreated, user)
}// UpdateUser 更新用户信息
// @Summary 更新用户信息
// @Description 根据ID更新用户的信息
// @Tags users
// @Accept json
// @Produce json
// @Param id path int true "用户ID"
// @Param user body model.User true "更新的用户信息"
// @Success 200 {object} model.User
// @Failure 400 {object} gin.H{"error": "用户名和邮箱不能为空"}
// @Failure 404 {object} gin.H{"error": "用户不存在"}
// @Router /api/users/{id} [put]
// @author ken
func UpdateUser(c *gin.Context) {id := c.Param("id")var user model.User// 检查用户是否存在if result := db.DB.First(&user, id); result.Error != nil {c.JSON(http.StatusNotFound, gin.H{"error": "用户不存在"})return}// 绑定更新的数据var updateUser model.Userif err := c.ShouldBindJSON(&updateUser); err != nil {c.JSON(http.StatusBadRequest, gin.H{"error": err.Error()})return}// 验证必要字段if updateUser.Username == "" || updateUser.Email == "" {c.JSON(http.StatusBadRequest, gin.H{"error": "用户名和邮箱不能为空"})return}// 更新用户信息user.Username = updateUser.Usernameuser.Email = updateUser.Emailresult := db.DB.Save(&user)if result.Error != nil {c.JSON(http.StatusInternalServerError, gin.H{"error": result.Error.Error()})return}c.JSON(http.StatusOK, user)
}// DeleteUser 删除用户
// @Summary 删除用户
// @Description 根据ID删除用户
// @Tags users
// @Accept json
// @Produce json
// @Param id path int true "用户ID"
// @Success 204 {object} nil
// @Failure 404 {object} gin.H{"error": "用户不存在"}
// @Router /api/users/{id} [delete]
// @author ken
func DeleteUser(c *gin.Context) {id := c.Param("id")var user model.User// 检查用户是否存在if result := db.DB.First(&user, id); result.Error != nil {c.JSON(http.StatusNotFound, gin.H{"error": "用户不存在"})return}// 删除用户result := db.DB.Delete(&user)if result.Error != nil {c.JSON(http.StatusInternalServerError, gin.H{"error": result.Error.Error()})return}c.Status(http.StatusNoContent)
}
路由配置(router/router.go):
package routerimport ("github.com/gin-gonic/gin""github.com/swaggo/gin-swagger""github.com/swaggo/files"_ "github.com/yourusername/go-user-api/docs" // 导入生成的Swagger文档"github.com/yourusername/go-user-api/handler"
)// SetupRouter 设置路由
// @author ken
func SetupRouter() *gin.Engine {r := gin.Default()// Swagger文档路由r.GET("/swagger/*any", ginSwagger.WrapHandler(swaggerFiles.Handler))// API路由组api := r.Group("/api"){users := api.Group("/users"){users.GET("", handler.GetAllUsers)users.GET("/:id", handler.GetUserById)users.POST("", handler.CreateUser)users.PUT("/:id", handler.UpdateUser)users.DELETE("/:id", handler.DeleteUser)}}return r
}
主程序(main.go):
package mainimport ("log""github.com/yourusername/go-user-api/db""github.com/yourusername/go-user-api/router"
)// @title 用户管理API
// @version 1.0
// @description 这是一个使用Go Gin框架实现的用户管理API服务
// @termsOfService http://example.com/terms/// @contact.name API Support
// @contact.url http://example.com/support
// @contact.email support@example.com// @license.name Apache 2.0
// @license.url http://www.apache.org/licenses/LICENSE-2.0.html// @host localhost:8080
// @BasePath /
// @schemes http https
func main() {// 初始化数据库db.InitDB()// 设置路由r := router.SetupRouter()// 启动服务器log.Println("服务器启动在 :8080 端口")if err := r.Run(":8080"); err != nil {log.Fatalf("服务器启动失败: %v", err)}
}
生成 Swagger 文档:
swag init
运行程序:
go run main.go
总结与进阶学习
通过本文,我们对比学习了 Go 语言与 Java 的核心差异,包括:
- 语法简洁性:Go 语法更简洁,去除了 Java 中的许多仪式性代码
- 并发模型:Go 的 Goroutine 和通道模型比 Java 的线程模型更轻量高效
- 错误处理:Go 采用返回值方式处理错误,Java 使用异常机制
- 面向对象:Go 通过结构体和接口实现类似 OOP 的功能,没有类和继承
- 包管理:Go 使用 go mod,Java 常用 Maven/Gradle
学习资源
- 官方文档:https://golang.org/doc/
- Go 标准库:https://golang.org/pkg/
作为 Java 开发者,掌握 Go 语言将为你打开云原生开发的大门,无论是容器编排、服务网格还是高性能微服务,Go 都展现出独特优势。通过不断实践,你将能够灵活选择最适合的工具解决实际问题,成为一名更全面的后端开发者。