软件测试 - 接口测试(中篇)
第八章 使用 Requests 库实现接口测试
一、Requests 库
1. Requests 库安装和简介
简介:
- Requests 库是 Python 编写的,基于 urllib 的 HTTP 库,使用方便。
安装
- 方法1:
pip install requests - 方法2:
pip install requests -i https://pypi.douban.com/simple/
豆瓣镜像:https://pypi.douban.com/simple/
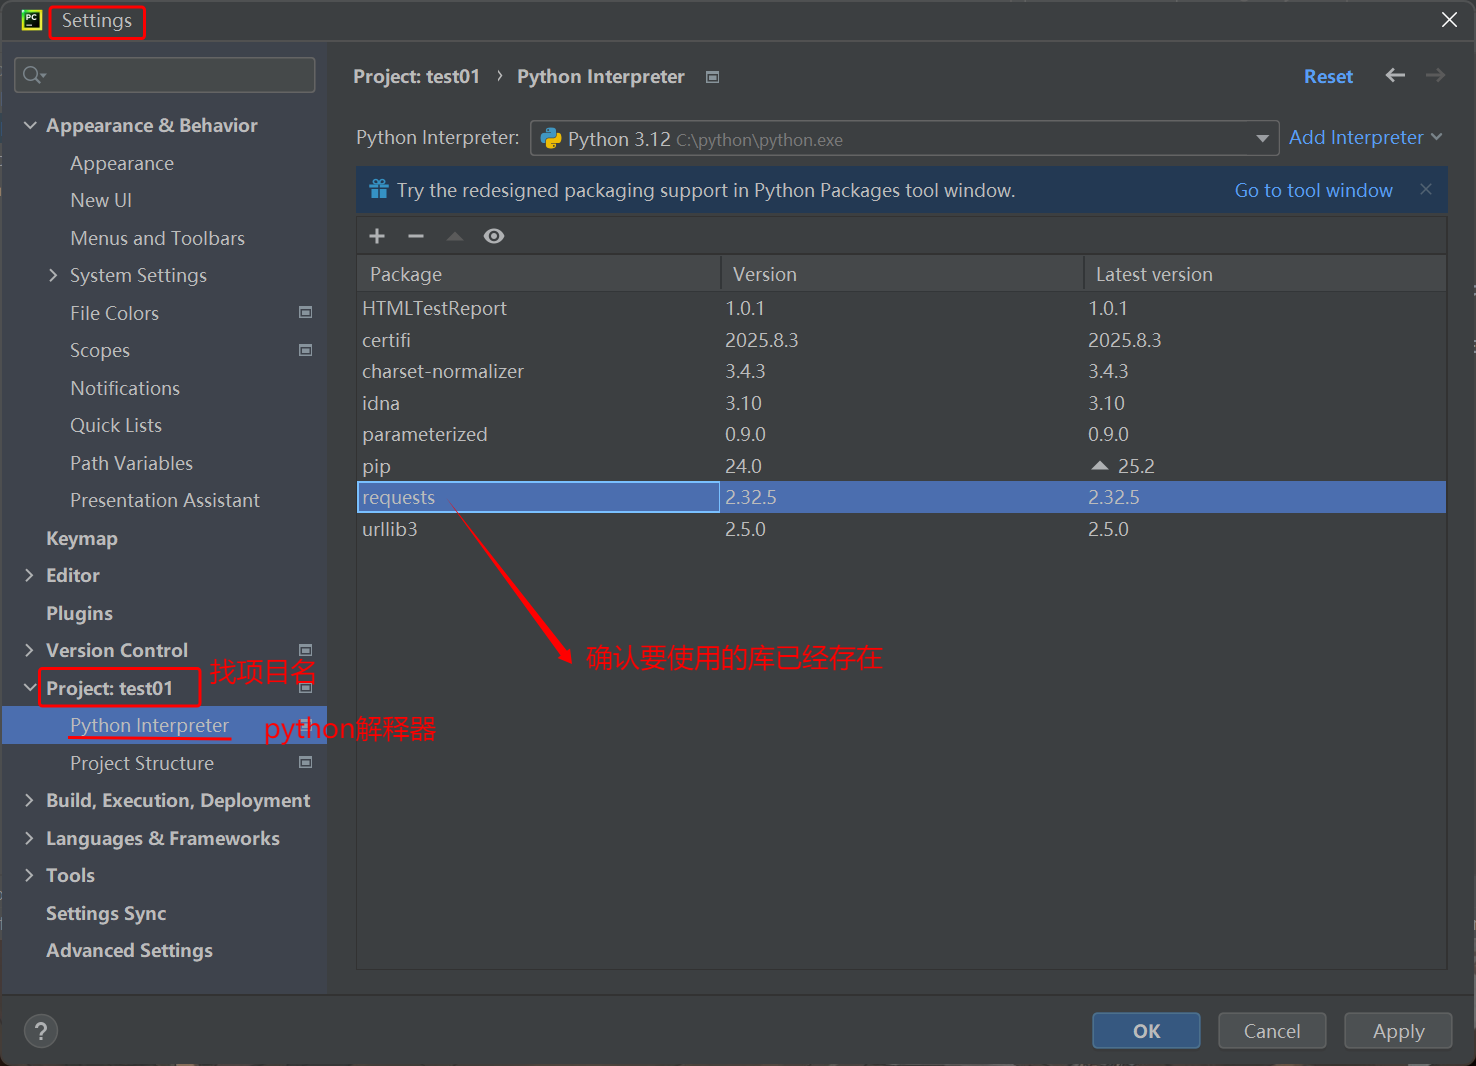
查验
- 步骤1:pip 中查验
# 方法1 pip list# 方法2 pip show 库名 - 步骤2:pycharm 中查验
2. 设置 http 请求语法
resp = requests.请求方法(url='URL地址', params={k:v}, headers={k:v},data={k:v}, json={k:v}, cookie='cookie数据'(如:令牌))- 请求方法:
- get请求 - get()
- post请求 - post()
- put请求 - put()
- delete请求 - delete()
- 参数:
- url:待请求的url - string类型
- params:查询参数 - 字典
- headers:请求头 - 字典
- data:表单格式的请求体 - 字典
- json:json格式的请求体 - 字典
- cookies:cookie数据 - string类型
- resp:响应结果
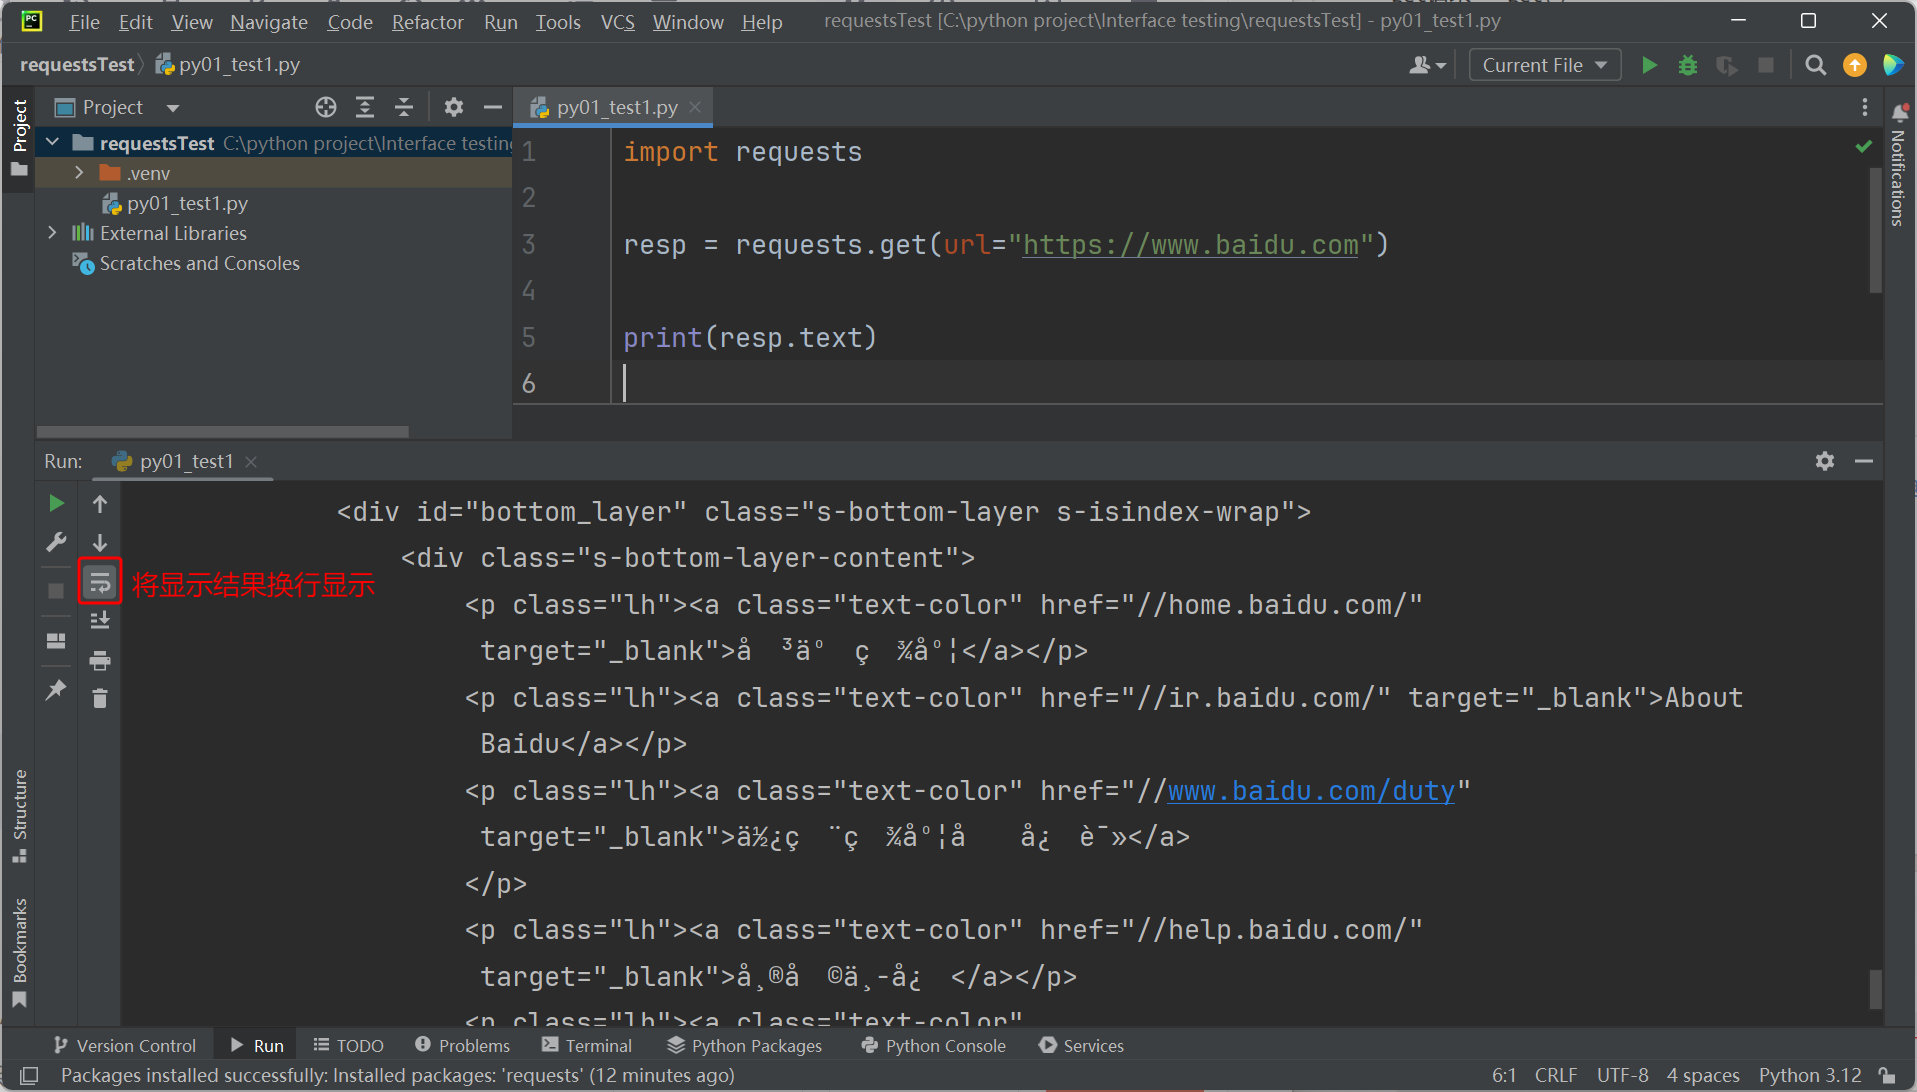
入门案例:使用Requests库访问百度 https://www.baidu.com
3. 应用案例
案例1
【带查询参数的get请求】使用Requests库,请求tpshop商城搜索商品接口,查询iphone
import requests# 发送get请求,指定url,获取响应结果
# 方法1:
# resp = requests.get(url="https://hmshop-test.itheima.net/Home/Goods/search.html?q=iPhone")
# 方法2:
resp = requests.get(url="https://hmshop-test.itheima.net/Home/Goods/search.html", params={"q": "iPhone"})# 查询响应结果
print(resp.text)
案例2
【带表单数据的post请求】使用Requests库,完成tpshop商城登录接口调用,返回“验证码错误”即可
import requests# 发送post请求,指定url、请求头、请求体,获取响应结果
resp = requests.post(url="https://hmshop-test.itheima.net/index.php?m=Home&c=User&a=do_login&t=0.11177720342691433",headers={"content-type": "application/x-www-form-urlencoded"},data={"username": "13800138006", "password": "1234", "verify_code": "8888"})# 打印响应结果 - 文本
print(resp.text)
# 打印响应结果 - json
print(resp.json())
案例3
【带json数据的post请求】使用Requests库,完成ihrm系统成功登录,返回“令牌数据”
import requests# 发送post登录请求,指定url、请求头、请求体,获取响应结果
resp = requests.post(url="https://ihrm-java.itheima.net/api/sys/login",# headers={"Content-Type": "application/json"},json={"mobile": "13800000002", "password": "929itheima.CN032@.20250919"})# 打印响应结果
print(resp.json())
案例4
【发送put、delete请求】使用Requests库发送ihrm系统修改员工信息、删除员工信息请求
# ------------- 修改put
import requestsresp = requests.put(url="https://ihrm-java.itheima.net/api/sys/user/1467780995754229760",headers={"Authorization": "Bearer 1972194a-0eca-40c1-9123-aa3219f1ddc7"},json={"username": "王五"})print(resp.json())# ------------- 删除delete
import requestsresp = requests.put(url="https://ihrm-java.itheima.net/api/sys/user/1467780995754229760",headers={"Authorization": "Bearer 1972194a-0eca-40c1-9123-aa3219f1ddc7"})print(resp.json())
二、Cookie
1. Cookie 简介
简介:工程师针对 http 协议是无连接、无状态特性设计的一种技术,可以在浏览器端存储用户的信息。
特性:
- cookie 用于存储用户临时的不敏感信息
- cookie 位于浏览器(客户端)端。默认大小4kb(可以调整)
- cookie 中的数据可以随意被访问,没有安全性可言
- cookie 中存储的数据类型受浏览器限制
2. Cookie + Session 认证方式
在计算机中,认证用户身份的方式有多种!接触到两种:
- ihrm 项目:token 认证
- tpshop 项目:cookie + session 认证
3. 案例5 - 看演示,此代码无需实现
完整实现tpshop商城登录,并获取“我的订单”页面数据
获取验证码:https://hmshop-test.itheima.net/index.php?m=Home&c=User&a=verify
登录:https://hmshop-test.itheima.net/index.php?m=Home&c=User&a=do_login
我的订单:https://hmshop-test.itheima.net/Home/Order/order_list.html
import requests# 发送获取验证码请求
resp_v = requests.get(url="https://hmshop-test.itheima.net/index.php?m=Home&c=User&a=verify&r=0.11466334229817765")# 从获取验证码的响应结果提取cookie
my_cookie = resp_v.cookies# 发送登录请求 url、请求头、请求体、携带cookie,得到响应结果
resp = requests.post(url="https://hmshop-test.itheima.net/index.php?m=Home&c=User&a=do_login&t=0.11177720342691433",# headers={"content-type": "application/x-www-form-urlencoded"},data={"username": "13800138006", "password": "123456", "verify_code": "8888"},cookies=my_cookie)# 打印响应结果
print(resp.json())# 发送查看我的订单请求
resp_o = requests.get(url="https://hmshop-test.itheima.net/Home/Order/order_list.html",cookies=my_cookie)
print(resp_o.text)
三、Session
1. Session 简介
简介:也叫会话。通常出现在网络通信中,从客户端借助访问终端登录上服务器,直到退出登录所产生的通信数据,保存在会话中。
特性:
- Session 用于存储用户的信息
- Session 位于服务器。大小直接使用服务器存储空间
- Session 中的数据不能随意被访问,安全性较高
- Session 中存储的数据类型受服务器影响,几乎能支持所有的数据类型
2. Session 自动管理 Cookie
因为 Cookie 中的数据都是 Session 传递的,因此 Session 可以直接自动管理 Cookie
3. 案例6
借助 session 重新实现上述 tpshop 商城登录,并获取“我的订单”页面数据
实现步骤:
- 创建一个 Session 实例
- 使用 Session 实例调 get 方法,发送获取验证码请求(不需要获取 cookie)
- 使用同一个 Session 实例,调用 post 方法,发送请求方法(不需要携带 cookie)
- 使用同一个 Session 实例,调用 get 方法,发送查看我的订单请求(不需要携带 cookie)
import requests# 1. 创建一个 Session 实例
session = requests.session()# 2. 使用 Session 实例调 get 方法,发送获取验证码请求(不需要获取 cookie)
resp_v = session.get(url="https://hmshop-test.itheima.net/index.php?m=Home&c=User&a=verify&r=0.11466334229817765")# 3. 使用同一个 Session 实例,调用 post 方法,发送请求方法(不需要携带 cookie)
resp = session.post(url="https://hmshop-test.itheima.net/index.php?m=Home&c=User&a=do_login&t=0.11177720342691433",data={"username": "13800138006", "password": "123456", "verify_code": "8888"})
print(resp.json())# 4. 使用同一个 Session 实例,调用 get 方法,发送查看我的订单请求(不需要携带 cookie)
resp_o = session.get(url="https://hmshop-test.itheima.net/Home/Order/order_list.html")
print(resp_o.text)
四、面试题 Cookie 和 Session 区别
数据存储位置:
- cookie 存储在浏览器;session 存储在服务器
安全性:
- cookie 中的数据可以任意获取,没有安全性可言;session 的数据多为加密存储,安全性较高
数据类型:
- cookie 支持的数据类型受浏览器限制,较少;session 直接使用服务器存储,支持所有数据类型
大小:
- cookie 大小默认4k;session 大小约为服务器存储空间大小
五、获取指定响应数据
常用:
- 获取 URL:resp.url
- 获取响应状态码:resp.status_code
- 获取 Cookie:resp.cookies
- 获取响应头:resp.headers
- 获取响应体:
- 文本格式:resp.text
- json 格式:resp.json()
代码
import requestsresp = requests.get(url="https://www.baidu.com")# 获取 URL:resp.url
print("URL =", resp.url)# 获取响应状态码:resp.status_code
print("status_code =", resp.status_code)# 获取 Cookie:resp.cookies
print("Cookies =", resp.cookies)# 获取响应头:resp.headers
print("headers =", resp.headers)# 获取响应体:
#   文本格式:resp.text
print("body_text =", resp.text)
#   json 格式:resp.json()
#   当显示 JSONDecodeError 错误时,说明 resp 不能转换为 json 格式数据
print("body_json =", resp.json())
六、UnitTest 框架
UnitTest 是开发人员用来实现“单元测试”的框架。测试工程师可以在自动化“测试执行”时使用。
使用 UnitTest 的好处:
- 方便管理,维护测试用例
- 提供丰富的断言方法
- 生成测试报告(需要插件 HTMLTestReport)
1. UnitTest 框架回顾
TestCase
# 1. 导包:import unittest
# 2. 定义测试类从 TestCase 类继承
class TestXXX(unittest.TestCase):pass# 3. 测试方法定义必须以 test 开头,建议添加编号!
class TestXXX(unittest.TestCase):def test01_xxx(self):pass
Fixture
# 1、方法级别的
setUp(self) tearDown(self) 每个普通方法执行 之前/之后 自动运行。# 2、类级别的
setUpClass(cls) tearDownClass(cls) 在类内所有方法执行 之前/之后 运行一次。
TestSuite
# 1、实例化测试集对象
suite = unittest.TestSuite()# 2、添加指定类的全部测试方法
suite.addTest(unittest.defaultTestLoader.loadTestsFromTestCase(类名))# Testsuite 通过搜索创建测试集
suite = unittest.TestLoader().discover(搜索目录, 搜索文件名)
suite = unittest.TestLoader().discover("./", "test*.py")
TestRunner
runner = HTMLTestReport("./report1.html", description="描述信息", title="报告标题")
runner.run(suite)
示例:测试类
"""
unittest 测试框架代码所处文件要求:遵守标识符命名规范
1. 只能使用 字母、数字、下划线
2. 不能数字开头
3. 避免使用 关键字、已知函数名类:首字母必须大写,建议以 Test 开头方法:必须 test 开头,建议编号
"""
import unittest# 待测试的方法
def add(x, y):return x + y# 封装测试类,从 unittest.TestCase 类继承
class TestAdd(unittest.TestCase):def setUp(self):print("--------setUp--------")def tearDown(self):print("--------tearDown--------")@classmethoddef setUpClass(cls):print("======setUpClass======")@classmethoddef tearDownClass(cls):print("======tearDownClass======")# 自定义的测试方法def test01_add(self):print("测试方法1")ret = add(10, 20)# 断言响应结果self.assertEqual(30, ret)def test02_add(self):print("测试方法2")ret = add(100, 200)# 断言self.assertEqual(300, ret)
示例:生成测试报告
import unittestfrom py10_unittest_demo import TestAdd
from htmltestreport import HTMLTestReport# 创建 suite 实例
suite = unittest.TestSuite()# 指定测试类,添加测试方法
suite.addTest(unittest.defaultTestLoader.loadTestsFromTestCase(TestAdd))# 创建 HTMLTestReport 实例
runner = HTMLTestReport("测试报告.html")# 调用 run() 传入 suite
runner.run(suite)
2. ihrm 案例
登录成功
import unittest
import requests# 定义测试类
class TestIhrmLogin(unittest.TestCase):# 添加测试方法def test01_login_success(self):# 发送post登录请求,指定url、请求头、请求体,获取响应结果resp = requests.post(url="https://ihrm-java.itheima.net/api/sys/login",json={"mobile": "13800000002", "password": "929itheima.CN032@.20250920"})# 打印响应结果print(resp.json())# 断言 响应状态码为 200self.assertEqual(200, resp.status_code)# 断言 success 的值为 trueself.assertEqual(True, resp.json().get("success"))# 断言 code 的值为 10000self.assertEqual(10000, resp.json().get("code"))# 断言 message 的值为 操作成功!self.assertIn("操作成功", resp.json().get("message"))
断言方法:
assertEqual(参1,参2) :参1:预期结果。 参2:实际结果。成功:完全相等。断言通过。不报错!失败:报错!assertIn(参1,参2):参1:预期结果。参2:实际结果。成功:实际结果中,包含预期结果。断言通过。不报错!失败:报错!账号、密码错误
# 添加测试方法-手机号不存在def test02_mobile_not_exist(self):resp = requests.post(url="https://ihrm-java.itheima.net/api/sys/login",json={"mobile": "13245895899", "password": "1234"})print(resp.json())# 断言 响应状态码为 200self.assertEqual(200, resp.status_code)# 断言 success 的值为 trueself.assertEqual(False, resp.json().get("success"))# 断言 code 的值为 10000self.assertEqual(20001, resp.json().get("code"))# 断言 message 的值为 操作成功!self.assertIn("用户名或密码错误", resp.json().get("message"))# 添加测试方法-密码错误def test03_pwd_err(self):resp = requests.post(url="https://ihrm-java.itheima.net/api/sys/login",json={"mobile": "13800000002", "password": "1234"})print(resp.json())# 断言 响应状态码为 200self.assertEqual(200, resp.status_code)# 断言 success 的值为 trueself.assertEqual(False, resp.json().get("success"))# 断言 code 的值为 10000self.assertEqual(20001, resp.json().get("code"))# 断言 message 的值为 操作成功!self.assertIn("用户名或密码错误", resp.json().get("message"))第九章 数据库工具类封装
一、数据库操作应用场景
校验测试数据:
- 接口发送请求后明确会对数据库中的某个字段进行修改,但响应结果中无该字段数据时
- 如:ihrm 删除员工接口,is_delete 字段没有在响应结果中出现,需要借助数据库校验
构造测试数据:
- 测试数据使用一次就消失
- 如:ihrm 添加员工接口,使用的手机号
- 测试前,无法保证测试数据是否存在
- 如:ihrm 查询员工接口,使用的员工 id
二、PyMySQL
1. 安装 PyMySQL
方法1:
pip install PyMySQL方法2:
pip install PyMySQL -i https://pypi.douban.com/simple/2. 操作步骤
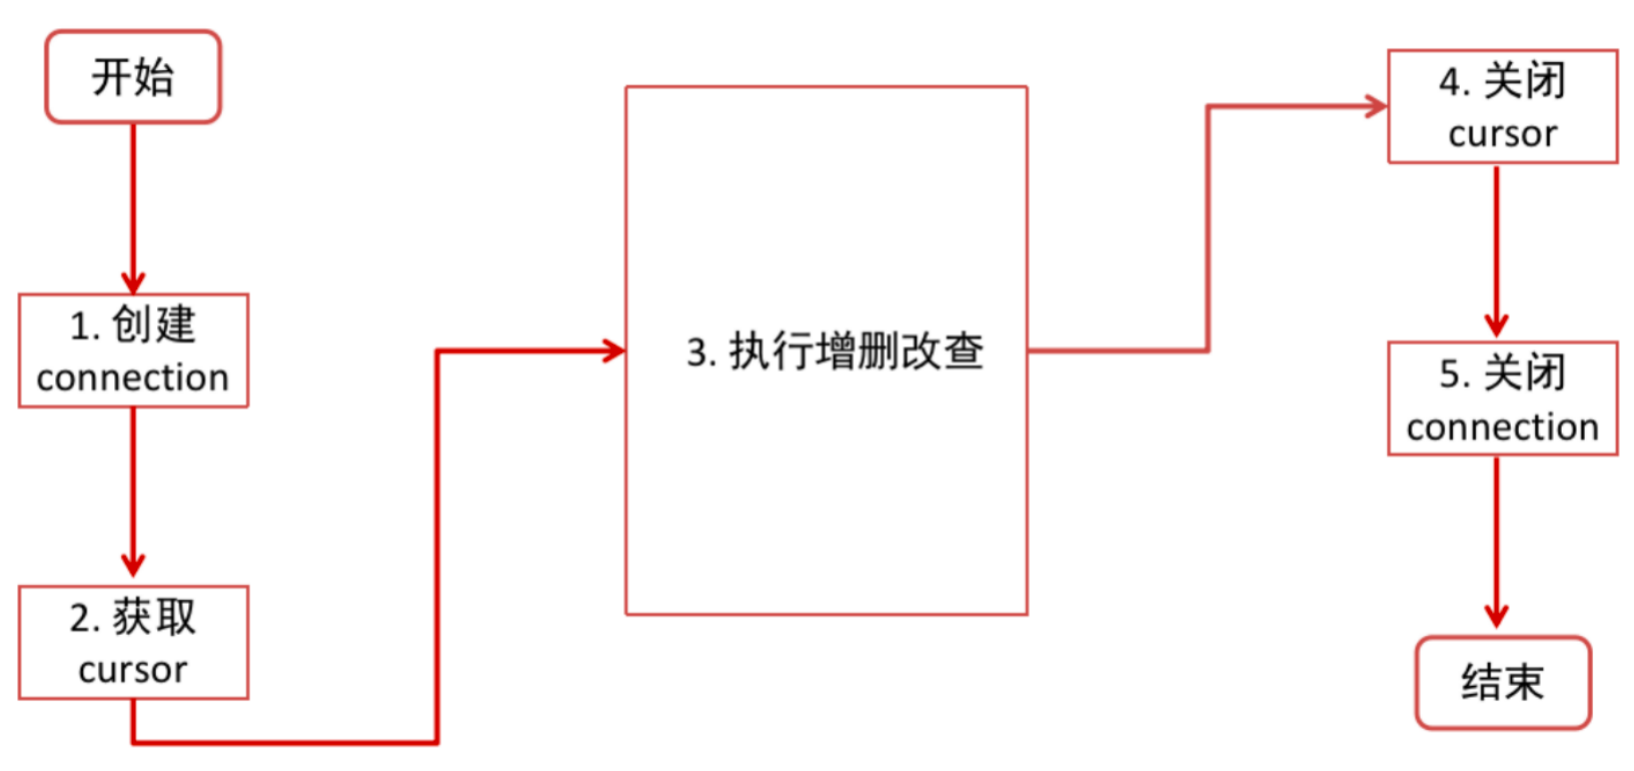
1)导包 import pymysql
2)创建连接。conn = pymysql.connect(host, port, user, password, database, charset)
3)创建游标。cursor = con.cursor()
4)执行 SQL。cursor.execute("sql语句")
- 查询语句(select)
- 处理结果集(提取数据 fetch*)
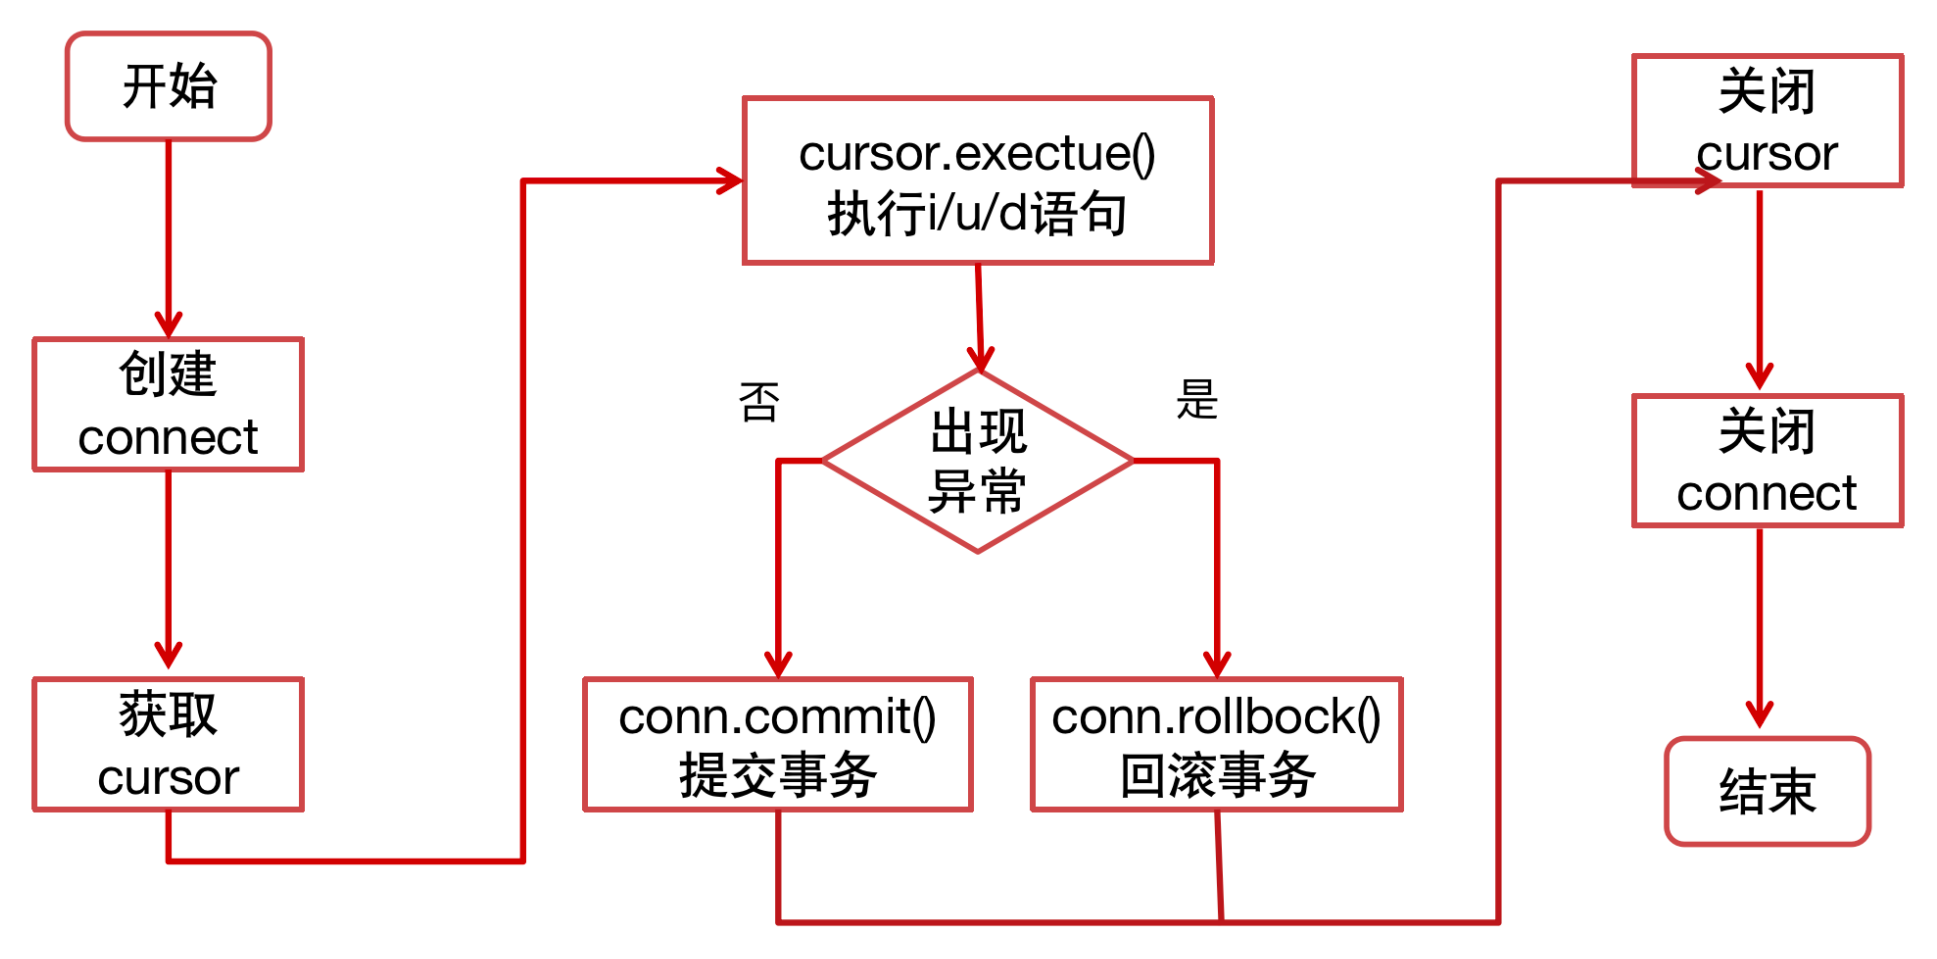
- 增删改语句(insert、update、delete)
- 成功:提交事务 conn.commit()
- 失败:回滚事务 conn.rollback()
5)关闭游标。cursor.close()
6)关闭连接。conn.close()
3. 事务的概念
事务,是关系型数据库(mysql)特有的概念。
事务,可以看作一个虚拟的容器,在容器中存放一系列的数据库操作,看作一个整体。内部的所有操作,要么都一次性成功,只要有一个失败,就全部失败。
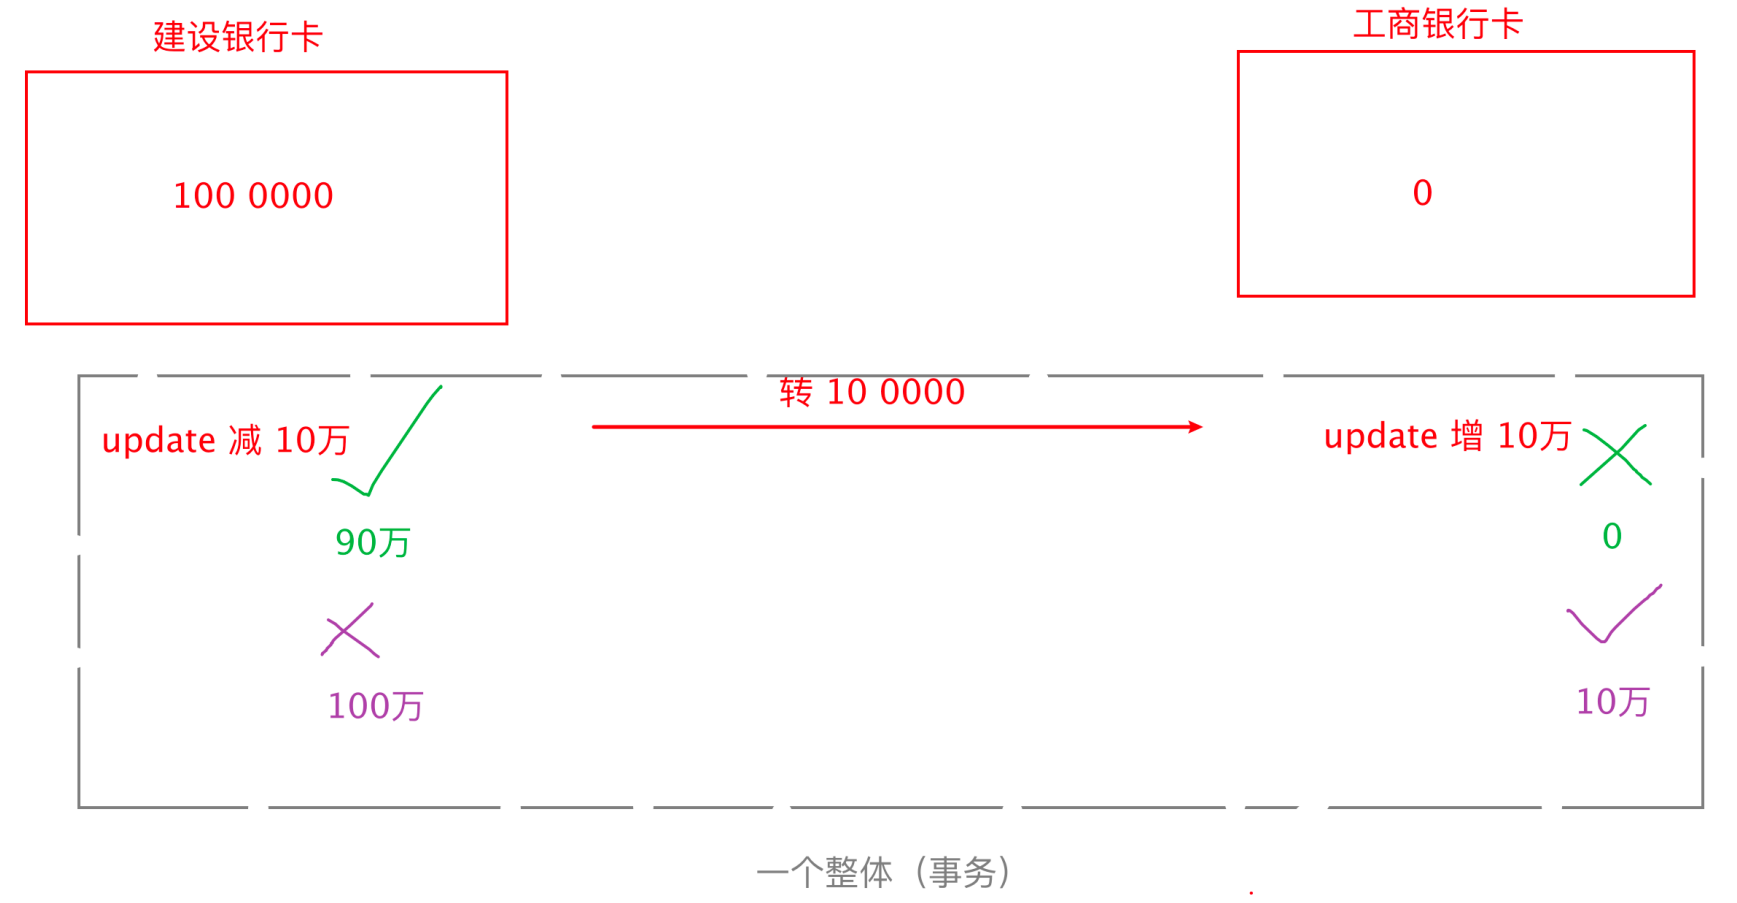
- 事务操作:只有2种情况
- 提交:conn.commit()
- 回滚:conn.rollback()
三、PyMySQL 连接数据库
1. 建立连接方法
conn = pymysql.connect(host="", port=0, user="", password="", database="", charset="")- host:数据库所在主机 IP 地址 - string
- port:数据库使用的端口号 - int
- user:连接数据库使用的用户名 - string
- password:连接数据库使用的密码 - string
- database:要连接的数据库的名字 - string
- charset:字符集。常用 utf8 - string
- conn:连接数据库的对象
2. 入门案例
查询数据库,获取 MySQL 服务器的版本
# 1. 导包
import pymysql# 2. 建立连接
conn = pymysql.connect(host="211.103.136.244", port=7061, user="student",password="iHRM_student_xxxx", database="test_db", charset="utf8")# 3. 获取游标
cursor = conn.cursor()# 4. 执行 sql 语句(查询)
cursor.execute("select version()")# 5. 获取结果
res = cursor.fetchone()
print("res =", res[0])# 6. 关闭游标
cursor.close()# 7. 关闭连接
conn.close()
四、PyMySQL 操作数据库
1. SQL 语法回顾
查询语法:
select 字段1, 字段2,... from 表 where 条件;示例:select id, title, pub_date from t_book where title = '读者';添加语法:
insert into 表名(字段1, 字段2, ...) values(值1, 值2, ...);示例:insert into t_book(id, title, pub_date) values(17, '红楼梦', '2021-11-11');更新语法:
update 表名 set 字段名 = 字段值 where 条件;示例:update t_book set title = '三国' where id = 17;删除语法:
delete from 表名 where 条件;示例:delete from t_book where title = '三国';2. 数据库查询
查询操作流程
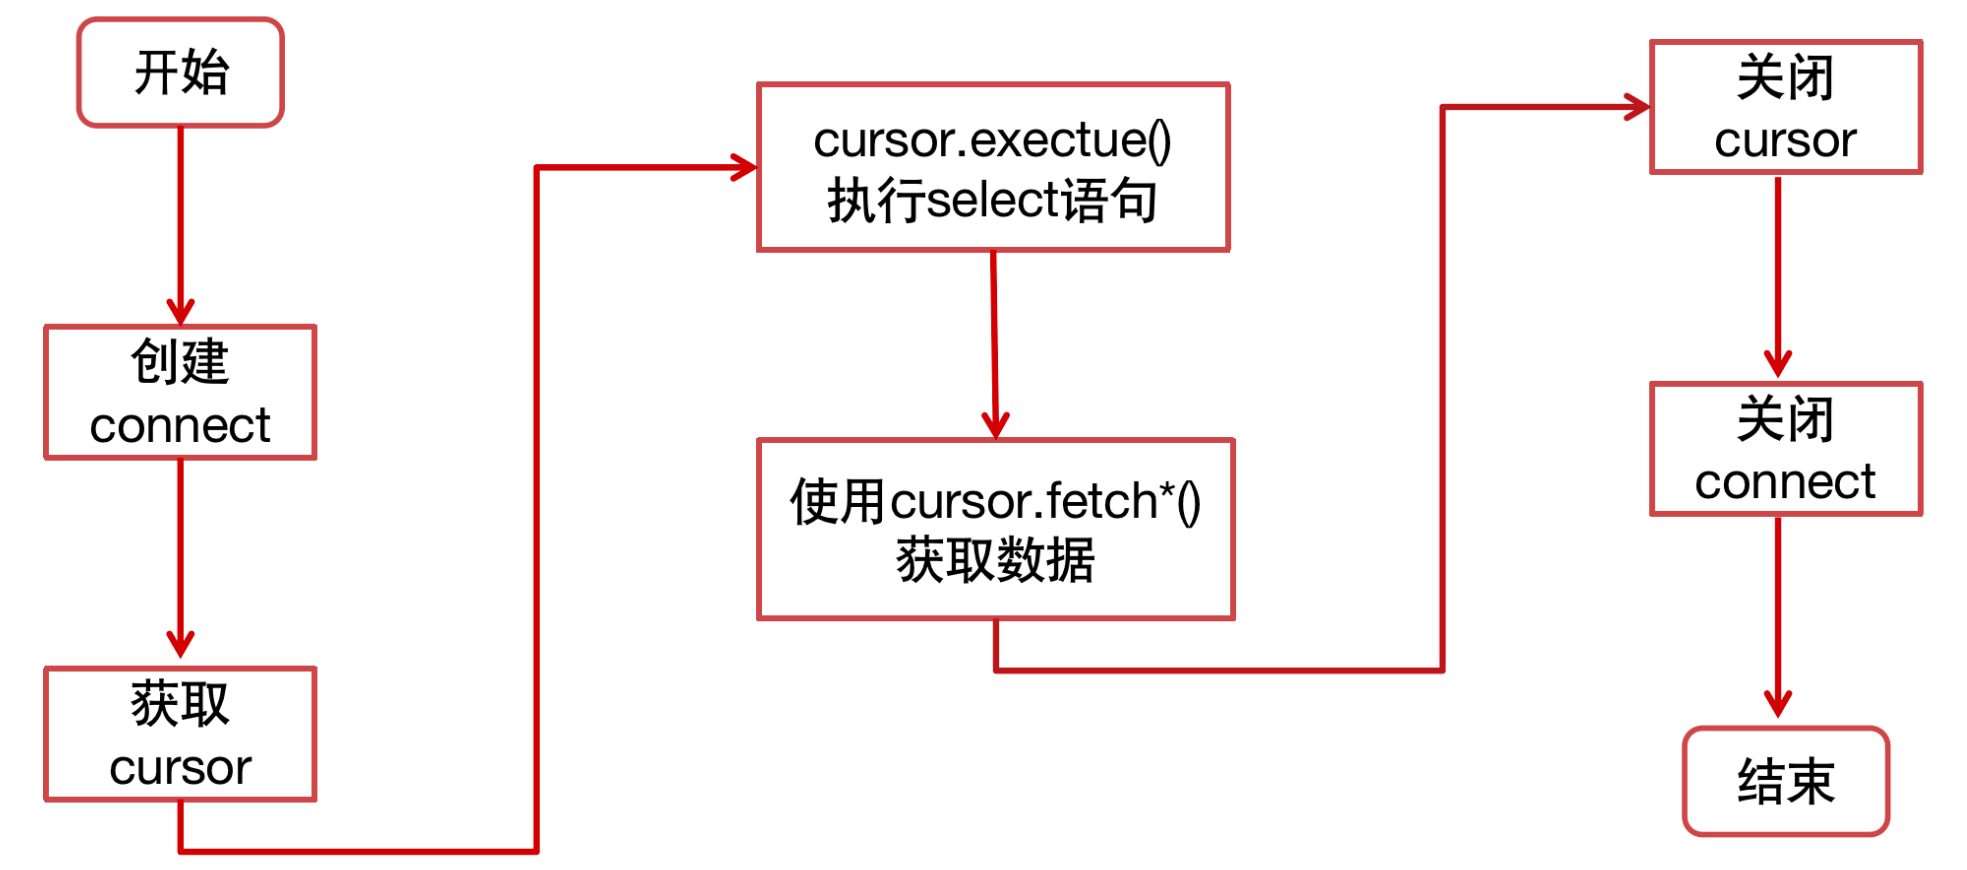
cursor游标
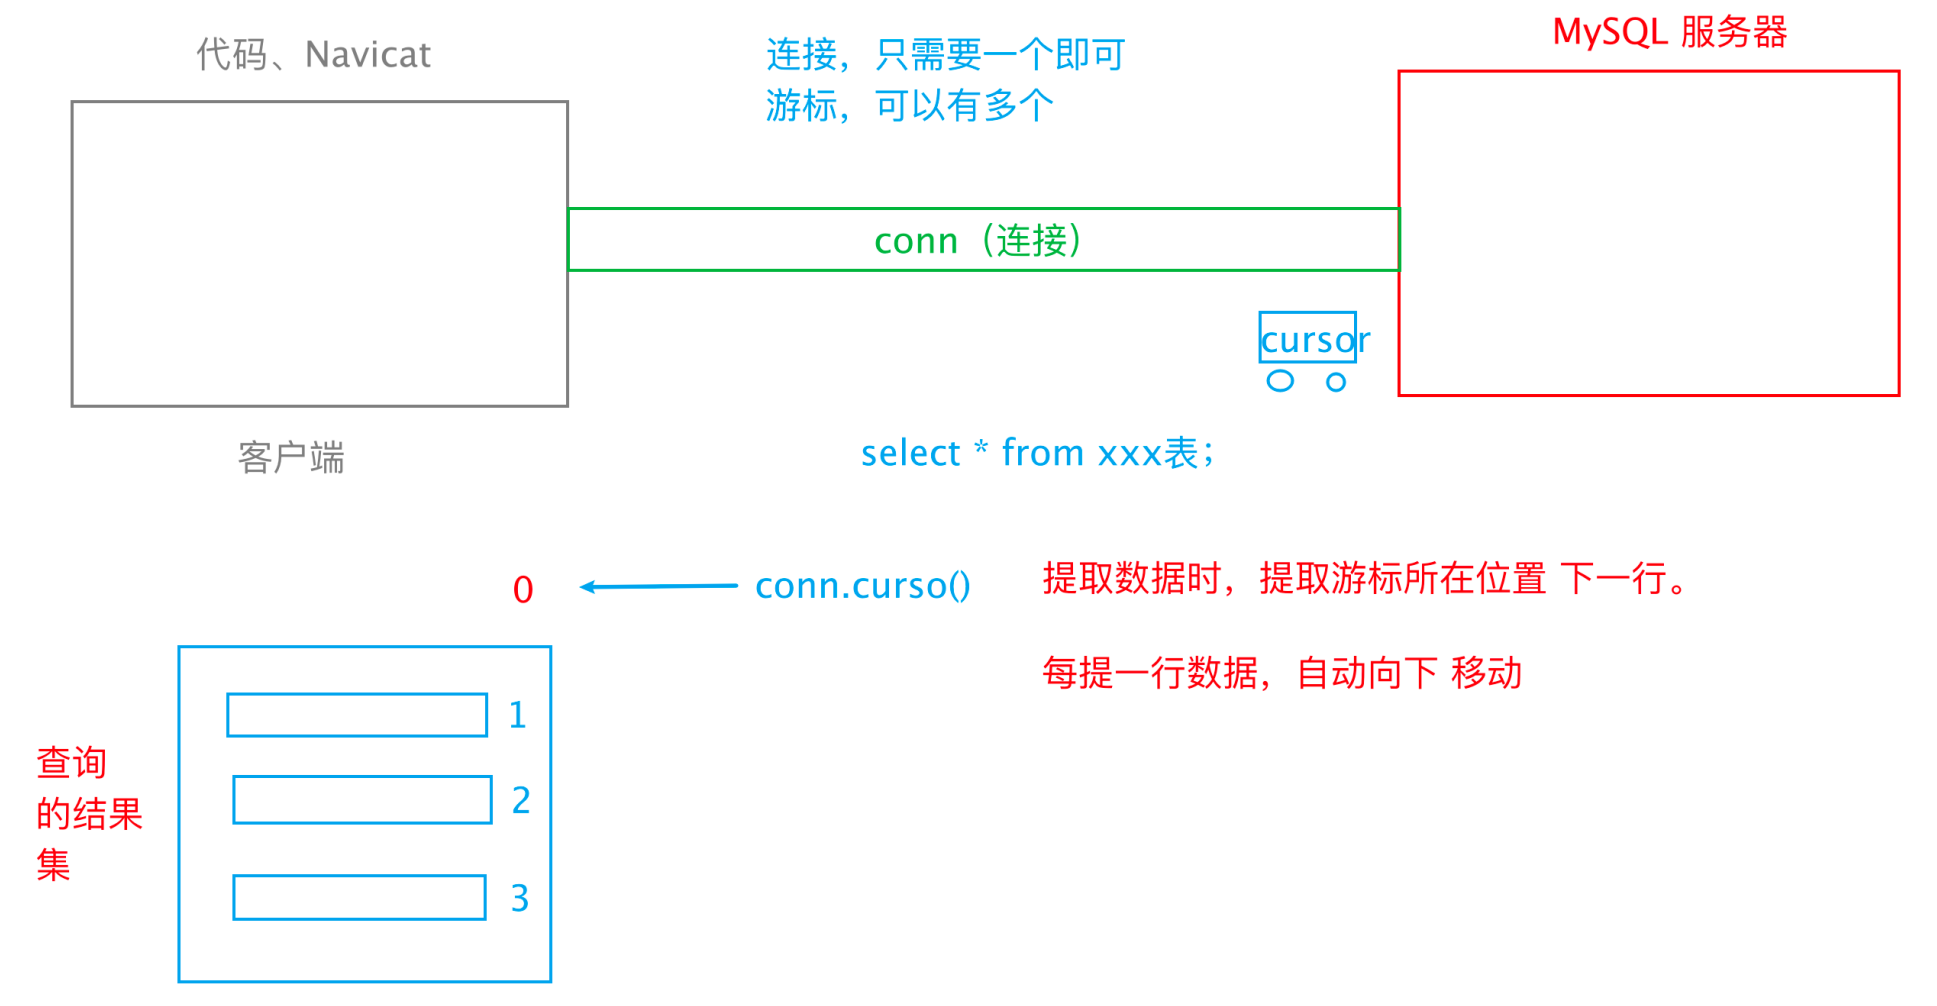
常用方法
- fetchone():从结果集中提取一行
- fetchmany(size):从结果集中提取 size 行
- fetchall():提取所有结果集
- 属性 rownumber:可以设置游标位置
案例
查询 t_book 表,获取 第一条 数据
查询 t_book 表,获取 前两条 数据
查询 t_book 表,获取 全部 数据
查询 t_book 表,获取 第3条和第4条 数据
# 1. 导包
import pymysql# 2. 建立连接
conn = pymysql.connect(host="211.103.136.244", port=7061, user="student",password="iHRM_student_xxxx", database="test_db", charset="utf8")# 3. 获取游标
cursor = conn.cursor()# 4. 执行sql语句(查询)
cursor.execute("select * from t_book;")# 5. 获取结果 - 提取第一条
res1 = cursor.fetchone()
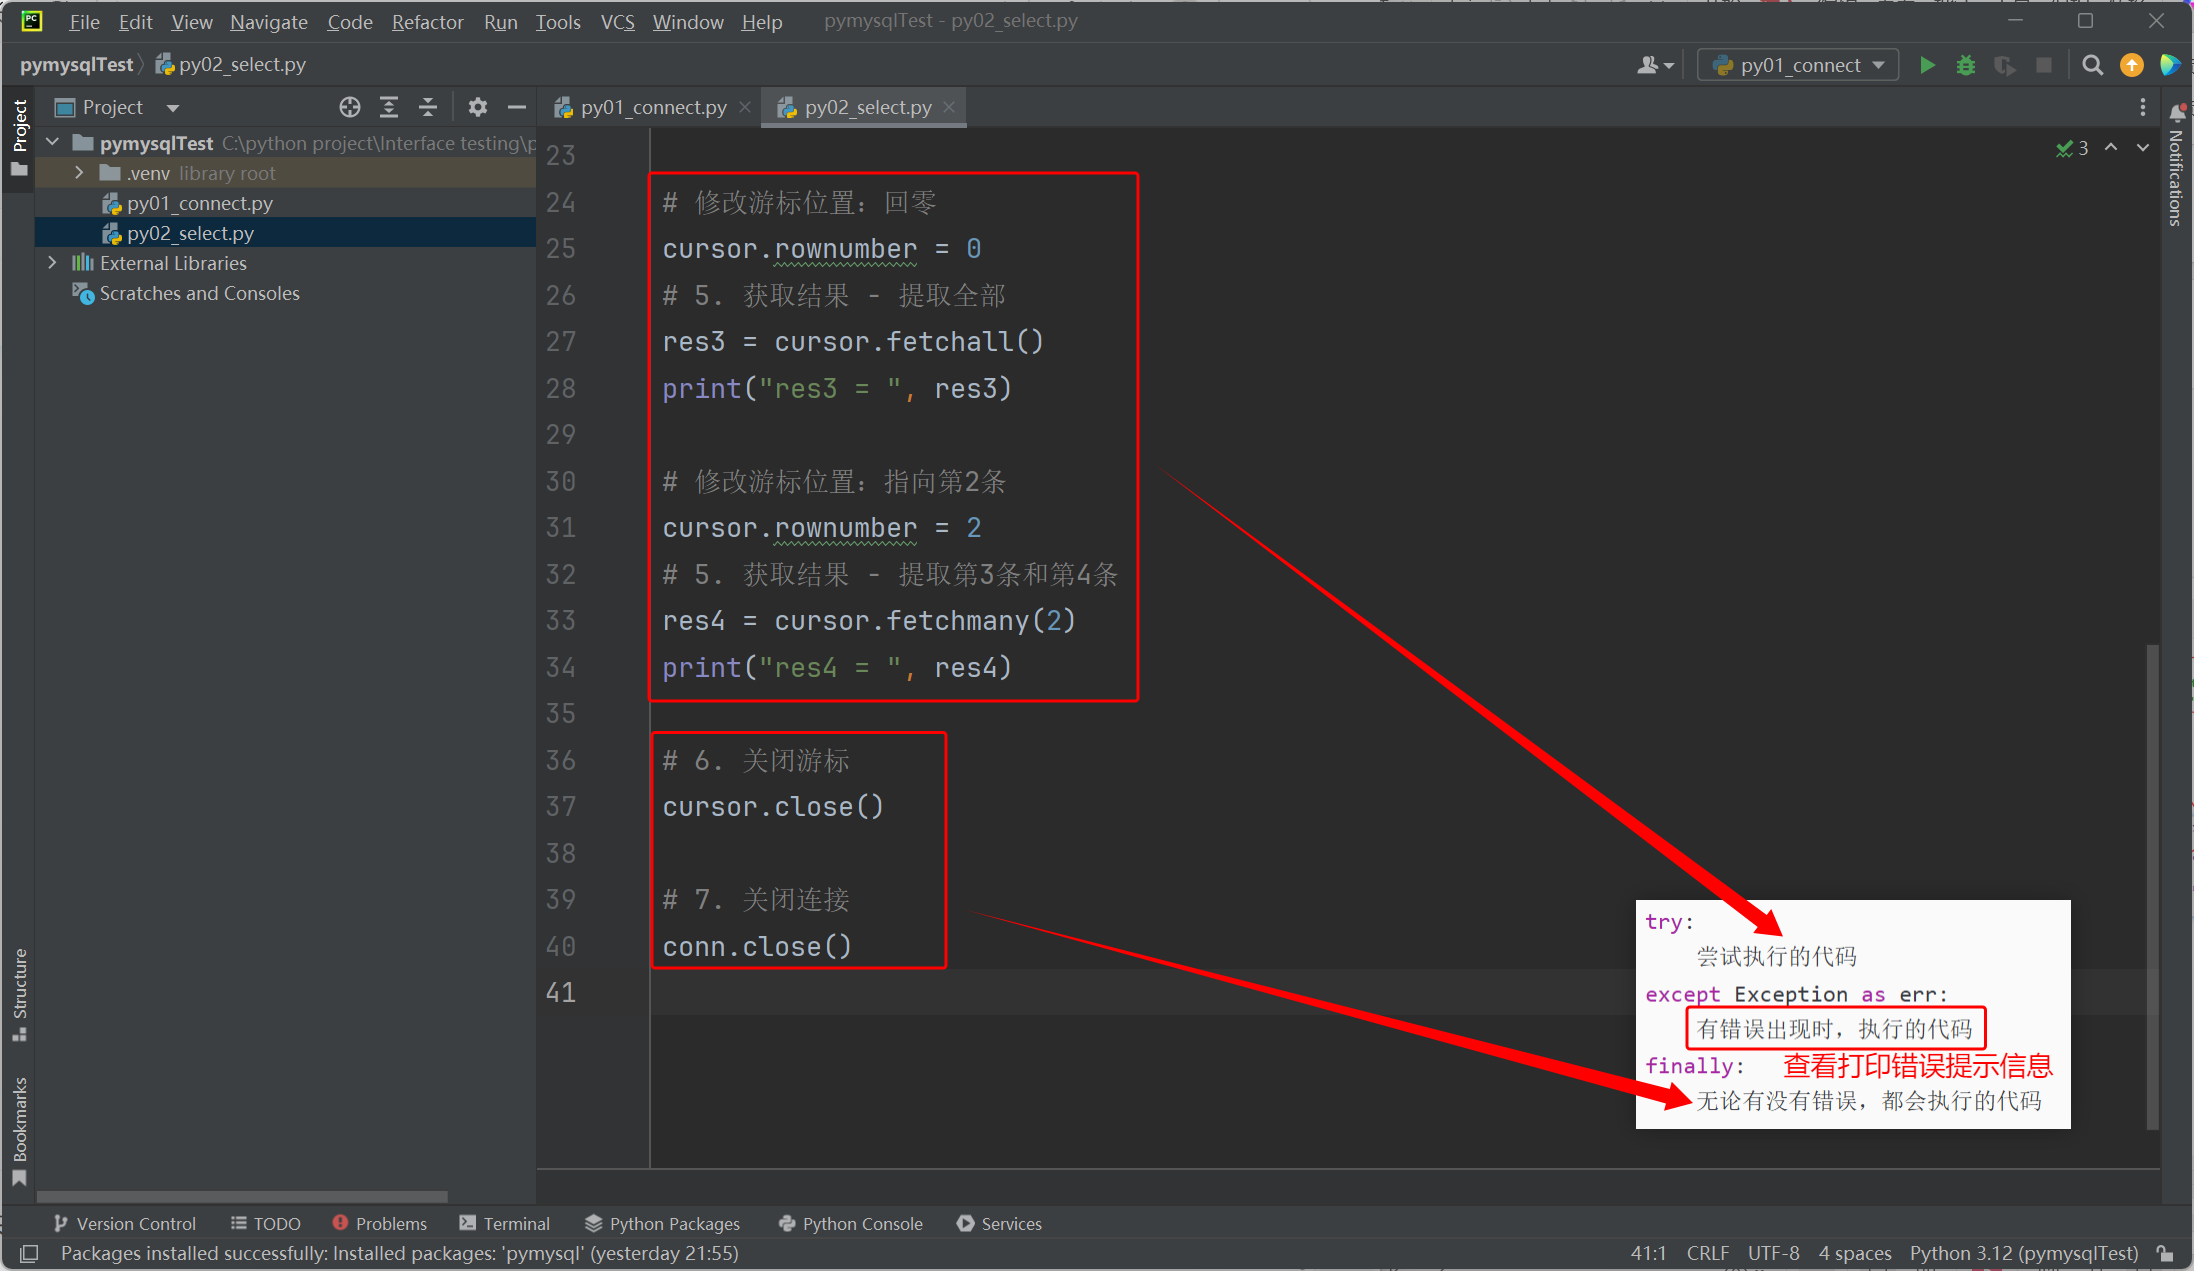
print("res1 = ", res1)# 修改游标位置:回零
cursor.rownumber = 0
# 5. 获取结果 - 提取前两条
res2 = cursor.fetchmany(2)
print("res2 = ", res2)# 修改游标位置:回零
cursor.rownumber = 0
# 5. 获取结果 - 提取全部
res3 = cursor.fetchall()
print("res3 = ", res3)# 修改游标位置:指向第2条
cursor.rownumber = 2
# 5. 获取结果 - 提取第3条和第4条
res4 = cursor.fetchmany(2)
print("res4 = ", res4)# 6. 关闭游标
cursor.close()# 7. 关闭连接
conn.close()
异常捕获
try:尝试执行的代码
except Exception as err:有错误出现时,执行的代码
finally:无论有没有错误,都会执行的代码
# 1. 导包
import pymysql# 定义全局变量,初值为 None
conn = None
cursor = Nonetry:# 2. 建立连接conn = pymysql.connect(host="211.103.136.244", port=7061, user="student",password="iHRM_student_xxxx", database="test_db", charset="utf8")# 3. 获取游标cursor = conn.cursor()# 4. 执行sql语句(查询)cursor.execute("select * from t_book;")# 5. 获取结果 - 提取第一条res1 = cursor.fetchone()print("res1 = ", res1)# 修改游标位置:回零cursor.rownumber = 0# 5. 获取结果 - 提取前两条res2 = cursor.fetchmany(2)print("res2 = ", res2)# 修改游标位置:回零cursor.rownumber = 0# 5. 获取结果 - 提取全部res3 = cursor.fetchall()print("res3 = ", res3)# 修改游标位置:指向第2条cursor.rownumber = 2# 5. 获取结果 - 提取第3条和第4条res4 = cursor.fetchmany(2)print("res4 = ", res4)
except Exception as err:print("查询语句执行出错: ", str(err))
finally:# 6. 关闭游标cursor.close()# 7. 关闭连接conn.close()
3. 数据库 UID(增删改)
更新操作流程
案例
单独实现如下操作:
①:新增一条图书数据(id: 5 title: 西游记 pub_date: 1986-01-01)
②:把图书名称为“西游记”的阅读量加一
③:删除名称为“西游记”的图书
插入数据
"""
新增一条图书数据(id: 5 title: 西游记 pub_date: 1986-01-01)
1. 导包
2. 创建连接
3. 获取游标
4. 执行 insert 语句
5. 提交/回滚事务
6. 关闭游标
7. 关闭连接
"""# 1. 导包
import pymysqlconn = None
cursor = Nonetry:# 2. 创建连接conn = pymysql.connect(host="localhost", port=3306, user="root",password="123456", database="test_db", charset="utf8")# 3. 获取游标cursor = conn.cursor()# 4. 执行 insert 语句cursor.execute("insert into t_book(id, title, pub_date) values(5, '西游记', '1986-01-01');")# 查看sql执行影响多少行print("影响的行数:", conn.affected_rows())# 5. 提交事务conn.commit()except Exception as err:print("插入数据错误:", str(err))# 回滚事务conn.rollback()
finally:# 6. 关闭游标cursor.close()# 7. 关闭连接conn.close()
修改数据
"""
把图书名称为“西游记”的阅读量加一
1. 导包
2. 创建连接
3. 获取游标
4. 执行 update 语句
5. 提交/回滚事务
6. 关闭游标
7. 关闭连接
"""
# 1. 导包
import pymysqlconn = None
cursor = Nonetry:# 2. 创建连接conn = pymysql.connect(host="localhost", port=3306, user="root",password="123456", database="test_db", charset="utf8")# 3. 获取游标cursor = conn.cursor()# 4. 执行 update 语句cursor.execute("update t_book set `read` = `read` + 1 where title = '西游记';")print("影响的行数:", conn.affected_rows())# 5. 提交事务conn.commit()except Exception as err:print("更新失败:", str(err))# 回滚事务conn.rollback()
finally:# 6. 关闭游标cursor.close()# 7. 关闭连接conn.close()
删除数据
"""
删除名称为“西游记”的图书
1. 导包
2. 创建连接
3. 获取游标
4. 执行 delete 语句
5. 提交/回滚事务
6. 关闭游标
7. 关闭连接
"""
# 1. 导包
import pymysqlconn = None
cursor = Nonetry:# 2. 创建连接conn = pymysql.connect(host="localhost", port=3306, user="root",password="123456", database="test_db", charset="utf8")# 3. 获取游标cursor = conn.cursor()# 4. 执行 delete 语句cursor.execute("delete from t_book where title = '西游记';")print("影响的行数:", conn.affected_rows())# 5. 提交事务conn.commit()except Exception as err:print("删除失败:", str(err))# 回滚事务conn.rollback()
finally:# 6. 关闭游标cursor.close()# 7. 关闭连接conn.close()
五、数据库工具类封装
1. 封装的目的
将常用的数据库操作,封装到一个方法。后续再操作数据库时,通过调用该方法来实现。
提高代码复用性。
2. 设计数据库工具类
# 封装数据库操作类
class DBUtil(object):@classmethoddef __get_conn(cls):pass@classmethoddef __close_conn(cls):pass@classmethod# 常用方法:查询一条def select_one(cls, sql):pass@classmethod# 常用方法:增删改def uid_db(cls, sql):pass
3. 实现类方法
获取、关闭连接
# 封装数据库操作类
class DBUtil(object):# 添加类属性conn = None@classmethoddef __get_conn(cls):# 判断 conn 是否为空,如果是,再创建if cls.conn is None:cls.conn = pymysql.connect(host="localhost", port=3306, user="root",password="123456", database="test_db", charset="utf8")# 返回非空连接return cls.conn@classmethoddef __close_conn(cls):# 判断,conn 不为空,需要关闭if cls.conn is not None:cls.conn.close()cls.conn = None
查询一条记录
# 封装数据库操作类
class DBUtil(object):# 常用方法:查询一条@classmethoddef select_one(cls, sql):cursor = Noneres = Nonetry:# 获取连接cls.conn = cls.__get_conn()# 获取游标cursor = cls.conn.cursor()# 执行查询语句cursor.execute(sql)# 提取一条结果res = cursor.fetchone()except Exception as err:print("查询sql执行错误:", str(err))finally:# 关闭游标cursor.close()# 关闭连接cls.__close_conn()# 将查询sql执行的结果返回return resif __name__ == '__main__':res = DBUtil.select_one("select * from t_book where id = 5;")print("查询结果为:", res)
增删改数据
# 封装数据库操作类
class DBUtil(object):# 常用方法:增删改@classmethoddef uid_db(cls, sql):cursor = Nonetry:# 获取连接cls.conn = cls.__get_conn()# 获取游标cursor = cls.conn.cursor()# 执行uid语句cursor.execute(sql)print("影响的行数:", cls.conn.affected_rows())# 提交事务cls.conn.commit()except Exception as err:# 回滚事务cls.conn.rollback()print("增删改sql执行错误:", str(err))finally:# 关闭游标cursor.close()# 关闭连接cls.conn.close()if __name__ == '__main__':DBUtil.uid_db("insert into t_book(id, title, pub_date) values(11, '活着', '1993-06-01');")
完整封装代码实现
import pymysql# 封装数据库操作类
class DBUtil(object):# 添加类属性conn = None@classmethoddef __get_conn(cls):# 判断 conn 是否为空,如果是,再创建if cls.conn is None:cls.conn = pymysql.connect(host="localhost", port=3306, user="root",password="123456", database="test_db", charset="utf8")# 返回非空连接return cls.conn@classmethoddef __close_conn(cls):# 判断,conn 不为空,需要关闭if cls.conn is not None:cls.conn.close()cls.conn = None# 常用方法:查询一条@classmethoddef select_one(cls, sql):cursor = Noneres = Nonetry:# 获取连接cls.conn = cls.__get_conn()# 获取游标cursor = cls.conn.cursor()# 执行查询语句cursor.execute(sql)# 提取一条结果res = cursor.fetchone()except Exception as err:print("查询sql执行错误:", str(err))finally:# 关闭游标cursor.close()# 关闭连接cls.__close_conn()# 将查询sql执行的结果返回return res# 常用方法:增删改@classmethoddef uid_db(cls, sql):cursor = Nonetry:# 获取连接cls.conn = cls.__get_conn()# 获取游标cursor = cls.conn.cursor()# 执行uid语句cursor.execute(sql)print("影响的行数:", cls.conn.affected_rows())# 提交事务cls.conn.commit()except Exception as err:# 回滚事务cls.conn.rollback()print("增删改sql执行错误:", str(err))finally:# 关闭游标cursor.close()# 关闭连接cls.conn.close()if __name__ == '__main__':res = DBUtil.select_one("select * from t_book where id = 5;")print("查询结果为:", res)DBUtil.uid_db("insert into t_book(id, title, pub_date) values(11, '活着', '1993-06-01');")