第1章:初识Linux系统——第3节:FinalShell的认识与安装和文件操作命令1
目录
一、FinalShell
二、touch
(1)touch 命令核心原理与默认行为
(2)touch 命令常用选项与示例
1. 无选项(默认用法)
2. -a:仅更新访问时间(atime)
3. -m:仅更新修改时间(mtime)
4. -d / --date:自定义时间戳(支持灵活格式)
5. -t:固定格式自定义时间(适合脚本)
6. -r / --reference=参考文件:复制参考文件时间戳
7. -c / --no-create:不创建新文件(仅更新现有文件)
8. --help:查看 CentOS 本地帮助
9. --version:查看 CentOS 中 touch 版本
三、cat
(1)基础用法:查看单个文件内容
(2)核心用法:查看多个文件内容
(3)扩展用法 1:创建新文件(配合重定向 >)
(4)扩展用法 2:合并文件内容到新文件(配合重定向 >>)
示例
(5)扩展用法 3:显示行号(-n 选项)
(6)扩展用法 4:压缩空行(-s 选项)
(7)扩展用法 5:显示不可打印字符(-v/-t/-e 选项)
(8)扩展用法 6:不显示行号(-b 选项)
(9)特殊用法:配合管道(|)传递内容
四、与 "user" 相关的命令
(1)useradd
(2)userdel
(3)usermod
五、其他重点命令
(1)clear
(2)uname
(3)shutdown
一、FinalShell
FinalShell的下载地址为:
Windows: http://www.hostbuf.com/downloads/finalshell_install.exe
Mac: http://www.hostbuf.com/downloads/finalshell_install.pkg
下载完成后双击打开安装。
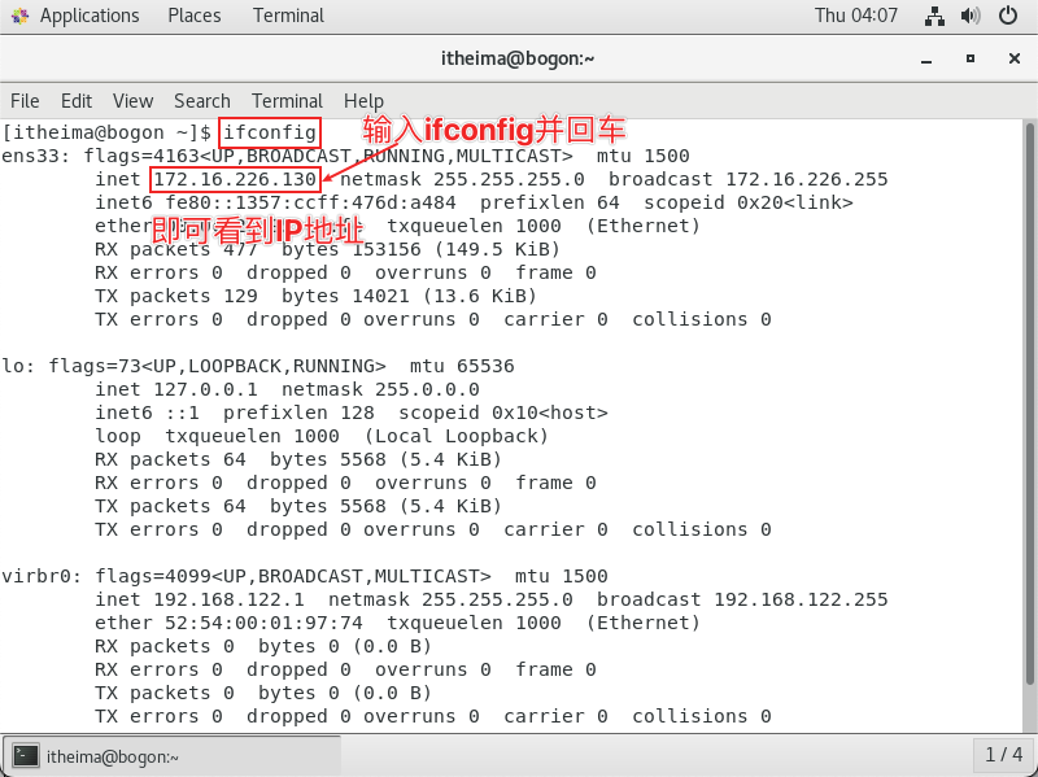
连接到Linux系统——首先,先查询到Linux系统的IP地址
打开Finshell软件,配置到Linux系统的连接(Mac和Windows系统的操作一致,不再分开赘述)

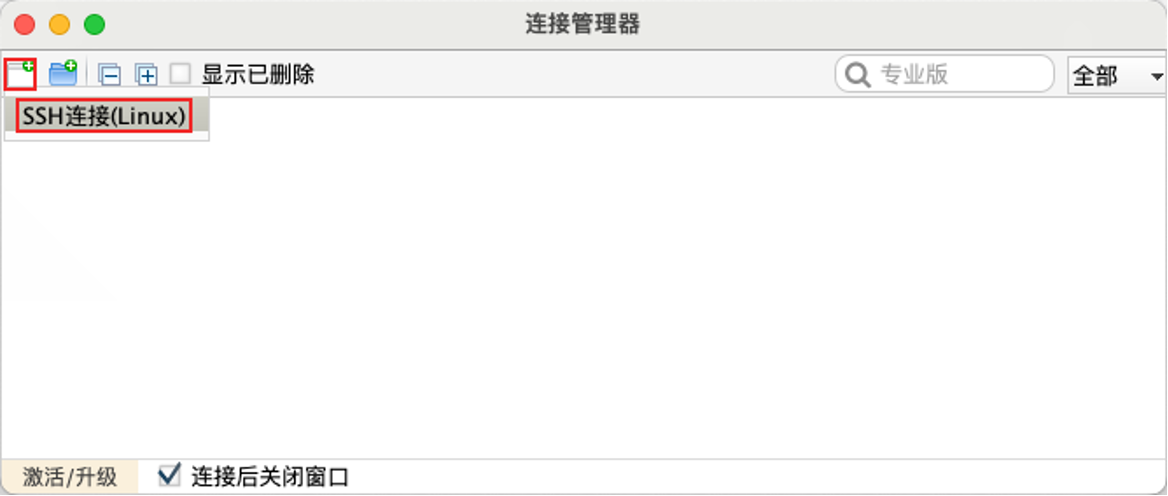
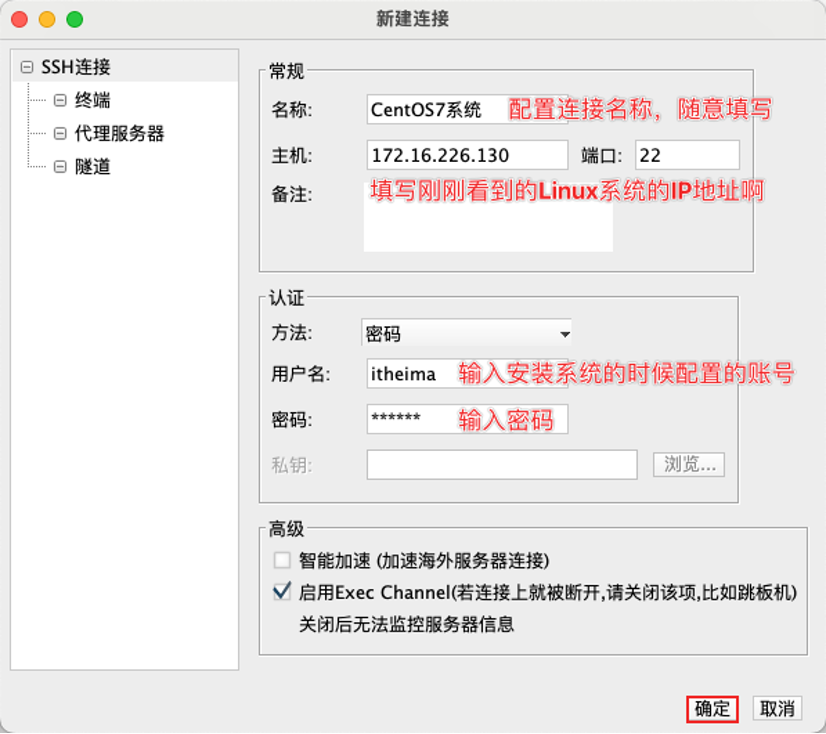
按图示配置连接,并点击确定
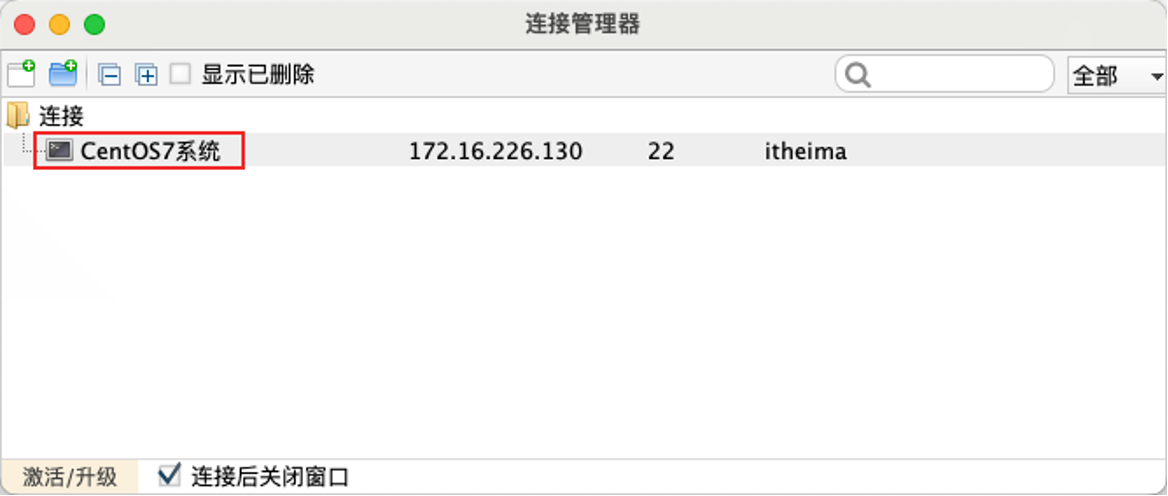
打开连接管理器

双击刚刚配置好的连接
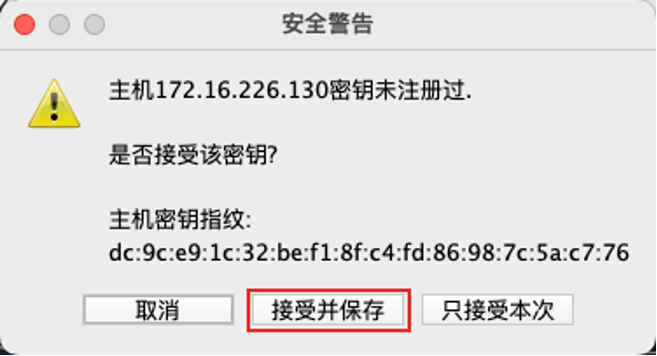
点击接受并保存
如图连接成功
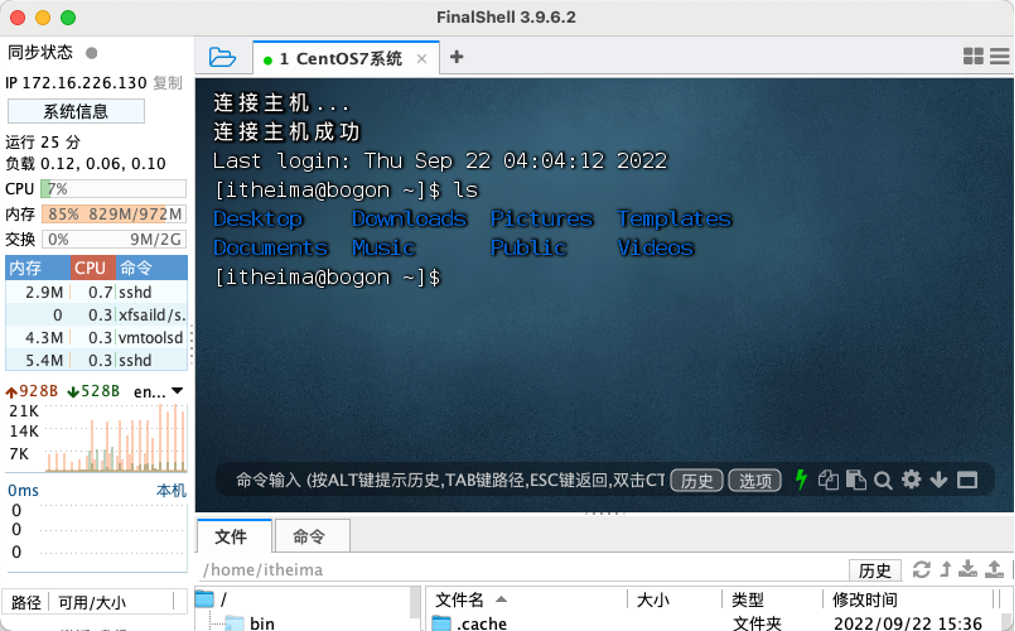
注意: Linux虚拟机如果重启,有可能,发生IP改变 如果改变IP需要在FinalShell中修改连接的IP地址 后面我们会讲解如何固定IP地址不发生改变
二、touch
touch 是 Linux 系统中最基础且常用的命令之一,核心功能是创建空文件或修改文件 / 目录的时间戳(包括访问时间 atime、修改时间 mtime 和更改时间 ctime),不具备编辑文件内容的能力。
(1)touch 命令核心原理与默认行为
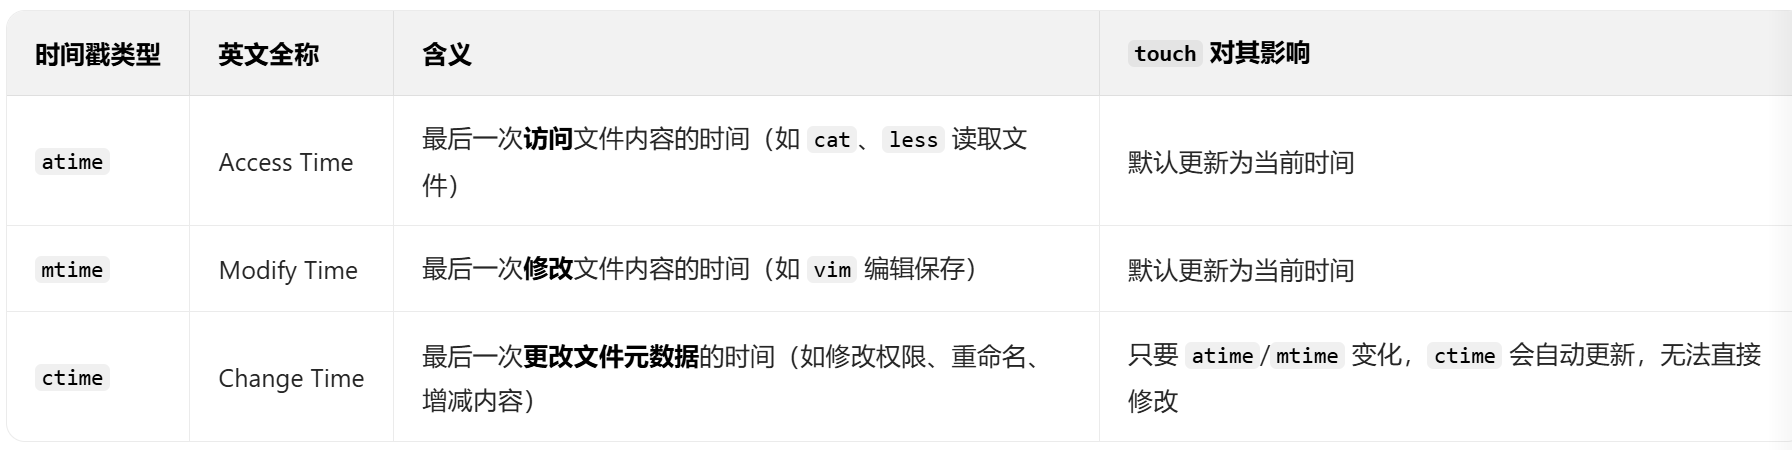
默认行为:如果目标文件不存在,touch 会创建一个空文件;如果文件已存在,会将其 atime 和 mtime 更新为当前系统时间(ctime 随之自动更新)。
(2)touch 命令常用选项与示例
touch命令的基本语法为:touch [选项] 文件名/目录名
以下示例均基于 CentOS Stream 9,用户为普通用户 centos,操作目录为 /home/centos(普通用户默认家目录)。
1. 无选项(默认用法)
- 作用:
- 文件不存在:创建空文件(权限受
umask控制); - 文件已存在:更新
atime和mtime为当前系统时间。
- 文件不存在:创建空文件(权限受
示例 1:创建单个空文件创建 centos-test.txt,并查看默认权限(符合 umask 0022 的 -rw-r--r--):
[centos@localhost ~]$ touch centos-test.txt
[centos@localhost ~]$ ls -l centos-test.txt  # 查看文件信息
-rw-r--r--. 1 centos centos 0 Oct 15 15:30 centos-test.txt  # CentOS 中会显示 SELinux 上下文标记“.”
示例 2:批量创建空文件同时创建 log1.log、data.csv、conf.ini(CentOS 支持空格分隔多文件名):
[centos@localhost ~]$ touch log1.log data.csv conf.ini
[centos@localhost ~]$ ls  # 验证创建结果
centos-test.txt  conf.ini  data.csv  log1.log
示例 3:更新已有文件时间戳先查看 centos-test.txt 原时间,再用 touch 更新:
[centos@localhost ~]$ ls -l centos-test.txt  # 原时间:15:30
-rw-r--r--. 1 centos centos 0 Oct 15 15:30 centos-test.txt[centos@localhost ~]$ touch centos-test.txt  # 更新时间戳
[centos@localhost ~]$ ls -l centos-test.txt  # 新时间:当前系统时间(假设 15:40)
-rw-r--r--. 1 centos centos 0 Oct 15 15:40 centos-test.txt
2. -a:仅更新访问时间(atime)
- 作用:不修改
mtime,仅将atime设为当前时间(ctime自动更新)。 - CentOS 示例:用
stat命令查看完整时间戳(CentOSstat输出格式与 Ubuntu 一致):
# 1. 查看原时间戳(重点关注 Access 和 Modify)
[centos@localhost ~]$ stat centos-test.txtFile: centos-test.txtSize: 0          Blocks: 0          IO Block: 4096   regular empty file
Device: fd00h/64768d Inode: 123457      Links: 1
Access: (0644/-rw-r--r--)  Uid: ( 1000/  centos)   Gid: ( 1000/  centos)
Context: unconfined_u:object_r:user_home_t:s0  # CentOS 特有的 SELinux 安全上下文
Access: 2024-10-15 15:40:00.000000000 +0800  # 原 atime
Modify: 2024-10-15 15:40:00.000000000 +0800  # 原 mtime
Change: 2024-10-15 15:40:00.000000000 +0800  # 原 ctime# 2. 仅更新 atime
[centos@localhost ~]$ touch -a centos-test.txt# 3. 验证结果(atime 变新,mtime 不变)
[centos@localhost ~]$ stat centos-test.txt | grep -E "Access|Modify"
Access: 2024-10-15 15:45:00.000000000 +0800  # 新 atime
Modify: 2024-10-15 15:40:00.000000000 +0800  # mtime 未变
3. -m:仅更新修改时间(mtime)
- 作用:不修改
atime,仅将mtime设为当前时间(ctime自动更新)。 - CentOS 示例:延续上例,更新
centos-test.txt的mtime:
[centos@localhost ~]$ touch -m centos-test.txt
[centos@localhost ~]$ stat centos-test.txt | grep -E "Access|Modify"
Access: 2024-10-15 15:45:00.000000000 +0800  # atime 未变
Modify: 2024-10-15 15:50:00.000000000 +0800  # 新 mtime(当前时间)
4. -d / --date:自定义时间戳(支持灵活格式)
- 作用:将
atime和mtime设为指定时间(支持相对时间、绝对时间,CentOS 完全兼容 GNU 格式)。 - 支持的时间格式:
- 相对时间:
yesterday(昨天)、2 days ago(2 天前)、1 hour ago(1 小时前); - 绝对时间:
2024-10-01(仅日期)、2024-10-01 09:30(日期 + 时间)、Oct 1 09:30(月份缩写)。
- 相对时间:
CentOS 示例 1:设置为 “昨天”将 log1.log 时间戳设为昨天同一时刻:
[centos@localhost ~]$ touch -d "yesterday" log1.log
[centos@localhost ~]$ ls -l log1.log
-rw-r--r--. 1 centos centos 0 Oct 14 15:50 log1.log  # 日期为昨天(Oct 14)
示例 2:设置为绝对时间将 data.csv 时间戳设为 2024-09-15 14:20:
[centos@localhost ~]$ touch -d "2024-09-15 14:20" data.csv
[centos@localhost ~]$ ls -l data.csv
-rw-r--r--. 1 centos centos 0 Sep 15 14:20 data.csv
5. -t:固定格式自定义时间(适合脚本)
- 作用:按
[[CC]YY]MMDDhhmm[.ss]格式设置时间(CentOS 脚本自动化中常用,格式严格)。 - 格式说明:
CC(可选):世纪(如20代表 2000 年后);YY(可选):年份(如24代表 2024 年);MM(必选):月份(01-12)、DD(必选):日期(01-31);hh(必选):小时(00-23)、mm(必选):分钟(00-59);ss(可选):秒(00-59)。
- CentOS 示例:设置
conf.ini时间为2024-10-01 10:30:45:
[centos@localhost ~]$ touch -t 202410011030.45 conf.ini
[centos@localhost ~]$ stat conf.ini | grep -E "Access|Modify"
Access: 2024-10-01 10:30:45.000000000 +0800
Modify: 2024-10-01 10:30:45.000000000 +0800
6. -r / --reference=参考文件:复制参考文件时间戳
- 作用:将目标文件的时间戳同步为 “参考文件” 的时间(CentOS 中常用于统一日志、配置文件的时间格式)。
- CentOS 示例:让
new-file.txt的时间与centos-test.txt一致:
# 1. 查看参考文件 centos-test.txt 的时间
[centos@localhost ~]$ ls -l centos-test.txt
-rw-r--r--. 1 centos centos 0 Oct 15 15:50 centos-test.txt# 2. 创建新文件 new-file.txt(默认时间为当前时间)
[centos@localhost ~]$ touch new-file.txt
[centos@localhost ~]$ ls -l new-file.txt
-rw-r--r--. 1 centos centos 0 Oct 15 16:00 new-file.txt# 3. 同步参考文件的时间戳
[centos@localhost ~]$ touch -r centos-test.txt new-file.txt# 4. 验证结果(时间一致)
[centos@localhost ~]$ ls -l new-file.txt
-rw-r--r--. 1 centos centos 0 Oct 15 15:50 new-file.txt
7. -c / --no-create:不创建新文件(仅更新现有文件)
- 作用:若目标文件不存在,
touch -c不执行任何操作(CentOS 中避免误创建空文件,尤其在 root 用户操作时)。 - CentOS 示例:尝试更新不存在的
nonexist.txt:
# 1. 无 -c:创建不存在的文件
[centos@localhost ~]$ touch nonexist.txt
[centos@localhost ~]$ ls nonexist.txt  # 文件已创建
nonexist.txt# 2. 删除文件后,用 -c 尝试更新(不创建)
[centos@localhost ~]$ rm nonexist.txt
[centos@localhost ~]$ touch -c nonexist.txt  # 无输出(不创建)
[centos@localhost ~]$ ls nonexist.txt  # 验证:文件不存在
ls: cannot access 'nonexist.txt': No such file or directory
8. --help:查看 CentOS 本地帮助
- 作用:显示
touch所有选项说明(CentOS 帮助信息为英文,包含 GNU 特性说明)。 - CentOS 示例:
[centos@localhost ~]$ touch --help
Usage: touch [OPTION]... FILE...
Update the access and modification times of each FILE to the current time.
...(后续为完整选项说明,与 GNU coreutils 一致)
9. --version:查看 CentOS 中 touch 版本
- 作用:CentOS Stream 9 预装
coreutils-8.53-1(截至 2024 年 5 月),可通过此选项确认版本。 - CentOS 示例:
[centos@localhost ~]$ touch --version
touch (GNU coreutils) 8.53
Copyright (C) 2024 Free Software Foundation, Inc.
License GPLv3+: GNU GPL version 3 or later <https://gnu.org/licenses/gpl.html>.
This is free software: you are free to change and redistribute it.
There is NO WARRANTY, to the extent permitted by law.Written by Paul Rubin, Arnold Robbins, Jim Kingdon, David MacKenzie, and Randy Smith.
三、cat
核心功能是 “连接文件并打印到标准输出(stdout)”,但衍生出多种实用用法。
(1)基础用法:查看单个文件内容
1.作用
直接读取并打印指定文件的全部内容(适合内容较短的文件,如配置片段、日志片段),不会分页(内容过长时会快速滚屏,长文件建议用 less 或 more)。
2.命令格式
cat [文件名]
3.示例
①查看 CentOS 的系统版本文件(查看系统内核及发行版信息):
cat /etc/redhat-release
输出示例:
CentOS Stream release 9
②查看 /etc/hosts 文件(本地域名解析配置):
cat /etc/hosts
输出示例:
127.0.0.1 localhost localhost.localdomain localhost4 localhost4.localdomain4
::1 localhost localhost.localdomain localhost6 localhost6.localdomain6
(2)核心用法:查看多个文件内容
1.作用
同时读取多个文件,并按 “文件顺序” 将内容拼接后打印到屏幕(可用于对比或合并多个同类文件的内容)。
2.命令格式
cat [文件1] [文件2] [文件3] ...
3.示例
①同时查看 /etc/hostname(主机名配置)和 /etc/hosts(本地解析):
cat /etc/hostname /etc/hosts输出示例(先打印 hostname 内容,再打印 hosts 内容):
centos-stream-9
127.0.0.1   localhost localhost.localdomain localhost4 localhost4.localdomain4
::1         localhost localhost.localdomain localhost6 localhost6.localdomain6
②查看当前目录下的 log1.txt 和 log2.txt 两个日志文件:
cat log1.txt log2.txt(3)扩展用法 1:创建新文件(配合重定向 >)
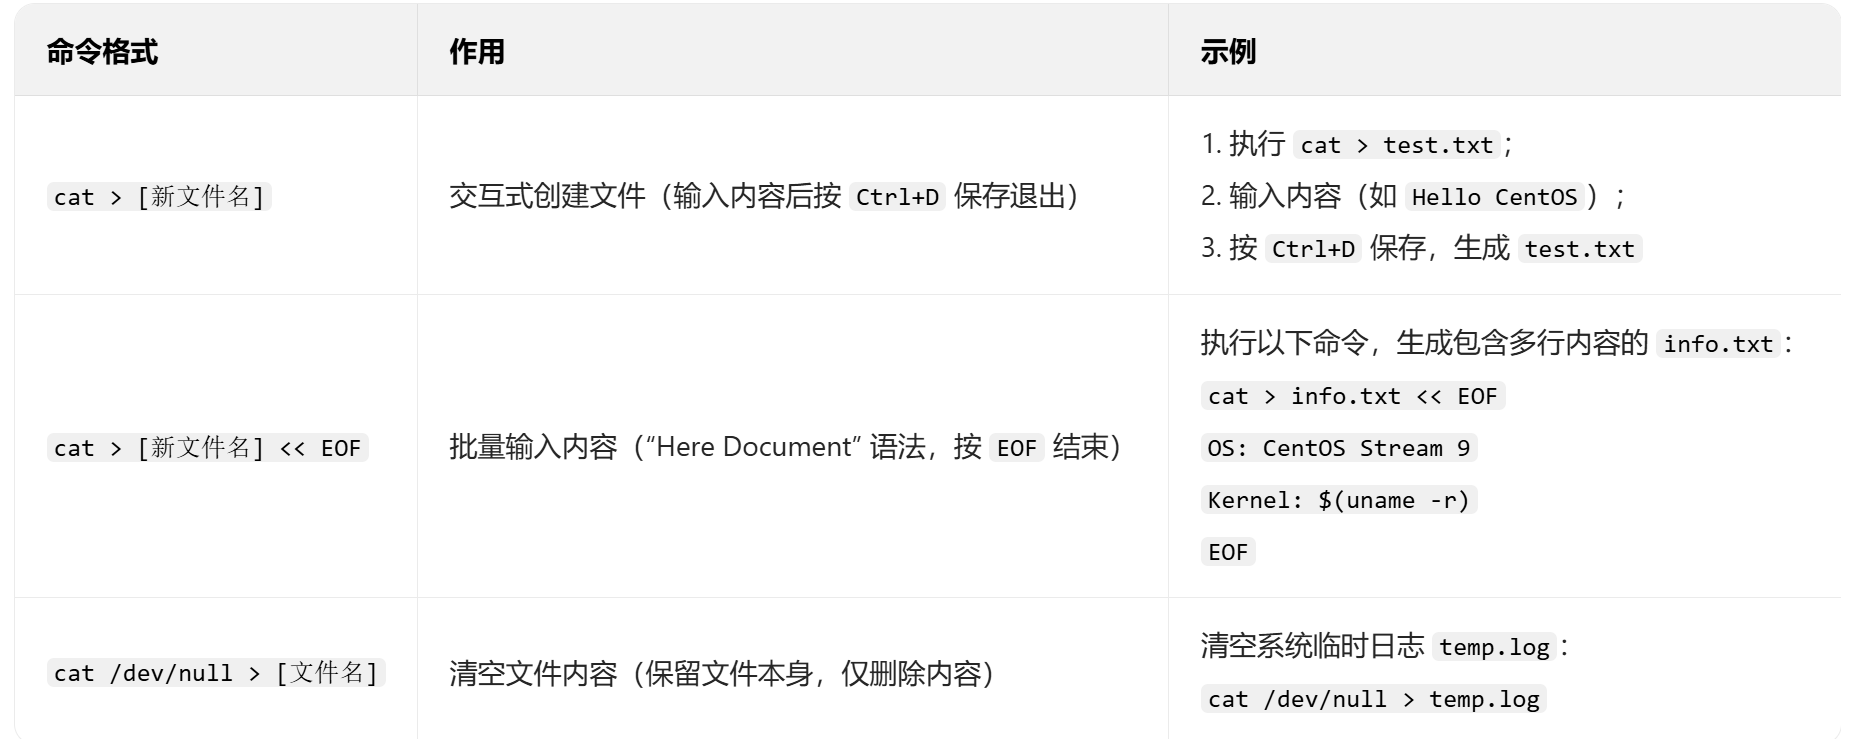
1.作用:通过 cat 结合重定向符号 >,快速创建空文件或包含简单内容的文件(无需打开文本编辑器)。
2.命令格式 & 示例
例2:将stu1、stu2、stu3三个文件合并为一个文件stu4。
[root@localhost ~]#cat stu1 stu2 stu3 >stu4
(4)扩展用法 2:合并文件内容到新文件(配合重定向 >>)
1.作用:通过 >>(追加重定向),将多个文件的内容合并并追加到新文件(不会覆盖原有文件内容,若文件不存在则创建)。
2.命令格式
cat [文件1] [文件2] ... >> [目标文件]
示例
①将 file1.txt 和 file2.txt 的内容合并到 merged.txt(若 merged.txt 已存在,内容追加到末尾):
cat file1.txt file2.txt >> merged.txt②追加单个文件内容到目标文件:
cat /etc/redhat-release >> system_info.txt③例:将文件stu4追加到文件stu1末尾。
[root@localhost ~]#cat stu4 >> stu1
(5)扩展用法 3:显示行号(-n 选项)
1.作用:查看文件时,为每一行内容添加行号(包括空行),适合核对配置文件的行结构(如脚本、配置项)。
2.命令格式
cat -n [文件名]
3.示例
查看 /etc/passwd(用户账户配置文件)并显示行号:
cat -n /etc/passwd输出示例(前 5 行):
1 root:x:0:0:root:/root:/bin/bash2 bin:x:1:1:bin:/bin:/sbin/nologin3 daemon:x:2:2:daemon:/sbin:/sbin/nologin4 adm:x:3:4:adm:/var/adm:/sbin/nologin5 lp:x:4:7:lp:/var/spool/lpd:/sbin/nologin(6)扩展用法 4:压缩空行(-s 选项)
1.作用:将文件中的连续空行压缩为单个空行(保留单个空行,删除多余空行),使文件内容更整洁。
2.命令格式
cat -s [文件名]
3.示例
假设 messy.txt 中有多个连续空行,执行以下命令压缩空行:
cat -s messy.txt原文件(含 3 个连续空行):
line1line2执行后输出(压缩为 1 个空行):
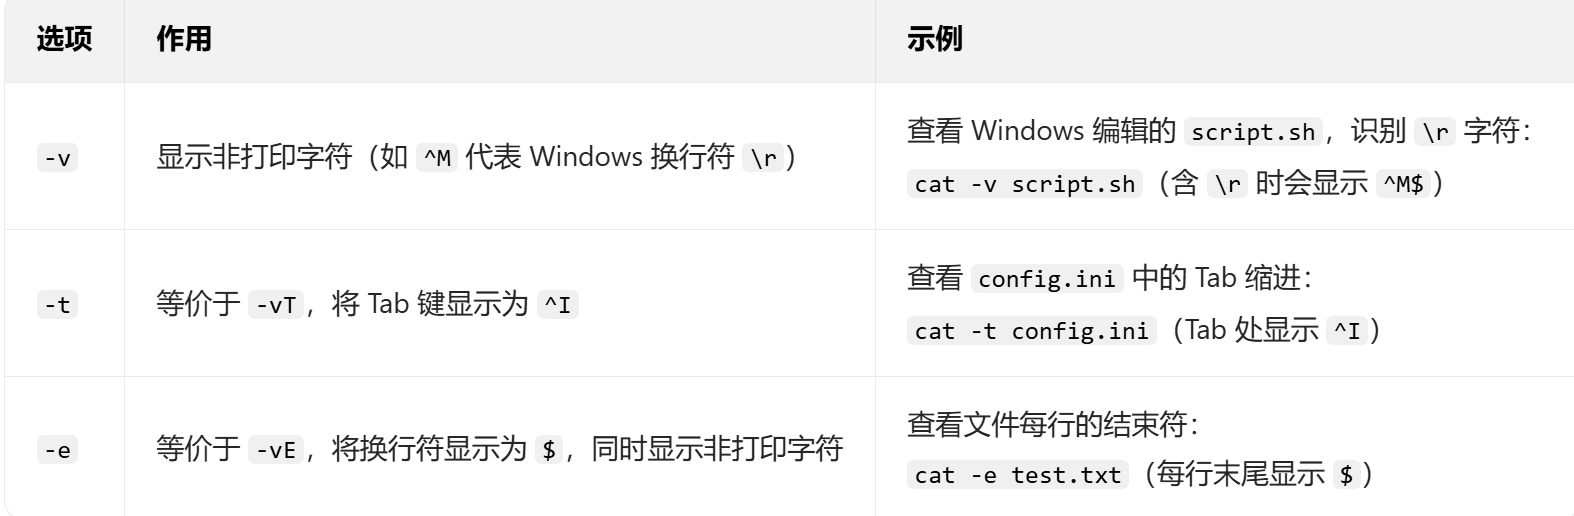
line1line2(7)扩展用法 5:显示不可打印字符(-v/-t/-e 选项)
1.作用:查看文件中不可见的特殊字符(如 Tab 键、换行符、控制字符),常用于排查脚本或配置文件的格式错误(如 Windows 格式的 \r\n 换行符)。
2.选项说明 & 示例
(8)扩展用法 6:不显示行号(-b 选项)
-b:对输出内容中的非空行标注行号。
(9)特殊用法:配合管道(|)传递内容
1.作用:将 cat 读取的文件内容,通过管道 | 传递给其他命令(如 grep 过滤、sort 排序、wc 统计),实现复杂操作。
2.示例
①过滤文件内容:查看 /var/log/messages(系统日志)中包含 “error” 的行:
cat /var/log/messages | grep -i "error"②统计文件行数:用 wc -l 统计 /etc/passwd 的用户数量(每行对应一个用户):
cat /etc/passwd | wc -l③排序文件内容:将 numbers.txt 的内容排序后输出:
cat numbers.txt | sort -n四、与 "user" 相关的命令
(1)useradd
作用:创建新用户
示例:useradd newuser # 创建名为 newuser 的用户
(2)userdel
作用:删除用户
示例:userdel newuser # 删除名为 newuser 的用户
示例:userdel -r newuser # 删除用户及其主目录
(3)usermod
作用:修改用户属性
示例:usermod -l newname oldname # 修改用户名
示例:usermod -d /new/home/dir username # 修改用户主目录
五、其他重点命令
(1)clear
用于清除字符终端屏幕内容
(2)uname
用于显示系统信息
(3)shutdown
用于在指定时间关闭系统
语法:shutdown [选项] 时间
-r:重新启动系统
-h:关机
时间表示为:
- now:立即。
- hh:mm:hh小时mm分钟。
+m:表示m分钟以后。
例1:现在关机并重启。
[root@localhost ~]# shutdown -r now
例2:在11:30分后关闭系统,并且不重新启动。
[root@localhost ~]# shutdown -h 11:30
reboot:重新启动系统,相当于“shutdown –r now”。
poweroff:关机,相当于“shutdown –h now”。
history:用于显示用户最近执行的命令。