自由学习记录(103)
【NAI4.5教程】NovelAI 4.5 Full 从零开始 1 小时掌握最强二次元AI画图工具|重置版教程_哔哩哔哩_bilibili
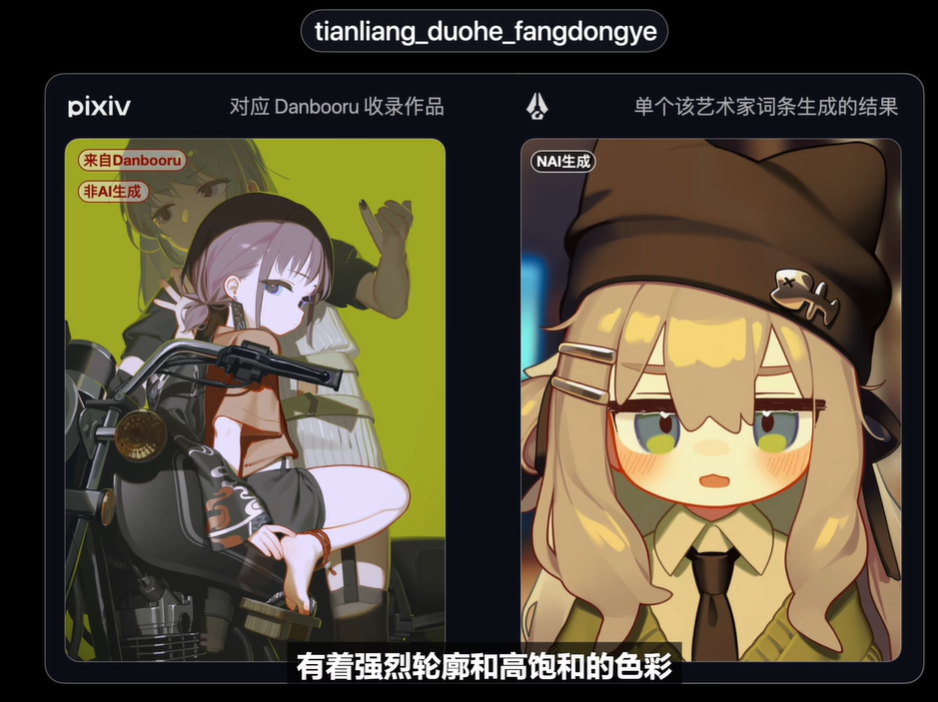
立体感,,,强烈的轮廓分界,,,,,高饱和的色彩
https://www.woshipm.com/ucd/1729140.html

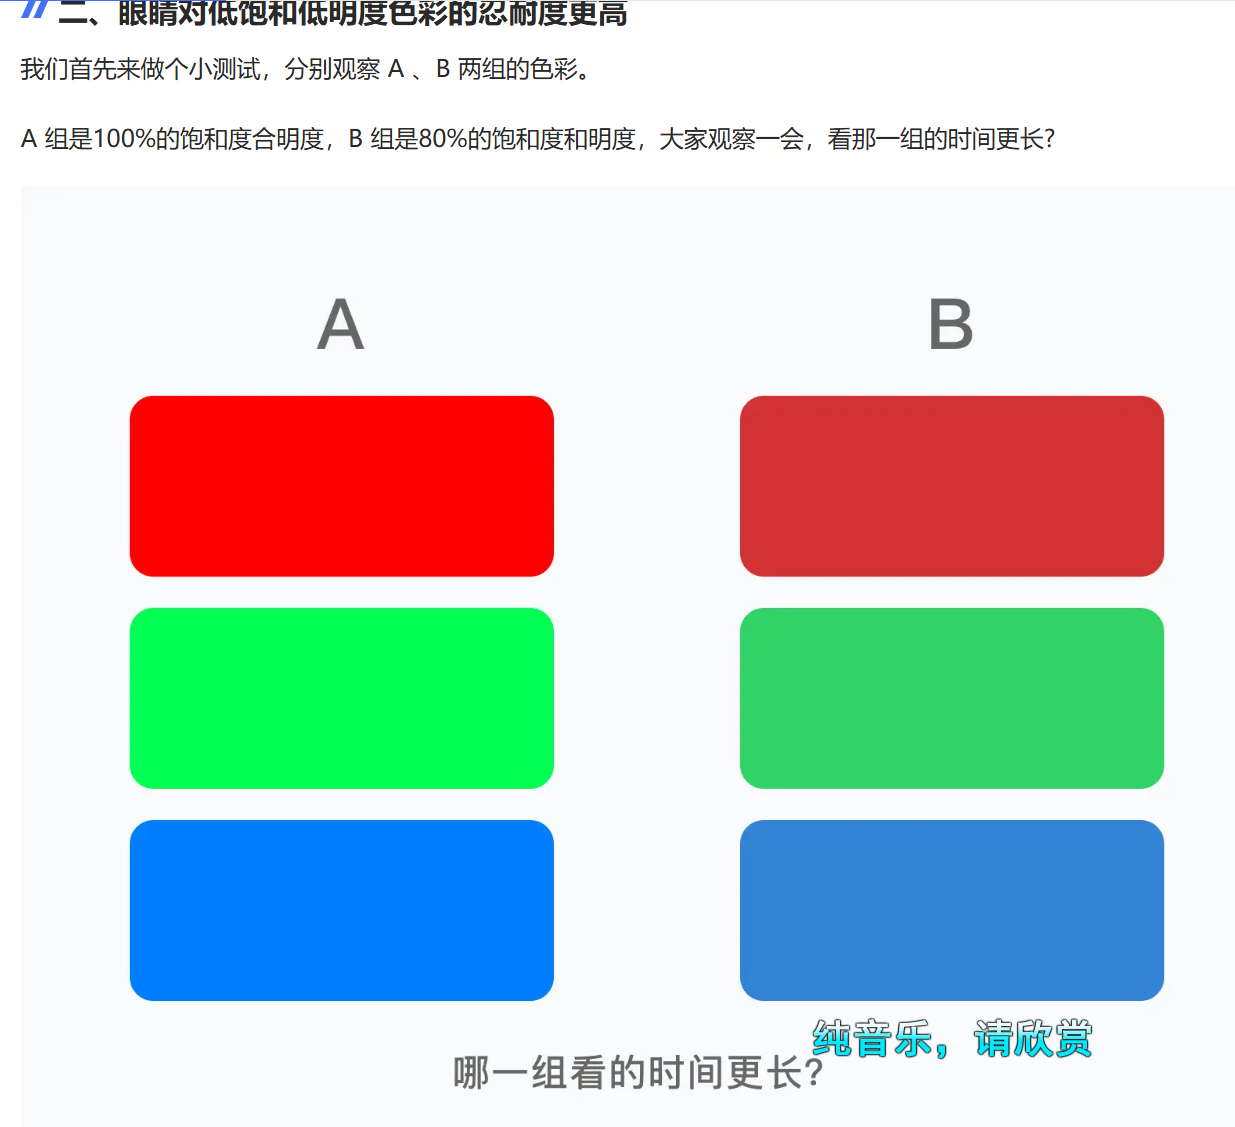
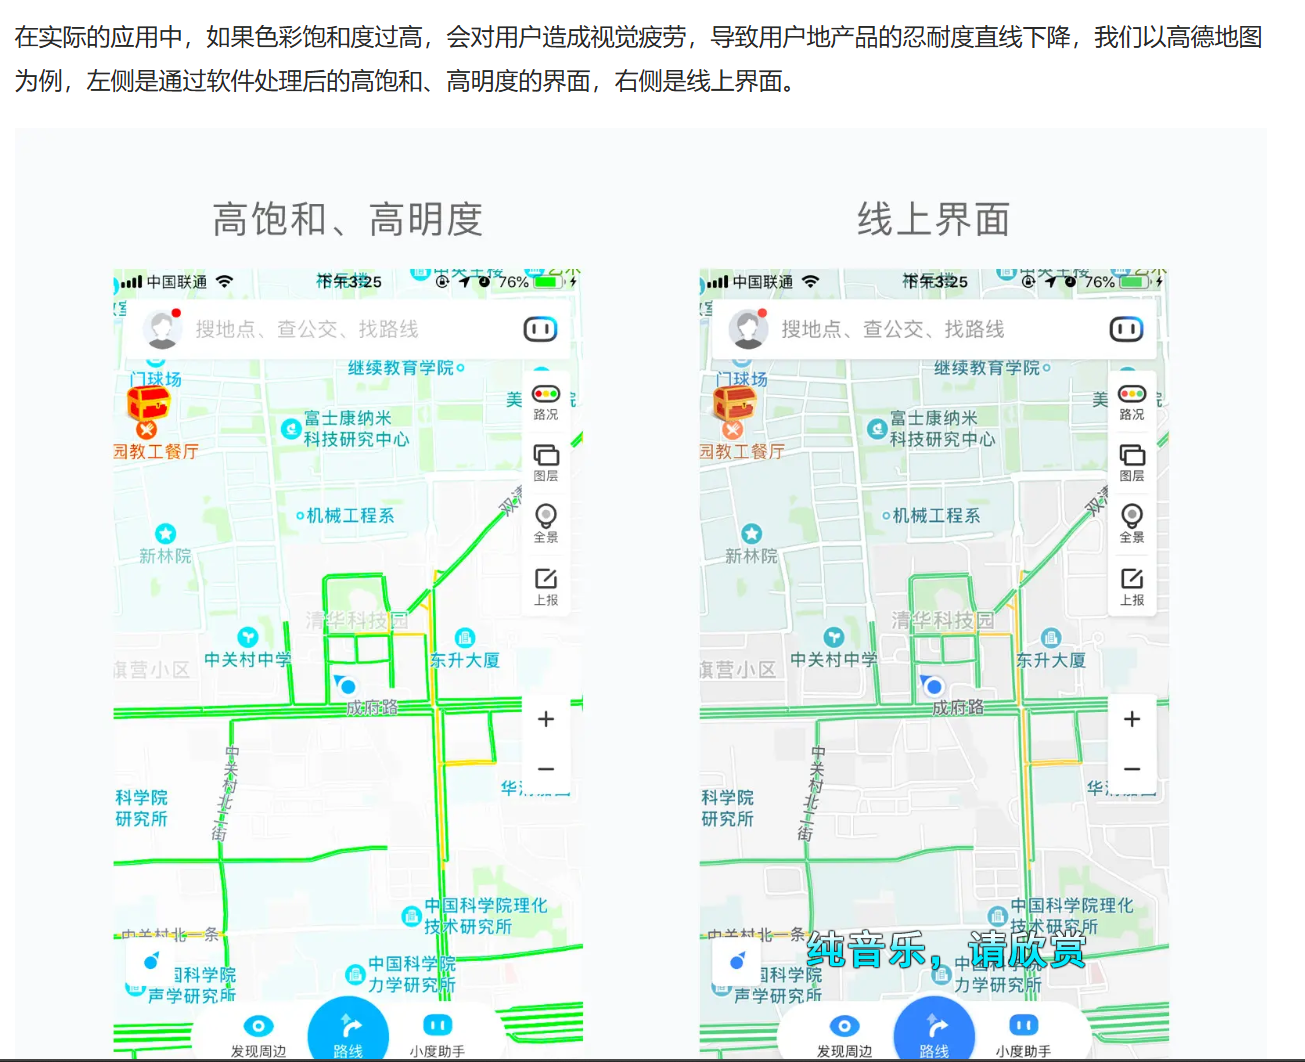
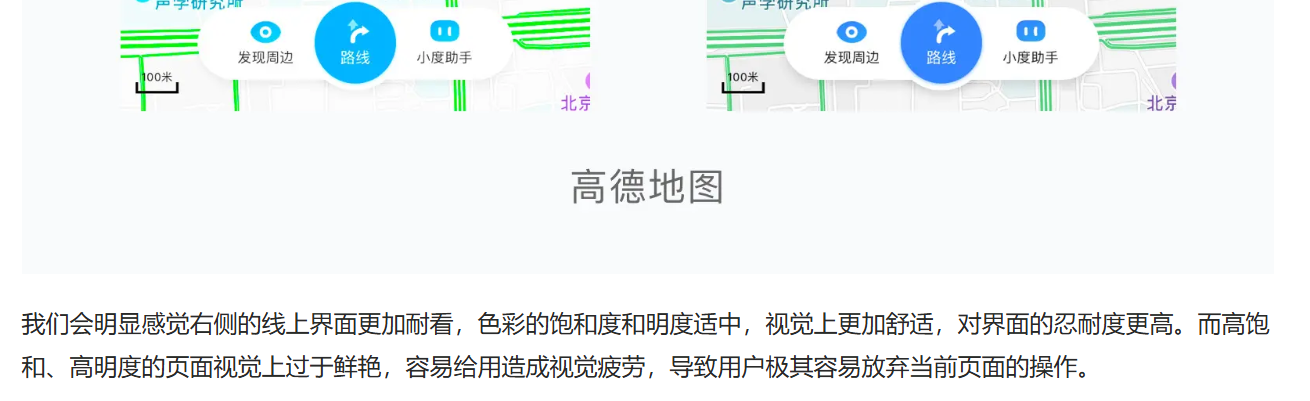
高饱和色彩缺乏品质感,缺乏忍耐度,高饱和色彩可以劝退用户的体验意愿
低饱和低明度,给人以整体感,和谐的构成
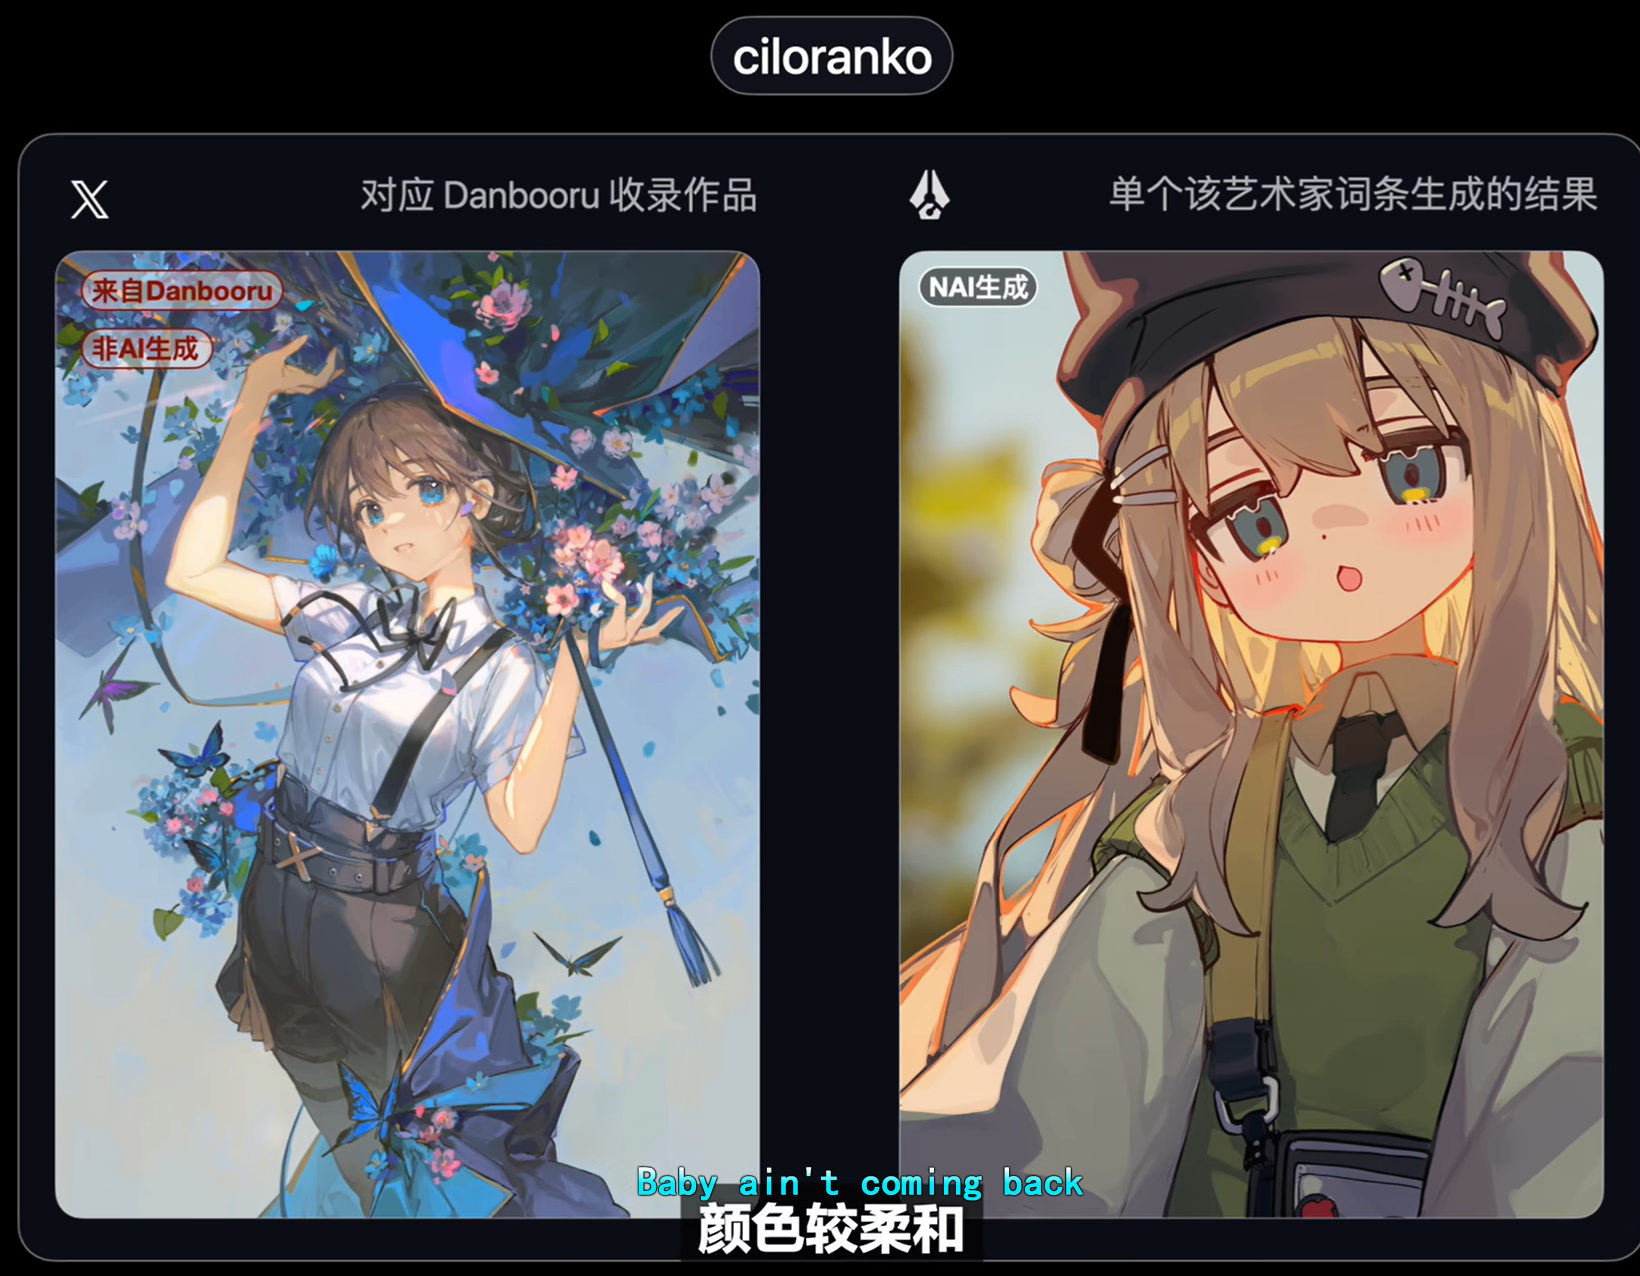
颜色,柔和?听不懂了
些许油画的笔触??
尤其是最左边的那张图,,为什么画的这么自然了?
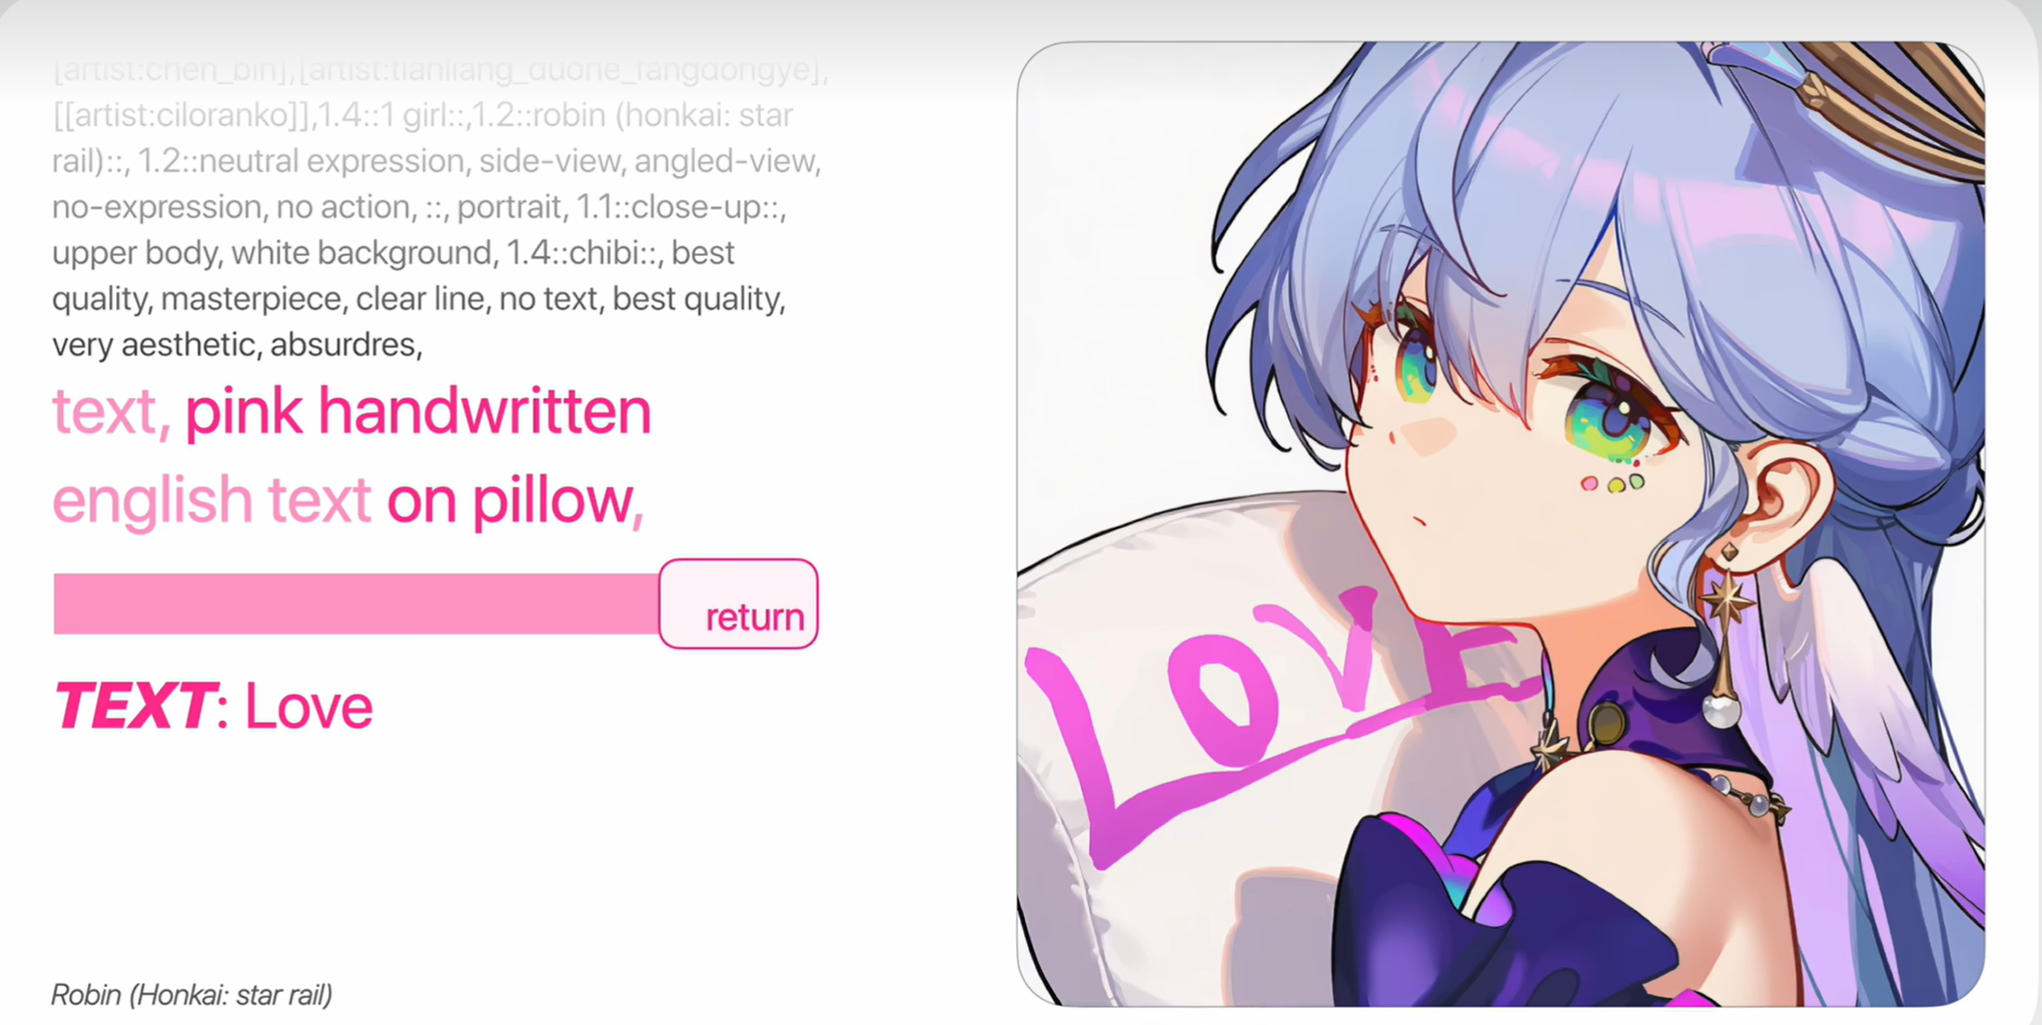
到底是什么内部的训练,让这样的图可以吸收一个抽象的“画师画风”,
光是靠像素的加噪去噪就可以做到这样的程度吗?‘“”’
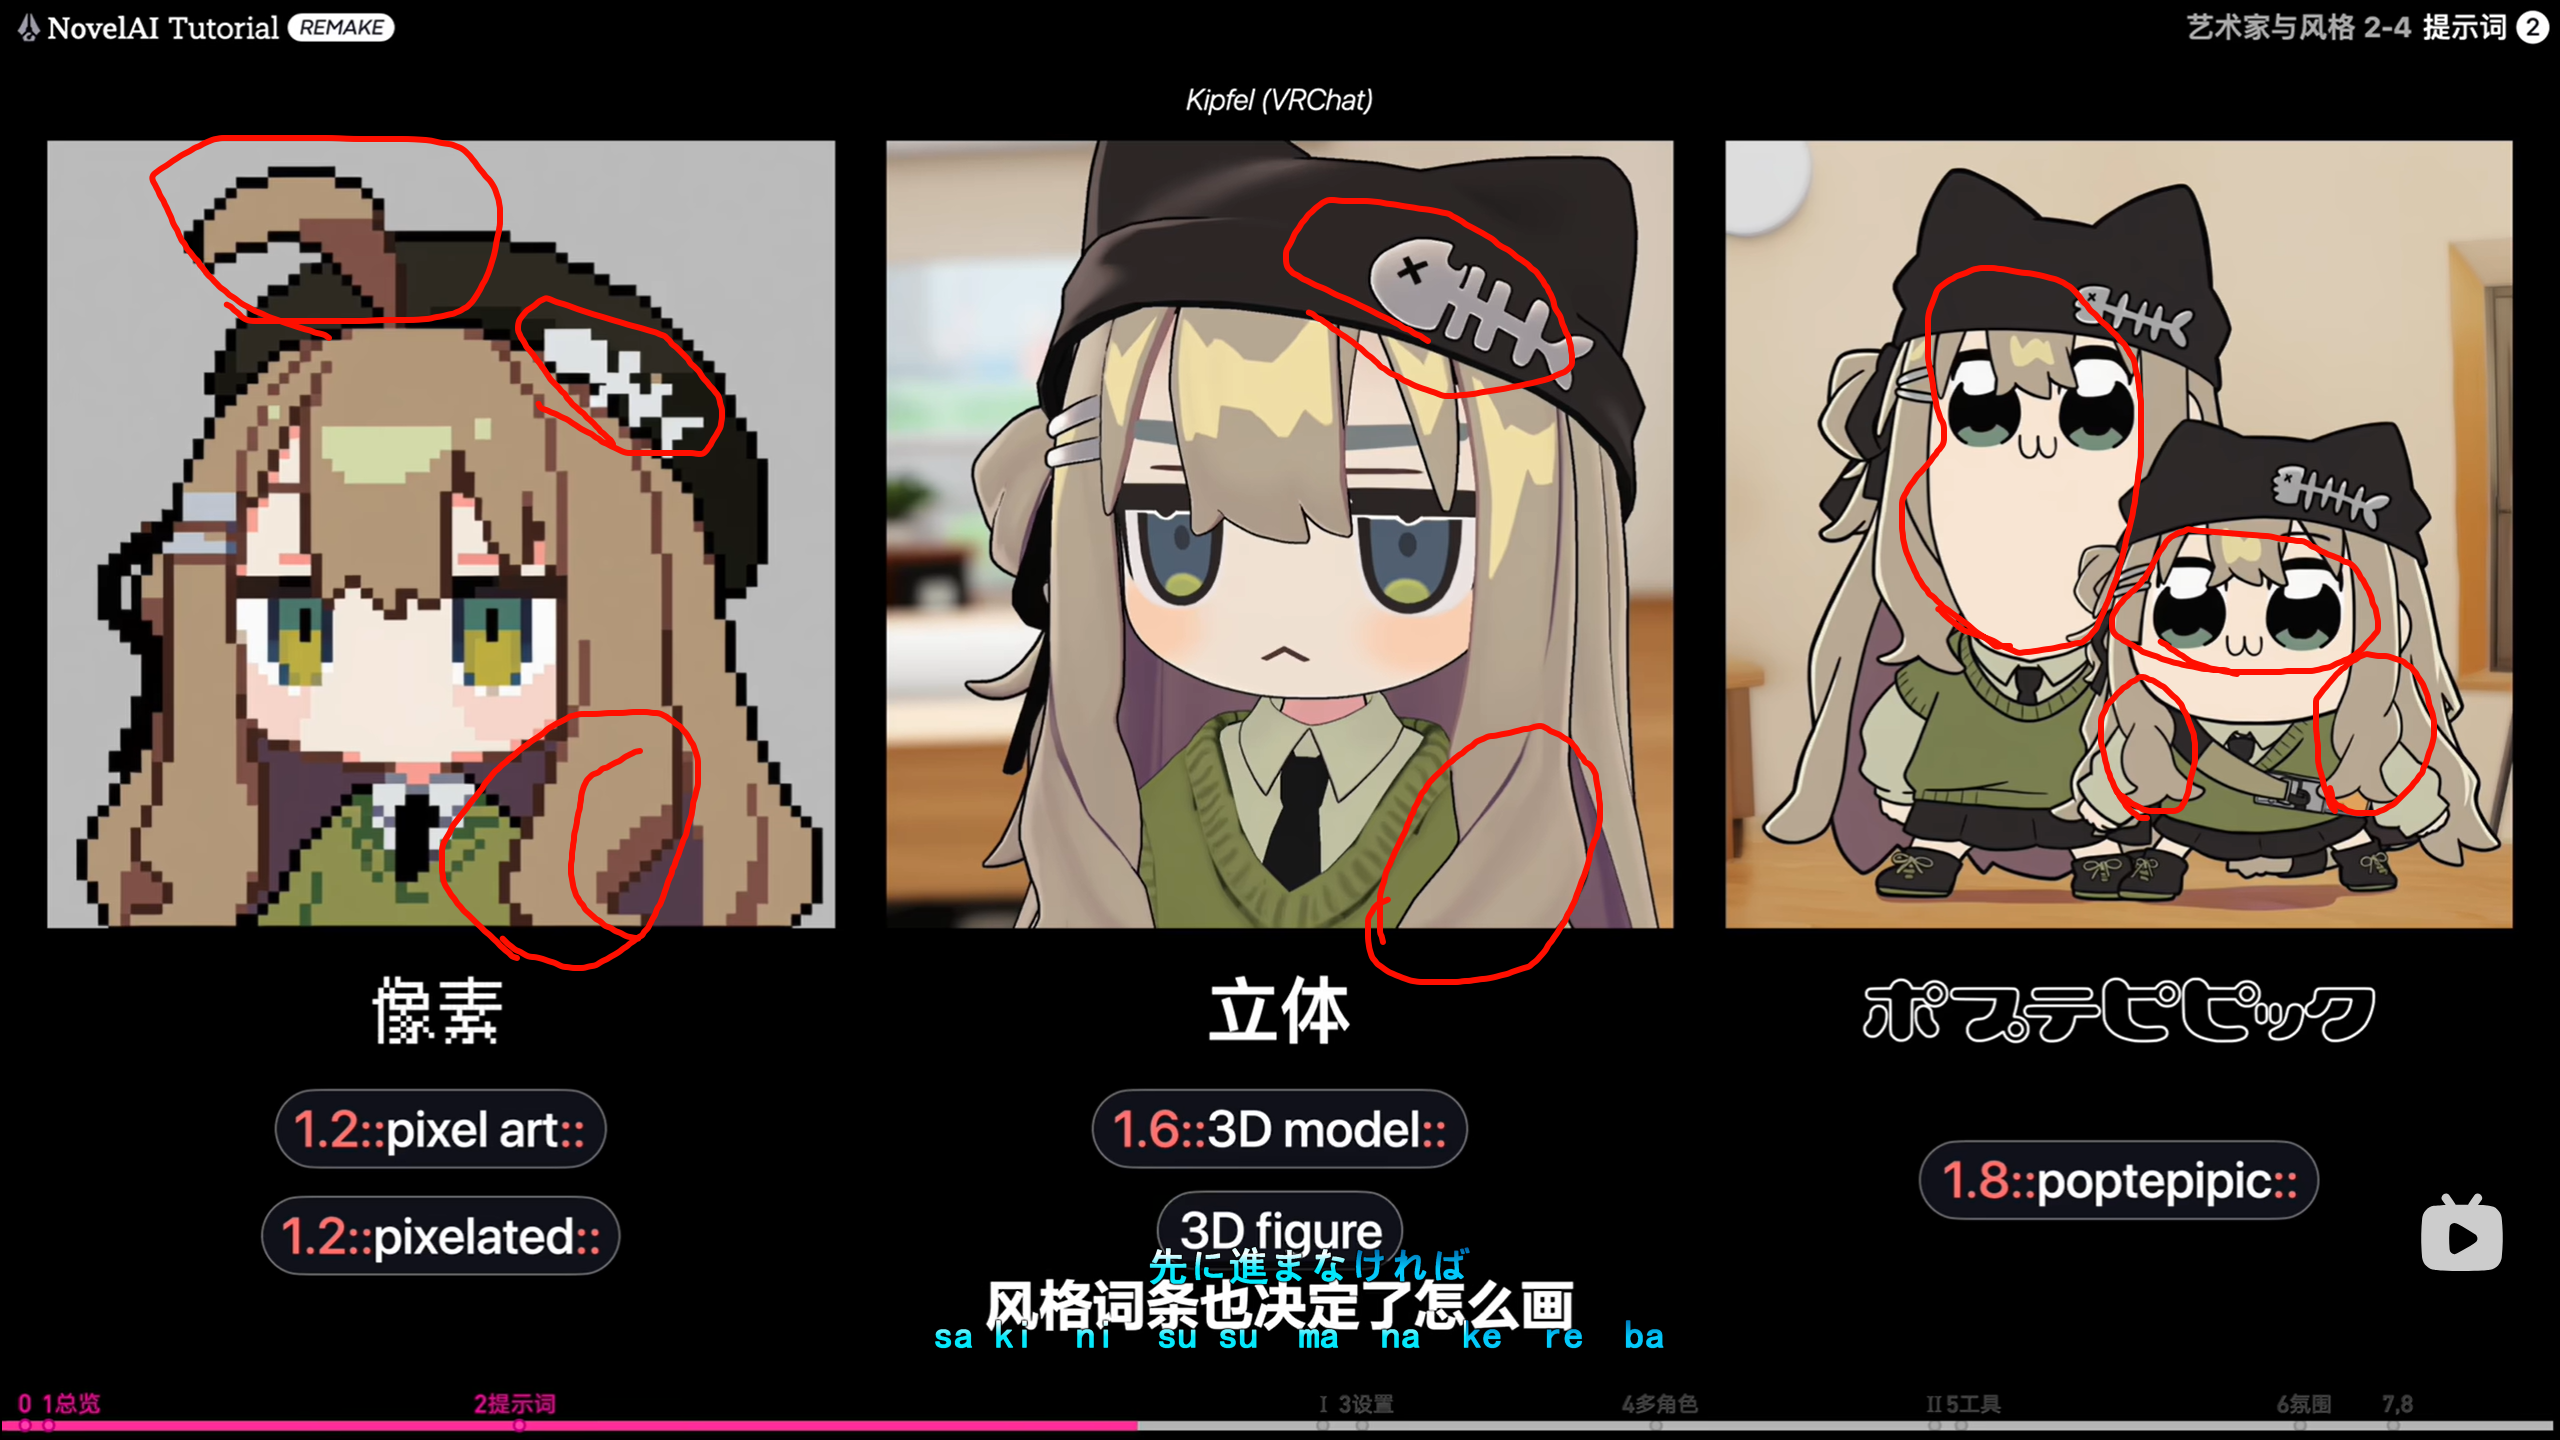
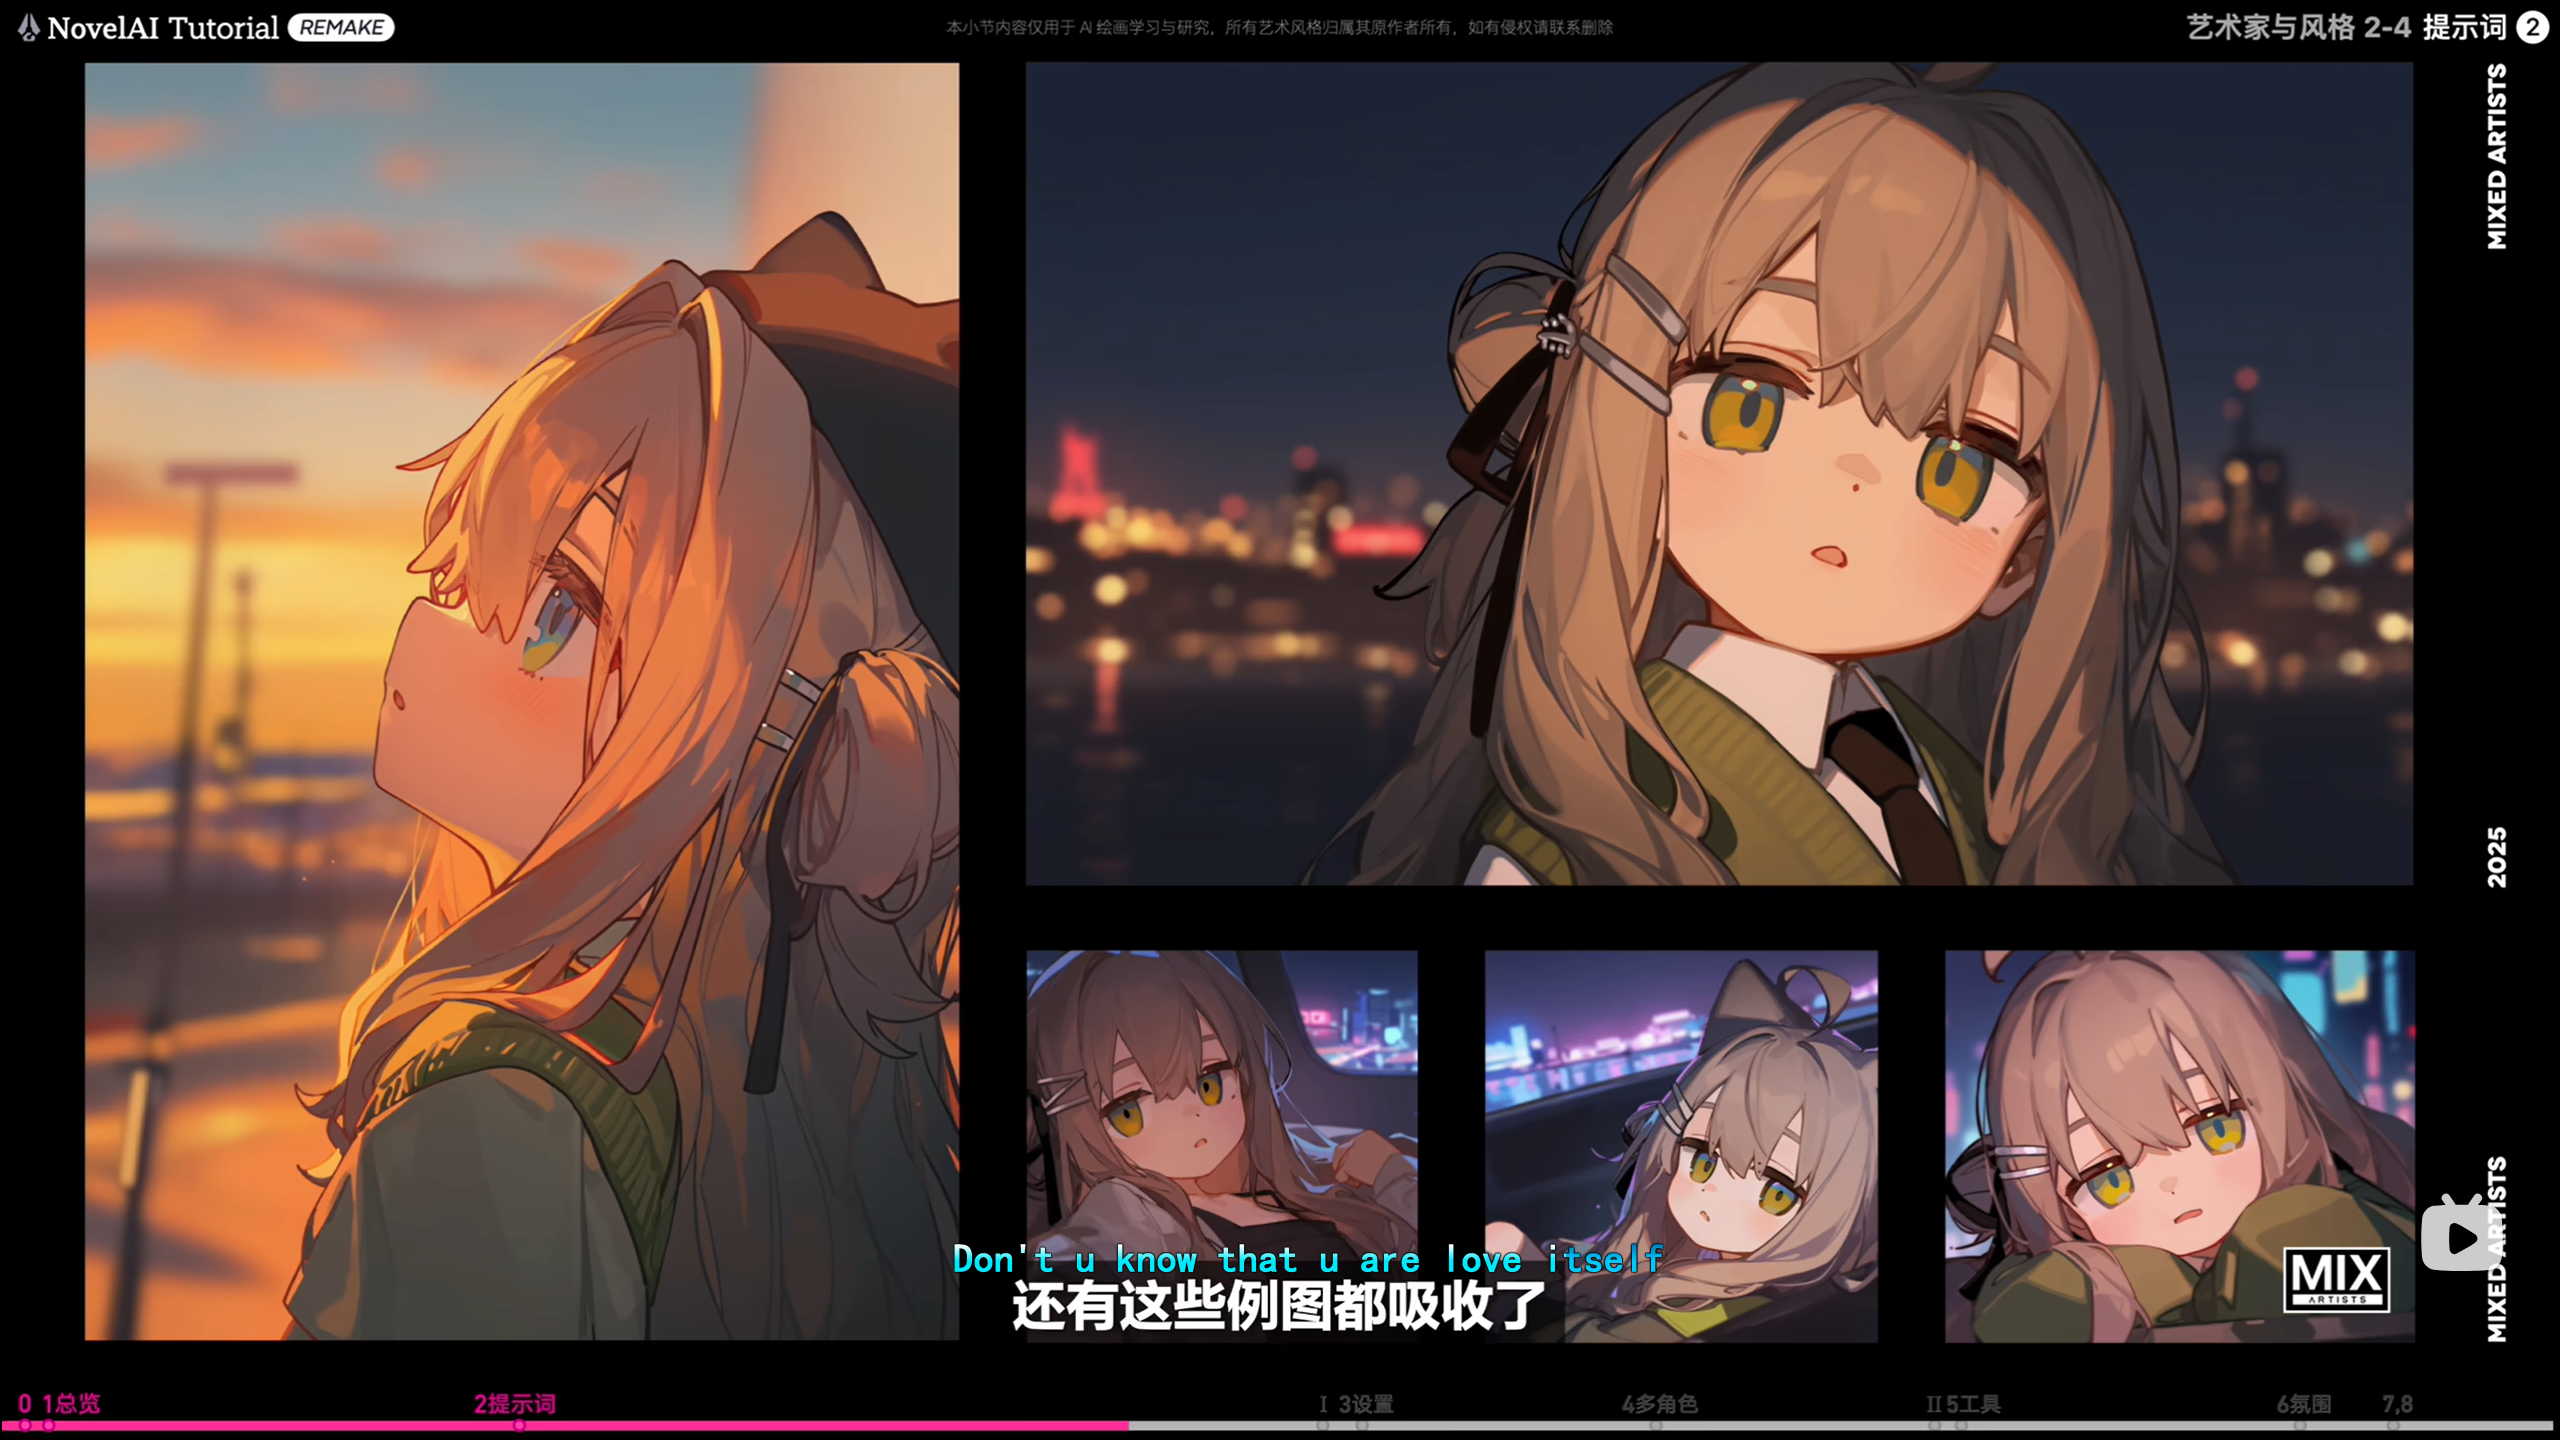
艺术家词条可以被吸收,风格词条也可以被吸收
像素风格,被吸收学习
立体风格,建模感,
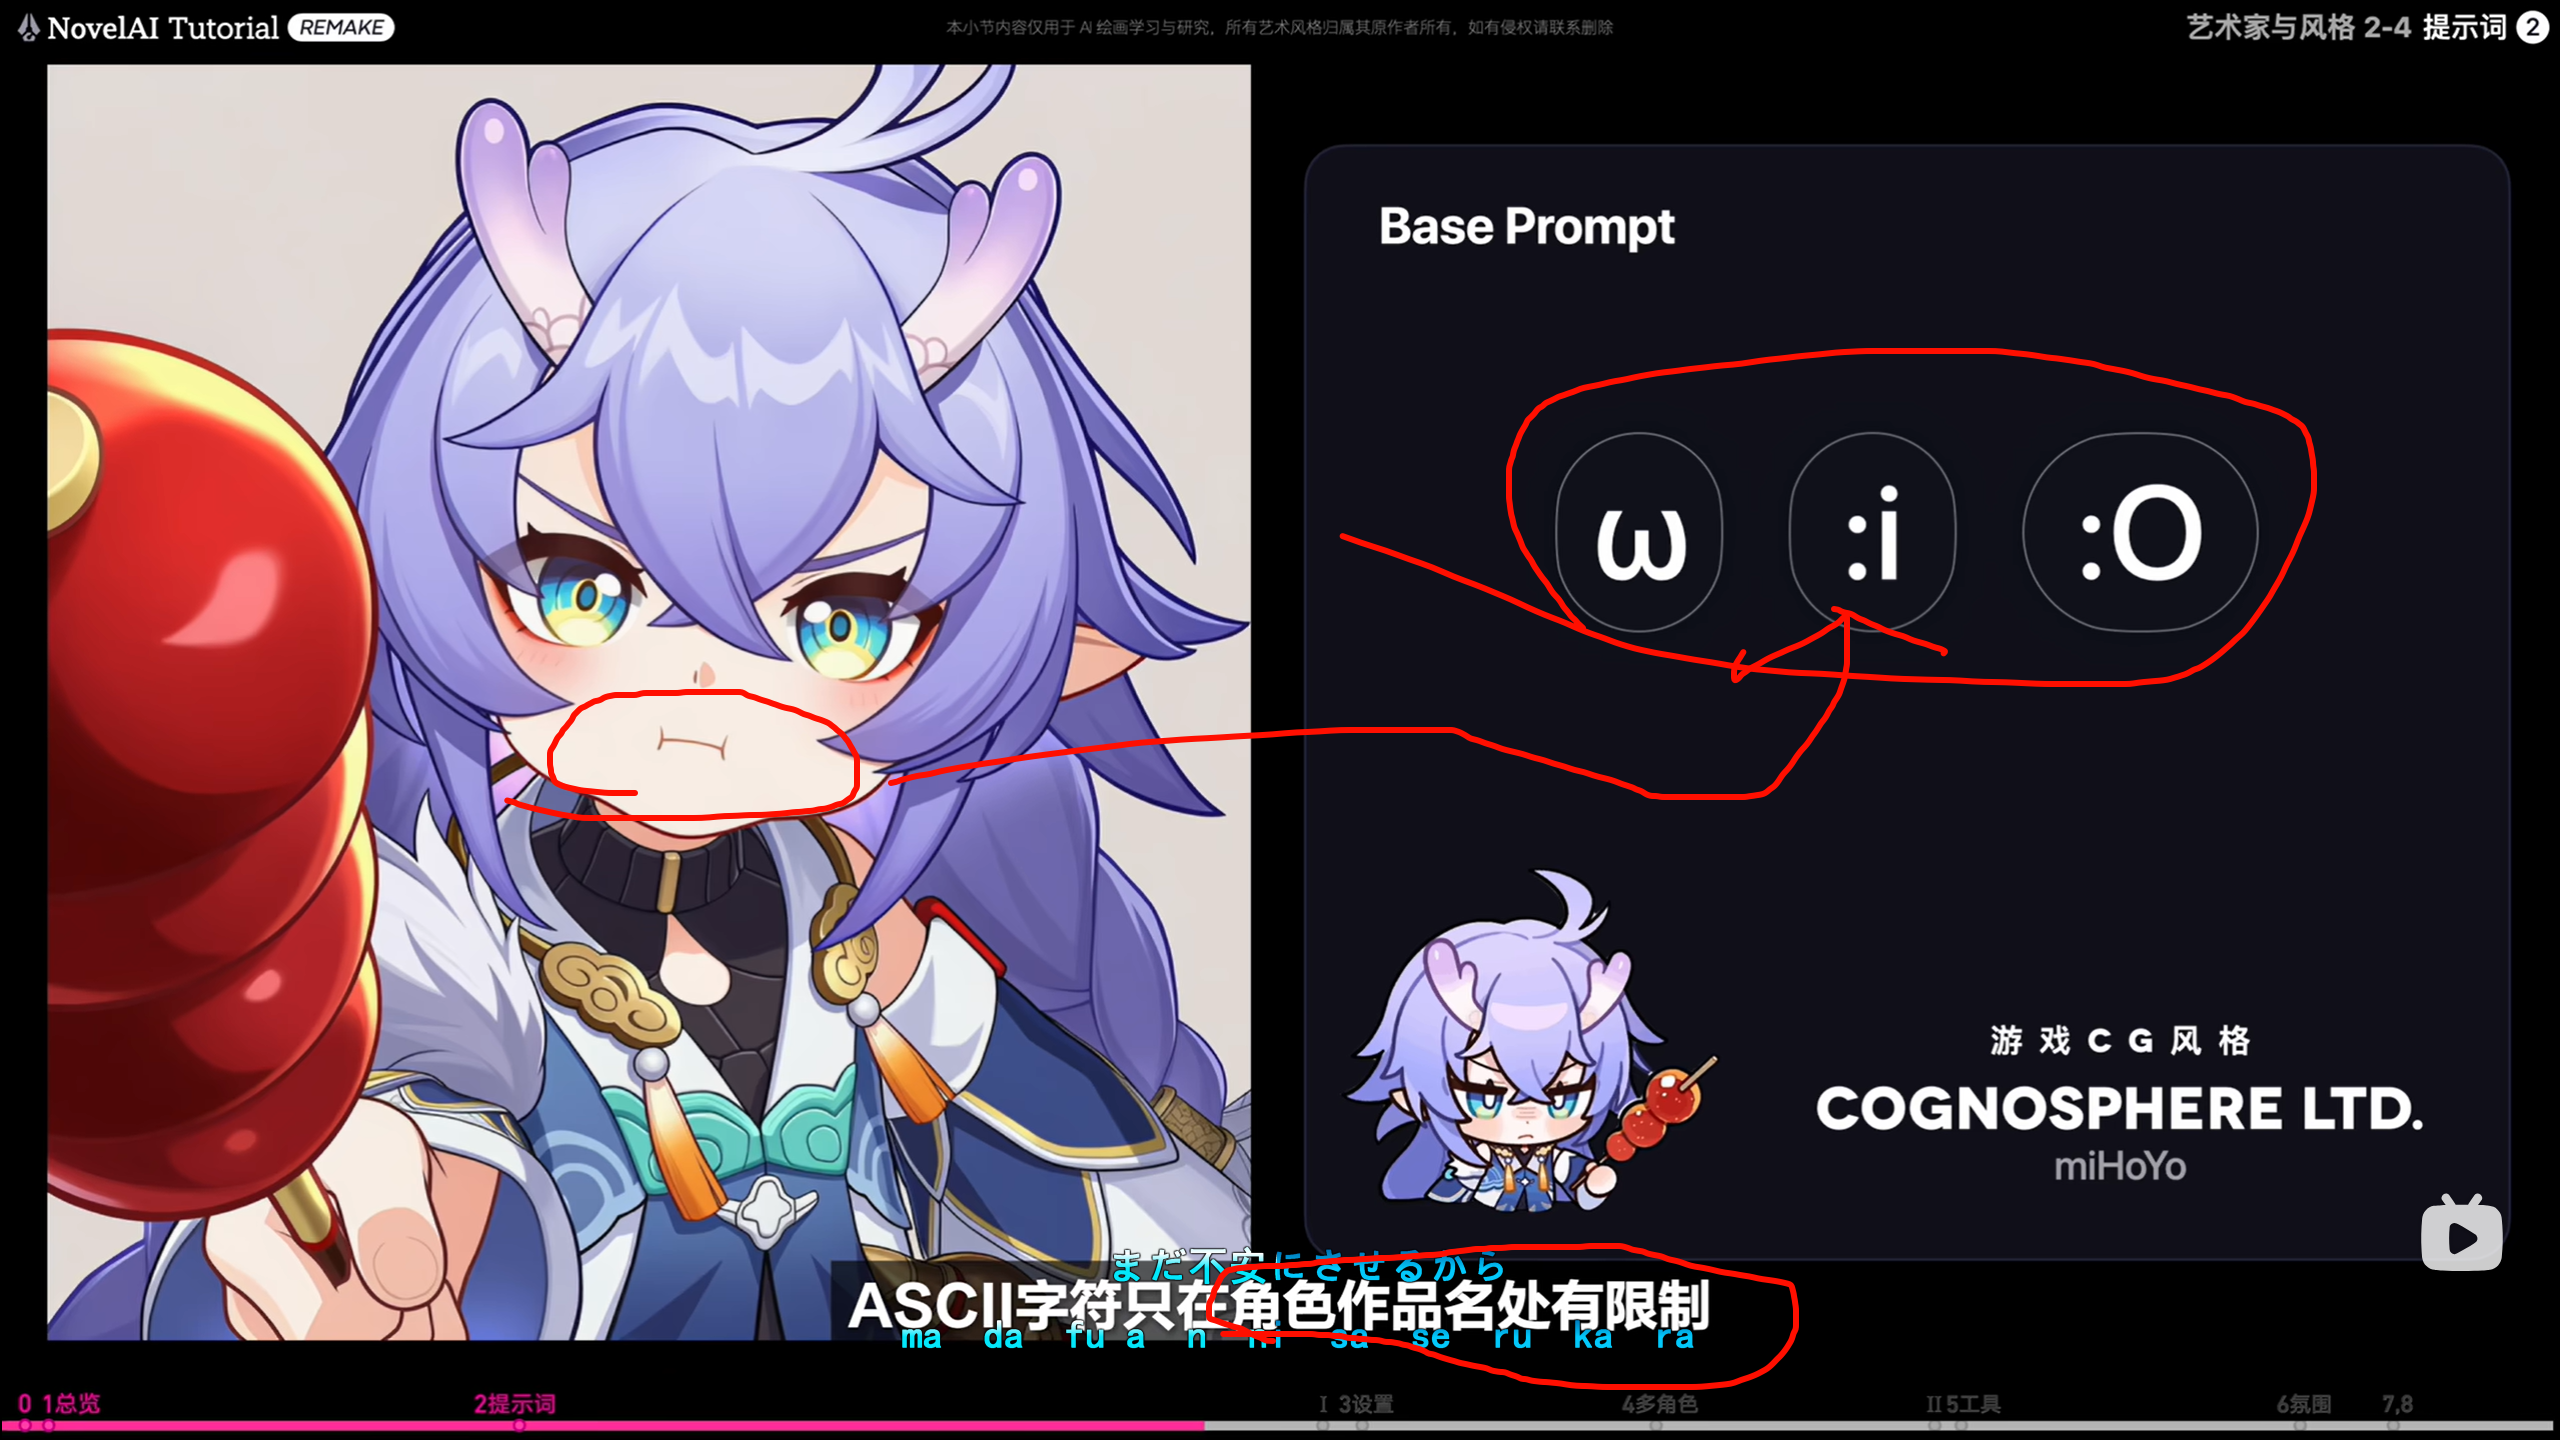
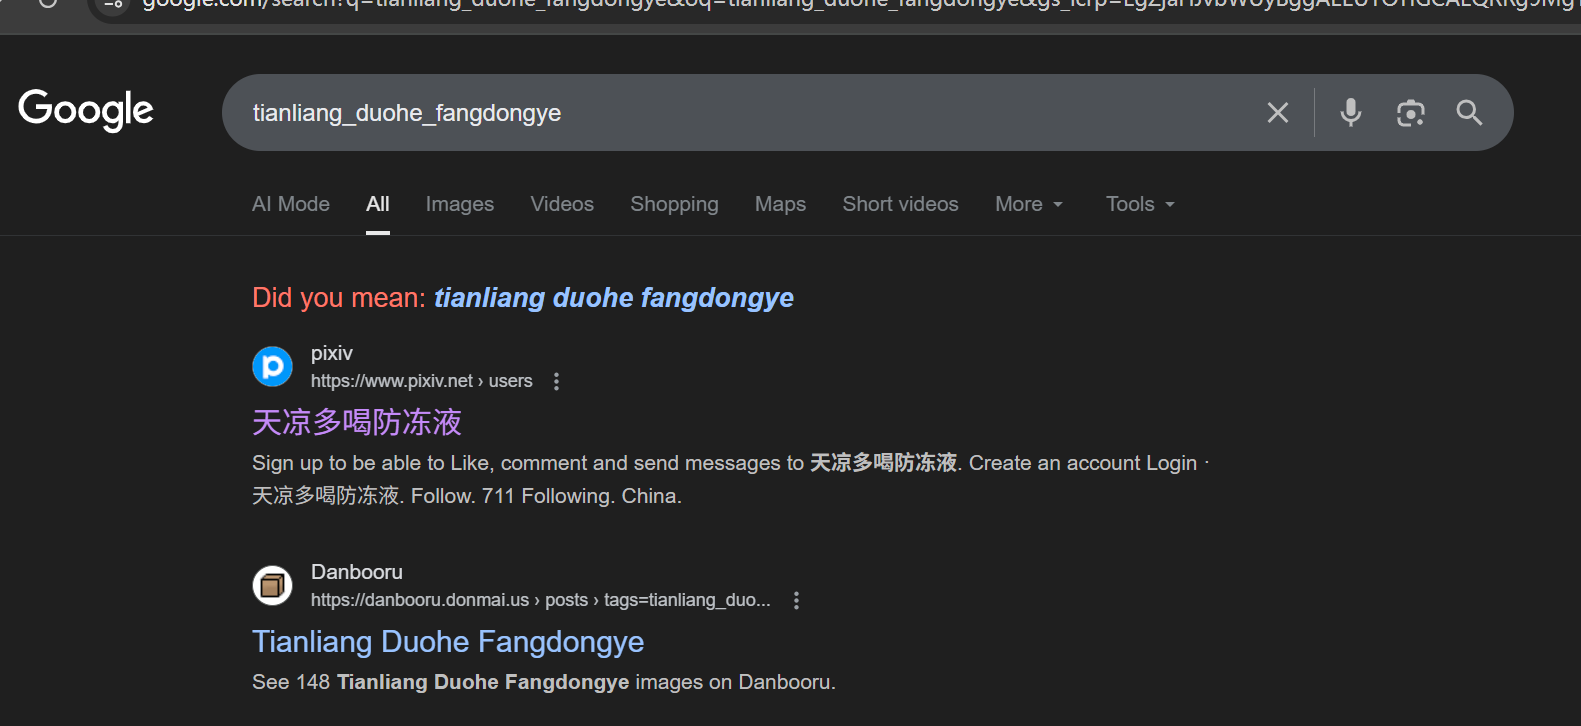
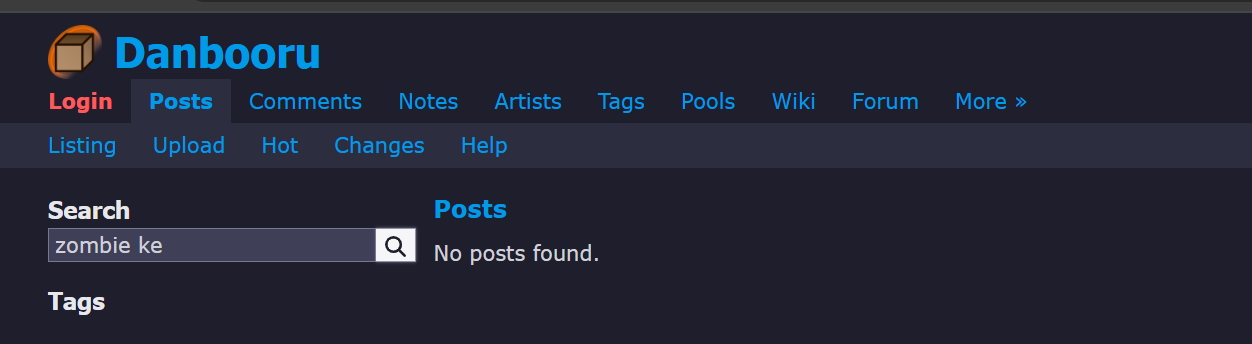
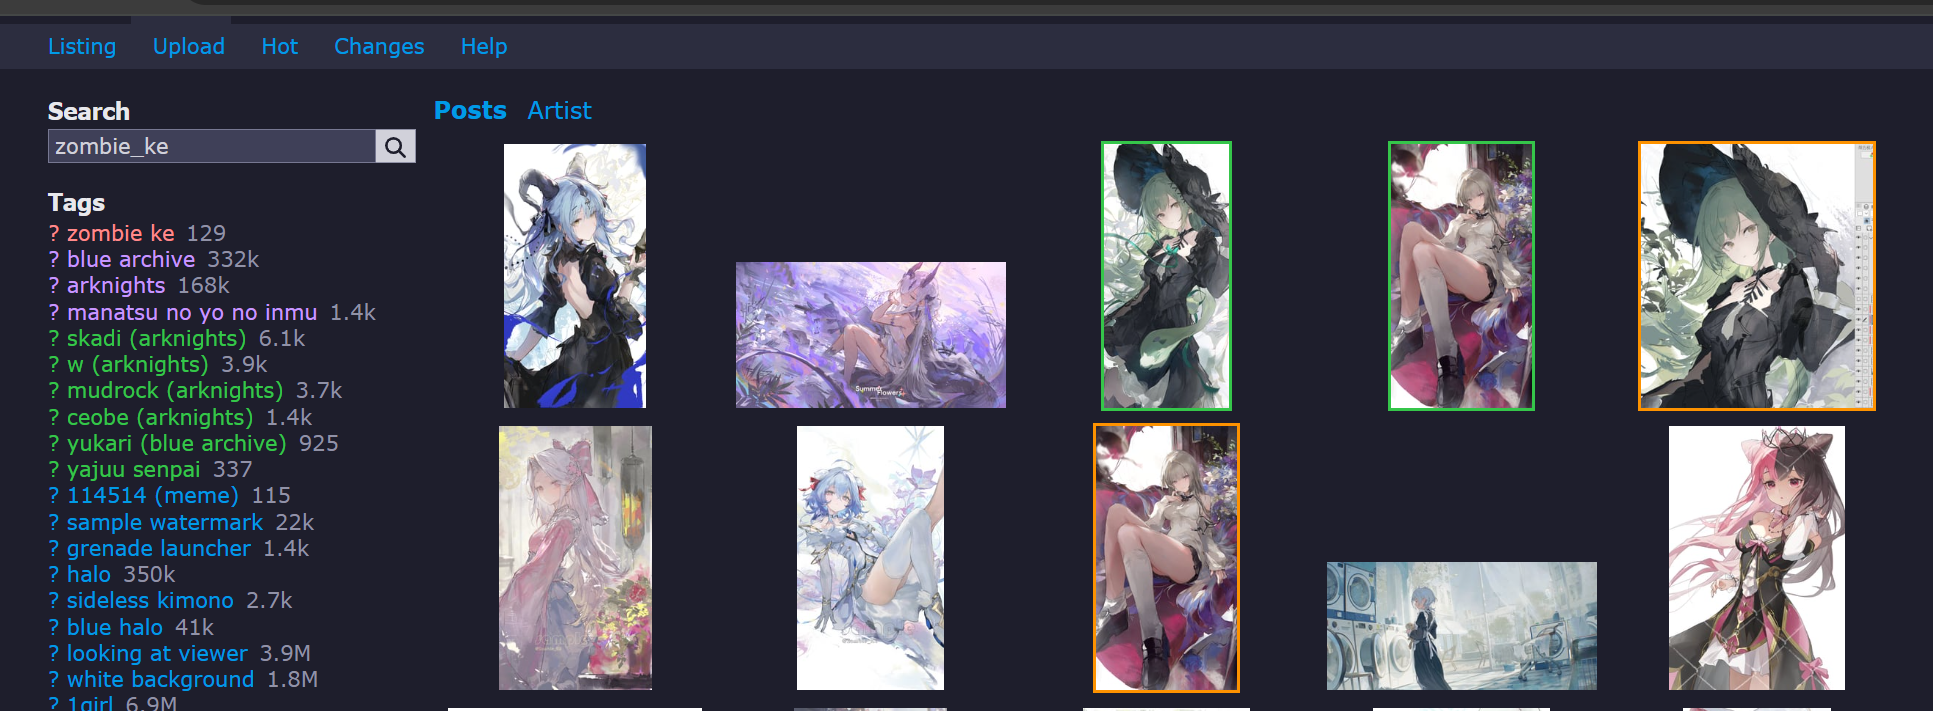
搜索的要求真的蛮严格的,少了下划线也不可以
https://www.pixiv.net/artworks/119743960
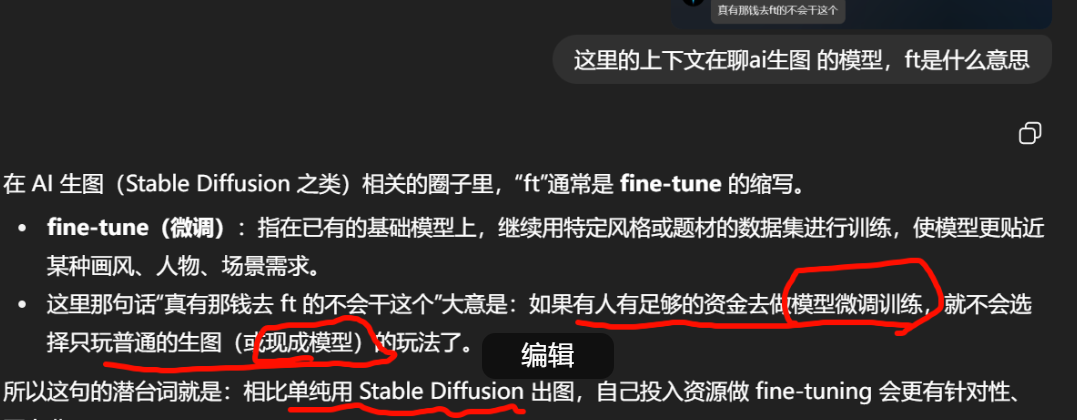
在 AI 生图(如 Stable Diffusion、SDXL、Diffusion 系列)领域里,fine-tuning(ft) 的位置可以从几个维度来看:
1. 基础与目的
-
基础模型:例如
stable-diffusion-1.5、sdxl-base。这些是开源社区或公司用大规模图文对训练出来的通用扩散模型。 -
微调 (fine-tune):在这些基础模型的权重上继续训练,让模型学到某一类风格、人物、构图习惯
2. 方法体系
| 方法 | 特点 | 适用 |
|---|---|---|
| 全量微调 (full fine-tune) | 改动整个权重文件,耗显存大、需要大量数据 | 大型团队或企业级需求 |
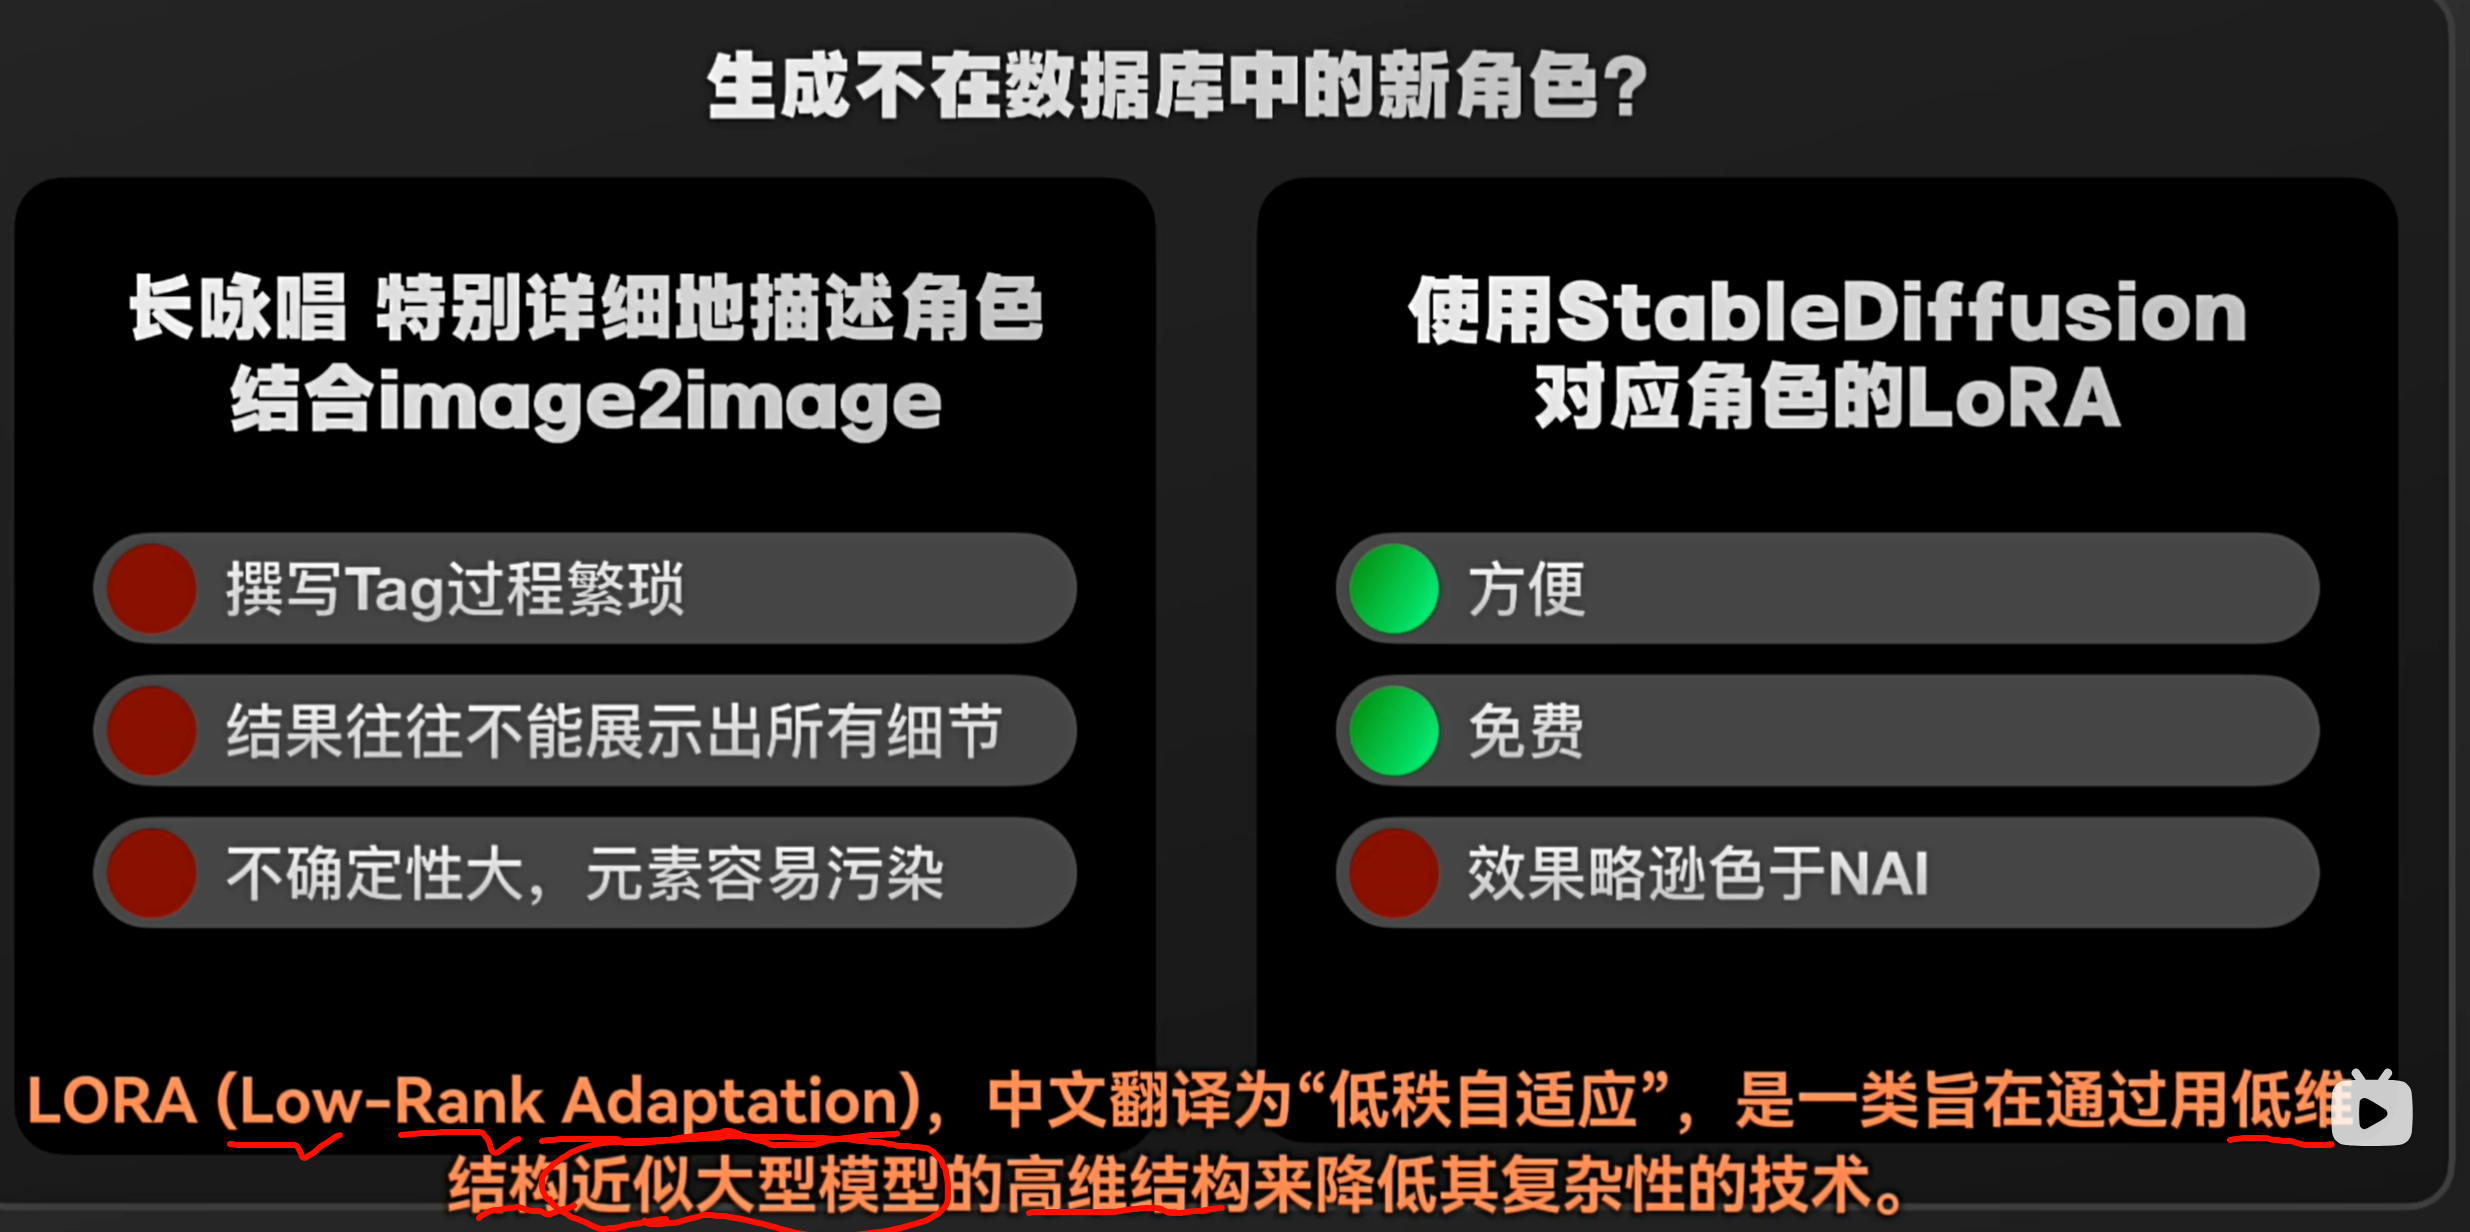
| LoRA (Low-Rank Adaptation) | 只训练权重的低秩子空间,文件小、成本低 | 社区最常用,几十张到几百张图即可 |
| DreamBooth | 偏向“注入”特定概念或人物 | 个人用户快速定制 |
| Textual Inversion | 训练一组文本 embedding | 适合小数据量、特定概念 |
3. 资源要求
-
硬件:显存通常 24 GB 以上更舒适;全量微调可用多卡集群。
-
数据:几十张到上千张高质量配文图像。
-
时间成本:LoRA 几小时到一天;全量可能数天到数周。
4. 生态与用途
-
社区分享:Civitai、Hugging Face、ModelScope 等平台盛行各种 LoRA / DreamBooth 模型。
-
商用:游戏公司、影视公司会做私有 fine-tune,以保持统一美术风格并保护版权。
-
个人创作:独立画师、同人圈常用来做专属角色、统一画风的作品集。
因此,聊天中那句“真有那钱去 ft 的不会干这个”隐含的意思是:
如果你有资金与资源直接做专业的模型微调,能得到专门化、高度定制的结果,就不必仅依赖于现成的开源模型和简单的 prompt 调试。
群体内部的幽默:
-
“拍人”≈ 随机点名 / 随机生成真人图(玩笑)
-
“烧砖”≈ 烧显卡 / 高强度跑图、聊天活跃度的搞笑说法
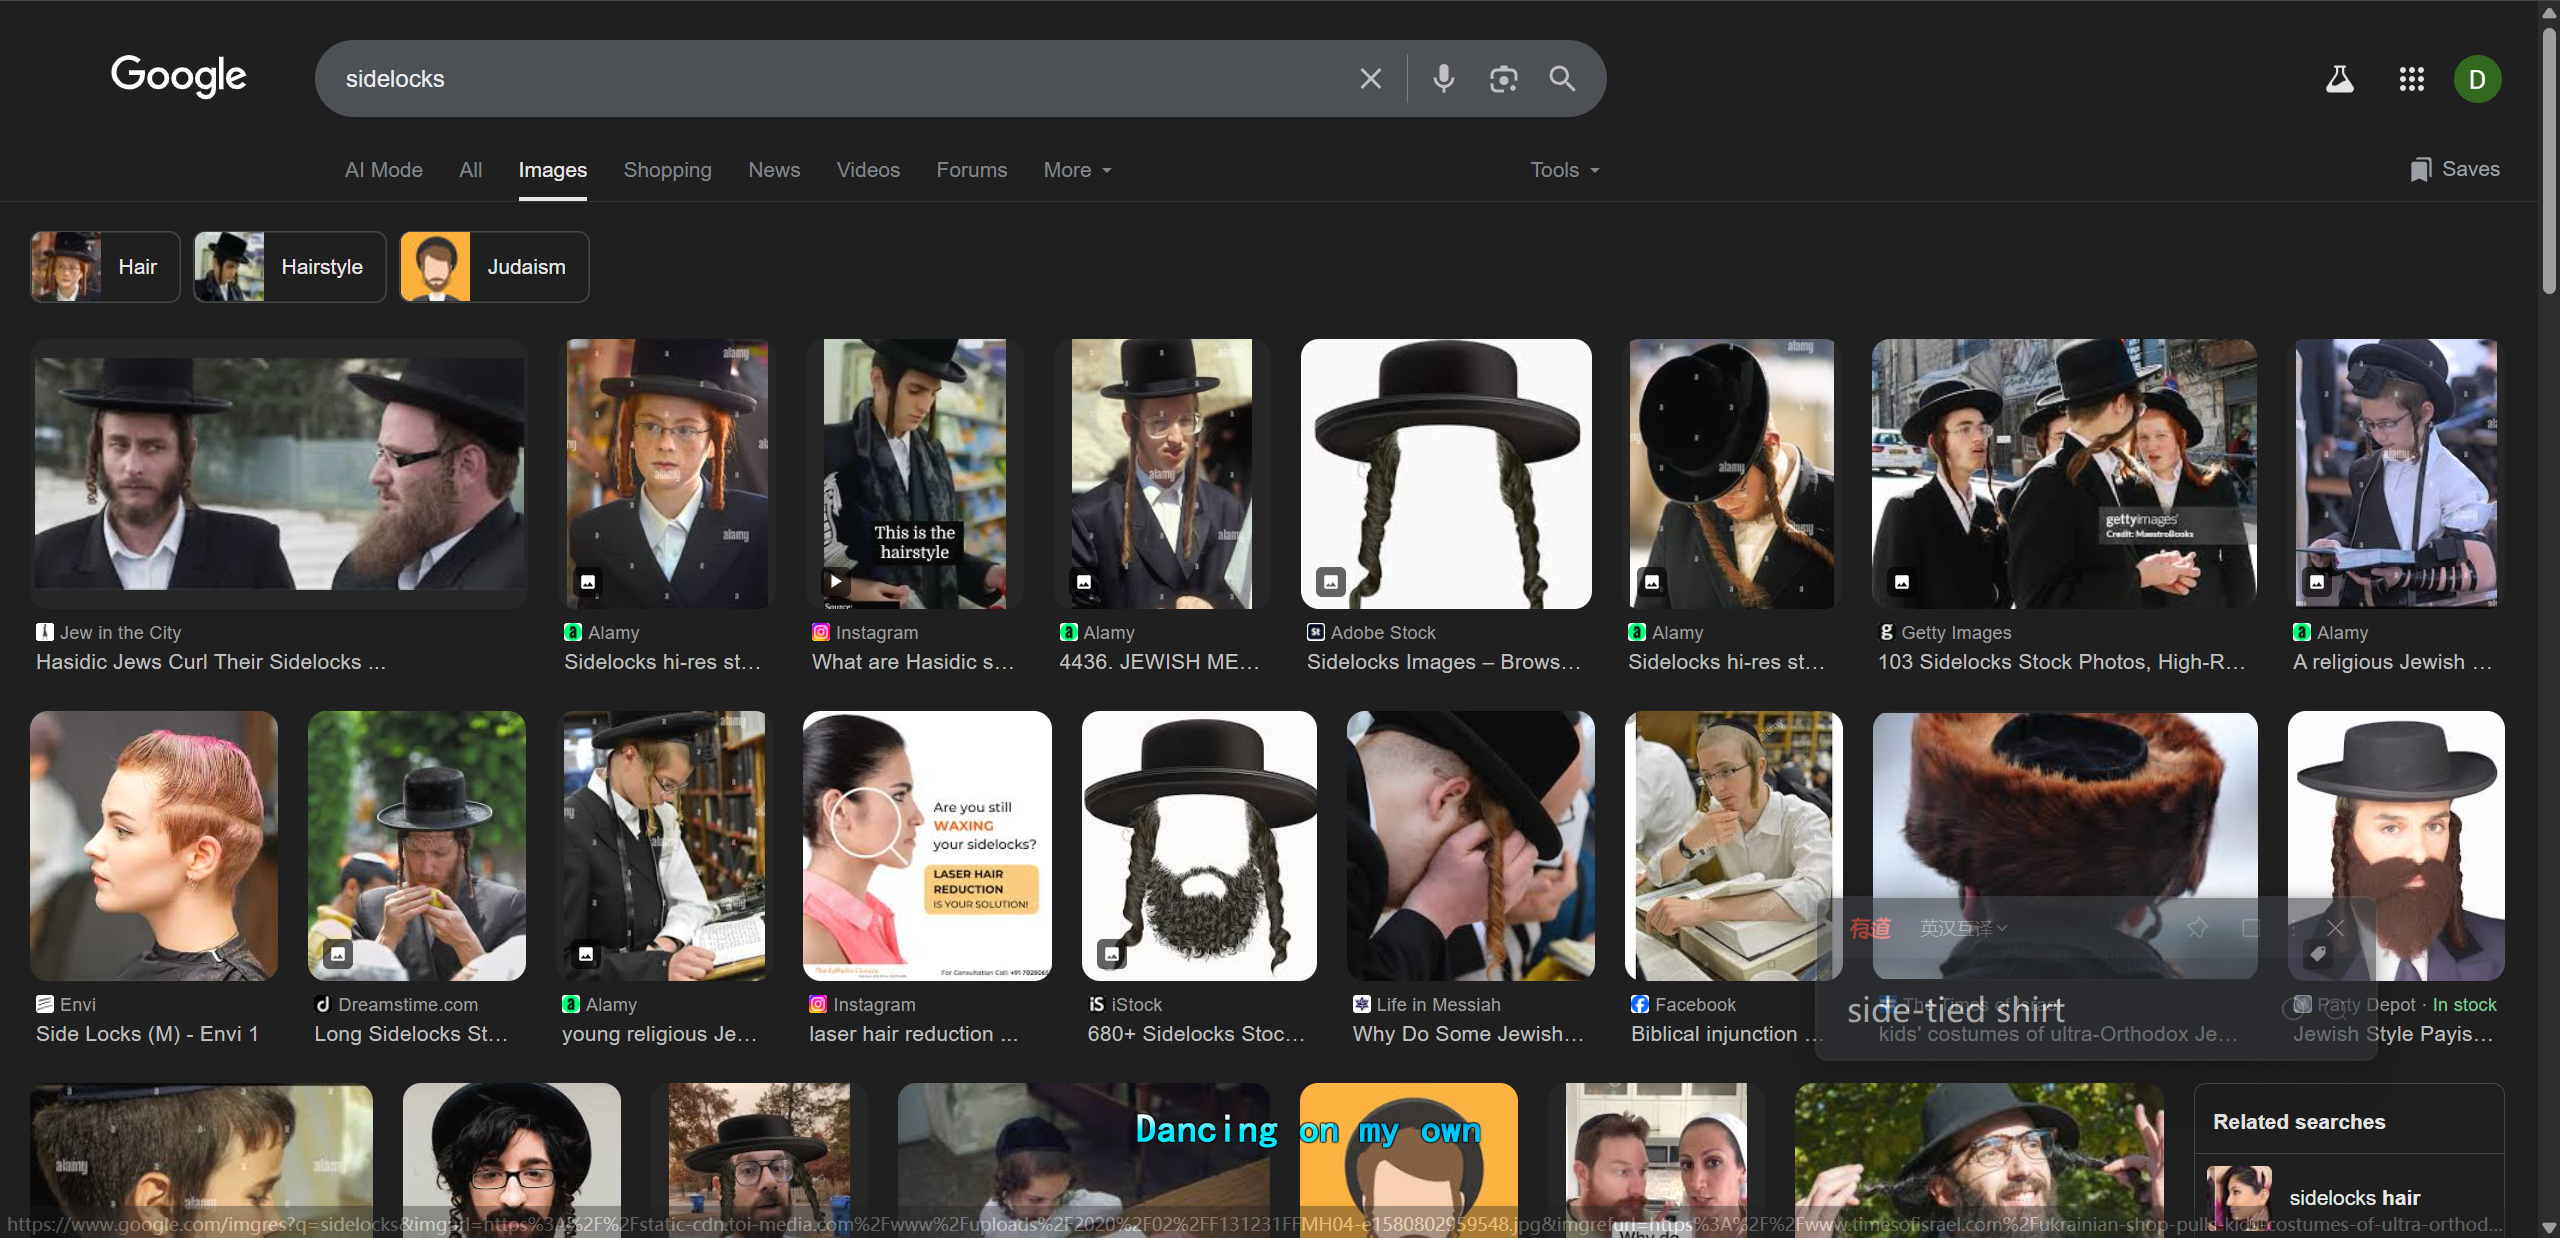
attractively small and dainty (used of a woman).
"she was petite and vivacious"

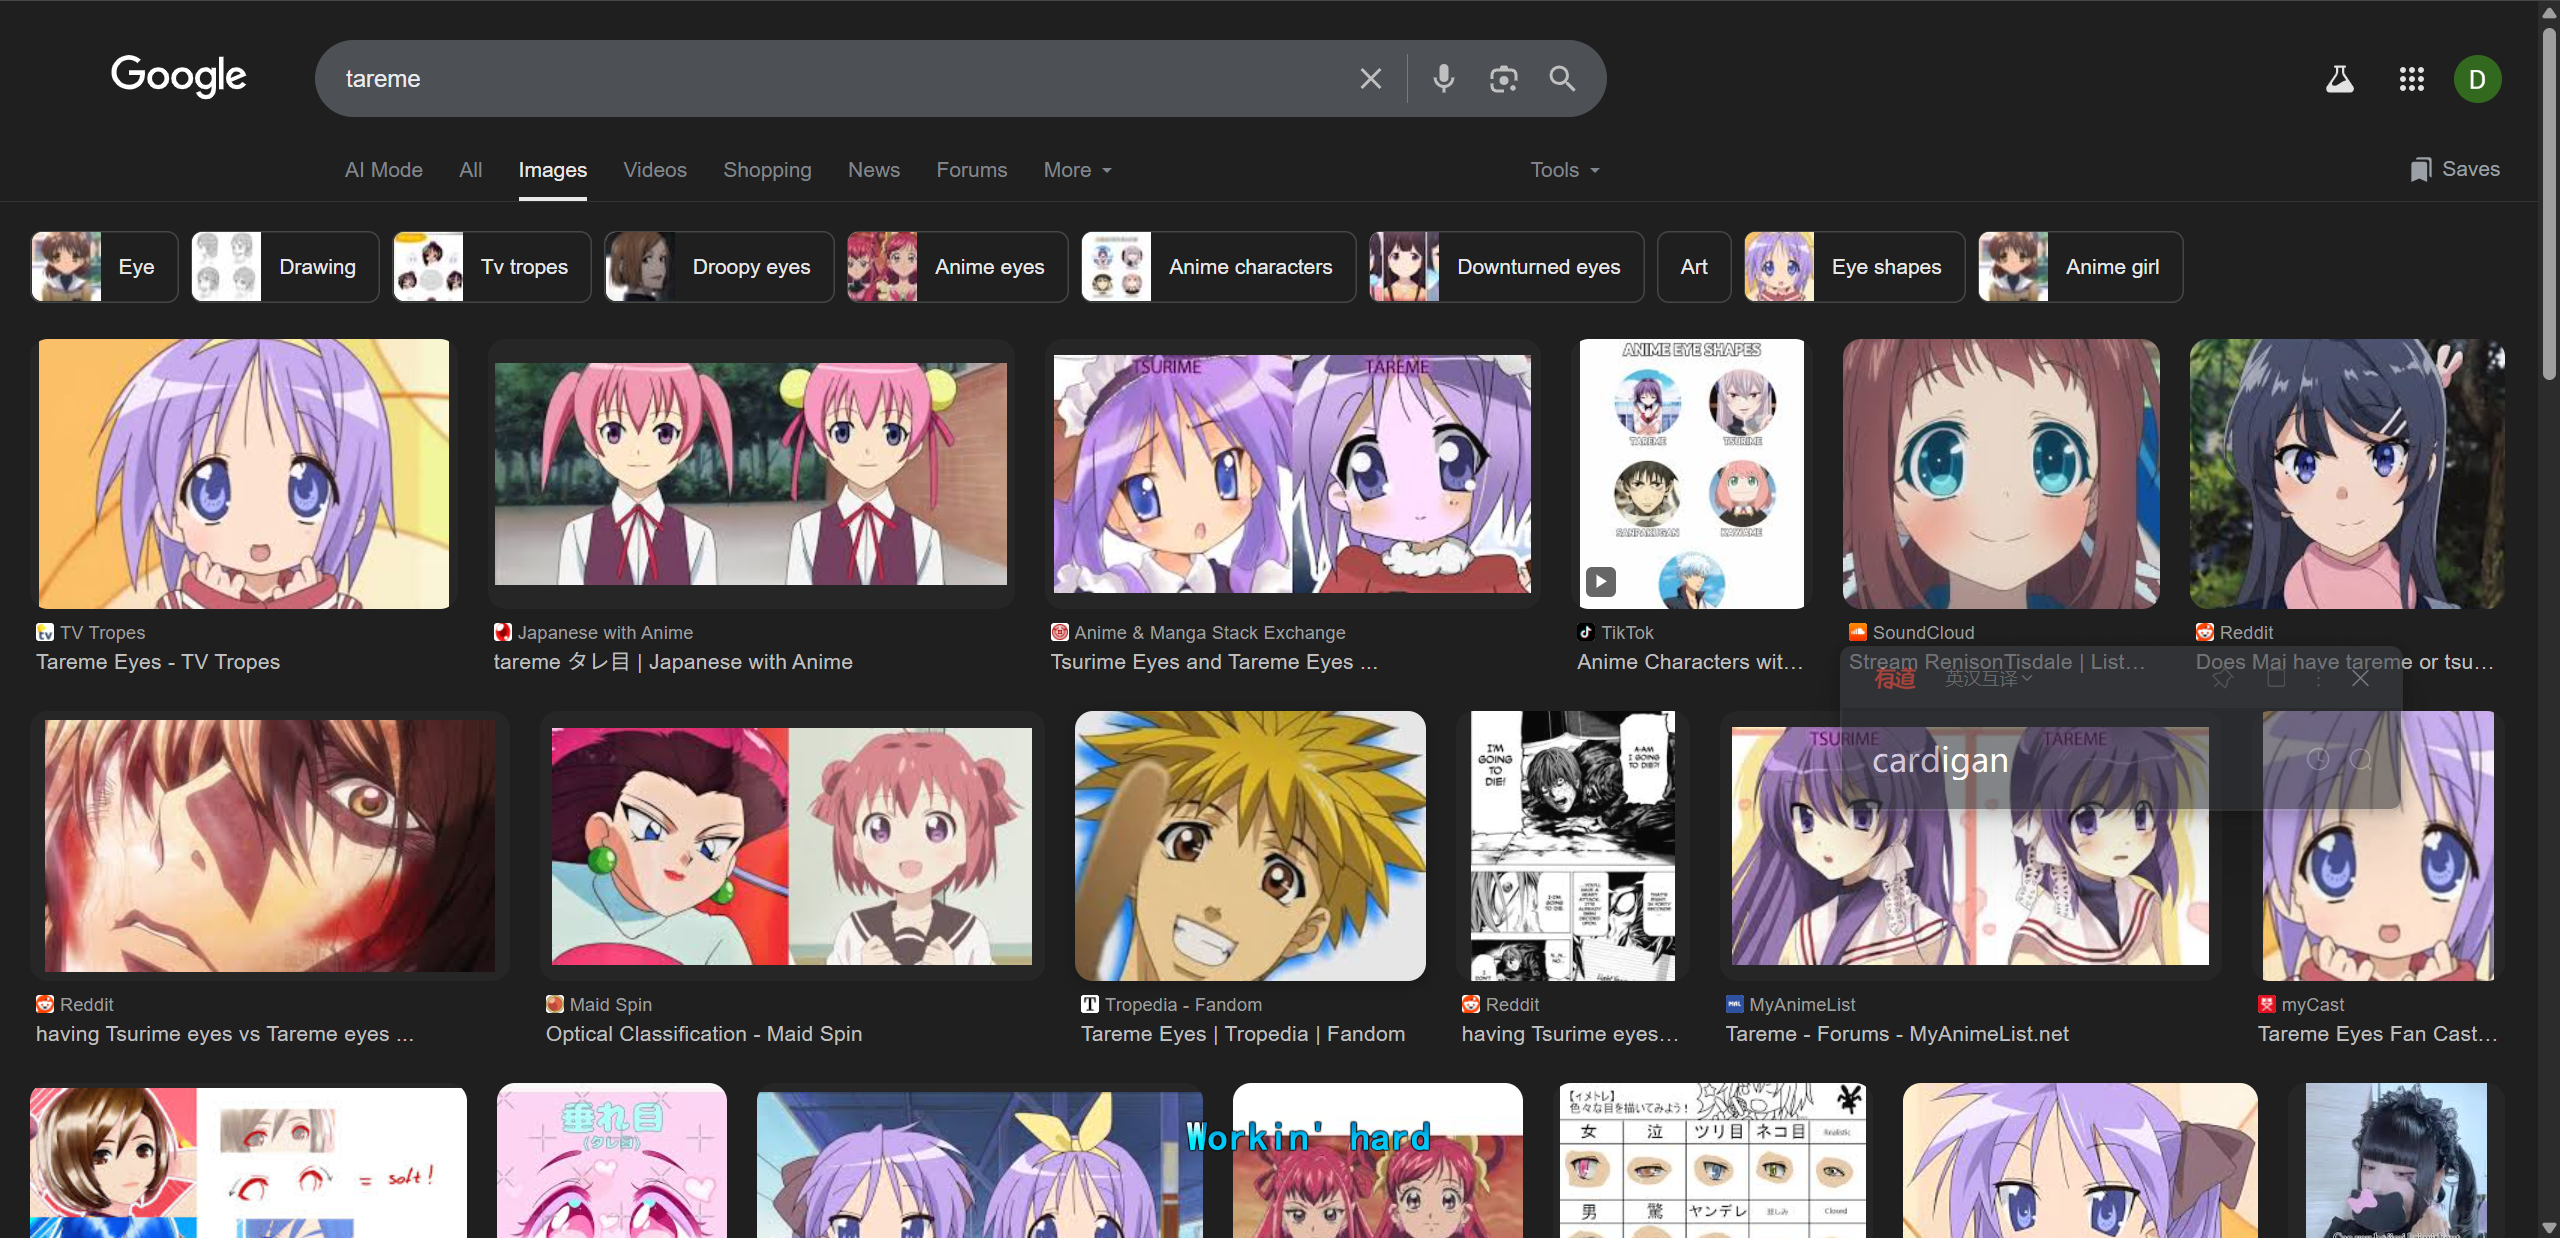
https://www.reddit.com/r/deathnote/comments/1kql71y/light_having_tsurime_eyes_vs_tareme_eyes/
When Light is meant to be seen in more of an innocent light (no pun intended), he has Tareme eyes; wide, bright and innocent. We see this at the start of the story and during the Yotsuba arc too.
When Light is being malicious, he has Tsurime eyes; more narrow and slit. These are especially noticeable on him for the 2nd arc of the series.
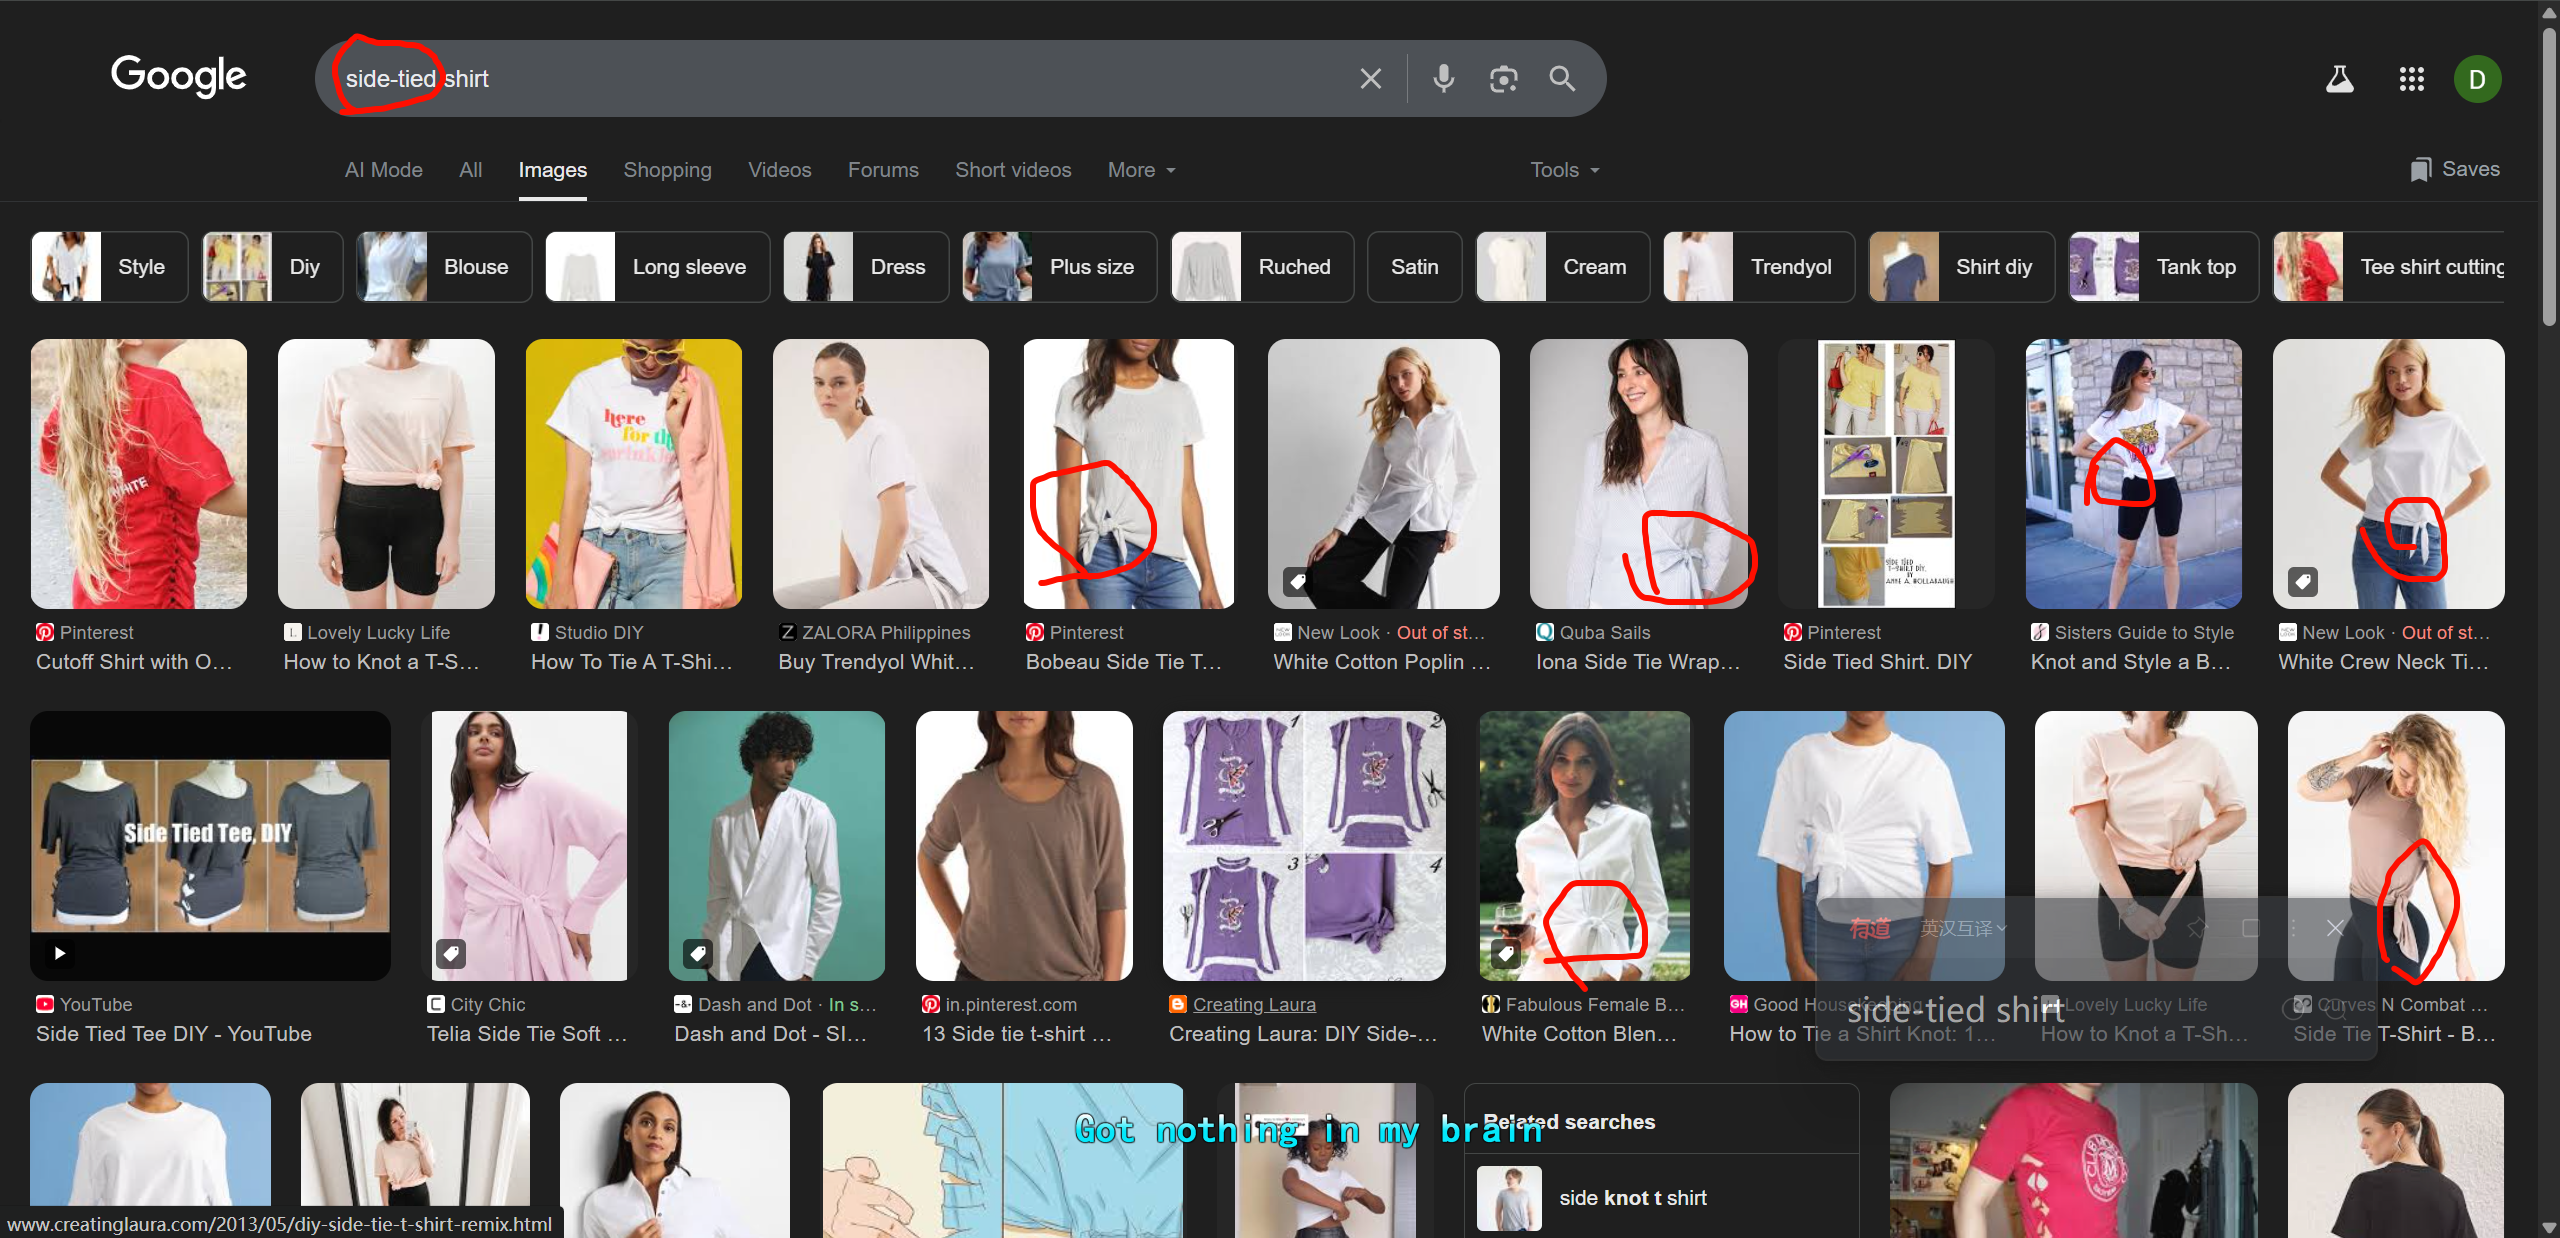
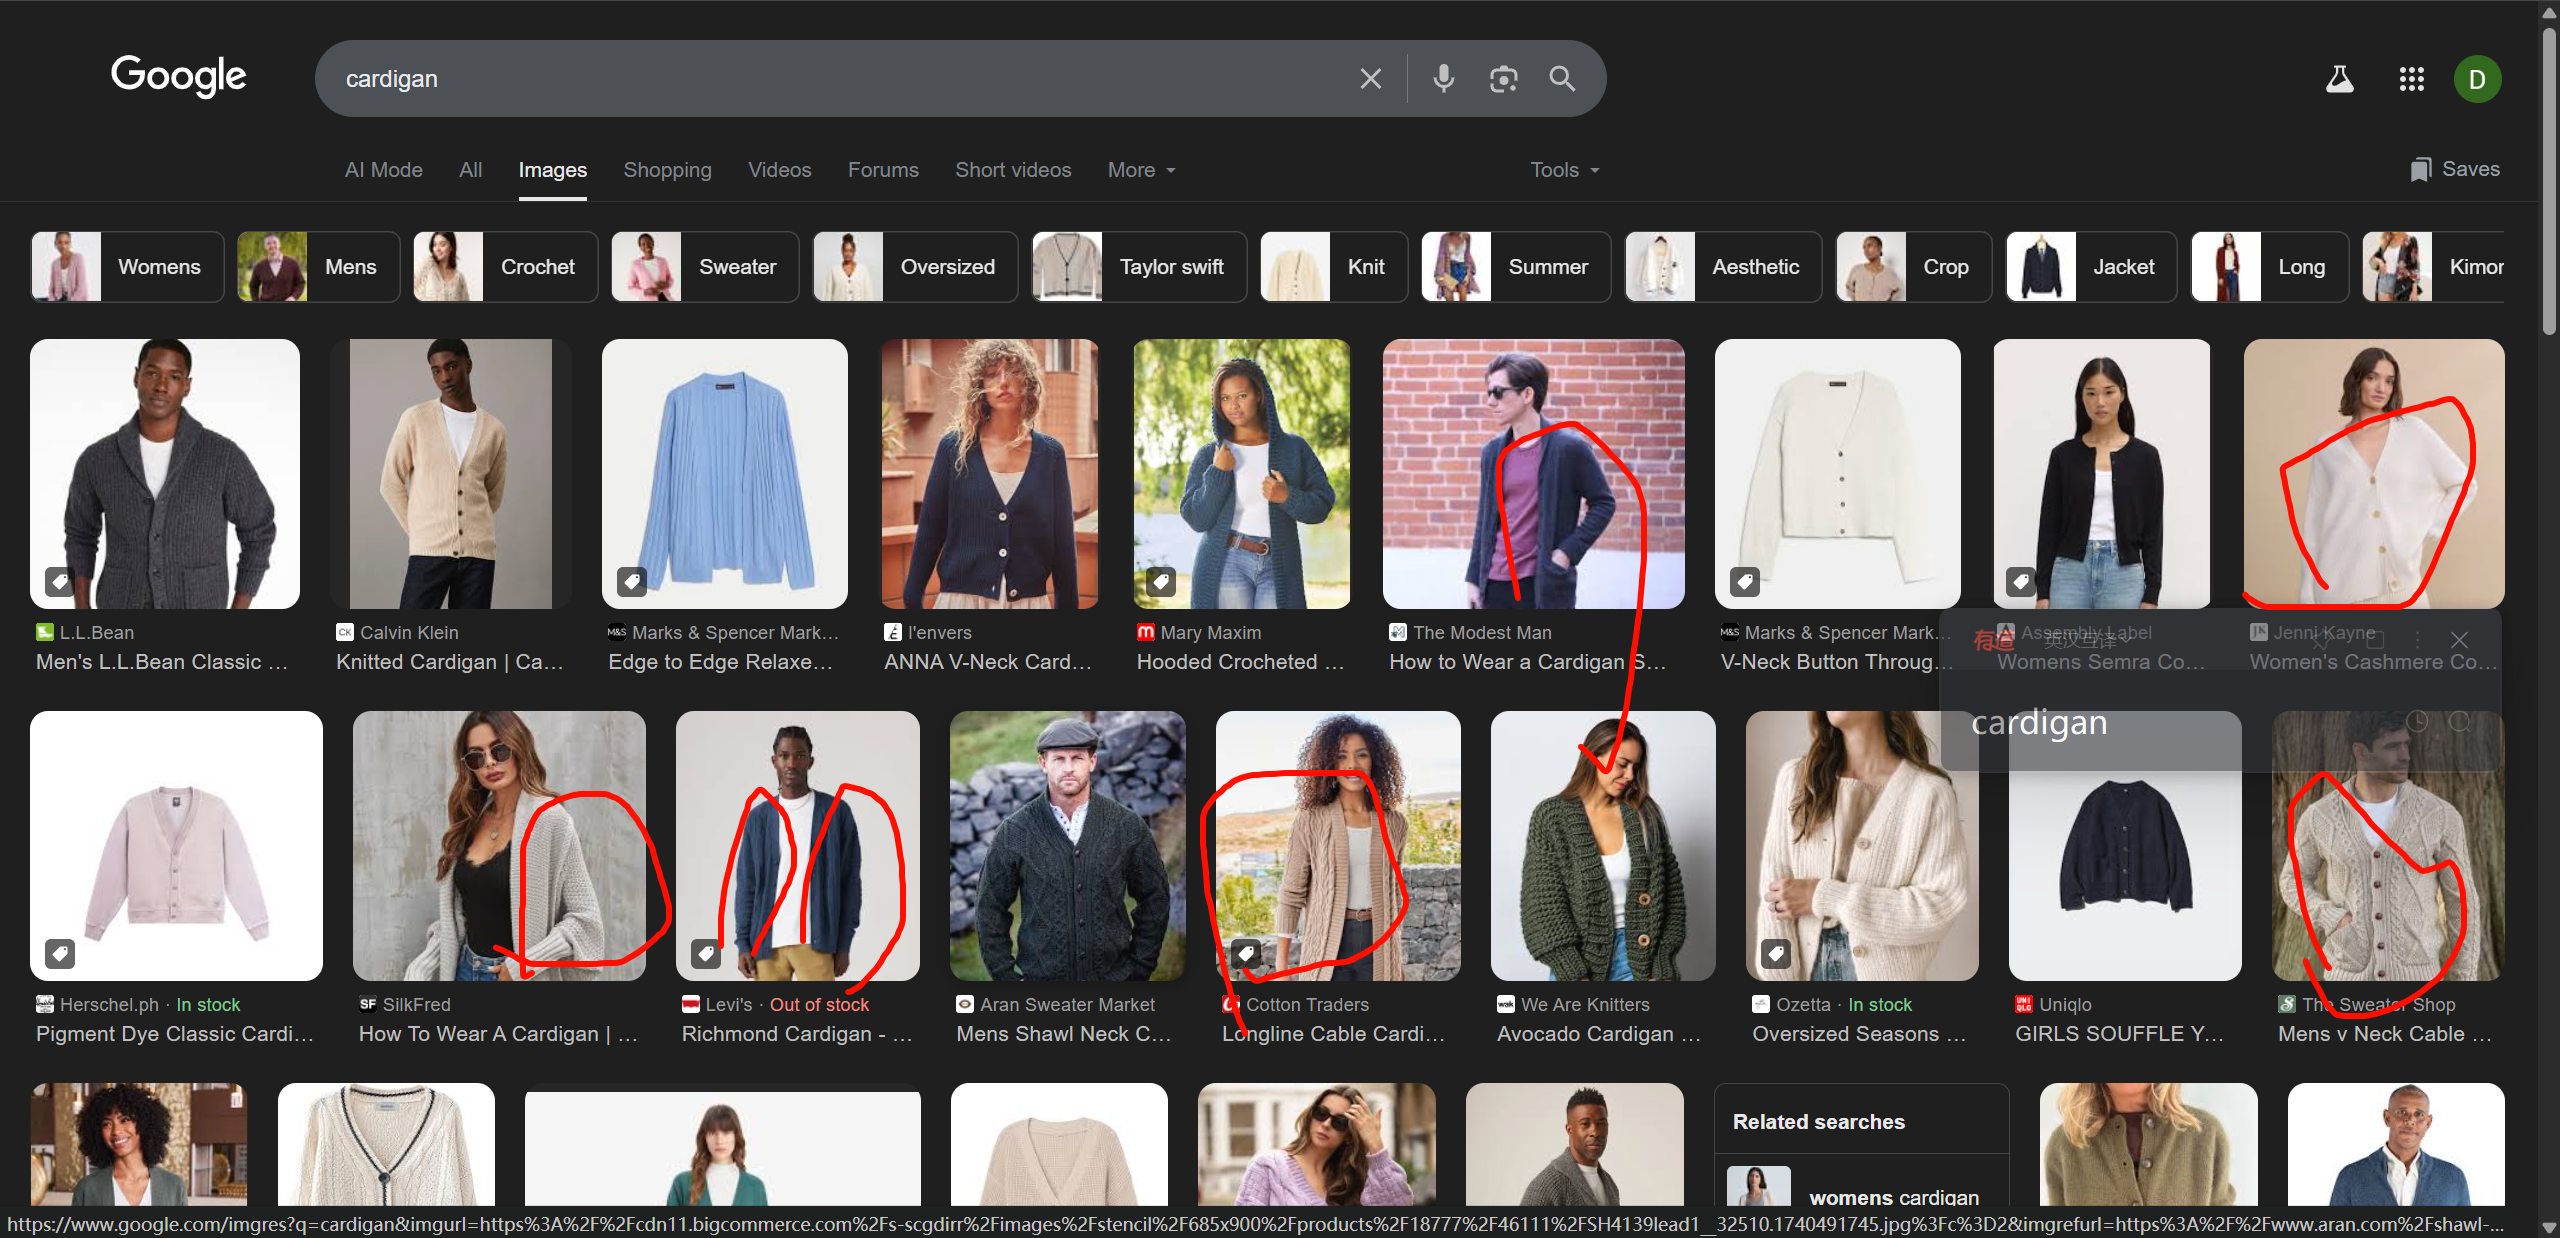
cardigan
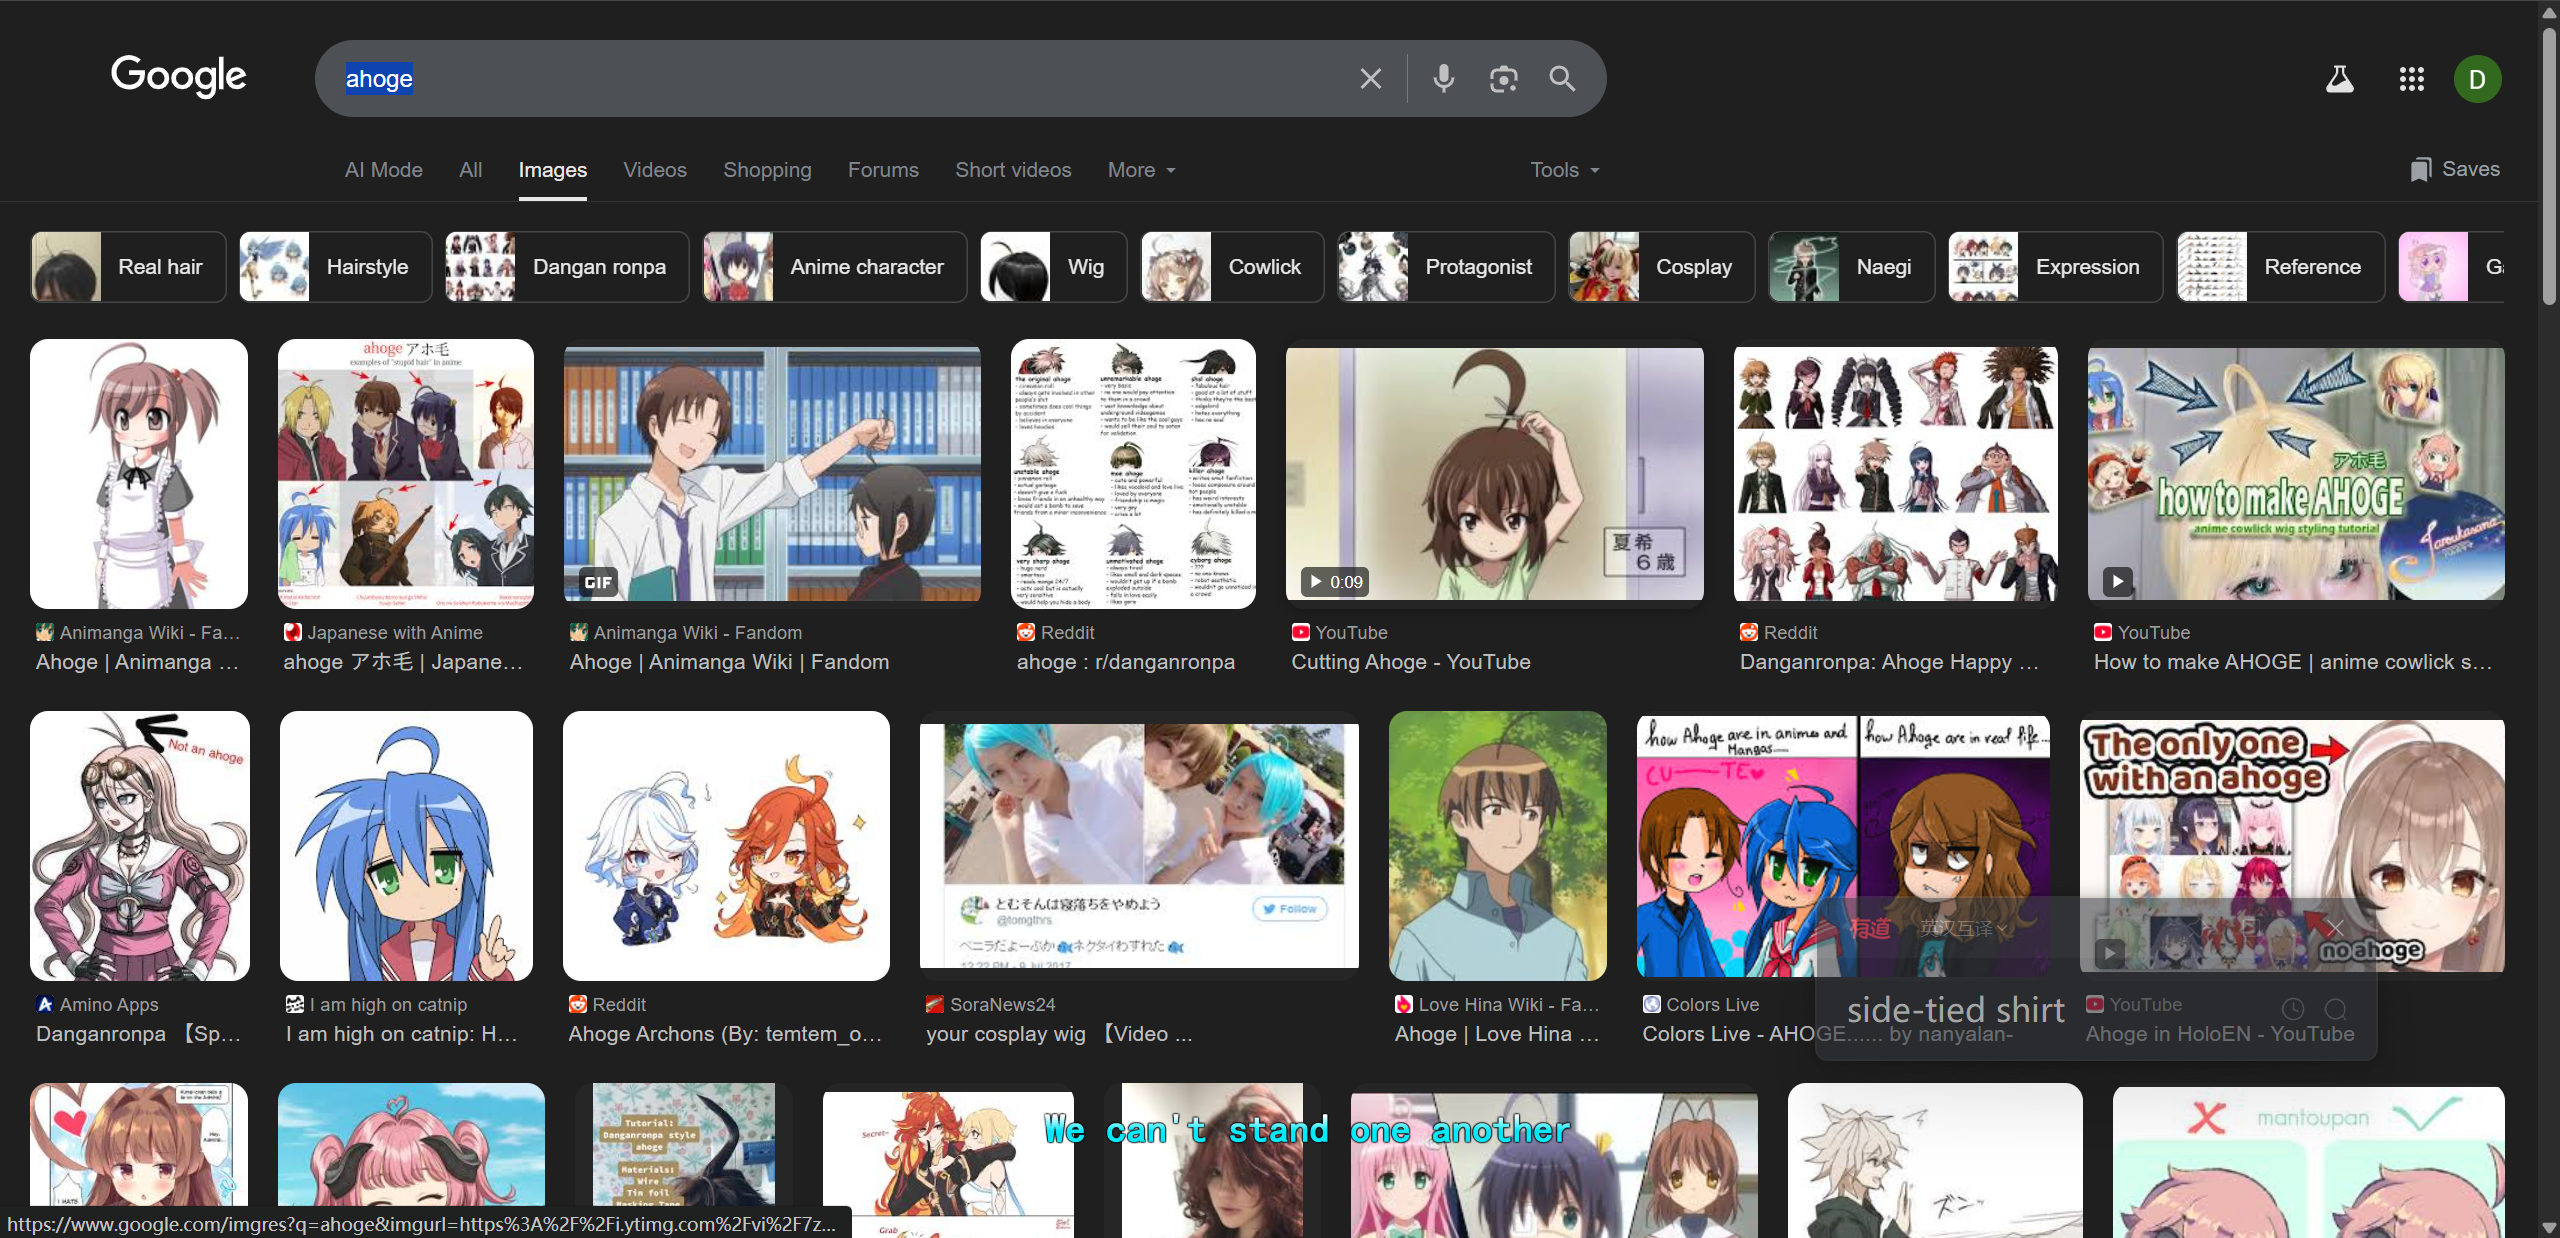
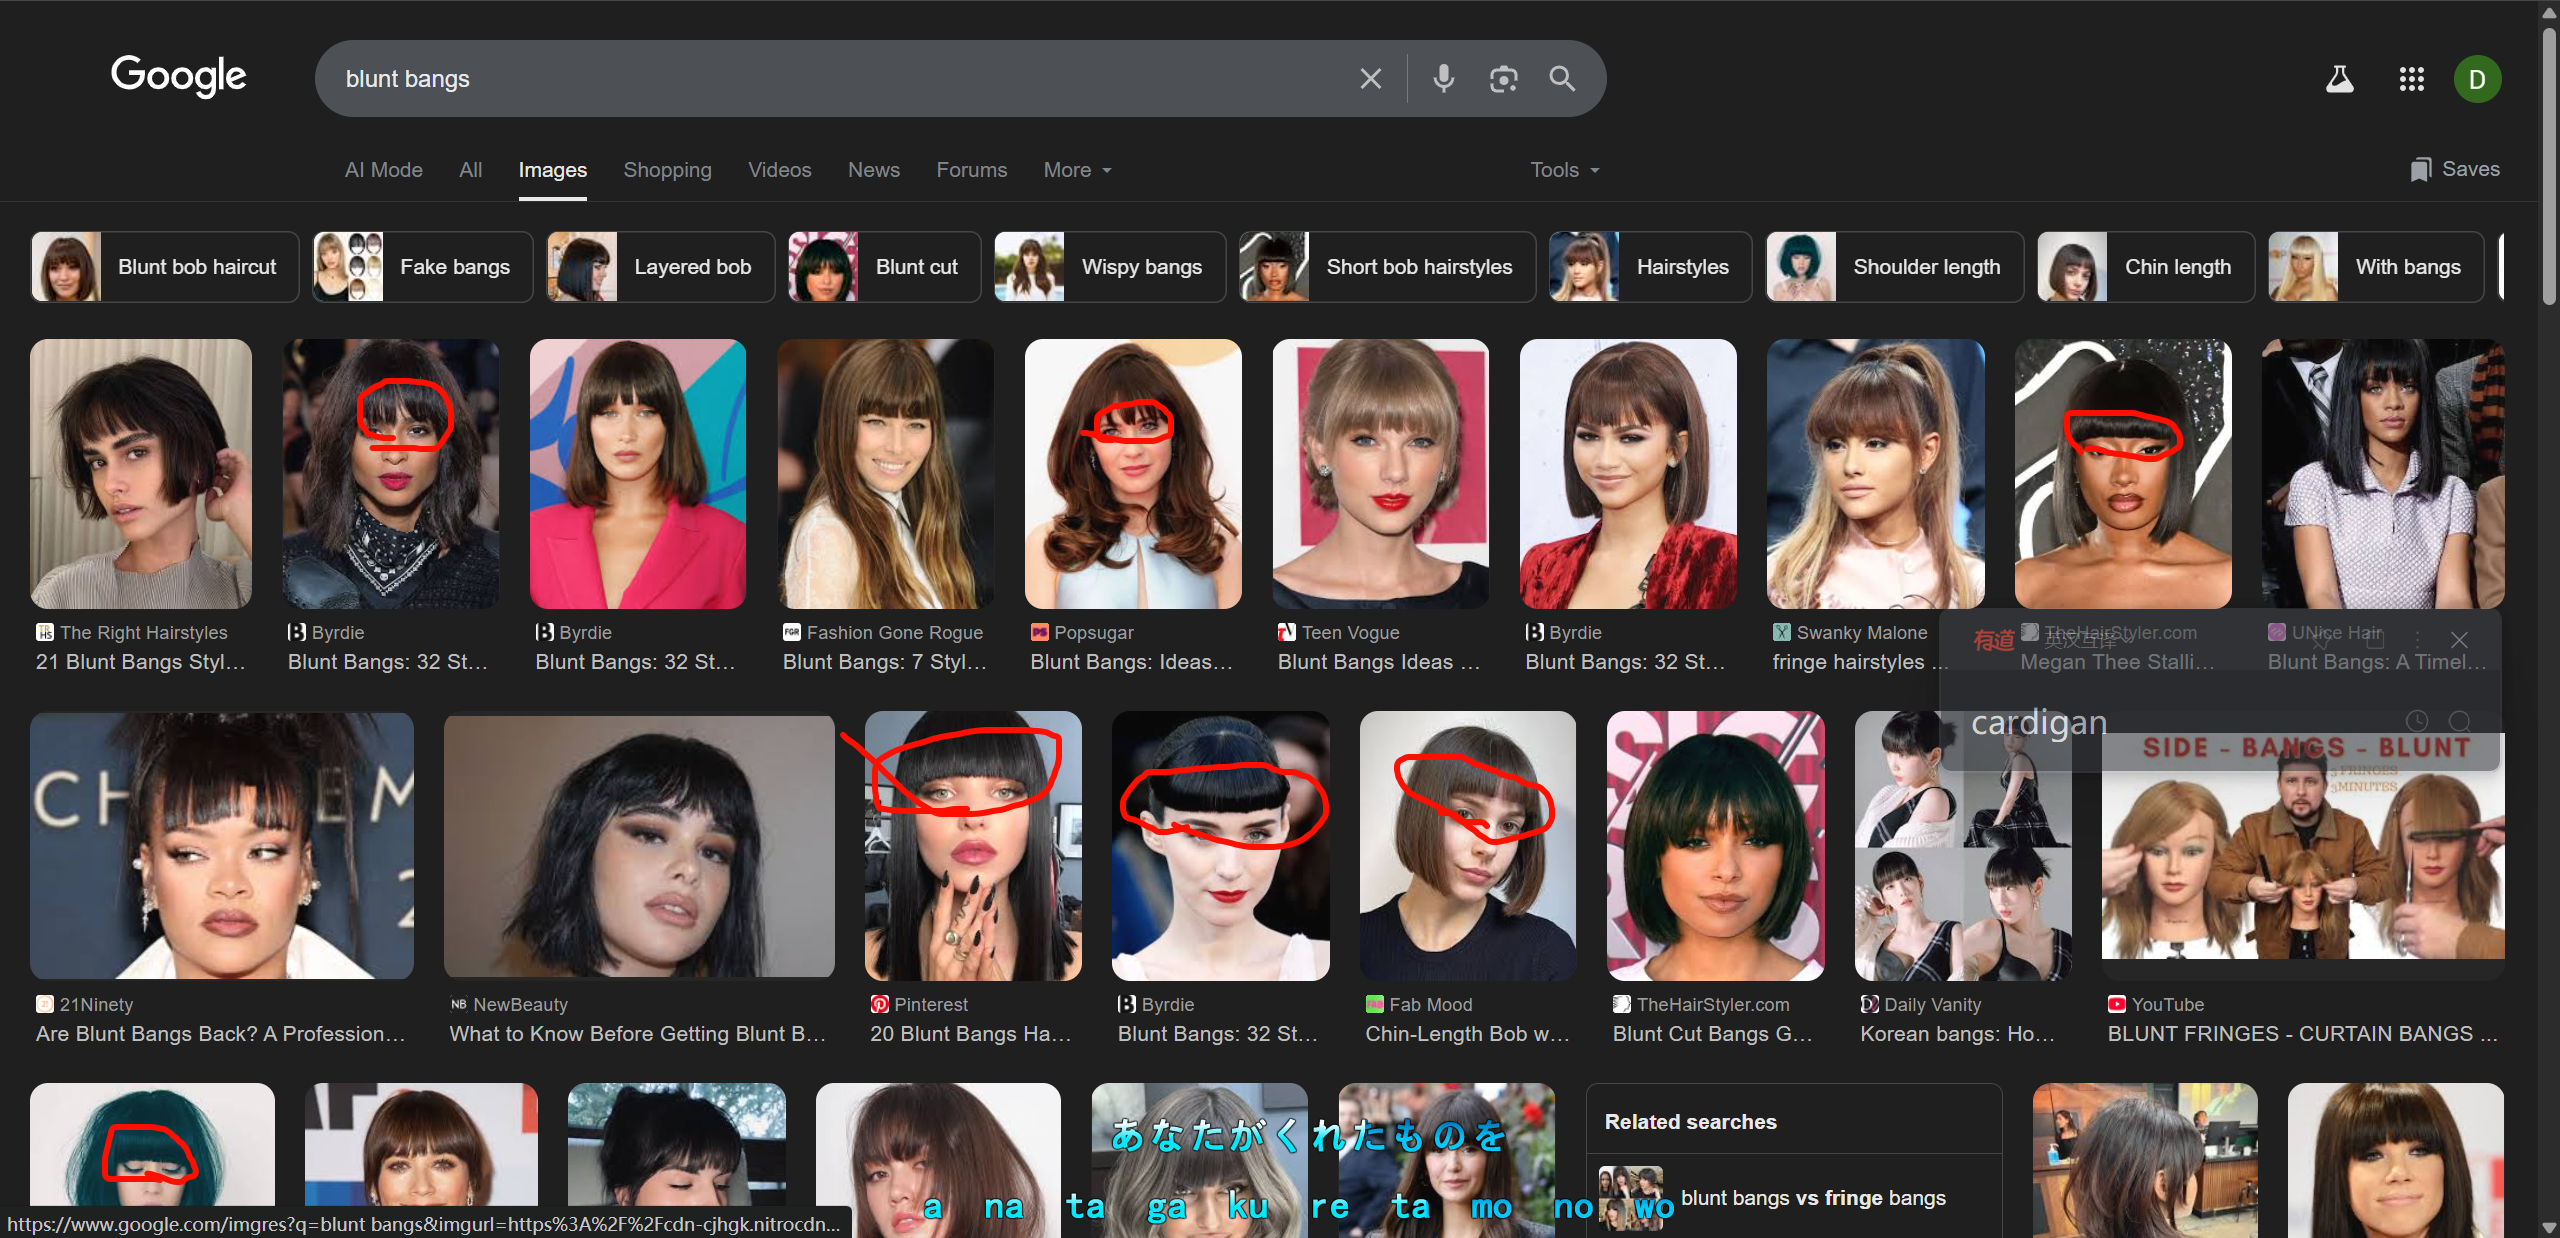
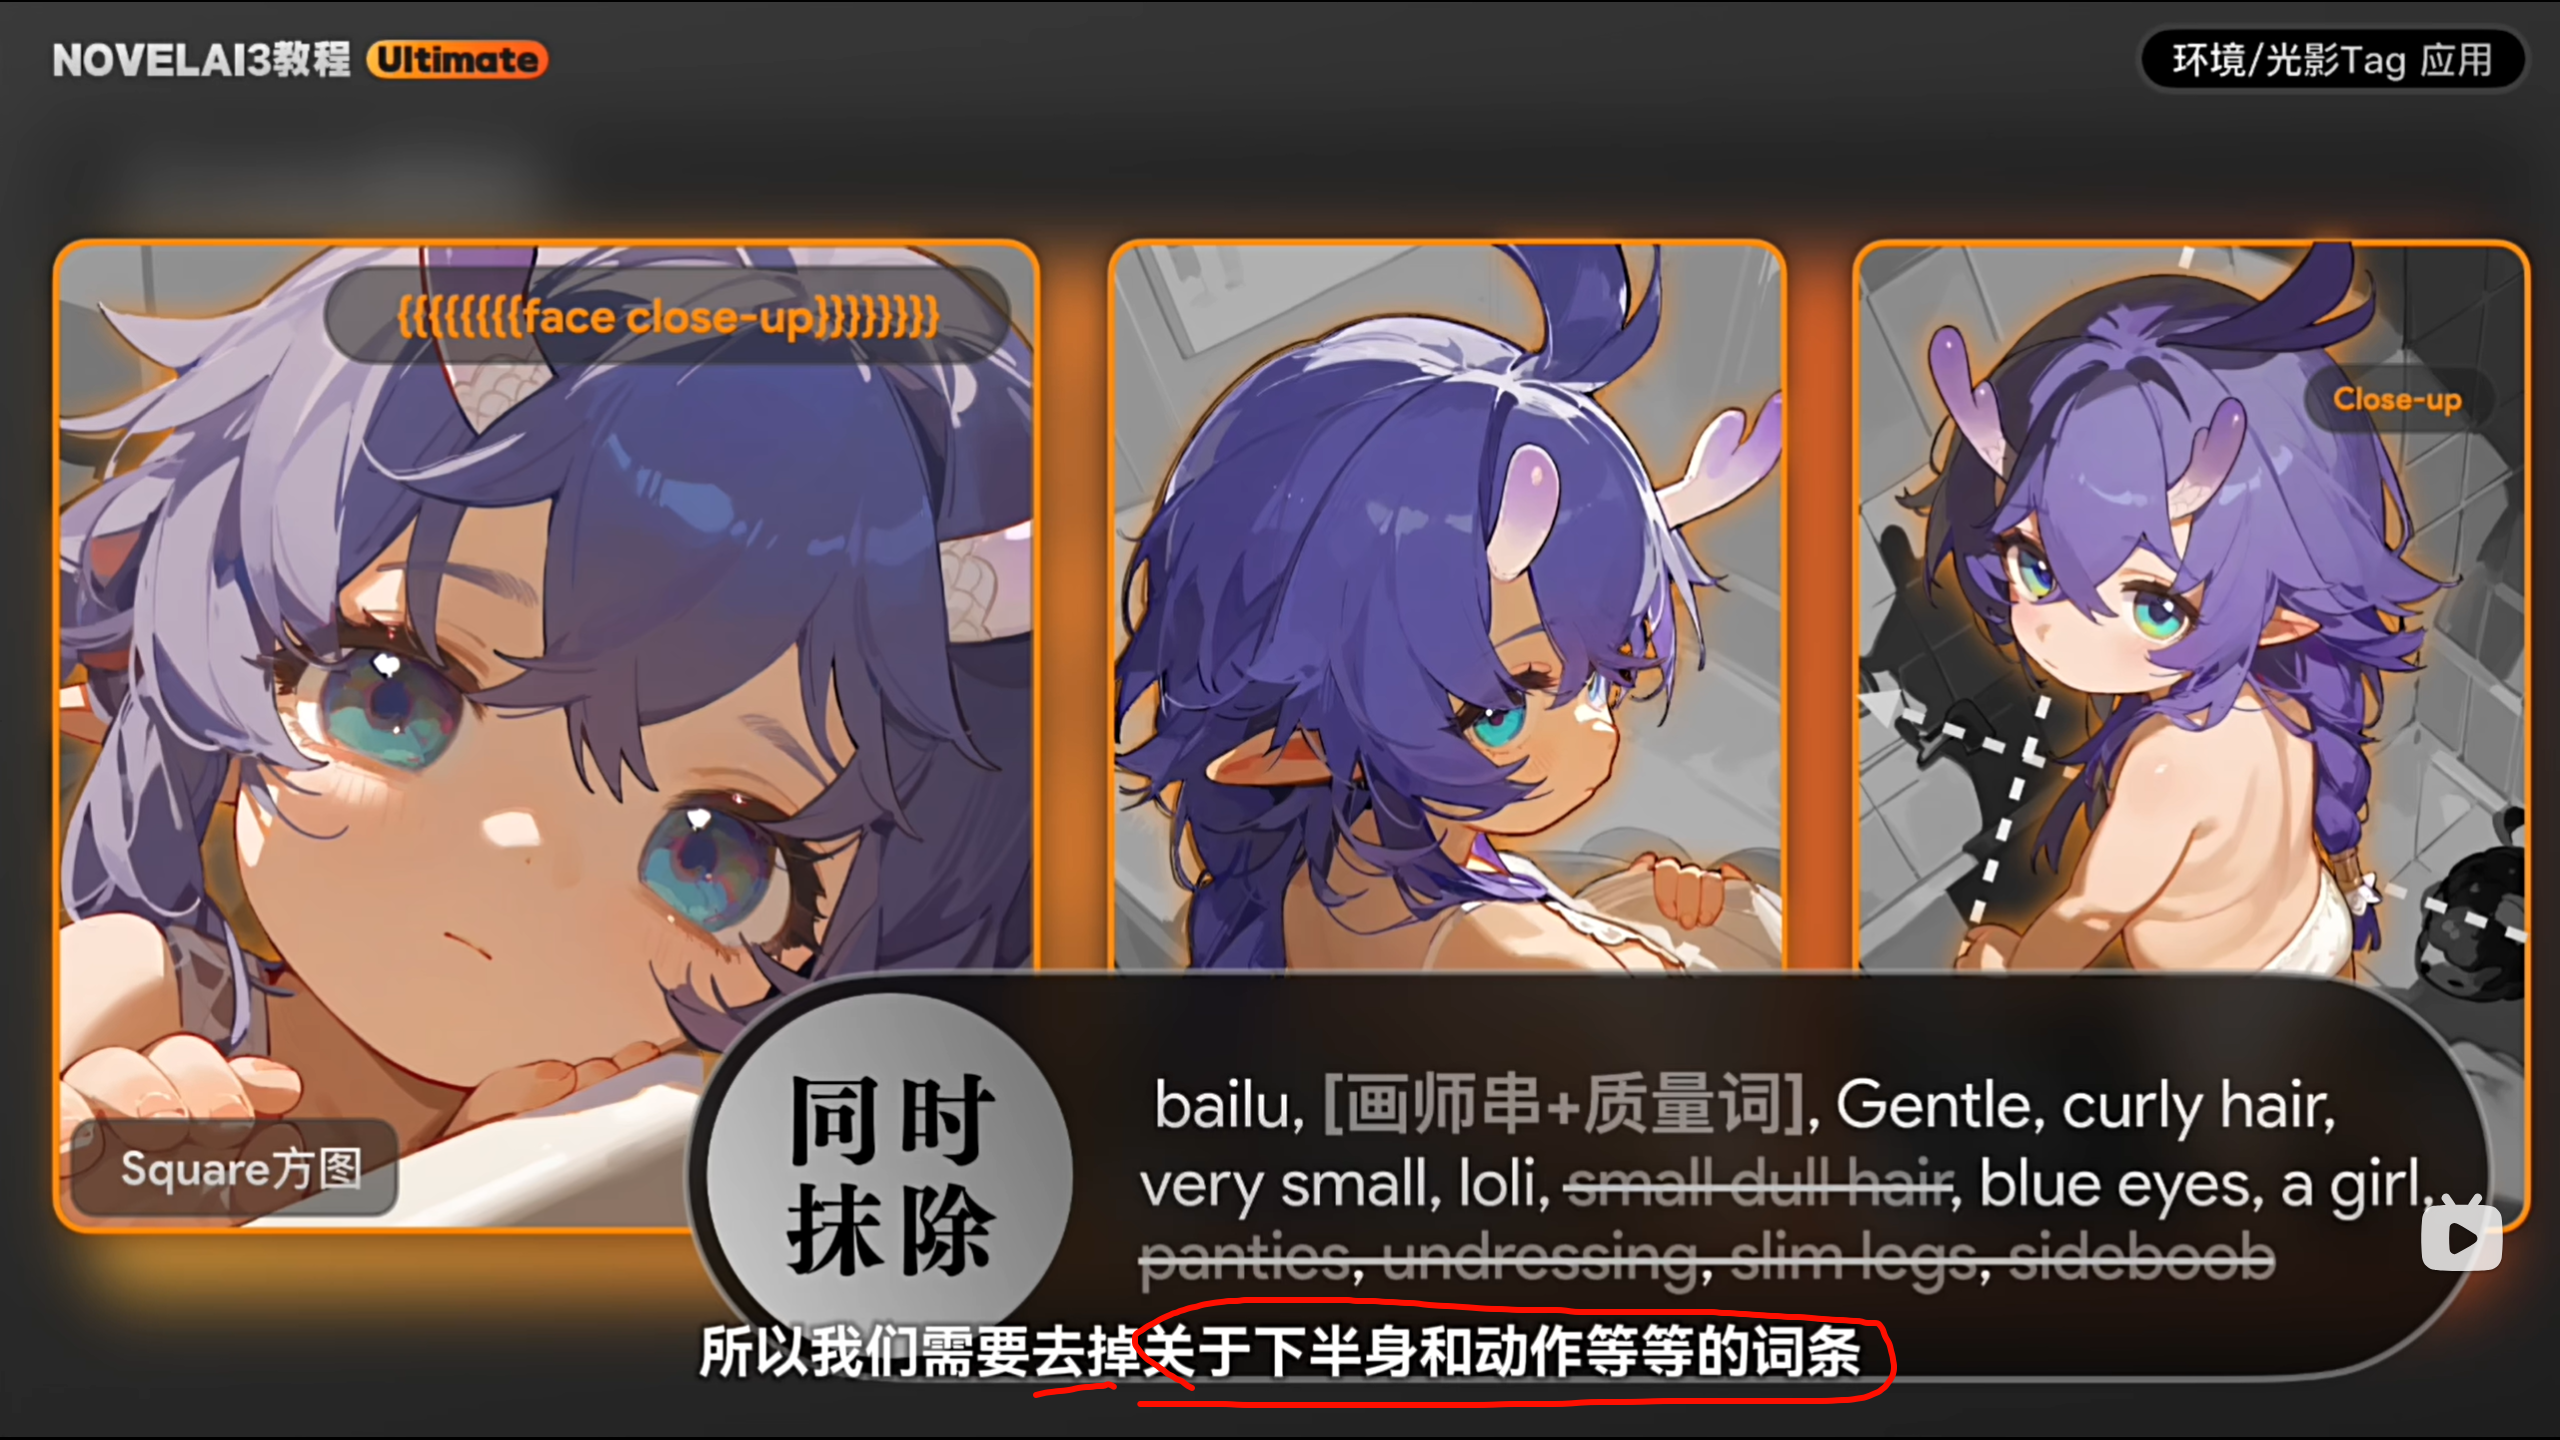
The standard look of a straight bangs is a complete straight line. However, due to the difficulty in describing similar variations, the form with broken hair in the bangs is also classified as a straight bangs. This kind of word contamination is extremely common and can have a significant impact on the choice of tags

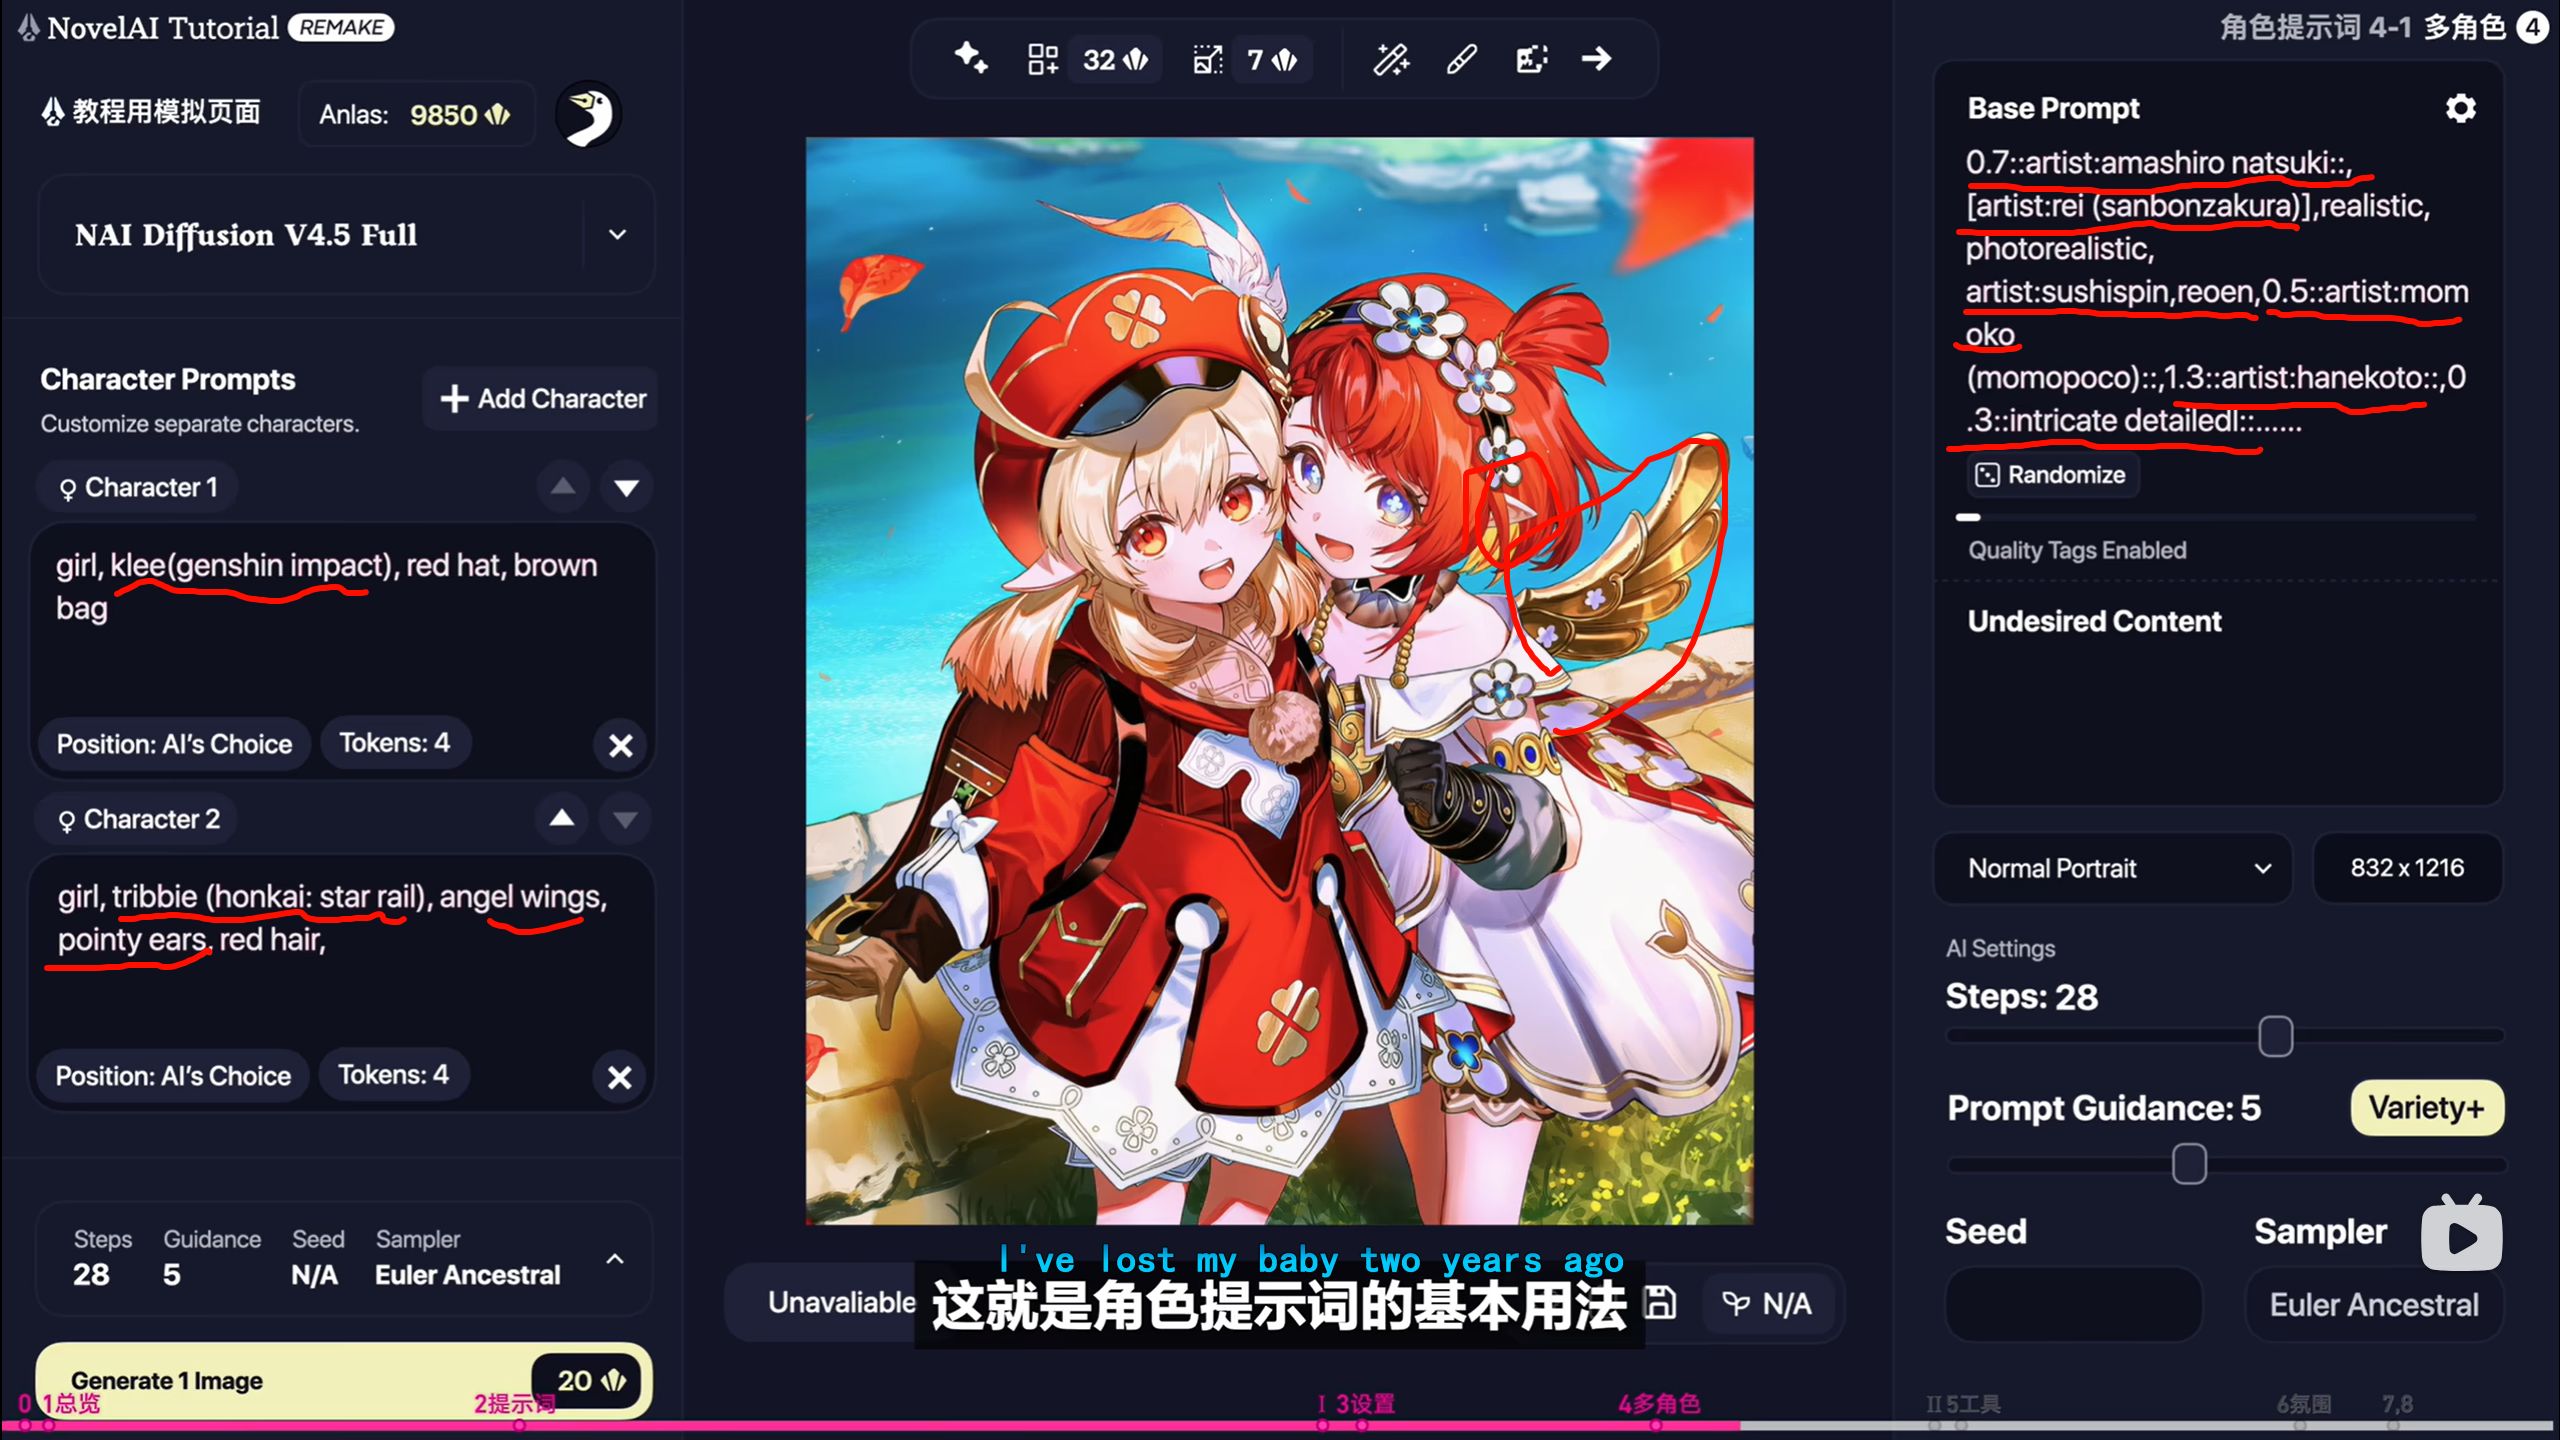
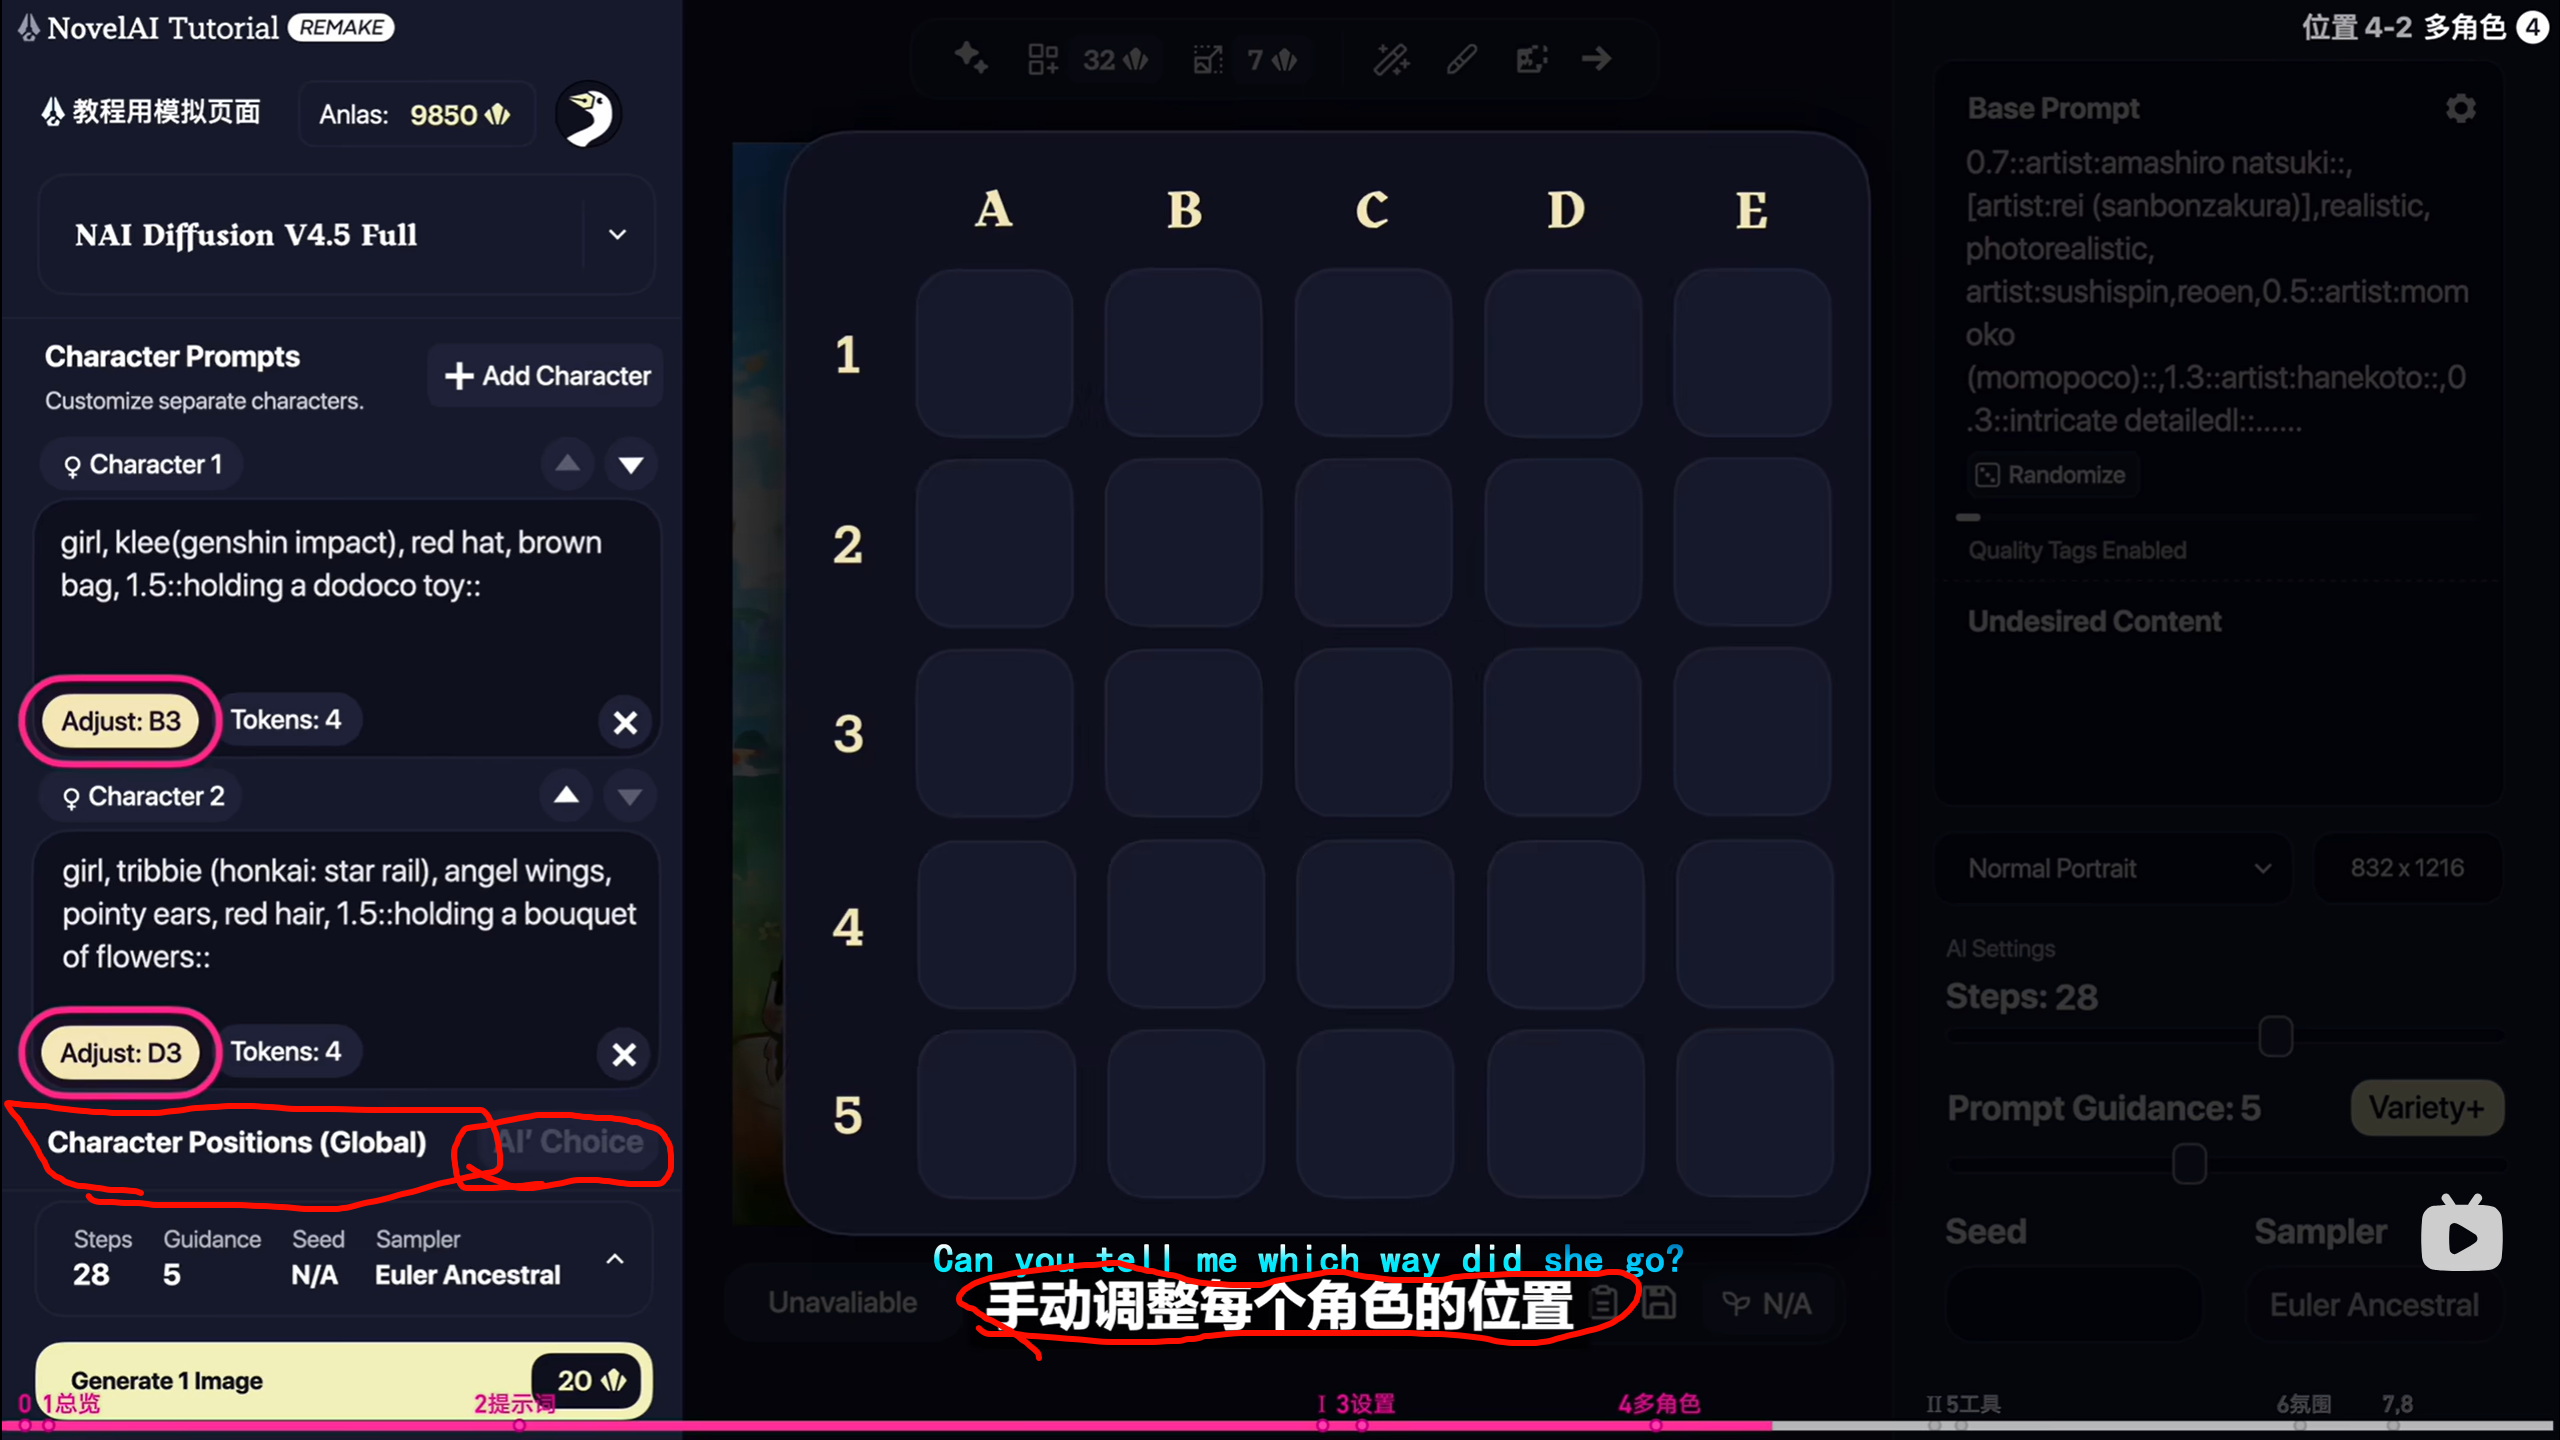
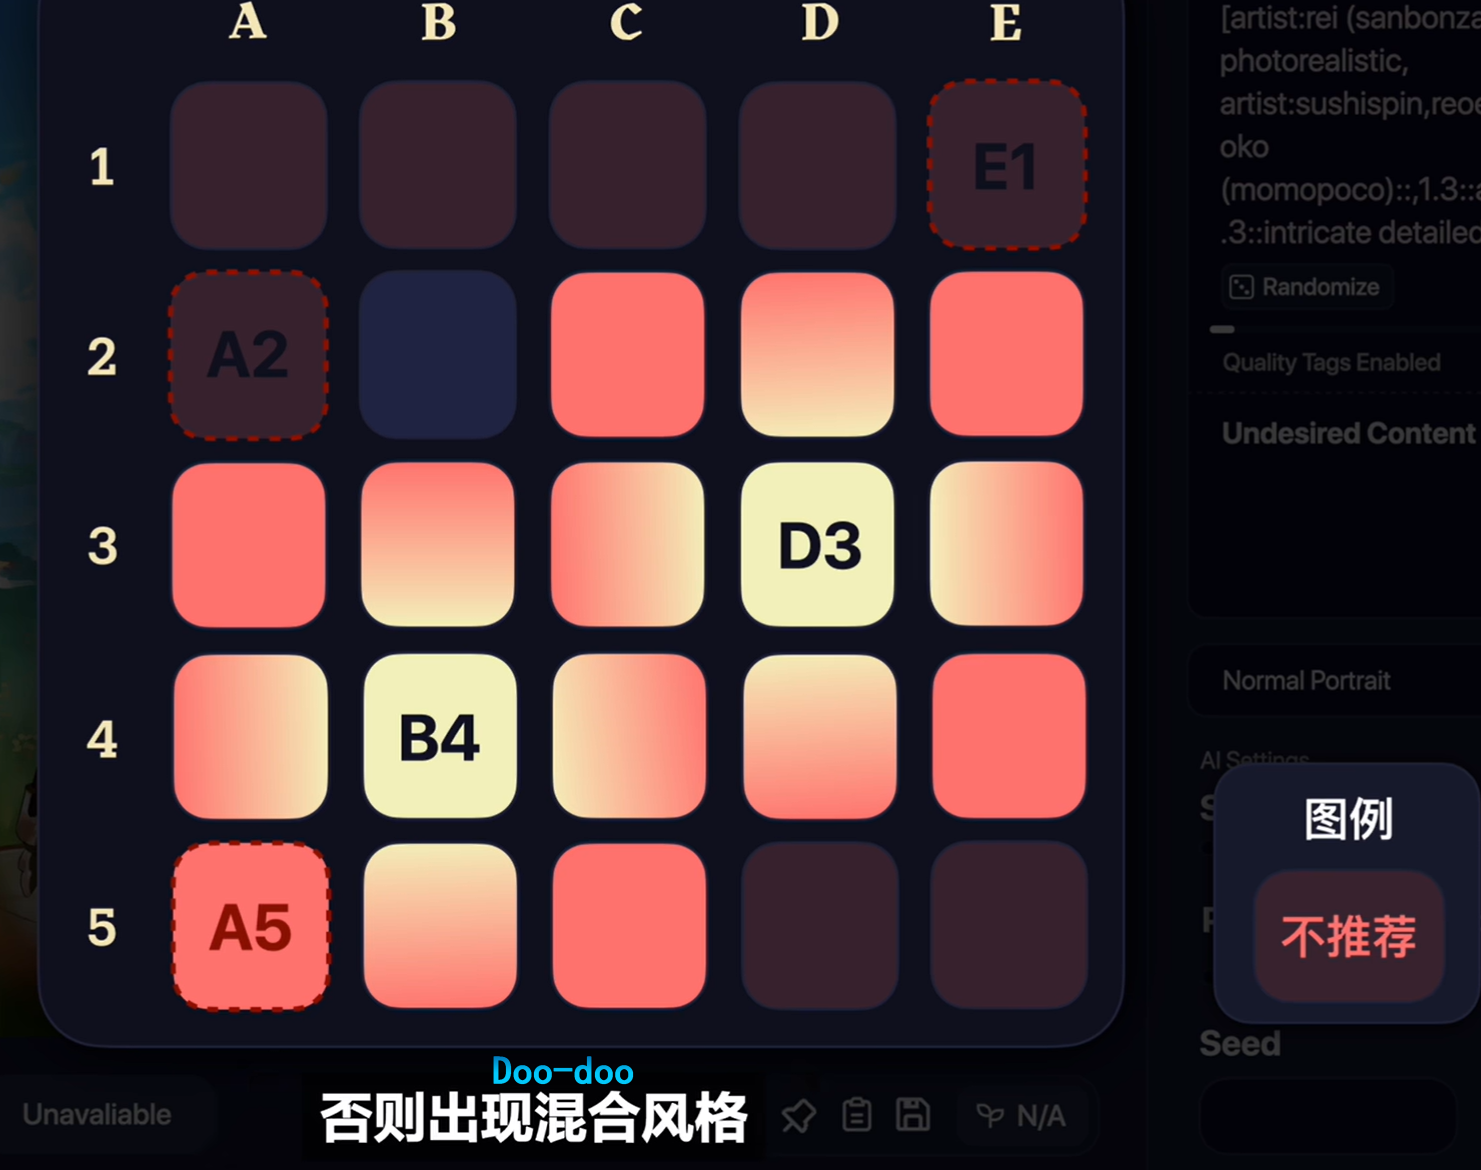
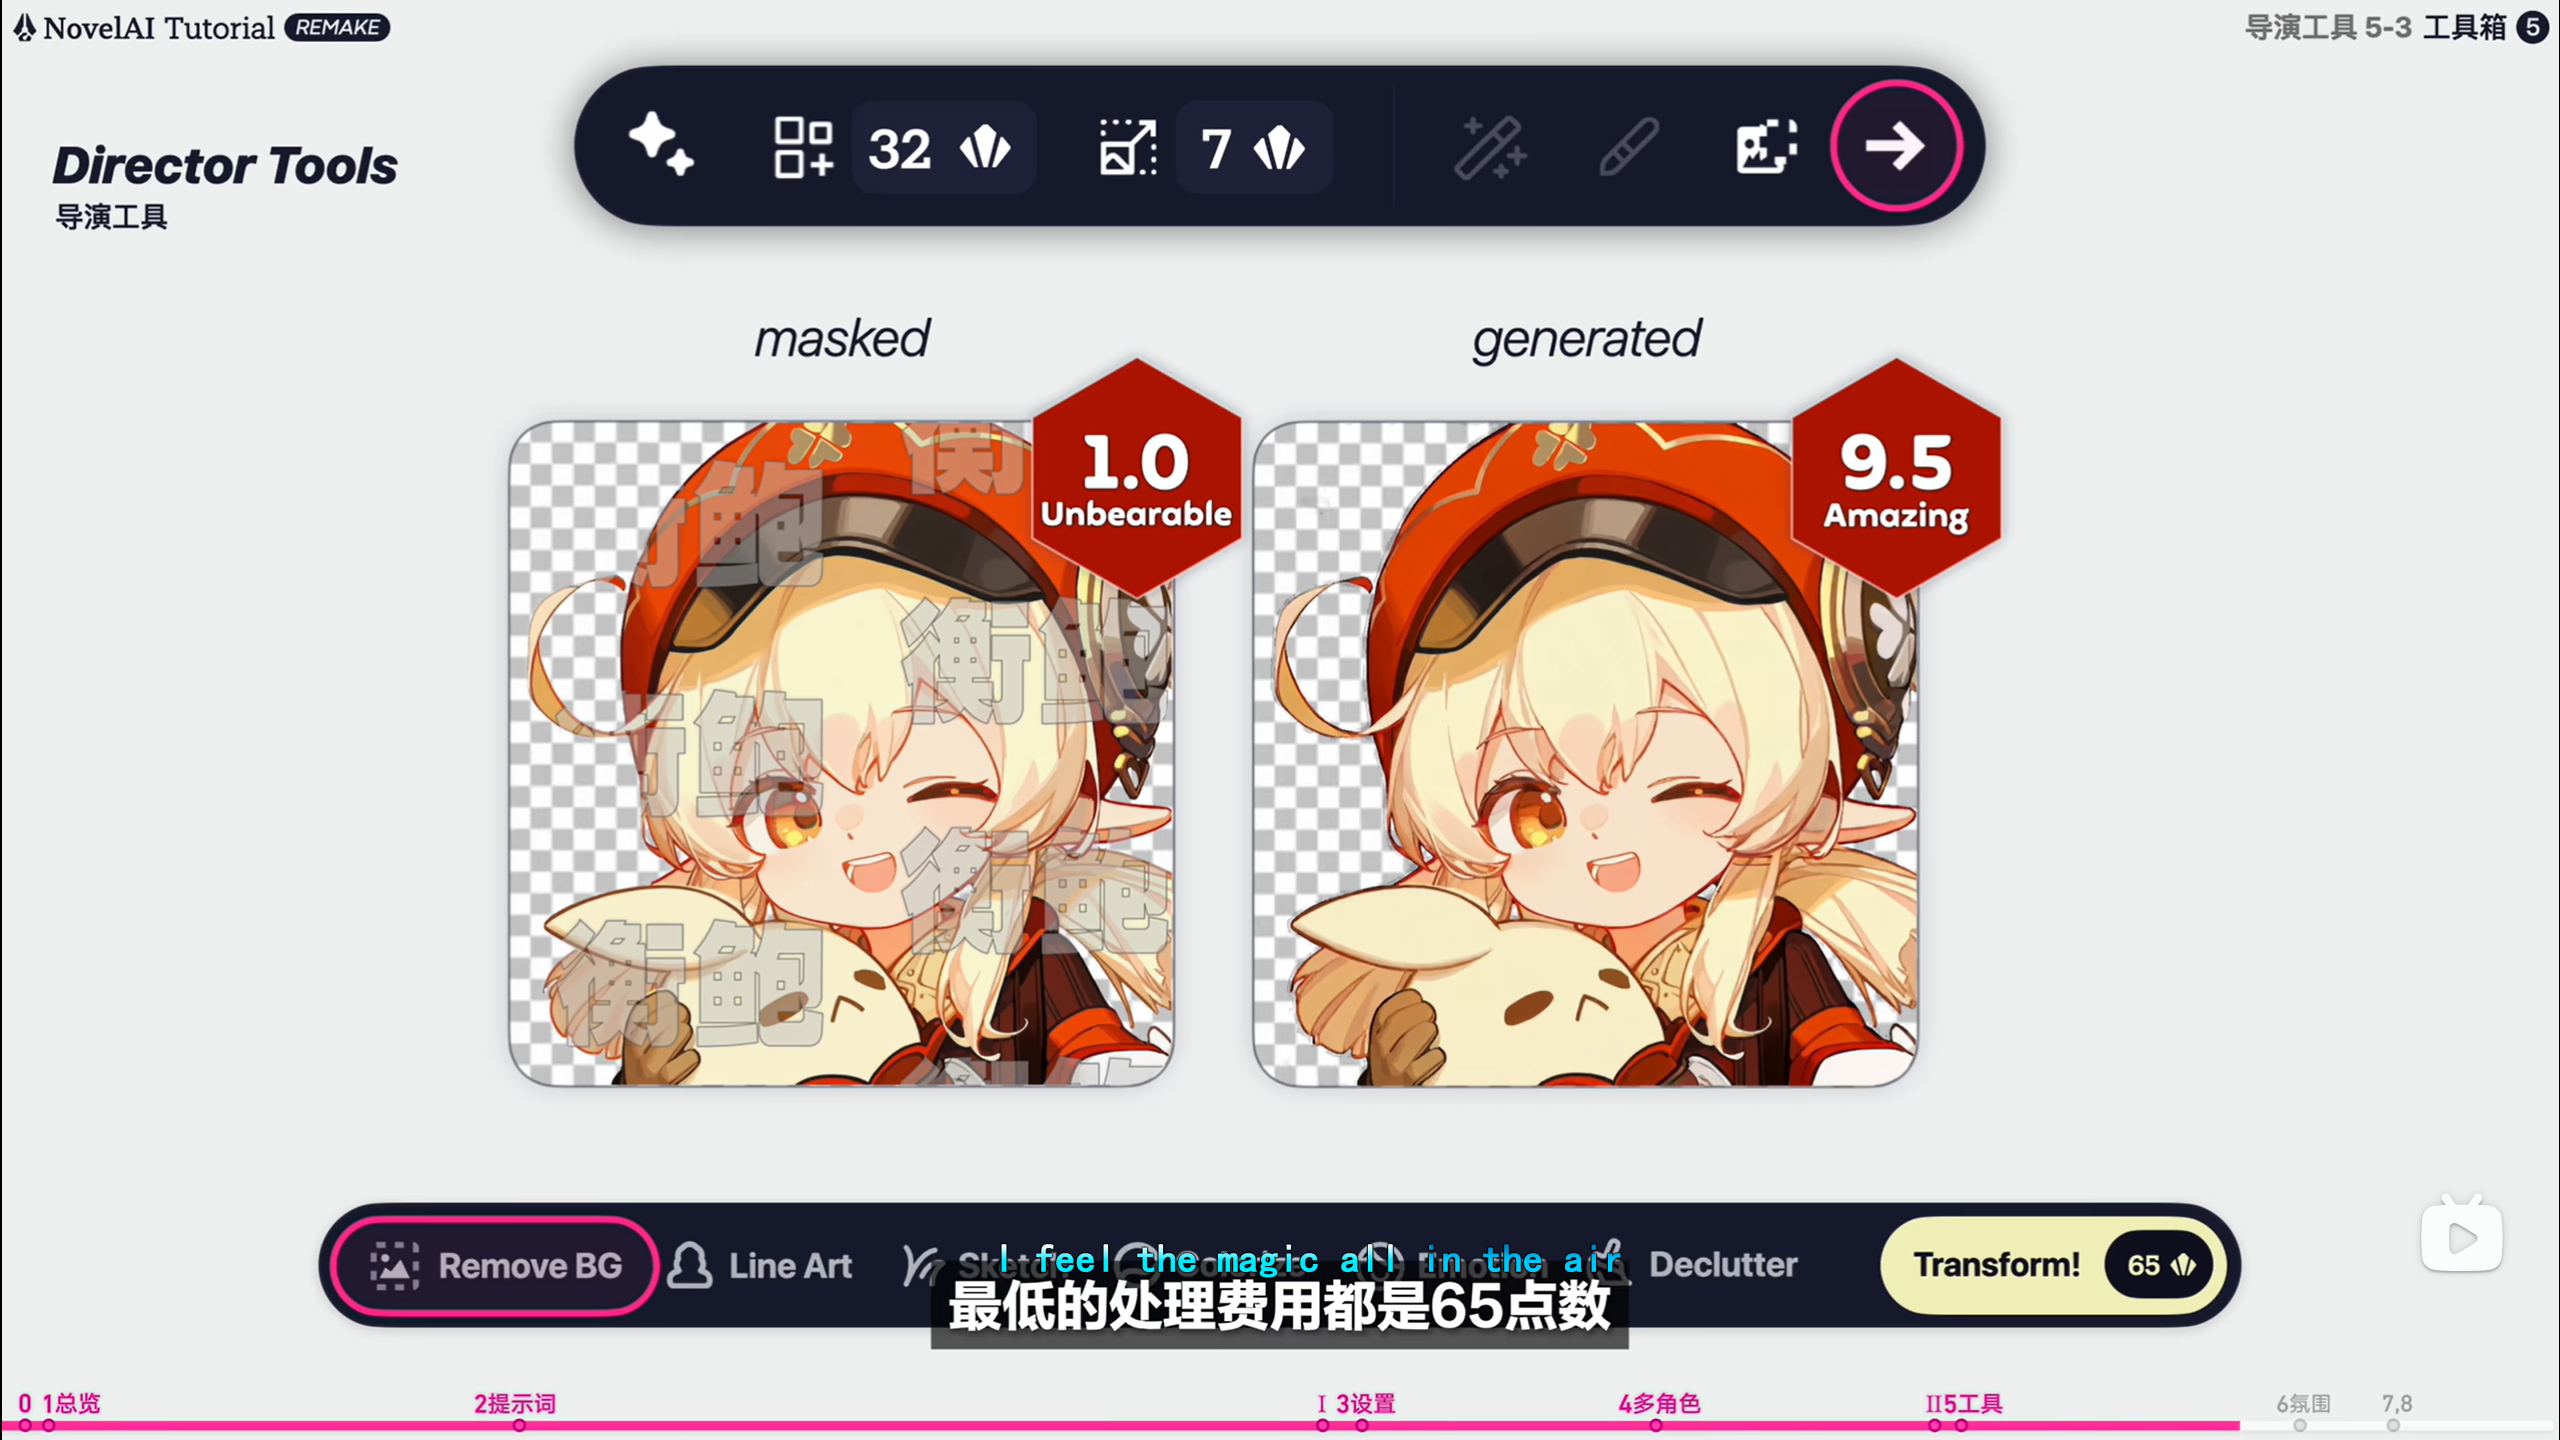
边缘放,可能出现角色不全,
角色贴近可能出现混合
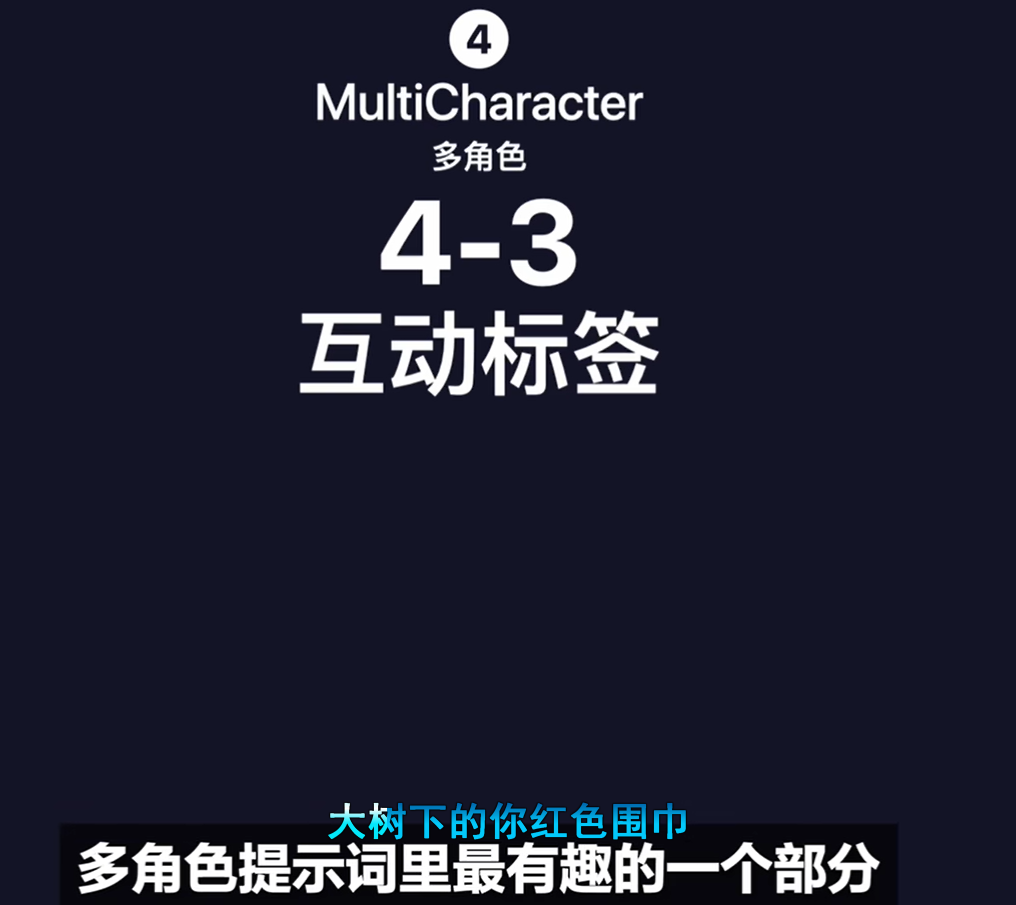 互动标签,
互动标签,
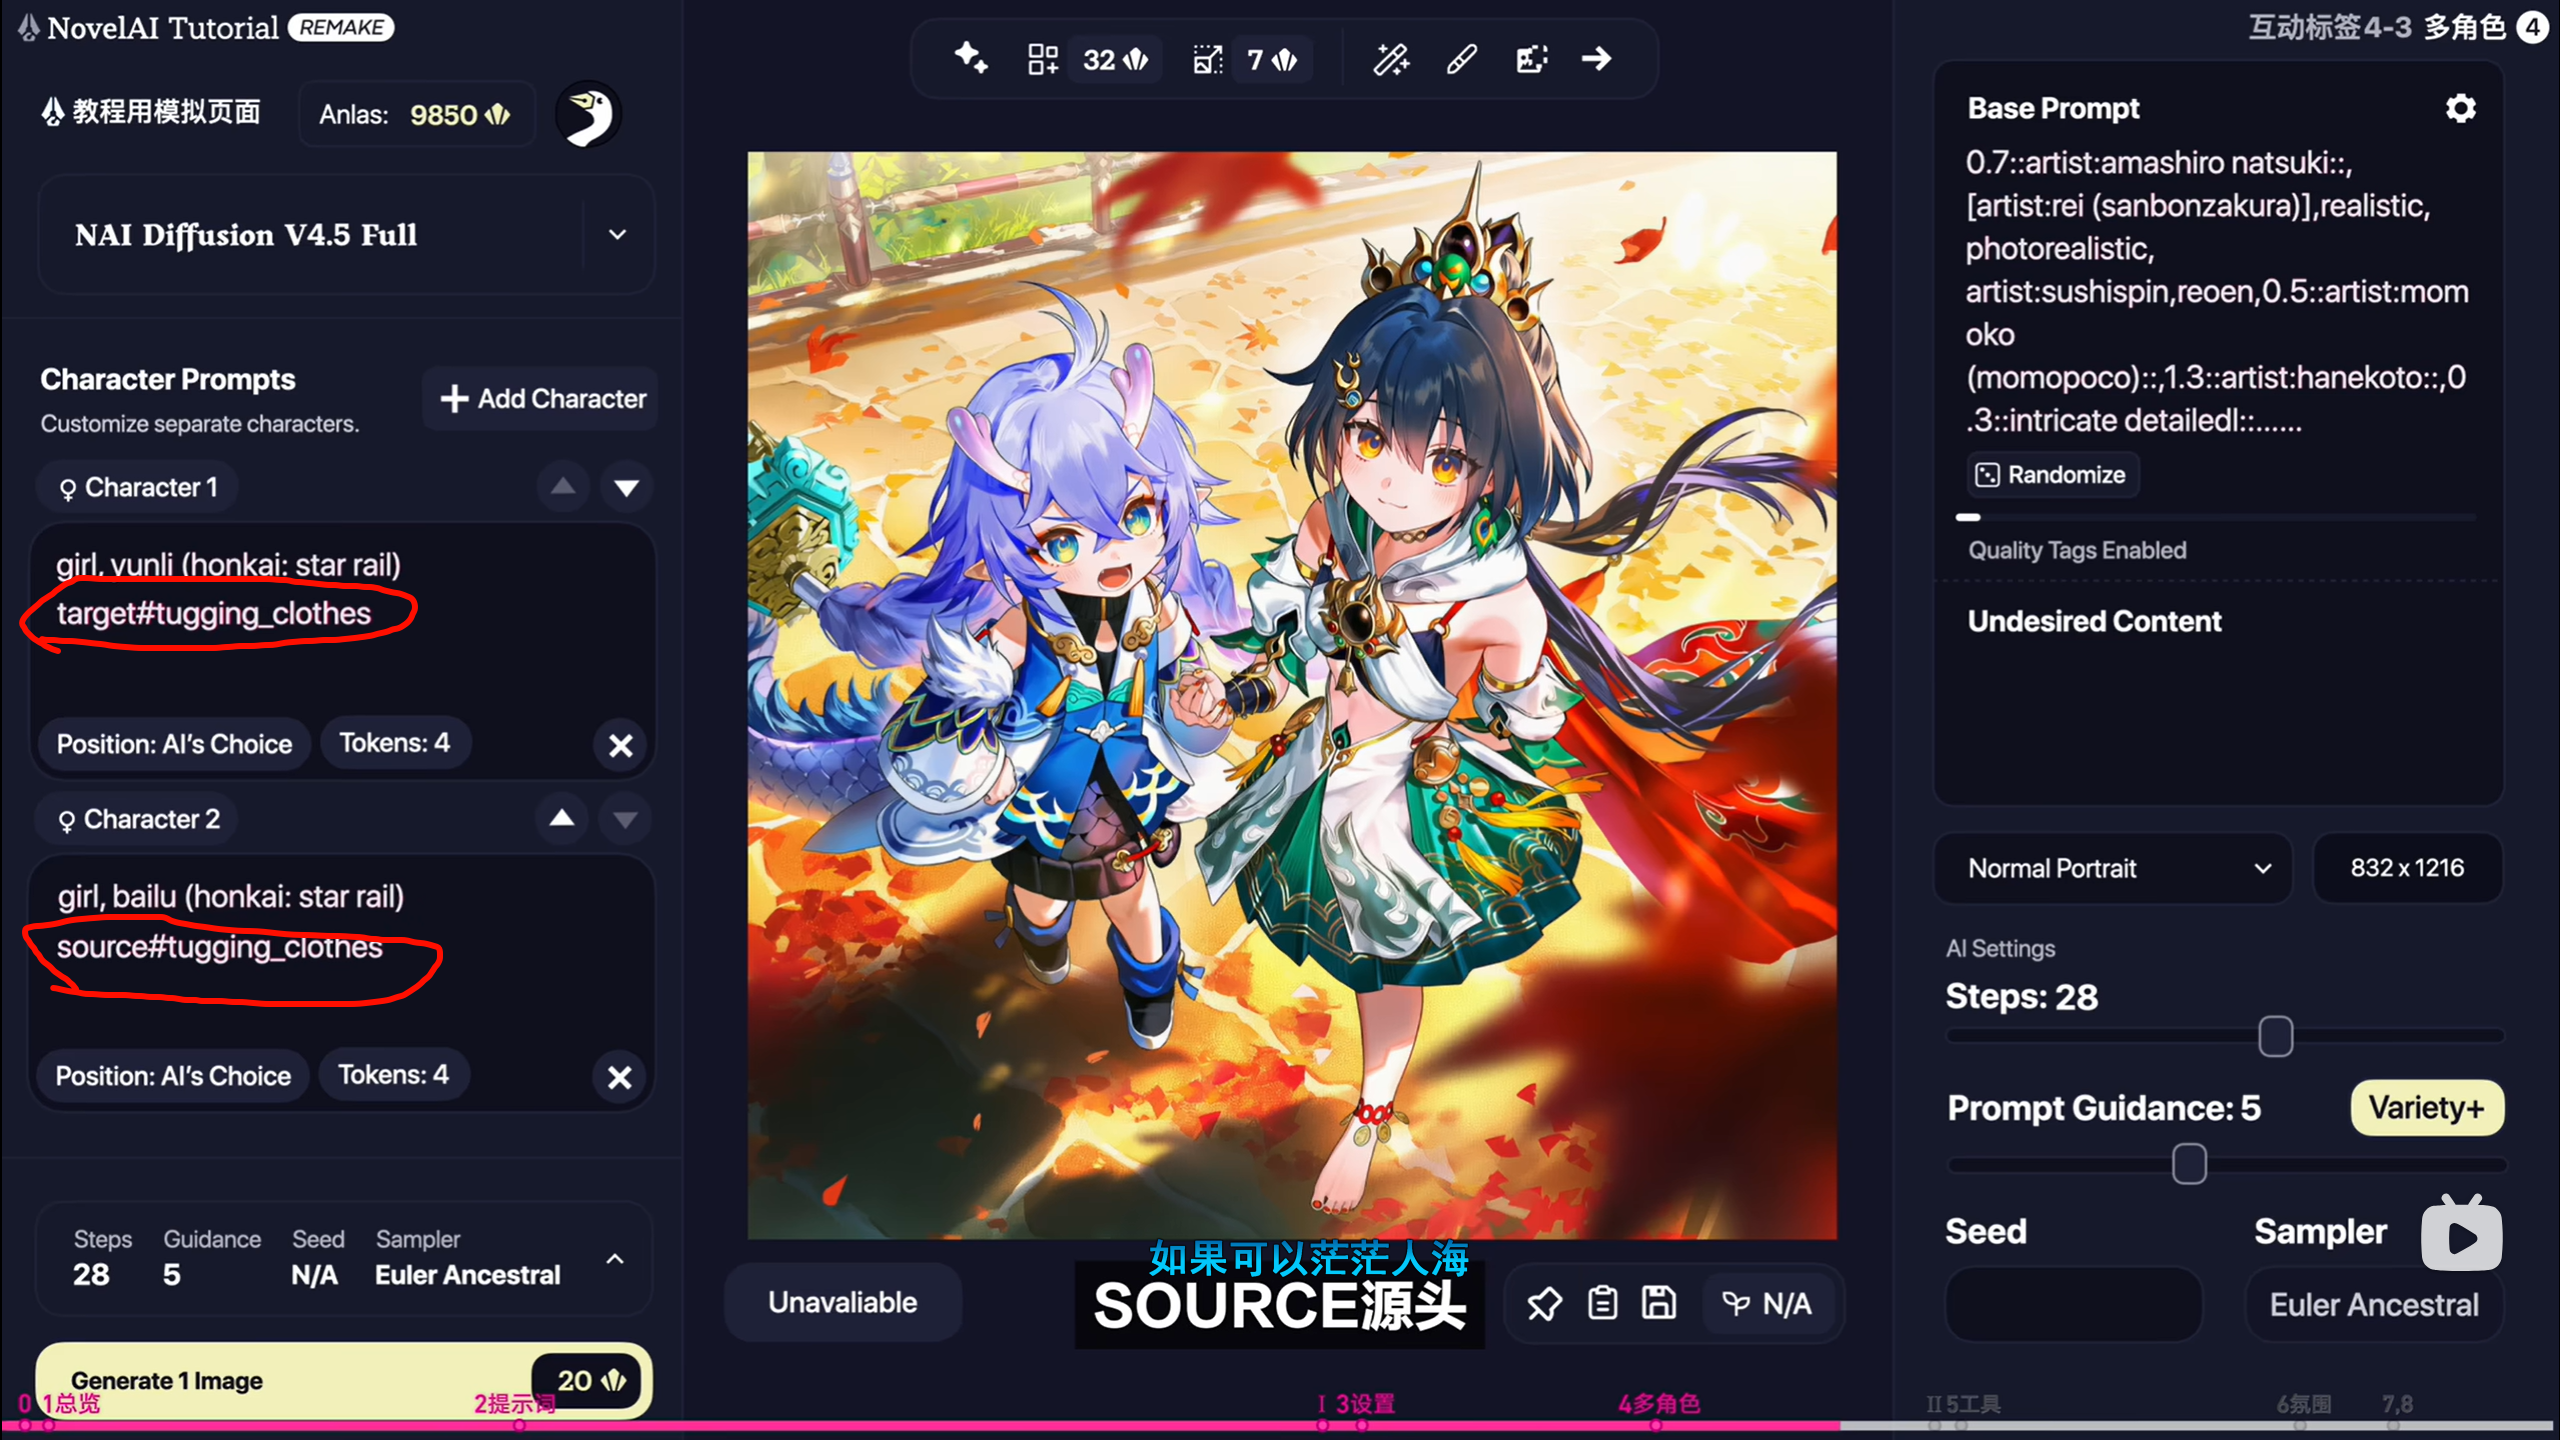
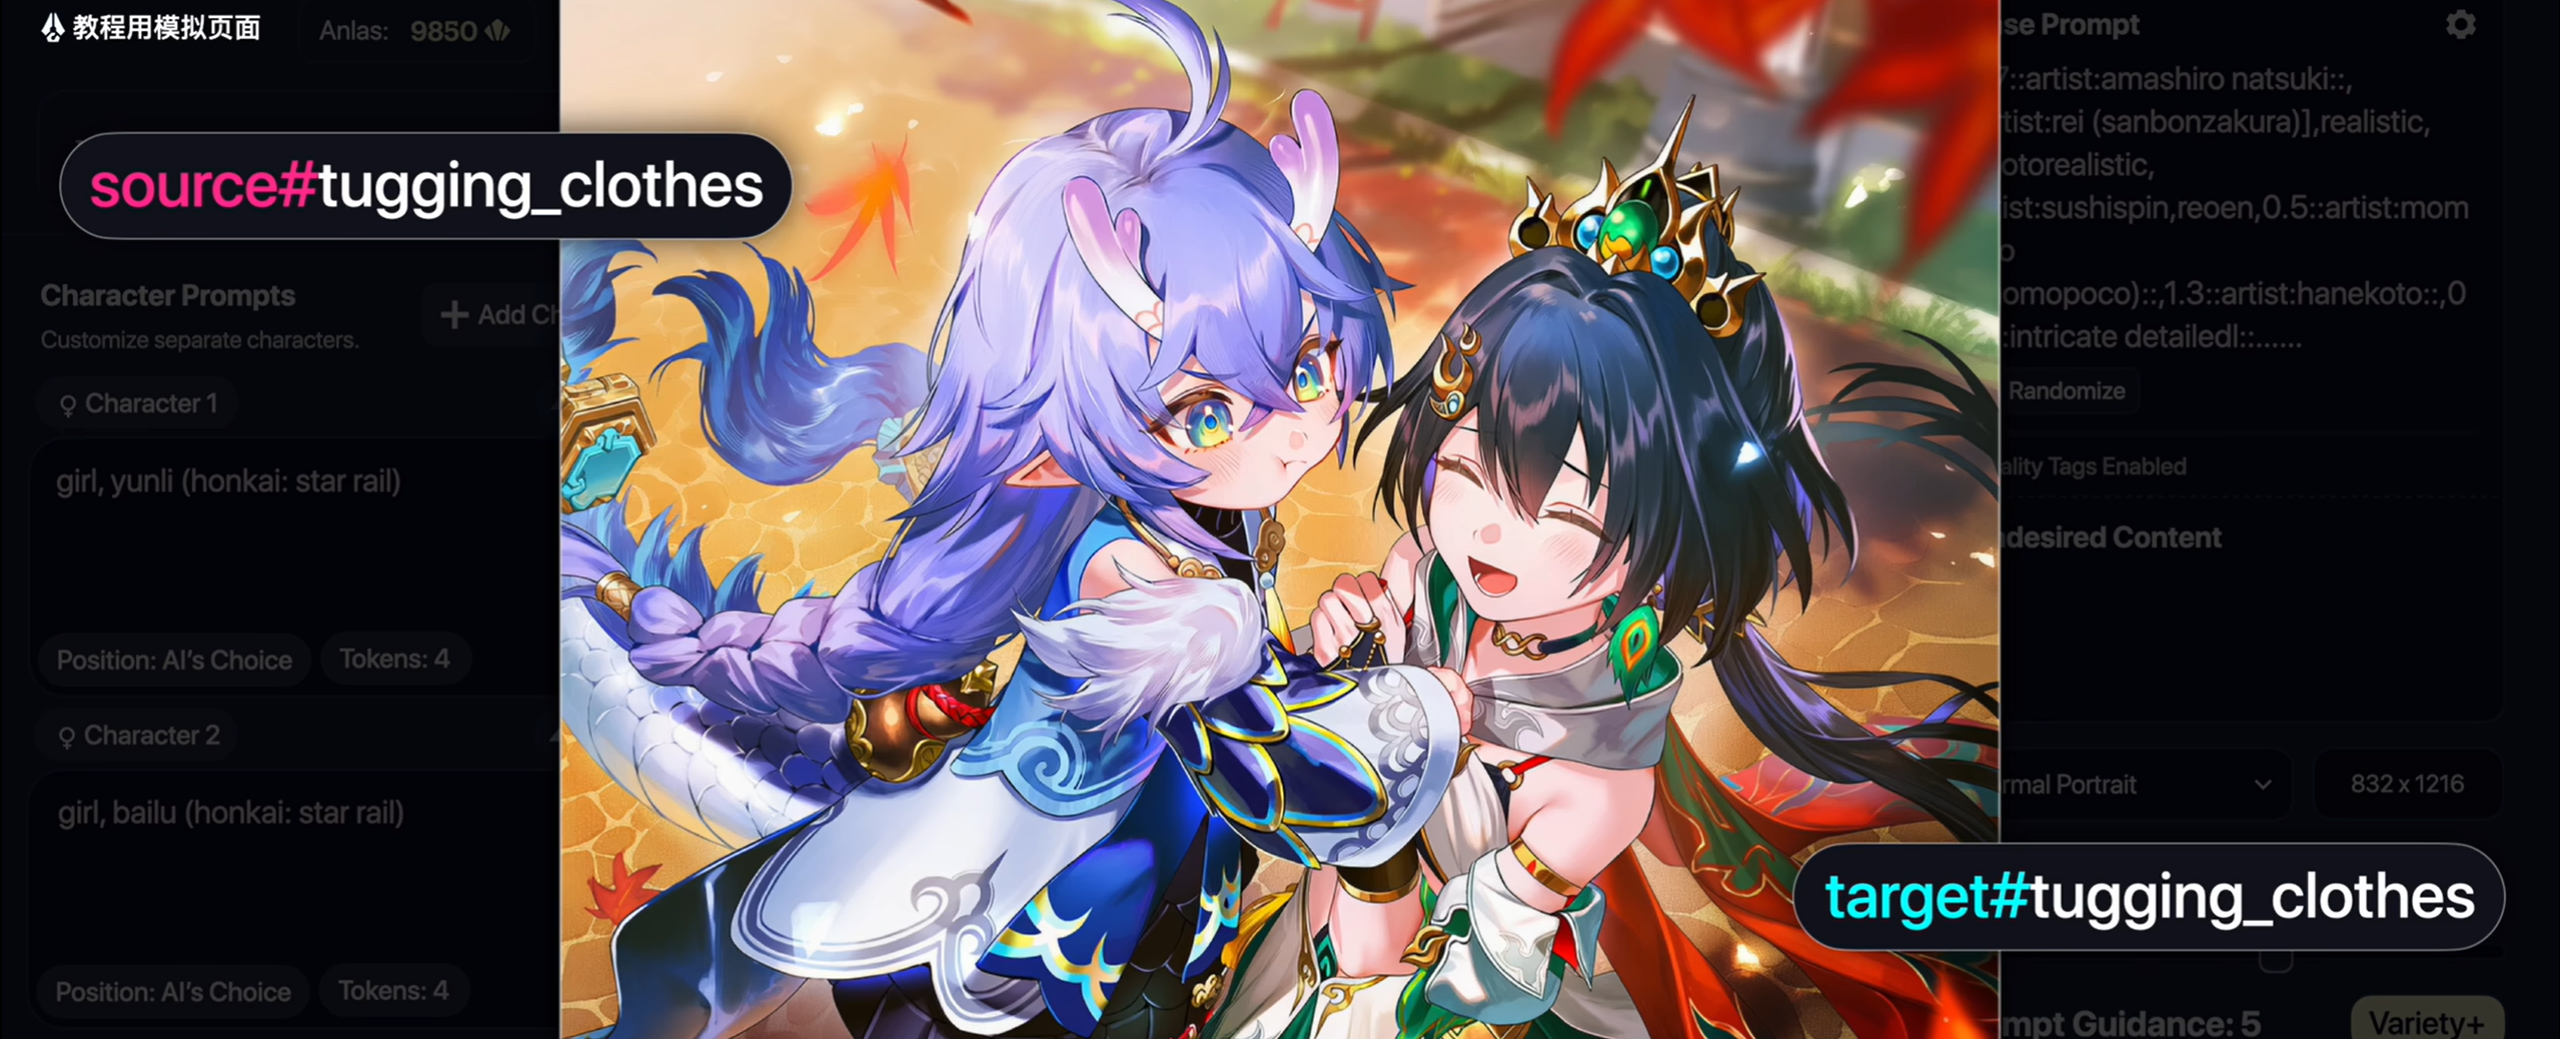
做cosplay的效果,用这里的#target,
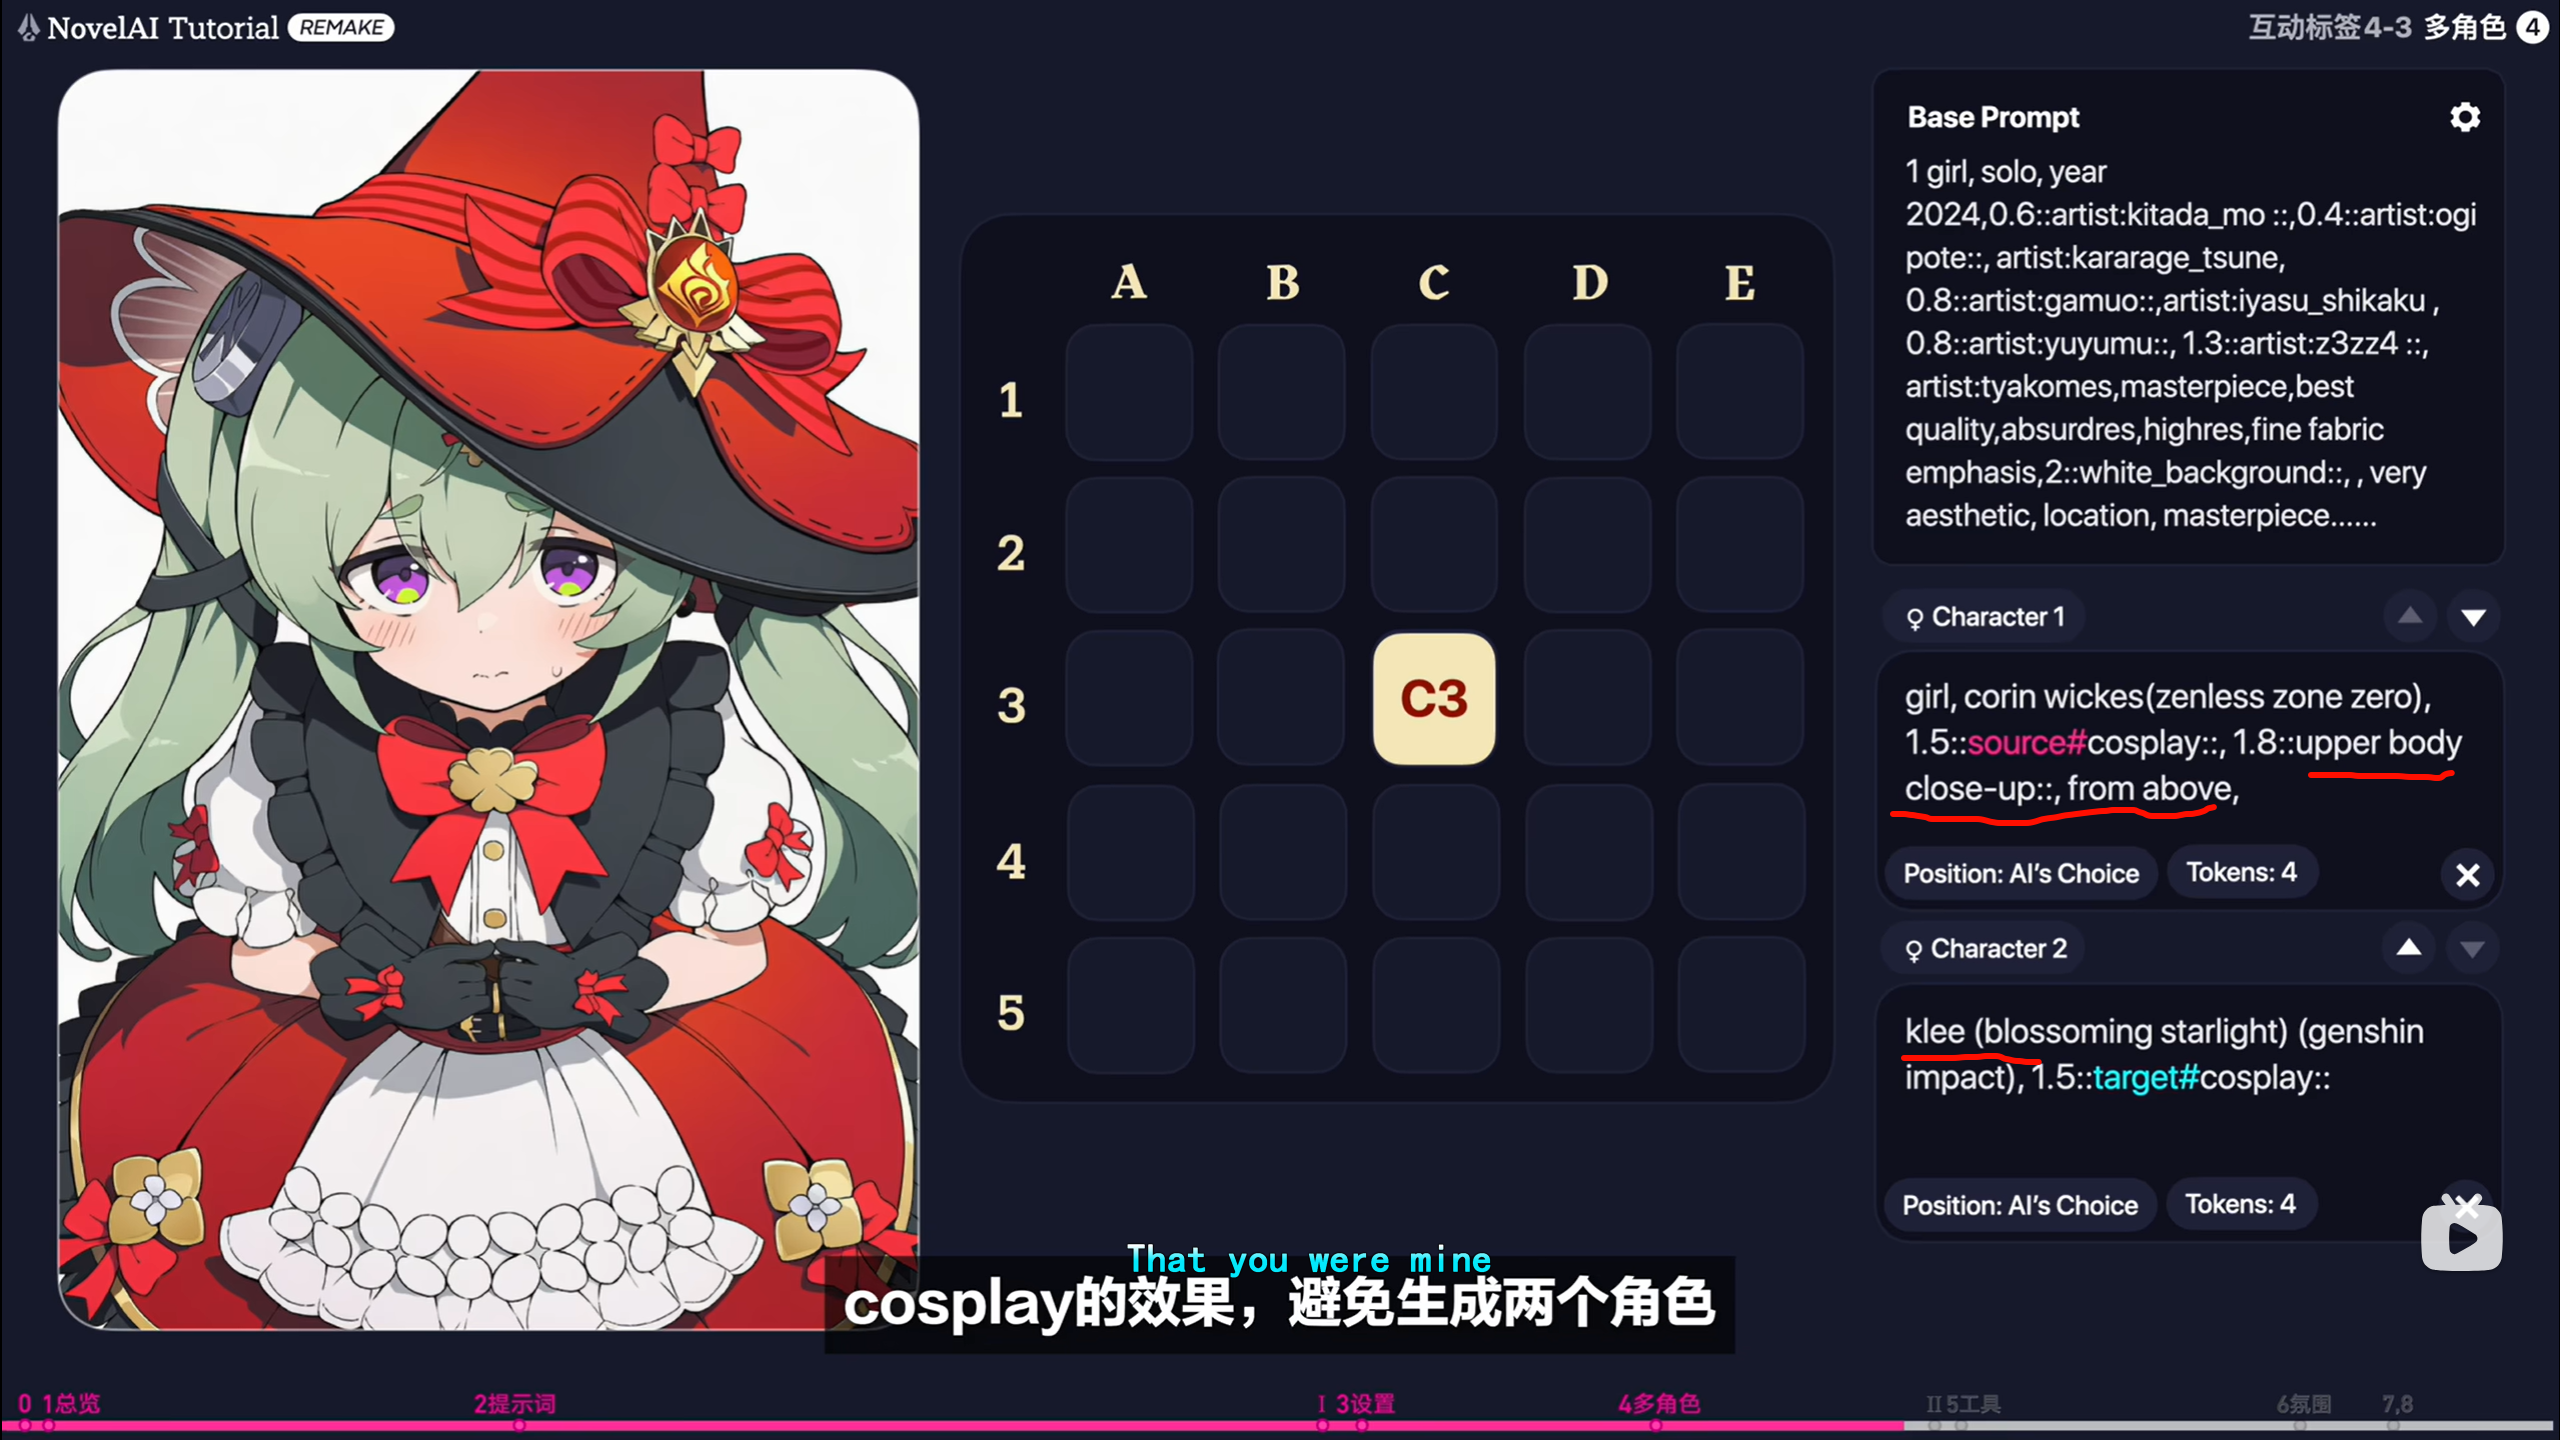
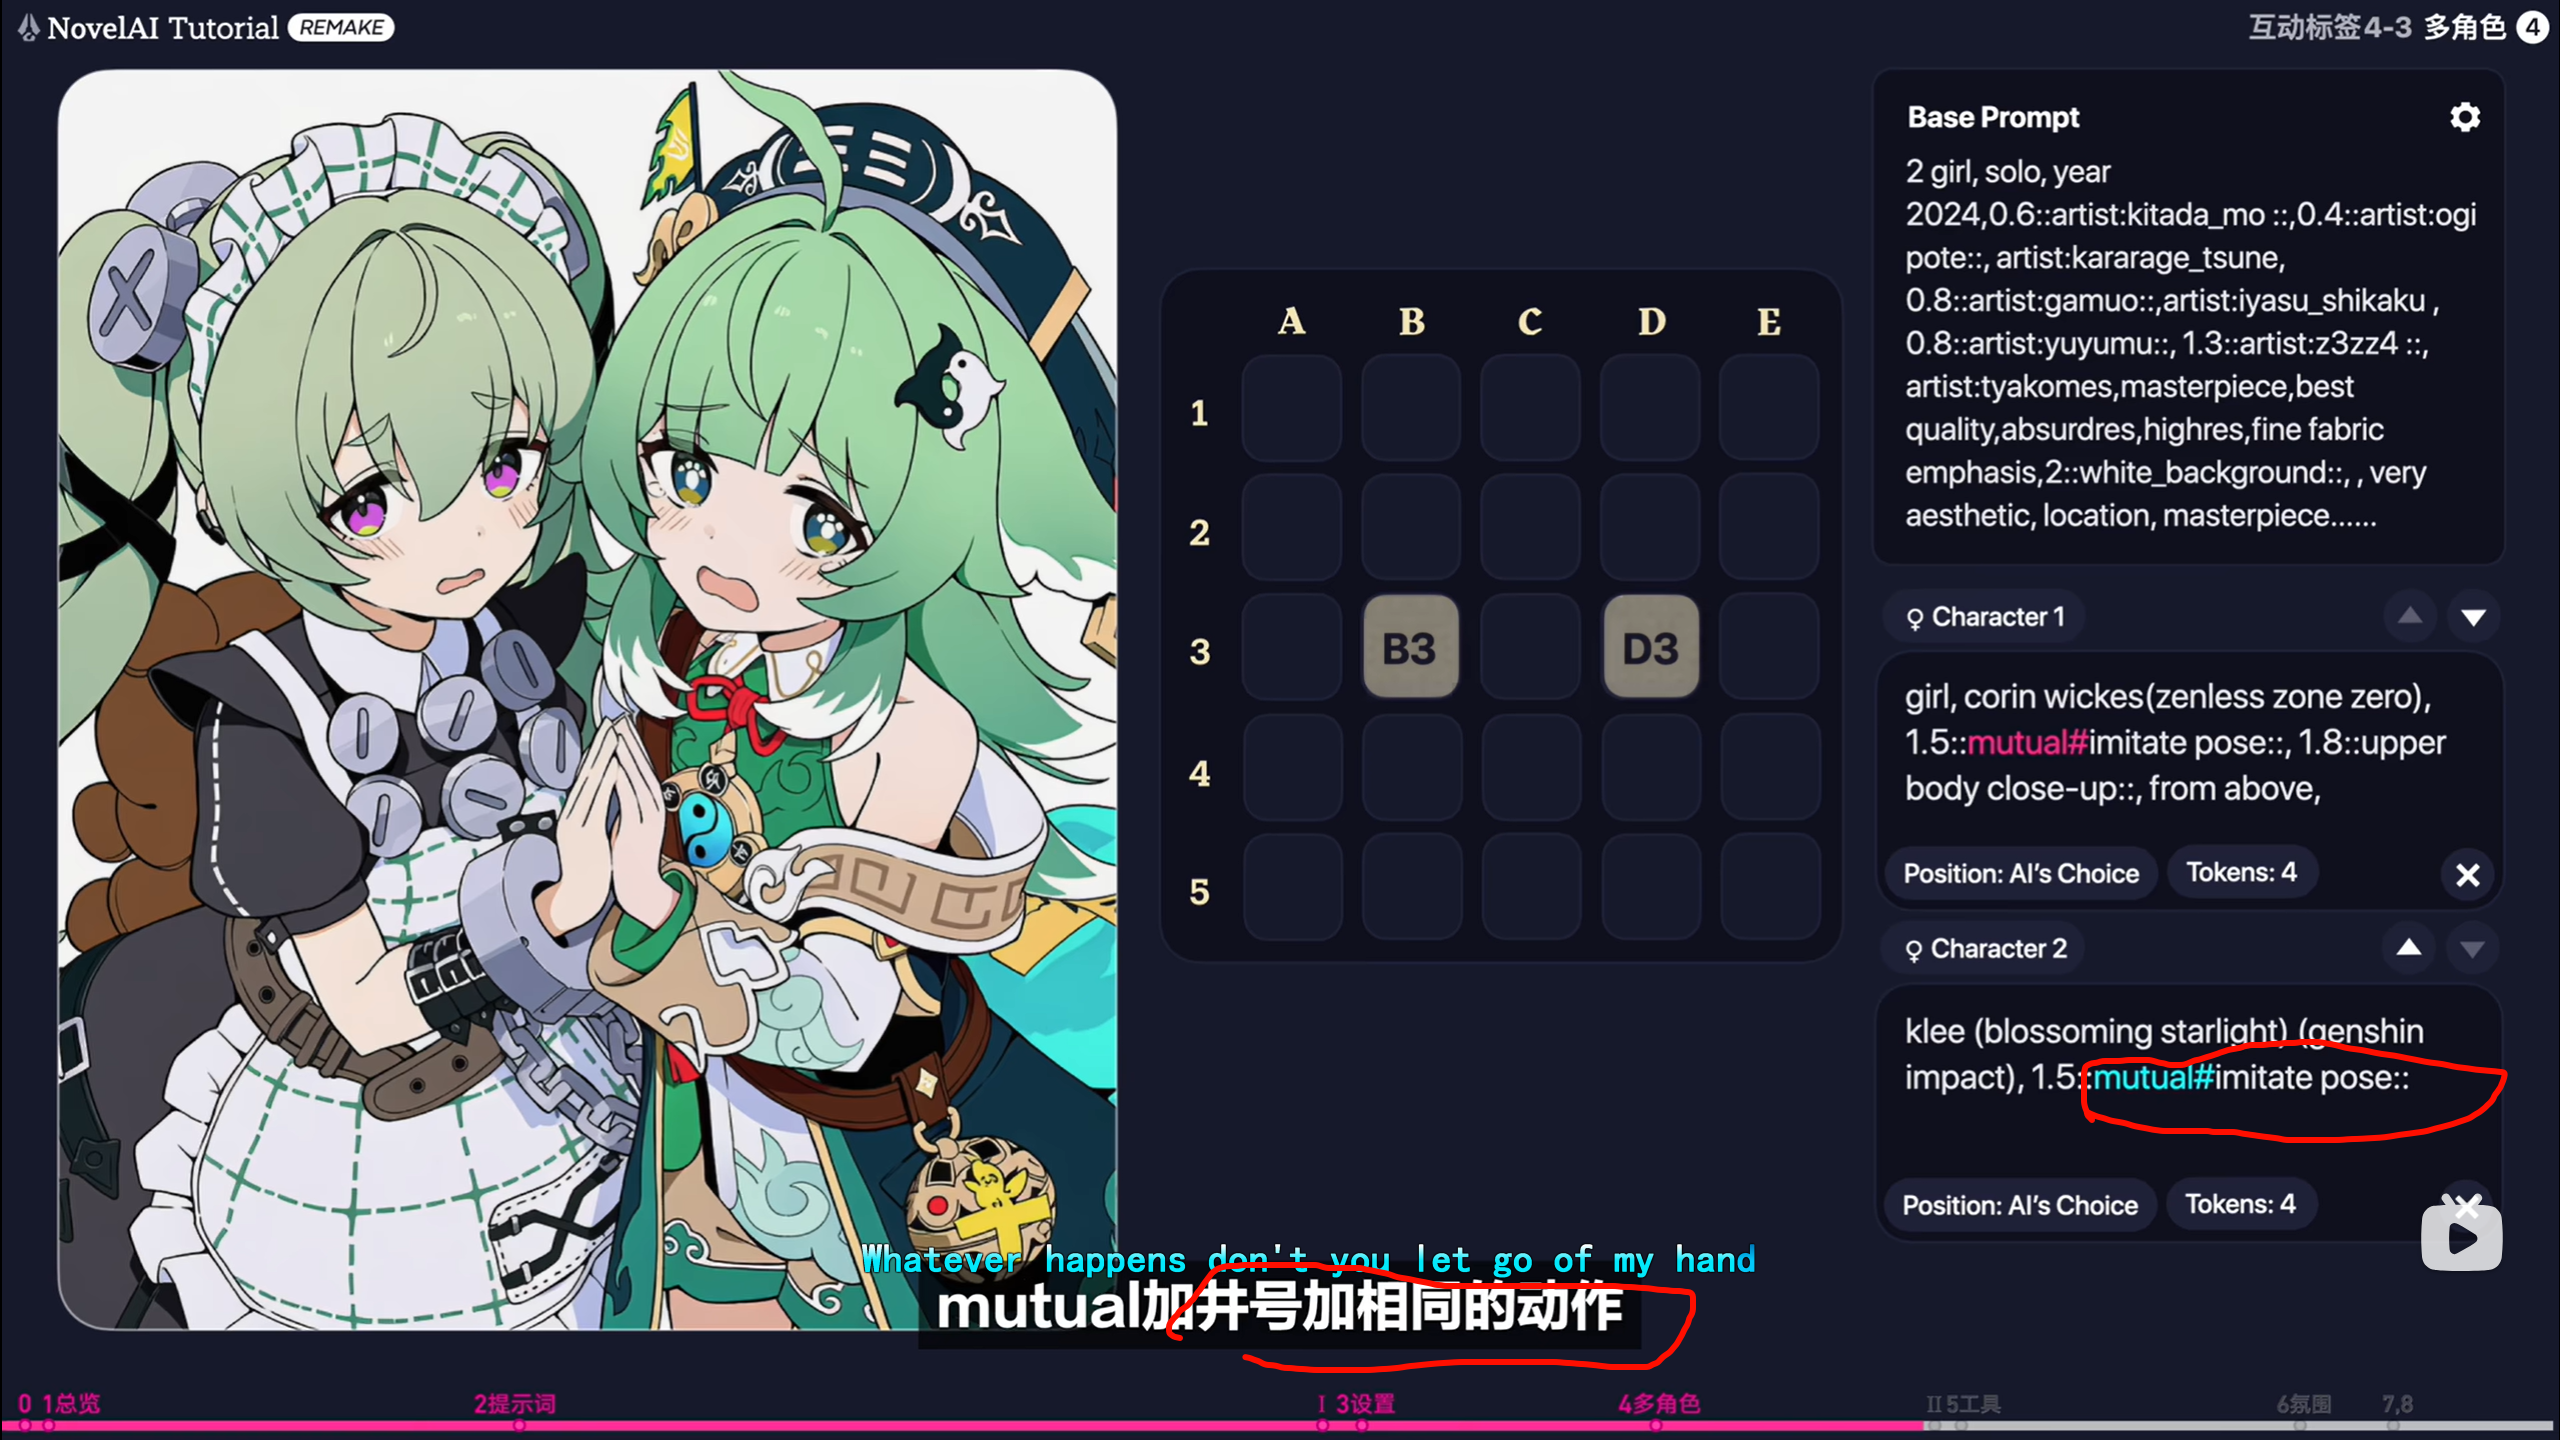
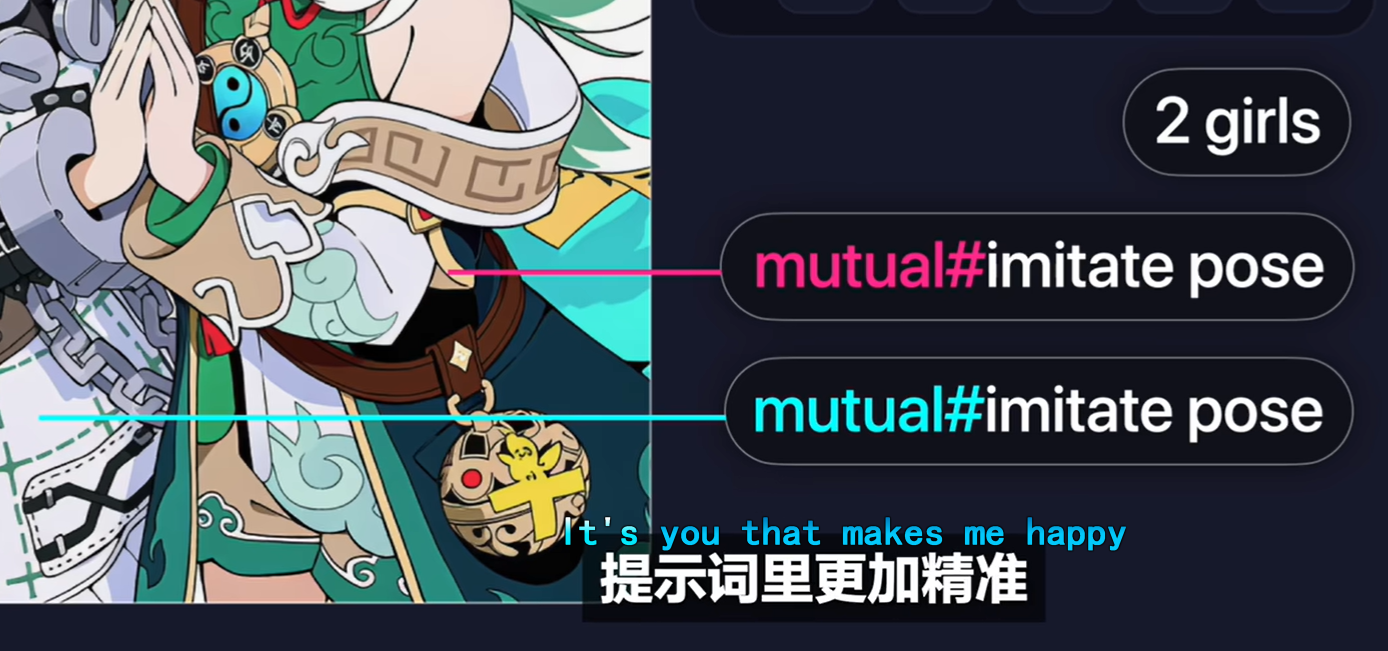
比起写到把两个单独的imitate pose 写到两个角色会更加精准,,,,提示词,,
产生了交互,,对交互有现有的定义,,定义的复用
每次看到这样的结果还是感觉很不可思议,,,,,

尝试一次 LoRA 训练
-
自己收集 20–100 张图训练一个 LoRA,再在不同场景下调用。
-
亲自训练一次能非常直观地理解模型是如何“记住”风格的。
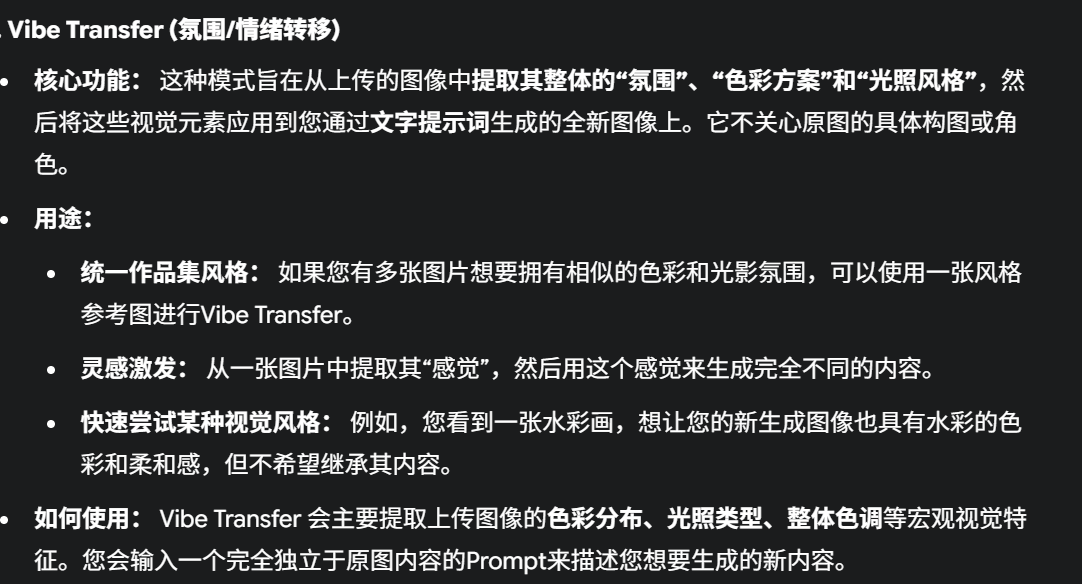
CharacterReference(角色参考)
核心功能:这种模式(通常是较新的功能)专门用于让AI学习并记住上传图像中角色的视觉特
征(如发型、眼晴颜色、服装样式、特殊配饰等),然后尝试在您后续生成的不同构图、姿势或
背景的图像中复现这个角色。
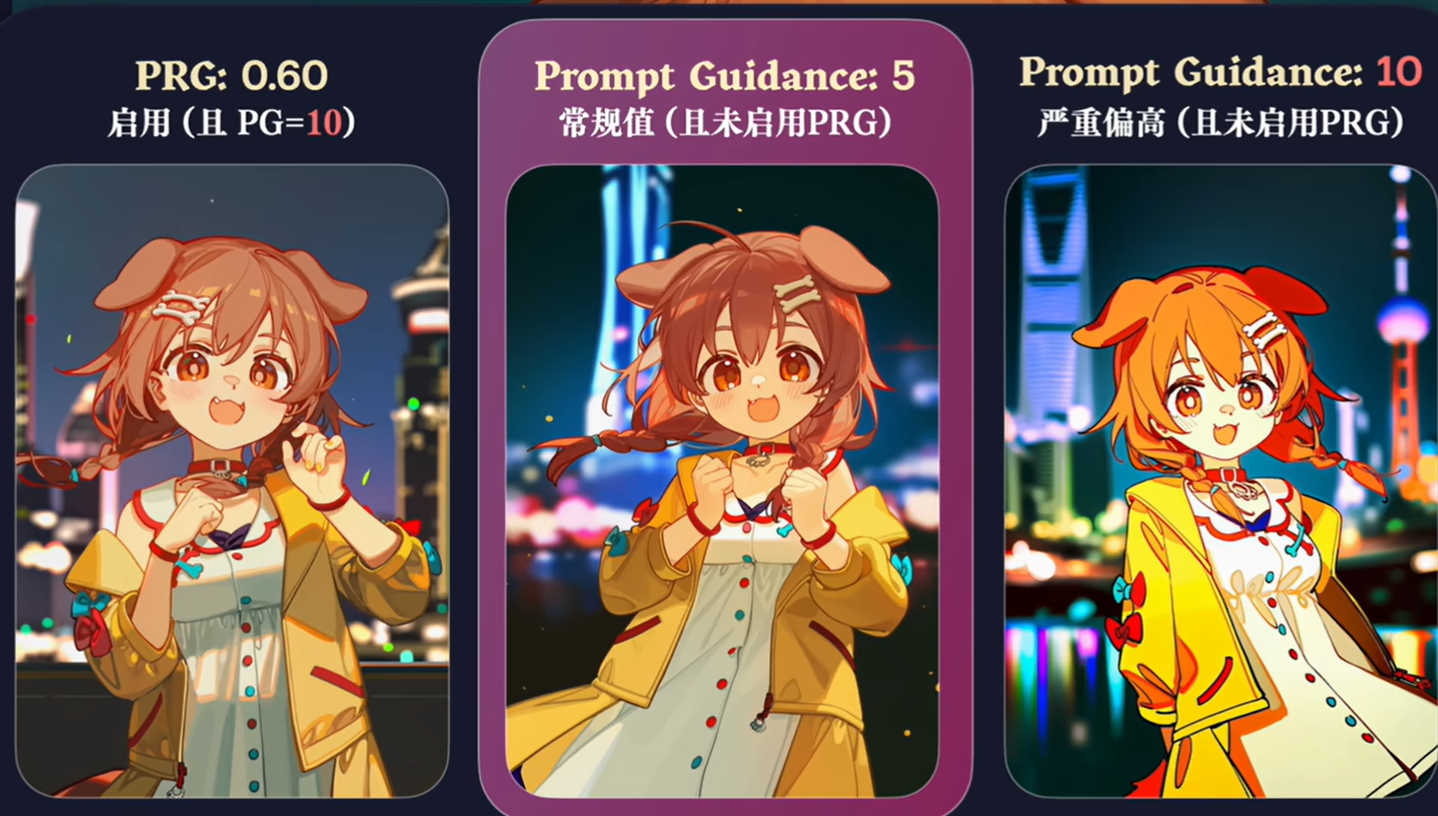
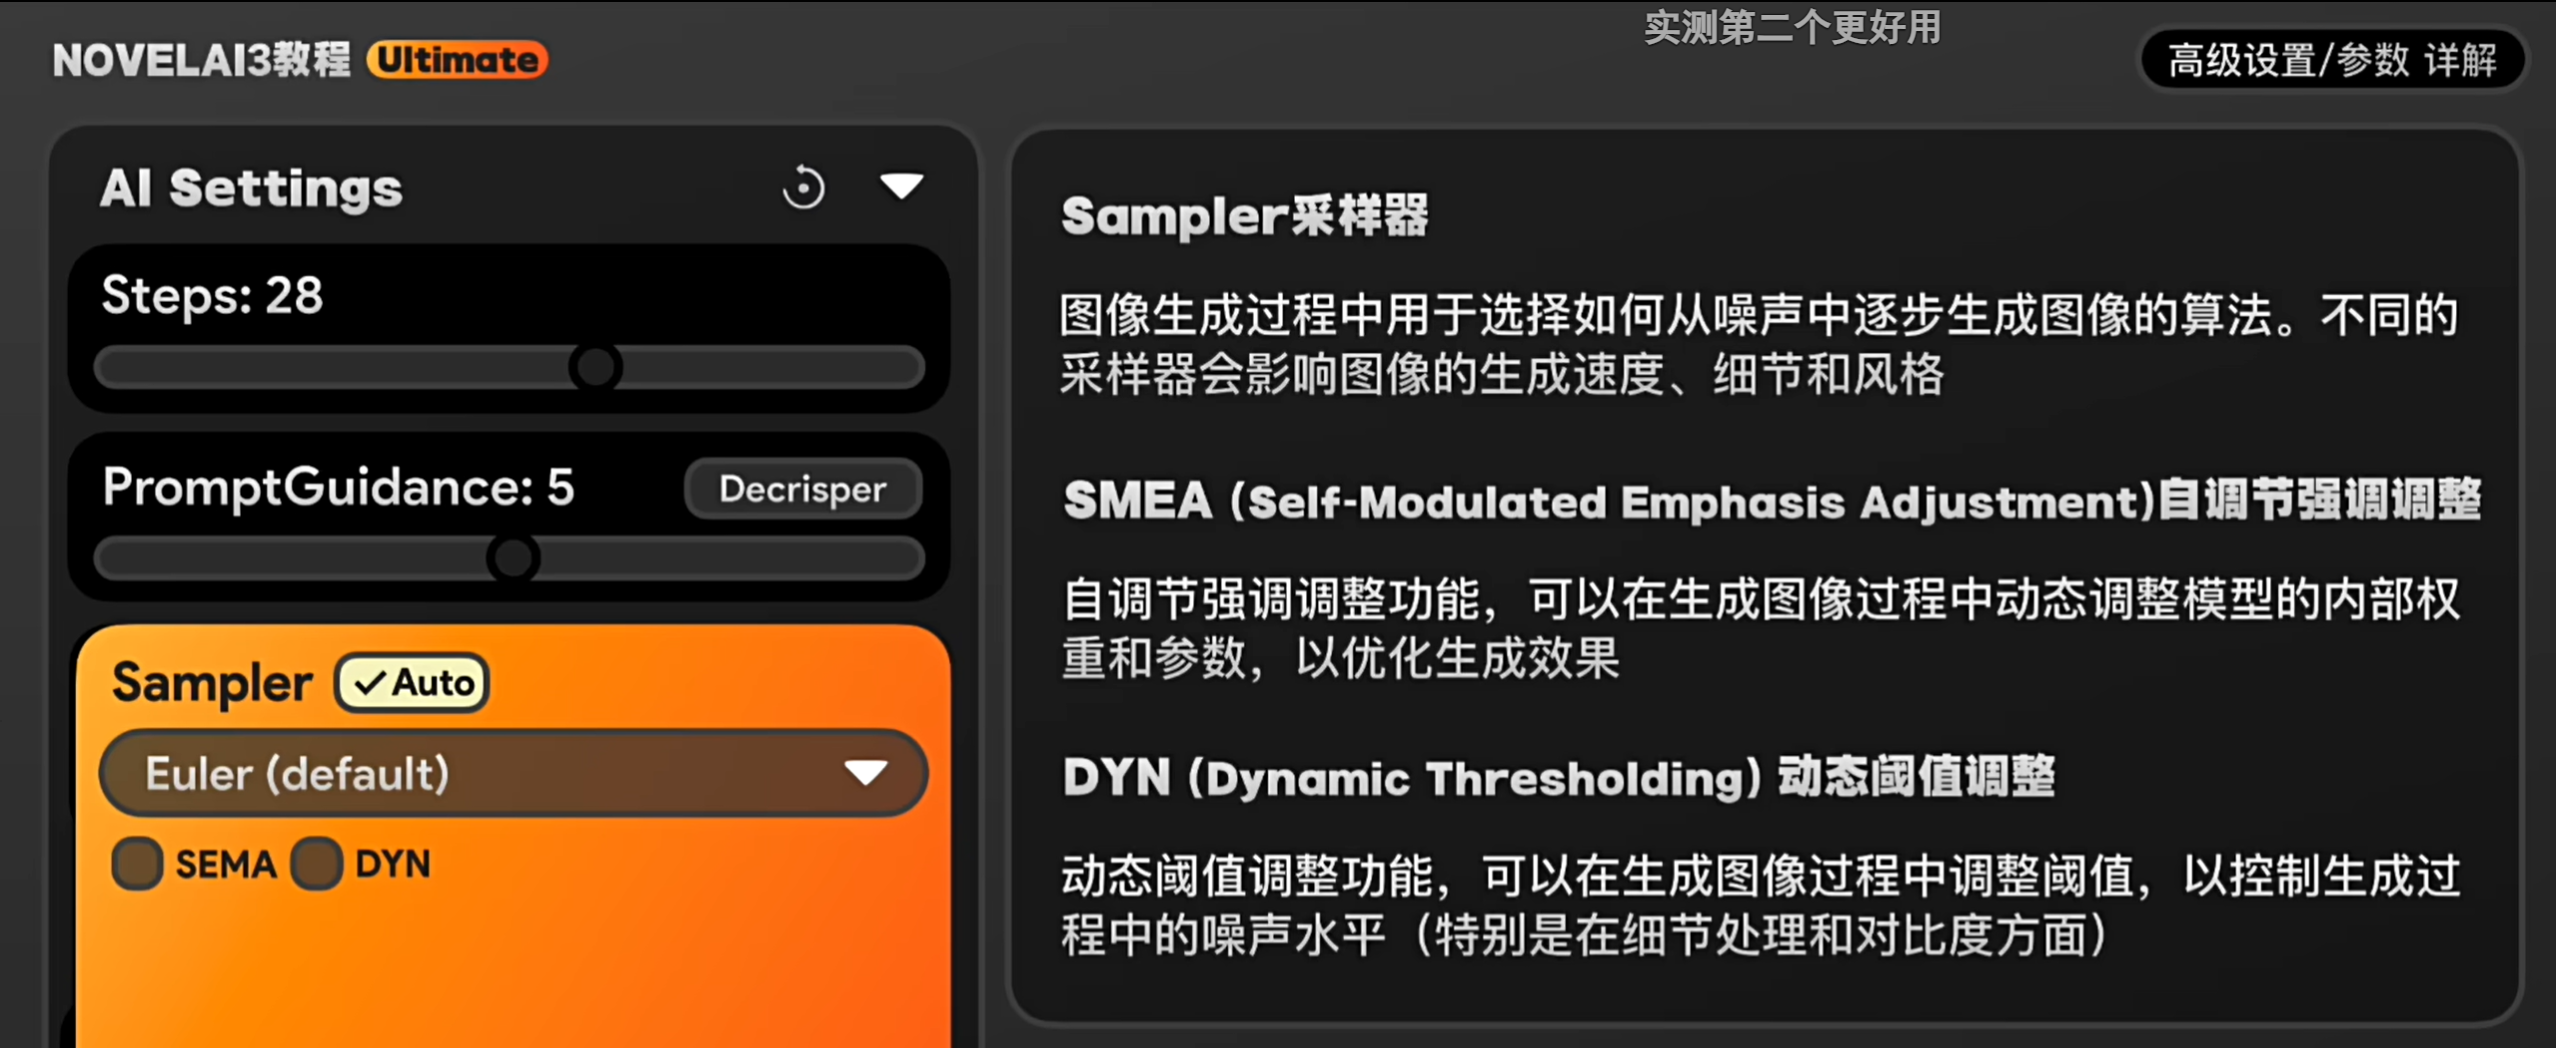
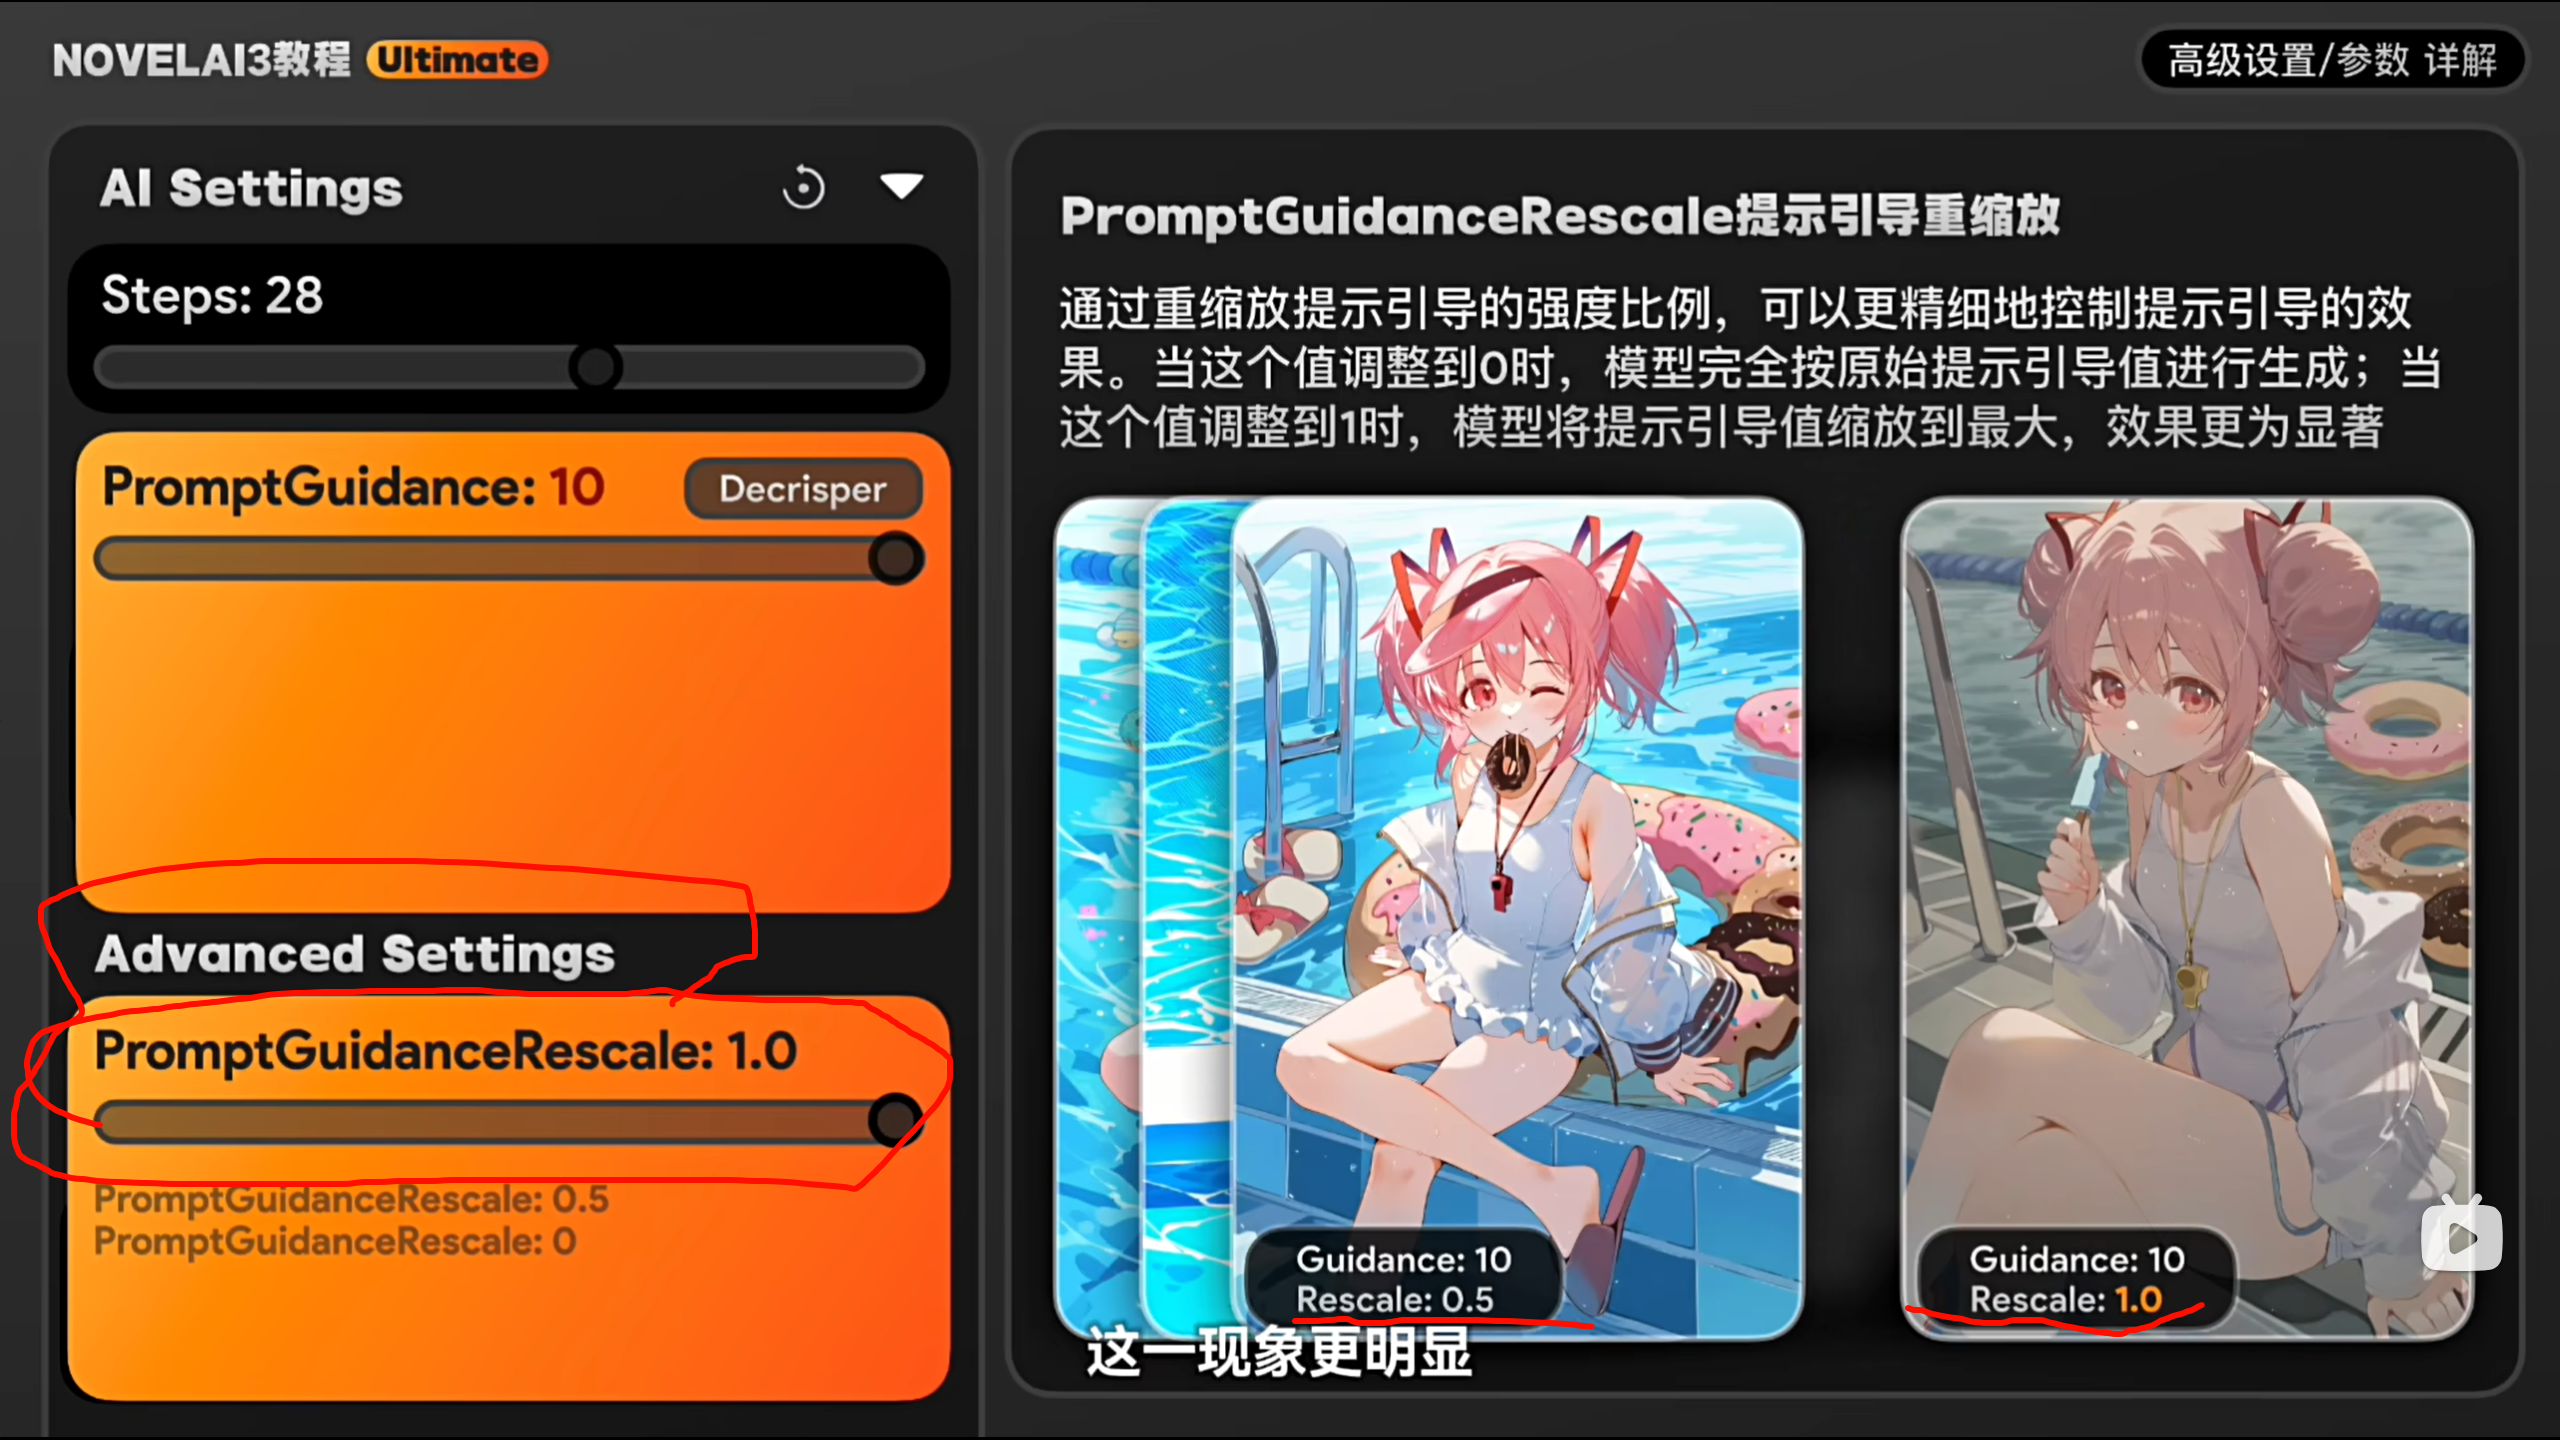
CFG Scale (Classifier Free Guidance Scale): 建议使用 7 - 12 的范围。较高的 CFG Scale 会使AI更严格地遵循您的Prompt,但可能导致图像缺乏多样性或显得过于锐利。
-
Steps (迭代步数):
28 - 50之间通常足够了,太高不一定有明显提升,但会增加生成时间。 -
Seed (种子值): 初始可以随机,生成几张图后,如果您喜欢某一特定构图或细节,可以固定其种子值,然后微调Prompt或Strength。
-
Resolution (分辨率): 尝试接近您原图的比例,或者常用的 832x1216 (Portrait) / 1216x832 (Landscape) 等。
【NAI3进阶教程】导演工具/进阶提示词 一个视频带你玩转NAI3|NovelAI Diffusion v3进阶版教程_哔哩哔哩_bilibili


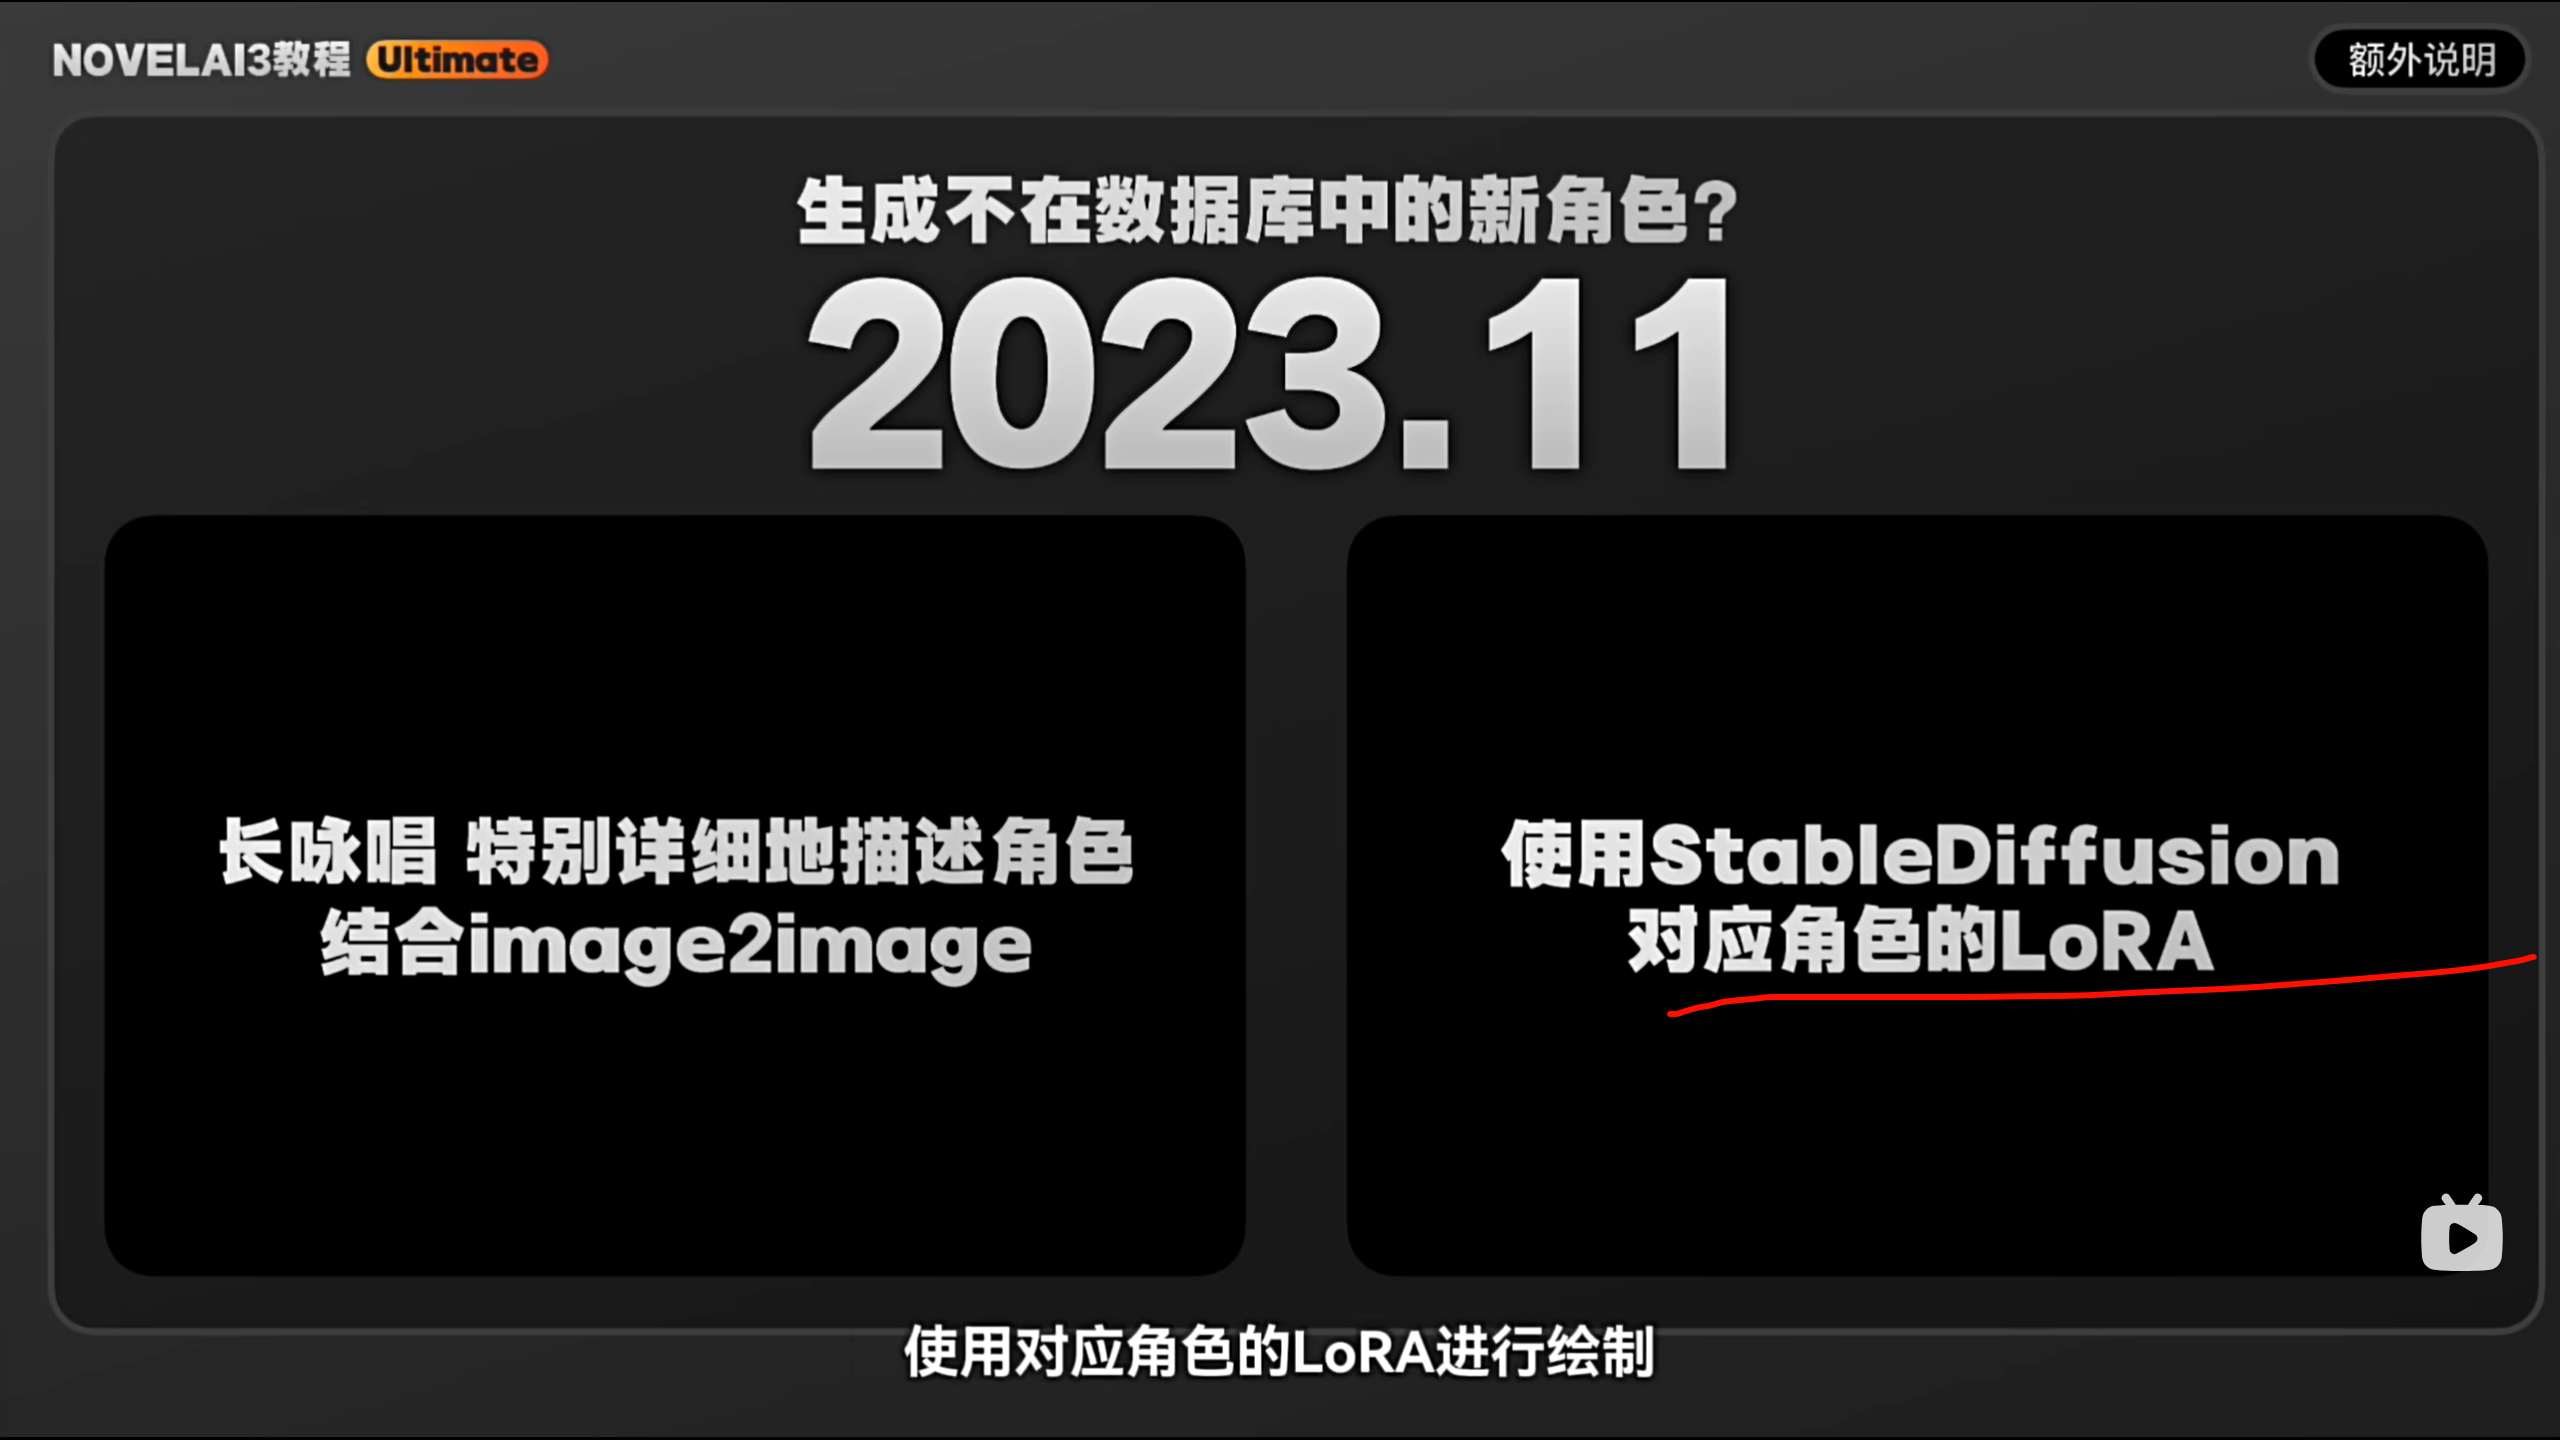
数据库中,如果此时不存在需要的新出的角色的tag使用
“金九银十”是中国招聘和求职行业的惯用语。
-
含义:指每年 9 月和 10 月 是招聘与跳槽的高峰期。
-
来源:企业在上半年总结需求、下半年冲业绩,9–10 月集中发布岗位;同时高校应届生秋招也在这段时间。
-
使用场景:求职者认为这两个月“黄金期”机会多,企业也把这两个月视为招人窗口。
延伸:与之对应还有“金三银四”,指春季招聘旺季。
You’ll need to provide the ExecuteCopyColorPass. It simply uses the Blitter method BlitTexture. This function is provided with a variety of parameters. This example uses this version . public static void BlitTexture(CommandBuffer cmd, RTHandle source, Vector4 scaleBias, float mipLevel, bool bilinear
Class Blitter | Scriptable Render Pipeline Core | 17.0.4
define the ExecuteMainPass function. You need to set the _BlitScaleBias uniform for user material with shaders replying on core Blit.hlsl to work .
private static void ExecuteMainPass(RasterCommandBuffer cmd, Material material, RTHandle copiedColor)

ename CustomRenderPass to TintPass, and change m_ScriptablePass to m_pass .
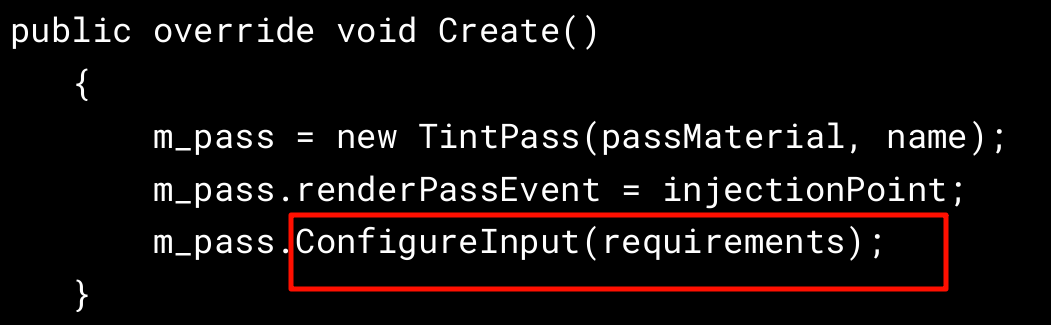
Delete the existing code in the Create method. Create a new TintPass using the custom constructor . Define the renderPassEvent and configure the input
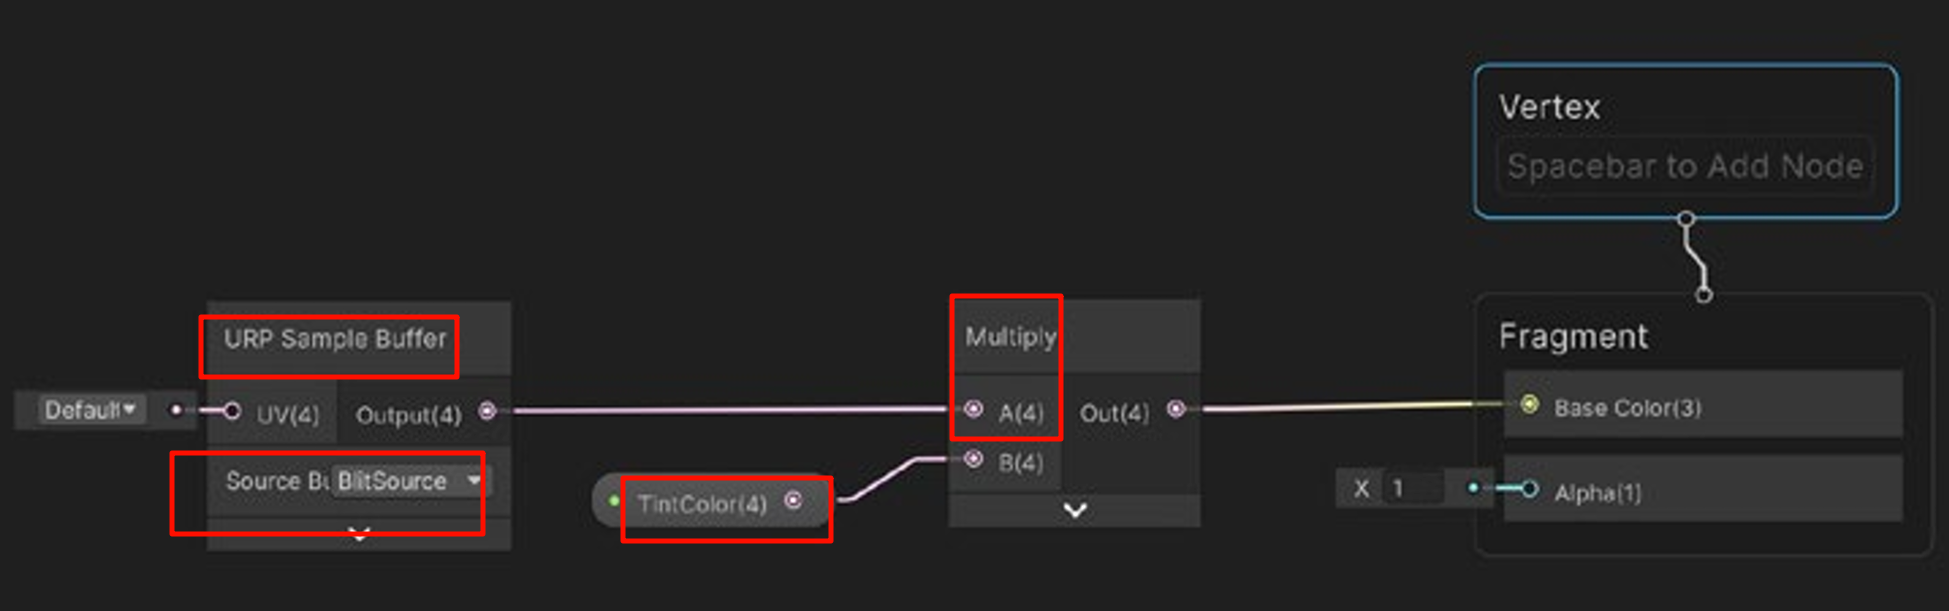
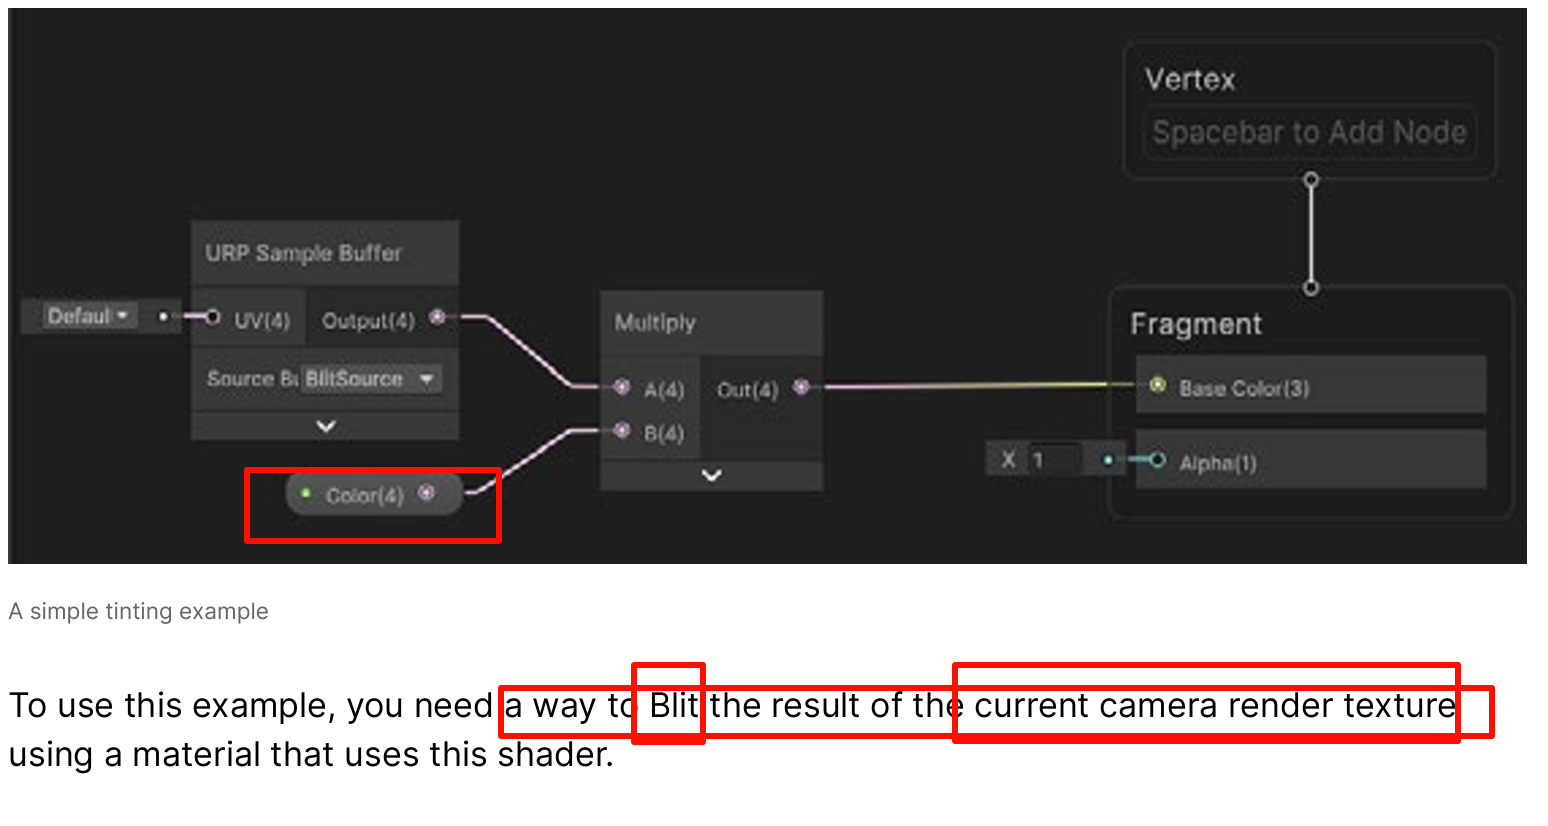
These next steps complete this example of a Renderer Feature, which is designed to work with a Shader Graph shader. It’s a simple example consisting of a TintColor property, a URP Sample Buffer node using the BlitSource and a Multiply node that modulates the existing BlitSource with the TintColor. Let’s look at the steps below
In the ExecuteCopyColorPass you need to remove the Blit and use a DrawProcedural instead.
Using the identity matrix again, you’ll use the material s_FrameBufferFetchMaterial for the second pass.

网格在 GPU 上如何解释索引缓冲区的数据,也就是 图元拓扑类型。它决定绘制时每一组索引被当成什么图元。
主要取值及意义:
| 枚举值 | GPU 对应 | 说明 |
|---|---|---|
| Points | GL_POINTS | 每个顶点单独渲染成一个点。 |
| Lines | GL_LINES | 每两个索引组成一条独立直线。 |
| LineStrip | GL_LINE_STRIP | 一串连续的线段,首尾相接。 |
| Triangles | GL_TRIANGLES | 每三个索引形成一个独立三角形(最常用)。 |
| TriangleStrip | GL_TRIANGLE_STRIP | 共享相邻顶点形成连续三角带,可减少索引数量。 |
| Quads (已弃用) | GL_QUADS | 四边形,早期兼容。 |
作用:
-
控制 顶点如何拼合成几何图元,直接影响渲染结果和性能。
-
与
Mesh.SetIndices(int[] indices, MeshTopology topology, int submesh)搭配,告诉 GPU 按何种方式解释索引数组。
简述:MeshTopology = 网格绘制拓扑,定义“这些索引是画点、线还是三角形”。
Next you’ll use the RecordRenderGraph method. For the first pass replace UseTexture with SetInputAttachment.
This method uses FrameBufferFetch to access the previous pass.

The same steps are down for the second pass.
builder.SetInputAttachment( copiedColorTexture, 0)
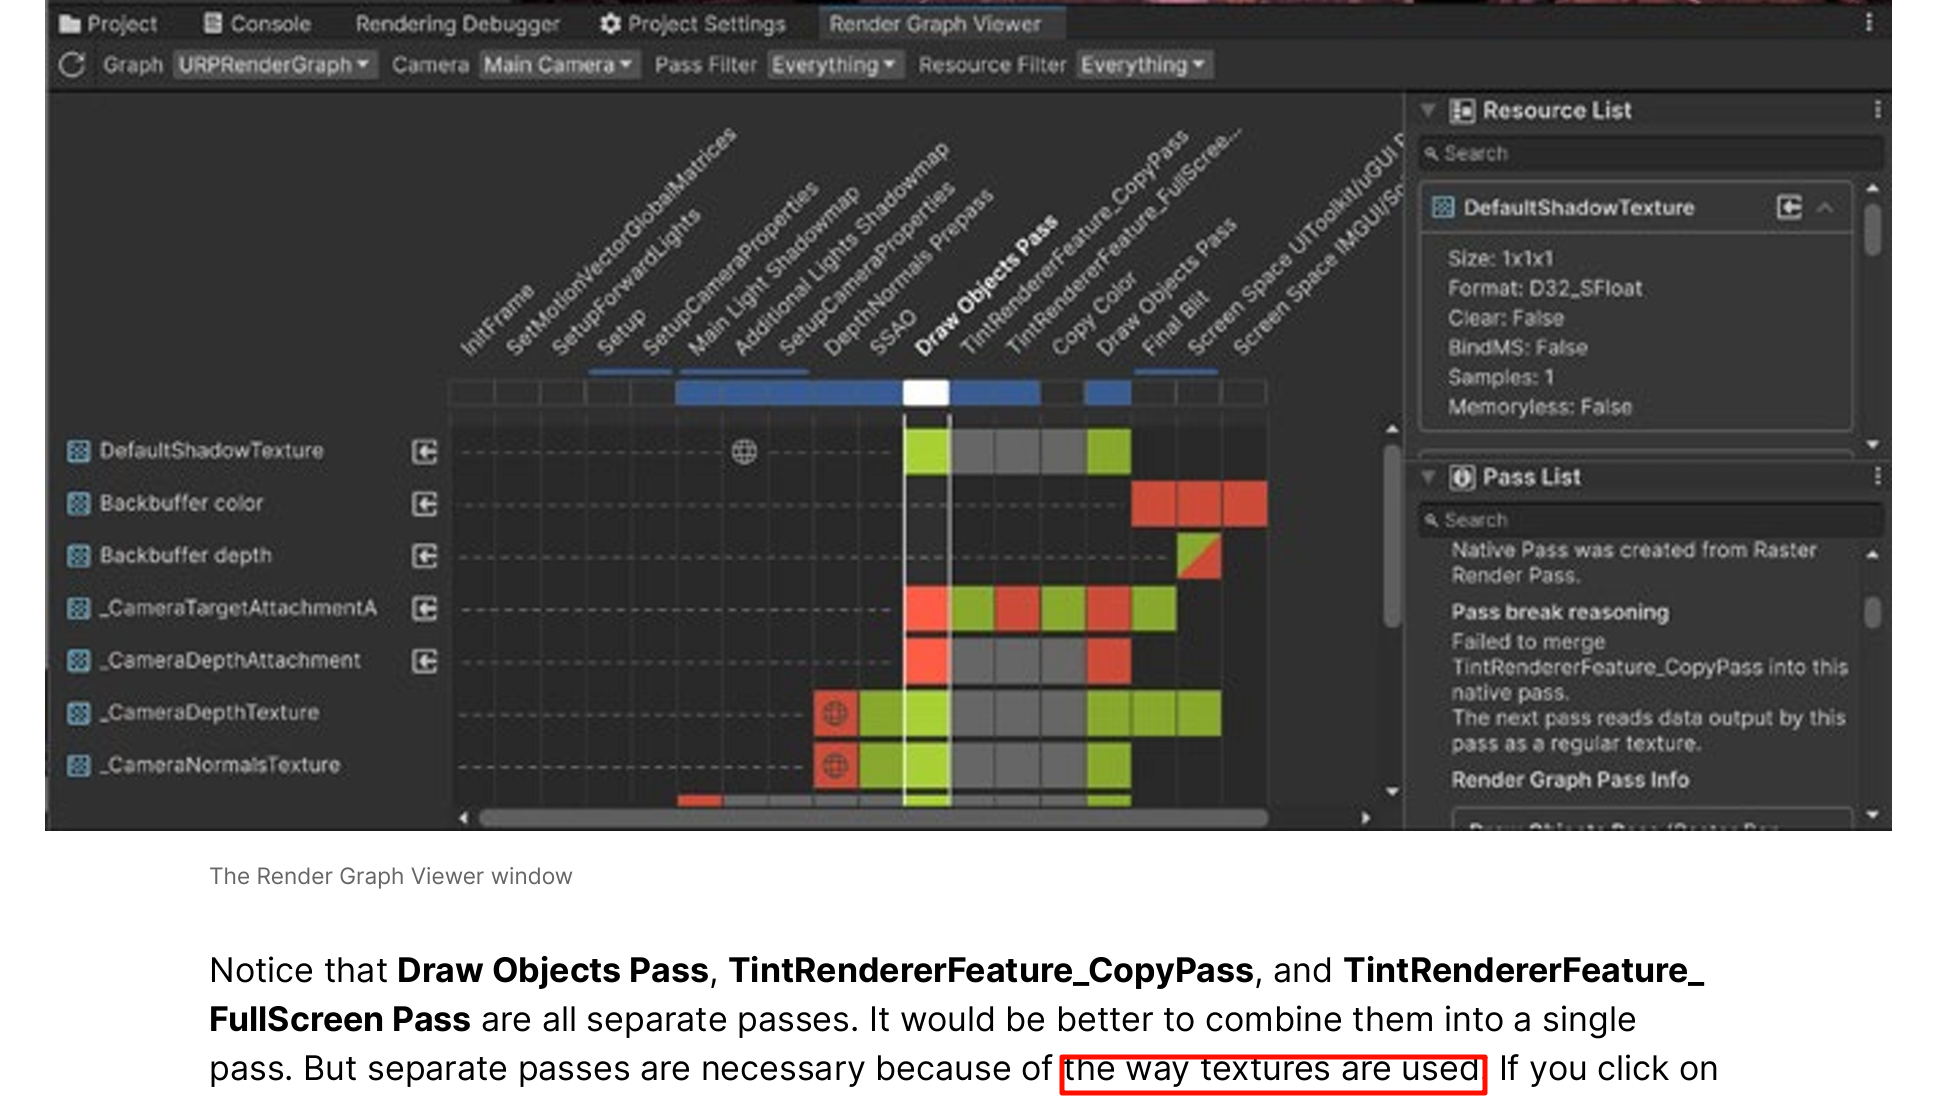
will see that the three passes, Draw Objects Pass and the two TintRendererFeature passes, are combined into a single pass,
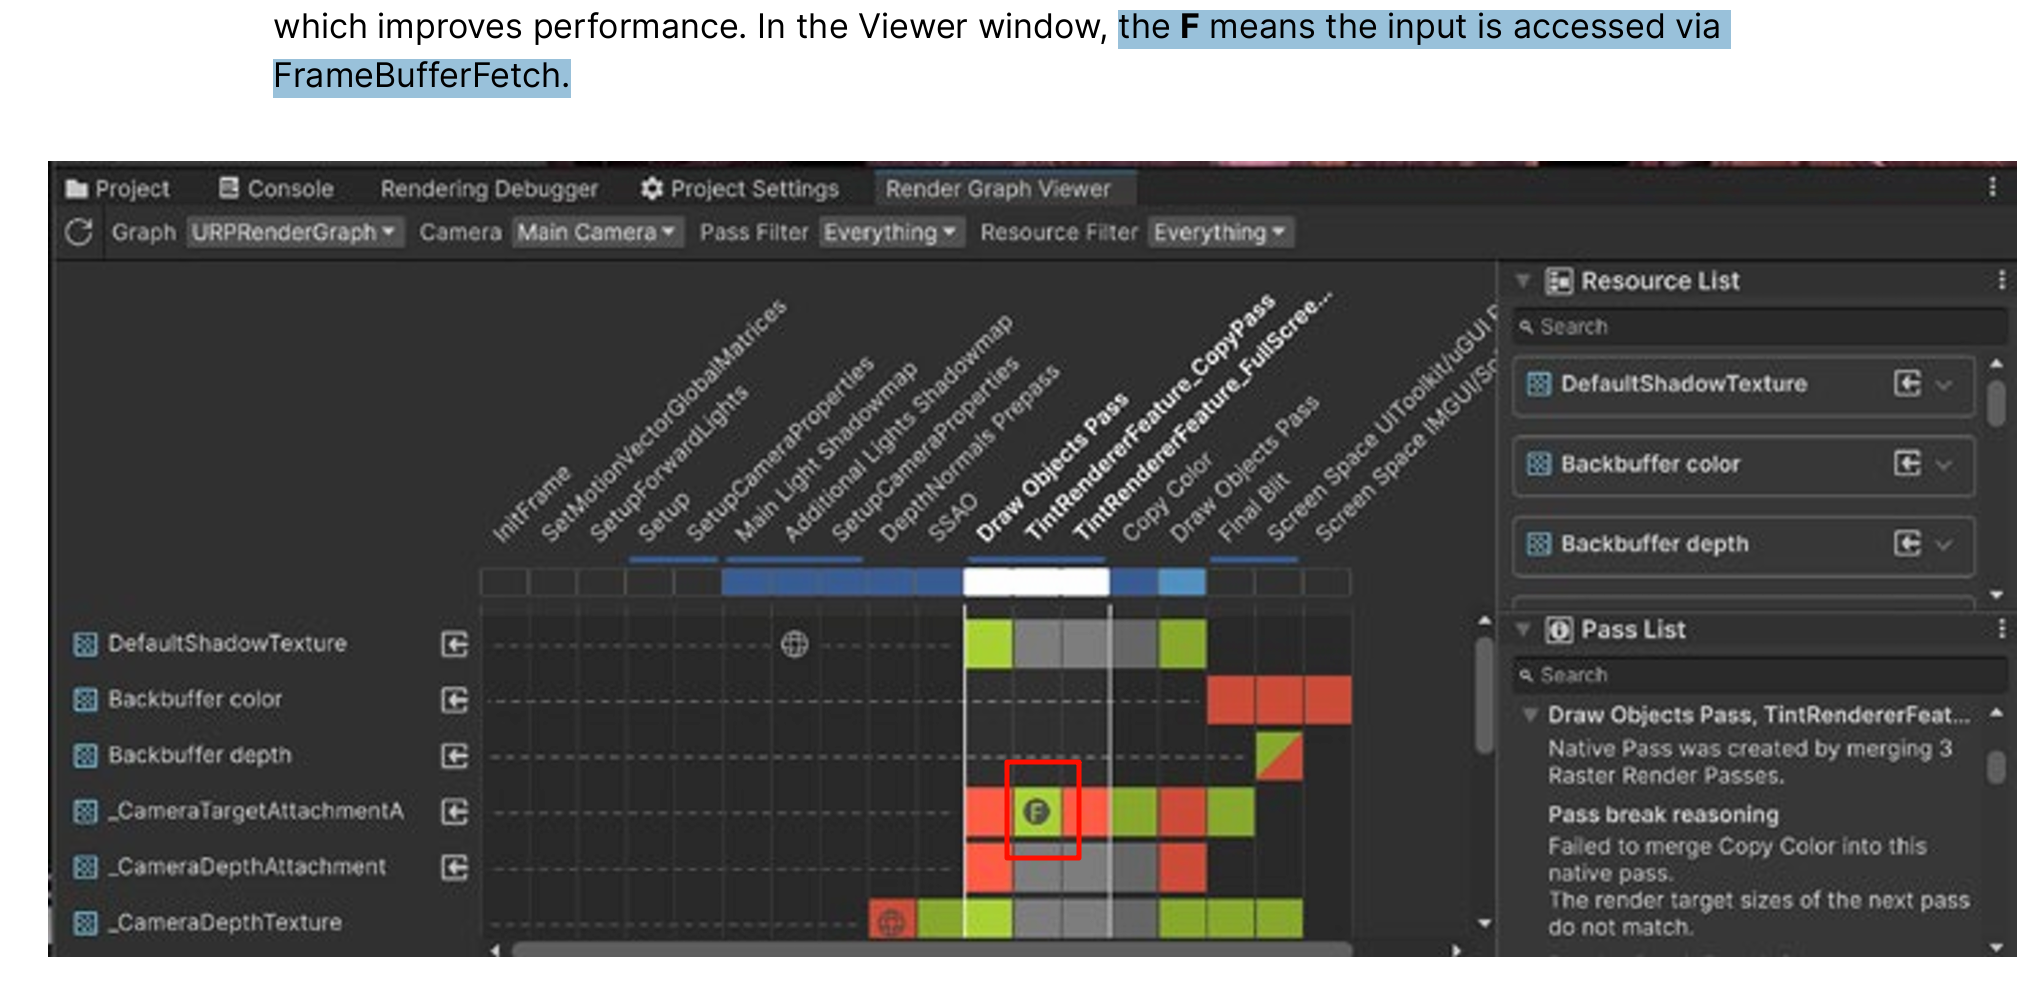
FramebufferFetch support is available on mobile platforms targeting Vulkan, Metal, and DirectX 12.
On other platforms the engine falls back on texture sampling.
Using FrameBufferFetch reduces bandwidth usage, which can improve performance if bandwidth bound, and generally reduce battery usage
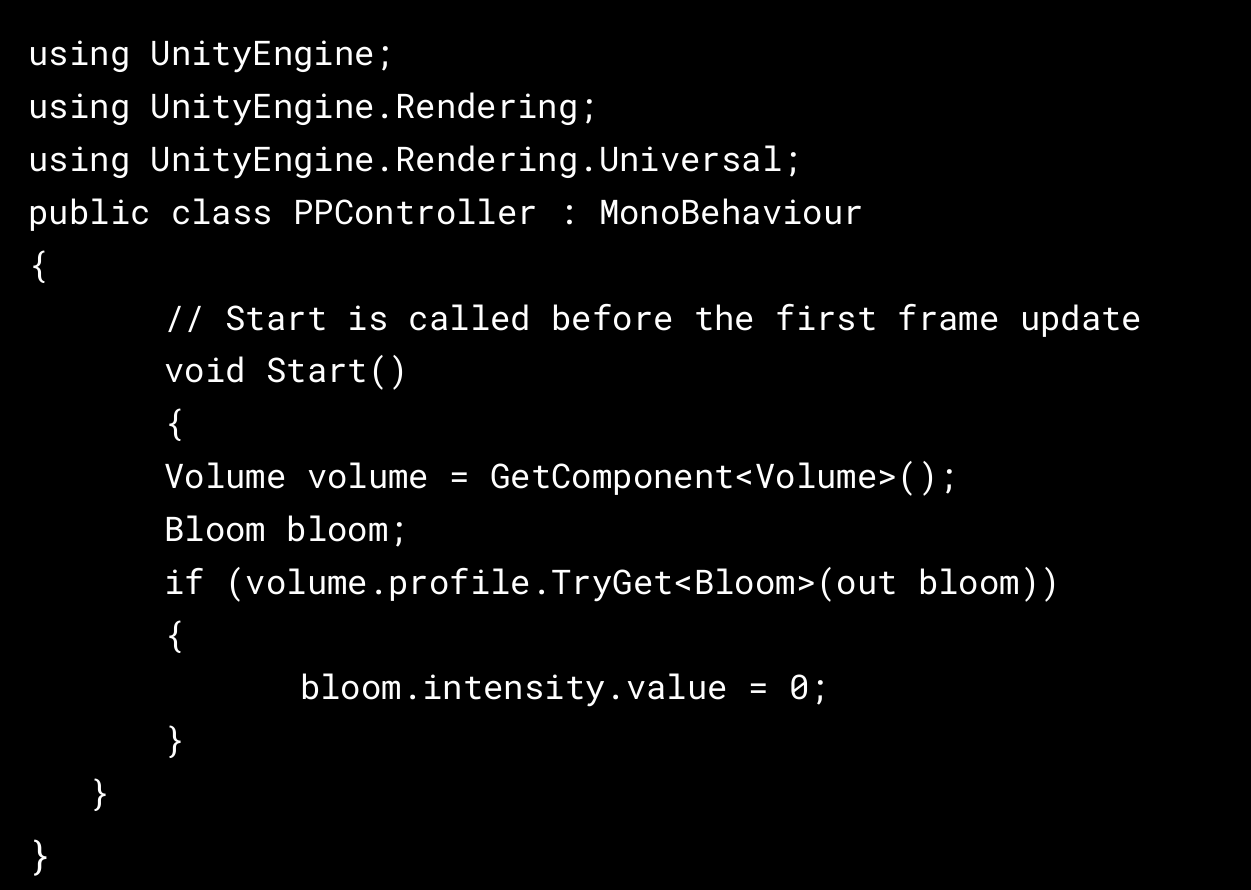
dynamically adjust your post-processing profile using a C# script. The following code example shows how to adjust the intensity of the Bloom effect.
a Vignette is applied, you can control the vignetting color via code. For example, if the player character takes damage, you can temporarily tint it red
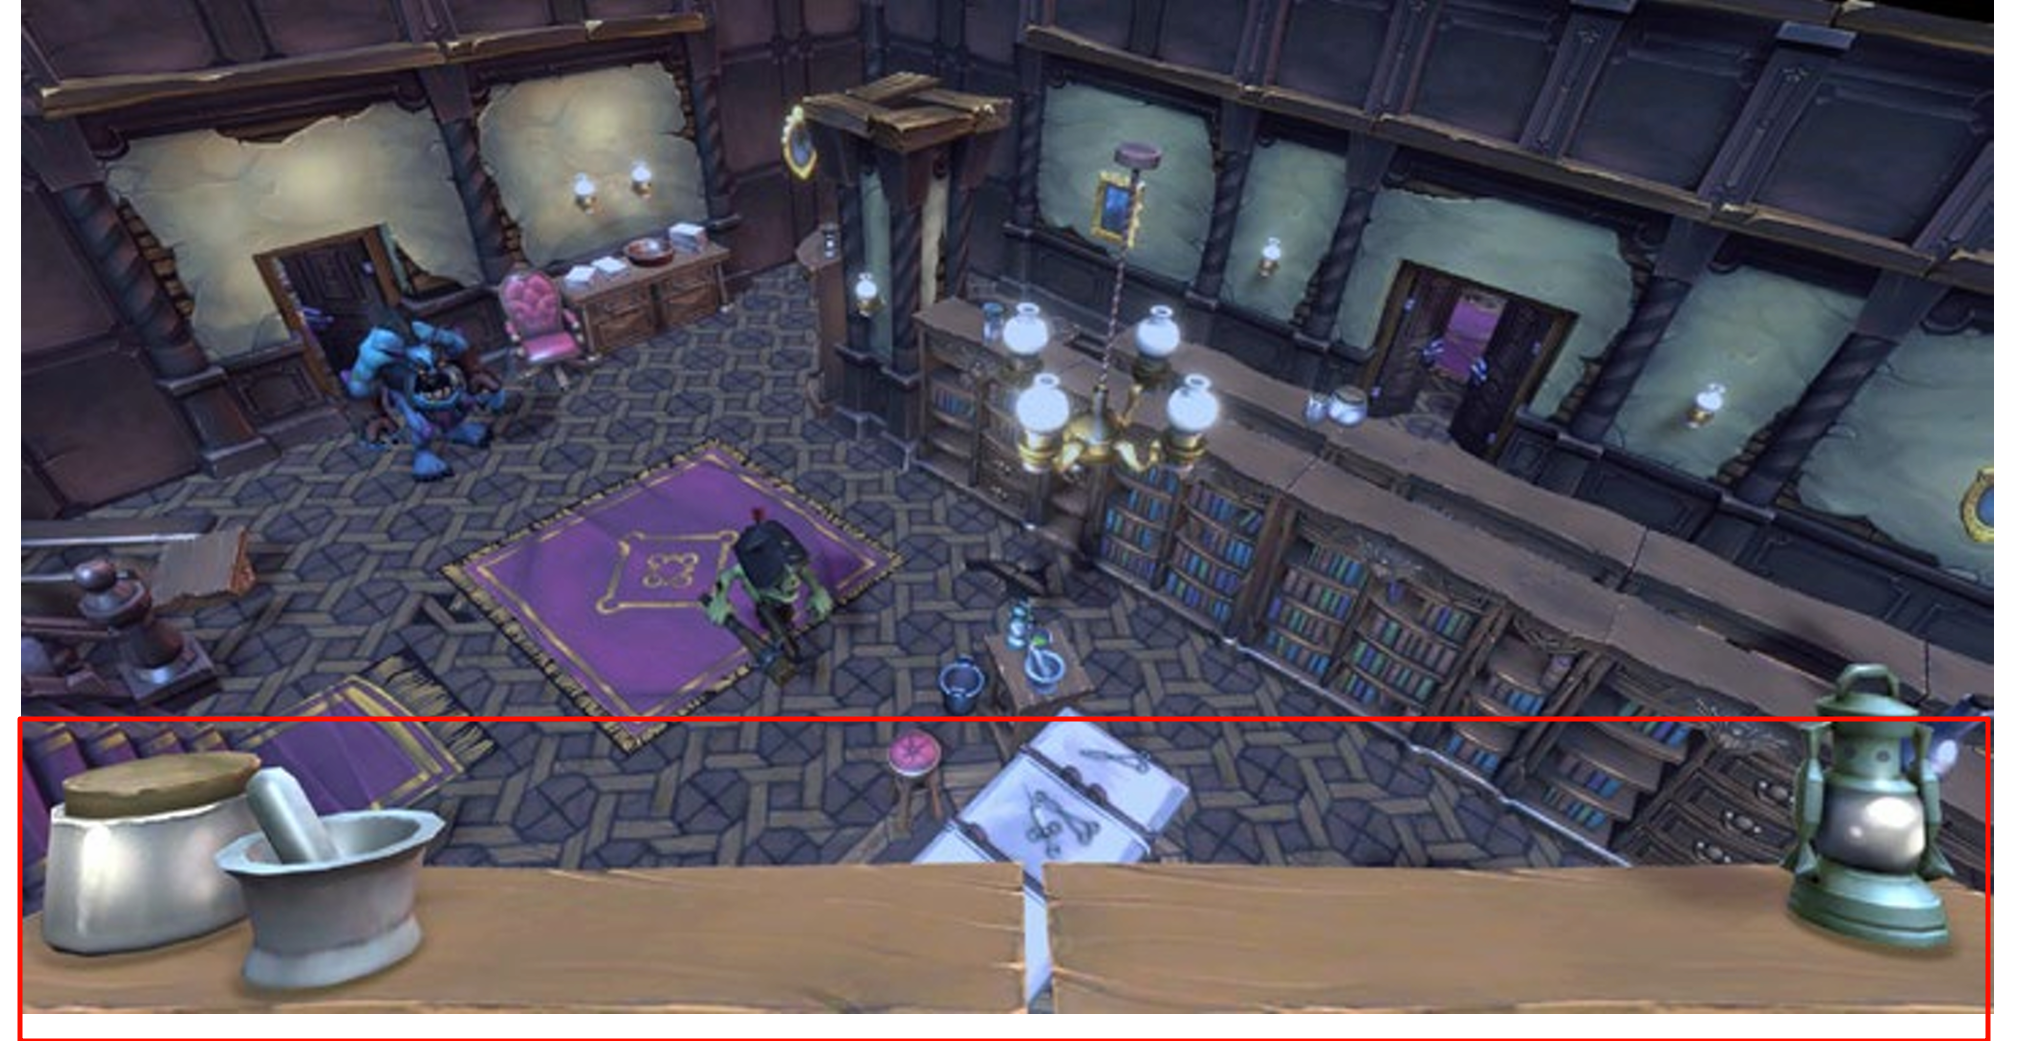
common requirement in games is the ability to combine geometry viewed from different cameras in a single render.
a shelf in the foreground acting as an inventory within the game.
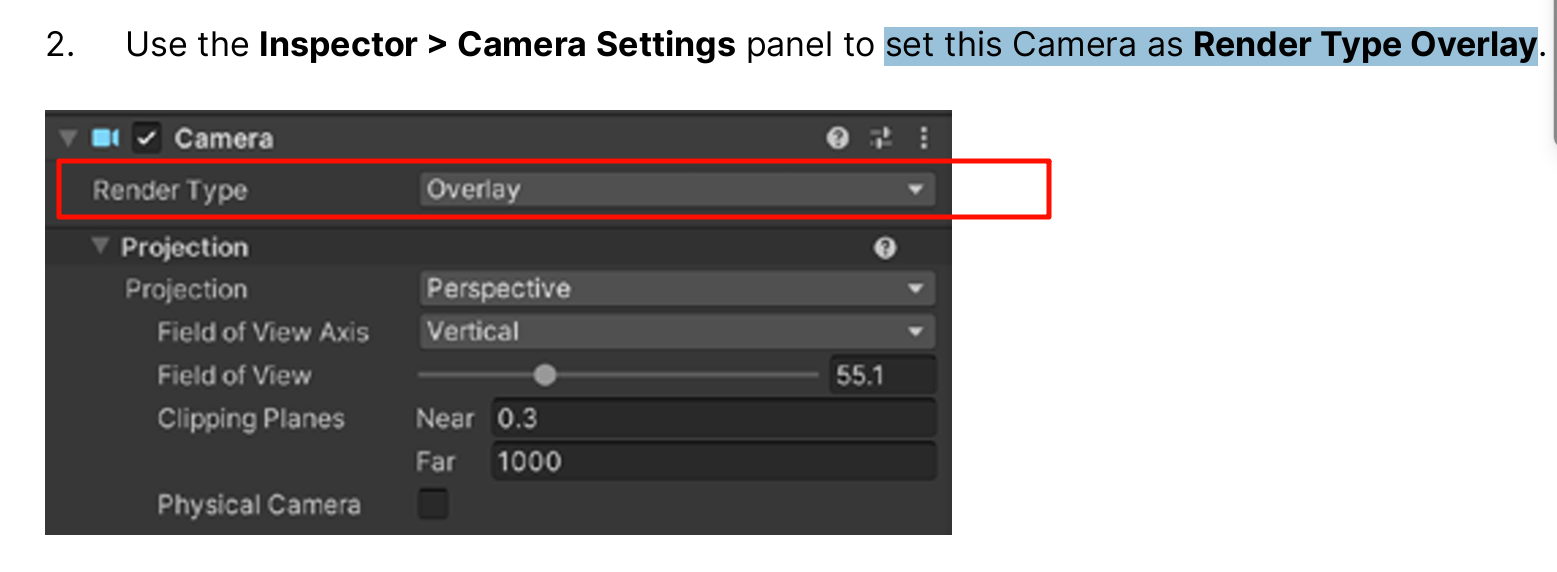
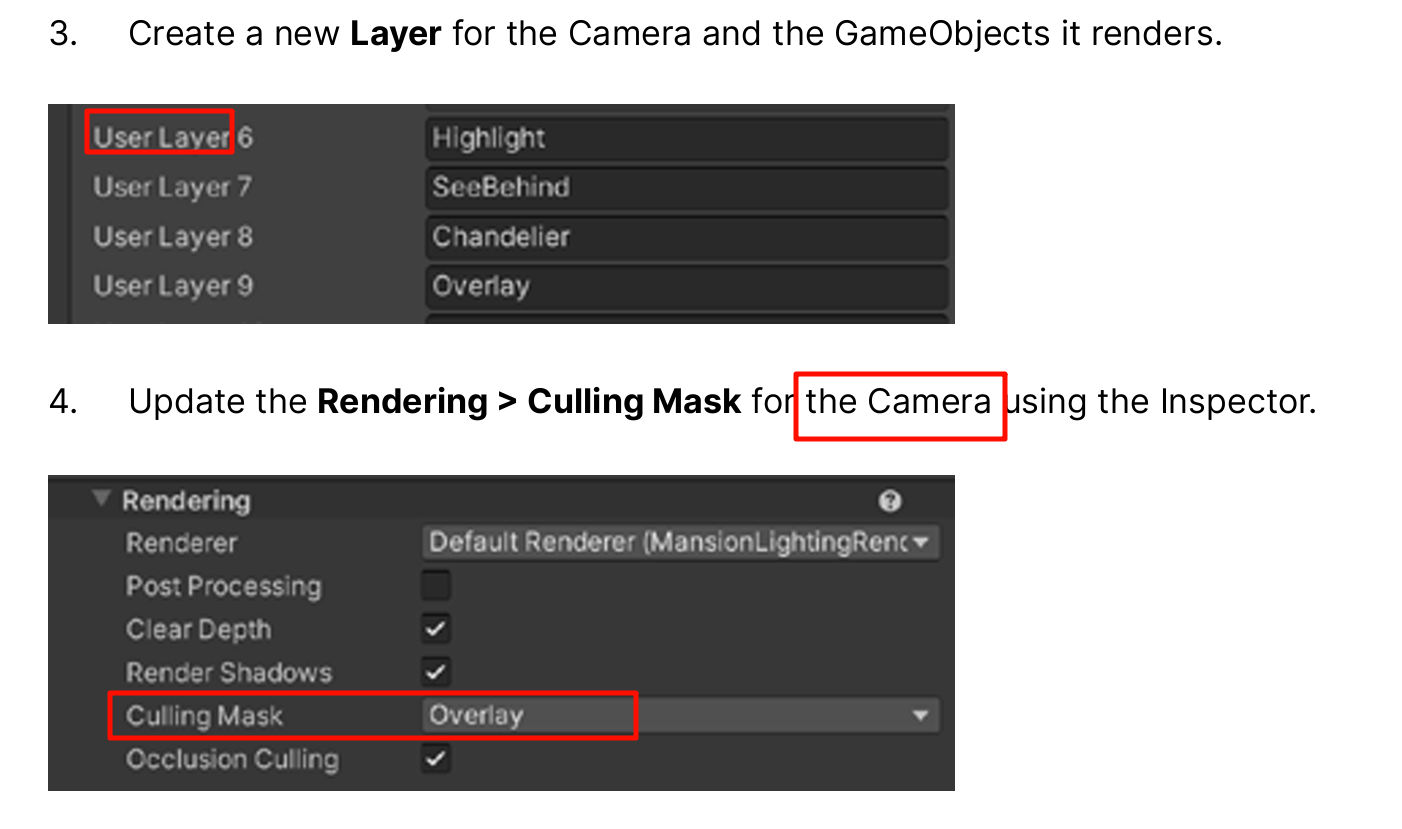
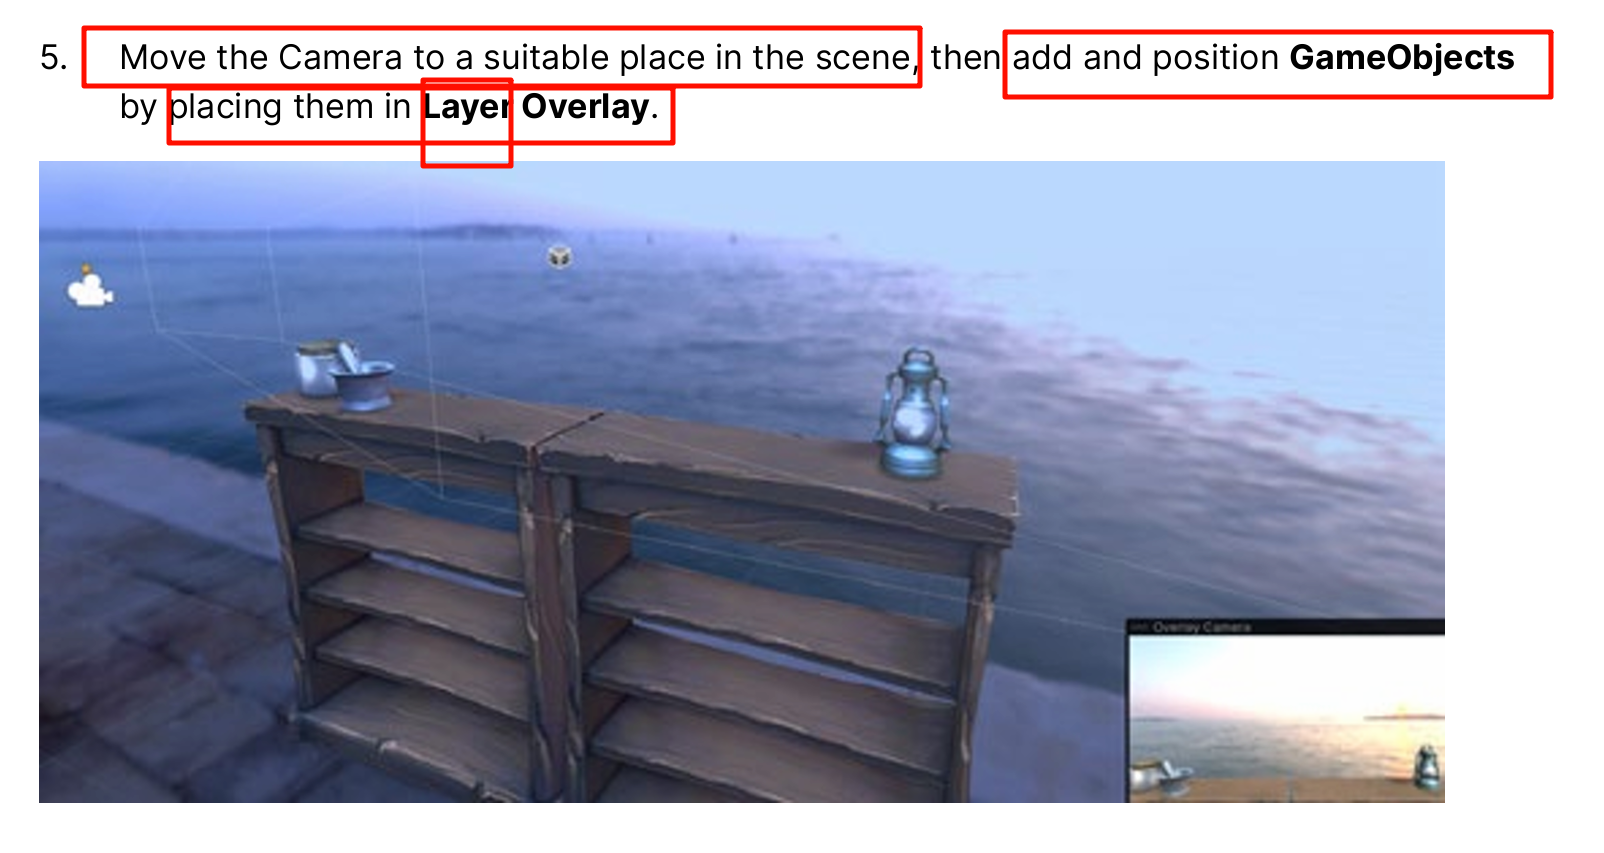
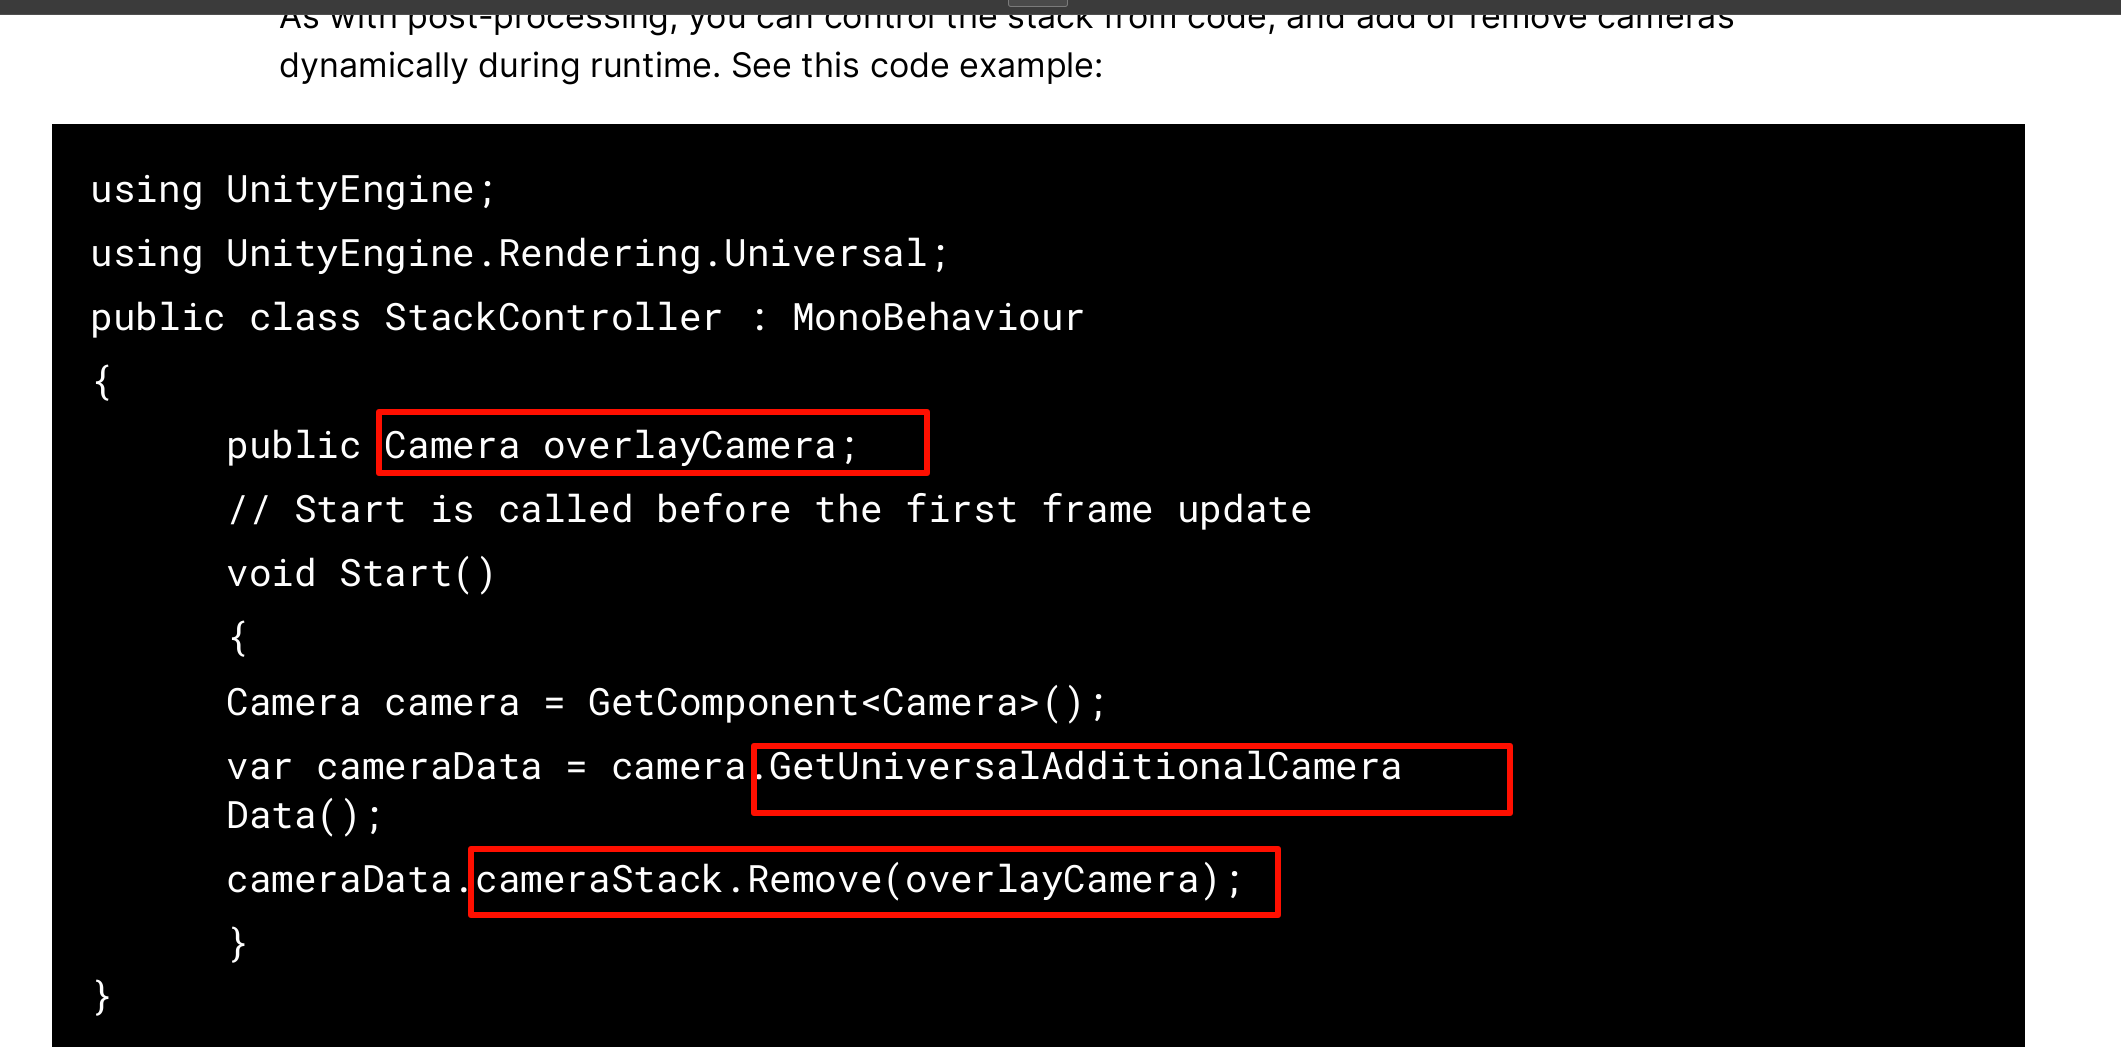
Post-processing and Camera Stacking, both easily configured using URP, are powerful tools for creating rich, atmospheric effects in your games.
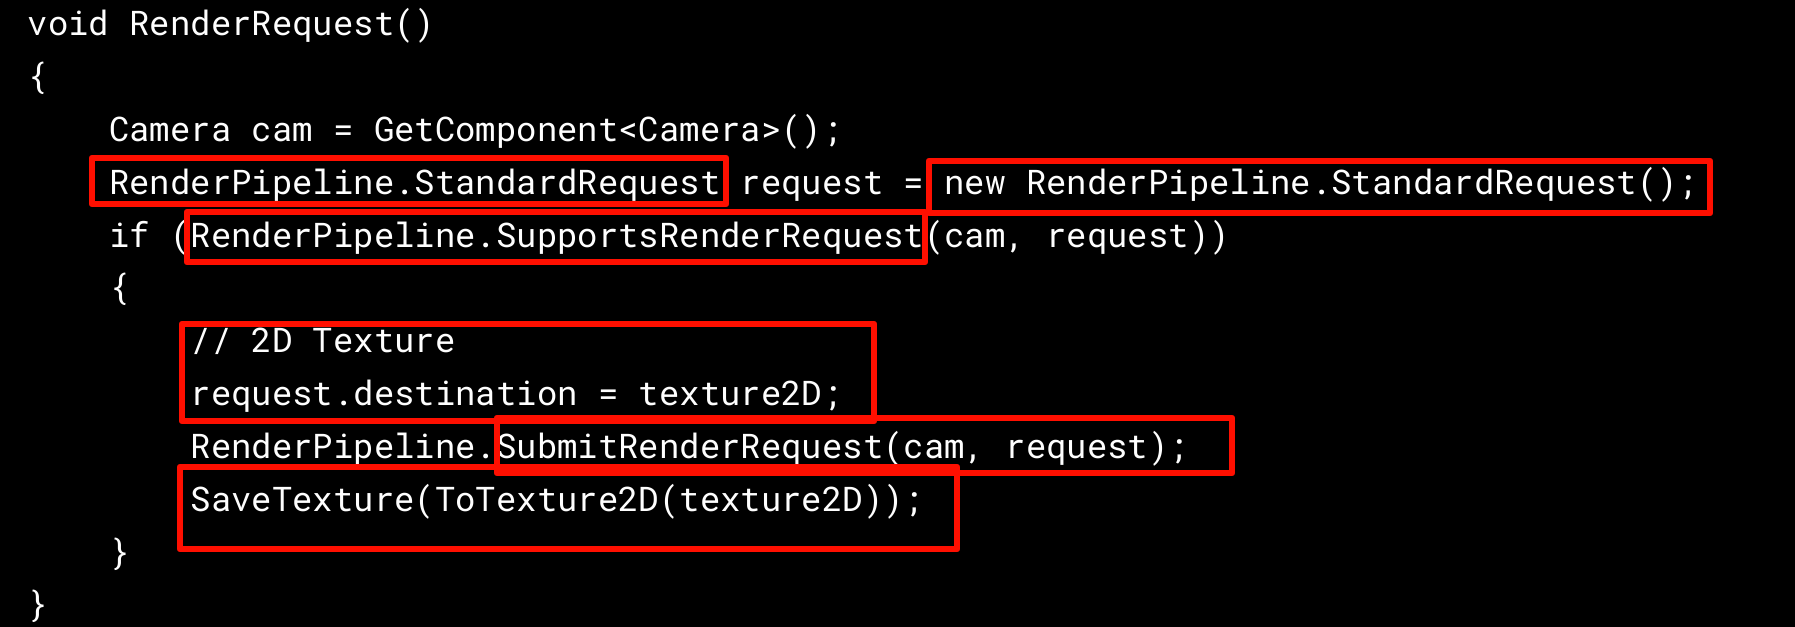
The SubmitRenderRequest API
Sometimes you might want to render your game to a different destination than the user’s screen
The SubmitRenderRequest API is designed with this purpose in mind.
render the game to an off-screen RenderTexture when the user presses the onscreen GUI.
The script should be attached to the Main Camera. A RenderTexture is created in the Start callback.


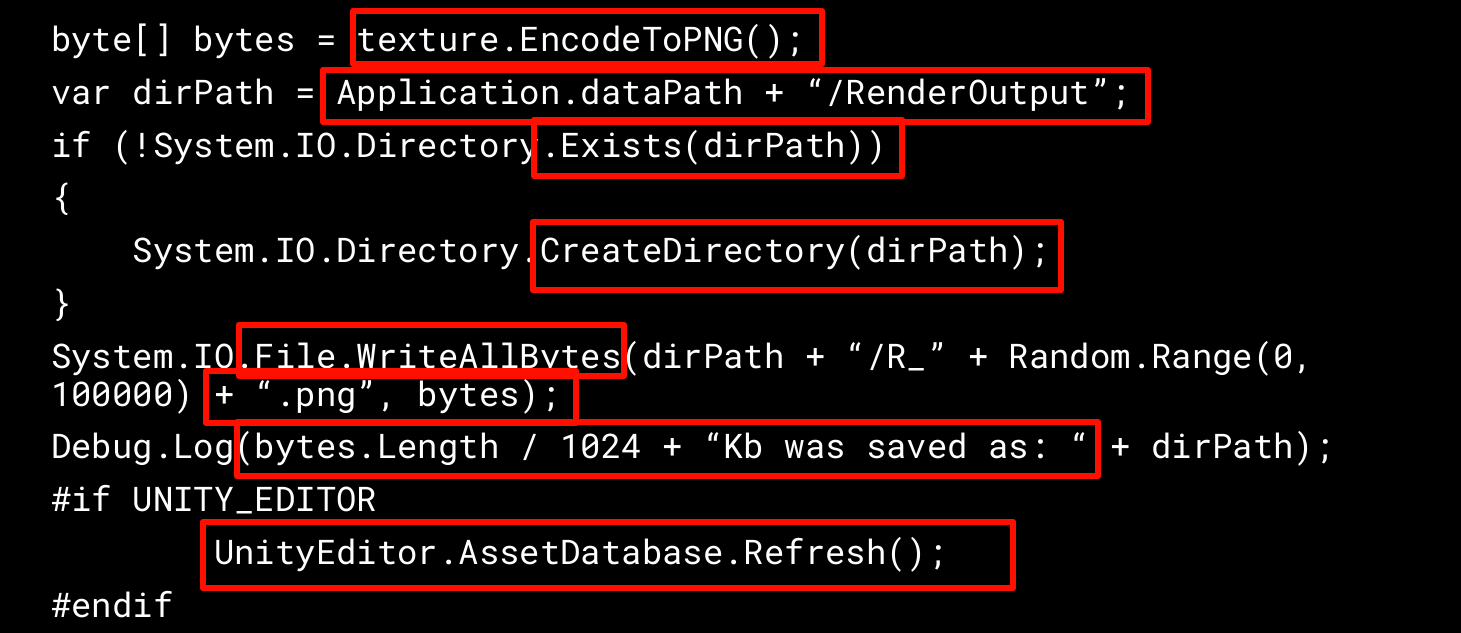
void SaveTexture(Texture2D texture)
using UnityEngine;
using System.Collections;// Get the contents of a RenderTexture into a Texture2D
public class ExampleClass : MonoBehaviour
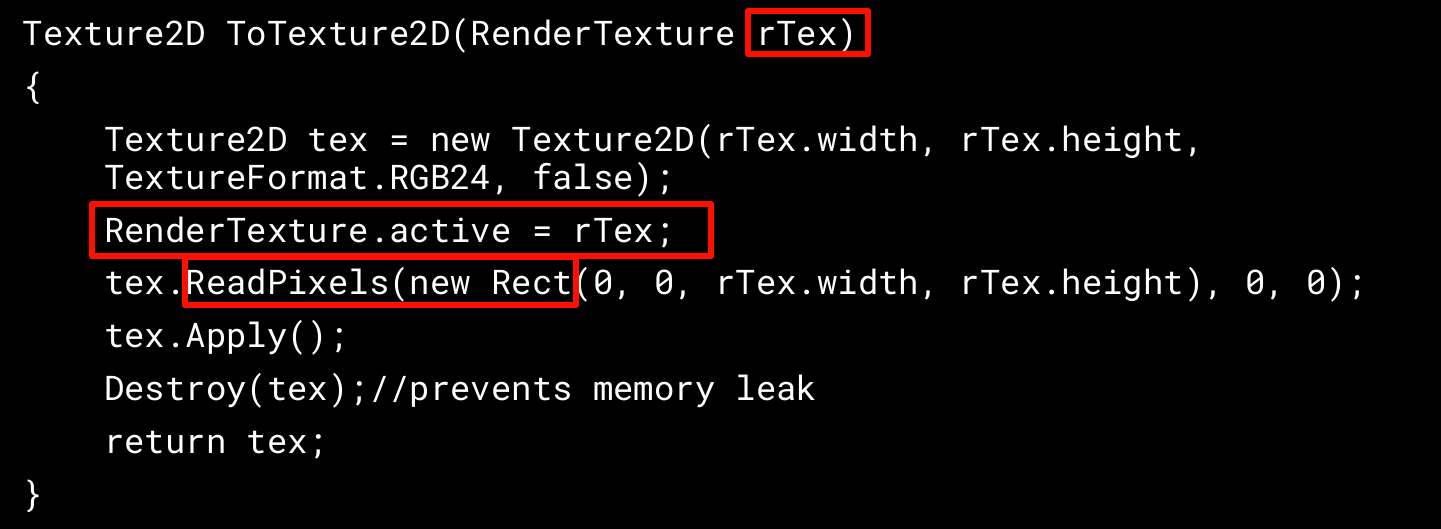
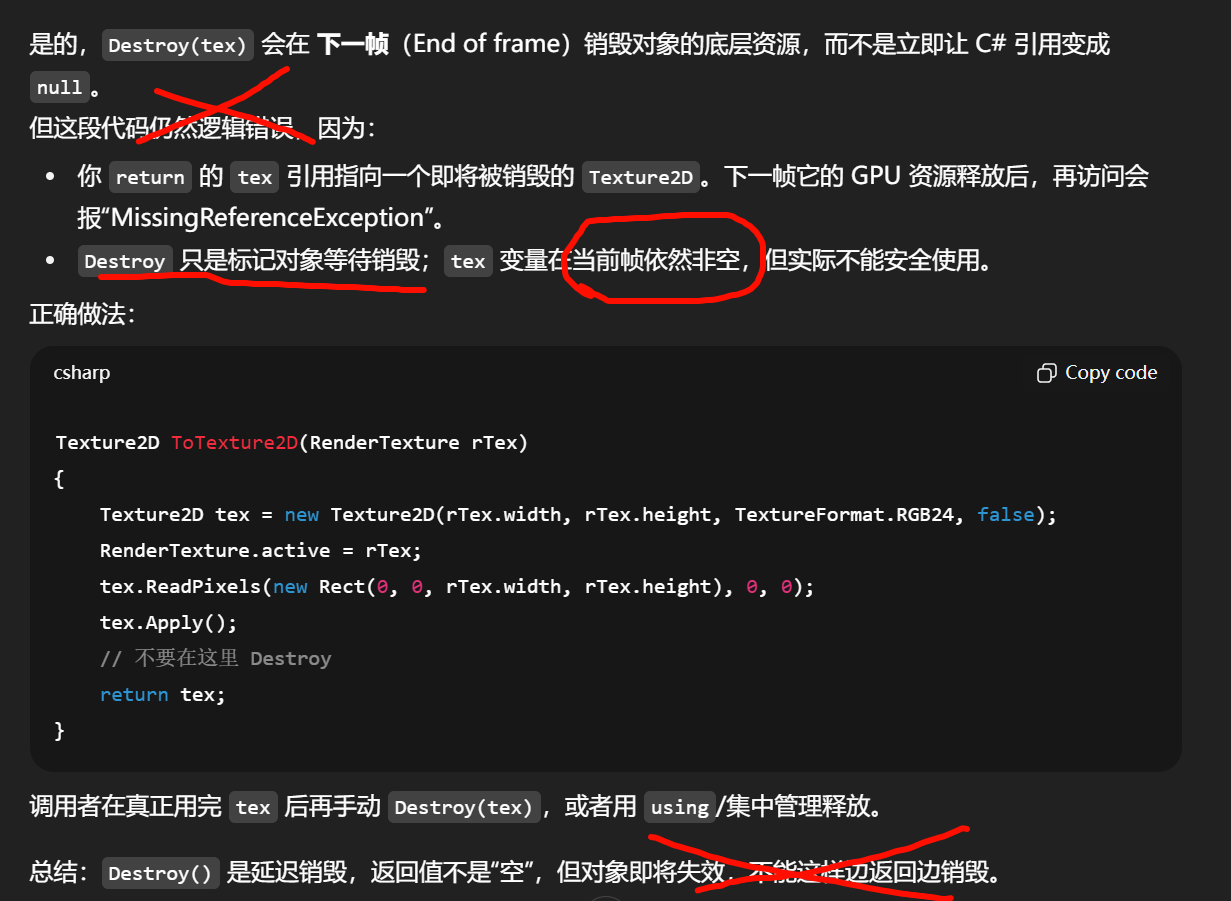
{static public Texture2D GetRTPixels(RenderTexture rt){// Remember currently active render textureRenderTexture currentActiveRT = RenderTexture.active;// Set the supplied RenderTexture as the active oneRenderTexture.active = rt;// Create a new Texture2D and read the RenderTexture image into itTexture2D tex = new Texture2D(rt.width, rt.height);tex.ReadPixels(new Rect(0, 0, tex.width, tex.height), 0, 0);tex.Apply();// Restore previously active render textureRenderTexture.active = currentActiveRT;return tex;}
}
Currently active render texture.
All rendering goes into the active RenderTexture. If the active RenderTexture is null everything is rendered in the main window.
Setting RenderTexture.active is the same as calling Graphics.SetRenderTarget. Typically you change or query the active render texture when implementing custom graphics effects
Additional tools compatible with URP
the Shader Graph node examples libraries in the Shader Graph package in the Package Manager window.
Shader Graph Tutorial for Unity HDRP & URP | 2022 LTS
Read about the new Shader Graph production ready shaders in Unity 6 in this blog post .
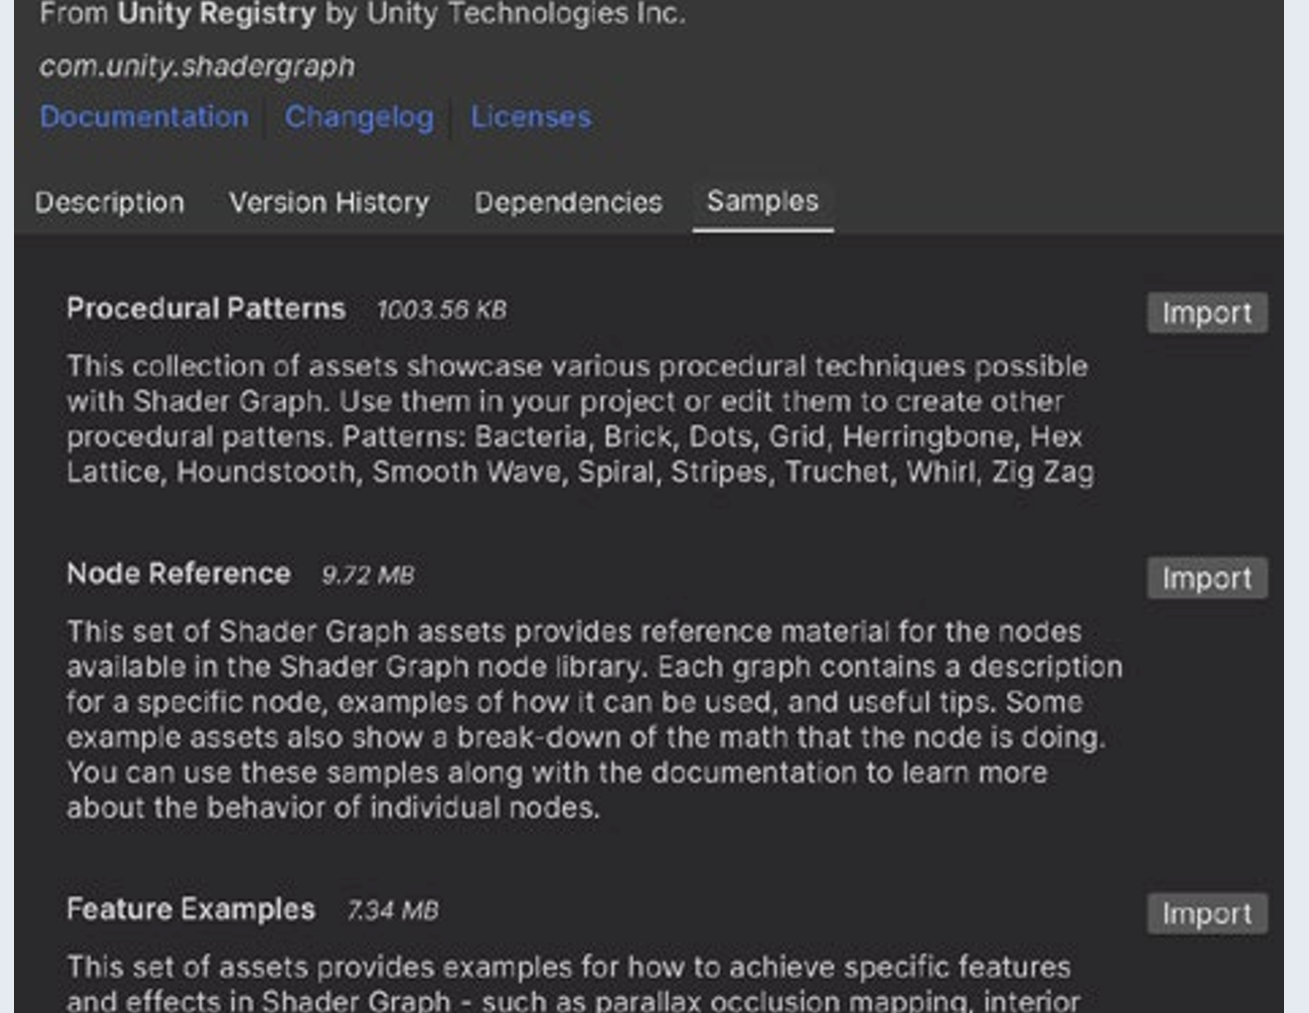
This set of samples contains more than 25 Shader Graph assets and dozens of subgraphs that are ready to be used directly in your projects. The sample shaders work in both HDRP and URP.
Covering Shader Graph warrants a separate guide, but let’s go over some basic yet crucial steps by creating the Light Halo shader from the Lighting chapter
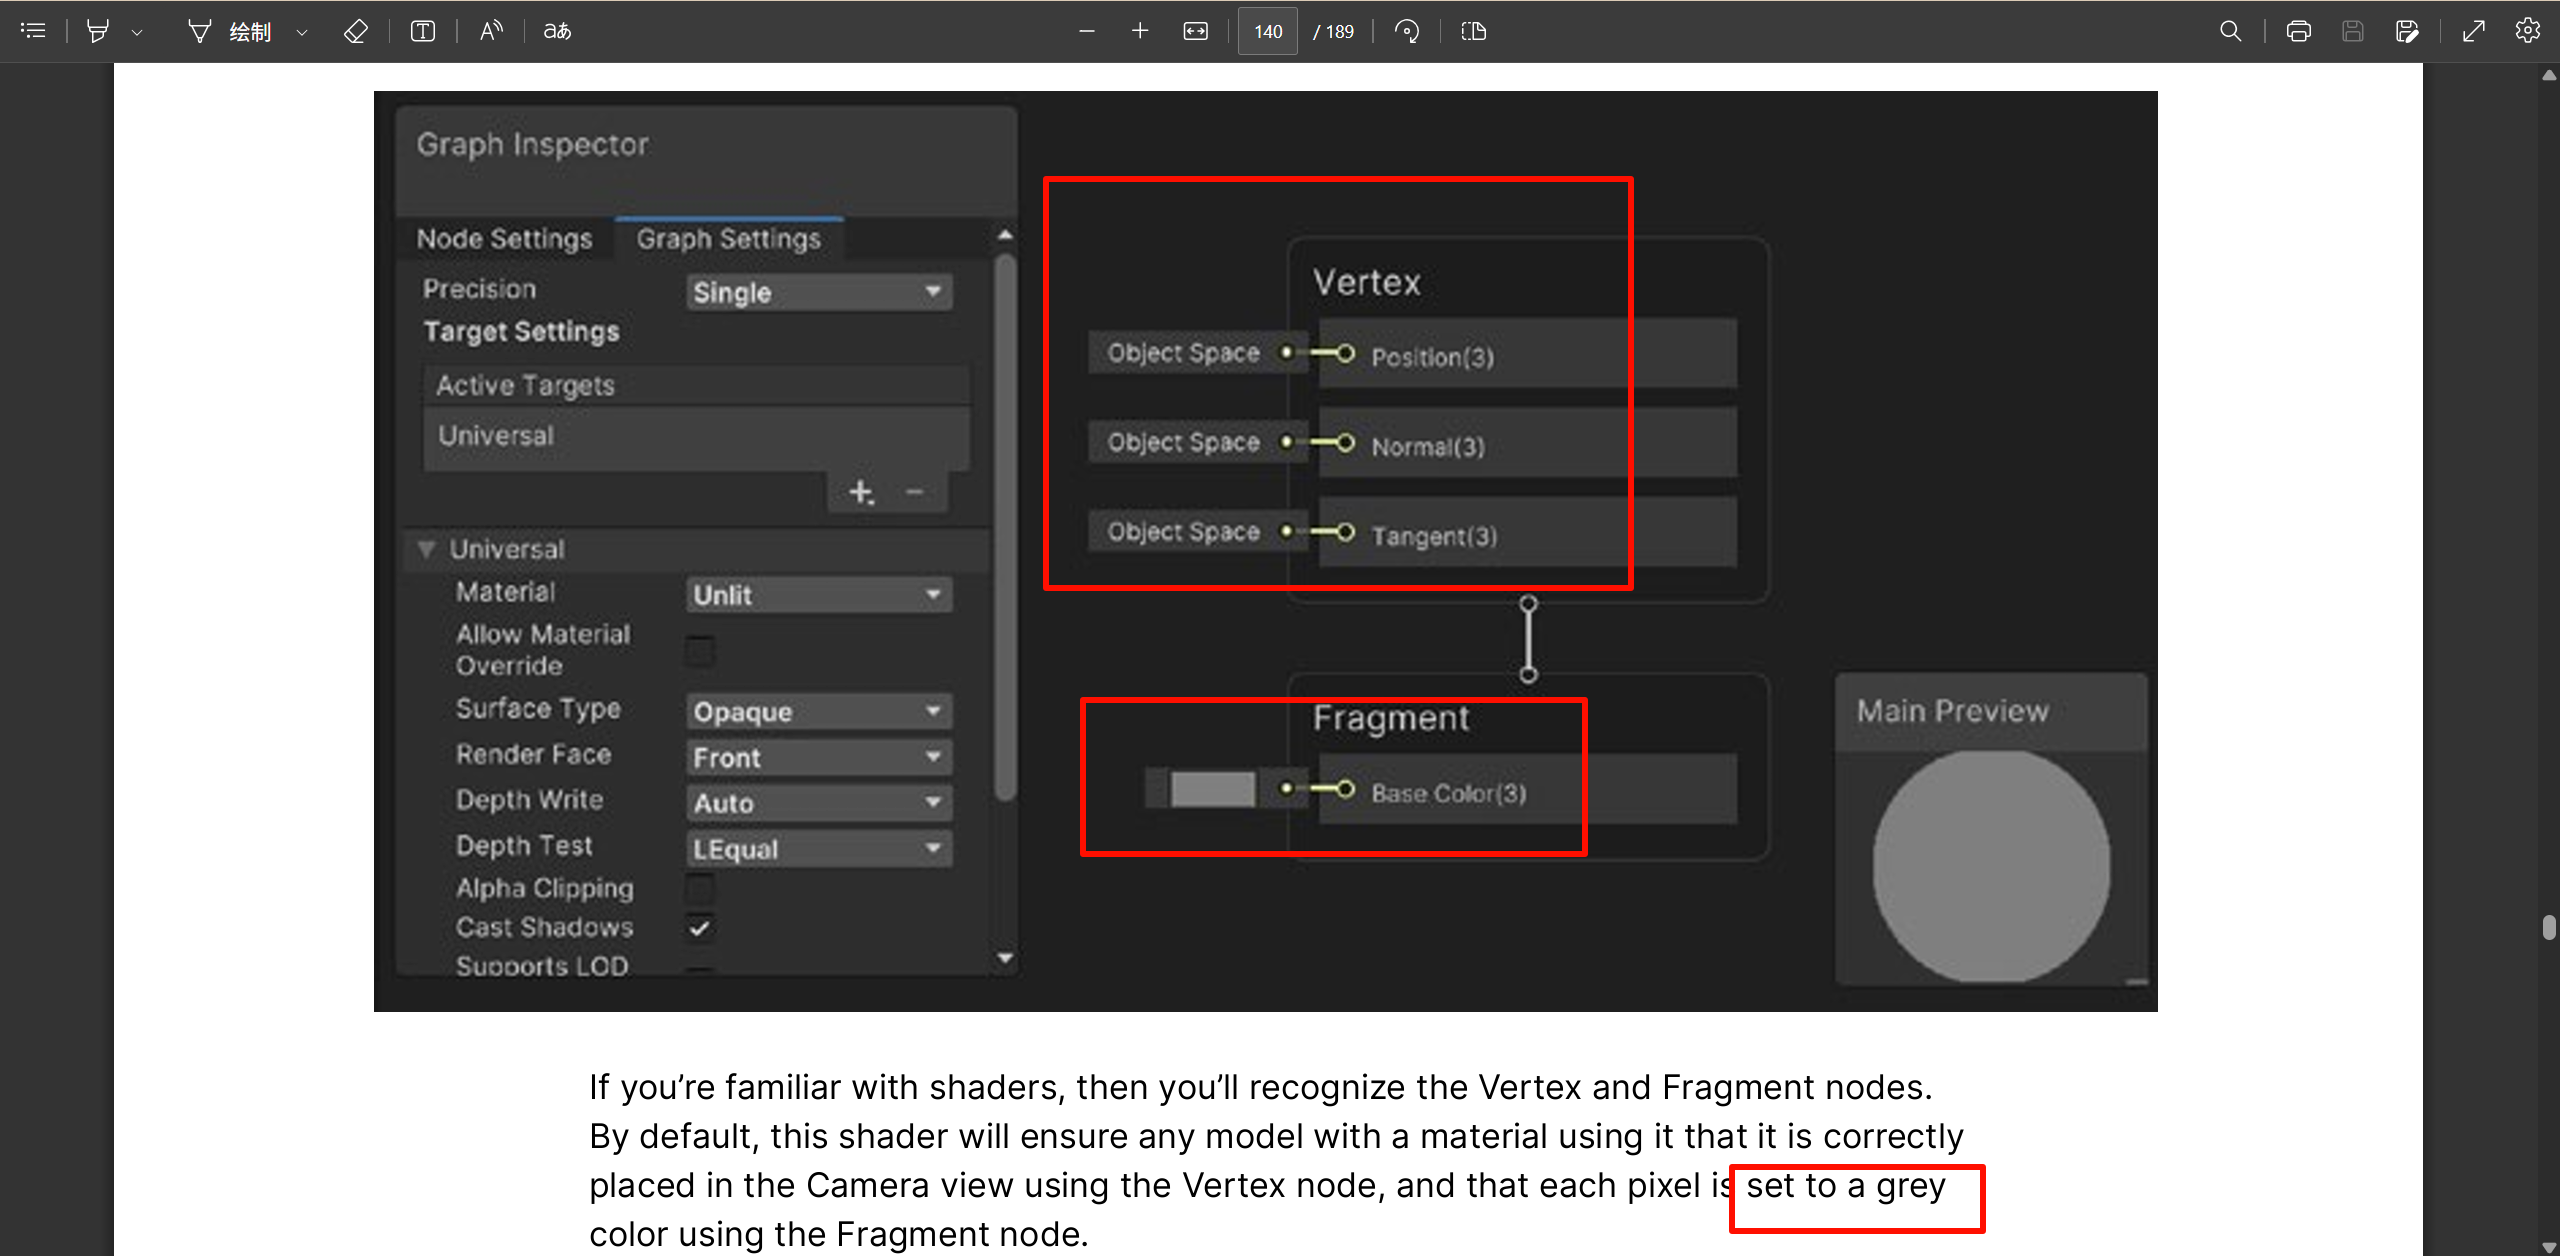
u’re familiar with shaders, then you’ll recognize the Vertex and Fragment nodes. By default, this shader will ensure any model with a material using it that it is correctly placed in the Camera view using the Vertex node, and that each pixel is set to a grey color using the Fragment node
This shader is going to set the alpha transparency of the object.
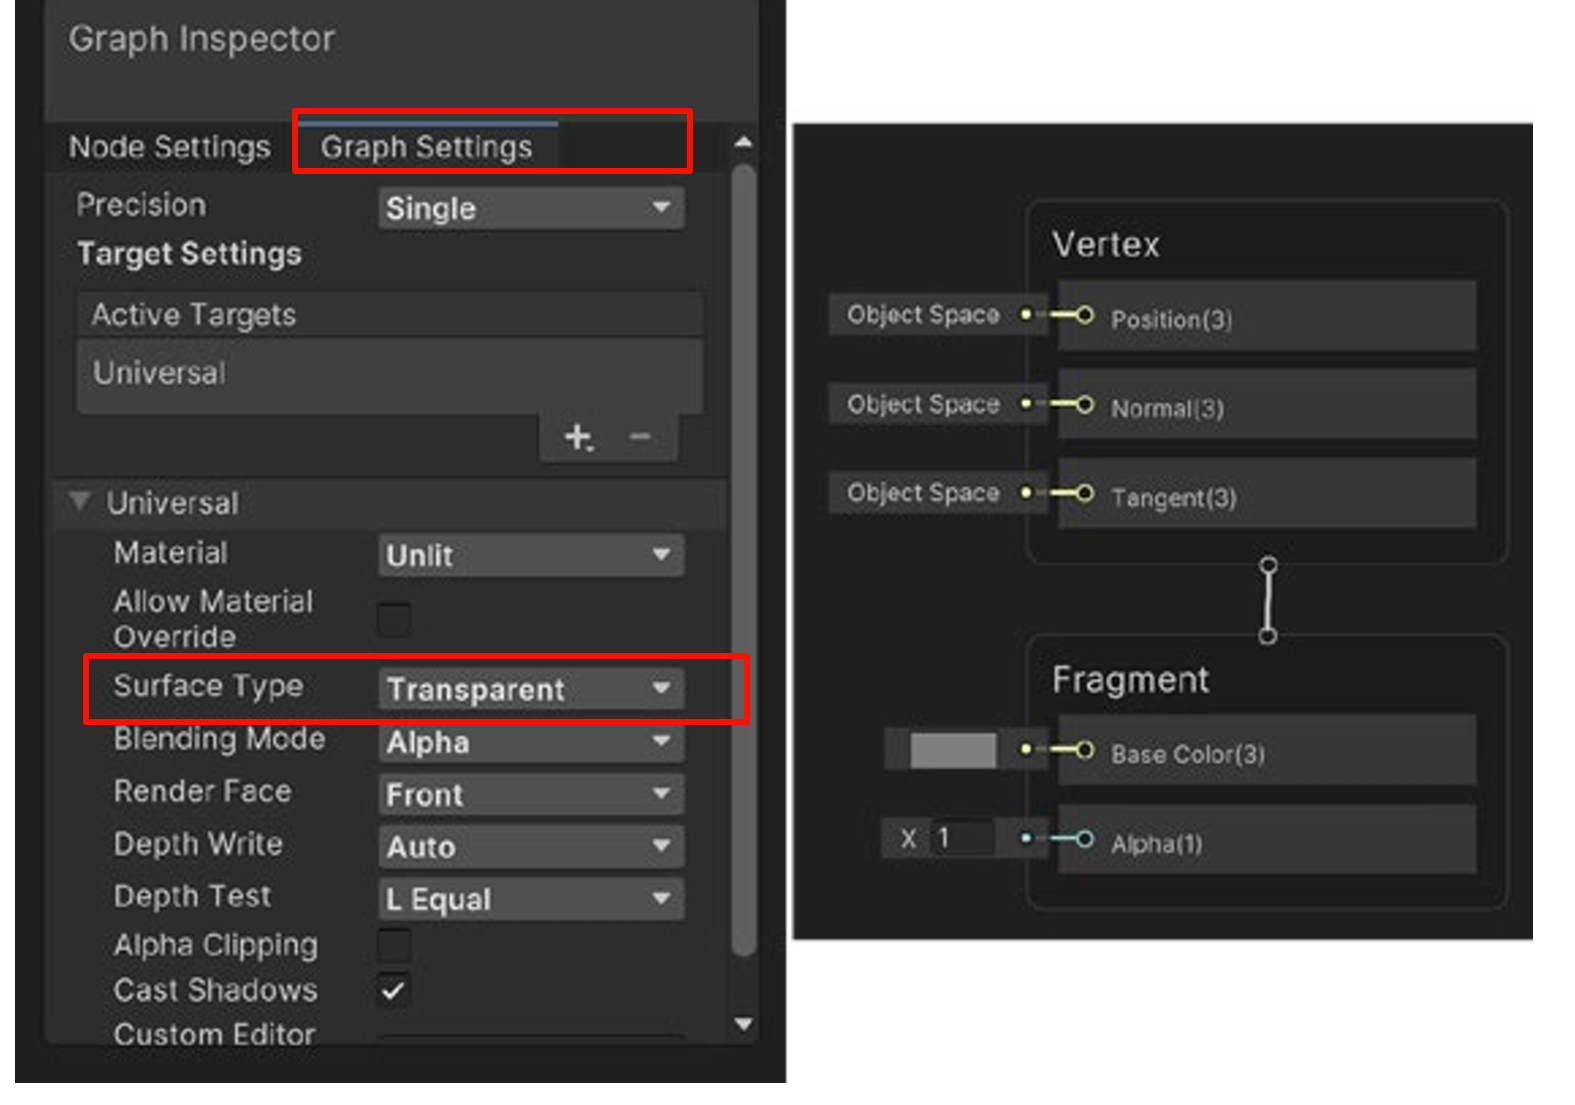
needs to apply to the Transparent queue.
Change the Graph Inspector > Graph Settings > Surface Type to Transparent. You’ll see that the Fragment node now has an Alpha input as well as Base Color
Add properties to the shader. For instance, add Color as a Color, and Power and Strength as Float values
can flip the result using a One Minus node. To do this, click Create Node and enter One. Select the One Minus node
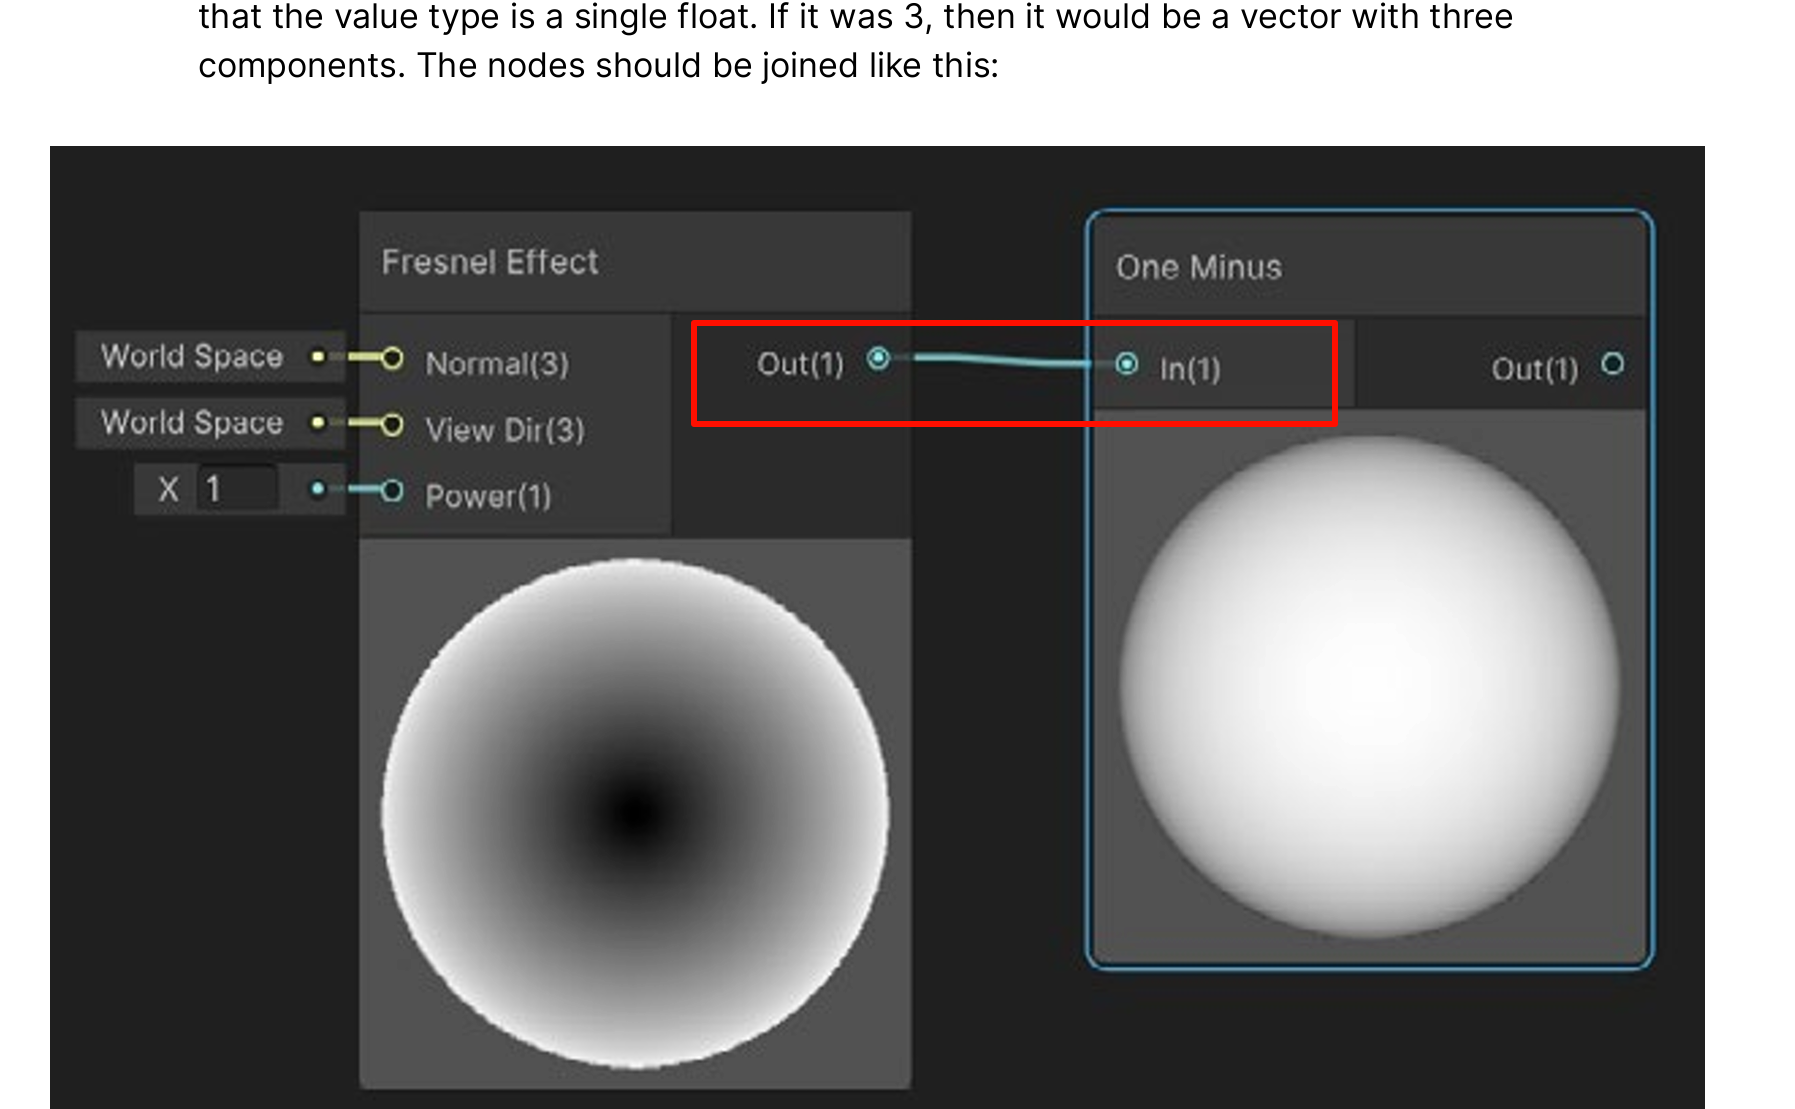
Now drag from Out(1) on the Fresnel Effect node to In(1) on the One Minus node.
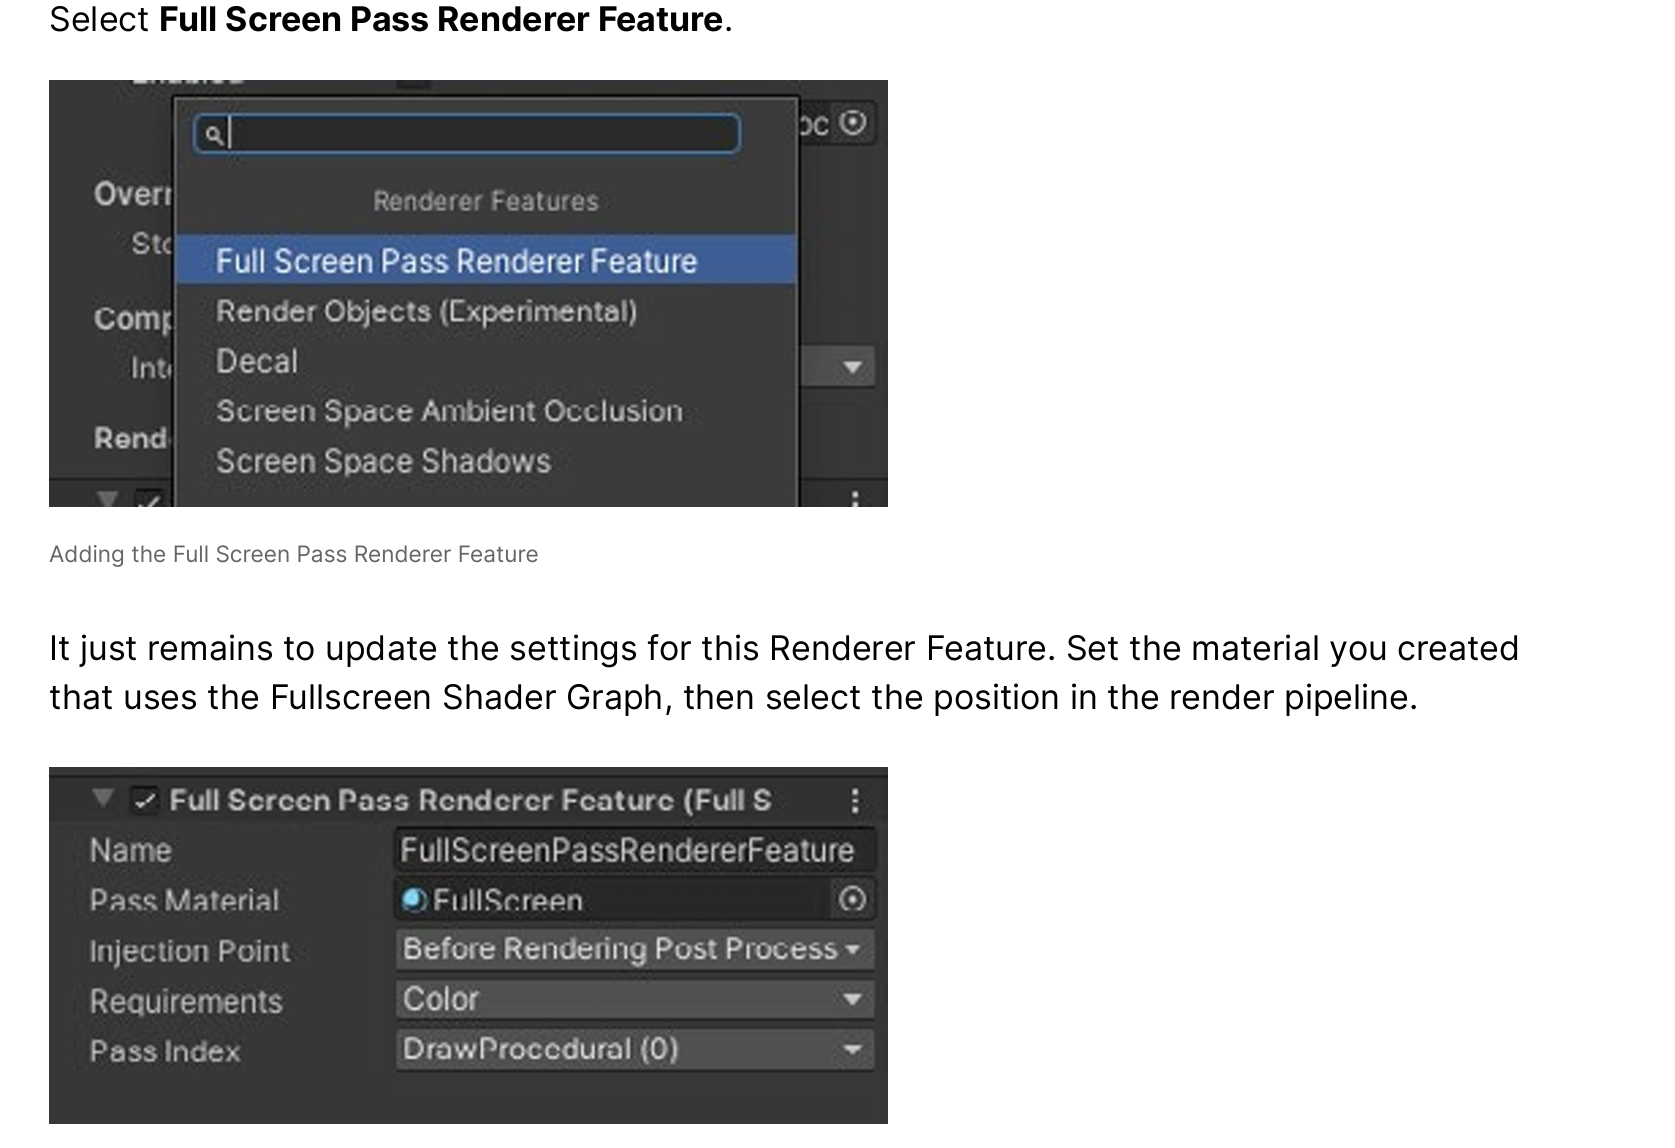
With the active Renderer Data asset selected, use the Inspector to add a Renderer Feature.
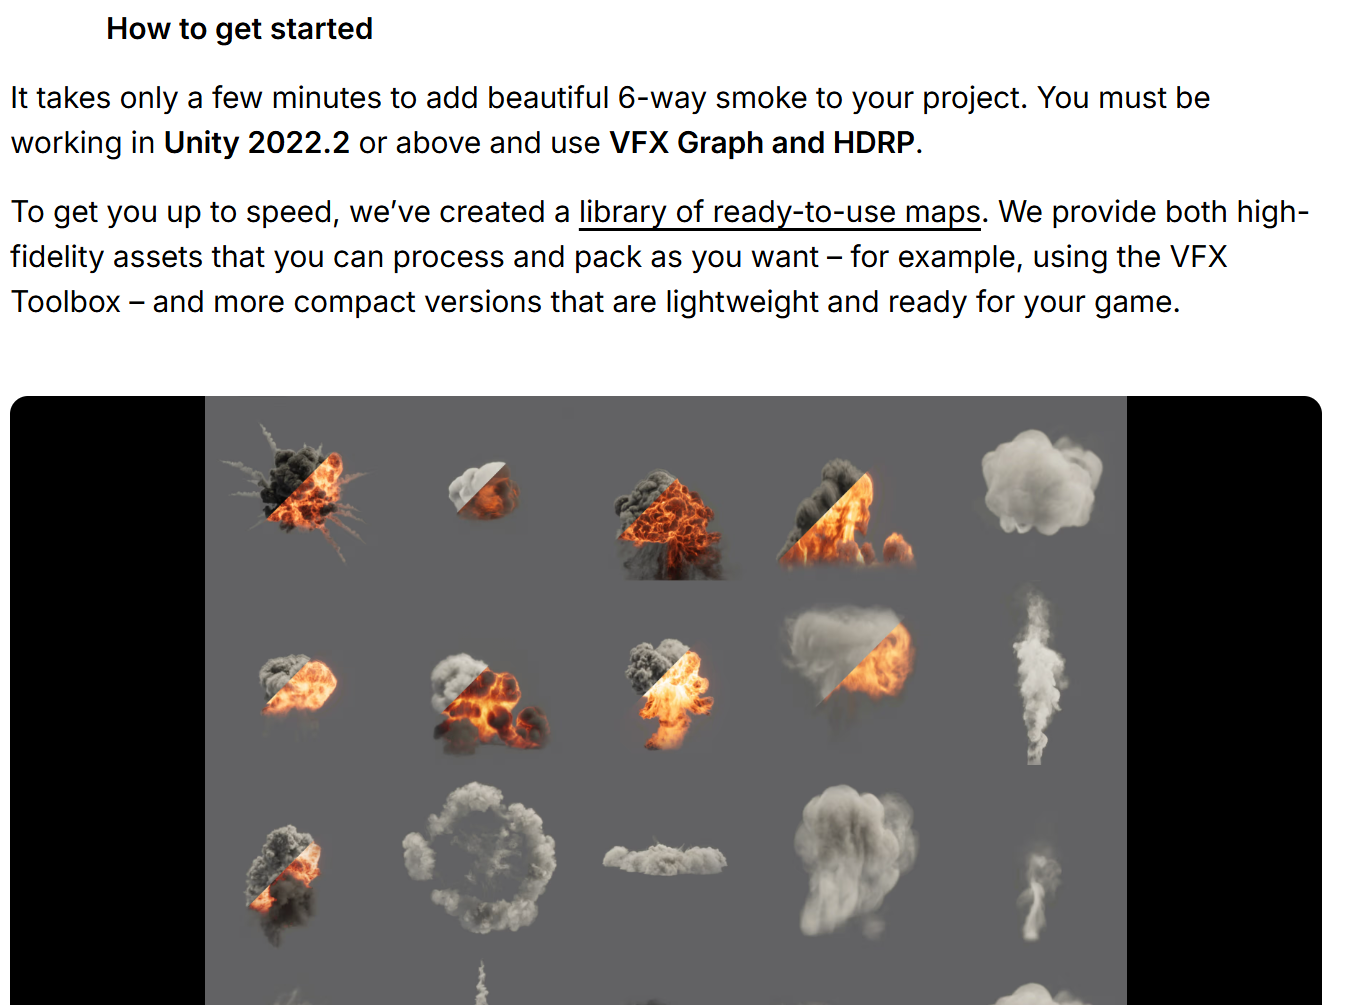
know more about six-way lighting see the blog post Realistic smoke lighting with 6-way lighting in VFX Graph . And see this blog post that goes through the Shader Graph process with an example project and some advanced suggestions
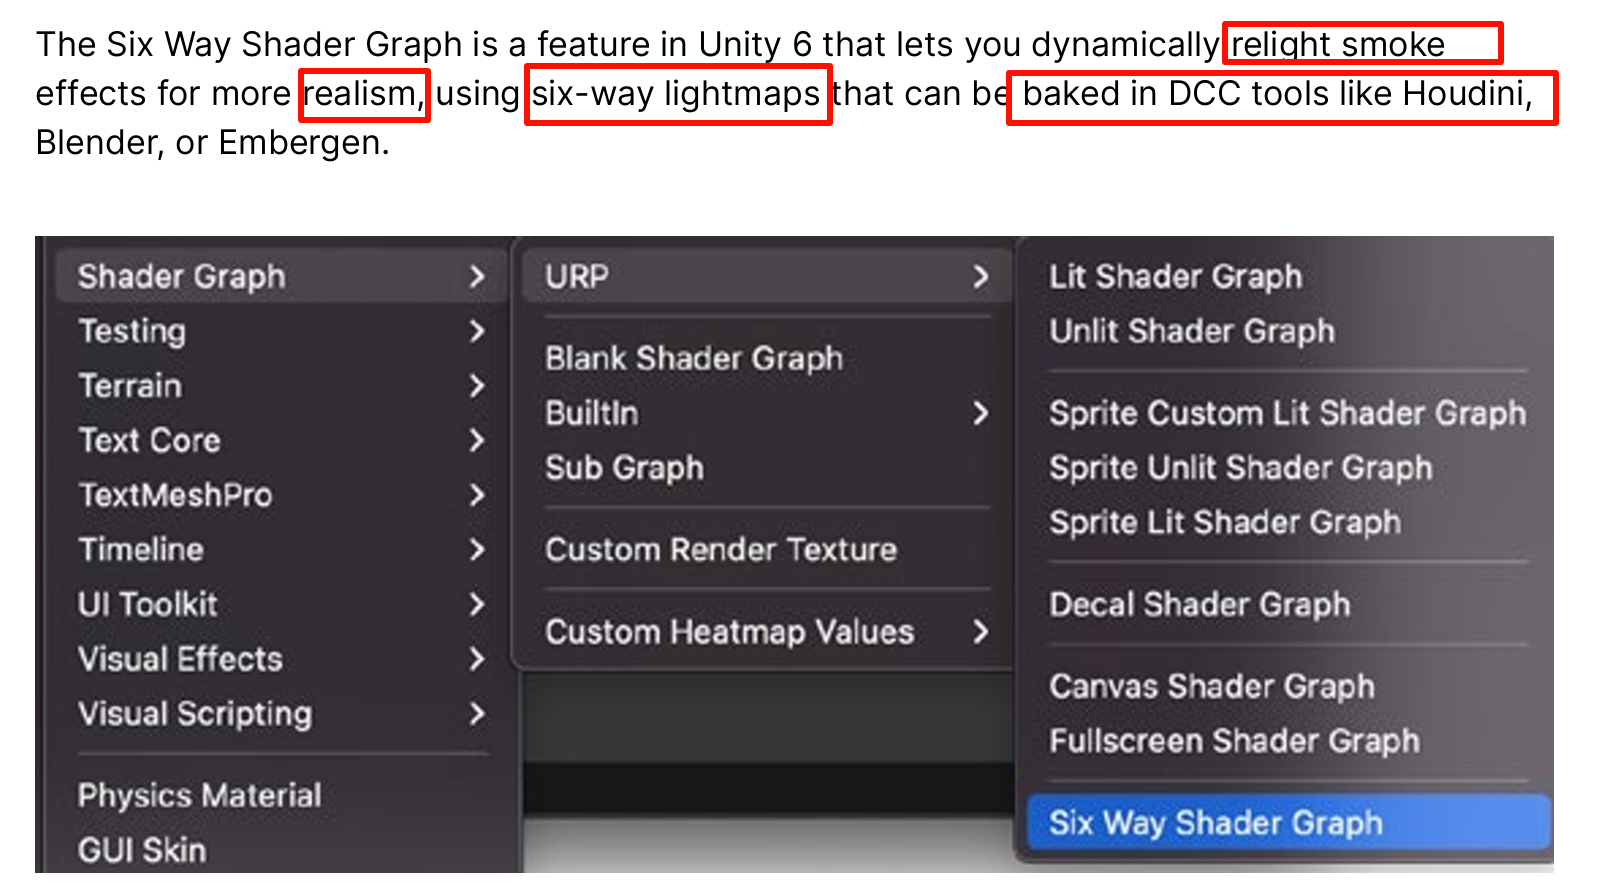
6-way lighting
Rendering smoke in games is most often done with textured sprites because computing fully volumetric lighting is too expensive for a real-time budget. One of the most common questions when it comes to sprites, though, is: How can one light the smoke based on flat, 2D geometry?
Several approaches exist, such as using normal mapping or using a fully baked color map. But, these approaches either lack realism, extensibility, or both.
Enter 6-way lighting, an alternative approach to this problem that uses a set of lightmaps that contain the lighting response of the smoke for light coming from six different directions. These lightmaps are baked into a set of two textures, along with an alpha channel and an optional emissive mask.
Realistic smoke lighting with 6-way lighting in VFX Graph

Equipped with these textures, the smoke can be shaded dynamically under different lighting conditions. It will exhibit volumetric lighting phenomenon such as internal shadowing or light rims when lit from the back, which were not achievable with the other techniques.
internal shadowing or light rims when lit from the back
several controls like color, absorption, emissive gradient, and lightmap remapping to create varied effects based on the same set of textures.
to reuse your assets in many different scenarios.
Smoke Lighting and texture re-usability in Skull & Bones - Real Time VFX
Six-Way-Lighting-Textures - Google 云端硬盘
see this blog post that goes through the Shader Graph process with an example project and some advanced suggestions.
Custom lighting in Shader Graph: Expanding your graphs in 2019
2D Renderer and 2D lights
almost unlimited sprite count
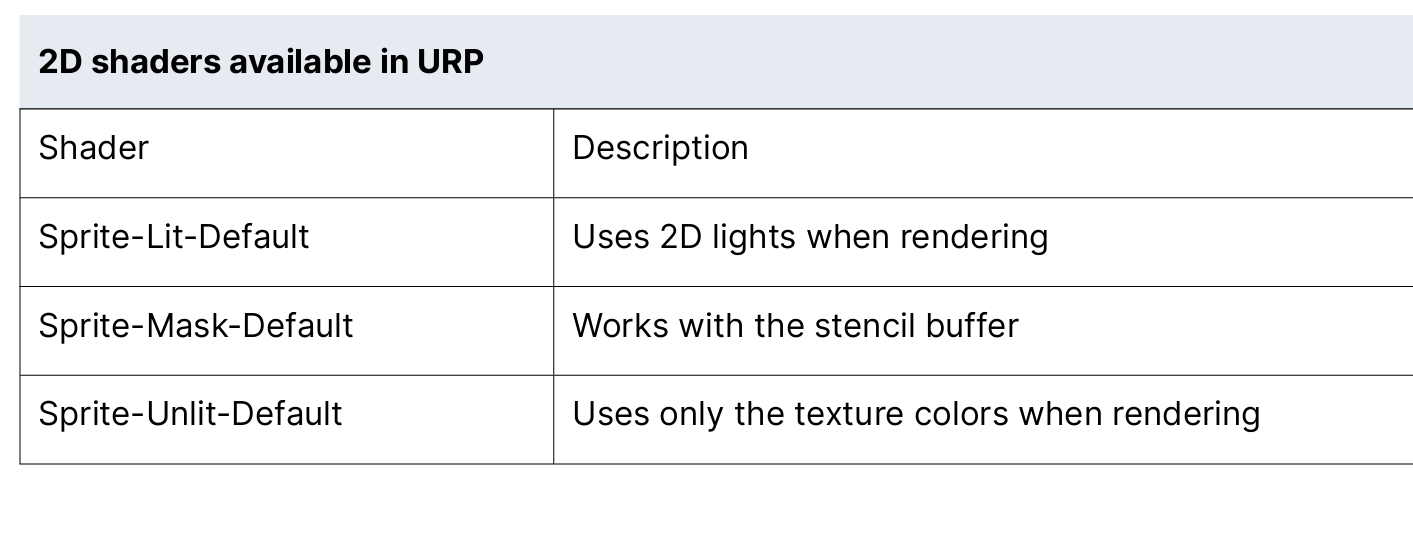
If your sprites use the Sprite-Lit-Default shader, you might be surprised to see a lit render.
But with no lights, you get a default Global Light assigned to the scene for an unlit appearance
Find a treasure trove of lighting and visual effects in our new match-3 sample Gem Hunter Match
Gem Hunter Match shows you how a 2D puzzle/match-3 game can stand out from the competition with eye-catching lighting and visual effects created in URP. Among other techniques, you’ll learn how to prepare and light 2D sprites to add depth, apply a Sprite Custom Lit shader for shimmer, and create glare and ripple effects
Gem Hunter Match - 2D Sample Project | 视频教程项目资源 | Unity Asset Store
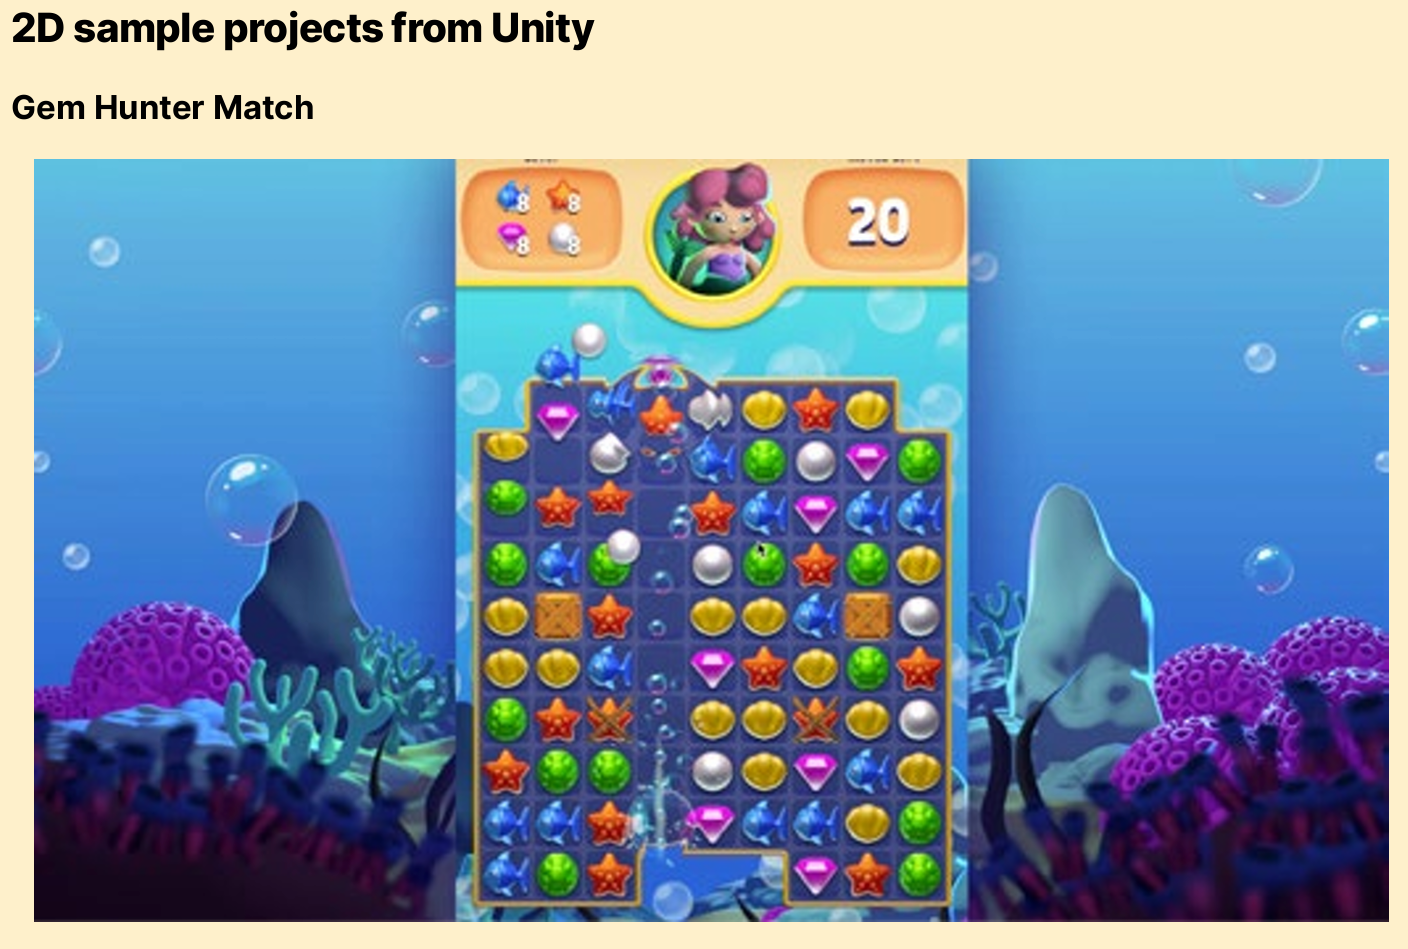
We hope you’ll download Gem Hunter Match, play and customize it, then try out its graphics techniques in your own projects. All of these and more are covered in the Unite 2023 session, Lighting and AI techniques for your 2D game.
Don’t miss out on these other samples, e-books, and tutorials for URP:
- E-book: 2D game art, animation, and lighting for artists
- E-book: Introduction to the Universal Render Pipeline for advanced Unity creators
- Unite 2023: Accelerate your multiplatform development with the latest for URP
- Livestream: What’s new in Unity’s Universal Render Pipeline?
- Video tutorial: Happy Harvest: Custom crops and player notes
- E-book: The definitive guide to creating advanced visual effects in Unity
Make sure to join the conversation about the Universal Render Pipeline on the Unity Forums or join Unity Discussions.
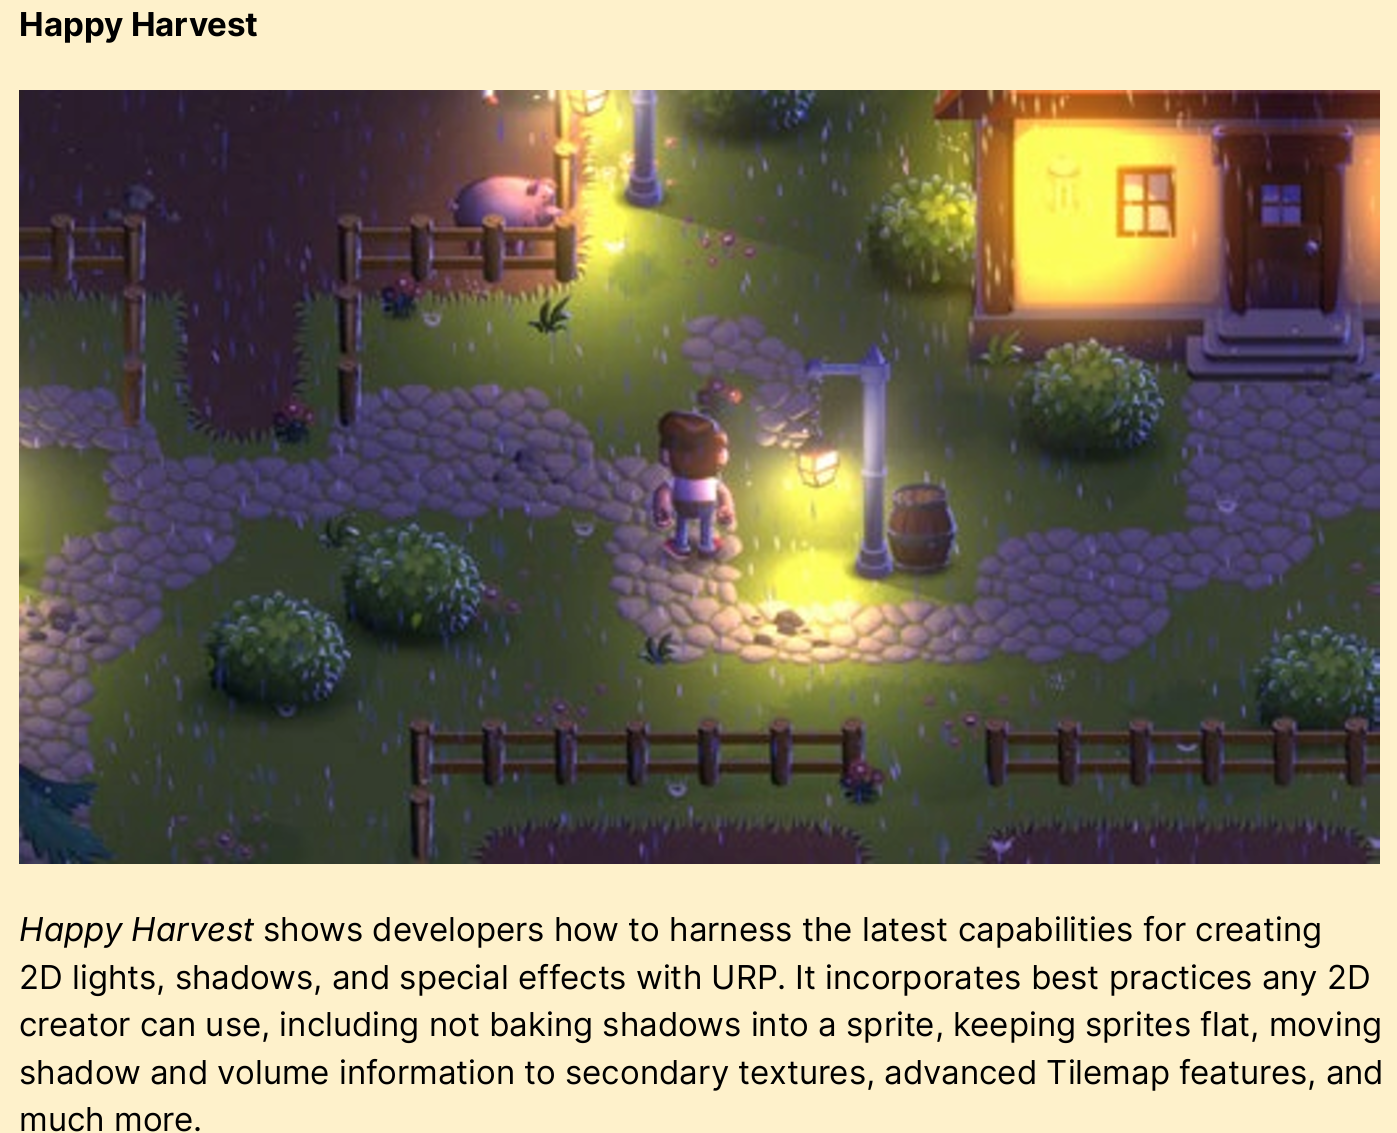
including not baking shadows into a sprite, keeping sprites flat, moving shadow and volume information to secondary textures, advanced Tilemap features, and much more
More Unity 6 features for URP
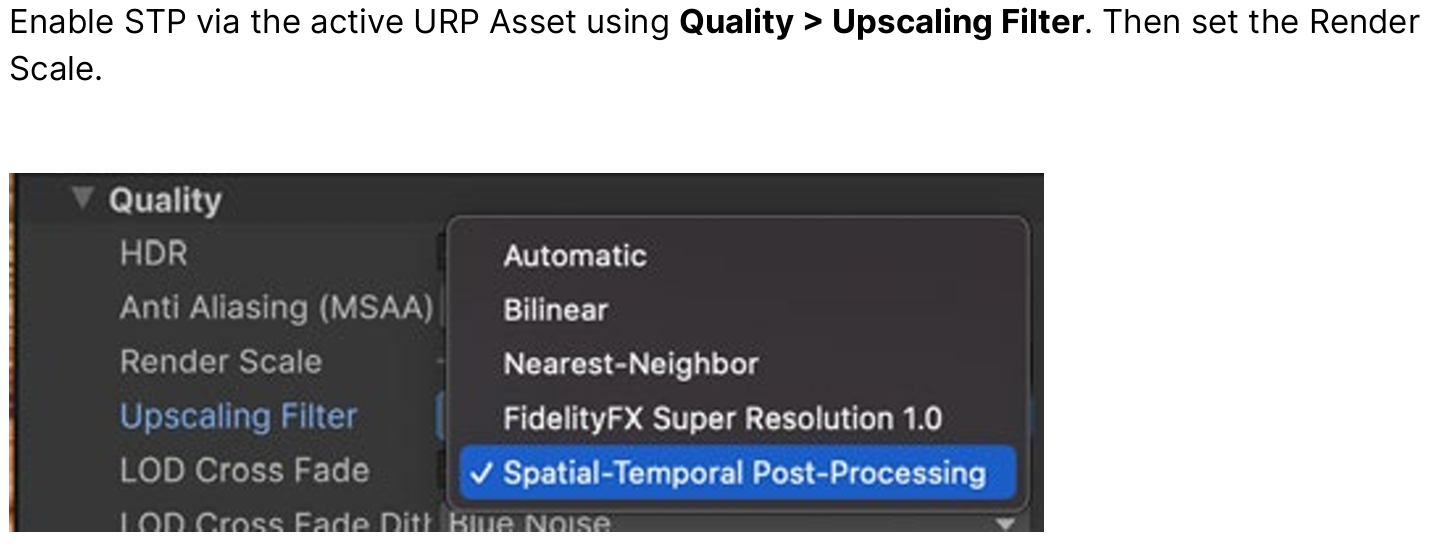
key features in URP in Unity 6 that can improve performance or fidelity on a wide variety of devices
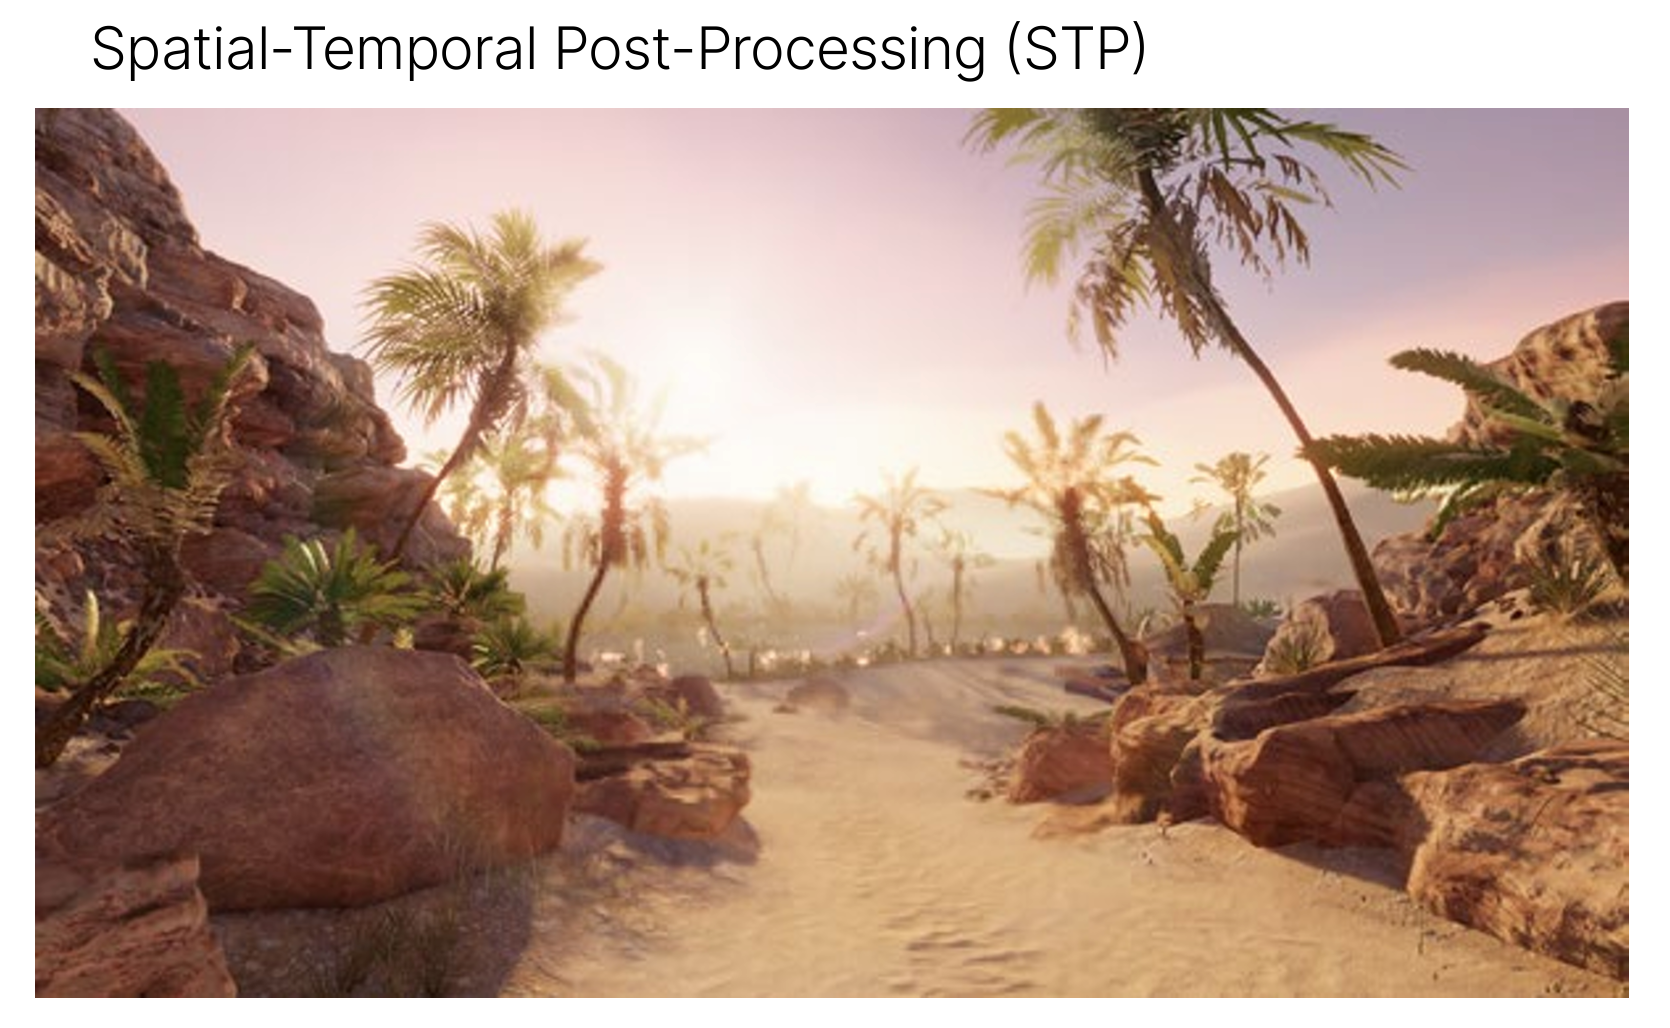
STP is a spatio-temporal anti-aliasing upscaling solution that should work on any device that supports shader model 5.0.
comparable to DLSS2, FSR2, or XeSS, with a lower performance cost.
High Dynamic Range display output for PC and consoles
reproducing images in the higher range of difference in luminance closer to natural lighting conditions
High Dynamic Range content has a wider color gamut and greater luminosity range than standard definition content.
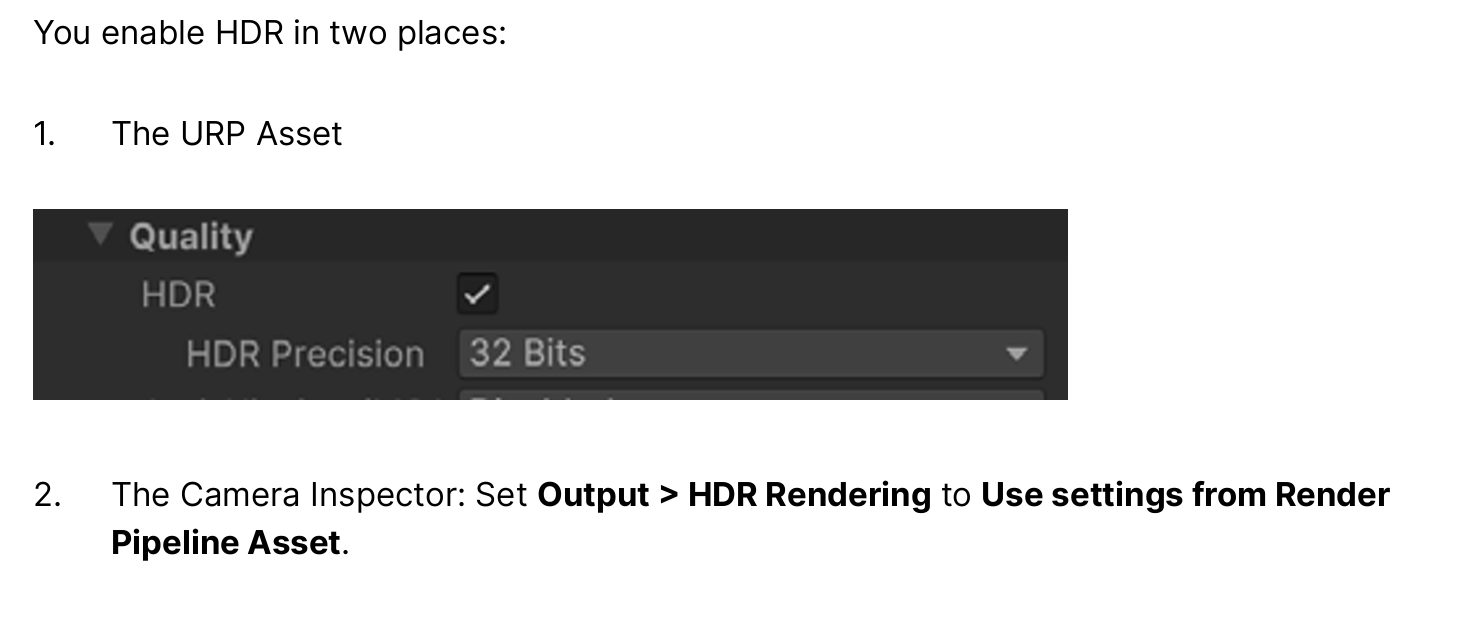
URP can output HDR
content for displays which support that functionality.
Note: You can only use HDR Output with a linear color space. For more information on color spaces in Unity, refer to Color space.
Unity’s HDR Output is split into the following steps which always occur in this order:
- Tone mapping
- Transfer Function
Tone mapping is the first step in the HDR Output process. In this step, Unity balances the exposure and hue of the scene
according to the target display’s dynamic range. Dynamic range is determined by the following properties:
- Minimum brightness
- Maximum brightness
- Paper white brightness
At the same time, Unity performs the color space conversion. Unity converts the colors from the default Rec. 709 color space to the target display’s color space. This maps the colors in the scene to the wider gamut of colors of the target display and ensures Unity utilizes the full color gamut available on the display.
The second step of HDR Output is the transfer function. The transfer function converts the output of the rendering process to levels of brightness of a given display. Unity determines the correct transfer function for the display and uses it to encode the output according to the standard the display expects. This enables Unity to use the correct level of precision for the gamma and create accurate exposure levels on the target display.
After you enable Allow HDR Display Output, you must configure tone mapping settings for your HDR input.
In order to configure these settings effectively, you need to understand how certain values related to tone mapping determine the visual characteristics of your HDR output.
To properly make use of the capabilities of HDR displays, your Tonemapping
configuration must take into account the capabilities of the target display, specifically these three values (in nits):
- Minimum supported brightness.
- Maximum supported brightness.
- Paper White value: This value represents the brightness of a paper-white surface represented on the display, which determines the display’s brightness overall.
Unity - Manual: HDR Output in URP
allows for better preservation of the contrast and quality of the linear lighting renders and HDR images displayed on these devices
present final images with colors and contrasts that mimic natural lighting conditions better on these devices.
In addition to the existing desktop and console support that became available in Unity 2022, mobile support is introduced in Unity 6 for the following platforms:

powerful Pipeline State Object (PSO) tracing and precooking workflow
introduces a new and powerful Pipeline State Object (PSO) tracing and precooking workflow, unlocking a smoother and stutter-less player experience, when targeting modern platforms
Prevent shader compilation stutters with PSO Tracing in Unity 6 - Unity Engine - Unity Discussions
unlocking a smoother and stutter-less player experience
upgrade from the “shader warmup” API
traditional shader warmup is sufficient for older graphics APIs (e.g. OpenGL, DirectX11)
new PSO workflow allows developers to better utilize modern graphics APIs, such as Vulkan, DirectX12 and Metal
the GPU vendor’s graphics drivers will perform runtime shader compilation (and other rendering state translation) as part of the PSO creation process.
PSO creation is a lengthy process
may lead to noticeable stutters in the runtime application.
This overhead can be exacerbated for more complex projects
require the application to compile a large amount of PSOs on the fly.
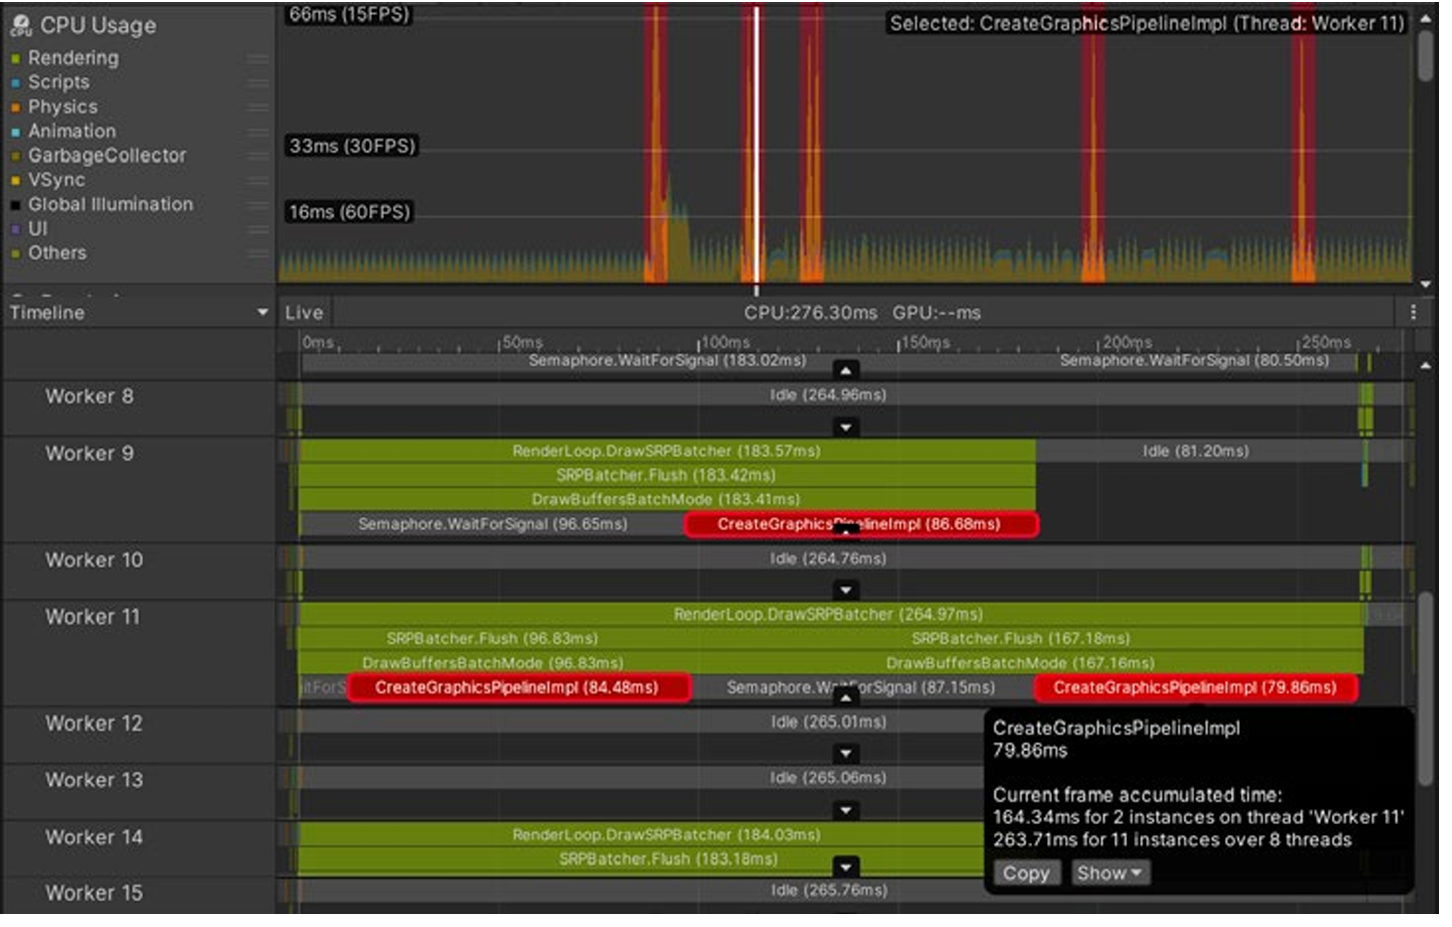
identify PSO creation stutters in the Unity Profiler, using the GraphicsPipelineImpl markers:
many cases, the GPU vendor’s graphics drivers will automatically cache any compiled PSO to disk
in order to accelerate PSO creation for subsequent application runs.
Furthermore, OS and driver updates will often invalidate the driver-managed PSO cache
ideal way to warm PSOs may vary depending on your application and use case
you may choose to synchronously precook PSOs during level transitions and scene loading.
This can be done progressively (time-sliced) in order to increase application responsiveness, creating a fixed amount of PSOs per frame.
Alternatively, you can choose to asynchronously precook PSOs in the application’s background. This will not block the application, but may temporarily regress CPU performance for the duration of the warm up
To finalize the tracing process, call the GraphicsStateCollection.EndTrace method . In most cases, you should end tracing during scene or application end
Unity - Scripting API: Experimental.Rendering.GraphicsStateCollection.SaveToFile
Once tracing is complete, you can save the PSO collection to disk, using GraphicsStateCollection.SaveToFile
additional control, you can inspect the recorded PSOs and variant data, and modify the collection as needed.
Unity - Scripting API: Experimental.Rendering.GraphicsStateCollection.GetVariants
can be used to retrieve all shader variants recorded in a PSO collection. You can then read the graphics states used by each variant via GraphicsStateCollection.GetGraphicsStatesForVariant.
Lastly, you can modify the graphics states associated with each variant using AddGraphicsStateForVariant / RemoveGraphicsStatesForVariant
GPU representation of the PSO may vary across platforms. It is highly recommended to perform tracing in the Player, targeting the relevant graphics API, and to maintain separate collections per target
When tracing on a target device using Player Connection, you can send the PSO collection to the Editor and save to disk, via GraphicsStateCollection.SendToEditor. You can also query the platform used when tracing the PSO collection via GraphicsStateCollection.runtimePlatform
Precooking a PSO collection
request Unity to precook PSO collection, ideally well ahead of drawing time. In most cases, the ideal time to perform warmup is during application or scene loading sequences
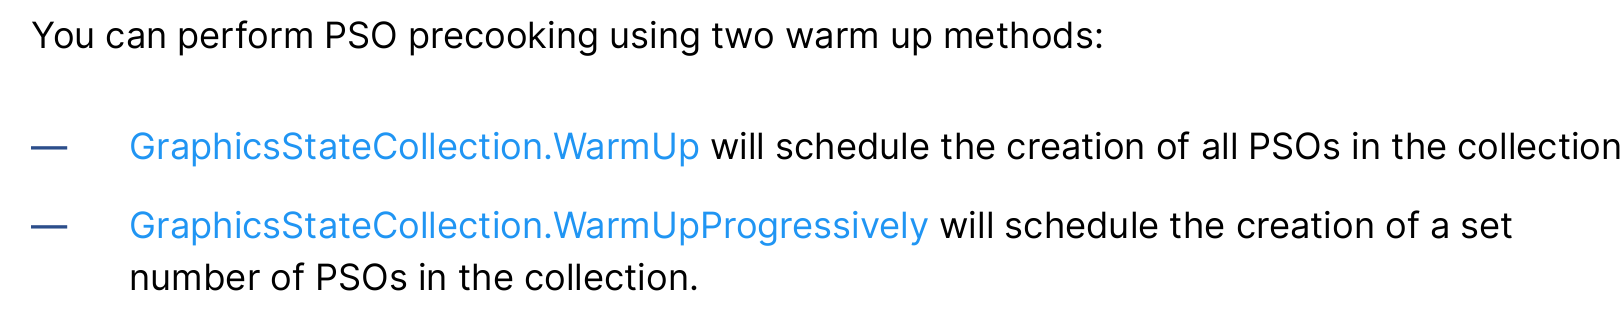
Both methods will return a job handle, which can be used to determine whether PSO Warmup is performed synchronously or asynchronously.
Once the PSOs are created, the drivers will often cache those to disk. Next time the PSOs are precooked, they could be loaded directly from cache
This section looks at seven ways to improve the performance of your games: — Managing your lighting — Light probes — Reflection probes — Camera settings — Pipeline settings — Frame Debugger — Profiler These optimizations are also covered in this tutorial
https://www.youtube.com/watch?v=xjsqv8nj0cw
https://www.youtube.com/watch?v=Ypg84Fr20Sw
https://www.youtube.com/watch?v=Uuzd39AjFWQ

assuming the lights in your scene are static.
This is especially useful if your scene uses multiple lights. Another great reason to bake your lighting is that it allows you to render bounced or indirect lighting in your scene and improve the visual quality of the render
sample the lighting data in the scene during baking and allow the bounced light information to be used by dynamic objects as they move or change. This helps them blend into and feel more natural in the baked lighting environment. (The Unity engine now has an alternative to Light Probes, see the APV section)
Light probes add naturalism to a render without increasing the processing time for a rendered frame. This makes them suitable for all hardware, even low-end mobile devices
By default, Unity uses the Skybox as the reflection map. But by using one or more reflection probes, the reflections will match their surroundings more closely.
size of the cubemap generated when baking the reflection probes depends on how close the camera gets to a reflective object. Always make sure to use the smallest map size that suits your needs to optimize your scene

to disable unwanted renderer processes on your cameras for performance optimization. This is useful if you’re targeting both high- and low-end devices in your project. Disabling expensive processes, such as post-processing, shadow rendering, or depth texture can reduce visual fidelity but improve performance on low-end devices
great way to optimize your Camera is with occlusion culling. By default, the Camera in Unity will always draw everything in the Camera’s frustum, including geometry that might be hidden behind walls or other objects.
will always draw everything in the Camera’s frustum
There’s no point in drawing geometry that the player can’t see, and that takes up precious milliseconds
best suited to a scene where significant numbers of objects might be masked when another item appears between them and the Camera.
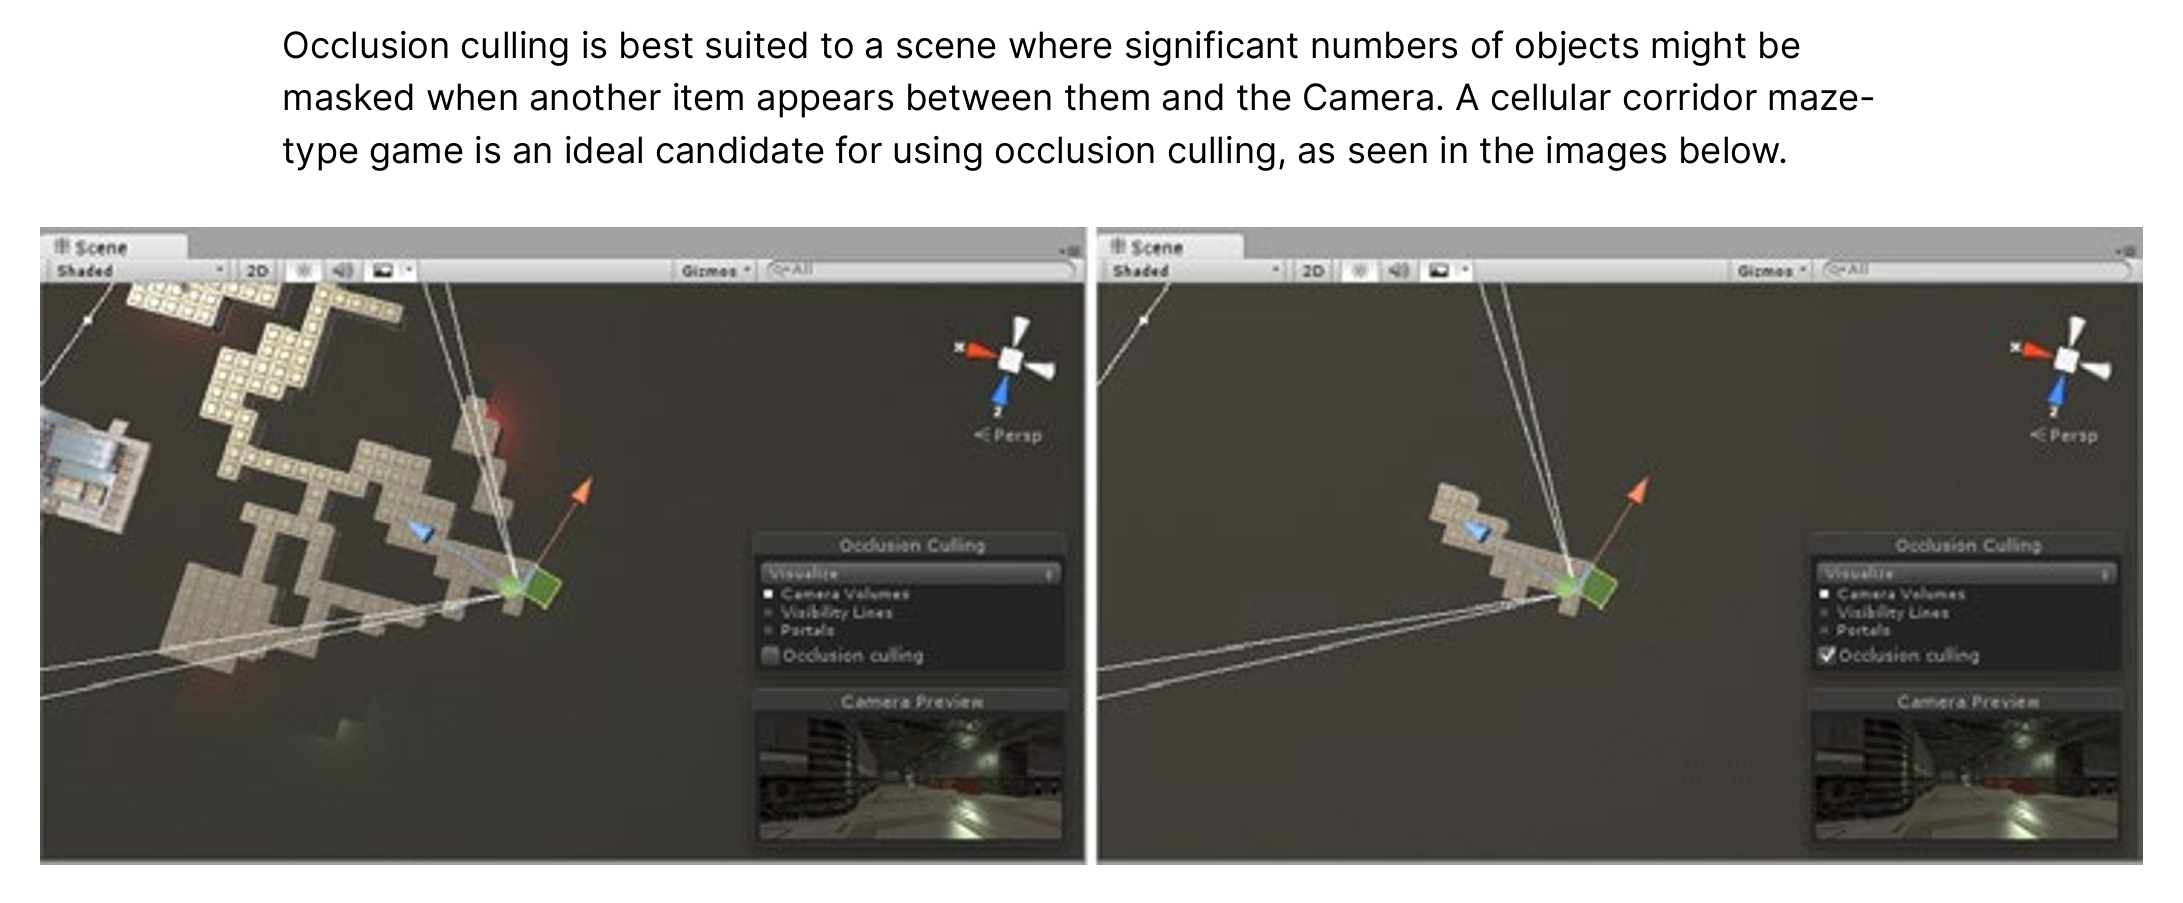
By baking occlusion data, Unity ignores the parts of your scene that are blocked.
Reducing the geometry being drawn per frame
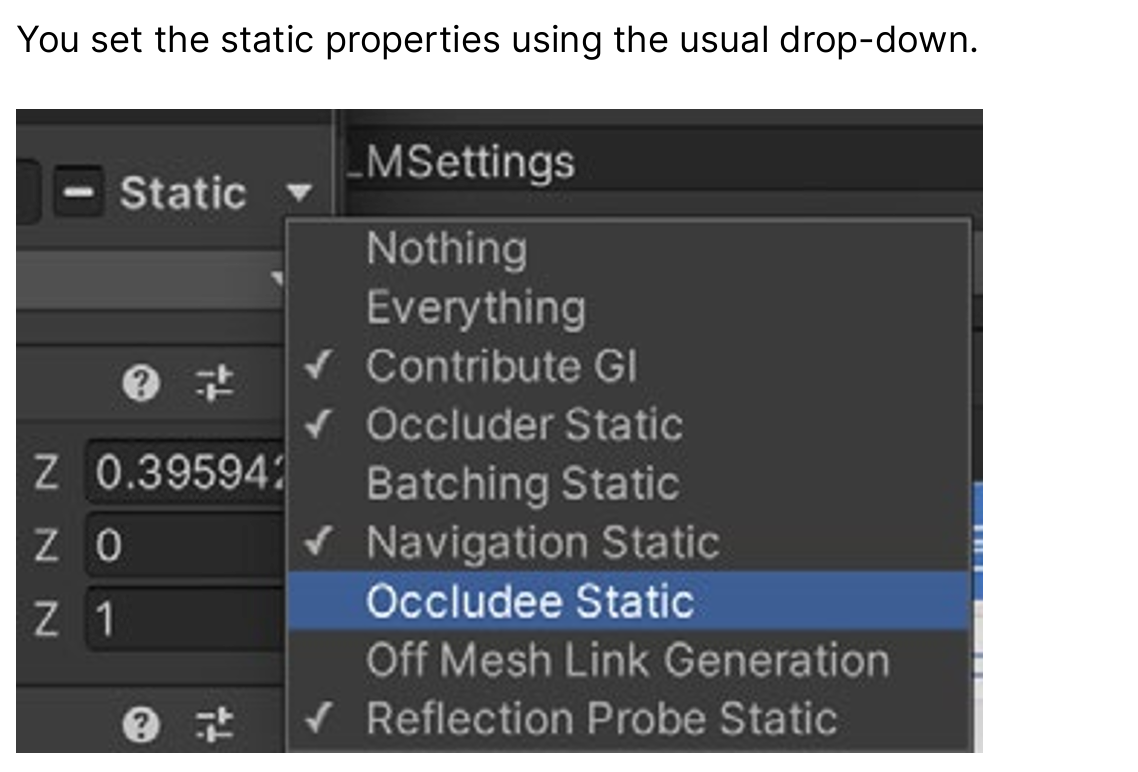
To enable occlusion culling in your scene, mark any geometry as either Occluder Static or Occludee Static
Occluders are medium to large objects that can occlude objects marked as Occludees.
To be an Occulder, an object must be opaque, have a Terrain or Mesh Renderer component, and not move at runtime.
Occludees can be any object with a Renderer component, including small and transparent objects that similarly do not move at runtime.
启用场景的遮挡剔除(Occlusion Culling)时,需要将几何体标记为 Occluder Static 或 Occludee Static。
-
Occluder Static(遮挡体):
中型或大型的物体,可以遮挡其他物体。
作为遮挡体,必须满足:-
不透明(opaque)
-
具有 Terrain 或 Mesh Renderer 组件
-
运行时不会移动
-
-
Occludee Static(被遮挡体):
任何带 Renderer 组件的物体都可,包括体积小或半透明的物体,只要同样在运行时不会移动。
一句话总结:
要使用遮挡剔除,把场景中静止的物体标记为“遮挡体”或“被遮挡体”。遮挡体需大且不透明,被遮挡体可以小且透明,但两者都必须在运行时保持静止。
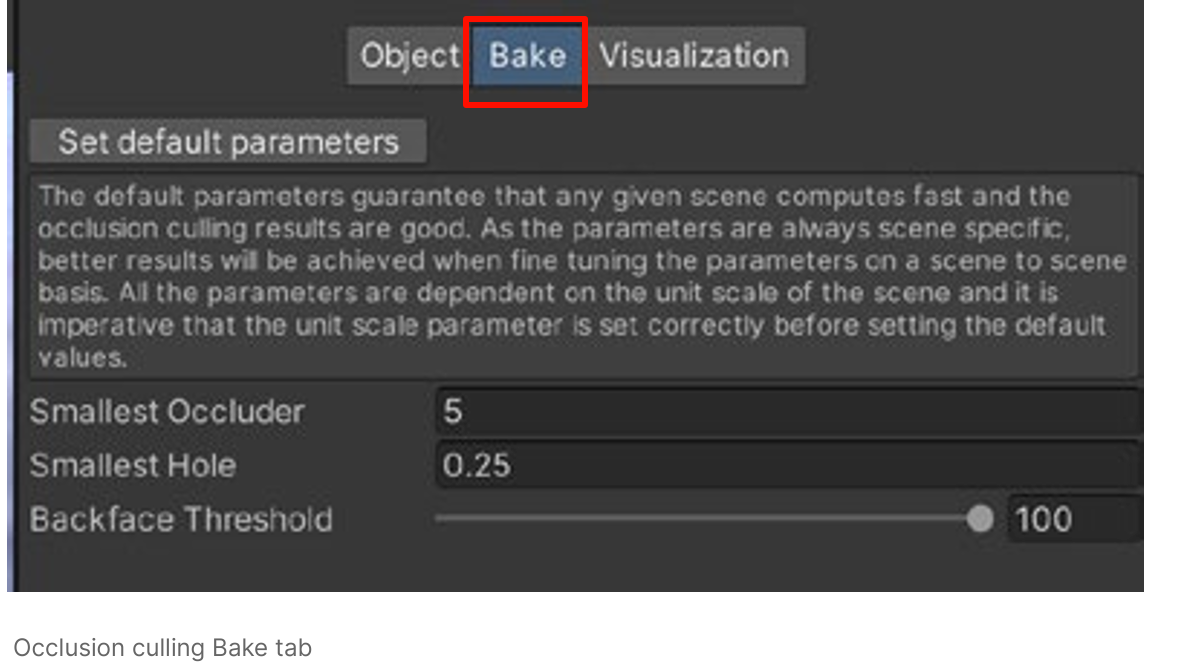
Open Window > Rendering > Occlusion Culling, and select the Bake tab. In the bottom-right corner of the Inspector, press Bake. Unity generates occlusion data, saving the data as an asset in your project and linking the asset to the current scene.
Window > Rendering > Occlusion Culling
the Bake tab
bottom-right corner of the Inspector, press Bake
generates occlusion data
saving the data as an asset in your project and linking to the current scene.
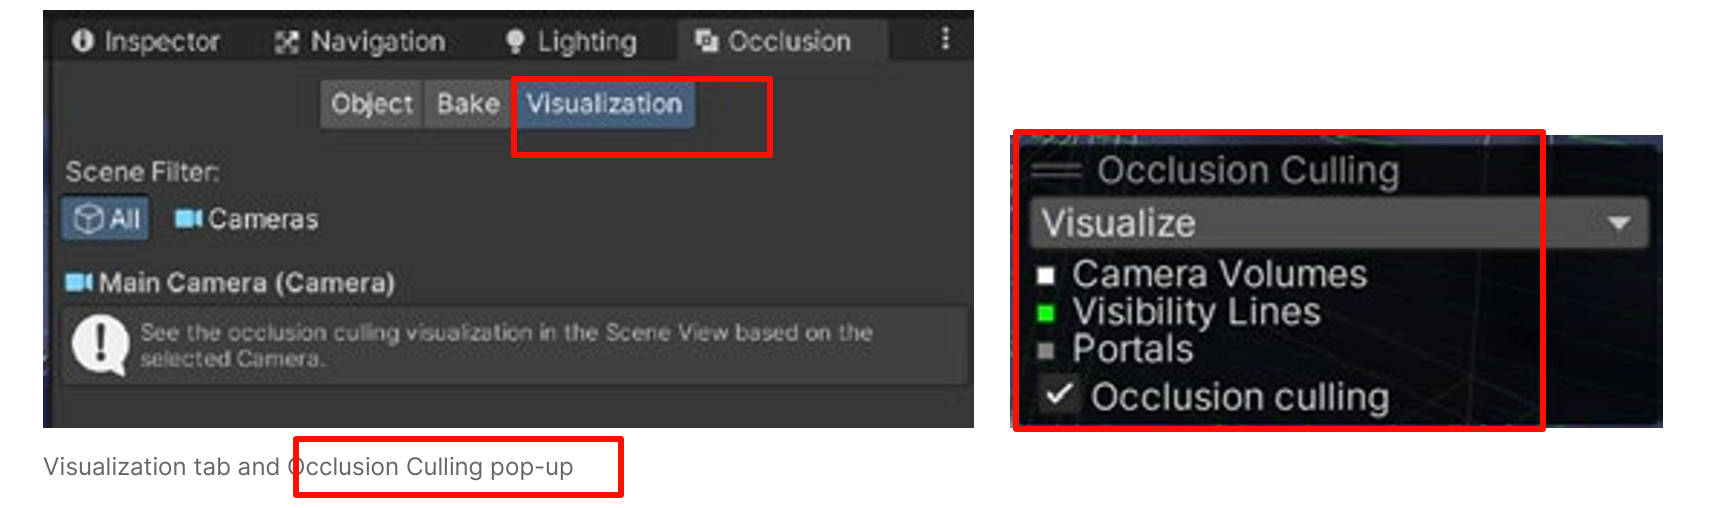
You can see occlusion culling in action using the Visualization tab
Select the Camera in the scene and use the Occlusion Culling pop-up window in the Scene view to configure the visualization.
configure the visualization.
The pop-up might be hidden behind the small Camera view window. Right-click the double-line icon and choose Collapse if this is the case.
-
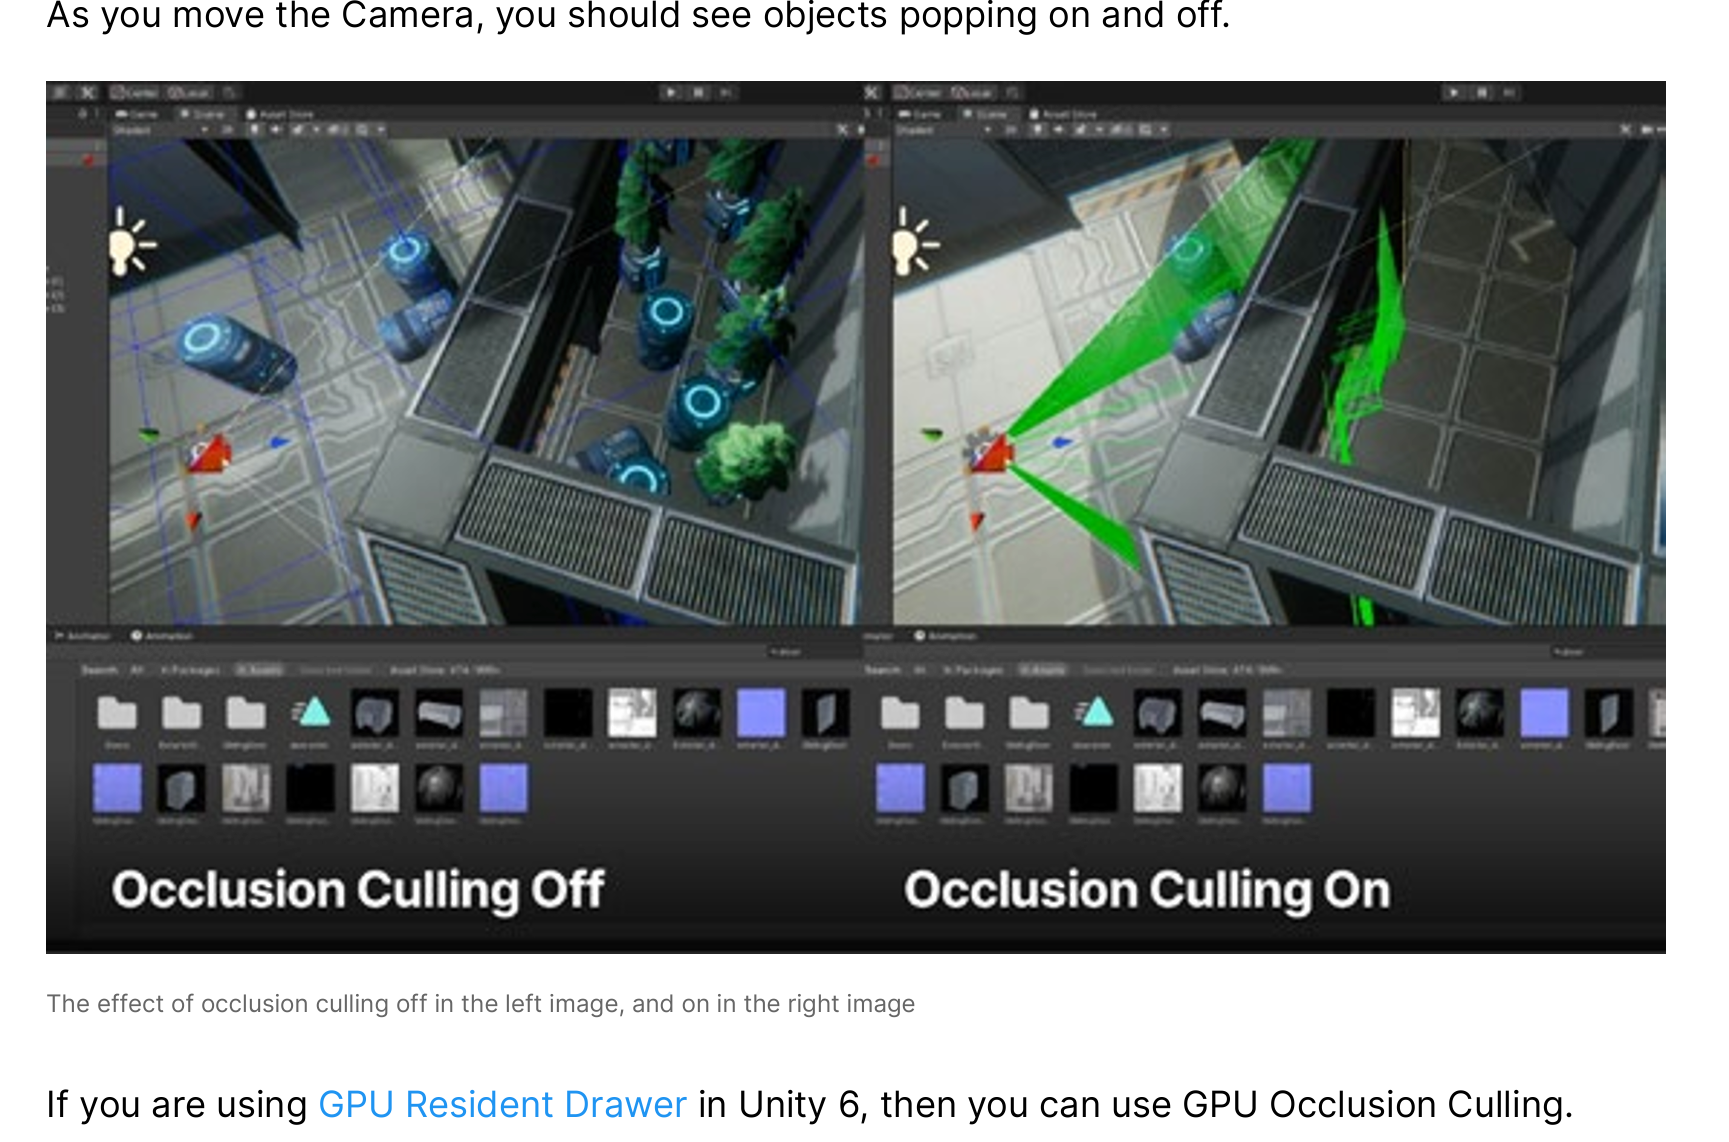
GPU Resident Drawer 是 Unity 6 的一项新式绘制管线特性。
-
只有启用它,Unity 才能走“GPU 级别的遮挡剔除(GPU Occlusion Culling)”路径。
-
普通 Occlusion Culling 仍然存在,也能单独开启。GPU 版本只是更高效的实现。
GPU Resident Drawer = 开启 GPU 驱动的渲染架构 → 在此架构下 Unity 才能提供 GPU Occlusion Culling。
不开它,就还是传统 CPU Occlusion Culling。
GPU Occlusion Culling(GOC)
-
前提:必须开启 GRD。
-
流程:
-
GPU 在渲染深度/层次 Z-buffer 的同时完成可见性判断。
-
直接在 GPU 内存里对实例化的对象做遮挡剔除,不需要 CPU 参与。
-
剔除结果直接驱动下一步的绘制调用。
-
开发者实操要点
-
启用 GRD:在 Player Settings / Graphics Settings 中打开 GPU Resident Drawer 相关选项。
-
保持对象静态或批处理友好:避免频繁改变 Mesh 或 Renderer 结构。Transform 可以更新,但要走 Unity 支持的 GPU 更新路径。
-
结合其它优化:如 LOD、Instancing、Streaming;GOC 只解决“看不见的不画”,并不减少几何细分。
-
测试与回退:
-
GPU Occlusion 对显卡驱动与硬件要求较高;旧 GPU 可能不支持或效果一般。
-
可以随时关闭 GRD,Unity 会自动回到 CPU Occlusion Culling。
-
the effects of changing the settings for the URP Asset and using different Quality tiers
some additional tips for experimenting with Quality tiers to get the best results for your project
Disable features that your project does not require, such as depth texture and opaque texture
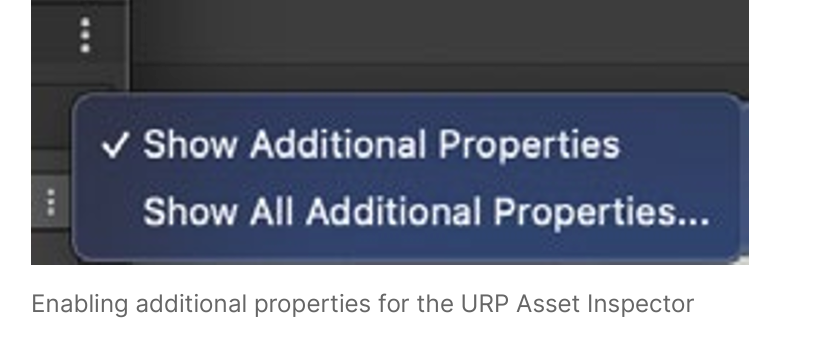
Enable the SRP Batcher to use the new batching method. The SRP Batcher will automatically batch together meshes that use the same shader variant, thereby reducing draw calls. If you have numerous dynamic objects in your scene, this can be a useful way to gain performance. If the SRP Batcher checkbox is not visible, then click the three vertical dots icon (⁝) and select Show Additional Properties
https://unity.com/blog/engine-platform/srp-batcher-speed-up-your-rendering
The SRP Batcher will automatically batch together meshes that use the same shader variant, thereby reducing draw calls
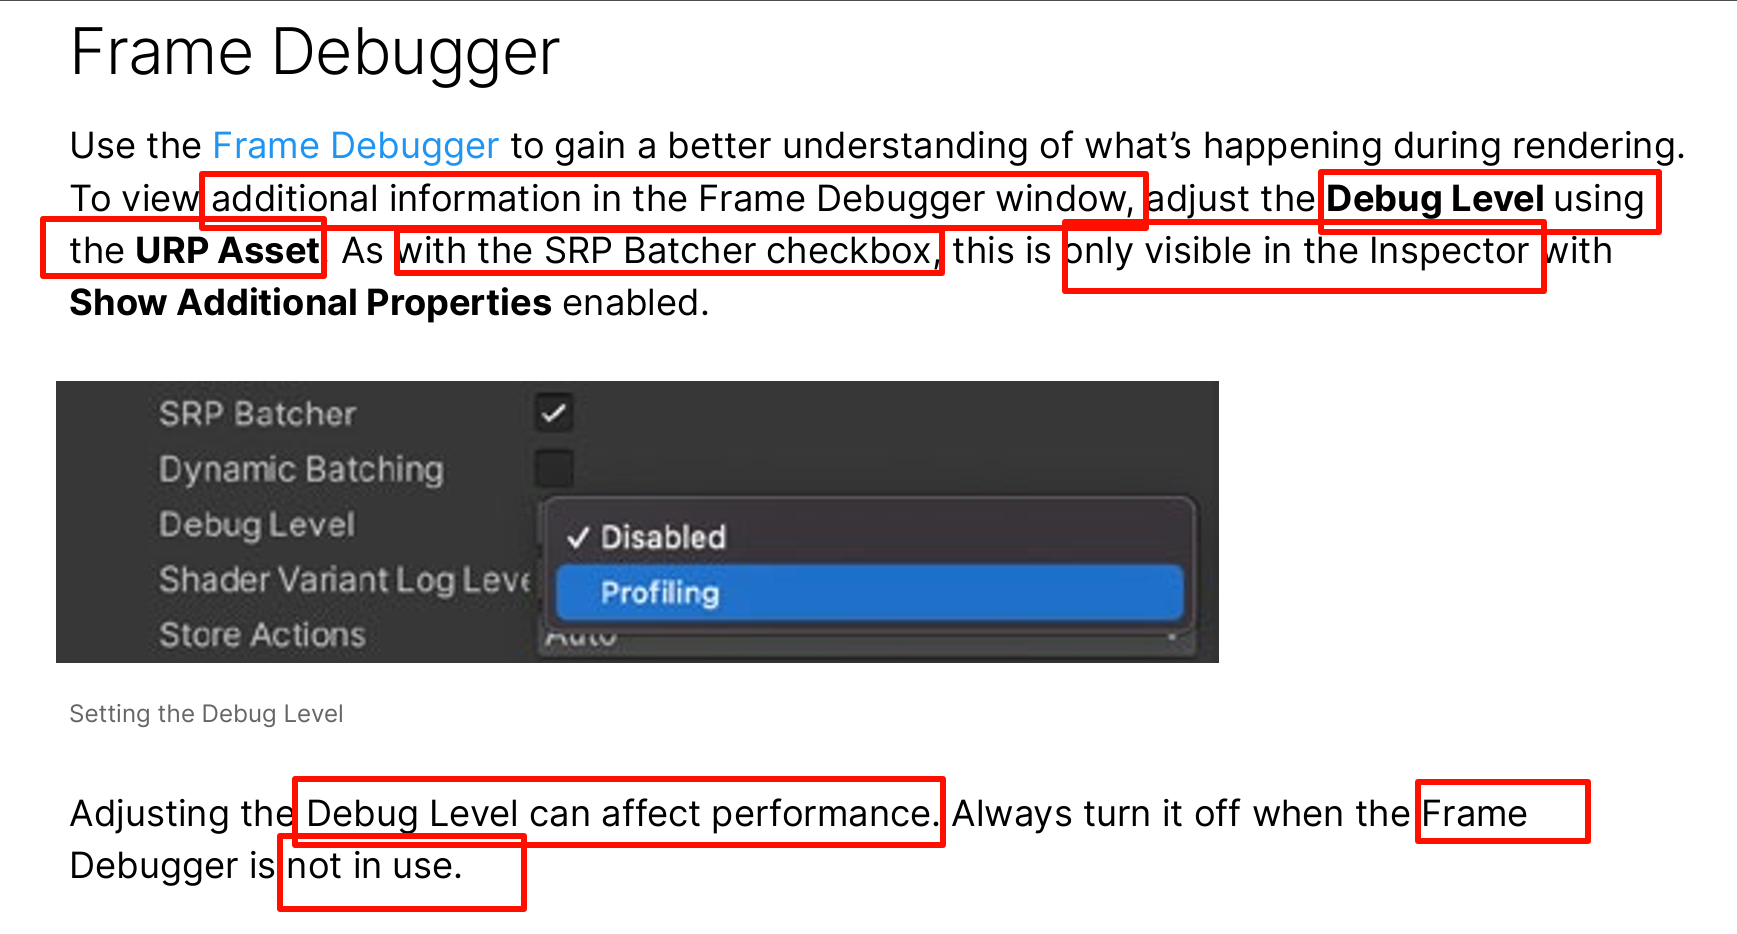
shows a list of all the draw calls made before rendering the final image and can help you pinpoint why certain frames are taking a long time to render. It can also identify why your scene’s draw call count is so high.
Unity - Manual: Profiling low-level native plug-ins
You can use the low-level native plug-in
profiler
API to extend the Profiler and collect performance data of native plug-in
code, or prepare profiling data to send to third-party profiling tools such as Razor (PS4), PIX (Xbox, Windows), Chrome Tracing, ETW, ITT, Vtune, or Telemetry.
The low-level native plug-in Profiler APIs provide the following interfaces for communication between the Unity Profiler and external tooling:
- IUnityProfiler: Use this interface to add instrumentation events to the Unity Profiler from C/C++ native plug-in code.
- IUnityProfilerCallbacks: Use this interface to intercept Unity Profiler events and store or redirect them to other tools.
Here’s an example of using the low-level native plug-in Profiler API
e interested in building advanced profiling skills in Unity, start by downloading the free e-book
brings together advanced advice and knowledge on how to profile an application in Unity,
manage its memory, and optimize its power consumption from start to finish.
A couple of other useful resources include Measuring Performance by Catlike Coding, and Unity Draw Call Batching by The Gamedev Guru

an off-screen render target to render the incoming scene before the transition is complete
The incoming scene is then rendered to large monitors placed in the outgoing scene using a custom shader created with Shader Graph
and the full-screen swap is handled using a stencil via a Render Objects Renderer Feature.

To see the effect in action, walk toward the pedestal until the Unity logo is displayed, then keep the logo in the center of the screen. This will trigger the transition
MainCamera renders the active scene, and ScreenCamera the scene displayed on the monitors.
During a transition, the incoming scene camera is rendered to the render target.
This creates a potential problem since URP only supports one main directional light.
A script called Scripts > SceneManagement > SceneTransitionManager.cs runs before rendering, enabling the active scene’s main light and disabling the other to keep to this restriction.
Take a look at the script below. In the OnBeginCameraRendering method, we first check whether we’re rendering the main camera . If isMainCamera is true, then the ToggleMainLight calls activate the main directional light for the currentScene and disable the main directional light for the screenScene, the incoming scene. However, if isMainCamera is false, then the reverse will be the case. The same script handles switching the fog, reflection, and skybox to suit the scene being rendered by adjusting the settings of the RenderSettings object.
The transition between the incoming and outgoing scenes is handled using a Render Objects Renderer Feature. By writing a value to the stencil buffer, this can be checked in a subsequent pass. If the pixel being rendered has a certain stencil value, then you keep what is already in the color buffer; otherwise, you can freely overwrite it. Renderer Features are a highly flexible way to build a final render using combinations of passes.
To match camera positions during a transition, the project has a SceneMetaData script for each scene that stores an offset Transform, while a SceneTransitionManager script handles the incoming and outgoing scenes during the transition. The Update method tracks the progress of the transition. When ElapsedTimeInTransition is greater than m_TransitionTime, then TriggerTeleport is called, which in turn calls the Teleport method. This repositions and orientates the player to create a seamless switch from the outgoing scene to the incoming scene .
rendered frame requiring twice the work. Additionally, with a minimum target fps of 72, you’ll need a lot of pixels per second. A workaround for this challenge is to use stylized lighting. The Cockpit scene below uses a Toon Shaded lighting model
A common problem for game developers is getting a game running smoothly on a mobile device. The new sample project includes a Mobile Forward+ URP Asset in the Settings folder. Remember that the URP Asset is the principal way you can adjust quality settings. Forward+ relies on the CPU to do significant culling operations per frame and so is not necessarily the best option for a low-end mobile device. The best option for such devices is the Deferred renderer, which is used by a URP asset in the sample project.
The Depth Texture is enabled. Note that Additional Lights do not cast shadows
very expensive option and for mobile devices can often be mimicked using light cookies
For most games, a DPI of 96 is sufficient. If Screen.DPI is 300, for example, then a render scale of 96/300 on a 2400 x 1200 screen would mean rendering 768 x 384 pixels, almost a tenth of the pixels, which is a massive performance boost.
Notice that the Mobile Forward+_Renderer asset has a Decal renderer feature with its Technique option set to Automatic. This will switch to Screen Space on GPUs with hidden surface removal. This provides a performance boost by avoiding a depth prepass, which is a waste of resources on these devices.
Use Deferred rendering on devices where the CPU overhead of Forward+ is too expensive.
— To enable more aggressive render pass merging by the Render Graph system, consider the following
If using Opaque Texture, set Opaque Downsampling to “None”. Downsampling the opaque texture will introduce a resolution change in the URP intermediate textures, preventing pass merging
— If using Depth Texture, set Depth Texture Mode to “After Transparents”. Doing so will avoid injecting a CopyDepth pass between the main render passes (Opaque, Sky, Transparents), and allow Render Graph to successfully merge those passes
A careful study of these four scenes alongside their URP Asset settings and documentation will help you learn how to use the techniques on display in your own projects.
For developers and artists looking to switch to URP, be sure to check out the full Unity Documentation, as well as Unity Learn, the Unity Blog, and Discussions
Unity Blog
Universal Pipeline - Unity Platform - Rendering & Visual Effects | Product Roadmap
The Unity Product Board provides an overview of current URP features being developed, in addition to what’s coming up next. You can even add your own feature requests