ego(5)---Astar绕障
Astar的基础原理
关于 Astar 算法的原理网上有特别多,因为也不算是特别难推导的,我之前也有文章专门介绍 Astar 的算法:https://blog.csdn.net/a_xiaoning/article/details/123518943?spm=1001.2014.3001.5501
因此,这里就简单回顾一下 Astar 的一些基础概念,然后再分析 ego 工程。
Astar 的核心公式是:
f(n) = g(n) + h(n)
用以评估每个节点的代价,其中:
- g(n) 表示从起点到当前节点 n 的实际代价(已走距离,耗时等)
- h(n) 表示从当前节点 n 到终点的估计代价(如欧式距离,曼哈顿距离或其他启发函数)
算法总是优先处理总代价最小的节点,这样就可以大致以最优路径来快速收敛到终点。
ego中的Astar应用
开集与闭集
在 ego 中使用开集与闭集的概念,区分节点的状态。
- 开集(OPENSET) 存放已发现但还未处理的节点,也就是邻居还没有探索完的点,每次在开集中取代价最小的节点进一步探索
- 闭集(CLOSESET) 存放已处理完毕的节点,也就是已探索完所有邻居的节点,确保不会重复处理,减少无效计算。
ego 中的搜索流程
Astar 在 ego 中是使用在上一节检测到B样条轨迹中的障碍物进出点后,其流程大致如下:
- 初始化:将起点加入开集,g = 0, h 按启发函数计算:
// 初始化起始节点
startPtr->index = start_idx;
startPtr->rounds = rounds_; // 标记当前轮回次数
startPtr->gScore = 0;   // 存储节点到起始点的代价 g
startPtr->fScore = getHeu(startPtr, endPtr);    // f = g + 启发值h
startPtr->state = GridNode::OPENSET; //put start node in open set   路径集中加入起始点
startPtr->cameFrom = NULL;  // 起始点的父节点设置为空
openSet_.push(startPtr); //put start in open set Astar路径集中添加初始点 - 循环执行:在开集中取代价最小的节点记作 current,检测 current 是否是终点,如果是终点,则回溯路径并记录(因为一直会记录节点的父节点,因此从终点一直往前找父节点,就能找到完整路径),如果不是终点,则探索当前节点的所有邻居节点;
- 探索邻居节点:对 current 的所有相邻节点,计算其 g 值(从起点到当前节点的距离),若邻居未在开集或闭集中,或者找到更优的 g 值,则更新其 g 与 f ,加入开集;
- 标记:将处理完的 current 移入闭集,重复 2-3 步骤,直到开集为空(开集为空表示无路径),或找到终点。
对应 ego 中的代码如下(加入了部分注释):
int num_iter = 0;while (!openSet_.empty()){num_iter++;current = openSet_.top(); // 取出代价最小的节点openSet_.pop();// if ( num_iter < 10000 )// cout << "current=" << current->index.transpose() << endl;// 检测是否到达目标点if (current->index(0) == endPtr->index(0) && current->index(1) == endPtr->index(1) && current->index(2) == endPtr->index(2)){// ros::Time time_2 = ros::Time::now();// printf("\033[34mA star iter:%d, time:%.3f\033[0m\n",num_iter, (time_2 - time_1).toSec()*1000);// if((time_2 - time_1).toSec() > 0.1)// ROS_WARN("Time consume in A star path finding is %f", (time_2 - time_1).toSec() );gridPath_ = retrievePath(current); // 回溯路径return true;}current->state = GridNode::CLOSEDSET; //move current node from open set to closed set. CLOSEDSET 表示已探索过/******************搜索邻居节点*******************/ // 在三维空间中,每个节点有26个可能的邻居(xyz三轴分别±1,9+9+8)for (int dx = -1; dx <= 1; dx++)for (int dy = -1; dy <= 1; dy++)for (int dz = -1; dz <= 1; dz++){if (dx == 0 && dy == 0 && dz == 0)continue; // 跳过自身// 计算当前邻居节点的索引Vector3i neighborIdx;neighborIdx(0) = (current->index)(0) + dx;neighborIdx(1) = (current->index)(1) + dy;neighborIdx(2) = (current->index)(2) + dz;// 检查邻居是否在有效范围内if (neighborIdx(0) < 1 || neighborIdx(0) >= POOL_SIZE_(0) - 1 || neighborIdx(1) < 1 || neighborIdx(1) >= POOL_SIZE_(1) - 1 || neighborIdx(2) < 1 || neighborIdx(2) >= POOL_SIZE_(2) - 1){continue;}// 获取邻居节点指针neighborPtr = GridNodeMap_[neighborIdx(0)][neighborIdx(1)][neighborIdx(2)];neighborPtr->index = neighborIdx;bool flag_explored = neighborPtr->rounds == rounds_; // 是否为本轮已探索的节点// 如果已经标记为探索过,则跳过if (flag_explored && neighborPtr->state == GridNode::CLOSEDSET){continue; //in closed set.}neighborPtr->rounds = rounds_;// 检查邻居节点是否为障碍物,是则跳过if (checkOccupancy(Index2Coord(neighborPtr->index))){continue;}// 计算到达邻居节点的代价(使用欧氏距离)double static_cost = sqrt(dx * dx + dy * dy + dz * dz);tentative_gScore = current->gScore + static_cost;// 如果是未探索节点,则将节点加入开集(未探索点的集合),并设置初始代价if (!flag_explored){//discover a new nodeneighborPtr->state = GridNode::OPENSET;neighborPtr->cameFrom = current;neighborPtr->gScore = tentative_gScore;neighborPtr->fScore = tentative_gScore + getHeu(neighborPtr, endPtr);openSet_.push(neighborPtr); //put neighbor in open set and record it.}// 如果是已探索节点但发现更优路径else if (tentative_gScore < neighborPtr->gScore){ //in open set and need updateneighborPtr->cameFrom = current;neighborPtr->gScore = tentative_gScore;neighborPtr->fScore = tentative_gScore + getHeu(neighborPtr, endPtr);}}ros::Time time_2 = ros::Time::now();// 超时判断if ((time_2 - time_1).toSec() > 0.2){ROS_WARN("Failed in A star path searching !!! 0.2 seconds time limit exceeded.");return false;}}ego中的启发函数
启发函数的作用是用来计算当前节点到终点的代价,在 ego 中,使用量节点的标号差,再结合三维,二维,平面距离来计算。假设体素边长为1,那么一个体素差的平面距离就是1,二维距离就是 sqrt(2),三维距离就是 sqrt(3):
double AStar::getDiagHeu(GridNodePtr node1, GridNodePtr node2)
{// 计算三维坐标差(两个节点在 xyz 三轴上的标号差值)double dx = abs(node1->index(0) - node2->index(0));double dy = abs(node1->index(1) - node2->index(1));double dz = abs(node1->index(2) - node2->index(2));double h = 0.0;int diag = min(min(dx, dy), dz);    // 确定三个方向中的最小差值// 减去最短的一维差值,则剩余两维较长的距离dx -= diag;dy -= diag;dz -= diag;// 总的代价按标号差的三维,二维,一维距离计算,边长为1时,三维对角线距离为 sqrt(3),二维对角线距离为 sqrt(2),平面距离为 1if (dx == 0){h = 1.0 * sqrt(3.0) * diag + sqrt(2.0) * min(dy, dz) + 1.0 * abs(dy - dz);}if (dy == 0){h = 1.0 * sqrt(3.0) * diag + sqrt(2.0) * min(dx, dz) + 1.0 * abs(dx - dz);}if (dz == 0){h = 1.0 * sqrt(3.0) * diag + sqrt(2.0) * min(dx, dy) + 1.0 * abs(dx - dy);}return h;
}
python验证
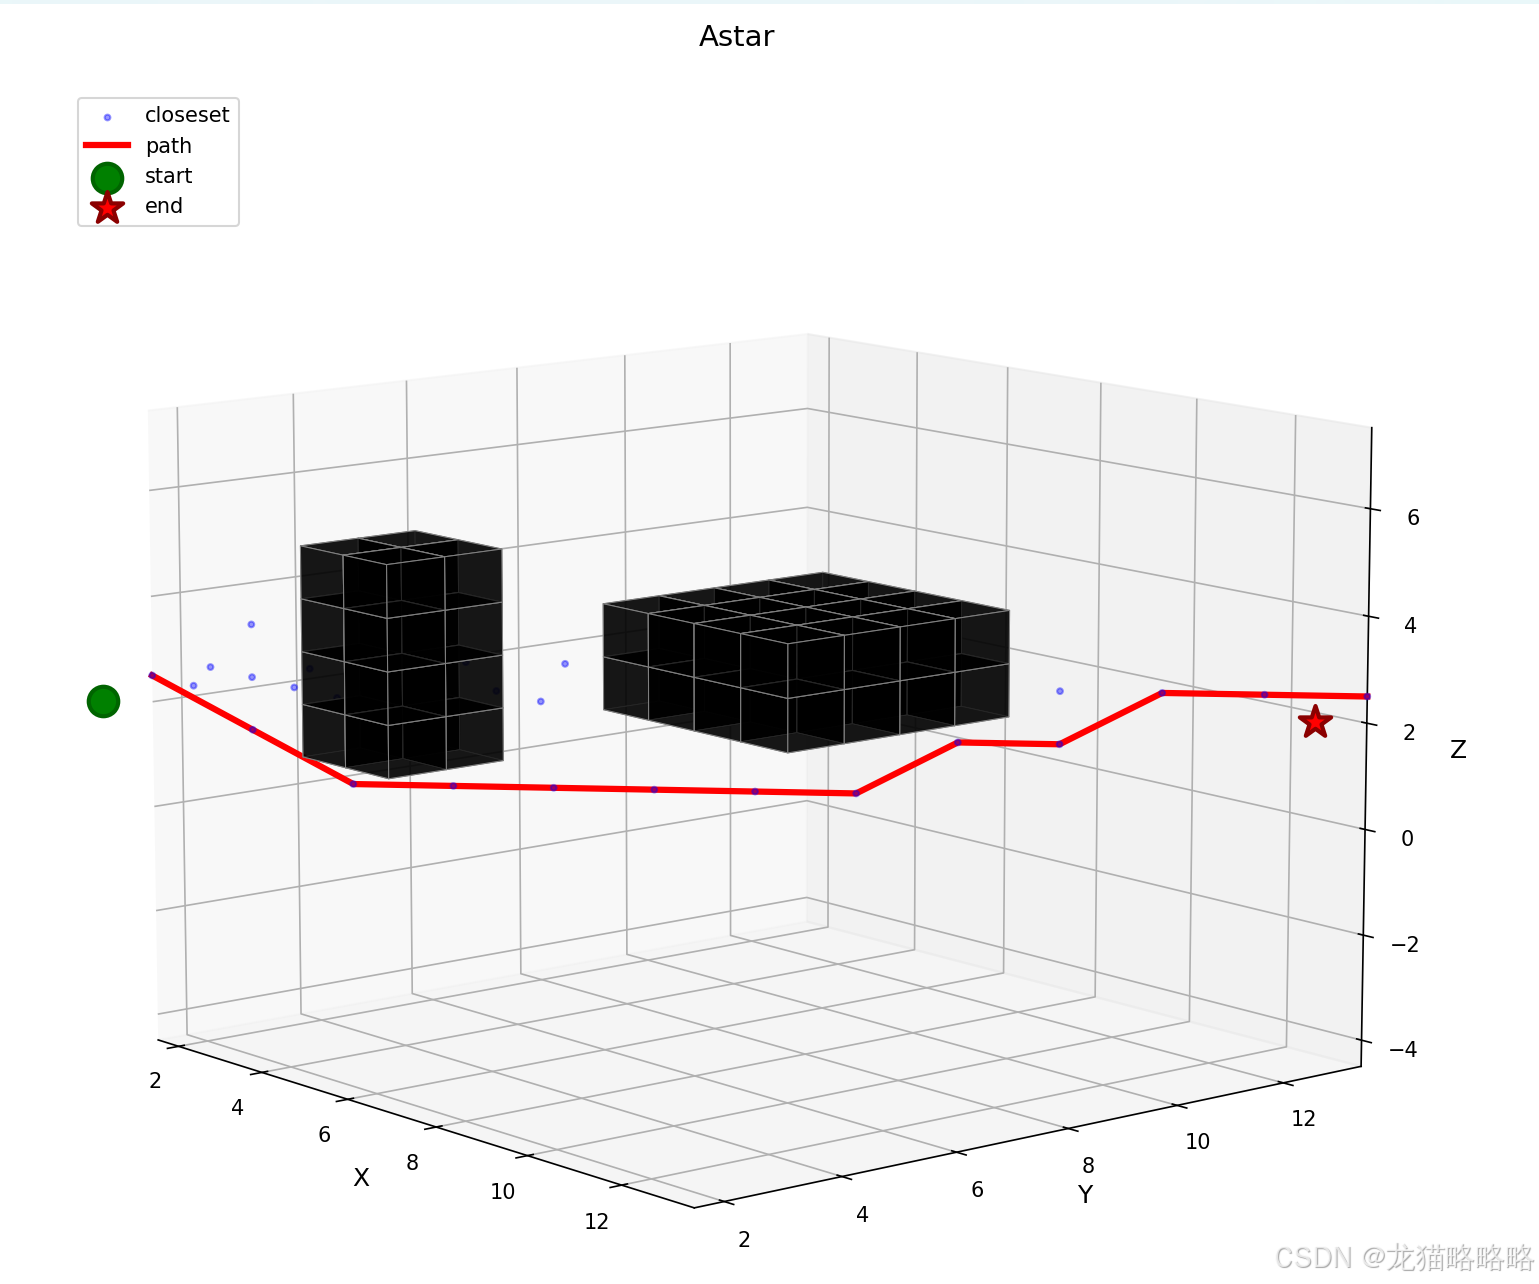
根据 ego 的主要思想,编写了一段大概的 python 验证代码来看一下效果:
import math
import heapq
import numpy as np
import matplotlib.pyplot as plt
from mpl_toolkits.mplot3d import Axes3D
from mpl_toolkits.mplot3d.art3d import Poly3DCollectionclass GridNode:"""网格节点类,存储A*算法所需的节点信息"""def __init__(self, index):self.index = np.array(index, dtype=int)  # 三维索引 (x, y, z)self.rounds = -1  # 所属搜索轮次self.g_score = float('inf')  # 从起点到当前节点的实际代价self.f_score = float('inf')  # 估计总代价 = g_score + h_scoreself.state = 0  # 0: 未探索, 1: 开放集, 2: 关闭集self.came_from = None  # 路径回溯指针def __repr__(self):return f"GridNode(index={self.index}, g={self.g_score:.2f}, f={self.f_score:.2f})"class AStar:"""三维A*路径搜索算法类(XYZ轴刻度等长)"""def __init__(self, grid_size, resolution=1.0):"""初始化A*算法:param grid_size: 三维网格大小 (x_size, y_size, z_size):param resolution: 网格分辨率(每个网格的实际尺寸)"""self.grid_size = np.array(grid_size, dtype=int)self.resolution = resolutionself.inv_resolution = 1.0 / resolution# 初始化三维网格节点地图self.grid_node_map = self._initialize_grid()self.open_set = []  # 开放集,使用优先队列实现self.rounds = 0  # 搜索轮次计数器self.grid_path = []  # 存储找到的路径self.explored_nodes = []  # 存储探索过的节点,用于可视化# 定义26个邻居方向(三维空间)self.neighbor_directions = [np.array([dx, dy, dz])for dx in [-1, 0, 1]for dy in [-1, 0, 1]for dz in [-1, 0, 1]if not (dx == 0 and dy == 0 and dz == 0)]def _initialize_grid(self):"""初始化三维网格节点地图"""grid = []for x in range(self.grid_size[0]):y_grid = []for y in range(self.grid_size[1]):z_grid = [GridNode([x, y, z]) for z in range(self.grid_size[2])]y_grid.append(z_grid)grid.append(y_grid)return griddef coord_to_index(self, coord):"""将三维坐标转换为网格索引"""index = np.round(coord * self.inv_resolution).astype(int)index = np.clip(index, [0, 0, 0], self.grid_size - 1)  # 确保索引有效return indexdef index_to_coord(self, index):"""将网格索引转换为三维坐标(返回网格中心坐标)"""return (index + 0.5) * self.resolution  # +0.5确保坐标在网格中心def check_occupancy(self, coord, obstacle_map):"""检查坐标点是否为障碍物"""index = self.coord_to_index(coord)if np.any(index < 0) or np.any(index >= self.grid_size):return True  # 超出网格范围视为障碍物return obstacle_map[index[0], index[1], index[2]] == 1def get_heu(self, node1, node2):"""计算启发值,使用对角线启发式函数"""dx = abs(node1.index[0] - node2.index[0])dy = abs(node1.index[1] - node2.index[1])dz = abs(node1.index[2] - node2.index[2])h = 0.0diag = min(min(dx, dy), dz)dx -= diagdy -= diagdz -= diag# 三维对角线、二维对角线、直线移动的代价加权if dx == 0:h = math.sqrt(3) * diag + math.sqrt(2) * min(dy, dz) + 1.0 * abs(dy - dz)if dy == 0:h = math.sqrt(3) * diag + math.sqrt(2) * min(dx, dz) + 1.0 * abs(dx - dz)if dz == 0:h = math.sqrt(3) * diag + math.sqrt(2) * min(dx, dy) + 1.0 * abs(dx - dy)return h * self.resolution  # 转换为实际距离def retrieve_path(self, current_node):"""从终点回溯到起点,获取路径"""path = []current = current_nodewhile current is not None:coord = self.index_to_coord(current.index)path.append(coord)current = current.came_fromreturn path[::-1]  # 反转路径为“起点→终点”顺序def astar_search(self, start_coord, end_coord, obstacle_map, max_time=0.2):"""执行A*路径搜索"""import timestart_time = time.time()self.rounds += 1self.explored_nodes = []  # 重置探索节点记录# 坐标转索引并检查起点/终点合法性start_index = self.coord_to_index(start_coord)end_index = self.coord_to_index(end_coord)if self.check_occupancy(start_coord, obstacle_map) or self.check_occupancy(end_coord, obstacle_map):print("起点或终点在障碍物中,无法搜索路径")return False, []# 初始化起点节点start_node = self.grid_node_map[start_index[0]][start_index[1]][start_index[2]]end_node = self.grid_node_map[end_index[0]][end_index[1]][end_index[2]]start_node.rounds = self.roundsstart_node.g_score = 0.0start_node.f_score = self.get_heu(start_node, end_node)start_node.state = 1  # 标记为开放集start_node.came_from = None# 清空开放集并加入起点(用id避免节点比较冲突)self.open_set = []heapq.heappush(self.open_set, (start_node.f_score, id(start_node), start_node))num_iter = 0found = Falsewhile self.open_set:# 超时判断if time.time() - start_time > max_time:print(f"A*搜索超时(超过{max_time}秒)")return False, []num_iter += 1_, _, current_node = heapq.heappop(self.open_set)self.explored_nodes.append(current_node)  # 记录探索节点# 到达终点:回溯路径if np.array_equal(current_node.index, end_node.index):self.grid_path = self.retrieve_path(current_node)found = Truebreakcurrent_node.state = 2  # 标记为关闭集# 探索26个邻居for dir in self.neighbor_directions:neighbor_index = current_node.index + dir# 检查邻居索引有效性if np.any(neighbor_index < 0) or np.any(neighbor_index >= self.grid_size):continueneighbor_node = self.grid_node_map[neighbor_index[0]][neighbor_index[1]][neighbor_index[2]]is_explored = (neighbor_node.rounds == self.rounds)# 跳过关闭集节点if is_explored and neighbor_node.state == 2:continueneighbor_node.rounds = self.rounds  # 标记为本轮次# 跳过障碍物neighbor_coord = self.index_to_coord(neighbor_index)if self.check_occupancy(neighbor_coord, obstacle_map):continue# 计算代价并更新节点step_cost = np.linalg.norm(dir) * self.resolution  # 欧氏距离代价tentative_g_score = current_node.g_score + step_costif not is_explored or tentative_g_score < neighbor_node.g_score:neighbor_node.came_from = current_nodeneighbor_node.g_score = tentative_g_scoreneighbor_node.f_score = tentative_g_score + self.get_heu(neighbor_node, end_node)if not is_explored:neighbor_node.state = 1heapq.heappush(self.open_set, (neighbor_node.f_score, id(neighbor_node), neighbor_node))print(f"A*搜索完成:迭代{num_iter}次,耗时{time.time() - start_time:.4f}秒")return found, self.grid_path if found else []def _get_cube_faces(self, center_coord, size):"""生成立方体的6个面(用于绘制障碍物立体块)"""x, y, z = center_coordhalf_size = size / 2.0# 立方体8个顶点(x±half, y±half, z±half)vertices = [[x - half_size, y - half_size, z - half_size],[x + half_size, y - half_size, z - half_size],[x + half_size, y + half_size, z - half_size],[x - half_size, y + half_size, z - half_size],[x - half_size, y - half_size, z + half_size],[x + half_size, y - half_size, z + half_size],[x + half_size, y + half_size, z + half_size],[x - half_size, y + half_size, z + half_size]]# 6个面的顶点索引(每个面4个顶点)faces = [[0, 1, 2, 3],  # 底面(z-)[4, 5, 6, 7],  # 顶面(z+)[0, 1, 5, 4],  # 前面(y-)[2, 3, 7, 6],  # 后面(y+)[0, 3, 7, 4],  # 左面(x-)[1, 2, 6, 5]  # 右面(x+)]# 转换为面的顶点坐标列表face_coords = [[vertices[i] for i in face] for face in faces]return face_coordsdef plot_3d_scene(self, start_coord, end_coord, obstacle_map):"""绘制3D场景:XYZ轴刻度等长"""if not self.grid_path:print("无路径可绘制(未找到有效路径)")return# 创建3D图fig = plt.figure(figsize=(12, 10))ax = fig.add_subplot(111, projection='3d')# 1. 绘制障碍物(黑色立体块)obstacle_faces = []for x in range(self.grid_size[0]):for y in range(self.grid_size[1]):for z in range(self.grid_size[2]):if obstacle_map[x, y, z] == 1:# 获取障碍物网格中心坐标obs_center = self.index_to_coord(np.array([x, y, z]))# 生成立方体6个面cube_faces = self._get_cube_faces(obs_center, self.resolution)obstacle_faces.extend(cube_faces)# 批量添加障碍物面(黑色半透明,有边框)if obstacle_faces:obs_collection = Poly3DCollection(obstacle_faces,facecolors='black',  # 面颜色:黑色edgecolors='gray',  # 边框颜色:灰色alpha=0.7,  # 透明度:70%linewidths=0.5  # 边框宽度)ax.add_collection3d(obs_collection)# 2. 绘制探索过的节点(蓝色小点,半透明)if self.explored_nodes:explored_coords = np.array([self.index_to_coord(node.index) for node in self.explored_nodes])ax.scatter(explored_coords[:, 0], explored_coords[:, 1], explored_coords[:, 2],c='blue', marker='.', s=30, alpha=0.4, label='closeset')# 3. 绘制路径(红色实线,加粗)path_coords = np.array(self.grid_path)ax.plot(path_coords[:, 0], path_coords[:, 1], path_coords[:, 2],'r-', linewidth=3, label='path')# 4. 标记起点(绿色大圆点)和终点(红色大星号)ax.scatter(start_coord[0], start_coord[1], start_coord[2],c='green', marker='o', s=200, edgecolors='darkgreen', linewidths=2, label='start')ax.scatter(end_coord[0], end_coord[1], end_coord[2],c='red', marker='*', s=250, edgecolors='darkred', linewidths=2, label='end')# 图轴与标题设置ax.set_xlabel('X', fontsize=12)ax.set_ylabel('Y', fontsize=12)ax.set_zlabel('Z', fontsize=12)ax.set_title('Astar', fontsize=14, pad=20)ax.legend(fontsize=10, loc='upper left')ax.grid(True, alpha=0.3)# 关键修改:设置XYZ轴等长刻度# 获取数据的最大范围max_range = np.array([path_coords[:, 0].max() - path_coords[:, 0].min(),path_coords[:, 1].max() - path_coords[:, 1].min(),path_coords[:, 2].max() - path_coords[:, 2].min()]).max() / 2.0# 获取数据中心mid_x = (path_coords[:, 0].max() + path_coords[:, 0].min()) * 0.5mid_y = (path_coords[:, 1].max() + path_coords[:, 1].min()) * 0.5mid_z = (path_coords[:, 2].max() + path_coords[:, 2].min()) * 0.5# 设置XYZ轴范围相同,确保刻度线长度一致ax.set_xlim(mid_x - max_range, mid_x + max_range)ax.set_ylim(mid_y - max_range, mid_y + max_range)ax.set_zlim(mid_z - max_range, mid_z + max_range)# 调整视角ax.view_init(elev=30, azim=45)plt.tight_layout()return fig# 仿真测试:生成简洁的障碍物场景并绘制3D结果
def simulate_3d_astar():# 1. 配置网格与障碍物(减少障碍物数量)grid_size = (15, 15, 5)  # 15x15x5的三维网格resolution = 1.0  # 每个网格1m×1m×1mastar = AStar(grid_size, resolution)# 创建障碍物地图(1表示障碍物,0表示自由空间)obstacle_map = np.zeros(grid_size, dtype=int)# 障碍物1:中间的一个小型立方体(x6-9, y6-9, z2-3)obstacle_map[6:10, 6:10, 2:4] = 1# 障碍物2:一个垂直小柱子(x3-4, y3-4, z1-4)obstacle_map[3:5, 3:5, 1:5] = 1# 2. 配置起点与终点start_coord = np.array([1.0, 1.0, 2.0])  # 左下角起点end_coord = np.array([13.0, 13.0, 2.0])  # 右上角终点# 3. 执行A*搜索并绘制3D场景found, path = astar.astar_search(start_coord, end_coord, obstacle_map)if found:print(f"找到有效路径,共{len(path)}个路径点")fig = astar.plot_3d_scene(start_coord, end_coord, obstacle_map)plt.show()else:print("未找到从起点到终点的路径")if __name__ == "__main__":simulate_3d_astar()