FIT镜像格式详解与编译方法
FIT镜像格式详解与编译方法
1. FIT格式概述
FIT(Flattened Image Tree)是U-Boot引入的新一代镜像格式,基于设备树语法,提供了比传统uImage更强大和灵活的功能。
1.1 FIT的核心优势
- 统一打包:将内核、设备树、initramfs等组件打包在单一镜像中
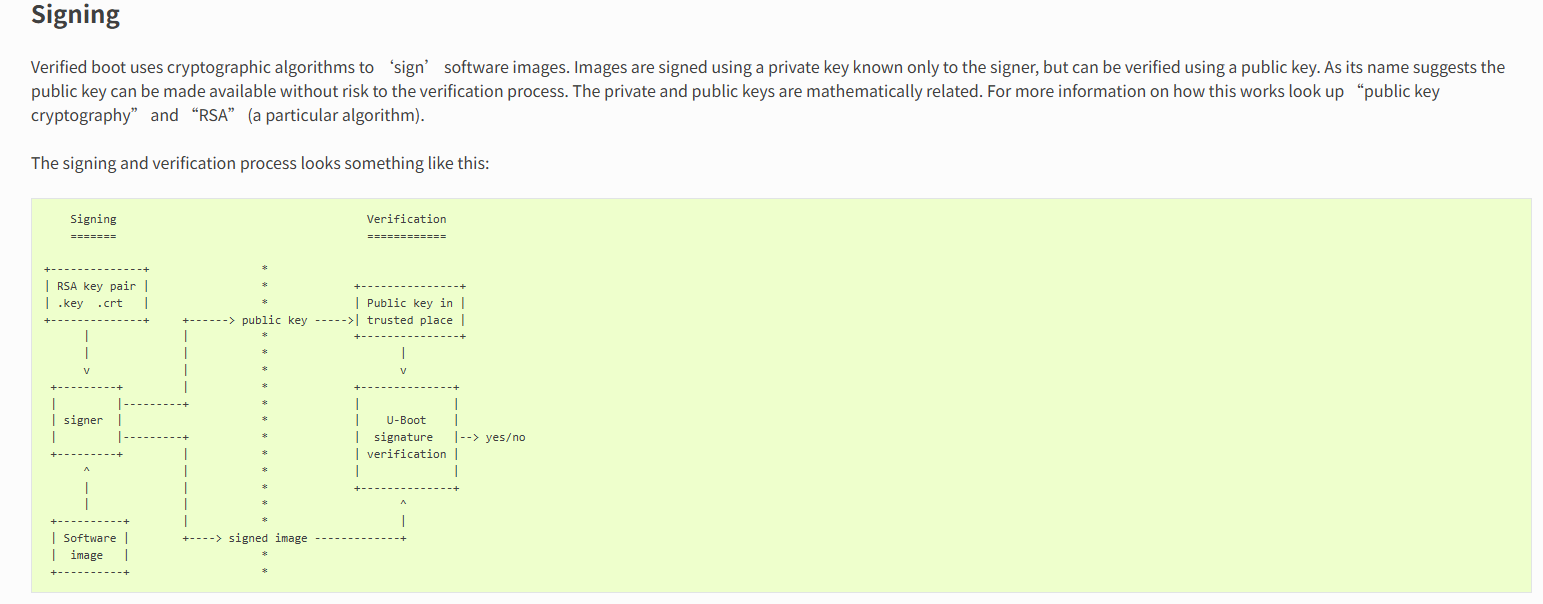
- 数字签名:支持RSA/ECDSA数字签名验证,确保启动安全
- 多配置支持:一个镜像支持多种硬件配置
- 压缩支持:支持gzip、bzip2、lzma等多种压缩算法
- 灵活加载:支持动态地址分配和运行时配置选择
2. 文件格式关系详解
2.1 文件扩展名说明
.ITS文件(Image Tree Source)
- 性质:源文件,人类可读的文本格式
- 语法:基于设备树语法(DTS语法)
- 作用:定义FIT镜像的结构、组件和配置
- 编辑:可用任何文本编辑器编辑
.ITB文件(Image Tree Blob)
- 性质:编译后的二进制文件
- 格式:FDT(Flattened Device Tree)二进制格式
- 作用:U-Boot实际加载和使用的镜像文件
- 生成:由.ITS文件通过mkimage工具编译产生
.FIT文件
- 性质:ITB文件的别名
- 关系:.FIT和.ITB本质上是同一种文件
- 命名:通常用于强调这是FIT格式的镜像
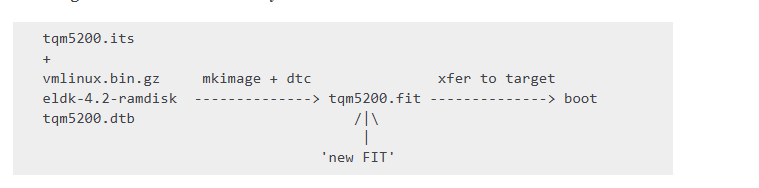
2.2 文件转换流程
源文件准备 → ITS编写 → 编译生成 → 部署使用↓           ↓         ↓         ↓
zImage      kernel.its   mkimage   kernel.fit
dtb                        ↓         ↓
initramfs                 ITB     bootm
3. ITS文件详细语法
3.1 基本结构
/dts-v1/;/ {description = "描述信息";#address-cells = <1>;images {// 镜像定义};configurations {// 配置定义};
};
3.2 Images节点详解
3.2.1 内核镜像定义
images {kernel {description = "Linux Kernel";data = /incbin/("./zImage");         // 二进制文件包含type = "kernel";                     // 镜像类型arch = "arm";                        // 目标架构os = "linux";                        // 操作系统compression = "none";                // 压缩方式load = <0x80008000>;                // 加载地址entry = <0x80008000>;               // 入口地址hash-1 {                            // 校验和algo = "sha256";};signature-1 {                       // 数字签名algo = "sha256,rsa2048";key-name-hint = "dev";};};
};
3.2.2 设备树定义
fdt-1 {description = "Device Tree Blob";data = /incbin/("./board.dtb");type = "flat_dt";arch = "arm";compression = "none";hash-1 {algo = "sha256";};signature-1 {algo = "sha256,rsa2048";key-name-hint = "dev";};
};
3.2.3 Ramdisk定义
ramdisk-1 {description = "Initial Ramdisk";data = /incbin/("./initramfs.cpio.gz");type = "ramdisk";arch = "arm";os = "linux";compression = "gzip";hash-1 {algo = "sha256";};
};
3.3 Configurations节点详解
3.3.1 基本配置
configurations {default = "config-1";                   // 默认配置config-1 {description = "Standard Boot";kernel = "kernel";                  // 引用kernel镜像fdt = "fdt-1";                     // 引用设备树ramdisk = "ramdisk-1";             // 引用ramdisksignature-1 {                      // 配置签名algo = "sha256,rsa2048";key-name-hint = "dev";sign-images = "kernel", "fdt", "ramdisk";};};
};
3.3.2 多配置支持
configurations {default = "config-base";config-base {description = "Basic configuration";kernel = "kernel";fdt = "base-fdt";};config-lcd {description = "Configuration with LCD";kernel = "kernel";fdt = "base-fdt";fdt-overlay-0 = "lcd-overlay";};config-full {description = "Full featured configuration";kernel = "kernel";fdt = "base-fdt";fdt-overlay-0 = "lcd-overlay";fdt-overlay-1 = "camera-overlay";fdt-overlay-2 = "wifi-overlay";};
};
4. FIT镜像编译方法
4.1 准备工作
4.1.1 安装编译工具
# Ubuntu/Debian
sudo apt-get install u-boot-tools device-tree-compiler# CentOS/RHEL
sudo yum install uboot-tools dtc# 源码编译U-Boot工具
git clone https://github.com/u-boot/u-boot.git
cd u-boot
make tools-only
4.1.2 准备源文件
# 目录结构
project/
├── zImage              # 内核镜像
├── board.dtb          # 设备树文件
├── initramfs.cpio.gz  # 初始化文件系统
├── overlay1.dtbo      # 设备树覆盖1
├── overlay2.dtbo      # 设备树覆盖2
└── kernel.its         # ITS源文件
4.2 基础编译过程
4.2.1 简单ITS示例
/dts-v1/;/ {description = "Simple Linux FIT";#address-cells = <1>;images {kernel {description = "Linux Kernel";data = /incbin/("./zImage");type = "kernel";arch = "arm";os = "linux";compression = "none";load = <0x80008000>;entry = <0x80008000>;};fdt {description = "Device Tree";data = /incbin/("./board.dtb");type = "flat_dt";arch = "arm";compression = "none";};ramdisk {description = "Initial Ramdisk";data = /incbin/("./initramfs.cpio.gz");type = "ramdisk";arch = "arm";os = "linux";compression = "gzip";};};configurations {default = "config1";config1 {description = "Default Linux";kernel = "kernel";fdt = "fdt";ramdisk = "ramdisk";};};
};
4.2.2 编译命令
# 基本编译
mkimage -f kernel.its kernel.fit# 详细输出
mkimage -f kernel.its -v kernel.fit# 指定输出文件
mkimage -f kernel.its -o output.itb
4.3 带签名的安全编译
4.3.1 生成密钥对
# 生成RSA 2048位密钥对
openssl genrsa -out dev.key 2048
openssl rsa -in dev.key -pubout -out dev.crt# 生成RSA 4096位密钥对(更安全)
openssl genrsa -out dev.key 4096
openssl rsa -in dev.key -pubout -out dev.crt# 生成ECDSA密钥对
openssl ecparam -genkey -name prime256v1 -out dev-ec.key
openssl ec -in dev-ec.key -pubout -out dev-ec.crt
4.3.2 创建密钥设备树
// keys.dts
/dts-v1/;/ {model = "Keys";signature {key-dev {required = "image";algo = "sha256,rsa2048";rsa,r-squared = <0x...>;  // 由mkimage自动填充rsa,modulus = <0x...>;    // 由mkimage自动填充rsa,exponent = <0x...>;   // 由mkimage自动填充rsa,n0-inverse = <0x...>; // 由mkimage自动填充rsa,num-bits = <0x800>;key-name-hint = "dev";};};
};
4.3.3 带签名的ITS文件
/dts-v1/;/ {description = "Signed Linux FIT";#address-cells = <1>;images {kernel {description = "Linux Kernel";data = /incbin/("./zImage");type = "kernel";arch = "arm";os = "linux";compression = "none";load = <0x80008000>;entry = <0x80008000>;hash-1 {algo = "sha256";};signature-1 {algo = "sha256,rsa2048";key-name-hint = "dev";};};fdt {description = "Device Tree";data = /incbin/("./board.dtb");type = "flat_dt";arch = "arm";compression = "none";hash-1 {algo = "sha256";};signature-1 {algo = "sha256,rsa2048";key-name-hint = "dev";};};};configurations {default = "config1";config1 {description = "Signed Linux";kernel = "kernel";fdt = "fdt";signature-1 {algo = "sha256,rsa2048";key-name-hint = "dev";sign-images = "kernel", "fdt";};};};
};
4.3.4 签名编译过程
# 1. 编译密钥设备树
dtc -p 0x1000 keys.dts -O dtb -o keys.dtb# 2. 使用私钥签名编译FIT镜像
mkimage -f kernel.its -k . -K keys.dtb -r kernel.fit# 参数说明:
# -f: ITS源文件
# -k: 私钥目录(包含dev.key)
# -K: 密钥设备树文件
# -r: 必需签名验证
4.4 高级编译选项
4.4.1 压缩支持
kernel {description = "Compressed Linux Kernel";data = /incbin/("./zImage.gz");type = "kernel";arch = "arm";os = "linux";compression = "gzip";       // 支持: none, gzip, bzip2, lzma, lzo, lz4load = <0x80008000>;entry = <0x80008000>;
};
4.4.2 多架构支持
# 为不同架构编译
mkimage -f kernel.its -A arm kernel-arm.fit
mkimage -f kernel.its -A arm64 kernel-arm64.fit
mkimage -f kernel.its -A x86 kernel-x86.fit
4.4.3 自定义加载地址
kernel {description = "Linux Kernel";data = /incbin/("./zImage");type = "kernel";arch = "arm";os = "linux";compression = "none";load = <0x82000000>;        // 自定义加载地址entry = <0x82000000>;       // 自定义入口地址
};
5. 实际应用示例
5.1 BeagleBone安全启动示例
5.1.1 完整ITS文件
/dts-v1/;/ {description = "BeagleBone Black Signed FIT";#address-cells = <1>;images {kernel {description = "Linux kernel";data = /incbin/("./zImage");type = "kernel";arch = "arm";os = "linux";compression = "none";load = <0x80008000>;entry = <0x80008000>;hash-1 {algo = "sha256";};signature-1 {algo = "sha256,rsa4096";key-name-hint = "dev";};};fdt {description = "BeagleBone Black device tree";data = /incbin/("./am335x-boneblack.dtb");type = "flat_dt";arch = "arm";compression = "none";hash-1 {algo = "sha256";};signature-1 {algo = "sha256,rsa4096";key-name-hint = "dev";};};ramdisk {description = "Initial ramdisk";data = /incbin/("./initramfs.cpio.gz");type = "ramdisk";arch = "arm";os = "linux";compression = "gzip";hash-1 {algo = "sha256";};signature-1 {algo = "sha256,rsa4096";key-name-hint = "dev";};};};configurations {default = "config1";config1 {description = "BeagleBone Black";kernel = "kernel";fdt = "fdt";ramdisk = "ramdisk";signature-1 {algo = "sha256,rsa4096";key-name-hint = "dev";sign-images = "kernel", "fdt", "ramdisk";};};};
};
5.1.2 编译脚本
#!/bin/bash# BeagleBone Black FIT镜像编译脚本# 1. 准备工作目录
WORK_DIR="./fit_build"
mkdir -p $WORK_DIR
cd $WORK_DIR# 2. 生成密钥对
if [ ! -f "dev.key" ]; thenecho "Generating RSA key pair..."openssl genrsa -out dev.key 4096openssl rsa -in dev.key -pubout -out dev.crt
fi# 3. 创建密钥设备树
cat > keys.dts << EOF
/dts-v1/;
/ {model = "BeagleBone Black Keys";compatible = "vendor,board";signature {key-dev {required = "image";algo = "sha256,rsa4096";key-name-hint = "dev";};};
};
EOF# 4. 编译密钥设备树
dtc -p 0x1000 keys.dts -O dtb -o keys.dtb# 5. 编译签名FIT镜像
mkimage -f ../beaglebone.its -k . -K keys.dtb -r beaglebone.fitecho "FIT image created: beaglebone.fit"
echo "Public keys embedded in: keys.dtb"
5.2 多配置FIT示例
5.2.1 支持多种硬件版本
/dts-v1/;/ {description = "Multi-board FIT image";#address-cells = <1>;images {kernel {description = "Linux kernel";data = /incbin/("./zImage");type = "kernel";arch = "arm";os = "linux";compression = "none";load = <0x80008000>;entry = <0x80008000>;};fdt_v1 {description = "Device tree for board v1.0";data = /incbin/("./board-v1.dtb");type = "flat_dt";arch = "arm";compression = "none";};fdt_v2 {description = "Device tree for board v2.0";data = /incbin/("./board-v2.dtb");type = "flat_dt";arch = "arm";compression = "none";};fdt_base {description = "Base device tree";data = /incbin/("./board-base.dtb");type = "flat_dt";arch = "arm";compression = "none";};overlay_lcd {description = "LCD overlay";data = /incbin/("./lcd-overlay.dtbo");type = "flat_dt";arch = "arm";compression = "none";};overlay_wifi {description = "WiFi overlay";data = /incbin/("./wifi-overlay.dtbo");type = "flat_dt";arch = "arm";compression = "none";};};configurations {default = "config_v1";config_v1 {description = "Board v1.0 configuration";kernel = "kernel";fdt = "fdt_v1";};config_v2 {description = "Board v2.0 configuration";kernel = "kernel";fdt = "fdt_v2";};config_modular {description = "Modular configuration with overlays";kernel = "kernel";fdt = "fdt_base";fdt-overlay-0 = "overlay_lcd";fdt-overlay-1 = "overlay_wifi";};};
};
6. 验证和调试
6.1 镜像验证
# 查看FIT镜像信息
mkimage -l kernel.fit# 详细信息输出
mkimage -l -v kernel.fit# 验证签名
mkimage -l -k keys.dtb kernel.fit
6.2 U-Boot中的使用
# 加载FIT镜像
load mmc 0:1 0x88000000 /boot/kernel.fit# 查看镜像信息
iminfo 0x88000000# 使用默认配置启动
bootm 0x88000000# 使用指定配置启动
bootm 0x88000000#config_v2# 列出所有可用配置
iminfo 0x88000000 config
6.3 常见问题解决
6.3.1 编译错误
# 检查ITS语法
dtc -I dts -O dtb kernel.its -o /dev/null# 检查文件路径
ls -la ./zImage ./board.dtb ./initramfs.cpio.gz
6.3.2 签名验证失败
# 检查密钥文件
openssl rsa -in dev.key -text -noout
openssl rsa -pubin -in dev.crt -text -noout# 重新生成密钥设备树
rm keys.dtb
dtc -p 0x1000 keys.dts -O dtb -o keys.dtb
7. 最佳实践
7.1 开发阶段
- 使用简单的无签名FIT进行快速迭代
- 利用多配置支持不同的开发板变体
- 使用压缩减少镜像大小
7.2 生产阶段
- 启用数字签名确保安全性
- 使用强加密算法(RSA4096或ECDSA)
- 妥善保管私钥文件
- 在U-Boot中启用签名验证
7.3 维护阶段
- 建立密钥轮换机制
- 保留历史版本的密钥用于验证
- 使用版本控制管理ITS文件
- 建立自动化编译流程
8. 总结
FIT格式提供了强大而灵活的镜像打包方案:
- ITS文件:人类可读的源文件,定义镜像结构
- ITB/FIT文件:编译后的二进制镜像,U-Boot直接使用
- 编译过程:通过mkimage工具将ITS转换为ITB
- 安全特性:支持数字签名验证,确保启动安全
- 灵活配置:支持多配置、覆盖设备树等高级特性
选择FIT格式可以显著提升嵌入式系统的安全性、灵活性和可维护性。
9. 分离式FIT镜像部署
9.1 分离式部署概念
传统的单一FIT镜像虽然方便,但在某些场景下存在局限性:
- 更新灵活性:U-Boot和内核可以独立更新
- 存储优化:避免重复存储相同的U-Boot
- 安全隔离:U-Boot和内核可以使用不同的签名密钥
- 版本管理:便于管理不同版本的组合
9.2 uboot.itb的创建
9.2.1 U-Boot FIT结构
uboot.itb
├── uboot@1 (U-Boot主程序)
├── atf@1 (ARM Trusted Firmware)
├── optee@1 (OP-TEE,可选)
└── configurations└── config@1 (U-Boot配置)
9.2.2 uboot.its示例
/dts-v1/;/ {description = "U-Boot FIT Image";#address-cells = <1>;images {uboot {description = "U-Boot";data = /incbin/("./u-boot-nodtb.bin");type = "firmware";arch = "arm64";compression = "none";load = <0x200000>;entry = <0x200000>;hash-1 {algo = "sha256";};signature-1 {algo = "sha256,rsa4096";key-name-hint = "uboot";};};atf {description = "ARM Trusted Firmware";data = /incbin/("./bl31.bin");type = "firmware";arch = "arm64";compression = "none";load = <0x40000>;entry = <0x40000>;hash-1 {algo = "sha256";};signature-1 {algo = "sha256,rsa4096";key-name-hint = "uboot";};};fdt {description = "U-Boot device tree";data = /incbin/("./u-boot.dtb");type = "flat_dt";arch = "arm64";compression = "none";hash-1 {algo = "sha256";};signature-1 {algo = "sha256,rsa4096";key-name-hint = "uboot";};};};configurations {default = "config1";config1 {description = "U-Boot with ATF";firmware = "atf";loadables = "uboot";fdt = "fdt";signature-1 {algo = "sha256,rsa4096";key-name-hint = "uboot";sign-images = "atf", "uboot", "fdt";};};};
};
9.2.3 编译uboot.itb
#!/bin/bash# U-Boot FIT镜像编译脚本# 1. 准备U-Boot组件
UBOOT_DIR="./uboot_build"
mkdir -p $UBOOT_DIR
cd $UBOOT_DIR# 2. 生成U-Boot专用密钥
if [ ! -f "uboot.key" ]; thenecho "Generating U-Boot RSA key pair..."openssl genrsa -out uboot.key 4096openssl rsa -in uboot.key -pubout -out uboot.crt
fi# 3. 创建U-Boot密钥设备树
cat > uboot-keys.dts << EOF
/dts-v1/;
/ {model = "U-Boot Keys";signature {key-uboot {required = "image";algo = "sha256,rsa4096";key-name-hint = "uboot";};};
};
EOF# 4. 编译密钥设备树
dtc -p 0x1000 uboot-keys.dts -O dtb -o uboot-keys.dtb# 5. 编译U-Boot FIT镜像
mkimage -f ../uboot.its -k . -K uboot-keys.dtb -r uboot.itbecho "U-Boot FIT image created: uboot.itb"
9.3 kernel.itb的创建
9.3.1 内核FIT结构
kernel.itb
├── kernel@1 (Linux内核)
├── fdt@1 (设备树)
├── ramdisk@1 (initramfs)
├── overlay@1 (设备树覆盖1)
├── overlay@2 (设备树覆盖2)
└── configurations├── config@base (基础配置)├── config@full (完整配置)└── config@debug (调试配置)
9.3.2 kernel.its示例
/dts-v1/;/ {description = "Kernel FIT Image";#address-cells = <1>;images {kernel {description = "Linux Kernel";data = /incbin/("./Image.gz");type = "kernel";arch = "arm64";os = "linux";compression = "gzip";load = <0x80080000>;entry = <0x80080000>;hash-1 {algo = "sha256";};signature-1 {algo = "sha256,rsa4096";key-name-hint = "kernel";};};fdt_base {description = "Base Device Tree";data = /incbin/("./base.dtb");type = "flat_dt";arch = "arm64";compression = "none";hash-1 {algo = "sha256";};signature-1 {algo = "sha256,rsa4096";key-name-hint = "kernel";};};ramdisk {description = "Initial Ramdisk";data = /incbin/("./initramfs.cpio.gz");type = "ramdisk";arch = "arm64";os = "linux";compression = "gzip";hash-1 {algo = "sha256";};signature-1 {algo = "sha256,rsa4096";key-name-hint = "kernel";};};overlay_debug {description = "Debug overlay";data = /incbin/("./debug-overlay.dtbo");type = "flat_dt";arch = "arm64";compression = "none";hash-1 {algo = "sha256";};};overlay_periph {description = "Peripheral overlay";data = /incbin/("./periph-overlay.dtbo");type = "flat_dt";arch = "arm64";compression = "none";hash-1 {algo = "sha256";};};};configurations {default = "config_base";config_base {description = "Basic kernel configuration";kernel = "kernel";fdt = "fdt_base";ramdisk = "ramdisk";signature-1 {algo = "sha256,rsa4096";key-name-hint = "kernel";sign-images = "kernel", "fdt_base", "ramdisk";};};config_full {description = "Full featured configuration";kernel = "kernel";fdt = "fdt_base";ramdisk = "ramdisk";fdt-overlay-0 = "overlay_periph";signature-1 {algo = "sha256,rsa4096";key-name-hint = "kernel";sign-images = "kernel", "fdt_base", "ramdisk";};};config_debug {description = "Debug configuration";kernel = "kernel";fdt = "fdt_base";ramdisk = "ramdisk";fdt-overlay-0 = "overlay_debug";fdt-overlay-1 = "overlay_periph";signature-1 {algo = "sha256,rsa4096";key-name-hint = "kernel";sign-images = "kernel", "fdt_base", "ramdisk";};};};
};
9.3.3 编译kernel.itb
#!/bin/bash# 内核FIT镜像编译脚本# 1. 准备内核组件
KERNEL_DIR="./kernel_build"
mkdir -p $KERNEL_DIR
cd $KERNEL_DIR# 2. 生成内核专用密钥
if [ ! -f "kernel.key" ]; thenecho "Generating Kernel RSA key pair..."openssl genrsa -out kernel.key 4096openssl rsa -in kernel.key -pubout -out kernel.crt
fi# 3. 创建内核密钥设备树
cat > kernel-keys.dts << EOF
/dts-v1/;
/ {model = "Kernel Keys";signature {key-kernel {required = "image";algo = "sha256,rsa4096";key-name-hint = "kernel";};};
};
EOF# 4. 编译密钥设备树
dtc -p 0x1000 kernel-keys.dts -O dtb -o kernel-keys.dtb# 5. 编译内核FIT镜像
mkimage -f ../kernel.its -k . -K kernel-keys.dtb -r kernel.itbecho "Kernel FIT image created: kernel.itb"
9.4 分离式部署流程
9.4.1 存储布局
Flash/eMMC布局:
├── SPL/TPL          (0x0000 - 0x8000)
├── uboot.itb        (0x8000 - 0x80000)     # 480KB
├── uboot-env        (0x80000 - 0x88000)    # 32KB
├── kernel.itb       (0x100000 - 0x900000)  # 8MB
├── rootfs-A         (0x1000000 - 0x4000000) # 48MB
└── rootfs-B         (0x4000000 - 0x7000000) # 48MB
9.4.2 U-Boot启动脚本
# U-Boot环境变量设置
setenv kernel_addr_r 0x84000000
setenv fdt_addr_r 0x88000000
setenv ramdisk_addr_r 0x8C000000# 加载内核FIT镜像
setenv load_kernel 'load mmc 0:1 ${kernel_addr_r} /boot/kernel.itb'# 根据GPIO或其他条件选择配置
setenv select_config 'if gpio input 100; then setenv kernel_config config_debug; else setenv kernel_config config_base; fi'# 启动命令
setenv bootcmd_fit 'run load_kernel; run select_config; bootm ${kernel_addr_r}#${kernel_config}'# 故障转移机制
setenv bootcmd_fallback 'if run bootcmd_fit; then; else echo "Primary boot failed, trying fallback"; load mmc 0:1 ${kernel_addr_r} /boot/kernel-backup.itb; bootm ${kernel_addr_r}#config_base; fi'setenv bootcmd 'run bootcmd_fallback'
9.5 动态配置选择
9.5.1 硬件检测启动
# 基于硬件版本的配置选择
setenv detect_hw_version 'if i2c probe 0x50; thenif i2c md 0x50 0 1 | grep -q "v2"; thensetenv kernel_config config_v2elsesetenv kernel_config config_v1fielsesetenv kernel_config config_basefi'# 启动脚本
setenv bootcmd 'run detect_hw_version;load mmc 0:1 ${kernel_addr_r} /boot/kernel.itb;bootm ${kernel_addr_r}#${kernel_config}'
9.5.2 用户选择启动
# 交互式配置选择
setenv show_boot_menu 'echo "Select boot configuration:";echo "1. Base configuration";echo "2. Full configuration"; echo "3. Debug configuration";echo "Enter choice (1-3, default=1):"'setenv process_choice 'if test "${bootmenu_choice}" = "2"; thensetenv kernel_config config_fullelif test "${bootmenu_choice}" = "3"; thensetenv kernel_config config_debugelsesetenv kernel_config config_basefi'# 启动菜单
setenv bootcmd 'run show_boot_menu;ask bootmenu_choice "Choice";run process_choice;load mmc 0:1 ${kernel_addr_r} /boot/kernel.itb;bootm ${kernel_addr_r}#${kernel_config}'
9.6 A/B分区系统
9.6.1 双内核FIT部署
# A/B分区配置
setenv boot_slot_a '/boot/kernel-a.itb'
setenv boot_slot_b '/boot/kernel-b.itb'
setenv boot_slot_current 'a'# 启动计数机制
setenv boot_counter '0'
setenv boot_limit '3'# A/B切换逻辑
setenv try_boot_slot 'if test "${boot_slot_current}" = "a"; thensetenv kernel_itb ${boot_slot_a}setenv rootfs_part 2elsesetenv kernel_itb ${boot_slot_b}setenv rootfs_part 3fi'# 故障检测和切换
setenv check_boot_counter 'if test "${boot_counter}" -gt "${boot_limit}"; thenecho "Boot limit exceeded, switching slot";if test "${boot_slot_current}" = "a"; thensetenv boot_slot_current belsesetenv boot_slot_current afi;setenv boot_counter 0;saveenvfi'# 完整启动流程
setenv bootcmd 'run check_boot_counter;run try_boot_slot;setenv bootargs "root=/dev/mmcblk0p${rootfs_part} rw";load mmc 0:1 ${kernel_addr_r} ${kernel_itb};bootm ${kernel_addr_r}#config_base'