使用XAMPP一键式快速搭建LAMP的完整环境——且配置上WordPress网站的保姆级教程
一、快速安装部署LAMP环境
1.1、XAMPP一体安装包是什么
| 序号 | 说明 |
| 1 | 对许多人来说让他们自己使用源码安装部署一整套的Apache web服务器【Apache+Mysql或MairaDB+PHP和Perl】并不容易。 XAMPP的目标是为开发人员建立一个安装简单的发行版,来进入Apache的世界(为了给开发人员提供便捷一键式安装整套环境,XAMPP配置成开启全部功能,极大的缩短优化部署环境的时间和复杂度)。 |
| 2 | XAMPP 是一个免费软件编译版(类似于一份Linux发行版),它是免费的,根据GNU通用公共许可的条款进行复制免费。 但只有XAMPP编译版是根据GPL发布的。请分别检查所包含每个产品的独立许可,以了解允许以及不允许做什么。 注意:如果是商业用途,请看一下产品许可(尤其是 MySQL),在XAMPP看来,商业应用也应该是免费的. |
| 3 | XAMPP的下载地址是【Download XAMPP】 |
1.2、使用XAMPP一体包快速安装部署LAMP环境实操流程
#0-下载xampp一体安装包
cd /data
wget https://sourceforge.net/projects/xampp/files/XAMPP%20Linux/8.2.12/xampp-linux-x64-8.2.12-0-installer.run#1-修改xampp安装包的权限并安装
chmod 755 xampp-linux-x64-8.2.12-0-installer.run
./xampp-linux-x64-8.2.12-0-installer.run#2-进入xampp的默认安装路径
cd /opt/lampp/
#2.1启动xampp(在启动前会确认一些内容,若无修改安装路径的需要则全部按下Enter键确认即可,耐心等待安装完成)
./xampp start#3-解决启动xampp出现Apache fail的错误提示【Syntax error on line 6 of /opt/lampp/etc/extra/httpd-xampp.conf: Cannot load modules/mod_perl.so into server: libnsl.so.1: cannot open shared object file: No such file or directory】
yum install libnsl -y#4-安装完成apache缺失的libnsl软件包后再次启动apache服务,此时就可以启动成功了
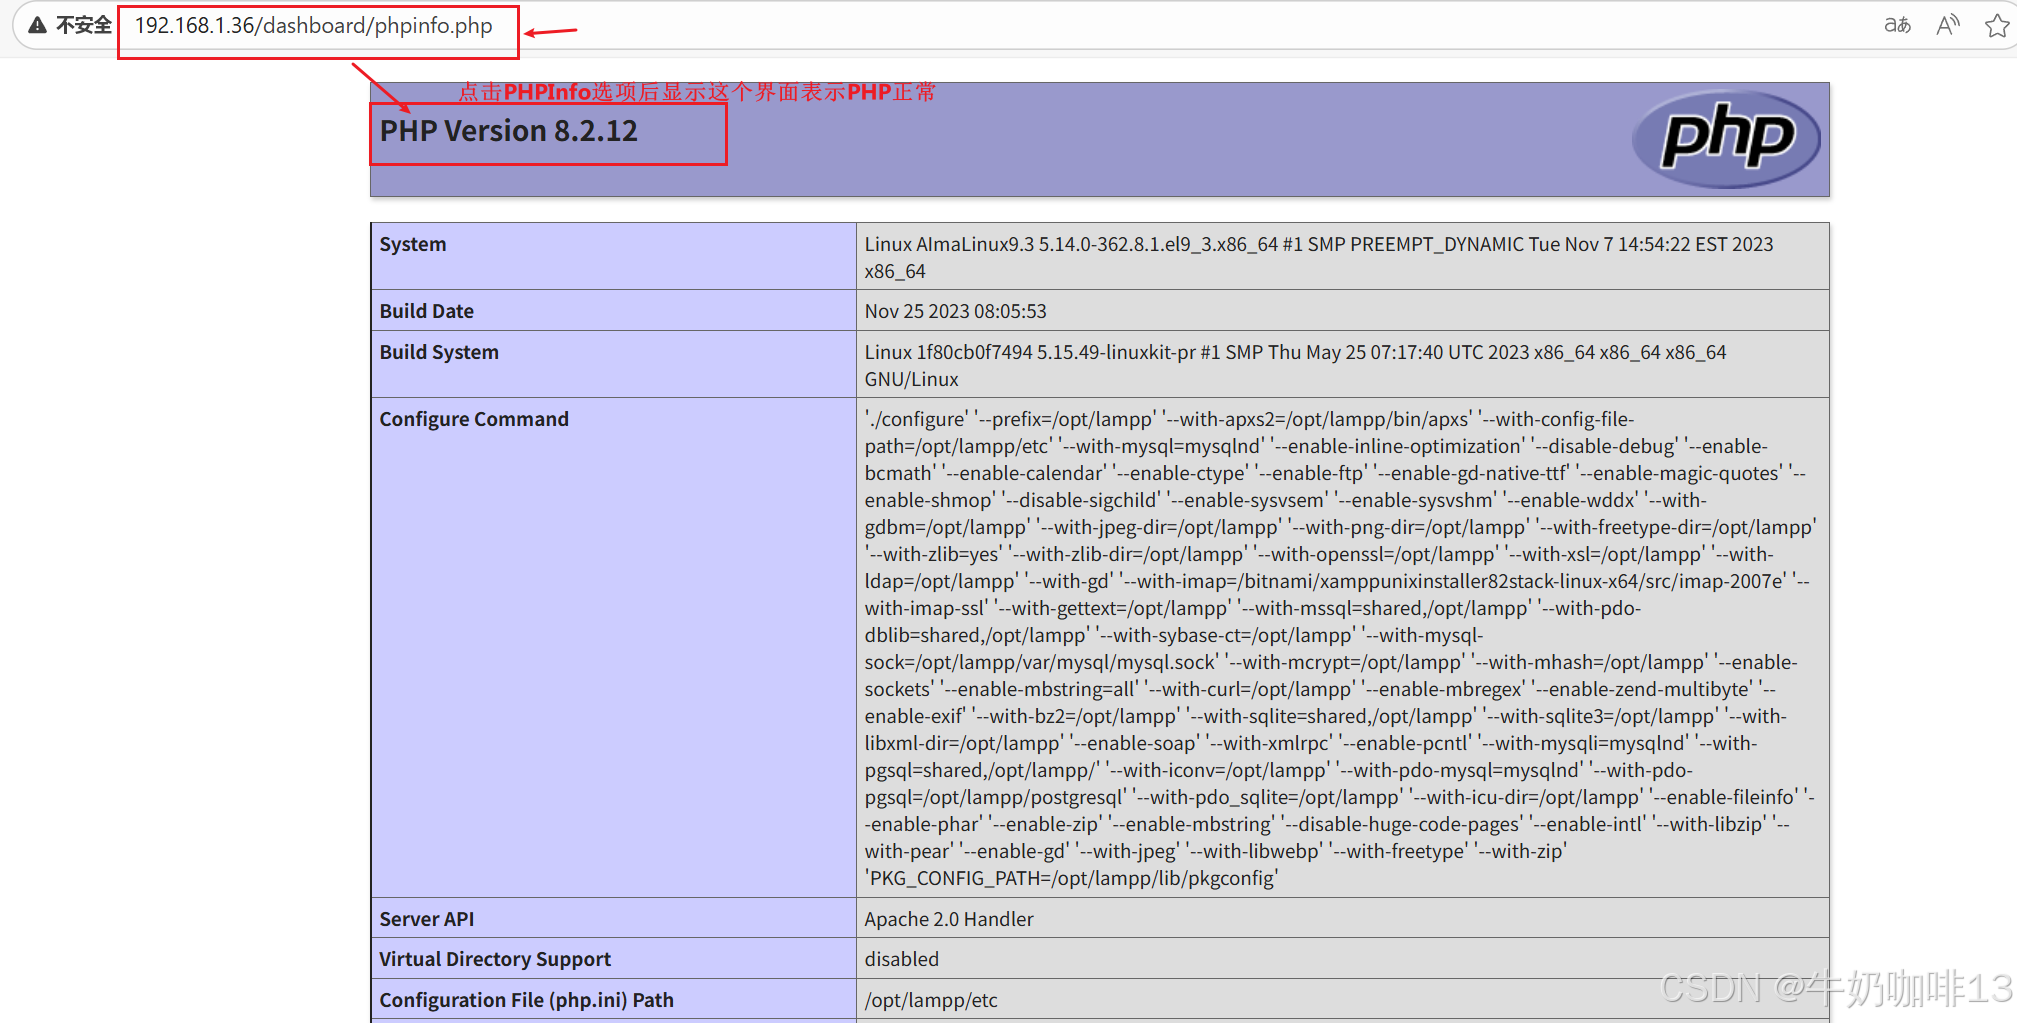
./xampp startapache#5-获取xampp的ip并在浏览器访问这个xampp服务器的IP地址(在xampp的浏览器界面上分别点击PHPInfo选项、phpMyAdmin选项查看确认一下是否都正常)
ifconfig#5.1-要想在phpMyAdmin选项界面成功登录,就需要我们【在/opt/lampp/】路径下对xampp进行安全配置(需要我们确认是否放开数据库的对外网络【yes】表示关闭、手动输入mysql/phpMyAdmin的【pma】用户登录密码、MariaDB数据库root用户的密码、最后是否需要修改FTP默认的用户是【daemon】密码是【xampp】)
./xampp security#5.2、解决“我们设置完成xampp的安全内容后再次访问浏览器的【phpMyAdmin选项】还是提示【Access forbidden(禁止访问)的错误界面(即:xampp的配置文件【/opt/lampp/etc/extra/httpd-xampp.conf】里面只能本机访问的权限需要修改)】”
vi /opt/lampp/etc/extra/httpd-xampp.conf#5.3-httpd-xampp.conf文件的修改内容是将(Require local修改为【Require all granted】(允许所有请求)或者 Require 192.168.1.2)
Require all granted#6-重启xampp的apache服务
/opt/lampp/xampp restartapache#7-设置xampp开机自动重启
yum install chkconfig -y
ln -s /opt/lampp/lampp /etc/init.d/lampp
chkconfig --add lampp


注意:在启动xampp的时候若给出错误“XAMPP: Starting Apache...fail.
httpd: Syntax error on line 522 of /opt/lampp/etc/httpd.conf: Syntax error on line 6 of /opt/lampp/etc/extra/httpd-xampp.conf: Cannot load modules/mod_perl.so into server: libnsl.so.1: cannot open shared object file: No such file or directory”的提示,我们通过仔细查看报错提示可以了解到其实是由于缺失了【libnsl.so.1】内容造成的,我们只需要执行【yum install libnsl -y】重新安装一下libnsl库就可以了。如下图所示:


要想在XAMPP的Web界面上phpMyAdmin选项界面成功登录,就需要我们【在/opt/lampp/】路径下对xampp进行安全配置(即:需要我们确认是否放开数据库的对外网络【yes】表示关闭、手动输入mysql/phpMyAdmin的【pma】用户登录密码、MariaDB数据库root用户的密码、最后是否需要修改FTP默认的用户是【daemon】密码是【xampp】,详细操作如下图所示:

若我们在XAMPP的Web界面上打开phpMyAdmin选项后显示【Access forbidden】(禁止访问的提示);解决方法是:需要我们对【httpd-xampp.conf】文件修改;即修改内容是将(Require local修改为【Require all granted】(允许所有请求)或者 Require 192.168.1.2),详细操作如下图所示:


再次打开xampp浏览器的【phpMyAdmin】选项即可成功打开访问,输入root用户和密码即可进入mysql数据库,如下图所示:


注意:当我们设置xampp开机自启时提示“ln: 无法创建符号链接 '/etc/init.d/lampp': 没有那个文件或目录”(即:Linux中没有【/etc/init.d/】目录,/etc/init.d/也只是/etc/rc.d/init.d/的软连接,所以没有/etc/init.d,我们使用【yum install chkconfig -y】命令安装chkconfig的软件包即可)详细问题和解决方法如下图所示:

二、使用LAMP环境安装部署WordPress
WordPress的各个发行版本下载地址![]() https://cn.wordpress.org/download/releases/
https://cn.wordpress.org/download/releases/
#使用LAMP环境安装部署WrodPress Web应用实操流程#1-获取并下载WordPress安装包到/data路径
wget https://cn.wordpress.org/wordpress-6.8.2-zh_CN.tar.gz -c 0 -P /data#2-将WordPress解压到Xampp中的网站路径【/opt/lampp/htdocs/】中
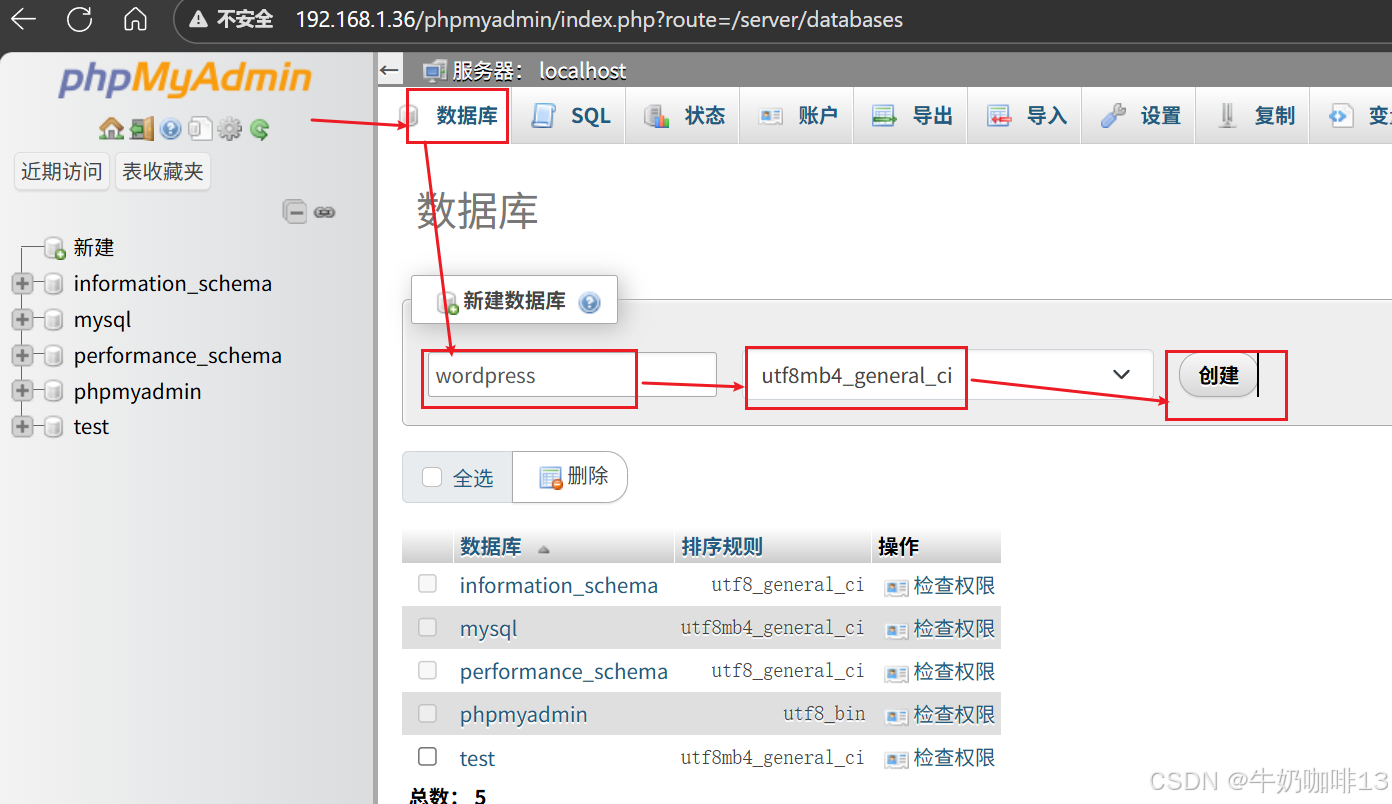
tar -zxvf /data/wordpress-6.8.2-zh_CN.tar.gz -C /opt/lampp/htdocs/#3-在浏览器上输入XAMPP所在服务器的IP后选择phpMyAdmin后登录MiairDB数据库创建【wordpress】数据库(如:192.168.1.36)或者直接输入【ip/phpmyadmin/】(如:192.168.1.36/phpmyadmin/)#4-在浏览器上输入XAMPP所在服务器的IP/wordpress(如:192.168.1.36/wordpress)开始安装wordpress#5-在wordpress网站路径【/opt/lampp/htdocs/wordpress/】下创建【wp-config.php】文件,且该文件内容如下:
<?php
/*** The base configuration for WordPress** The wp-config.php creation script uses this file during the installation.* You don't have to use the website, you can copy this file to "wp-config.php"* and fill in the values.** This file contains the following configurations:** * Database settings* * Secret keys* * Database table prefix* * ABSPATH** @link https://developer.wordpress.org/advanced-administration/wordpress/wp-config/** @package WordPress*/// ** Database settings - You can get this info from your web host ** //
/** The name of the database for WordPress */
define( 'DB_NAME', 'wordpress' );/** Database username */
define( 'DB_USER', 'root' );/** Database password */
define( 'DB_PASSWORD', 'abc123456' );/** Database hostname */
define( 'DB_HOST', 'localhost' );/** Database charset to use in creating database tables. */
define( 'DB_CHARSET', 'utf8mb4' );/** The database collate type. Don't change this if in doubt. */
define( 'DB_COLLATE', '' );/**#@+* Authentication unique keys and salts.** Change these to different unique phrases! You can generate these using* the {@link https://api.wordpress.org/secret-key/1.1/salt/ WordPress.org secret-key service}.** You can change these at any point in time to invalidate all existing cookies.* This will force all users to have to log in again.** @since 2.6.0*/
define( 'AUTH_KEY', '?m0=7V~R<_Q!eg/ca[1v<69~uFEPxAD1h0S&1tA4/29sjP`WcB}*{/4,:i!iXq&f' );
define( 'SECURE_AUTH_KEY', ':@@~uy2d=`T6L1ix)wC4#zWcR,Ig:}RT<K?5$n4}3ZKMEWaKM&pCn5x.Xg21pe[/' );
define( 'LOGGED_IN_KEY', 'mbP<y;:k~G^dnN!p/>B_Y}ruqsw}Ubvbd.v4H#hD99v*fn[YJltQJ|m^,C:GNUQq' );
define( 'NONCE_KEY', '_VyA<g`ee|-g{+hq+3$~YmmQ]u|`QK0StGnp`|*E^P&Epi7}~W9=OtA[r9)|N3aC' );
define( 'AUTH_SALT', 'v*yd/X@^&&7-?_IUuZj{Fe<7;/d2SvCa~Sx)o}N$Na,(X;X,{=qqq}J`2*AgmK-4' );
define( 'SECURE_AUTH_SALT', 'Ys?B=:Ns8+ hupr1MGJ9c!UJNAh[HLF]7Hn,@xUA(/q4.xN*@(=oaeJ!XaI|Rt 5' );
define( 'LOGGED_IN_SALT', '6rsHu3Qr?&`<`[KfM?&LL]Ll,N.nubWy13BnY L3r5j.]kS?~*BJ<48S..sa65.h' );
define( 'NONCE_SALT', 'tEvy&jP+~1 IFdtHC76K^:4{:gO^igmAhCfx8/!,vE?roOZi!8pKud?s[{cww? ' );/**#@-*//*** WordPress database table prefix.** You can have multiple installations in one database if you give each* a unique prefix. Only numbers, letters, and underscores please!** At the installation time, database tables are created with the specified prefix.* Changing this value after WordPress is installed will make your site think* it has not been installed.** @link https://developer.wordpress.org/advanced-administration/wordpress/wp-config/#table-prefix*/
$table_prefix = 'wp_';/*** For developers: WordPress debugging mode.** Change this to true to enable the display of notices during development.* It is strongly recommended that plugin and theme developers use WP_DEBUG* in their development environments.** For information on other constants that can be used for debugging,* visit the documentation.** @link https://developer.wordpress.org/advanced-administration/debug/debug-wordpress/*/
define( 'WP_DEBUG', false );/* Add any custom values between this line and the "stop editing" line. *//* That's all, stop editing! Happy publishing. *//** Absolute path to the WordPress directory. */
if ( ! defined( 'ABSPATH' ) ) {define( 'ABSPATH', __DIR__ . '/' );
}/** Sets up WordPress vars and included files. */
require_once ABSPATH . 'wp-settings.php';


注意:如果需要修改当前用户的密码,则点击【wordpress的后台右上角用户名称】-->【编辑个人资料】-->拉到最底部点击【设置新密码】输入自己想要设置的新密码-->点击【更新个人资料】即可完成密码更新,如下图所示:


到这里恭喜你就使用XAMPP一键安装包下使用LAMP环境安装部署完成了WordPress网站。
三、LNMP一键安装包
| 序号 | 内容 | 说明 |
| 1 | LNMP是什么 | LNMP一键安装包是一个用Linux Shell编写的可以为各种流行的Linux发行版: 【红帽系】(RHEL、Fedora、CentOS、Rocky、AlmaLinux); 【德班系】(Debian、Ubuntu、Kali); 【国产信创】(UOS、银河麒麟、openEuler、Anolis OS); 等众多Linux、VPS或独立主机安装LNMP(Nginx/MySQL/PHP)、LNMPA(Nginx/MySQL/PHP/Apache)、LAMP(Apache/MySQL/PHP)生产环境的Shell程序。 |
| 2 | 为什么需要LNMP | LNMP一键安装包可轻松让很多不是很熟悉Linux的人员快速搭建环境实现自己的业务功能(如:Web网站、个人博客等的搭建)。 (无需编译安装需要输入大量的命令,和配置生产环境耗费的大量部署时间)。 |
| 3 | LNMP的优势 | 《1》无需配置各种编译参数、依赖包、可实现一键式无人值守自动化安装; 《2》支持自定义Nginx、PHP编译参数及网站和数据库目录; 《3》支持生成Let'sEcrypt/ZeroSSL/BuyPass免费SSL证书; 《4》支持多PHP版本、支持单独安装Nginx/MySQL/MariaDB/Pureftpd服务器(且同时提供一些实用的辅助工具如:虚拟主机管理、FTP用户管理、Nginx、MySQL/MariaDB、PHP的升级、常见PHP模块exif、fileinfo、ldap、bz2、sodium、imap和swoole的一键安装、常用缓存组件Redis/Xcache等的安装、重置MySQL root密码、502自动重启、日志切割、SSH防护DenyHosts/Fail2Ban、备份等许多实用脚本)。 |
| 4 | LNMP官网地址 | LNMP一键安装包 |