Vue框架技术详解——项目驱动概念理解【前端】【Vue】
Vue3框架
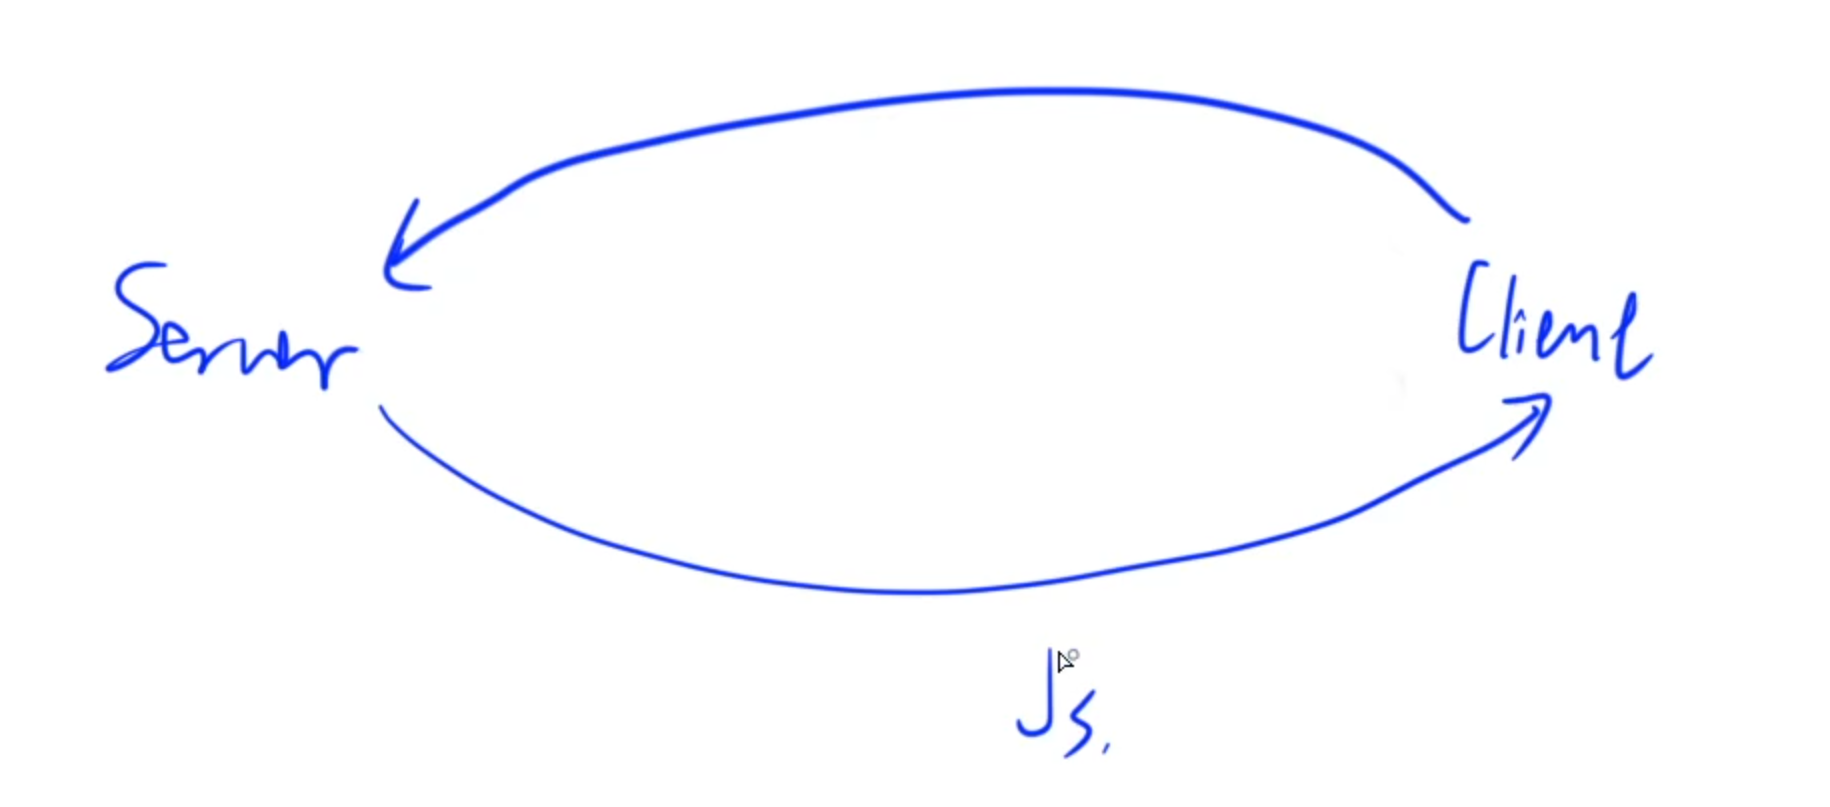
- 是前端渲染框架
- 浏览器向服务器第一次发送请求,就会将所有页面的样式全部返回到浏览器
- vue中会将所有js文件最后打包成一个js文件,当前访问其中一个页面时,其他页面的样式也已经返回到浏览器中了,下次切换页面时,就不会再向服务器发送请求
1.配置环境
1)vue3的安装
-
Windows上推荐使用
powershell或者cmd -
1.
Node.js安装:官网地址, 具体的安装细节可以参考下面的安装教程
参考Nodejs安装教程 -
2.
vue3安装:Vue官网, 具体的安装细节可以参考下面的安装教程
Vue3 v5.0.8的安装教程 -
3.安装
@vue/cli:vue的脚手架
打开终端执行:
npm i -g @vue/cli
安装较慢可以配置镜像:
npm config set registry https://registry.npmmirror.com/
如果执行后面的操作有bug,可能是最新版有问题,可以尝试安装早期版本,比如:npm i -g @vue/cli@4
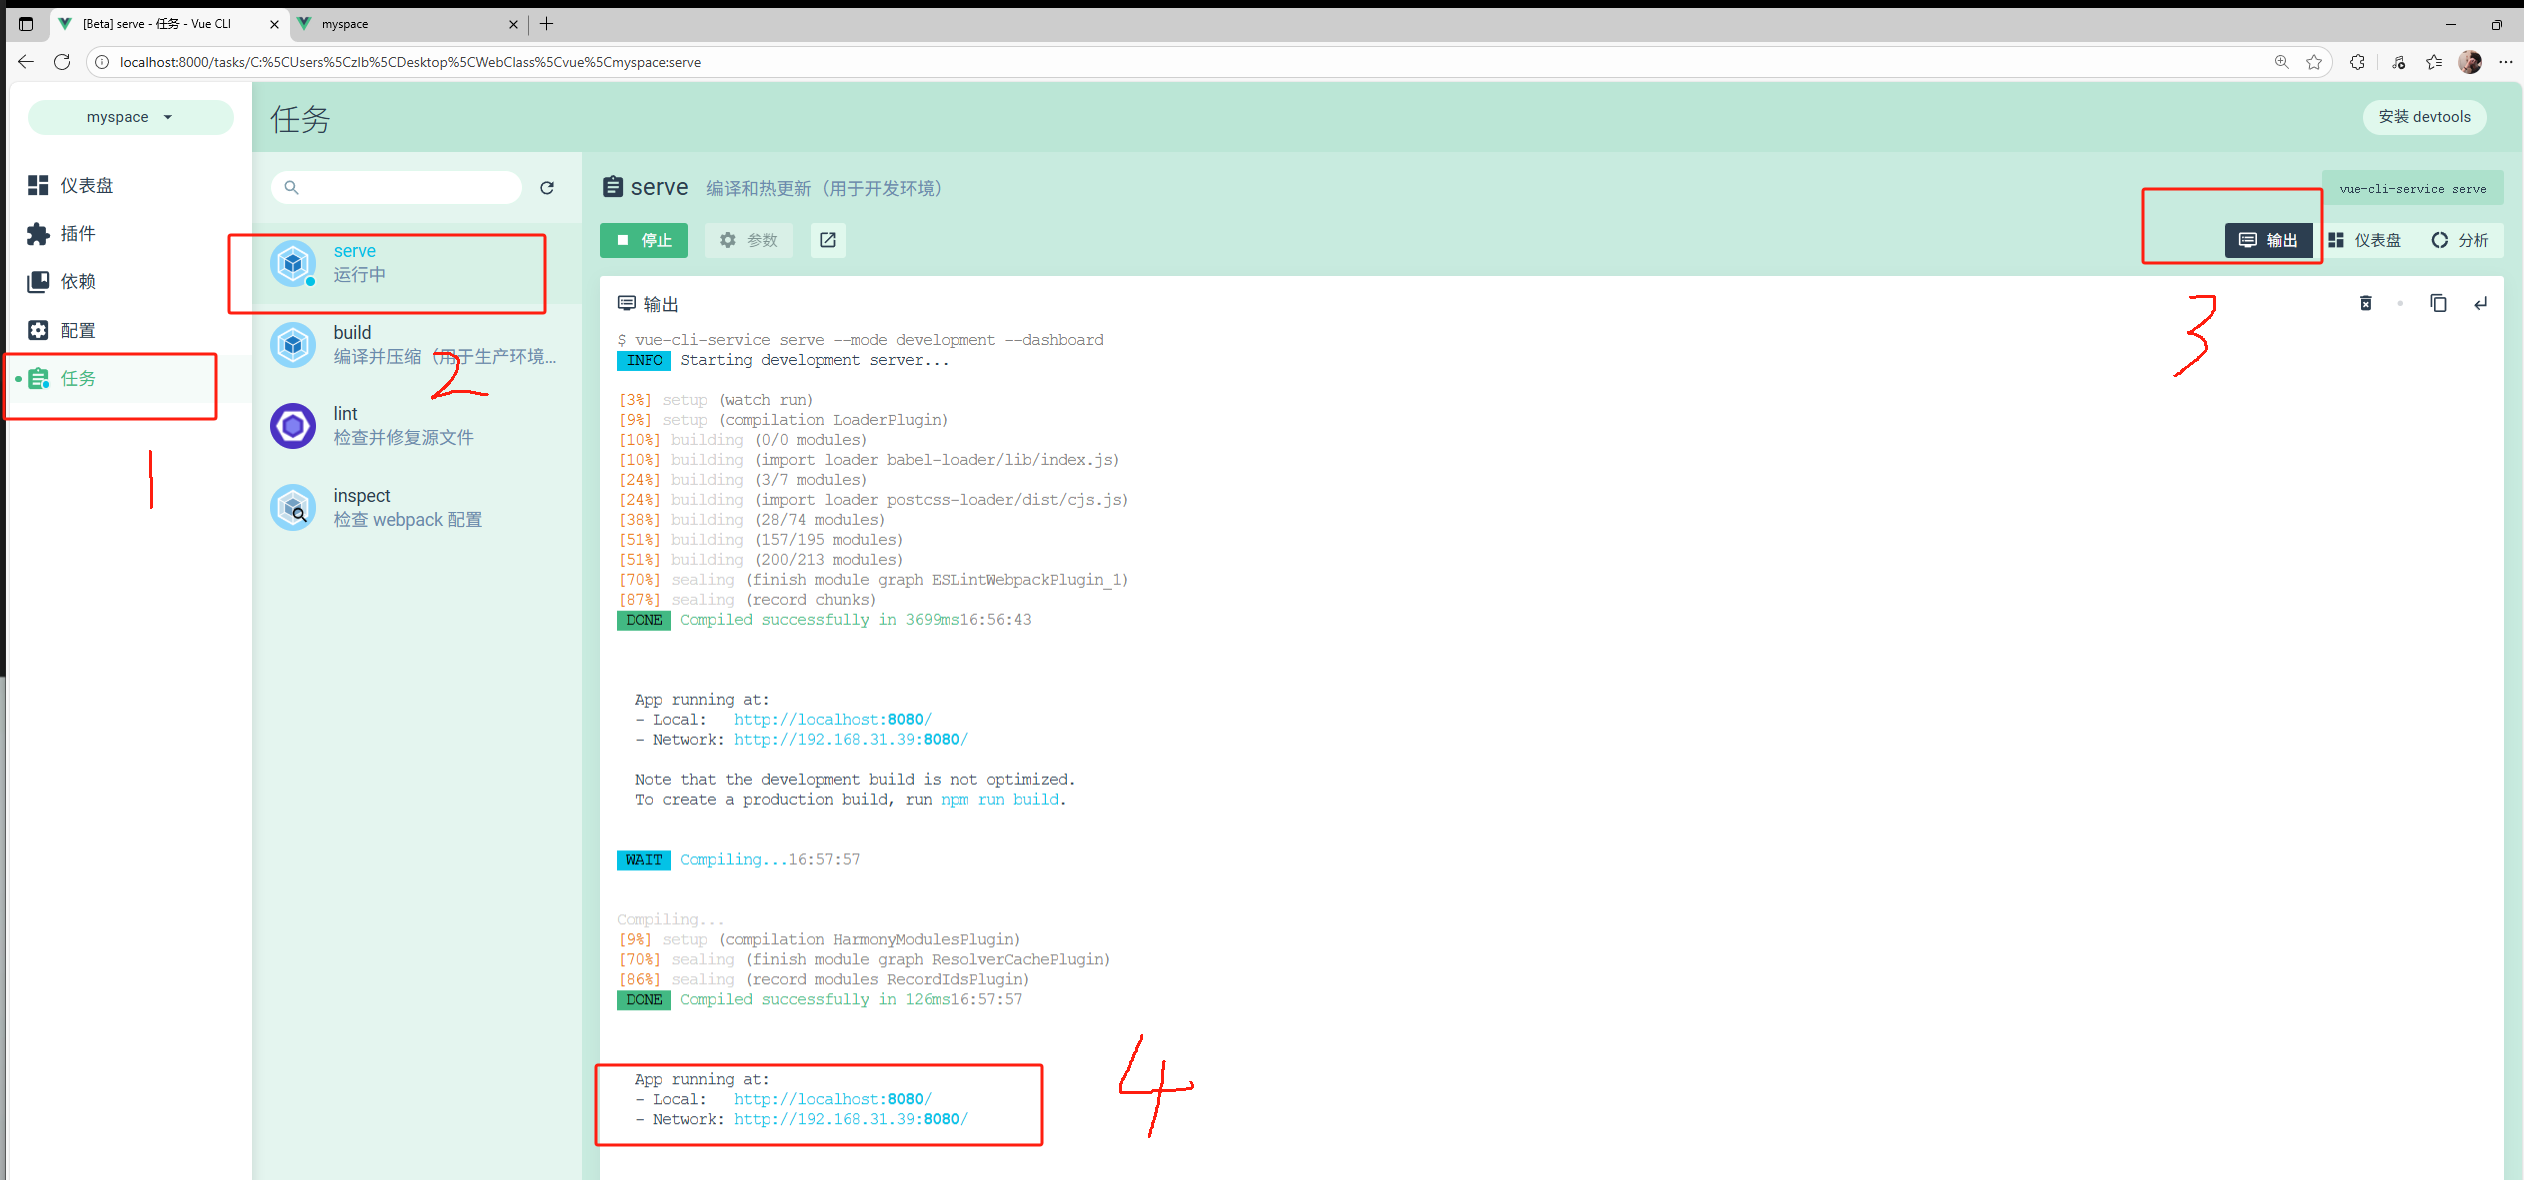
- 4.启动
vue自带的图形化项目管理界面:vue ui- 常见问题1:Windows上运行
vue,提示无法加载文件,表示用户权限不足。 - 解决方案:用管理员身份打开终端,输入
set-ExecutionPolicy RemoteSigned,然后输入y
- 常见问题1:Windows上运行
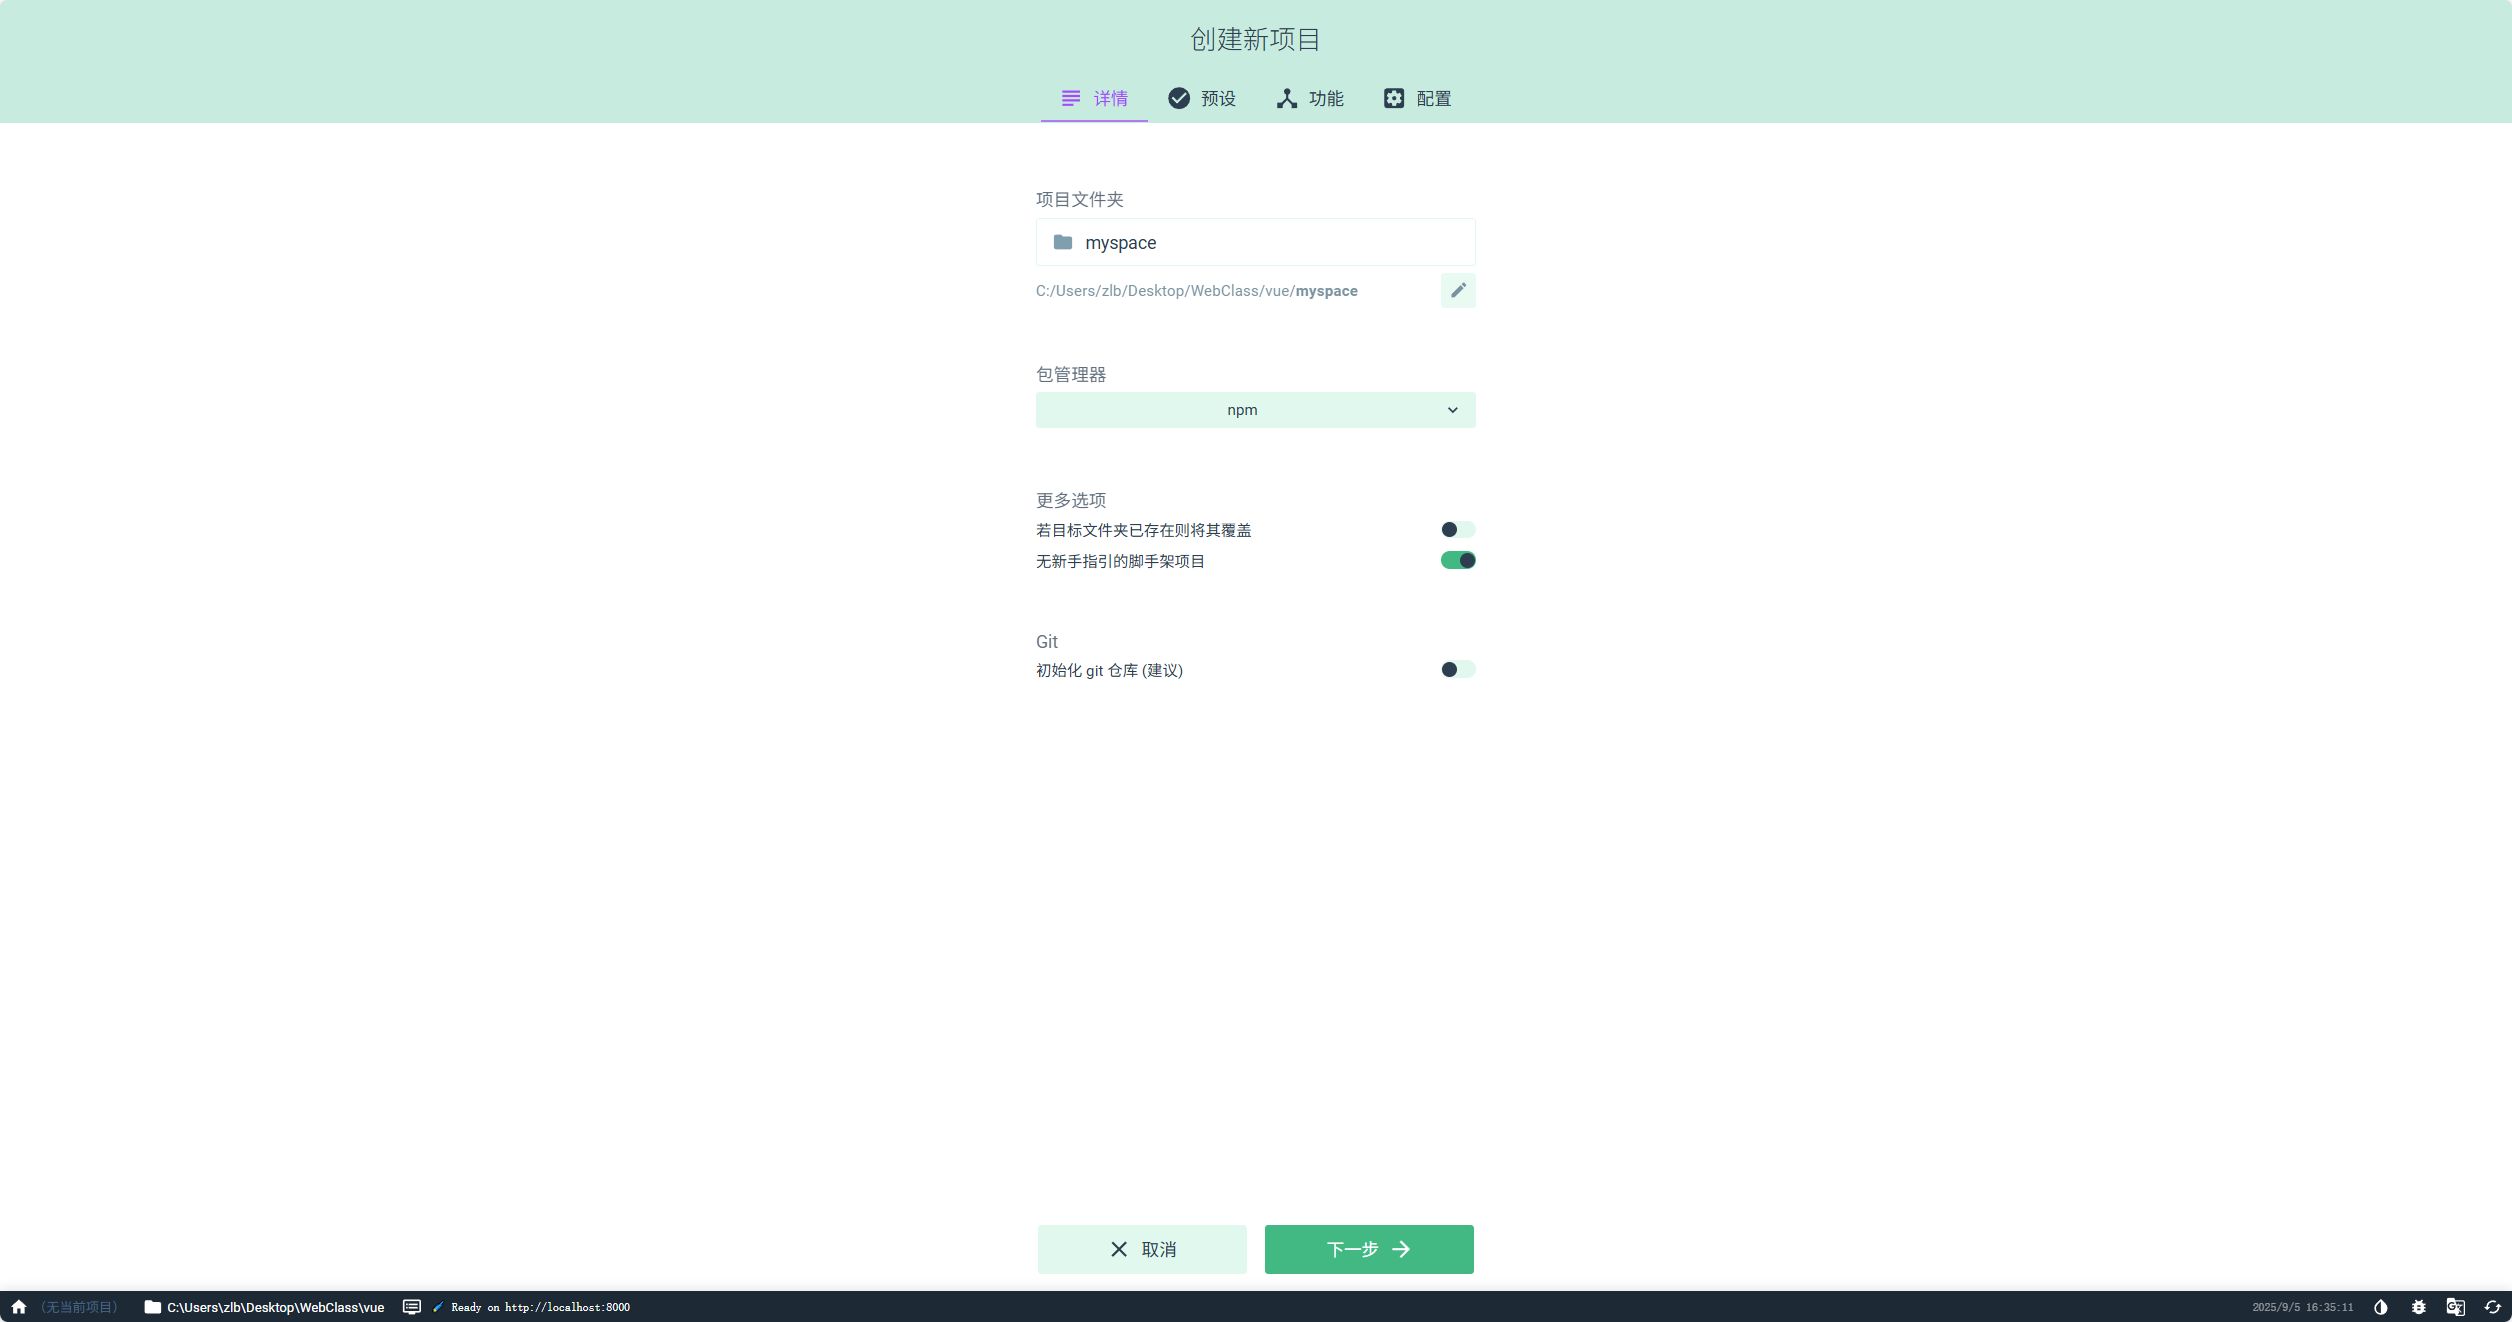
2.创建项目
- 1.选择文件夹,创建项目名称:
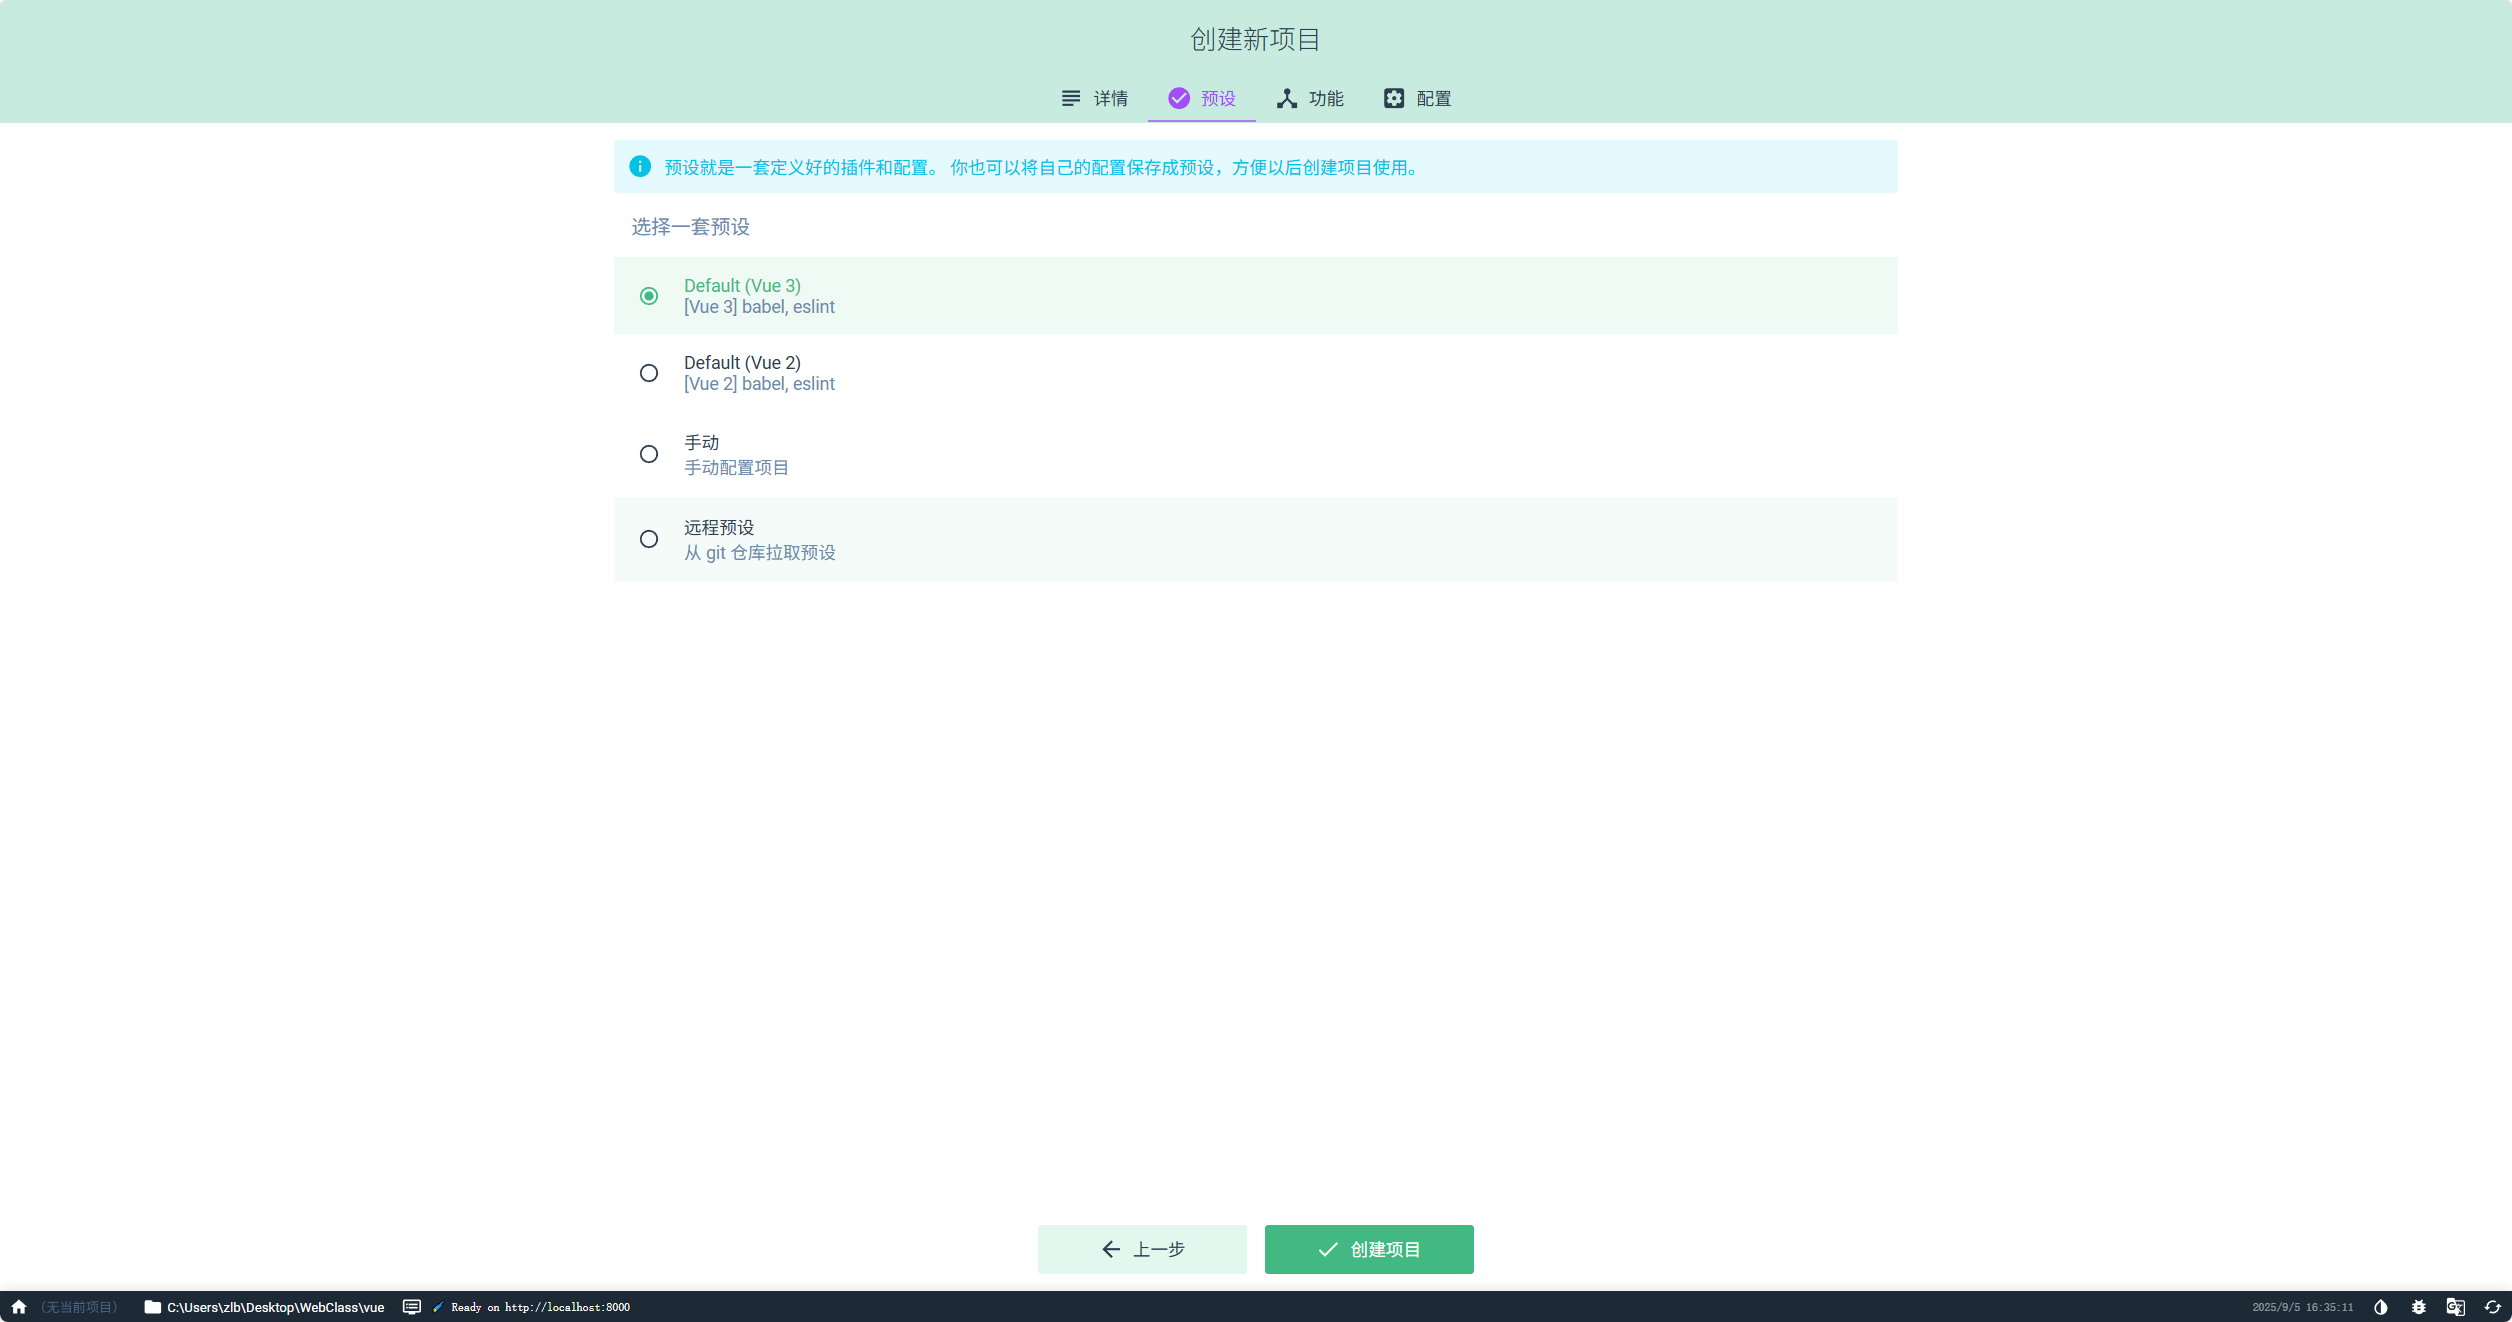
- 2.选择vue3框架:
- 3.添加必要插件:

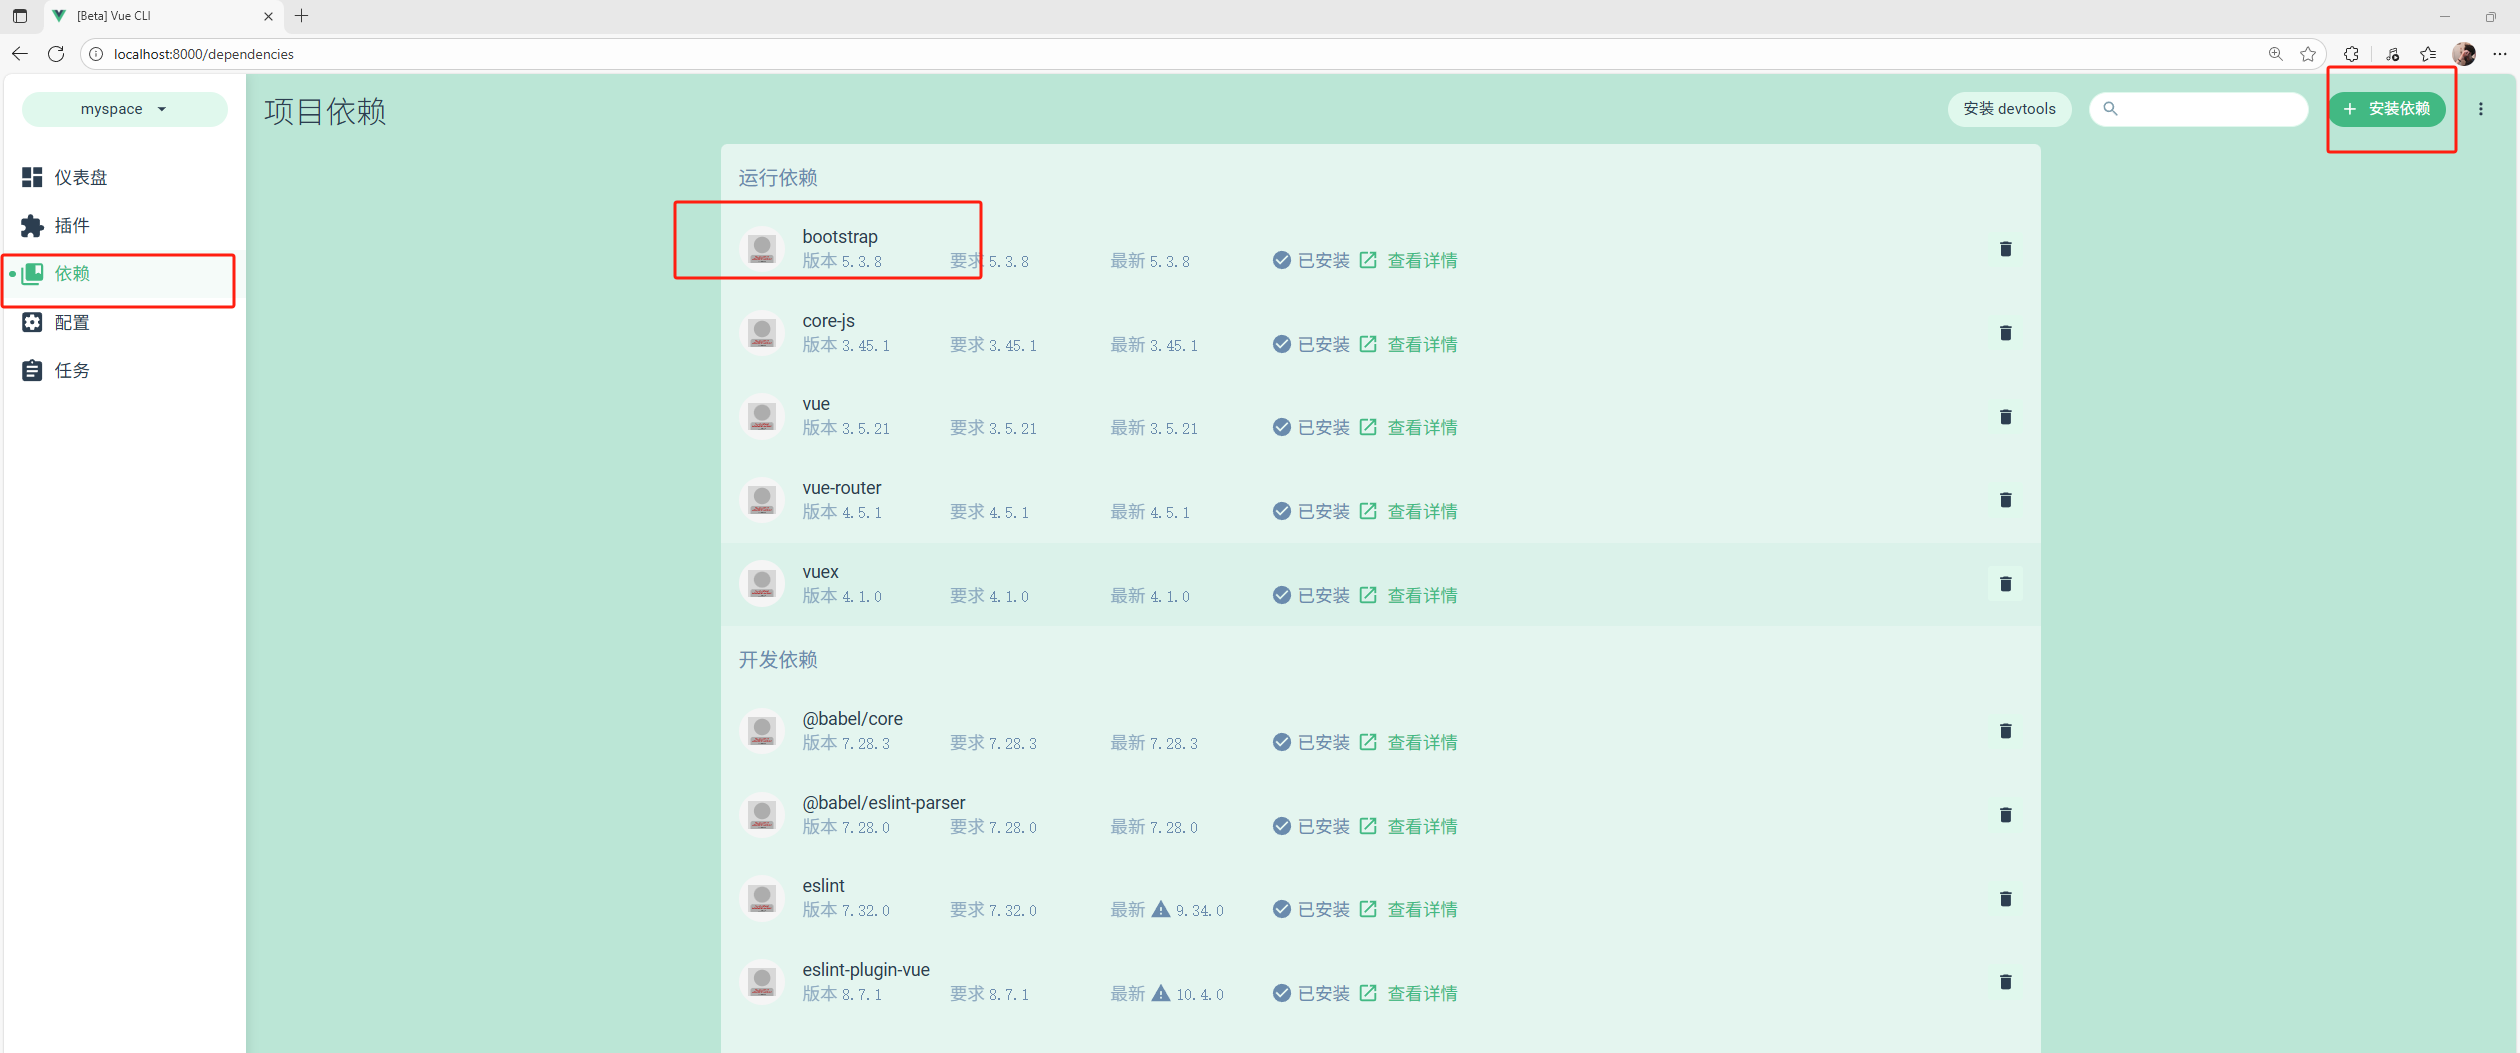
- 4.安装依赖:bootstrap
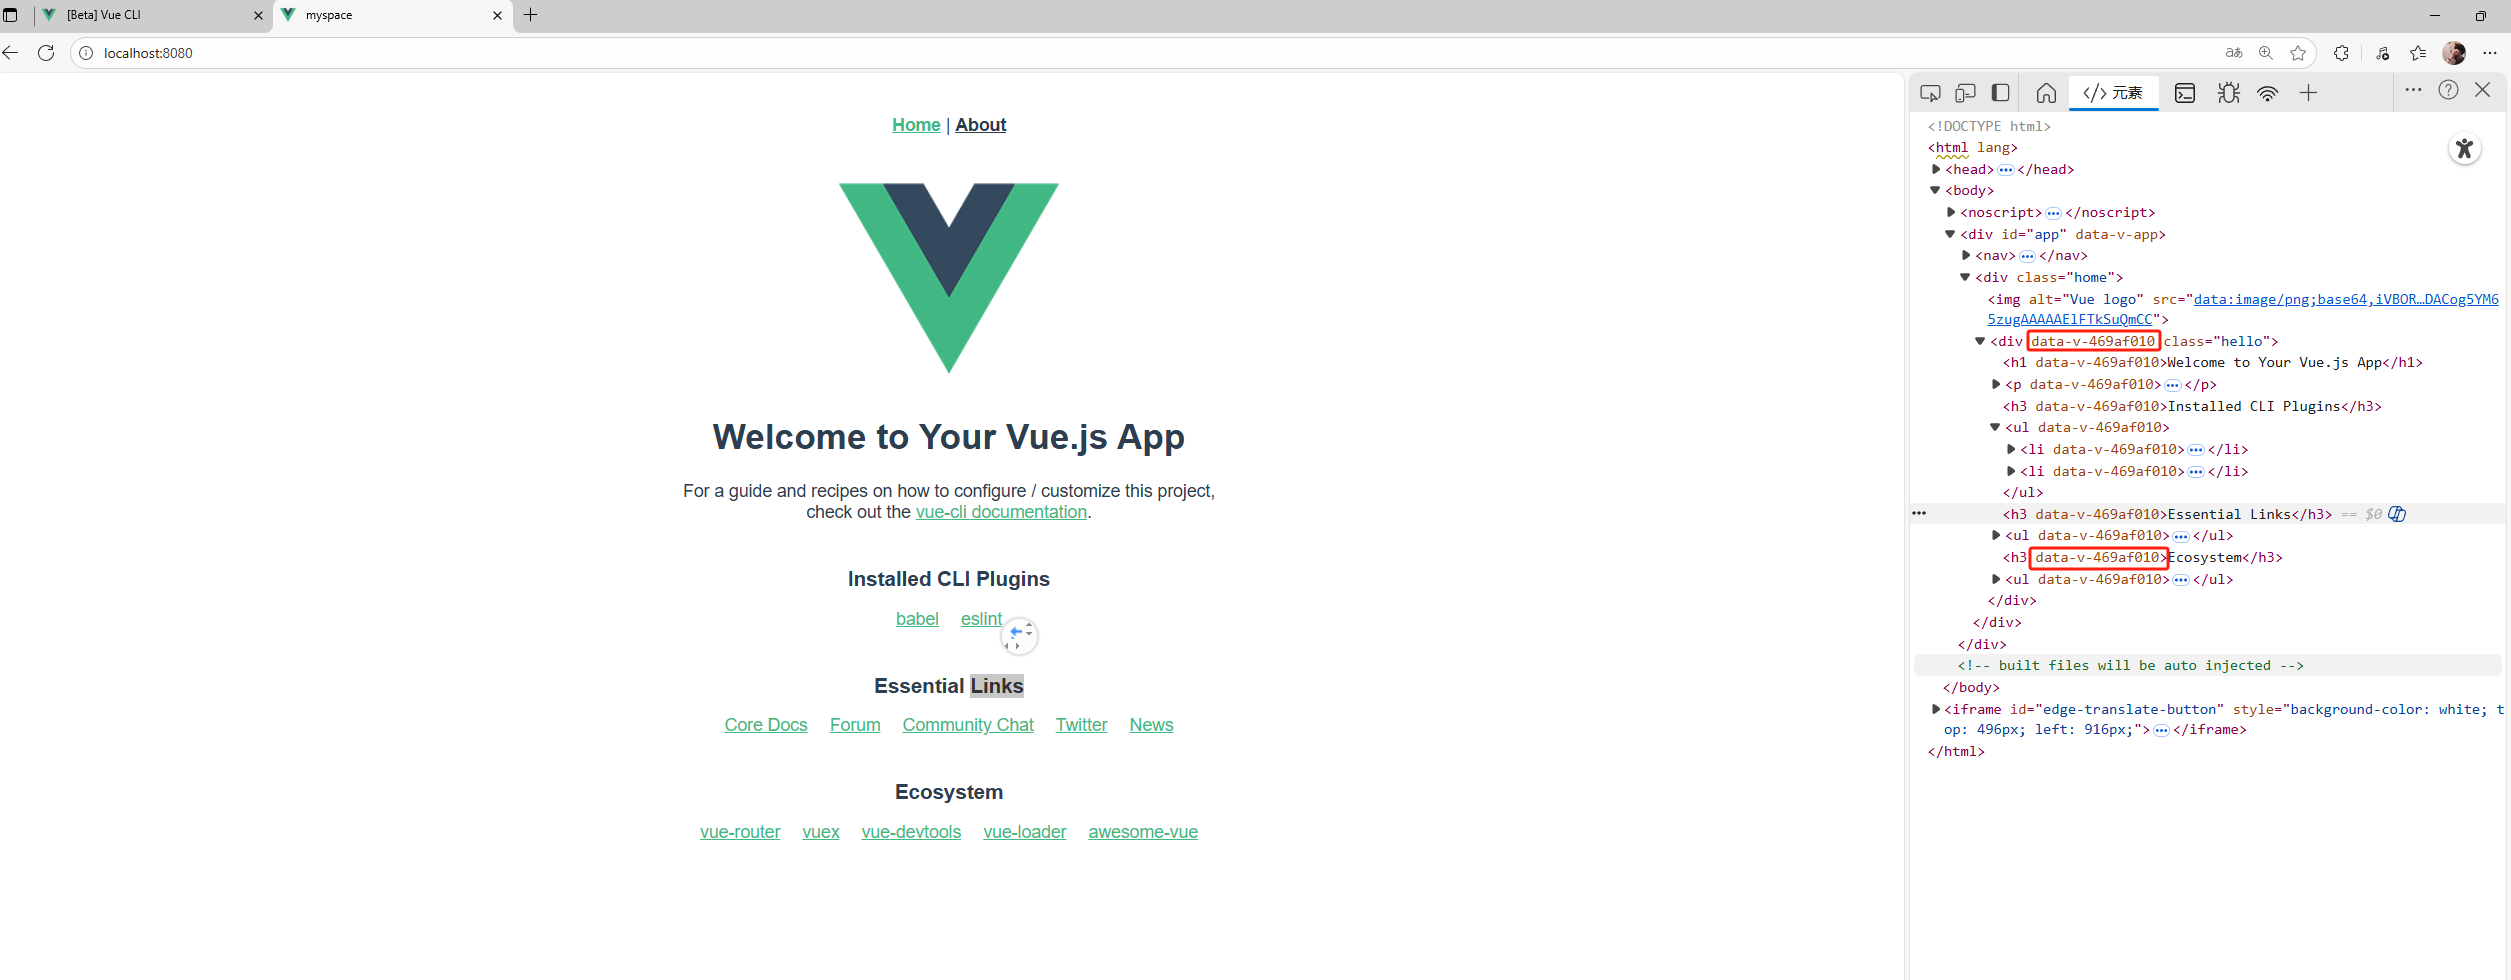
- 5.运行项目:
- 6.使用
vscode打开项目文件夹 - 推荐的一个
vscode插件,用于vue文件的代码高亮等显示:Vetur
3.Vue的优势
- 1.写不同组件的css样式时不需要考虑不同组件之间的样式互相影响:在渲染时,vue会自动给每个css类自动生成一个随机的值,从而确保不同组件的样式不会互相影响
4.系统设计
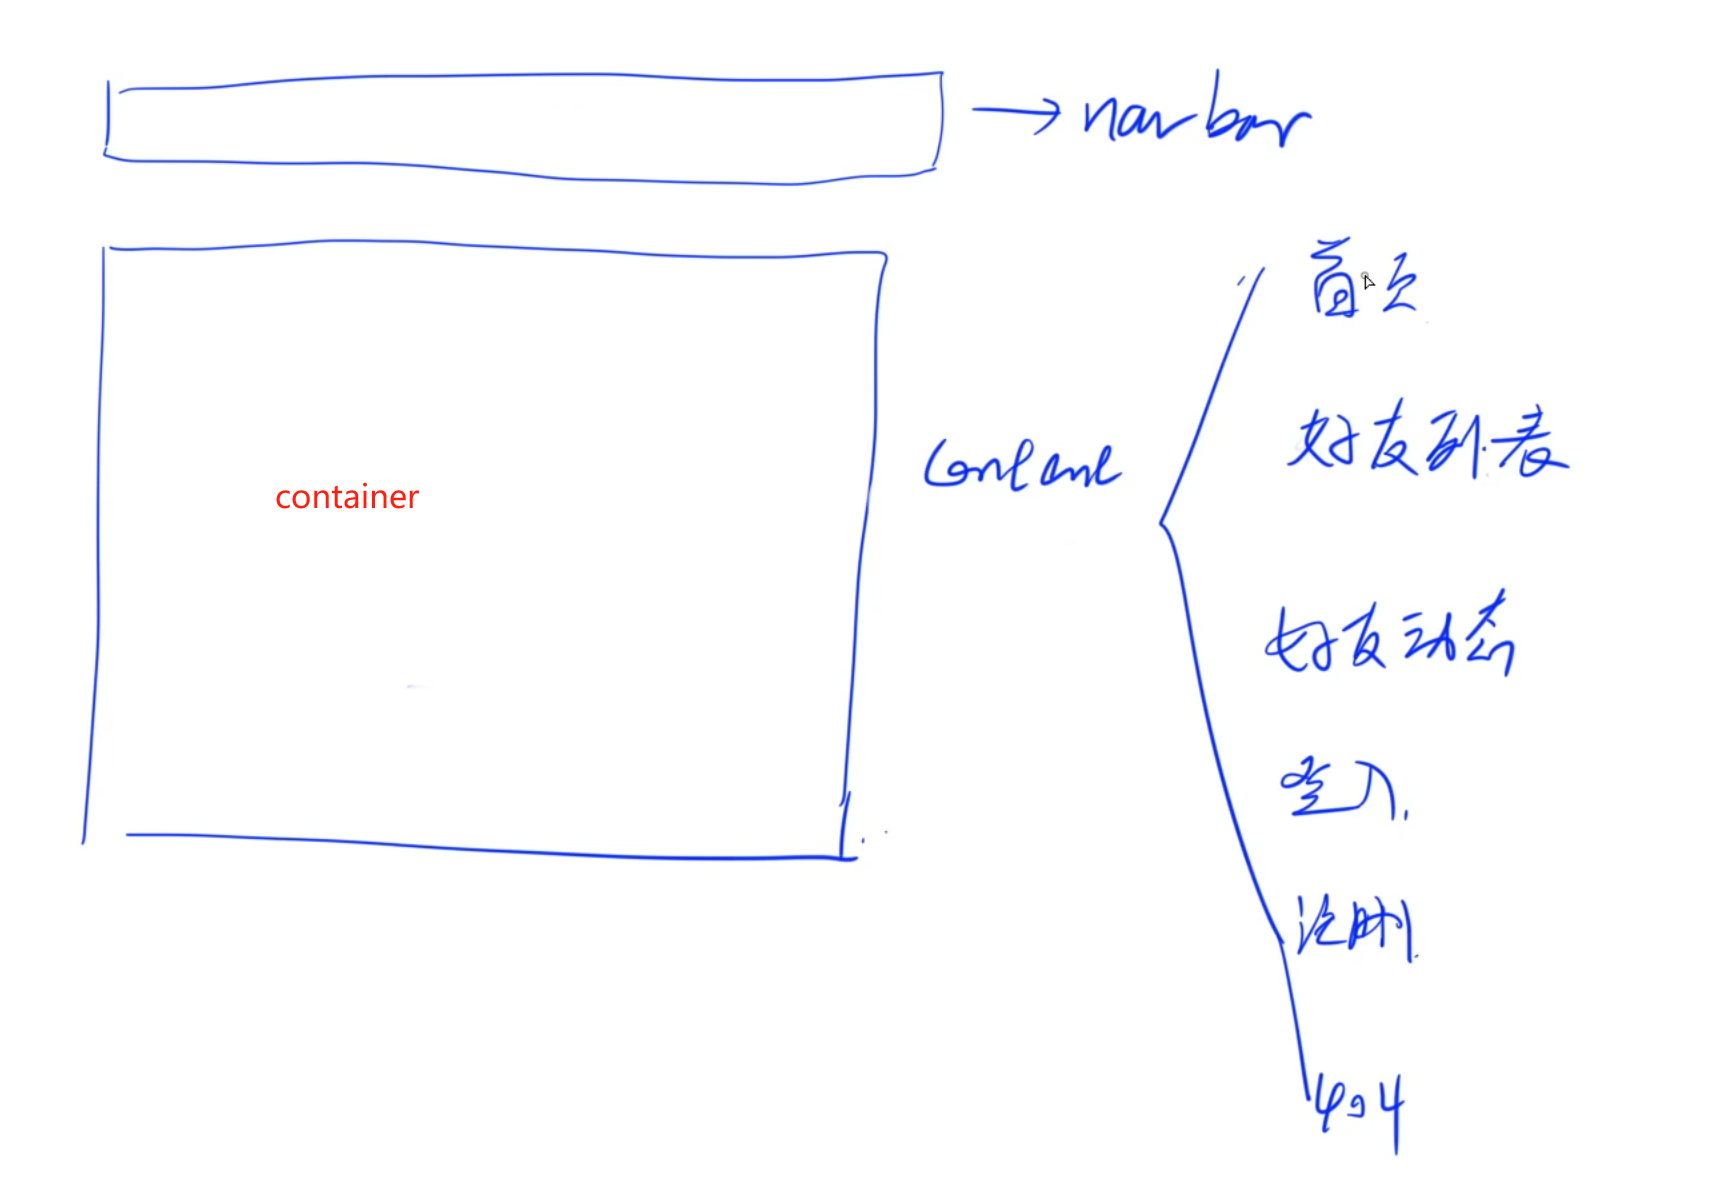
1)NavBar——导航栏
- 负责所有页面的路由跳转
- 通过在BootStrap官网找到自己需要的样式
比如:
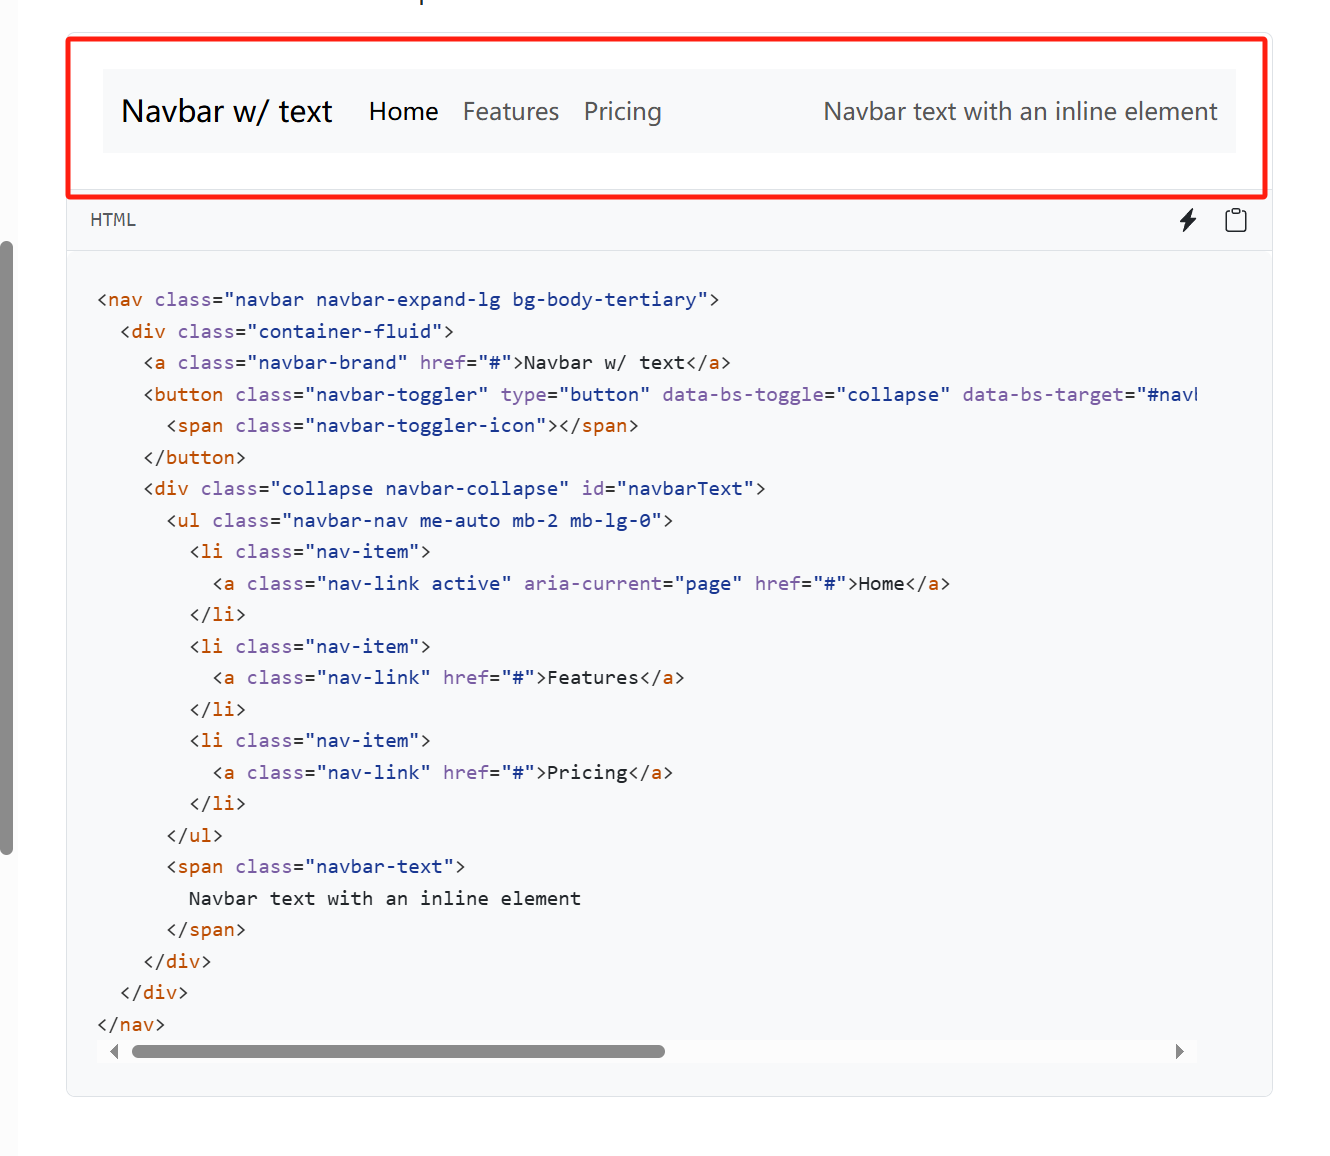
- 1.将样式代码直接复制,然后根据自己的页面设计稍加修改即可:
NavBar.vue:
<template><nav class="navbar navbar-expand-lg bg-body-tertiary"><div class="container"><a class="navbar-brand" href="#">SharingSpace</a><button class="navbar-toggler" type="button" data-bs-toggle="collapse" data-bs-target="#navbarText" aria-controls="navbarText" aria-expanded="false" aria-label="Toggle navigation"><span class="navbar-toggler-icon"></span></button><div class="collapse navbar-collapse" id="navbarText"><ul class="navbar-nav me-auto mb-2 mb-lg-0"><li class="nav-item"><a class="nav-link active" aria-current="page" href="/">Home</a></li><li class="nav-item"><a class="nav-link" href="#">好友列表</a></li><li class="nav-item"><a class="nav-link" href="#">好友动态</a></li></ul><ul class="navbar-nav"><li class="nav-item"><a class="nav-link" href="#">登录</a></li><li class="nav-item"><a class="nav-link" href="#">注册</a></li></ul></div></div></nav>
</template><script>
export default {name: "NavBar",
}</script><style scoped></style>
- 2.将NavBar添加到展示组件上:
App.vue:
<template><NavBar/><router-view/>
</template>
<script>
import 'bootstrap/dist/css/bootstrap.css';
import 'bootstrap/dist/js/bootstrap.js';
import NavBar from './components/NavBar.vue';
export default {name: "App",components: {NavBar: NavBar,}
}
</script><style>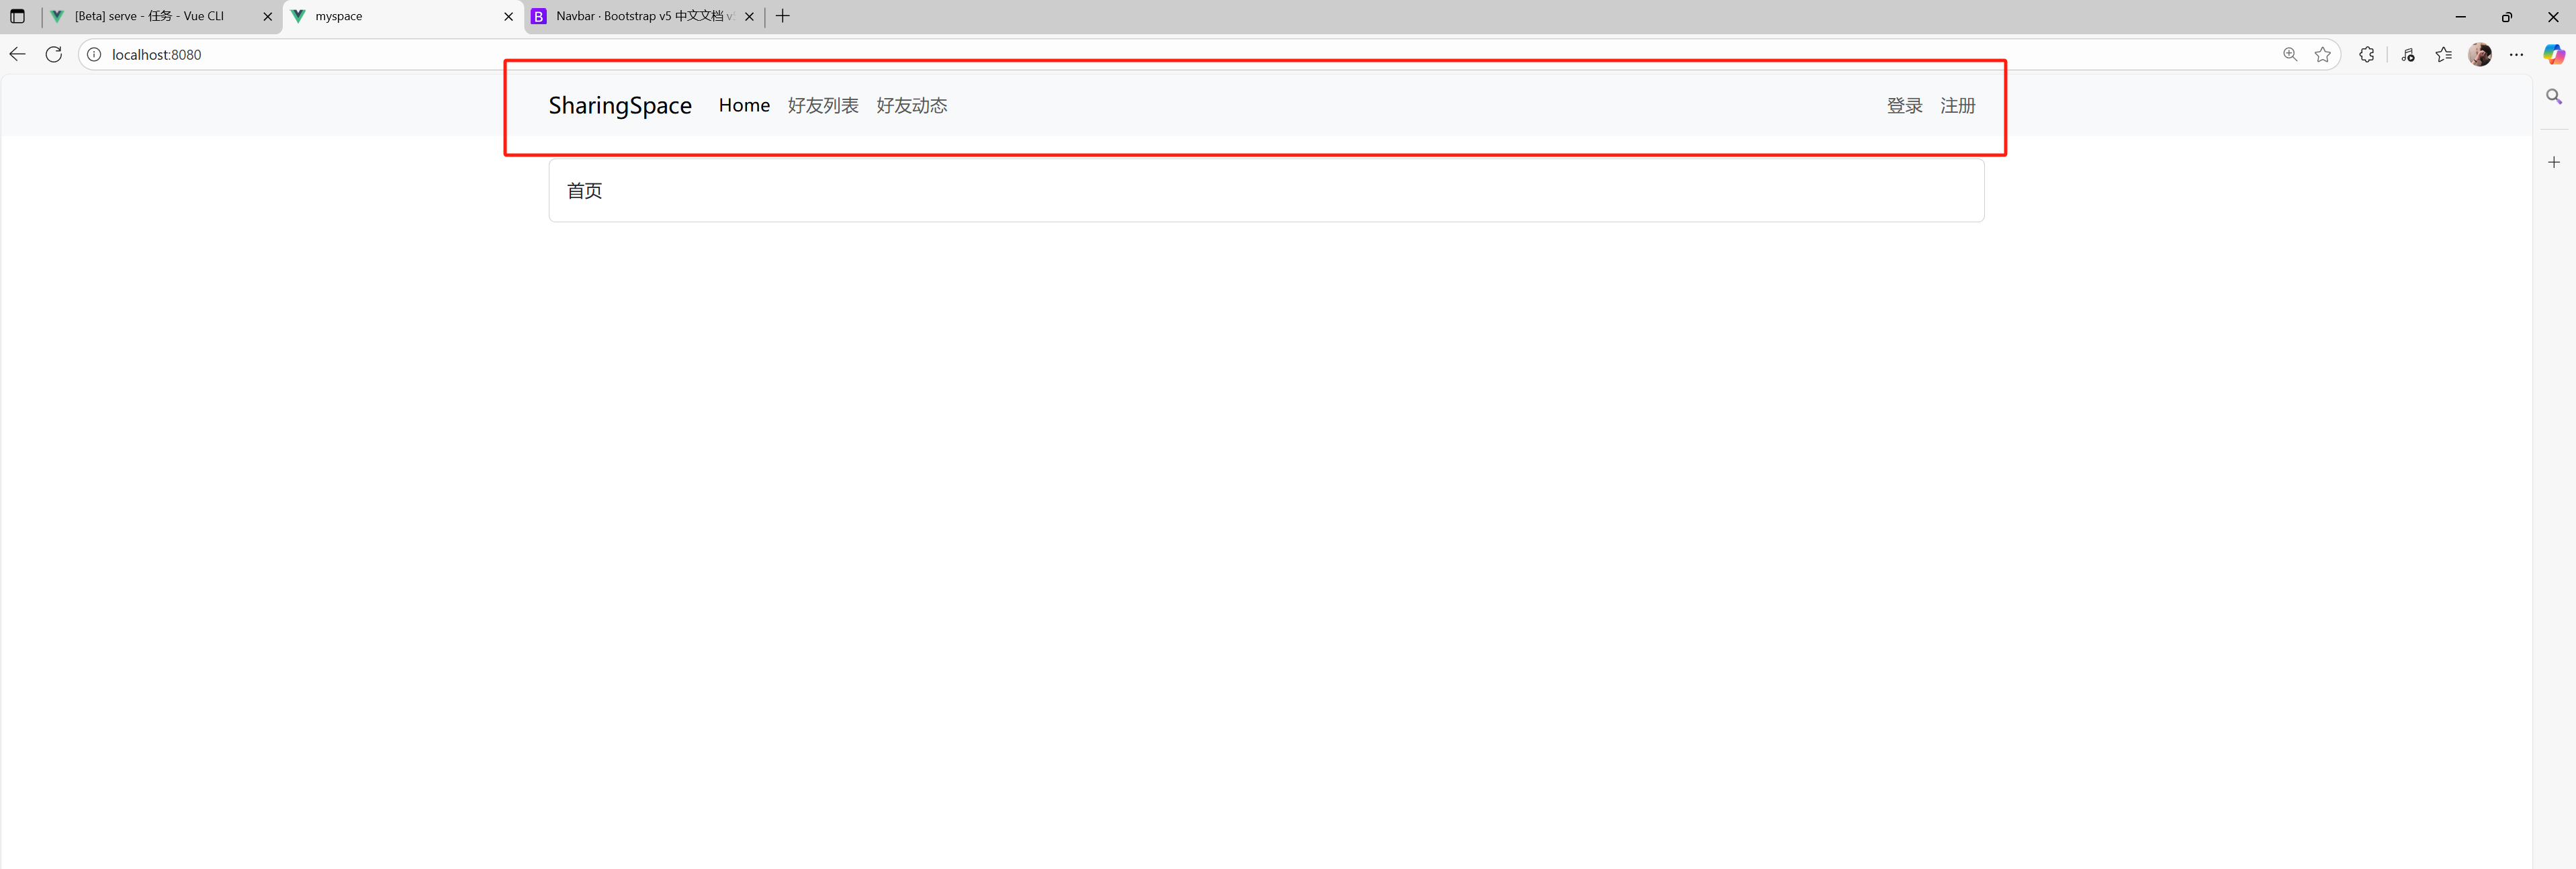
</style>- 3.页面效果:
2)ContentBase——页面统一容器组件
- 作用是将所有页面展示在同一个规范下,比如一些共通性的样式,每个页面距离NavBar组件的margin-top等
-
使用
<slot></slot>存放父组件传过来的children - 当需要修改整个页面布局的展示形式时,只需要统一修改ContentBase就能完成全部页面的修改
ContenBase.vue:
<template><div class="home"><div class="container"><div class="card"><div class="card-body"><slot></slot></div></div></div></div>
</template><script>
export default {name: "ContentBase",
}
</script><style scoped>
.container {margin-top: 20px;
}
</style>
3)Views——页面组件
- 由于初期的页面布局只是名字不同,这里只展示
HomeView的构造,其他页面结构完全相同
HomeView.vue:
<template><ContentBase>首页</ContentBase>
</template><script>
import ContentBase from '@/components/ContentBase.vue'export default {name: 'HomeView',components: {ContentBase}
}
</script><style scoped>
</style>
4)router——页面路由
- 添加不同页面的路由路径
- 将所有页面组件导入,并通过定义router:
path: '/xxx', name: 'xxxx', component: 'xxxxx',来指定不同路径对应的页面组件 - 重定向:通过
catchAll(.*)将除上述连接外的所有连接重定向到404
index.js:
import { createRouter, createWebHistory } from 'vue-router'
import HomeView from '../views/HomeView.vue';
import LoginView from '../views/LoginView.vue';
import RegisterView from '../views/RegisterView.vue';
import NotFoundView from '../views/NotFoundView.vue';
import UserListView from '../views/UserListView.vue';
import UserProfileView from '../views/UserProfileView.vue';const routes = [{path: '/',name: 'home',component: HomeView},{path: '/login/',name: 'name-login',component: LoginView},{path: '/register/',name: 'name-register',component: RegisterView},{path: '/userlist/',name: 'name-userlist',component: UserListView},{path: '/userprofile/',name: 'name-userprofile',component: UserProfileView},{path: '/404/',name: 'name-notfound',component: NotFoundView},{path: '/:catchAll(.*)',redirect: '/404/'}
]const router = createRouter({history: createWebHistory(),routes
})
export default router
5)<router-link>——页面跳转
- 当添加router后,就能根据对应的地址加载对应的页面组件进行展示
- 在NavBar中绑定对应的路径实现页面跳转:
NavBar.vue:
<template><nav class="navbar navbar-expand-lg bg-body-tertiary"><div class="container"><a class="navbar-brand" href="#">SharingSpace</a><button class="navbar-toggler" type="button" data-bs-toggle="collapse" data-bs-target="#navbarText" aria-controls="navbarText" aria-expanded="false" aria-label="Toggle navigation"><span class="navbar-toggler-icon"></span></button><div class="collapse navbar-collapse" id="navbarText"><ul class="navbar-nav me-auto mb-2 mb-lg-0"><li class="nav-item"><a class="nav-link active" aria-current="page" href="/">Home</a></li><li class="nav-item"><a class="nav-link" href="/userlist">好友列表</a></li><li class="nav-item"><a class="nav-link" href="/userprofile">好友动态</a></li></ul><ul class="navbar-nav"><li class="nav-item"><a class="nav-link" href="/login">登录</a></li><li class="nav-item"><a class="nav-link" href="register">注册</a></li></ul></div></div></nav>
</template><script>
export default {name: "NavBar",
}</script>
<style scoped>
</style>
- 但是这种形式每次会向服务器发送请求,刷新对应的页面,属于后端渲染
- vue中提供了前端渲染的标签:
<router-link>:每次切换页面时就不会在刷新了,因为第一次请求时已经将所有页面样式发送过来了。
NavBar.vue:
<template><nav class="navbar navbar-expand-lg bg-body-tertiary"><div class="container"><router-link class="navbar-brand" :to="{name: 'home'}">SharingSpace</router-link><button class="navbar-toggler" type="button" data-bs-toggle="collapse" data-bs-target="#navbarText" aria-controls="navbarText" aria-expanded="false" aria-label="Toggle navigation"><span class="navbar-toggler-icon"></span></button><div class="collapse navbar-collapse" id="navbarText"><ul class="navbar-nav me-auto mb-2 mb-lg-0"><li class="nav-item"><router-link class="nav-link active" aria-current="page" :to="{name: 'home'}">Home</router-link></li><li class="nav-item"><router-link class="nav-link" :to="{name: 'name-userlist'}">好友列表</router-link></li><li class="nav-item"><router-link class="nav-link" :to="{name: 'name-userprofile'}">好友动态</router-link></li></ul><ul class="navbar-nav"><li class="nav-item"><router-link class="nav-link" :to="{name: 'name-login'}">登录</router-link></li><li class="nav-item"><router-link class="nav-link" :to="{name: 'name-register'}">注册</router-link></li></ul></div></div></nav>
</template><script>
export default {name: "NavBar",
}</script>
<style scoped>
</style>
5.页面功能实现
1)UserProfileView——用户个人空间
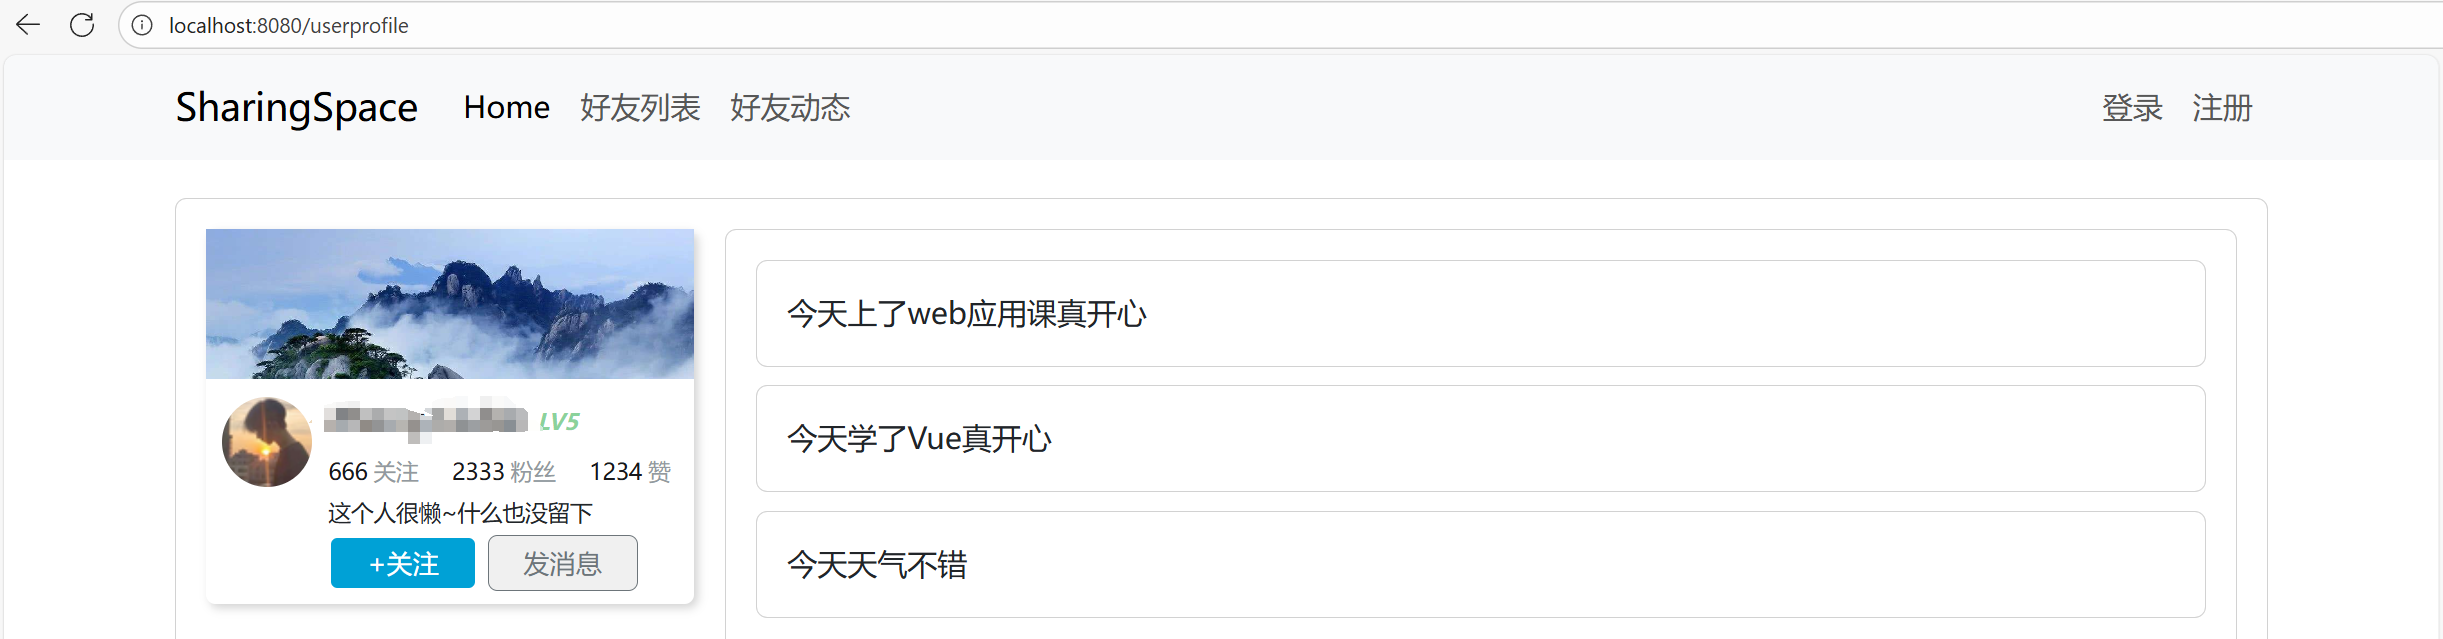
- 用户个人空间总共包含三个模块: 用户信息,用户历史的动态,编辑动态模块
- 使用bootstarp的grid布局来规划页面:用户信息占3份,历史动态占9份,编辑动态模块也是占3份,紧跟在用户信息下面
- 首先是实现
<UserInfo> 和<UserProfileContent>组件,将其添加到当前个人空间组件中:
1.UserProfileView: 用户个人空间总组件
<template><ContentBase><div class="row"><div class="col-3"><UserInfo /></div><div class="col-9"><UserProfileContent /></div></div></ContentBase>
</template><script>
import ContentBase from '@/components/ContentBase.vue';
import UserInfo from '@/components/UserInfo.vue';
import UserProfileContent from '@/components/UserProfileContent.vue';export default {name: 'UserProfileView',components: {ContentBase,UserInfo,UserProfileContent},
}
</script><style scoped></style>
2.UserInfo:用户个人信息子组件
- 包含用户名称、头像、粉丝数、点赞数、收藏数
<template><div class="row"><div class="col-3"><div class="user-card"><div class="user-card-head"></div><div class="user-card-body"><div class="user-card-body-left"><img src="https://cdn.acwing.com/media/user/profile/photo/450127_md_da0516e621.jpg" alt=""></div><div class="user-card-body-right"><div class="user-card-body-right-text"><div class="user-card-body-right-text-username">Liubin Zhong<span>LV5</span></div><div class="user-card-body-right-text-reputation"><span class="user-card-body-right-text-reputation-item"><span>58</span><span>收藏</span></span><span class="user-card-body-right-text-reputation-item"><span>32</span><span>粉丝</span></span><span class="user-card-body-right-text-reputation-item"><span>15</span><span>赞</span></span></div><div class="user-card-body-right-text-discreption">这个人很懒~什么也没留下</div></div><div class="user-card-body-right-button"><button>+关注</button><button>发消息</button></div></div></div></div></div><div class="col-9"></div></div>
</template><script>export default {name: "UserInfo",
}
</script><style scoped>img {border-radius: 50%;
}.user-card {width: 300px;height: 200px;box-shadow: 2px 2px 5px lightgrey;border-radius: 5px;
}.user-card-head {background-image: url('/src/assets/mountain.jpg');background-size: cover;width: 100%;height: 80px;
}.user-card-body {width: 300px;height: calc(100% - 85px);box-sizing: border-box;padding-top: 10px;
}.user-card-body-left {width: 65px;height: 100%;float: left;text-align: center;
}.user-card-body-left>img {border-radius: 50%;width: 48px;height: 48px;
}.user-card-body-right {width: calc(100% - 70px);height: 100%;float: left;
}.user-card-body-right-text {width: 100%;height: 70%;
}.user-card-body-right-text-username {font-size: 16px;color: #222222;font-weight: bold;padding: 0px 0px 10px 0px;
}.user-card-body-right-text-username>span {font-size: 12px;color: #8BD29B;font-style: italic;
}.user-card-body-right-text-reputation {width: 276px;height: 22px;padding: 0px 0px 10px 0px;font-size: 12px;color: #9499A0;box-sizing: border-box;line-height: 12px;
}.user-card-body-right-text-reputation-item {margin-right: 18px;
}.user-card-body-right-text-reputation-item>span:nth-child(1) {font-size: 12px;color: #18191c;padding: 0px 3px 0px 0px;
}.user-card-body-right-text-reputation-item>span:nth-child(2) {font-size: 12px;color: #9299A0;
}.user-card-body-right-text-discreption {margin-top: 1px;width: 200px;height: 10px;font-size: 12px;line-height: 10px;
}.user-card-body-right-button>button {width: 100px;height: 30px;font-size: 14px;border-radius: 5px;border: none;cursor: pointer;
}.user-card-body-right-button>button:nth-child(1) {color: white;background-color: #00A1D6;padding: 1px 6px;float: left;margin-right: 5px;
}.user-card-body-right-button>button:nth-child(1):hover {background-color: #00B5E5;transition: 700ms;
}.user-card-body-right-button>button:nth-child(2) {padding: 1px 6px;color: #6D757A;float: left;border: #6D757A solid 1px;
}.user-card-body-right-button>button:nth-child(2):hover {border-color: #00B5E5;color: #00B5E5;transition: 700ms;
}
</style>
3.UserProfileContent:用户历史动态
- 展示用户的历史动态信息内容
<template><div class="card"><div></div></div>
</template><script>export default {name: "UserProfileContent",
}
</script><style scoped></style>
2)组件之间的数据交互
-
setup(props, context):初始化变量、函数ref:定义变量,可以用.value属性重新赋值reactive:定义对象,不可重新赋值props:存储父组件传递过来的数据context.emit():触发父组件绑定的函数
-
在父组件中通过
setup(),定义一个user,封装用户的个人信息,方便传递给UserInfo子组件获取数据 -
父组件给子组件传递数据是通过
props传递,而子组件给父组件传递数据是通过触发父组件的函数event,来修改父组件中的数据,因为数据全部是定义在了父组件中。
1.父组件给子组件传递信息——子组件中展示用户的个人信息
- 父组件:用户个人空间
- 传递信息是通过给子组件绑定一个封装的对象:
:user="user",这里的: == v.bind:,是一个简写。
UserProfile.vue:
<template><ContentBase><div class="row"><div class="col-3"><UserInfo :user="user"/></div><div class="col-9"><UserProfileContent /></div></div></ContentBase>
</template><script>
import ContentBase from '@/components/ContentBase.vue';
import UserInfo from '@/components/UserInfo.vue';
import UserProfileContent from '@/components/UserProfileContent.vue';
import { reactive } from 'vue';export default {name: 'UserProfileView',components: {ContentBase,UserInfo,UserProfileContent},setup() {const user = reactive({id: 1,username: "vue hello",lastName: "Vue",firstName: "hello",followCount: 666,fans: 2333,favoriaties: 1234,is_followed: true,});return {user: user,}}
}
</script>
<style scoped></style>
- 子组件通过
user获取到封装的值 - 如果需要对数据进行拼接等运算操作,则需要将
user放到props中通过setup()函数重新定义一个值作为运算的返回值:
UserInfo.vue::
<template><div class="row"><div class="col-3"><div class="user-card"><div class="user-card-head"></div><div class="user-card-body"><div class="user-card-body-left"><img src="https://cdn.acwing.com/media/user/profile/photo/450127_md_da0516e621.jpg" alt=""></div><div class="user-card-body-right"><div class="user-card-body-right-text"><div class="user-card-body-right-text-username">{{fullName}}<span>LV5</span></div><div class="user-card-body-right-text-reputation"><span class="user-card-body-right-text-reputation-item"><span>{{ user.followCount }}</span><span>关注</span></span><span class="user-card-body-right-text-reputation-item"><span>{{ user.fans }}</span><span>粉丝</span></span><span class="user-card-body-right-text-reputation-item"><span>{{ user.favoriaties}}</span><span>赞</span></span></div><div class="user-card-body-right-text-discreption">这个人很懒~什么也没留下</div></div><div class="user-card-body-right-button"><button @click="follow" v-if="!user.is_followed">+关注</button><button @click="unfollow" v-if="user.is_followed">取消关注</button><button>发消息</button></div></div></div></div></div><div class="col-9"></div></div>
</template><script>
import { computed } from 'vue';
export default {name: "UserInfo",props: {user: {type: Object,required: true,},},setup(props) {let fullName = computed(() => props.user.lastName + ' ' + props.user.firstName);const follow = () => {}const unfollow = () => {}return {fullName,follow,unfollow,}}
}
</script><style scoped>
//此处先省略,避免重复篇幅
</style>
2.子组件通过触发父组件的函数操作数据——子组件中点击关注按钮需要将关注数进行+ 1
- 1.
UserProfile.vue:在父组件中定义函数,传递到子组件中
<template><ContentBase><div class="row"><div class="col-3"><UserInfo @follow="follow" @unfollow="unfollow" :user="user"/></div><div class="col-9"><UserProfileContent /></div></div></ContentBase>
</template><script>
import ContentBase from '@/components/ContentBase.vue';
import UserInfo from '@/components/UserInfo.vue';
import UserProfileContent from '@/components/UserProfileContent.vue';
import { reactive } from 'vue';export default {name: 'UserProfileView',components: {ContentBase,UserInfo,UserProfileContent},setup() {const user = reactive({id: 1,username: "hello vue",lastName: "Vue",firstName: "Hello",followCount: 666,fans: 2333,favoriaties: 1234,is_followed: false,});const follow = () => {if (user.is_followed) return;user.is_followed = true;user.fans ++;};const unfollow = () => {if (!user.is_followed) return;user.is_followed = false;user.fans --;};return {user: user,follow,unfollow,}}
}
</script><style scoped></style>- 2.
UserInfo.vue:子组件中通过context获取到父组件传递过来的函数,从而在自定义的函数中通过context.emit()触发对应的父组件函数进行数据的操作 - 将子组件中自定义的函数绑定到按钮上,点击按钮触发自定义函数,而自定义函数中会触发父组件传递过来的函数,从而对父组件中存储的数据进行修改。
<template><div class="row"><div class="col-3"><div class="user-card"><div class="user-card-head"></div><div class="user-card-body"><div class="user-card-body-left"><img src="https://cdn.acwing.com/media/user/profile/photo/450127_md_da0516e621.jpg" alt=""></div><div class="user-card-body-right"><div class="user-card-body-right-text"><div class="user-card-body-right-text-username">{{fullName}}<span>LV5</span></div><div class="user-card-body-right-text-reputation"><span class="user-card-body-right-text-reputation-item"><span>{{ user.followCount }}</span><span>关注</span></span><span class="user-card-body-right-text-reputation-item"><span>{{ user.fans }}</span><span>粉丝</span></span><span class="user-card-body-right-text-reputation-item"><span>{{ user.favoriaties}}</span><span>赞</span></span></div><div class="user-card-body-right-text-discreption">这个人很懒~什么也没留下</div></div><div class="user-card-body-right-button"><button @click="follow" type="button"  v-if="!user.is_followed">+关注</button><button v-on:click="unfollow" type = "button" v-if="user.is_followed">取消关注</button><button>发消息</button></div></div></div></div></div><div class="col-9"><button v-on:click="follow" type="button">去哪</button></div></div>
</template><script>
import { computed } from 'vue';
export default {name: "UserInfo",props: {user: {type: Object,required: true,},},setup(props, context) {let fullName = computed(() => props.user.lastName + ' ' + props.user.firstName);const follow = () => {console.log("follow");context.emit('follow');};const unfollow = () => {console.log('unfollow');context.emit('unfollow');};return {fullName,follow,unfollow}}
}
</script><style scoped>.user-card-body-right-button>button {width: 100px;height: 30px;font-size: 14px;border-radius: 5px;border: none;cursor: pointer;position: relative;z-index: 9999;border: 2px solid;
}
</style>
- Vue中绑定一个事件使用
v-on:click="xxx",可以简写成@click="xxx" - 触发父组件传递的函数使用
context.emit() - 总的来说就是:数据在哪定义的在哪修改
遇到的一个小问题:
- 我是直接将之前写的一个模仿B站的小卡片直接作为个人信息的样式展示的
- 但是获取不到按钮的点击事件触发:
- 调了半天:最后发现是由于之前的样式中
.user-card-body-right里用了float: left;和一些固定高度的子元素(例如.user-card-body-right-text高度写了 70%),这样会导致.user-card-body-right-text的容器区域盖住了下面的按钮。虽然它是透明的,但实际上它在按钮上方,占据了点击事件。所以看到按钮在页面上,鼠标点击的时候,事件却落在透明的文字容器上 → 按钮没反应。 - 解决方案:我这里使用的是简单方法:通过
position: relative + z-index。只有在元素是定位元素(position: relative/absolute/fixed/sticky)时,z-index才会生效。
设置了position: relative; z-index: 9999;,把按钮抬到了“最上层”,高于之前挡住它的元素。所以按钮又能被鼠标点到了。 - 较优的解决方案是将float布局改成flex布局,就不需要靠
z-index来压层了
- 目前的页面布局:
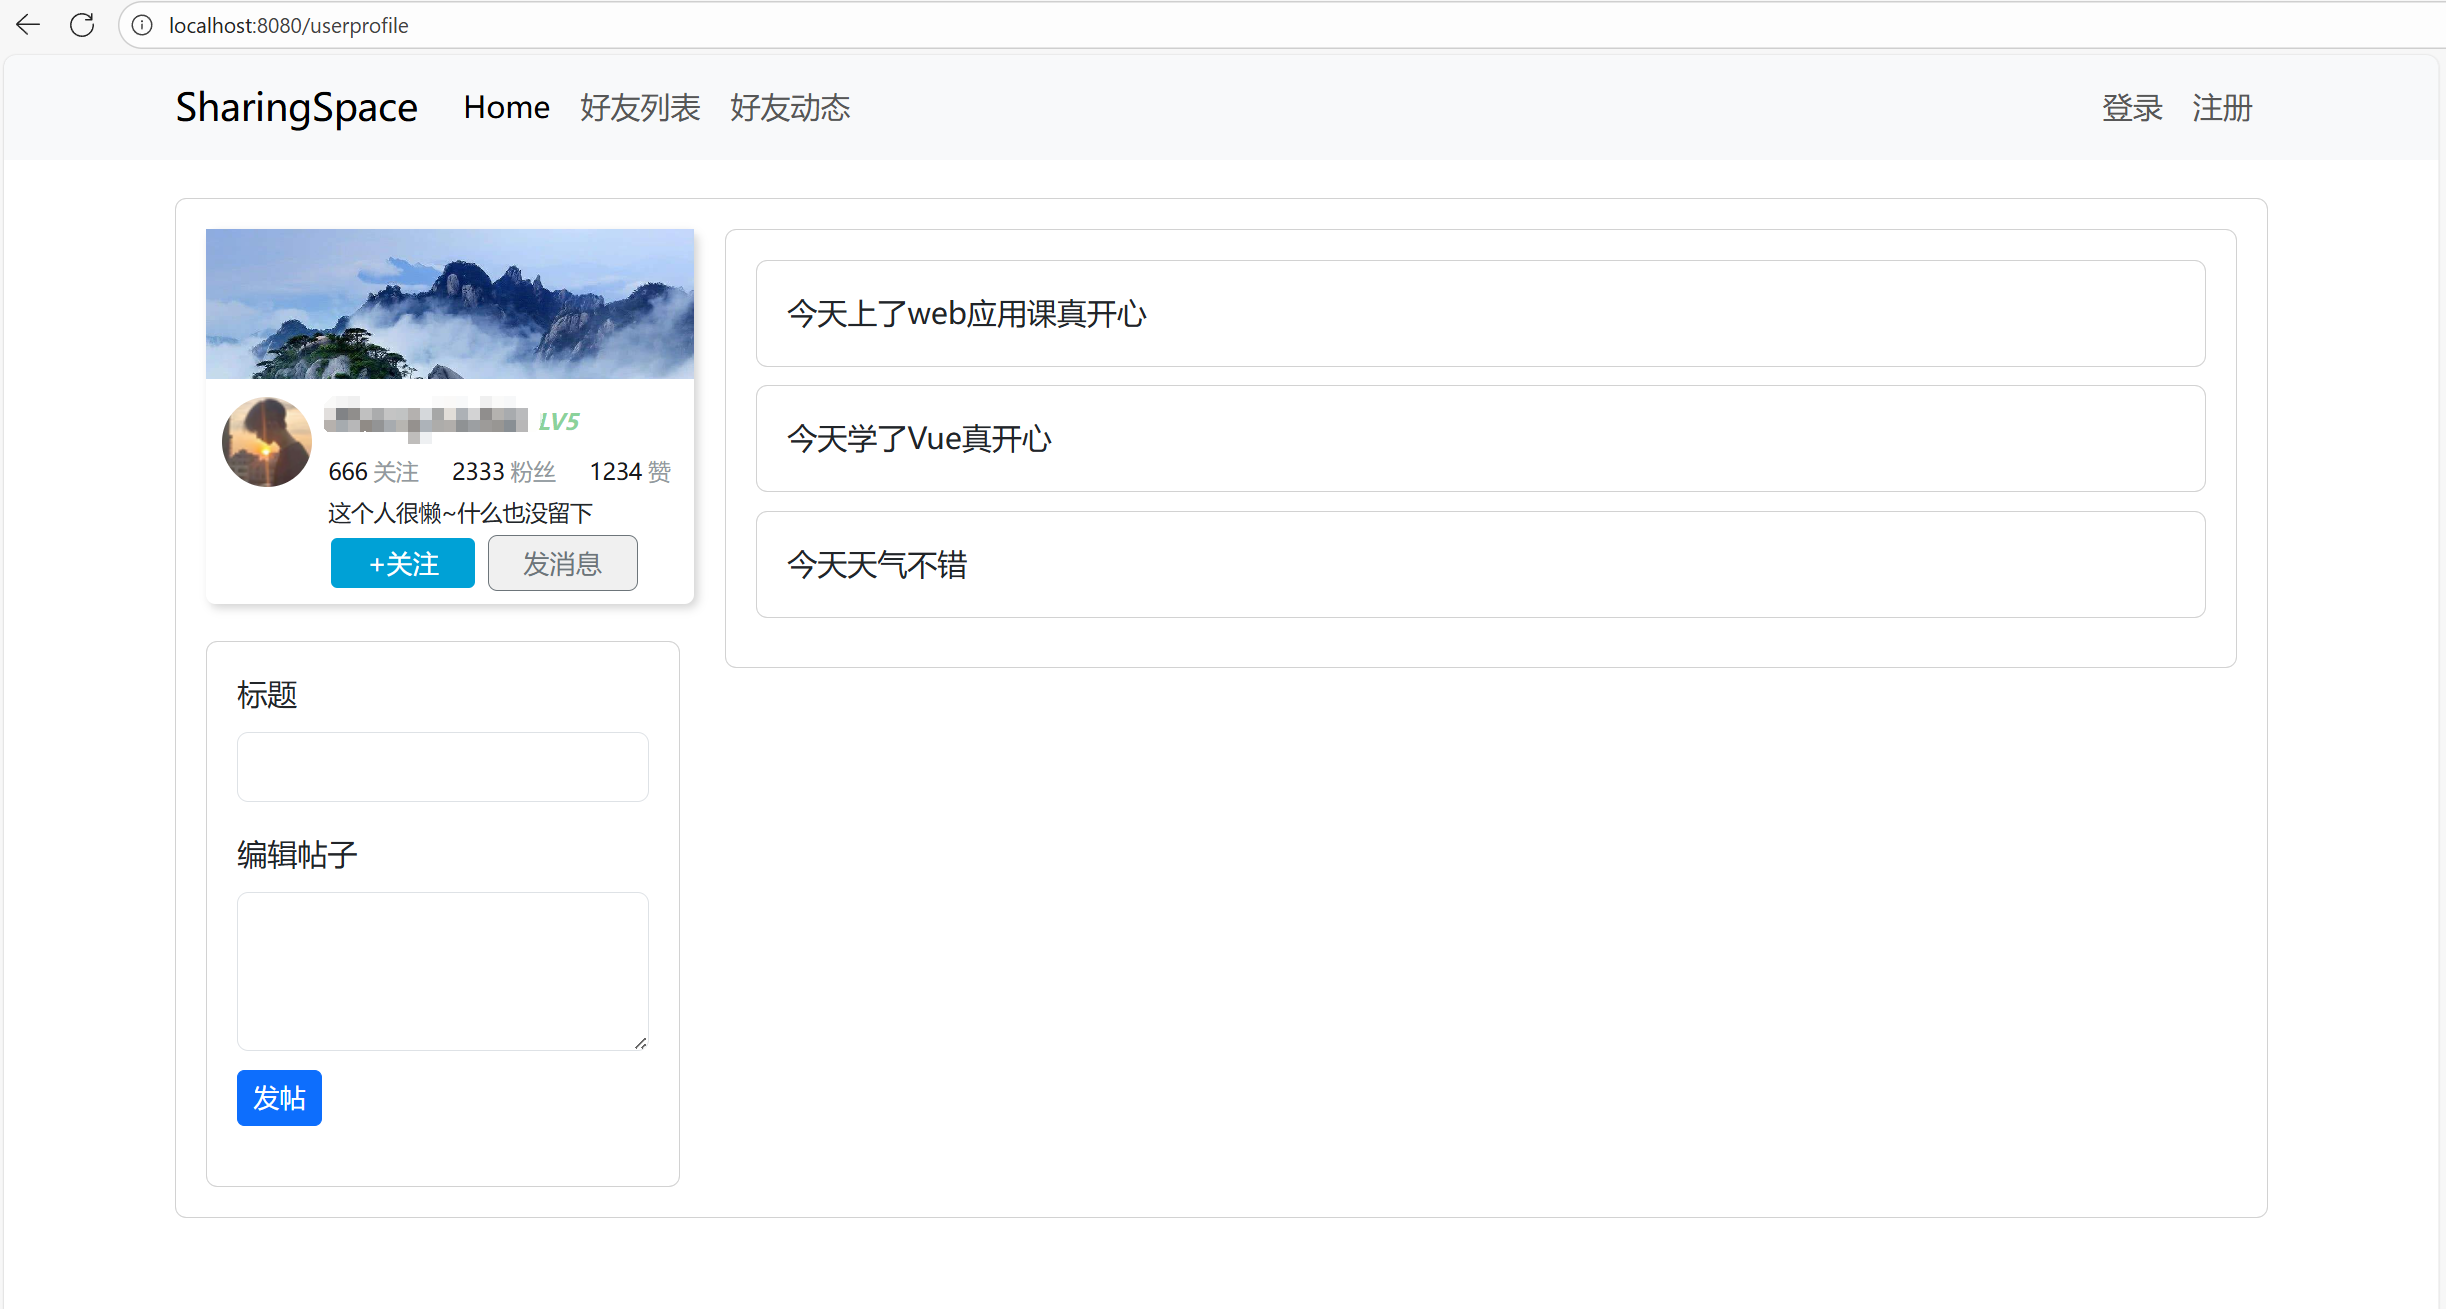
3)数据对象添加展示——帖子展示
- 1.在父组件中将帖子封装成一个数组对象:
UserProfile.vue:
const posts = reactive({count: 3,posts: [{id: 1,userId: 1,content: "今天上了web应用课真开心",},{id: 2,userId: 1,content: "今天学了Vue真开心",},{id: 3,userId: 1,content: "今天天气不错",},]});
- 2.展示帖子:
- 使用
v-for="post in posts.posts" :key="post.id"来遍历传过来的帖子对象数组,只展示其中post的content部分:
UserProfileContent.vue:
<template><div class="card"><div class="card-body"><div v-for="post in posts.posts" :key="post.id"><div class="card single-post"><div class="card-body">{{ post.content }}</div></div></div></div></div>
</template><script>export default {name: "UserProfileContent",props: {posts: {type: Object,required: true,},}
}
</script><style scoped>
.single-post {margin-bottom: 10px;
}
</style>
*3.完善UserEditProfile.vue发帖编辑区:
在bootstrap官网找到对应的编辑样式,直接复制过来修改:
<template><div class="card edit-field"><div class="card-body"><div class="mb-3"><label for="edit-title" class="form-label">标题</label><input type="email" class="form-control" id="exampleFormControlInput1"></div><div class="mb-3"><label for="edit-post" class="form-label">编辑帖子</label><textarea v-model="content" class="form-control" id="exampleFormControlTextarea1" rows="3"></textarea><button  type="button" class="btn btn-primary btn-sm" >发帖</button></div></div></div>
</template><script>
import { ref } from 'vue';export default {name: "UserEditProfile",setup(props, context) {let content = ref('');return {content,}}
}
</script><style scoped>.edit-field {margin-top: 20px;
}button {margin-top: 10px;
}
</style>- 页面展示:
4)动态对象添加——发帖并展示
- 在发帖编辑区编辑好帖子之后,点击发帖会上传到帖子展示区
- 这就涉及到
UserEditProfile区需要添加一个帖子对象到帖子数组中 - 属于子组件触发父组件传递的函数来修改数据
- 1.首先通过
v-model="content"获取到帖子编辑区的内容,作为参数传递给子组件中的submit_post函数 - 2.点击发帖按钮绑定子组件的
submit_post函数,点击时,触发子组件函数并传入content表示帖子的内容,从而触发父组件传递的submit_post函数,并传入content,而父组件中,如果该函数触发则会将content封装成一个贴子对象,通过unshift()添加到帖子数组的顶部,完成最新的动态展示
UserEditProfile.vue:
<template><div class="card edit-field"><div class="card-body"><div class="mb-3"><label for="edit-title" class="form-label">标题</label><input type="email" class="form-control" id="exampleFormControlInput1"></div><div class="mb-3"><label for="edit-post" class="form-label">编辑帖子</label><textarea v-model="content" class="form-control" id="exampleFormControlTextarea1" rows="3"></textarea><button @click="submit_post" type="button" class="btn btn-primary btn-sm" >发帖</button></div></div></div>
</template>
<script>
import { ref } from 'vue';export default {name: "UserEditProfile",setup(props, context) {let content = ref('');const submit_post = () => {context.emit("submit_post", content.value);content.value = "";}return {content,submit_post,}}
}
</script>
<style scoped>
.edit-field {margin-top: 20px;
}
button {margin-top: 10px;
}
</style>
UserProfileView.vue:
<template><ContentBase><div class="row"><div class="col-3"><UserInfo @follow="follow" @unfollow="unfollow" :user="user"/><UserEditProfileVue @submit_post="submit_post"/></div><div class="col-9"><UserProfileContent :posts="posts" /></div></div></ContentBase>
</template><script>
import ContentBase from '@/components/ContentBase.vue';
import UserInfo from '@/components/UserInfo.vue';
import UserProfileContent from '@/components/UserProfileContent.vue';
import { reactive } from 'vue';
import UserEditProfileVue from '@/components/UserEditProfile.vue';export default {name: 'UserProfileView',components: {ContentBase,UserInfo,UserProfileContent,UserEditProfileVue},setup() {const user = reactive({id: 1,username: "zhongliubin",lastName: "Zhong",firstName: "Liubin",followCount: 666,fans: 2333,favoriaties: 1234,is_followed: false,});const posts = reactive({count: 3,posts: [{id: 1,userId: 1,content: "今天上了web应用课真开心",},{id: 2,userId: 1,content: "今天学了Vue真开心",},{id: 3,userId: 1,content: "今天天气不错",},]});const follow = () => {if (user.is_followed) return;user.is_followed = true;user.fans ++;};const unfollow = () => {if (!user.is_followed) return;user.is_followed = false;user.fans --;};const submit_post = (content) => {if (content == '') return;posts.count ++;posts.posts.unshift({id: posts.count,userId: 1,content: content,});};return {user: user,follow,unfollow,posts,submit_post,}}
}
</script>
<style scoped>
</style>
- 页面展示:标题区并未完成,后续如果有时间再完善

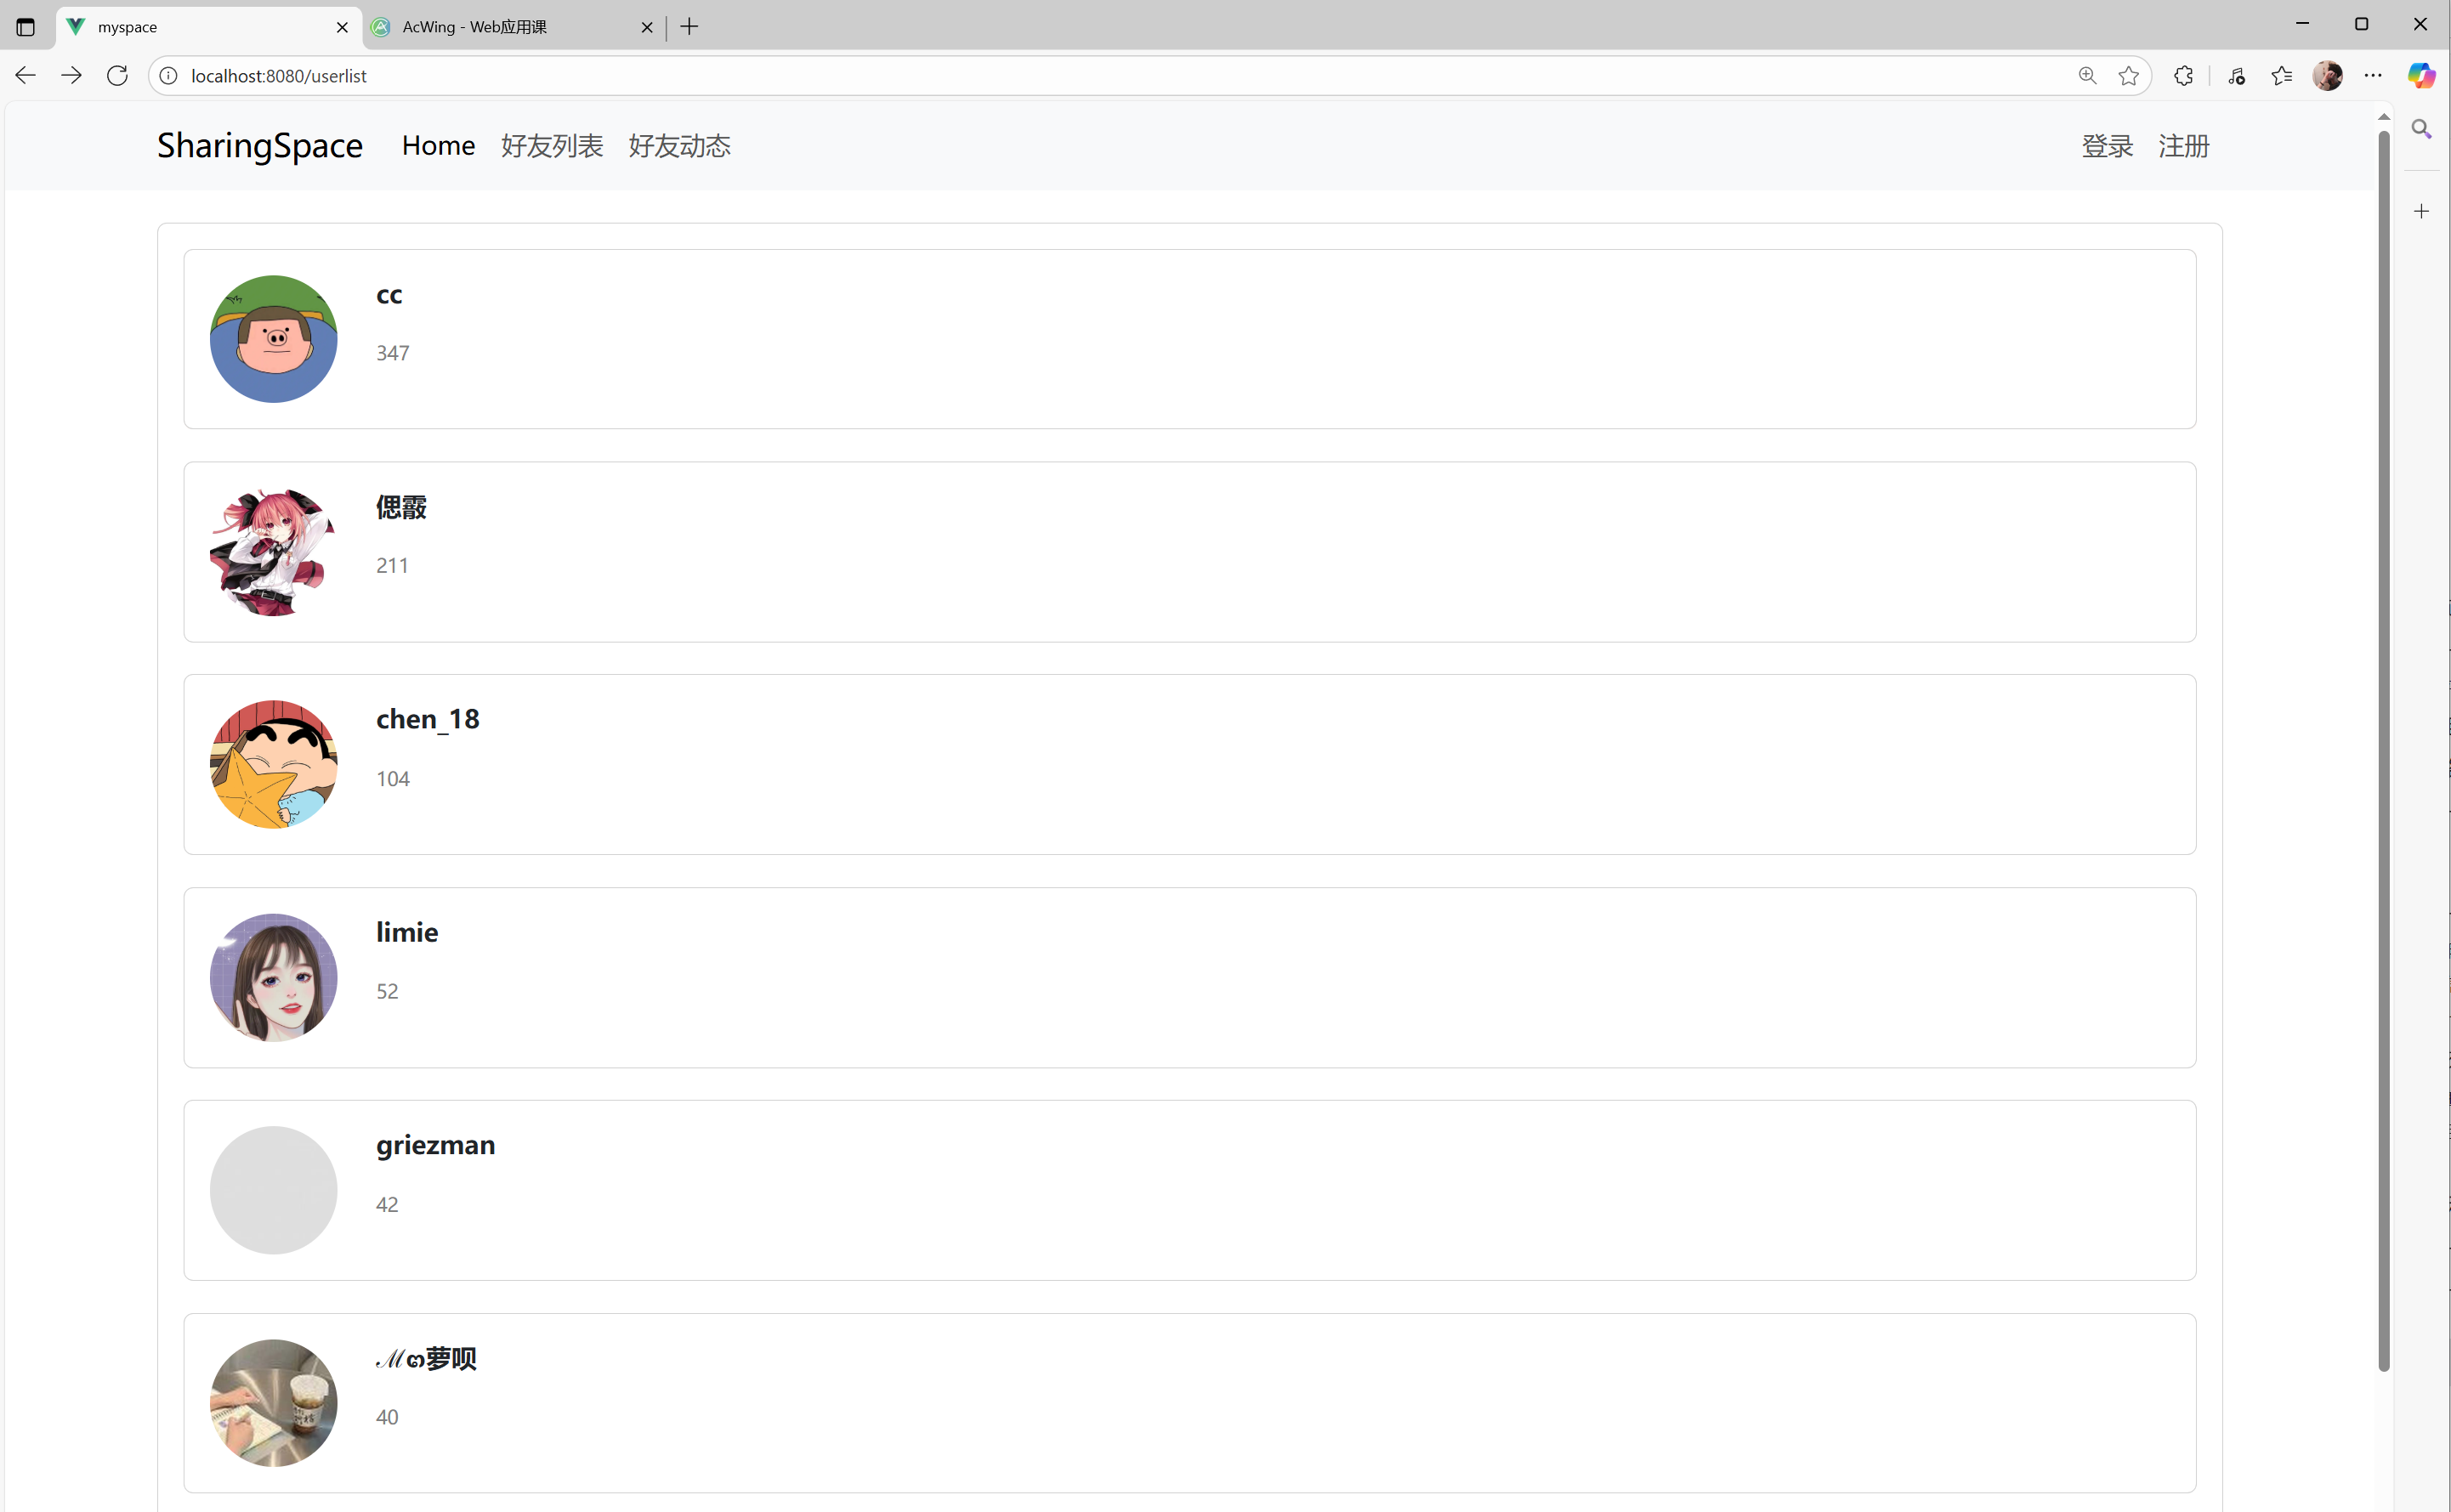
5)好友列表展示——模拟从云端获取好友数据
- 模拟从云端获取好友数据并展示
- 这里直接使用课程提供的API从云端获取数据,如果有兴趣,可以自己在服务器中实现该API
- 在
setup()中使用ref定义一个user数组,用于接收请求返回的user列表 - 然后将user列表中的信息通过
v-for="user in users" :key="user.id"获取到每个user的头像、用户名、粉丝数用于信息展示
UserListProfile.vue:
<template><ContentBase><div class="card" v-for="user in users" :key="user.id"><div class="card-body"><div class="row"><div class="col-1"><img class="img-fluid" v-bind:src="user.photo" alt=""></div><div class="col-11"><div class="username">{{ user.username }} </div><div class="followcount">{{ user.followerCount }}</div></div></div></div></div></ContentBase>
</template><script>
import ContentBase from '@/components/ContentBase.vue'
import $ from 'jquery';
import { ref } from 'vue';export default {name: 'UserListView',components: {ContentBase},setup() {let users = ref([]);$.ajax({url: 'https://app165.acapp.acwing.com.cn/myspace/userlist/',type: "GET",success(resp) {users.value = resp;}});return {users,};}
}
</script><style scoped>
img {border-radius: 50%;
}.username {font-weight: bold;height: 50%;
}.followcount {font-size: 12px;height: 50%;color: gray;
}.card {margin-bottom: 20px;cursor: pointer;
}.card:hover {box-shadow: 2px 2px 10px lightsalmon;transition: 500ms;
}
</style>
- 页面效果:
6)访问不同好友空间——链接添加参数访问不同id的空间页面
- 在访问空间页面时,是通过
userId来访问,于是路径中需要添加对应的参数 - 在
router.js添加:
{path: '/userprofile/:userId/',name: 'name-userprofile',component: UserProfileView},
如何取得链接中的参数
- 1.NavBar中,访问时需要用到参数,则需要设置访问路径的参数:
params: {}
<li class="nav-item"><router-link class="nav-link" :to="{name: 'name-userprofile', params: {userId: 2}}">好友动态</router-link>
</li>
- 2.使用
useRoute从而获取到链接中的参数:
const route = useRoute();console.log(route.params.userId);
7)登录
- 表单提交:
@submit.prevent="login",表单提交事件为login,并且阻止默认的表单提交行为 - 前端模拟:
<template><ContentBase><div class="row justify-content-center"><div class="col-3"><form @submit.prevent="login"><div class="mb-3"><label for="username" class="form-label">用户名</label><input v-model="username" type="text" class="form-control" id="username"></div><div class="mb-3"><label for="password" class="form-label">密码</label><input v-model="password" type="password" class="form-control" id="password"></div><div class="error-message">{{ error_message }}</div><button type="submit" class="btn btn-primary">登录</button></form></div></div></ContentBase>
</template><script>
import ContentBase from '@/components/ContentBase.vue'
import { ref } from 'vue';export default {name: 'LoginView',components: {ContentBase},setup() {let username = ref('');let password = ref('');let error_message = ref('');const login = () => {console.log(username.value, password.value);}return {username: username,password: password,error_message: error_message,login,}}
}
</script><style scoped>button {width: 100%;}
</style>
1. 登录状态的维护
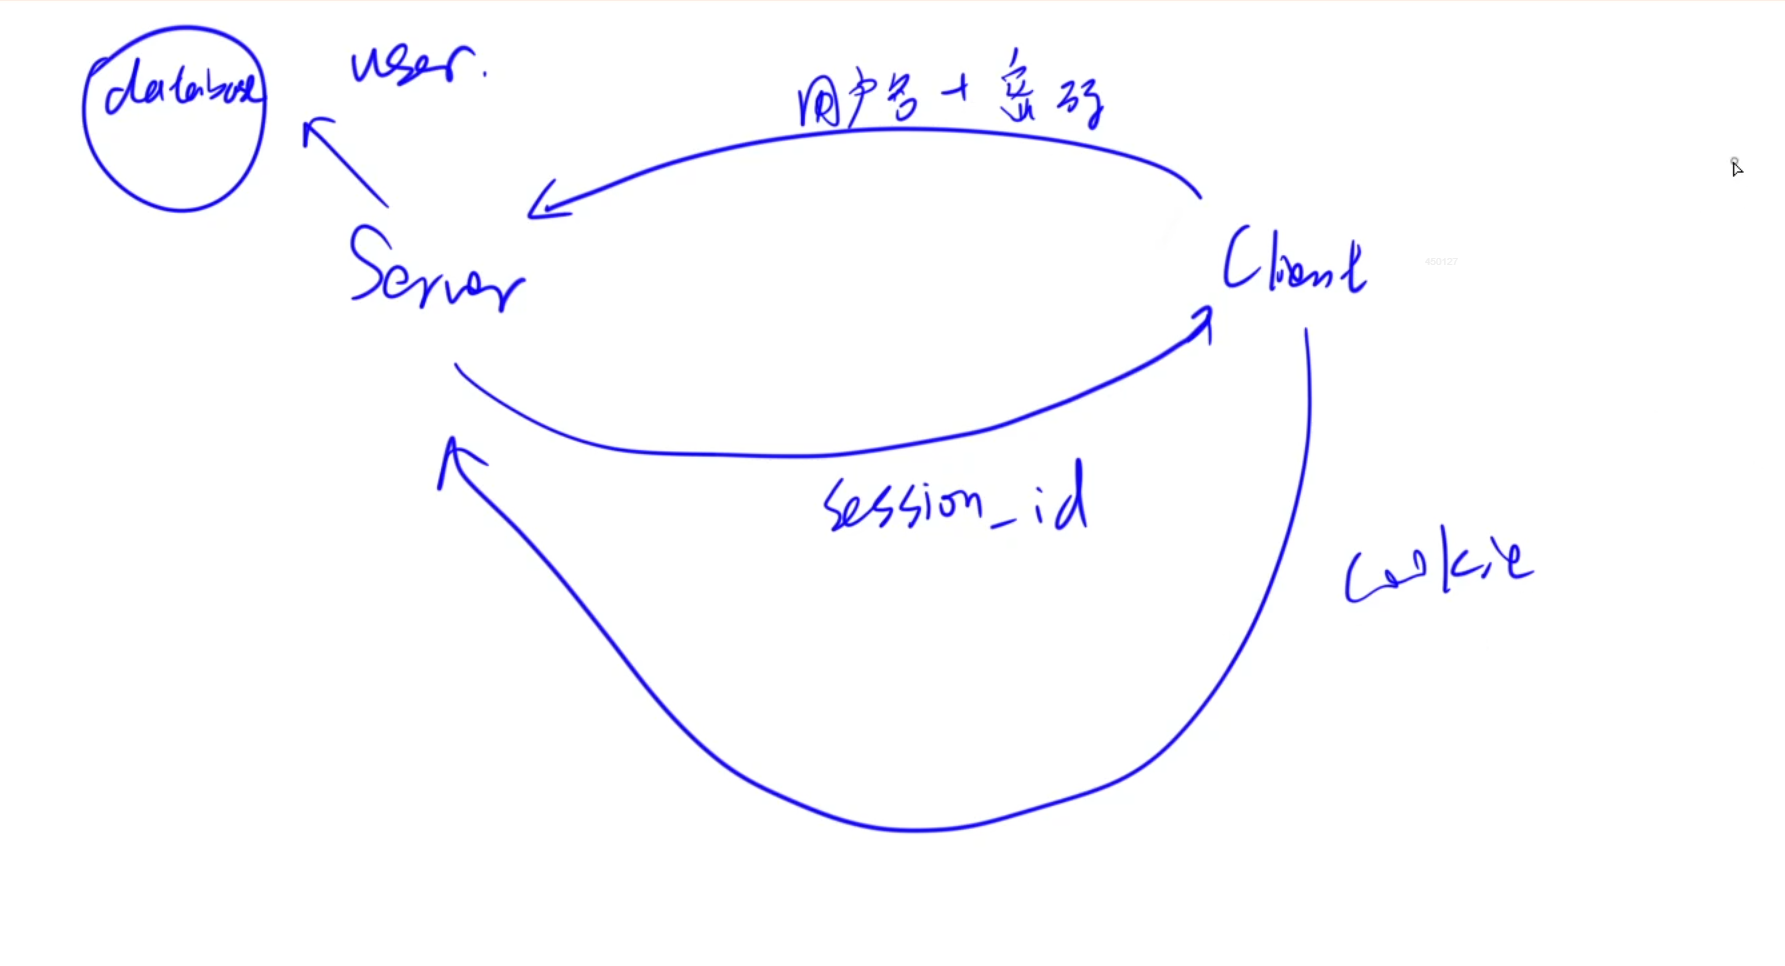
1.传统Session的登录维护方式:
* 用户输入用户名+密码去登录时,会访问服务器的登录验证
* 如果验证通过,服务器会通过`cookie`返回一个`session_id`给客户端,并将该`session_id`保存在数据库中,用于判断是属于哪个用户的登录验证
* 登录成功之后,用户每次向服务器发送请求,都会携带`session_id`,而服务器会去验证该`session_id`是否存在并且是属于该用户,通过则可以继续访问
* Session 过期与销毁:`Session` 有一个有效期限,一般通过设置一个固定的时间,或者在一定时间内没有用户活动时会将 `Session `标记为过期。当` Session `过期时,服务器会销毁对应的 `Session` 数据,释放内存或其他资源。
- 传统的
cookie维护登录方式,在面对跨域访问时,由于js限制无法访问不同源的的资源,cookie是有跨域问题的,详细介绍参考Cookie、Session、Token的区别
2.jwt维护跨域的登录状态(JSON Web Token)
-
1.用户输入用户名+密码进行登录时,首先会验证用户名和密码是否正确
-
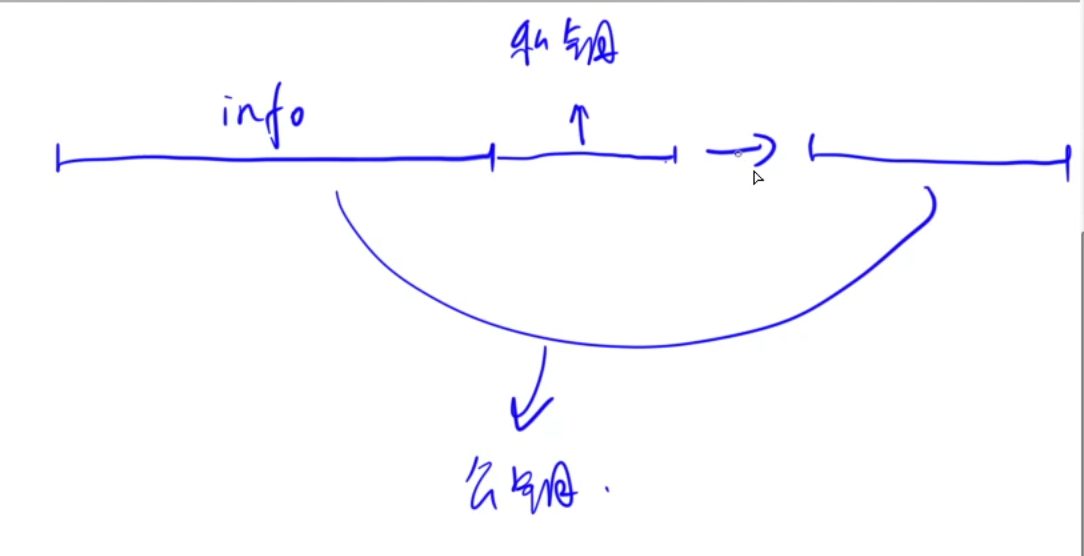
2.验证通过则由服务器将用户的一些信息
info+ 服务器本地配置的私钥(一个字符串)通过加密算法得到一个新的Token,而这个Token会与info一起返回给客户端 -
3.当客户端向服务器发送请求时,每次需要携带该
Token和info,接收到请求后,服务器会将info与本地的私钥进行拼接,再通过同一个加密算法求出此次请求返回的加密值是多少,将该加密值与客户端传回的token进行比对 -
4.如果一致则允许访问,如果不一样则说明该信息被修改了,不合法,不允许访问。
-
过期与销毁:可以在info中设置有效期,设置公钥颁发的有效期,如果超过时间则该token过期,需要重新登录并颁发新的token
-
该状态的安全性是由加密算法保证的:
info+私钥 -> token是很容易的,但是如果想通过token + info -> 私钥是几乎无法在短时间内突破的,如果我们修改了info的信息,由于无法获取私钥的值,那么加密产生的token必然是不同的。
-
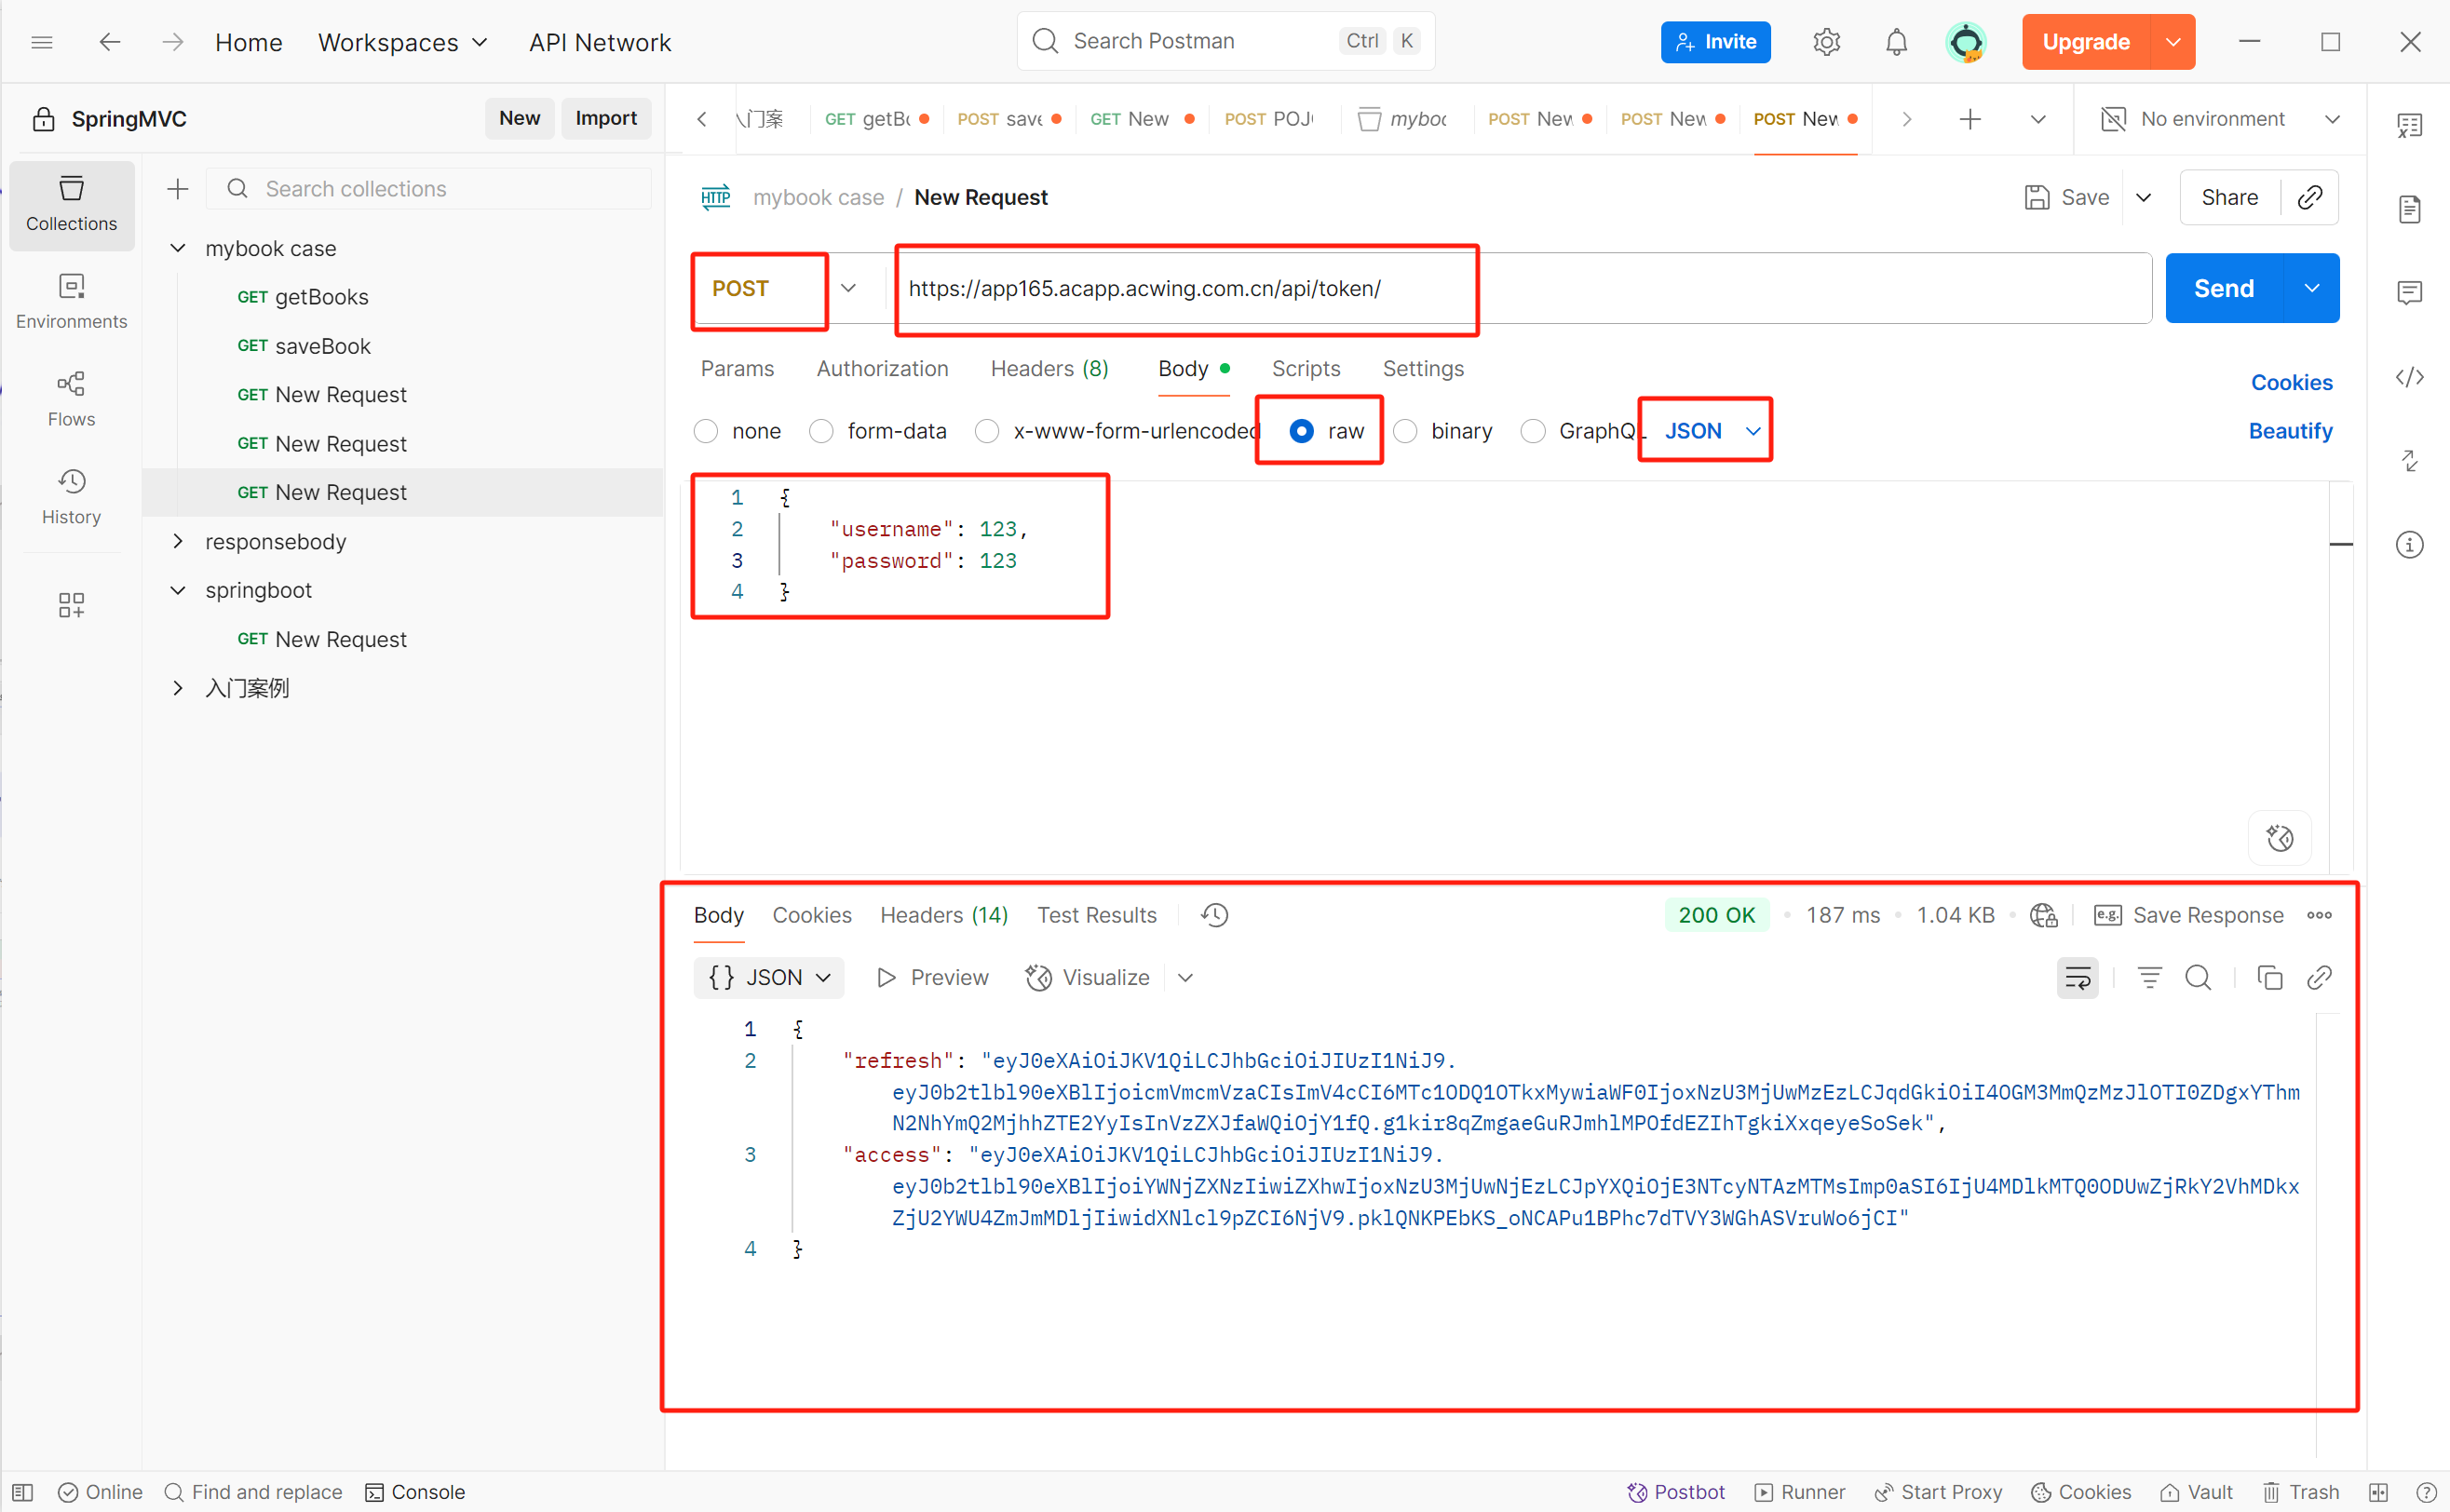
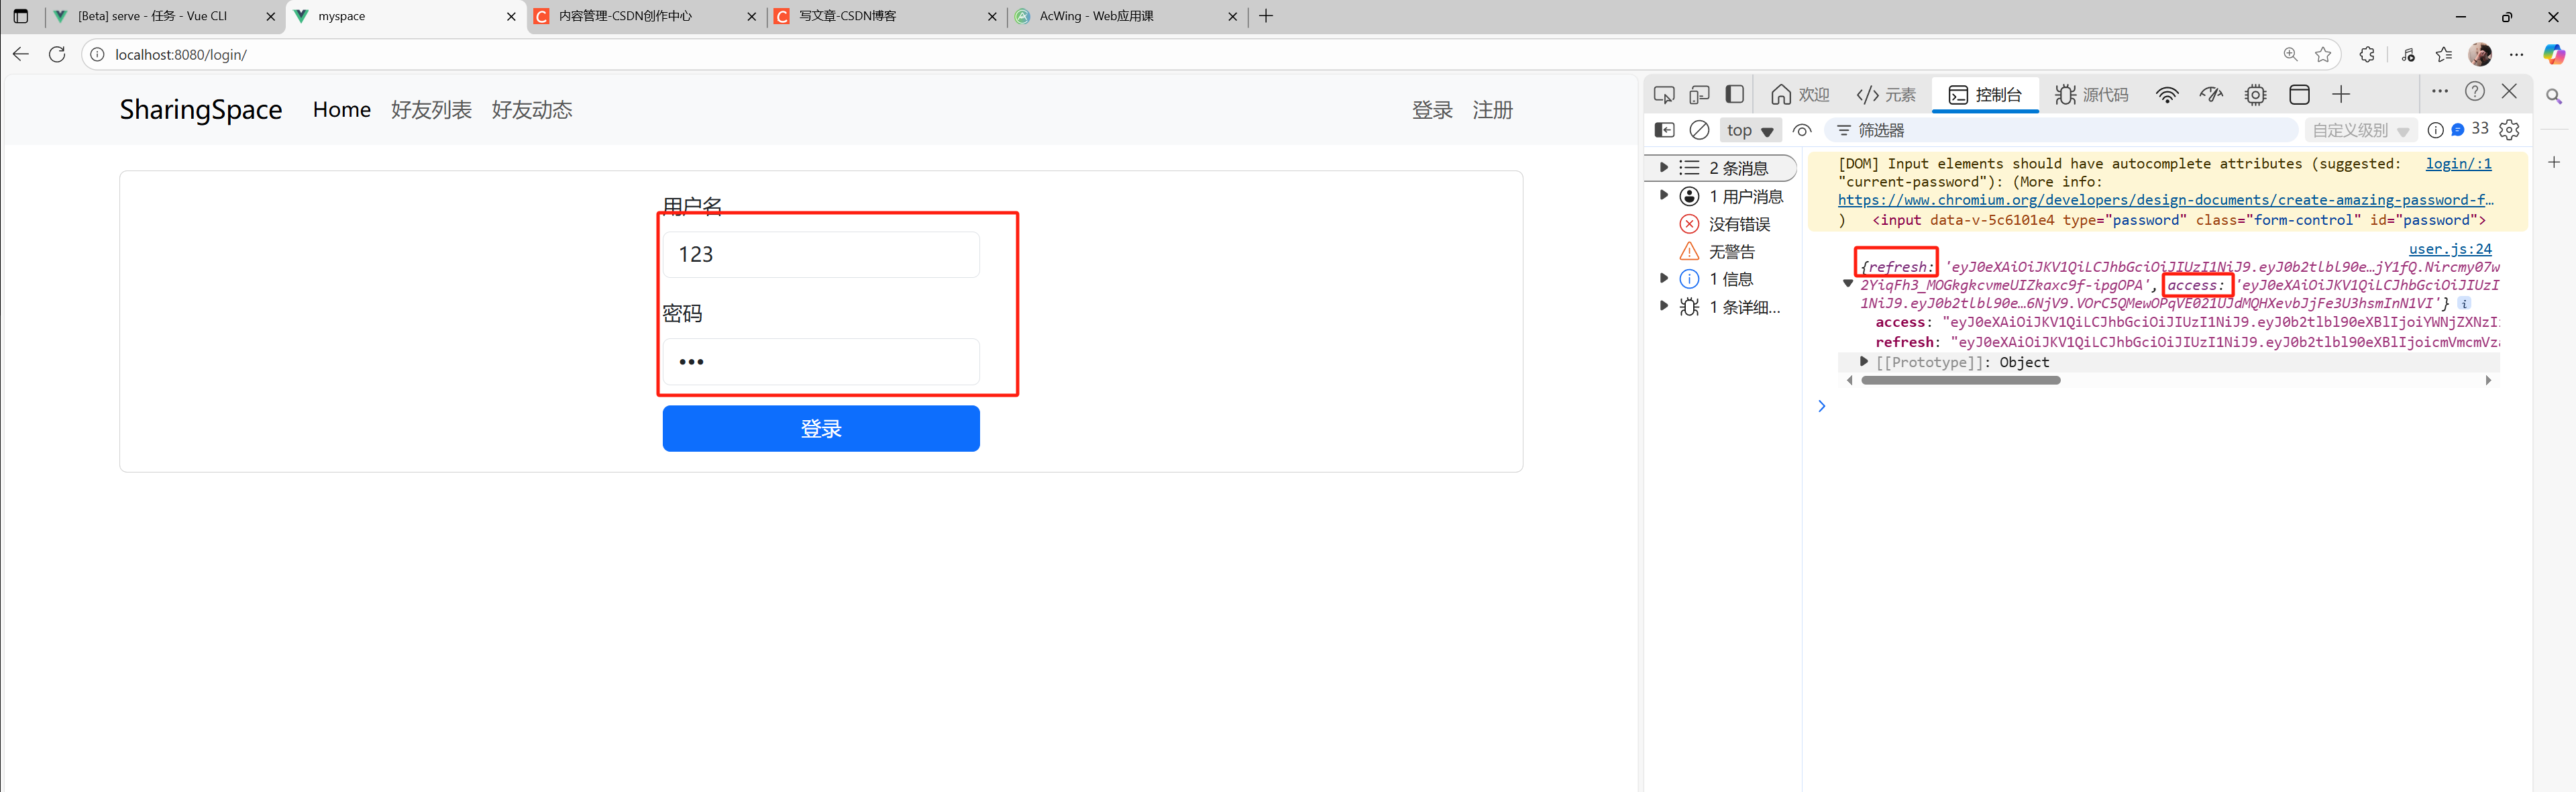
通过
postman查看后端服务器提供的api返回的jwt:
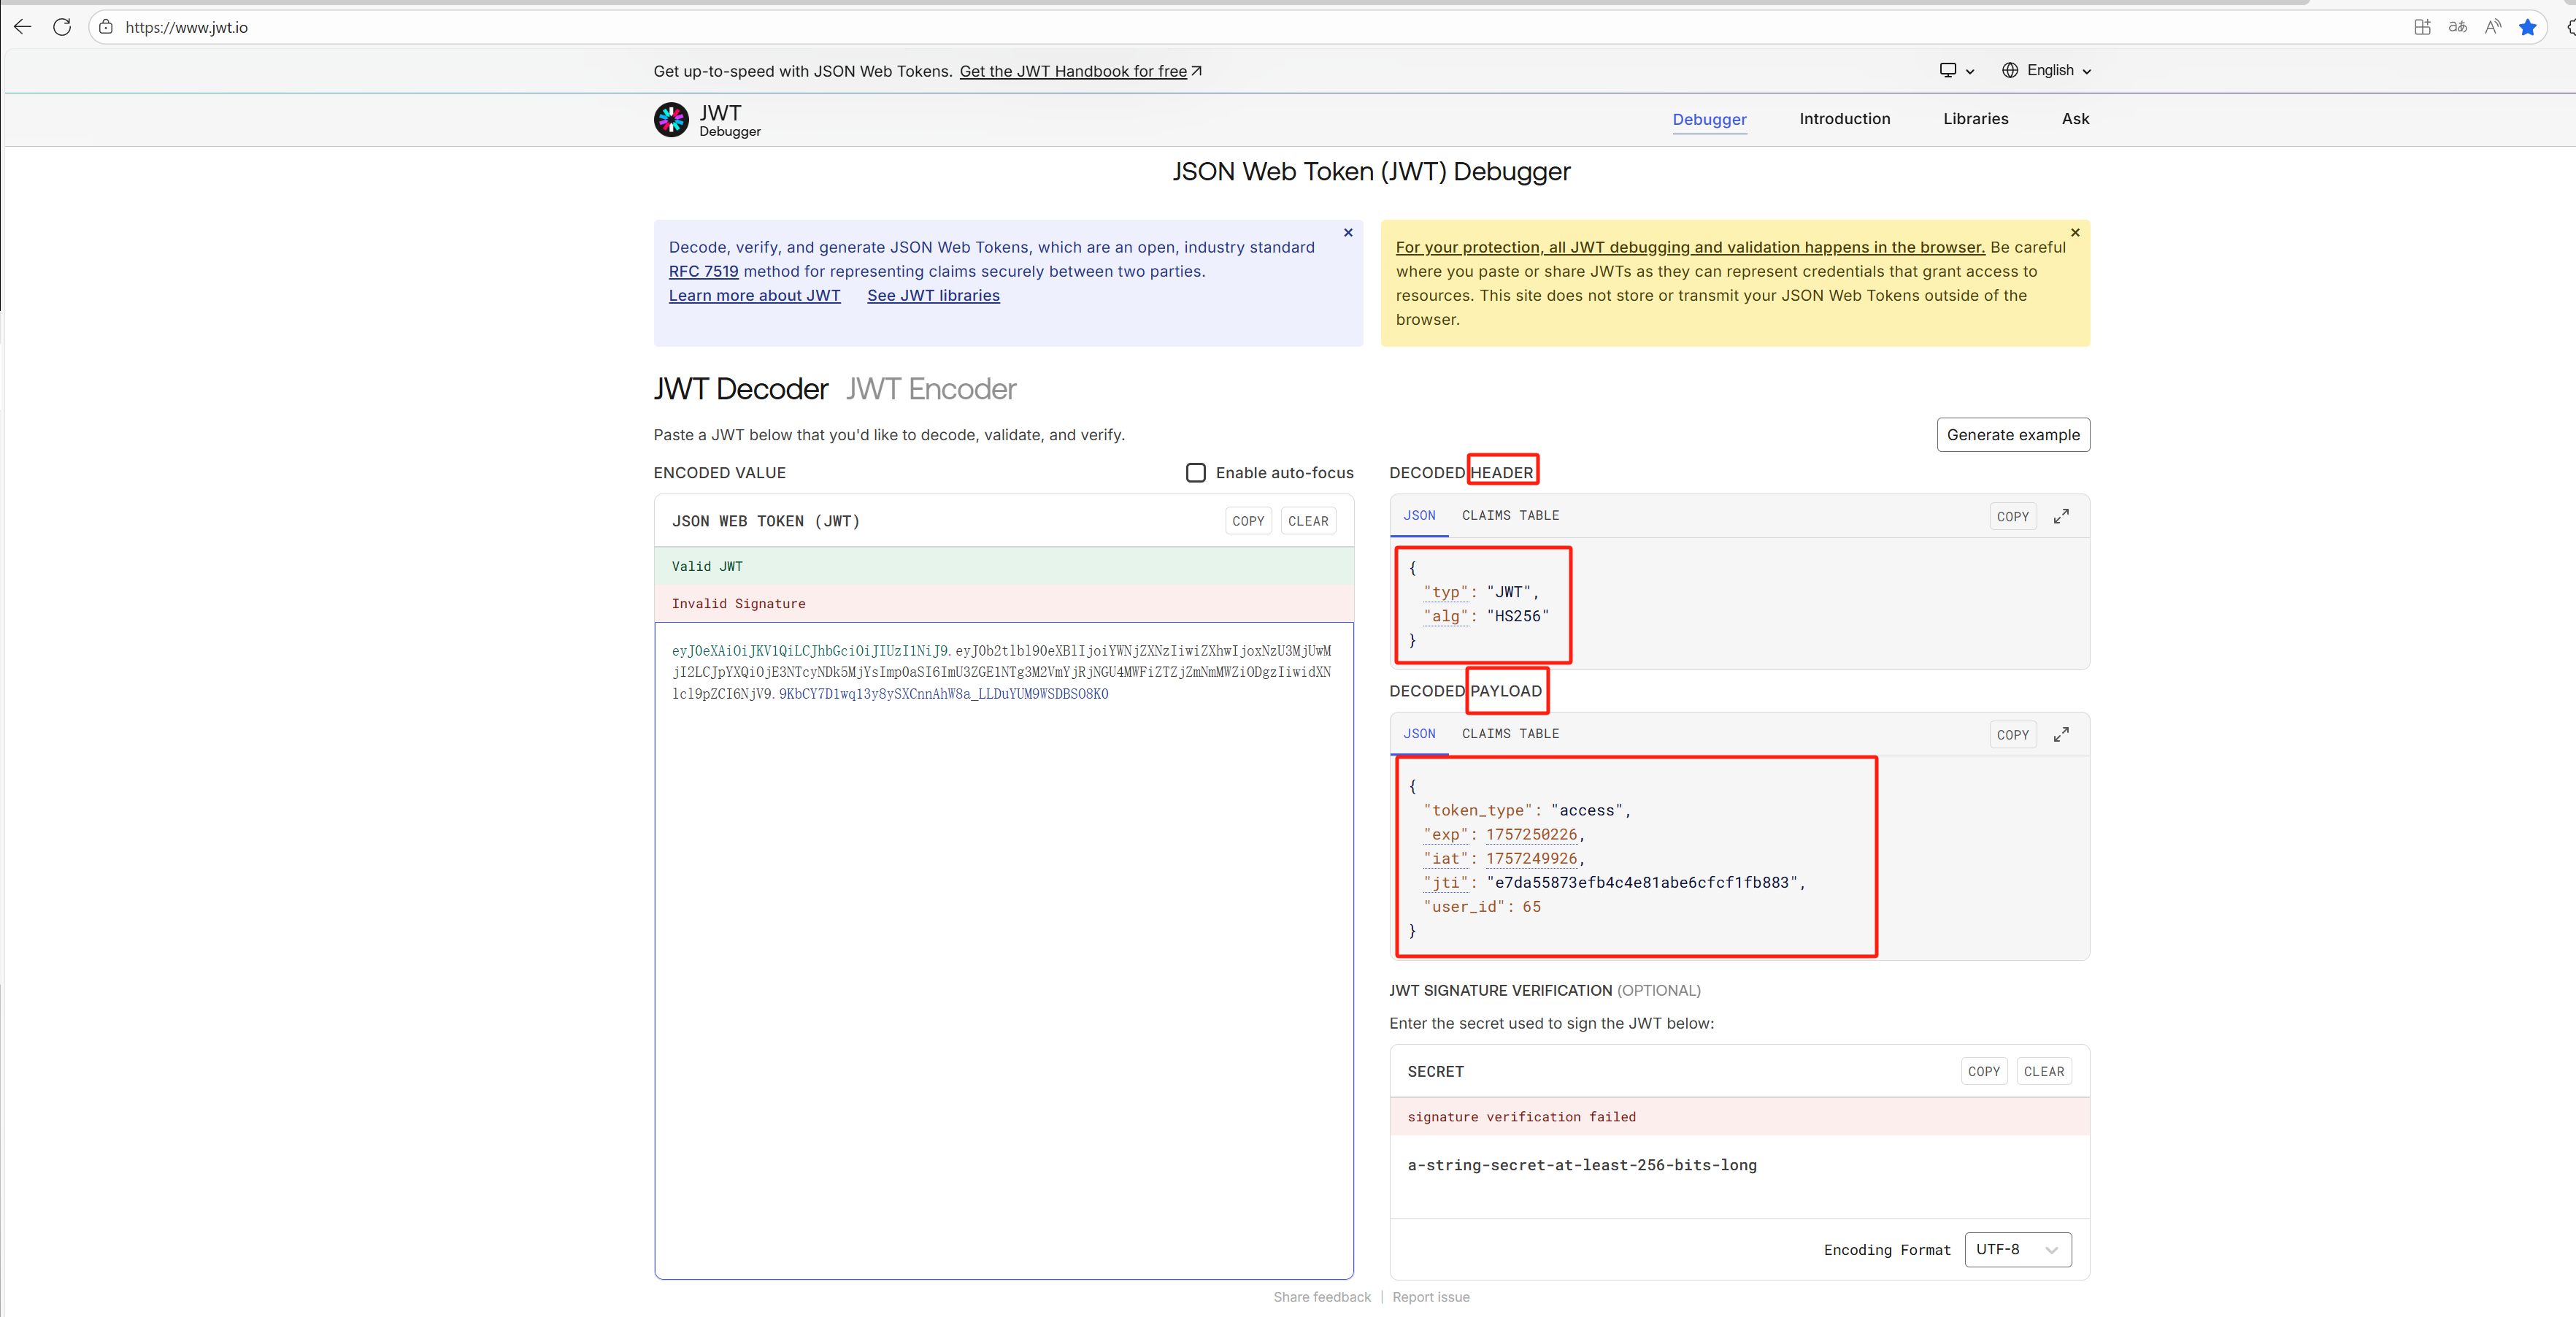
-
通过jwt的解析网站查看jwt中包含的信息:
-
access: 访问令牌,有效期5分钟, 直接获取服务器端的认证jwt
refresh: 刷新令牌,有效期14天 -
为什么还要有
refresh令牌,GET请求的api会将参数添加到路径上,不安全,所以access的令牌有效期较短,而refresh的令牌是通过POST请求获取的,将refresh的令牌传入就能获取到一个新的access令牌,每次access令牌过期,就会将refresh令牌传到refreshapi中,重新获取一个新的access令牌
补充知识点一、什么是跨域
跨域是指浏览器出于安全考虑,限制网页脚本访问不同源(协议、域名、端口)的资源。两个URL的协议、域名或端口任意一个不相同时,就属于不同源,浏览器会阻止脚本请求从一个源加载的文档与另一个源的资源进行交互。
补充知识点二、跨域产生的原因
跨域问题产生的根本原因是浏览器的同源策略(Same-Origin Policy)。同源策略是浏览器实现的一种安全协议,它限制了一个源的文档或脚本如何与另一个源的资源进行交互。如果没有同源策略,恶意网页可能会读取另一个网页的敏感信息,如用户输入的密码、银行账号等,从而进行非法操作。
2.维护全局变量
- 用户信息需要维护成一个全局变量,便于各个组件获取
- Vue中使用
vuex维护state,存储全局变量 - 为了使各个部分的信息独立,新增
module:user.js:主要存放user的个人信息 - 这样就可以通过
store.state.user获取user里面的相关信息
store.index.js
import { createStore } from 'vuex'
import ModuleUser from './user'export default createStore({state: {},getters: {},mutations: {},actions: {},modules: {user: ModuleUser,}
})
store.user.js
const ModuleUser = ({state: {id: "",username: "",photo: "",followerCount: 0,},getters: {},mutations: {},actions: {},modules: {}
});
export default ModuleUser;
state:主要维护变量getters:读取state的信息,然后进行运算等actions:定义对state信息的异步更新操作mutations:对state信息的同步更新操作
3.登录的实现
1.获取jwt-token令牌
- 定义异步请求方法
login:通过用户名和密码以POST请求形式访问后端api(https://app165.acapp.acwing.com.cn/api/token/),成功的话会返回令牌通过resp参数接收
user.js:
import $ from 'jquery';const ModuleUser = ({state: {id: "",username: "",photo: "",followerCount: 0,},getters: {},mutations: {},actions: {login(context, data) {$.ajax({url: "https://app165.acapp.acwing.com.cn/api/token/",type: "POST",data: {username: data.username,password: data.password,},success(resp) {console.log(resp);}});}},modules: {}
});export default ModuleUser;- 在
LoginView中通过调用store.dispathc("login")来触发登录令牌的请求,传入参数为从登录文本框和密码文本框获取的用户名和密码,并且添加了登录成功和失败的回调函数
LoginView.vue:
<script>
import ContentBase from '@/components/ContentBase.vue'
import { ref } from 'vue';
import { useStore } from 'vuex';export default {name: 'LoginView',components: {ContentBase},setup() {const store = useStore();let username = ref('');let password = ref('');let error_message = ref('');const login = () => {store.dispatch("login", {username: username.value,password: password.value,success() {console.log("success");},error() {console.log("failed");}});};return {username: username,password: password,error_message: error_message,login,}}
}
</script>
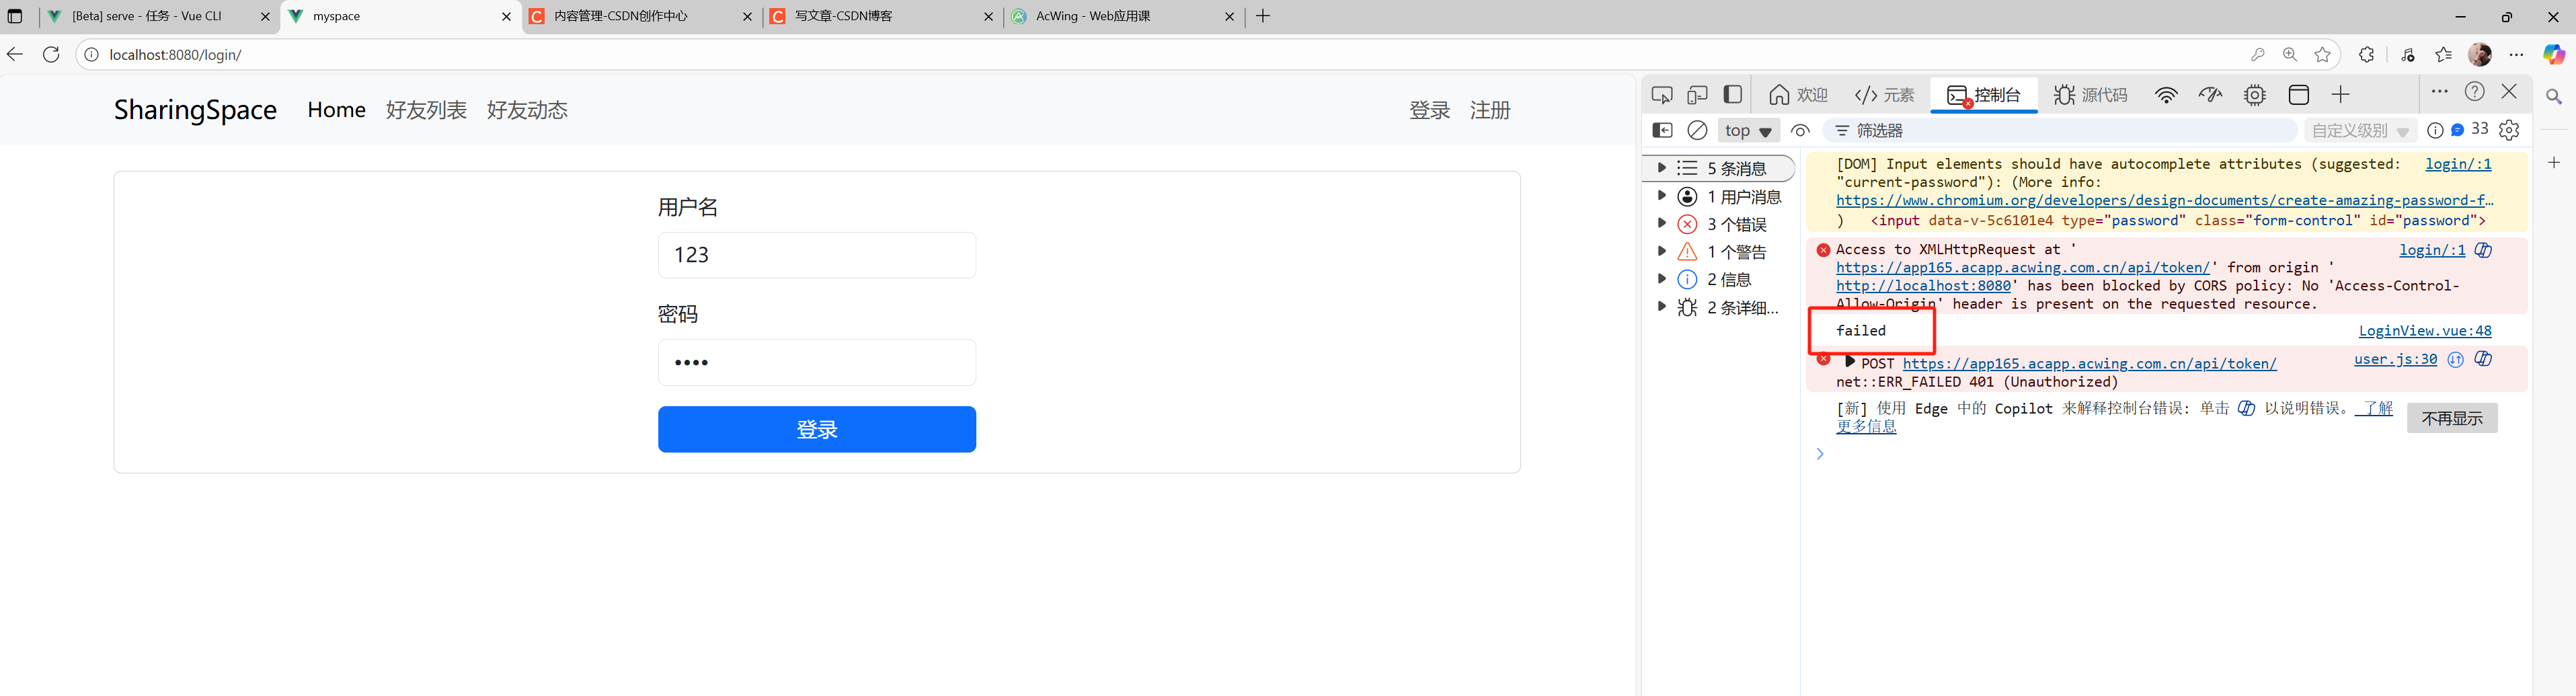
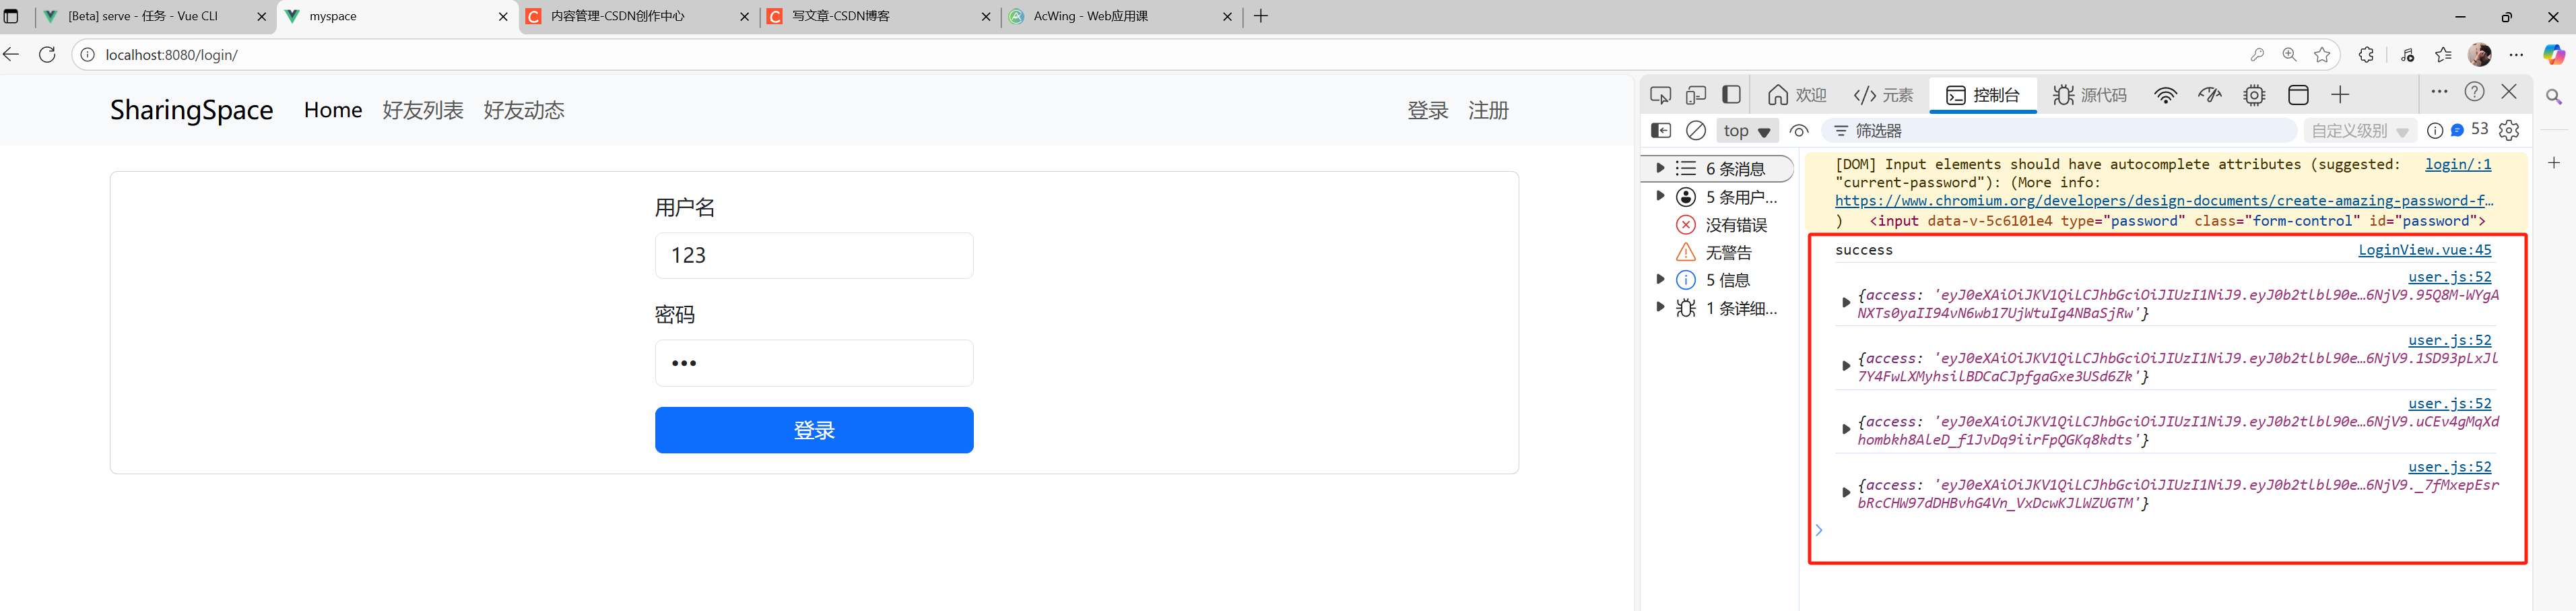
- 为了直观只展示script部分
- 请求结果展示:
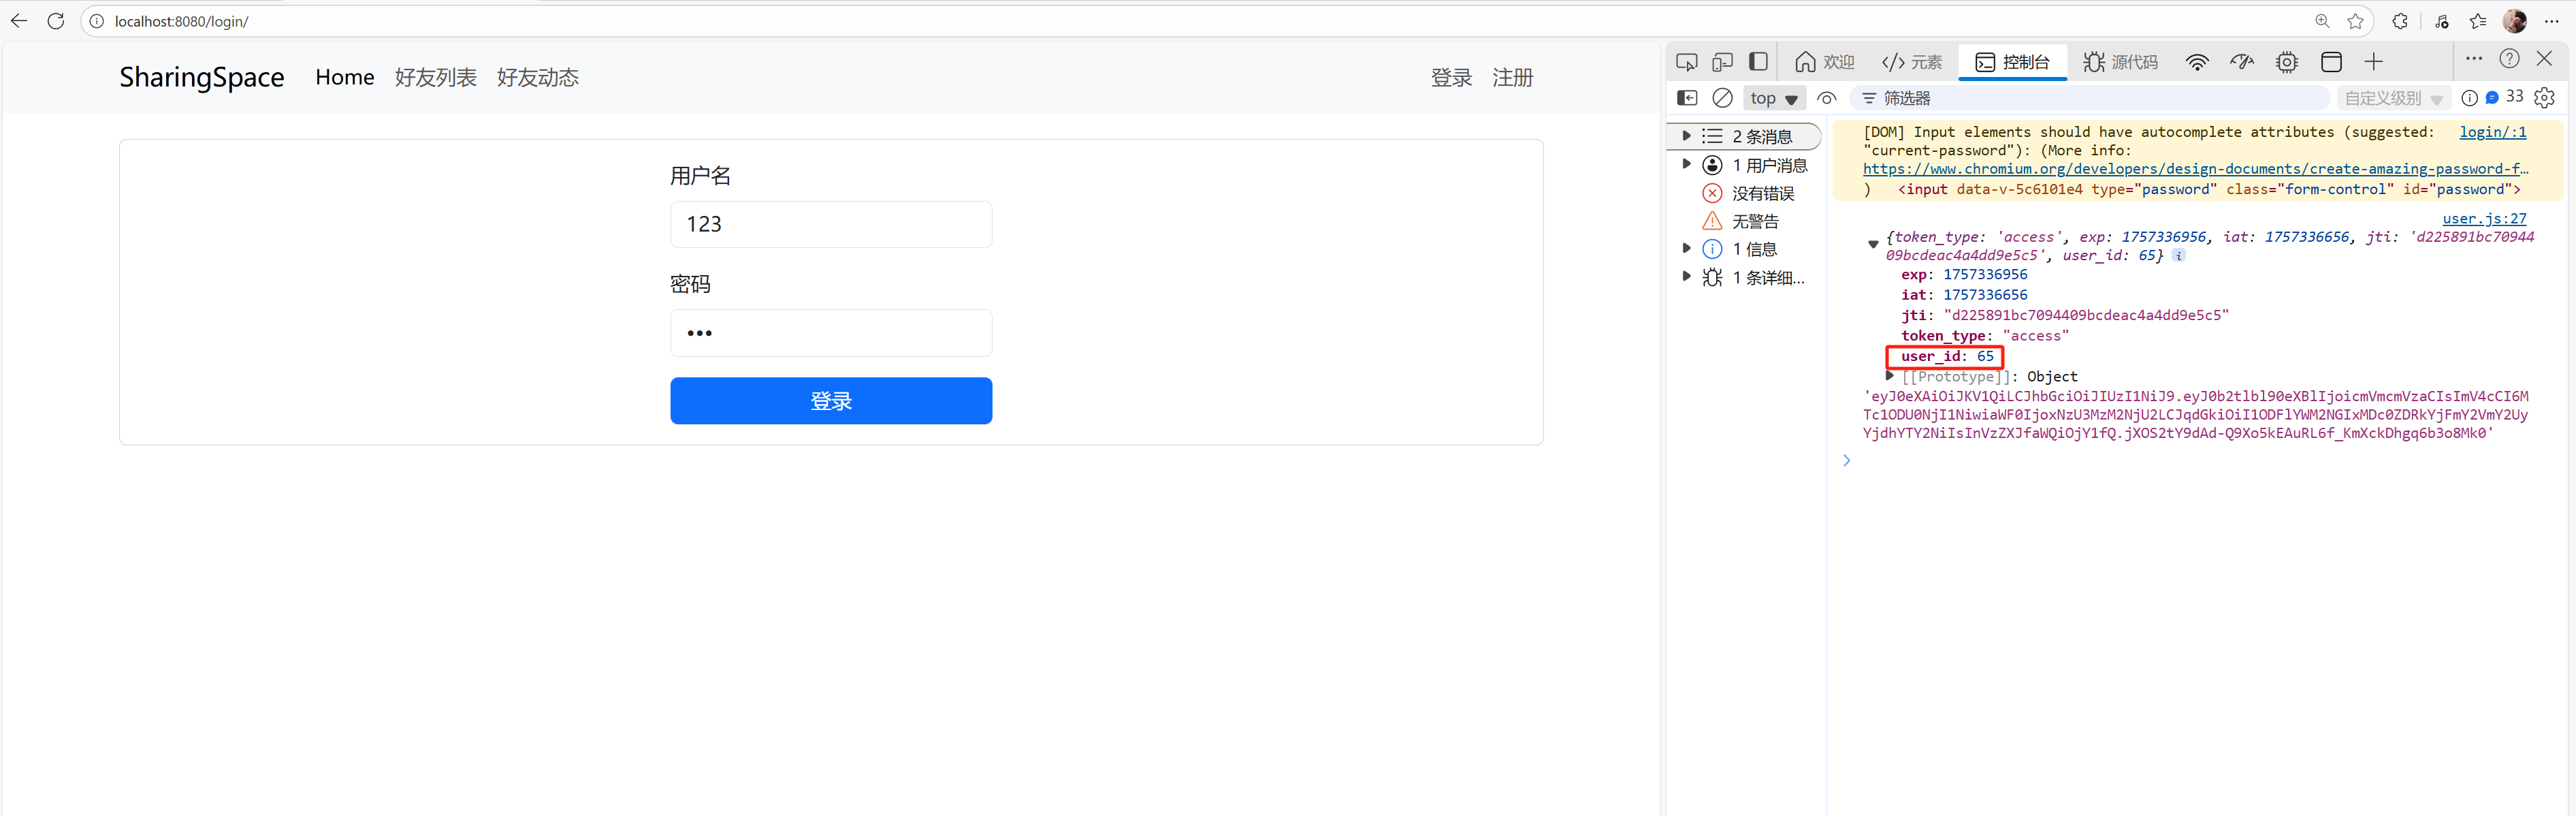
2.解析jwt-token得到用户在数据库中的user_id
- 使用jwtDecode函数来解析获取到的jwt-token:
import { jwtDecode } from “jwt-decode”;
user.js:
import $ from 'jquery';
import { jwtDecode } from 'jwt-decode';const ModuleUser = ({state: {id: "",username: "",photo: "",followerCount: 0,},getters: {},mutations: {},actions: {login(context, data) {$.ajax({url: "https://app165.acapp.acwing.com.cn/api/token/",type: "POST",data: {username: data.username,password: data.password,},success(resp) {const {refresh, access} = resp;const access_info = jwtDecode(access);console.log(access_info, refresh);}});}},modules: {}
});
export default ModuleUser;
- 获取结果:
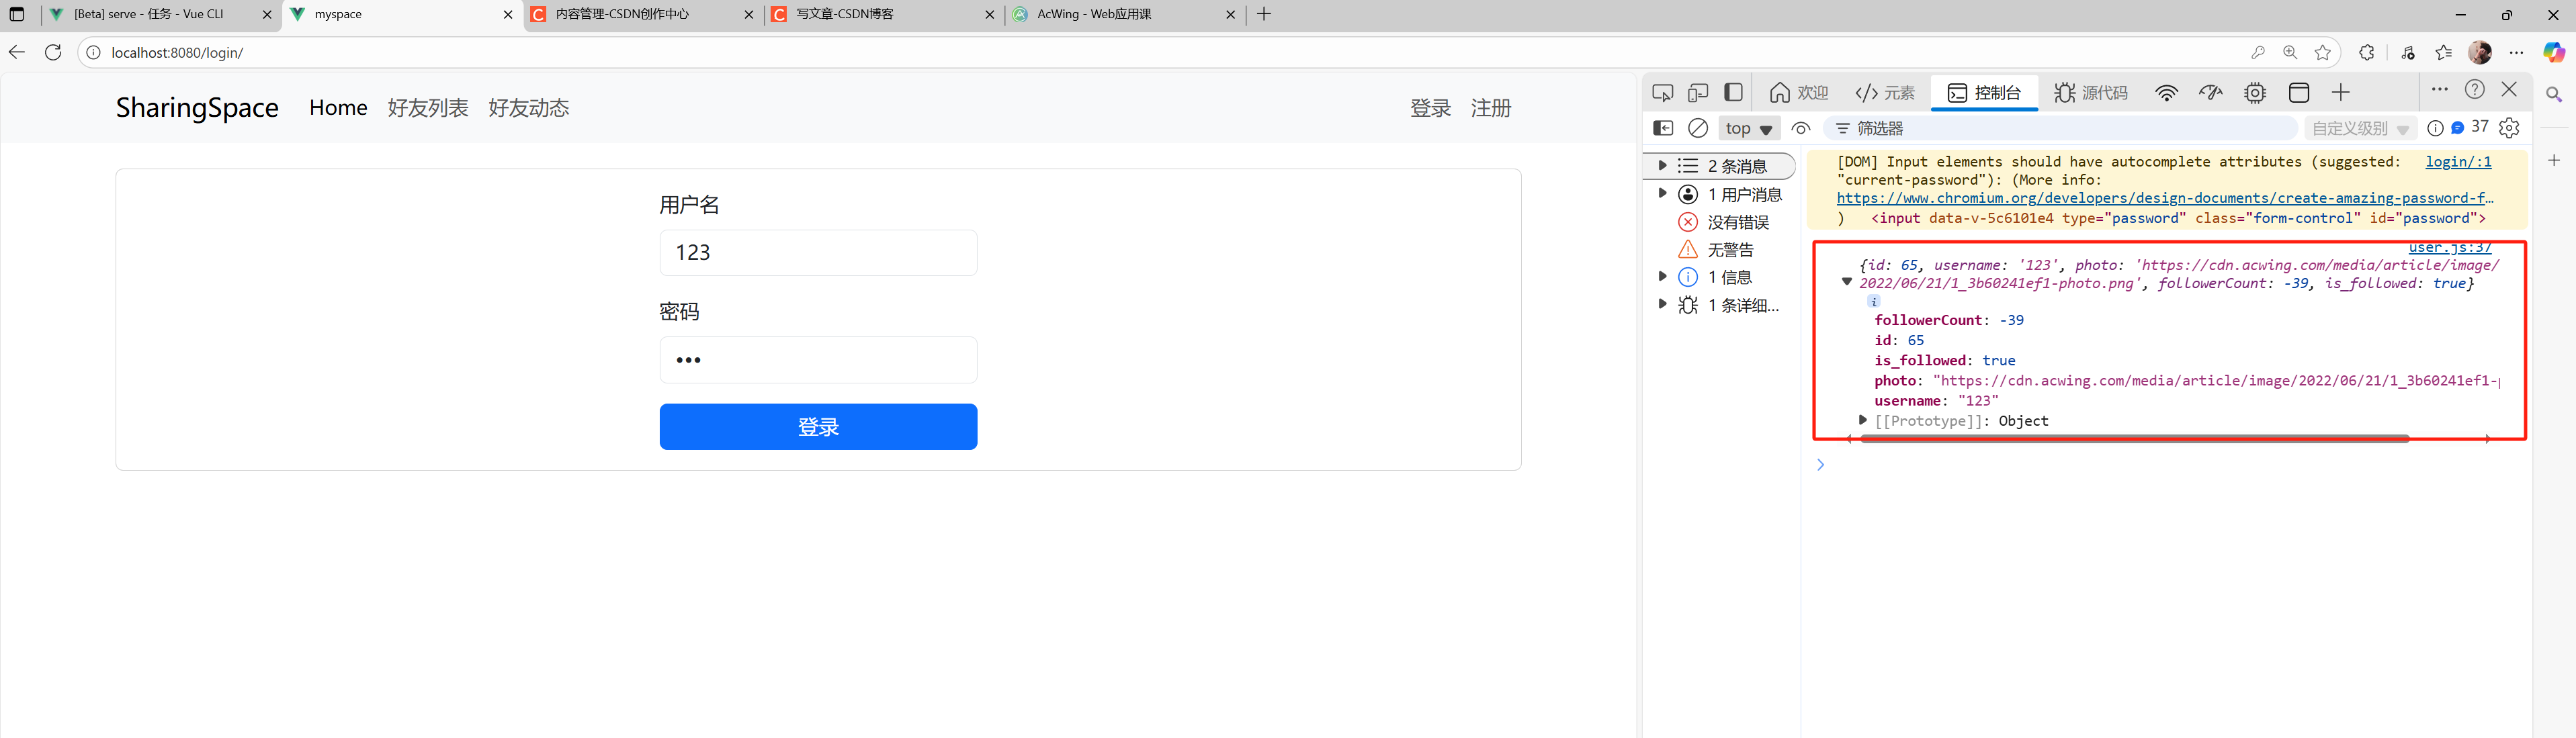
3.通过user_id获取用户信息
- 用户的详细信息一般是需要jwt验证才能获取
- 所以当得到
user_id后,通过该user_id向后端发送获取用户信息的请求(需要携带jwt-token)
user.js:
import $ from 'jquery';
import { jwtDecode } from 'jwt-decode';const ModuleUser = ({state: {id: "",username: "",photo: "",followerCount: 0,},getters: {},mutations: {},actions: {login(context, data) {$.ajax({url: "https://app165.acapp.acwing.com.cn/api/token/",type: "POST",data: {username: data.username,password: data.password,},success(resp) {const {access} = resp;const access_info = jwtDecode(access);$.ajax({url: "https://app165.acapp.acwing.com.cn/myspace/getinfo/",type: "GET",data: {user_id: access_info.user_id,},headers: {'Authorization': "Bearer " + access,},success(resp) {console.log(resp);}});}});}},modules: {}
});export default ModuleUser;- 用户信息获取结果:
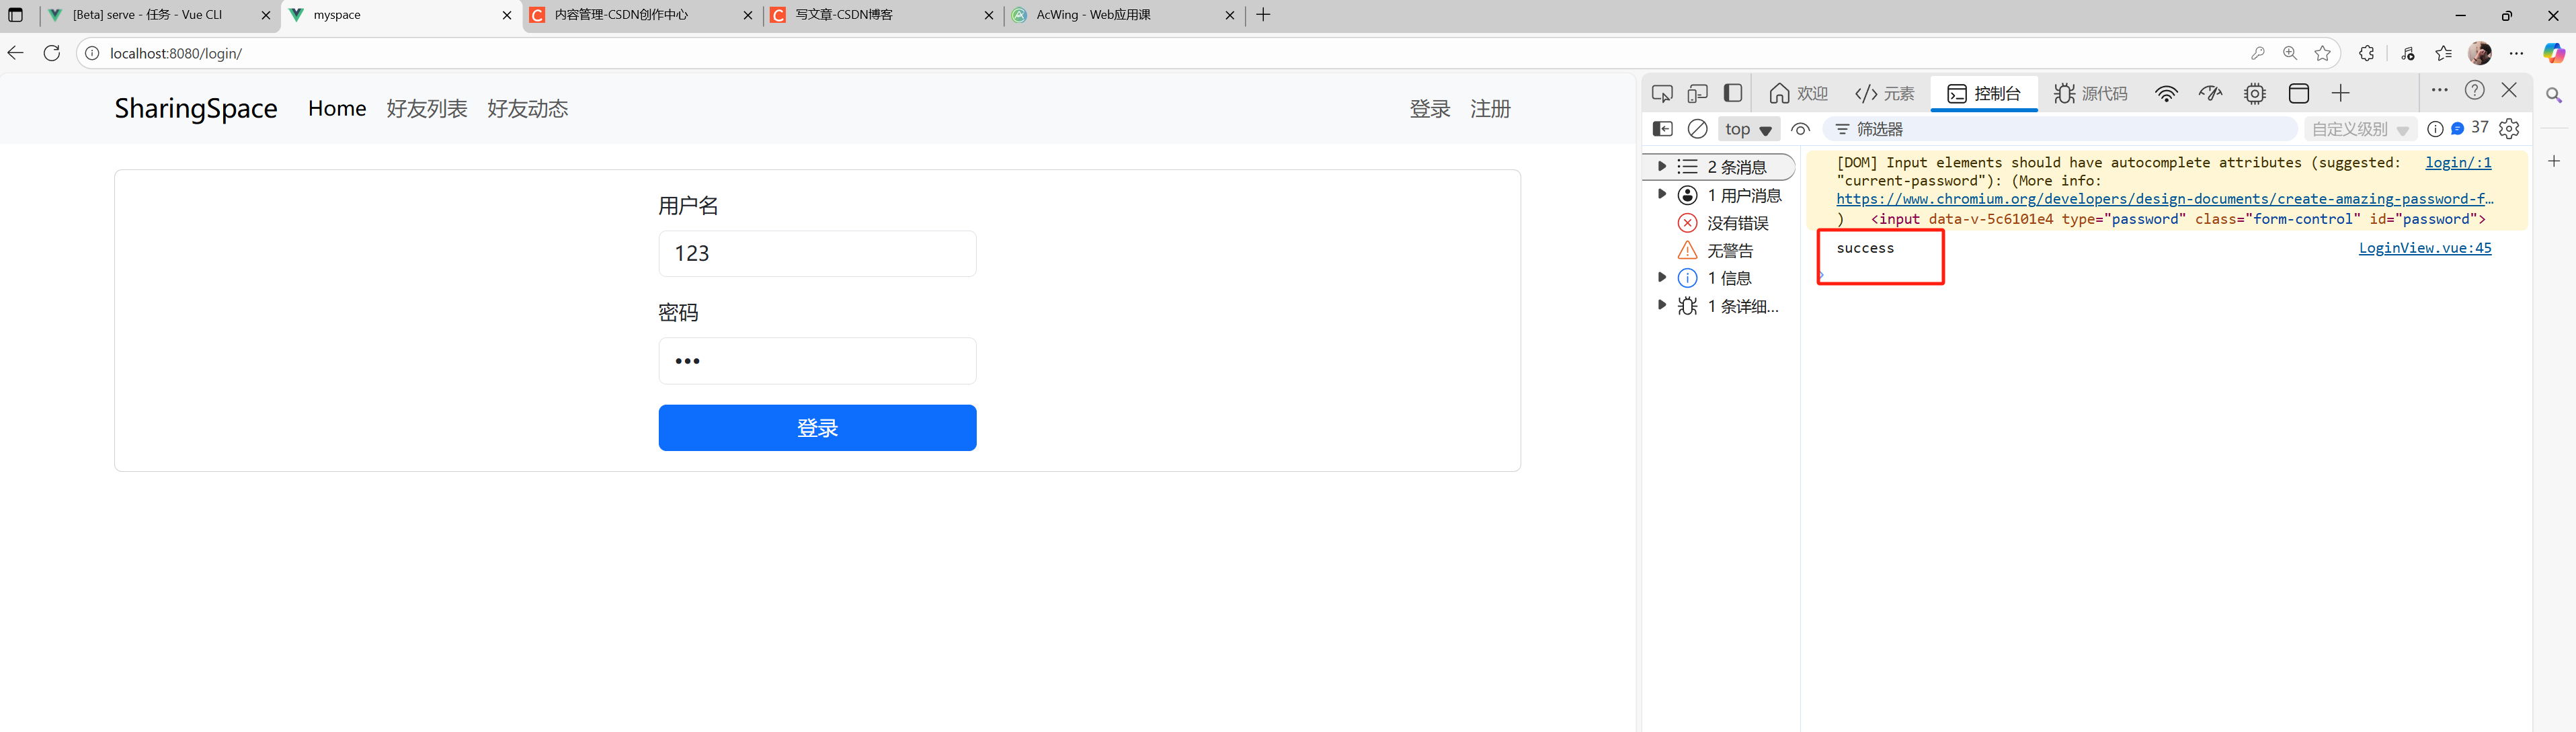
4.将获取的用户信息更新到当前全局中
- 在
mutations中定义对user的更新操作 - 而当通过登录请求获取到
user_id,并通过user_id发送获取用户信息请求成功后,触发在mutations中定义的updateUser,将全局中的user更新成登录的user - 调用作为参数传递过来的
data.success(),证明根据输入的用户名和密码,登录成功 - 如果整个过程失败了,则说明账户和密码是不对的,无法获取到jwt-token
user.js:
import $ from 'jquery';
import { jwtDecode } from 'jwt-decode';const ModuleUser = ({state: {id: "",username: "",photo: "",followerCount: 0,access: "",refresh: "",is_login: false,},getters: {},mutations: {updateUser(state, user) {state.id = user.id;state.username = user.username;state.photo = user.photo;state.followerCount = user.followerCount;state.access = user.access;state.refresh = user.refresh;state.is_login = user.is_login;},},actions: {login(context, data) {$.ajax({url: "https://app165.acapp.acwing.com.cn/api/token/",type: "POST",data: {username: data.username,password: data.password,},success(resp) {const {access, refresh} = resp;const access_info = jwtDecode(access);$.ajax({url: "https://app165.acapp.acwing.com.cn/myspace/getinfo/",type: "GET",data: {user_id: access_info.user_id,},headers: {'Authorization': "Bearer " + access,},success(resp) {context.commit("updateUser", {...resp,access: access,refresh: refresh,is_login: true,});data.success(); },});},error() {data.error();}});}},modules: {}
});
export default ModuleUser;
- 登录成功展示:
- 登录失败展示:
5.维护jwt-token的有效期
- 因为access令牌有效期是五分钟,而整体的refresh令牌有效期是14天
- 为了维护14天的有效登录,需要每隔五分钟通过refresh请求,获取一个新的access令牌
- 于是我们需要定义函数使得每五分钟能够发送refresh请求,获取新的access令牌
- 而为了防止出现边界,比如刚好五分钟时,浏览器卡住,导致请求发送失败,access令牌刷新失败,登录状态失效,我们可以设置为四分半发送一次refersh请求。
*使用setInterval()设置周期函数每四分半发送一次refresh请求
import $ from 'jquery';
import { jwtDecode } from 'jwt-decode';const ModuleUser = ({state: {id: "",username: "",photo: "",followerCount: 0,access: "",refresh: "",is_login: false,},getters: {},mutations: {updateUser(state, user) {state.id = user.id;state.username = user.username;state.photo = user.photo;state.followerCount = user.followerCount;state.access = user.access;state.refresh = user.refresh;state.is_login = user.is_login;},updateAccess(access) {state.access = access;}},actions: {login(context, data) {$.ajax({url: "https://app165.acapp.acwing.com.cn/api/token/",type: "POST",data: {username: data.username,password: data.password,},success(resp) {const {access, refresh} = resp;const access_info = jwtDecode(access);setInterval(() => {$.ajax({url: "https://app165.acapp.acwing.com.cn/api/token/refresh/",type: "POST",data: {refresh: refresh,},success(resp) {console.log(resp);context.commit("updateAccess", resp.access);},});}, 4.5 * 60 * 1000);$.ajax({url: "https://app165.acapp.acwing.com.cn/myspace/getinfo/",type: "GET",data: {user_id: access_info.user_id,},headers: {'Authorization': "Bearer " + access,},success(resp) {context.commit("updateUser", {...resp,access: access,refresh: refresh,is_login: true,});data.success(); },});},error() {data.error();}});}},modules: {}
});
export default ModuleUser;
- 当登录成功之后,每四分半发送一次refresh请求,请求到新的access之后触发
mutations的updateAccess(access),将全局存放的access替换成最新的access,以此来维护长期的登录有效状态 - 通过refresh刷新access展示:
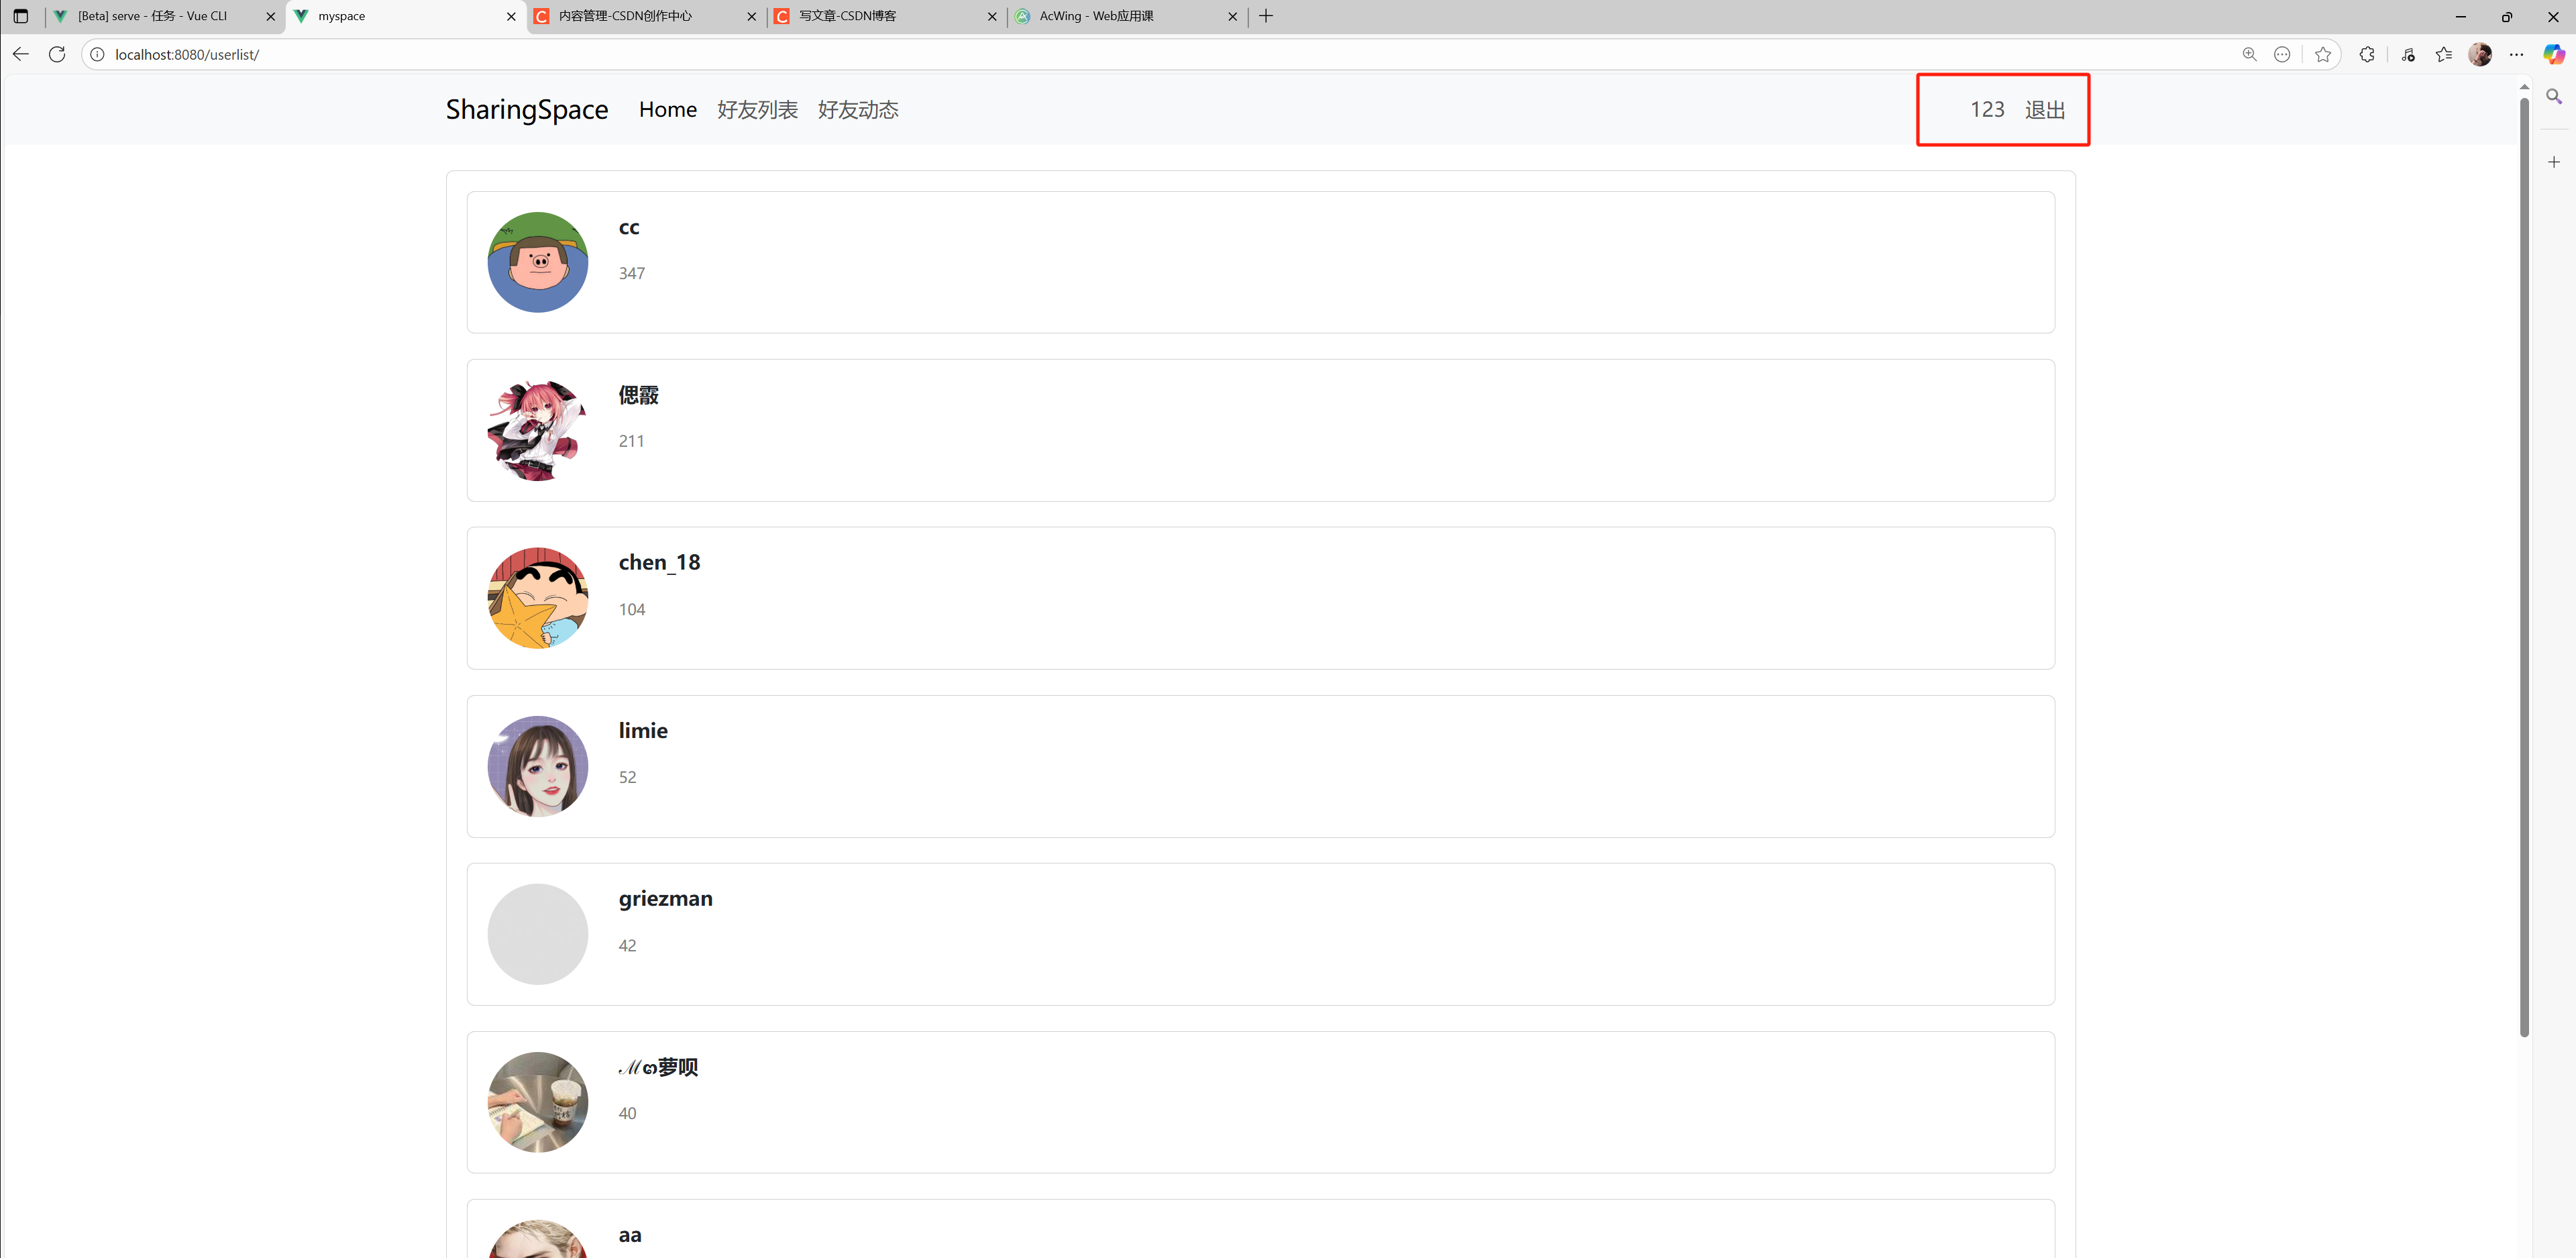
6.登录成功跳转到好友列表
- 通过
router.push({name: "name-userlist"});: 登录成功则跳转到name-userlist - 如果登录失败,则将
erro_message = '用户名或者密码错误'
export default {name: 'LoginView',components: {ContentBase},setup() {const store = useStore();let username = ref('');let password = ref('');let error_message = ref('');const login = () => {error_message.value = "";store.dispatch("login", {username: username.value,password: password.value,success() {console.log("success");router.push({name: 'name-userlist'});},error() {console.log("failed");error_message.value = "用户名或者密码错误";}});};return {username: username,password: password,error_message: error_message,login,}}
}
7.NavBar右上角的登录信息变更
- 当登录成功之后,NavBar右上角的登录和注册需要变成用户名和退出进行展示
- 这里使用
v-if 和v-else
NavBar.vue:
<template><nav class="navbar navbar-expand-lg bg-body-tertiary"><div class="container"><router-link class="navbar-brand" :to="{name: 'home'}">SharingSpace</router-link><button class="navbar-toggler" type="button" data-bs-toggle="collapse" data-bs-target="#navbarText" aria-controls="navbarText" aria-expanded="false" aria-label="Toggle navigation"><span class="navbar-toggler-icon"></span></button><div class="collapse navbar-collapse" id="navbarText"><ul class="navbar-nav me-auto mb-2 mb-lg-0"><li class="nav-item"><router-link class="nav-link active" aria-current="page" :to="{name: 'home'}">Home</router-link></li><li class="nav-item"><router-link class="nav-link" :to="{name: 'name-userlist'}">好友列表</router-link></li><li class="nav-item"><router-link class="nav-link" :to="{name: 'name-userprofile', params: {userId: 2}}">好友动态</router-link></li></ul><ul class="navbar-nav" v-if="!$store.state.user.is_login"><li class="nav-item"><router-link class="nav-link" :to="{name: 'name-login'}">登录</router-link></li><li class="nav-item"><router-link class="nav-link" :to="{name: 'name-register'}">注册</router-link></li></ul><ul class="navbar-nav" v-else><li class="nav-item"><router-link class="nav-link" :to="{name: 'name-userprofile', params: {userId: $store.state.user.id}}">{{ $store.state.user.username }}</router-link></li><li class="nav-item"><a class="nav-link" style="cursor: pointer">退出</a></li></ul></div></div></nav>
</template><script>
export default {name: "NavBar",
}</script><style scoped></style>
- 页面展示:
8.退出登录
- 当需要退出登录时,直接将jwt令牌删除即可
- 简单比喻就是:给你发了一张通行证,当你不想再进行通行时,直接将通行证撕毁即可,不用通知发证人
- 由于jwt令牌存放在全局变量access中,所以需要在
user.js中定义删除令牌的逻辑
vue知识点
- 1.调用
mutations里面的api使用commit() - 2.调用
actions里面的api使用dispatch()
store.user.js:主要展示mutations里面的logout逻辑
import $ from 'jquery';
import { jwtDecode } from 'jwt-decode';const ModuleUser = ({state: {id: "",username: "",photo: "",followerCount: 0,access: "",refresh: "",is_login: false,},getters: {},mutations: {updateUser(state, user) {state.id = user.id;state.username = user.username;state.photo = user.photo;state.followerCount = user.followerCount;state.access = user.access;state.refresh = user.refresh;state.is_login = user.is_login;},updateAccess(state, access) {state.access = access;},logout(state) {state.access = "";state.id = "";state.username = "";state.photo = "";state.followerCount = 0;state.refresh = "";state.is_login = false;},},
});
export default ModuleUser;
NavBar.vue: 主要展示退出的绑定逻辑
<template><ul class="navbar-nav" v-else><li class="nav-item"><router-link class="nav-link" :to="{name: 'name-userprofile', params: {userId: $store.state.user.id}}">{{ $store.state.user.username }}</router-link></li><li class="nav-item"><a class="nav-link" @click="logout" style="cursor: pointer">退出</a></li></ul>
</template><script>import { useStore } from 'vuex';export default {name: "NavBar",setup() {const store = useStore();const logout = () => {store.commit("logout");}return {logout,}}
}
</script>
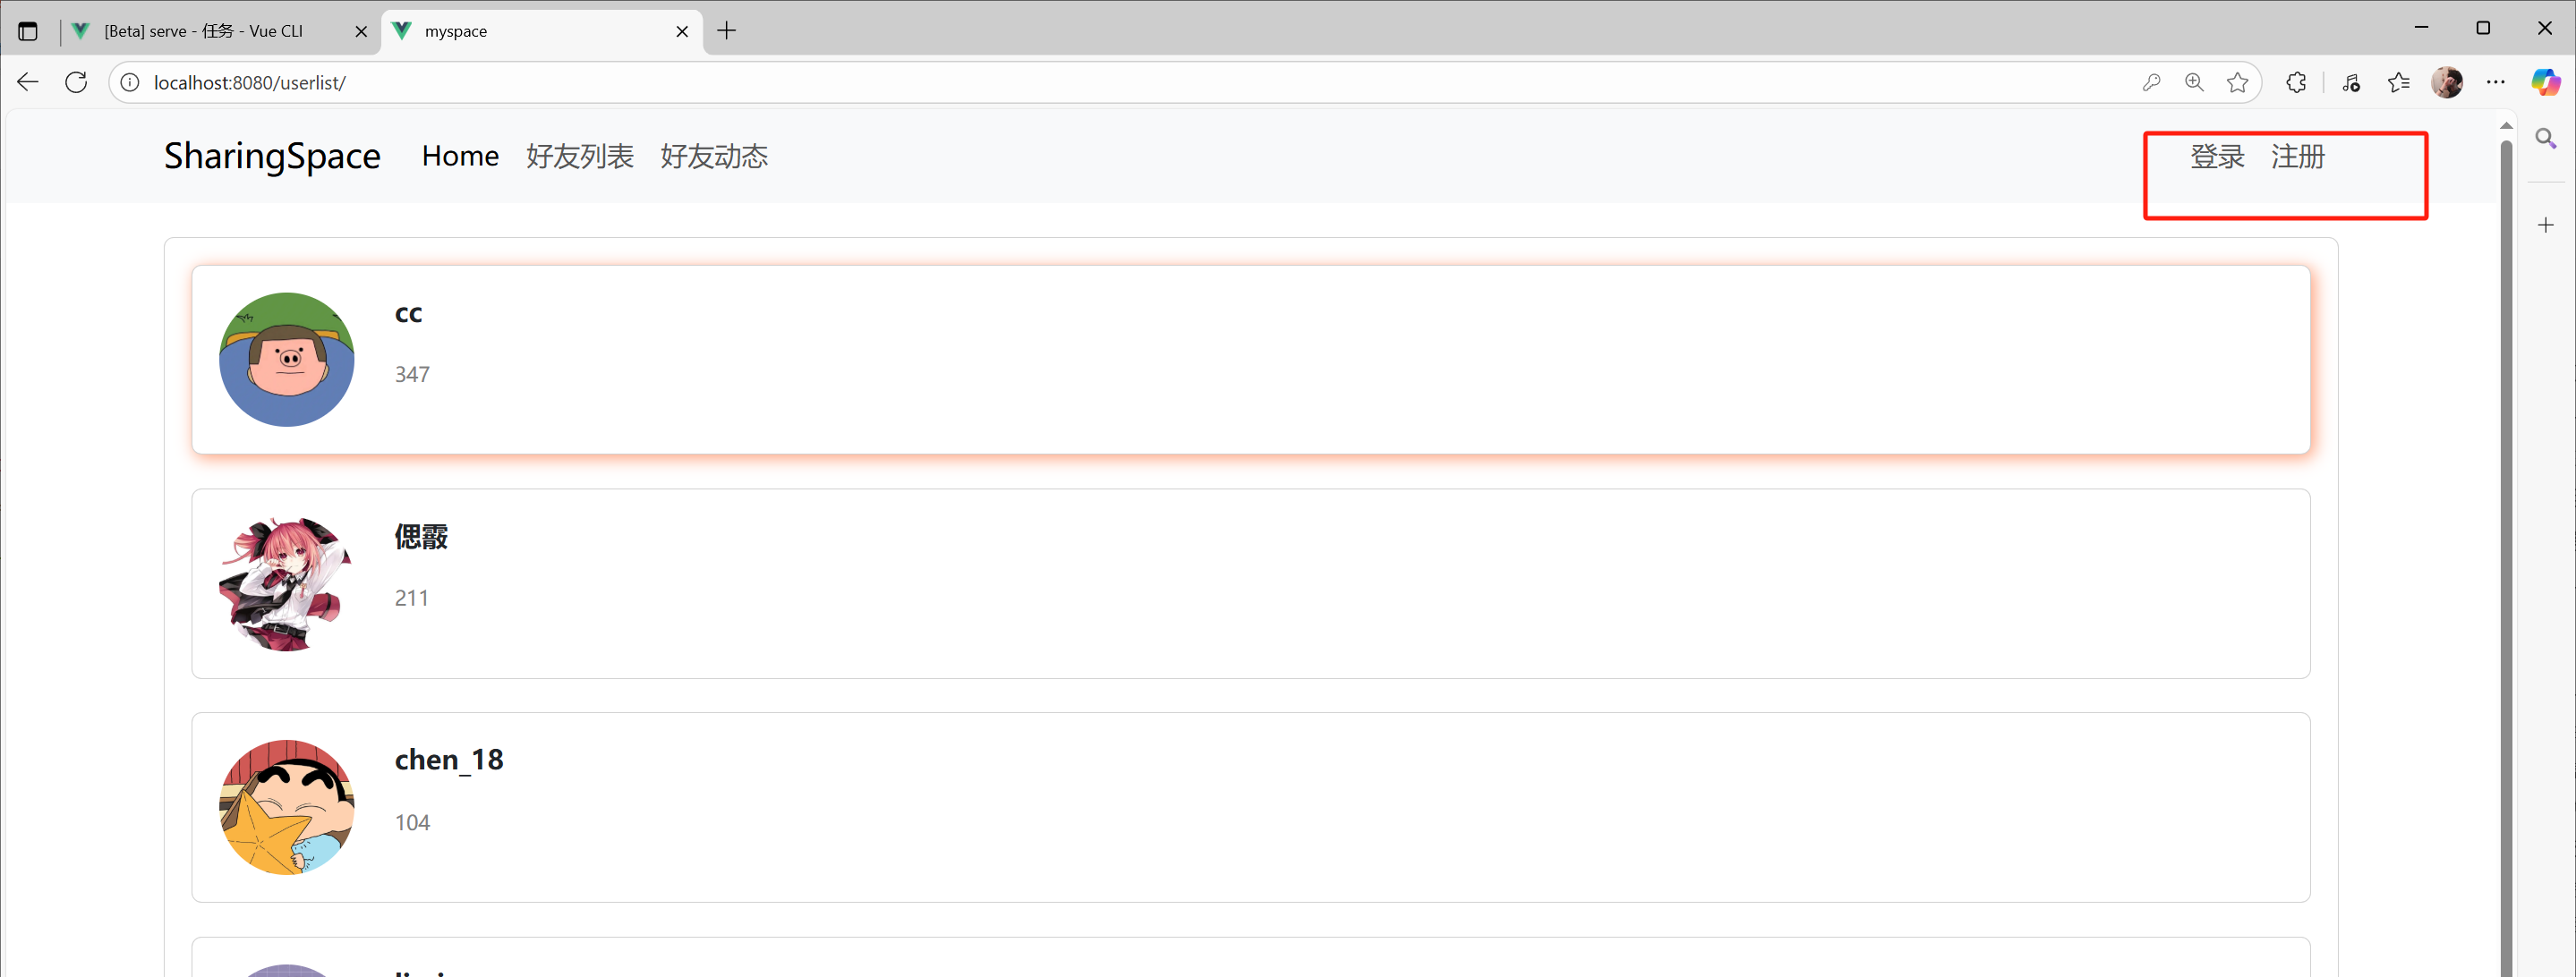
- 页面效果:当登录成功之后会跳转到好友列表,右上角展示用户名以及退出,点击退出则展示登录注册
7)权限控制——只有登录状态才能查看自己和好友的个人空间以及发帖
- 1.先将用户动态页面从导航栏中删除
- 2.在登录后,点击好友列表的其中一个,跳转到对应的好友个人空间
/userprofile/userid:router.push({name: "name-userprofile", params: {userId}}); - 3.如果未登录则跳转到登录界面:
router.push({name: "name-login"});
UserListView.vue:
<template><ContentBase><div class="card" v-for="user in users" :key="user.id" @click="click_userprofile(user.id)"><div class="card-body"><div class="row"><div class="col-1"><img class="img-fluid" v-bind:src="user.photo" alt=""></div><div class="col-11"><div class="username">{{ user.username }}</div><div class="followcount">{{ user.followerCount }}</div></div></div></div></div></ContentBase>
</template><script>
import ContentBase from '@/components/ContentBase.vue'
import $ from 'jquery';
import { ref } from 'vue';
import router from '@/router/index';
import { useStore } from 'vuex';export default {name: 'UserListView',components: {ContentBase},setup() {let users = ref([]);const store = useStore();$.ajax({url: 'https://app165.acapp.acwing.com.cn/myspace/userlist/',type: "GET",success(resp) {users.value = resp;}});const click_userprofile = userId => {if (store.state.user.is_login) {router.push({name: "name-userprofile",params: {userId: userId,},});} else {router.push({name: "name-login",});}};return {users,click_userprofile,};}
}
</script>
- 将该事件绑定到好友列表的card上,这样当点击其中一个card时,就会触发该
click_userprofile(userId),根据card分配的user.id,传入到路径中,从而完成对应个人空间的跳转
8)从云端动态拉取个人空间信息——点击对应的好友跳转到它的个人空间,展示是否关注以及粉丝数等信息
- 跳转到每个用户对应的
userprofile后,需要根据userId去向服务器发送获取用户信息请求
UserProfileView.vue: 主要展示拉取用户信息的请求编写
<script>
export default {name: 'UserProfileView',components: {ContentBase,UserInfo,UserProfileContent,UserEditProfileVue},setup() {const route = useRoute();const userId = route.params.userId;console.log(userId);const user = reactive({});const posts = reactive({});const store = useStore();$.ajax({url: "https://app165.acapp.acwing.com.cn/myspace/getinfo/",type: "GET",data: {user_id: userId,},headers: {'Authorization': "Bearer " + store.state.user.access,},success(resp) {console.log(resp);user.id = resp.id;user.username = resp.username;user.photo = resp.photo;user.followerCount = resp.followerCount;user.is_followed = resp.is_followed;},});}
}
</script>
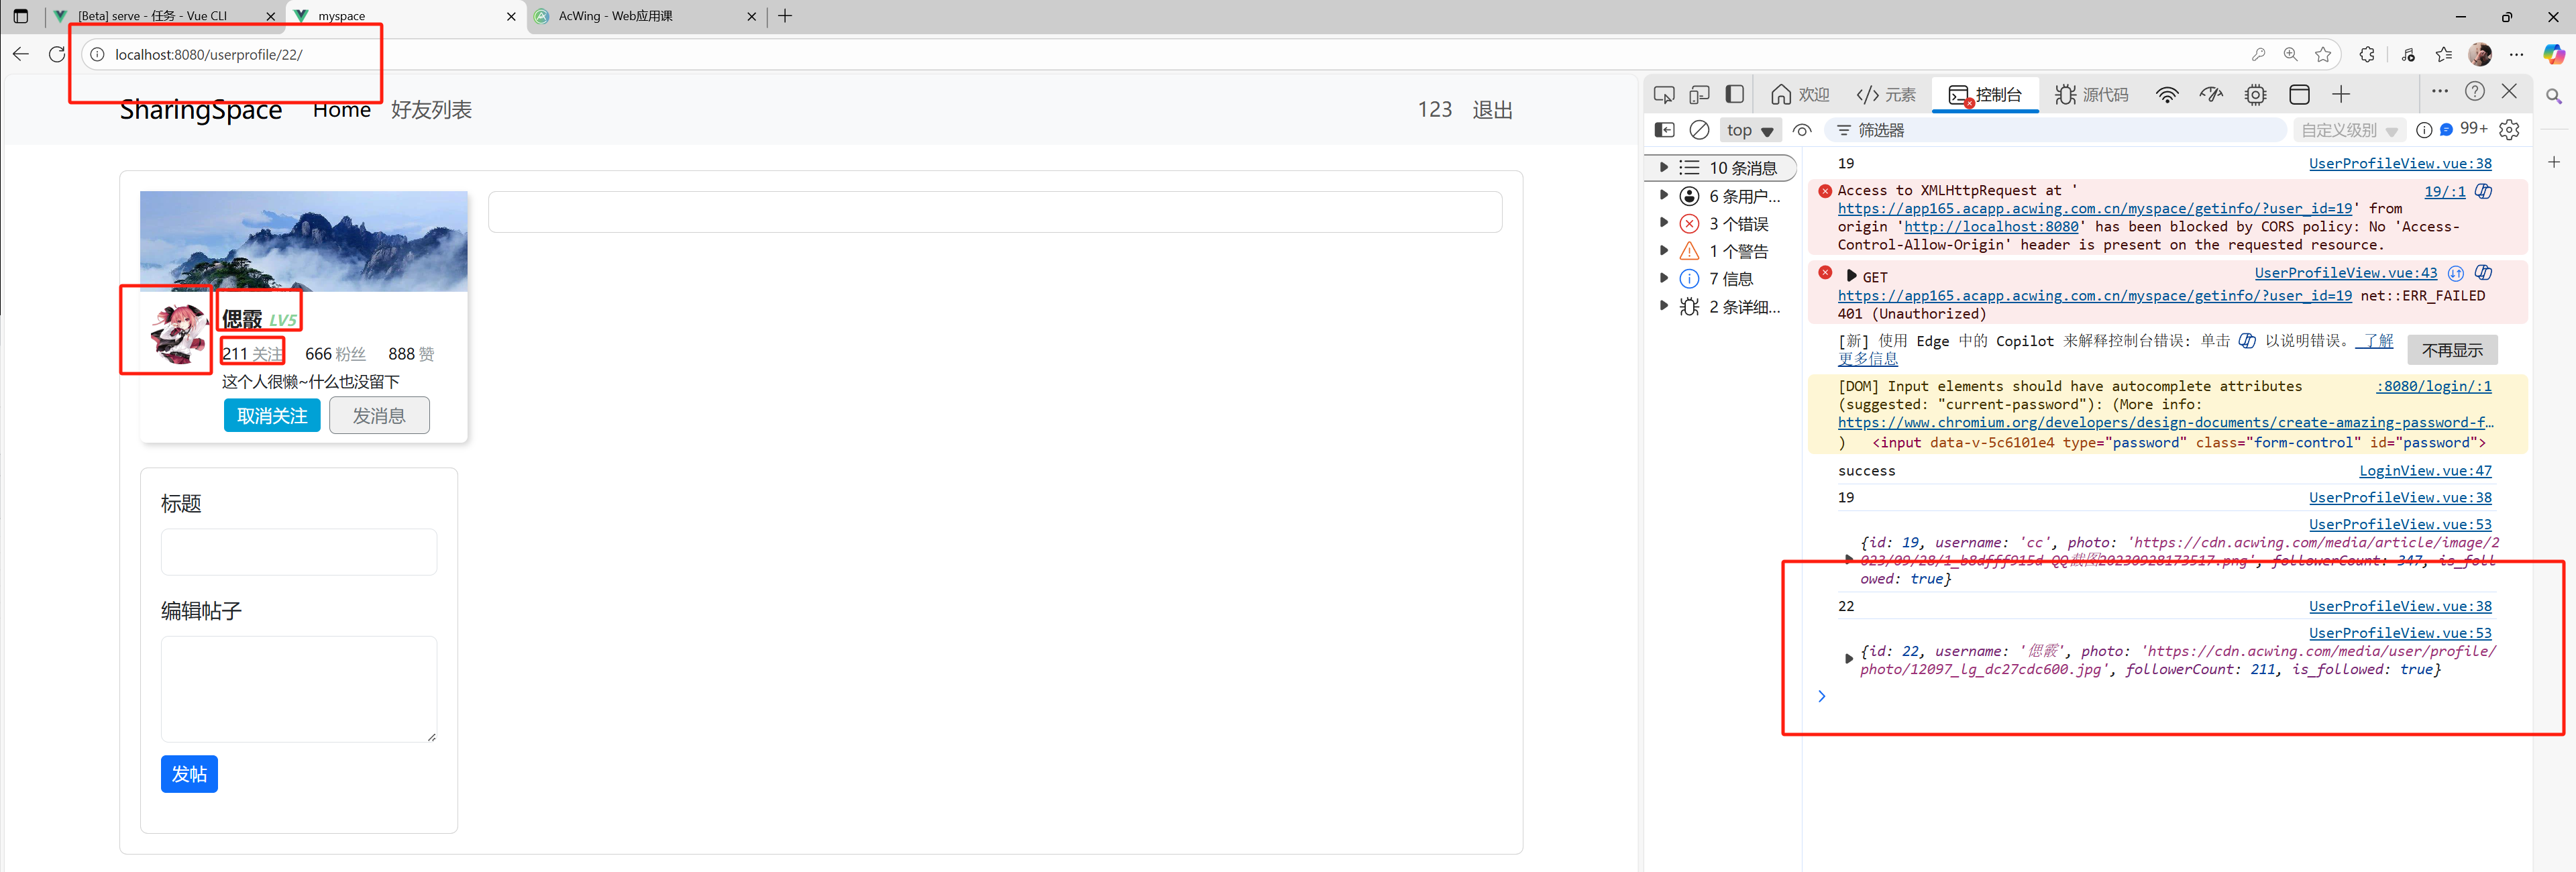
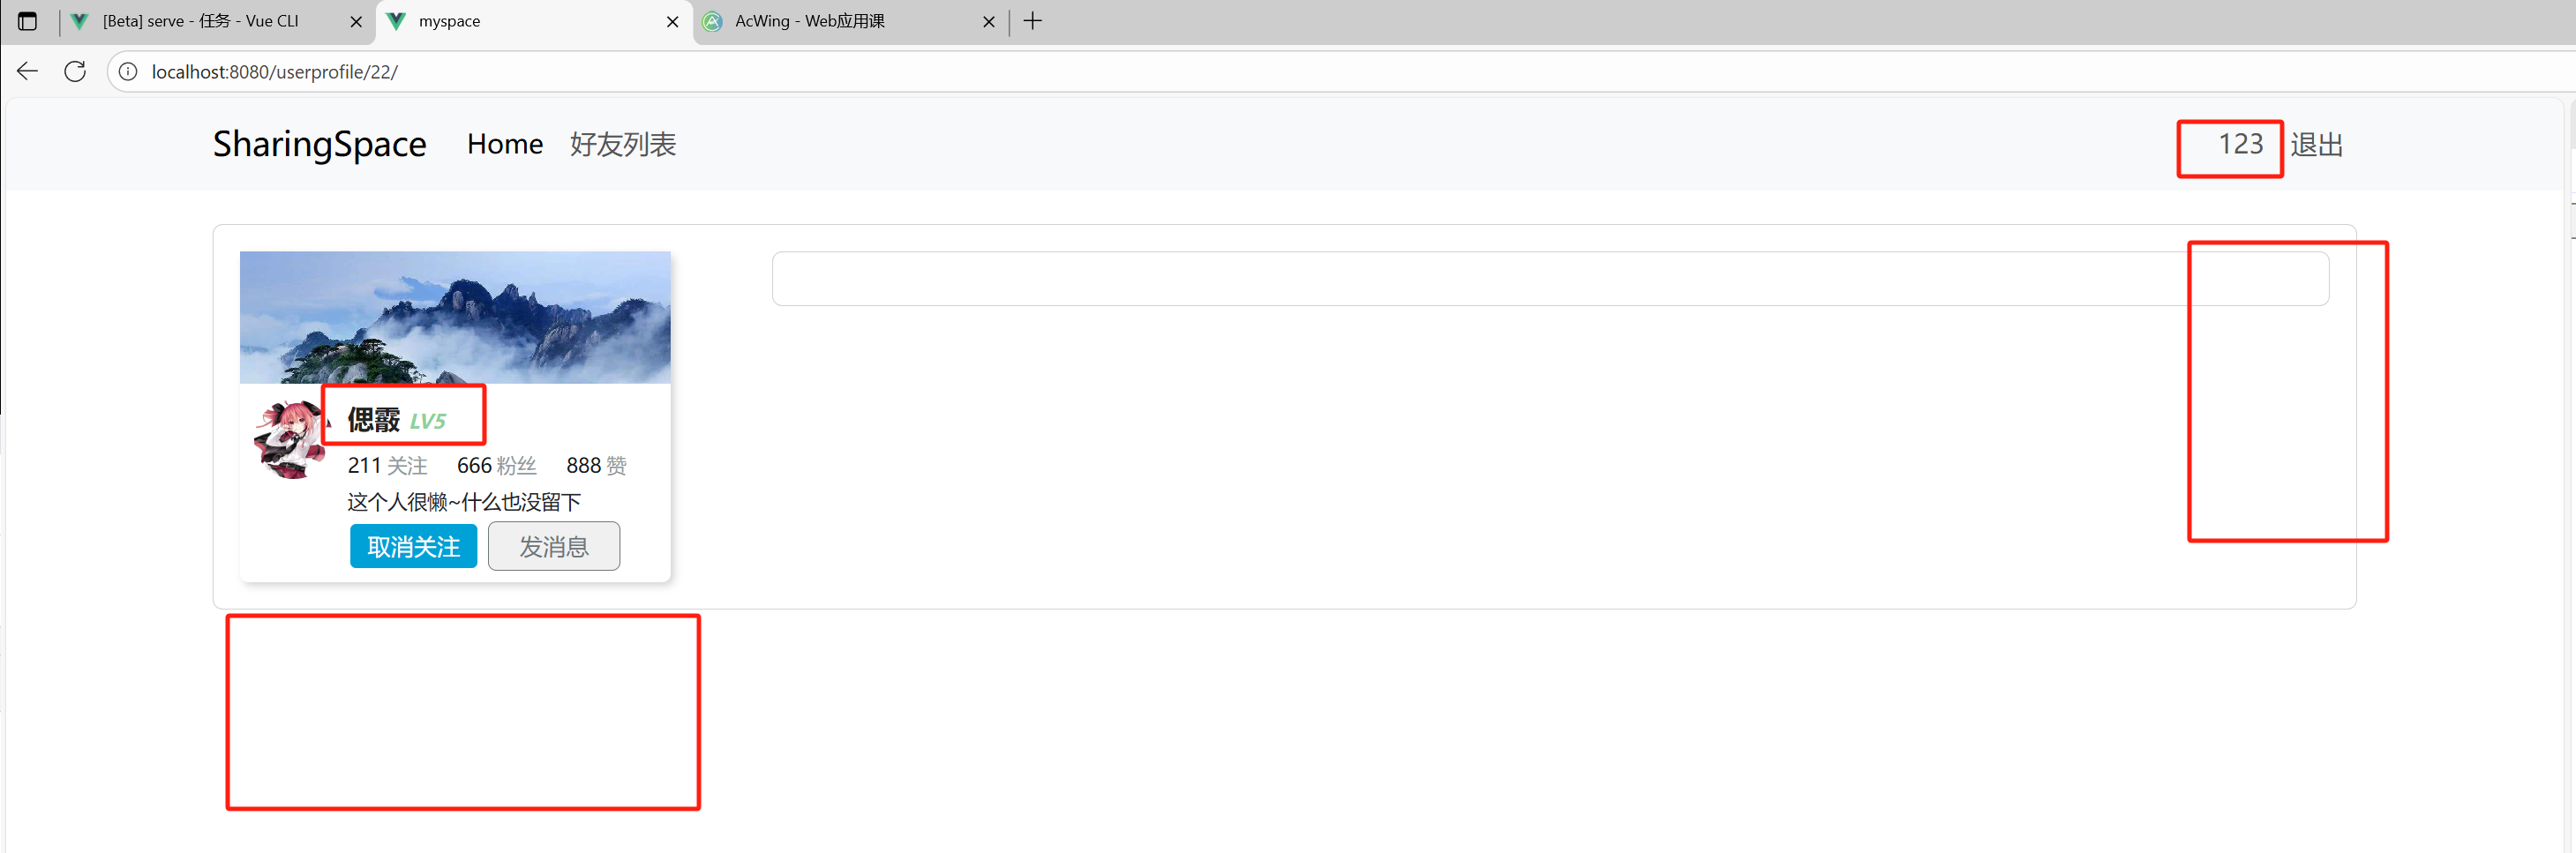
- 页面效果:将对应的用户信息拉取之后,就将里面的信息读取到页面对应的位置,由于这里的信息只包含username和关注数以及是否关注,粉丝数和获赞数没有,我就写死为666和888了
9)发帖区如果是访问的是个人空间则需要展示,好友空间则不展示
- 使用一个函数判断:登录的id:
store.state.user.id是否与当前访问的id:userId是一样的 - 如果一样,展示发帖区,不一样则不展示
UserProfileView.vue: 主要展示判断逻辑以及使用v-if="is_me"逻辑
<template><ContentBase><div class="row"><div class="col-3"><UserInfo @follow="follow" @unfollow="unfollow" :user="user"/><UserEditProfileVue v-if="is_me" @submit_post="submit_post"/></div><div class="col-9"><UserProfileContent :posts="posts" /></div></div></ContentBase>
</template><script>
export default {name: 'UserProfileView',components: {ContentBase,UserInfo,UserProfileContent,UserEditProfileVue},setup() {const route = useRoute();const userId = parseInt(route.params.userId);console.log(userId);const user = reactive({});const posts = reactive({});const store = useStore();console.log(userId, store.state.user.id);const is_me = computed(() => userId === store.state.user.id);return {user: user,follow,unfollow,posts,submit_post,is_me,}}
}
</script>
- 页面效果:

- 当点击的是登录者时,展示发贴区,其他好友空间则不展示
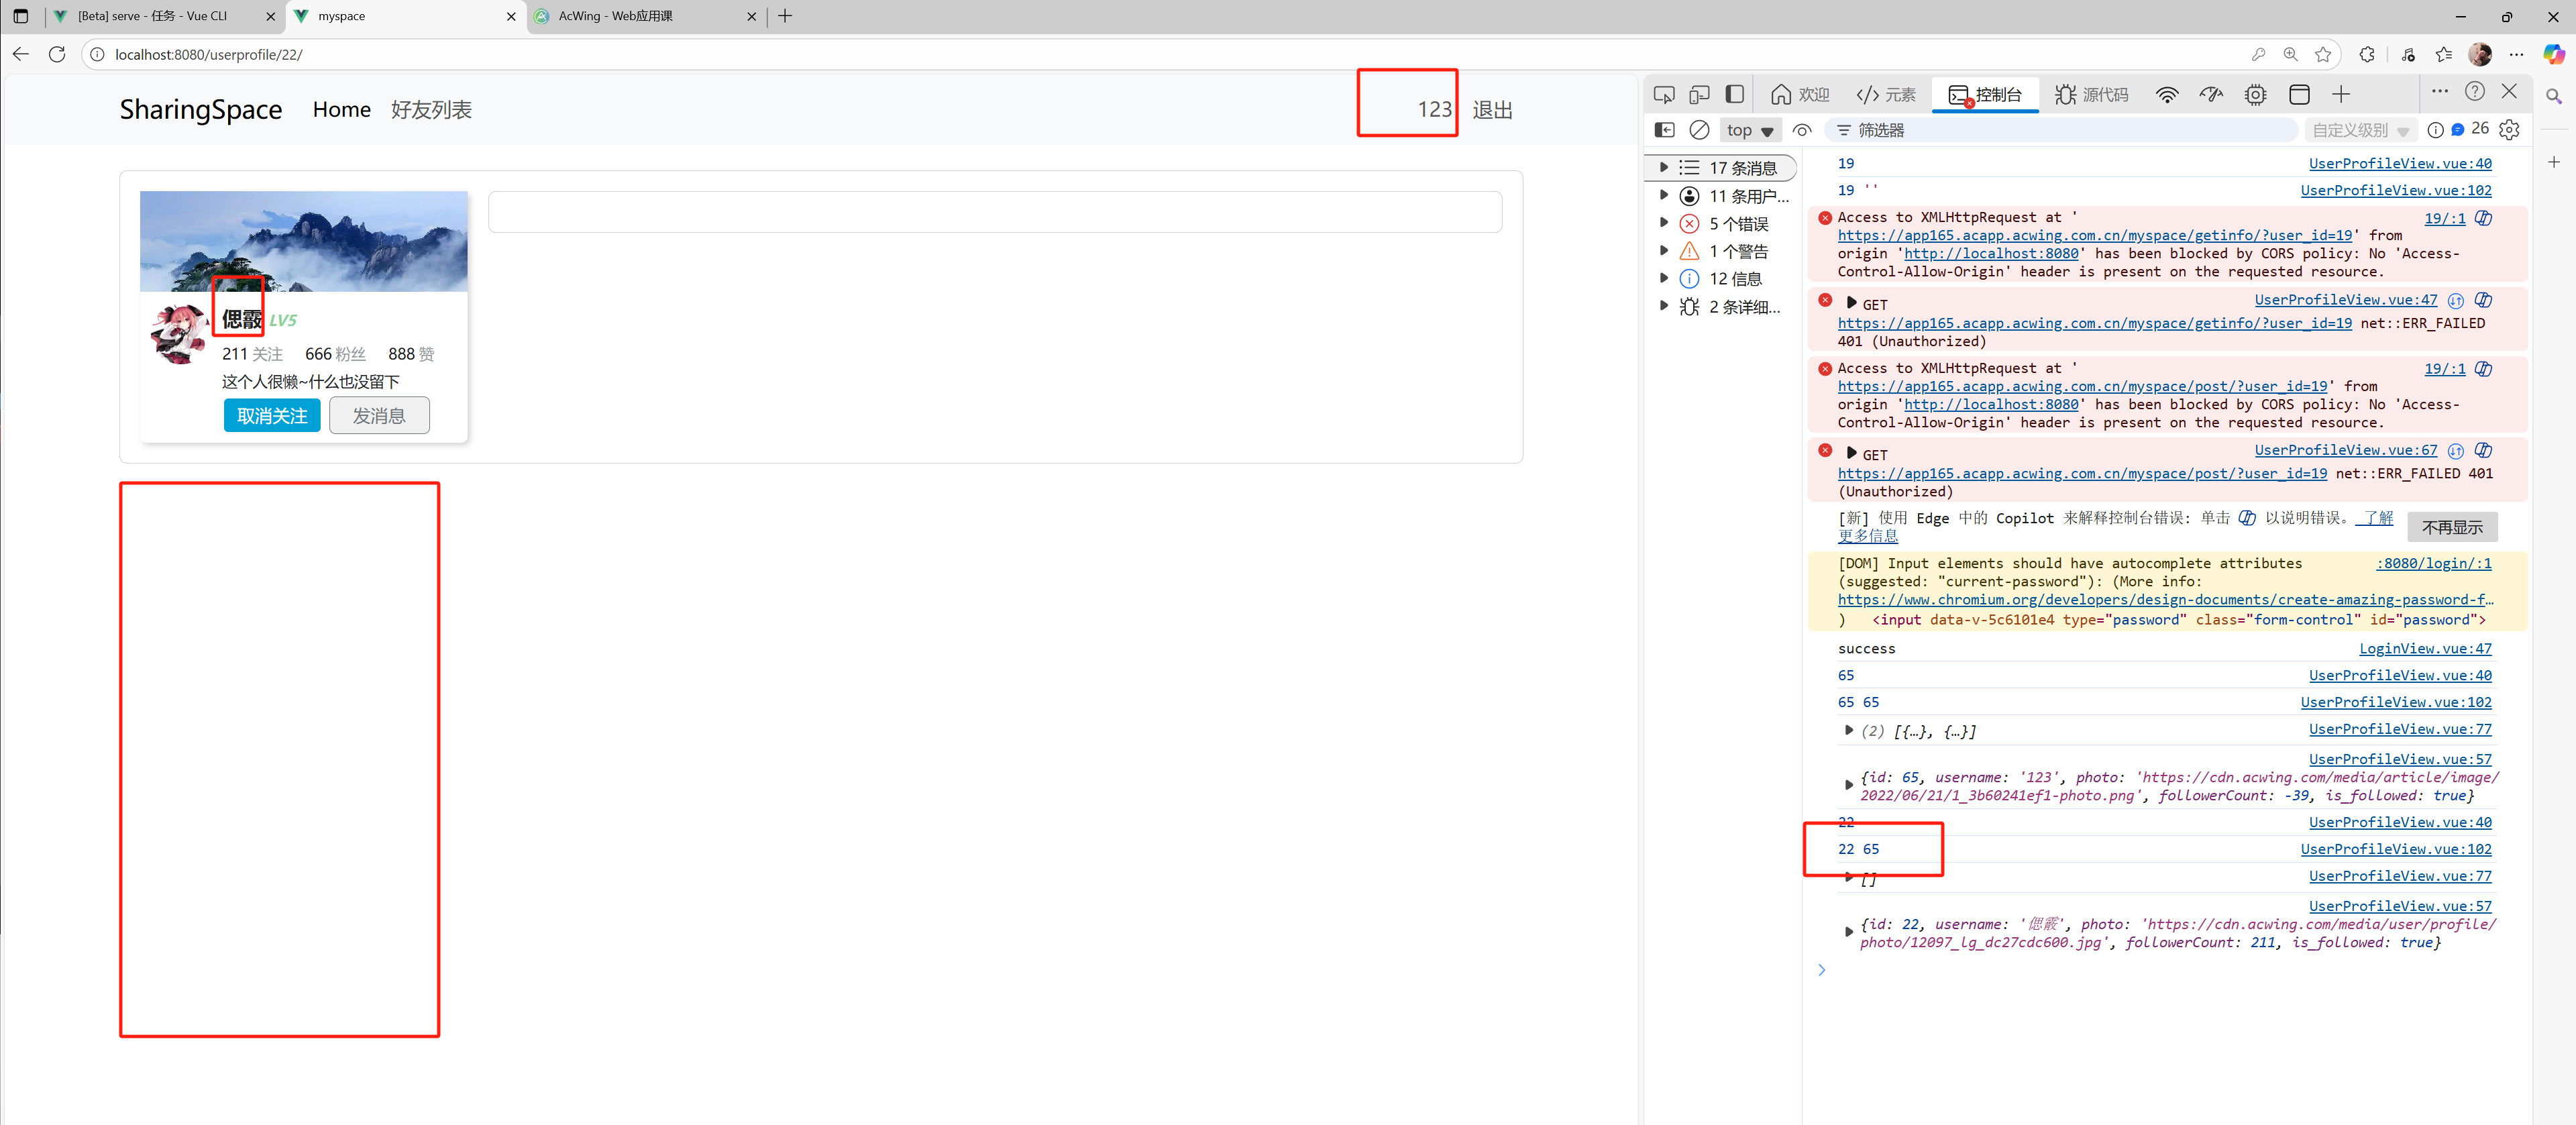
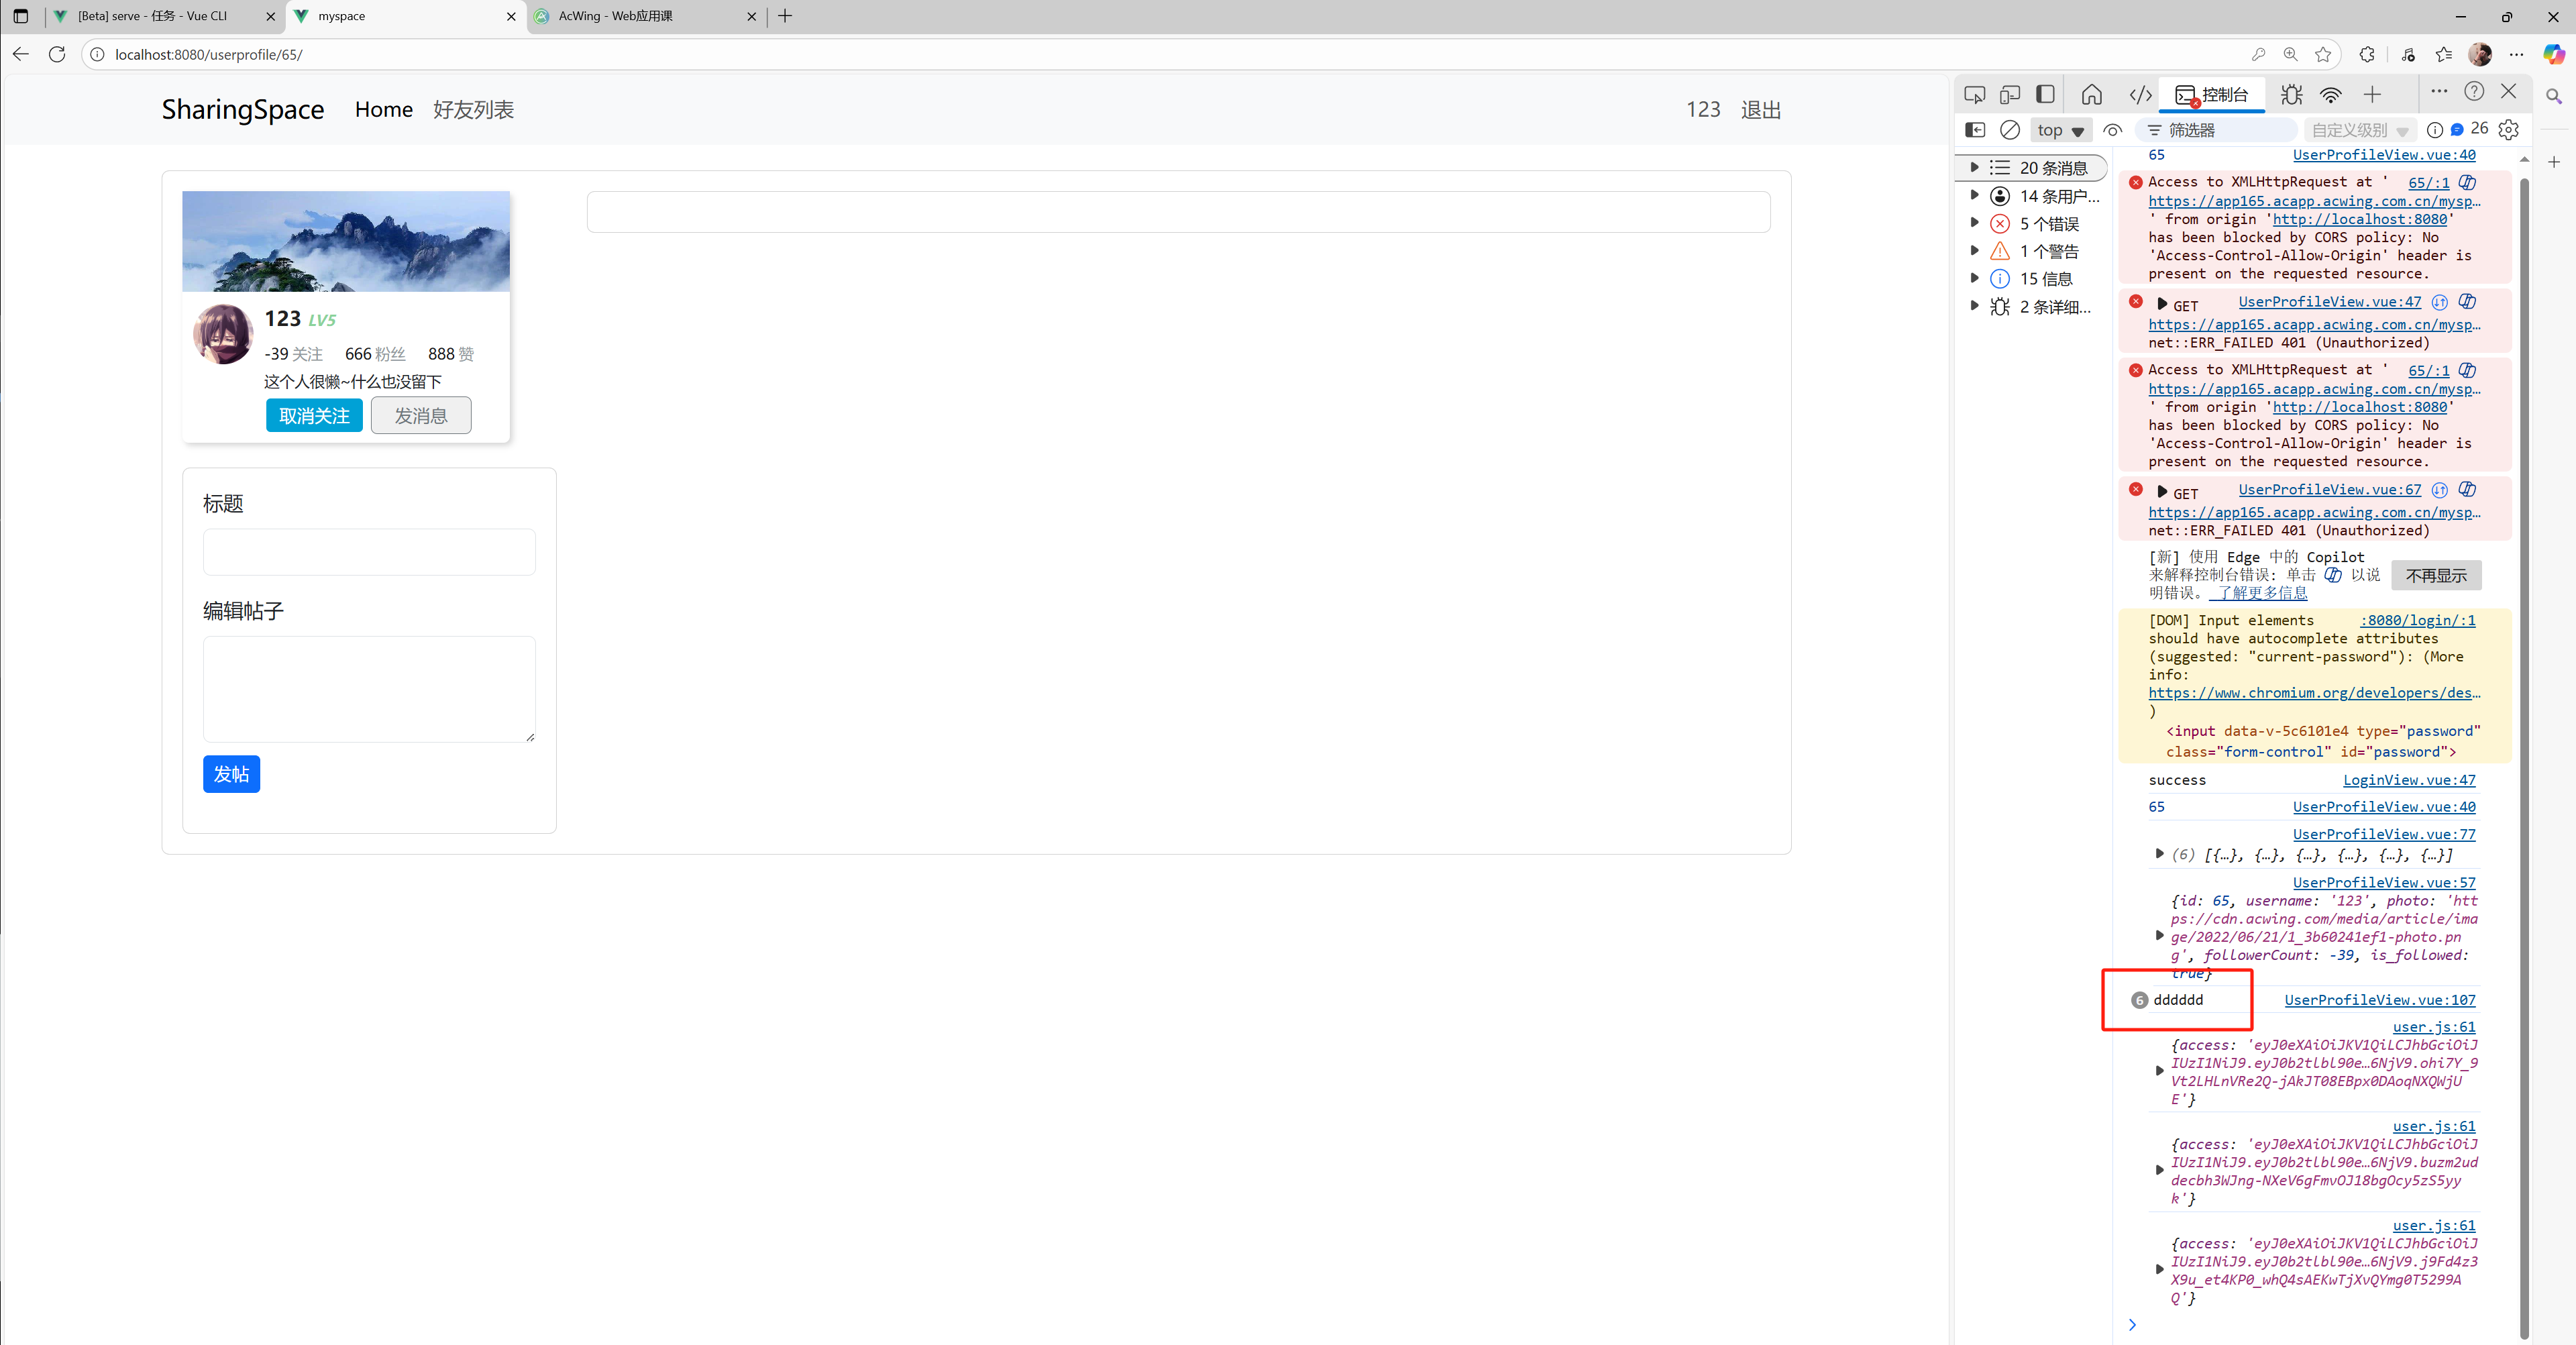
小bug:当进入好友空间点击个人空间时,则不会跳转到用户的个人空间
- 这是因为在路径相同,参数不同时,会默认认为是同一个路径,不会进行判重,比如:
userprofile/22和userprofile/65,默认为是同一个路径,所以不跳转 - 在route上加入
:key="$route.fullPath",使得他以全路径名来判重,这样参数不同,他就会识别为不同的路径,从而完成跳转
<template><NavBar/><router-view :key="$route.fullPath"/>
</template><script>
import 'bootstrap/dist/css/bootstrap.css';
import 'bootstrap/dist/js/bootstrap.js';
import NavBar from './components/NavBar.vue';export default {name: "App",components: {NavBar: NavBar,}
}
</script>
<style>
</style>
10)动态添加帖子——编辑帖子之后发送POST请求,完成帖子的添加
- 在自己的空间中编辑一个贴子,然后点击发布,则需要向服务器发送发帖请求
- 请求通过之后则完成编辑区内容赋值给
content并清空编辑区
UserEditProfile.vue:
<template><div class="card edit-field"><div class="card-body"><div class="mb-3"><label for="edit-title" class="form-label">标题</label><input type="email" class="form-control" id="exampleFormControlInput1"></div><div class="mb-3"><label for="edit-post" class="form-label">编辑帖子</label><textarea v-model="content" class="form-control" id="exampleFormControlTextarea1" rows="3"></textarea><button @click="submit_post" type="button" class="btn btn-primary btn-sm" >发帖</button></div></div></div>
</template><script>
import { ref } from 'vue';
import $ from 'jquery';
import { useStore } from 'vuex';export default {name: "UserEditProfile",setup(props, context) {const store = useStore();let content = ref('');const submit_post = () => {$.ajax({url: "https://app165.acapp.acwing.com.cn/myspace/post/",type: "POST",data: {content: content.value,},headers: {'Authorization': "Bearer " + store.state.user.access, },success(resp) {if (resp.result === "success") {context.emit("submit_post", content.value);content.value = "";}},});}return {content,submit_post,}}
}
</script><style scoped>.edit-field {margin-top: 20px;
}
button {margin-top: 10px;
}
</style>
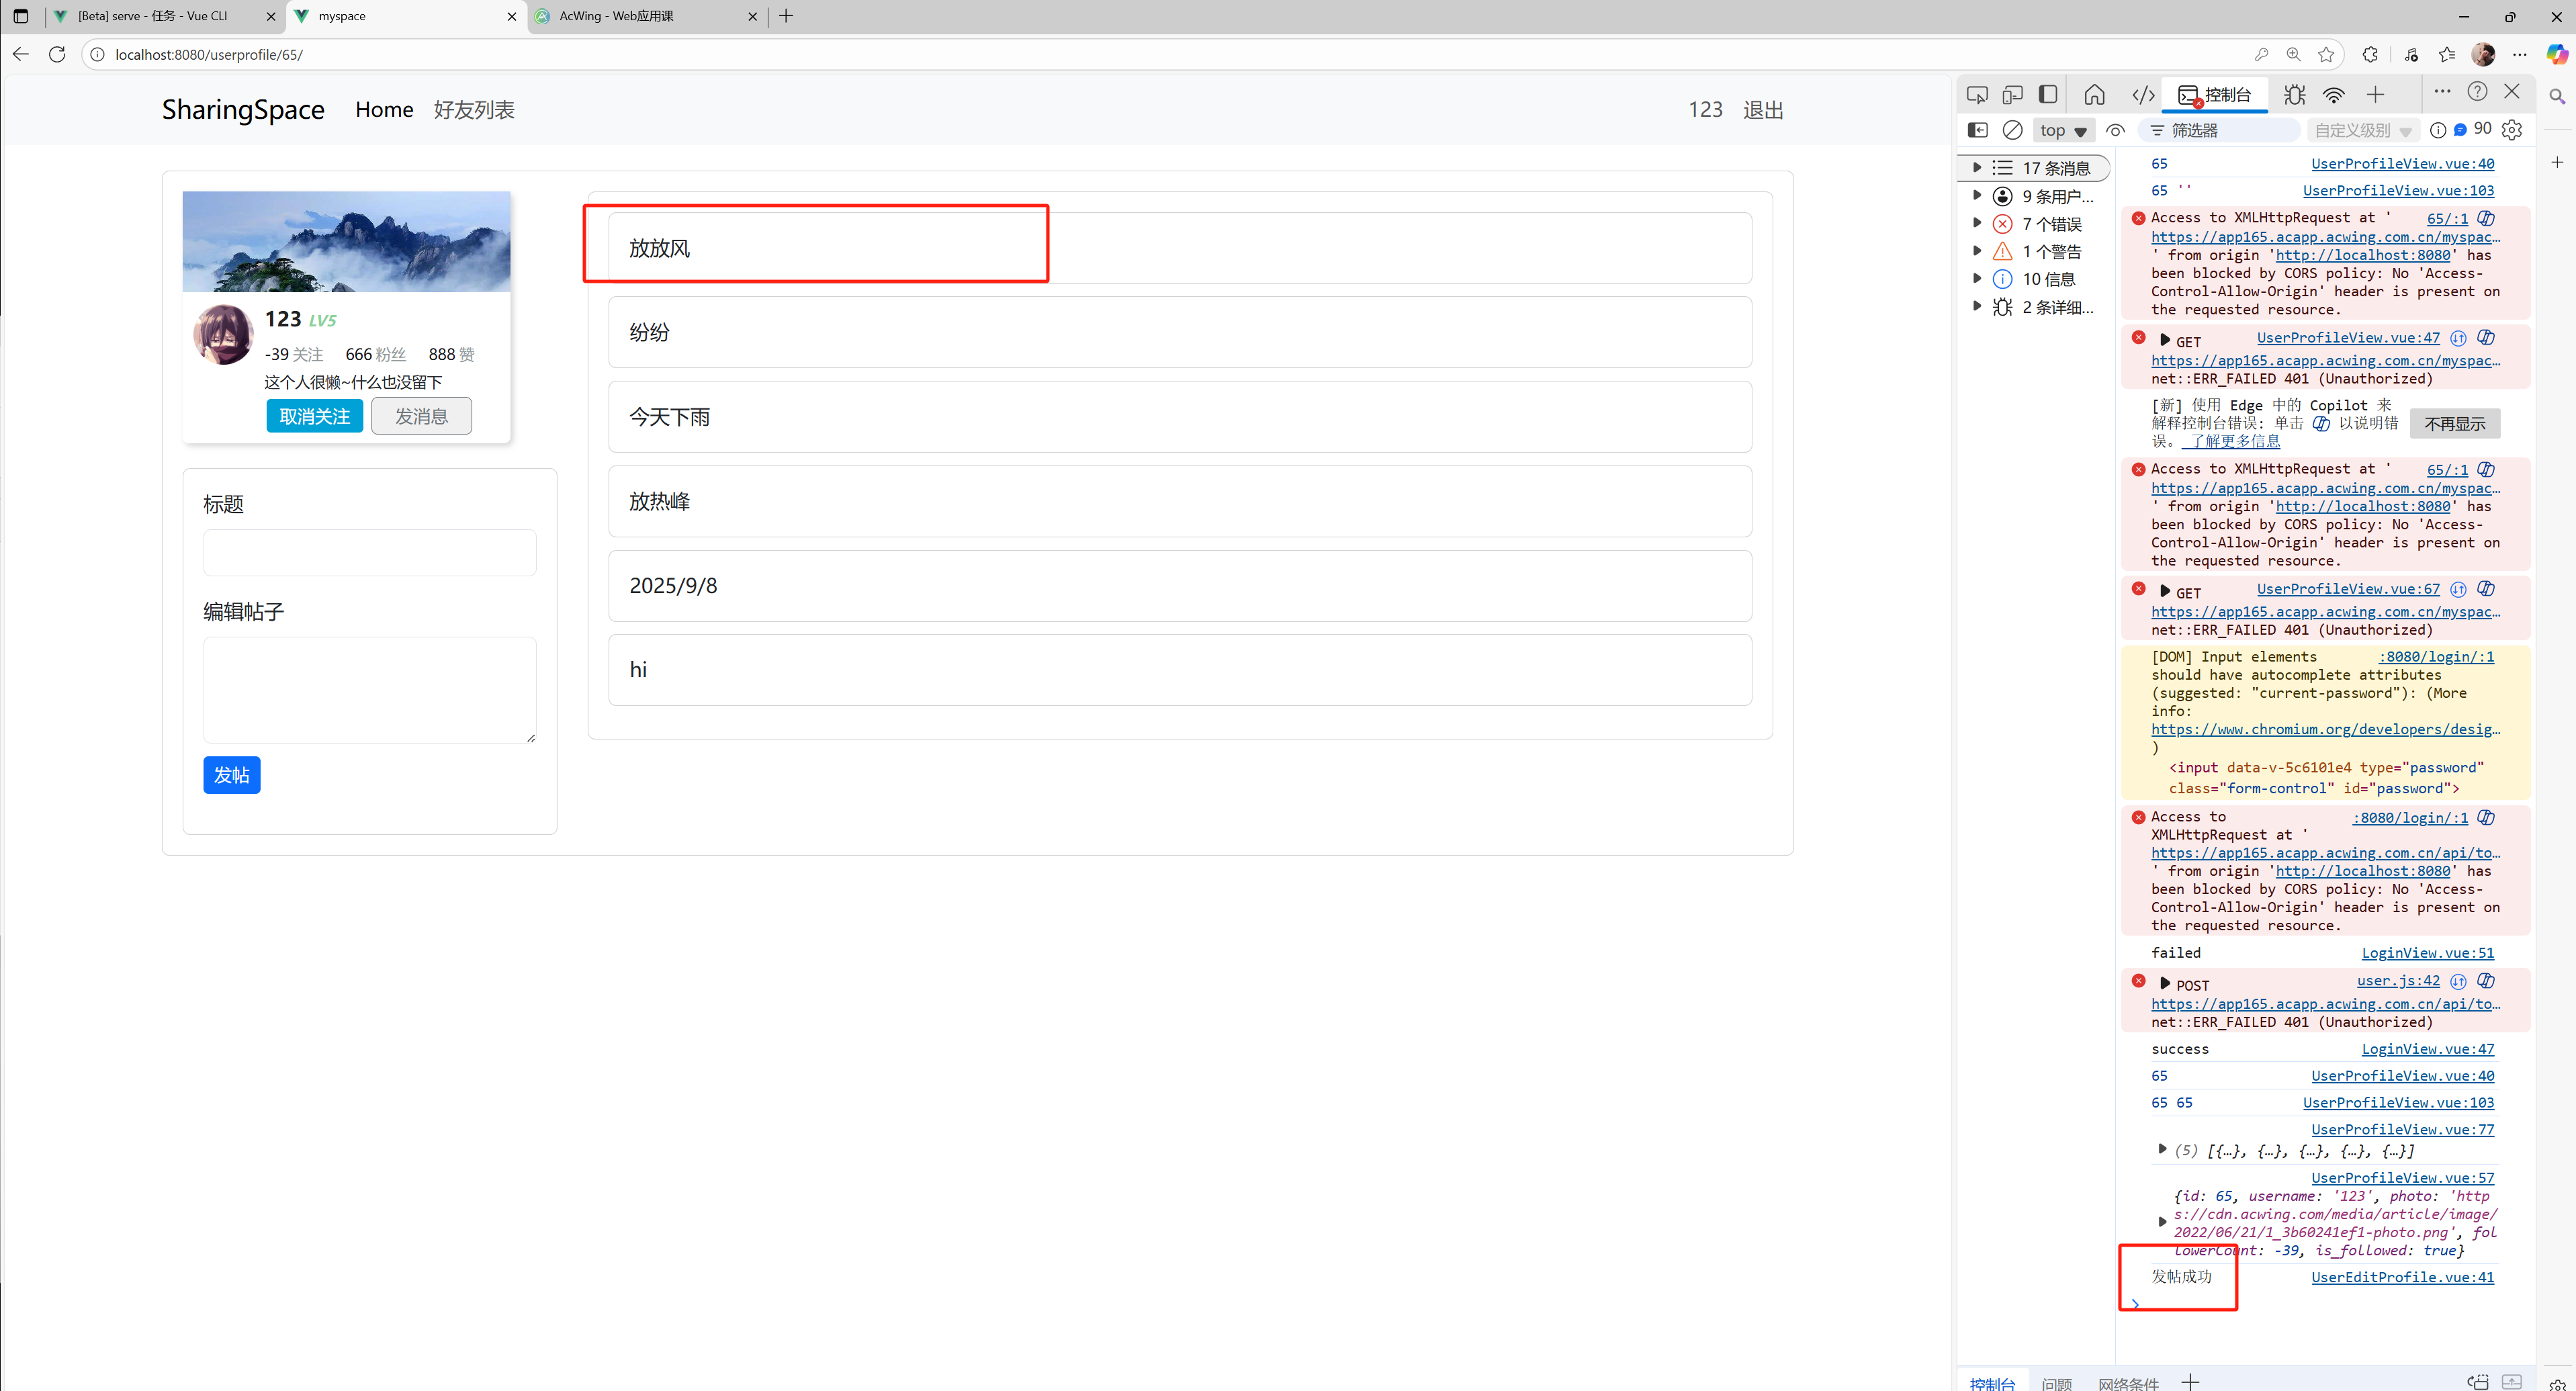
- 发帖展示:
11)删除帖子——进入自己的空间之后,可以删除对应的帖子
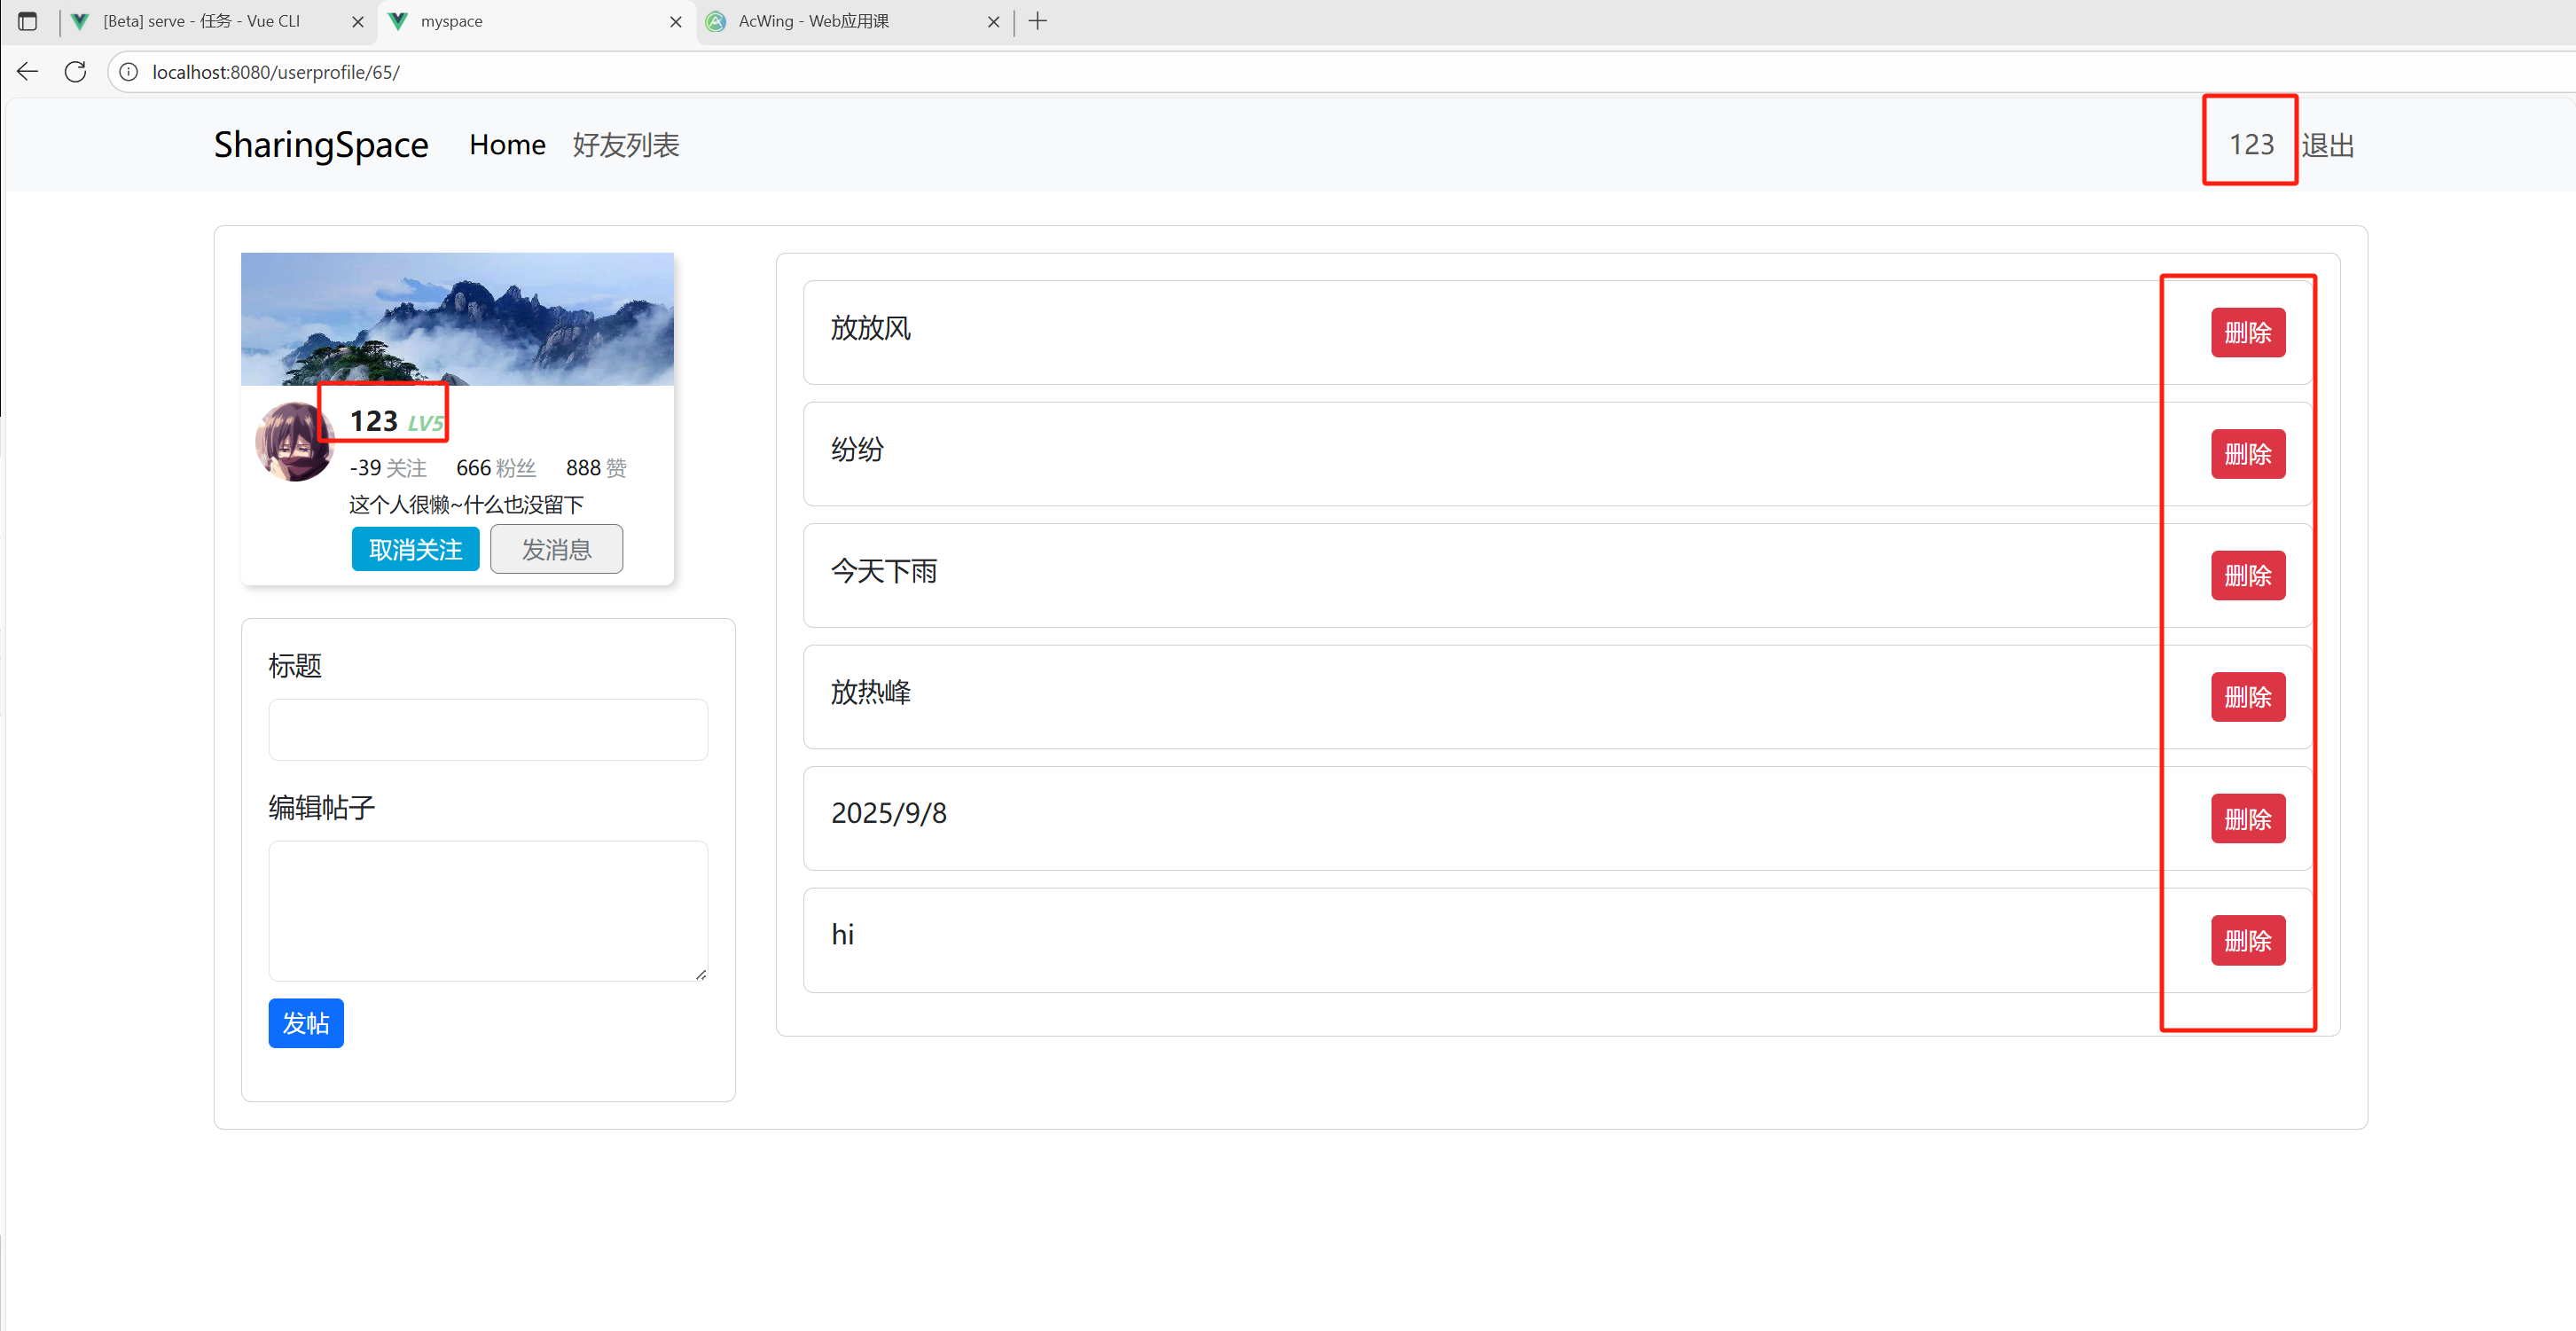
- 增加删除按钮,用于删除对应的帖子
- 需要特判:如果是自己的空间才展示删除按钮,如果不是则不展示
UserProfileContent.vue: 需要传入user用于获取当前登录的用户id
<template><div class="card"><div class="card-body"><div v-for="post in posts.posts" :key="post.id"><div class="card single-post"><div class="card-body">{{ post.content }}<button type="button" v-if="is_myself" class="btn btn-danger btn-sm">删除</button></div></div></div></div></div>
</template><script>import { useStore } from 'vuex';
import { computed } from 'vue';export default {name: "UserProfileContent",props: {posts: {type: Object,required: true,},user: {type: Object,required: true,}},setup(props) {const store = useStore();let is_myself = computed(() => store.state.user.id === props.user.id);return {is_myself,}}
}
</script>
<style scoped>
.single-post {margin-bottom: 10px;
}button {float: right;
}
</style>
- 自己的空间展示删除按钮:
- 不是自己的空间则不展示:
1.前端删除逻辑——点击帖子,获取帖子的id,然后从帖子列表中将该帖子id对应的帖子删除
- 在因为帖子数组posts是定义在
UserProfile中,需要修改帖子的话需要在这个组件中完成帖子的实际删除 - 但是具体的帖子是由
UserProfileContent管理并展示的,这就需要父组件UserProfile将删除函数传递给子组件UserProfileContent,使得子组件能够触发该函数 - 所以我们的删除逻辑就是在
UserProfileContent组件中,点击某个帖子的删除键时,获取到该帖子的post.id,并触发删除帖子的函数,传入删除的该帖子id - 而具体的帖子删除是在父组件的
delete_post中,于是我们在子组件UserProfileContent中定义它的delete_post,当点击删除时,触发该函数,在该函数触发后,会触发父组件传过来的真正的delete_post函数
UserProfileView.vue: 具体的帖子删除
<template><ContentBase><div class="row"><div class="col-3"><UserInfo @follow="follow" @unfollow="unfollow" :user="user"/><UserEditProfileVue v-if="is_me" @submit_post="submit_post"/></div><div class="col-9"><UserProfileContent :user="user" :posts="posts" @delete_post="delete_post"/></div></div></ContentBase>
</template><script>export default {name: 'UserProfileView',components: {ContentBase,UserInfo,UserProfileContent,UserEditProfileVue},setup() {const route = useRoute();const userId = parseInt(route.params.userId);console.log(userId);const user = reactive({});const posts = reactive({});const store = useStore();//点击一个post时,获取到它的post_id,将该post从posts中过滤掉const delete_post = post_id => {//返回true则保留,否则过滤掉,当传入的post_id跟数组中的post.id相同时过滤console.log("dddddd");posts.posts = posts.posts.filter(post => post.id !== post_id);posts.count = posts.posts.length;};const is_me = computed(() => userId === store.state.user.id);return {user: user,follow,unfollow,posts,submit_post,is_me,delete_post,}}
}
</script>
<style scoped>
</style>
UserProfileContent.vue:通过触发父组件传递的函数从而使得父组件完成帖子删除
<template><div class="card"><div class="card-body"><div v-for="post in posts.posts" :key="post.id"><div class="card single-post"><div class="card-body">{{ post.content }}<button @click="delete_post(post.id)" type="button" v-if="is_myself" class="btn btn-danger btn-sm">删除</button></div></div></div></div></div>
</template><script>import { useStore } from 'vuex';
import { computed } from 'vue';export default {name: "UserProfileContent",props: {posts: {type: Object,required: true,},user: {type: Object,required: true,}},setup(props, context) {const store = useStore();let is_myself = computed(() => store.state.user.id === props.user.id);const delete_post  = post_id => {context.emit('delete_post', post_id);};return {is_myself,delete_post,}}
}
</script><style scoped>
.single-post {margin-bottom: 10px;
}button {float: right;
}
</style>
- 页面效果:点击删除时能够从前端展示中将该帖子删除
2.删除时向后端发送删除请求——从数据库中真正删除该帖子
- 通过发送删除帖子的请求,将该帖子真正从数据库删除
UserProfileContent.vue:
<script>
import { useStore } from 'vuex';
import { computed } from 'vue';
import $ from 'jquery';export default {name: "UserProfileContent",props: {posts: {type: Object,required: true,},user: {type: Object,required: true,}},setup(props, context) {const store = useStore();let is_myself = computed(() => store.state.user.id === props.user.id);const delete_post  = post_id => {$.ajax({url: "https://app165.acapp.acwing.com.cn/myspace/post/",type: "DELETE",data: {post_id: post_id,},headers: {'Authorization': "Bearer " + store.state.user.access,},success(resp) {if (resp.result === "success") {context.emit('delete_post', post_id);}}});};return {is_myself,delete_post,}}
}
</script>
12)注册功能
-
与登录功能类似,直接向服务器发送注册请求,传入用户名、密码和确认密码
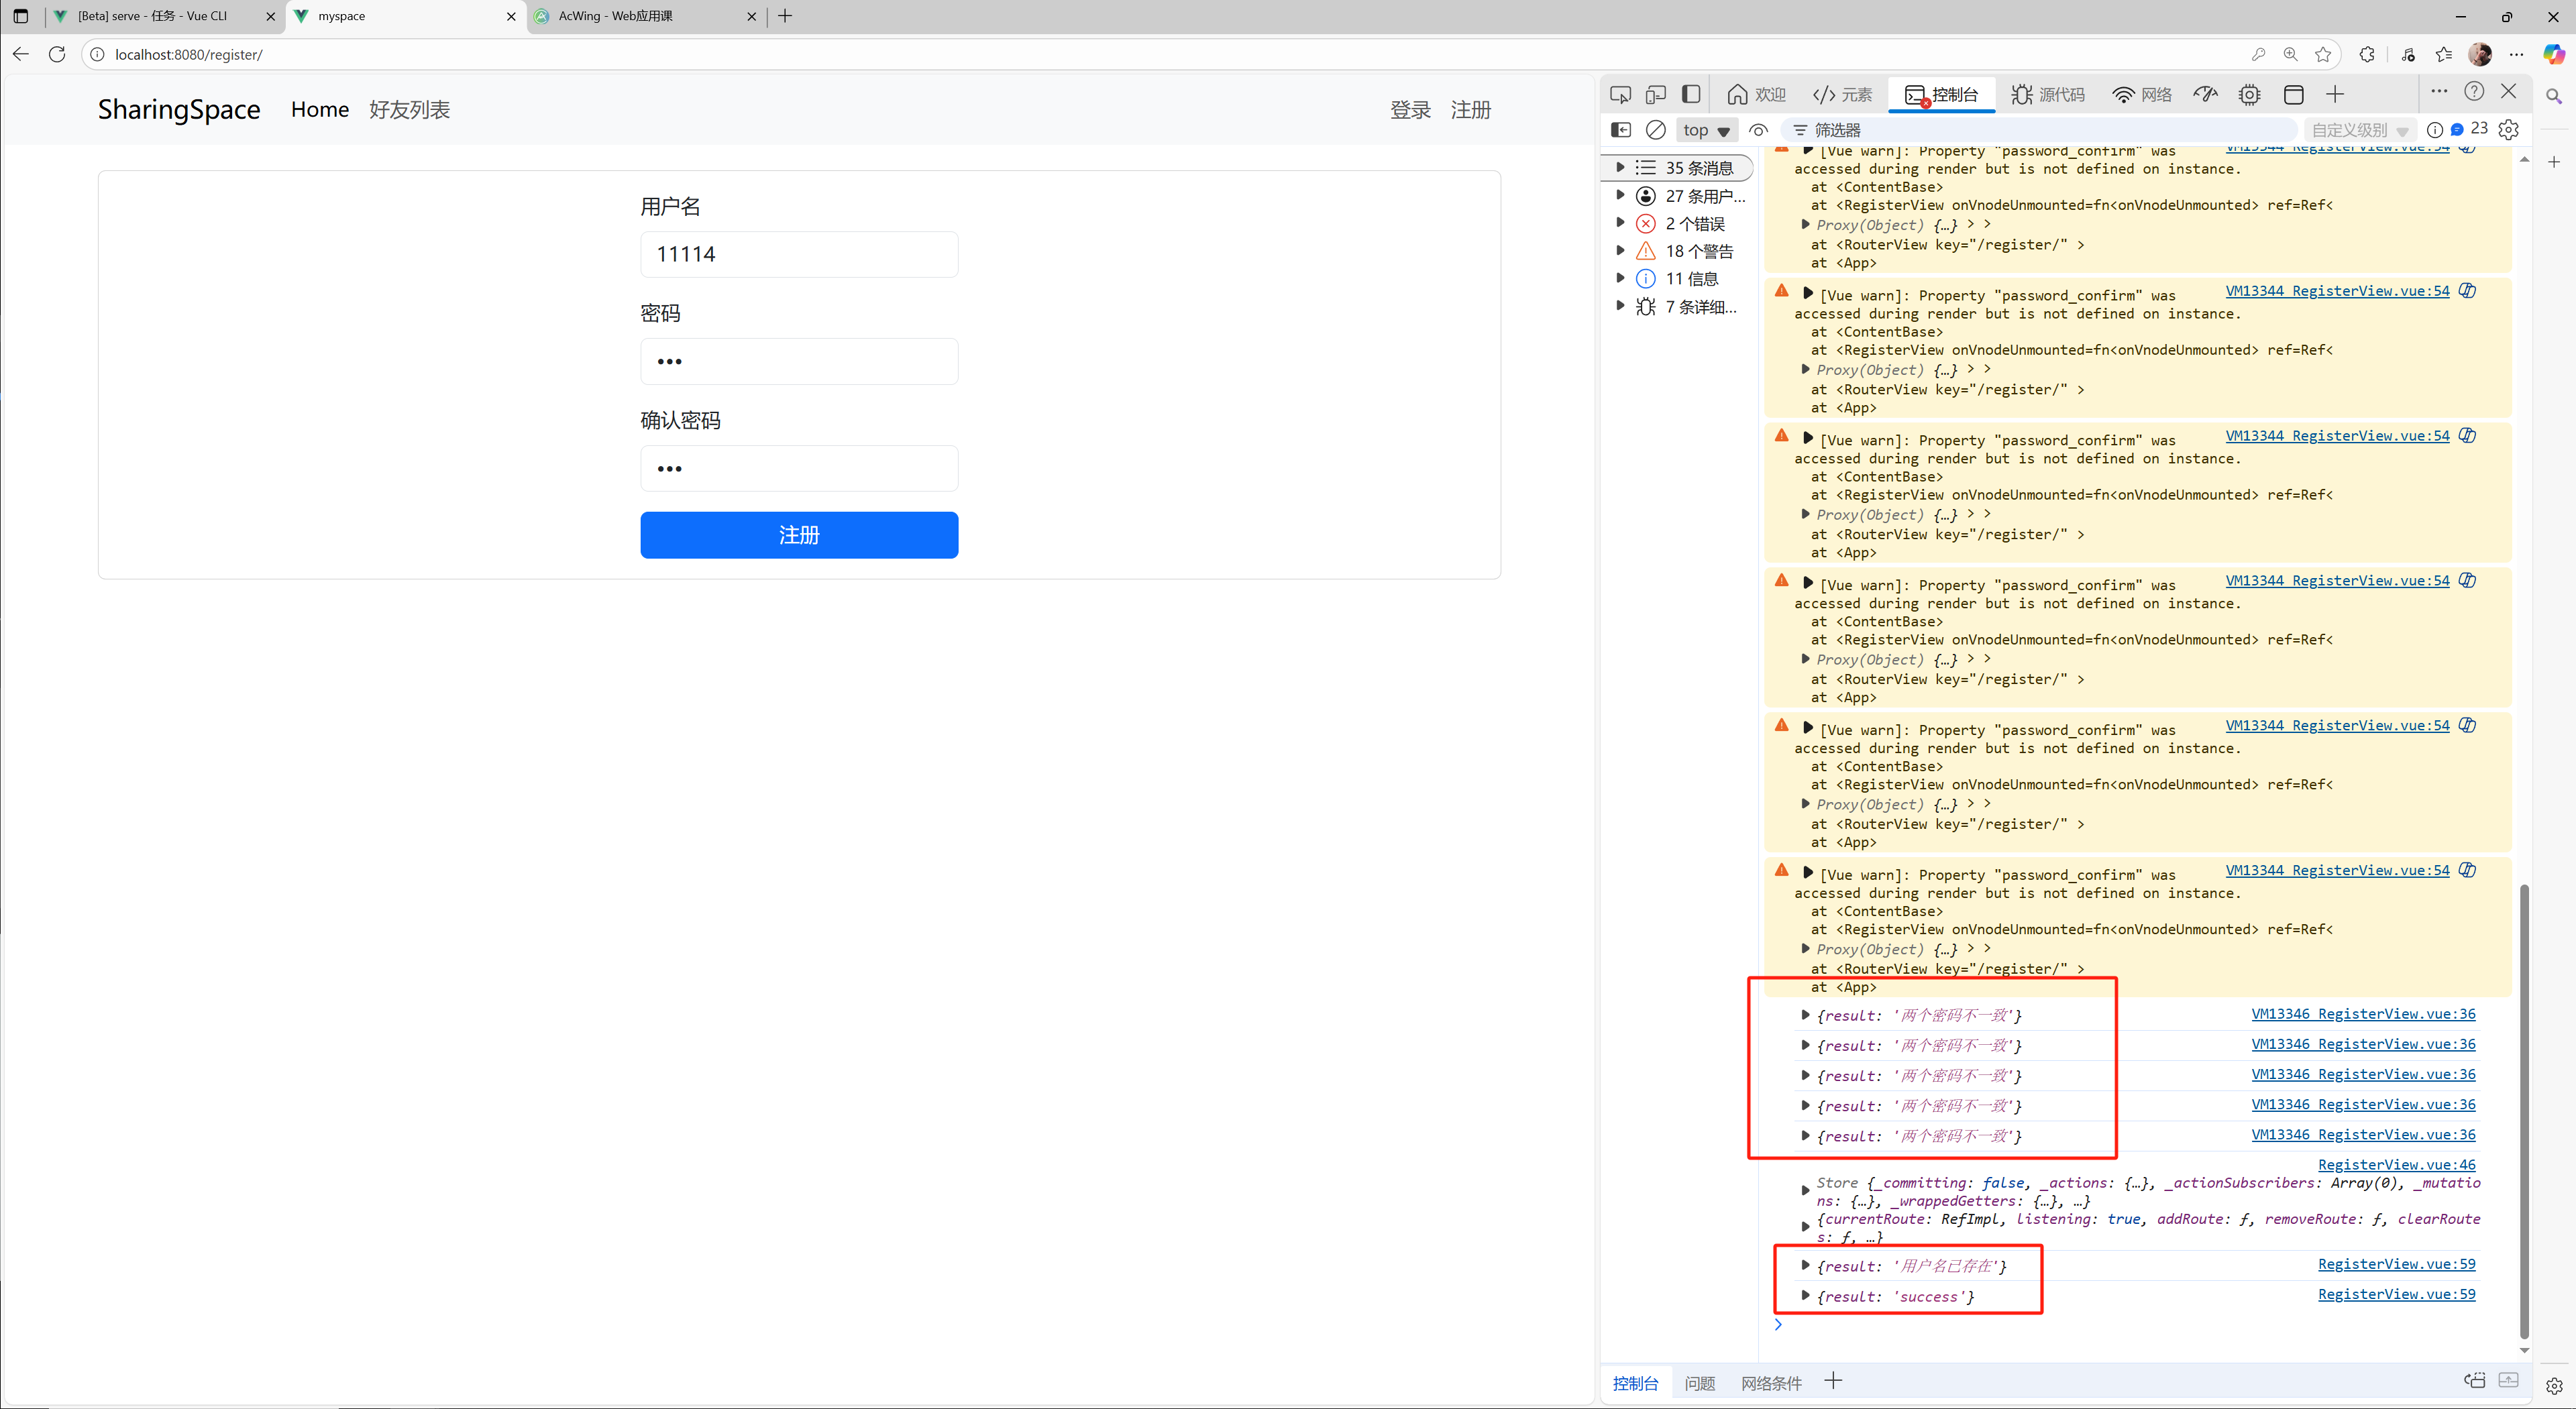
-
注册请求发送成功之后就跟登录是一样的逻辑,于是套用login的代码:
RegisterView.vue:
<template><ContentBase><div class="row justify-content-center"><div class="col-3"><form @submit.prevent="register"><div class="mb-3"><label for="username" class="form-label">用户名</label><input v-model="username" type="text" class="form-control" id="username"></div><div class="mb-3"><label for="password" class="form-label">密码</label><input v-model="password" type="password" class="form-control" id="password"></div><div class="mb-3"><label for="password_confirm" class="form-label">确认密码</label><input v-model="password_confirm" type="password" class="form-control" id="password_confirm"></div><div class="error-message">{{ error_message }}</div><button type="submit" class="btn btn-primary">注册</button></form></div></div></ContentBase>
</template><script>
import ContentBase from '@/components/ContentBase.vue'
import { ref } from 'vue';
import { useStore } from 'vuex';
import router from '@/router/index';
import $ from 'jquery';export default {name: 'RegisterView',components: {ContentBase},setup() {const store = useStore();let username = ref('');let password = ref('');let password_confirm = ref('');let error_message = ref('');console.log(store, router);const register = () => {error_message.value = "";$.ajax({url: "https://app165.acapp.acwing.com.cn/myspace/user/",type: "POST",data: {username: username.value,password: password.value,password_confirm: password_confirm.value,},success(resp) {if (resp.result === "success") {store.dispatch("login", {username: username.value,password: password.value,success() {console.log("success");router.push({name: 'name-userlist'});},error() {error_message.value = "服务器异常,请稍后再试";},});} else {error_message.value = resp.result;}}});};return {username: username,password: password,password_confirm,error_message,register,}}
}
</script>
<style scoped>button {width: 100%;}.error-message {color: red;}
</style>
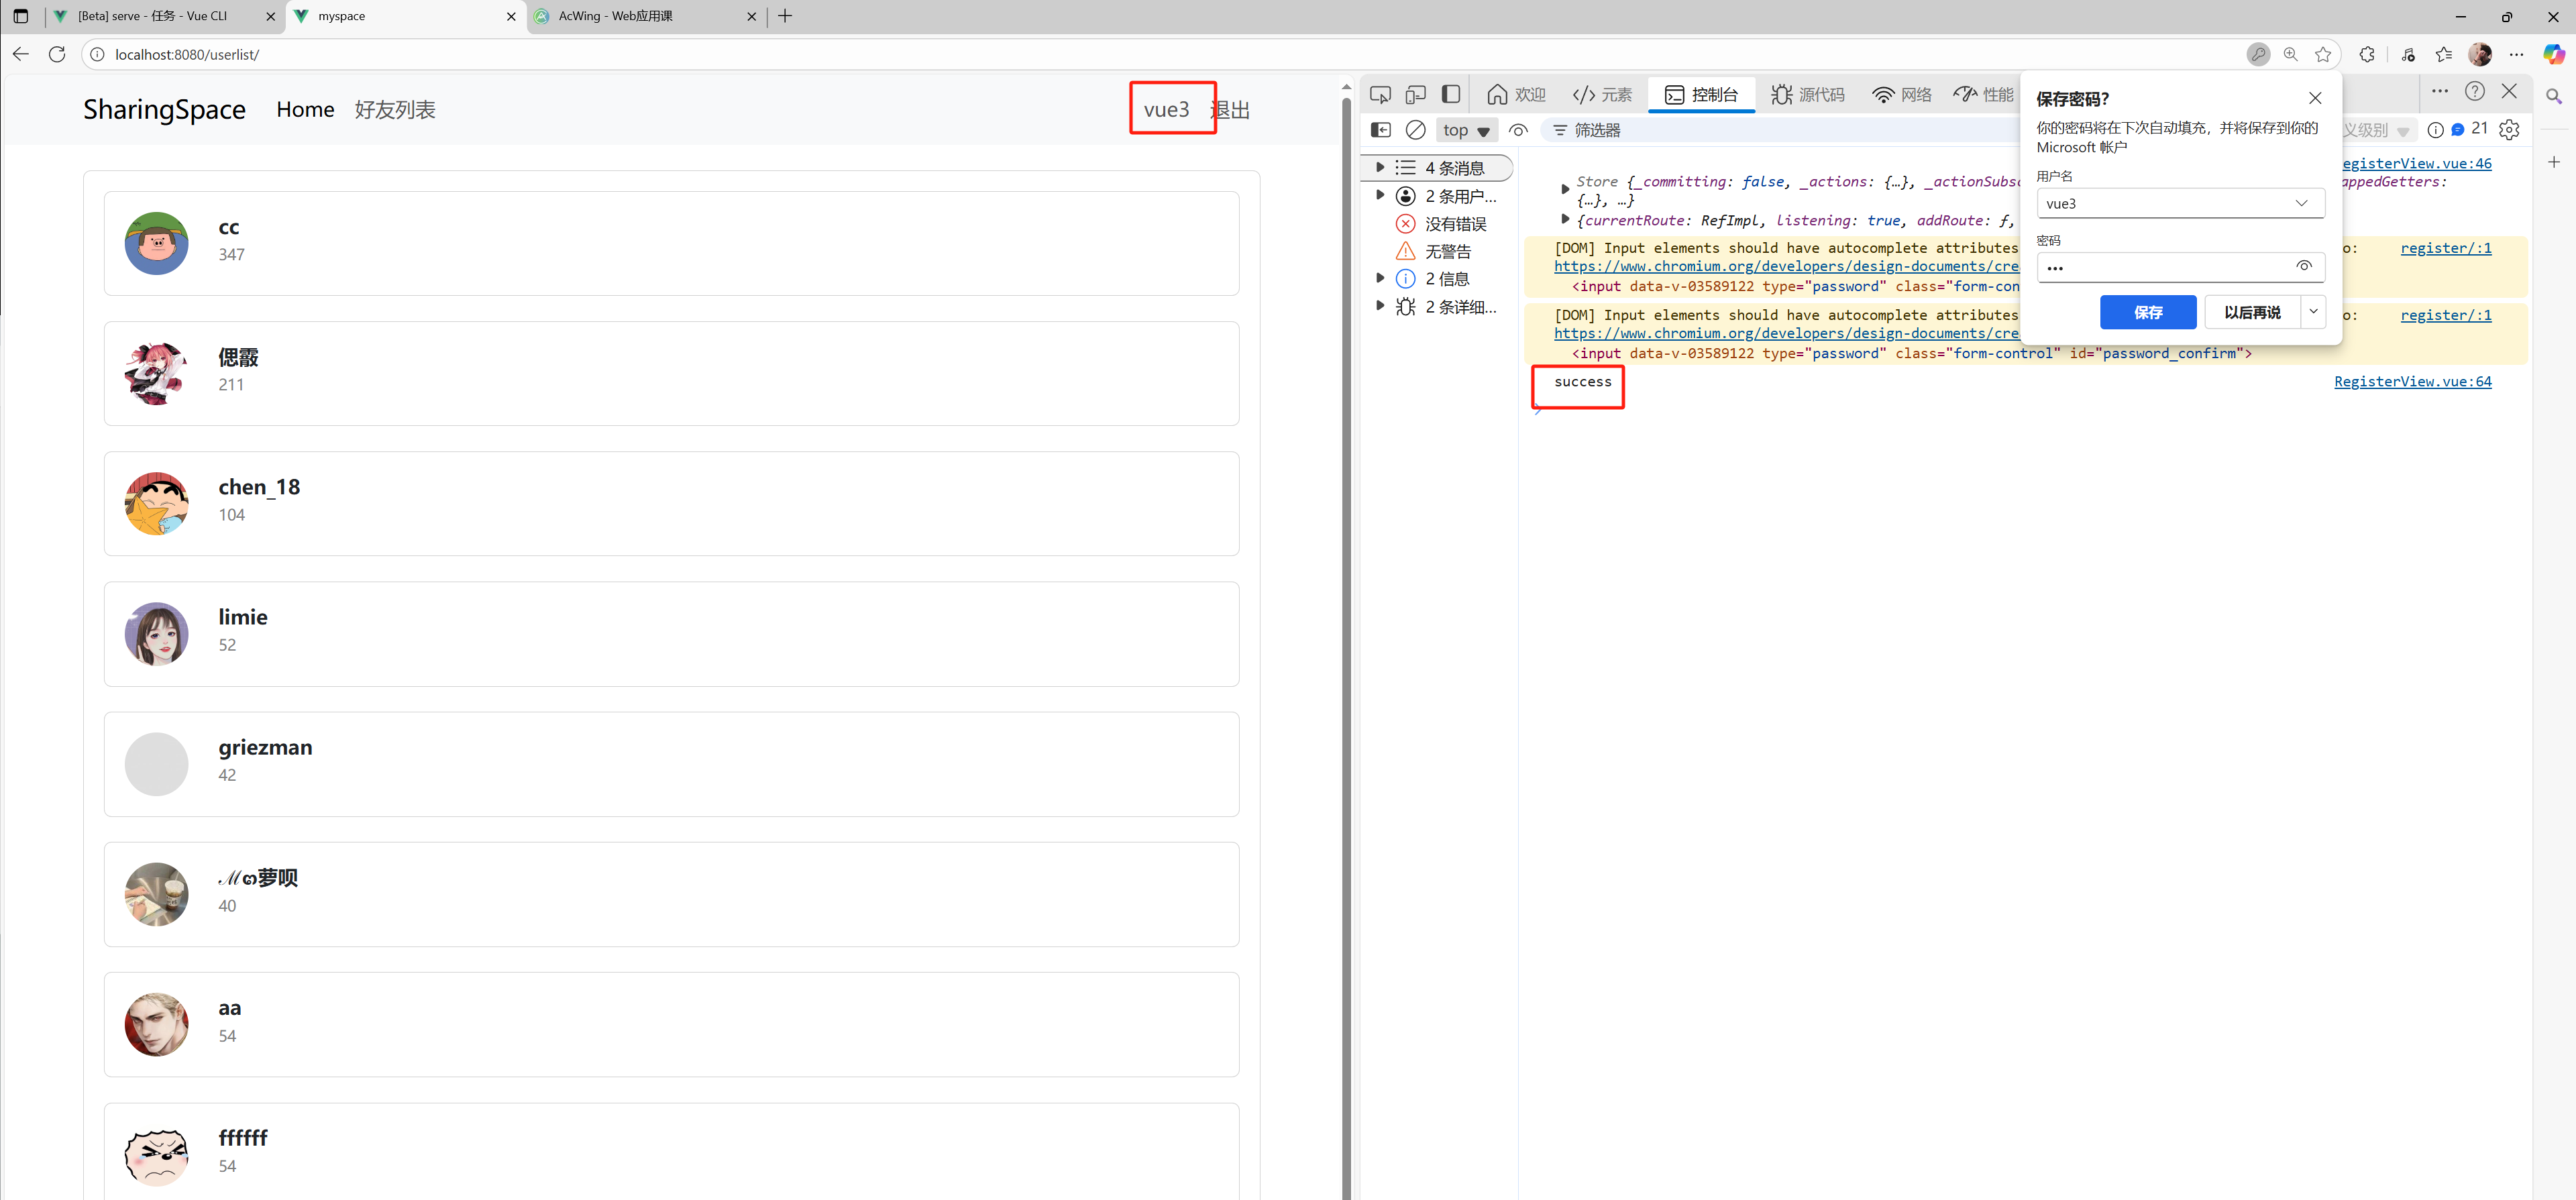
- 注册成功之后,会直接跟登录一样,右上角显示注册的用户名以及退出登录选项
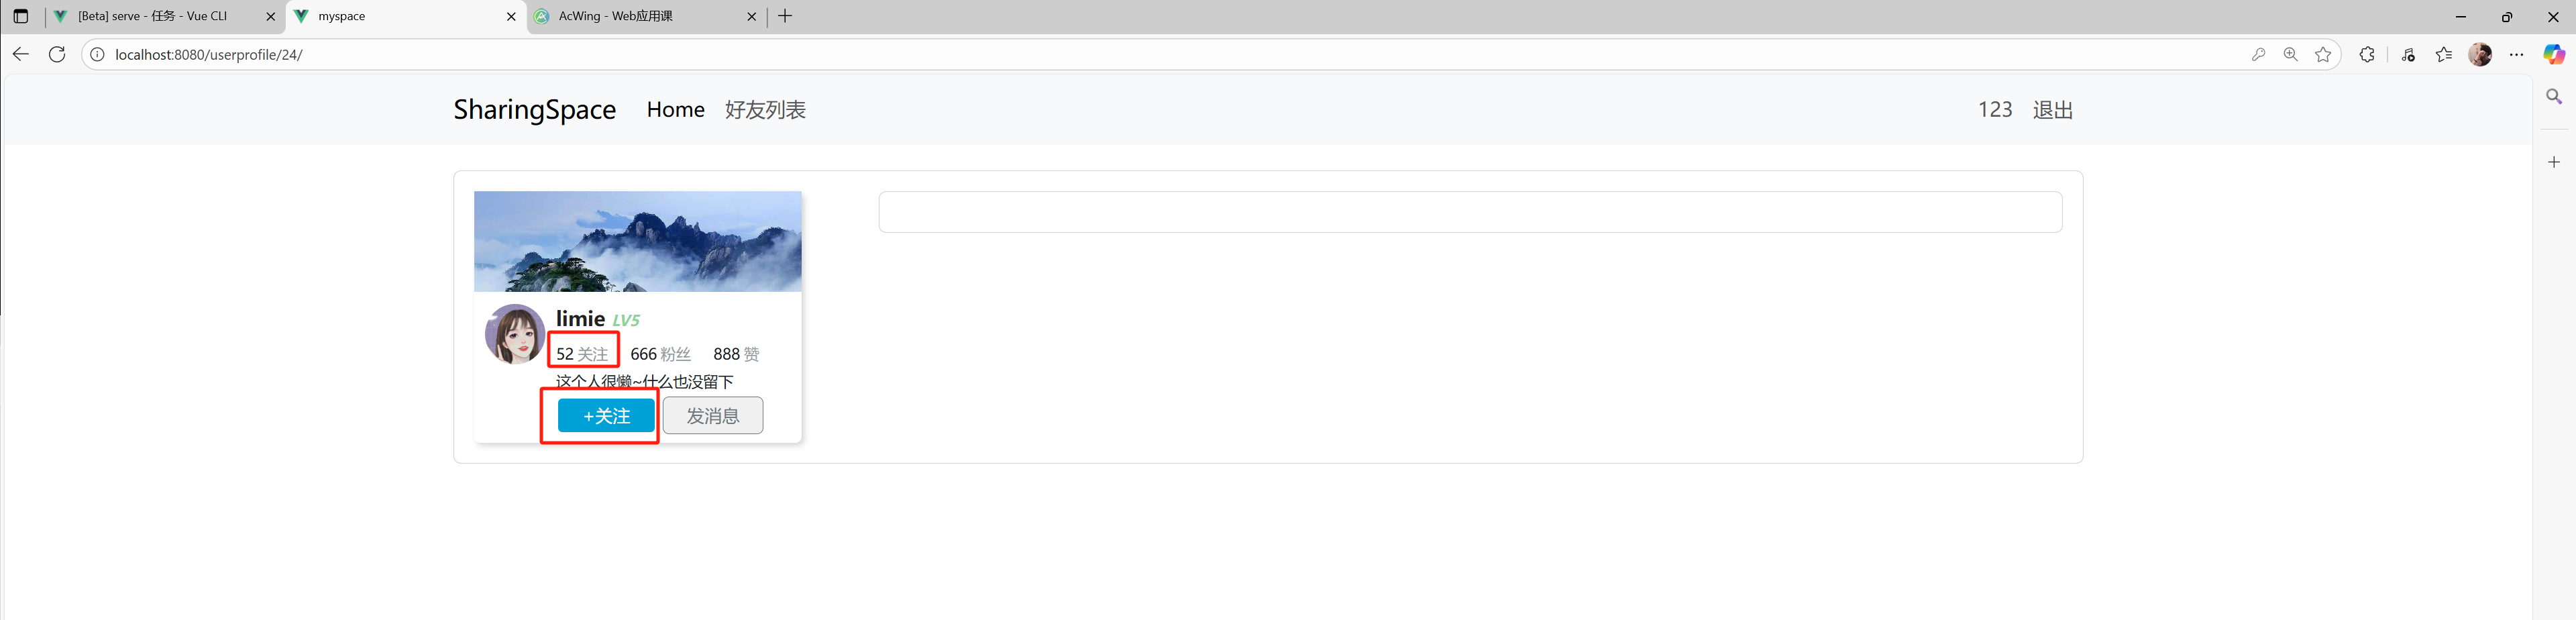
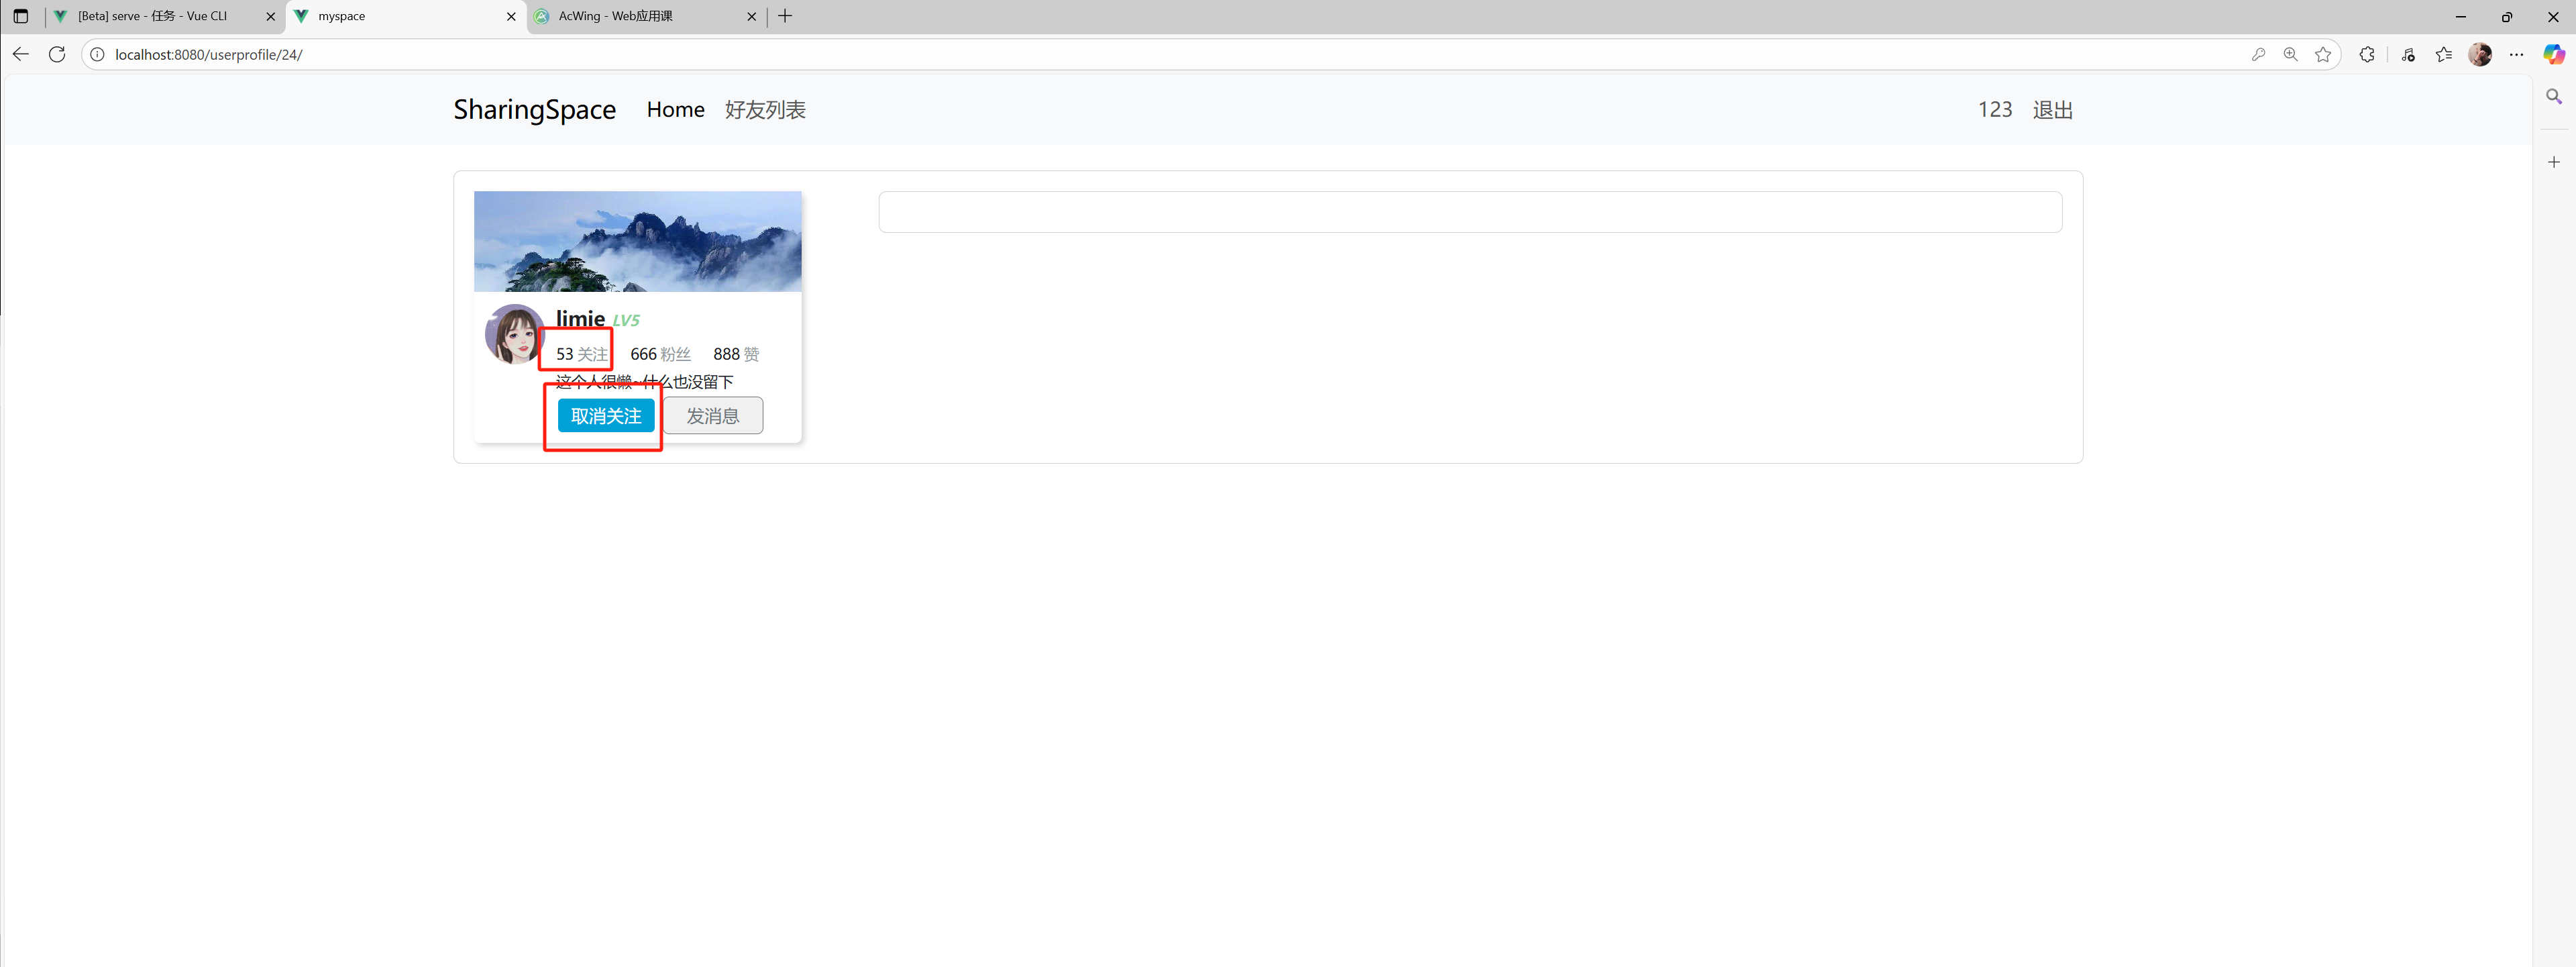
13)关注功能——点击关注按钮更新数据库的关注状态
- 每次在前端修改之前,先向后端发送请求,根据后端返回结果修改前端的数据展示,使得前后端是同步
- 在子组件中点击关注和取消关注是向后端发送请求,如果后端修改成功则触发前端在父组件的关注状态修改逻辑
UserInfo.vue:
<template><div class="row"><div class="col-3"><div class="user-card"><div class="user-card-head"></div><div class="user-card-body"><div class="user-card-body-left"><img :src="user.photo" alt=""></div><div class="user-card-body-right"><div class="user-card-body-right-text"><div class="user-card-body-right-text-username">{{ user.username }}<span>LV5</span></div><div class="user-card-body-right-text-reputation"><span class="user-card-body-right-text-reputation-item"><span>{{ user.followerCount }}</span><span>关注</span></span><span class="user-card-body-right-text-reputation-item"><span>666</span><span>粉丝</span></span><span class="user-card-body-right-text-reputation-item"><span>888</span><span>赞</span></span></div><div class="user-card-body-right-text-discreption">这个人很懒~什么也没留下</div></div><div class="user-card-body-right-button"><button @click="follow" type="button"  v-if="!user.is_followed">+关注</button><button v-on:click="unfollow" type = "button" v-if="user.is_followed">取消关注</button><button>发消息</button></div></div></div></div></div><div class="col-9"></div></div>
</template><script>
import { computed } from 'vue';
import $ from 'jquery';
import { useStore } from 'vuex';export default {name: "UserInfo",props: {user: {type: Object,required: true,},},setup(props, context) {const store = useStore();let fullName = computed(() => props.user.lastName + ' ' + props.user.firstName);const follow = () => {$.ajax({url: "https://app165.acapp.acwing.com.cn/myspace/follow/",type: "POST",data: {target_id: props.user.id,},headers: {'Authorization': "Bearer " + store.state.user.access,},success(resp) {if (resp.result === "success") {context.emit('follow');}}});};const unfollow = () => {$.ajax({url: "https://app165.acapp.acwing.com.cn/myspace/follow/",type: "POST",data: {target_id: props.user.id,},headers: {'Authorization': "Bearer " + store.state.user.access,},success(resp) {if (resp.result === "success") {context.emit('unfollow');}}});};return {fullName,follow,unfollow}}
}
</script><style scoped>img {border-radius: 50%;
}.user-card {width: 260px;height: 200px;box-shadow: 2px 2px 5px lightgrey;border-radius: 5px;
}.user-card-head {background-image: url('/src/assets/mountain.jpg');background-size: cover;width: 100%;height: 80px;
}.user-card-body {width: 260px;height: calc(100% - 85px);box-sizing: border-box;padding-top: 10px;
}.user-card-body-left {width: 65px;height: 100%;float: left;text-align: center;
}.user-card-body-left>img {border-radius: 50%;width: 48px;height: 48px;
}.user-card-body-right {width: calc(100% - 70px);height: 100%;float: left;
}.user-card-body-right-text {width: 100%;height: 70%;
}.user-card-body-right-text-username {font-size: 16px;color: #222222;font-weight: bold;padding: 0px 0px 10px 0px;
}.user-card-body-right-text-username>span {font-size: 12px;color: #8BD29B;font-style: italic;
}.user-card-body-right-text-reputation {width: 250px;height: 22px;padding: 0px 0px 10px 0px;font-size: 12px;color: #9499A0;box-sizing: border-box;line-height: 12px;
}.user-card-body-right-text-reputation-item {margin-right: 18px;
}.user-card-body-right-text-reputation-item>span:nth-child(1) {font-size: 12px;color: #18191c;padding: 0px 3px 0px 0px;
}.user-card-body-right-text-reputation-item>span:nth-child(2) {font-size: 12px;color: #9299A0;
}.user-card-body-right-text-discreption {margin-top: 1px;width: 200px;height: 10px;font-size: 12px;line-height: 10px;
}.user-card-body-right-button>button {width: 80px;height: 30px;font-size: 14px;border-radius: 5px;border: none;cursor: pointer;position: relative;z-index: 9999;border: 2px solid;
}.user-card-body-right-button>button:nth-child(1) {color: white;background-color: #00A1D6;padding: 1px 6px;float: left;margin-right: 5px;
}.user-card-body-right-button>button:nth-child(1):hover {background-color: #00B5E5;transition: 700ms;
}.user-card-body-right-button>button:nth-child(2) {padding: 1px 6px;color: #6D757A;float: left;border: #6D757A solid 1px;
}
</style>
- 在父组件中真正执行关注和取消关注的前端数据修改:
UserProfileView.vue:
<script>
export default {name: 'UserProfileView',components: {ContentBase,UserInfo,UserProfileContent,UserEditProfileVue},setup() {const route = useRoute();const userId = parseInt(route.params.userId);console.log(userId);const user = reactive({});const posts = reactive({});const store = useStore();const follow = () => {if (user.is_followed) return;user.is_followed = true;user.followerCount ++;};const unfollow = () => {if (!user.is_followed) return;user.is_followed = false;user.followerCount --;};return {user: user,follow,unfollow,posts,submit_post,is_me,delete_post,}}
}
</script>
- 关注和取消关注持久化到数据库展示:
- 至此整个项目前端全部完成,所有数据交互都是通过访问后端api进行的
- 功能包括:好友列表、登录注册、发布帖子(日常分享)、删除自己发布的帖子、查看好友的空间以及历史动态、关注和取消关注
*注:以上内容来自acwing的web应用课vue框架的学习应用,仅作为学习交流,不用作商业用途,如果感兴趣可以去该网站查看,y总nb!!!。以上内容如有侵权,联系删除。