springboot框架使用websocket实现一个聊天室的细节
项目基于 Spring Boot + WebSocket + JPA/MyBatis-Plus
1.技术栈选型
Spring WebSocket
实现客户端与服务器的 长连接,支持实时消息推送(替代轮询,降低延迟)
JPA
自动创建数据库表(messages 消息表、chat_session 会话表)
MyBatis-Plus
复杂查询(如 “查询用户未读消息数”“历史聊天记录”)
Spring Security
验证 WebSocket 连接的合法性(如 token 校验,防止非法连接)
2.核心表结构设计
聊天室需要存储 消息内容 和 会话状态(如未读消息数、最后一条消息时间),设计 messages 表,chat_session 表(会话表)
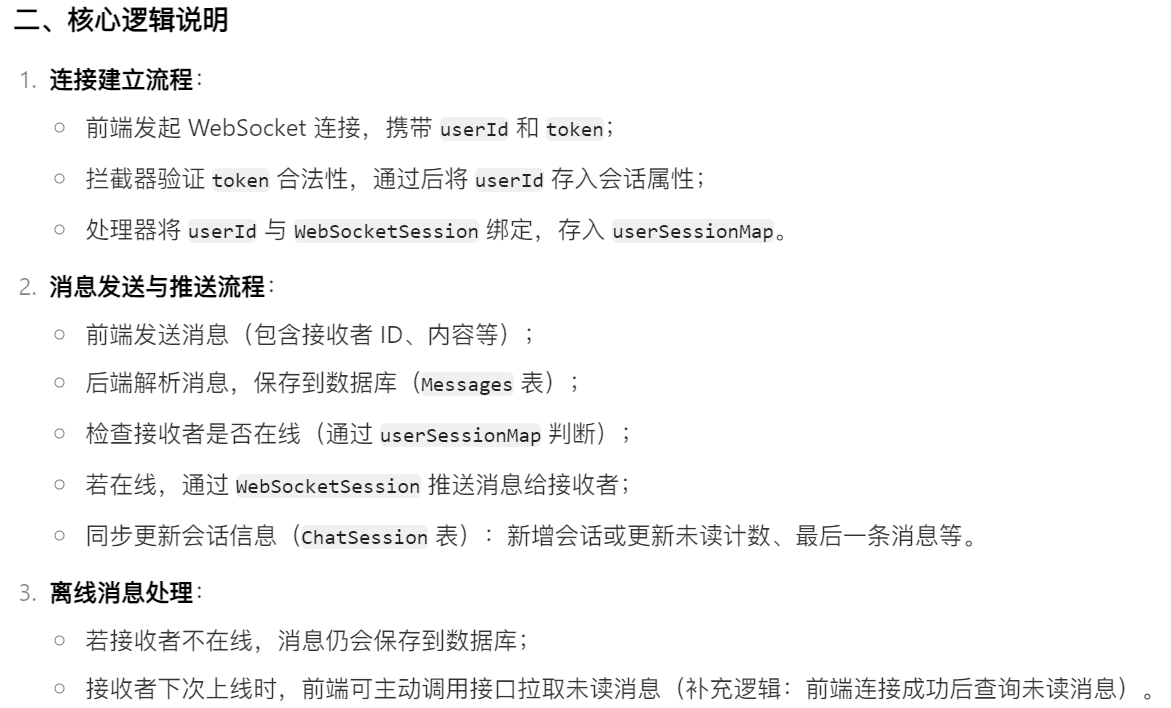
3.WebSocket 核心实现(后端长连接处理)
WebSocket 是聊天室的 “通信管道”,负责 建立连接、接收消息、推送消息、断开连接 四个核心动作。需要自定义 WebSocketHandler 处理业务逻辑,并配置拦截器验证连接合法性
(1)首先编写WebSocket的配置类
import org.springframework.context.annotation.Bean;
import org.springframework.context.annotation.Configuration;
import org.springframework.web.socket.config.annotation.EnableWebSocket;
import org.springframework.web.socket.config.annotation.StompEndpointRegistry;
import org.springframework.web.socket.config.annotation.WebSocketConfigurer;
import org.springframework.web.socket.config.annotation.WebSocketHandlerRegistry;
import org.springframework.web.socket.server.HandshakeInterceptor;@Configuration
@EnableWebSocket // 开启WebSocket支持
public class WebSocketConfig implements WebSocketConfigurer {// 注入自定义的消息处理器和拦截器private final MessageWebSocketHandler messageWebSocketHandler;private final HandshakeInterceptor authInterceptor;// 构造器注入(依赖注入)public WebSocketConfig(MessageWebSocketHandler messageWebSocketHandler, HandshakeInterceptor authInterceptor) {this.messageWebSocketHandler = messageWebSocketHandler;this.authInterceptor = authInterceptor;}@Overridepublic void registerWebSocketHandlers(WebSocketHandlerRegistry registry) {// 1. 配置WebSocket连接路径:/ws/message// 2. 添加拦截器:握手前校验token(用户身份)// 3. 允许跨域(前端项目地址,如http://localhost:8080)registry.addHandler(messageWebSocketHandler, "/ws/message").addInterceptors(authInterceptor).setAllowedOrigins("http://localhost:8080"); // 生产环境需指定具体域名,避免*}// 注入自定义WebSocket处理器@Beanpublic MessageWebSocketHandler messageWebSocketHandler() {return new MessageWebSocketHandler();}// 注入WebSocket身份验证拦截器(可选,用于验证连接合法性)@Beanpublic WebSocketAuthInterceptor webSocketAuthInterceptor() {return new WebSocketAuthInterceptor();}
}
(2)连接拦截器(Token 校验)
用户建立 WebSocket 连接时,需在 URL 中携带 token(如 ws://localhost:8090/ws/message?userId=234&token=xxx),拦截器校验 token 合法性,防止非法连接
import org.springframework.http.server.ServerHttpRequest;
import org.springframework.http.server.ServerHttpResponse;
import org.springframework.http.server.ServletServerHttpRequest;
import org.springframework.web.socket.WebSocketHandler;
import org.springframework.web.socket.server.HandshakeInterceptor;import java.util.Map;public class AuthHandshakeInterceptor implements HandshakeInterceptor {// 握手前校验(核心)@Overridepublic boolean beforeHandshake(ServerHttpRequest request, ServerHttpResponse response, WebSocketHandler wsHandler, Map<String, Object> attributes) throws Exception {// 1. 从URL参数中获取userId和tokenServletServerHttpRequest servletRequest = (ServletServerHttpRequest) request;String userId = servletRequest.getServletRequest().getParameter("userId");String token = servletRequest.getServletRequest().getParameter("token");// 2. 校验逻辑:① userId非空 ② token有效(如查询Redis中的用户token)if (userId == null || token == null || !validateToken(Long.parseLong(userId), token)) {// 校验失败,拒绝握手response.setStatusCode(HttpStatus.UNAUTHORIZED);return false;}// 3. 校验成功:将userId存入WebSocket会话属性,后续处理消息时用attributes.put("userId", Long.parseLong(userId));return true;}// 校验token(实际项目需对接Spring Security或Redis)private boolean validateToken(Long userId, String token) {// 示例逻辑:从Redis中查询该用户的有效token,对比是否一致// String redisToken = redisTemplate.opsForValue().get("user:token:" + userId);// return token.equals(redisToken);return "valid_123".equals(token); // 测试用,实际需替换为真实逻辑}@Overridepublic void afterHandshake(ServerHttpRequest request, ServerHttpResponse response, WebSocketHandler wsHandler, Exception exception) {}
}
(3)自定义 WebSocket 消息处理器(核心业务)
MessageWebSocketHandler 继承 TextWebSocketHandler,重写 消息接收、连接建立、连接断开 方法,实现 “消息存储、消息推送、会话管理”。
用 ConcurrentHashMap 存储 “在线用户 ID → WebSocket 会话” 的映射,确保线程安全(多用户同时连接时不冲突)
import org.springframework.stereotype.Component;
import org.springframework.web.socket.TextMessage;
import org.springframework.web.socket.WebSocketSession;
import org.springframework.web.socket.handler.TextWebSocketHandler;import java.io.IOException;
import java.time.LocalDateTime;
import java.util.Map;
import java.util.concurrent.ConcurrentHashMap;@Component
public class MessageWebSocketHandler extends TextWebSocketHandler {// 存储在线用户:key=userId,value=WebSocketSession(线程安全)private final Map<Long, WebSocketSession> onlineUsers = new ConcurrentHashMap<>();// 注入消息和会话的Service(用于数据库操作)private final MessagesService messagesService;private final ChatSessionService chatSessionService;// 构造器注入public MessageWebSocketHandler(MessagesService messagesService, ChatSessionService chatSessionService) {this.messagesService = messagesService;this.chatSessionService = chatSessionService;}// 1. 连接建立成功后:将用户加入在线列表@Overridepublic void afterConnectionEstablished(WebSocketSession session) throws Exception {// 从会话属性中获取userId(拦截器中存入的)Long userId = (Long) session.getAttributes().get("userId");if (userId != null) {onlineUsers.put(userId, session);System.out.println("用户[" + userId + "]上线,当前在线人数:" + onlineUsers.size());}}// 2. 接收客户端发送的消息(核心)@Overrideprotected void handleTextMessage(WebSocketSession session, TextMessage textMessage) throws Exception {// ① 解析前端发送的JSON消息(包含:接收者ID、内容、消息类型、订单ID)String json = textMessage.getPayload();MessageDTO messageDTO = JSON.parseObject(json, MessageDTO.class); // 用FastJSON/Jackson解析// ② 获取发送者ID(从会话属性中取,避免前端伪造)Long senderId = (Long) session.getAttributes().get("userId");messageDTO.setSenderId(senderId);messageDTO.setSendTime(LocalDateTime.now());messageDTO.setIsRead(0); // 初始未读// ③ 保存消息到数据库(调用Service)Messages messages = messagesService.saveMessage(messageDTO);// ④ 推送消息给接收者(如果接收者在线)WebSocketSession receiverSession = onlineUsers.get(messageDTO.getReceiverId());if (receiverSession != null && receiverSession.isOpen()) {// 发送消息到接收者的WebSocket会话receiverSession.sendMessage(new TextMessage(JSON.toJSONString(messages)));// 接收者在线:更新消息为“已读”(可选,根据业务)messages.setIsRead(1);messagesService.updateById(messages);}// ⑤ 更新会话表(chat_session):未读计数+1、更新最后一条消息chatSessionService.updateSession(messageDTO);}// 3. 连接断开后:从在线列表移除用户@Overridepublic void afterConnectionClosed(WebSocketSession session, CloseStatus status) throws Exception {Long userId = (Long) session.getAttributes().get("userId");if (userId != null) {onlineUsers.remove(userId);System.out.println("用户[" + userId + "]下线,当前在线人数:" + onlineUsers.size());}}// 4. 处理连接异常@Overridepublic void handleTransportError(WebSocketSession session, Throwable exception) throws Exception {System.err.println("WebSocket连接异常:" + exception.getMessage());// 异常时断开连接,移除在线用户afterConnectionClosed(session, CloseStatus.SERVER_ERROR);}
}
4.几个需要注意的点
(1)通过 @Bean 注册:Spring 会在创建 MessageWebSocketHandler 时,自动从容器中找到 MessagesService 实例,通过构造器注入进去,避免空指针
- 如果用
new MessageWebSocketHandler()手动创建对象:Spring 不会介入这个对象的创建过程,无法自动注入MessagesService,最终调用saveMessage时会触发NullPointerException;
(2)@Component和@Bean都是注册为Spring的Spring Bean区别是什么
如果你的类是 “无复杂构造逻辑” 的普通类,直接在类上添加 @Component 注解即可,无需手动写 @Bean
如:
// 用 @Component 标记,Spring 会自动扫描并注册为 Bean
@Component
public class MessageWebSocketHandler extends TextWebSocketHandler {private final MessagesService messagesService;// 构造器注入(Spring 自动处理)@Autowired // 或省略(Spring 5+ 支持构造器注入自动识别)public MessageWebSocketHandler(MessagesService messagesService) {this.messagesService = messagesService;}
}@Component
public class WebSocketAuthInterceptor implements HandshakeInterceptor {// ... 逻辑 ...
}
你的配置类中用 @Bean 方法,属于 “显式注册 Bean”,适用于以下场景
组件的构造需要额外参数
例如,MessageWebSocketHandler 需要传入一个自定义的 ConcurrentHashMap 初始容量:
@Bean
public MessageWebSocketHandler messageWebSocketHandler(MessagesService messagesService) {// 构造时传入额外参数,或执行复杂初始化逻辑Map<Long, WebSocketSession> onlineUsers = new ConcurrentHashMap<>(16); // 初始容量16return new MessageWebSocketHandler(messagesService, onlineUsers);
}
如果你的 MessageWebSocketHandler 类上已经添加了 @Component 注解,同时又在配置类中写了 @Bean 方法,会导致 Bean 重复注册(Spring 容器中出现两个同名 / 同类型的 Bean),启动时可能报错。
5.如何测试连接
postman中选择WebSocket 输入ws://localhost:8090/ws/message?userId=234&token=valid_123
或者是使用 wscat
wscat -c "ws://localhost:8080/ws/message?userId=1&token=valid_1"