Kotlin 协程之 Flow 的理解使用及源码解析

前言
在前面的文章中,我们已经讨论了 Channel 的概念和基本使用以及 Channel 的高阶应用。这篇我们来看日常开发中更常用的Flow。
“冷流” 和 “热流” 的本质
先来梳理一下所谓的 “冷流” 和 “热流”。
核心概念
我们已经知道 Channel 是 “热流”,而用 flow{} 构建器创建的 Flow 是 “冷流”(Flow 也有热流形式,如 SharedFlow、
StateFlow,这个后面文章会详细介绍)。
所谓的热和冷,本质上是指"数据生产"和"数据消费"是否解耦为两套独立逻辑。
-
热流:不依赖消费端,提前生产数据,即使没有消费者也会持续工作
-
冷流:当有消费端触发消费事件时,才开始生产数据,懒加载的思想
对比示例
让我们通过代码来直观感受一下:
Channel(热流)示例
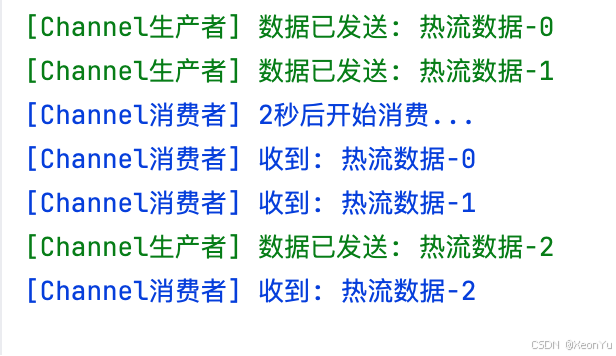
suspend fun channelHotExample() {val channel = Channel<String>(Channel.BUFFERED)// 生产者开始工作,不管有没有消费者val producer = GlobalScope.launch {repeat(3) { i ->delay(1000)channel.send("热流数据-$i")println("\u001B[32m[Channel生产者] 数据已发送: 热流数据-$i\u001B[0m")}channel.close()}// 等待2秒后才开始消费delay(2500)println("\u001B[34m[Channel消费者] 2秒后开始消费...\u001B[0m")for (data in channel) {println("\u001B[34m[Channel消费者] 收到: $data\u001B[0m")}producer.join()
}
Flow(冷流)示例
Flow 的创建和收集很简单:用 flow {} 创建,用 collect 收集。
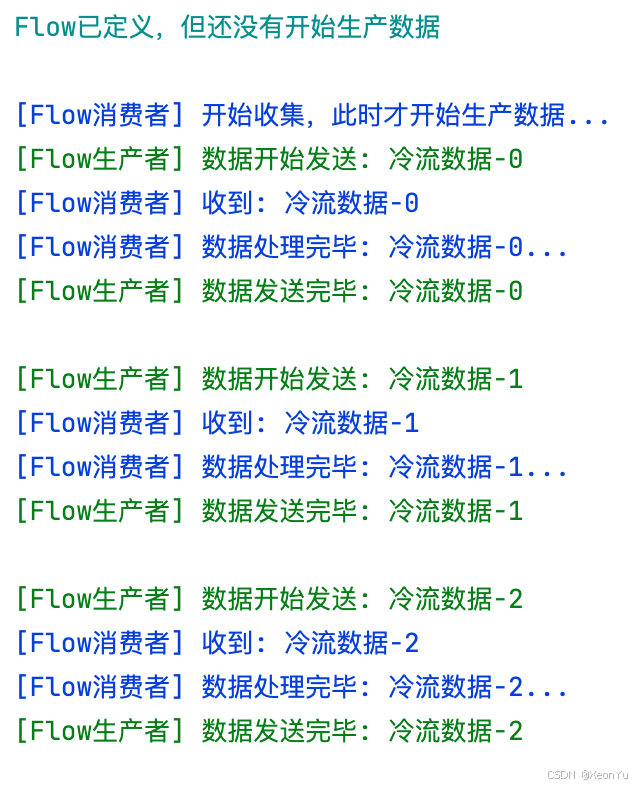
suspend fun flowColdExample() {// 定义Flow,但此时还没有开始生产数据val flow = flow {repeat(3) { i ->delay(1000)println("\u001B[32m[Flow生产者] 数据开始发送: 冷流数据-$i\u001B[0m")emit("冷流数据-$i")println("\u001B[32m[Flow生产者] 数据发送完毕: 冷流数据-$i\u001B[0m")println()}}println("\u001B[36mFlow已定义,但还没有开始生产数据\u001B[0m")println()delay(2000)println("\u001B[34m[Flow消费者] 开始收集,此时才开始生产数据...\u001B[0m")flow.collect { data ->println("\u001B[34m[Flow消费者] 收到: $data\u001B[0m")// 模拟处理逻辑delay(500)println("\u001B[34m[Flow消费者] 数据处理完毕: $data...\u001B[0m")}
}
热流 vs 冷流对比
| 特性 | 热流 | 冷流 |
|---|---|---|
| 数据生产 | 立即开始,不管有没有消费者 | 只有在被收集时才开始生产 |
| 数据共享 | 多个消费者共享同一份数据 | 每个收集器都有独立的数据流 |
| 资源消耗 | 持续消耗资源 | 按需消耗资源 |
| 背压处理 | 通过缓冲区和挂起机制 | 天然支持背压,生产速度跟随消费 |
| 生命周期 | 独立于消费者 | 与收集器生命周期绑定 |
| 内存使用 | 需要缓冲区存储数据 | 按需生产,内存友好 |
Flow 的基本使用
Flow 的创建有多种方式,不同方式背后的实现原理和适用场景也不同。
flow 构建器
flow{} 构建器是最常用的也是很重要的一种方式。后面提到的 flowOf、asFlow、以及 channelFlow,本质上都是对 flow{}
的封装或扩展。
使用示例
先来看个最简单的例子:
suspend fun basicFlowBuilder() {val numberFlow = flow {repeat(5) { i ->delay(500)emit(i) // 发射数据}}numberFlow.collect { value ->println("[消费者] 收到: $value")}
}
使用起来非常简单,用
flow{}创建,用collect收集即可。
flowOf
当你有一组已知的静态数据需要转成 Flow,flowOf 最方便:
suspend fun flowOfExample() {val staticFlow = flowOf("Apple", "Banana", "Cherry")staticFlow.collect { fruit ->println("[消费者] 水果: $fruit")}}源码
// Flow.kt
public fun <T> flowOf(vararg elements: T): Flow<T> = flow {for (element in elements) {emit(element)}
}可以看到,flowOf 本质就是对 flow 的封装:遍历所有元素并逐个 emit。
asFlow 扩展函数
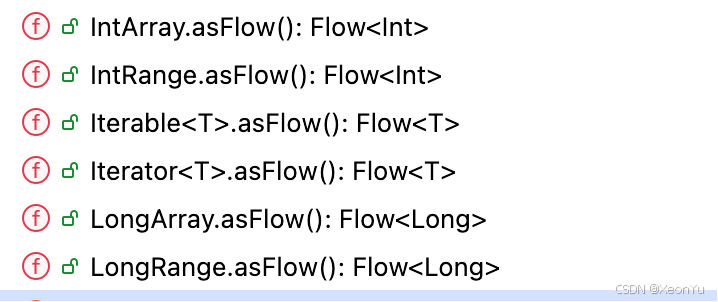
将各类数据结构直接转换为 Flow
示例:
suspend fun asFlowExample() {
// 集合转Flowval listFlow = listOf(1, 2, 3, 4, 5).asFlow()listFlow.collect { number ->println("\u001B[34m[消费者] 数字: $number\u001B[0m")}// 区间转Flowval rangeFlow = (1..3).asFlow()rangeFlow.collect { value ->println("\u001B[34m[消费者] 区间值: $value\u001B[0m")}// 数组转Flowval arrayFlow = arrayOf("A", "B", "C").asFlow()arrayFlow.collect { letter ->println("\u001B[34m[消费者] 字母: $letter\u001B[0m")}}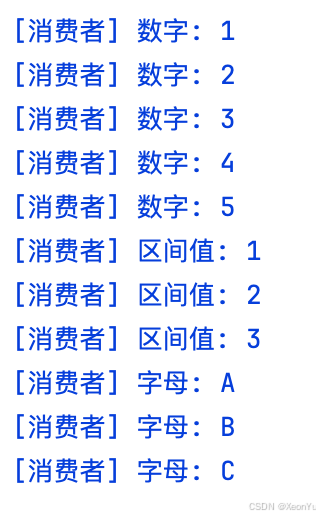
源码
// Iterable -> Flow
public fun <T> Iterable<T>.asFlow(): Flow<T> = flow {forEach { value ->emit(value)}
}// Array -> Flow
public fun <T> Array<T>.asFlow(): Flow<T> = flow {forEach { value ->emit(value)}
}
核心特点:同步转换、按需发射、内存友好。
Flow 源码分析
Flow 内部的实现还是很有意思的, 我们就基于上述示例代码结合源码进行分析,来看一看 flow 内部的执行流程。
1. 创建阶段
例如:
val numberFlow = flow {repeat(5) { i ->delay(500)emit(i)}
}
flow{}
public fun <T> flow(@BuilderInference block: suspend FlowCollector<T>.() -> Unit): Flow<T> = SafeFlow(block)
-
参数类型:
suspend FlowCollector<T>.() -> Unit(一个可挂起的扩展函数类型) -
返回值:返回
SafeFlow
FlowCollector
public fun interface FlowCollector<in T> {/*** Collects the value emitted by the upstream.* This method is not thread-safe and should not be invoked concurrently.*/public suspend fun emit(value: T)
}
可以看到,FlowCollector 接口提供了 emit 方法,因此我们才能在 flow{} 代码块里直接调用 emit(),因为这个代码块本身就是FlowCollector 的扩展函数。
SafeFlow
private class SafeFlow<T>(private val block: suspend FlowCollector<T>.() -> Unit) : AbstractFlow<T>() {override suspend fun collectSafely(collector: FlowCollector<T>) {collector.block()//这里的 block,实际上就是我们写的生产逻辑的代码块}
}
关键点:
flow { ... }返回SafeFlow实例- 传入的
block实际就是我们写的生产逻辑代码块 - 此时生产逻辑并没有被执行,等待
collectSafely被调用后才会执行生产逻辑
2. 收集阶段
numberFlow.collect { value ->println("[消费者] 收到: $value")
}
numberFlow 是 SafeFlow 的实例
AbstractFlow.collect()
SafeFlow 继承自 AbstractFlow,当我们调用 numberFlow.collect 时,实际上是走到了 AbstractFlow.collect()
// kotlinx-coroutines-core/common/src/flow/AbstractFlow.kt
public abstract class AbstractFlow<T> : Flow<T>, CancellableFlow<T> {/*** 这里的 collector,就是我们写的消费逻辑的代码块*/public final override suspend fun collect(collector: FlowCollector<T>) {// 创建 SafeCollector ,并且把消费逻辑代码块作为参数传递进去val safeCollector = SafeCollector(collector, coroutineContext)try {//调用实现类(SafeFlow)的collectSafely,此时的safeCollector是包含了消费逻辑代码块的collectSafely(safeCollector)} finally {safeCollector.releaseIntercepted()}}
}
关键点:
safeCollector创建时,把collector传入,并且把collector包装成SafeCollector,也就是保存了消费逻辑代码块- 然后,调用了
collectSafely,这里会走到实现类(SafeFlow)的collectSafely
SafeFlow.collectSafely()
//这里的 block 参数上面说过了,是我们生产逻辑的代码块
private class SafeFlow<T>(private val block: suspend FlowCollector<T>.() -> Unit) : AbstractFlow<T>() {//这里的collector,则是把消费逻辑包装后的SafeCollector,当触发 collect 后,会触发生产逻辑,此时,collector也是包含消费逻辑了的。override suspend fun collectSafely(collector: FlowCollector<T>) {collector.block()}
}
关键点:
-
collector.block()中的collector是SafeCollector实例 -
block是我们写的生产逻辑(flow { ... }中的代码),也就是示例中的:
repeat(5) { i ->delay(500)emit(i)
}
当执行到 emit(i) 时,实际上调用的是 SafeCollector.emit(i)。
SafeCollector.emit()
internal actual class SafeCollector<T> actual constructor(@JvmField internal actual val collector: FlowCollector<T>,//保存的消费代码块@JvmField internal actual val collectContext: CoroutineContext
) : FlowCollector<T>, ContinuationImpl(NoOpContinuation, EmptyCoroutineContext), CoroutineStackFrame {/*** This is a crafty implementation of state-machine reusing.* First it checks that it is not used concurrently (which we explicitly prohibit) and* then just cache an instance of the completion in order to avoid extra allocation on each emit,* making it effectively garbage-free on its hot-path.*/override suspend fun emit(value: T) {return suspendCoroutineUninterceptedOrReturn sc@{ uCont ->try {emit(uCont, value)//执行下面的私有方法} catch (e: Throwable) {// Save the fact that exception from emit (or even check context) has been thrown// Note, that this can the first emit and lastEmissionContext may not be saved yet,// hence we use `uCont.context` here.lastEmissionContext = DownstreamExceptionContext(e, uCont.context)throw e}}}private fun emit(uCont: Continuation<Unit>, value: T): Any? {val currentContext = uCont.contextcurrentContext.ensureActive()//检查协程是否处于活跃状态// This check is triggered once per flow on happy path.//上下文检查,flow 不允许跨协程发送数据,这个后面会讲到val previousContext = lastEmissionContextif (previousContext !== currentContext) {checkContext(currentContext, previousContext, value)lastEmissionContext = currentContext}completion = uCont//真正执行消费的地方:collector 是我们写的消费逻辑代码块,value 就是 生产逻辑中发送的数据val result = emitFun(collector as FlowCollector<Any?>, value, this as Continuation<Unit>)/** If the callee hasn't suspended, that means that it won't (it's forbidden) call 'resumeWith` (-> `invokeSuspend`)* and we don't have to retain a strong reference to it to avoid memory leaks.*/if (result != COROUTINE_SUSPENDED) {completion = null}return result}
}
关键点:
SafeCollector保存了消费逻辑代码块,也就是参数collectoremit最终会调用到emitFunemitFun(collector, value, this)中的collector是我们传入的消费逻辑代码块,就是示例代码中的
{ value -> println("[消费者] 收到: $value") }
emitFun
@Suppress("UNCHECKED_CAST")
private val emitFun =FlowCollector<Any?>::emit as Function3<FlowCollector<Any?>, Any?, Continuation<Unit>, Any?>
这里要转换来看
// emitFun 的类型是 Function3<FlowCollector<Any?>, Any?, Continuation<Unit>, Any?>
// 相当于下面代码:
fun emitFun(collector: FlowCollector<Any?>, value: Any?, completion: Continuation<Unit>): Any? {return collector.emit(value, completion)  // 调用消费者的 emit 方法
}
当执行 emitFun(collector, value, this) 时:
-
collector是我们的消费逻辑({ value -> println("收到: $value") }) -
value是数据(比如 0, 1, 2) -
this是 SafeCollector 自己作为Continuation
我们的消费逻辑代码块实际上就是一个 FlowCollector 的实现
// 当我们写 collect { value -> println("收到: $value") } 时
// 实际上创建了一个匿名类,实现了 FlowCollector 接口:val consumer = object : FlowCollector<Int> {override suspend fun emit(value: Int) {println("收到: $value")  // 我们的消费逻辑}
}
所以当调用 emitFun(collector, value, completion) 时,实际上是在调用我们的消费逻辑
换句话说,当我们调用 emit 时,相当于是把 emit() 替换为消费代码块里的代码。
例如:
suspend fun basicFlowBuilder() {val numberFlow = flow {repeat(5) { i ->delay(500)emit(i) // 发射数据}}numberFlow.collect { value ->println("[消费者] 收到: $value")}
}
就相当于:
suspend fun basicFlowBuilder() {repeat(5) { i ->delay(500)println("[消费者] 收到: $value")//消费代码块替换掉 emit}
}
整体执行流程
1.numberFlow.collect { value -> println("[消费者] 收到: $value") }
↓
2.AbstractFlow.collect(collector) 被调用-collector = { value -> println("[消费者] 收到: $value") }(我们的消费逻辑)
↓
3.SafeCollector(collector, coroutineContext) 被创建-SafeCollector.collector = 我们的消费逻辑
-SafeCollector 自己也实现了 FlowCollector<T>
↓
4.SafeFlow.collectSafely(safeCollector) 被调用-safeCollector 是 SafeCollector 实例
↓
5.safeCollector.block() 执行-block 是我们的生产逻辑 : repeat (5) { i -> delay(500); emit(i) }
-当执行到 emit (i) 时 , 调用 SafeCollector.emit(i)
↓
6.SafeCollector.emit(i) 执行-检查上下文一致性
-调用 emitFun (SafeCollector.collector, i, continuation)
-SafeCollector.collector 就是我们的消费逻辑
↓
7.我们的消费逻辑被执行:println("[消费者] 收到: $i")
↓
8.继续下一次循环,直到 repeat(5) 完成
总结
-
SafeFlow负责执行生产逻辑,SafeCollector负责执行消费逻辑。 -
collector.block()中的collector是SafeCollector实例,保存了消费逻辑代码块 -
block是我们的生产逻辑(flow { ... }中的代码) -
当生产逻辑调用
emit(value)时,会触发SafeCollector.emit(value) -
SafeCollector.emit(value)最终会调用我们传入的消费逻辑
以上就是 Flow 内部的实现机制。这就是为什么说 Flow 是"冷流",因为生产逻辑只有在被收集时才开始执行,而且每次收集都是全新的执行。
到这里,Flow 内部的执行机制就搞明白了。
Flow 的重要限制
在看其他创建方式之前,先明确一个非常重要的限制:Flow 不允许在不同协程中调用 emit()。
示例
suspend fun wrongConcurrentEmitExample() {val errorFlow = flow {println("\u001B[32m[主协程] 开始创建Flow\u001B[0m")//在新协程中调用emitlaunch {delay(1000)emit("来自子协程的数据")  // 这里会抛出异常!}emit("正常数据")  // 这个是正常的}try {errorFlow.collect { data ->println("\u001B[34m[消费者] 收到: $data\u001B[0m")}} catch (e: Exception) {println("\u001B[31m[异常] ${e.message}\u001B[0m")}
}

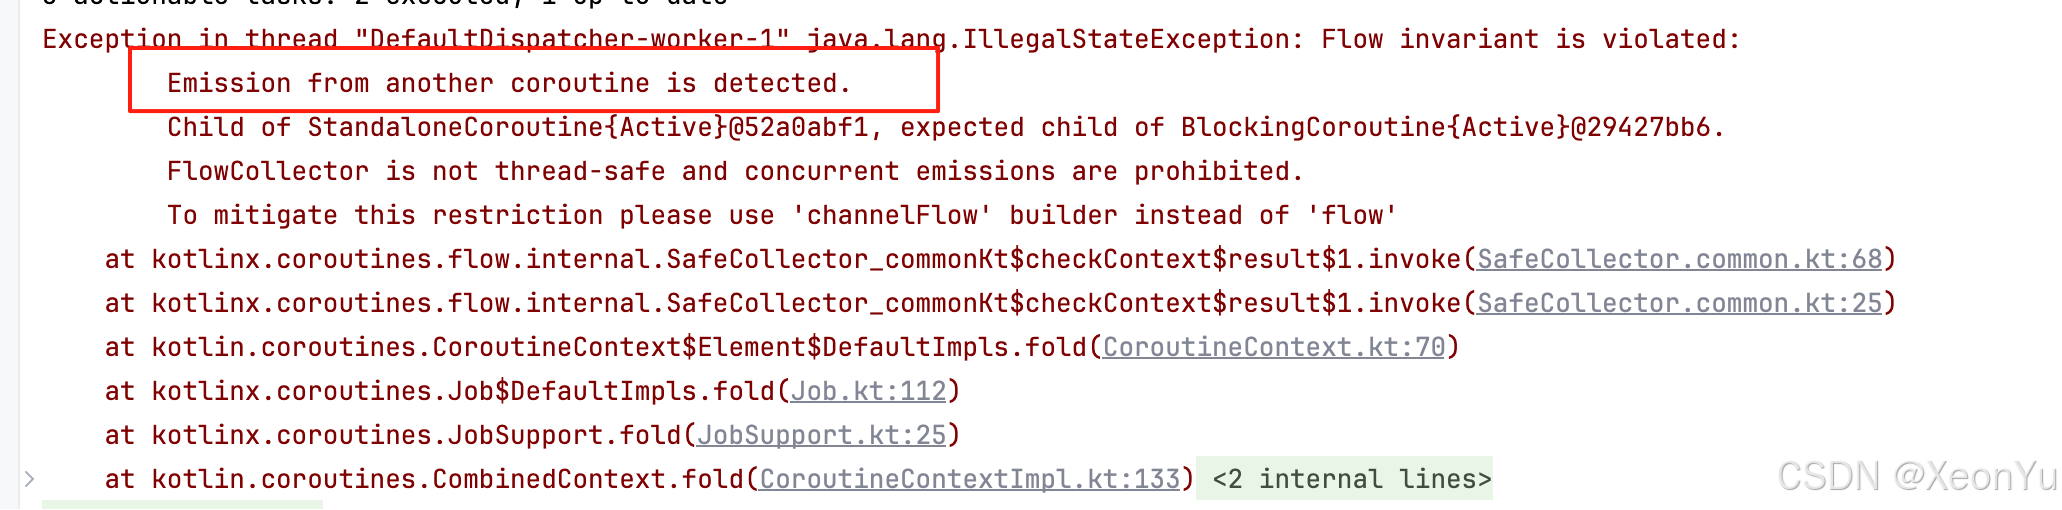
抛出的异常表明:FlowCollector 不是线程安全的,禁止并发发送数据。
报错堆栈:
SafeCollector 的检查机制
collect 内部会构建 SafeCollector,这个我们前面分析源码的时候已经知道了

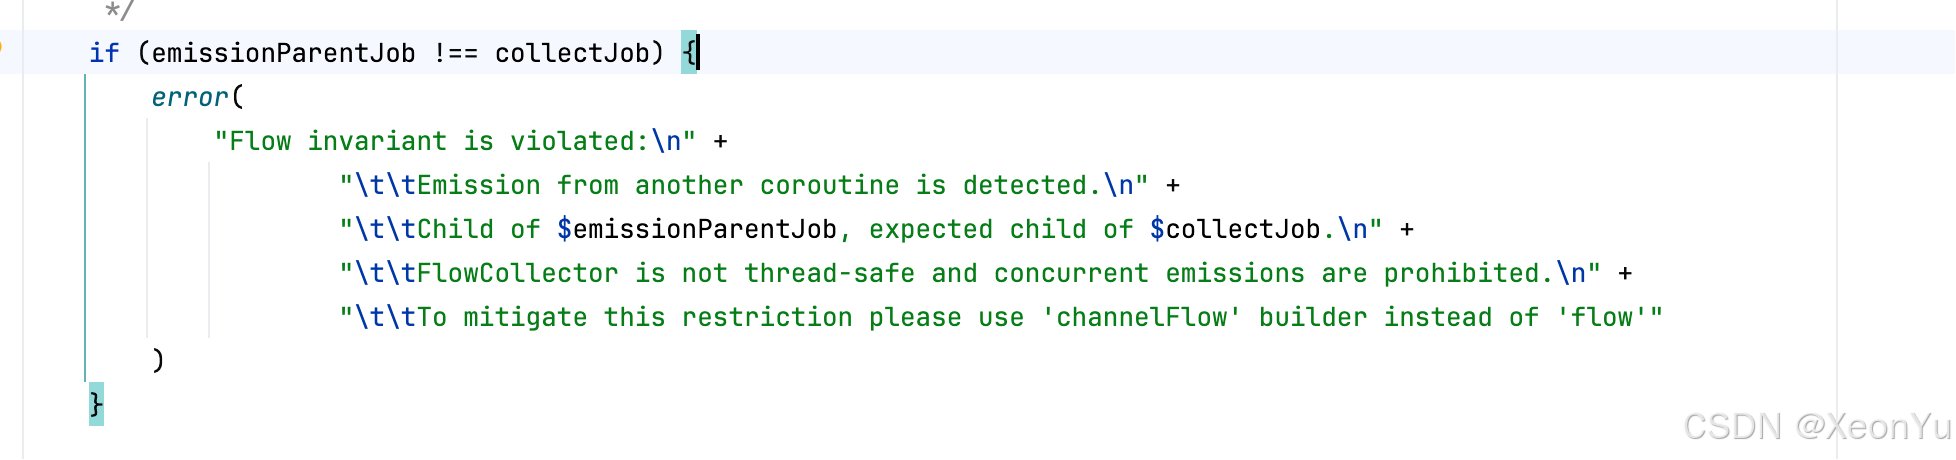
SafeCollector 在执行 emit 时会检查上下文:
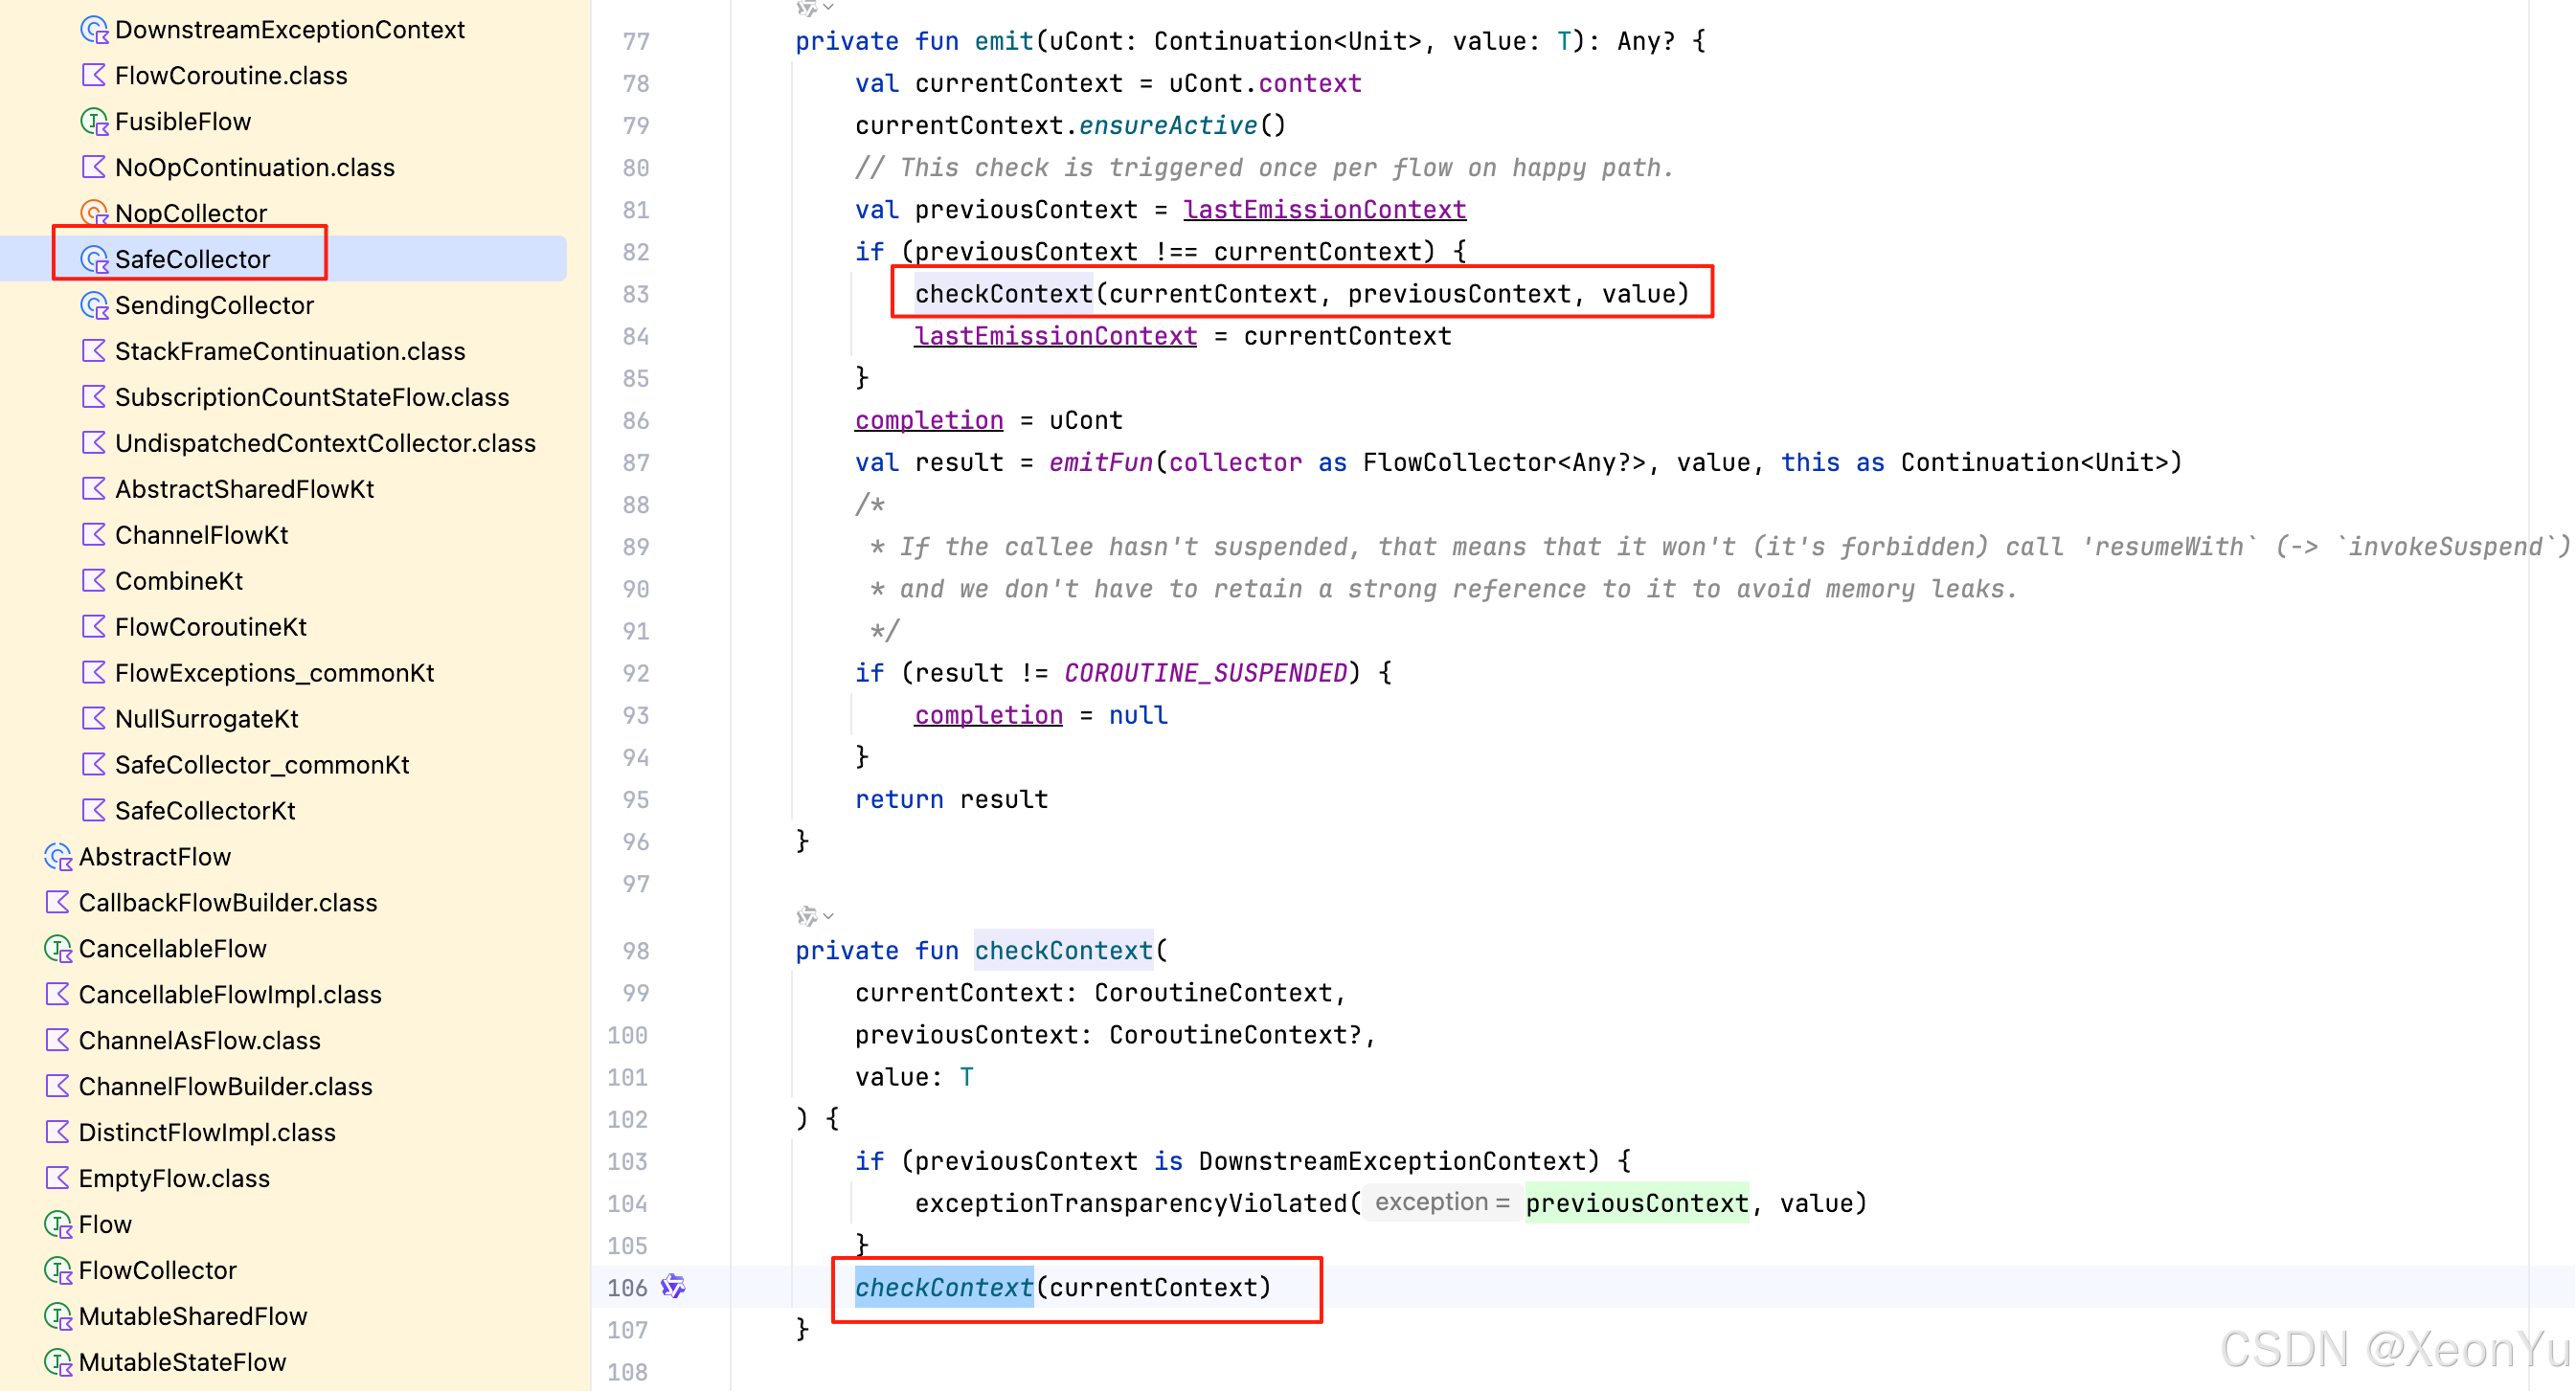
当协程上下文不一致时,会抛出异常:
关键代码:
if (emissionParentJob !== collectJob) {error("Flow invariant is violated:\n" +"\t\tEmission from another coroutine is detected.\n" +"\t\tChild of $emissionParentJob, expected child of $collectJob.\n" +"\t\tFlowCollector is not thread-safe and concurrent emissions are prohibited.\n" +"\t\tTo mitigate this restriction please use 'channelFlow' builder instead of 'flow'")
}
关键点:
emit发生时的Job必须与collect的Job一致(或为其子层级)。因此在另一协程中调用emit会触发异常。
为什么要有这个限制?
根因在于 Flow 的冷流本质。
冷流的设计理念
Flow 是冷流,每次 collect 都会重新执行 flow{} 代码块,就像一次函数调用:
-
调用者(collect)与被调用者(flow{})在同一执行上下文中
-
生产与消费是同步协作,而非并发竞争
-
过程需要顺序、可预测
协程上下文的一致性
在 Flow 中,emit 的协程上下文应当与 collect 保持一致。否则:
-
上下文一致性被破坏,可能产生线程切换问题
-
异常无法被正确传播到消费者
-
取消机制失效,子协程取消无法正确传递
源码分析的时候也提到过,emit() 的代码相当于是把消费逻辑代码块给替换掉 emit(),如果说 Flow
生产逻辑可以跨协程并发执行,那么,消费逻辑逻辑代码块就会出现跟预期不符的逻辑。
例如,我原本在消费逻辑默认是在主线程中运行,如果可以跨协程 emit,例如,切到了 IO 线程,那么,消费逻辑就会跑到 emit
所在的IO线程中执行,无法保证上下文一致。
总结
Flow 在使用上还是很简单的,关键是要搞清楚概念特性以及底层实现原理,以及结合特性用在合适的场景中去。
核心原则:Flow 是用来处理数据流的,如果你的场景是一次性的数据获取,直接用 suspend fun 就够了。记住,合适的工具做合适的事情,这样代码才会既清晰又高效。
Flow 虽然在生产端存在限制,不能跨协程并发地生产数据,但 Kotlin 还给我们提供了其他的解决方案,具备更加灵活的生产端。下一篇文章,我们将深入探讨如何突破Flow 的限制,看看 Channel 与 Flow 的结合之道。
好了, 本篇文章就是这些,希望能帮到你。下一篇:突破 Flow 限制:Channel 与 Flow 的结合之道
感谢阅读,如果对你有帮助请三连(点赞、收藏、加关注)支持。有任何疑问或建议,欢迎在评论区留言讨论。如需转载,请注明出处:喻志强的博客