vLLM推理框架:pagedAttention算法+pipeline介绍+源码逐行注释
欢迎留言,每条留言都会精选、本人当天回复,文章错误内容也会在回复中更新。本文分为三部分,第一部分是pagedAttention算法介绍,第二部分是vLLM的工作流程介绍,第三部分是vLLM 源代码逐行注释。
一、PagedAttention 算法介绍
1.vLLM问世之前,已有推理框架的算法缺陷如下:

如上图,预分配策略保证了每个请求有足够的内存空间,但会带来下面三处内存浪费:
1. Reserved Slot(预留槽位)
定义:这些槽位是为将来可能会用到的token预留给的,但在当前轮次中不会被立即使用。
问题:由于这些槽位当前不被使用,其他请求无法利用这些空间,导致资源闲置。
比如:请求A中有2个slot被标记为“future used”,这意味着它们在未来某个时刻会被使用,但在当前轮次中是空闲的;请求B中有1个slot被标记为“future used”。
2. Internal Fragmentation(内部碎片)
定义:这是指在完成请求之前无法确定某些槽位是否会被使用,因为无法提前知道LLM会生成多长的输出。
问题:这些不确定的槽位在当前轮次中也无法被其他请求利用,造成资源浪费。
比方说:请求A中有2038个slot从未被使用过,这就是内部碎片;请求B中有507个slot从未被使用过,同样属于内部碎片。
3. External Fragmentation(外部碎片)
定义:这是指在预分配时就已经确认不会被使用的槽位,但由于连续性要求,这些槽位难以再分配给其他请求。
问题:这些槽位虽然已经确认不会被使用,但由于内存分配的连续性要求,其他请求难以利用这些零散的空间。
例子:请求A实际只需要2048个slot,但预分配了2050个slot,剩下的2个slot难以再分配给其他请求,形成了外部碎片。
2.vLLM 解决内外部碎片问题
PagedAttention 算法如何解决内部和外部碎片问题呢?
1. 初始化阶段
在初始化阶段,PagedAttention 预先分配一大块显存,并将其划分为多个小块,这些小块被称为Physical KV cache blocks。每个 Physical block 可以存储一定数量的 token 所需的 KV cache(例如,block_size 个 token)。同时,系统会创建一个 Block table,用于将 Logical KV cache blocks 映射到 Physical KV cache blocks。Logical block 是用来存储 token 值的逻辑单元,而 Block table 则记录了每个 Logical block 对应的 Physical block 位置以及该 Physical block 中已填充的 slot 数量。

2. 生成token阶段
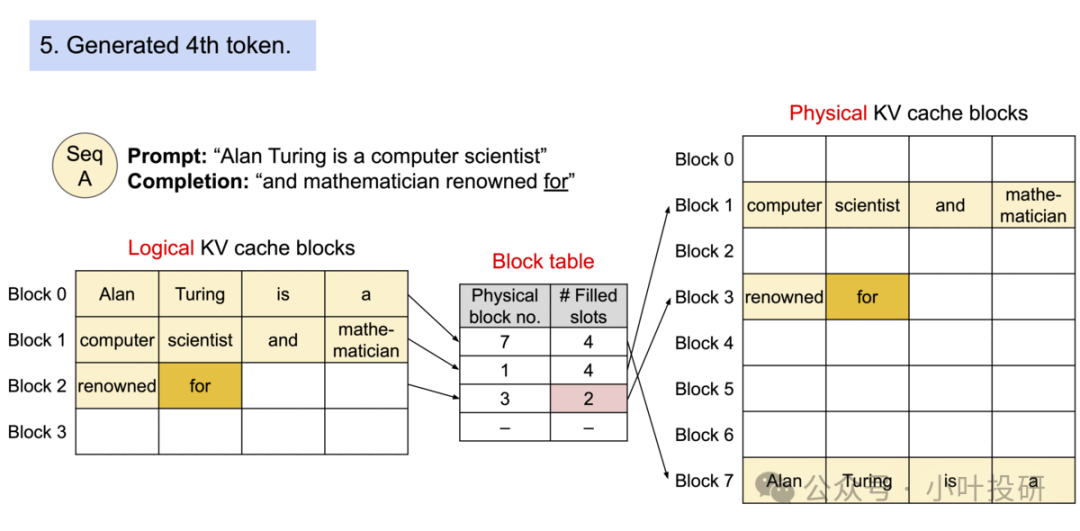
假设接收到的请求的 prompt 是 "Alan Turing is a computer scientist",它为该请求分配 Logical KV block 以及 Physical KV cache block,并通过块表将两者关联在一起。如下图所示,"Alan Turing is a" 逻辑上存储在 Logical KV cache blocks 中的 Block 0,实际上是被存储在 Physical KV cache block 的 Block 7,两者通过块表关联在一起,其中 Filled slots 表示该 块已存储的 token 数。
接着依次生成“and”、“mathematician”、“renowed”、“for”。
也就是说,当生成开始时,PagedAttention 会按照以下步骤进行:
请求新的 Logical block: 当需要存储新的 token 时,系统会请求一个新的 Logical block。
查找可用的 Physical block: 通过 Block table 查找是否有可用的 Physical block。如果找到,则将 Logical block 映射到该 Physical block;如果没有找到,则从预分配的显存中分配一个新的 Physical block。
更新 Block table: 将新映射的信息更新到 Block table 中,包括 Physical block 编号和已填充的 slot 数量。
3.vLLM通过beam search 解决共享问题
PagedAttention 让 Beam Search 更高效,就像“多个浏览器标签页共享同一个网页缓存”,这样可以大幅减少内存占用,支持更大 batch、更长序列、更多 beam 数,提升生成质量和吞吐:
所有 beam 共用相同的开头(prompt)→ 只存一份
中间有相似路径 → 相同的部分也只存一份
下面举个例子,Beam Search可分为初始化、第一次扩展、第二次扩展三个阶段:
一、初始化阶段
Prompt: "The cat"
Logical KV Cache Blocks: 每个 Logical block 可以存储一个 token 的 KV cache。
Physical KV Cache Blocks: 每个 Physical block 可以存储 4 个 token 的 KV cache。
Prompt: "The cat"Logical KV Cache Blocks:Block 0: ["The"]Block 1: ["cat"]Physical KV Cache Blocks:Block 0: ["The", "cat", -, -]
二、第一次扩展后
Logical KV Cache Blocks: 新增 Block 2 和 Block 3 分别对应 "is" 和 "was"。
Physical KV Cache Blocks: Block 0 已经存储 "The" 和 "cat",新增 Block 1 存储 "is" 和 "was"。
Beams:Beam 1: "The cat is"Beam 2: "The cat was"Logical KV Cache Blocks:Block 0: ["The"]Block 1: ["cat"]Block 2: ["is"]Block 3: ["was"]Physical KV Cache Blocks:Block 0: ["The", "cat", -, -]Block 1: ["is", "was", -, -]
三、第二次扩展后
Logical KV Cache Blocks: 新增 Block 4 和 Block 5 分别对应 "cute" 和 "smart"。
Physical KV Cache Blocks: Block 0 和 Block 1 保持不变,新增 Block 2 存储 "cute" 和 "smart"。
Beams:Beam 1: "The cat is cute"Beam 2: "The cat was smart"Logical KV Cache Blocks:Block 0: ["The"]Block 1: ["cat"]Block 2: ["is"]Block 3: ["was"]Block 4: ["cute"]Block 5: ["smart"]Physical KV Cache Blocks:Block 0: ["The", "cat", -, -]Block 1: ["is", "was", -, -]Block 2: ["cute", "smart", -, -]
4.vLLM通过shared prompt解决共享问题
例如:
请求 A: [System Prompt] Translate: "hello"
请求 B: [System Prompt] Translate: "world"
其中 [System Prompt]是固定的,比如:
"You are a helpful assistant. Translate English to French:"
这个 [System Prompt]就是共享前缀 shared prompt。
在推理系统中,每个输入都会被 tokenizer 转成 token ID 序列。
系统如何“识别”共享前缀?可以按下面顺序来:
1、提取每个请求的 token ID 序列
- 请求 A: [101, 205, 307, ..., 888] (共 50 个 token)
- 请求 B: [101, 205, 307, ..., 999] (共 52 个 token)
2、从左到右比较 token ID
- 前 40 个 token 完全相同 → 确认共享前缀长度为 40
3、提前计算并缓存这前 40 个 token 的 KV Cache
二、vLLM工作流介绍
vLLM源码地址:https://github.com/vllm-project/vllm/tree/main
vLLM分为三个系统,调度系统、推理系统、管理系统,下图是调度系统和推理系统:
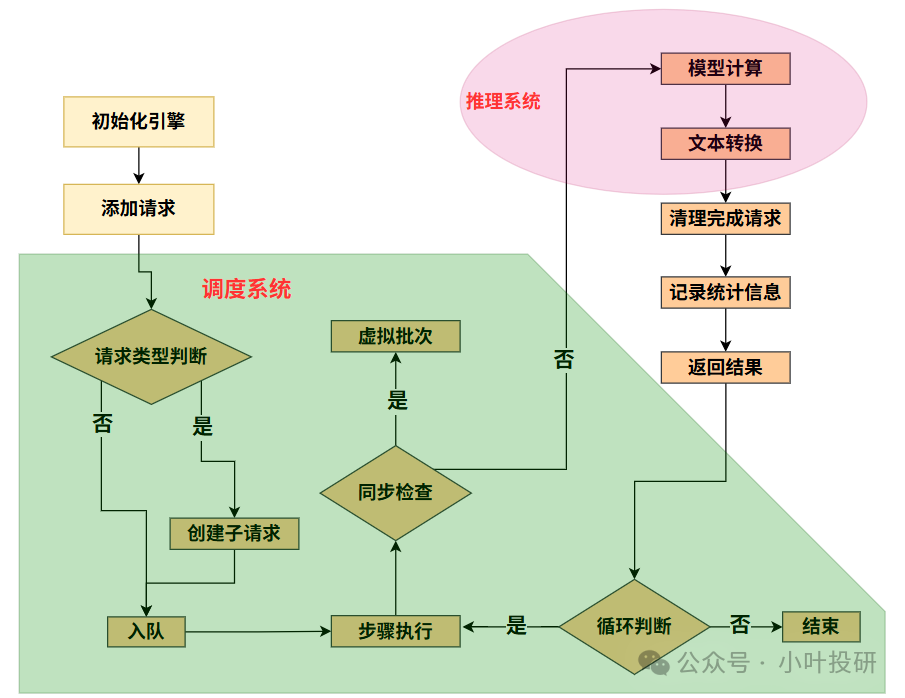
1.工厂初始化(引擎启动)
如下面__init__方法所示,
def __init__(...):# 环境检查:确保使用V1引擎if not envs.VLLM_USE_V1: raise ValueError("必须启用V1引擎") # 保存全局配置(包含模型、调度、缓存等参数)self.vllm_config = vllm_configself.model_config = vllm_config.model_configself.cache_config = vllm_config.cache_config# 初始化统计记录器(用于性能监控)self.stat_logger = PrometheusStatLogger(vllm_config) if log_stats else None# 分布式处理:当需要多GPU协作时初始化进程组if not multiprocess_mode and parallel_config.data_parallel_size > 1:self.dp_group = parallel_config.stateless_init_dp_group()# 文本处理器:将文字转化为数字(除非配置跳过)if not self.model_config.skip_tokenizer_init:self.tokenizer = init_tokenizer_from_configs(...)# 核心组件初始化:self.processor = Processor(...) # 请求预处理(文本->数字)self.output_processor = OutputProcessor(...) # 输出后处理(数字->文字)# 推理引擎核心:根据配置选择单进程/多进程实现self.engine_core = EngineCoreClient.make_client(multiprocess_mode=multiprocess_mode, # 关键选择点... )首先检查环境配置(确保使用新版引擎)
接收整个工厂的蓝图(VllmConfig包含模型参数、硬件配置等)
根据蓝图搭建生产线:
安装文本处理器(Tokenizer,把文字转成数字);
设置输入处理站(Processor:处理用户原始输入);
设置输出包装站(OutputProcessor:把模型输出包装成可读结果);
启动核心车间(EngineCore:实际运行模型的"黑盒子")
2.接单生产(处理请求)
如下面add_request方法所示
def add_request(...):# 请求ID格式检查if not isinstance(request_id, str): raise TypeError("请求ID必须是字符串")# 文本预处理:将用户输入转化为模型可理解的数字序列prompt_str, request = self.processor.process_inputs(...)# 获取采样数量(默认n=1)n = params.n if isinstance(params, SamplingParams) else 1# 单结果请求处理if n == 1:# 直接加入输出处理器(记录请求状态)self.output_processor.add_request(...)# 加入引擎核心等待队列self.engine_core.add_request(request)# 多结果请求处理(例如n=3时生成3个变体)else:# 创建父请求(管理多个子请求)parent_req = ParentRequest(request_id, params)# 为每个结果创建子请求for idx in range(n):# 创建子请求(复制基础参数)child_request = copy(request) if idx < n-1 else request# 设置子请求专属ID和参数child_request.request_id, child_params = parent_req.get_child_info(idx)# 加入输出处理器self.output_processor.add_request(...)# 加入引擎核心等待队列self.engine_core.add_request(child_request)当新订单(用户请求)到达时:
先检查订单号(request_id)是否合法
在输入处理站进行预处理:
1、把用户问题转换成模型能理解的数字序列;
2、处理特殊需求(如多张图片+文字的组合问题)
如果用户要求生成多个答案(比如n=3):
自动创建子订单(父子请求结构)
每个子订单生成不同版本的答案
所有订单送入核心车间排队等待处理
3.流水线作业(执行推理)
如下面step方法所示,
def step(...):# 分布式协调:当其他节点有任务时执行空批次保持同步if self.should_execute_dummy_batch:self.engine_core.execute_dummy_batch() # 执行空批次return [] # 不产生实际输出# 核心推理:从引擎获取原始输出(包含多个请求结果)outputs = self.engine_core.get_output()# 输出后处理:processed_outputs = self.output_processor.process_outputs(outputs.outputs, # 原始模型输出... )# 清理已完成请求:# - 因停止条件结束的请求需要从引擎移除self.engine_core.abort_requests(processed_outputs.reqs_to_abort)# 性能统计记录:if self.stat_logger:# 记录批次处理时间、token数量等指标self.stat_logger.record(...)# 返回处理后的用户友好格式结果return processed_outputs.request_outputs定时启动生产线(step()方法):
1、先检查是否需要"空转"(分布式环境下保持节点同步)
2、从核心车间取出刚完成的产品(模型原始输出)
在输出包装站:
1、把数字序列转回文字;
2、检查是否满足停止条件(如遇到句号);
3、打包成用户易读的格式
清理异常订单(自动取消卡住的请求)
记录生产效率数据(统计处理速度、资源消耗等)
4.特殊操作(管理功能)
管理系统如下图所示,
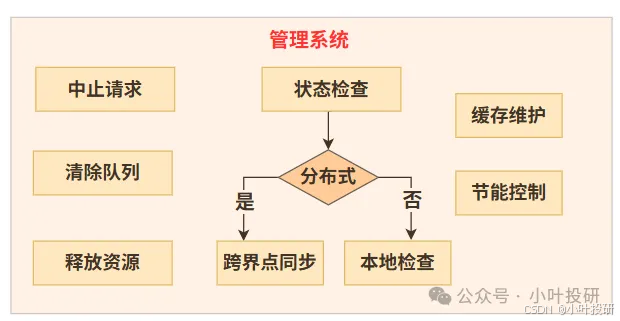
比如中止请求,如下面abort_request方法所示,
def abort_request(self, request_ids: list[str]) -> None:# 从输出处理器移除请求(返回需实际中止的ID)actual_ids = self.output_processor.abort_requests(request_ids)# 通知引擎核心终止这些请求的计算self.engine_core.abort_requests(actual_ids)紧急插单:高优先级请求可以插队(priority参数)
订单取消:随时中止指定请求(abort_request)
车间维护:
1、清理缓存(reset_mm_cache像清理原料仓库);
2、节能模式(sleep/wake_up像开关生产线灯光)
分布式协作:
1、多工厂(GPU)自动同步进度;
2、用"假生产"(虚拟批次)保持各工厂步调一致
5.总览下来,设计特点
vLLM的pipeline有如下特点:
模块化设计:输入处理、核心计算、输出包装分离,像工厂的预处理车间、生产车间、包装车间
批量处理:同时加工多个请求(像流水线一次生产多件产品)
状态感知:实时跟踪每个请求进度(像快递跟踪系统)
资源优化:空闲时自动节能,忙时自动协调多设备
简单来说,LLMEngine就像个工厂厂长:
1.建厂时根据设计图配置生产线
2.接单后把用户问题转换成标准化生产指令
3.指挥车间批量生产答案
4.把车间输出的半成品包装成最终答案
5.随时监控生产线状态,处理异常情况
这种设计让大模型服务能高效处理海量请求,就像现代化工厂能大批量生产高质量产品一样。整个系统通过分层分工,既保证了处理效率,又能灵活应对各种复杂需求。
三、vLLM源代码逐行注释
vLLM引擎的核心是LLMengine类,LLMengine类中有几个关键依赖,下文中,我们首先介绍下面的5个关键依赖,最后再介绍主代码LLMengine类:
vllm/v1/executor/engine_core_client.py
vllm/v1/engine/processor.py
vllm/v1/engine/output_processor.py
vllm/v1/executor/abstract.py
vllm/v1/engine/llm_engine.py
对于5个关键依赖和主代码LLMengine类,我们从请求调度(从等待队列中选择接下来要处理的请求)和模型推理(使用模型对被调度的请求进行推理)两个层面详细介绍:
1. vllm/v1/executor/engine_core_client.py
请求调度层面:
class EngineCoreClient(ABC):@abstractmethoddef add_request(self, request: EngineCoreRequest) -> None:# 抽象方法:将请求加入引擎处理队列# 具体实现由子类完成(如InprocClient直接操作引擎,MPClient通过ZMQ发送)@abstractmethoddef get_output(self) -> EngineCoreOutputs:# 抽象方法:获取引擎处理完成的输出结果# 具体实现由子类完成(如InprocClient直接调用引擎step())模型推理层面:
class InprocClient(EngineCoreClient):def get_output(self) -> EngineCoreOutputs:# 直接调用同进程内EngineCore的step()方法执行推理outputs, _ = self.engine_core.step()return outputs.get(0) or EngineCoreOutputs()def add_request(self, request: EngineCoreRequest) -> None:# 预处理请求后直接加入引擎队列req, request_wave = self.engine_core.preprocess_add_request(request)self.engine_core.add_request(req, request_wave)
class SyncMPClient(MPClient):def _send_input(self, request_type: EngineCoreRequestType, request: Any):# 通过ZMQ套接字将请求发送给远程引擎进程msg = (self.core_engine, request_type.value, *self.encoder.encode(request))self.input_socket.send_multipart(msg, copy=False)def get_output(self) -> EngineCoreOutputs:# 从输出队列获取引擎处理结果outputs = self.outputs_queue.get()return outputs  # 阻塞直到有结果
2.vllm/v1/engine/processor.py
请求调度层面:
class Processor:def process_inputs(...) -> tuple[Optional[str], EngineCoreRequest]:# 1. 验证请求参数(LoRA/采样参数等)self._validate_lora(lora_request)self._validate_params(params, lora_request)# 2. 构造请求唯一ID,记录到达时间request_id = ... arrival_time = time.time()# 3. 返回标准化请求对象(加入调度队列)return prompt, EngineCoreRequest(request_id=request_id, ...)模型推理层面:
def _validate_model_inputs(...):# 检查输入长度是否超过模型最大长度if len(prompt_ids) > max_prompt_len:raise ValueError("Prompt too long")def process_inputs(...):# 核心预处理流程:# 分词处理(考虑LoRA适配器情况下)# 多模态数据特征提取processed_inputs = self.input_preprocessor.preprocess(...)# 构造模型可直接消费的输入格式return EngineCoreRequest(prompt_token_ids=..., mm_features=...)3.vllm/v1/engine/output_processor.py
请求调度层面:
class RequestOutputCollector:def put(self, output: ...):# 非阻塞方式存入输出结果self.output = outputself.ready.set()  # 触发等待事件async def get(self) -> ...:# 异步等待输出结果await self.ready.wait()return self.output
class OutputProcessor:def process_outputs(...) -> OutputProcessorOutput:# 遍历所有引擎输出for engine_core_output in engine_core_outputs:# 关联请求状态req_state = self.request_states.get(req_id)# 生成最终用户可见的输出格式request_output = req_state.make_request_output(...)# 放入请求专属队列或返回列表req_state.queue.put(request_output) or request_outputs.append()
模型推理层面:
def process_outputs(...):for engine_core_output in engine_core_outputs:# 后处理步骤:# 1. 解码token为文本stop_string = req_state.detokenizer.update(new_token_ids, ...)# 2. 计算logprobsreq_state.logprobs_processor.update_from_output(...)# 3. 组装最终输出对象output = CompletionOutput(text=text, token_ids=token_ids, ...)4.vllm/v1/executor/abstract.py
请求调度层面:
class Executor(ExecutorBase):def execute_model(self, scheduler_output):# 核心调度入口:将调度器输出分发给模型执行器output = self.collective_rpc("execute_model", args=(scheduler_output,))return output[0] # 返回首个结果模型推理层面:
class UniProcExecutor(UniProcExecutorV0, Executor):# 单进程执行器直接调用模型runnerdef execute_model(...):return self.model_runner.execute_model(scheduler_output)5. vllm/engine/arg_utils.py
请求调度层面:
class EngineArgs:def create_engine_config(...) -> VllmConfig:# 核心配置流程:# 1. 自动选择V0/V1引擎(基于硬件/模型兼容性)use_v1 = self._is_v1_supported_oracle(model_config)# 2. 设置并行策略(张量/流水/数据并行)parallel_config = ParallelConfig(pipeline_parallel_size=...,tensor_parallel_size=...,data_parallel_size=...)# 3. 构建最终配置对象return VllmConfig(model_config=model_config,parallel_config=parallel_config,scheduler_config=SchedulerConfig(...),... )模型推理层面:
def create_model_config(...) -> ModelConfig:# 模型专项配置:# - 量化方案(bitsandbytes/gguf等)# - 滑动窗口设置# - LoRA适配器配置return ModelConfig(quantization=self.quantization,max_model_len=self.max_model_len,lora_config=LoRAConfig(...) if self.enable_lora else None)6.vllm/v1/engine/processor.py
这是主代码
# 定义LLMEngine类,下面有一个兼容旧版的操作
class LLMEngine:# 初始化,设置引擎配置和核心组件def __init__(self,vllm_config: VllmConfig,           # 全局配置对象executor_class: type[Executor],     # 执行器类型log_stats: bool,                    # 是否记录统计信息usage_context: UsageContext = UsageContext.ENGINE_CONTEXT,  # 使用场景stat_loggers: Optional[list[StatLoggerFactory]] = None,  # 统计日志器mm_registry: MultiModalRegistry = MULTIMODAL_REGISTRY,  # 多模态注册表use_cached_outputs: bool = False,  # 是否使用缓存输出multiprocess_mode: bool = False,    # 是否启用多进程模式) -> None:# 环境变量检查:必须启用V1引擎if not envs.VLLM_USE_V1:raise ValueError("Using V1 LLMEngine but envs.VLLM_USE_V1=False...")# 初始化核心配置self.vllm_config = vllm_configself.model_config = vllm_config.model_configself.cache_config = vllm_config.cache_configself.log_stats = log_stats# 初始化统计日志器(目前好像仅支持Prometheus)self.stat_logger = PrometheusStatLogger(vllm_config) if log_stats else None# 初始化分布式进程组(非多进程模式且需要数据并行时)parallel_config = vllm_config.parallel_configif not multiprocess_mode and parallel_config.data_parallel_size > 1:self.dp_group = parallel_config.stateless_init_dp_group()else:self.dp_group = None# 初始化tokenizer(如果配置需要)self.tokenizer = Noneif not self.model_config.skip_tokenizer_init:self.tokenizer = init_tokenizer_from_configs(vllm_config.model_config)# 初始化处理器组件self.processor = Processor(vllm_config, self.tokenizer, mm_registry)self.output_processor = OutputProcessor(self.tokenizer, log_stats)# 初始化引擎核心客户端(选择多进程/单进程模式)self.engine_core = EngineCoreClient.make_client(multiprocess_mode=multiprocess_mode,asyncio_mode=False,  # 同步模式vllm_config=vllm_config,executor_class=executor_class,log_stats=log_stats,)# 兼容旧版:直接暴露模型执行器if not multiprocess_mode:self.model_executor = self.engine_core.engine_core.model_executor# 重置多模态缓存self.reset_mm_cache()# 类方法:从VllmConfig创建引擎实例@classmethoddef from_vllm_config(cls,vllm_config: VllmConfig,usage_context: UsageContext = UsageContext.ENGINE_CONTEXT,stat_loggers: Optional[list[StatLoggerFactory]] = None,disable_log_stats: bool = False,  # 是否禁用统计日志) -> "LLMEngine":return cls(vllm_config=vllm_config,executor_class=Executor.get_class(vllm_config),  # 获取执行器类型log_stats=not disable_log_stats,usage_context=usage_context,stat_loggers=stat_loggers,multiprocess_mode=envs.VLLM_ENABLE_V1_MULTIPROCESSING,  # 多进程开关)# 类方法:从EngineArgs创建引擎实例@classmethoddef from_engine_args(cls,engine_args: EngineArgs,usage_context: UsageContext = UsageContext.ENGINE_CONTEXT,stat_loggers: Optional[list[StatLoggerFactory]] = None,enable_multiprocessing: bool = False,  # 显式启用多进程) -> "LLMEngine":# 创建引擎配置vllm_config = engine_args.create_engine_config(usage_context)executor_class = Executor.get_class(vllm_config)# 环境变量优先启用多进程if envs.VLLM_ENABLE_V1_MULTIPROCESSING:enable_multiprocessing = Truereturn cls(vllm_config=vllm_config,executor_class=executor_class,log_stats=not engine_args.disable_log_stats,usage_context=usage_context,stat_loggers=stat_loggers,multiprocess_mode=enable_multiprocessing,  # 最终多进程模式)# 获取未完成请求数量def get_num_unfinished_requests(self) -> int:return self.output_processor.get_num_unfinished_requests()# 检查是否有未完成请求def has_unfinished_requests(self) -> bool:has_unfinished = self.output_processor.has_unfinished_requests()if self.dp_group is None:return has_unfinished or self.engine_core.dp_engines_running()return self.has_unfinished_requests_dp(has_unfinished)# 分布式模式下的未完成请求检查def has_unfinished_requests_dp(self, has_unfinished: bool) -> bool:aggregated_has_unfinished = ParallelConfig.has_unfinished_dp(self.dp_group, has_unfinished)# 设置执行虚拟批次标志if not has_unfinished and aggregated_has_unfinished:self.should_execute_dummy_batch = Truereturn aggregated_has_unfinished# 添加新请求def add_request(self,request_id: str,                   # 请求唯一IDprompt: PromptType,                # 输入提示params: Union[SamplingParams, PoolingParams],  # 生成参数arrival_time: Optional[float] = None,  # 到达时间(用于优先级)lora_request: Optional[LoRARequest] = None,  # LoRA适配器请求tokenization_kwargs: Optional[dict[str, Any]] = None,  # tokenize参数trace_headers: Optional[Mapping[str, str]] = None,  # 跟踪头priority: int = 0,                 # 请求优先级) -> None:# 验证request_id类型if not isinstance(request_id, str):raise TypeError("request_id must be a string")# 处理输入并创建请求对象prompt_str, request = self.processor.process_inputs(request_id, prompt, params, arrival_time, lora_request,tokenization_kwargs, trace_headers, priority)# 处理采样数量n>1的情况(创建子请求)n = params.n if isinstance(params, SamplingParams) else 1if n == 1:self.output_processor.add_request(request, prompt_str, None, 0)self.engine_core.add_request(request)else:parent_req = ParentRequest(request_id, params)for idx in range(n):child_id, child_params = parent_req.get_child_info(idx)child_request = copy(request) if idx < n-1 else requestchild_request.request_id = child_idchild_request.sampling_params = child_paramsself.output_processor.add_request(child_request, prompt_str, parent_req, idx)self.engine_core.add_request(child_request)# 执行推理步骤def step(self) -> Union[list[RequestOutput], list[PoolingRequestOutput]]:# 检查是否需要执行虚拟批次if self.should_execute_dummy_batch:self.should_execute_dummy_batch = Falseself.engine_core.execute_dummy_batch()return []  # 虚拟批次不产生输出# 1. 从引擎核心获取输出outputs = self.engine_core.get_output()# 2. 处理输出iteration_stats = IterationStats() if self.log_stats else Noneprocessed_outputs = self.output_processor.process_outputs(outputs.outputs,engine_core_timestamp=outputs.timestamp,iteration_stats=iteration_stats)# 3. 中止因停止条件完成的请求self.engine_core.abort_requests(processed_outputs.reqs_to_abort)# 4. 记录统计信息if self.stat_logger is not None:self.stat_logger.record(scheduler_stats=outputs.scheduler_stats,iteration_stats=iteration_stats)return processed_outputs.request_outputs  # 返回处理后的请求输出# 中止指定请求def abort_request(self, request_ids: list[str]) -> None:# 移除引擎核心和输出处理器中的请求request_ids = self.output_processor.abort_requests(request_ids)self.engine_core.abort_requests(request_ids)# 重置多模态缓存def reset_mm_cache(self) -> None:self.processor.clear_cache()self.engine_core.reset_mm_cache()# 重置前缀缓存def reset_prefix_cache(self, device: Optional[Device] = None) -> None:self.engine_core.reset_prefix_cache()# 进入睡眠模式(节能)def sleep(self, level: int = 1) -> None:self.engine_core.sleep(level)# 唤醒引擎def wake_up(self, tags: Optional[list[str]] = None) -> None:self.engine_core.wake_up(tags)# 检查是否处于睡眠状态def is_sleeping(self) -> bool:return self.engine_core.is_sleeping()# 析构时清理分布式进程组def __del__(self):if dp_group := getattr(self, "dp_group", None):stateless_destroy_torch_distributed_process_group(dp_group)