嵌入式碎片知识总结(二)
1.repo的一个问题:
repo init -u ssh://shchen@gerrit.bouffalolab.com:29418/bouffalo/manifest/bouffalo_sdk -b master -m allchips-internal.xml
/usr/bin/repo:681: DeprecationWarning: datetime.datetime.utcnow() is deprecated and scheduled for removal in a future version. Use timezone-aware objects to represent datetimes in UTC: datetime.datetime.now(datetime.UTC).now = datetime.datetime.utcnow()
Downloading Repo source from https://gerrit.googlesource.com/git-repo
fatal: Cannot get https://gerrit.googlesource.com/git-repo/clone.bundle
fatal: error [Errno 110] Connection timed out
fatal: double check your --repo-rev setting.
fatal: cloning the git-repo repository failed, will remove '.repo/repo'
可以看到是网络连接失败导致的,可是为什么repo init 民令回去google上进行下载东西呢?
原因:
我们 sudo apt install 下载的repo 其实就是一个引导器,真正的repo只有你init才会下载
说回到问题,这里错误是因为默认的链接是 google 的,配置一个国内镜像就能解决。
export REPO_URL='https://mirrors.tuna.tsinghua.edu.cn/git/git-repo/'2.refspec 与 ref
ref 展开来说是 git 的reference,默认情况下 refs/heads/master 可以简称为master
1)本地分支的Reference格式:refs/heads/<local_branch_name>
如refs/heads/master,在保证唯一的情况下可以简写为master
2)远程追踪分支的Reference格式:refs/remotes/<remote_repository>/<remote_branch_name>
如refs/remotes/origin/master,在保证唯一的情况下可以简写为origin/master
而refspec 是一个 git 的规则,该规则正是表示了本地和远端的 refs 的关系的。当你 fetch push 相关操作的时候会有一个默认的规则,指定远端的仓库的哪个分支拉取到本地的哪个仓库哪个分支。
+refs/heads/*:refs/remotes/origin/*#默认的命名空间 git 只认head还有remote,如果你放在一个非规定的命名空间里,则git branch -all 都不会显示。比如:
git fetch origin/refs/heads/mater:refs/mynamespace/mybranch就会生成一个不再规则显示内的分支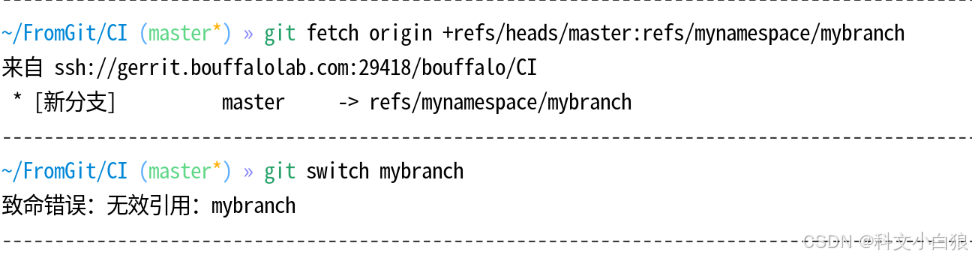
可以看到无法直接过去,但是可以 --detach强制分离指针然后跳转,tig 可以看到当前分支情况:

3.Linux设置服务器:
在 /etc/systemd/system/ 目录下添加一个 xxx.service文件
然后在文件中按照下面的类似框架去写:
[Unit]
Description=My Custom Application Server  # 服务的描述,便于识别
Documentation=https://github.com/yourusername/yourapp  # 可选:项目文档地址
After=network.target  # 指定在网络就绪后再启动本服务[Service]
Type=simple  # 这是最常用的类型,假设您的服务是前台运行的
User=www-data  # 强烈建议:以非 root 用户运行服务,提高安全性。可以是 www-data, nobody 或您创建的用户
Group=www-data # 用户所属的组
WorkingDirectory=/opt/myapp  # 服务启动时的工作目录
ExecStart=/opt/myapp/server-linux-amd64  # 最重要的指令:启动服务的完整命令
Restart=always  # 服务意外退出时自动重启
RestartSec=5  # 重启前等待的秒数
Environment="PORT=8080"  # 可选:设置环境变量,您的应用可以读取它
# EnvironmentFile=/etc/default/myapp  # 可选:也可以从一个文件加载多个环境变量# 安全相关设置(可选但推荐)
NoNewPrivileges=yes
PrivateTmp=yes[Install]
WantedBy=multi-user.target  # 指定在系统进入“多用户”模式时启用此服务
完成后执行:sudo systemctl daemon-reload
然后就可以通过 systemctl 相关命令进行控制了。
4.SSH通信
SSH通信本质是 CS通信, 本地生成一对密钥也就是公钥和私钥,然后把公钥配置在服务器Server上,下面把公钥叫做pub,私钥叫做pri。
pub是一把锁,只有pri能解开。你把pub放在服务器上,通信的时候,服务器就会把一段明文使用pub来进行加密发给你,验证方法就是你使用pri把加密信息解开发回去,服务器验证发现明文一致那么就判断可以进行通信。
5.awk tr test 命令
awk:
awk options 'pattern {action}' file其中最常见的使用 option 是-f 就是分割符号,action是打印行为,默认打印全行。
eg:
awk -F "=" '{print $2}' a.txt 就是以=分割打印每行的第二个。
tr:
用于替换,比如:
perf_content=$(tr '\r\n' ' ' < iperf_result.txt) 就是替换iperf文件里所有的 /r/n 为空格
test:
-n 测试是否为空 -e 测试是否存在,会这两个就够用了基本。