day45-Ansible流程控制
1.每日复盘与今日内容
1.1复盘
- 在play中定义变量
- 在当前目录group_vars host_vars 定义变量🍟🍟🍟🍟🍟
- 变量注册register🍟🍟🍟🍟🍟
- 使用Facts内置变量 ansible_hostname 获取客户端主机名称等...🍟🍟🍟🍟🍟
1.2今日内容
- when判断🍟🍟🍟🍟🍟、Handlers
- 循环语句
- 任务标签、文件复用
- jinjia2模板
- roles模板🍟🍟🍟🍟🍟
2.Ansible-流程控制
playbook条件语句
不管是shell还是各大编程语言中,流程控制,条件判断这些都是必不可少的,在我们使用Ansible的过程中,条件判断的使用频率极其高。
例如:
1.我们使用不同的系统的时候,可以通过判断系统来对软件包进行安装。
2.在nfs和rsync安装过程中,客户端服务器不需要推送配置文件,之前我们都是写多个play,会影响效率。
3.我们在源码安装nginx的时候,执行第二遍就无法执行了,此时我们就可以进行判断是否安装过。
1. when判断
案例1.客户端WEB01卸载 wget WEB02卸载tree命令
- hosts: webstasks:- name: Install wgetyum:name: wgetstate: presentwhen: ansible_hostname == "WEB01"- name: Remove treeyum:name: treestate: absentwhen: ansible_hostname == "WEB02"ansible-playbook --syntax-check when.ymlansible-playbook when.yml案例2.并且关系 主机名称是WEB01并且IP地址是10.0.0.7
[root@m01 ansible]# cat when.yml
- hosts: webstasks:- name: Install wgetyum:name: wgetstate: presentwhen: (ansible_hostname == "web01") and (ansible_default_ipv4.address == "10.0.0.7")或者使用列表的方式
[root@m01 ansible]# cat when.yml
- hosts: webstasks:- name: Install wgetyum:name: wgetstate: presentwhen: - ansible_hostname == "web01"- ansible_default_ipv4.address == "10.0.0.7"
案例3.或者关系 or
[root@m01 ansible]# cat when.yml
- hosts: webstasks:- name: Install wgetyum:name: wgetstate: presentwhen: ( ansible_hostname == "web01") or (ansible_default_ipv4.address == "10.0.0.8")
2. Nginx-when判断实战
[root@m01 ansible]# cat nginx.yml
- hosts: 10.0.0.8tasks:- name: Configure Nginx Repoyum_repository:name: nginxdescription: Nginx YUM repobaseurl: http://nginx.org/packages/centos/7/$basearch/gpgcheck: noenabled: yes- name: Install Nginx Serveryum:name: nginxstate: present- name: Create Group wwwgroup:name: wwwgid: 666state: present- name: Create User wwwuser:name: wwwuid: 666group: wwwshell: /sbin/nologincreate_home: false- name: Configure Nginx Servercopy:src: nginx.confdest: /etc/nginx/- name: nginx check to ng_recommand: nginx -tregister: ng_reignore_errors: yes  # 当结果错误时候忽略掉、继续向下执行- name: Restart Nginx Serversystemd:name: nginxstate: restartedenabled: yeswhen: ng_re is search "successful"   # 判断ng_re变量中是否存在successful或者使用其他的返回值作为执行标准- name: Restart Nginx Serversystemd:name: nginxstate: restartedenabled: yeswhen: ng_re.rc is match "0"#when条件表达式
when:  ansible_hostname == "web01"
when:  ansible_hostname is match "web01"
when:  ansible_hostname is search "web01"
ansible_hostname is search "web"   # 只要主机名称有web则运行
ansible_hostname is match "web"    # 只要主机名称有web则运行#ignore_errors: yes  当tasks执行错误时、忽略继续执行。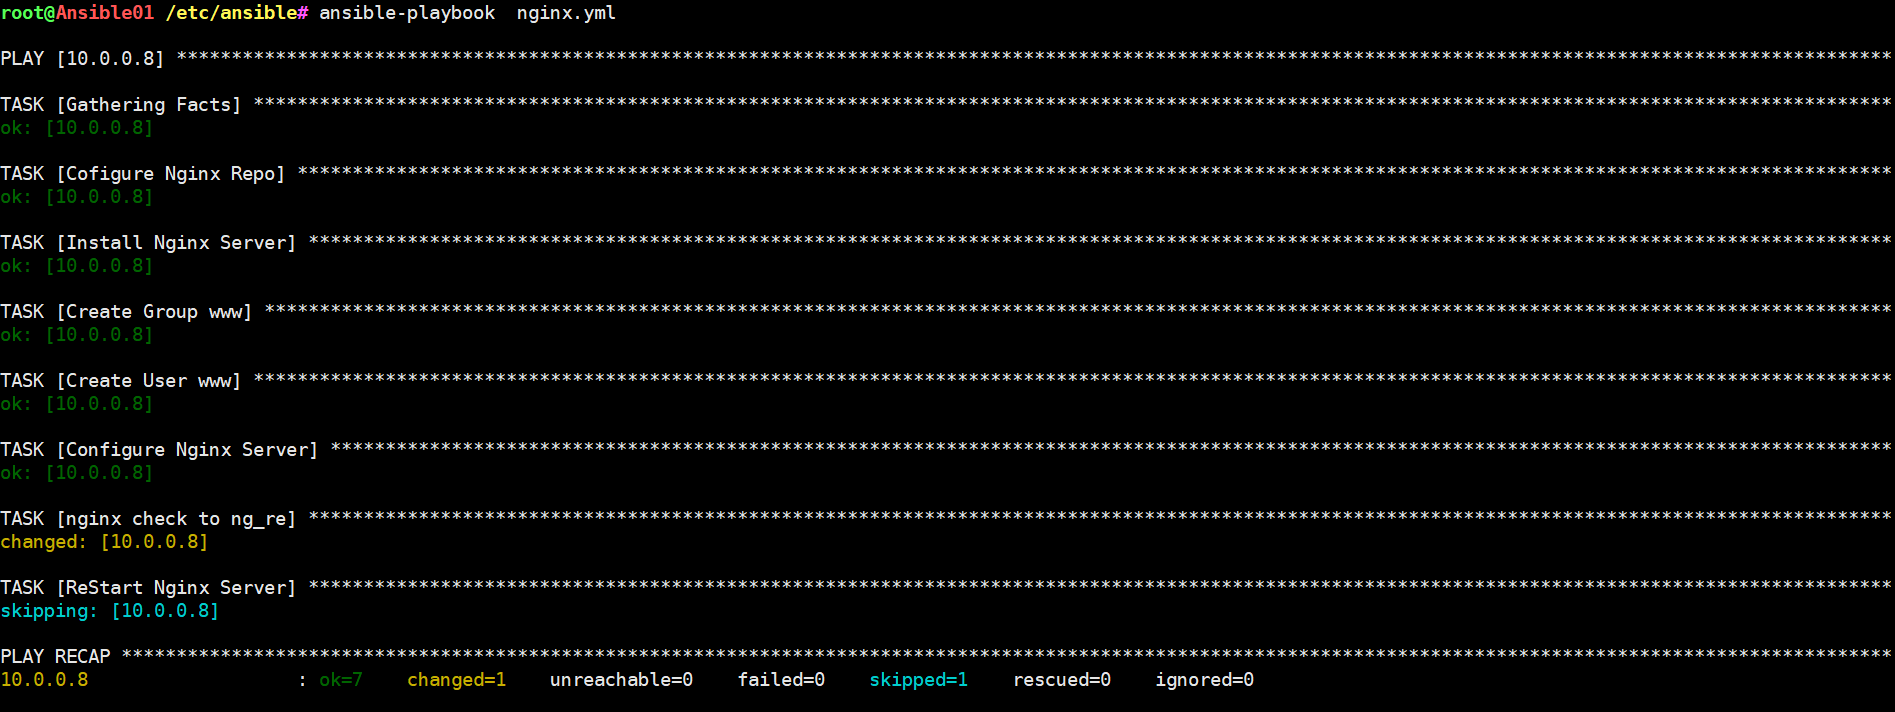
3. Handlers
什么是handlers?
handler用来执行某些条件下的任务,比如当配置文件发生变化的时候,通过notify触发handler去重启服务。
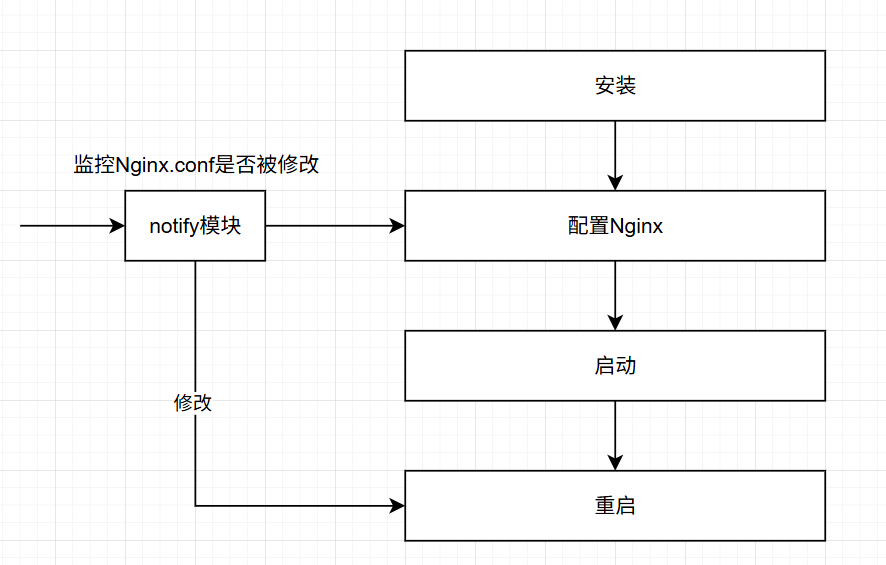
案例: 当nginx.conf配置文件被修改才会触发重启动作、如果不修改则不重启
[root@m01 ansible]# cat nginx.yml
- hosts: 10.0.0.8tasks:- name: Configure Nginx Repoyum_repository:name: nginxdescription: Nginx YUM repobaseurl: http://nginx.org/packages/centos/7/$basearch/gpgcheck: noenabled: yes- name: Install Nginx Serveryum:name: nginxstate: present- name: Create Group wwwgroup:name: wwwgid: 666state: present- name: Create User wwwuser:name: wwwuid: 666group: wwwshell: /sbin/nologincreate_home: false- name: Configure Nginx Servercopy:src: nginx.confdest: /etc/nginx/notify: Restart Nginx Server- name: nginx -tcommand: nginx -tregister: ng_reignore_errors: yes- name: Start Nginx Serversystemd:name: nginxstate: startedenabled: yeshandlers:- name: Restart Nginx Serversystemd:name: nginxstate: restartedenabled: yeswhen: ng_re.rc is match "0"
4. playbook循环语句
之前的学习过程中,我们经常会有传送文件,创建目录之类的操作,创建2个目录就要写两个file模块来创建,如果要创建100个目录,我们需要写100个file模块???妈耶~~~~ 当然不是,只要有循环即可,减少重复性代码。
案例1.创建多个文件
[root@m01 ansible]# cat a.yml
- hosts: webstasks:- name: touch a.txt b.txtfile:path: "{{ item }}"state: touchloop:- a.txt- b.txt
案例2.拷贝多个文件
[root@m01 ansible]# cat copy.yml
- hosts: 10.0.0.8tasks:- name: copy a.txt to /root , b.txt to /optcopy:src: "{{ item.src }}"dest: "{{ item.dest }}"loop:- { src: a.txt,dest: /root/ }- { src: b.txt,dest: /opt/ }
案例3.a.txt到/root 属主属主为root 权限644, b.txt到/opt属主属组www 权限600
[root@m01 ansible]# cat copy.yml
- hosts: 10.0.0.8tasks:- name: copy a.txt to /root , b.txt to /optcopy:src: "{{ item.src }}"dest: "{{ item.dest }}"owner: "{{ item.owner }}"group: "{{ item.group }}"mode: "{{ item.mode }}"loop:- { src: a.txt,dest: /root/,owner: root,group: root,mode: '0644' }- { src: b.txt,dest: /opt/,owner: www,group: www,mode: '0600' }
案例4.创建两个组
oldboy01 组 gid 778
oldboy02 组 gid 779
[root@m01 ansible]# cat group.yml
- hosts: web02tasks:- name: create groupsgroup:name: "{{ item.name }}"gid: "{{ item.gid }}"loop:- { name: oldboy01,gid: '778' }- { name: oldboy02,gid: '779' }
案例5.创建两个用户
oldboy01 uid gid 778的普通账号
oldboy02 uid gid 779的虚拟账号
[root@m01 ansible]# cat user.yml
- hosts: web02tasks:- name: Create Useruser: name: "{{ item.name }}"uid: "{{ item.uid }}"group: "{{ item.group }}"shell: "{{ item.shell }}"create_home: "{{ item.home }}"state: presentloop:- { name: oldboy01,uid: '778',group: oldboy01,shell: /bin/bash,home: true }- { name: oldboy02,uid: '779',group: oldboy02,shell: /sbin/nologin,home: false }
[root@m01 ansible]# ansible-playbook  user.yml
5. playbook任务标签
默认情况下,Ansible在执行一个playbook时,会执行playbook中定义的所有任务,Ansible的标签(tag)功能可以给单独任务甚至整个playbook打上标签,然后利用这些标签来指定要运行playbook中的个别任务,或不执行指定的任务。
#第一步给一个task打标签
vim nginx.yml
..- name: Configure Nginx Servercopy:src: nginx.confdest: /etc/nginx/notify: Restart Nginx Servertags: config- name: nginx -tcommand: nginx -tregister: ng_reignore_errors: yestags: config...#第二步: 查看yml中所有的标签
[root@m01 ansible]# ansible-playbook nginx.yml --list-tagsplaybook: nginx.ymlplay #1 (web02): web02	TAGS: []TASK TAGS: [config]#第三步: 通过-t指定某个标签运行
[root@m01 m01]# ansible-playbook tag.yml --list-tags  # 查看当前的所有tag
[root@m01 m01]# ansible-playbook tag.yml -t config   # 只运行带有config标签的tasks
[root@m01 m01]# ansible-playbook tag.yml --skip-tags config # 跳过带有config标签的tasks
6. playbook文件复用
在之前写playbook的过程中,我们发现,写多个playbook没有办法,一键执行,这样我们还要单个playbook挨个去执行,很鸡肋。所以在playbook中有一个功能,叫做`include`用来动态调用task任务列表。
#需求 nfs服务器上安装nfs服务 web02上安装nginx服务
#第一步准备两个tasks文件
[root@m01 ansible]# cat a.yml
- name: Install nfs Serveryum:name: nfs-utilsstate: present[root@m01 ansible]# cat b.yml
- name: Install nginx Serveryum:name: nginxstate: present#第二步: 准备一个文件将上面两个文件包含引入
[root@m01 ansible]# cat all.yml
- hosts: alltasks:- include_tasks: a.ymlwhen: ansible_hostname is match "nfs"- include_tasks: b.ymlwhen: ansible_hostname is match "web02"
[root@m01 ansible]# ansible-playbook  --syntax-check all.ymlplaybook: all.yml
[root@m01 ansible]# ansible-playbook  all.yml
7. 抑制changed
目标已经变成我想要的了,将changed改为ok
- name: nginx -tcommand: nginx -tregister: ng_reignore_errors: yestags: configchanged_when: false # 将黄色修改为绿色8. jiaja2模板
什么是jiaja2?
jinja2是Python的全功能模板引擎
Jinja2与Ansible啥关系?
Ansible通常会使用jinja2模板来修改被管理主机的配置文件等
Ansible如何使用Jinja2?
使用Ansible的jinja2模板也就是使用template模块,该模块和copy模块一样,都是将文件复制到远端主机上去,但是区别在于,template模块可以获取到文件中的变量,而copy则是原封不动的把文件内容复制过去。之前我们在推送rsync的backup脚本时,想把脚本中的变量名改成主机名,如果使用copy模块则推送过去的就是{{ ansible_fqdn }},不变,如果使用template,则会变成对应的主机名。
案例1.将motd.j2拷贝到目标主机的/root下
[root@m01 ansible]# cat copy.yml
- hosts: web02tasks:- name: copy motd.j2 to web02template:src: motd.j2dest: /root/motd
[root@m01 ansible]# ansible-playbook  copy.yml查看目标内容
[root@web02 ~]# cat motd
Welcome to web02
This system total mem is : 948 MB
This system free mem is: 148 MB
This system ip address is : 10.0.0.8
案例2.生成负载均衡的配置文件
[root@m01 ansible]# cat lb.conf.j2
upstream {{ server_name }} {
{% for n in range(7,9) %} server 172.16.1.{{ n }}:{{ up_port }};
{% endfor %}
}server {listen 80;server_name {{ server_name }};location / {root /code;index index.html;proxy_pass http://{{ server_name }};proxy_set_header Host $http_host;}
}拷贝到目标主机
[root@m01 ansible]# cat copy.yml
- hosts: web02vars:- server_name: www.wp.com- up_port: 8080tasks:- name: copy lb.conf to web02template:src: lb.conf.j2dest: /root/lb.conf
案例3.将keepliaved.conf.j2拷贝到两台web
routeid 都以自身主机名称生成
web01生成是角色master 票数150
web02生成的角色backup 票数100
[root@m01 ansible]# cat keepalived.conf.j2
global_defs {router_id {{ ansible_hostname }}
}vrrp_instance VI_1 {
{% if ansible_fqdn == "web01" %}state MASTERpriority 150
{% else %}state BACKUPpriority 100
{% endif %}interface eth0virtual_router_id 50advert_int 1authentication {auth_type PASSauth_pass 1111}virtual_ipaddress {         10.0.0.3}
}[root@m01 ansible]# cat copy.yml
- hosts: webstasks:- name: copy keepalived.conf.j2 to webstemplate:src: keepalived.conf.j2dest: /root/keepalived.conf
9. Roles角色
roles对playbook的一种重新编排。
- 前期准备
root@Ansible01 ~# mkdir roles
root@Ansible01 ~# cd roles/
root@Ansible01 ~/roles# ansible-galaxy init backup
- Role backup was created successfully
root@Ansible01 ~/roles# tree backup/
backup/
├── defaults
│   └── main.yml
├── files
├── handlers
│   └── main.yml
├── meta
│   └── main.yml
├── README.md
├── tasks
│   └── main.yml
├── templates
├── tests
│   ├── inventory
│   └── test.yml
└── vars└── main.yml8 directories, 8 filesroot@Ansible01 ~/roles/backup# rm -fr defaults/ meta/ README.md tests/
root@Ansible01 ~/roles/backup# ll
total 0
drwxr-xr-x 2 root root  6 Aug 30 12:10 files
drwxr-xr-x 2 root root 22 Aug 30 12:10 handlers
drwxr-xr-x 2 root root 22 Aug 30 12:10 tasks
drwxr-xr-x 2 root root  6 Aug 30 12:10 templates
drwxr-xr-x 2 root root 22 Aug 30 12:10 vars
案例: roles重构backup服务
41恢复快照
41和81做免密钥#1.安装rsync
#2.配置rsync 收集rsync.conf
#3.rsync.conf中配置变量练习
#4.启动rsyncroot@Ansible01 ~/roles/backup/tasks# vim main.yml - name: Install rsync Serveryum:name: rsyncstate: present- name: Configure Rsync Servertemplate:src: "{{ item.src }}"dest: "{{ item.dest }}"mode: "{{ item.mode }}"notify: Restart rsync Serverloop:- { src: rsyncd.conf.j2,dest: /etc/rsyncd.conf,mode: '0644' }- { src: rsync.passwd,dest: /etc/,mode: '0600' }- name: Create Groupstate: directoryowner: wwwgroup: www- name: Start backup Serversystemd:name: rsyncdstate: startedenabled: yes[root@m01 templates]# pwd
/root/roles/backup/templates
[root@m01 templates]# cat rsyncd.conf.j2
uid = {{ user }}
gid = {{ user }}
port = {{ port }}
fake super = yes
use chroot = no
max connections = 200
timeout = 600
ignore errors
read only = false
list = false
auth users = rsync_backup
secrets file = /etc/rsync.passwd
log file = /var/log/rsyncd.log
#####################################
[backup]
comment = welcome to oldboyedu backup!
path = {{ code_dir }}#密码文件
[root@m01 templates]# pwd
/root/roles/backup/templates
[root@m01 templates]# cat rsync.passwdrsync_backup:123#变量文件内容
[root@m01 backup]# pwd
/root/roles/backup
[root@m01 backup]# cat vars/main.yml
user: www
port: 873
code_dir: /backup#handlers配置文件
[root@m01 backup]# cat handlers/main.yml
- name: Restart rsync Serversystemd:name: rsyncdstate: restarted#site配置文件
root@Ansible01 ~/roles# vim site.yml
- hosts: allroles:- role: backupwhen: ansible_hostname is match "backup"
测试成功
3.今日总结
- when判断🍟🍟🍟🍟🍟、Handlers
- 循环语句
- 任务标签、文件复用
- jinjia2模板
- roles模板🍟🍟🍟🍟🍟
