day083-Filebeat数据采集案例与Kibana可视化应用
文章目录
- 0. 老男孩思想-人生四行
- 1. 模拟面试
- 1.1 ES集群索引,分片和副本的区别?
- 1.2 ES集群的端口是多少,使用的什么协议及作用?
- 1.3 ES集群有多少种颜色,分别代表什么含义?
- 1.4 EFK分别代表什么含义,数据流走线如何?
- 1.5 容器和虚拟机的区别?请从多角度分析。
- 2. Filebeat采集数据原理
- 3. Filebeat采集nginx日志
- 4. Filebeat采集tomcat日志
- 4.1 安装tomcat
- 4.2 编写filebeat文件
- 5. Filebeat多实例
- 6. Filebeat采集多种业务日志
- 7. Filebeat采集docker日志
- 8. Filebeat排除不必要的行exclude_lines
- 9. kibana可视化
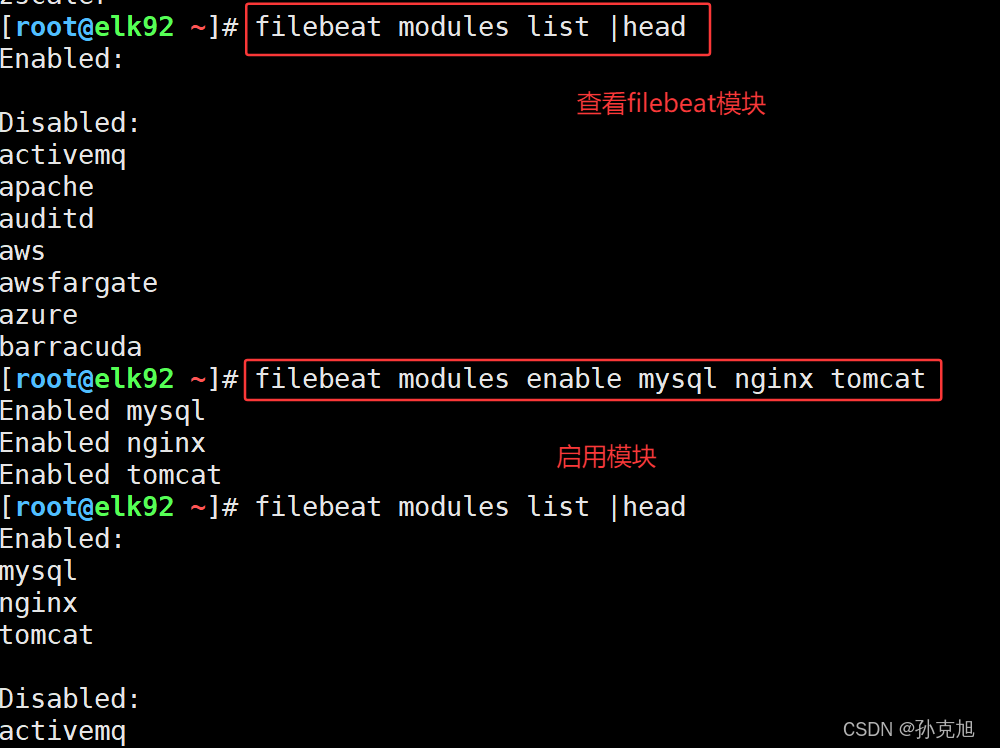
- 10. Filebeat的模块启用和禁用
- 11. Filebeat模块应用案例
- 12. 基于Filebeat的模块分析nginx访问日志
- 13. kibana可视化2
- 13.1 kibana统计全球用户分布图
- 13.2 kibana统计带宽
- 13.3 kibana统计PV
- 13.4 kibana统计IP
- 13.5 Kibana统计设备类型
- 13.6 kibana统计操作系统占比
- 13.7 kibana统计访问业务占比
- 13.8 kibana仪表盘Dasboard制作
- 14. ElasticStack故障排查思路
- 15. 思维导图
- 16. Filebeat采集MySQL日志
- 16.1 编写Filebeat配置文件
- 16.2 kibana查询数据
- 17. Filebeat采集Linux的系统日志
- 17.1 编辑filebeat配置文件
- 17.2 kibana查询数据
- 18. 在Ubuntu系统部署KVM,并使用KVM部署麒麟系统安装ES单点服务测试
- 18.1 部署kvm虚拟机-centos7.9
- 18.2 kvm虚拟机部署单点ES
- 19. 踩坑记录
- 1. 2025-08-28T19:18:12.044+0800 ERROR [publisher_pipeline_output] pipeline/output.go:154 Failed to connect to backoff(elasticsearch(http://10.0.0.92:9200)): Connection marked as failed because the onConnect callback failed: error loading template: failed to load template: couldn't load template: 400 Bad Request:],"type":"illegal_argument_exception","reason":"index template [oldboyedu--modules-mysql] has index patterns [oldboyedu-modules-mysql*] matching patterns from existing templates [oldboyedu-modules] with patterns (oldboyedu-modules => [oldboyedu-modules*]) that have the same priority [150], multiple index templates may not match during index creation, please use a different priority"},"status":400}. Response body:],"type":"illegal_argument_exception","reason":"index template [oldboyedu--modules-mysql] has index patterns [oldboyedu-modules-mysql*] matching patterns from existing templates [oldboyedu-modules] with patterns (oldboyedu-modules => [oldboyedu-modules*]) that have the same priority [150], multiple index templates may not match during index creation, please use a different priority"},"status":400}
0. 老男孩思想-人生四行
判断自己有没有能力,就看有几个“行”!
(1)自己要行
(2)要有人认为你行
(3)认为你行的人也很行
(4)身体要行

1. 模拟面试
1.1 ES集群索引,分片和副本的区别?
- 索引: index,索引 是文档的逻辑集合,是ES集群数据存储的逻辑单元,类似于关系型数据库中的“数据库”或“表”。
- 分片: shard
一个索引对应一个或多个分片。当该索引的分片数量大于1时,意味着数据可以实现分布式存储。
负责处理写入请求(索引、更新、删除文档) - 副本: replica,副本分片是主分片的完整拷贝
一个分片可以有0个或多个副本。当分片的数量大于等于1时,就可以对分片进行数据备份。
注意,副本分片和主分片的数据不能在同一个节点上,主分片负责数据的读写,而副本分片负责备份主分片,且可以负责读的负载均衡。
1.2 ES集群的端口是多少,使用的什么协议及作用?
9200:使用http或者https协议,对外部用户暴露的端口。9300:ES集群数据同步及选举的端口,使用tcp协议。
温馨提示:9300优于9200端口启动。
1.3 ES集群有多少种颜色,分别代表什么含义?
red: 红色代表有部分主分片无法访问。一般情况下不会出现,如果数据量较大时启动时可能会短暂出现yellow: 黄色 代表有部分副本分片无法访问。处于亚健康状态。green: 绿色。代表所有的主分片和副本分片均可以正常访问。1.4 EFK分别代表什么含义,数据流走线如何?
- E:ElasticSearch,数据存储、分析
- F:filebeat,数据采集
- K:Kibana,数据可视化
filebeat从数据源采集日志,发送到 Elasticsearch 进行存储,通过 Kibana 进行可视化分析和查询
1.5 容器和虚拟机的区别?请从多角度分析。
- 隔离性:虚拟机隔离性强,每个虚拟机拥有独立的操作系统和内核,彼此完全隔离,安全性强;容器隔离性弱,容器共享主机内核,安全性相对较弱
- 性能:虚拟机占用资源多,启动慢(分钟级);容器主机运行在主机内核上,启动快(秒级)
- 资源占用:虚拟机会占用大量CPU、内存、磁盘空间;容器占用资源极少
- 镜像大小:虚拟机镜像大,GB级别;容器镜像小,MB级别
- 可移植性:虚拟机的可移植性较好,但镜像庞大,跨平台迁移和分发成本较高。容器的可移植性极好。一次构建,随处运行。镜像轻量,易于分发和迁移
2. Filebeat采集数据原理
- filebeat配置文件:
[root@elk92 ~]# cat /etc/filebeat/config/03-log-to-console.yaml
filebeat.inputs:
- type: logpaths:- /tmp/student.jsonoutput.console:pretty: true
- 测试
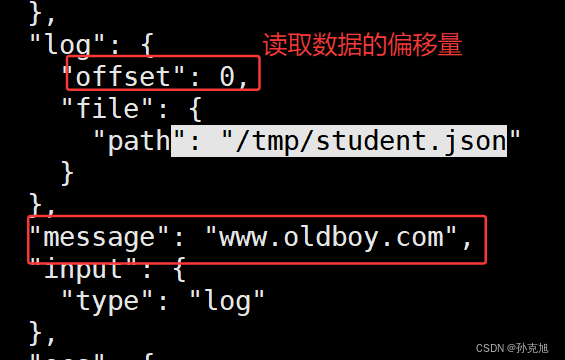
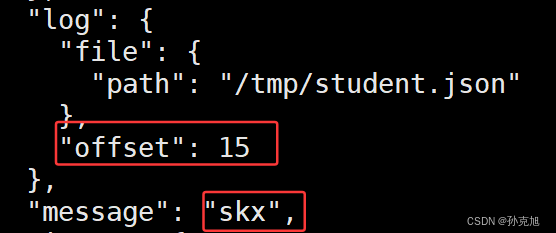
[root@elk92 ~]# echo -n www >> /tmp/student.json
[root@elk92 ~]# echo -n .oldboy >> /tmp/student.json
[root@elk92 ~]# echo  .com >> /tmp/student.json

- 总结Filebeat采集数据原理
- 1.Filebeat默认按行采集数据,如果数据没有换行,则该条数据无法采集到;
- 2.Filebeat属于有状态服务,可以记录上一次采集数据的位置点信息;
- 记录偏移量的默认日志:
/var/lib/filebeat/registry/filebeat/log.json

- 温馨提示:
- 1.如果想要从头采集Filebeat的源数据文件,可以删除数据目录。
[root@elk92 ~]# rm -rf /var/lib/filebeat/[root@elk92 ~]# filebeat -e -c /etc/filebeat/config/03-log-to-console.yaml
3. Filebeat采集nginx日志
1.安装nginx
[root@elk92 ~]# apt -y install nginx
[root@elk92 ~]# systemctl start nginx
[root@elk92 ~]# ss -ntl | grep 80
LISTEN 0      511          0.0.0.0:80        0.0.0.0:*
LISTEN 0      511             [::]:80           [::]:*
[root@elk92 ~]# 2.访问nginx测试
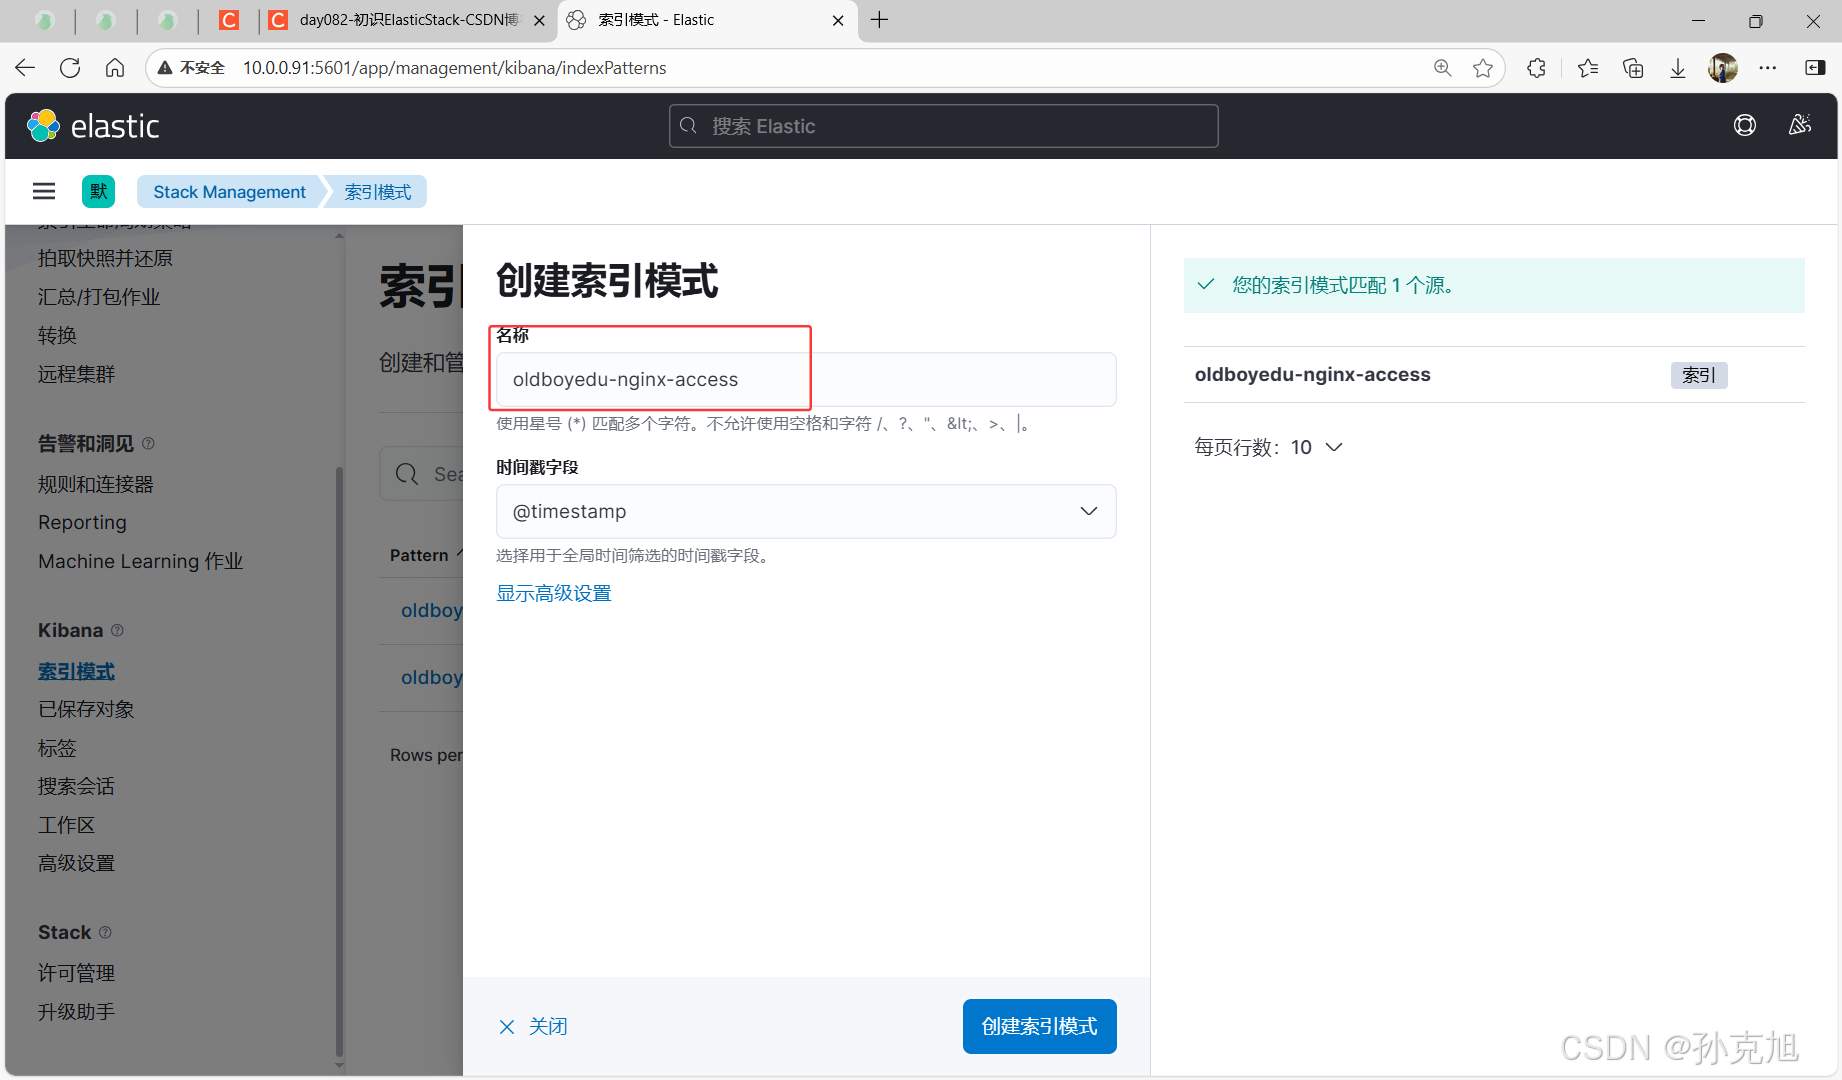
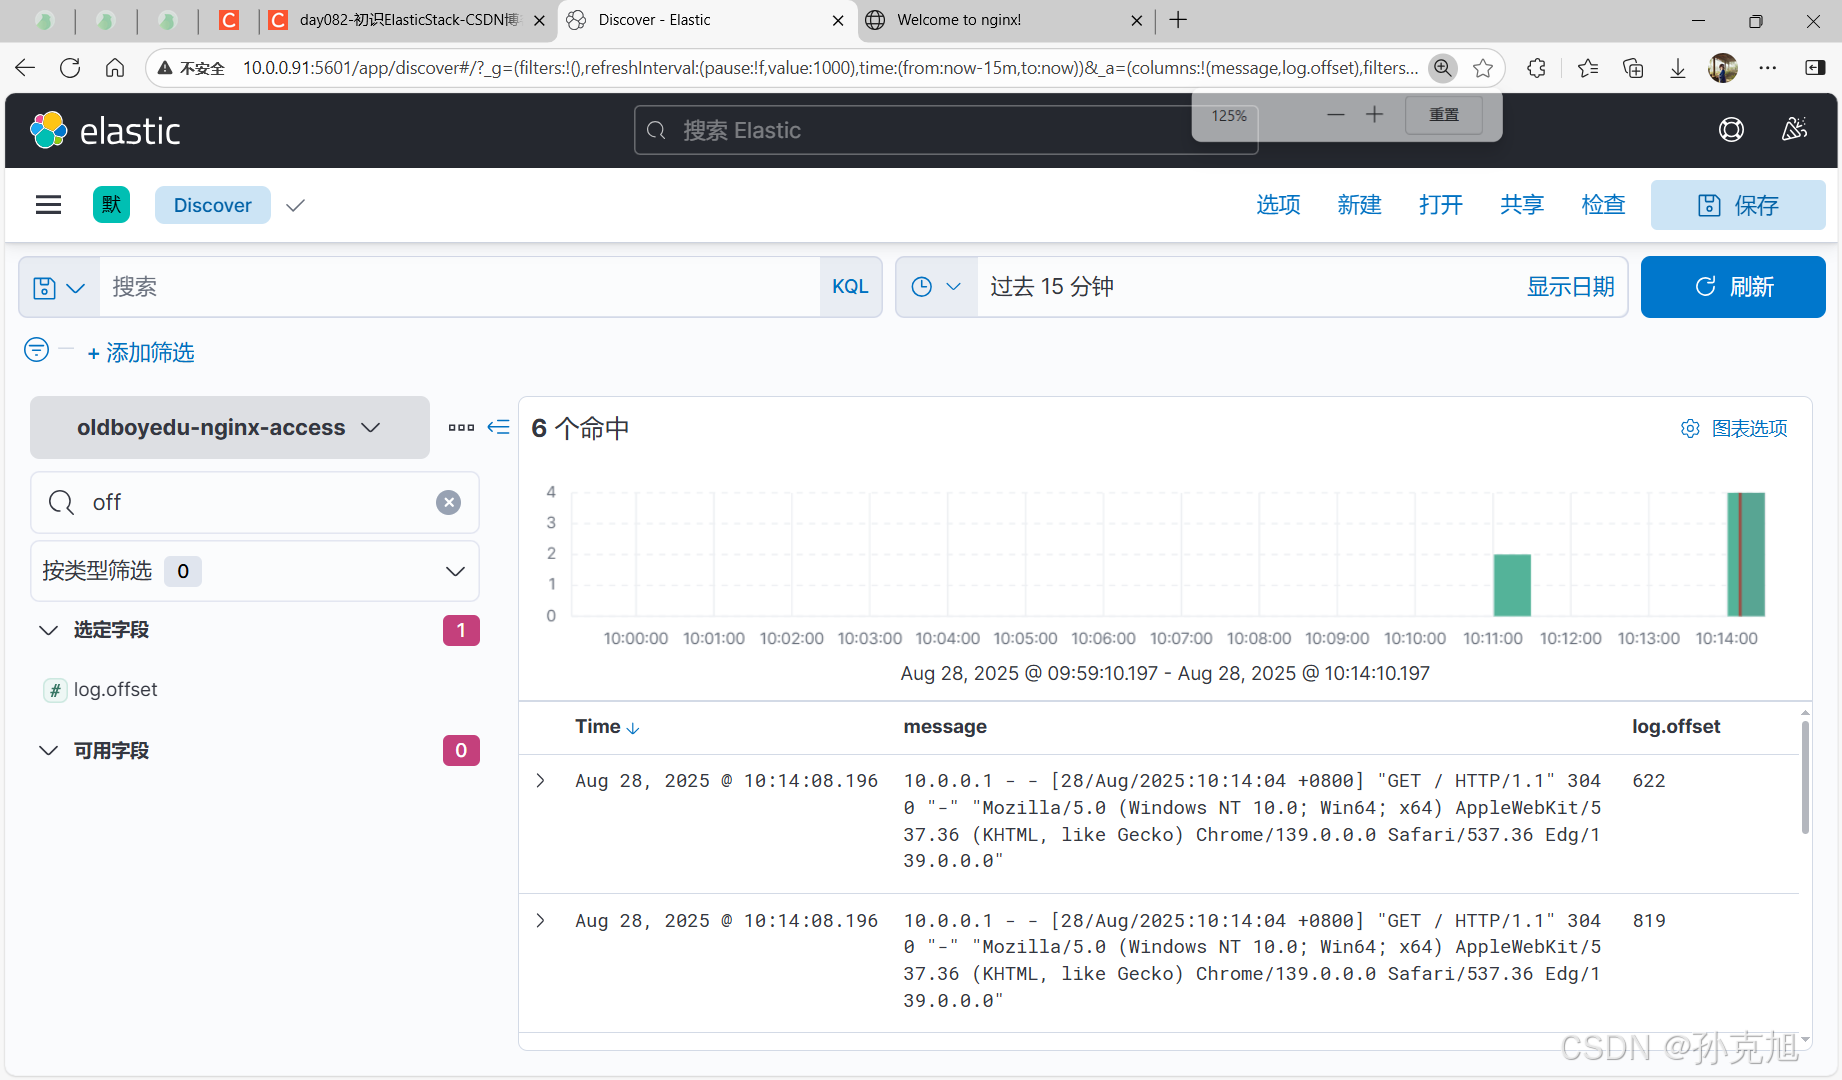
http://10.0.0.92/3.编写Filebeat采集nginx日志
[root@elk92 ~]# cat /etc/filebeat/config/04-nginx-to-es.yaml
filebeat.inputs:
- type: logpaths:- /var/log/nginx/access.log*output.elasticsearch:hosts: ["http://10.0.0.91:9200","http://10.0.0.92:9200","http://10.0.0.93:9200"]index: oldboyedu-nginx-accesssetup.ilm.enabled: false
setup.template.name: "oldboyedu-nginx"
setup.template.pattern: "oldboyedu-nginx*"
setup.template.overwrite: false
setup.template.settings:index.number_of_shards: 3index.number_of_replicas: 0
[root@elk92 ~]# 4.启动Filebeat
[root@elk92 ~]# filebeat -e -c /etc/filebeat/config/04-nginx-to-es.yaml
4. Filebeat采集tomcat日志
4.1 安装tomcat
/usr/share/elasticsearch/jdk这个路径下的是 Elasticsearch 自带的、捆绑(Bundled)的 JDK
1.下载tomcat
wget https://dlcdn.apache.org/tomcat/tomcat-11/v11.0.10/bin/apache-tomcat-11.0.10.tar.gz2.解压软件包
[root@elk92 ~]# tar xf apache-tomcat-11.0.8.tar.gz  -C /usr/local/
[root@elk92 ~]#
[root@elk92 ~]# cat /etc/profile.d/tomcat.sh
#!/bin/bashexport TOMCAT_HOME=/usr/local/apache-tomcat-11.0.8
export JAVA_HOME=/usr/share/elasticsearch/jdk
export PATH=$PATH:$TOMCAT_HOME/bin:$JAVA_HOME/bin
[root@elk92 ~]#
[root@elk92 ~]# source /etc/profile.d/tomcat.sh
[root@elk92 ~]#
[root@elk92 ~]# startup.sh
Using CATALINA_BASE:   /usr/local/apache-tomcat-11.0.8
Using CATALINA_HOME:   /usr/local/apache-tomcat-11.0.8
Using CATALINA_TMPDIR: /usr/local/apache-tomcat-11.0.8/temp
Using JRE_HOME:        /usr/share/elasticsearch/jdk
Using CLASSPATH:       /usr/local/apache-tomcat-11.0.8/bin/bootstrap.jar:/usr/local/apache-tomcat-11.0.8/bin/tomcat-juli.jar
Using CATALINA_OPTS:
Tomcat started.
[root@elk92 ~]#
[root@elk92 ~]# ss -ntl | grep 8080
LISTEN 0      100                     *:8080            *:*
4.2 编写filebeat文件
[root@elk92 ~]# cat /etc/filebeat/config/05-tomcat-to-es.yaml
filebeat.inputs:
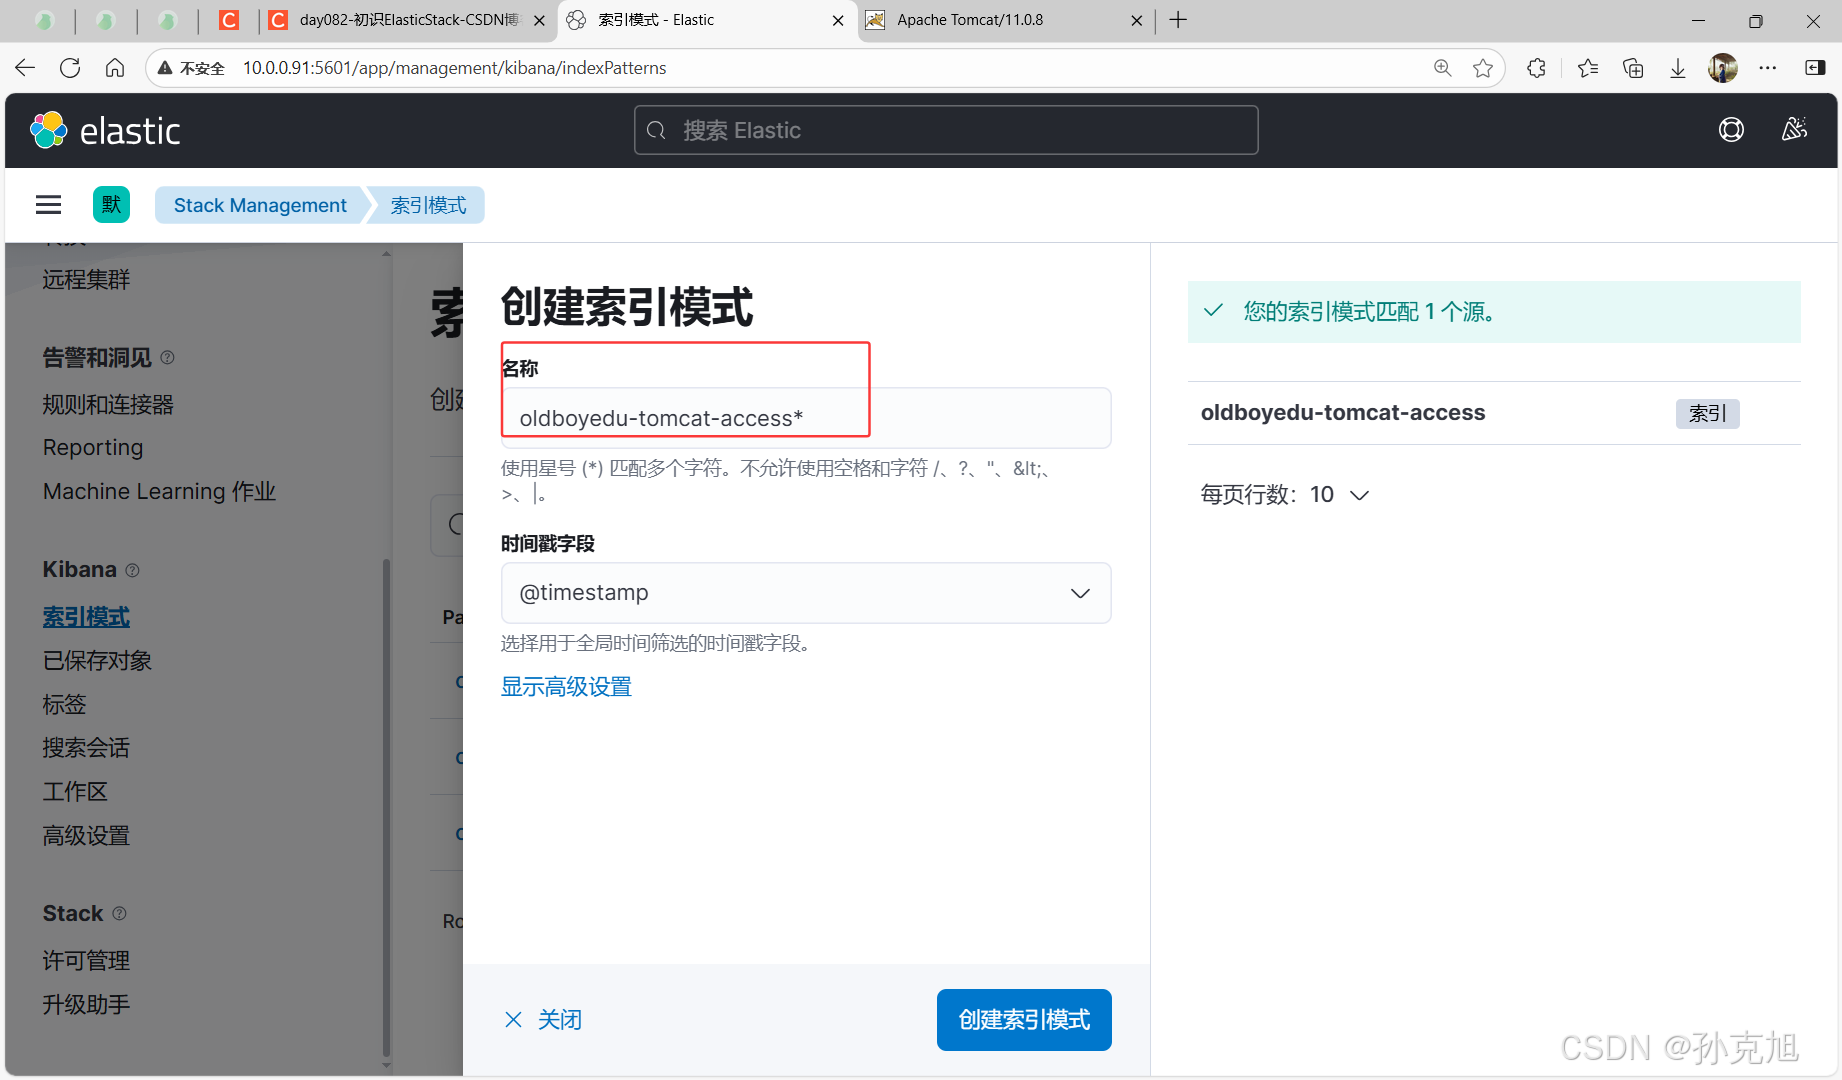
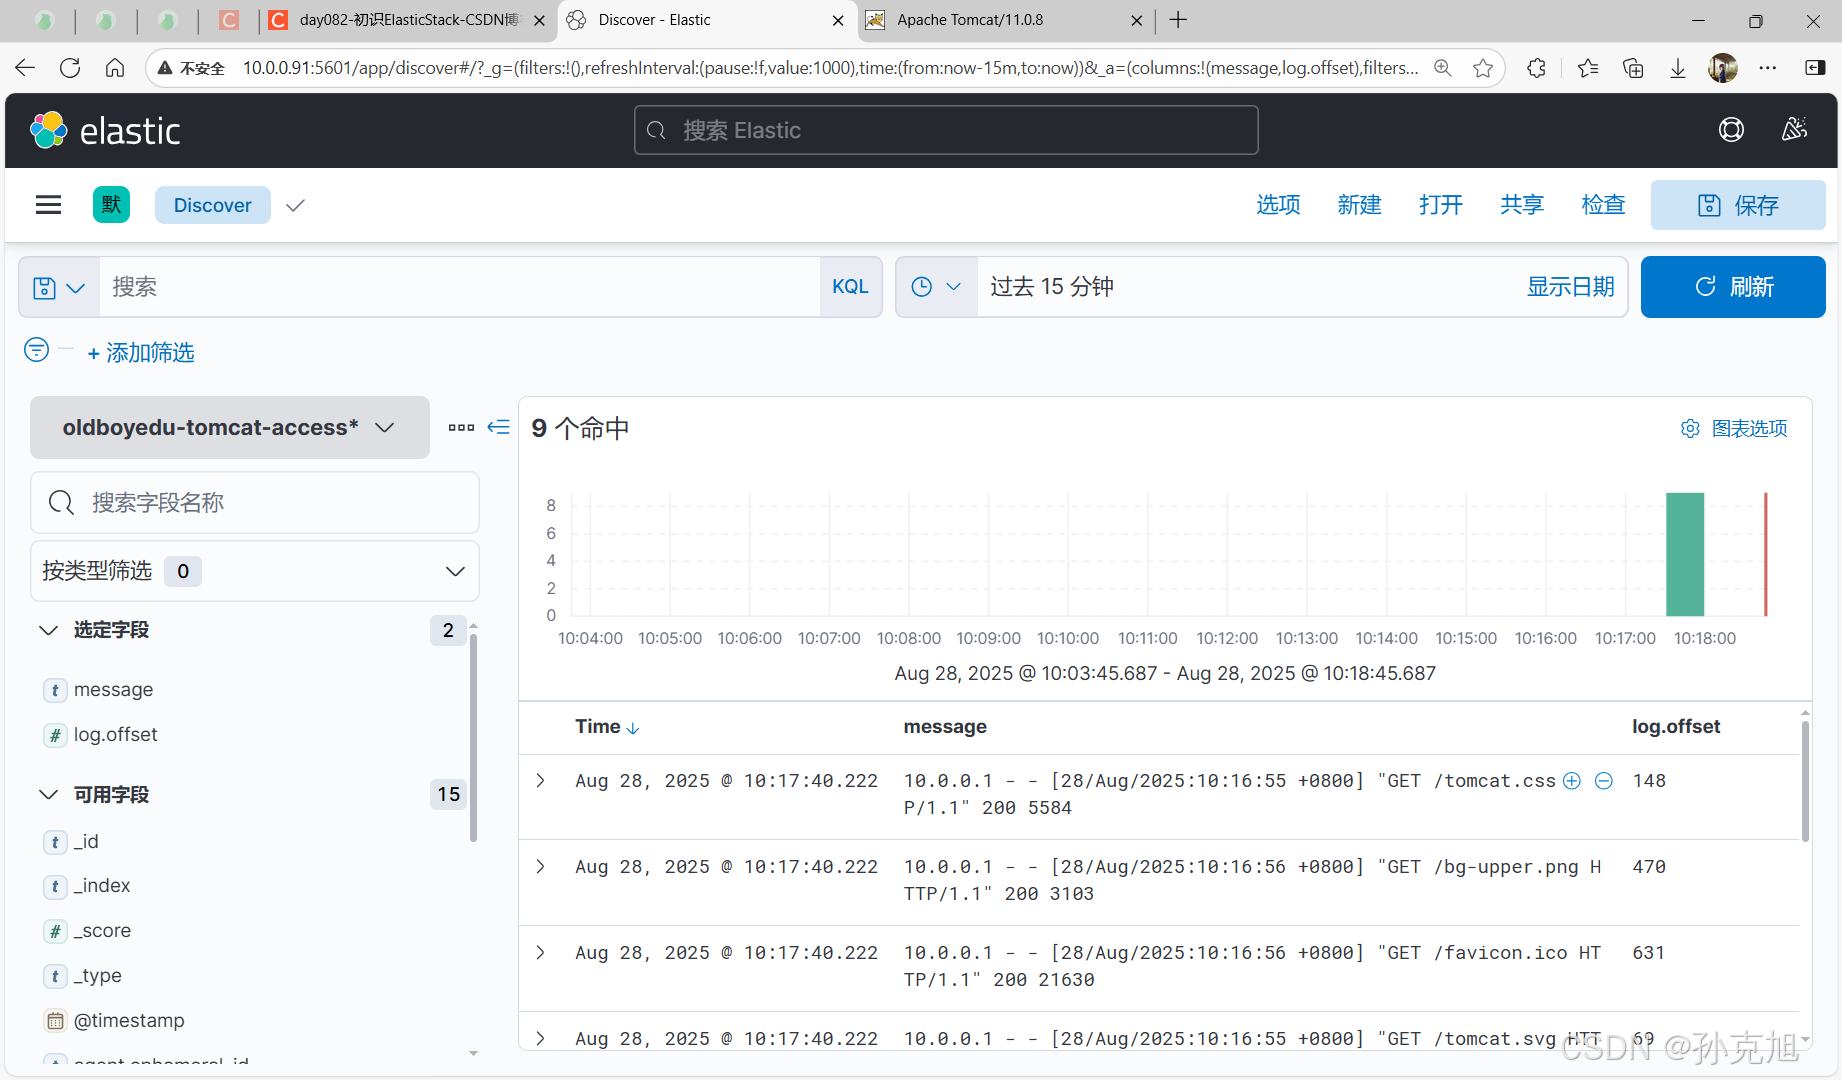
- type: logpaths:- /usr/local/apache-tomcat-11.0.8/logs/localhost_access_log.*.txtoutput.elasticsearch:hosts: ["http://10.0.0.91:9200","http://10.0.0.92:9200","http://10.0.0.93:9200"]index: oldboyedu-tomcat-accesssetup.ilm.enabled: false
setup.template.name: "oldboyedu-tomcat"
setup.template.pattern: "oldboyedu-tomcat*"
setup.template.overwrite: false
setup.template.settings:index.number_of_shards: 5index.number_of_replicas: 0
[root@elk92 ~]#
[root@elk92 ~]# filebeat -e -c /etc/filebeat/config/05-tomcat-to-es.yaml
5. Filebeat多实例
- filebeat启动多个实例时会报错:


- 运行filebeat时手动指定其他数据目录即可运行:

- 温馨提示:
- 1.如果在工作中需要启动多个Filebeat实例,则可以使用" --path.data"参数指定不同的数据目录,若目录不存在则会自动创建;
- 2.如果工作中Filebeat停止可以使用kill命令操作来停止服务;

6. Filebeat采集多种业务日志
1.编写Filebeat配置文件
[root@elk92 ~]# cat /etc/filebeat/config/06-multiple_input-to-es.yaml
filebeat.inputs:
- type: logpaths:- /var/log/nginx/access.log*tags: "nginx"
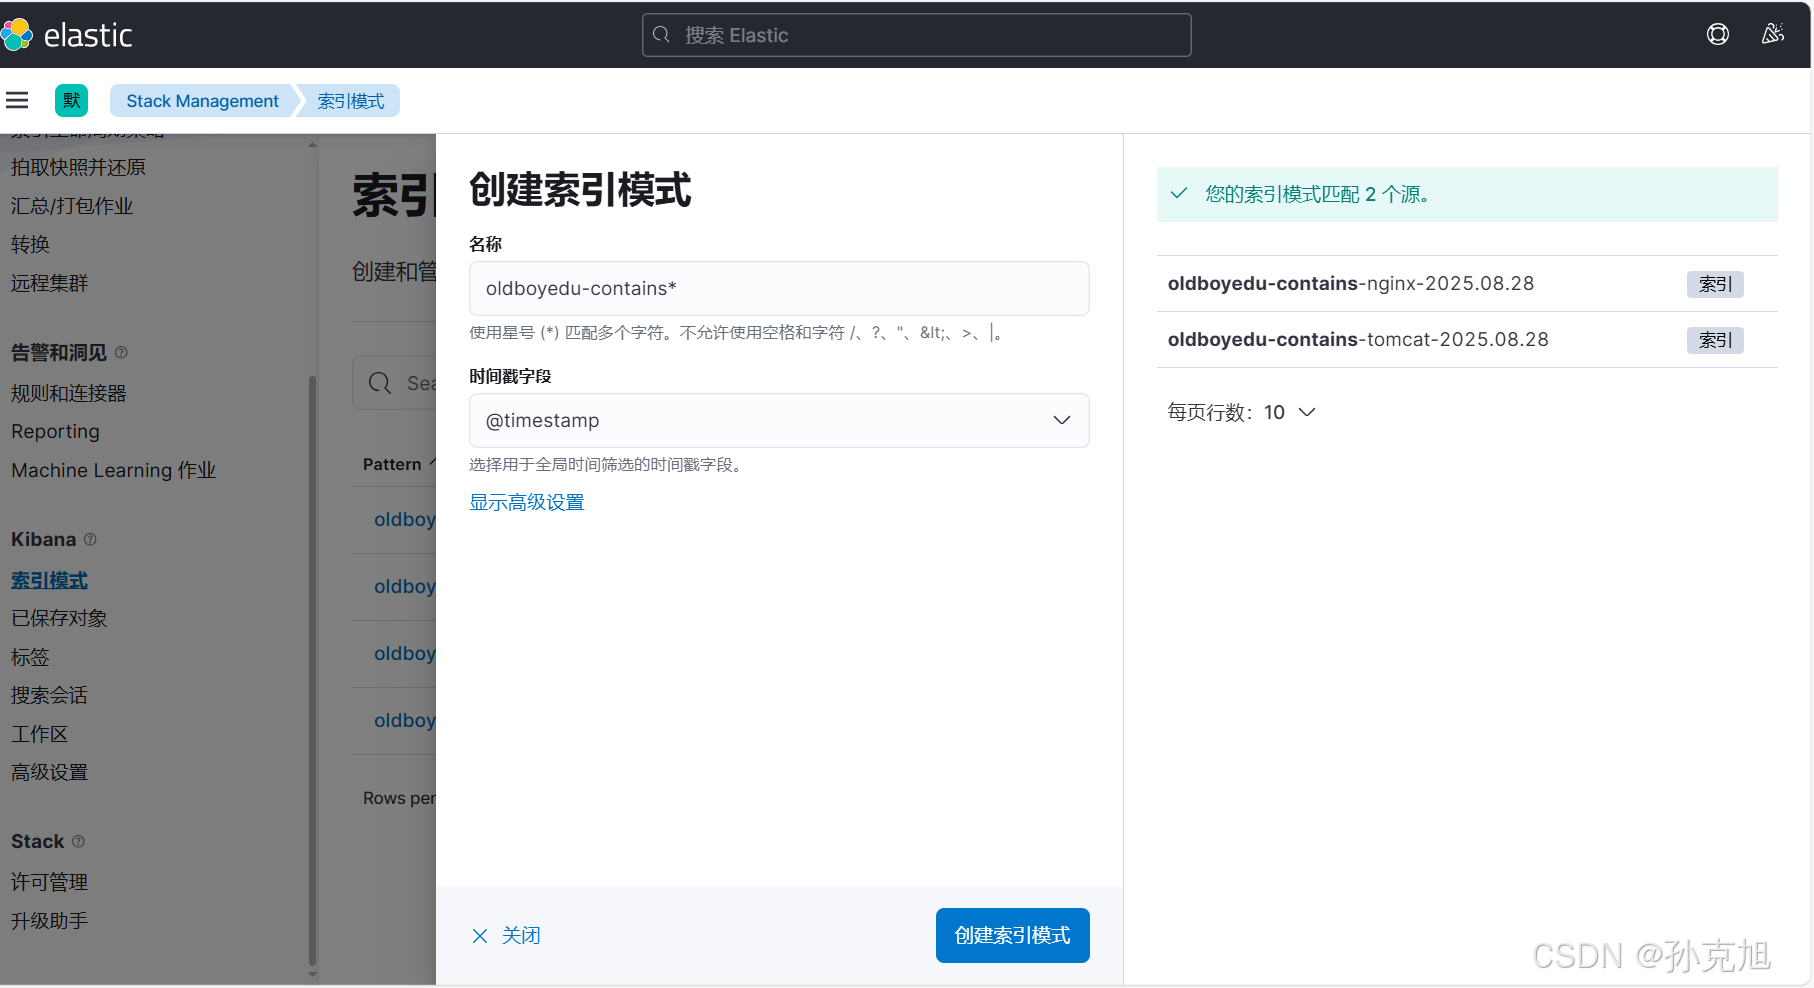
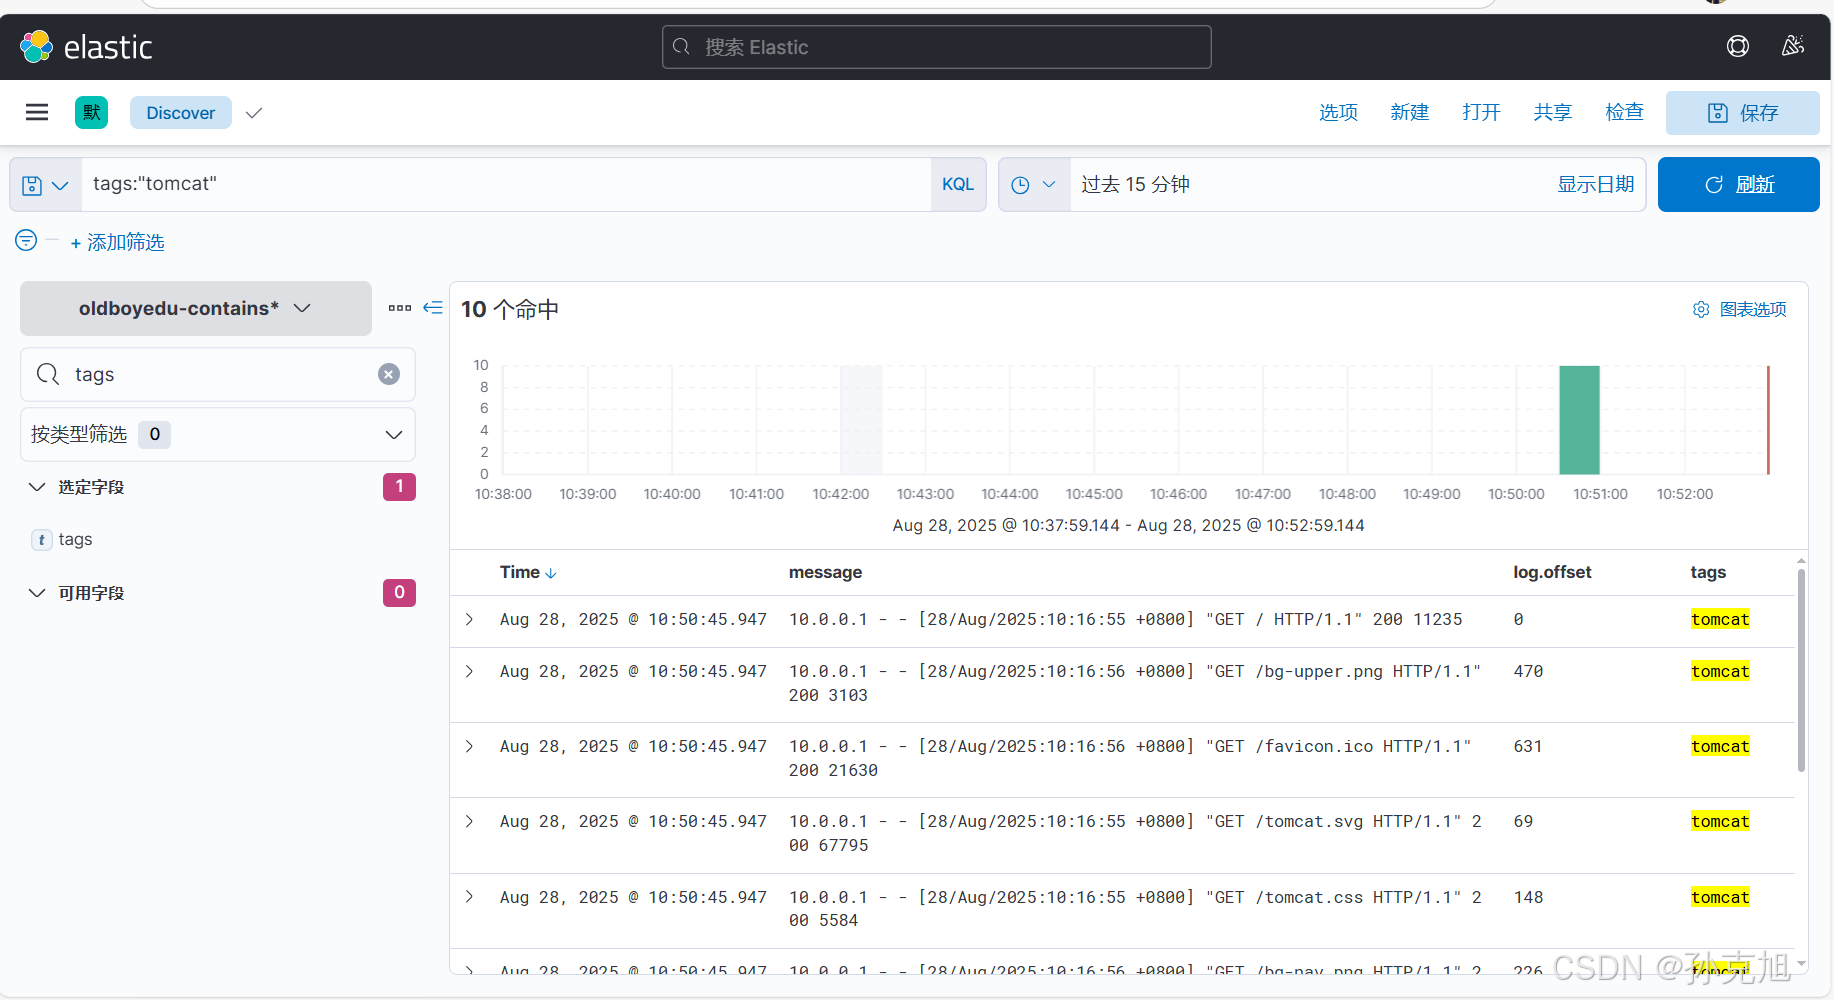
- type: logpaths:- /usr/local/apache-tomcat-11.0.8/logs/localhost_access_log.*.txttags: "tomcat"output.elasticsearch:hosts: ["http://10.0.0.91:9200","http://10.0.0.92:9200","http://10.0.0.93:9200"]# 根据条件判断,将数据写入不同的索引indices:# 指定索引的名称- index: "oldboyedu-contains-nginx-%{+yyyy.MM.dd}"# 指定匹配条件when.contains:tags: "nginx"- index: "oldboyedu-contains-tomcat-%{+yyyy.MM.dd}"when.contains:tags: "tomcat"setup.ilm.enabled: false
setup.template.name: "oldboyedu-contains"
setup.template.pattern: "oldboyedu-contains*"
setup.template.overwrite: false
setup.template.settings:index.number_of_shards: 3index.number_of_replicas: 0
[root@elk92 ~]# 2.启动实例
[root@elk92 ~]# rm -rf /var/lib/filebeat/
[root@elk92 ~]# filebeat -e -c /etc/filebeat/config/06-multiple_input-to-es.yaml
7. Filebeat采集docker日志
- 脚本文件:
oldboyedu-autoinstall-docker-docker-compose.tar.gz 链接: https://pan.baidu.com/s/17IGlZPlIAFwfT17A1-Ltfw?pwd=v2ah 提取码: v2ah - 启动docker容器
1.部署docker
[root@elk93 ~]# wget http://192.168.16.253/Resources/Docker/scripts/oldboyedu-autoinstall-docker-docker-compose.tar.gz
[root@elk93 ~]# tar xf oldboyedu-autoinstall-docker-docker-compose.tar.gz
[root@elk93 ~]# ./install-docker.sh i2.导入镜像
[root@elk93 ~]# wget http://192.168.16.253/Resources/Docker/images/Nginx/oldboyedu-nginx-1.27.4-alpine.tar.gz
[root@elk93 ~]# docker load < oldboyedu-nginx-1.27.4-alpine.tar.gz
[root@elk93 ~]# docker image ls
REPOSITORY   TAG             IMAGE ID       CREATED        SIZE
nginx        1.27.4-alpine   1ff4bb4faebc   6 months ago   47.9MB
[root@elk93 ~]# 3.运行容器
[root@elk93 ~]# docker run -d --name c1 -p 81:80 nginx:1.27.4-alpine
52361d96e587b76dd0d46241ea02d37c36ee1ffbf2349dce73bcb504604d1265
[root@elk93 ~]#
[root@elk93 ~]# docker run -d --name c2 -p 82:80 nginx:1.27.4-alpine
fbc65cde1c0f73f4b76d3028fcba29e351cf15aa5c429685285d3c6b449e29f4
[root@elk93 ~]#
[root@elk93 ~]# docker ps -a
CONTAINER ID   IMAGE                 COMMAND                  CREATED         STATUS         PORTS                               NAMES
fbc65cde1c0f   nginx:1.27.4-alpine   "/docker-entrypoint.…"   4 seconds ago   Up 2 seconds   0.0.0.0:82->80/tcp, :::82->80/tcp   c2
52361d96e587   nginx:1.27.4-alpine   "/docker-entrypoint.…"   9 seconds ago   Up 7 seconds   0.0.0.0:81->80/tcp, :::81->80/tcp   c1
[root@elk93 ~]#
- 编写filebeat文件
4.安装Filebeat
[root@elk92 ~]# scp filebeat-7.17.29-amd64.deb 10.0.0.93:~[root@elk93 ~]# dpkg -i filebeat-7.17.29-amd64.deb 5.编写Filebeat配置文件
[root@elk93 ~]# cat /etc/filebeat/docker-to-es.yaml
filebeat.inputs:
- type: containerpaths: - '/var/lib/docker/containers/*/*.log'# 添加处理器。
processors:# 添加docker的元数据信息。- add_docker_metadata:# 找本地的套接字文件。host: "unix:///var/run/docker.sock"output.elasticsearch:hosts: ["http://10.0.0.91:9200","http://10.0.0.92:9200","http://10.0.0.93:9200"]index: oldboyedu-dockersetup.ilm.enabled: false
setup.template.name: "oldboyedu-docker"
setup.template.pattern: "oldboyedu-docker*"
setup.template.overwrite: false
setup.template.settings:index.number_of_shards: 6index.number_of_replicas: 0
[root@elk93 ~]# 6.启动实例
[root@elk93 ~]# filebeat -e -c /etc/filebeat/docker-to-es.yaml
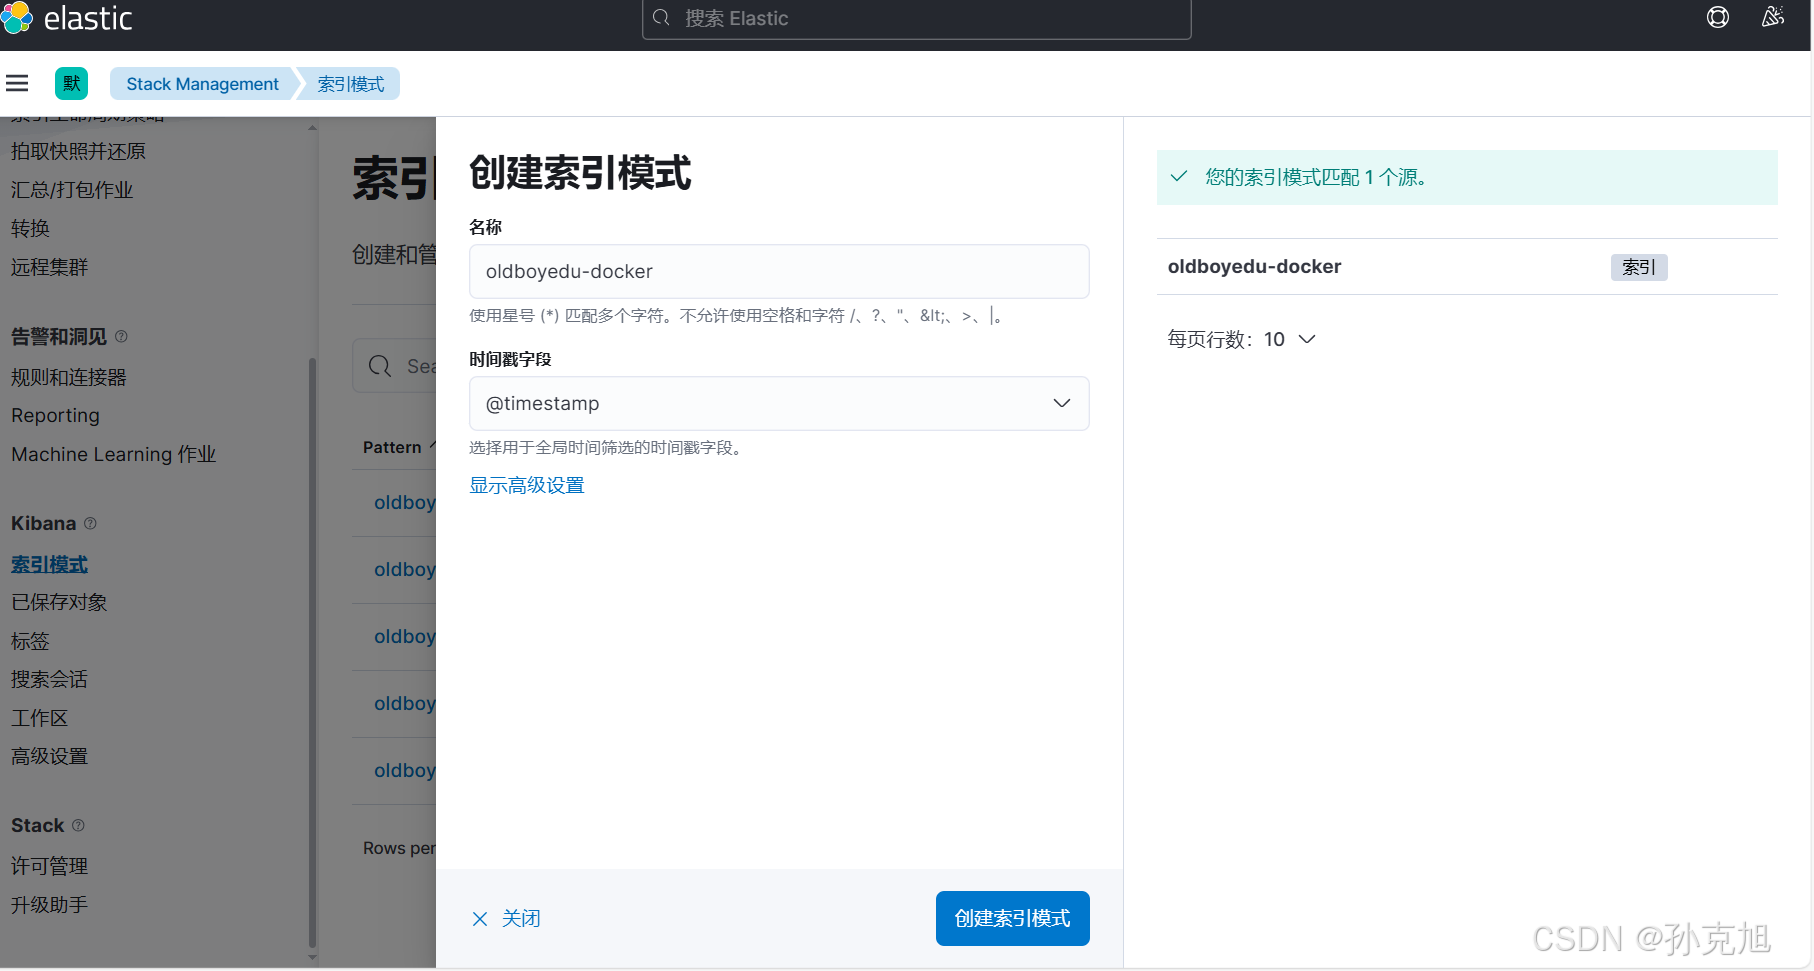
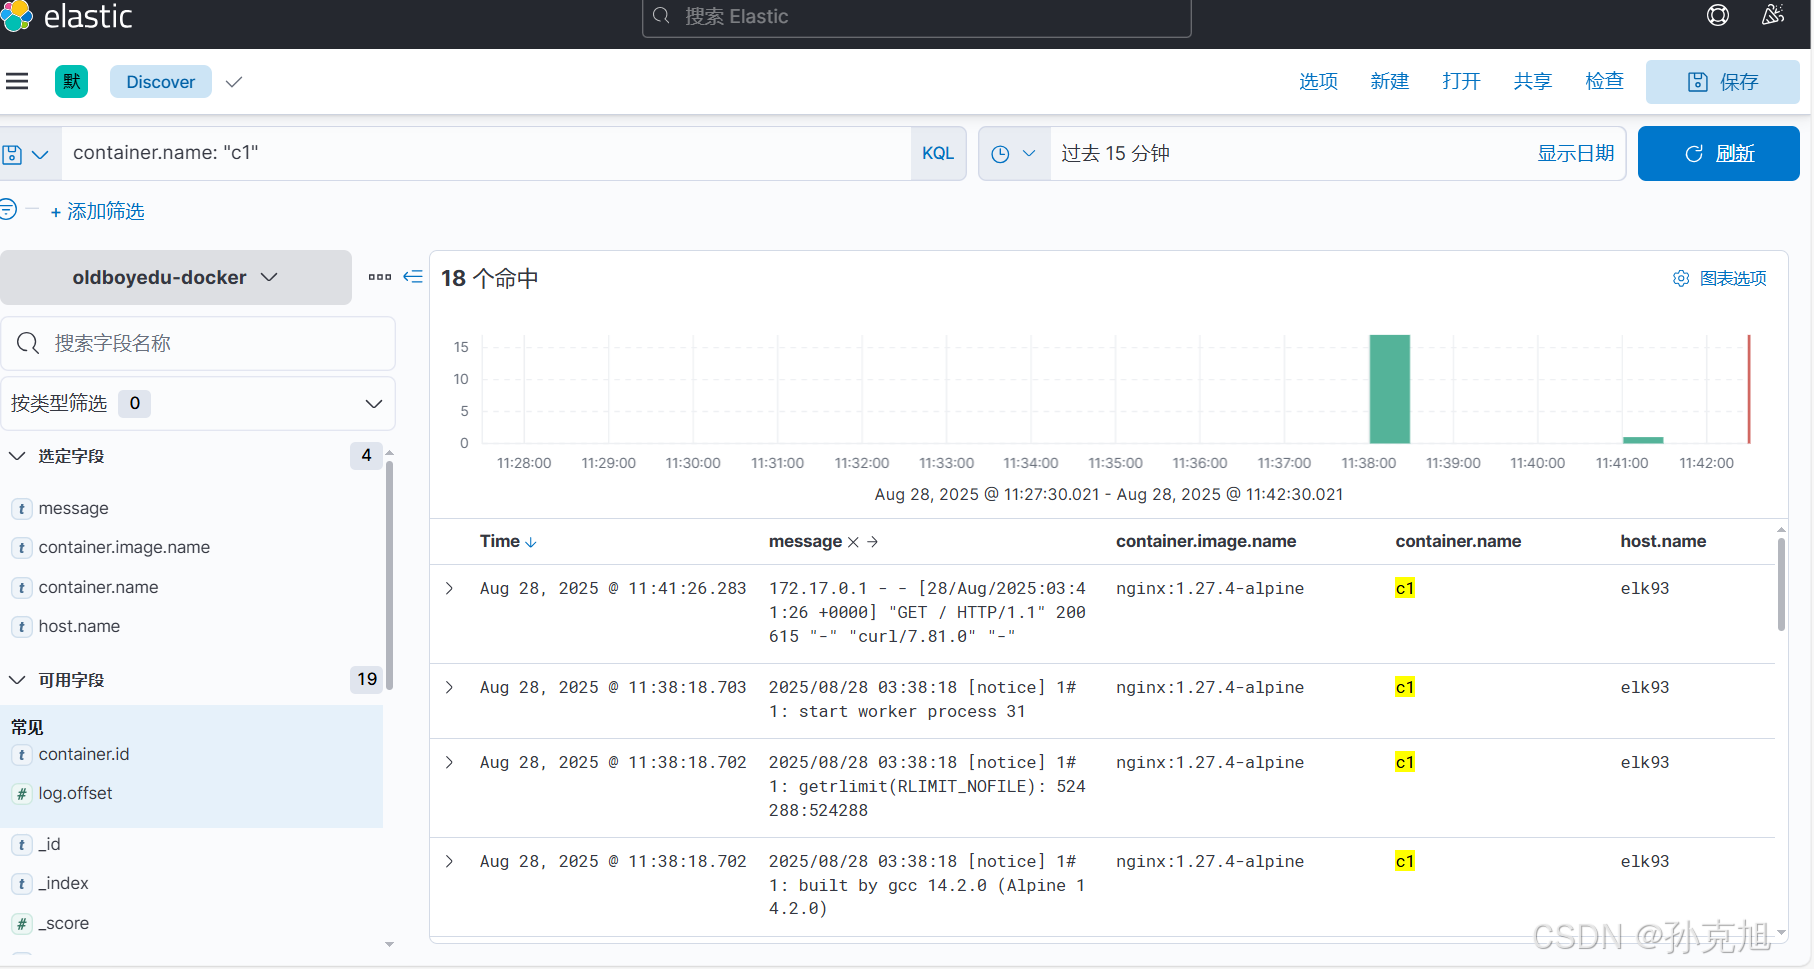
8. Filebeat排除不必要的行exclude_lines
1.编写Filebeat配置文件
[root@elk93 ~]# cat /etc/filebeat/docker-to-es.yaml
filebeat.inputs:
- type: containerpaths: - '/var/lib/docker/containers/*/*.log'# 排除不必要的行。exclude_lines: ['.*notice','.*entrypoint','.*listen']# 添加处理器。
processors:# 添加docker的元数据信息。- add_docker_metadata:# 找本地的套接字文件。host: "unix:///var/run/docker.sock"output.elasticsearch:hosts: ["http://10.0.0.91:9200","http://10.0.0.92:9200","http://10.0.0.93:9200"]index: oldboyedu-dockersetup.ilm.enabled: false
setup.template.name: "oldboyedu-docker"
setup.template.pattern: "oldboyedu-docker*"
setup.template.overwrite: false
setup.template.settings:index.number_of_shards: 6index.number_of_replicas: 0
[root@elk93 ~]# 2.启动Filebeat实例
[root@elk93 ~]# filebeat -e -c /etc/filebeat/docker-to-es.yaml
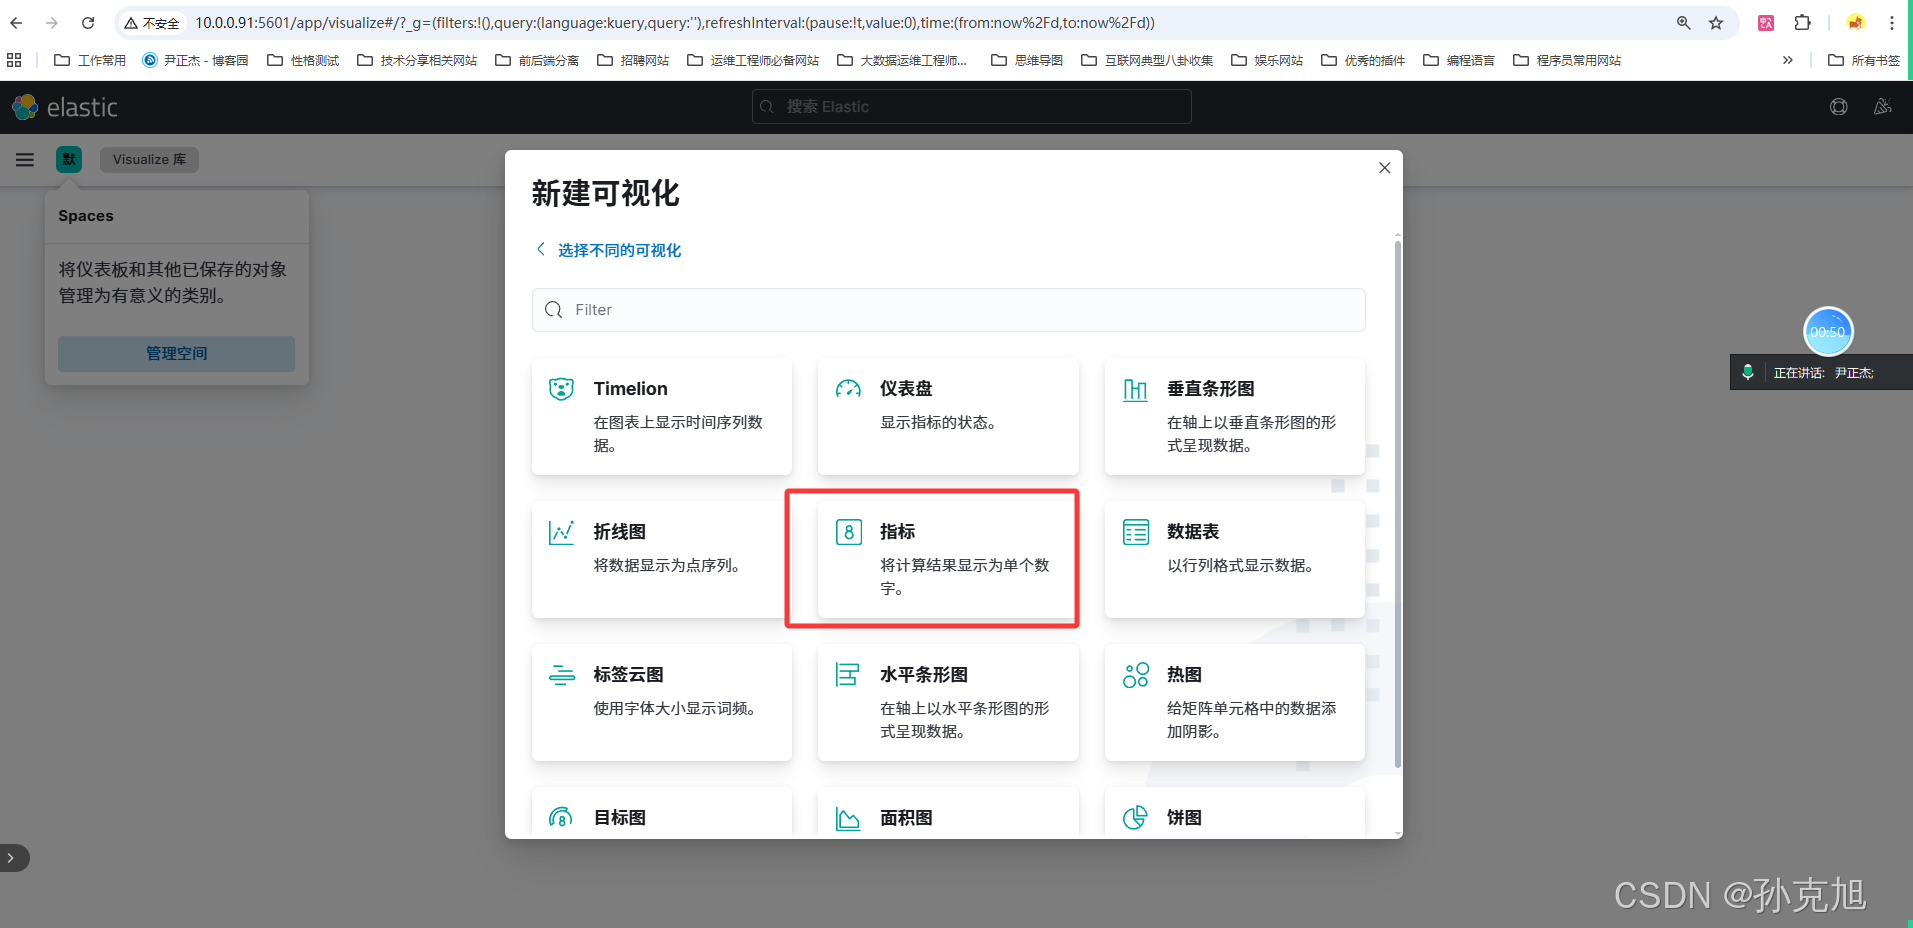
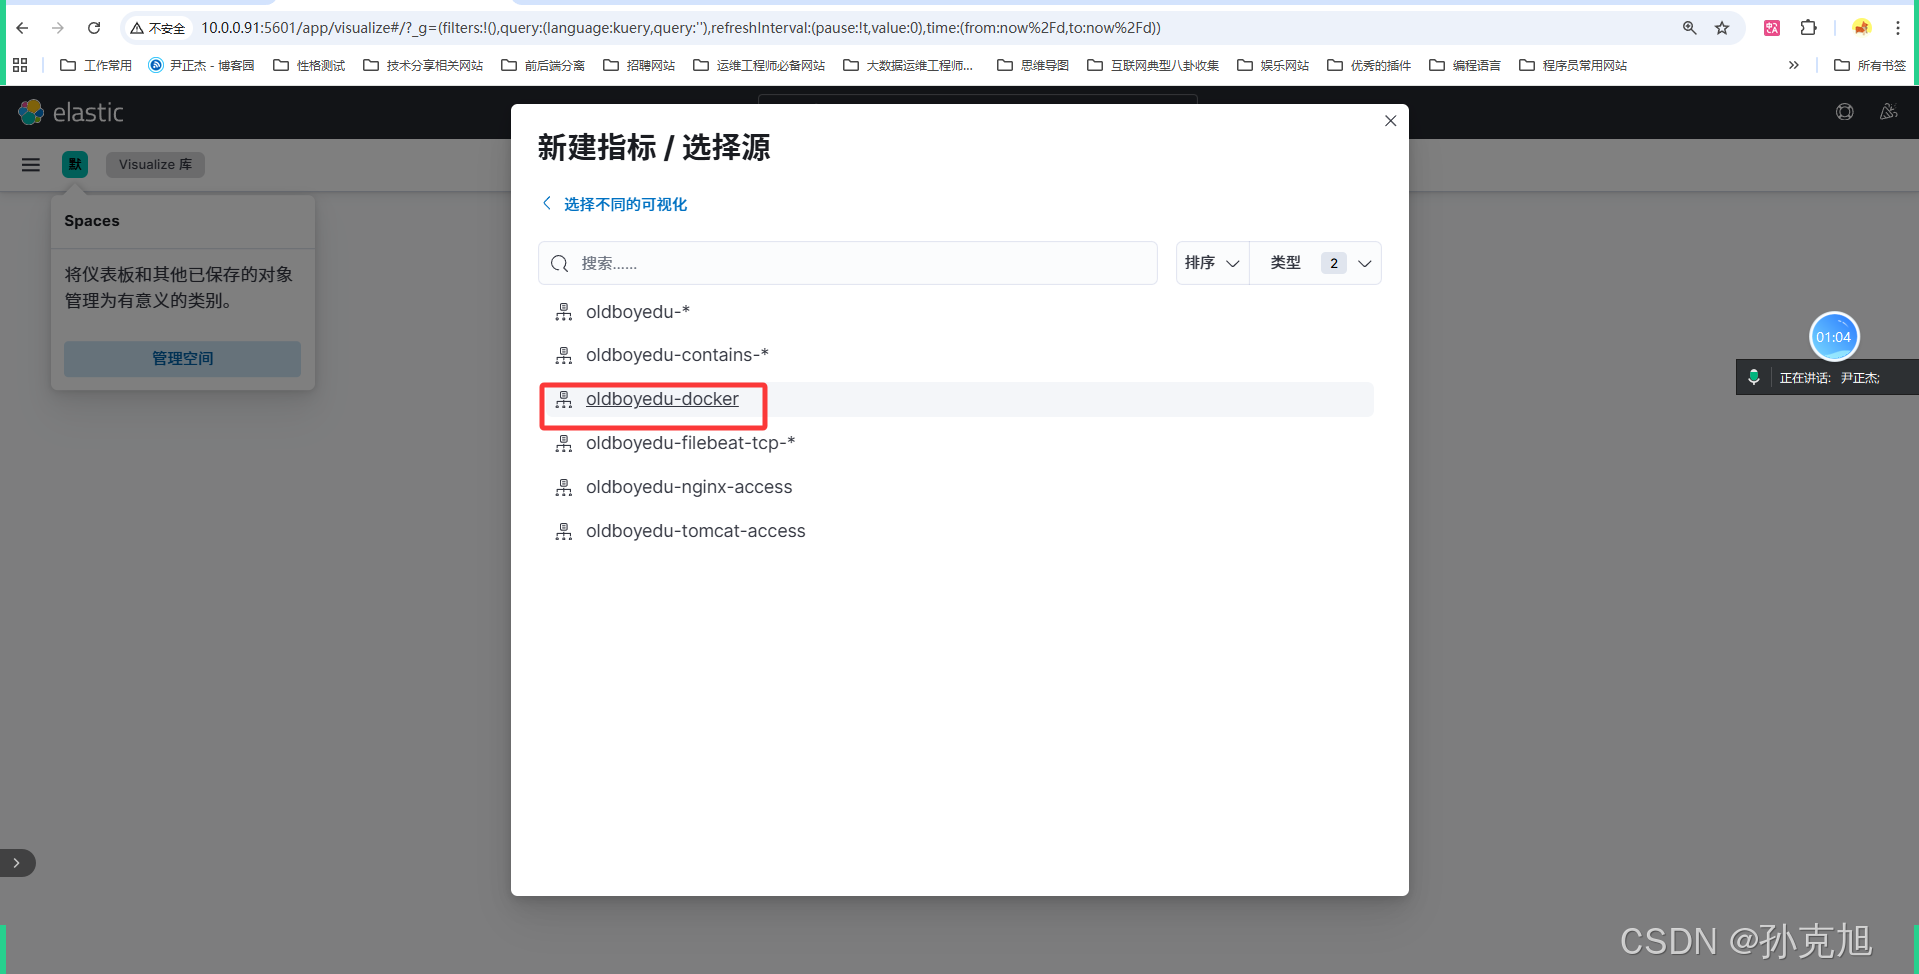
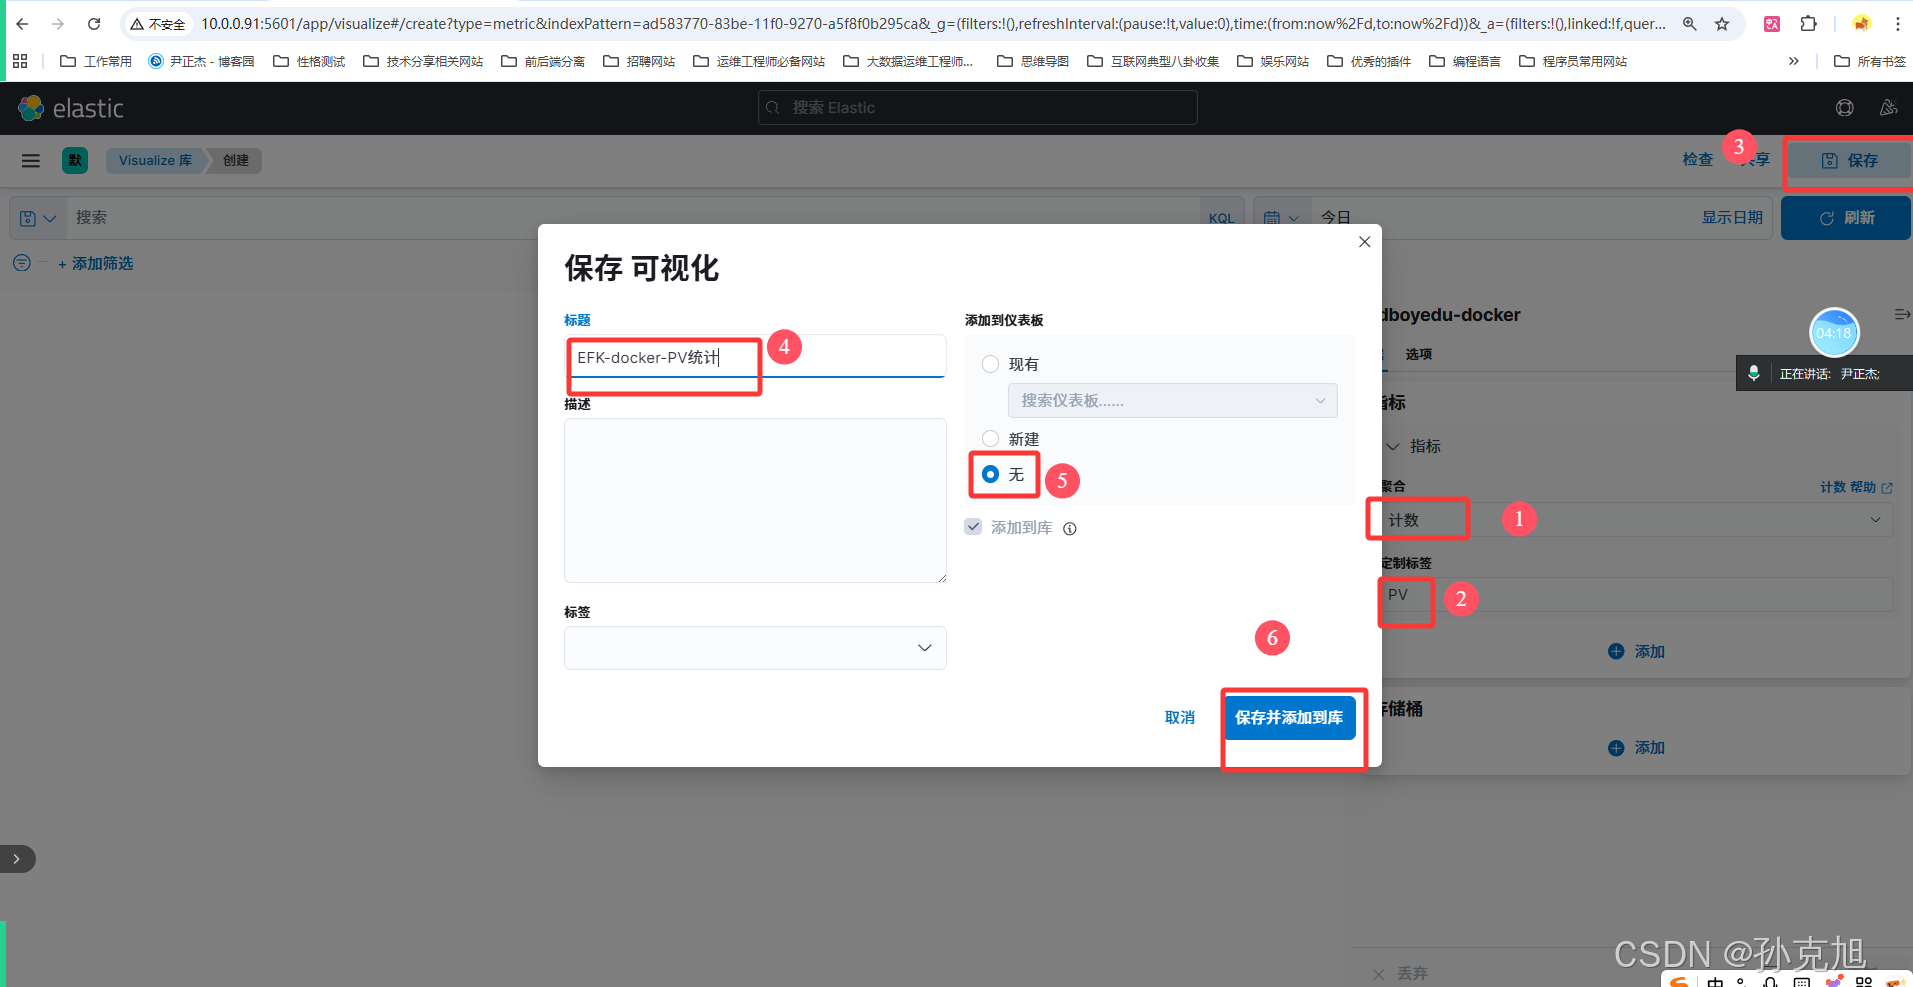
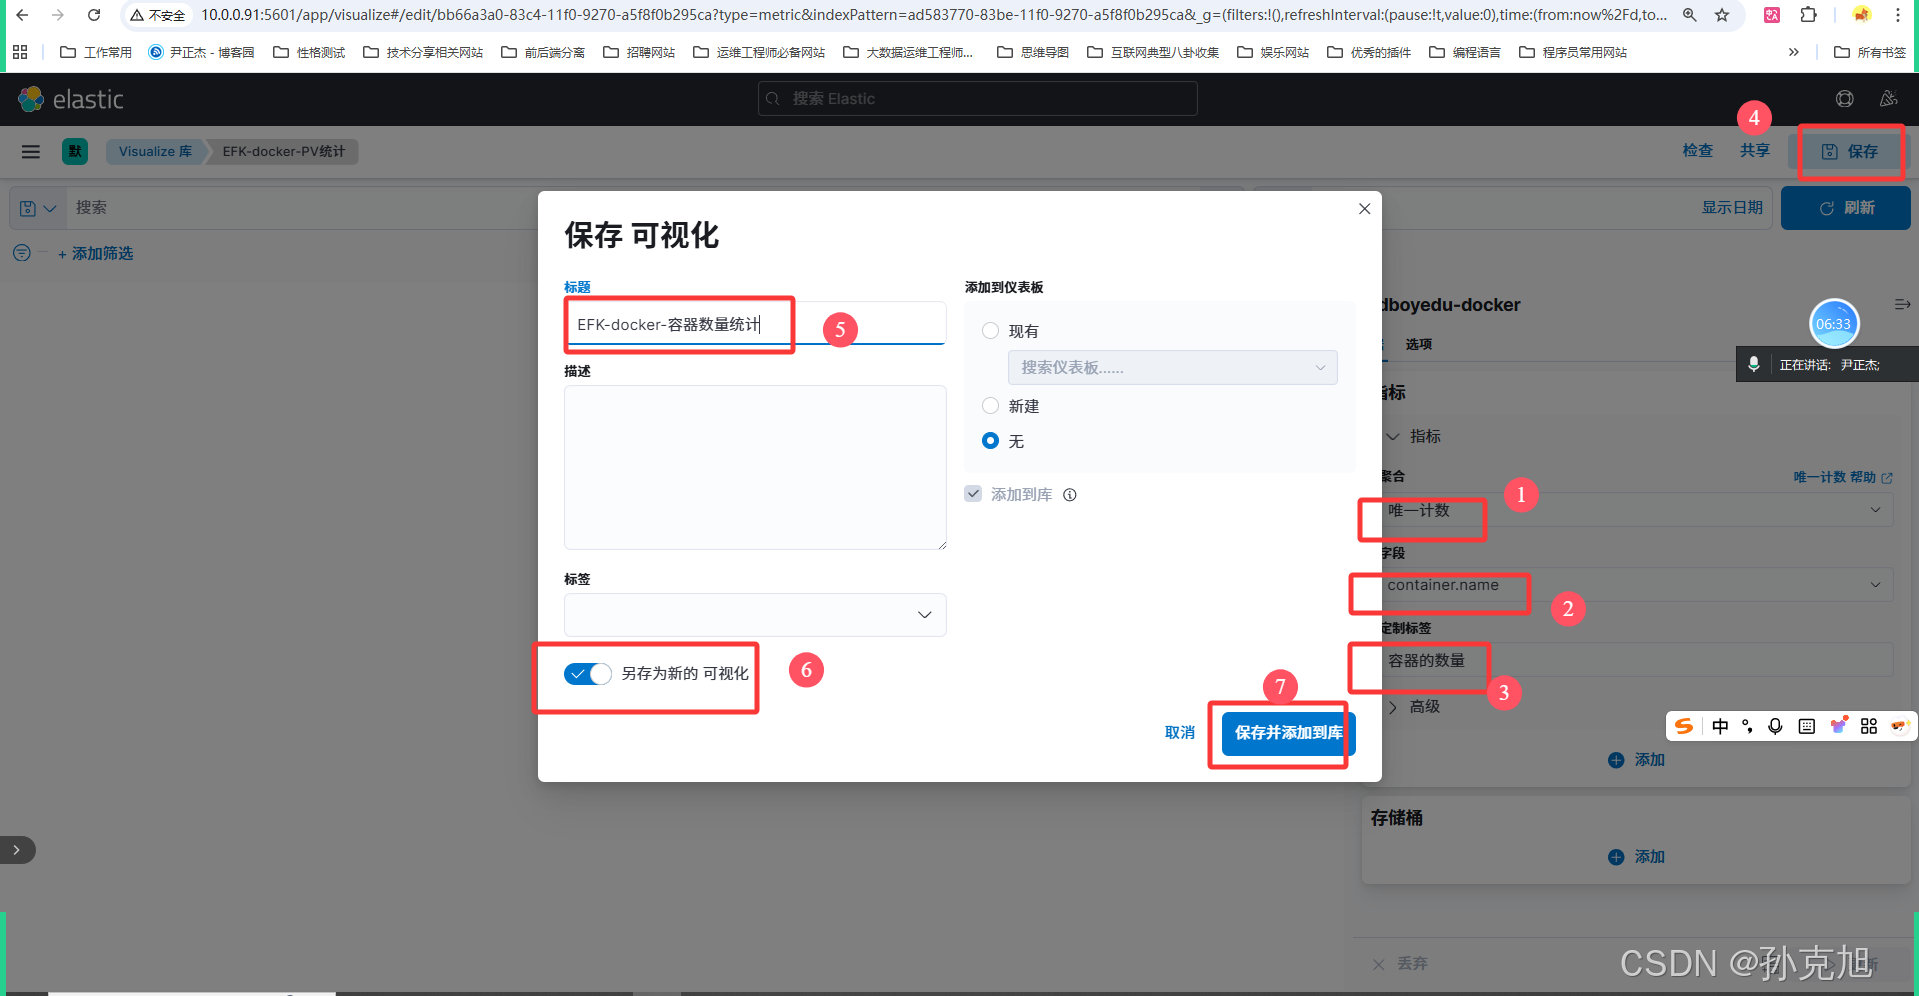
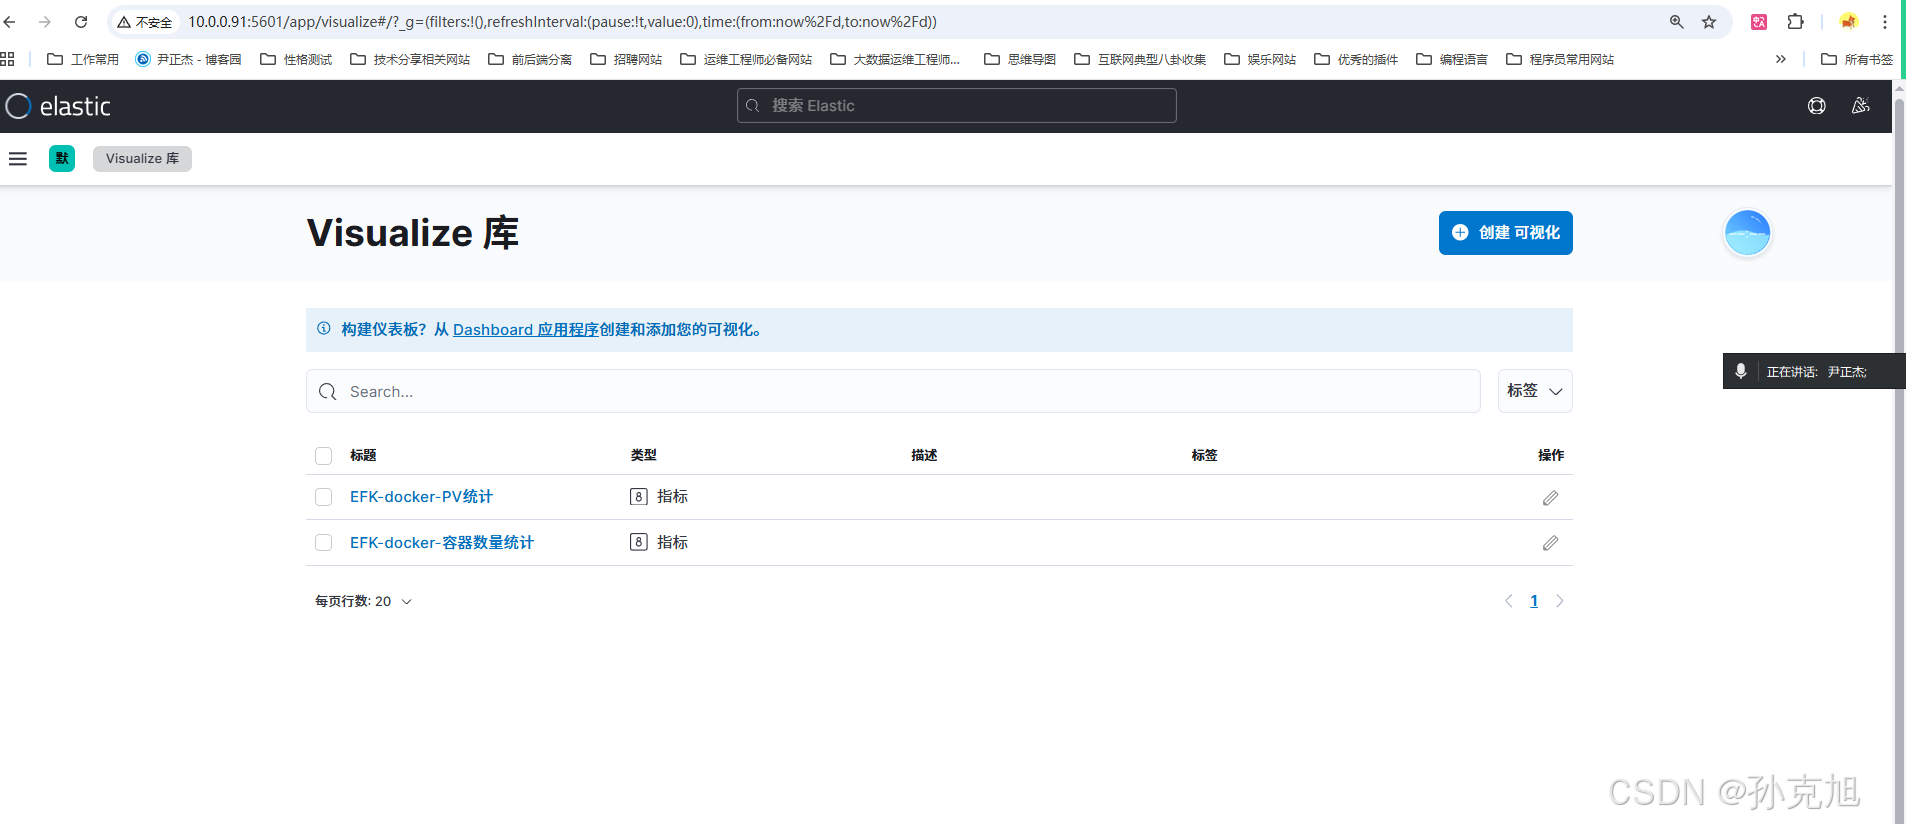
9. kibana可视化
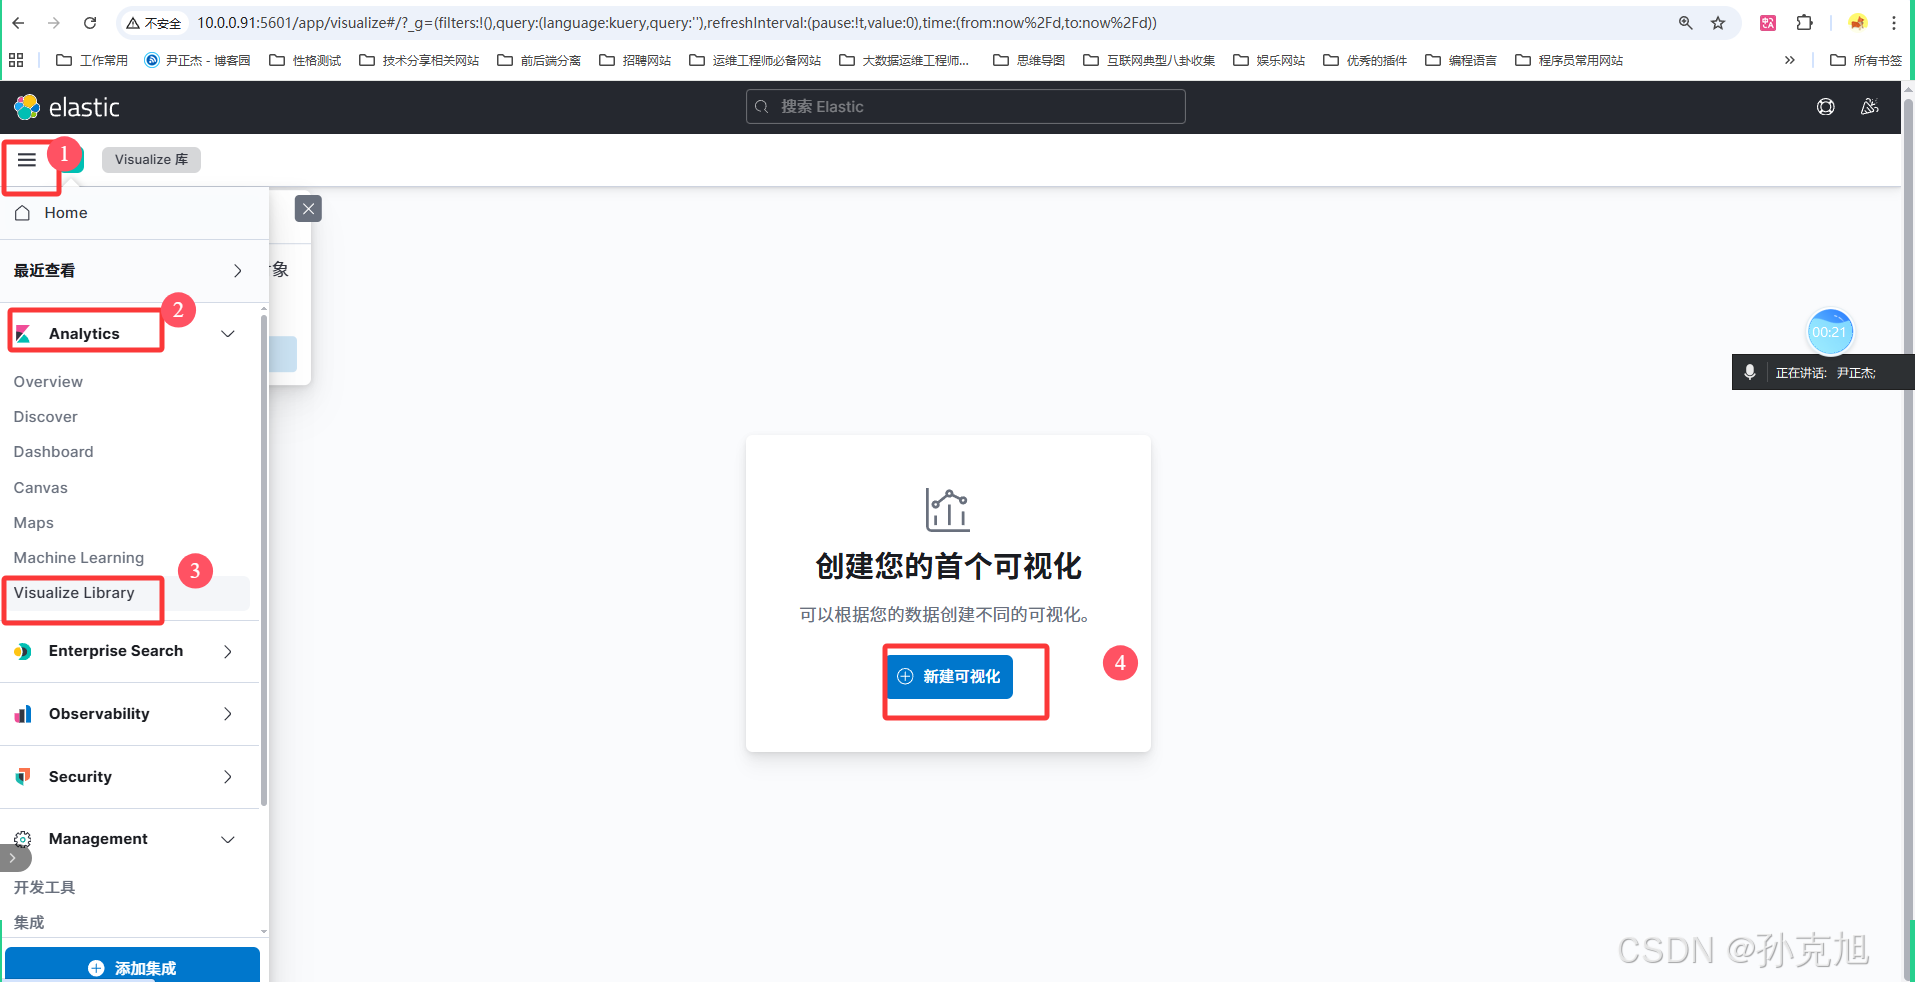
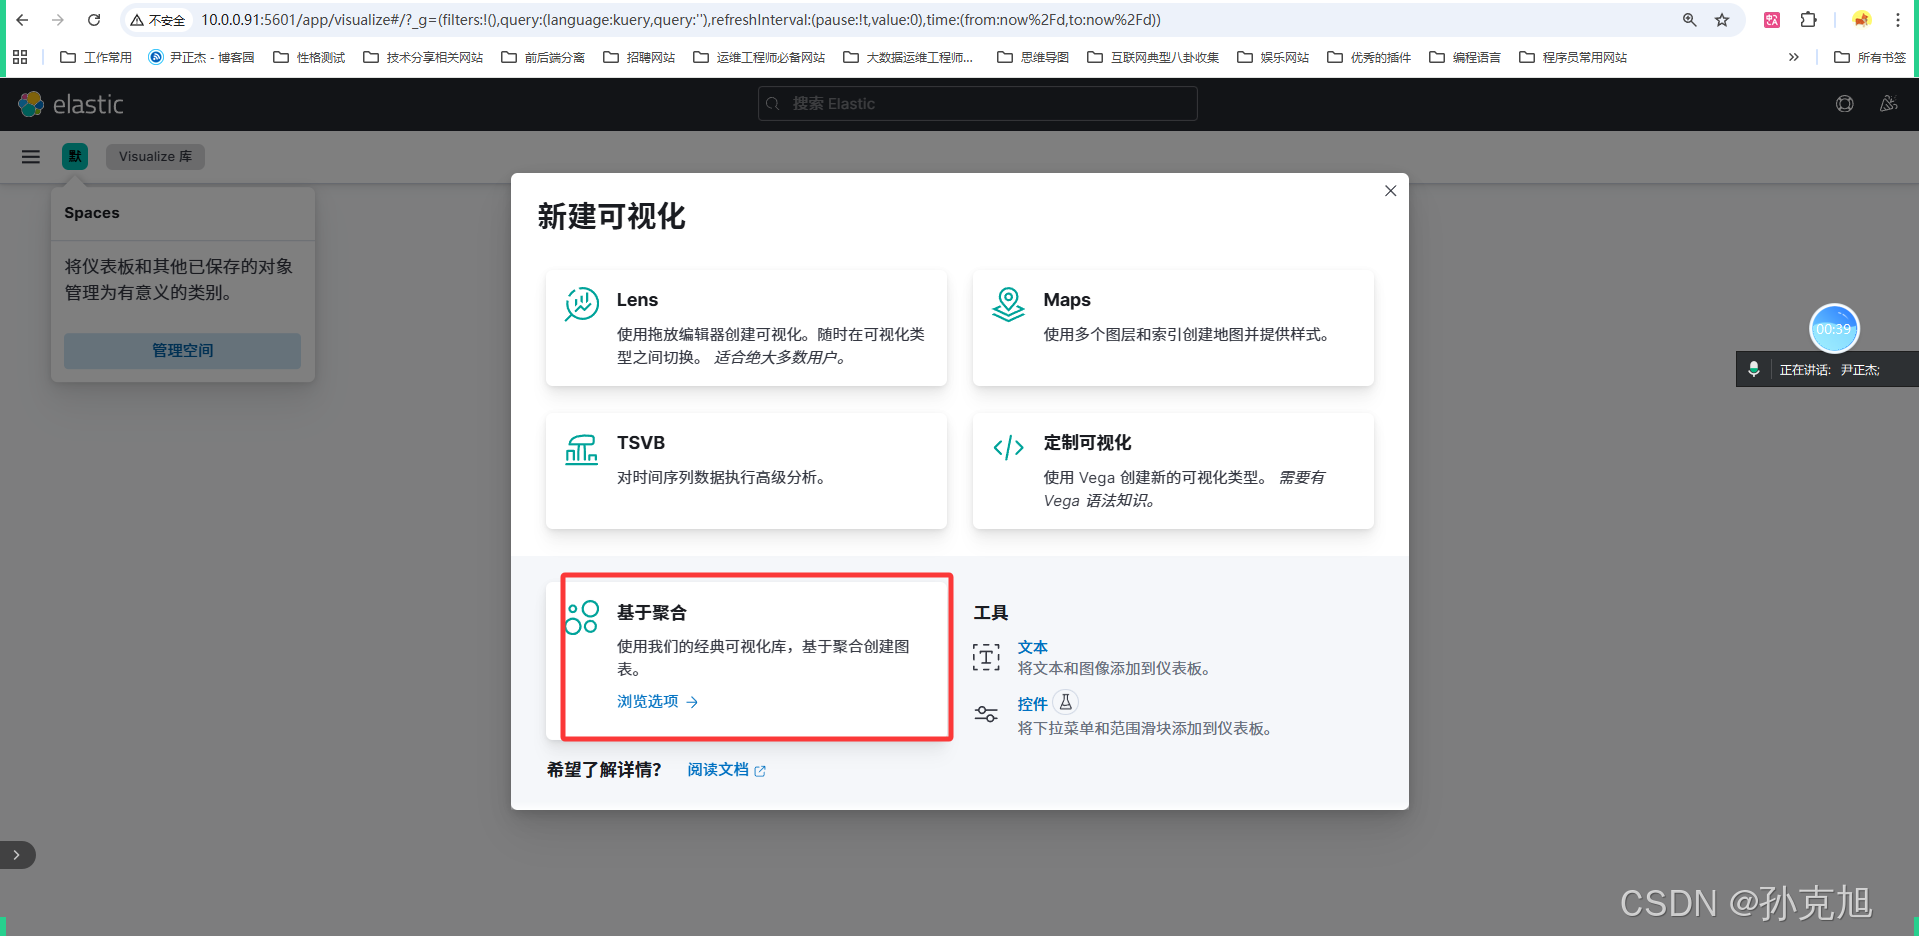
10. Filebeat的模块启用和禁用
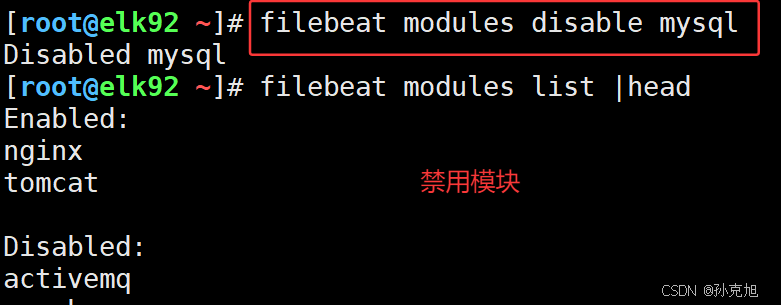
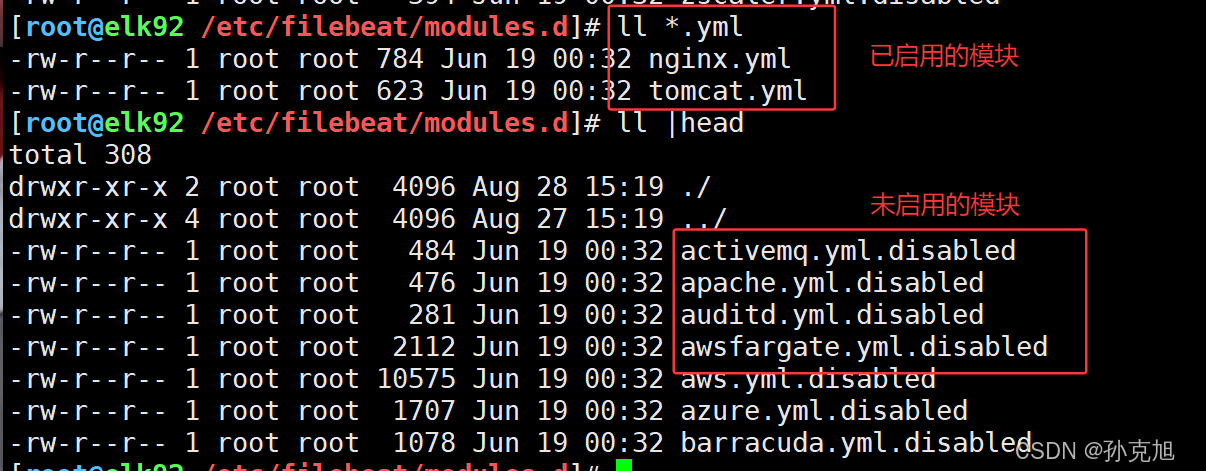
温馨提示:
- 1.Filebeat模块底层启用和禁用本质上对应的是模块文件列表;
11. Filebeat模块应用案例
1.启用模块
[root@elk92 ~]# filebeat modules enable tomcat
Enabled tomcat
[root@elk92 ~]#
[root@elk92 ~]# filebeat modules list
Enabled:
nginx
tomcatDisabled:
activemq
apache
auditd
aws
...2.修改nginx的模块文件
[root@elk92 ~]# egrep -v "^.*#|^$" /etc/filebeat/modules.d/nginx.yml
- module: nginxaccess:enabled: truevar.paths: ["/var/log/nginx/access.log*"]error:enabled: truevar.paths: ["/var/log/nginx/error.log*"]ingress_controller:enabled: false
[root@elk92 ~]# 3.修改tomcat的模块文件
[root@elk92 ~]# egrep -v "^.*#|^$" /etc/filebeat/modules.d/tomcat.yml
- module: tomcatlog:enabled: truevar.input: filevar.paths:- /usr/local/apache-tomcat-11.0.8/logs/localhost_access_log.*.txt
[root@elk92 ~]# 4.修改Filebeat的配置文件
[root@elk92 ~]# cat /etc/filebeat/config/07-modules-to-es.yaml
# 启用Filebeat模块
filebeat.config.modules:# 指定模块的路径path: ${path.config}/modules.d/*.yml# 是否支持热加载配置reload.enabled: trueoutput.elasticsearch:hosts: ["http://10.0.0.91:9200","http://10.0.0.92:9200","http://10.0.0.93:9200"]index: oldboyedu-modules-xixisetup.ilm.enabled: false
setup.template.name: "oldboyedu-modules"
setup.template.pattern: "oldboyedu-modules*"
setup.template.overwrite: false
setup.template.settings:index.number_of_shards: 3index.number_of_replicas: 0
[root@elk92 ~]# 5.启动Filebeat实例
[root@elk92 ~]# filebeat -e -c /etc/filebeat/config/07-modules-to-es.yaml
12. 基于Filebeat的模块分析nginx访问日志
- 测试数据:
access.log 链接: https://pan.baidu.com/s/1eHS1h33BxLja4_nxTY3n6g?pwd=cqku 提取码: cqku
# filebeat配置nginx模块文件
[root@elk92 ~]# egrep -v "^.*#|^$" /etc/filebeat/modules.d/nginx.yml
- module: nginxaccess:enabled: truevar.paths: ["/root/access.log*"]error:enabled: falsevar.paths: ["/var/log/nginx/error.log*"]ingress_controller:enabled: false
# 编写Filebeat配置文件
[root@elk92 ~]# cat /etc/filebeat/config/08-modules_nginx-to-es.yaml
filebeat.config.modules:path: ${path.config}/modules.d/nginx.ymlreload.enabled: trueoutput.elasticsearch:hosts: ["http://10.0.0.91:9200","http://10.0.0.92:9200","http://10.0.0.93:9200"]index: oldboyedu-modules-efk-nginxsetup.ilm.enabled: false
setup.template.name: "oldboyedu-modules"
setup.template.pattern: "oldboyedu-modules*"
setup.template.overwrite: false
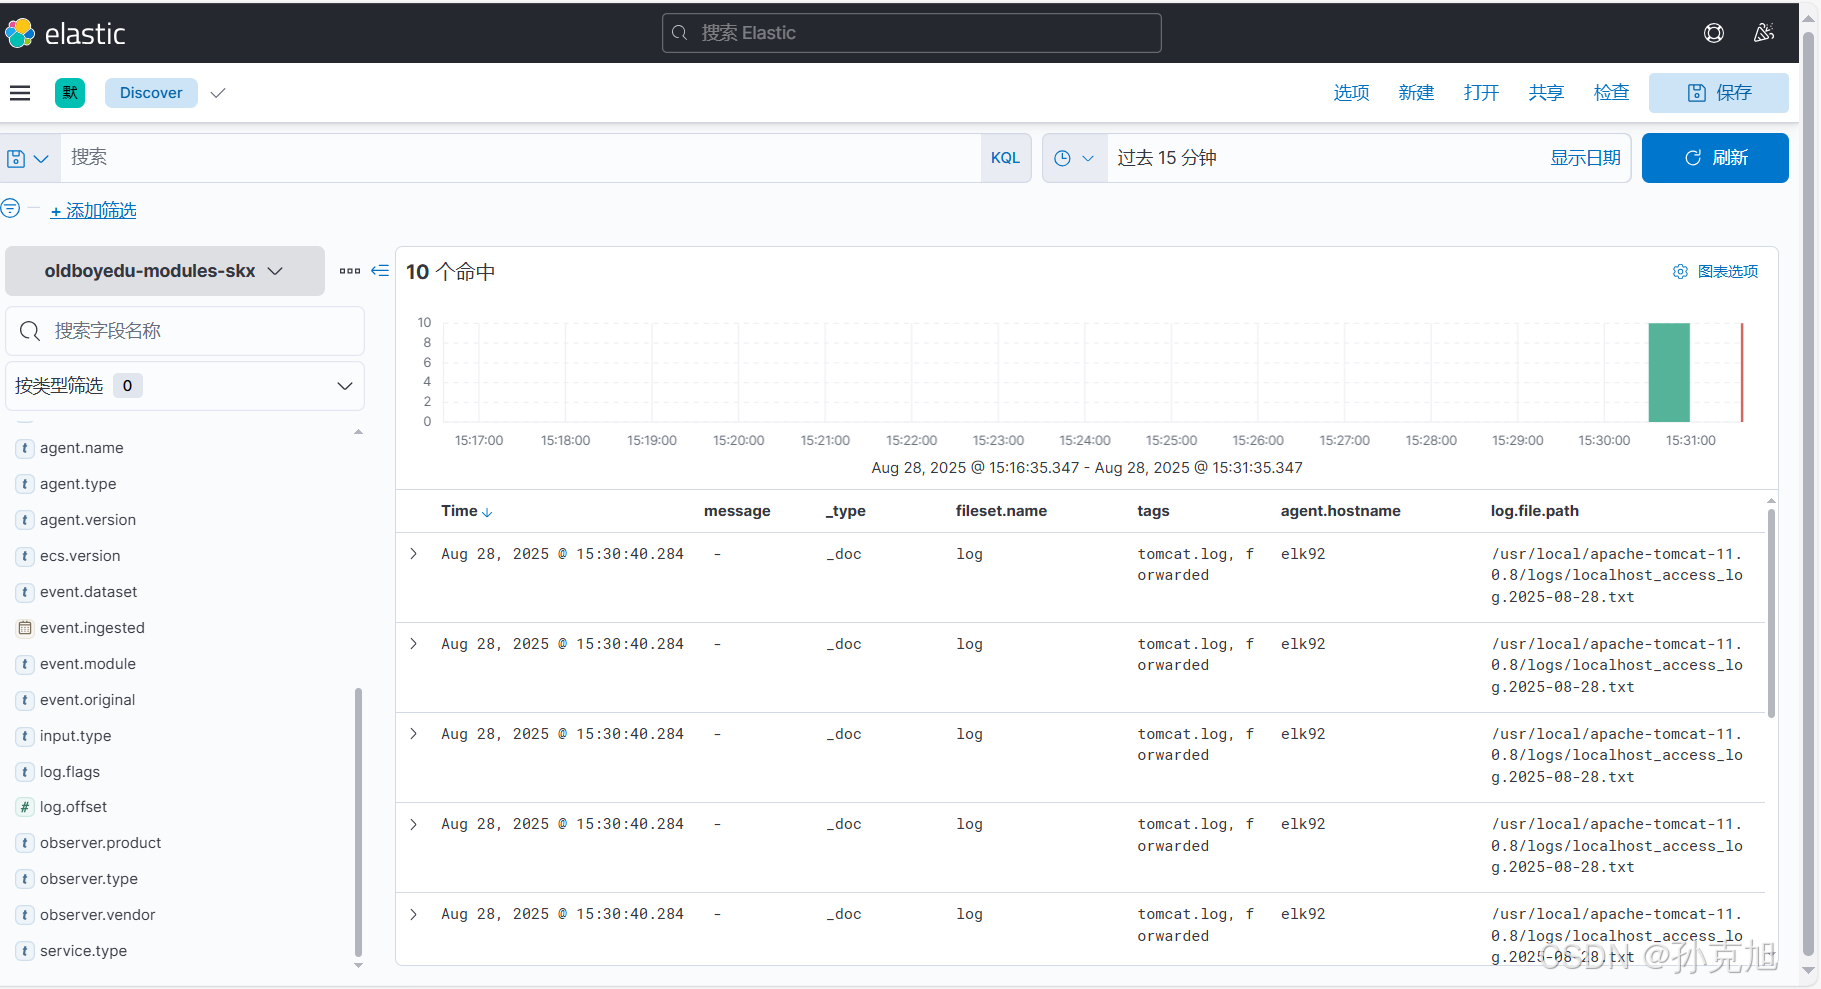
setup.template.settings:index.number_of_shards: 3index.number_of_replicas: 0# 启动Filebeat实例
[root@elk92 ~]# filebeat -e -c /etc/filebeat/config/08-modules_nginx-to-es.yaml
13. kibana可视化2
13.1 kibana统计全球用户分布图


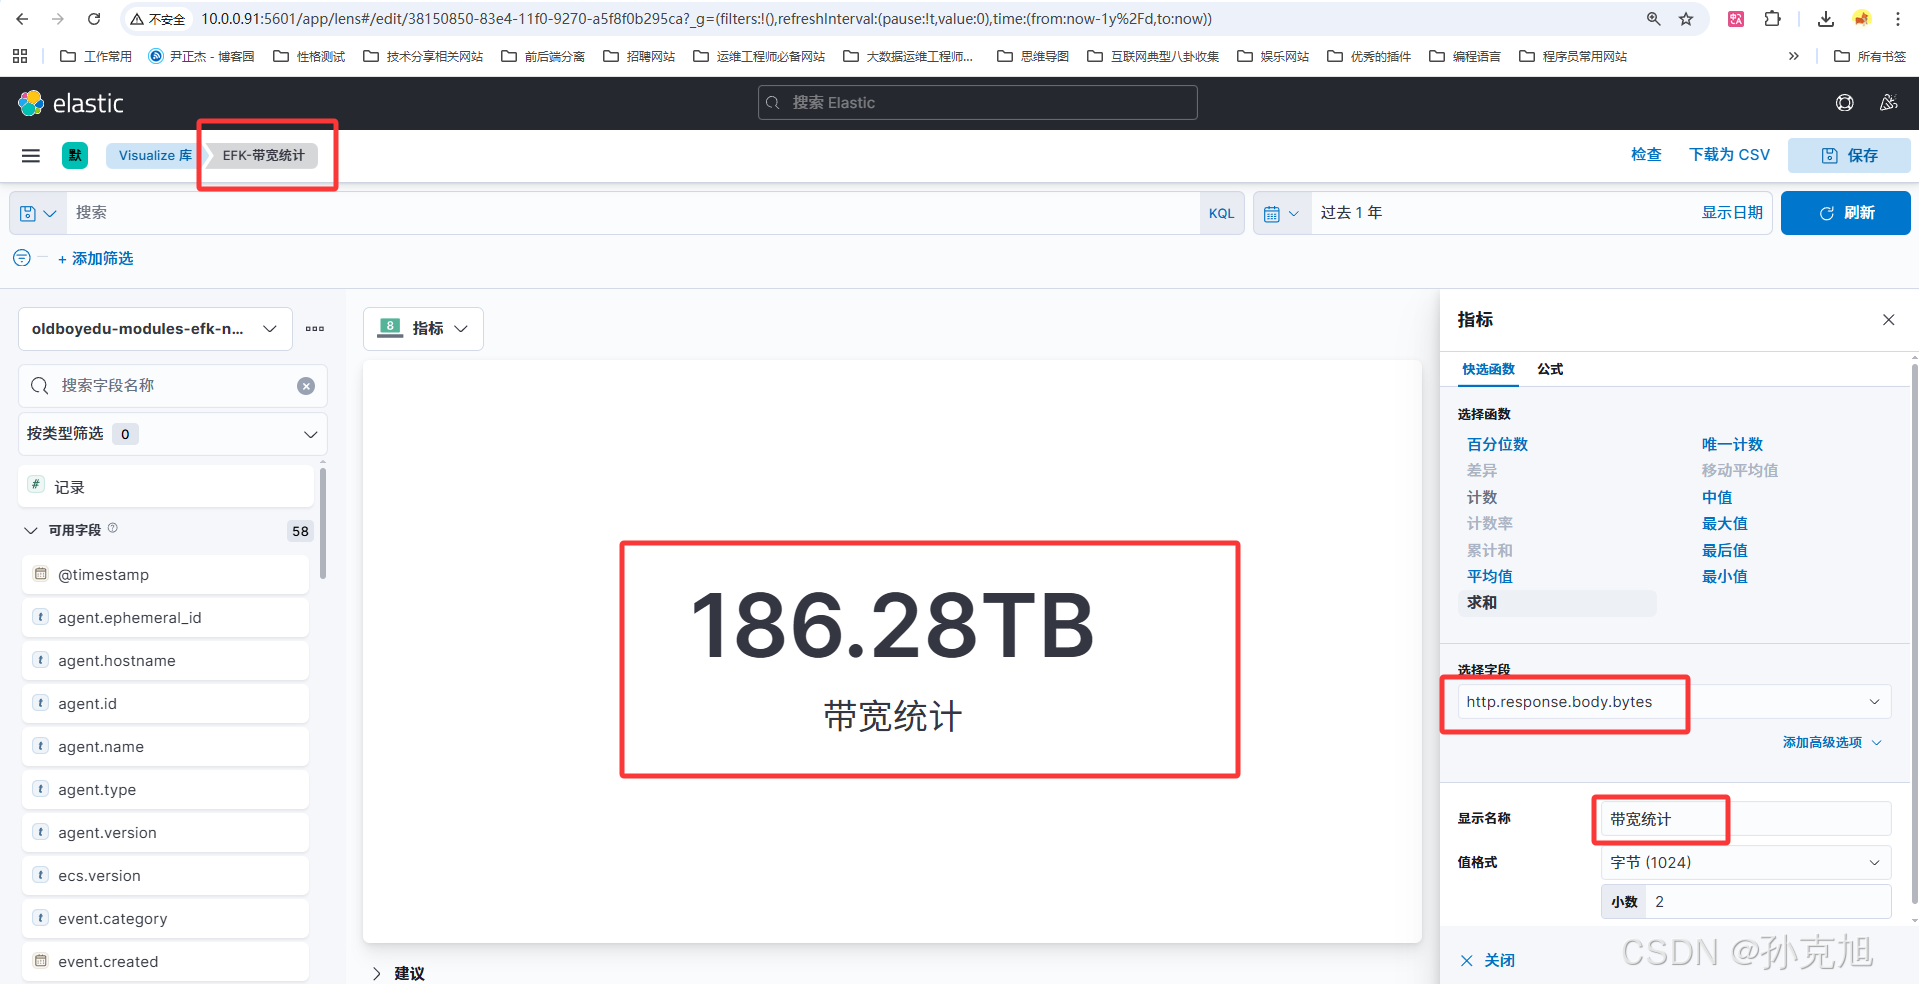
13.2 kibana统计带宽
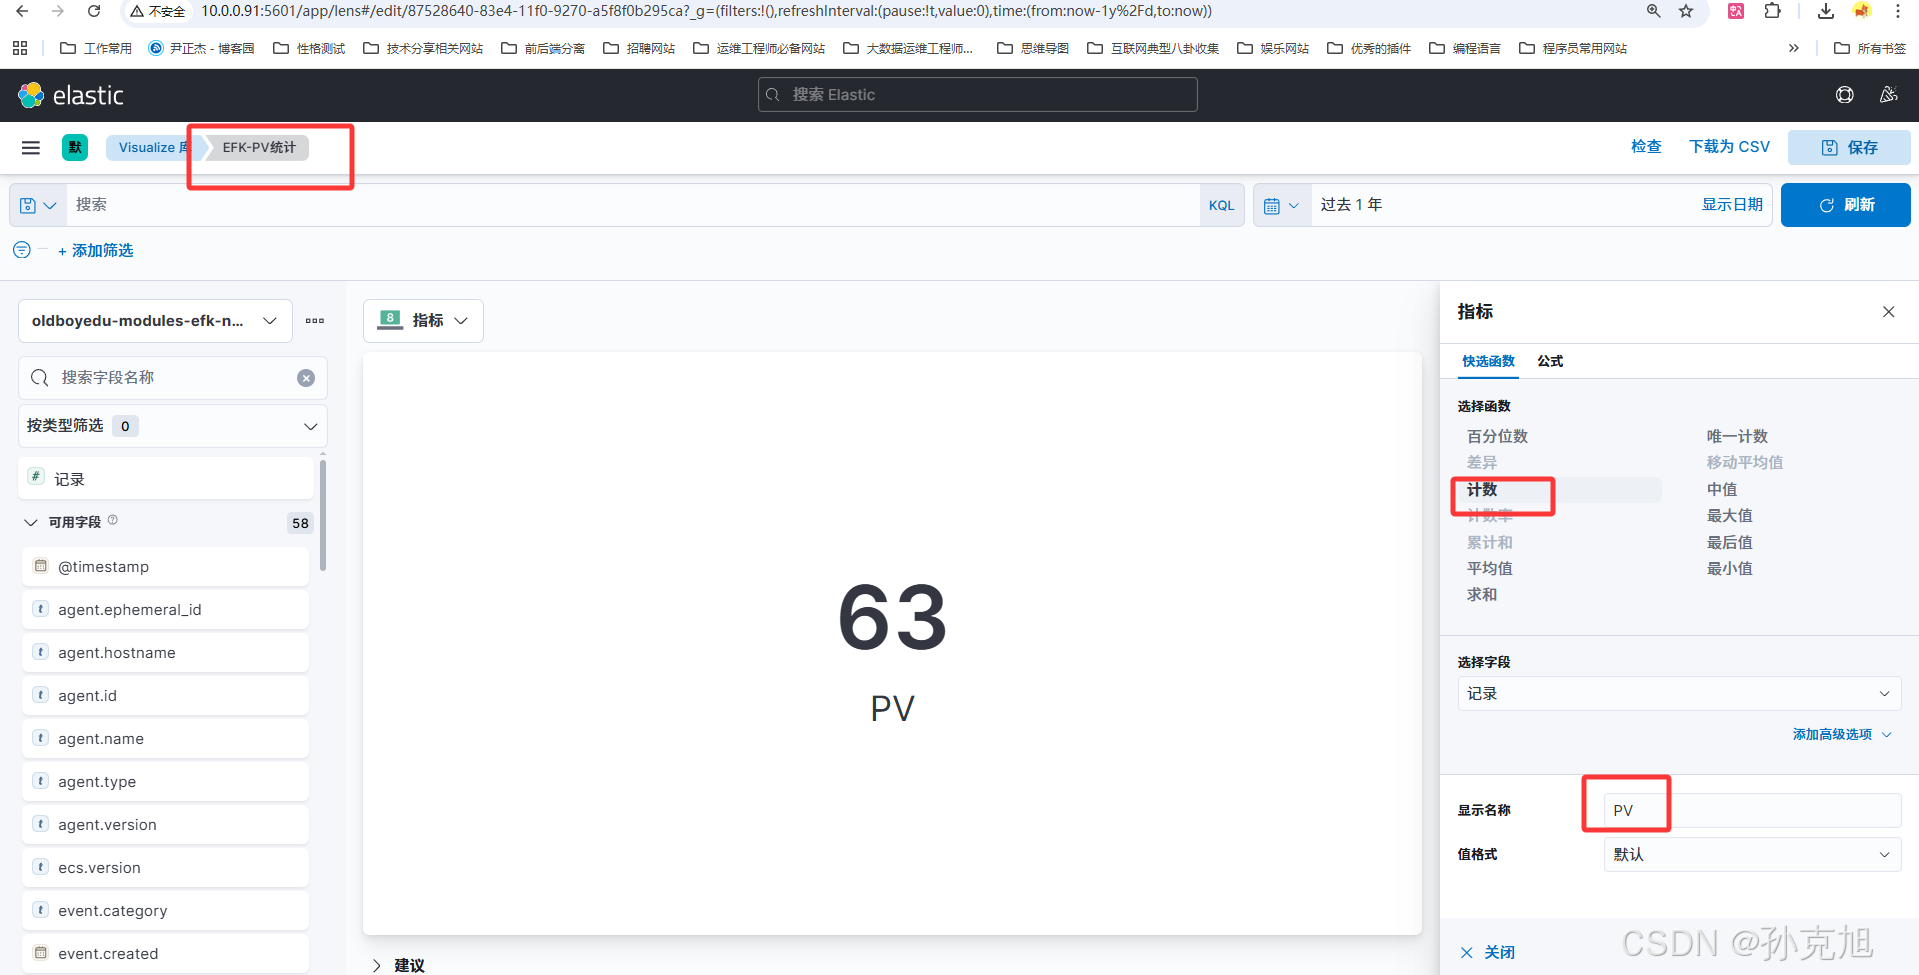
13.3 kibana统计PV
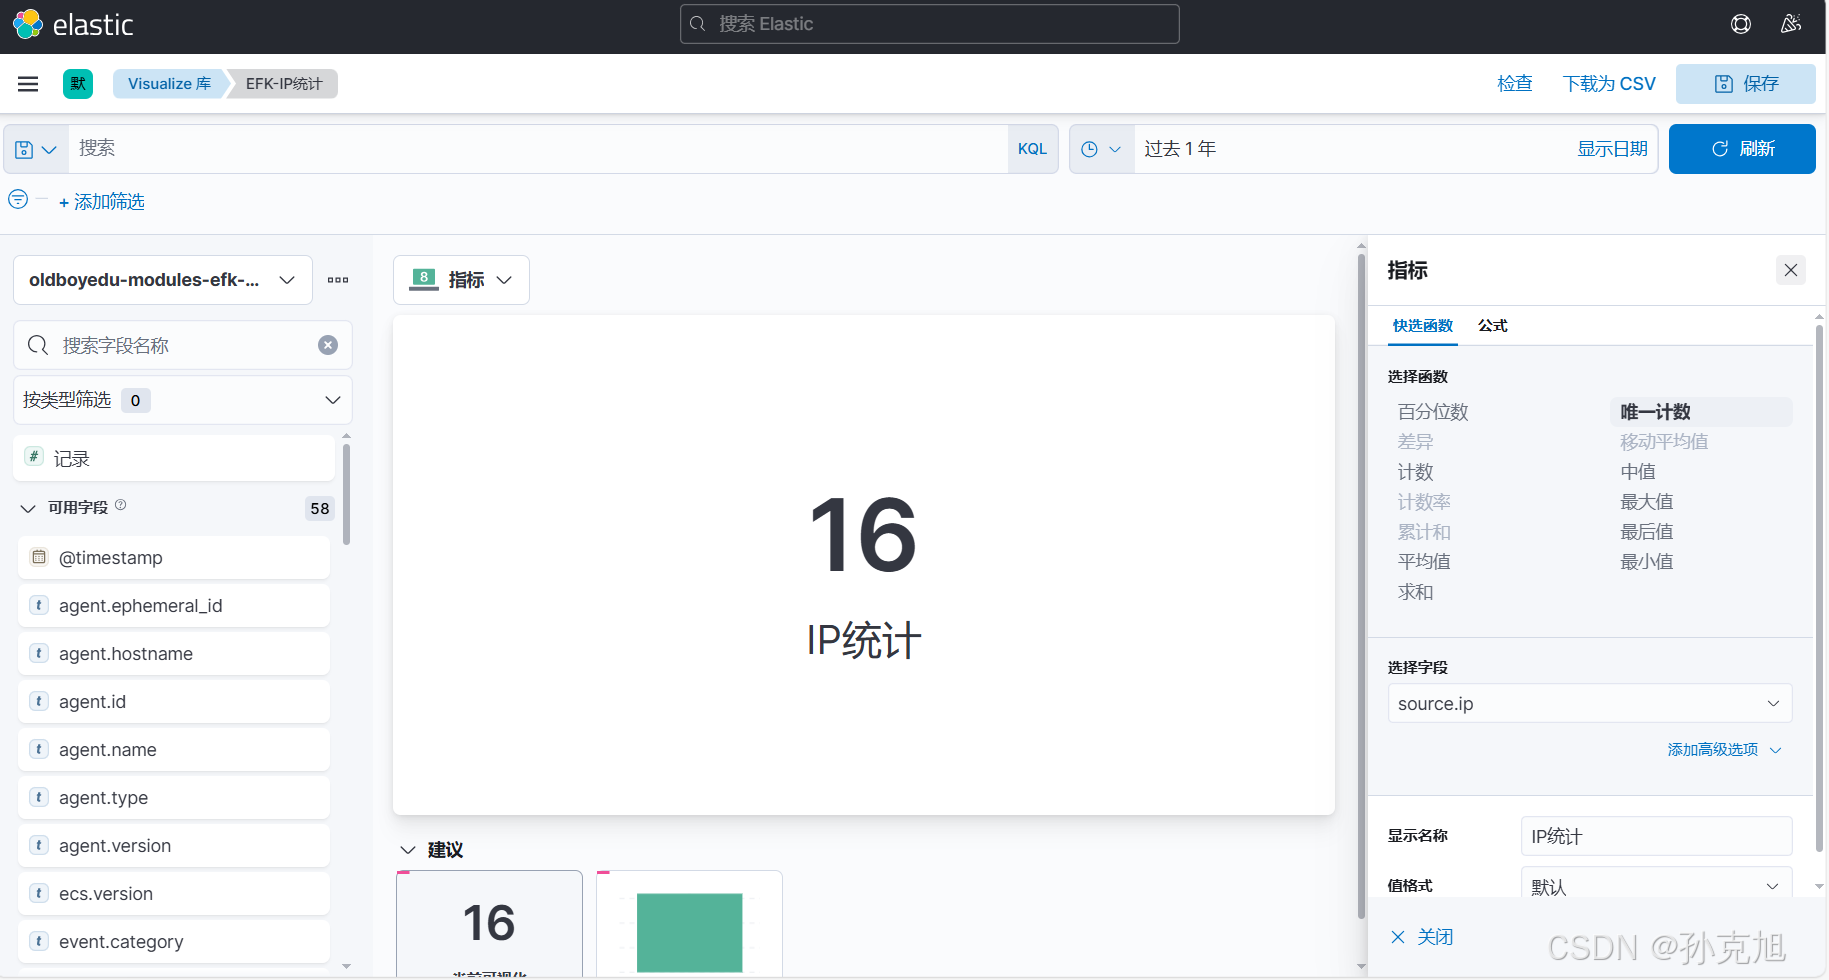
13.4 kibana统计IP
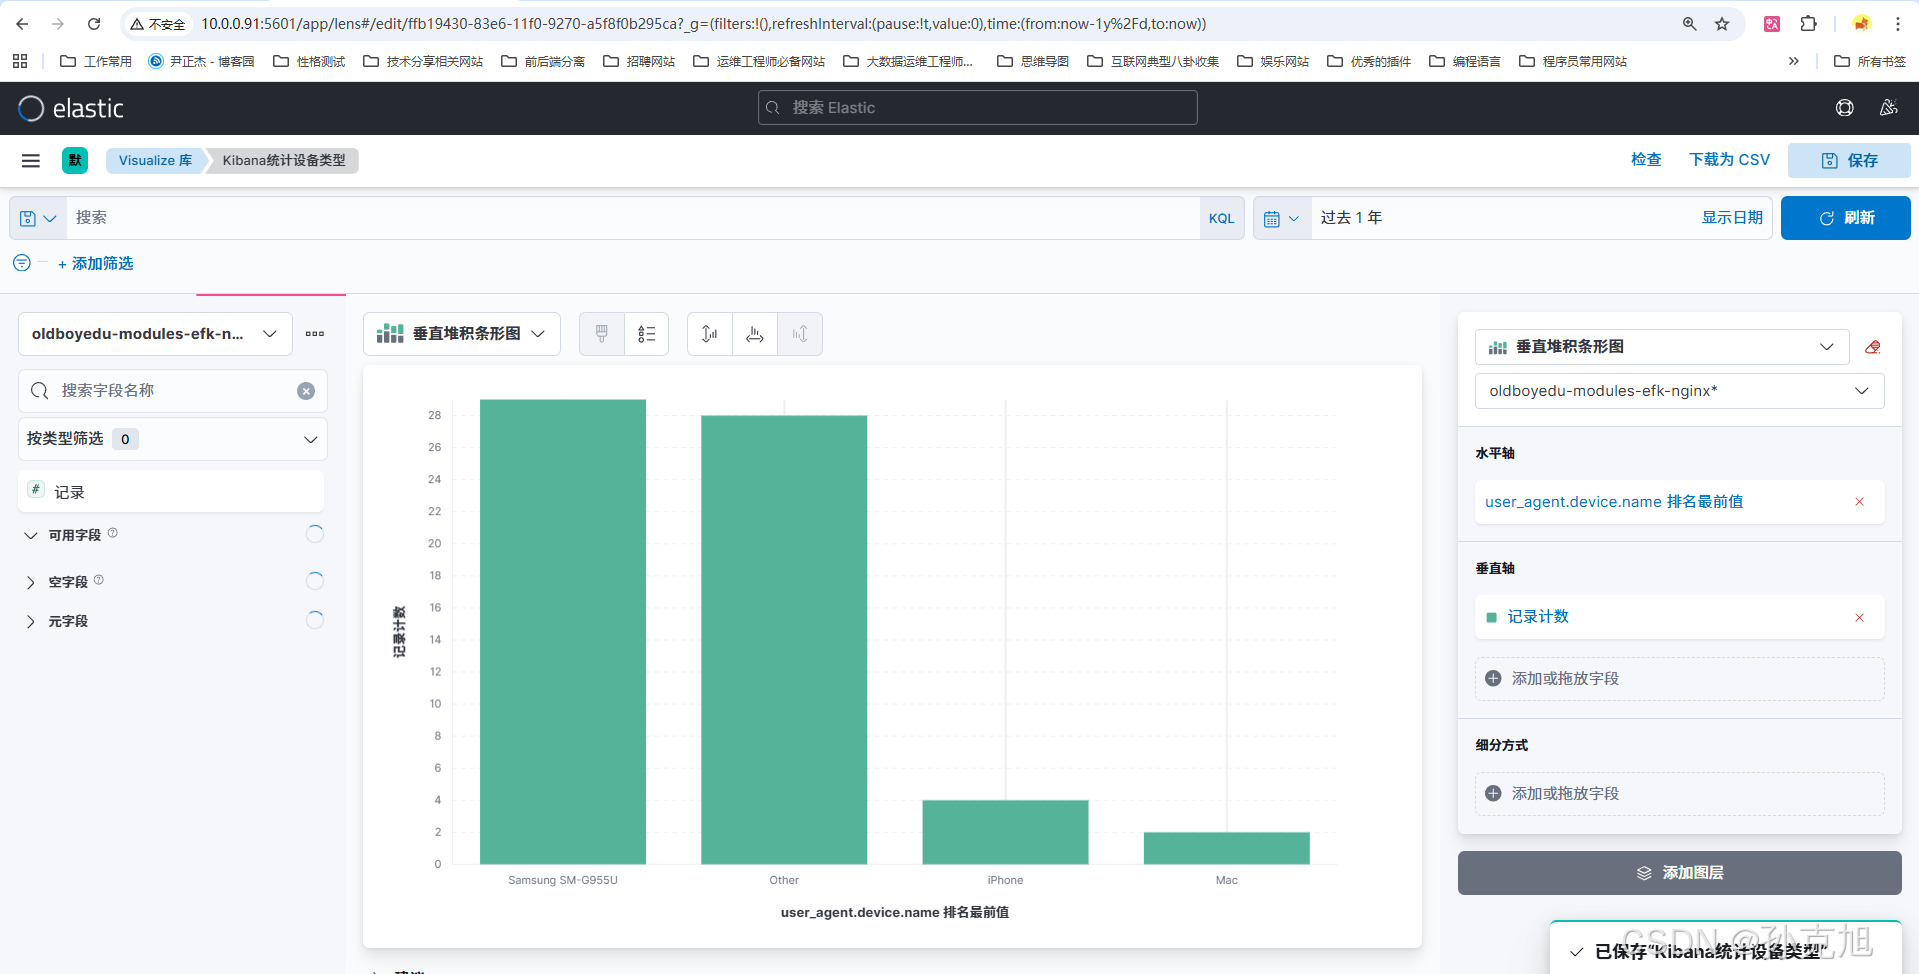
13.5 Kibana统计设备类型
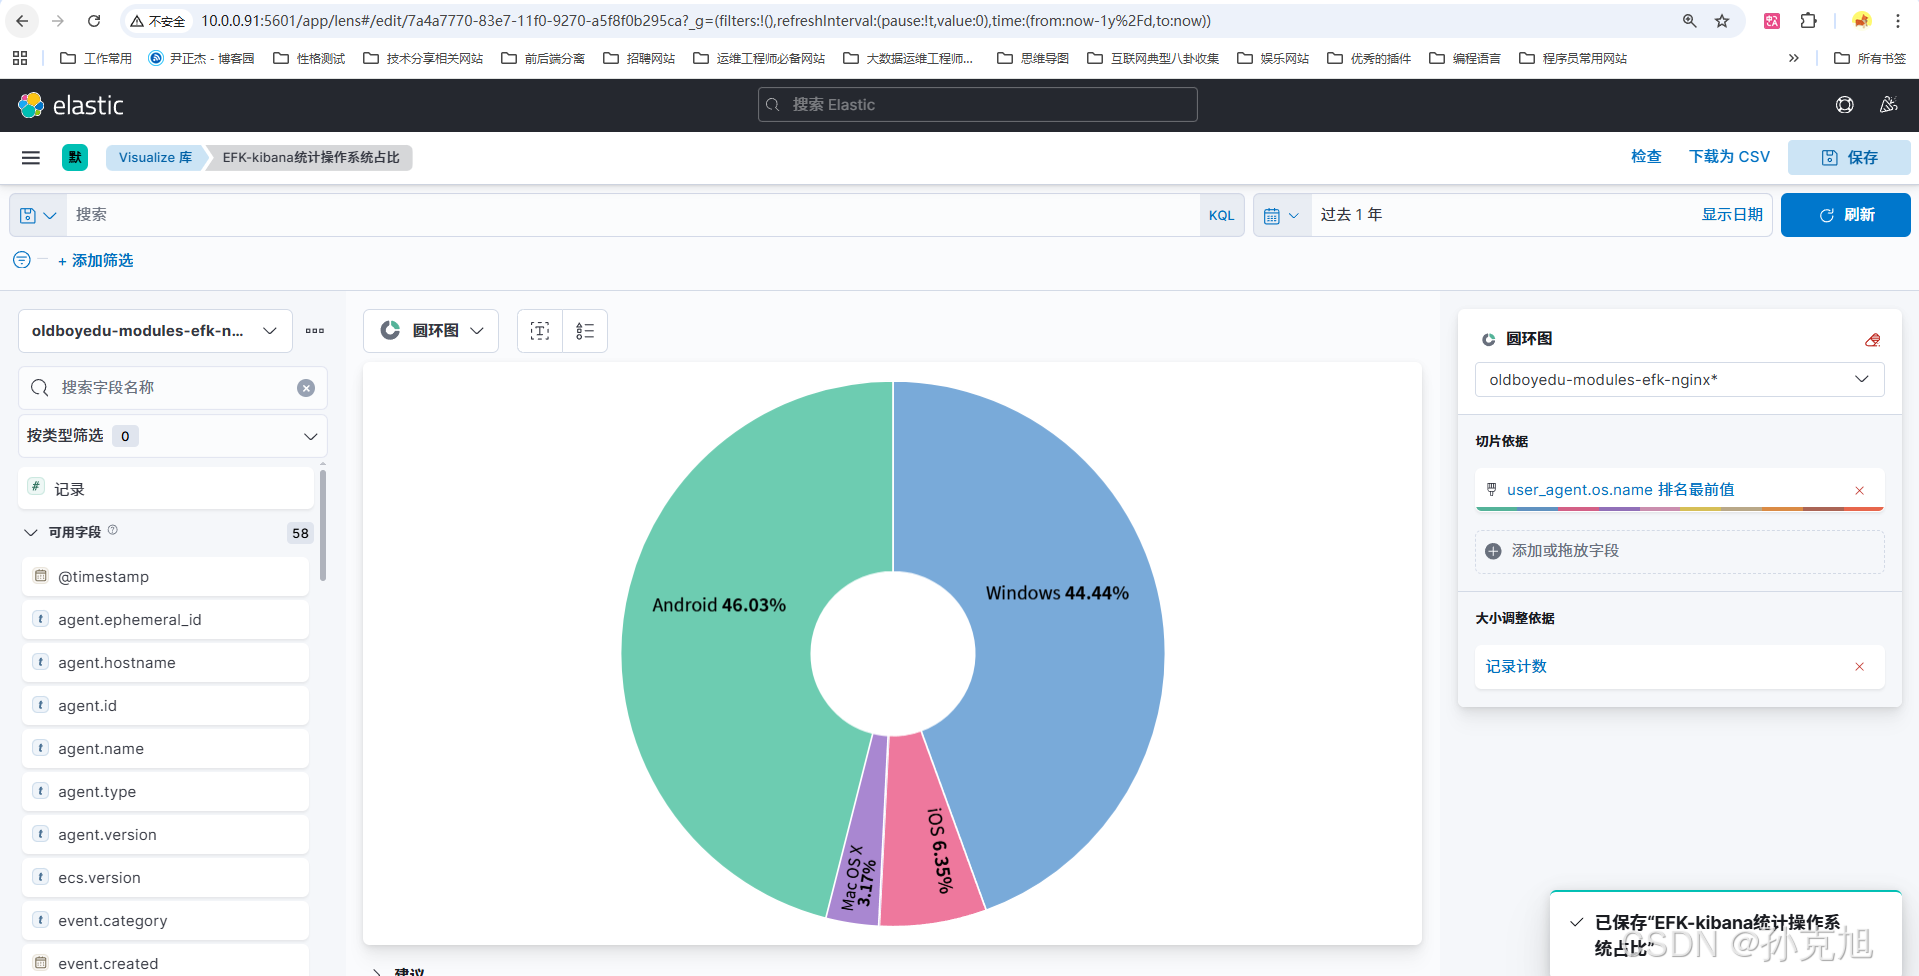
13.6 kibana统计操作系统占比
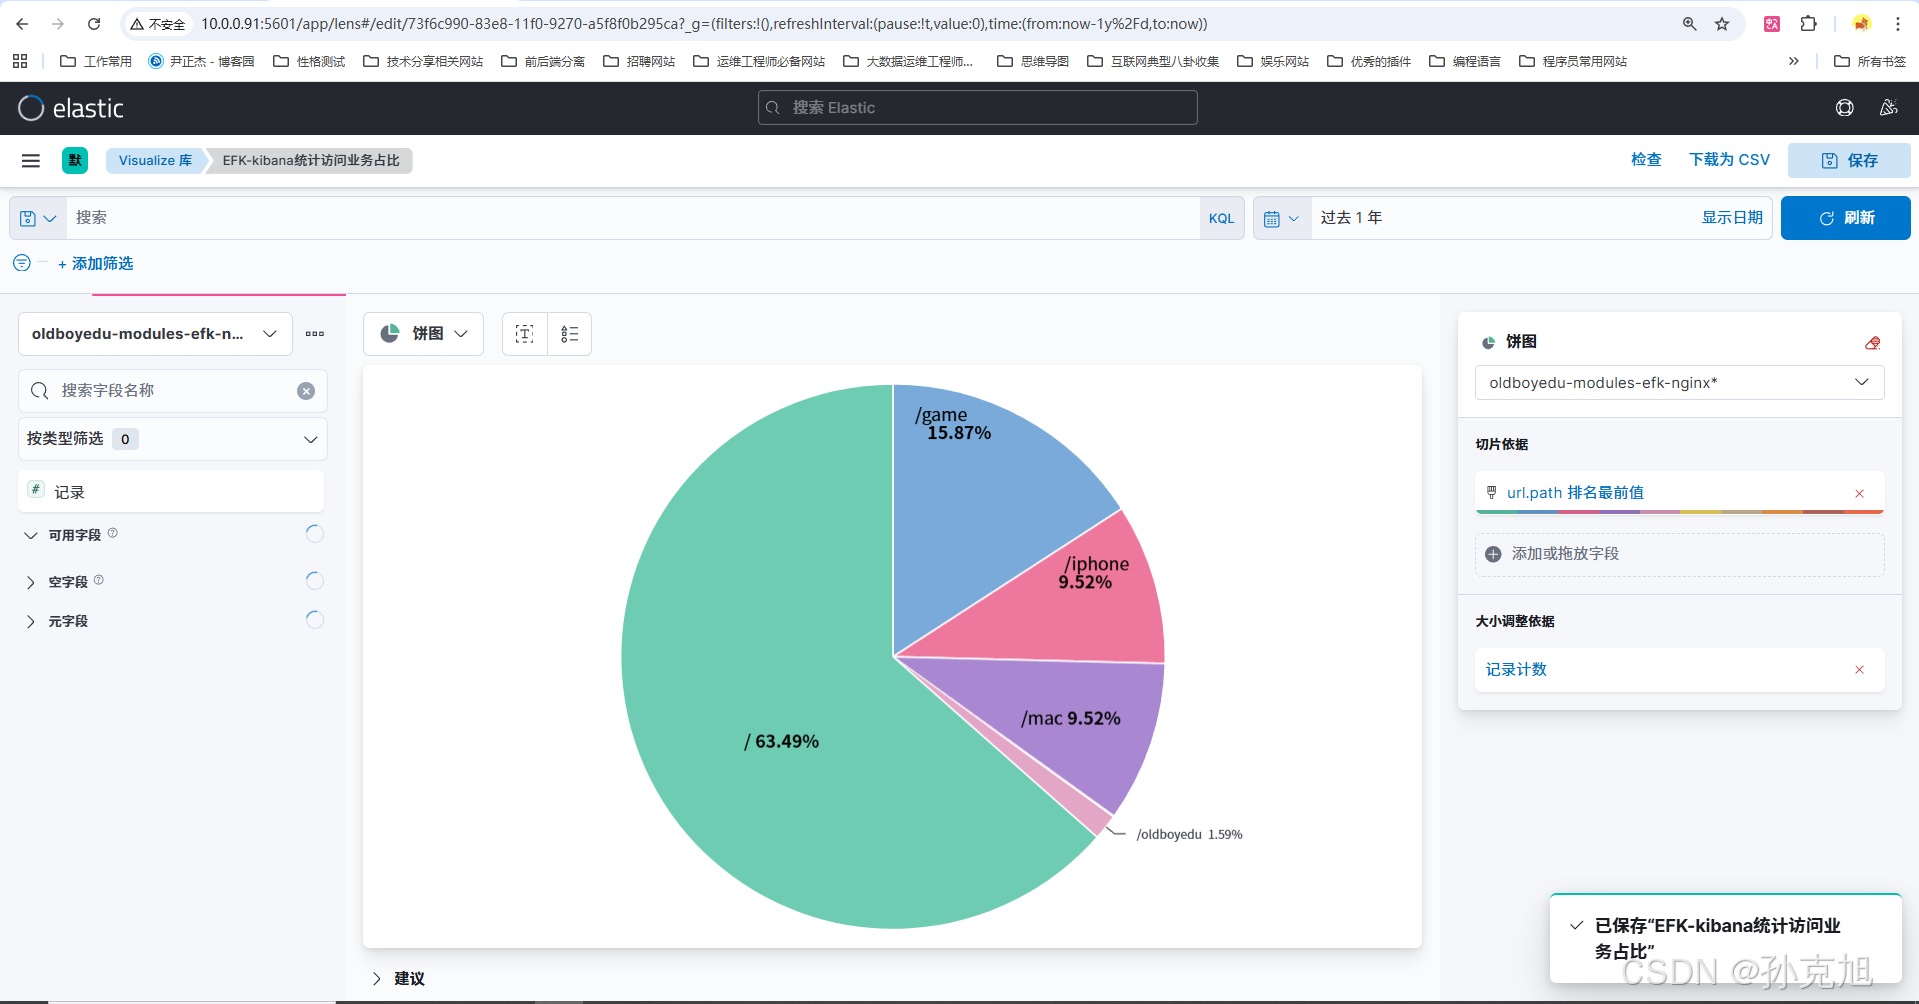
13.7 kibana统计访问业务占比
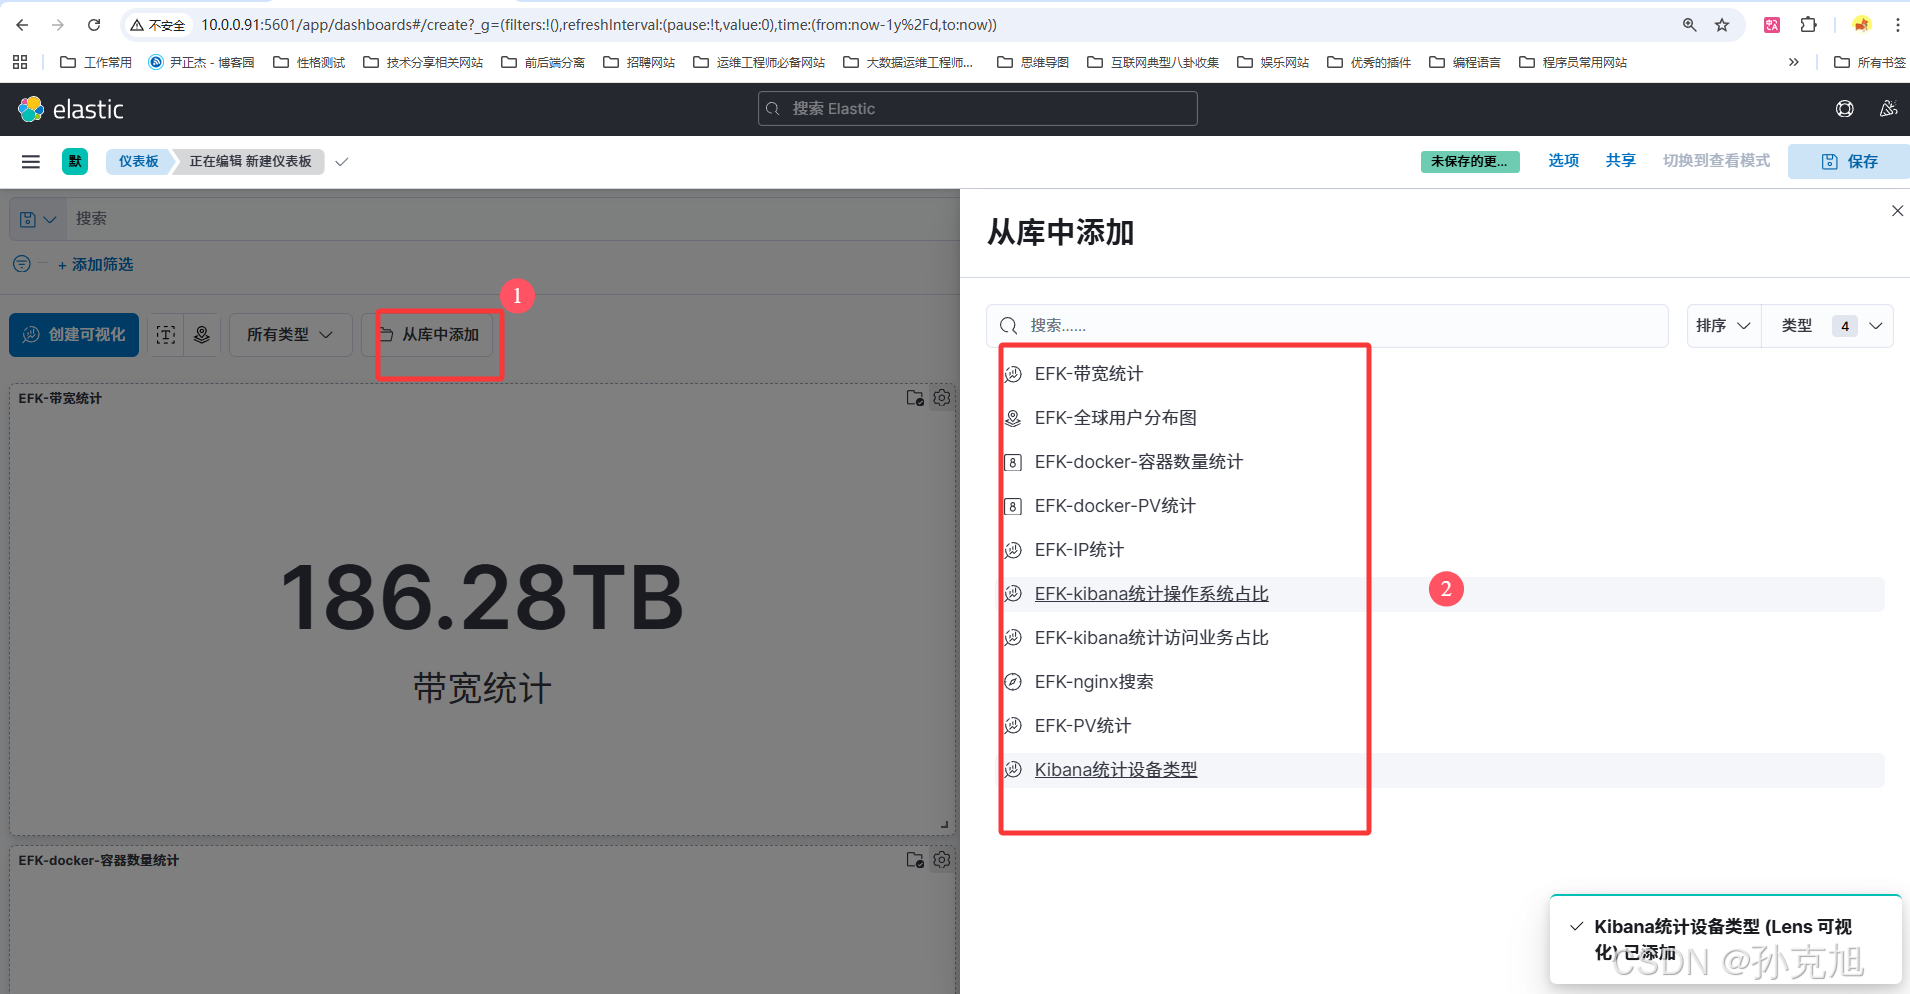
13.8 kibana仪表盘Dasboard制作

14. ElasticStack故障排查思路
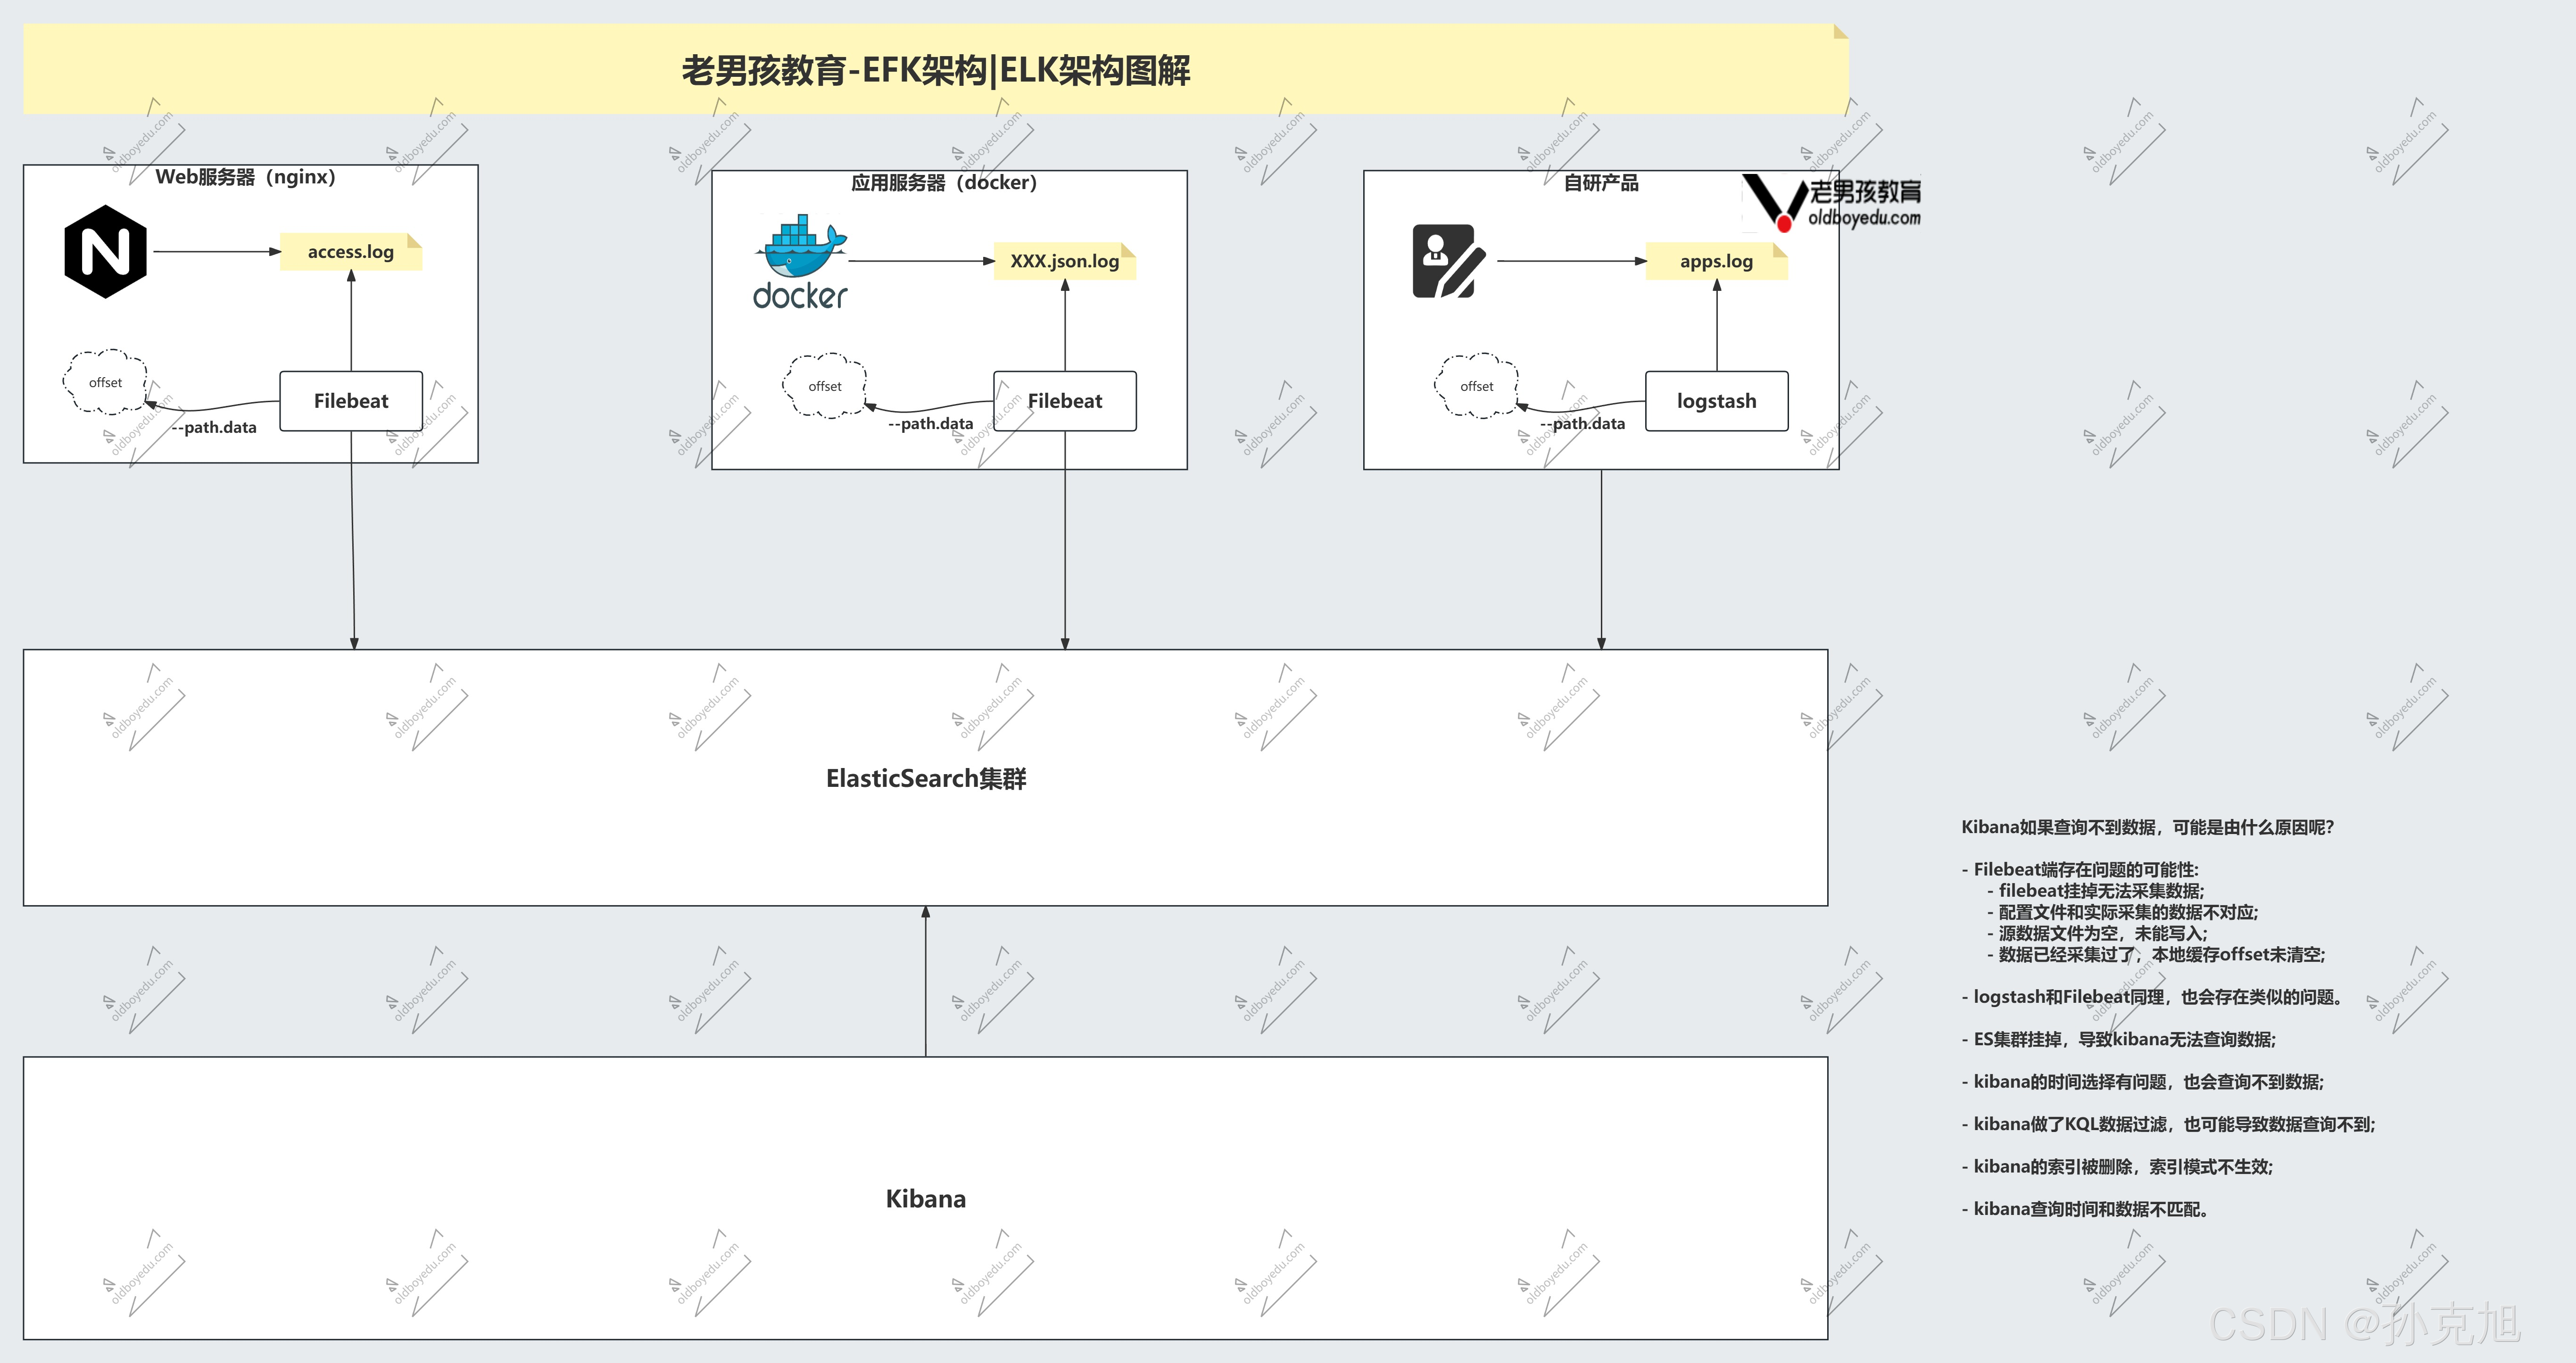
Kibana如果查询不到数据,可能是由什么原因呢?
-Filebeat端存在问题的可能性:-filebeat挂掉无法采集数据;-配置文件和实际采集的数据不对应;-源数据文件为空,未能写入;-数据已经采集过了:本地缓存offset未清空;
-logstash和Filebeat同理,也会存在类似的问题。
-ES集群挂掉,导致kibana无法查询数据;
-kibana的时间选择有问题,也会查询不到数据;
-kibana做了KQL数据过滤,也可能导致数据查询不到;
-kibana的索引被删除,索引模式不生效;
-kibana查询时间和数据不匹配。
15. 思维导图
https://kdocs.cn/join/gpuxq6r?f=101\r\n邀请你加入共享群「老男孩教育Linux运维99期-孙克旭」一起进行文档协作
16. Filebeat采集MySQL日志
- mysql数据目录:
/data/3306/data
16.1 编写Filebeat配置文件
# 1. 启用mysql模块
[root@db01 ~]# filebeat modules enable mysql
Enabled mysql# 2. 查询mysql日志路径mysql>  SHOW VARIABLES LIKE 'log_error';
+---------------+------------+
| Variable_name | Value      |
+---------------+------------+
| log_error     | ./db01.err |
+---------------+------------+
1 row in set (0.11 sec)在线临时开启慢查询(立即生效,重启后失效)
SET GLOBAL slow_query_log = 'ON';mysql> SHOW VARIABLES LIKE 'slow_query_log_file';
+---------------------+-------------------------------+
| Variable_name       | Value                         |
+---------------------+-------------------------------+
| slow_query_log_file | /data/3306/data/db01-slow.log |
+---------------------+-------------------------------+
1 row in set (0.00 sec)# 2. 编辑mysql模块配置文件
[root@db01 ~]# grep -Ev '^.*#|^$' /etc/filebeat/modules.d/mysql.yml
- module: mysqlerror:enabled: truevar.paths: ["/data/3306/data/db01.err"]slowlog:enabled: truevar.paths: ["/data/3306/data/db01-slow.log"]# 3. 编辑filebeat数据采集配置文件
[root@db01 ~]# cat /etc/filebeat/config/03-mysql-to-es.yaml
filebeat.config.modules:path: ${path.config}/modules.d/mysql.ymlreload.enabled: trueoutput.elasticsearch:hosts: ["http://10.0.0.91:9200","http://10.0.0.92:9200","http://10.0.0.93:9200"]index: oldboy-module-mysql-testsetup.ilm.enabled: false
setup.template.name: "oldboy-module-mysql"
setup.template.pattern: "oldboy-module-mysql*"
setup.template.overwrite: false
setup.template.settings:index.number_of_shards: 3index.number_of_replicas: 0# 4. 启动filebeat
[root@db01 ~]# filebeat -e -c /etc/filebeat/config/03-mysql-to-es.yaml
16.2 kibana查询数据
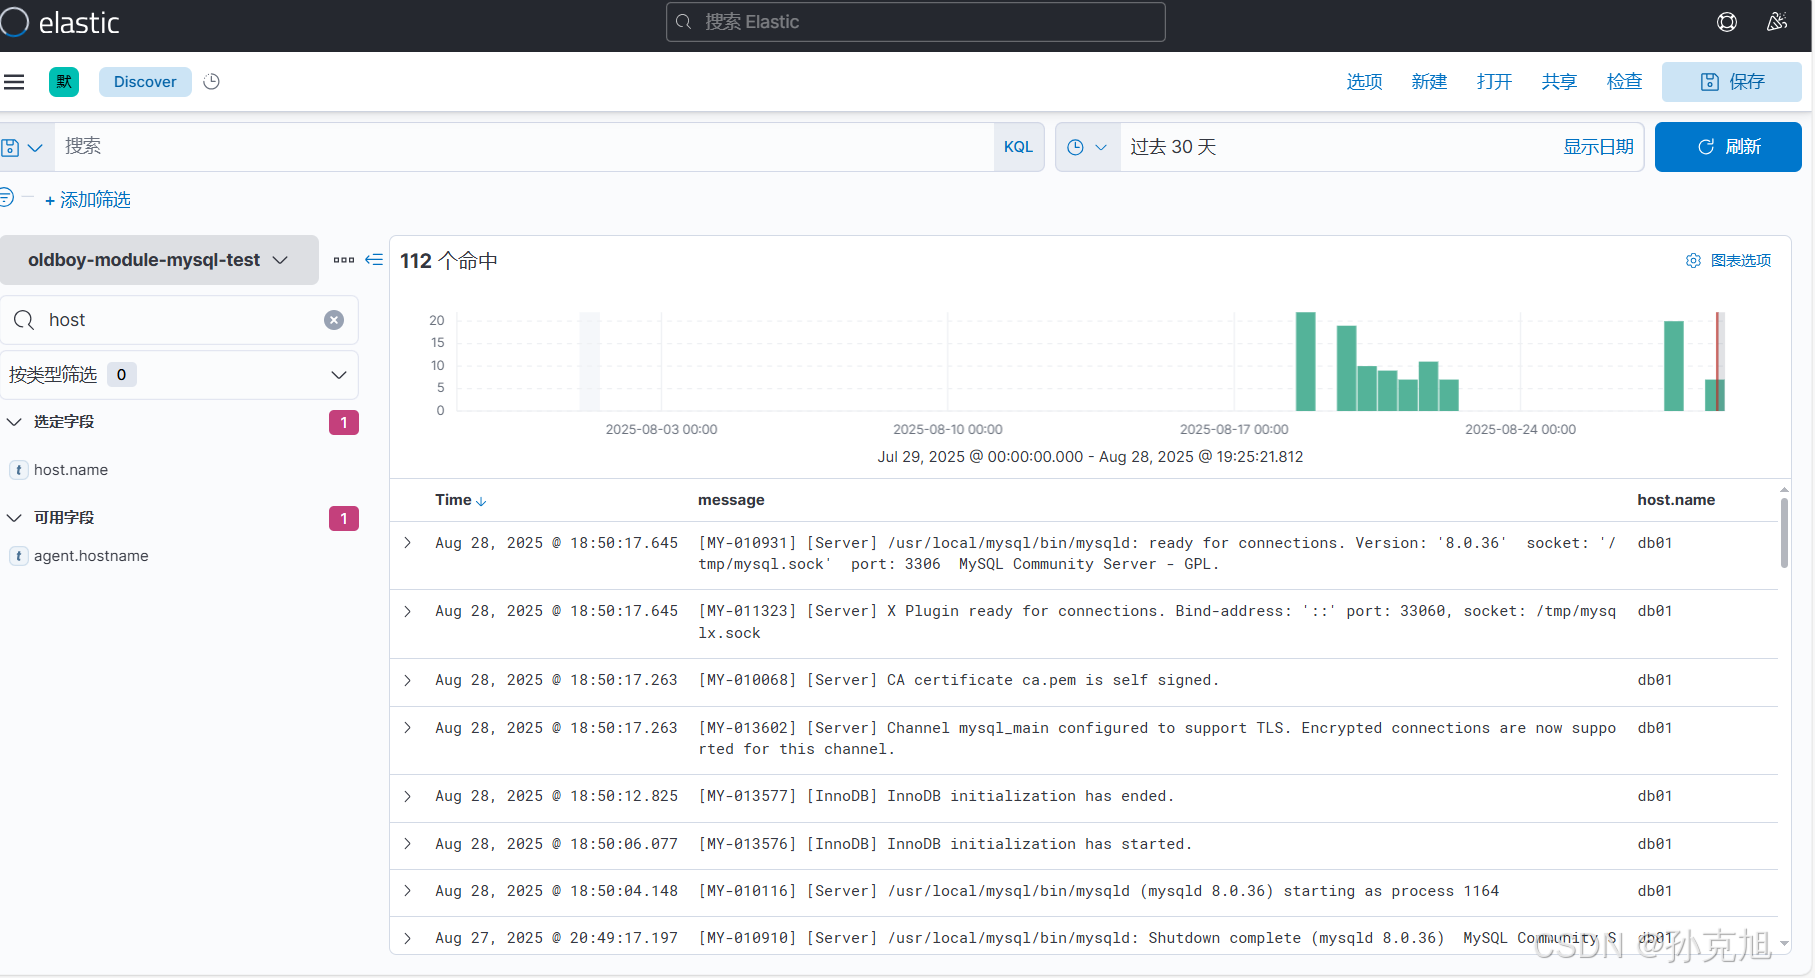
17. Filebeat采集Linux的系统日志
- /var/log/syslog
- /var/log/auth.log
- /var/log/bootstrap.log
17.1 编辑filebeat配置文件
# 1.启动系统数据采集模块
[root@elk93 ~]# filebeat modules enable system
Enabled system
[root@elk93 ~]# filebeat modules list |head
Enabled:
system
……# 2.编辑模块文件
[root@elk93 ~]# grep -Ev '^.*#|^$' /etc/filebeat/modules.d/system.yml
- module: systemsyslog:enabled: truevar.paths: ["/var/log/syslog","/var/log/bootstrap.log"]auth:enabled: truevar.paths: ["/var/log/auth.log"]# 3.编辑配置文件
[root@elk93 /etc/filebeat/conf]# cat 01-syslog2es.yaml
filebeat.config.modules:path: ${path.config}/modules.d/system.ymlreload.enabled: trueoutput.elasticsearch:hosts: ["http://10.0.0.91:9200","http://10.0.0.92:9200","http://10.0.0.93:9200"]index: oldboy-module-system-testsetup.ilm.enabled: false
setup.template.name: "oldboy-module-system"
setup.template.pattern: "oldboy-module-system*"
setup.template.overwrite: false
setup.template.settings:index.number_of_shards: 3index.number_of_replicas: 0# 4.启动filebeat
filebeat -e -c /etc/filebeat/conf/01-syslog2es.yaml
17.2 kibana查询数据
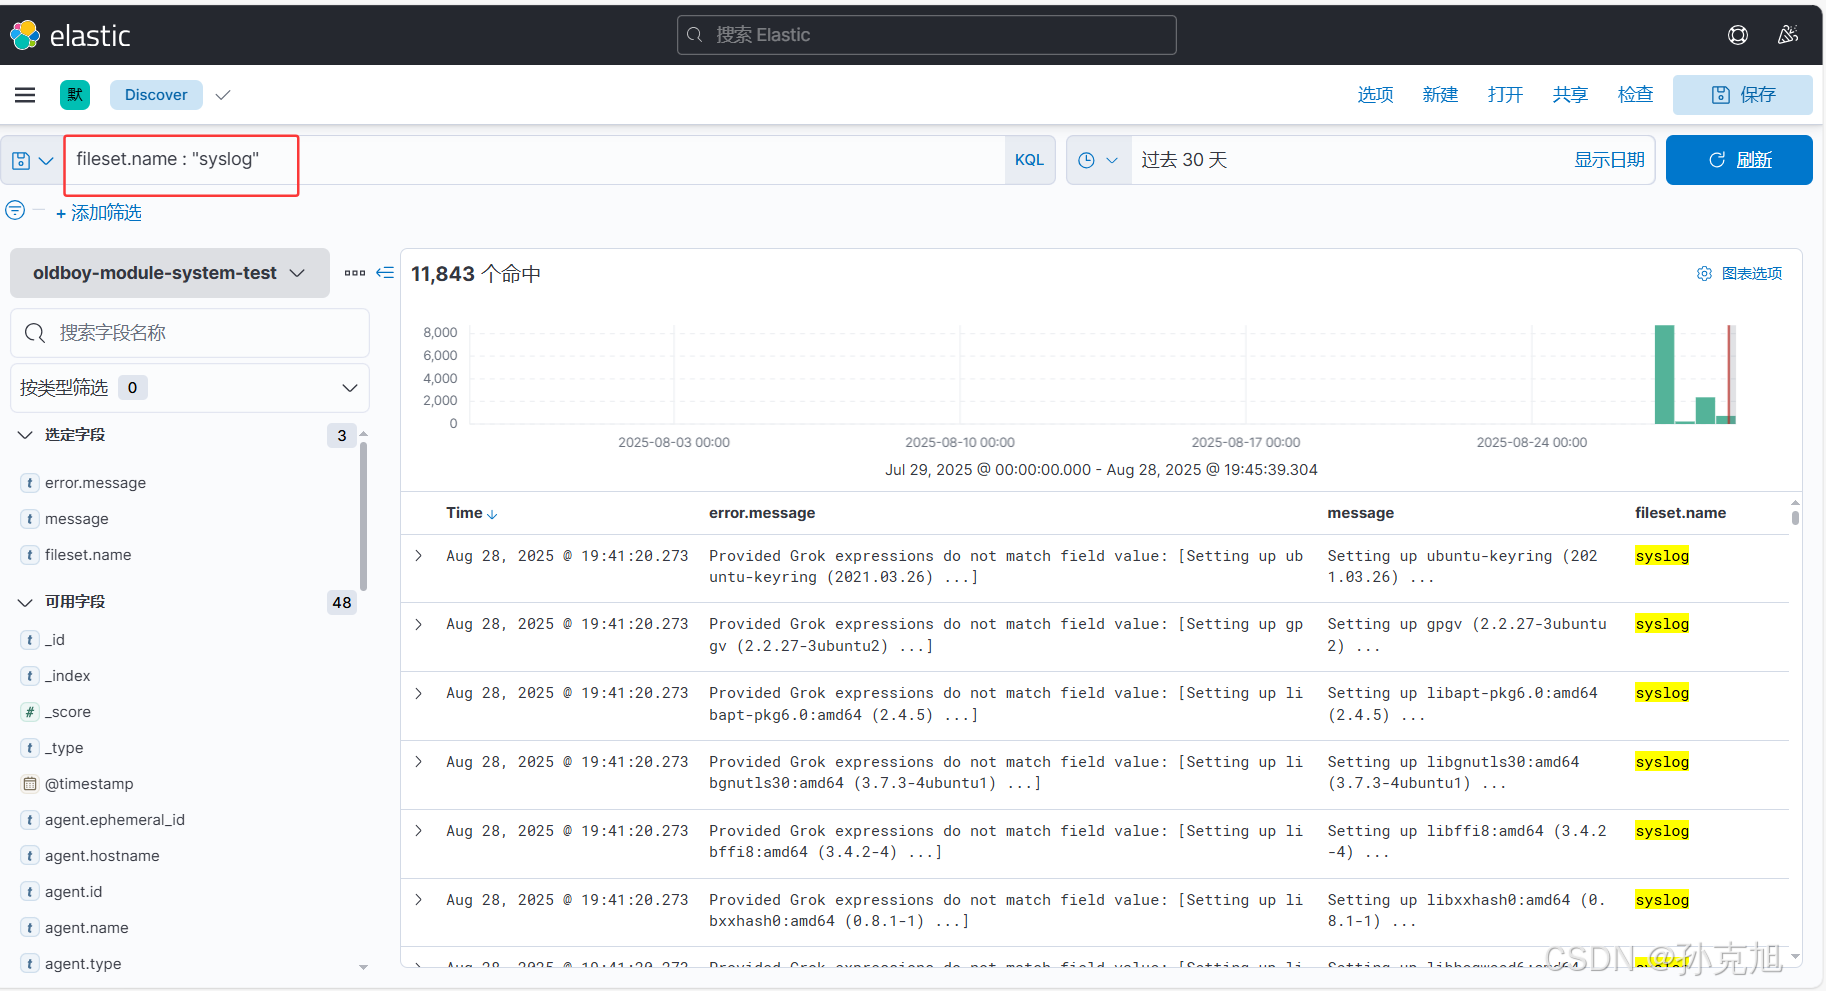
18. 在Ubuntu系统部署KVM,并使用KVM部署麒麟系统安装ES单点服务测试
- 参考资料:
https://www.cnblogs.com/yinzhengjie/tag/KVM/ [虚拟化技术概述及KVM虚拟机环境部署 - 尹正杰 - 博客园](https://www.cnblogs.com/yinzhengjie/p/14354730.html)
18.1 部署kvm虚拟机-centos7.9
- 开启虚拟机虚拟化技术
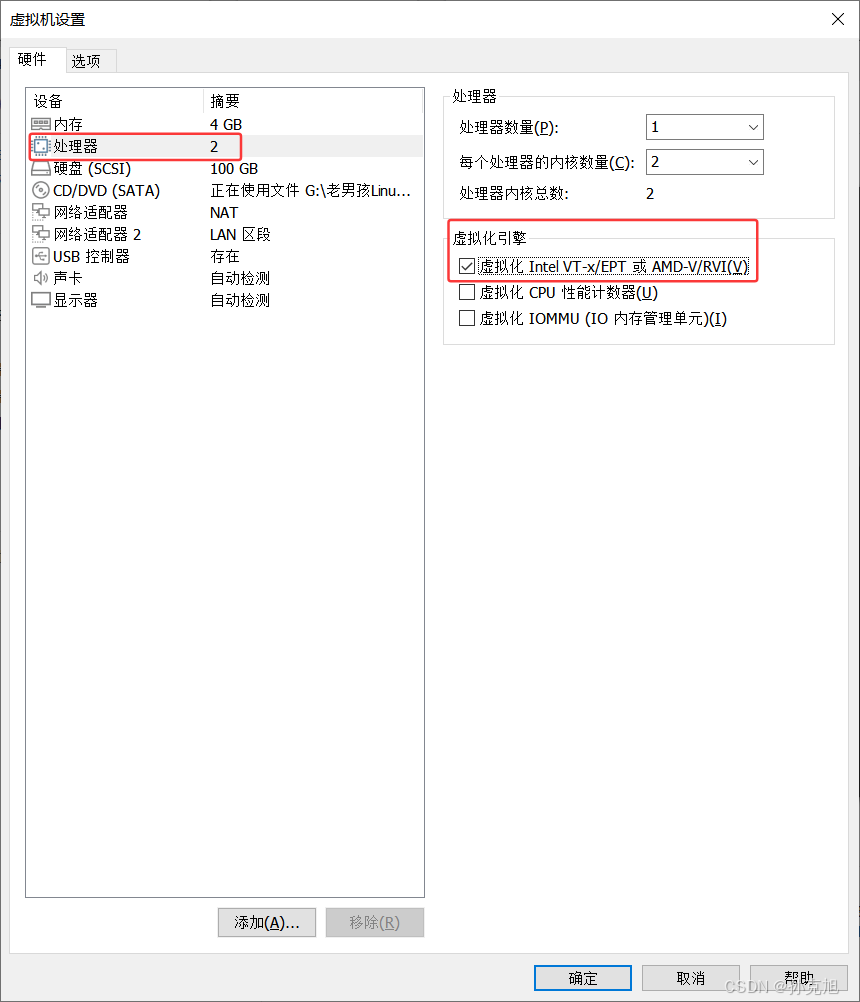
- 安装软件
1.判断CPU是否支持硬件虚拟化
lscpu  | grep Virtualization:
egrep 'svm|vmx'  /proc/cpuinfo  # 有几颗CPU就会显示几次vmx指令哟。2.检查KVM模块是否加载
lsmod | grep kvm3.安装软件包
[root@ceph141 ~]# apt-get -y install qemu-kvm libvirt-daemon-system libvirt-clients bridge-utils virtinst相关软件包说明:qemu-kvm:对于qemu,kvm、xen等虚拟磁盘格式是通用的。我们的KVM是基于qemu的磁盘技术做了一个优化,我们可以使用该工具来管理磁盘。安装该软件包会自动帮咱们安装"qemu-img"工具包,其作用就是滚利虚拟机的虚拟磁盘。libvirt-daemon-system :给虚拟机安装操作系统的工具包。libvirt-clients:一款通用的虚拟机管理软件,不仅仅能够操作kvm虚拟机,也可以操作xen,qemu的虚拟机。libvirt能够管理虚拟机的生命周期,比如开机,关机,重启等操作。bridge-utils:网络桥接工具包。  4.启动服务
systemctl enable --now libvirtd
systemctl status libvirtd5.查看虚拟网络
[root@ceph141 ~]# virsh net-list Name      State    Autostart   Persistent
--------------------------------------------default   active   yes         yes[root@ceph141 ~]# 6.查看虚拟主机
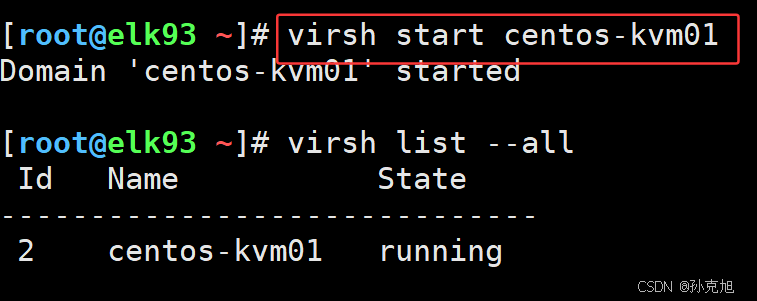
[root@ceph141 ~]# virsh list --all  # 目前来说还没有部署虚拟机Id   Name   State
- 导入系统镜像
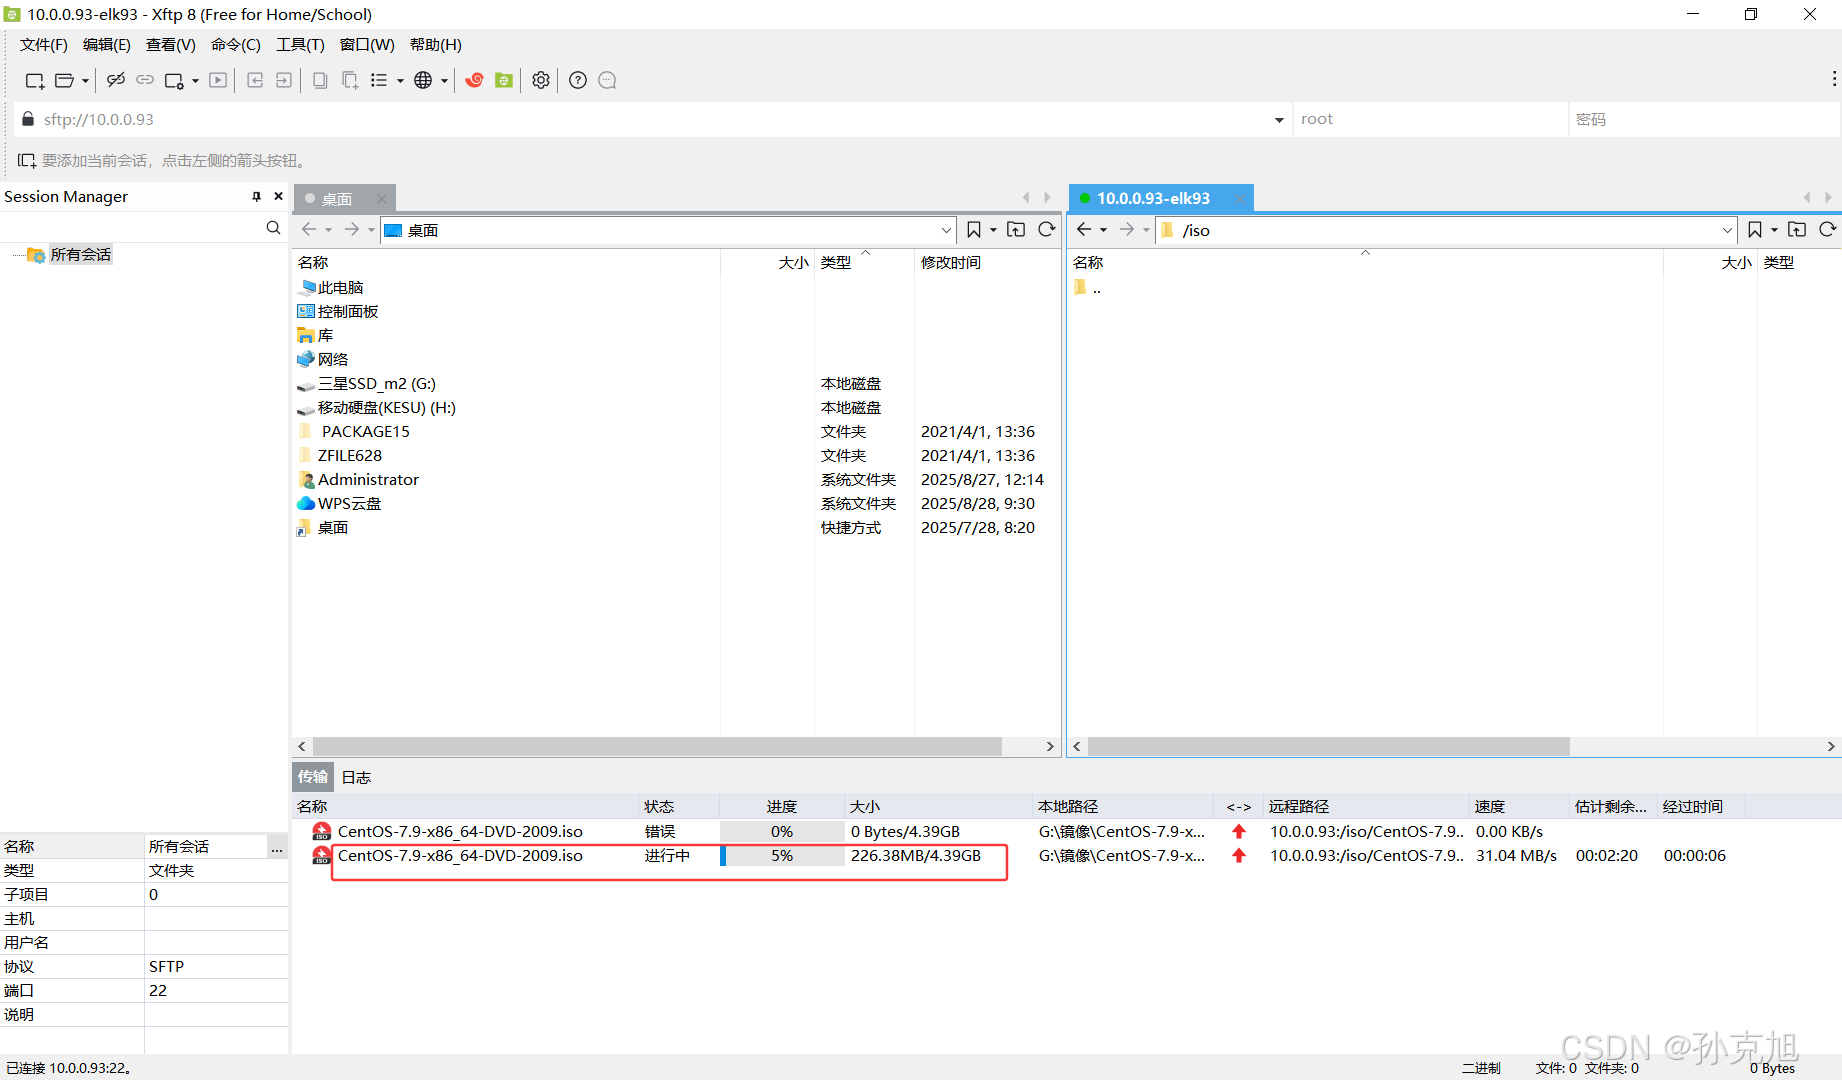
- 启动虚拟机
1.启动虚拟机
virt-install --virt-type kvm \--os-type=linux \--os-variant centos7 \--name centos-kvm01 \--memory 2048 \--vcpus 2 \--disk /opt/kvm01.raw,format=raw,size=10 \--cdrom /iso/CentOS-7.9-x86_64-DVD-2009.iso \--network  network=default \--graphics vnc,listen=0.0.0.0 \--noautoconsole# 可以查看可使用的虚拟机版本
[root@elk93 ~]# virt-install --osinfo list
almalinux9
almalinux8
alpinelinux3.21
alpinelinux3.20
alpinelinux3.19
alpinelinux3.18
……
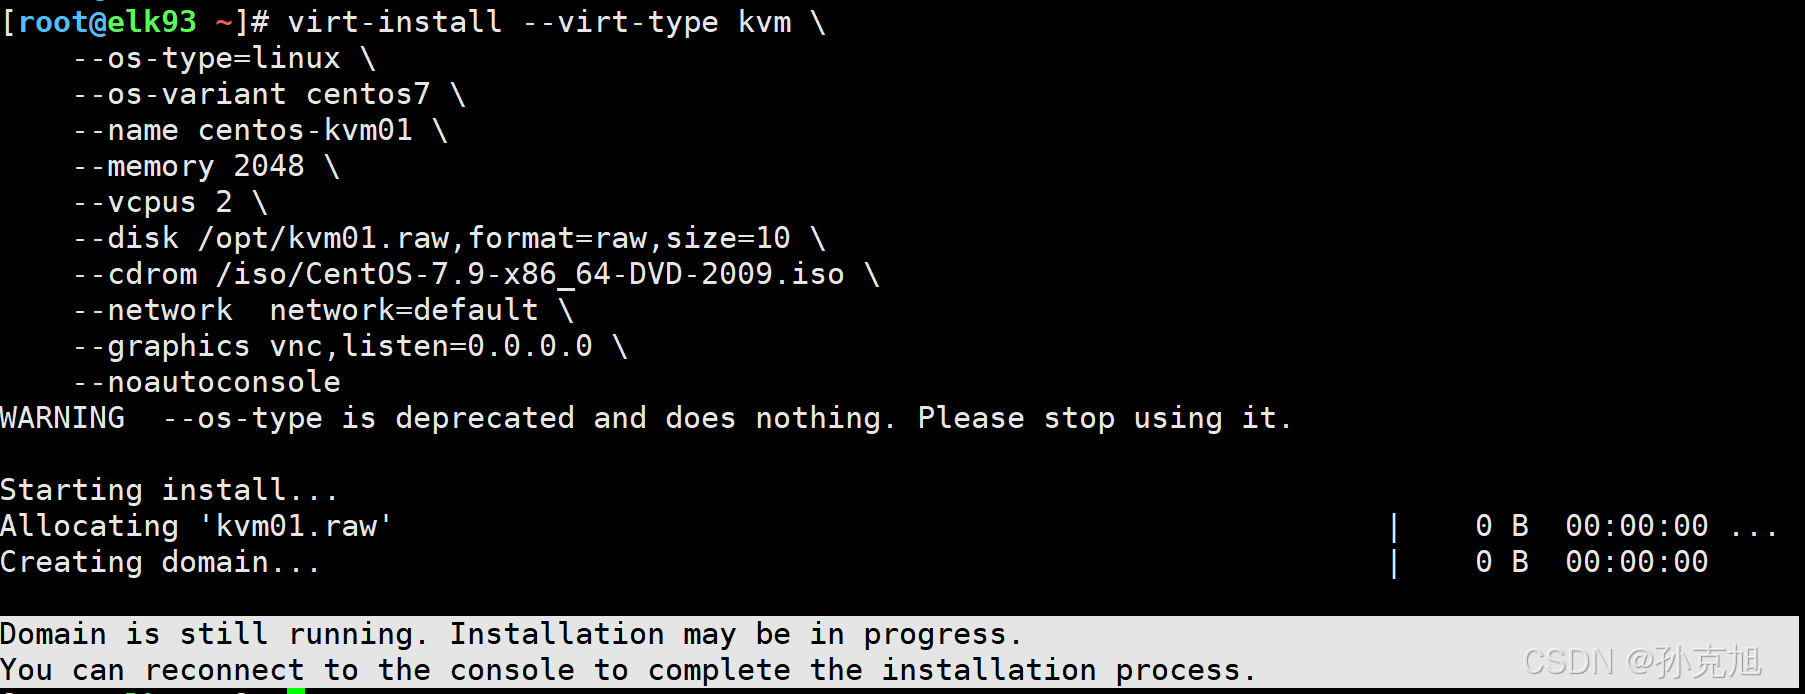
[root@elk93 ~]# ss -lntup |grep 5900
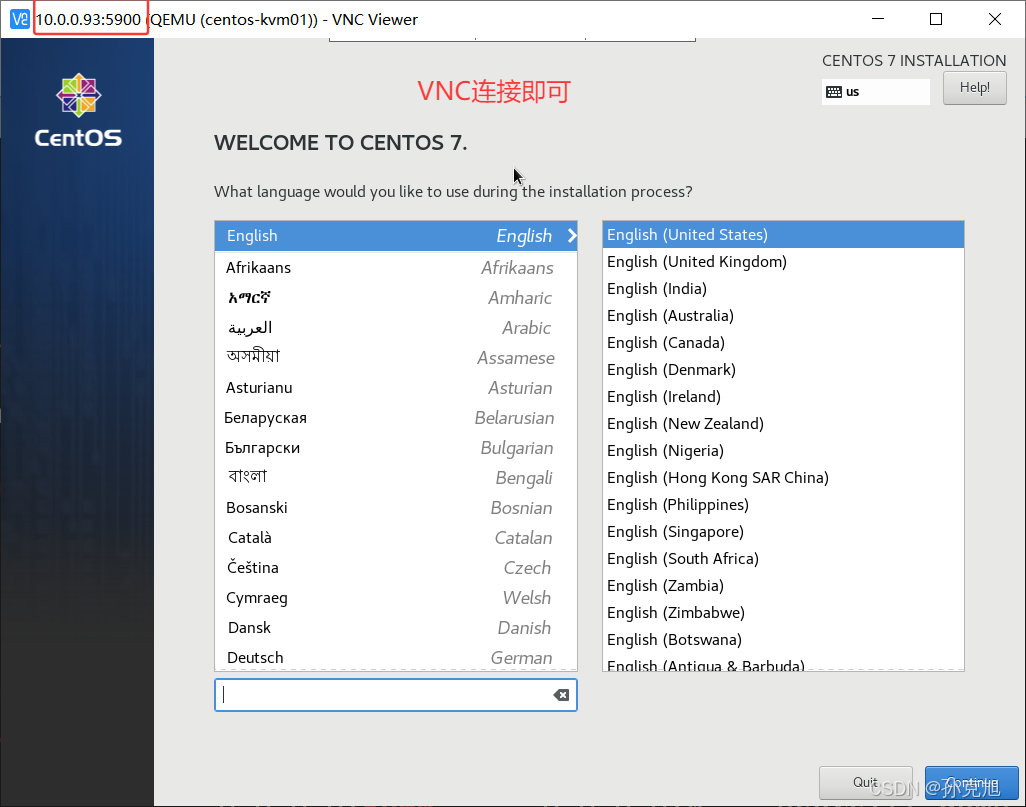
tcp   LISTEN 0      1             0.0.0.0:5900      0.0.0.0:*    users:(("qemu-system-x86",pid=1860,fd=10))2.使用vnc连接虚拟机
systemctl disable --now firewalld
netstat -untalp | grep 5900  # 注意,VNC服务端监听的默认端口为"5900",连接测试。3.KVM虚拟机的日常使用指南
推荐阅读:https://www.cnblogs.com/yinzhengjie/tag/KVM/温馨提示:- 每次启动虚拟机都会监听一个端口,默认监听的端口是从5900开始,依次递增;该端口可以直接通过vnc客户端工具进行连接即可。- 每次启动虚拟机都会启动一个qemu-kvm进程。ps -ef  | grep qemu-kvm
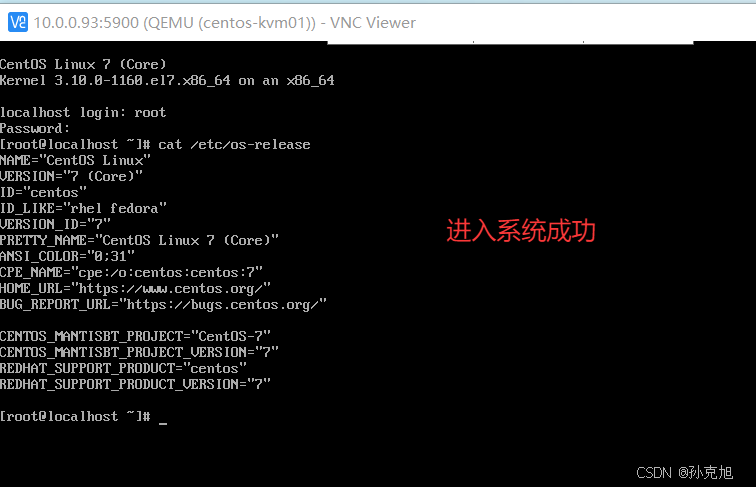
- 安装虚拟机:
[KVM虚拟机安装实战 - 尹正杰 - 博客园](https://www.cnblogs.com/yinzhengjie/p/14370252.html)

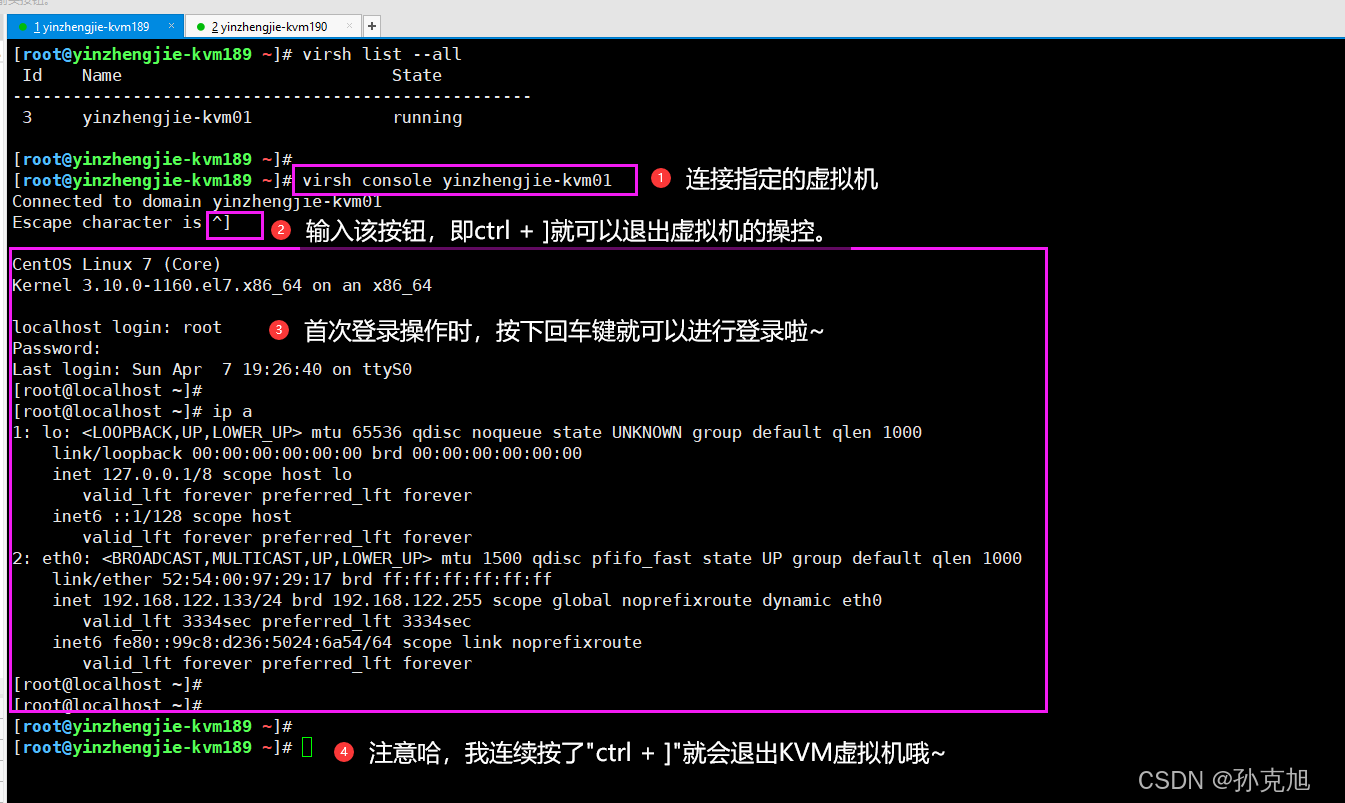
- 使用kvm的console连接虚拟机

grep console /etc/grub2.cfg
grubby --update-kernel=ALL --args="console=ttyS0,115200n8"
18.2 kvm虚拟机部署单点ES


19. 踩坑记录
1. 2025-08-28T19:18:12.044+0800 ERROR [publisher_pipeline_output] pipeline/output.go:154 Failed to connect to backoff(elasticsearch(http://10.0.0.92:9200)): Connection marked as failed because the onConnect callback failed: error loading template: failed to load template: couldn’t load template: 400 Bad Request:],“type”:“illegal_argument_exception”,“reason”:“index template [oldboyedu–modules-mysql] has index patterns [oldboyedu-modules-mysql*] matching patterns from existing templates [oldboyedu-modules] with patterns (oldboyedu-modules => [oldboyedu-modules*]) that have the same priority [150], multiple index templates may not match during index creation, please use a different priority”},“status”:400}. Response body:],“type”:“illegal_argument_exception”,“reason”:“index template [oldboyedu–modules-mysql] has index patterns [oldboyedu-modules-mysql*] matching patterns from existing templates [oldboyedu-modules] with patterns (oldboyedu-modules => [oldboyedu-modules*]) that have the same priority [150], multiple index templates may not match during index creation, please use a different priority”},“status”:400}
模板冲突,修改模板名称或模板匹配规则即可
