python项目开发:创建虚拟环境
使用PyCharm创建项目的时候创建虚拟环境:
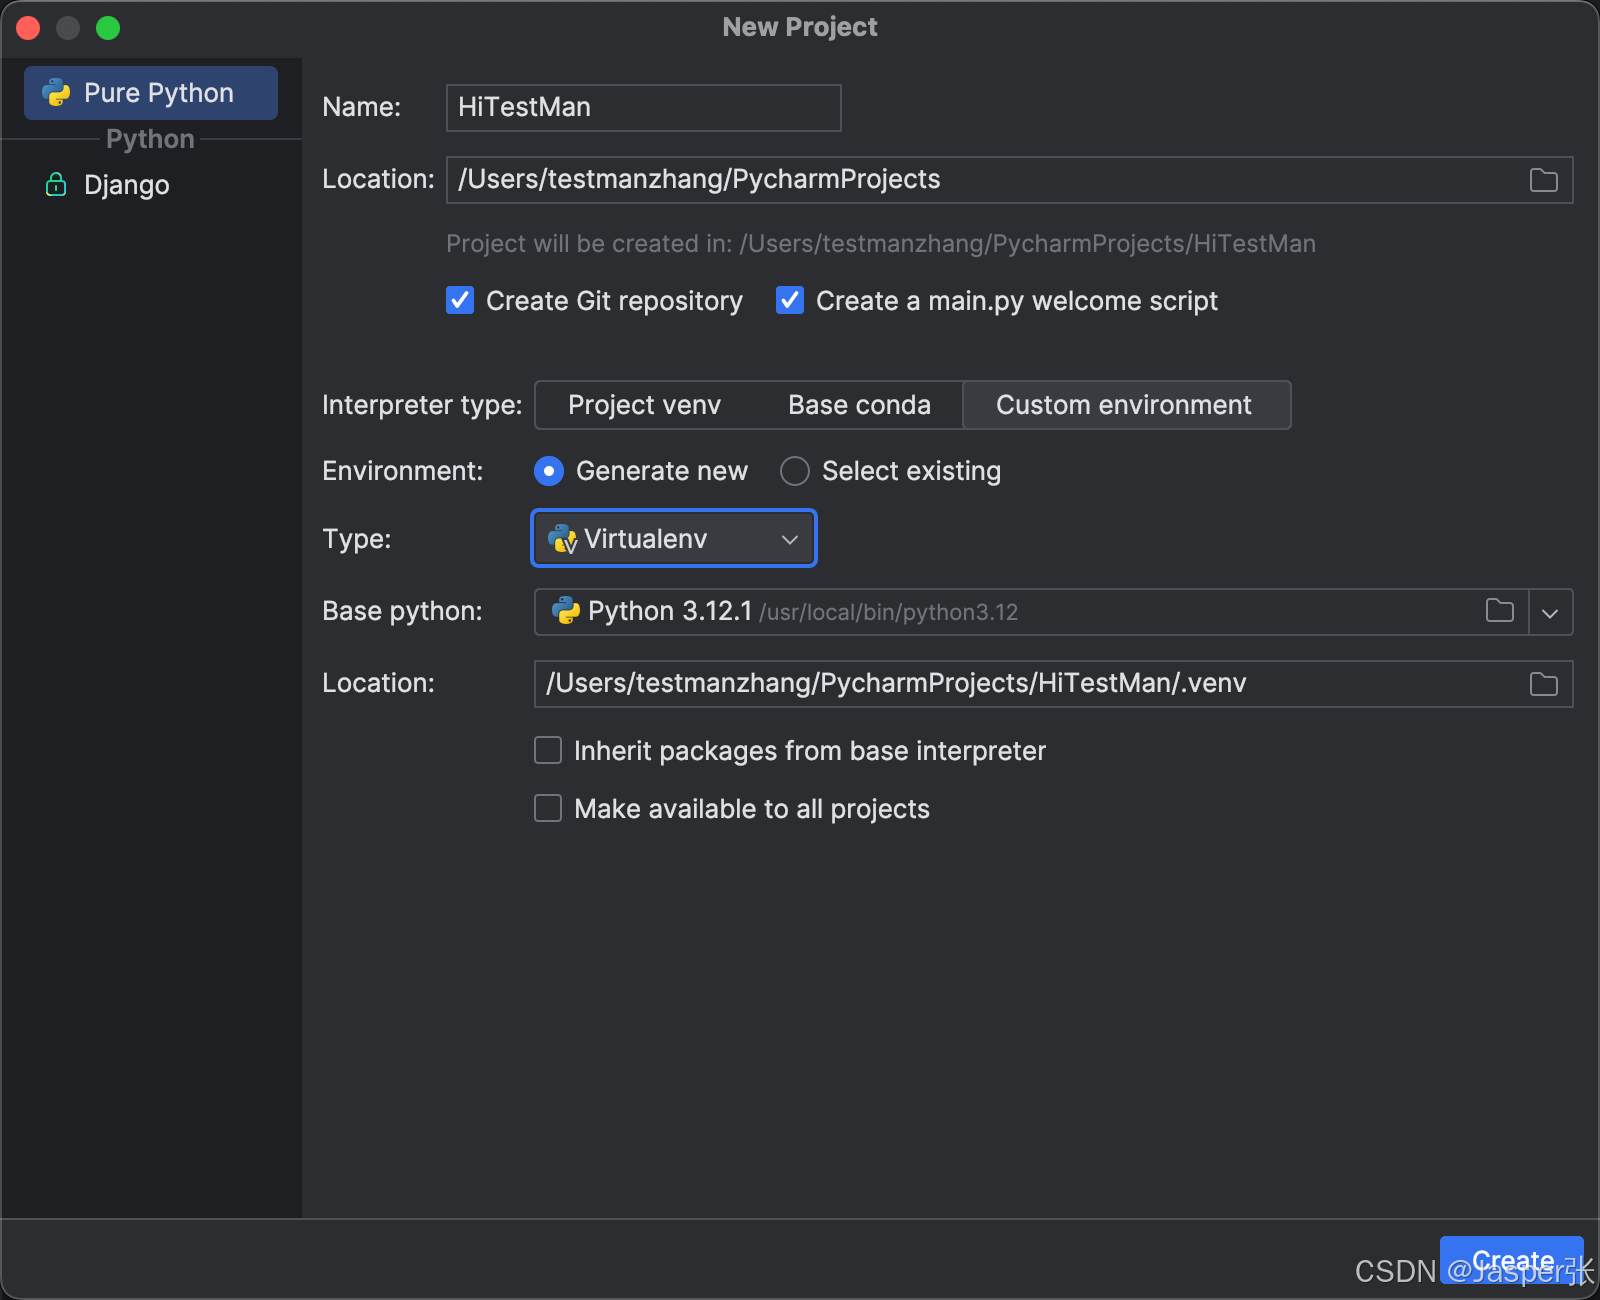
PyCharm->File->New Project...->Interpreter type中选择Custom environment->Environment选择Generate new->Type选择Virtualenv->Base python保持系统的python不变->Location是当前项目的虚拟环境位置,指向一个隐藏文件.venv:
如果在创建项目的时候没有创建虚拟环境,也可以手动创建虚拟环境:
python3 -m venv venv激活虚拟环境:
进入项目目录,执行:source .venv/bin/activate
testmanzhang@TestMandeMBP xxx_parse % source .venv/bin/activate
(.venv) testmanzhang@TestMandeMBP xxx_parse %
激活后,终端提示符通常会显示 (.venv),说明当前环境已切换。
安装依赖:
在虚拟环境中安装包时需要用pip3,因为通过下面的命令得知pip3指向的是项目的虚拟环境:
(.venv) testmanzhang@TestMandeMBP xxx_parse % which pip
pip: aliased to /Library/Frameworks/Python.framework/Versions/3.12/bin/pip3.12
(.venv) testmanzhang@TestMandeMBP xxx_parse % which pip3
/Users/testmanzhang/PycharmProjects/xxx_parse/.venv/bin/pip3
(.venv) testmanzhang@TestMandeMBP xxx_parse % which python
python: aliased to /Library/Frameworks/Python.framework/Versions/3.12/bin/python3.12
(.venv) testmanzhang@TestMandeMBP xxx_parse % which python3
/Users/testmanzhang/PycharmProjects/xxx_parse/.venv/bin/python3
(.venv) testmanzhang@TestMandeMBP xxx_parse % pip3 install fastapi uvicorn aiohttp查看已经安装的依赖,可以看到当前虚拟环境安装的所有包及版本号:
(.venv) testmanzhang@TestMandeMBP xxx_parse % pip3 list
Package           Version
----------------- -------
aiohappyeyeballs  2.6.1
aiohttp           3.12.15
aiosignal         1.4.0
annotated-types   0.7.0
anyio             4.10.0
attrs             25.3.0
click             8.2.1
fastapi           0.116.1
frozenlist        1.7.0
h11               0.16.0
idna              3.10
multidict         6.6.4
pip               23.2.1
propcache         0.3.2
pydantic          2.11.7
pydantic_core     2.33.2
sniffio           1.3.1
starlette         0.47.3
typing_extensions 4.15.0
typing-inspection 0.4.1
uvicorn           0.35.0
yarl              1.20.1
生成 requirements.txt
pip3 freeze > requirements.txt
pip3 freeze 会列出 当前虚拟环境中所有安装的包及版本,格式如:
aiohappyeyeballs==2.6.1
aiohttp==3.12.15
aiosignal==1.4.0
执行完成后会在项目目录下生成requirements.txt文件。
使用 requirements.txt 安装依赖(在其他环境或新环境):
pip3 install -r requirements.txt这样可以保证其他环境安装的依赖和版本与当前虚拟环境一致。
如果只想导出项目真正需要的依赖,而不是虚拟环境里所有包,可以用 pip-tools 或手动管理 requirements.in → requirements.txt。
始终确保在 虚拟环境激活状态 下生成 requirements.txt,否则会把全局 Python 的包也写进去。
安装 pip-tools
pip3 install pip-tools根据 requirements.in 生成 requirements.txt,需要先创建requirements.in,手动写入本次安装的依赖,例如:
(.venv) testmanzhang@TestMandeMBP xxx_parse % cat requirements.in
fastapi
uvicorn
aiohttp
之后执行:
(.venv) testmanzhang@TestMandeMBP aab_parse % pip-compile --index-url https://pypi.tuna.tsinghua.edu.cn/simple requirements.in# 安装依赖与 requirements.txt 同步
pip-sync requirements.txt
退出虚拟环境:
deactivate
(.venv) testmanzhang@TestMandeMBP xxx_parse % deactivate这样就可以达到项目的虚拟环境跟系统环境隔离的目的了。