基于HTTP3的WebTransport实践
本文代码及背景介绍参考:https://socket.io/get-started/webtransport。相比原文章,提供中文版操作说明,将原文中复杂指令替换为更简单可行的命令,并提供额外的debug指导。但本文仅提供最终版本的代码,如需了解WebTransport版本代码与WebSocket版本代码的差异,请参考原文。
背景
Socket.IO 4.7.0版本(2023 年 6 月)增加了对 WebTransport 的支持。简而言之,WebTransport 是 WebSocket 的替代品,它解决了困扰 WebSocket 的几个性能问题,例如队头阻塞。
工作目录结构
Project
|-- cert (存放证书)|--localhost+2.pem(cert文件)|--localhost+2-key.pem(key文件)
|--node_modules(Node依赖包)|-- ……
|--index.html(客户端)
|--index.js(服务端)
|--package.json(项目说明及依赖包引入)
Package.json
{"name": "ProjectName","version": "1.0.0","main": "index.js","scripts": {"test": "echo \"Error: no test specified\" && exit 1"},"keywords": [],"author": "","license": "ISC","description": "","dependencies": {"@fails-components/webtransport": "^1.4.1","@fails-components/webtransport-transport-http3-quiche": "^1.4.1","socket.io": "^4.8.1"}
}
依赖安装方法:npm i @fails-components/webtransport socket.io
⚠️注意:普通WebTransport是不支持HTTP3的,需要引入@fails-components/webtransport。该项目提供了quiche实现,支持HTTP3。此外,socket.io版本需要>4.7.0。
证书生成
使用mkcert为localhost生成证书(仅用于测试环境):
mkcert localhost 127.0.0.1 ::1
在当前目录下得到两个文件localhost+2.pem和localhost+2-key.pem。将其放入certs目录下(个人偏好,不放进去也可以)。
然后将本机mkcert加入系统受信任根证书颁发机构:
mkcert --install
命令行返回⬇️即为添加成功。
Created a new local CA 💥
Sudo password:
The local CA is now installed in the system trust store! ⚡️
服务端代码(index.js)
import { readFile } from "node:fs/promises";
import { createServer } from "node:https";
import {Server} from "socket.io";
import { Http3Server } from "@fails-components/webtransport";
import { randomBytes } from 'crypto';// const key = await readFile("./certs/localhost.key");
// const cert = await readFile("./certs/localhost.crt");
const key = await readFile("./certs/localhost+2-key.pem");
const cert = await readFile("./certs/localhost+2.pem");const httpsServer = createServer({key,cert
}, async (req, res) => {if (req.method === "GET" && req.url === "/") {const content = await readFile("./index.html");res.writeHead(200, {"content-type": "text/html"});res.write(content);res.end();} else {res.writeHead(404).end();}
});const port = process.env.PORT || 3001;httpsServer.listen(port, () => {console.log(`server listening at https://localhost:${port}`);
});// const io = new Server(httpsServer);
const io = new Server(httpsServer, {transports: ["polling", "websocket", "webtransport"]
});io.on("connection", (socket) => {console.log(`connected with transport ${socket.conn.transport.name}`);socket.conn.on("upgrade", (transport) => {console.log(`transport upgraded to ${transport.name}`);});socket.on("disconnect", (reason) => {console.log(`disconnected due to ${reason}`);});
});const h3Server = new Http3Server({port,host: "0.0.0.0",secret: 'ChangeIt', //不换也行cert,privKey: key,
});h3Server.startServer();(async () => {const stream = await h3Server.sessionStream("/socket.io/");const sessionReader = stream.getReader();while (true) {const { done, value } = await sessionReader.read();if (done) {break;}io.engine.onWebTransportSession(value);}
})();
客户端代码(index.html)
<!doctype html>
<html lang="en">
<head><meta charset="UTF-8"><title>Socket.IO WebTransport example</title>
</head>
<body>
<p>Status: <span id="status">Disconnected</span></p>
<p>Transport: <span id="transport">N/A</span></p><script src="/socket.io/socket.io.js"></script>
<script>const $status = document.getElementById("status");const $transport = document.getElementById("transport");// const socket = io();const socket = io({rejectUnauthorized: false,transportOptions: {webtransport: {hostname: "127.0.0.1"}}});socket.on("connect", () => {console.log(`connected with transport ${socket.io.engine.transport.name}`);$status.innerText = "Connected";$transport.innerText = socket.io.engine.transport.name;socket.io.engine.on("upgrade", (transport) => {console.log(`transport upgraded to ${transport.name}`);$transport.innerText = transport.name;});});socket.on("connect_error", (err) => {console.log(`connect_error due to ${err.message}`);});socket.on("disconnect", (reason) => {console.log(`disconnect due to ${reason}`);$status.innerText = "Disconnected";$transport.innerText = "N/A";});
</script>
</body>
</html>
运行项目
node index.js
然后在浏览器访问:https://localhost:3001,应该显示:
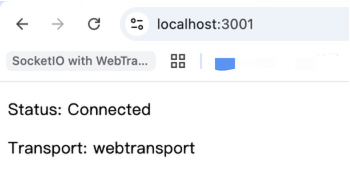
Debug
如果后端能跑起来但浏览器显示连接不安全,说明是根CA没有被浏览器信任。需要将根CA加入系统受信任根颁发机构中(方法参见证书生成节)。如果已经加了但还显示不安全,检查证书信息:openssl x509 -in ./certs/localhost+2.pem -text -noout(例如,检查证书是否过期)
如果Transport处显示N/A,可能是后端没跑起来。
如果Transport处显示polling,说明websocket连接失败,可能是socket连接失败,检查后端Http3Server和前端socket配置是否有问题。
如果Transport处显示WebSocket,说明WebTransport连接失败但socket连接成功(所以回退到WebSocket)。打开开发者工具,如果控制台报错:
Failed to establish a connection to https://127.0.0.1:3001/socket.io/:
net::ERR_QUIC_PROTOCOL_ERROR.QUIC_TLS_CERTIFICATE_UNKNOWN (TLS handshake failure (ENCRYPTION_HANDSHAKE) 46: certificate unknown.
SSLErrorStack:[handshake.cc:297] error:1000007d:SSL
routines:OPENSSL_internal:CERTIFICATE_VERIFY_FAILED).
说明是证书不认可。如果浏览器没有显示连接不安全,但这里不认可证书,说明是浏览器对HTTP3的特殊设置导致。Chrome http3通信默认仅支持信任机构发行的证书,.net 的开发者证书或CloudFlare的10年证书,或者其他自己创建的自签名证书是开启不了http3通信的[1]。根据该博客[1]指导,地址栏输入:chrome://flags。检查Experimental QUIC protocal和WebTransport Developer Mode是否启用,这两个都需要启用才行。
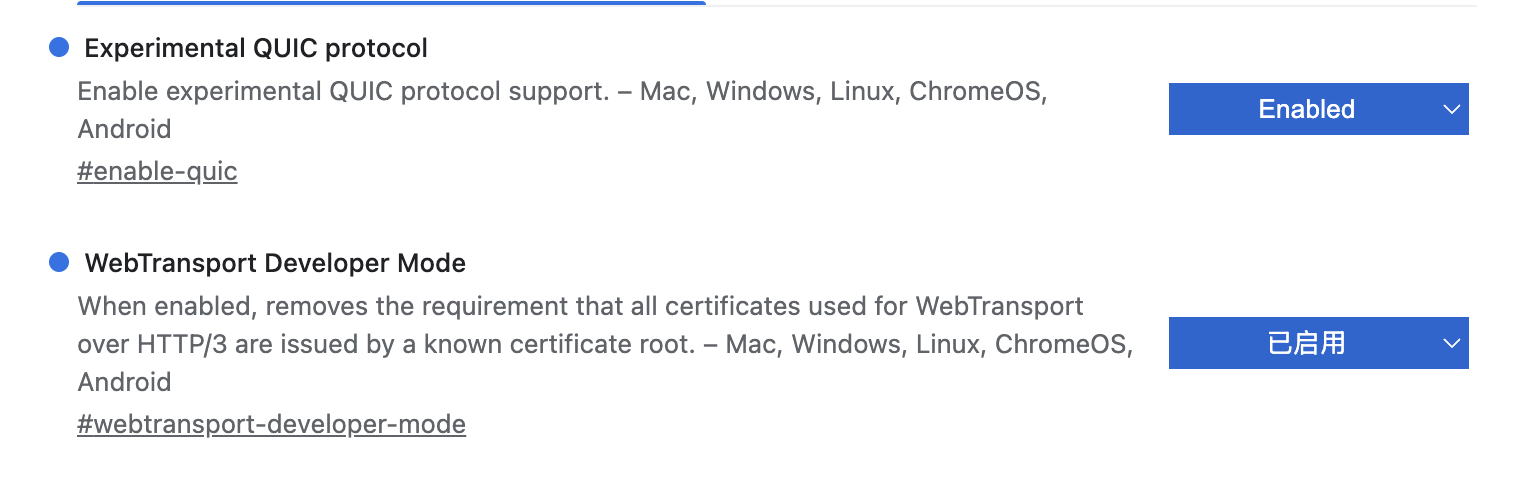
如果对上述设置进行了修改,需要重启浏览器(新开一个窗口没用的)。
其他Demo
GoogleChrome官方也提供了一个WebTransport示例,是前后端分离实现。服务器后端用python运行,前端自行渲染client.html或通过https://googlechrome.github.io/samples/webtransport/client.html访问。