超详细yolo8/11-pose人体姿态全流程概述:配置环境、数据标注、训练、验证/预测、onnx部署(c++/python)详解
文章目录
- 一、配置环境
- 二、数据标注和转换
- 2.1 json2txt_pose脚本
- 2.2X-anylabeling软件自带标注导出txt
- 三、模型部署
- c++版本
- python版本
一、配置环境
我的都是在Linux系统下,训练部署的;模型训练之前,需要配置好环境,Anaconda、显卡驱动、cuda、cudnn、pytorch等;建议在Linux下进行模型训练,能充分利用GPU,提升训练的速度。
因为yolo的检测/分割/姿态/旋转/分类模型的环境配置、训练、推理预测等命令非常类似,这里不再详细叙述,主要参考 【YOLOv8/11-detect目标检测全流程教程】 里面的配置教程,下面有相关链接:
【YOLOv8/11-detect目标检测全流程教程】超详细yolo8/11-detect目标检测全流程概述:配置环境、数据标注、训练、验证/预测、onnx部署(c++/python)详解
【环境配置】Ubuntu/Debian小白从零开始配置深度学习环境和各种软件库(显卡驱动、CUDA、CUDNN、Pytorch、OpenCv、PCL、Cmake
…)【持续维护】
【yolo全家桶github官网】https://github.com/ultralytics/ultralytics
【yolo说明文档】https://docs.ultralytics.com/zh/
这里主要针对数据标注、格式转换、模型部署等不同细节部分;
二、数据标注和转换
这里【强烈推荐使用】X-anylabeling, windows可以直接下载exe文件使用,linux下直接运行可执行文件,非常方便,而且后续可以加入分割大模型sam、sam2、自动标注等,可以实现快速标注;
官网链接:https://github.com/CVHub520/X-AnyLabeling
使用说明:https://blog.csdn.net/CVHub/article/details/144595664?spm=1001.2014.3001.5502
主要参考这篇文章 YoLoV8/11自定义关键点检测格式转换Labelme转Txt
2.1 json2txt_pose脚本
使用说明
1.txt格式为:0 x y w h x1 y1 visual x2 y2 visual … 就是yolov8/11关键点的格式;
2.修改代码26行 yolo_=[0]68,代码里面有注释,1+4+321=68,因为标注了21个关键点,所以是3*21,如果标注了5个关键点,那代码改为yolo_=[0]20,即,1+4+35=20;
3.修改代码66行,json和png文件的路径,注意json和png在同一个文件夹里面;
代码思路
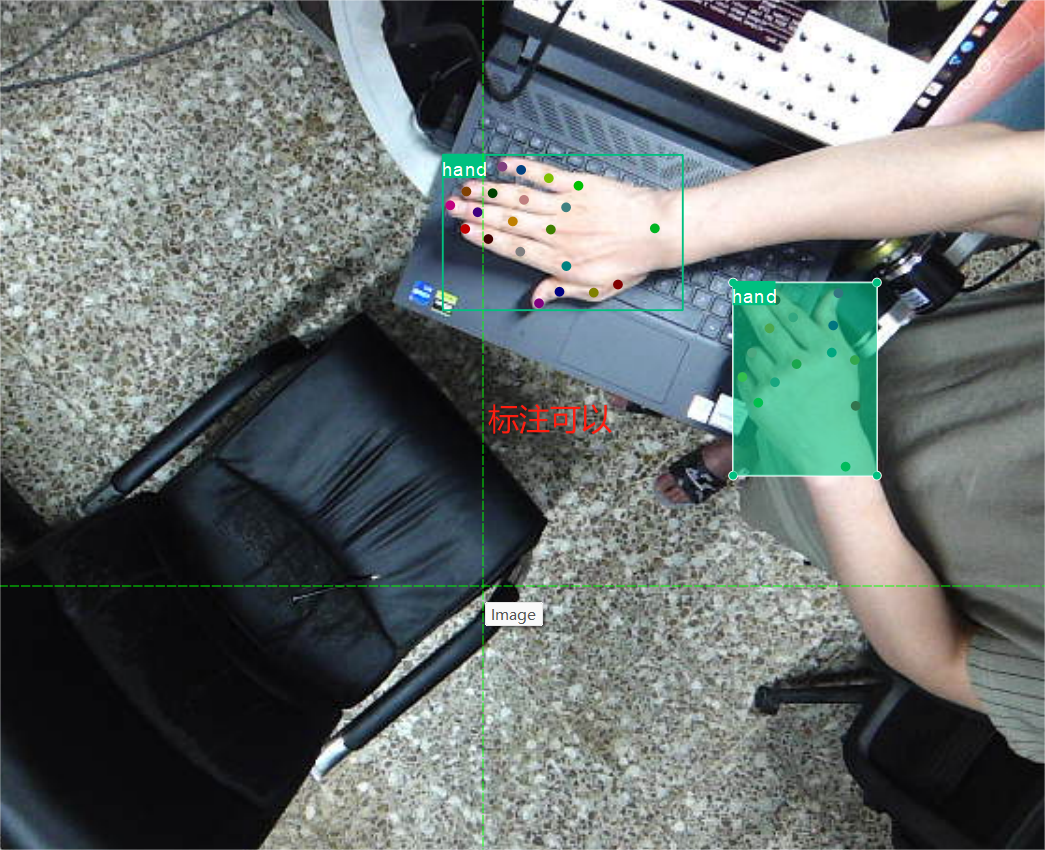
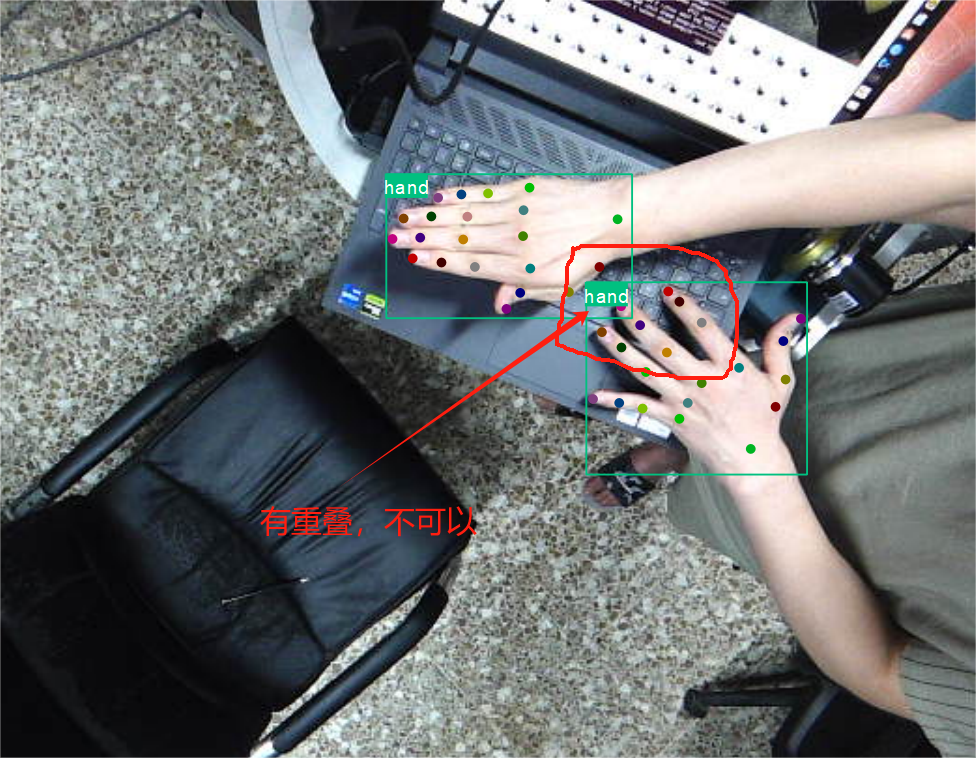
先创建每个标注占用的大小,全设置为0,然后循环遍历,找到需要的标注归一化坐标,把数字填进去,每个关键点的第三位visual,设置为2;根据矩形框边界筛选关键点是否在里面,使矩形框框与关键点对应,所以要求多个框时,不能有重叠;
json2txt_pose.py,有个限制就是标准需名称需要是数字,且从0开始;
# 将json文件转为yolo格式
import os
import cv2
import numpy as np
import matplotlib.pyplot as plt
import glob
import json
import tqdm# 物体类别
class_list = ["hand"]
# 关键点的顺序
keypoint_list = ['0','1','2','3','4','5','6','7','8','9','10','11','12','13','14','15','16','17','18','19','20']
#处理单个json文件
def json_to_yolo(img_data,json_data):h,w = img_data.shape[:2]with open(yolo_txt_path, "w") as f:  # 在循环外部打开文件,以写入模式  for each_ann in json_data['shapes']:         if each_ann['shape_type'] == 'rectangle':#遍历每个矩形框 yolo_=[0]*68 #(class_id,x,y,w,h,point_x,point_y,visual,...)1+4+3*21=68visual=2.000000top_x, top_y = each_ann['points'][0]  bottom_x, bottom_y = each_ann['points'][2] #print(top_x, top_y, bottom_x, bottom_y)                center_x = (top_x + bottom_x) / 2center_y = (top_y + bottom_y) / 2width = bottom_x - top_xheight = bottom_y - top_y#print(center_x, center_y, width, height)  # 归一化坐标,保留6位小数center_x_norm = round(center_x / w ,6)center_y_norm = round(center_y / h ,6)width_norm = round(width / w ,6)height_norm = round(height / h ,6)yolo_[1] = center_x_normyolo_[2] = center_y_normyolo_[3] = width_normyolo_[4] = height_normfor each_ann in json_data['shapes']: # 遍历所有标注if each_ann['shape_type'] == 'point': # 筛选出关键点标注p_x = each_ann['points'][0][0]p_y = each_ann['points'][0][1]if(p_x>top_x) & (p_x<bottom_x) & (p_y<bottom_y) & (p_y>top_y):label = int(each_ann['label'])yolo_[3*label+5+0] = round(p_x / w , 6)yolo_[3*label+5+1] = round(p_y / h , 6)yolo_[3*label+5+2] = round(visual,6)yolo_str = ' '.join(map(str, yolo_)) f.write(yolo_str + '\n')        num_count = 0 with open(yolo_txt_path, "r") as file:         for line in file:  # 去除每行末尾的换行符,并分割字符串得到数字列表  numbers_in_line = line.strip().split()for num in numbers_in_line:  try:  float(num)  # 尝试将字符串转换为浮点数  num_count += 1  # 如果成功,则增加总数except ValueError:  # 如果转换失败(即不是数字),则忽略该元素  pass  print(num_count)# 获取所有的图片
img_list = glob.glob("./hand_me_json/train_json/*.png")
for img_path in tqdm.tqdm( img_list ):      img = cv2.imread(img_path)print(img_path)json_file = img_path.replace('png', 'json')with open(json_file) as json_file:json_data = json.load(json_file)yolo_txt_path = img_path.replace('png', 'txt')json_to_yolo(img, json_data)
划分数据集
import os
import shutil
import randomdef split_data(data_dir, result_dir, train_ratio=0.7, val_ratio=0.2, test_ratio=0.1, seed=42):# 设置随机种子以确保结果可重复# random.seed(seed)# 确保结果目录存在if not os.path.exists(result_dir):os.makedirs(result_dir)# 创建images和labels子目录以及它们的train/val/test子目录for subset in ['train', 'val', 'test']:images_dir = os.path.join(result_dir, 'images', subset)labels_dir = os.path.join(result_dir, 'labels', subset)os.makedirs(images_dir, exist_ok=True)os.makedirs(labels_dir, exist_ok=True)# 获取data目录下所有文件名(不包含子目录)files = [f for f in os.listdir(data_dir) if os.path.isfile(os.path.join(data_dir, f))]# 过滤出图片和文本文件,并配对pairs = []for file in files:if file.endswith('.png'):base_name = os.path.splitext(file)[0]txt_file = f"{base_name}.txt"if txt_file in files:pairs.append((file, txt_file))# 随机打乱配对后的文件列表random.shuffle(pairs)# 计算每个集合的大小total = len(pairs)train_size = int(train_ratio * total)val_size = int(val_ratio * total)test_size = total - train_size - val_size# 分割数据集train_pairs = pairs[:train_size]val_pairs = pairs[train_size:train_size + val_size]test_pairs = pairs[train_size + val_size:]# 复制文件到相应的目录def copy_pairs(pairs, images_subdir, labels_subdir):for img_file, txt_file in pairs:shutil.copy(os.path.join(data_dir, img_file), os.path.join(images_subdir, img_file))shutil.copy(os.path.join(data_dir, txt_file), os.path.join(labels_subdir, txt_file))copy_pairs(train_pairs, os.path.join(result_dir, 'images', 'train'), os.path.join(result_dir, 'labels', 'train'))copy_pairs(val_pairs, os.path.join(result_dir, 'images', 'val'), os.path.join(result_dir, 'labels', 'val'))copy_pairs(test_pairs, os.path.join(result_dir, 'images', 'test'), os.path.join(result_dir, 'labels', 'test'))print("Data splitting completed.")if __name__ == "__main__":# 自定义data和result的路径,以及train/val/test比例data_directory = '12.19_persion'  # 可以修改为实际路径,目前是当前文件夹result_directory = '12.9_result'  # 可以修改为实际路径train_ratio = 0.9  # 可以自定义val_ratio = 0.04  # 可以自定义test_ratio = 0.06  # 可以自定义,或者根据train和val的比例自动计算(1 - train_ratio - val_ratio)seed = 1# 执行数据分割split_data(data_directory, result_directory, train_ratio, val_ratio, test_ratio)
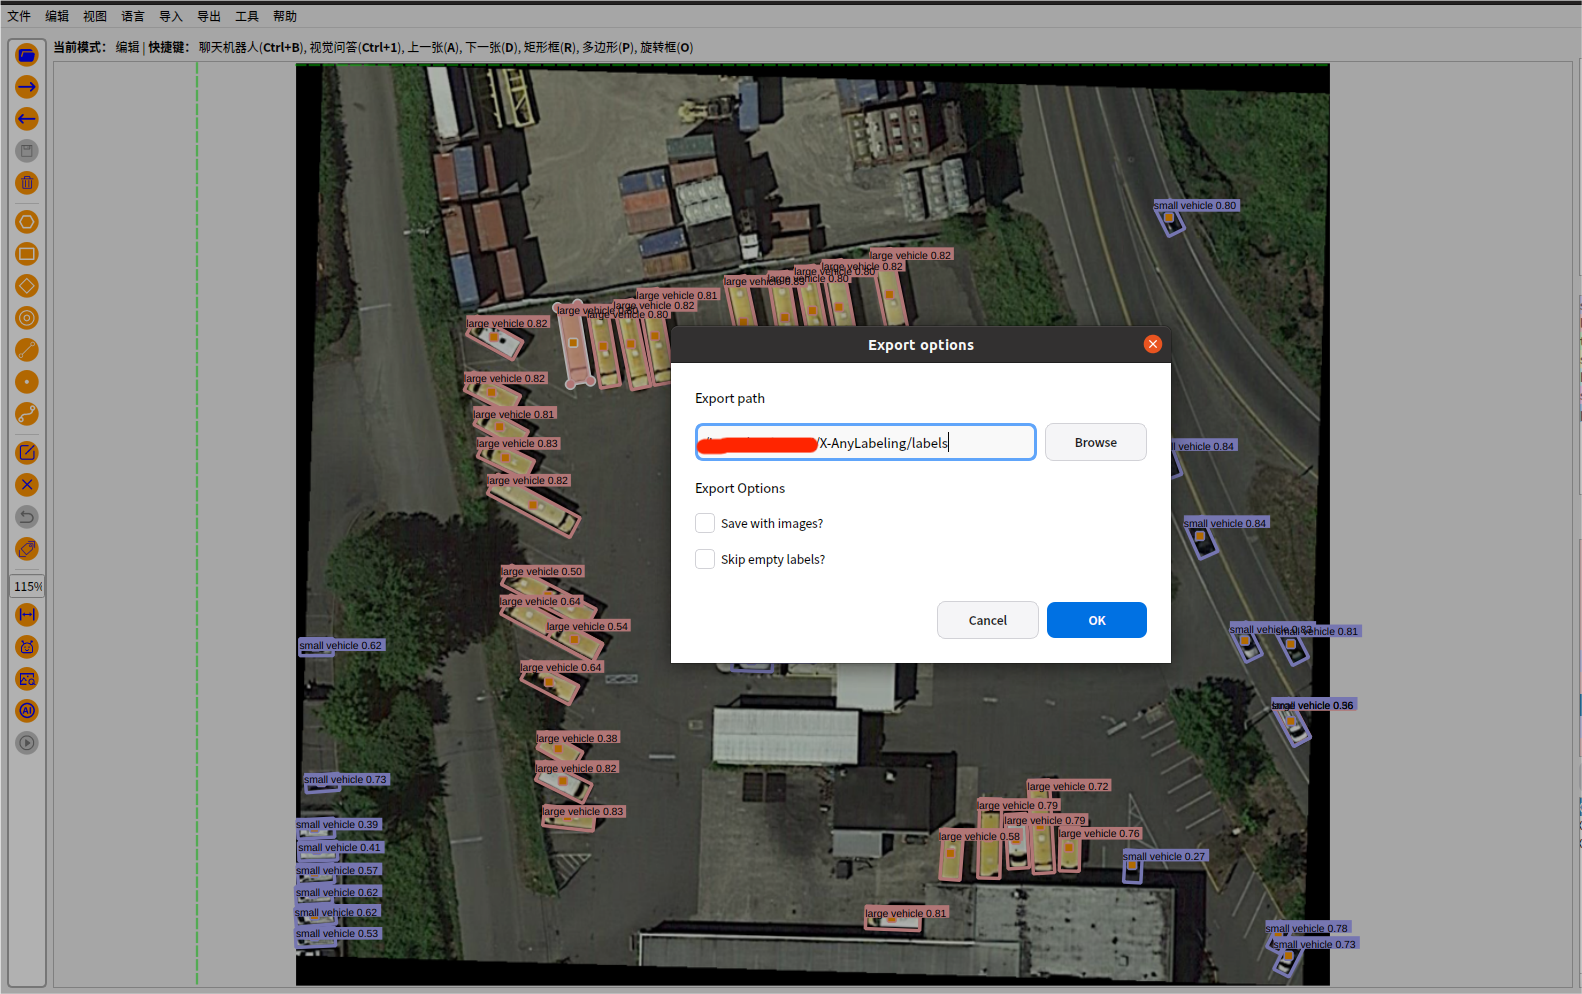
2.2X-anylabeling软件自带标注导出txt
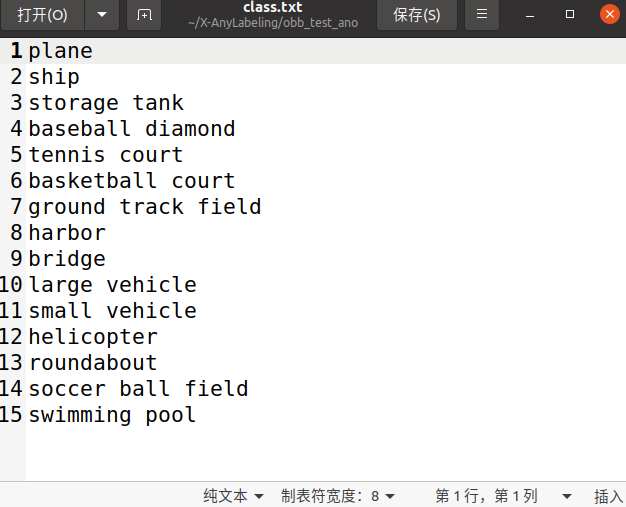
其实X-anylabeling这个软件带的有转换格式的按钮,需要创建一个 classes.txt 文件,用于存放所有标签的索引信息,是标注时候命名过的所用标签名称,最好按先后顺序放;
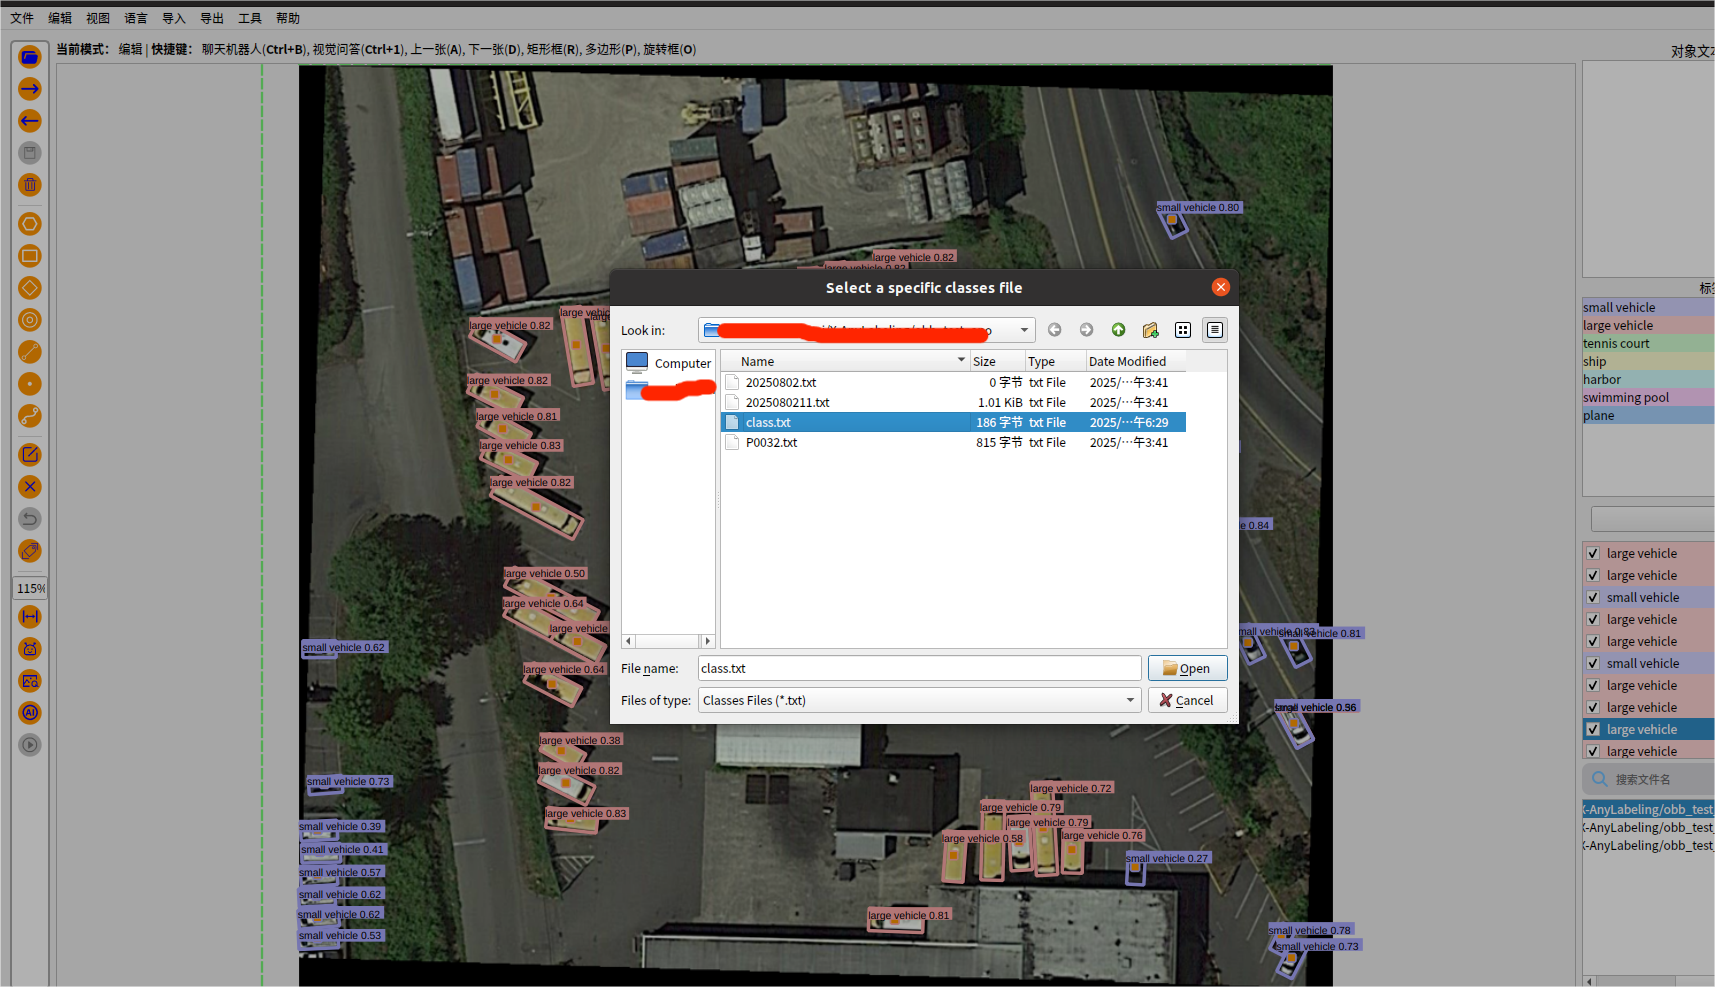
因为在使用 X-AnyLabeling 导出YOLO格式标签时,需要先选中一个描述类别的.txt文件,该文件按行列出所有类别(例如long_car、short_car、ship、plane)。要新建一个类别文件,这里以旋转标签为例,然后选择 导出->yolo旋转框标签->加载这个classt.txt->选择标签的导出的路径 ,即可;会一次性导出所有标签;
模型训练、预测、导出 终端命令
#pose的训练、预测和导出onnx命令
yolo pose train data=dataset.yaml model=yolo11n-obb.pt epochs=300 imgsz=1920 amp=False batch=2 lr0=0.001 mosaic=0.05 patience=200
#模型预测
yolo pose predict model=runs/detect/train4/weights/best.pt source=/xxx/images/test save=true conf=0.4 iou=0.5
#模型导出
yolo export model=/xxx/yolov11/runs/pose/train4/weights/best.pt format=onnx opset=17 simplify=True
三、模型部署
c++版本
主要参考大佬github开源文件https://github.com/UNeedCryDear/yolov8-opencv-onnxruntime-cpp
和检测相似,其中不管姿态、旋转、分割、检测啥的,都有yolov8_utils.h和yolov8_utils.cpp这两个文件,和目标检测里面的一样,可以参考上面的大佬的,或者下面这篇文章
【超详细yolo8/11-detect目标检测全流程概述:配置环境、数据标注、训练、验证/预测、onnx部署(c++/python)详解】
主要涉及五个文件,main.cpp yolov8_utils.h yolov8_pose_onnx.h yolov8_utils.cpp yolov8_pose_onnx.cpp,其中yolov8_utils.h和yolov8_utils.cpp和yolo8/11-detect目标检测一样,这里就不贴码了; 把onnx初始化放到主程序里面,执行检测时候不再初始化;
主要修改图片和模型路径,还有yolov8_pose_onnx.h里面的模型宽度和高度。
yolov8_pose_onnx.h 的头文件,修改_netWidth和_netHidth大小,换成自己onnx模型输入的大小。
yolov8_pose_onnx.h 修改_netWidth和_netHidth大小,换成自己onnx模型输入的大小。
#pragma once
#include <iostream>
#include<memory>
#include <opencv2/opencv.hpp>
#include "yolov8_utils.h"
#include<onnxruntime_cxx_api.h>//#include <tensorrt_provider_factory.h>  //if use OrtTensorRTProviderOptionsV2
//#include <onnxruntime_c_api.h>class Yolov8PoseOnnx {
public:Yolov8PoseOnnx() :_OrtMemoryInfo(Ort::MemoryInfo::CreateCpu(OrtAllocatorType::OrtDeviceAllocator, OrtMemType::OrtMemTypeCPUOutput)) {};~Yolov8PoseOnnx() {if (_OrtSession != nullptr)delete _OrtSession;};// delete _OrtMemoryInfo;public:/** \brief Read onnx-model* \param[in] modelPath:onnx-model path* \param[in] isCuda:if true,use Ort-GPU,else run it on cpu.* \param[in] cudaID:if isCuda==true,run Ort-GPU on cudaID.* \param[in] warmUp:if isCuda==true,warm up GPU-model.*/bool ReadModel(const std::string& modelPath, bool isCuda = false, int cudaID = 0, bool warmUp = true);/** \brief  detect.* \param[in] srcImg:a 3-channels image.* \param[out] output:detection results of input image.*/bool OnnxDetect(cv::Mat& srcImg, std::vector<OutputParams>& output);/** \brief  detect,batch size= _batchSize* \param[in] srcImg:A batch of images.* \param[out] output:detection results of input images.*/bool OnnxBatchDetect(std::vector<cv::Mat>& srcImg, std::vector<std::vector<OutputParams>>& output);private:template <typename T>T VectorProduct(const std::vector<T>& v){return std::accumulate(v.begin(), v.end(), 1, std::multiplies<T>());};int Preprocessing(const std::vector<cv::Mat>& srcImgs, std::vector<cv::Mat>& outSrcImgs, std::vector<cv::Vec4d>& params);//const int _netWidth = 1280;   //ONNX-net-input-width must be is onnx export//const int _netHeight = 1280;  //ONNX-net-input-heightconst int _netWidth = 640;   //ONNX-net-input-width must be is onnx exportconst int _netHeight = 640;  int _batchSize = 1;  //if multi-batch,set thisbool _isDynamicShape = false;//onnx support dynamic shapefloat _classThreshold = 0.5;float _nmsThreshold = 0.5;//ONNXRUNTIME	Ort::Env _OrtEnv = Ort::Env(OrtLoggingLevel::ORT_LOGGING_LEVEL_ERROR, "Yolov8");Ort::SessionOptions _OrtSessionOptions = Ort::SessionOptions();Ort::Session* _OrtSession = nullptr;Ort::MemoryInfo _OrtMemoryInfo;
#if ORT_API_VERSION < ORT_OLD_VISONchar* _inputName, * _output_name0;
#elsestd::shared_ptr<char> _inputName, _output_name0;
#endifstd::vector<char*> _inputNodeNames; //����ڵ���std::vector<char*> _outputNodeNames;//����ڵ���size_t _inputNodesNum = 0;        //����ڵ���size_t _outputNodesNum = 0;       //����ڵ���ONNXTensorElementDataType _inputNodeDataType; //��������ONNXTensorElementDataType _outputNodeDataType;std::vector<int64_t> _inputTensorShape; //��������shapestd::vector<int64_t> _outputTensorShape;public:std::vector<std::string> _className = {"person", "bicycle", "car", "motorcycle", "airplane", "bus", "train", "truck", "boat", "traffic light","fire hydrant", "stop sign", "parking meter", "bench", "bird", "cat", "dog", "horse", "sheep", "cow","elephant", "bear", "zebra", "giraffe", "backpack", "umbrella", "handbag", "tie", "suitcase", "frisbee","skis", "snowboard", "sports ball", "kite", "baseball bat", "baseball glove", "skateboard", "surfboard","tennis racket", "bottle", "wine glass", "cup", "fork", "knife", "spoon", "bowl", "banana", "apple","sandwich", "orange", "broccoli", "carrot", "hot dog", "pizza", "donut", "cake", "chair", "couch","potted plant", "bed", "dining table", "toilet", "tv", "laptop", "mouse", "remote", "keyboard", "cell phone","microwave", "oven", "toaster", "sink", "refrigerator", "book", "clock", "vase", "scissors", "teddy bear","hair drier", "toothbrush"};
};
yolov8_pose_onnx.cpp,注意int key_point_num = 4; //自定义关键点的数量,原始是17
#include "yolov8_pose_onnx.h"
//using namespace std;
//using namespace cv;
//using namespace cv::dnn;
using namespace Ort;bool Yolov8PoseOnnx::ReadModel(const std::string& modelPath, bool isCuda, int cudaID, bool warmUp) {if (_batchSize < 1) _batchSize = 1;try{if (!CheckModelPath(modelPath))return false;std::vector<std::string> available_providers = GetAvailableProviders();auto cuda_available = std::find(available_providers.begin(), available_providers.end(), "CUDAExecutionProvider");if (isCuda && (cuda_available == available_providers.end())){std::cout << "Your ORT build without GPU. Change to CPU." << std::endl;std::cout << "************* Infer model on CPU! *************" << std::endl;}else if (isCuda && (cuda_available != available_providers.end())){std::cout << "************* Infer model on GPU! *************" << std::endl;
#if ORT_API_VERSION < ORT_OLD_VISONOrtCUDAProviderOptions cudaOption;cudaOption.device_id = cudaID;_OrtSessionOptions.AppendExecutionProvider_CUDA(cudaOption);
#elseOrtStatus* status = OrtSessionOptionsAppendExecutionProvider_CUDA(_OrtSessionOptions, cudaID);
#endif}else{std::cout << "************* Infer model on CPU! *************" << std::endl;}//_OrtSessionOptions.SetGraphOptimizationLevel(GraphOptimizationLevel::ORT_ENABLE_EXTENDED);#ifdef _WIN32std::wstring model_path(modelPath.begin(), modelPath.end());_OrtSession = new Ort::Session(_OrtEnv, model_path.c_str(), _OrtSessionOptions);
#else_OrtSession = new Ort::Session(_OrtEnv, modelPath.c_str(), _OrtSessionOptions);
#endifOrt::AllocatorWithDefaultOptions allocator;//init input_inputNodesNum = _OrtSession->GetInputCount();
#if ORT_API_VERSION < ORT_OLD_VISON_inputName = _OrtSession->GetInputName(0, allocator);_inputNodeNames.push_back(_inputName);
#else_inputName = std::move(_OrtSession->GetInputNameAllocated(0, allocator));_inputNodeNames.push_back(_inputName.get());
#endif//std::cout << _inputNodeNames[0] << std::endl;Ort::TypeInfo inputTypeInfo = _OrtSession->GetInputTypeInfo(0);auto input_tensor_info = inputTypeInfo.GetTensorTypeAndShapeInfo();_inputNodeDataType = input_tensor_info.GetElementType();_inputTensorShape = input_tensor_info.GetShape();if (_inputTensorShape[0] == -1){_isDynamicShape = true;_inputTensorShape[0] = _batchSize;}if (_inputTensorShape[2] == -1 || _inputTensorShape[3] == -1) {_isDynamicShape = true;_inputTensorShape[2] = _netHeight;_inputTensorShape[3] = _netWidth;}//init output_outputNodesNum = _OrtSession->GetOutputCount();
#if ORT_API_VERSION < ORT_OLD_VISON_output_name0 = _OrtSession->GetOutputName(0, allocator);_outputNodeNames.push_back(_output_name0);
#else_output_name0 = std::move(_OrtSession->GetOutputNameAllocated(0, allocator));_outputNodeNames.push_back(_output_name0.get());
#endifOrt::TypeInfo type_info_output0(nullptr);type_info_output0 = _OrtSession->GetOutputTypeInfo(0);  //output0auto tensor_info_output0 = type_info_output0.GetTensorTypeAndShapeInfo();_outputNodeDataType = tensor_info_output0.GetElementType();_outputTensorShape = tensor_info_output0.GetShape();//_outputMaskNodeDataType = tensor_info_output1.GetElementType(); //the same as output0//_outputMaskTensorShape = tensor_info_output1.GetShape();//if (_outputTensorShape[0] == -1)//{//	_outputTensorShape[0] = _batchSize;//	_outputMaskTensorShape[0] = _batchSize;//}//if (_outputMaskTensorShape[2] == -1) {//	//size_t ouput_rows = 0;//	//for (int i = 0; i < _strideSize; ++i) {//	//	ouput_rows += 3 * (_netWidth / _netStride[i]) * _netHeight / _netStride[i];//	//}//	//_outputTensorShape[1] = ouput_rows;//	_outputMaskTensorShape[2] = _segHeight;//	_outputMaskTensorShape[3] = _segWidth;//}//warm upif (isCuda && warmUp) {//draw runstd::cout << "Start warming up" << std::endl;size_t input_tensor_length = VectorProduct(_inputTensorShape);float* temp = new float[input_tensor_length];std::vector<Ort::Value> input_tensors;std::vector<Ort::Value> output_tensors;input_tensors.push_back(Ort::Value::CreateTensor<float>(_OrtMemoryInfo, temp, input_tensor_length, _inputTensorShape.data(),_inputTensorShape.size()));for (int i = 0; i < 3; ++i) {output_tensors = _OrtSession->Run(Ort::RunOptions{ nullptr },_inputNodeNames.data(),input_tensors.data(),_inputNodeNames.size(),_outputNodeNames.data(),_outputNodeNames.size());}delete[]temp;}}catch (const std::exception&) {return false;}return true;}
int Yolov8PoseOnnx::Preprocessing(const std::vector<cv::Mat>& srcImgs, std::vector<cv::Mat>& outSrcImgs, std::vector<cv::Vec4d>& params) {outSrcImgs.clear();cv::Size input_size = cv::Size(_netWidth, _netHeight);for (int i = 0; i < srcImgs.size(); ++i) {cv::Mat temp_img = srcImgs[i];cv::Vec4d temp_param = { 1,1,0,0 };if (temp_img.size() != input_size) {cv::Mat borderImg;LetterBox(temp_img, borderImg, temp_param, input_size, false, false, true, 32);//std::cout << borderImg.size() << std::endl;outSrcImgs.push_back(borderImg);params.push_back(temp_param);}else {outSrcImgs.push_back(temp_img);params.push_back(temp_param);}}int lack_num = _batchSize - srcImgs.size();if (lack_num > 0) {for (int i = 0; i < lack_num; ++i) {cv::Mat temp_img = cv::Mat::zeros(input_size, CV_8UC3);cv::Vec4d temp_param = { 1,1,0,0 };outSrcImgs.push_back(temp_img);params.push_back(temp_param);}}return 0;}
bool Yolov8PoseOnnx::OnnxDetect(cv::Mat& srcImg, std::vector<OutputParams>& output) {std::vector<cv::Mat> input_data = { srcImg };std::vector<std::vector<OutputParams>> tenp_output;if (OnnxBatchDetect(input_data, tenp_output)) {output = tenp_output[0];return true;}else return false;
}
bool Yolov8PoseOnnx::OnnxBatchDetect(std::vector<cv::Mat>& srcImgs, std::vector<std::vector<OutputParams>>& output) {std::vector<cv::Vec4d> params;std::vector<cv::Mat> input_images;cv::Size input_size(_netWidth, _netHeight);//preprocessingPreprocessing(srcImgs, input_images, params);//std::cout<<"preprocess end"<<std::endl;cv::Mat blob = cv::dnn::blobFromImages(input_images, 1 / 255.0, input_size, cv::Scalar(0, 0, 0), true, false);int64_t input_tensor_length = VectorProduct(_inputTensorShape);std::vector<Ort::Value> input_tensors;std::vector<Ort::Value> output_tensors;input_tensors.push_back(Ort::Value::CreateTensor<float>(_OrtMemoryInfo, (float*)blob.data, input_tensor_length, _inputTensorShape.data(), _inputTensorShape.size()));//std::cout<<"tuili"<<std::endl;output_tensors = _OrtSession->Run(Ort::RunOptions{ nullptr },_inputNodeNames.data(),input_tensors.data(),_inputNodeNames.size(),_outputNodeNames.data(),_outputNodeNames.size());//std::cout<<"tuili end"<<std::endl;//post-processfloat* all_data = output_tensors[0].GetTensorMutableData<float>();_outputTensorShape = output_tensors[0].GetTensorTypeAndShapeInfo().GetShape();int net_width = _outputTensorShape[1];int key_point_length = net_width - 5;//std::cout<<"key_point_length: "<<key_point_length<<std::endl;//�Զ���ؼ�������int key_point_num = 17; //_bodyKeyPoints.size(), shape[x, y, confidence]//int key_point_num = 4; //自定义关键点的数量if (key_point_num * 3 != key_point_length) {std::cout << "Pose should be shape [x, y, confidence] with 17-points" << std::endl;return false;}int64_t one_output_length = VectorProduct(_outputTensorShape) / _outputTensorShape[0];for (int img_index = 0; img_index < srcImgs.size(); ++img_index) {cv::Mat output0 = cv::Mat(cv::Size((int)_outputTensorShape[2], (int)_outputTensorShape[1]), CV_32F, all_data).t();  //[bs,116,8400]=>[bs,8400,116]all_data += one_output_length;float* pdata = (float*)output0.data;int rows = output0.rows;std::vector<int> class_ids;//���id����std::vector<float> confidences;//���ÿ��id��Ӧ���Ŷ�����std::vector<cv::Rect> boxes;//ÿ��id���ο�std::vector<std::vector<PoseKeyPoint>> pose_key_points; //����kptfor (int r = 0; r < rows; ++r) {float max_class_socre = pdata[4];if (max_class_socre >= _classThreshold) {//rect [x,y,w,h]float x = (pdata[0] - params[img_index][2]) / params[img_index][0];  //xfloat y = (pdata[1] - params[img_index][3]) / params[img_index][1];  //yfloat w = pdata[2] / params[img_index][0];  //wfloat h = pdata[3] / params[img_index][1];  //hint left = MAX(int(x - 0.5 * w + 0.5), 0);int top = MAX(int(y - 0.5 * h + 0.5), 0);class_ids.push_back(0);confidences.push_back(max_class_socre);boxes.push_back(cv::Rect(left, top, int(w + 0.5), int(h + 0.5)));std::vector<PoseKeyPoint> temp_kpts;for (int kpt = 0; kpt < key_point_length; kpt += 3) {PoseKeyPoint temp_kp;temp_kp.x = (pdata[5 + kpt] - params[img_index][2]) / params[img_index][0];temp_kp.y = (pdata[6 + kpt] - params[img_index][3]) / params[img_index][1];temp_kp.confidence = pdata[7 + kpt];temp_kpts.push_back(temp_kp);}pose_key_points.push_back(temp_kpts);}pdata += net_width;//��һ��}std::vector<int> nms_result;cv::dnn::NMSBoxes(boxes, confidences, _classThreshold, _nmsThreshold, nms_result);std::vector<std::vector<float>> temp_mask_proposals;cv::Rect holeImgRect(0, 0, srcImgs[img_index].cols, srcImgs[img_index].rows);std::vector<OutputParams> temp_output;for (int i = 0; i < nms_result.size(); ++i) {int idx = nms_result[i];OutputParams result;result.id = class_ids[idx];result.confidence = confidences[idx];result.box = boxes[idx] & holeImgRect;result.keyPoints = pose_key_points[idx];temp_output.push_back(result);}output.push_back(temp_output);}if (output.size()){return true;}	elsereturn false;std::cout<<"output.size(): "<<std::endl;output_tensors.clear();
}
main.cpp 如何使用调用
#include <iostream>
#include<opencv2/opencv.hpp>
#include<math.h>
#include"yolov8_pose_onnx.h"
#include<time.h>
//#define  VIDEO_OPENCV //if define, use opencv for video.using namespace std;
using namespace cv;
using namespace dnn;template<typename _Tp>
std::vector<OutputParams> yolov8_onnx(_Tp& task, cv::Mat& img, std::string& model_path)
{// if (task.ReadModel(model_path, false,0,true)) {// 	std::cout << "read net ok!" << std::endl;// }//生成随机颜色 std::vector<cv::Scalar> color;srand(time(0));for (int i = 0; i < 80; i++) {int b = rand() % 256;int g = rand() % 256;int r = rand() % 256;color.push_back(cv::Scalar(b, g, r));}std::vector<OutputParams> result;PoseParams pose_detect;if (task.OnnxDetect(img, result)) {//std::cout<<"111"<<std::endl;//DrawPred(img, result, task._className, color,false);DrawPredPose(img, result, task._className,pose_detect, false);// 遍历所有检测结果// cv::Mat combinedMask = cv::Mat::zeros(img.size(), CV_8UC1);// for (const auto& output : result) {// 	// 获取当前检测框的ROI// 	cv::Mat roi = combinedMask(output.box);// 	cv::Mat boxMaskBinary;// 	output.boxMask.convertTo(boxMaskBinary, CV_8UC1);// 	// 将当前mask合并到总mask上// 	// 这里使用OR操作,可以根据需要改为其他合并方式// 	cv::bitwise_or(roi, boxMaskBinary, roi);// }// cv::imwrite("combinedMask.png", combinedMask);}else {std::cout << "Detect Failed!" << std::endl;}//system("pause");return result;
}int main(){std::string img_path = "./images/bus.jpg";std::string model_path_detect = "./model/yolo11n-pose.onnx";cv::Mat src = imread(img_path);cv::Mat img = src.clone();Yolov8PoseOnnx		task_pose_ort;if (task_pose_ort.ReadModel(model_path_detect, false,0,true)) {std::cout << "read net ok!" << std::endl;}std::vector<OutputParams> results_detect; long long startTime = std::chrono::system_clock::now().time_since_epoch().count(); //nsresults_detect=yolov8_onnx(task_pose_ort, img, model_path_detect); //yolov8 onnxruntime long long timeNow = std::chrono::system_clock::now().time_since_epoch().count();double timeuse = (timeNow - startTime) * 0.000001;//std::cout<<"end detect"<<endl;std::cout << (timeNow - startTime) * 0.000001 << "ms\n";OutputParams& output = results_detect[0];//第一个线缆信息std::cout<<"----person conf: "<<output.confidence<<std::endl;std::vector<cv::Point2f> getPoints;// 循环打印keyPoints信息 ssssss  ssfor (size_t i = 0; i < output.keyPoints.size(); ++i) {const auto& point = output.keyPoints[i];std::cout << "KeyPoint " << i << ": "<< "x=" << point.x << ", "<< "y=" << point.y << std::endl;}cv::waitKey(0);return 0;
}
运行结果


python版本
直接上代码,只需修改模型路径和图片路径即可
import onnxruntime as ort
import numpy as np
import cv2
import time# 定义一个调色板数组,其中每个元素是一个包含RGB值的列表,用于表示不同的颜色
palette = np.array([[255, 128, 0], [255, 153, 51], [255, 178, 102],[230, 230, 0], [255, 153, 255], [153, 204, 255],[255, 102, 255], [255, 51, 255], [102, 178, 255],[51, 153, 255], [255, 153, 153], [255, 102, 102],[255, 51, 51], [153, 255, 153], [102, 255, 102],[51, 255, 51], [0, 255, 0], [0, 0, 255], [255, 0, 0],[255, 255, 255]])
# 定义人体17个关键点的连接顺序,每个子列表包含两个数字,代表要连接的关键点的索引, 1鼻子 2左眼 3右眼 4左耳 5右耳 6左肩 7右肩 8左肘 9右肘 10左手腕 11右手腕 12左髋 13右髋 14左膝 15右膝 16左踝 17右踝
skeleton = [[16, 14], [14, 12], [17, 15], [15, 13], [12, 13], [6, 12],[7, 13], [6, 7], [6, 8], [7, 9], [8, 10], [9, 11], [2, 3],[1, 2], [1, 3], [2, 4], [3, 5], [4, 6], [5, 7]]
# 通过索引从调色板中选择颜色,用于绘制人体骨架的线条,每个索引对应一种颜色
pose_limb_color = palette[[9, 9, 9, 9, 7, 7, 7, 0, 0, 0, 0, 0, 16, 16, 16, 16, 16, 16, 16]]
# 通过索引从调色板中选择颜色,用于绘制人体的关键点,每个索引对应一种颜色
pose_kpt_color = palette[[16, 16, 16, 16, 16, 0, 0, 0, 0, 0, 0, 9, 9, 9, 9, 9, 9]]providers = [('CUDAExecutionProvider', {'device_id': 0,  # 可以选择GPU设备ID,如果你有多个GPU}),'CPUExecutionProvider',  # 也可以设置CPU作为备选
]def letterbox(im, new_shape=(640, 640), color=(114, 114, 114), scaleup=True):'''  调整图像大小和两边灰条填充  '''shape = im.shape[:2]if isinstance(new_shape, int):new_shape = (new_shape, new_shape)# 缩放比例 (new / old)r = min(new_shape[0] / shape[0], new_shape[1] / shape[1])# 只进行下采样 因为上采样会让图片模糊if not scaleup:r = min(r, 1.0)# 计算pad长宽new_unpad = int(round(shape[1] * r)), int(round(shape[0] * r))  # 保证缩放后图像比例不变dw, dh = new_shape[1] - new_unpad[0], new_shape[0] - new_unpad[1]  # wh padding# 在较小边的两侧进行pad, 而不是在一侧paddw /= 2dh /= 2# 将原图resize到new_unpad(长边相同,比例相同的新图)if shape[::-1] != new_unpad:  # resizeim = cv2.resize(im, new_unpad, interpolation=cv2.INTER_LINEAR)# 计算上下两侧的paddingtop, bottom = int(round(dh - 0.1)), int(round(dh + 0.1))# 计算左右两侧的paddingleft, right = int(round(dw - 0.1)), int(round(dw + 0.1))# 添加灰条im = cv2.copyMakeBorder(im, top, bottom, left, right, cv2.BORDER_CONSTANT, value=color)return imdef pre_process(img):# 归一化:将图像数据从0~255缩放到0~1之间,这一步是为了让模型更容易学习。img = img / 255.# 调整通道顺序:将图像从高度x宽度x通道数(H, W, C)调整为通道数x高度x宽度(C, H, W)的形式。# 这样做是因为许多深度学习框架要求输入的通道数在前。img = np.transpose(img, (2, 0, 1))# 增加一个维度:在0轴(即最前面)增加一个维度,将图像的形状从(C, H, W)变为(1, C, H, W)。# 这一步是为了满足深度学习模型输入时需要的批量大小(batch size)的维度,即使这里的批量大小为1。data = np.expand_dims(img, axis=0)return datadef xywh2xyxy(x):''' 中心坐标、w、h ------>>> 左上点,右下点 '''y = np.copy(x)y[:, 0] = x[:, 0] - x[:, 2] / 2  # top left xy[:, 1] = x[:, 1] - x[:, 3] / 2  # top left yy[:, 2] = x[:, 0] + x[:, 2] / 2  # bottom right xy[:, 3] = x[:, 1] + x[:, 3] / 2  # bottom right yreturn ydef nms(dets, iou_thresh):# dets: N * M, N是bbox的个数,M的前4位是对应的 左上点,右下点x1 = dets[:, 0]y1 = dets[:, 1]x2 = dets[:, 2]y2 = dets[:, 3]scores = dets[:, 4]areas = (x2 - x1 + 1) * (y2 - y1 + 1)  # 求每个bbox的面积order = scores.argsort()[::-1]  # 对分数进行倒排序keep = []  # 用来保存最后留下来的bboxx下标while order.size > 0:i = order[0]  # 无条件保留每次迭代中置信度最高的bboxkeep.append(i)# 计算置信度最高的bbox和其他剩下bbox之间的交叉区域xx1 = np.maximum(x1[i], x1[order[1:]])yy1 = np.maximum(y1[i], y1[order[1:]])xx2 = np.minimum(x2[i], x2[order[1:]])yy2 = np.minimum(y2[i], y2[order[1:]])# 计算置信度高的bbox和其他剩下bbox之间交叉区域的面积w = np.maximum(0.0, xx2 - xx1 + 1)h = np.maximum(0.0, yy2 - yy1 + 1)inter = w * h# 求交叉区域的面积占两者(置信度高的bbox和其他bbox)面积和的必烈ovr = inter / (areas[i] + areas[order[1:]] - inter)# 保留ovr小于thresh的bbox,进入下一次迭代。inds = np.where(ovr <= iou_thresh)[0]# 因为ovr中的索引不包括order[0]所以要向后移动一位order = order[inds + 1]output = []for i in keep:output.append(dets[i].tolist())return np.array(output)def xyxy2xywh(a):''' 左上点 右下点 ------>>> 左上点 宽 高 '''b = np.copy(a)b[:, 2] = a[:, 2] - a[:, 0]  # wb[:, 3] = a[:, 3] - a[:, 1]  # hreturn bdef scale_boxes(img1_shape, boxes, img0_shape):'''   将预测的坐标信息转换回原图尺度:param img1_shape: 缩放后的图像尺度:param boxes:  预测的box信息:param img0_shape: 原始图像尺度'''# 将检测框(x y w h)从img1_shape(预测图) 缩放到 img0_shape(原图)gain = min(img1_shape[0] / img0_shape[0], img1_shape[1] / img0_shape[1])  # gain  = old / newpad = (img1_shape[1] - img0_shape[1] * gain) / 2, (img1_shape[0] - img0_shape[0] * gain) / 2  # wh paddingboxes[:, 0] -= pad[0]boxes[:, 1] -= pad[1]boxes[:, :4] /= gain  # 检测框坐标点还原到原图上num_kpts = boxes.shape[1] // 3  # 56 // 3 = 18for kid in range(2, num_kpts + 1):boxes[:, kid * 3 - 1] = (boxes[:, kid * 3 - 1] - pad[0]) / gainboxes[:, kid * 3] = (boxes[:, kid * 3] - pad[1]) / gain# boxes[:, 5:] /= gain  # 关键点坐标还原到原图上clip_boxes(boxes, img0_shape)return boxesdef clip_boxes(boxes, shape):# 进行一个边界截断,以免溢出# 并且将检测框的坐标(左上角x,左上角y,宽度,高度)--->>>(左上角x,左上角y,右下角x,右下角y)top_left_x = boxes[:, 0].clip(0, shape[1])top_left_y = boxes[:, 1].clip(0, shape[0])bottom_right_x = (boxes[:, 0] + boxes[:, 2]).clip(0, shape[1])bottom_right_y = (boxes[:, 1] + boxes[:, 3]).clip(0, shape[0])boxes[:, 0] = top_left_x  # 左上boxes[:, 1] = top_left_yboxes[:, 2] = bottom_right_x  # 右下boxes[:, 3] = bottom_right_ydef plot_skeleton_kpts(im, kpts, steps=3):num_kpts = len(kpts) // steps  # 51 / 3 =17# 画点for kid in range(num_kpts):r, g, b = pose_kpt_color[kid]x_coord, y_coord = kpts[steps * kid], kpts[steps * kid + 1]conf = kpts[steps * kid + 2]if conf > 0.5:  # 关键点的置信度必须大于 0.5cv2.circle(im, (int(x_coord), int(y_coord)), 5, (int(r), int(g), int(b)), -1)# 画骨架for sk_id, sk in enumerate(skeleton):r, g, b = pose_limb_color[sk_id]pos1 = (int(kpts[(sk[0] - 1) * steps]), int(kpts[(sk[0] - 1) * steps + 1]))pos2 = (int(kpts[(sk[1] - 1) * steps]), int(kpts[(sk[1] - 1) * steps + 1]))conf1 = kpts[(sk[0] - 1) * steps + 2]conf2 = kpts[(sk[1] - 1) * steps + 2]if conf1 > 0.5 and conf2 > 0.5:  # 对于肢体,相连的两个关键点置信度 必须同时大于 0.5cv2.line(im, pos1, pos2, (int(r), int(g), int(b)), thickness=2)class Keypoint():def __init__(self, model_path):self.session = ort.InferenceSession(model_path, providers=providers)self.input_name = self.session.get_inputs()[0].nameself.label_name = self.session.get_outputs()[0].namedef inference(self, image):img = letterbox(image)data = pre_process(img)# 预测输出float32[1, 56, 8400]pred = self.session.run([self.label_name], {self.input_name: data.astype(np.float32)})[0]# [56, 8400]pred = pred[0]# [8400,56]pred = np.transpose(pred, (1, 0))# 置信度阈值过滤conf = 0.7pred = pred[pred[:, 4] > conf]if len(pred) == 0:print("没有检测到任何关键点")return imageelse:# 中心宽高转左上点,右下点bboxs = xywh2xyxy(pred)# NMS处理bboxs = nms(bboxs, iou_thresh=0.6)# 坐标从左上点,右下点 到 左上点,宽,高.bboxs = np.array(bboxs)bboxs = xyxy2xywh(bboxs)# 坐标点还原到原图bboxs = scale_boxes(img.shape, bboxs, image.shape)# 画框 画点 画骨架for box in bboxs:# 依次为 检测框(左上点,右下点)、置信度、17个关键点det_bbox, det_scores, kpts = box[0:4], box[4], box[5:]label = "person {:.2f}".format(det_scores)(label_width, label_height), _ = cv2.getTextSize(label, cv2.FONT_HERSHEY_SIMPLEX, 0.5, 1)# 画框cv2.rectangle(image, (int(det_bbox[0]), int(det_bbox[1])), (int(det_bbox[2]), int(det_bbox[3])), (0, 0, 255), 2)label_x = int(det_bbox[0])label_y = int(det_bbox[1]) - 10 if int(det_bbox[1]) - 10 > label_height else int(det_bbox[1]) + 10# 人体检测置信度if int(det_bbox[1]) < 30:cv2.rectangle(image, (label_x, label_y - label_height),(label_x + label_width + 3, label_y + label_height), (0, 0, 255), -1)cv2.putText(image, label, (label_x, label_y), cv2.FONT_HERSHEY_SIMPLEX, 0.5, (255, 255, 255), 1)else:cv2.rectangle(image, (label_x, label_y - label_height),(label_x + label_width + 3, label_y + label_height), (0, 0, 255), -1)cv2.putText(image, label, (int(det_bbox[0]) + 5, int(det_bbox[1]) - 5), cv2.FONT_HERSHEY_SIMPLEX,0.5, (255, 255, 255), 1)# 画点 连线plot_skeleton_kpts(image, kpts)return imageif __name__ == '__main__':model_path = 'yolo11n-pose.onnx'# 实例化模型keydet = Keypoint(model_path)# 输入图片路径image = cv2.imread('bus.jpg')output_image = keydet.inference(image)print("图片完成检测")cv2.imshow("keypoint", output_image)cv2.imwrite('zidane_pose.jpg', output_image)cv2.waitKey(0)cv2.destroyAllWindows()
