使用BeautifulReport让自动化测试报告一键生成
 在自动化测试中,一份清晰、美观的测试报告能极大提升工作效率 —— 它能快速呈现测试结果、定位问题,甚至能让非技术人员轻松理解测试情况。今天就来聊聊 Python 中一款超实用的测试报告工具 BeautifulReport,从基础使用到核心方法,带你全方位掌握它的用法。
一、什么是 BeautifulReport?
BeautifulReport 是一款基于 unittest 框架的测试报告生成工具,主打「高颜值」和「易上手」。相比 unittest 自带的文本报告或传统的 HTMLTestRunner,它有这些优势:
- 生成的 HTML 报告美观直观,支持明暗两种主题;
- 自带图表(饼图、柱状图),可视化展示测试结果(成功 / 失败 / 跳过用例占比);
- 支持用例详情展示,包括执行时间、错误信息、截图(失败时可自动嵌入);
- 配置简单,只需几行代码就能集成到现有 unittest 测试框架中。
二、快速上手:安装与基础使用
1. 安装 BeautifulReport
通过 pip 一键安装,支持 Python 3.6+:
pip install BeautifulReport2. 基础使用步骤
BeautifulReport 需配合 unittest 测试框架使用,核心流程分为 3 步:
编写测试用例 → 构建测试套件 → 用 BeautifulReport 运行并生成报告。
示例:生成第一份测试报告
下面通过一个完整例子演示:
import unittest
from BeautifulReport import BeautifulReport# 1. 编写测试用例(继承 unittest.TestCase)
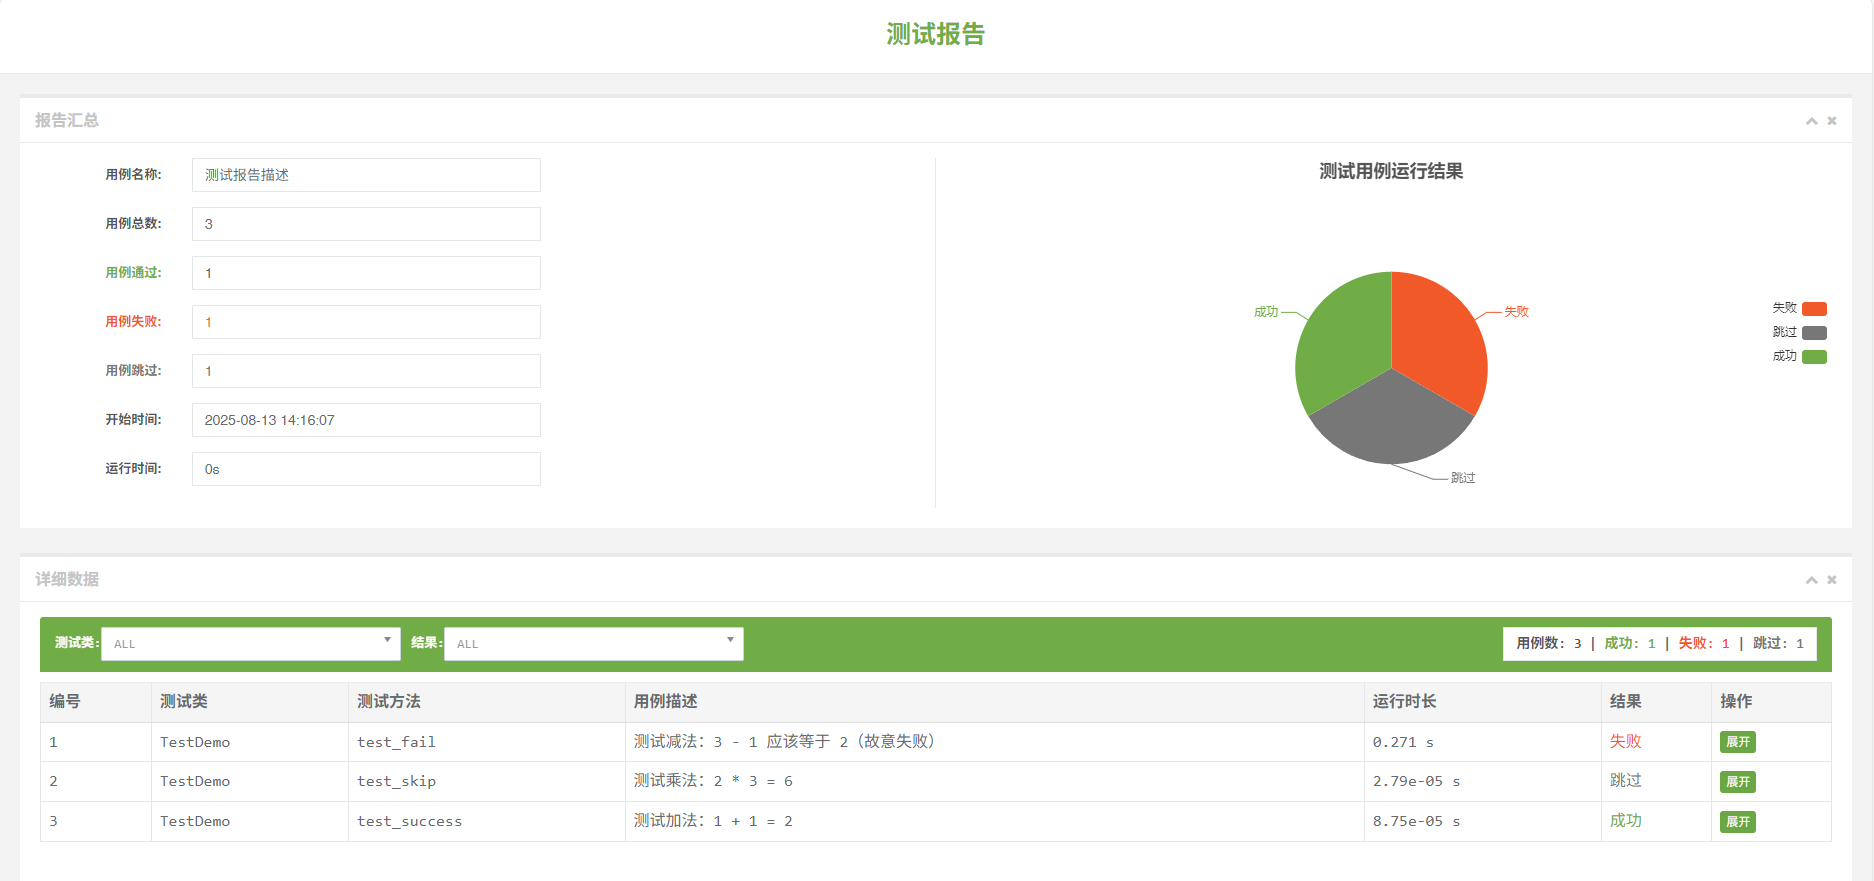
class TestDemo(unittest.TestCase):# 测试用例 1:成功案例def test_success(self):"""测试加法:1 + 1 = 2"""self.assertEqual(1 + 1, 2)# 测试用例 2:失败案例def test_fail(self):"""测试减法:3 - 1 应该等于 2(故意失败)"""self.assertEqual(3 - 1, 3) # 实际结果是 2,会失败# 测试用例 3:跳过案例@unittest.skip("暂时跳过此用例,原因:依赖未就绪")def test_skip(self):"""测试乘法:2 * 3 = 6"""self.assertEqual(2 * 3, 6)if __name__ == "__main__":# 2. 构建测试套件(收集要执行的用例)suite = unittest.TestLoader().loadTestsFromTestCase(TestDemo)# 3. 用 BeautifulReport 运行并生成报告# 生成报告(旧版用 report() 方法)BeautifulReport(suite).report(filename="test_report", # 报告文件名description="测试报告描述",report_dir="./reports" # 保存目录)生成的报告就是下面这个样子
三、report () 方法参数详解
BeautifulReport 的 report() 方法是生成报告的核心,其主要参数如下:
| 参数名 | 必选 | 说明 | 示例值 |
|---|---|---|---|
filename | 是 | 报告文件名(无需包含 .html 后缀) | "api_test_report" |
description | 否 | 报告描述(显示在报告顶部) | "V2.0 接口自动化测试报告" |
report_dir | 否 | 报告保存目录(默认当前目录) | "./reports/20231026" |
theme | 否 | 报告主题(旧版仅支持 "theme_default") | "theme_default" |
自定义报告路径和描述
# 构建测试套件
suite = unittest.TestLoader().loadTestsFromTestCase(TestCalculator)# 自定义报告参数
BeautifulReport(suite).report(filename="20231026_calculator_report",description="10月26日计算器功能回归测试",report_dir="./reports/daily"  # 保存到每日报告目录
)
四、高级技巧:提升报告实用性
1. 为测试用例添加详细描述
BeautifulReport 会自动提取测试方法的文档字符串(docstring)作为用例描述,建议在每个测试方法中添加清晰的说明:
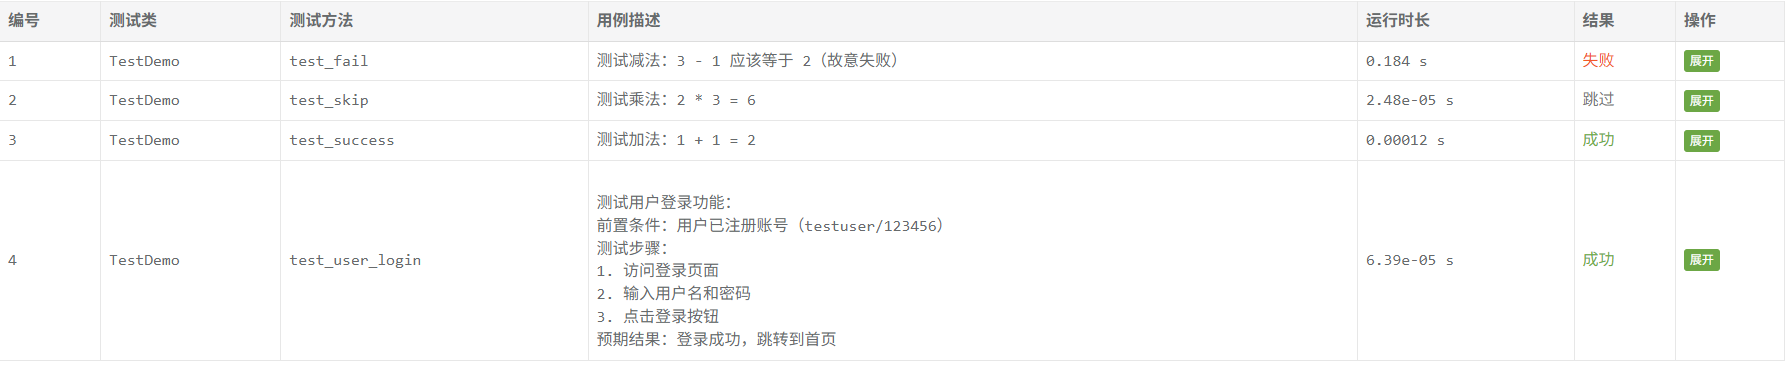
def test_user_login(self):"""测试用户登录功能:前置条件:用户已注册账号(testuser/123456)测试步骤:1. 访问登录页面2. 输入用户名和密码3. 点击登录按钮预期结果:登录成功,跳转到首页"""# 测试代码...图解:
2. 失败用例自动截图(UI 测试必备)
在 Selenium 等 UI 自动化测试中,用例失败时自动截图并嵌入报告,能极大方便问题定位。旧版 BeautifulReport 可通过 save_screenshot() 方法实现:
from selenium import webdriver
from selenium.webdriver.common.by import By
from selenium.webdriver.support.ui import WebDriverWait
from selenium.webdriver.support import expected_conditions as EC
import unittest
from BeautifulReport import BeautifulReport
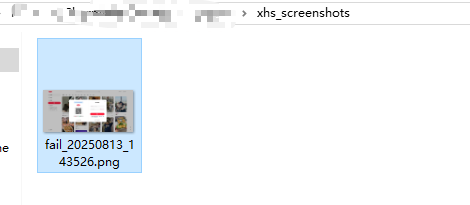
import os
import timeclass TestXiaohongshuLogin(unittest.TestCase):def setUp(self):# 初始化浏览器(显式指定驱动路径,避免配置问题)self.driver = webdriver.Chrome()self.driver.get("https://www.xiaohongshu.com")self.driver.maximize_window()self.wait = WebDriverWait(self.driver, 10) # 显式等待,最长10秒# 自动创建必要目录os.makedirs("./xhs_screenshots/", exist_ok=True)os.makedirs("./reports/", exist_ok=True)print("初始化完成,开始测试...")def test_login_failure(self):"""小红书登录失败测试(密码错误场景)"""# 标记用例是否执行成功self.test_success = Falsetry:# 1. 处理可能的弹窗(根据实际页面调整)try:close_btn = self.wait.until(EC.element_to_be_clickable((By.XPATH, "//button[text()='同意']")))close_btn.click()print("已关闭隐私弹窗")except Exception as e:print(f"无弹窗或关闭失败: {str(e)}")# 2. 点击登录按钮(更新XPath,适配最新页面)login_btn = self.wait.until(EC.element_to_be_clickable((By.XPATH, "//div[text()='登录' or text()='Sign in']")))login_btn.click()print("点击登录按钮成功")time.sleep(1)# 3. 切换到密码登录(更新XPath)try:pwd_login_btn = self.wait.until(EC.element_to_be_clickable((By.XPATH, "//span[text()='密码登录' or text()='Password login']")))pwd_login_btn.click()print("切换到密码登录模式")except Exception as e:print(f"无需切换密码登录或切换失败: {str(e)}")# 4. 输入账号密码(更新XPath)username_input = self.wait.until(EC.presence_of_element_located((By.XPATH, "//input[@placeholder='手机号/邮箱' or @placeholder='Phone/Email']")))username_input.send_keys("13800138000")pwd_input = self.wait.until(EC.presence_of_element_located((By.XPATH, "//input[@placeholder='请输入密码' or @placeholder='Enter password']")))pwd_input.send_keys("wrongpassword123")print("输入账号密码完成")# 5. 点击登录提交(更新XPath)submit_btn = self.wait.until(EC.element_to_be_clickable((By.XPATH, "//button[text()='登录' or text()='Login']")))submit_btn.click()print("点击登录提交")time.sleep(2)# 6. 故意断言失败(触发截图)self.assertIn("登录成功", self.driver.page_source)# 如果断言通过,才标记为成功(实际不会执行到这里)self.test_success = Trueexcept Exception as e:print(f"测试过程出错: {str(e)}")self.fail(f"测试执行失败: {str(e)}")def tearDown(self):# 优化截图逻辑:只要用例未成功执行,就截图if not hasattr(self, 'test_success') or not self.test_success:screenshot_path = f"./xhs_screenshots/fail_{time.strftime('%Y%m%d_%H%M%S')}.png"self.driver.save_screenshot(screenshot_path)print(f"用例失败,已截图保存到: {screenshot_path}")self.driver.quit()print("测试结束,浏览器已关闭")if __name__ == "__main__":suite = unittest.TestLoader().loadTestsFromTestCase(TestXiaohongshuLogin)BeautifulReport(suite).report(filename="小红书登录测试报告",description="小红书登录失败场景测试(含自动截图)",report_dir="./reports")print("测试报告已生成,路径: ./reports/小红书登录测试报告.html")失败截图:
3. 批量执行多个测试类
当测试用例分散在多个类中时,可以通过 TestSuite 批量收集并执行:
# 导入测试类
from test_login import TestLogin
from test_payment import TestPayment
from test_order import TestOrder# 构建测试套件
suite = unittest.TestSuite()
suite.addTests([unittest.TestLoader().loadTestsFromTestCase(TestLogin),unittest.TestLoader().loadTestsFromTestCase(TestPayment),unittest.TestLoader().loadTestsFromTestCase(TestOrder)
])# 生成综合报告
BeautifulReport(suite).report(filename="ecommerce_full_test",description="电商平台全流程测试报告",report_dir="./test_reports/full"
)
五、总结
旧版 BeautifulReport 虽然使用 report() 方法生成报告,但依然保持了工具的核心优势 —— 简单易用且报告美观。通过本文介绍的方法,你可以快速将其集成到 unittest 测试框架中,生成包含详细统计和可视化图表的测试报告。
如果你正在维护旧项目或需要兼容特定版本,掌握 report() 方法的使用能让你在不升级工具的情况下,依然享受 BeautifulReport 带来的便利。如需升级到新版,只需将 report() 方法替换为 run() 方法并调整相应参数即可平滑过渡。