scrapy 爬虫
- 创建项目
scrapy startproject tutorial:
生成目录结构

scrapy genspider example example.com
生成结果如下:
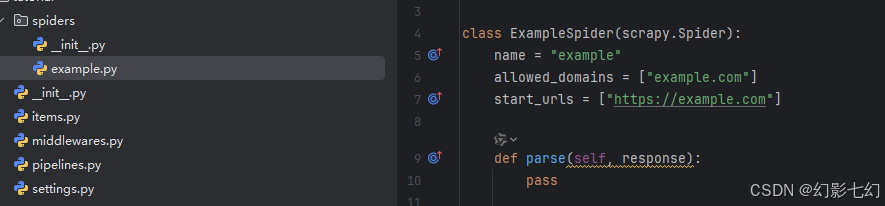 2.爬虫脚本:
这是我们第一只蜘蛛的代码。将其保存在名为的文件中 quotes_spider.py 下 tutorial/spiders 项目中的目录:
import scrapyclass QuotesSpider(scrapy.Spider):name = "quotes"def start_requests(self):urls = ['http://quotes.toscrape.com/page/1/','http://quotes.toscrape.com/page/2/',]for url in urls:yield scrapy.Request(url=url, callback=self.parse)def parse(self, response):page = response.url.split("/")[-2]filename = f'quotes-{page}.html'with open(filename, 'wb') as f:f.write(response.body)self.log(f'Saved file {filename}')scrapy crawl quotes 运行
-
name:标识蜘蛛。它在一个项目中必须是唯一的,即不能为不同的爬行器设置相同的名称。 -
start_requests():必须返回请求的可迭代(您可以返回请求列表或编写生成器函数),爬行器将从该请求开始爬行。后续请求将从这些初始请求中相继生成。 -
parse():将被调用以处理为每个请求下载的响应的方法。Response参数是 TextResponse 它保存页面内容,并具有进一步有用的方法来处理它。这个
parse()方法通常解析响应,将抓取的数据提取为字典,还查找要遵循的新URL并创建新请求 (Request)。
2.2 response.follow
跳转下一页
-
import scrapyclass QuotesSpider(scrapy.Spider):name = "quotes"start_urls = ['http://quotes.toscrape.com/page/1/',]def parse(self, response):for quote in response.css('div.quote'):yield {'text': quote.css('span.text::text').get(),'author': quote.css('span small::text').get(),'tags': quote.css('div.tags a.tag::text').getall(),}next_page = response.css('li.next a::attr(href)').get() #/page/3/if next_page is not None:yield response.follow(next_page, callback=self.parse)不像Scrapy.Request,
response.follow直接支持相对URL-无需调用URLJOIN。注意response.follow只返回一个请求实例;您仍然需要生成这个请求。
2.3 scrapy runspider quotes_spider.py -o quotes.jl 写入文件(测试启动脚本)
import scrapyclass QuotesSpider(scrapy.Spider):name = 'quotes'start_urls = ['http://quotes.toscrape.com/tag/humor/',]def parse(self, response):for quote in response.css('div.quote'):yield {'author': quote.xpath('span/small/text()').get(),'text': quote.css('span.text::text').get(),}next_page = response.css('li.next a::attr("href")').get()if next_page is not None:yield response.follow(next_page, self.parse)把它放在一个文本文件中,命名为 quotes_spider.py 然后用 runspider 命令:
完成后,您将 quotes.jl 以JSON行格式提交一个引号列表,包含文本和作者,如下所示:
{"author": "Jane Austen", "text": "“The person, be it gentleman or lady, who has not pleasure in a good novel, must be intolerably stupid.”"}
{"author": "Steve Martin", "text": "“A day without sunshine is like, you know, night.”"}
{"author": "Garrison Keillor", "text": "“Anyone who thinks sitting in church can make you a Christian must also think that sitting in a garage can make you a car.”"}
xpath 方法
response.xpath('//a[contains(@href, "image")]/text()').re(r'Name:\s*(.*)')
['My image 1','My image 2','My image 3','My image 4','My image 5']
response.xpath("//a/@href").getall()
['image1.html', 'image2.html', 'image3.html', 'image4.html', 'image5.html']
response.xpath('//div[count(a)=$cnt]/@id', cnt=5).get()
'images'
response.xpath('//a[contains(@href, "image")]/text()').re_first(r'Name:\s*(.*)')
'My image 1'
项目对象item
import scrapyclass Product(scrapy.Item):name = scrapy.Field()price = scrapy.Field()stock = scrapy.Field()tags = scrapy.Field()last_updated = scrapy.Field(serializer=str)项目管道pipelines
项目写入json文件
open_spider close_spider process_item 固定文件
import jsonfrom itemadapter import ItemAdapterclass JsonWriterPipeline:def open_spider(self, spider):self.file = open('items.jl', 'w')def close_spider(self, spider):self.file.close()def process_item(self, item, spider):line = json.dumps(ItemAdapter(item).asdict()) + "\n"self.file.write(line)return item
注解
配置文件setting
#它是一种可以用于构建用户代理机器人的名称,默认值:'scrapybot'
BOT_NAME = 'companyNews'
# 它是一种含有蜘蛛其中Scrapy将寻找模块列表,默认值: []
SPIDER_MODULES = ['companyNews.spiders']
# 默认: '',使用 genspider 命令创建新spider的模块。
NEWSPIDER_MODULE = 'companyNews.spiders'
#-----------------------日志文件配置-----------------------------------
# 默认: True,是否启用logging。
LOG_ENABLED=True
# 默认: 'utf-8',logging使用的编码。
LOG_ENCODING='utf-8'
# 它是利用它的日志信息可以被格式化的字符串。默认值:'%(asctime)s [%(name)s] %(levelname)s: %(message)s'
LOG_FORMAT='%(asctime)s [%(name)s] %(levelname)s: %(message)s'
# 它是利用它的日期/时间可以格式化字符串。默认值: '%Y-%m-%d %H:%M:%S'
LOG_DATEFORMAT='%Y-%m-%d %H:%M:%S'
#日志文件名
LOG_FILE = "dg.log"
#日志文件级别,默认值:“DEBUG”,log的最低级别。可选的级别有: CRITICAL、 ERROR、WARNING、INFO、DEBUG 。
LOG_LEVEL = 'WARNING'
# -----------------------------robots协议---------------------------------------------
# Obey robots.txt rules
# robots.txt 是遵循 Robot协议 的一个文件,它保存在网站的服务器中,它的作用是,告诉搜索引擎爬虫,
# 本网站哪些目录下的网页 不希望 你进行爬取收录。在Scrapy启动后,会在第一时间访问网站的 robots.txt 文件,
# 然后决定该网站的爬取范围。
ROBOTSTXT_OBEY = True
# -----------请求相关--------------
# 对于失败的HTTP请求(如超时)进行重试会降低爬取效率,当爬取目标基数很大时,舍弃部分数据不影响大局,提高效率
RETRY_ENABLED = False
#请求下载超时时间,默认180秒
DOWNLOAD_TIMEOUT=20
# 这是响应的下载器下载的最大尺寸,默认值:1073741824 (1024MB)
DOWNLOAD_MAXSIZE=1073741824
# 它定义为响应下载警告的大小,默认值:33554432 (32MB)
DOWNLOAD_WARNSIZE=33554432
# ------------------------全局并发数的一些配置:-------------------------------
# Configure maximum concurrent requests performed by Scrapy (default: 16)
# 默认 Request 并发数:16
CONCURRENT_REQUESTS = 32
# 默认 Item 并发数:100
CONCURRENT_ITEMS = 100
# The download delay setting will honor only one of:
# 默认每个域名的并发数:8
CONCURRENT_REQUESTS_PER_DOMAIN = 16
# 每个IP的最大并发数:0表示忽略
CONCURRENT_REQUESTS_PER_IP = 0
# Configure a delay for requests for the same website (default: 0)
# See http://scrapy.readthedocs.org/en/latest/topics/settings.html#download-delay
# See also autothrottle settings and docs
#DOWNLOAD_DELAY 会影响 CONCURRENT_REQUESTS,不能使并发显现出来,设置下载延迟
DOWNLOAD_DELAY = 3
# Disable cookies (enabled by default)
#禁用cookies,有些站点会从cookies中判断是否为爬虫
COOKIES_ENABLED = True
COOKIES_DEBUG = True
# Crawl responsibly by identifying yourself (and your website) on the user-agent
# 它定义了在抓取网站所使用的用户代理,默认值:“Scrapy / VERSION“
USER_AGENT = ' (+http://www.yourdomain.com)'
# Override the default request headers:
DEFAULT_REQUEST_HEADERS = {'Accept': 'text/html,application/xhtml+xml,application/xml;q=0.9,*/*;q=0.8','Accept-Language': 'en',
}
# Enable or disable spider middlewares
# See http://scrapy.readthedocs.org/en/latest/topics/spider-middleware.html
SPIDER_MIDDLEWARES = {'companyNews.middlewares.UserAgentmiddleware': 401,'companyNews.middlewares.ProxyMiddleware':426,
}
# Enable or disable downloader middlewares
# See http://scrapy.readthedocs.org/en/latest/topics/downloader-middleware.html
DOWNLOADER_MIDDLEWARES = {'companyNews.middlewares.UserAgentmiddleware': 400,'companyNews.middlewares.ProxyMiddleware':425,# 'scrapy.downloadermiddlewares.httpproxy.HttpProxyMiddleware':423,# 'companyNews.middlewares.CookieMiddleware': 700,
}
MYEXT_ENABLED=True      # 开启扩展
IDLE_NUMBER=12           # 配置空闲持续时间单位为 360个 ,一个时间单位为5s
# Enable or disable extensions
# See http://scrapy.readthedocs.org/en/latest/topics/extensions.html
# 在 EXTENSIONS 配置,激活扩展
EXTENSIONS = {# 'scrapy.extensions.telnet.TelnetConsole': None,'companyNews.extensions.RedisSpiderSmartIdleClosedExensions': 500,
}
# Configure item pipelines
# See http://scrapy.readthedocs.org/en/latest/topics/item-pipeline.html
# 注意:自定义pipeline的优先级需高于Redispipeline,因为RedisPipeline不会返回item,
# 所以如果RedisPipeline优先级高于自定义pipeline,那么自定义pipeline无法获取到item
ITEM_PIPELINES = {#将清除的项目在redis进行处理,# 将RedisPipeline注册到pipeline组件中(这样才能将数据存入Redis)# 'scrapy_redis.pipelines.RedisPipeline': 400,'companyNews.pipelines.companyNewsPipeline': 300,# 自定义pipeline视情况选择性注册(可选)
}
# Enable and configure HTTP caching (disabled by default)
# See http://scrapy.readthedocs.org/en/latest/topics/downloader-middleware.html#httpcache-middleware-settings
# ----------------scrapy默认已经自带了缓存,配置如下-----------------
# 打开缓存
HTTPCACHE_ENABLED = True
# 设置缓存过期时间(单位:秒)
HTTPCACHE_EXPIRATION_SECS = 0
# 缓存路径(默认为:.scrapy/httpcache)
HTTPCACHE_DIR = 'httpcache'
# 忽略的状态码
HTTPCACHE_IGNORE_HTTP_CODES = []
HTTPERROR_ALLOWED_CODES = [302, 301]
# 缓存模式(文件缓存)
HTTPCACHE_STORAGE = 'scrapy.extensions.httpcache.FilesystemCacheStorage'
#-----------------Scrapy-Redis分布式爬虫相关设置如下--------------------------
# Enables scheduling storing requests queue in redis.
#启用Redis调度存储请求队列,使用Scrapy-Redis的调度器,不再使用scrapy的调度器
SCHEDULER = "scrapy_redis.scheduler.Scheduler"
# Ensure all spiders share same duplicates filter through redis.
#确保所有的爬虫通过Redis去重,使用Scrapy-Redis的去重组件,不再使用scrapy的去重组件
DUPEFILTER_CLASS = "scrapy_redis.dupefilter.RFPDupeFilter"
# 默认请求序列化使用的是pickle 但是我们可以更改为其他类似的。PS:这玩意儿2.X的可以用。3.X的不能用
SCHEDULER_SERIALIZER = "scrapy_redis.picklecompat"
# 使用优先级调度请求队列 (默认使用),
# 使用Scrapy-Redis的从请求集合中取出请求的方式,三种方式择其一即可:
# 分别按(1)请求的优先级/(2)队列FIFO/(先进先出)(3)栈FILO 取出请求(先进后出)
SCHEDULER_QUEUE_CLASS = 'scr
代理ip
#mideware.py  #中添加方法
class ProxyMiddleware(object):"""This middleware provides http and https proxy for spiders"""def process_request(self, request, spider):# TODO: implement the code for spider.proxy_mode == 1, using proxy poolsif not hasattr(spider, 'proxy_mode') or not spider.proxy_mode:returnif spider.proxy_mode == 1:passif spider.proxy_mode == 2:if 'splash' in request.meta:request.meta['splash']['args']['proxy'] = GFW_PROXYelse:request.meta['proxy'] = GFW_PROXY#setting  添加代理配置
UserAgentMiddleware = 'haipproxy.crawler.middlewares.UserAgentMiddleware'
ProxyMiddleware = 'haipproxy.crawler.middlewares.ProxyMiddleware'
DOWNLOADER_MIDDLEWARES = {UserAgentMiddleware: 543,ProxyMiddleware: 543,'scrapy_splash.SplashCookiesMiddleware': 723,# it should be prior to HttpProxyMiddleware'scrapy_splash.SplashMiddleware': 725,'scrapy.downloadermiddlewares.httpcompression.HttpCompressionMiddleware': 810,
}
参考https://github.com/SpiderClub/haipproxy/blob/master/haipproxy/config/settings.py
spider
import scrapy
from tutorial.items import TutorialItemclass QuotesSpider(scrapy.Spider):name = "quotes1"start_urls = ['http://quotes.toscrape.com/page/1/',]def parse(self, response):for quote in response.css('div.quote'):item = TutorialItem()# item['text'] = quote.css('span.text::text').get()# item['author'] = quote.css('span small::text').get()# item['tags'] = quote.css('div.tags a.tag::text').getall()# yield itemtext = quote.css('span.text::text').get()item['text'] = text.replace(',', '').strip() if text else ''# 提取作者并清理数据author = quote.css('span small::text').get()item['author'] = author.replace(',', '').strip() if author else ''# 提取所有标签并清理数据(原代码只取第一个标签)tags = quote.css('div.tags a.tag::text').getall()item['tags'] = str([tag.replace(',', '').strip() for tag in tags] if tags else [])yield itemnext_page = response.css('li.next a::attr(href)').get()print('111 = ',next_page)if next_page is not None:yield response.follow(next_page, callback=self.parse)
item
import scrapyclass TutorialItem(scrapy.Item):# define the fields for your item here like:text = scrapy.Field()author = scrapy.Field()tags = scrapy.Field()
setting
ITEM_PIPELINES = {"tutorial.pipelines.TutorialPipeline": 300,
}
pipelines
class TutorialPipeline:def __init__(self):self.db = GetMysql(Mysql_me)self.conn = Noneself.cursor = Noneself.table_name = 'spider_tutorial_test'# self.log_tool = EnhancedLogger.get_logger('maven_api')self.log_tool = EnhancedLogger.get_logger(module_name="github_alldata_pip",log_dir="app_logs",rotation="50 MB")def open_spider(self, spider):self.conn, self.cursor = self.db.get_conn()# self.create_table()def process_item(self, item, spider):try:text = item['text']author = item['author']tags = item['tags']self.log_tool.info(f'开始写入数据{text},{author},{tags}')self.insert_data(text, author, tags)self.log_tool.info(f'开始写入数据')except Exception as e:self.log_tool.error(f'数据解析失败{e}')def insert_data(self, *args):"""安全插入数据到当前表"""try:# 使用参数化查询sql = f"""INSERT INTO `{self.table_name}` (text, author, tags) VALUES (%s, %s, %s)"""self.cursor.execute(sql, args)self.conn.commit()# 修复日志记录,正确引用参数self.log_tool.info(f"数据插入成功!!!!!!!!!!!文本:{args[0]}")except pymysql.Error as e:self.conn.rollback()self.log_tool.error(f"数据插入失败: {e}")def close_spider(self, spider):self.db.close(self.conn, self.cursor)self.log_tool.error(f"爬虫结束")