Docker-LNMP架构 创建多项目- 单个ngixn代理多个PHP容器服务
单个ngixn代理多个PHP容器
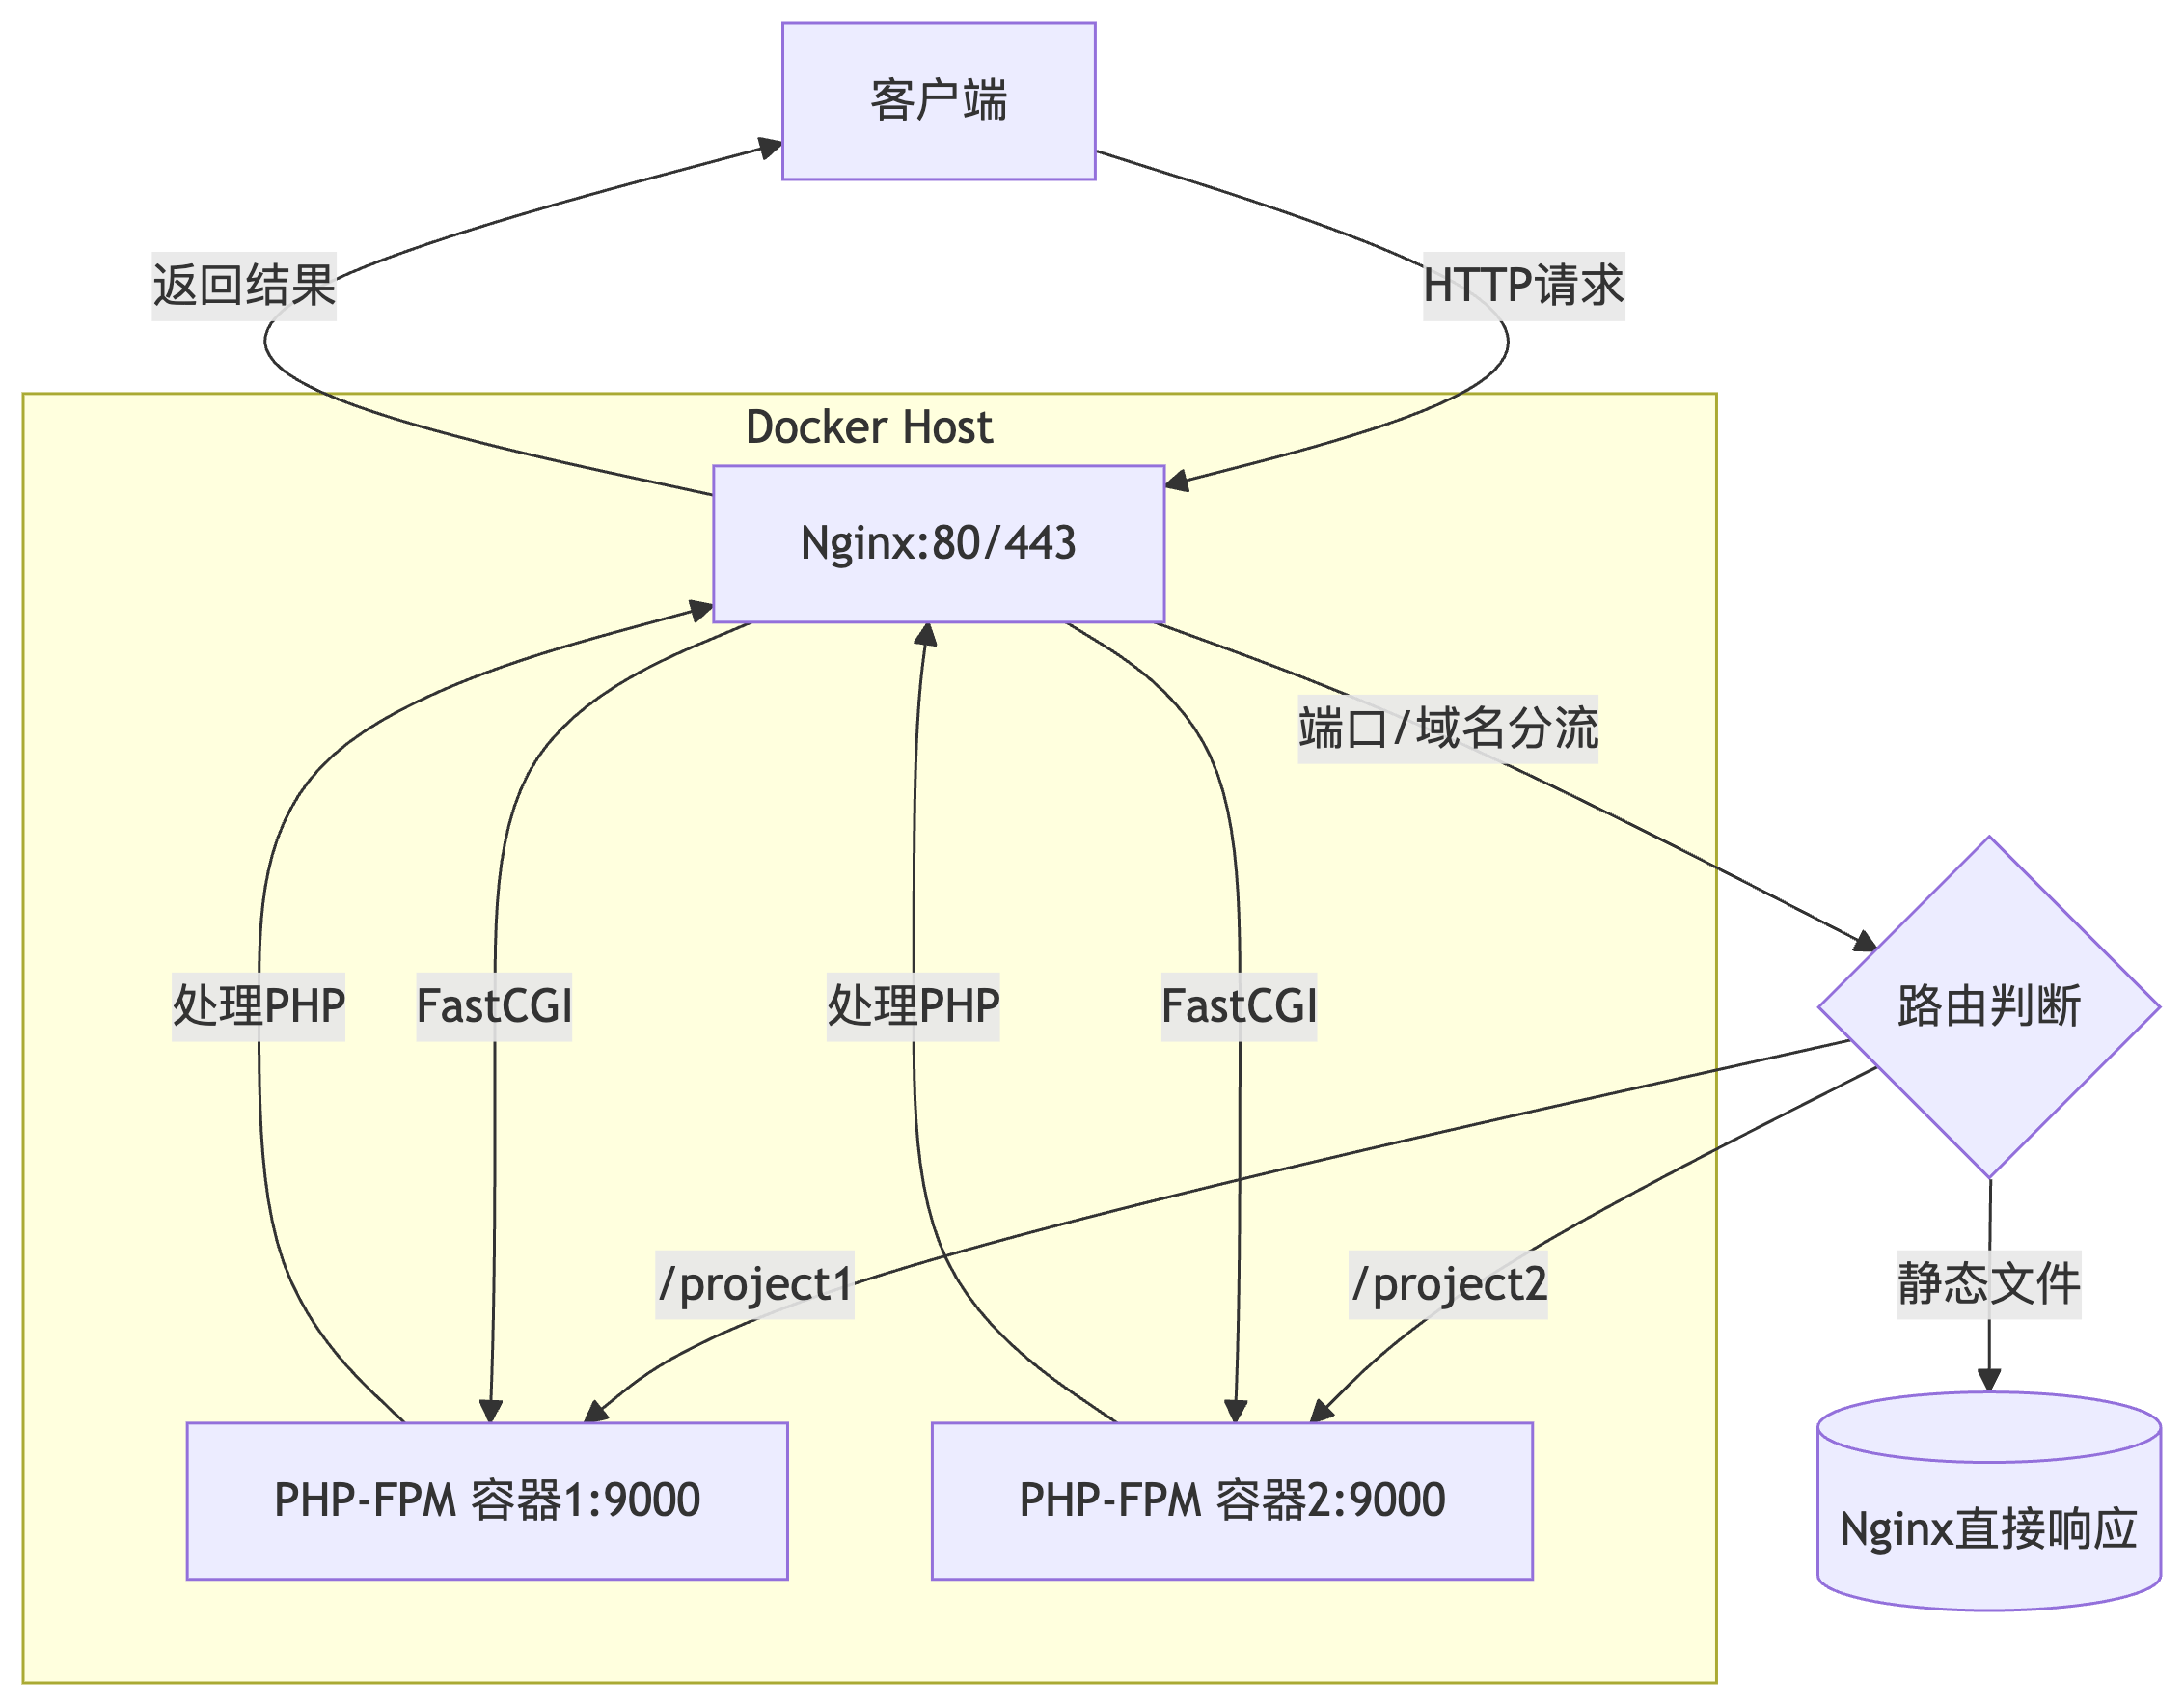
- 项目架构
- 1. 创建项目容器
- 2. 安装/配置nginx
- 3. 可能存在的问题
- 4. 注意事项
- PHP扩展安装
- 5. 其他方式配置
这种架构就是宿主机上单个nginx代理多个php容器服务,节省开销
由于使用了docker容器配置每个php服务
所以可以实现不同域名、端口访问一台服务器上的不同项目
项目架构
1. 创建项目容器
配置文件-1
docker-compose-php1.yml
services:php:image: php:7.4-fpmcontainer_name: my-php74-1volumes:- /var/www/html:/var/www/htmlports:- "9001:9000" #指定端口映射是为了在nginx中指向php容器中的PHP-FPM进程。容器内进程一般都默认是9000restart: unless-stopped
配置文件-2
docker-compose-php2.yml
services:php2:image: php:7.4-fpmcontainer_name: my-php74-2volumes:- /var/www/html:/var/www/htmlports:- "9002:9000"restart: unless-stopped
根据自己的情况创建、写入以上配置
mkdir /docker
vim docker-compose-php1.yml
vim docker-compose-php2.yml
执行docker compose创建容器
docker-compose -f 文件名 up -d-f:指定自定义的 compose 文件(默认是 docker-compose.yml)。
-d:后台运行。
配置也可以放到一个yml文件里面,分开写主要是方便之后新增项目。新增一个就单独执行一个
2. 安装/配置nginx
安装
#更新apt
apt update
#安装nginx
apt install nginx -y
#查看版本
nginx -v
#检查nginx状态
systemctl status nginx
#重启nginx
systemctl restart nginx
配置
这里我们有两个php容器,可以单独写配置代理两个http服务
#nginx配置目录
cd /etc/nginx/sites-enabled
#创建配置文件-1
vim php1
#创建配置文件-2
vim php2
配置文件-1
server {listen 8081;server_name _;#如果已经有域名,则可以使用域名来监听#listen 80;#server_name project2.example.com;#项目1目录文件root /var/www/html/project1;# Add index.php to the list if you are using PHPindex index.html index.htm index.nginx-debian.html;server_name _;location / {# First attempt to serve request as file, then# as directory, then fall back to displaying a 404.try_files $uri $uri/ /index.php?$query_string;index  index.html index.htm index.php;autoindex  on;if (!-e $request_filename) {rewrite  ^(.*)$ /index.php?s=/$1  last;break;}}# pass PHP scripts to FastCGI server#location ~ \.php$ {include snippets/fastcgi-php.conf;#php-fpm映射fastcgi_pass 127.0.0.1:9001;fastcgi_param SCRIPT_FILENAME $request_filename;include fastcgi_params;}
}
配置文件-2
server {listen 8082;server_name _;#如果已经有域名,则可以使用域名来监听#listen 80;#server_name project2.example.com;#项目2目录文件root /var/www/html/project2;# Add index.php to the list if you are using PHPindex index.html index.htm index.nginx-debian.html;location / {# First attempt to serve request as file, then# as directory, then fall back to displaying a 404.try_files $uri $uri/ /index.php?$query_string;index  index.html index.htm index.php;autoindex  on;if (!-e $request_filename) {rewrite  ^(.*)$ /index.php?s=/$1  last;break;}}# pass PHP scripts to FastCGI server#location ~ \.php$ {include snippets/fastcgi-php.conf;#php-fpm映射fastcgi_pass 127.0.0.1:9002;fastcgi_param SCRIPT_FILENAME $request_filename;include fastcgi_params;}
}
配置好之后可以在项目目录下写一个index.php文件
vim /var/www/html/project1 index.php
<?php
echo "Hello from Site 1!";
phpinfo();
?>
创建好之后,就可以在浏览器访问测试了
ip端口
服务器ip地址:8081
或者域名访问
project1.example.com
3. 可能存在的问题
如果配置好之后,访问504,可能是PHP-FPM没有成功,可以按以下步骤排查:
- 检查nginx配置文件,看是否指向容器映射在外的端口号(容器映射9001:9000)127.0.0.1:9000
vim /etc/nginx/sites-enabled/Nginx配置文件
查看配置,这里要和容器映射端口号保持一致
fastcgi_pass 127.0.0.1:9001;
- 进入容器检查,确定PHP-FPM已经启动
ps aux | grep php-fpm
- 检查php配置文件,查看PHP-FPM的listen配置,需要与端口映射一致,如果不对可以改成9000
docker ps
docker exec -it php容器id bash
cat /usr/local/etc/php-fpm.d/www.conf | grep listen
正常情况是,如果不是,改成这个就行
listen = 9000  # 表示 PHP-FPM 监听 TCP 9000 端口
或者
listen = 127.0.0.1:9000  # 表示 PHP-FPM 监听 TCP 9000 端口
4. 注意事项
PHP扩展安装
- 官方php:7.4-fpm镜像只包含最基本的核心扩展,在项目开发中如果有其他需求,比如连接mysql,需要在容器中单独安装对应扩展
PHP 官方 Docker 镜像提供了 docker-php-ext-install 工具,专门用于安装 PHP 扩展(不依赖系统包)
例如php-mysql扩展:在容器中执行
docker-php-ext-install pdo_mysql
安装成功后,在宿主机平滑重载php-fpm
docker exec -it 容器id /bin/sh -c "kill -USR2 1"
5. 其他方式配置
- 每个容器内部自带nginx的方式:Docker搭建lnmp详解
- nginx代理:Nginx代理-端口转发
- 如果还需要创建mysql容器、redis等,可以创建好容器之后,再将这些容器放到一个关联网络中,即可互相调用
Docker搭建Mysql8
Docker容器互联(桥接)实现互相访问