Angular初学者入门第二课——.ts、.d.ts、.state.ts的区别(精品)
初次接触 Angular 实际项目时,发现里边有很多不同后缀的文件,虽然没深入研究过,但根据其他编程语言的经验猜测这应该是通过后缀名来区分文件的作用。后来有时间研究了一下具体的细节和不同点,就有了今天这篇文章,这些知识虽然基础但属于必知必会的内容,希望有需要的看官可以认真读下去。
一、普通 .ts 文件
- 普通的 .ts 文件是 TypeScript 源文件,主要用于编写程序的逻辑和功能,这些文件会被编译成JavaScript 文件,并在运行时执行
- 包含实现代码:普通的 .ts 文件通常包含类、函数、变量的定义和实现逻辑
- 会被编译:在构建或编译项目时,.ts 文件会被 TypeScript 编译器转换成 .js 文件
- 使用场景:组件、服务、模块、指令等功能性代码文件
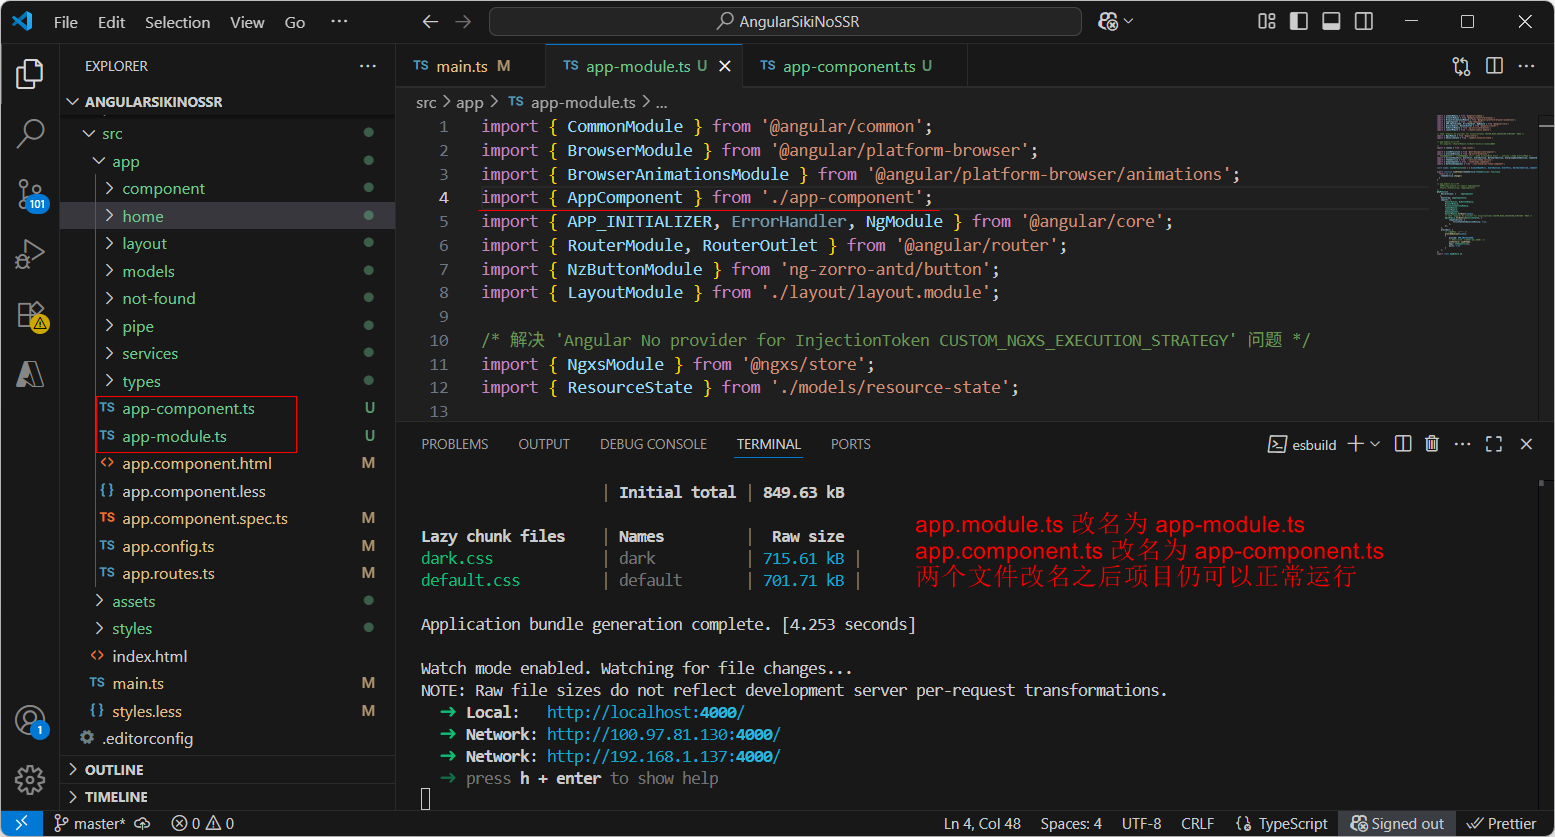
- 这里把 .component.ts、.module.ts 都作为普通 .ts,app.component.ts 改名为 app-component.ts、app.module.ts 改名为
app-module.ts 后项目仍可以正常运行(我们一般不改它们的后缀名)
// app.component.ts
import { Component } from '@angular/core';@Component({selector: 'app-root',template: `<h1>Hello Angular!</h1>`,
})
export class AppComponent {title: string = 'Angular App';constructor() {console.log('AppComponent initialized');}
}
二、.d.ts 文件
- .d.ts 文件是 TypeScript 的类型声明文件,用于提供类型定义信息,注意不包括具体的实现
- 它为 TypeScript 编译器提供类型检查和代码补全的支持,主要用于定义模块、库、全局变量或接口的类型
- 仅包含类型声明:.d.ts 文件只包含类型信息,没有实现逻辑
- 不会被编译:TypeScript 编译器会直接使用 .d.ts 文件中的类型信息进行类型检查,但不会将他们编译成 JavaScript 文件
- 使用场景:定义全局变量或接口;
为没有类型定义的第三方库提供类型支持;
为模块或库的外部用户提供类型支持; - 通俗点理解 .d.ts 文件中存放需要用 declare 声明的类型,global.d.ts 改成 globald.ts 编译会失败
//以下是 global.d.ts 文件的内容
declare global {interface Window {myCustomProperty: string;}
}//注意:TypeScript 声明文件必须包含至少一个 export 或 import,否则它会被视为一个全局脚本文件,而不是模块。
export {};
@Component({selector: 'app-resource',standalone: true,imports: [ CommonModule ],templateUrl: './resource.component.html',styleUrls: ['./resource.component.less']
})
export class ResourceComponent implements OnInit {constructor() { // 使用扩展的字段window.myCustomProperty = 'Hello, window.myCustomProperty!';console.log(window.myCustomProperty);}
}
三、.state.ts
- .state.ts 文件并不是 TypeScript 本身的标准文件类型,而是通常作为项目中的一种约定,用于定义和管理状态(state)相关的代码
- 它通常用于描述应用程序的状态模型,或者与状态管理工具(如NgRx、Akita、Redux等)配合
- 包含状态定义和逻辑:.state.ts 文件可能包含状态模型、初始状态、状态操作和选择器等
- 会被编译:与普通的 .ts 文件一样,.state.ts 文件也会被编译为 JavaScript 文件
- 使用场景:通常用于 Angular 项目中的状态管理模块,帮助管理局部或全局状态
- 既然是非标准文件类型,那么 resource.actions.ts 改名为 resource-actions.ts、resource.model.ts 改名为 resource-model.ts、resource.state.ts 改名为 resource-state.ts 后项目仍可以正常运行(我们一般不改它们的后缀名)
- 下面的代码是一个前后端完整的 ResourceState 实例,包括:定义ResourceState、@Selector()、@Action(xxx),以及使用ResourceState 和调用 @Action(xxx)
//resource.model.ts 文件的内容
export interface Resource {id: number,name: string
}export interface ResourceStateModel {resources: Resource[];selectedResourceId: number | null;
}
//resource.actions.ts 文件的内容
import { Resource } from "./resource.model";export class AddResource {static readonly type = '[Resource] Add Resource'; //动作类型constructor(public payload: Resource) {} //传递完整的资源数据
}export class SelectResource {static readonly type = '[Resource] Select Resource'; //动作类型constructor(public payload: number) {} //传递选中资源的Id
}
//resource.state.ts 文件的内容
import { Injectable } from '@angular/core';
import { State, Action, StateContext, Selector, NgxsAfterBootstrap } from '@ngxs/store';
import { Resource, ResourceStateModel } from './resource.model';
import { AddResource, SelectResource } from './resource.actions';@State<ResourceStateModel>({name: 'resource', //状态的名称,用于标识defaults: {resources: [{id: 1,name: 'name01'},{id: 2,name: 'name02'}], //初始资源列表为空,若ngxsAfterBootstrap()中对resources重新赋值则此处的初始化数据无效,若ngxsAfterBootstrap()中没对resources重新赋值则此处的初始化数据有效selectedResourceId: 1  //初始没有选中的资源}
})@Injectable({providedIn: 'root'
})
export class ResourceState implements NgxsAfterBootstrap{//定义选择器,用于从状态中派生数据//选择所有资源@Selector()static getAllResources(state: ResourceStateModel): Resource[] {return state.resources;}//选择当前选中的资源@Selector()static getSelectedResource(state: ResourceStateModel): Resource | undefined {return state.resources.find(resource => resource.id === state.selectedResourceId);}//定义动作处理器,用于更新状态,@Action(AddResource)与第二个参数必须是同类型//动作:添加资源@Action(AddResource)addResource(ctx: StateContext<ResourceStateModel>, action: AddResource): void {console.log(`In addResource, action as below:`)console.log(action)const state = ctx.getState();/*...是扩展运算符或剩余参数,扩展运算符用于将数组或对象的元素展开为单独的值,通常用于合并数组、克隆对象等操作。示例 1:展开数组const array1 = [1, 2, 3];const array2 = [4, 5, 6];const combinedArray = [...array1, ...array2];console.log(combinedArray); // 输出:[1, 2, 3, 4, 5, 6]示例 2:展开对象const obj1 = { name: 'Alice', age: 25 };const obj2 = { location: 'New York' };const combinedObj = { ...obj1, ...obj2 };console.log(combinedObj); // 输出:{ name: 'Alice', age: 25, location: 'New York' }*///这两行的效果一样,展开之后又组装成对象console.log(state)console.log({...state})console.log(state.resources)console.log(...state.resources)console.log({...state.resources})const newResources = [...state.resources, action.payload];ctx.setState({...state,resources: newResources});}//动作:选择资源@Action(SelectResource)selectResource(ctx: StateContext<ResourceStateModel>, action: SelectResource): void {console.log(`In selectResource, action as below:`)console.log(action)const state = ctx.getState();ctx.setState({...state,selectedResourceId: action.payload});}public ngxsAfterBootstrap(ctx: StateContext<ResourceStateModel>): void {console.log('check bootstrap')//ctx.patchState({resources: [{id: 1, name: "test",}]})}
}
<!-- resource.component.html 文件的内容 -->
<ul><!-- @State支持@Selector()读取状态值、@Action()更新状态值,这些功能普通Service也能实现@State最核心的Angular 提供的 AsyncPipe 是管理 Observable 最简单和推荐的方式。它会自动订阅和取消订阅,无需手动管理。如果手动对普通Service实现订阅和取消订阅还是比较复杂的--><li *ngFor="let resource of resources$ | async" (click)="onSelectResource(resource.id)">{{resource.name}}<span *ngIf="(selectedResource$ | async)?.id === resource.id">(selected)</span></li>
</ul>
<button (click)="addResource()">Add Resource</button>
//resource.component.ts 文件的内容
import { Component, inject, OnInit } from '@angular/core';
import { CommonModule } from '@angular/common';
import { AddResource, SelectResource } from '../../models/resource.actions';
import { Resource } from '../../models/resource.model';
import { Observable } from 'rxjs';
import { ResourceState } from '../../models/resource.state';
import { Store } from '@ngxs/store';@Component({selector: 'app-resource',standalone: true,imports: [ CommonModule ],templateUrl: './resource.component.html',styleUrls: ['./resource.component.less']
})
export class ResourceComponent implements OnInit {//使用 @Select 装饰器获取状态的选择器值public readonly resources$: Observable<Resource[]> = inject(Store).select(ResourceState.getAllResources);public readonly selectedResource$: Observable<Resource | undefined>= inject(Store).select(ResourceState.getSelectedResource);constructor(private store: Store) { }ngOnInit() {}ngAfterViewInit(): void {//Called after ngAfterContentInit when the component's view has been initialized. Applies to components only.//Add 'implements AfterViewInit' to the class.}addResource(): void {const newResource: Resource = {id: Math.floor(Math.random() * 1000), //随机生成Idname: `Resource ${Math.floor(Math.random() * 100)}`};//触发 AddResource 动作,找到resource.state.ts中的@Action(AddResource),向状态中添加新资源this.store.dispatch(new AddResource(newResource));}onSelectResource(resourceId: number): void {//触发 SelectResource 动作,找到resource.state.ts中的@Action(SelectResource)更新选中的资源Idthis.store.dispatch(new SelectResource(resourceId));}
}
四、总结
讨论了这么多,文章中列举出的这些不同后缀名的文件,只有 .d.ts 文件的后缀名不能改,其他后缀名改完之后项目仍然能正常运行,但是 Angular 的这一设定跟 .Net 中的 Controller 类似,约定大于配置,所有的开发者都按照相同的规则进行开发,这样当你读其他人的代码时就能快速入手,确实对大家都是好事。
OK,如果各位看官觉得本文对你有所帮助,请点赞、收藏、评论支持一下,我将感激不尽。