PXE自动化安装部署OpenEuler24.03LTS
PXE批量部署工作原理:
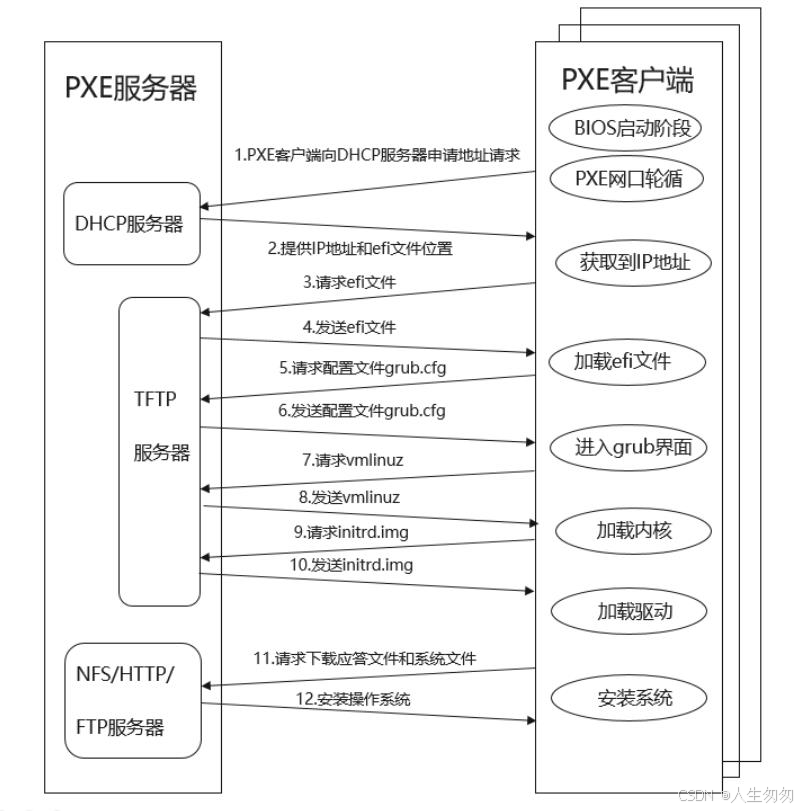
需要安装的服务:
dhcp:申请地址进行通信
tftp:提供小文件下载服务(grubaa64.efi、grub.cfg、initrd.img 、vmlinuz)
xinetd:超级守护进程,守护tftp
httpd:提供安装配置文佳下载服务
一、关闭Firewalld/SElinux,简单介绍一下,不再赘述
。
关闭并禁用防火墙:
systemctl disable firewalld.servicesystemctl stop firewalld.service禁用SElinux:编辑etc/sysconfig/selinux,永久关闭SELinux(需要重启系统)SELINUX=disabled
二、安装DHCP服务(多网卡)
yum install dhcp -y
修改配置文件
#---------可用最简配置-------------------
网络和子网掩码(根据自己实际情况编写)
cat >>/etc/dhcp/dhcpd.conf<<EOF
subnet 192.168.49.0 netmask 255.255.255.0 {
range 192.168.49.131 192.168.49.190;
default-lease-time 21600;
max-lease-time 43200;
next-server 192.168.49.130;
filename "uefi/grubx64.efi";}
EOF
systemctl restart dhcpd
配置文件说明:
range 192.168.49.131 192.168.49.190; # 可分配的起始IP-结束IP
default-lease-time 21600; # 设置默认的IP租用期限
max-lease-time 43200; # 设置最大的IP租用期限
next-server 192.168.49.130; # 告知客户端TFTP服务器的ip
filename “uefi/grubx64.efi”; # filename指定grubx64.efi作为efi引导文件。
我没有用到
在多网卡的情况下指定某块网卡启动DHCP服务,复制文件,修改配置文件,重新注册服务
cp /usr/lib/systemd/system/dhcpd.service /etc/systemd/system/
vi /etc/systemd/system/dhcpd.service
ExecStart=/usr/sbin/dhcpd -f -cf /etc/dhcp/dhcpd.conf -user dhcpd -group dhcpd --no-pid <your_interface_name(s)>(我要使用的网卡是ens192)
systemctl --system daemon-reload
systemctl restart dhcpd.service
systemctl enable dhcpd.service
三、安装TFTP服务(无需认证,小文件传输)
安装xinetd、tftp-server和syslinux服务
#syslinux 会在 /usr/share/syslinux/pxelinux.0 生成pxelinux.0文件 ,需要手动复制到/var/lib/tftpboot/ 目录中,后面详细介绍。
yum install xinetd -y
yum install tftp-server -y
配置xinetd,由xinetd管理tftp
vim /etc/xinetd.d/tftp
service tftp{socket_type             = dgramprotocol                = udpwait                    = yesuser                    = rootserver                  = /usr/sbin/in.tftpdserver_args             = -s /var/lib/tftpboot        disable                 = no  #只改这一行默认disable是yes的,把它改为no即可per_source              = 11cps                     = 100 2flags                   = IPv4
}
systemctl enable tftp
systemctl enable xinetd
systemctl start tftp
systemctl start xinetd
四、安装HTTP服务
yum install httpd -ysystemctl start httpdsystemctl enable httpd五、上传镜像文件

mkdir /var/www/html/cdrom
cp -a /mnt/* /var/www/html/cdrom  #建议拷贝,因为要改权限chown -R apache.apache /var/www/html/*
五、配置ks.cfg文件
创建ks文件夹存放安装配置
我的模板
vim /var/www/html/ks.cfg
步骤2 按要求需求准备ks.cfg文件
#version=DEVEL# Use graphical install#graphicaltext%packages@^server-product-environment%end# Keyboard layoutskeyboard --vckeymap=cn --xlayouts='cn'# System languagelang zh_CN.UTF-8#Network informationnetwork --hostname=localhost.localdomain# Use hard drive installation media# harddrive --dir= --partition=LABEL=openEuler-24.03-LTS-x86_64url --url http://192.168.100.201/OE2403# Run the Setup Agent on first bootfirstboot --enable# System servicesservices --disabled="chronyd"ignoredisk --only-use=sdaautopart# Partition clearing informationclearpart --none --initlabel
roootpw 123456
reboot
ks.cfg模板文件在/root下的anaconda-ks.cfg文件
cp /root/anaconda-ks.cfg  /var/www/html/ks.cfg
chown -R apache.apache /var/www/html/*
编辑ks.cfg文件,稍微修改以下4行
vim /var/www/html/ks.cfg
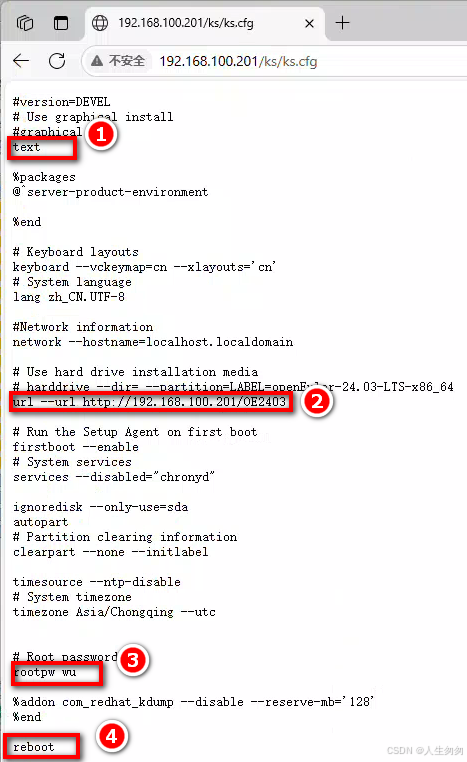
【备注】
①不要图形界面,太耗资源,选用文本方式。②http提供安装文件的url③root口令明文(简单,但不安全)④重启生效
六、复制内核文件
内核文件、虚拟根文件以及菜单文件,我们都是通过tftp服务来提供的,由于系统及版本的不同,对于一个比较复制机群来说,我们需要准备不同系统,不同版本的内核文件,initrd.img文件。菜单文件只需要一份即可。
/var/lib/tftpboot/目录规划如下:
挂载光驱,虚拟一定要先在连接光驱打上钩
将镜像中的启动文件COPY到tftp server的根目录中
步骤1 配置启动文件进入在tftpboot目录下创建一个uefi目录,执行以下命令。cd /var/lib/tftpboot/ && mkdir uefi步骤2 拷贝grubaa64.efi文件cp /var/www/html/cdrom/EFI/BOOT/grubx64.efi ./uefi/步骤3 拷贝安装源文件到uefi复制vmlinuz和initrd.img到/var/lib/tftpboot/uefi/目录下,执行以下命令。cp /var/www/html/cdrom/images/pxeboot/vmlinuz ./cp /var/www/html/cdrom/images/pxeboot/ initrd.img ./
步骤4 创建grub.cfg引导文件并编辑
执行以下命令。
cd /var/lib/tftpboot/uefi/ && vi grub.cfg
编辑内容如下
set timeout=5menuentry 'Install OpenEuler24' {linux uefi/vmlinuz ip=dhcp inst.ks=http://192.168.49.130/ks.cfginst.resolution=1024x768initrd uefi/initrd.img }
到此,PXE_Server所需要做的工作已经完成,直接开启所需要安装系统的服务器(或虚拟机)即可。
成功
