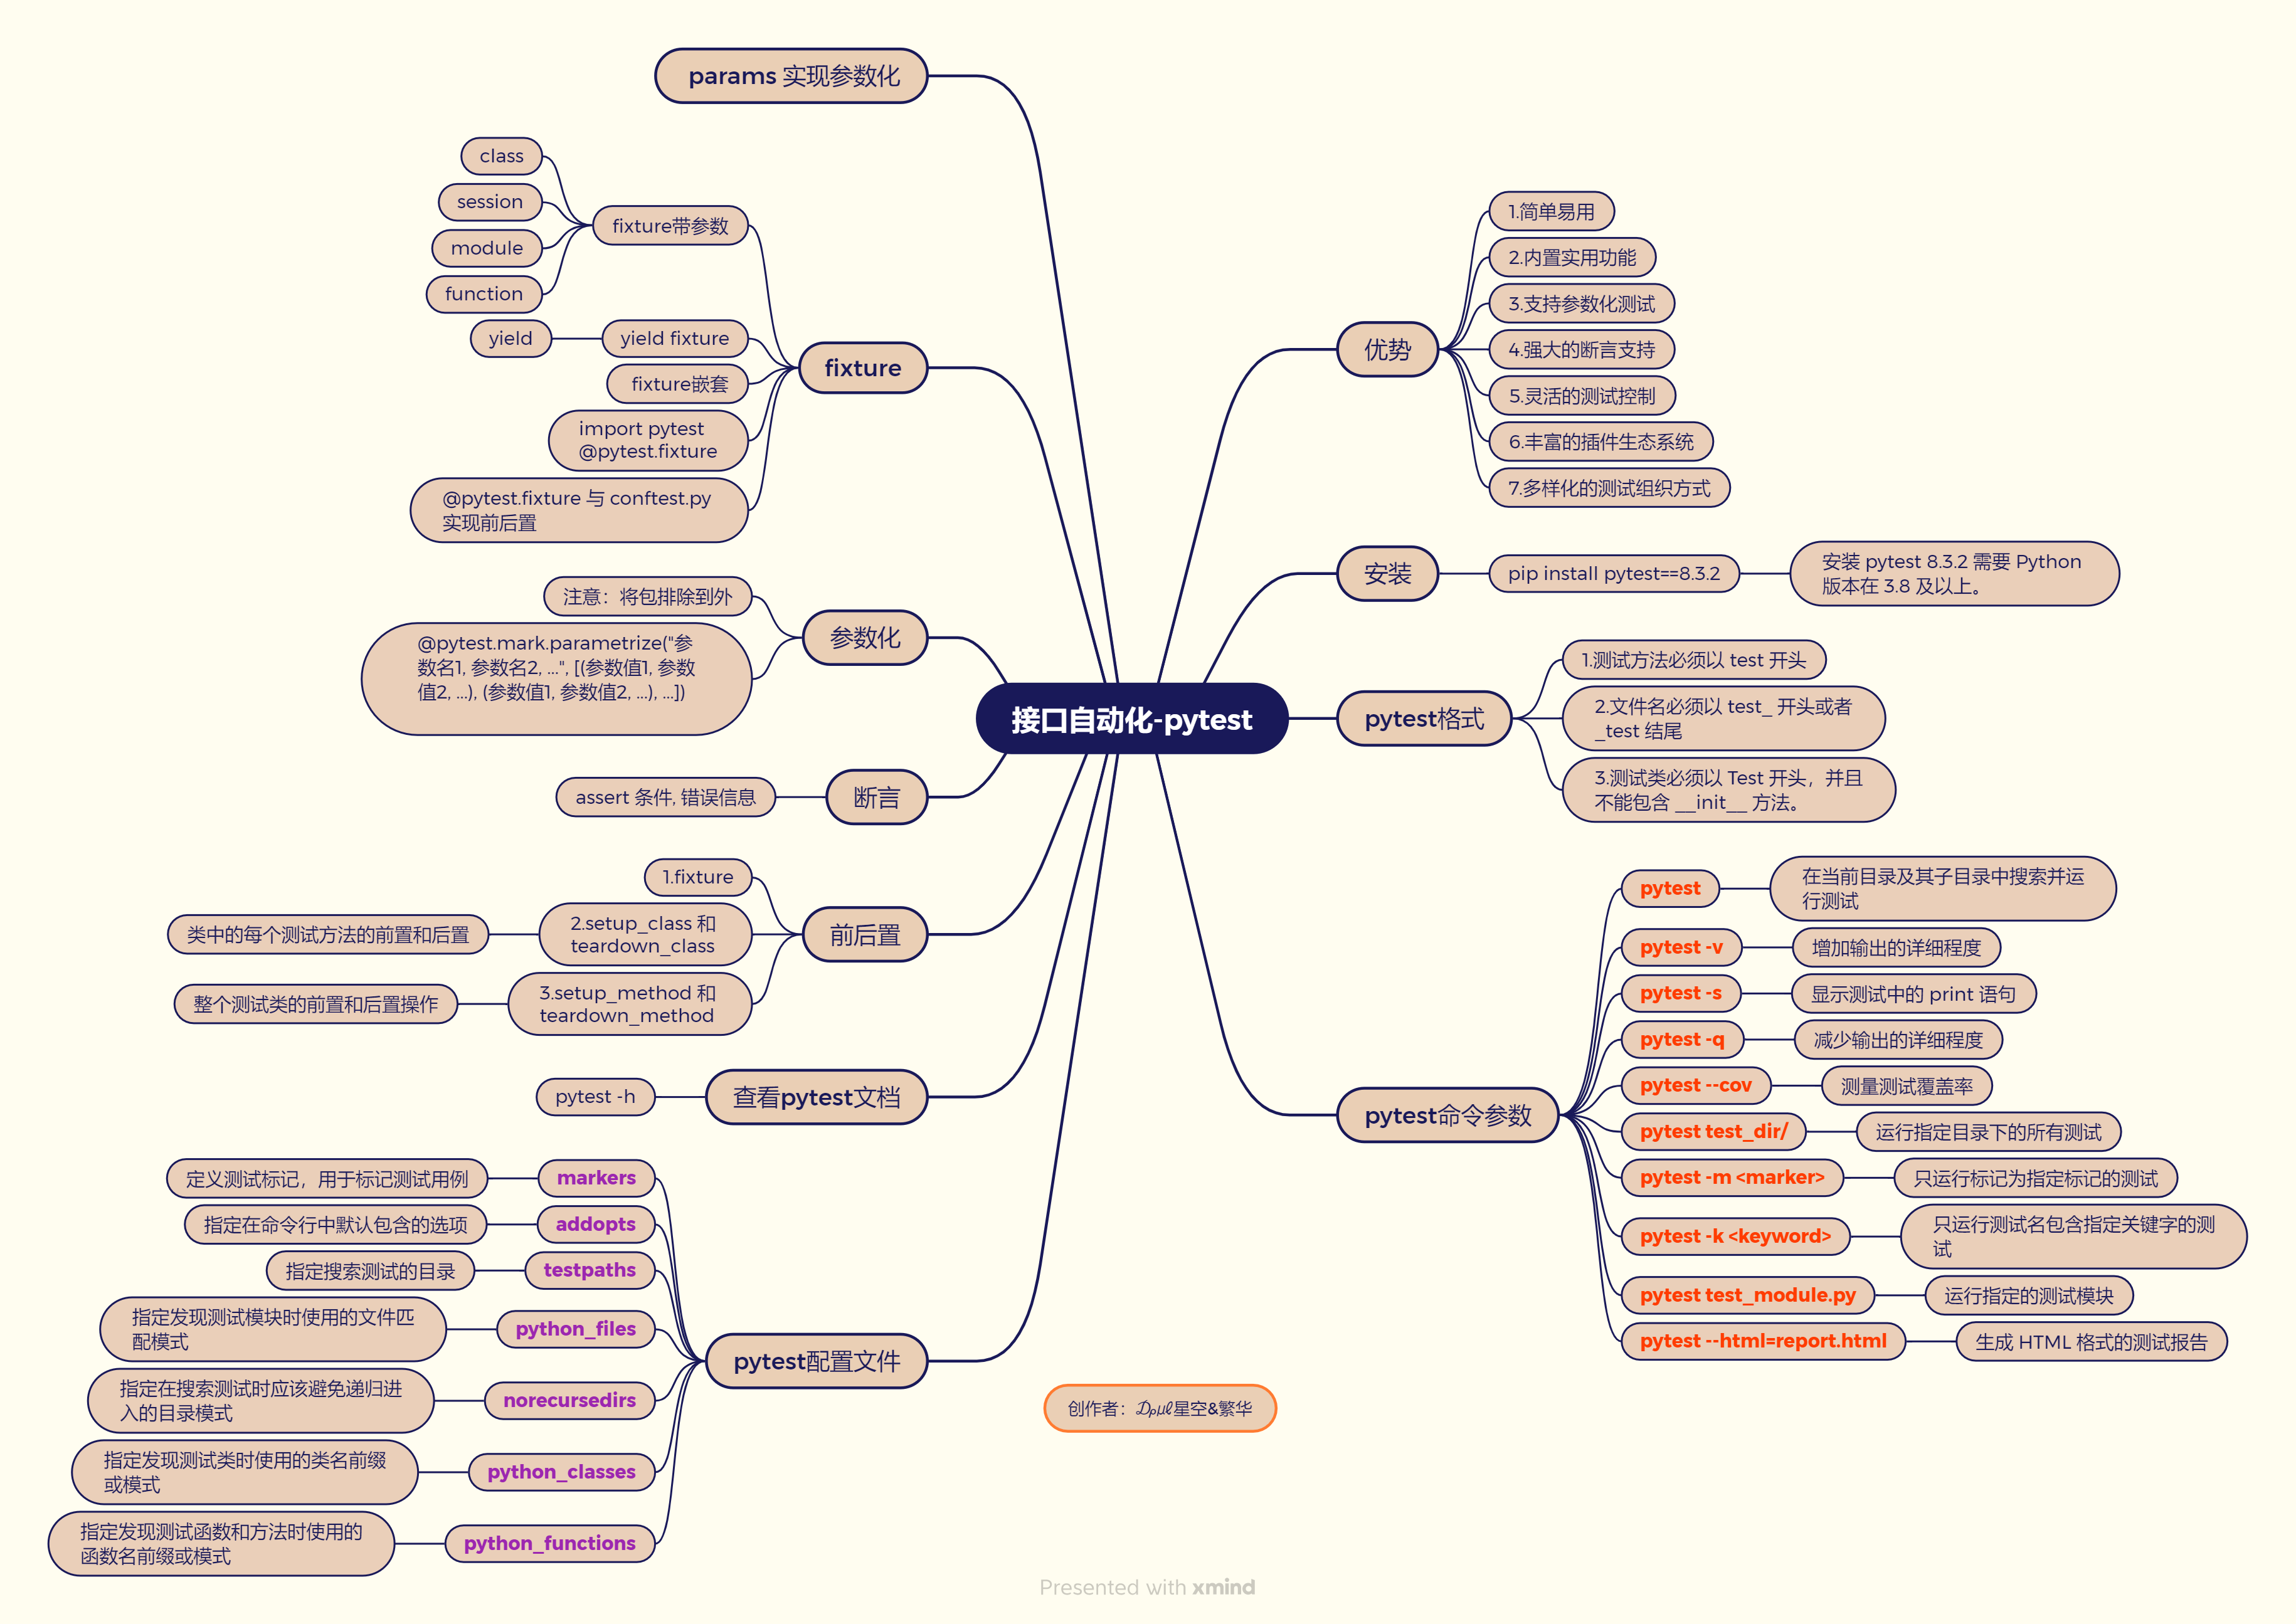
接口自动化-pytest
目录
1.介绍
2.pytest对比和优势
主流 Python 测试框架对比表
3.pytest安装
4.pytest
4.1传统的方式
4.2pytest测试
4.3pytest格式
4.4查看pytest文档
4.5 pytest命令参数
4.6pytest配置文件
4.7前后置
4.8断言
4.8参数化
4.9fixture
4.10 yield fixture
4.11fixtue带参数
4.11conftest.py 与 @pytest.fixture 结合实现全局前后置应用
4.12通过 params 实现参数化
5.总结
1.介绍
之前介绍了request,有了 requests 库,可以实现对接口发起 HTTP 请求。然而在自动化测试中,我们需要编写大量的测试用例,这些用例的组织、执行和管理则需要借助其他更强大的框架 ——pytest 框架。
requests 库专注于 HTTP 请求的发送,而 pytest 框架则提供了测试用例的组织、执行和管理功能。
pytest 是一个非常流行且高效的 Python 测试框架,它提供了丰富的功能和灵活的用法,使得编写和运行测试用例变得简单而高效。
pytest 官方文档:Get Started - pytest documentation
2.pytest对比和优势
主流 Python 测试框架对比表
| 维度 | unittest(Python 内置) | pytest | Robot Framework |
|---|---|---|---|
| 安装方式 | 无需安装(Python 标准库) | pip install pytest | pip install robotframework |
| 语法风格 | 基于类(需继承TestCase) | 函数式或面向对象(无需样板代码) | 关键字驱动(表格化用例) |
| 断言方法 | self.assertEqual()等 | 原生assert表达式 | 关键字断言(如Should Be Equal) |
| 参数化支持 | 需subTest或第三方库 | 内置@pytest.mark.parametrize | 数据驱动(Test Template) |
| 插件生态 | 少(依赖扩展库如HTMLTestRunner) | 丰富(如pytest-html、pytest-xdist、allure-pytest) | 一般(需安装额外库如RequestsLibrary) |
| 测试报告 | 需插件生成报告 | 支持多格式报告(HTML、Allure 等) | 自带详细日志和报告 |
| 学习曲线 | 中等(需熟悉 xUnit 模式) | 低(语法简洁) | 高(需掌握关键字和语法) |
| BDD 支持 | 不支持 | 支持(通过pytest-bdd插件) | 支持(通过robotframework-bdd) |
| 适用场景 | 简单项目或遗留系统维护 | 复杂项目、高扩展性需求 | 团队协作、非技术人员参与 |
| pytest 核心优势 | 详细说明 |
|---|---|
| 简单易用 | 语法简洁清晰,编写测试用例友好,几乎可在几分钟内上手。 |
| 强大的断言支持 | 支持原生 assert 表达式,无需记忆复杂的断言方法,且能智能报告断言失败的中间值,便于问题定位。 |
| 支持参数化测试 | 通过内置的 @pytest.mark.parametrize 装饰器,允许使用不同的参数多次运行同一个测试函数,大幅提高测试效率。 |
| 丰富的插件生态系统 | 拥有大量插件(如 pytest-html 生成 HTML 报告、pytest-xdist 实现并行执行、allure-pytest 生成美观报告等),可扩展覆盖测试、失败用例重跑等功能;同时支持与 Selenium、Requests、Appium 等工具结合,实现 Web、接口、App 自动化测试。 |
| 灵活的测试控制 | 允许跳过指定用例、标记预期失败的用例,还支持重复执行失败的用例,提升测试灵活性。 |
| 多样化的测试组织方式 | 支持函数式测试和面向对象测试(无需继承特定类),也可通过类对测试用例进行分组,便于测试管理。 |
| 内置实用功能 | 提供如临时目录(tmp_path)等内置 fixtures,方便处理测试资源;支持通过 pytest.raises 断言异常场景,满足各类测试需求。 |
3.pytest安装
版本要求:安装 pytest 8.3.2 需要 Python 版本在 3.8 及以上。
安装命令:
pip install pytest==8.3.2-
不同 pytest 版本支持的最低 Python 版本对应表:
pytest 版本 最低 Python 版本 8.0+ 3.8+ 7.1+ 3.7+ 6.2 - 7.0 3.6+ 5.0 - 6.1 3.5+ 3.3 - 4.6 2.7、3.4+ 若当前 Python 版本低于 3.8,可根据上表选择适配的 pytest 版本进行安装。

4.pytest
4.1传统的方式
def tes1():print('test1')def tes2():print('test2')def tes3():print('test3')import test03if __name__ == '__main__':test03.tes1()test03.tes2()test03.tes3()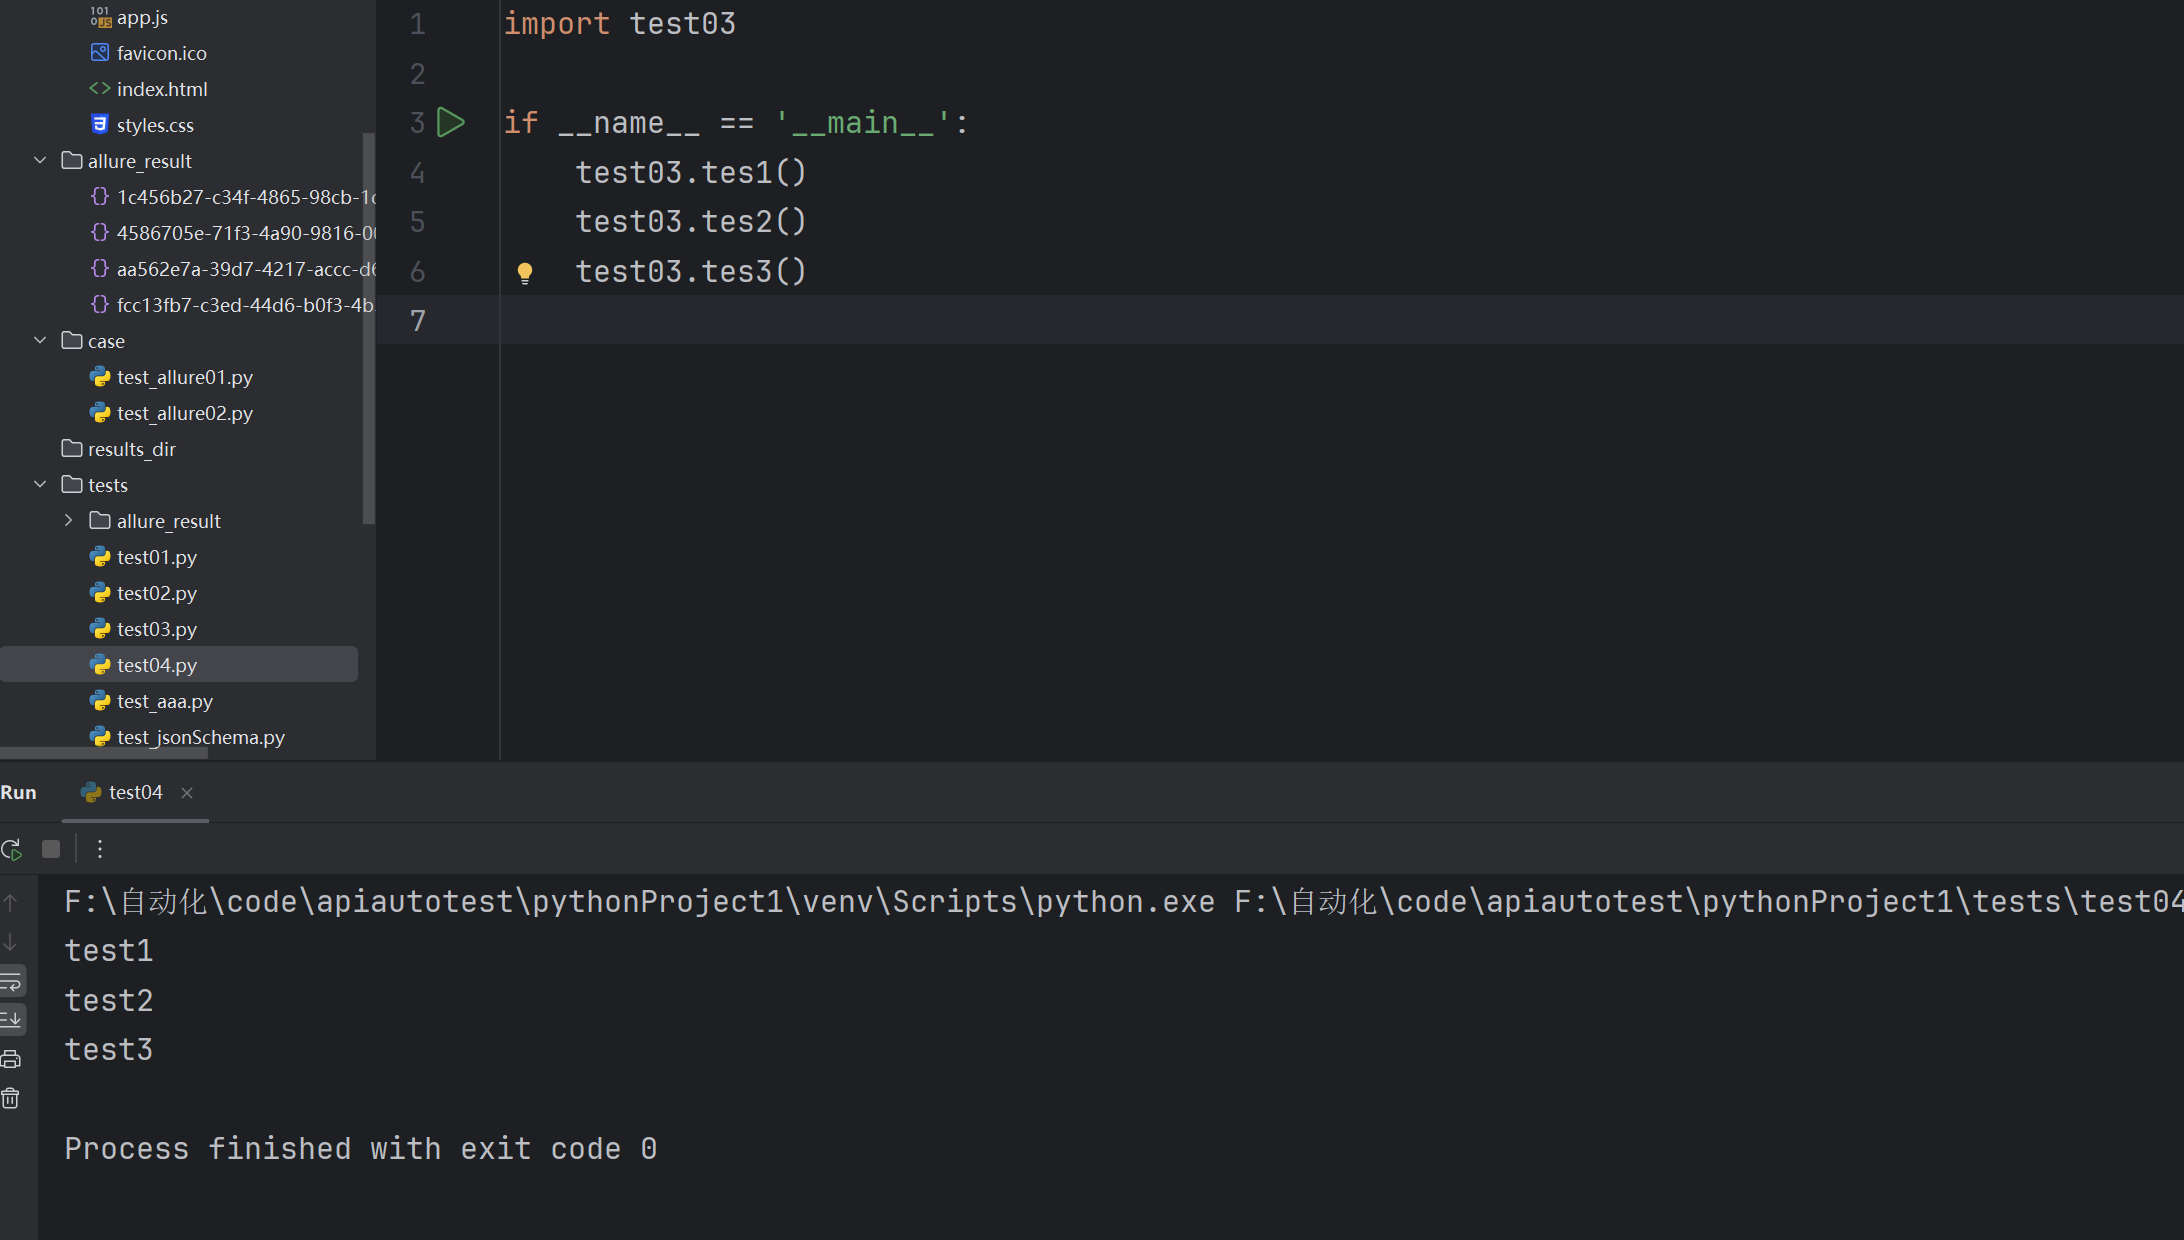
4.2pytest测试
class Testaaa():def test01(self):print("test01")def test02(self):print("test01")def test03(self):print("test01")def test04(seelf):print("test01")
pytest可以自动识别测试用例,不用再编写main函数并调用测试用例
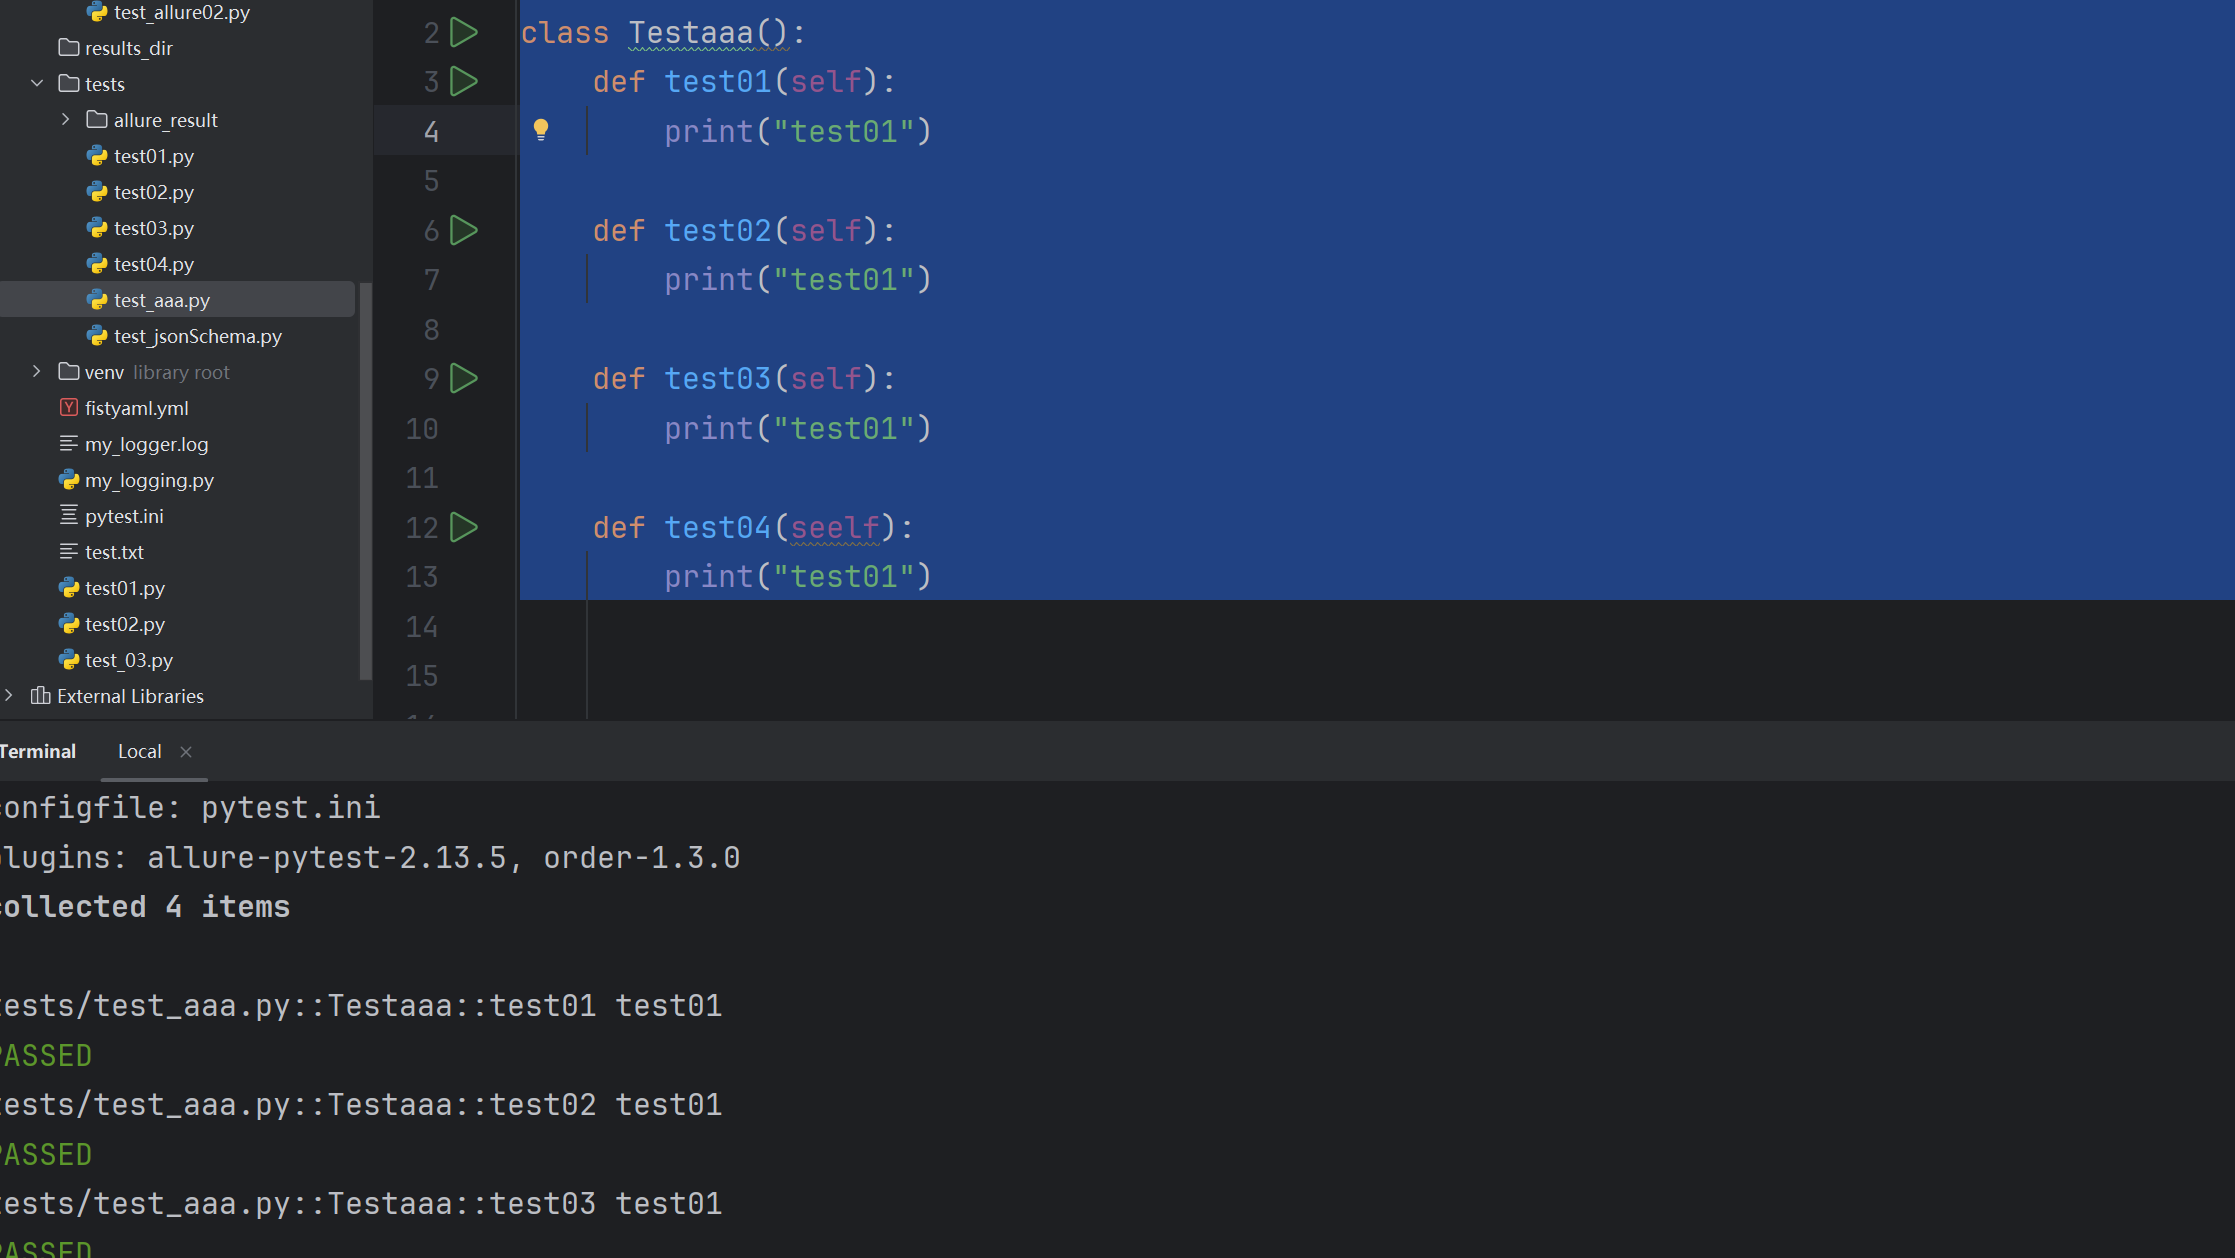
但是用例要按照一定格式,不然识别不出测试用例。
4.3pytest格式
pytest 测试用例的命名规范如下:
- 文件名必须以 test_ 开头或者_test 结尾。
- 测试类必须以 Test 开头,并且不能包含 __init__ 方法。
- 测试方法必须以 test 开头。
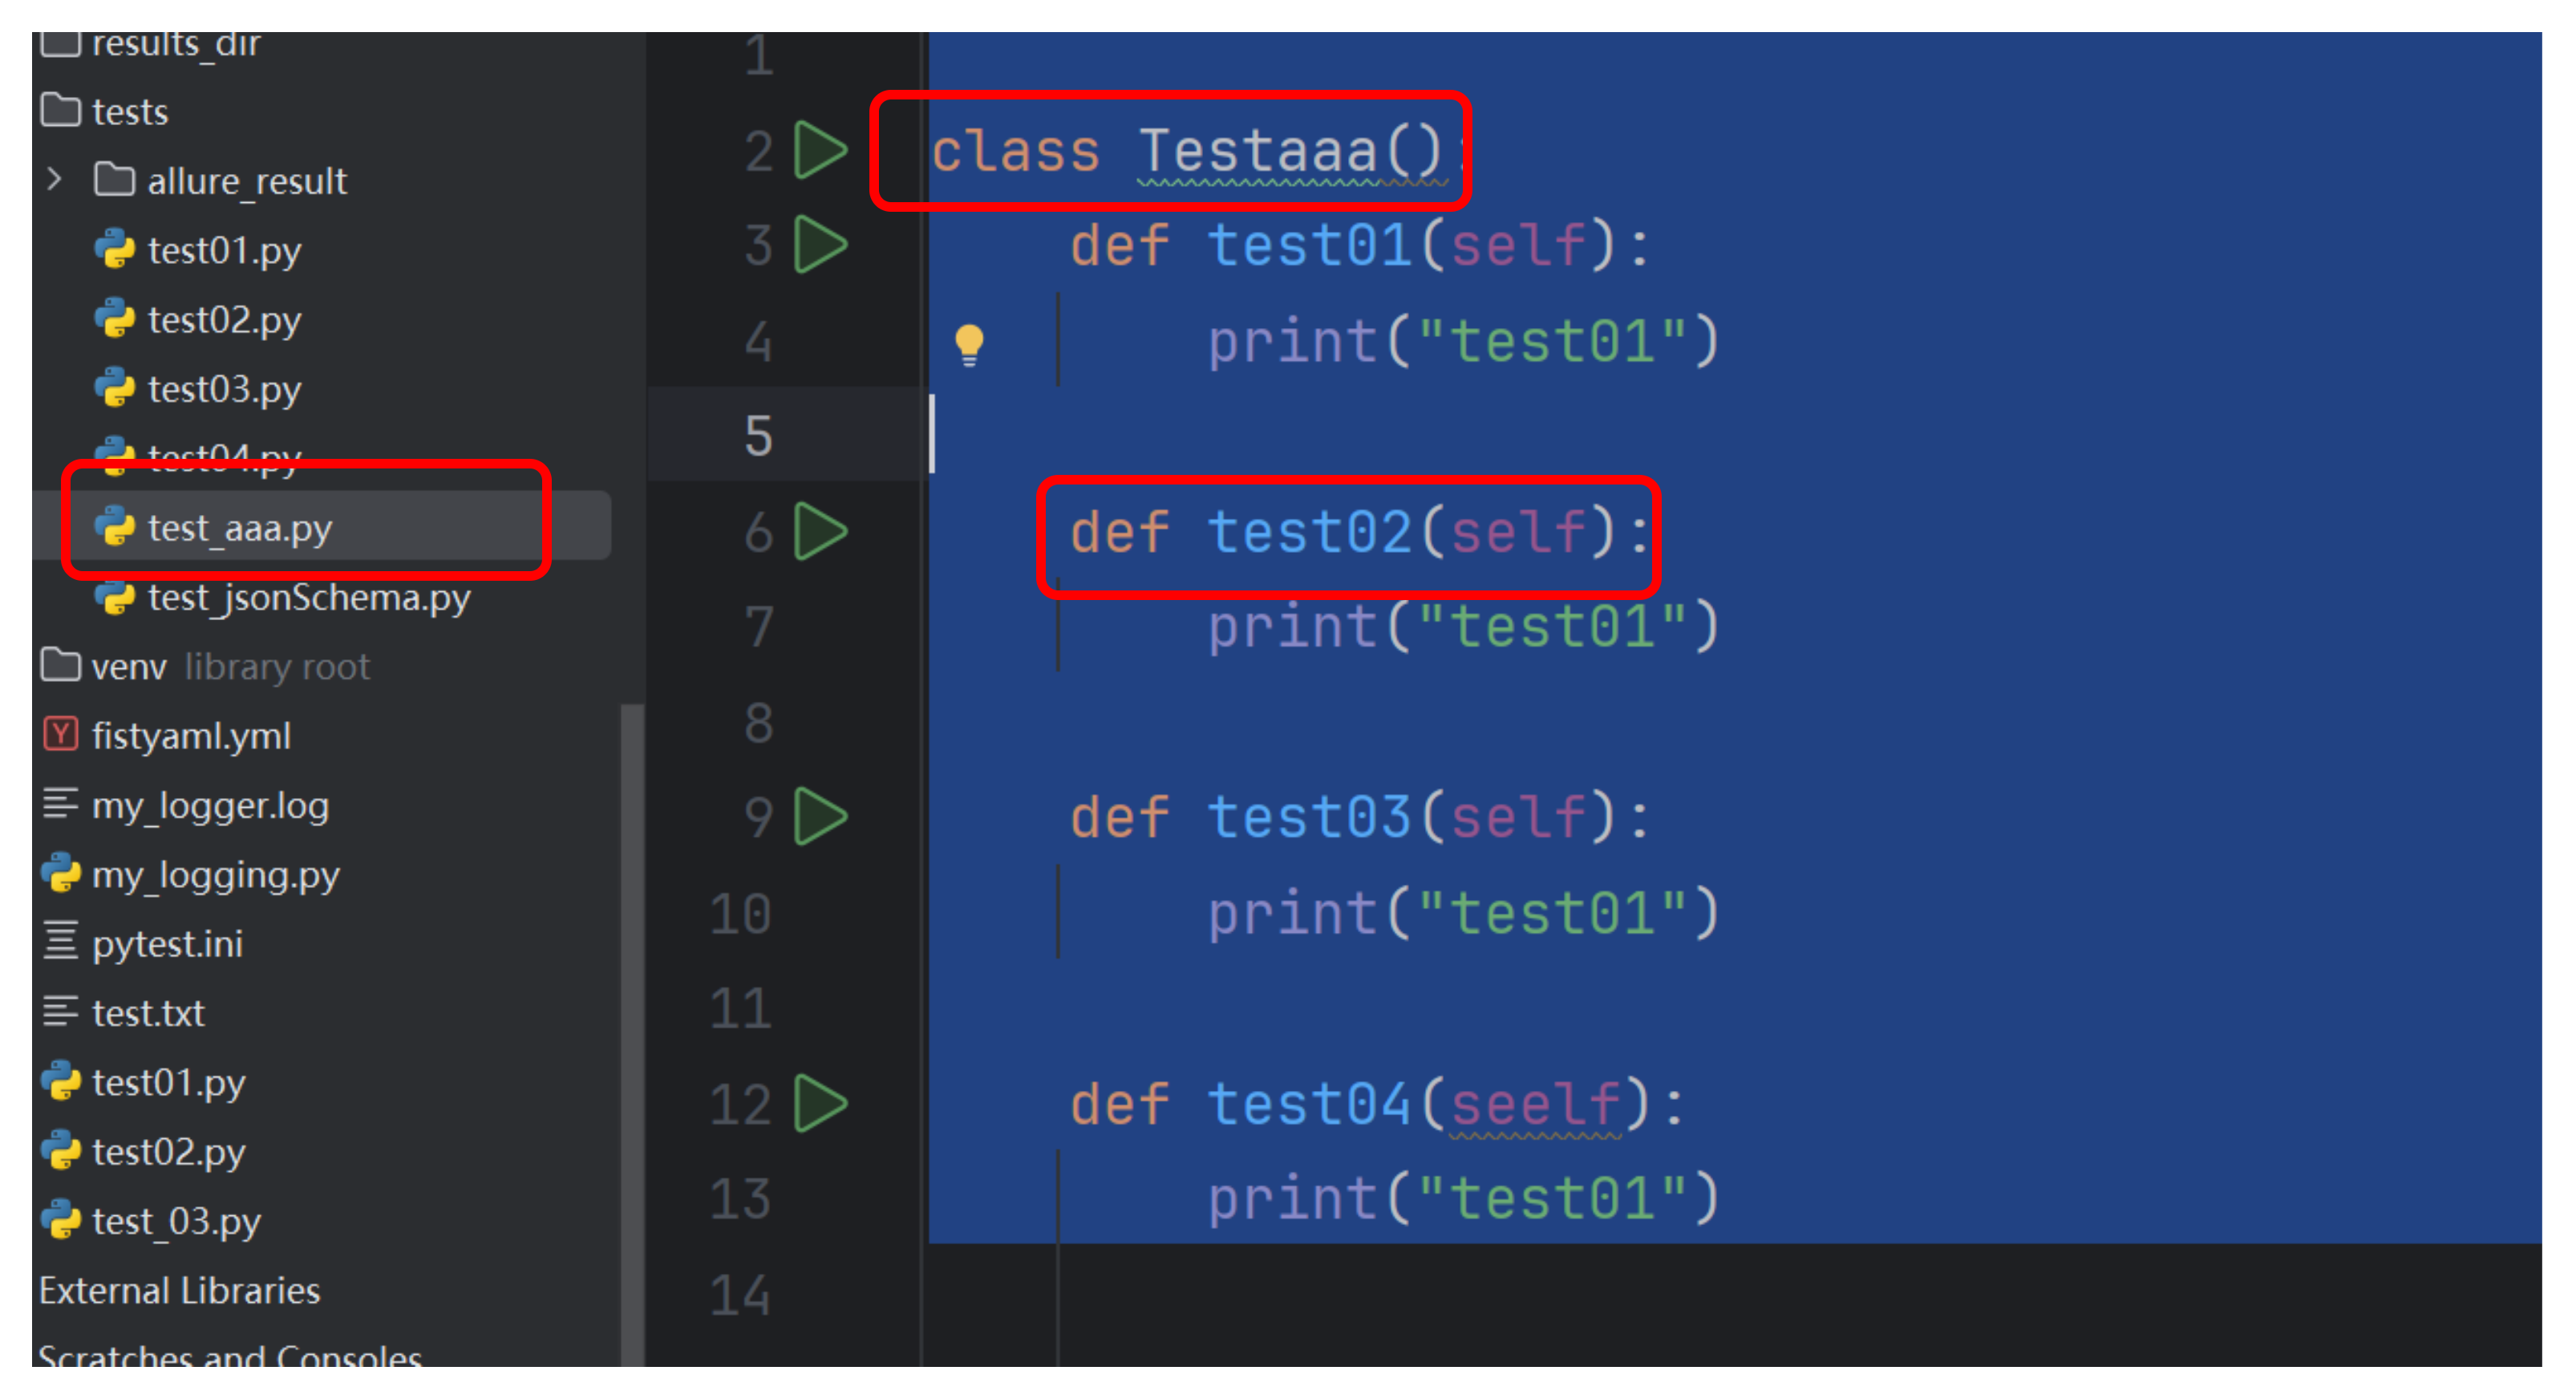
注意:Python类中不可以添加 init 方法法
class Test01():def __init__(self):print("init")def test01_01(self):print("test01")
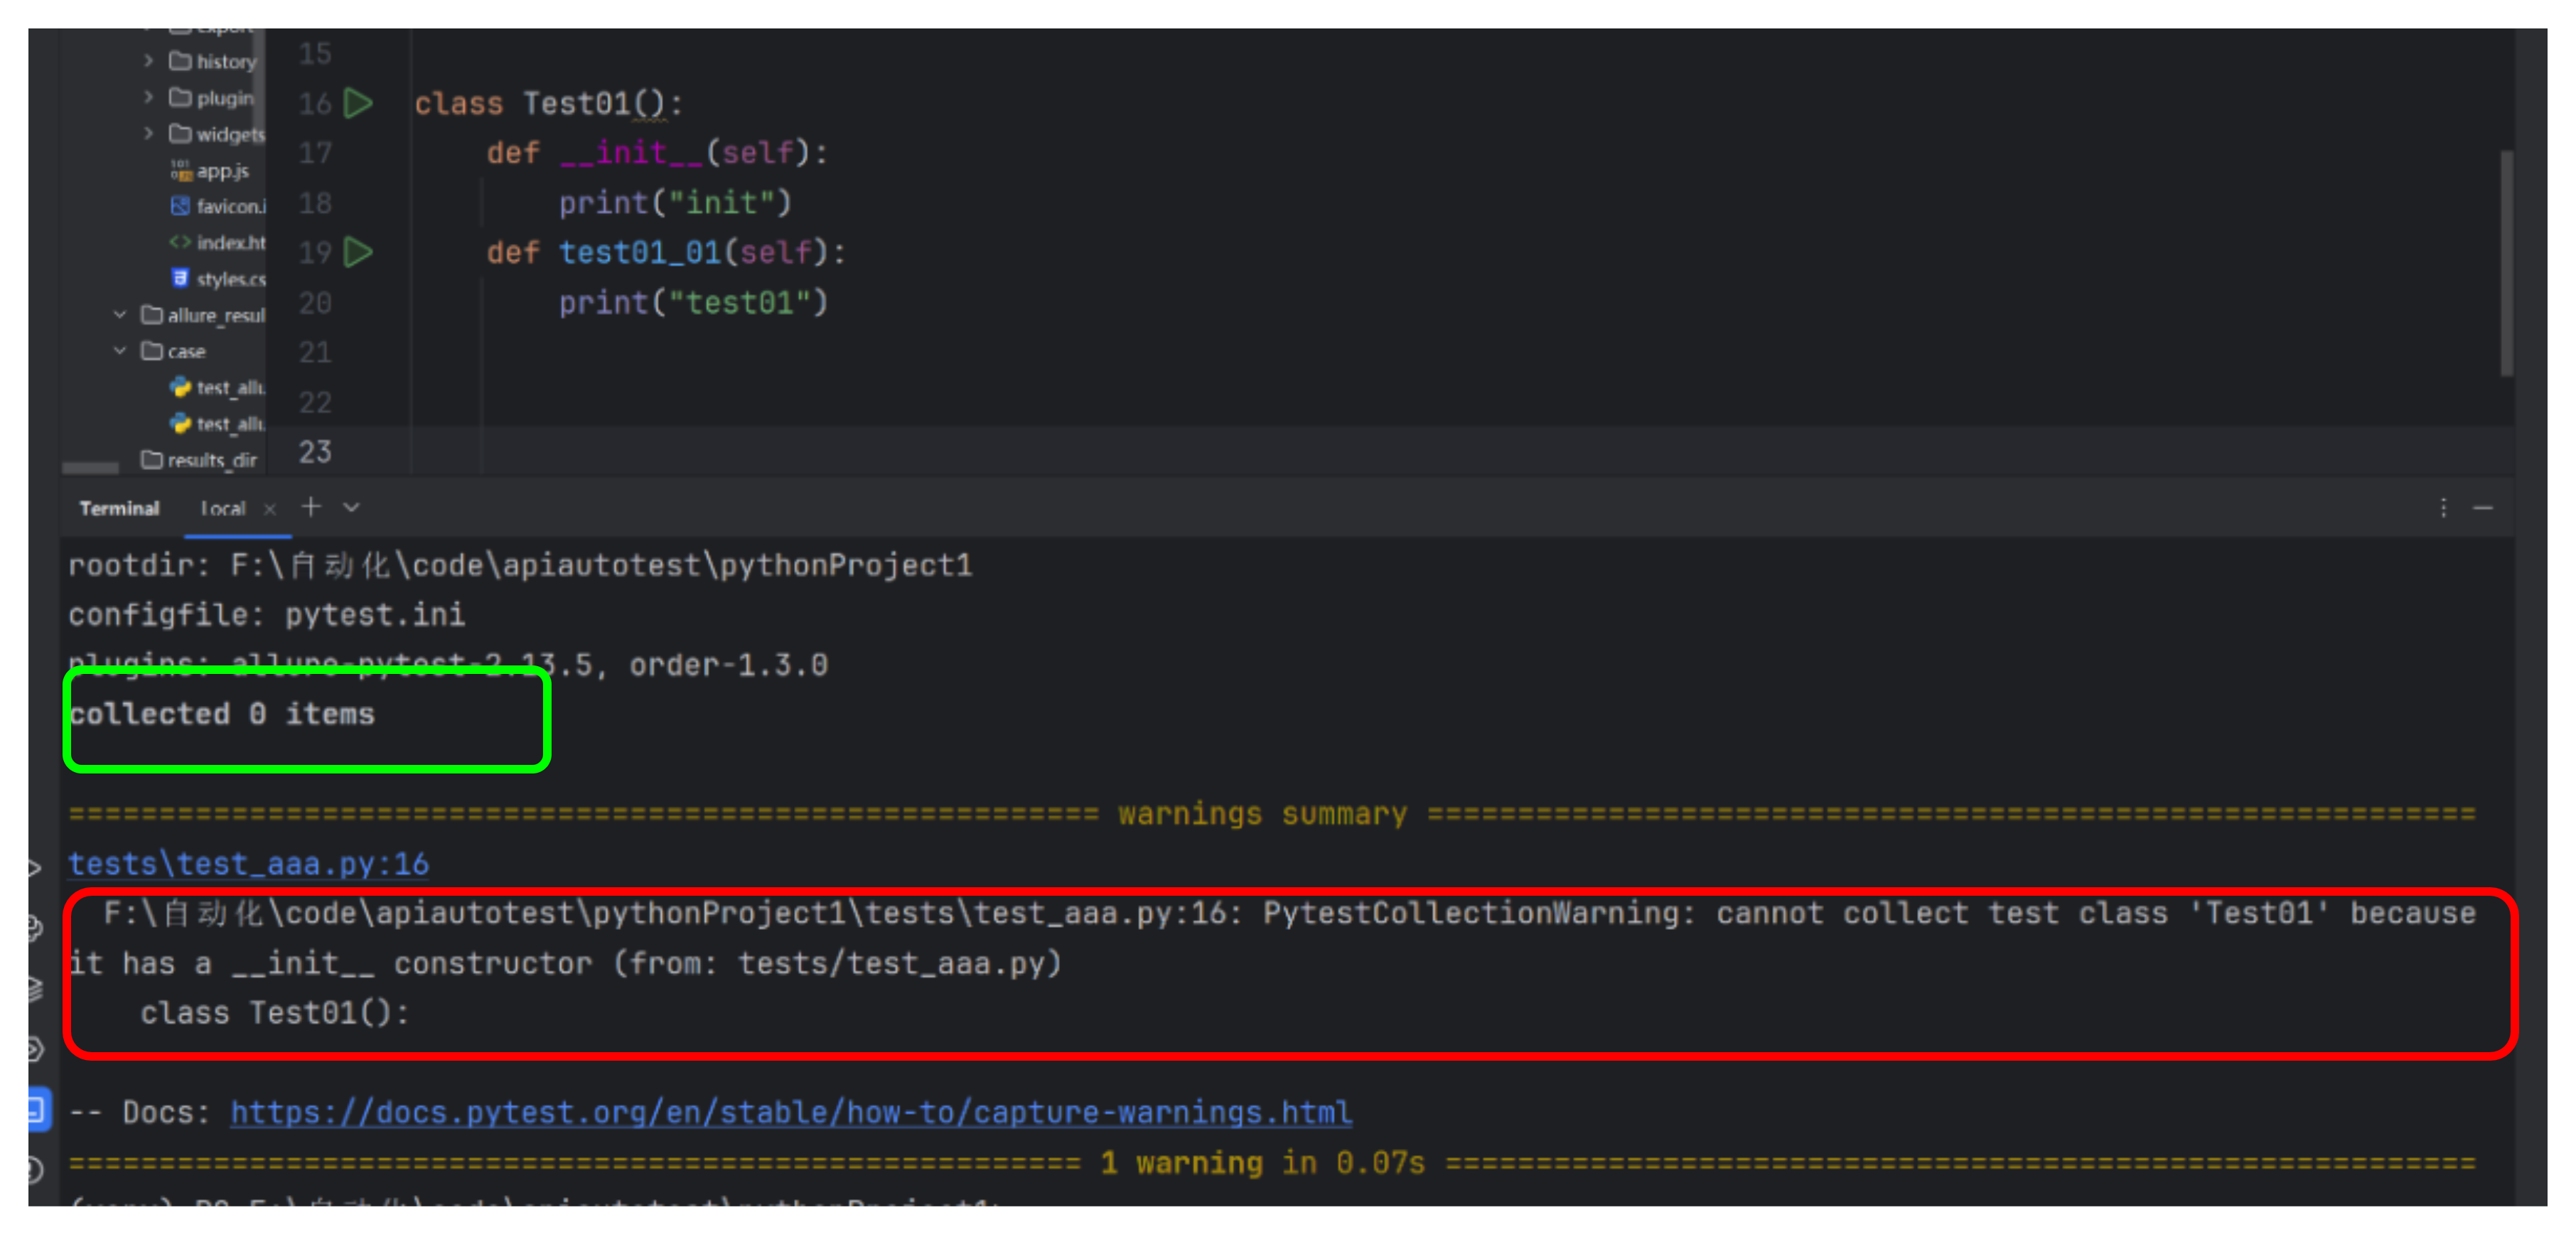
由于 pytest 的测试收集机制,测试类中不可以定义 __init__ 方法。
pytest 采用自动发现机制来收集测试用例:
- 它会自动实例化测试类
- 调用其所有以 test 结尾的方法作为测试用例
如果测试类中定义了 __init__ 方法,那么当 pytest 实例化该类时:
- __init__ 方法会被调用
- 这可能掩盖测试类的实际测试逻辑
- 可能引入额外的副作用,影响测试结果的准确性
为了避免使用 __init__ 方法,建议在 pytest 中使用其他替代方案:
- 使用 setUp () 和 tearDown () 方法
- 使用类属性
- 使用 fixture 函数
4.4查看pytest文档
pytest -h

4.5 pytest命令参数
pytest 提供了丰富的命令行选项来控制测试的执行,以下是一些常用的 pytest 命令行参数及其使用说明:
| 命令 | 描述 | 备注 |
|---|---|---|
| pytest | 在当前目录及其子目录中搜索并运行测试 | |
| pytest -v | 增加输出的详细程度 | |
| pytest -s | 显示测试中的 print 语句 | |
| pytest test_module.py | 运行指定的测试模块 | |
| pytest test_dir/ | 运行指定目录下的所有测试 | |
| pytest -k <keyword> | 只运行测试名包含指定关键字的测试 | |
| pytest -m <marker> | 只运行标记为指定标记的测试 | |
| pytest -q | 减少输出的详细程度 | |
| pytest --html=report.html | 生成 HTML 格式的测试报告 | 需要安装 pytest-html 插件 |
| pytest --cov | 测量测试覆盖率 | 需要安装 pytest-cov 插件 |
pytest .\tests\test_aaa.py 
pytest .\tests\test_aaa.py -sv
4.6pytest配置文件
| 参数 | 解释 |
|---|---|
| addopts | 指定在命令行中默认包含的选项 |
| testpaths | 指定搜索测试的目录 |
| python_files | 指定发现测试模块时使用的文件匹配模式 |
| python_classes | 指定发现测试类时使用的类名前缀或模式 |
| python_functions | 指定发现测试函数和方法时使用的函数名前缀或模式 |
| norecursedirs | 指定在搜索测试时应该避免递归进入的目录模式 |
| markers | 定义测试标记,用于标记测试用例 |
[pytest]
# 默认命令行参数:详细输出 + 显示print内容
addopts = -vs# 测试用例所在目录
testpaths = tests# 测试文件匹配规则
python_files = test_*.py *_test.py# 测试类命名规则
python_classes = Test*# 测试函数命名规则
python_functions = test*# 不搜索的目录
norecursedirs = .git venv node_modules build# 注册测试标记
markers =smoke: 核心功能冒烟测试regression: 回归测试用例slow: 执行时间较长的测试api: 接口测试用例| 目录名称 | 含义 | 为何在 pytest 中跳过搜索 |
|---|---|---|
.git | Git 版本控制系统的核心目录,存储项目的版本历史、分支信息、提交记录等元数据 | 与代码功能无关,不含测试用例,搜索会浪费时间,可能误判文件为测试用例 |
venv | Python 虚拟环境目录,用于隔离项目的依赖包(避免与系统全局依赖冲突) | 包含第三方库代码(非项目自身测试用例),搜索会扫描大量无关文件,降低测试执行效率 |
node_modules | Node.js 项目的依赖目录,存储通过 npm 或 yarn 安装的 JavaScript 依赖包 | 若为 Python 与前端混合开发项目,该目录仅含前端依赖,与 Python 测试用例无关,无需扫描 |
build | 存放编译、打包生成的文件(如 Python 项目的可执行文件、临时编译产物等) | 是自动生成的二进制或中间文件,不含源代码或测试用例,搜索无意义 |
import pytest@pytest.mark.api
class Testaaa():def test01(self):print("test01")def test02(self):print("test01")def test03(self):print("test01")def test04(seelf):print("test01")@pytest.mark.slow
class Testbbb():def test01(self):print("test01")def test02(self):print("test01")def test03(self):print("test01")def test04(seelf):print("test01")
pytest -m "api" 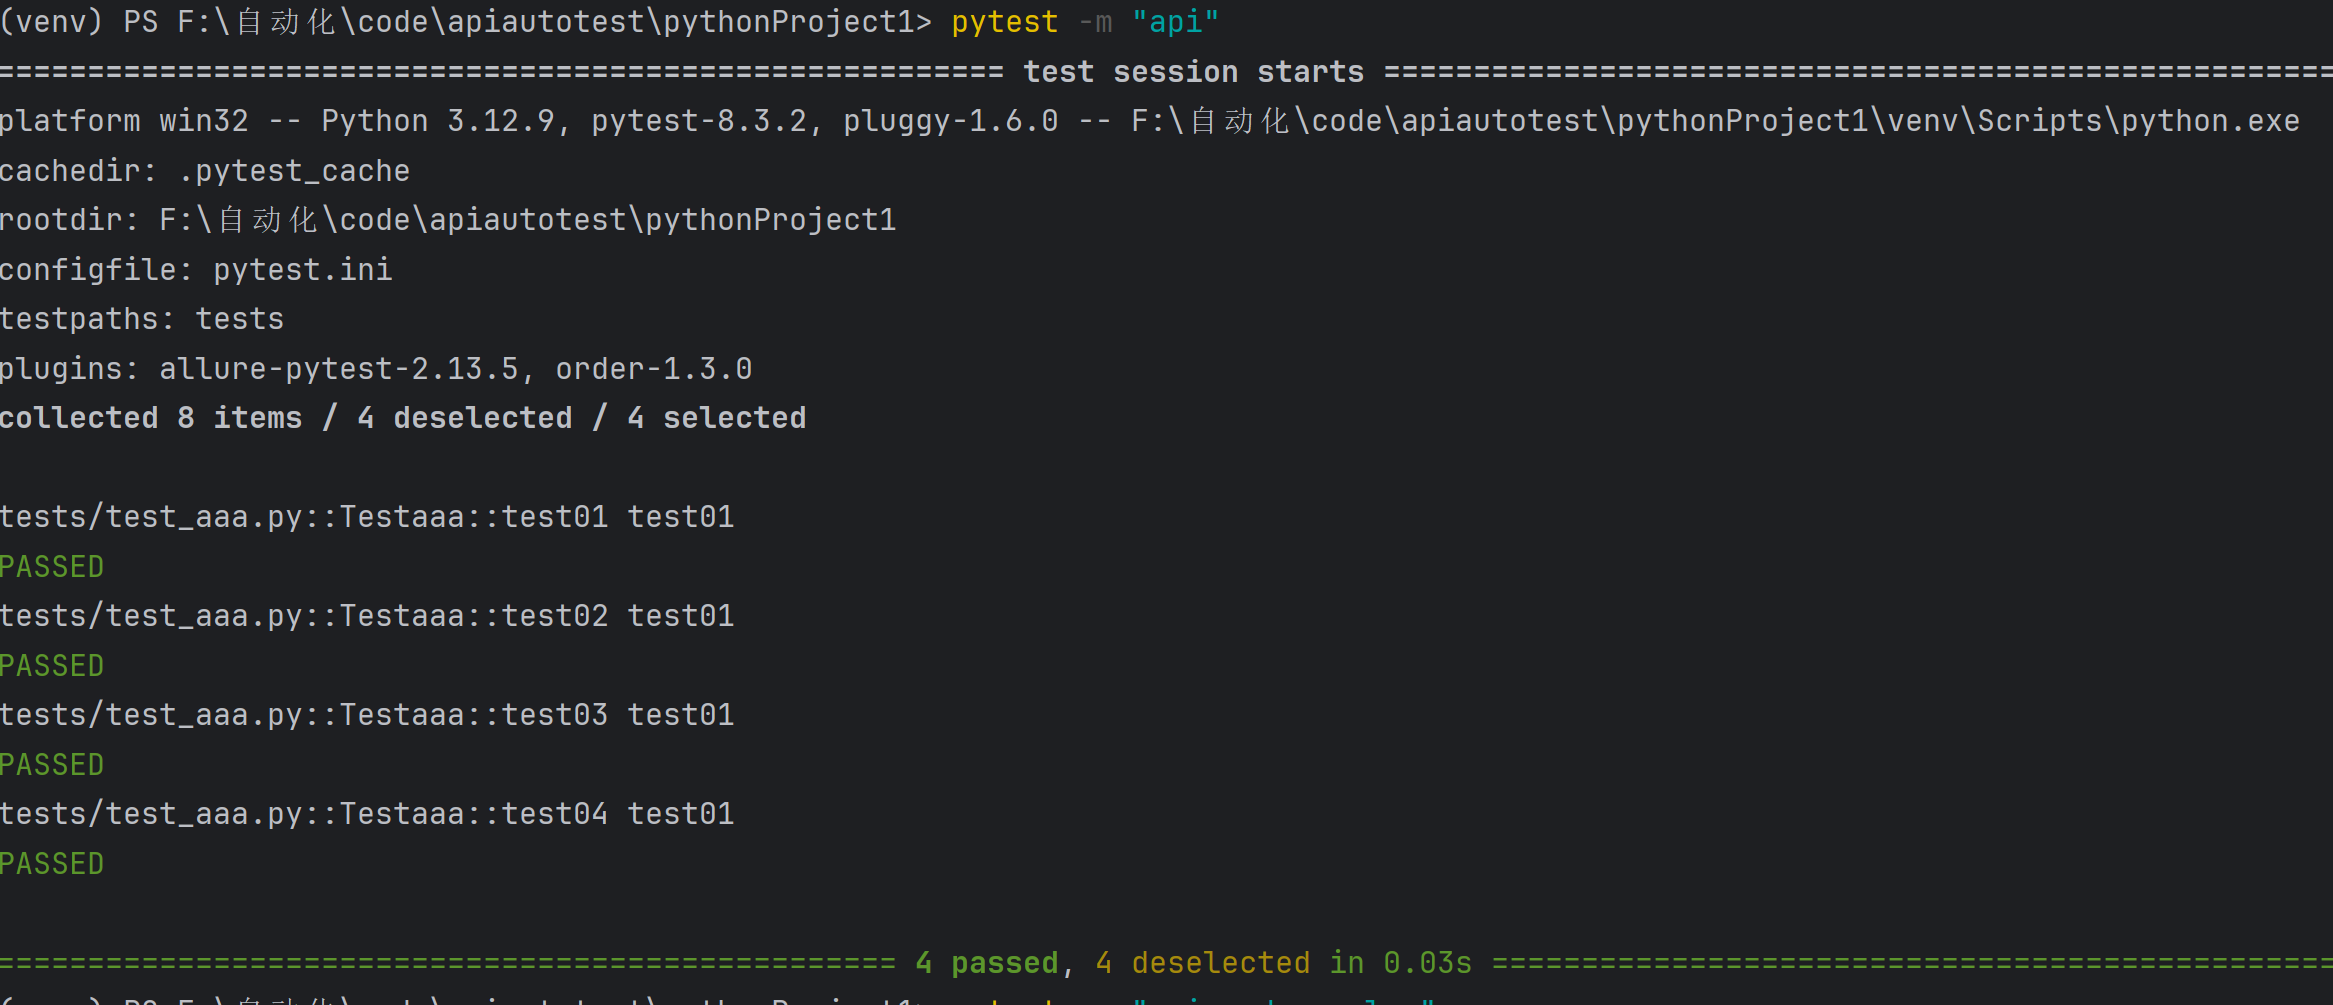
pytest -m "api and not slow"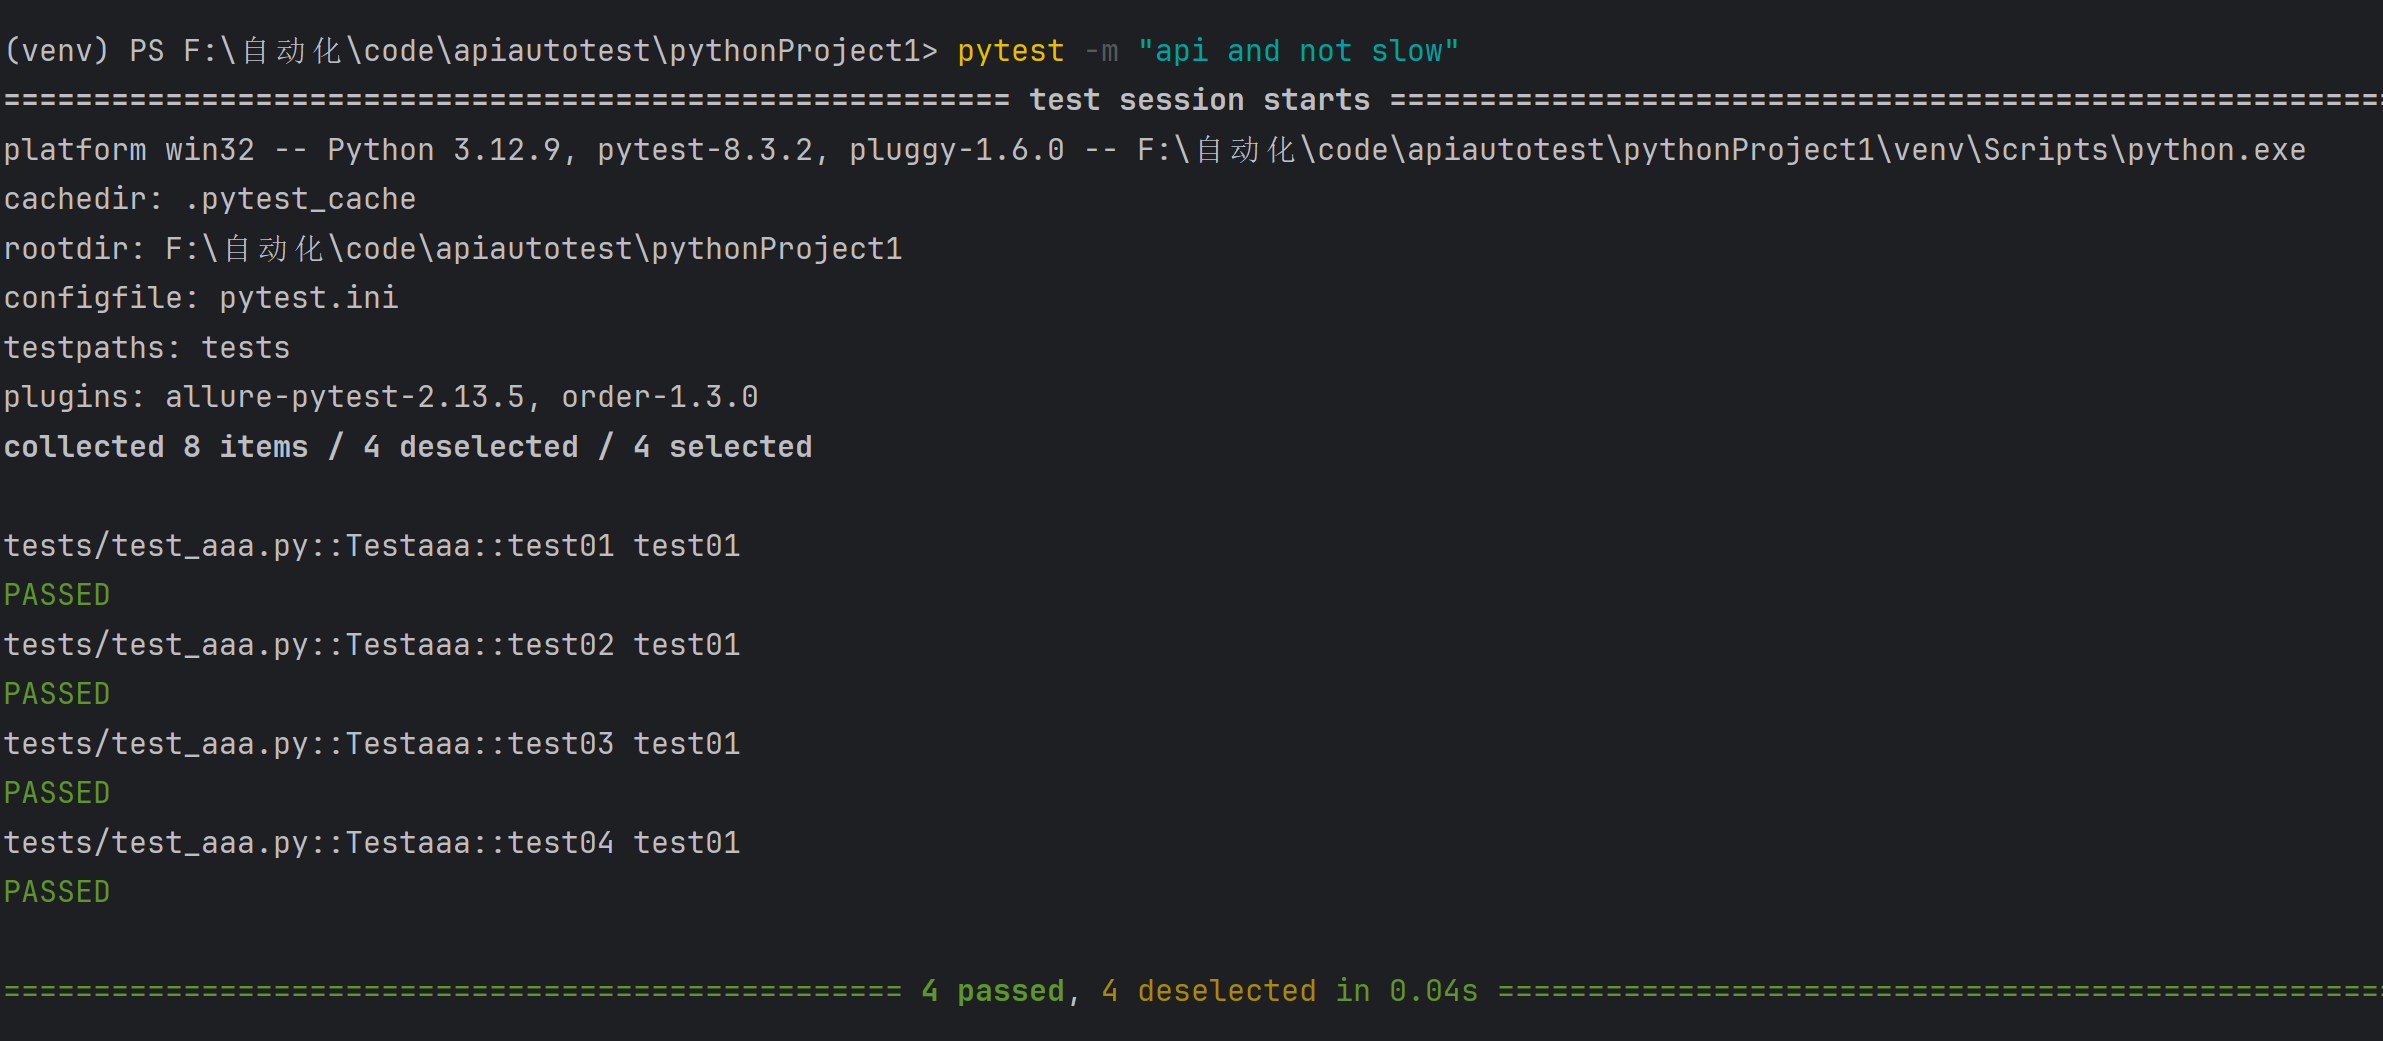
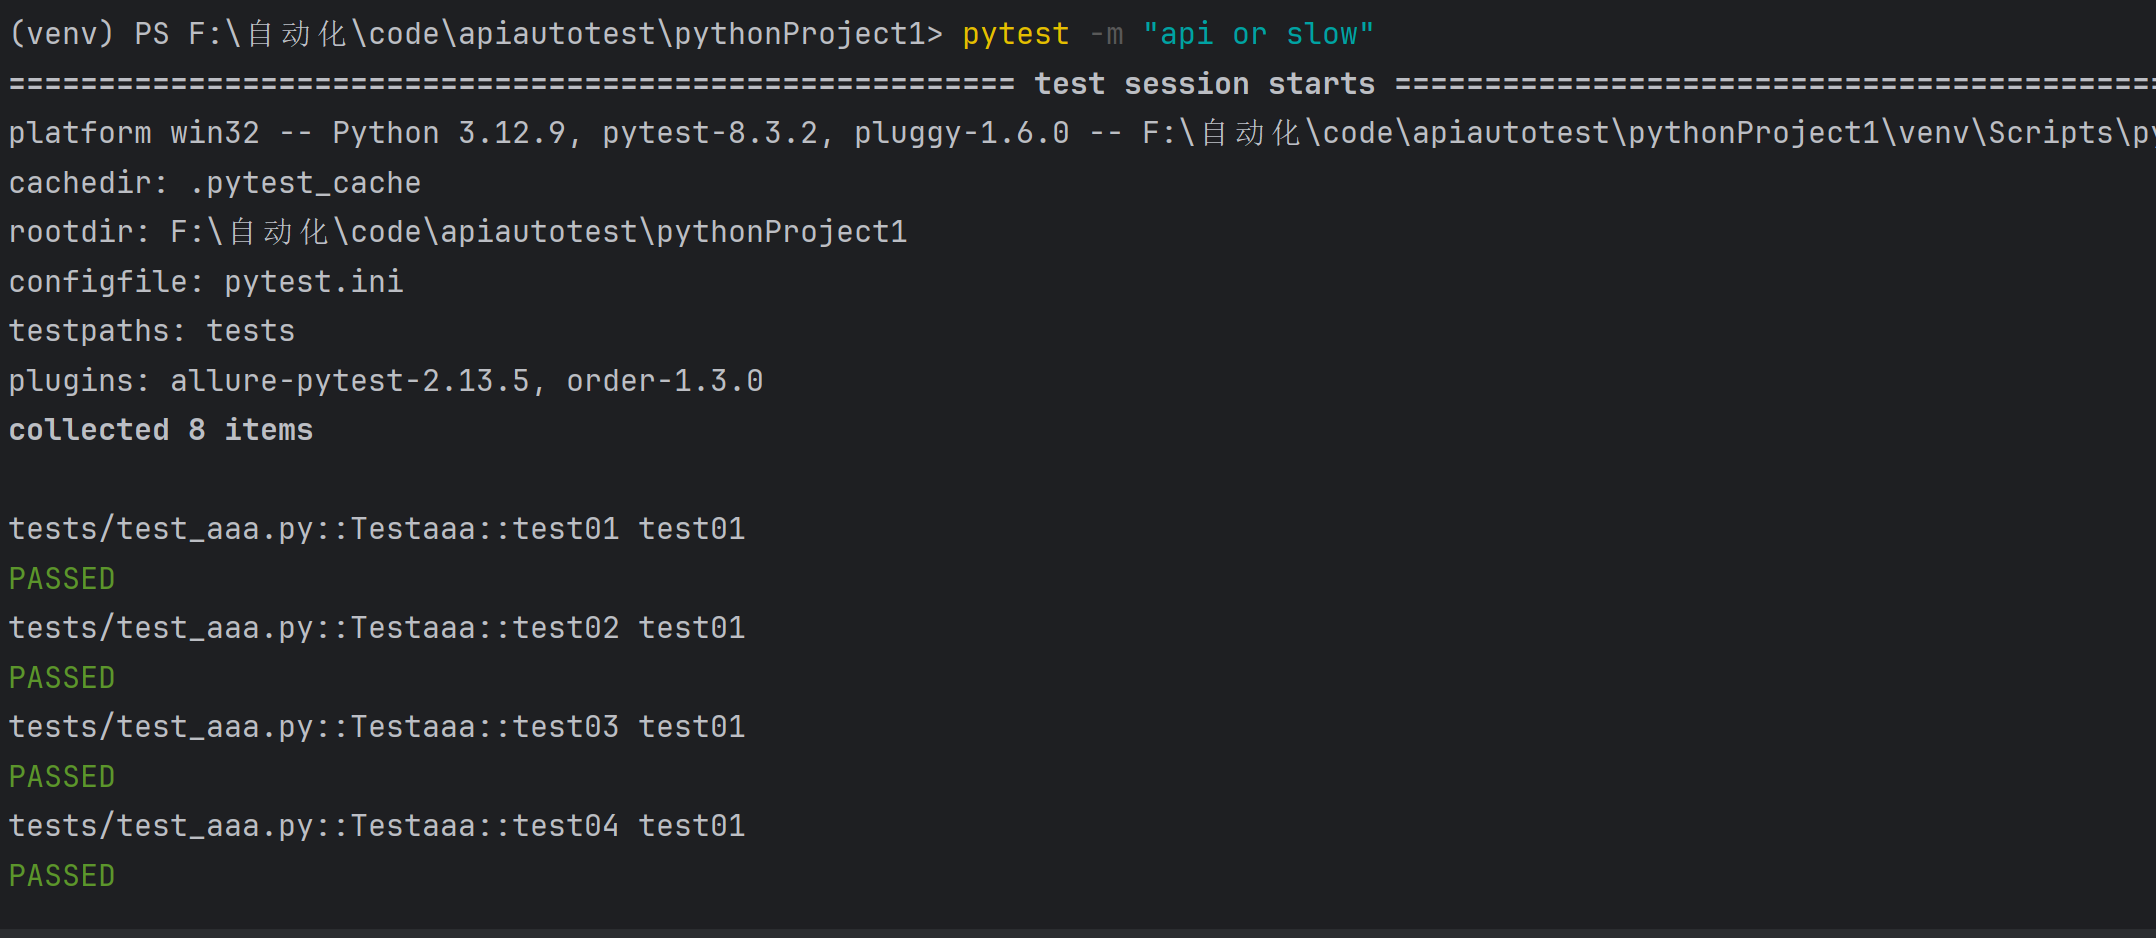
pytest -m "api and not slow"
4.7前后置
之前的问题:使用 pytest 框架,测试类中不可以添加 init () 方法,如何进行数据的初始化?
在测试框架中,前后置是指在执行测试用例前和测试用例后执行一些额外的操作,这些操作可以用于设置测试环境、准备测试数据等,以确保测试的可靠性。
pytest 框架提供三种方法做前后置的操作:
- setup_method 和 teardown_method:这两个方法用于类中的每个测试方法的前置和后置操作。
- setup_class 和 teardown_class:这两个方法用于整个测试类的前置和后置操作。
- fixture:这是 pytest 推荐的方式来实现测试用例的前置和后置操作。fixture 提供了更灵活的控制和更强大的功能。(后续在 fixture 中详细讲解)
class Test05():def setup_method(self, method):print("setup_method")def test05_01(self):print("test05_01")def test05_02(self):print("test05_02")def test05_03(self):print("test05_03")def teardown_method(self):print("teardown_method")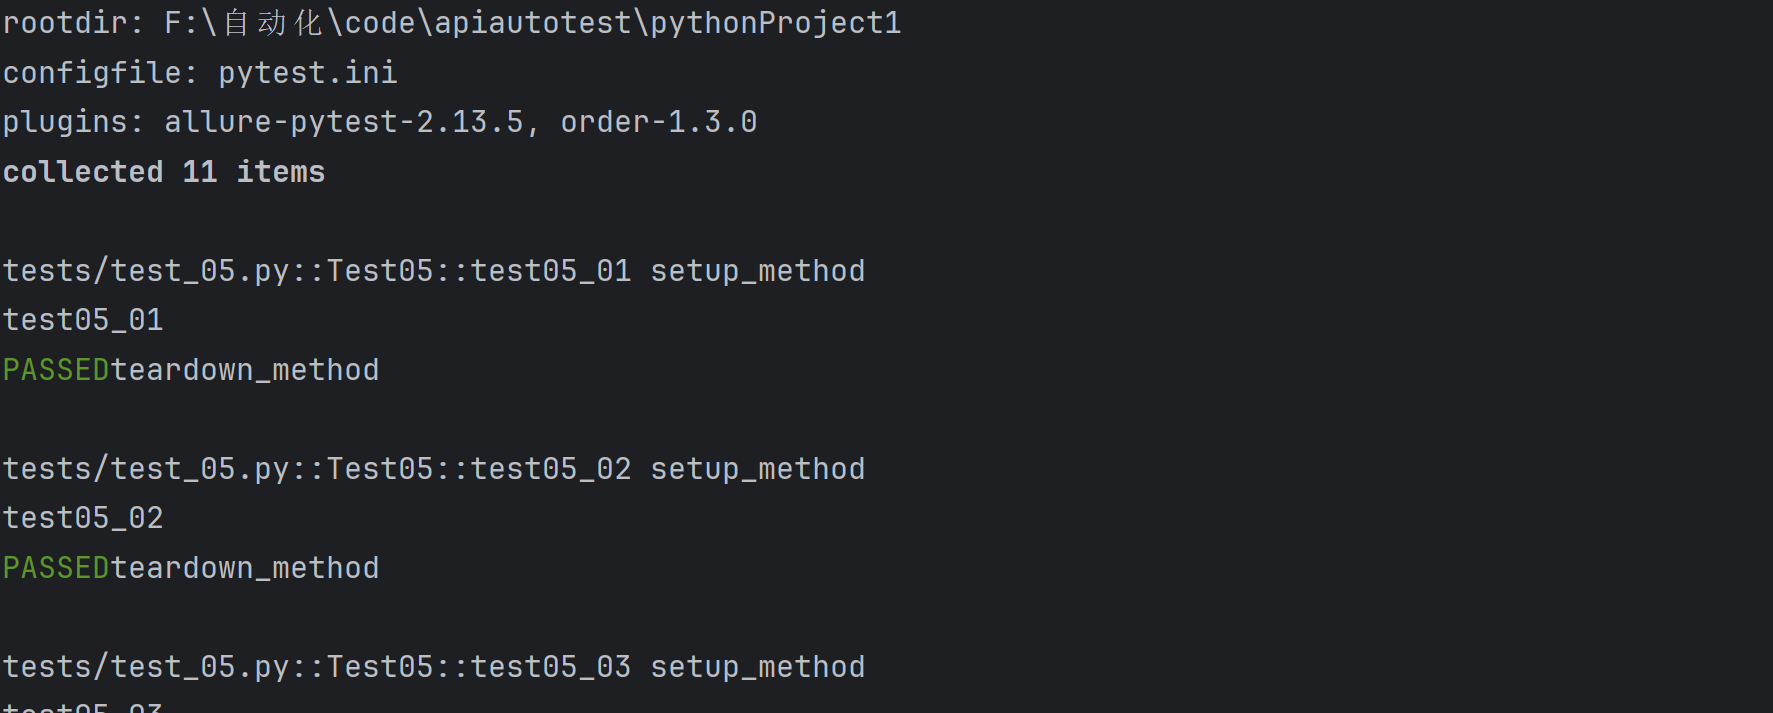
4.8断言
断言(assert)是一种调试辅助工具,用于检查程序的状态是否符合预期。如果断言失败(即条件为假),Python 解释器将抛出一个 AssertionError 异常。断言通常用于检测程序中的逻辑错误。
pytest 允许你在 Python 测试中使用标准的 Python assert 语句来验证预期和值。
基本语法:
assert 条件, 错误信息
- 条件:必须是⼀个布尔表达式。
- 错误信息:当条件为假时显示的错误信息,可选。
def test_assert():#断言列表expect_list=[1,3.14,"hello world"]actual_list=[1,3.14,"hello world"]assert expect_list==actual_list#断言元组expect_list = (1, 3.14, "hello world")actual_list = (1, 3.14, "hello world")assert expect_list == actual_list#断言集合expect_set = {1, 2, 3, 'apple'}actual_set = {1, 2, 3, 'apple'}assert expect_set == actual_setdef divide(a, b):assert b != 0, "除数不能为0"return a / b# 正常情况print(divide(10, 2)) # 输出 5.0# 触发断⾔print(divide(10, 0)) # 抛出 AssertionError: 除数不能为0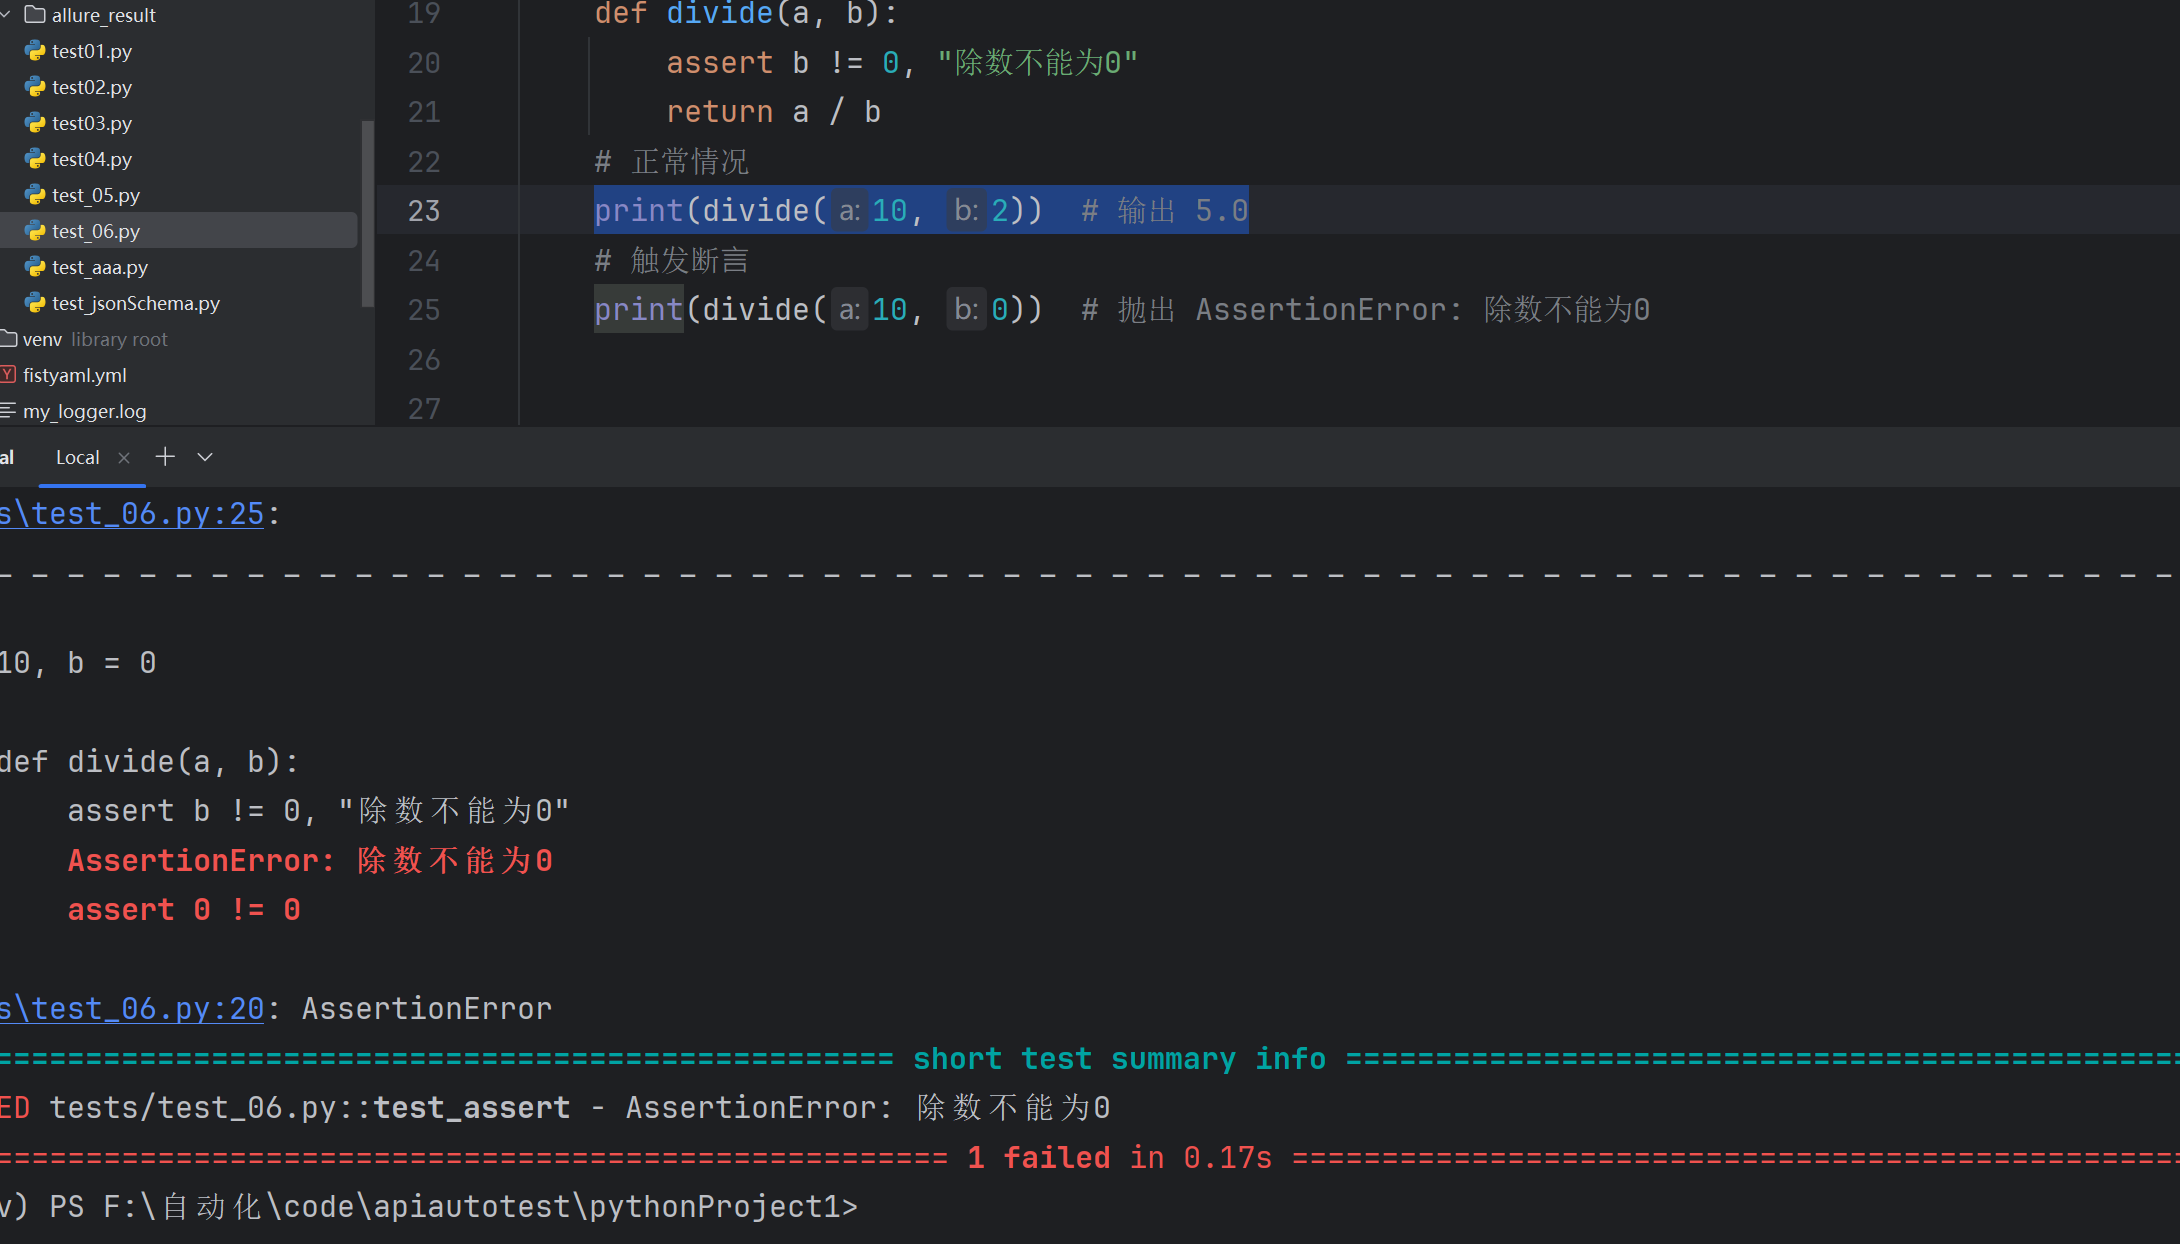
免费学习API资源:http://jsonplaceholder.typicode.com/
测试json结果

import requestsdef test():url="http://jsonplaceholder.typicode.com/posts/1"expect_data={"userId": 1,"id": 1,"title": "sunt aut facere repellat provident occaecati excepturi optio reprehenderit","body": "quia et suscipit\nsuscipit recusandae consequuntur expedita et cum\nreprehenderit molestiae ut ut quas totam\nnostrum rerum est autem sunt rem eveniet architecto"
}r=requests.get(url=url)assert r.json()==expect_data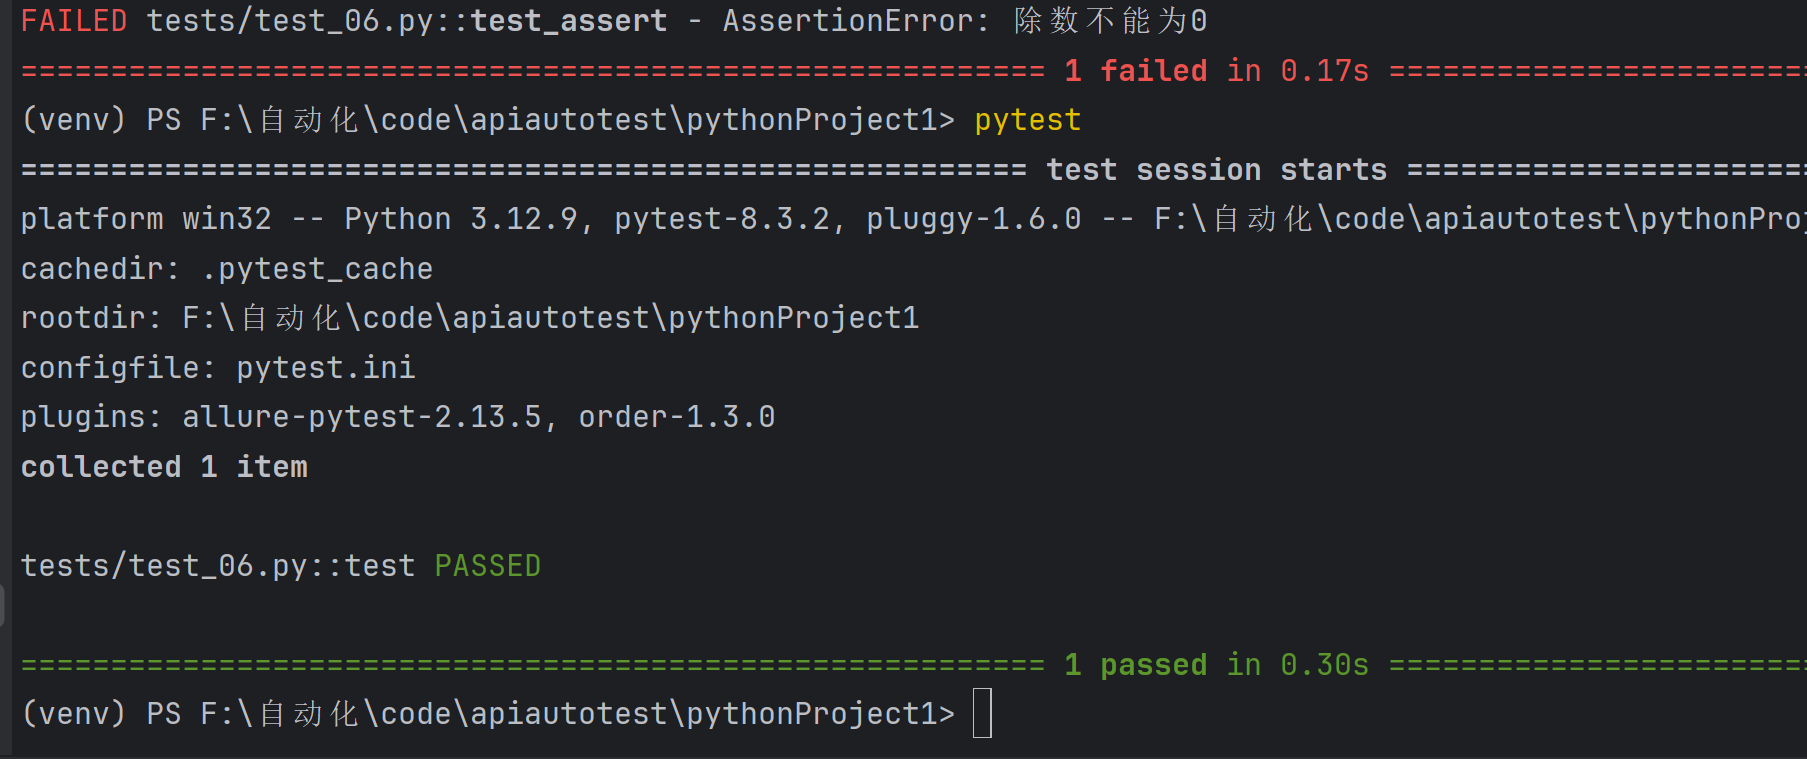
测试id结果
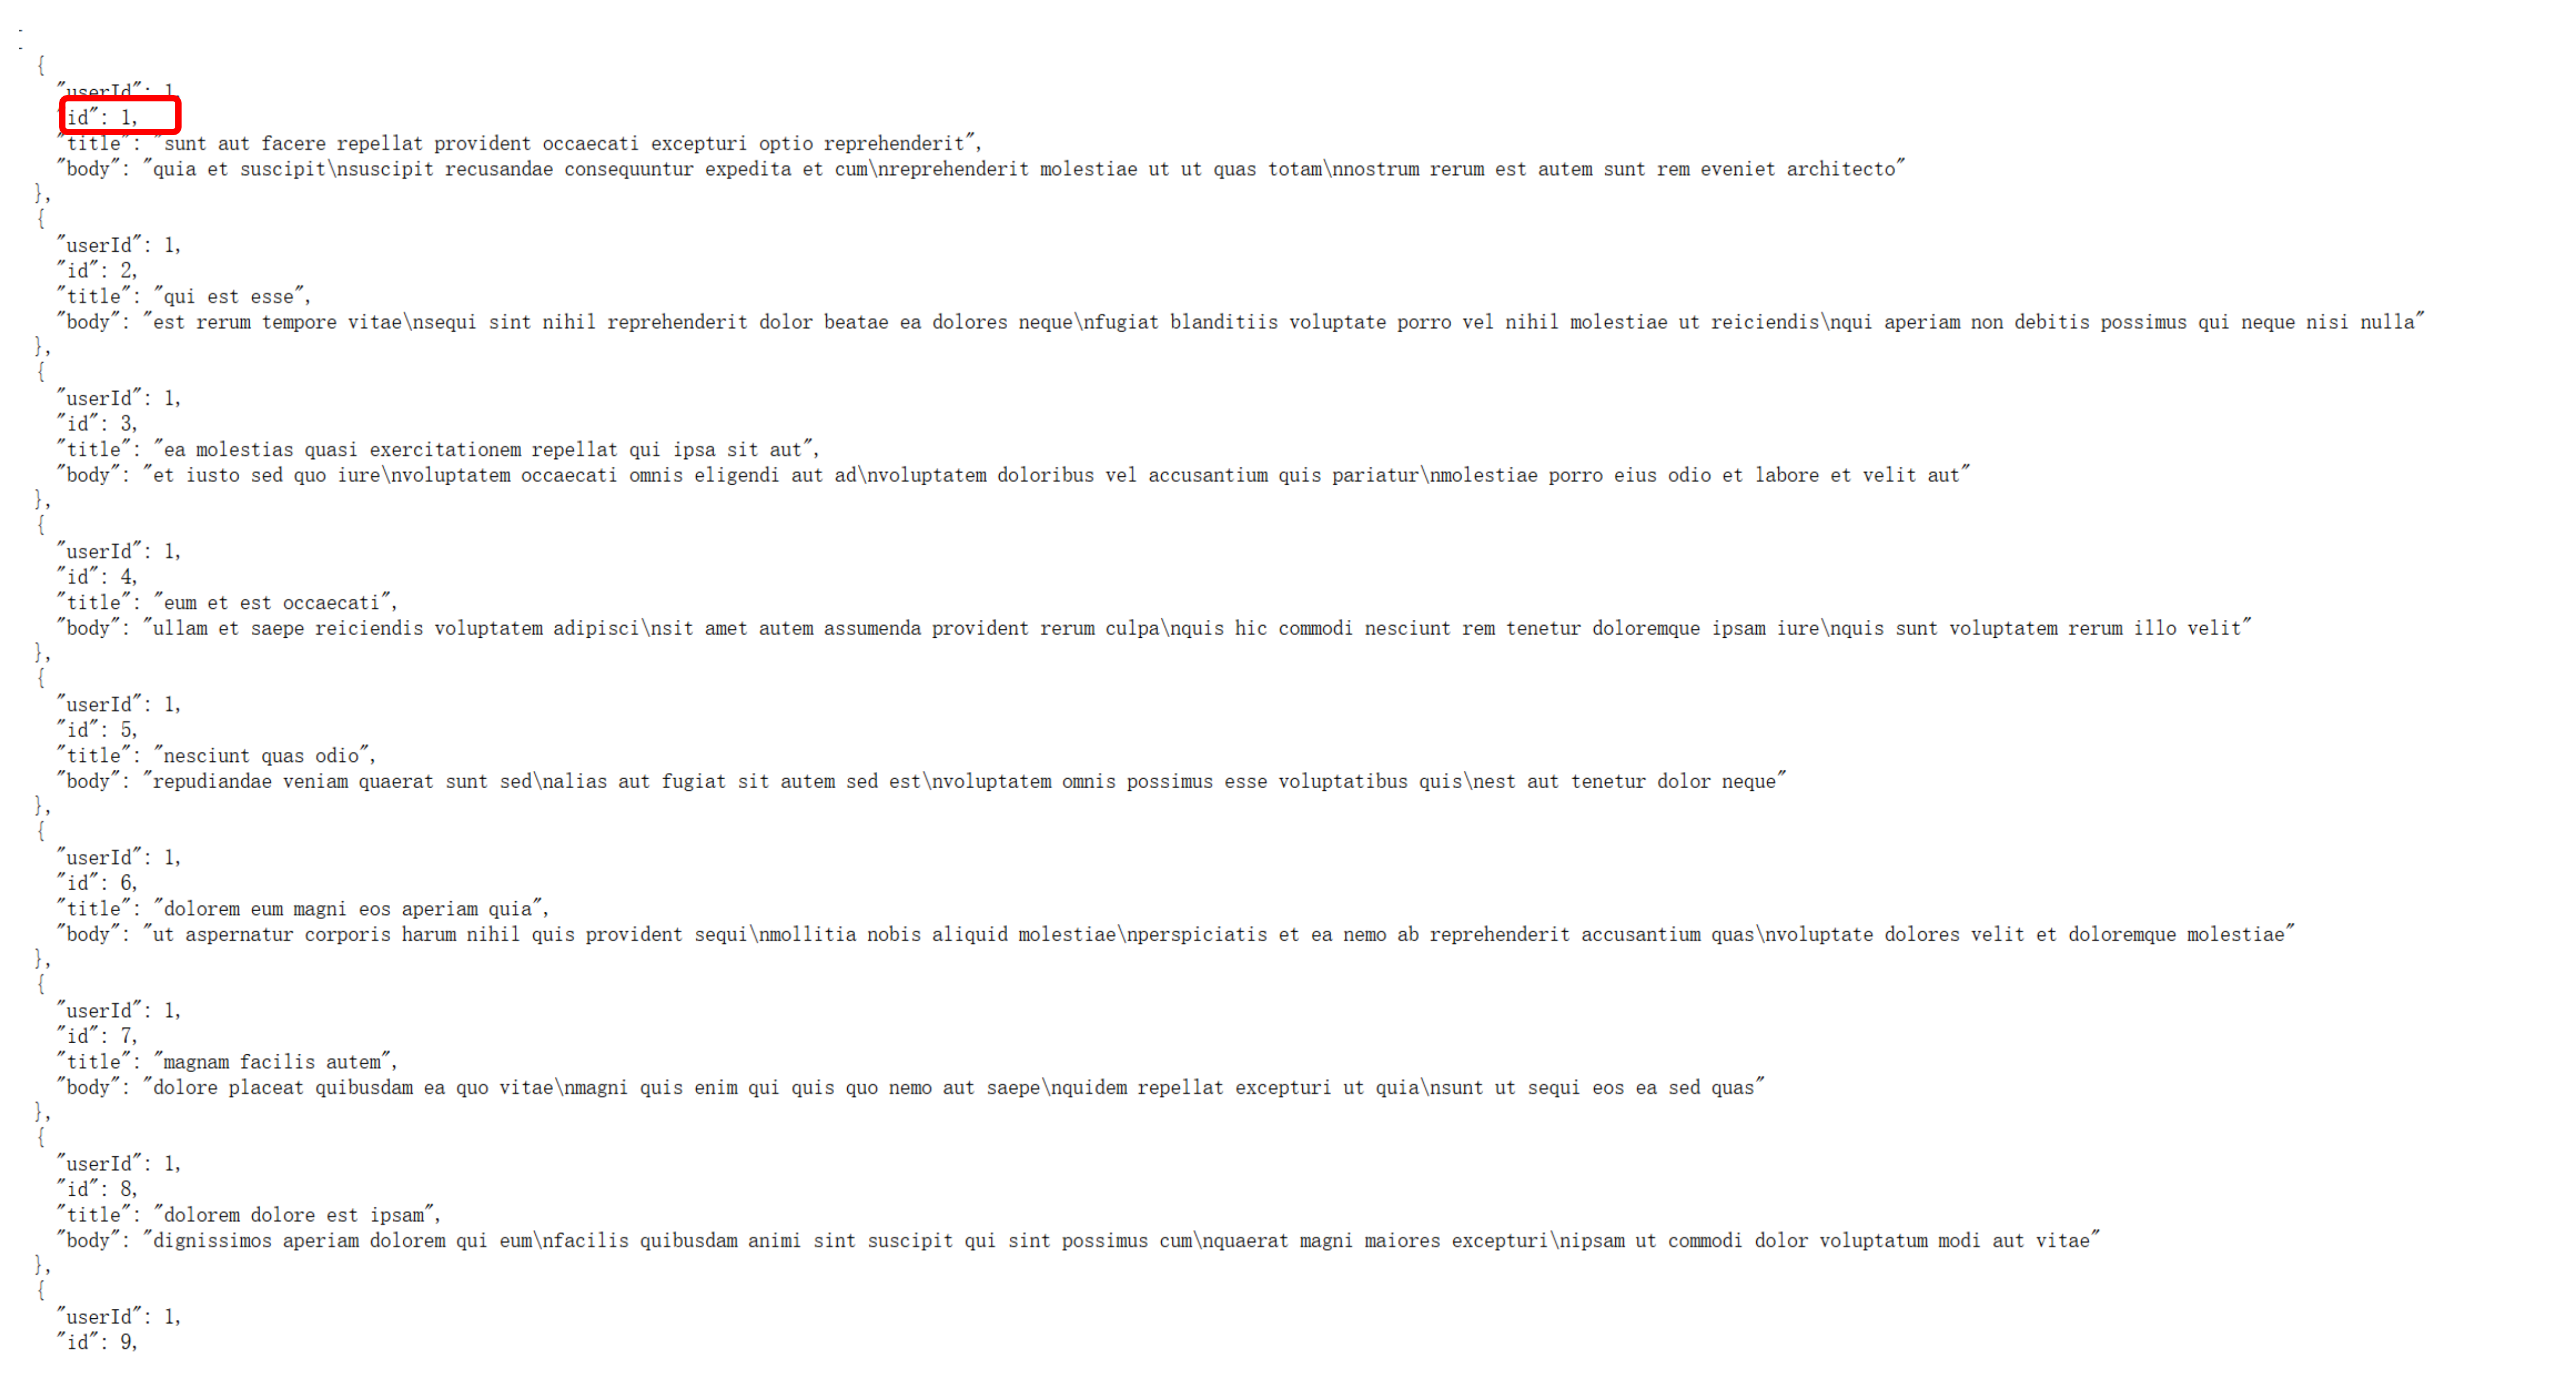
import requestsdef test02():url="http://jsonplaceholder.typicode.com/posts"r=requests.get(url=url)assert r.json()[0]["id"]==1assert r.json()[1]["id"] == 2assert r.json()[2]["id"] == 3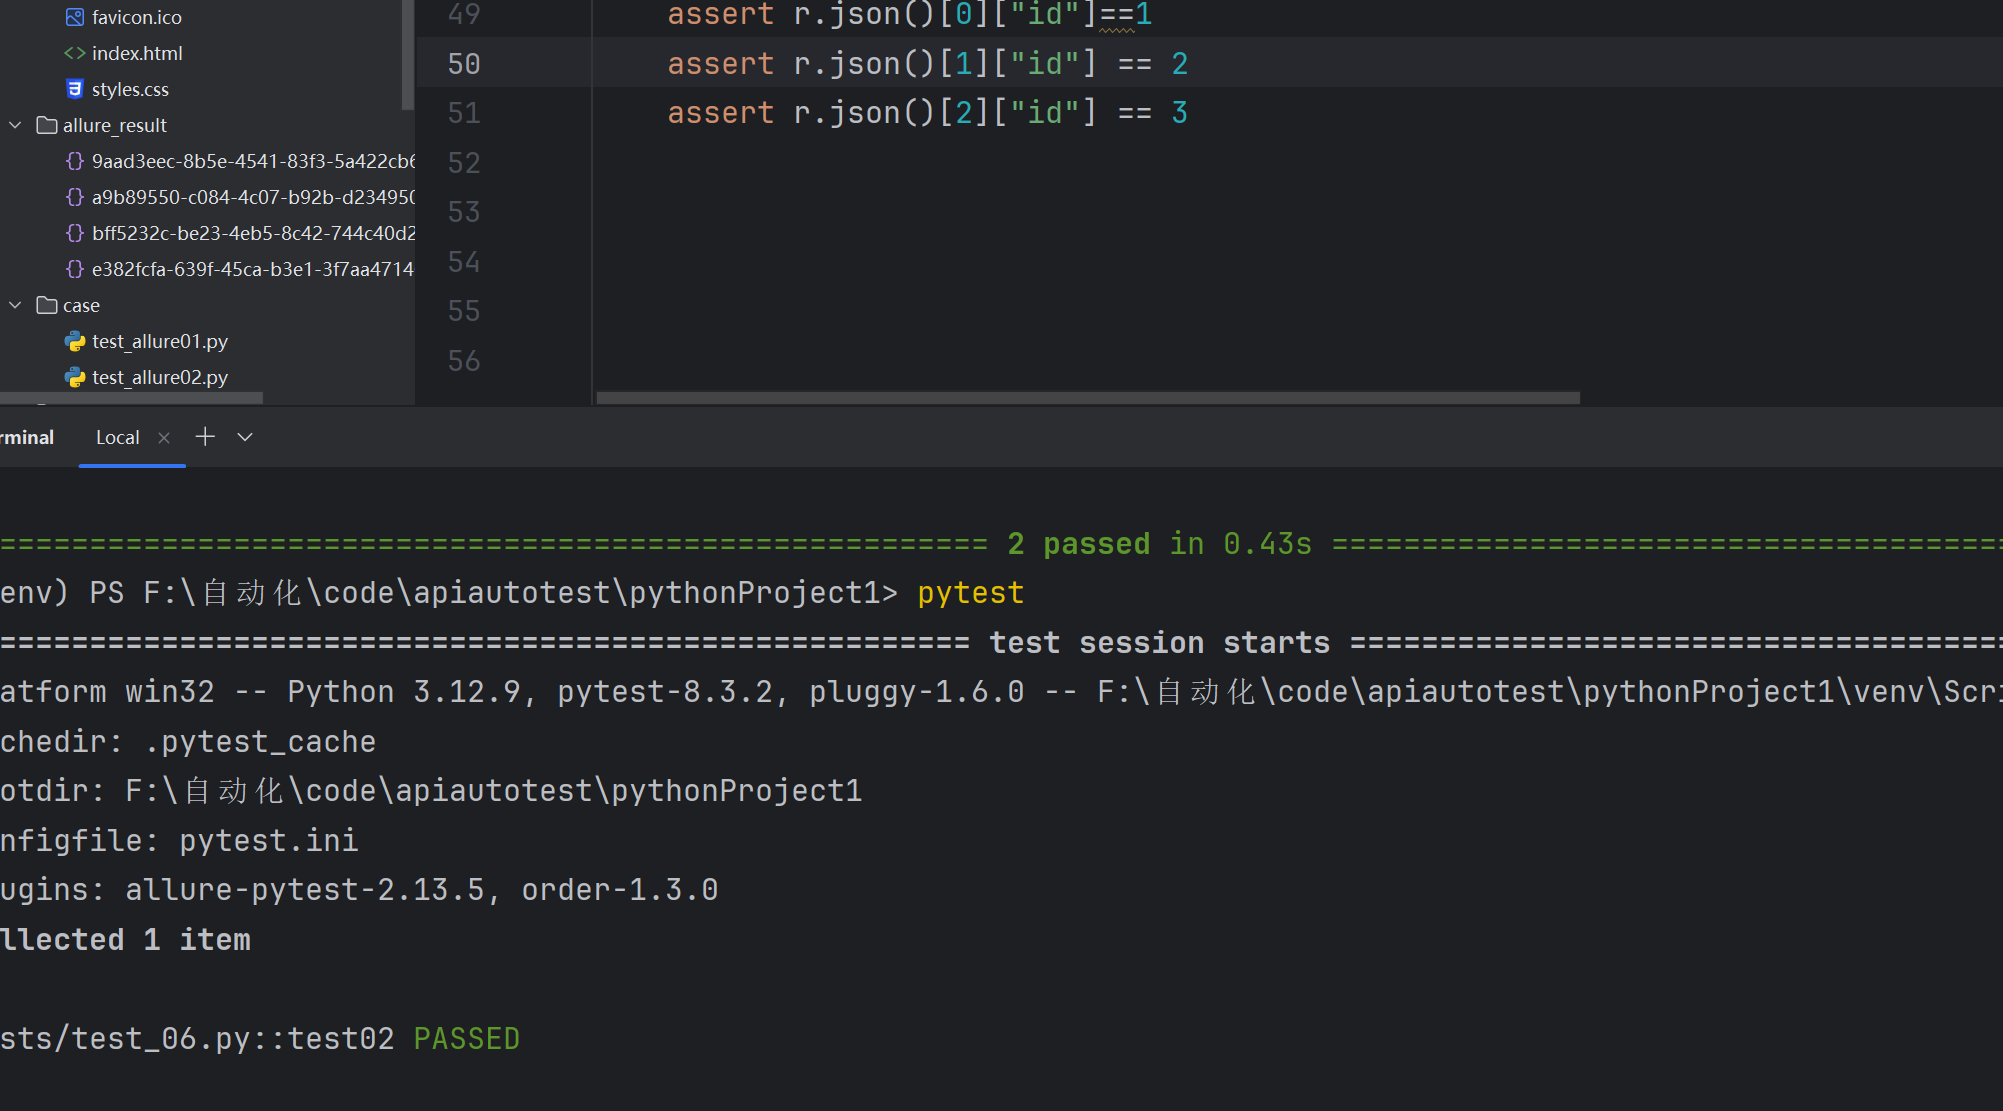
测试包含字段
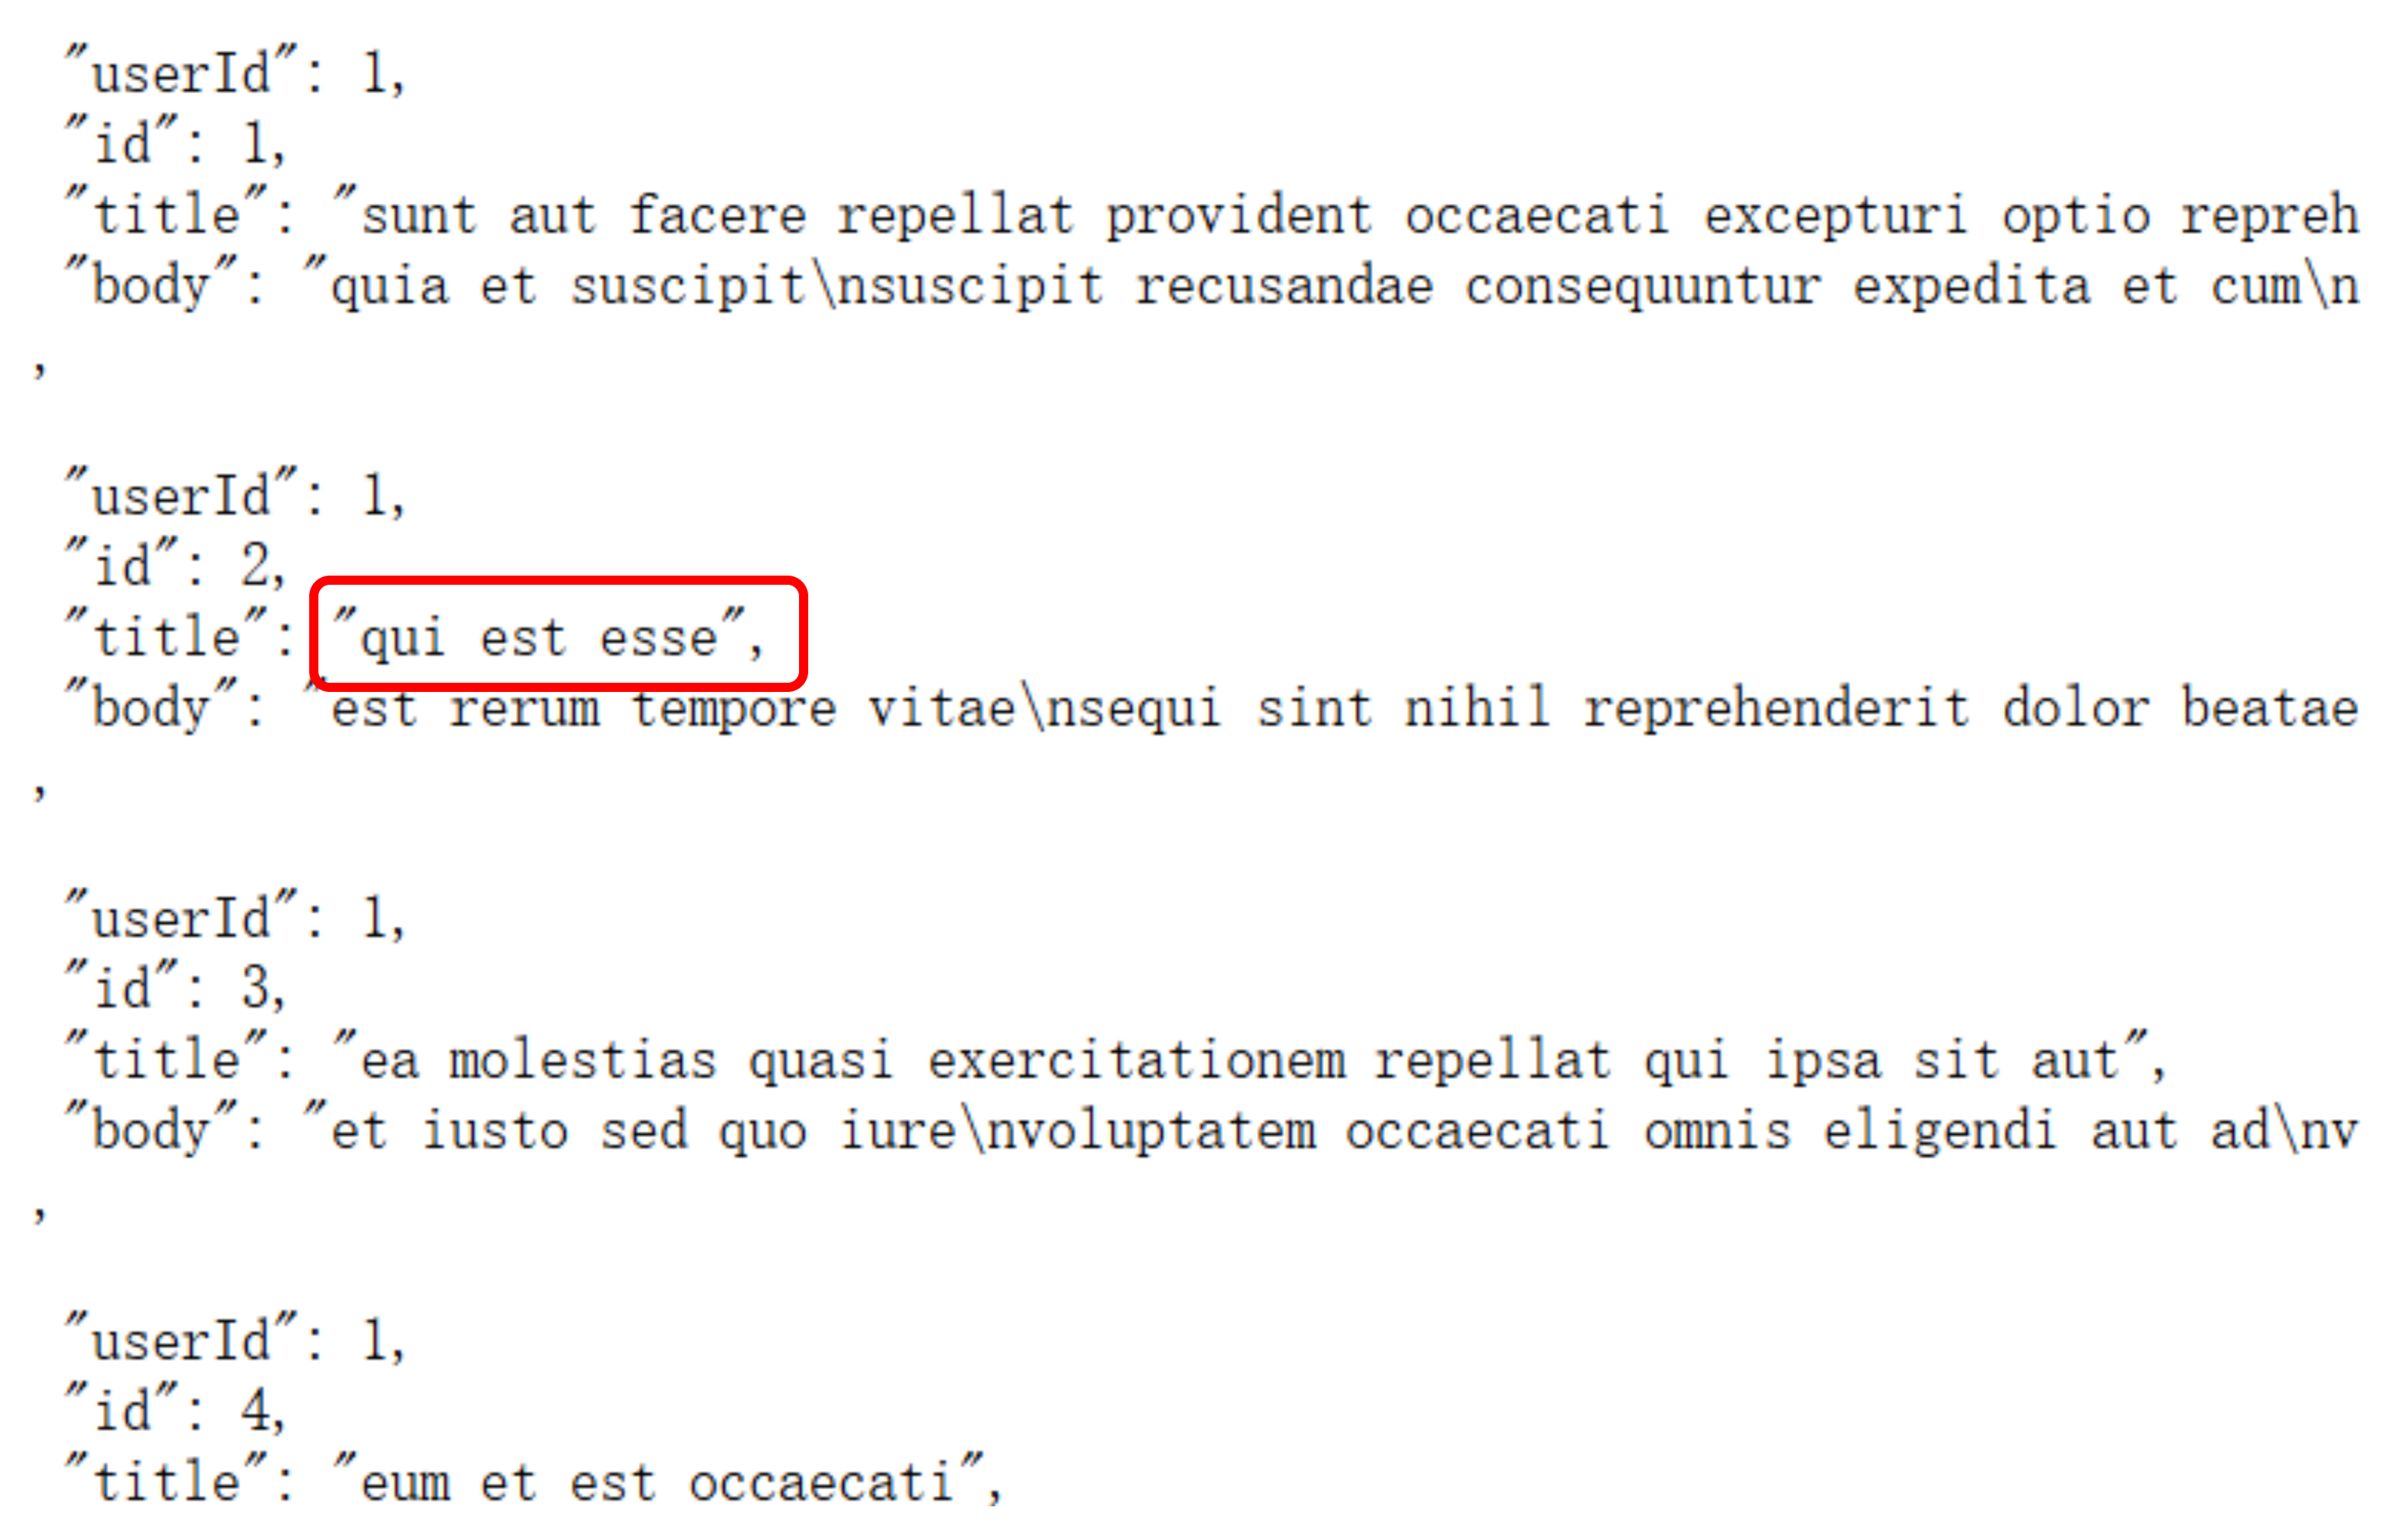
def test02():url="http://jsonplaceholder.typicode.com/posts"r=requests.get(url=url)text="qui est esse"assert text in r.text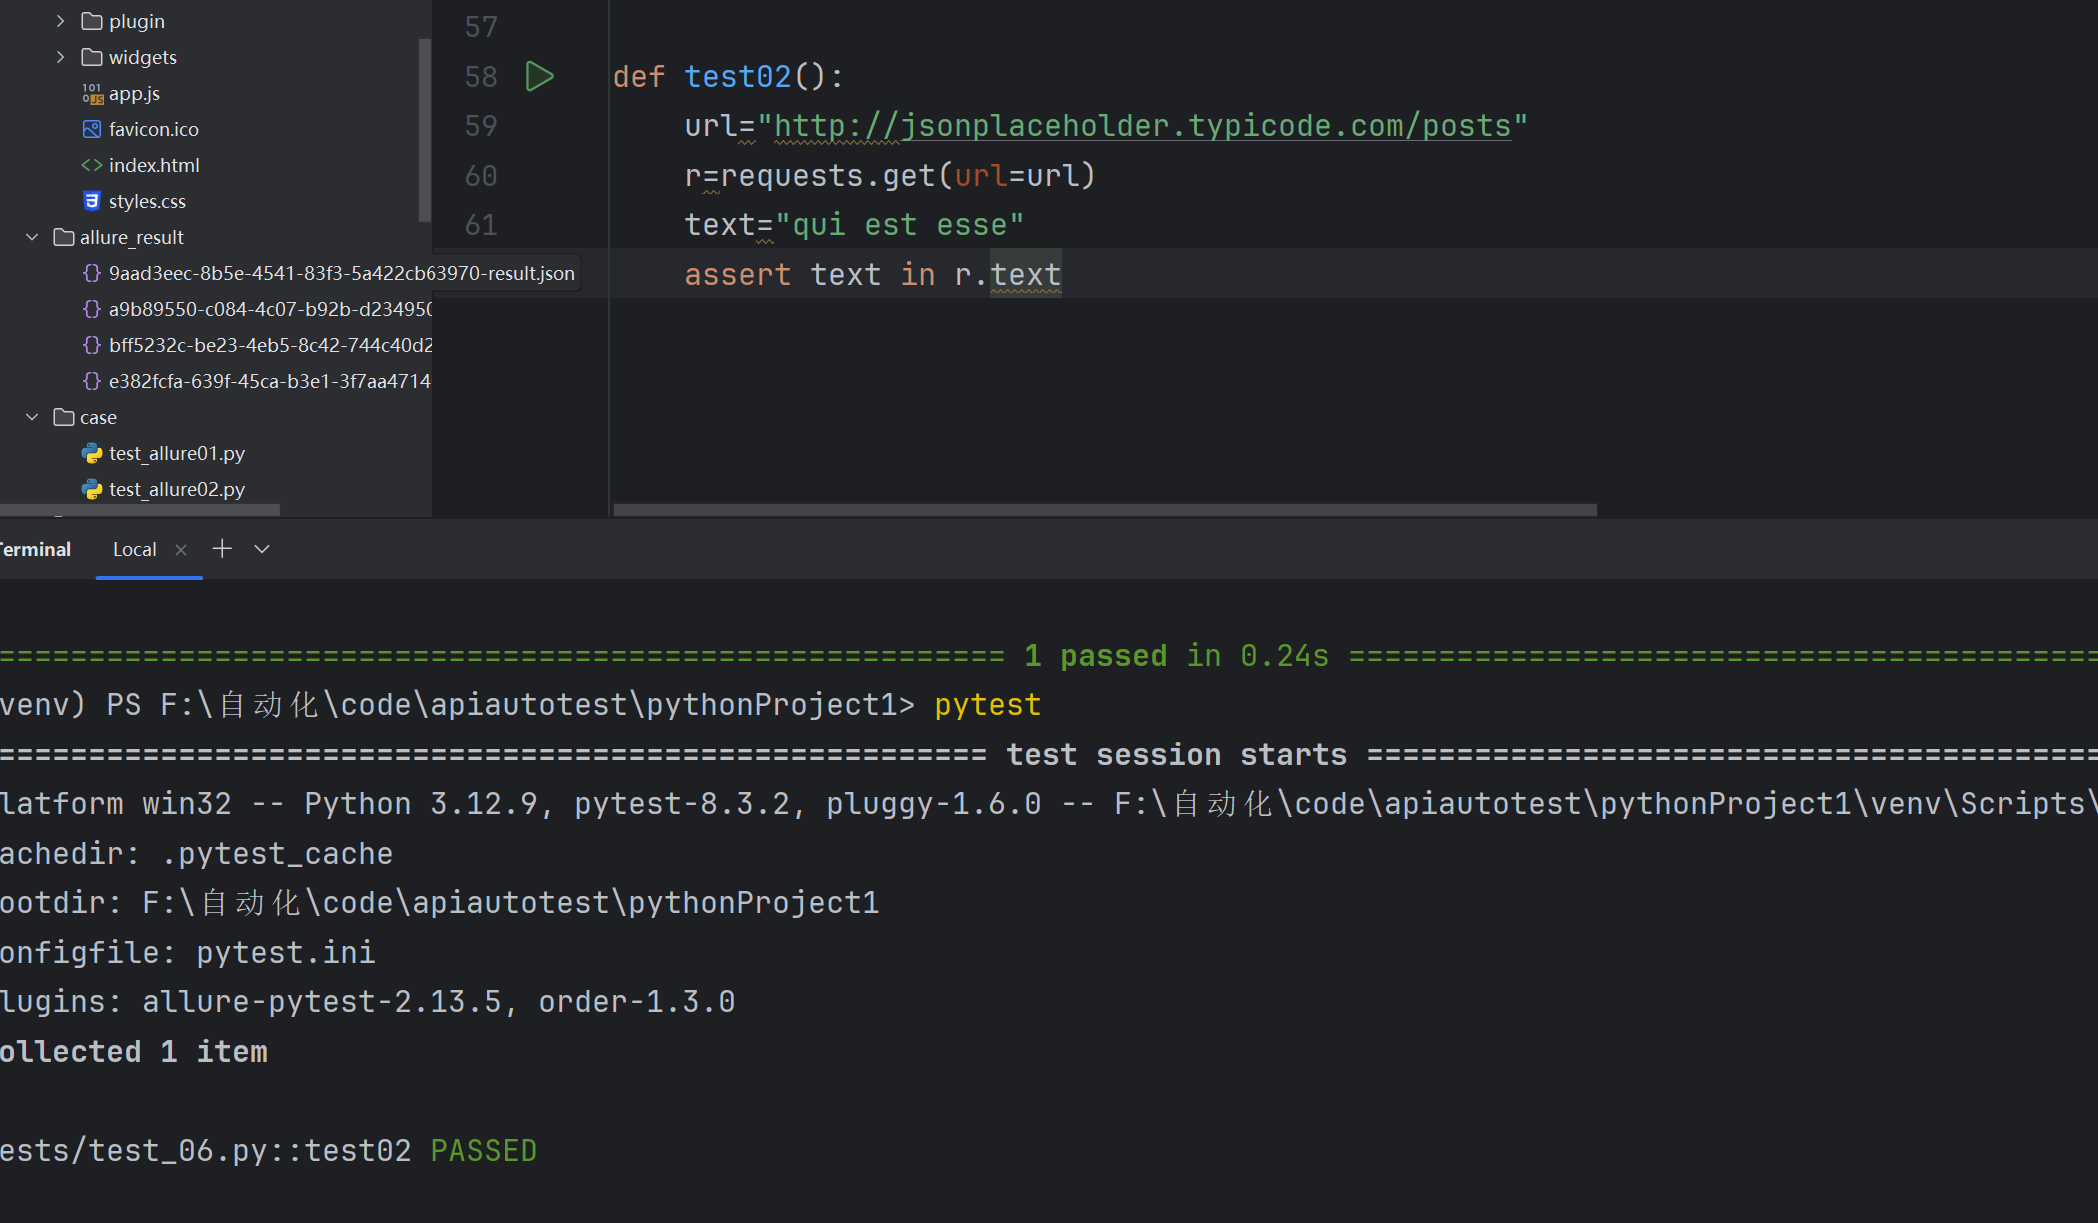
4.8参数化
参数化设计是自动化设计中的一个重要组成部分,它通过定义设计参数和规则,使得设计过程更加灵活和可控。
在 pytest 中,内置的 pytest.mark.parametrize 装饰器可实现对测试函数参数的参数化,其基本格式如下:
import pytest@pytest.mark.parametrize("参数名1, 参数名2, ...", [(参数值1, 参数值2, ...), (参数值1, 参数值2, ...), ...])
def test_函数名(参数名1, 参数名2, ...):# 测试逻辑pass
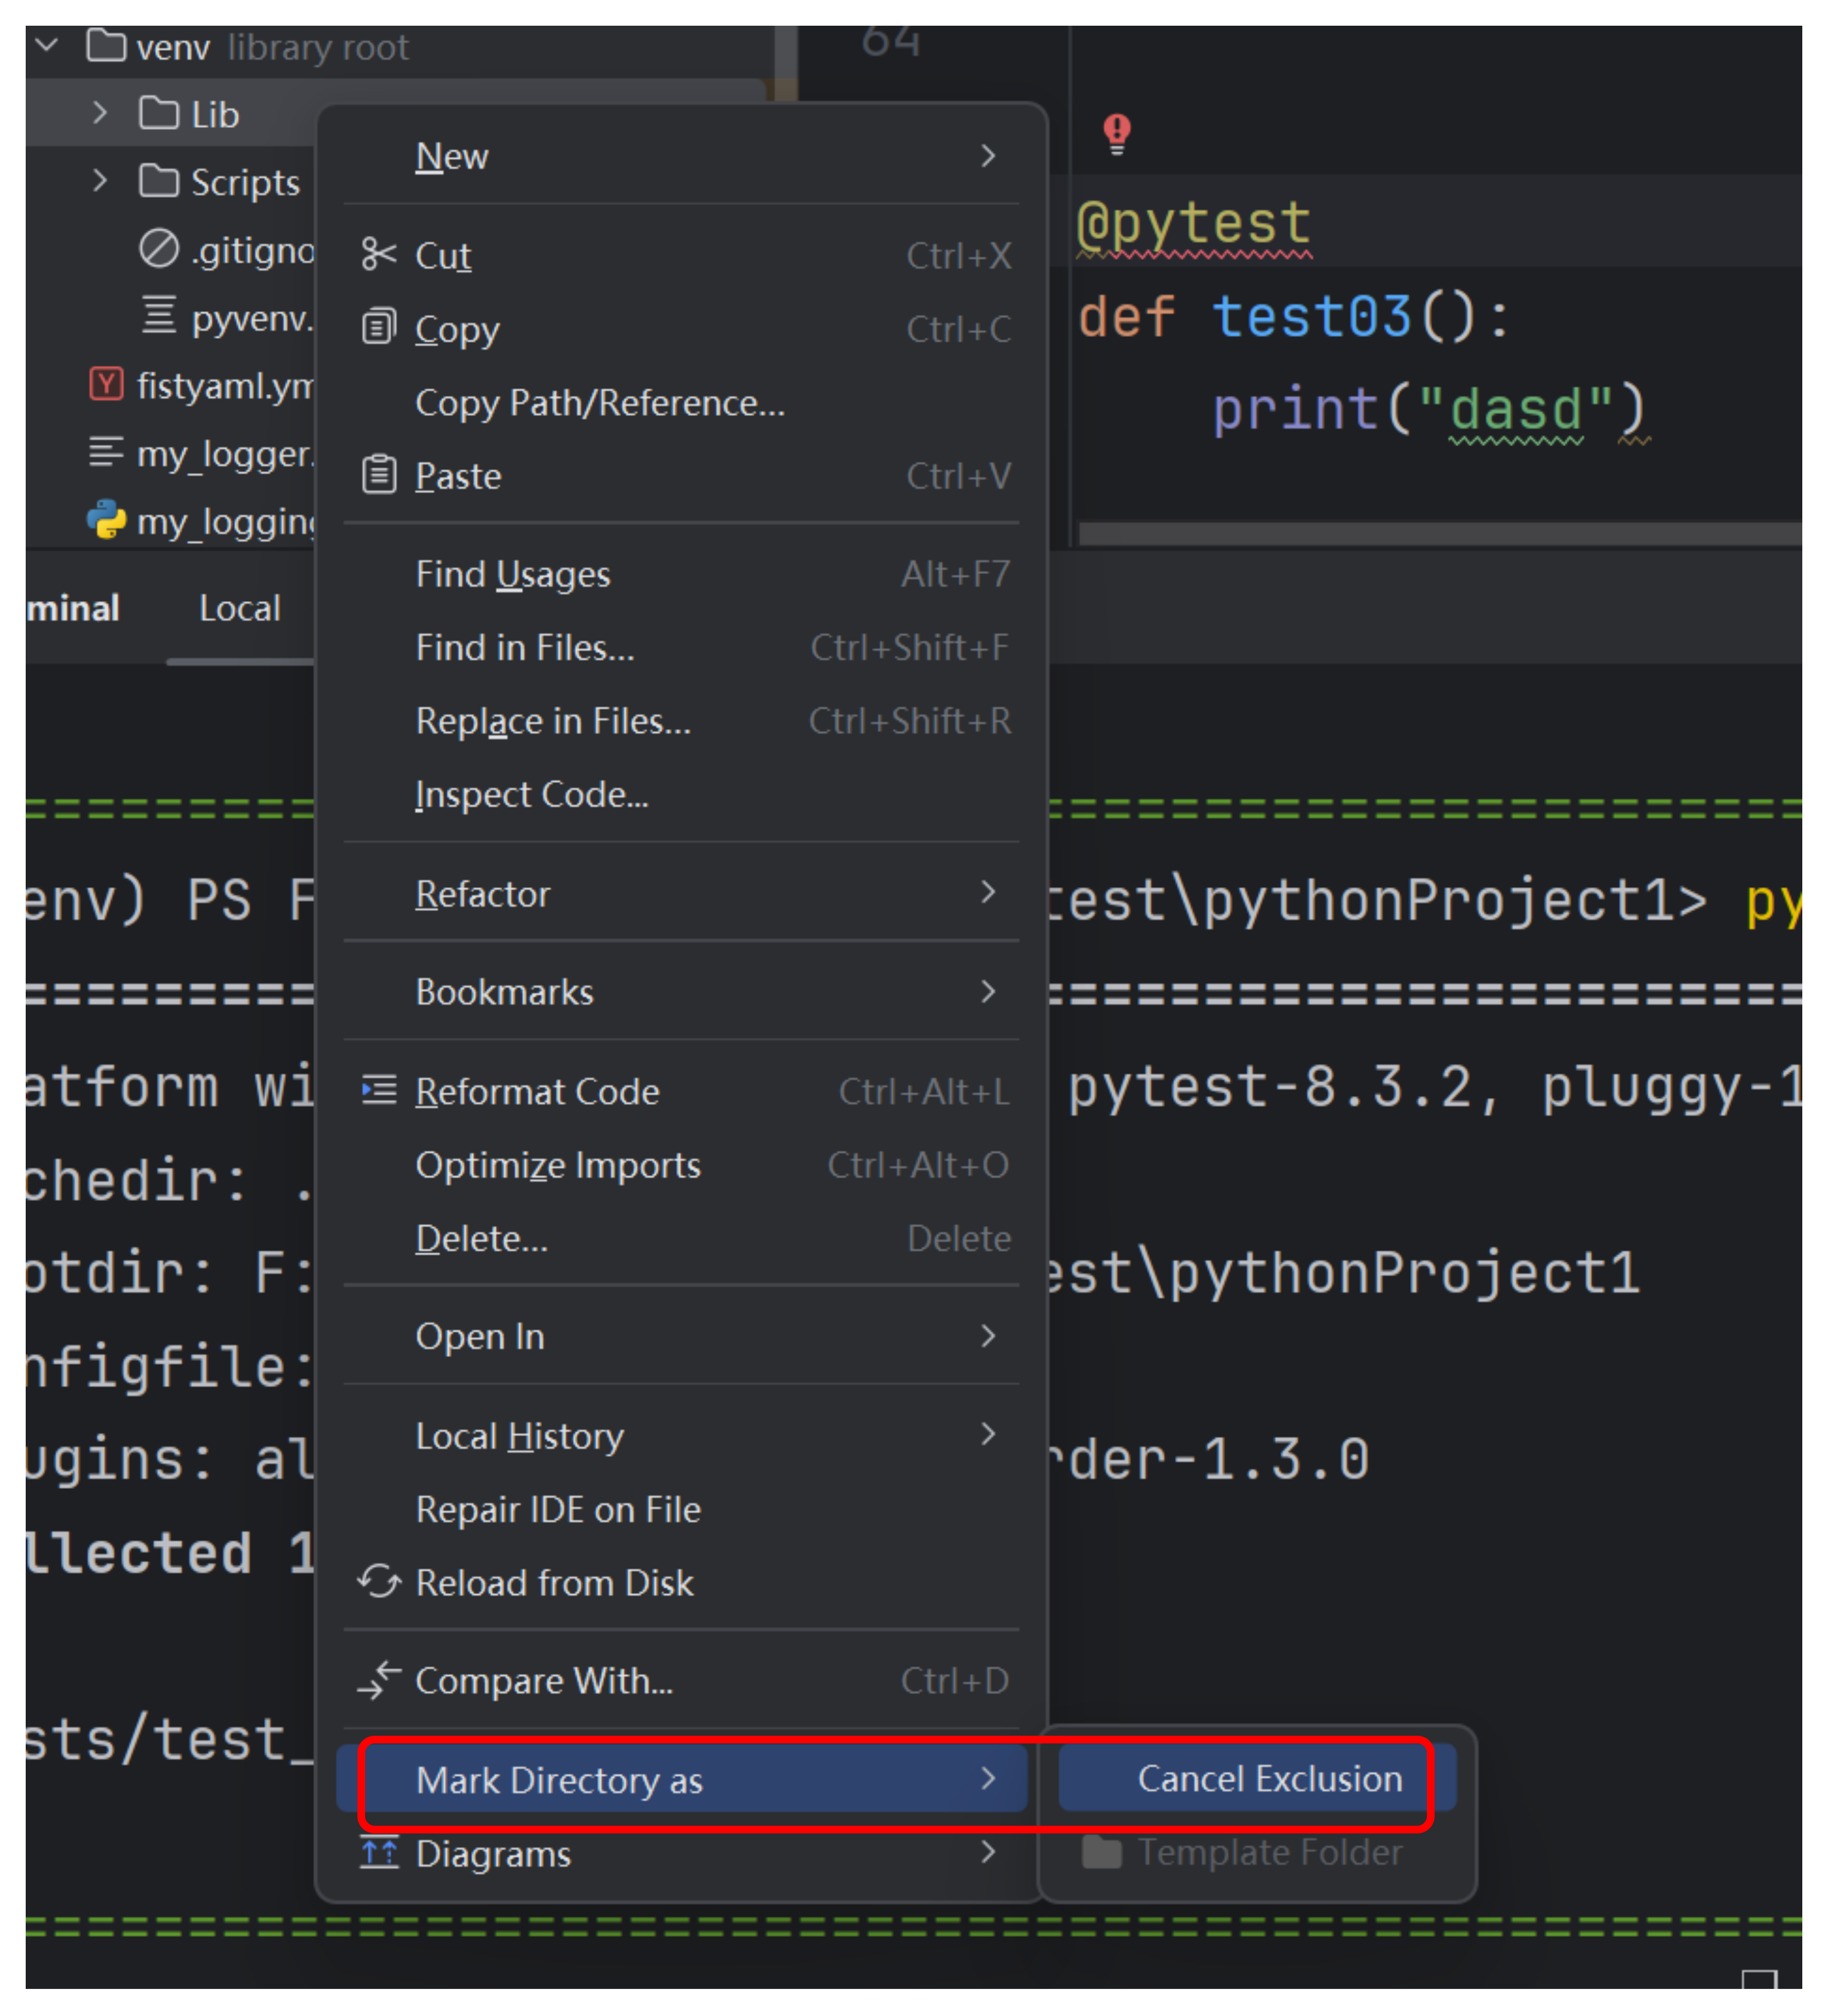
注意:找不到包,要在设置将包设置不排除在外。

示例:
单参数:
import pytest@pytest.mark.parametrize("data1", (1,2,3,4))
def test03(data1):print(data1)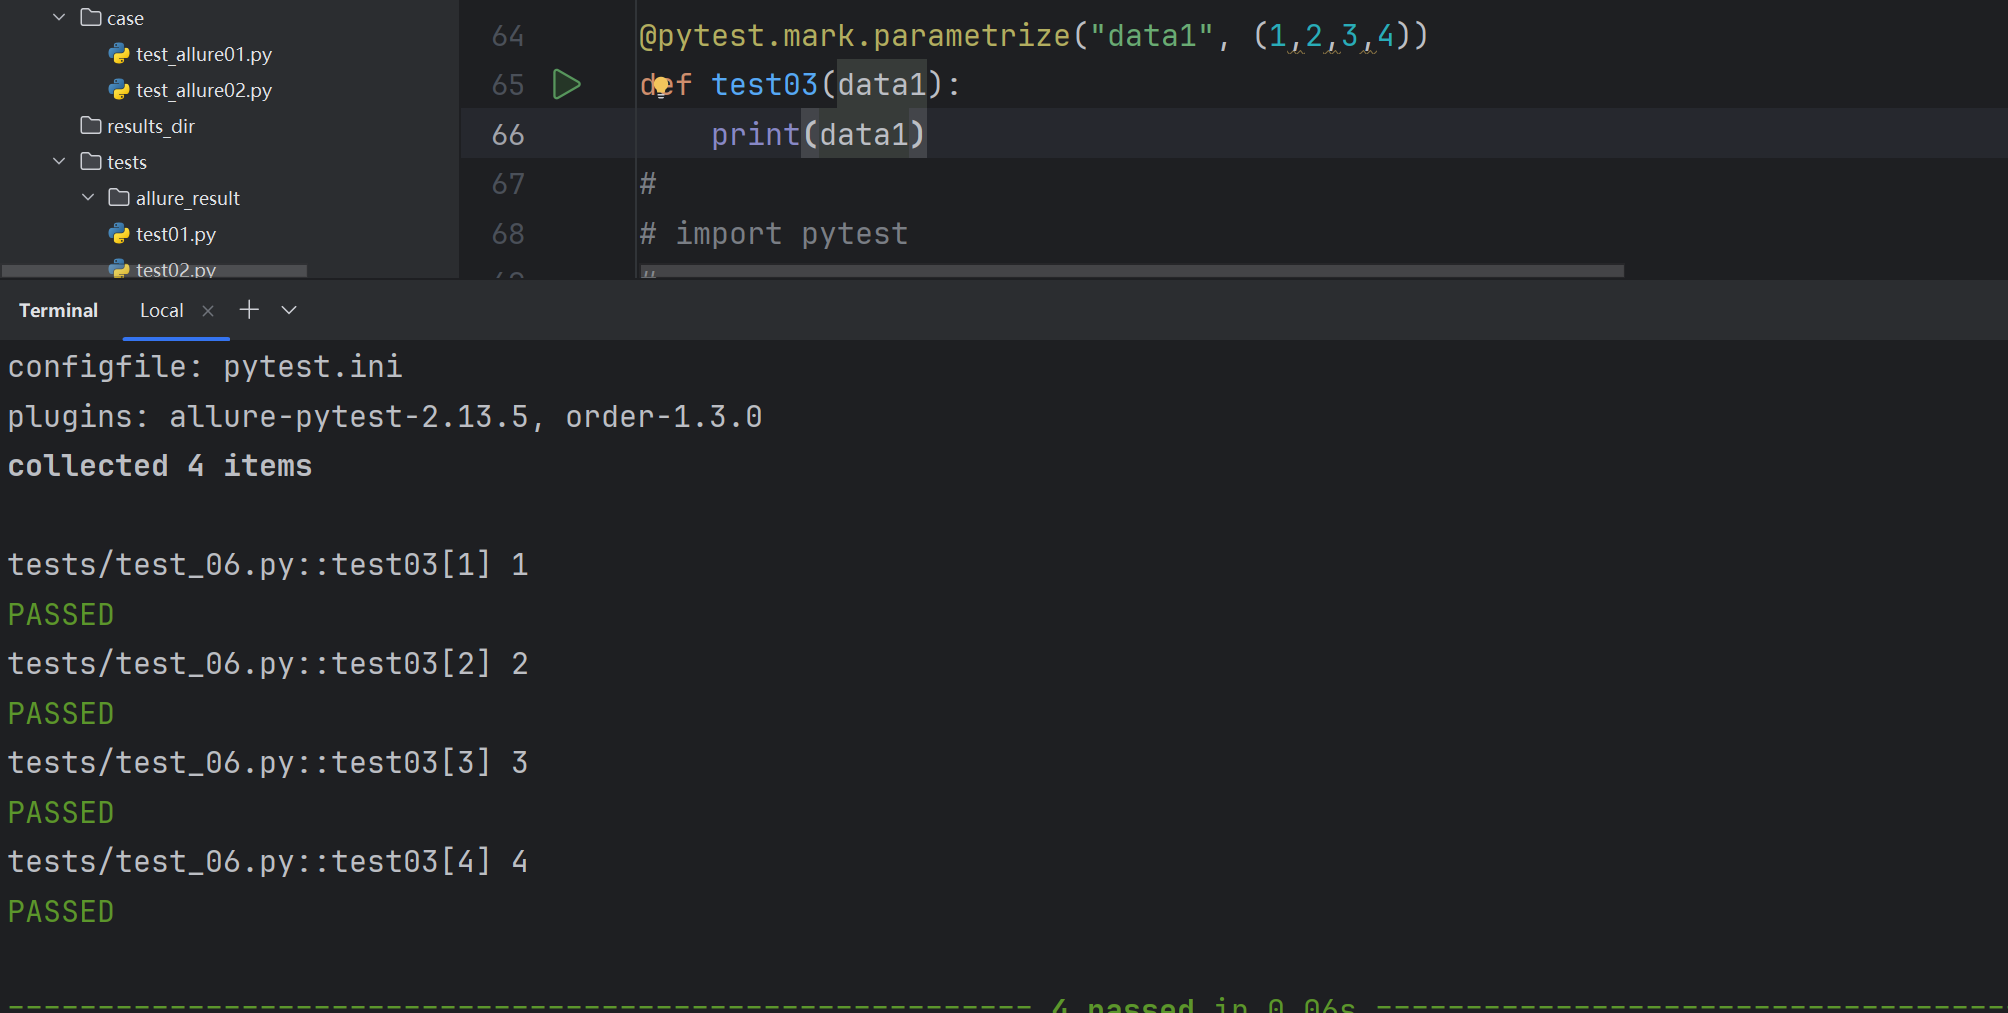
多参数:
import pytest@pytest.mark.parametrize("data1, data2", [(1, 4), (2, 5), (3.14, 6.23),("hello","pytest")])
def test03(data1, data2):print(data1, data2)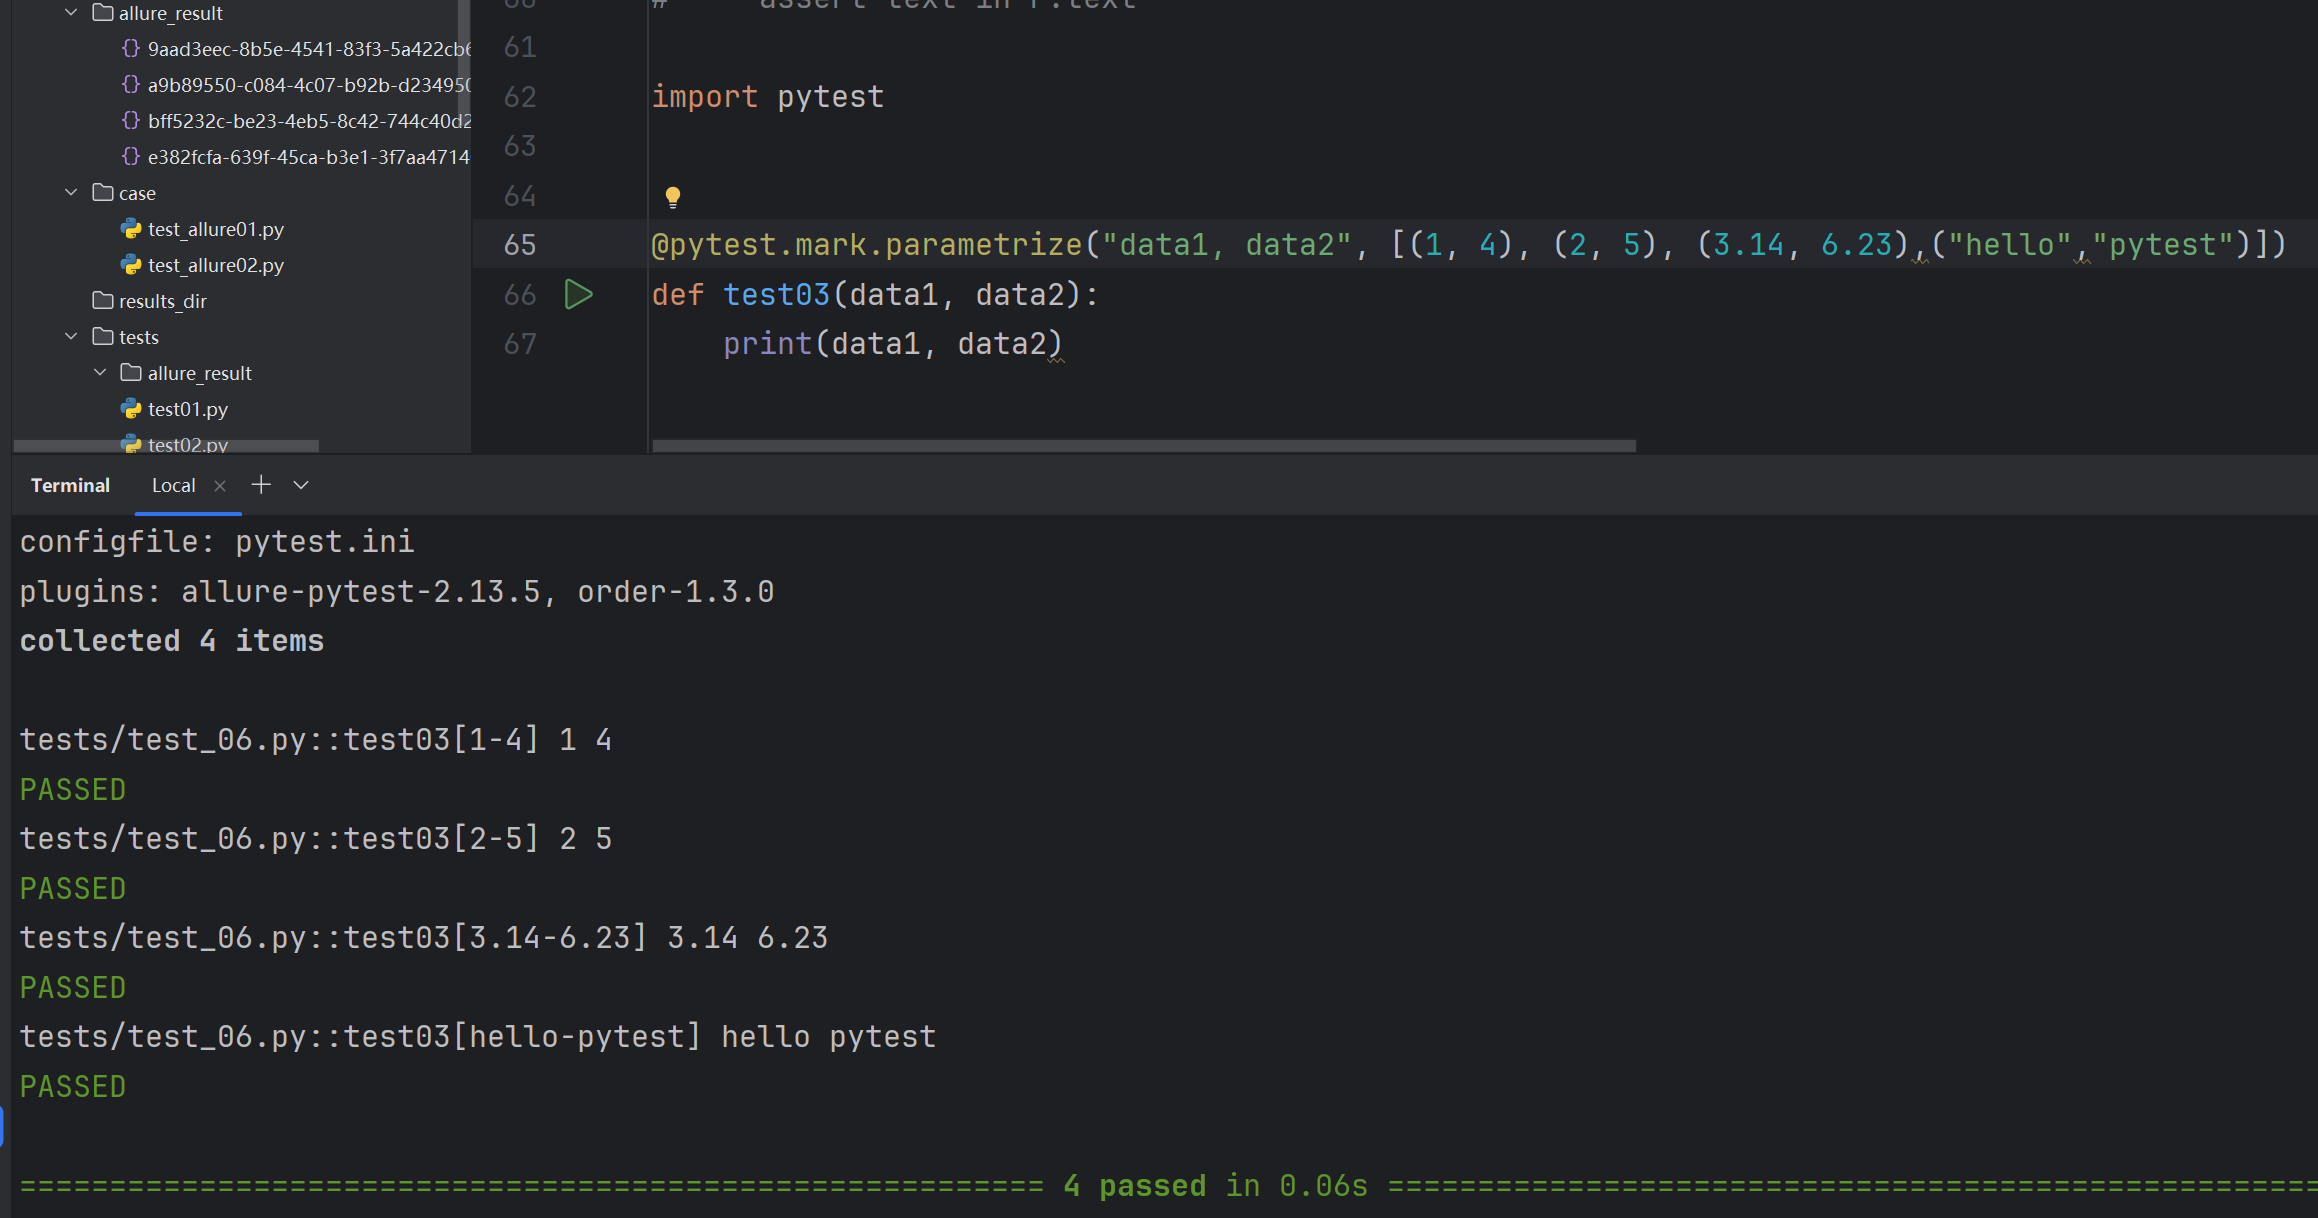
参数运算:
import pytest@pytest.mark.parametrize("test_input,expected ", [(1*42, 42), (2+5, 7), (4/2, 2),(1-1,0),("hello","hello")])
def test04(test_input,expected):assert test_input == expected@pytest.mark.parametrize("n,expected ", [(1, 2), (3, 4)])
class Test_n:def test05(self,n,expected):assert n+1 == expecteddef test06(self,n,expected):assert (n*1) + 1 == expected
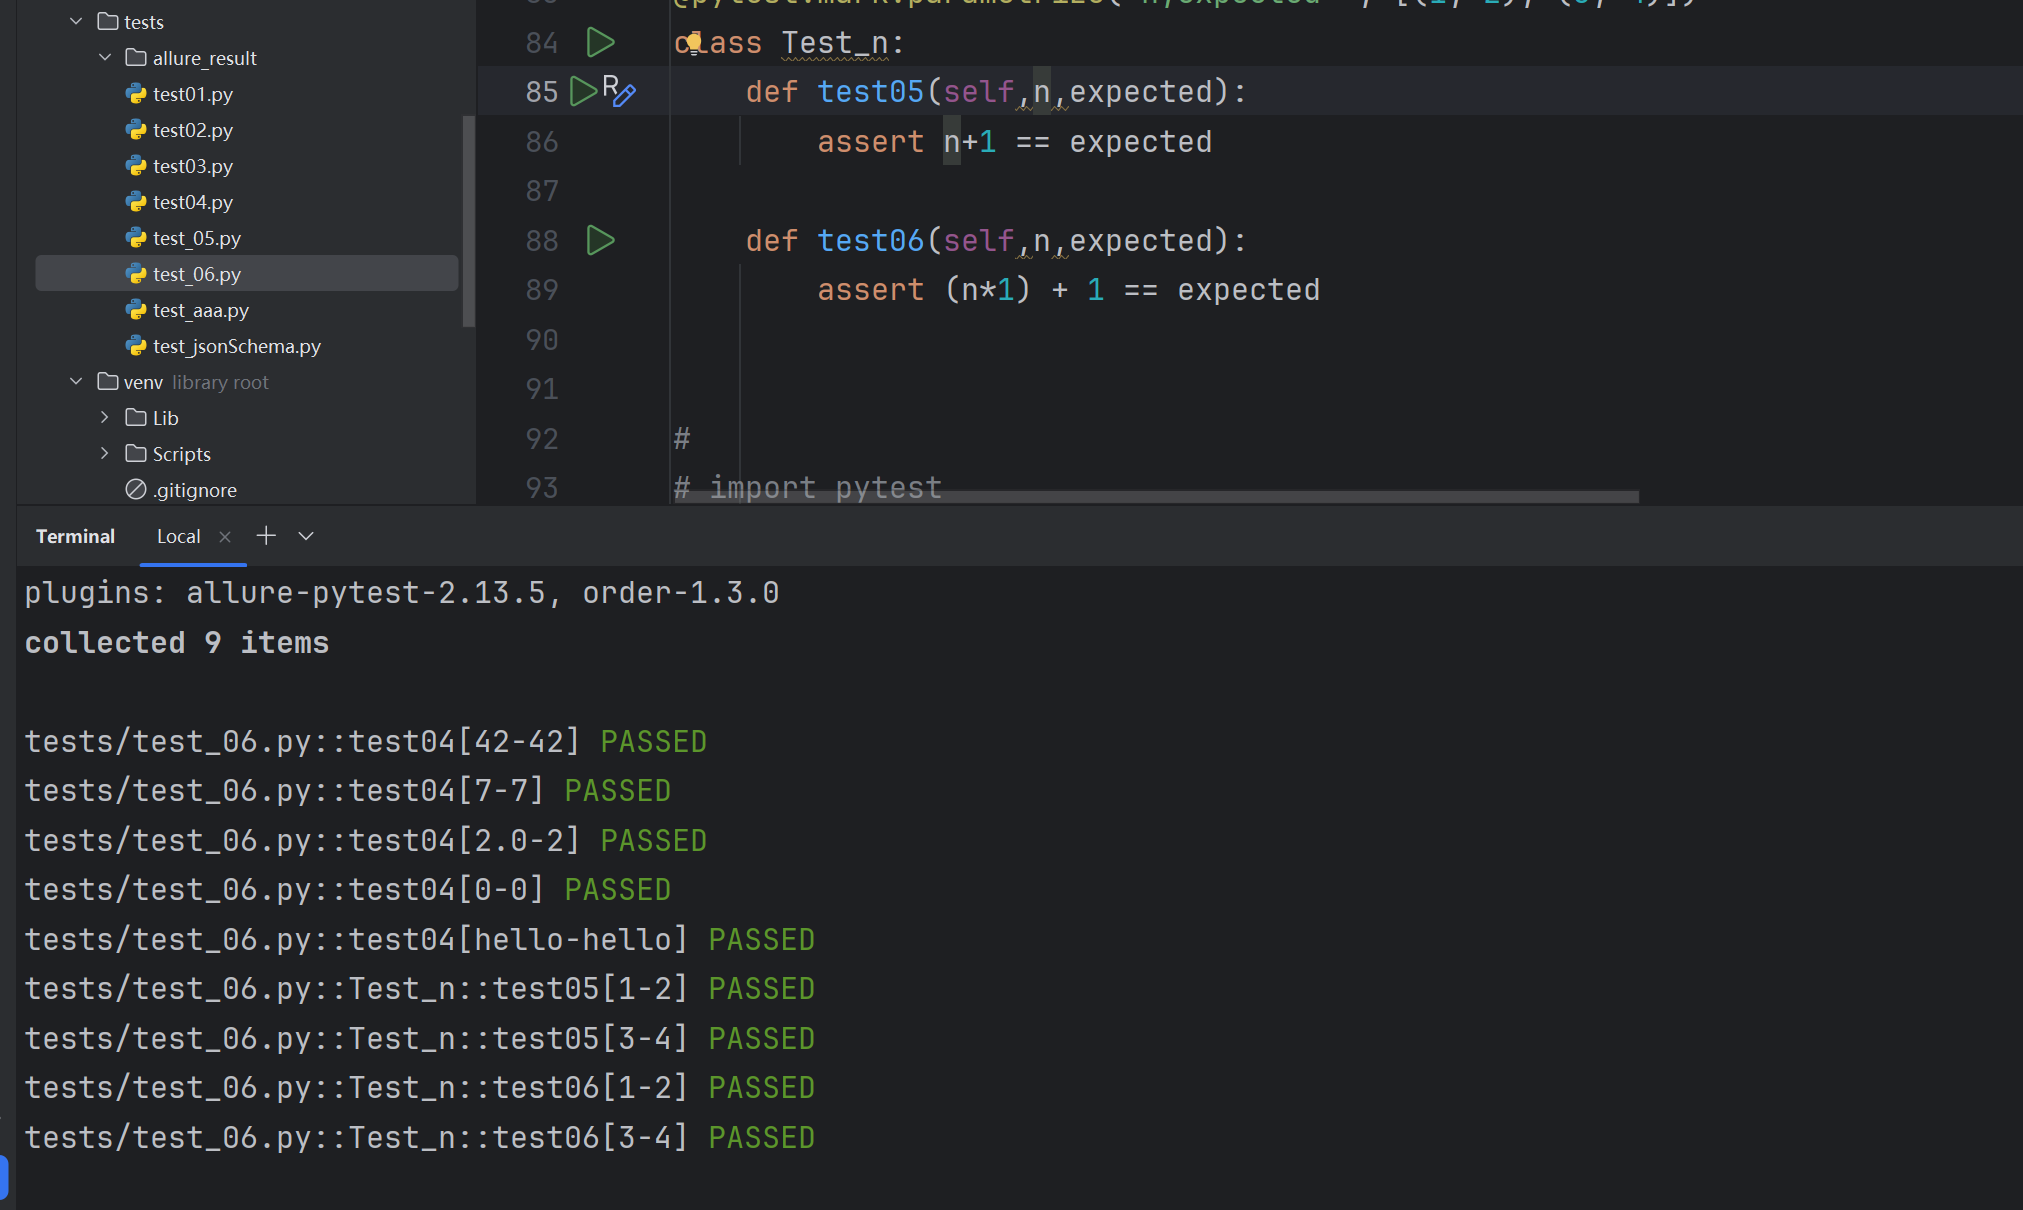
要对模块中的所有测试进⾏参数化,你可以将 pytestmark 全局变量赋值:
import pytestpytestmark = pytest.mark.parametrize("n",(1, 2))class Test_01():def test01(self,n):print(n)def test02(self,n):print(n)class Test_02():def test03(self,n):print(n)def test04(self,n):print(n)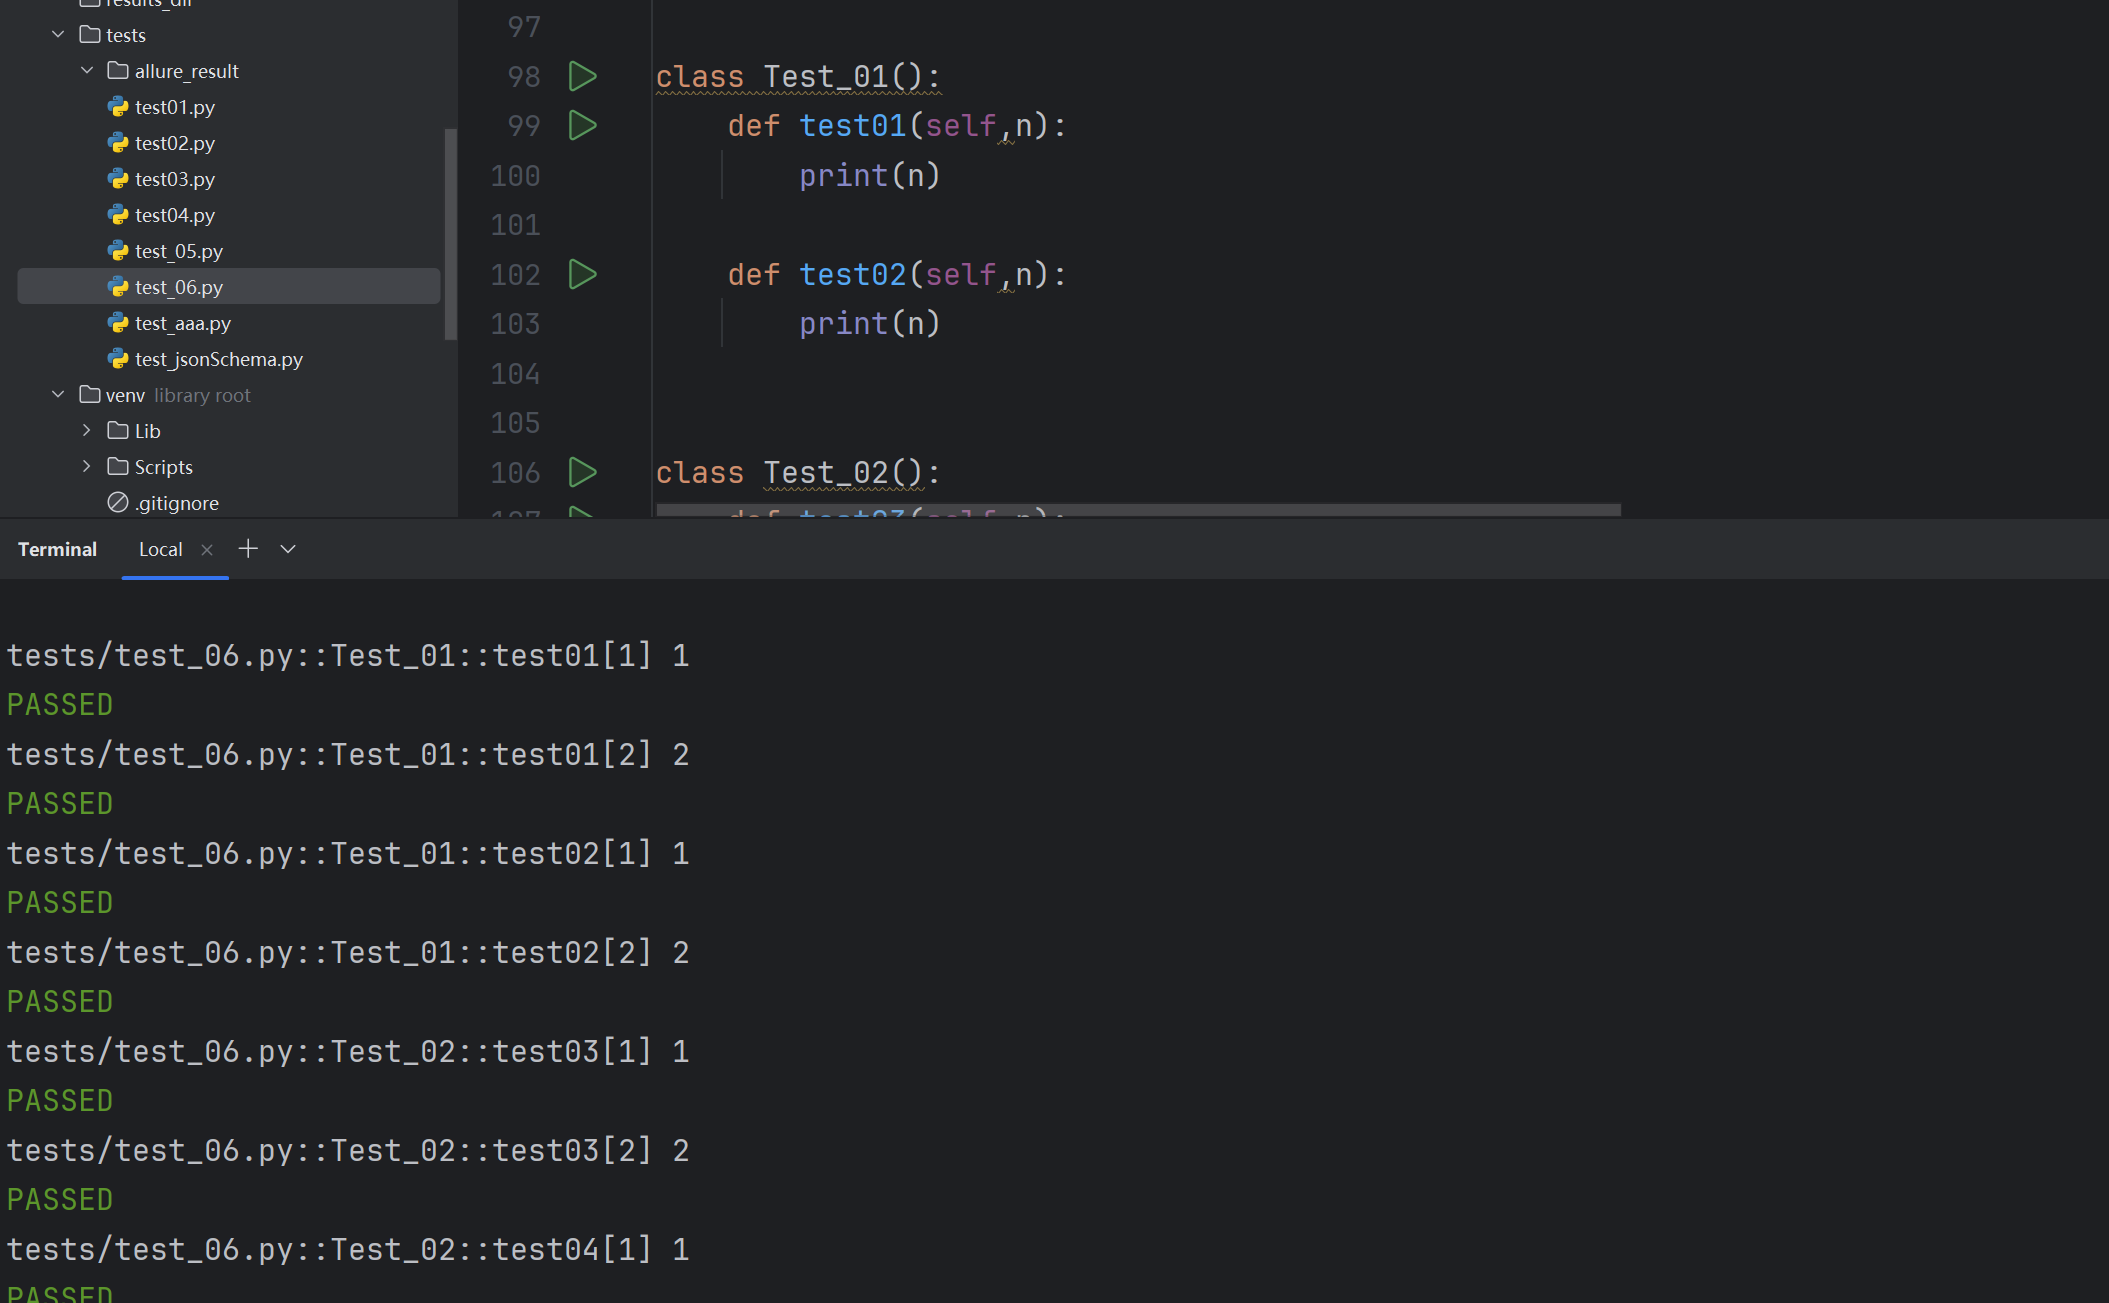
自定义参数化数据源:
import pytest
def data_provider():return ["hello",1,1+2,3.14]pytestmark = pytest.mark.parametrize("data",data_provider())
def test_06(data):print(data)
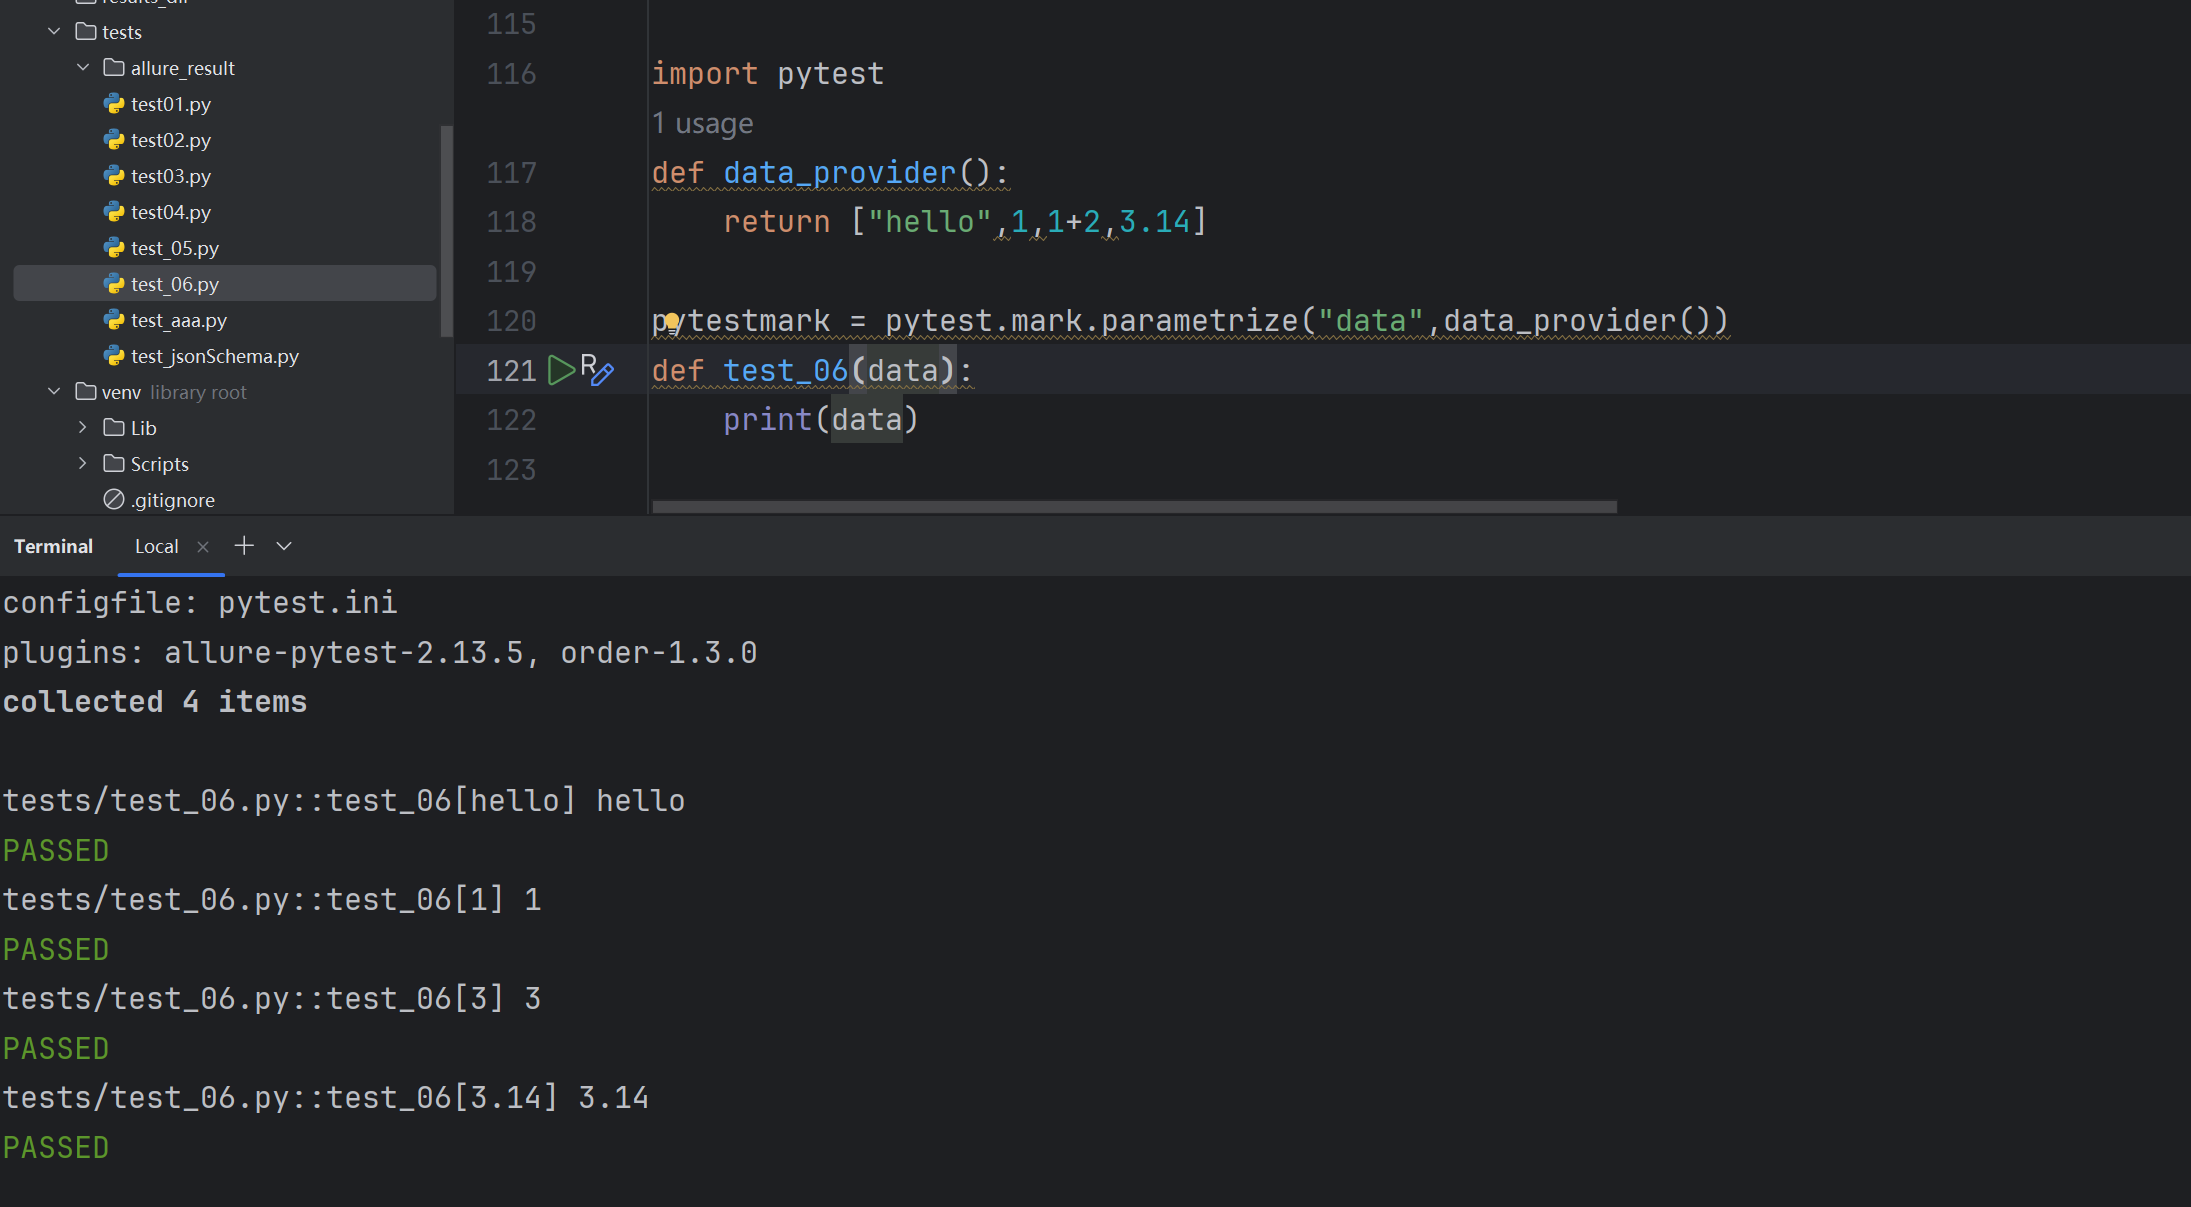
除了使用 @pytest.mark.parametrize 实现测试函数的参数化外,pytest.fixture() 也支持对 fixture 函数进行参数化。
4.9fixture
pytest 中的 fixture 是一种强大的机制,用于提供测试函数所需的资源或上下文。它可以用于设置测试环境、准备数据等。以下是 fixture 的一些核心概念和使用场景。
未调用fixture
def fixture_01():print("第⼀个fixture标记的⽅法")
def test_01():fixture_01()print("第⼀个测试⽤例")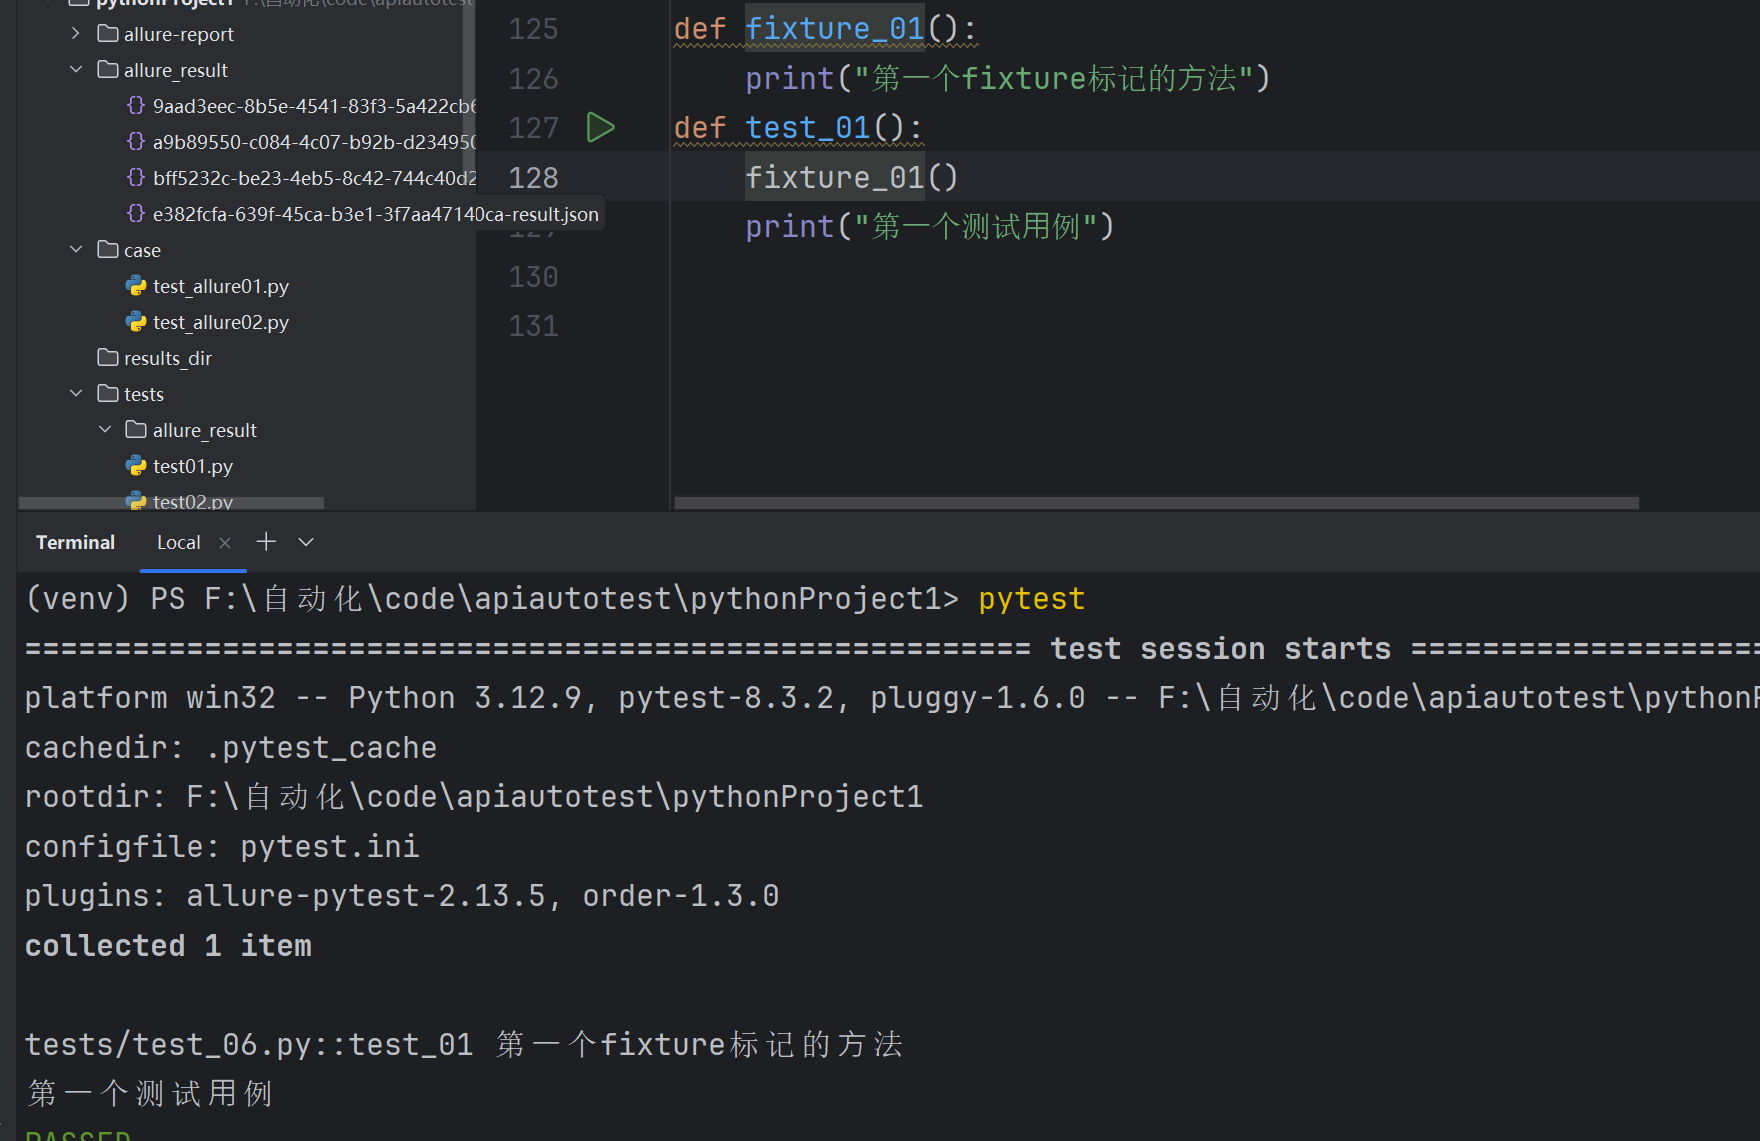
调用fixture
import pytest@pytest.fixture
def fixture_01():print("第⼀个fixture标记的⽅法")
def test_01(fixture_01):print("第⼀个测试⽤例")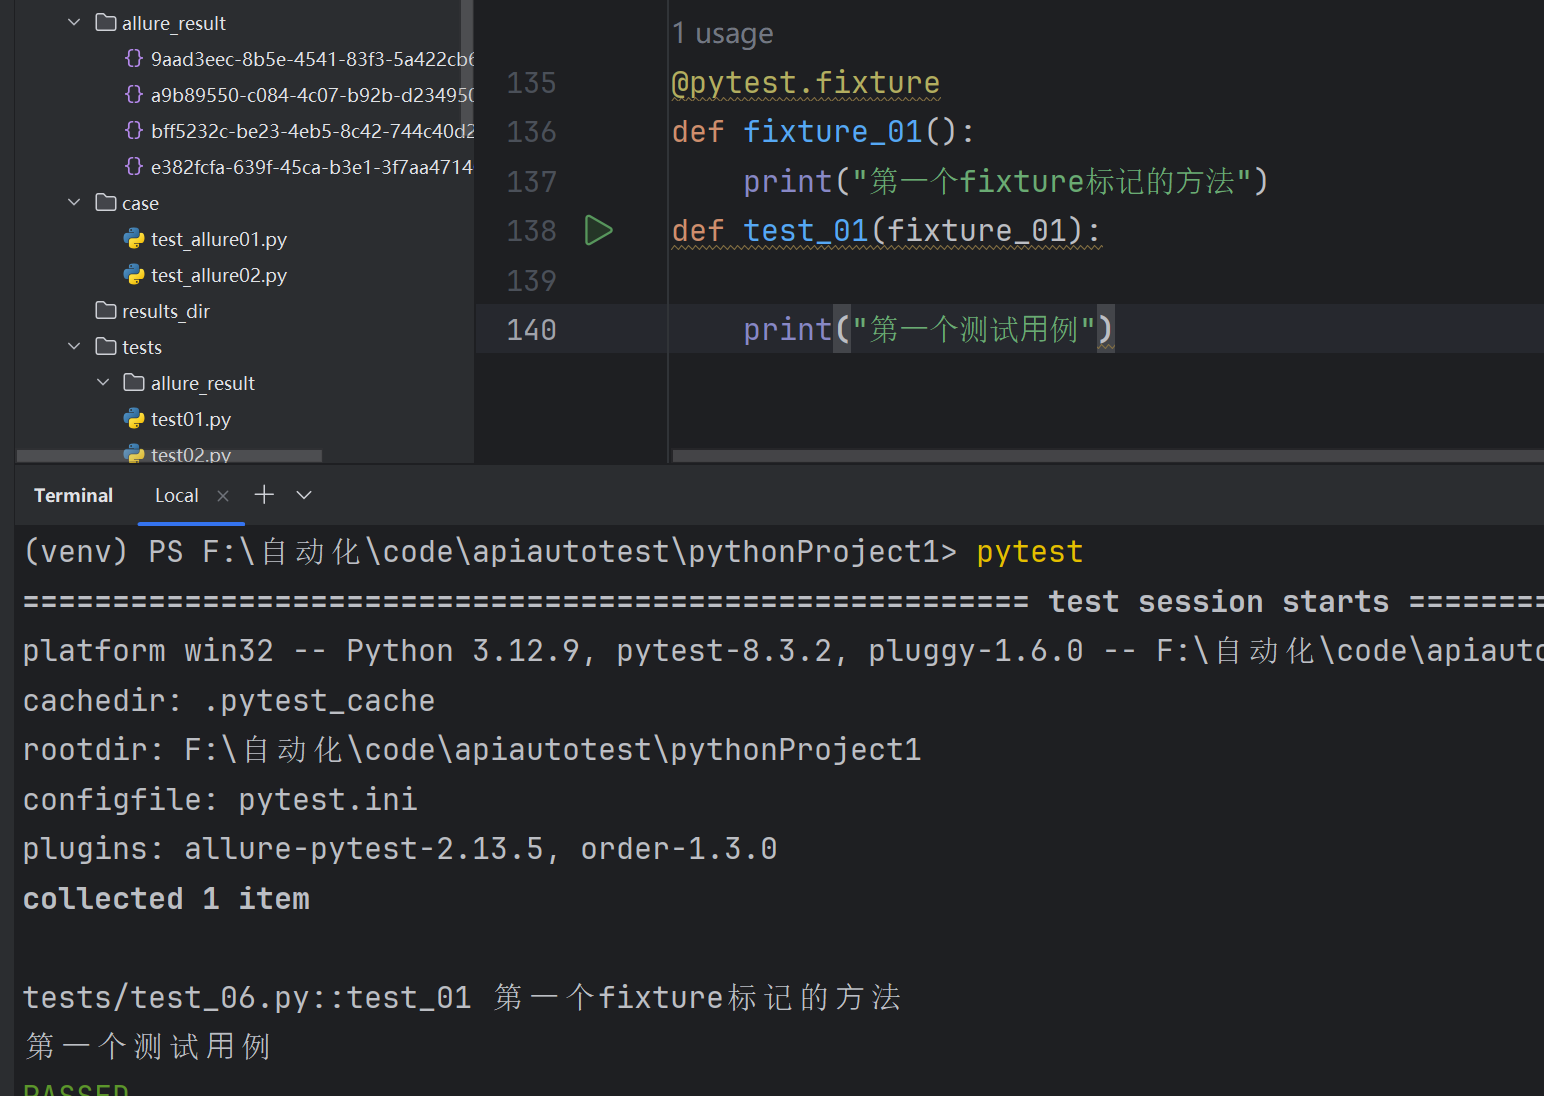
未标记 fixture 方法的调用与 fixture 标记的方法调用完全不一样,前者需要在方法体中调用,而后者可以将函数名作为参数进行调用。
测试脚本中存在很多重复的代码、公共的数据对象时,使用 fixture 最为合适。
fixture嵌套
import pytest
@pytest.fixture
def login():print("\n登陆")def test_list(login):print("访问列表⻚")def test_detail(login):print("访问详情⻚")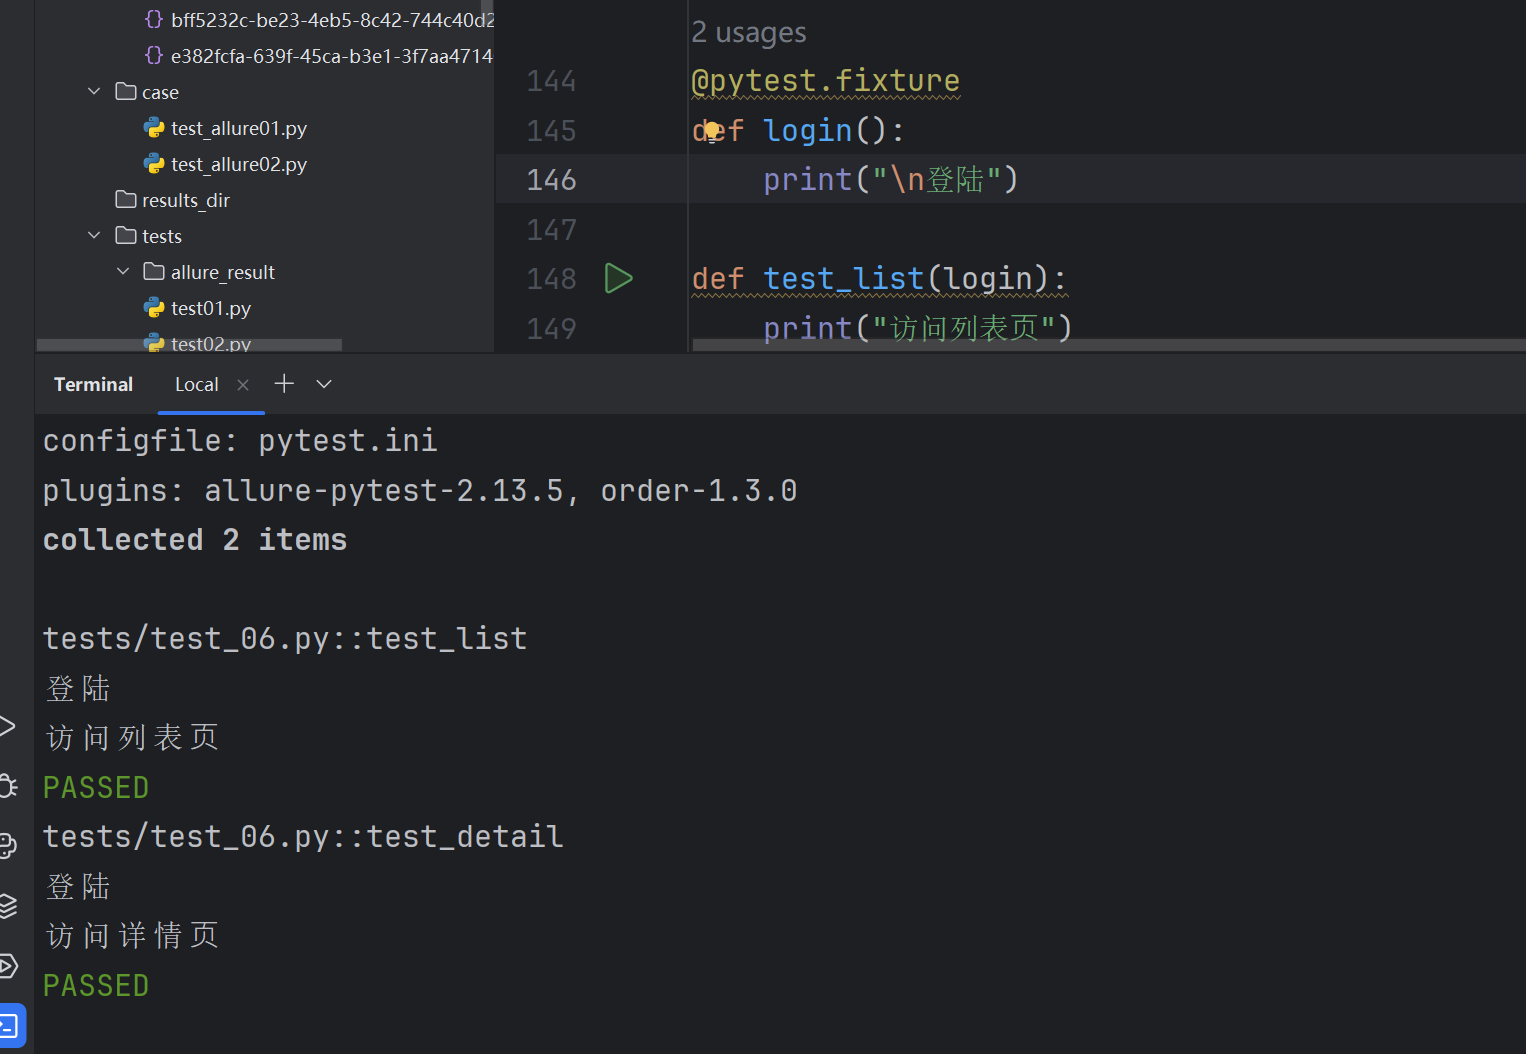
# test_append.py的内容 import pytest
import pytest
@pytest.fixture
def first_entry():return "a"
# 安排
@pytest.fixture
def order(first_entry):return [first_entry]def test_string(order): # ⾏动order.append("b")# 断⾔assert order == ["a", "b"]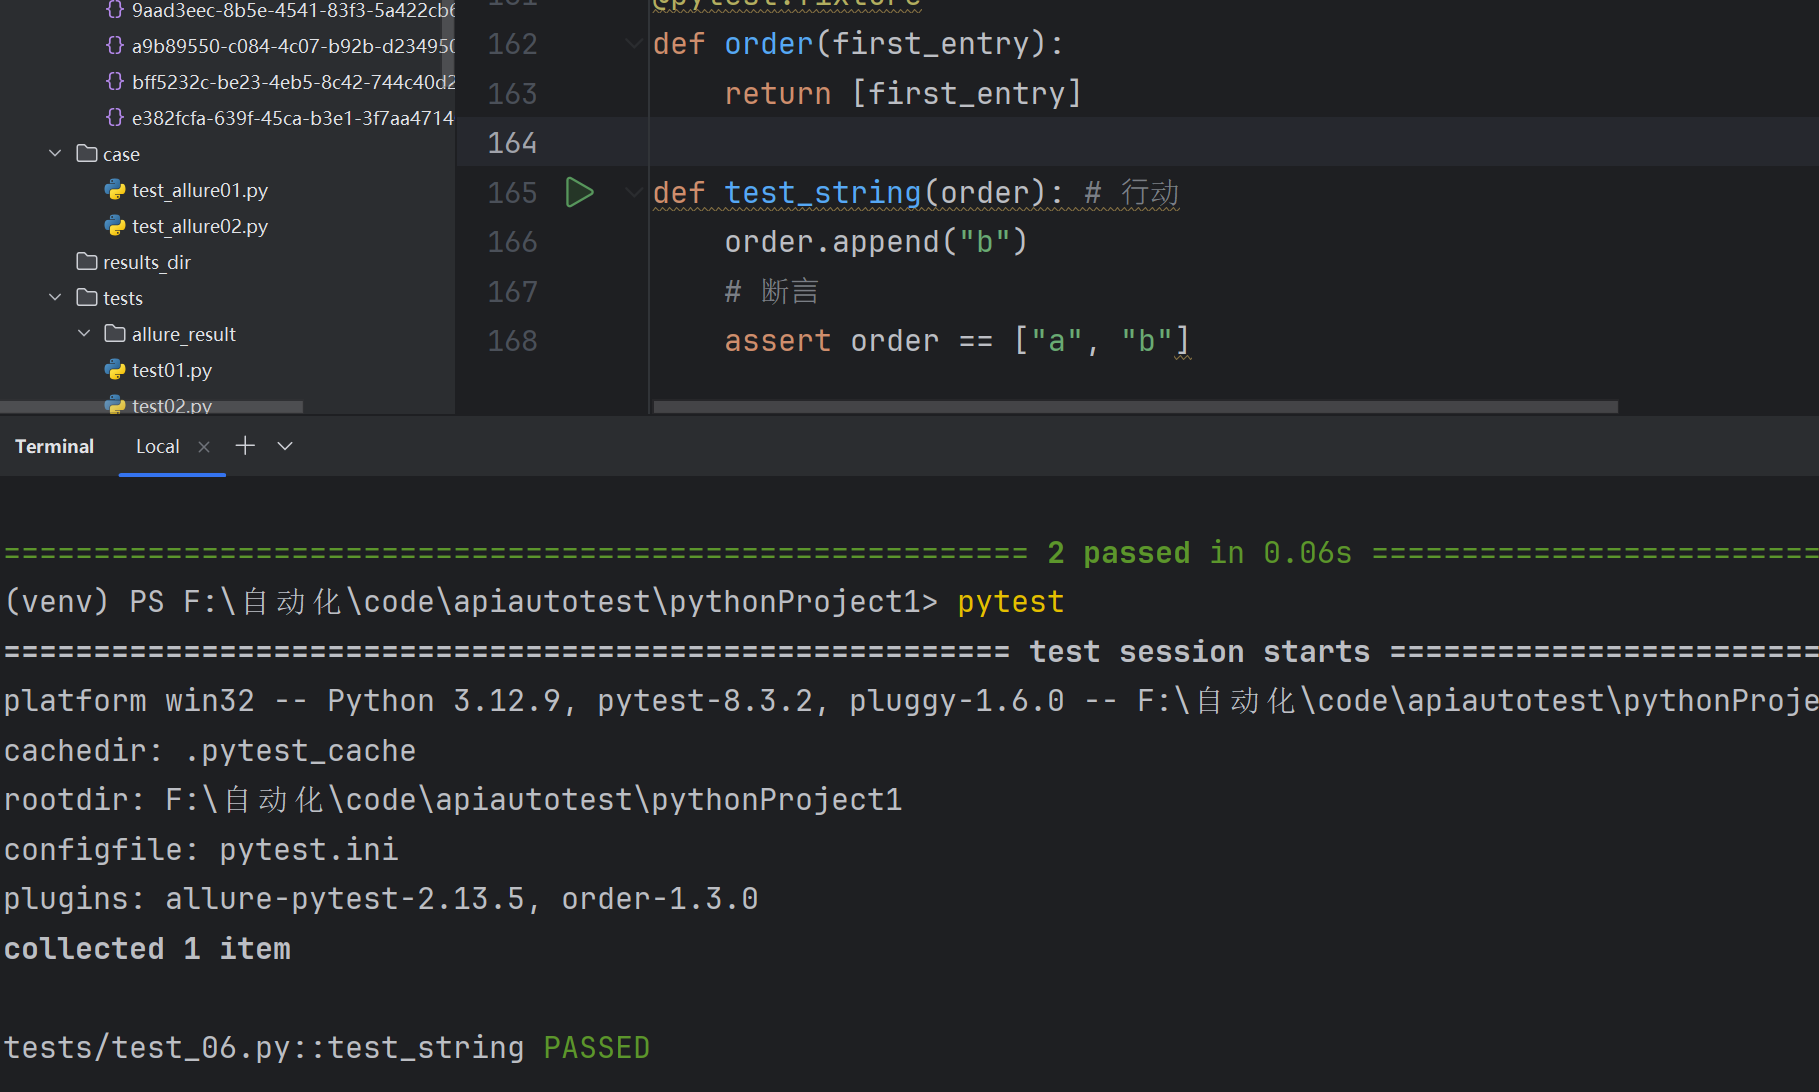
import pytest
class Fruit:#这里不是测试类可以用__init__def __init__(self, name):self.name = namedef __eq__(self, other):return self.name == other.name
@pytest.fixture
def my_fruit():return Fruit("apple")
@pytest.fixture
def fruit_basket(my_fruit):return [Fruit("banana"), my_fruit]def test_my_fruit_in_basket(my_fruit, fruit_basket):assert my_fruit in fruit_basket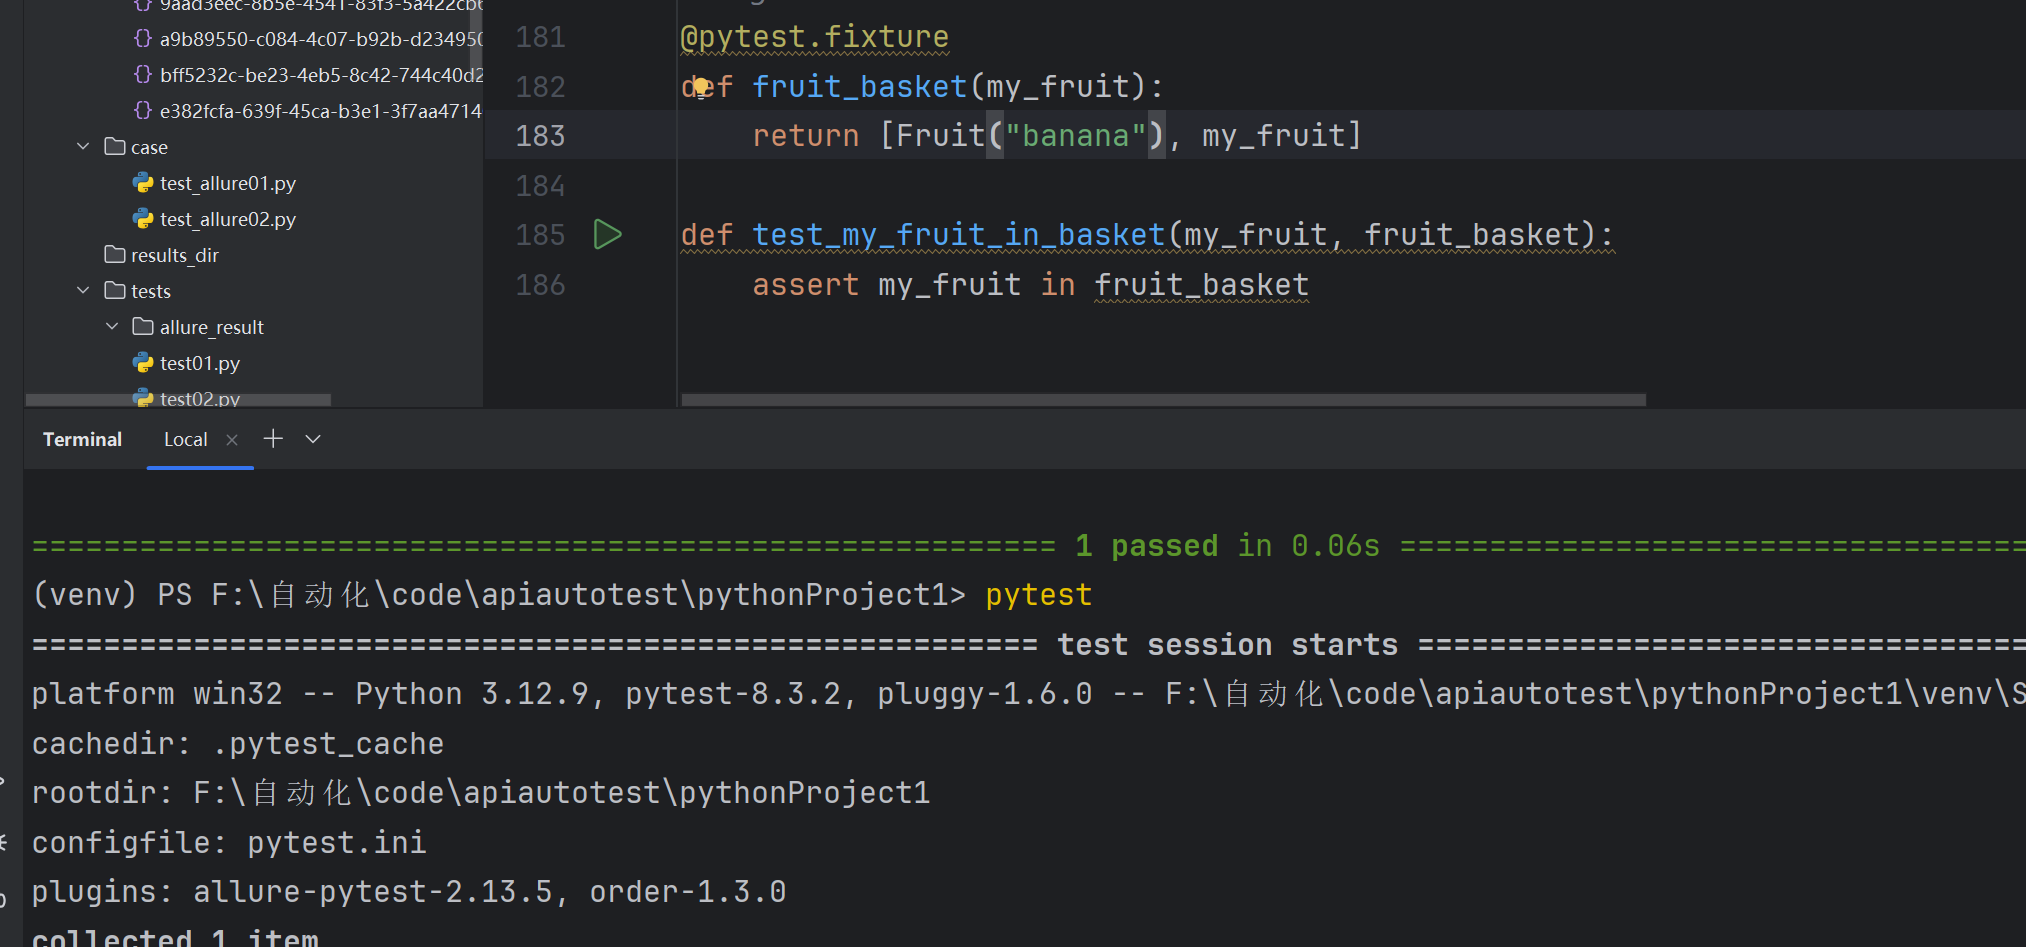
4.10 yield fixture
当我们运行测试时,我们希望确保它们能够自我清理,以便它们不会干扰其他测试(同时也避免留下大量测试数据来膨胀系统)。pytest 中的 fixture 提供了一个非常有用的拆卸系统,它允许我们为每个 fixture 定义具体的清理步骤。
“Yield” fixture 使用 yield 而不是 return 。有了这些 fixture ,我们可以运行一些代码,并将对象返回给请求的 fixture/test ,就像其他 fixture 一样。唯一的不同是:
return 被替换为 yield 。
该 fixture 的任何拆卸代码放置在 yield 之后。
一旦 pytest 确定了 fixture 的线性顺序,它将运行每个 fixture 直到它返回或 yield ,然后继续执行列表中的下一个 fixture 做同样的事情。
测试完成后,pytest 将逆向遍历 fixture 列表,对于每个 yield 的 fixture ,运行 yield 语句之后的代码。
示例:
不返回数据
import pytest
@pytest.fixture
def operator():print("初始化操作")yieldprint("\n清理数据")
def test01(operator):print("第一个测试用例")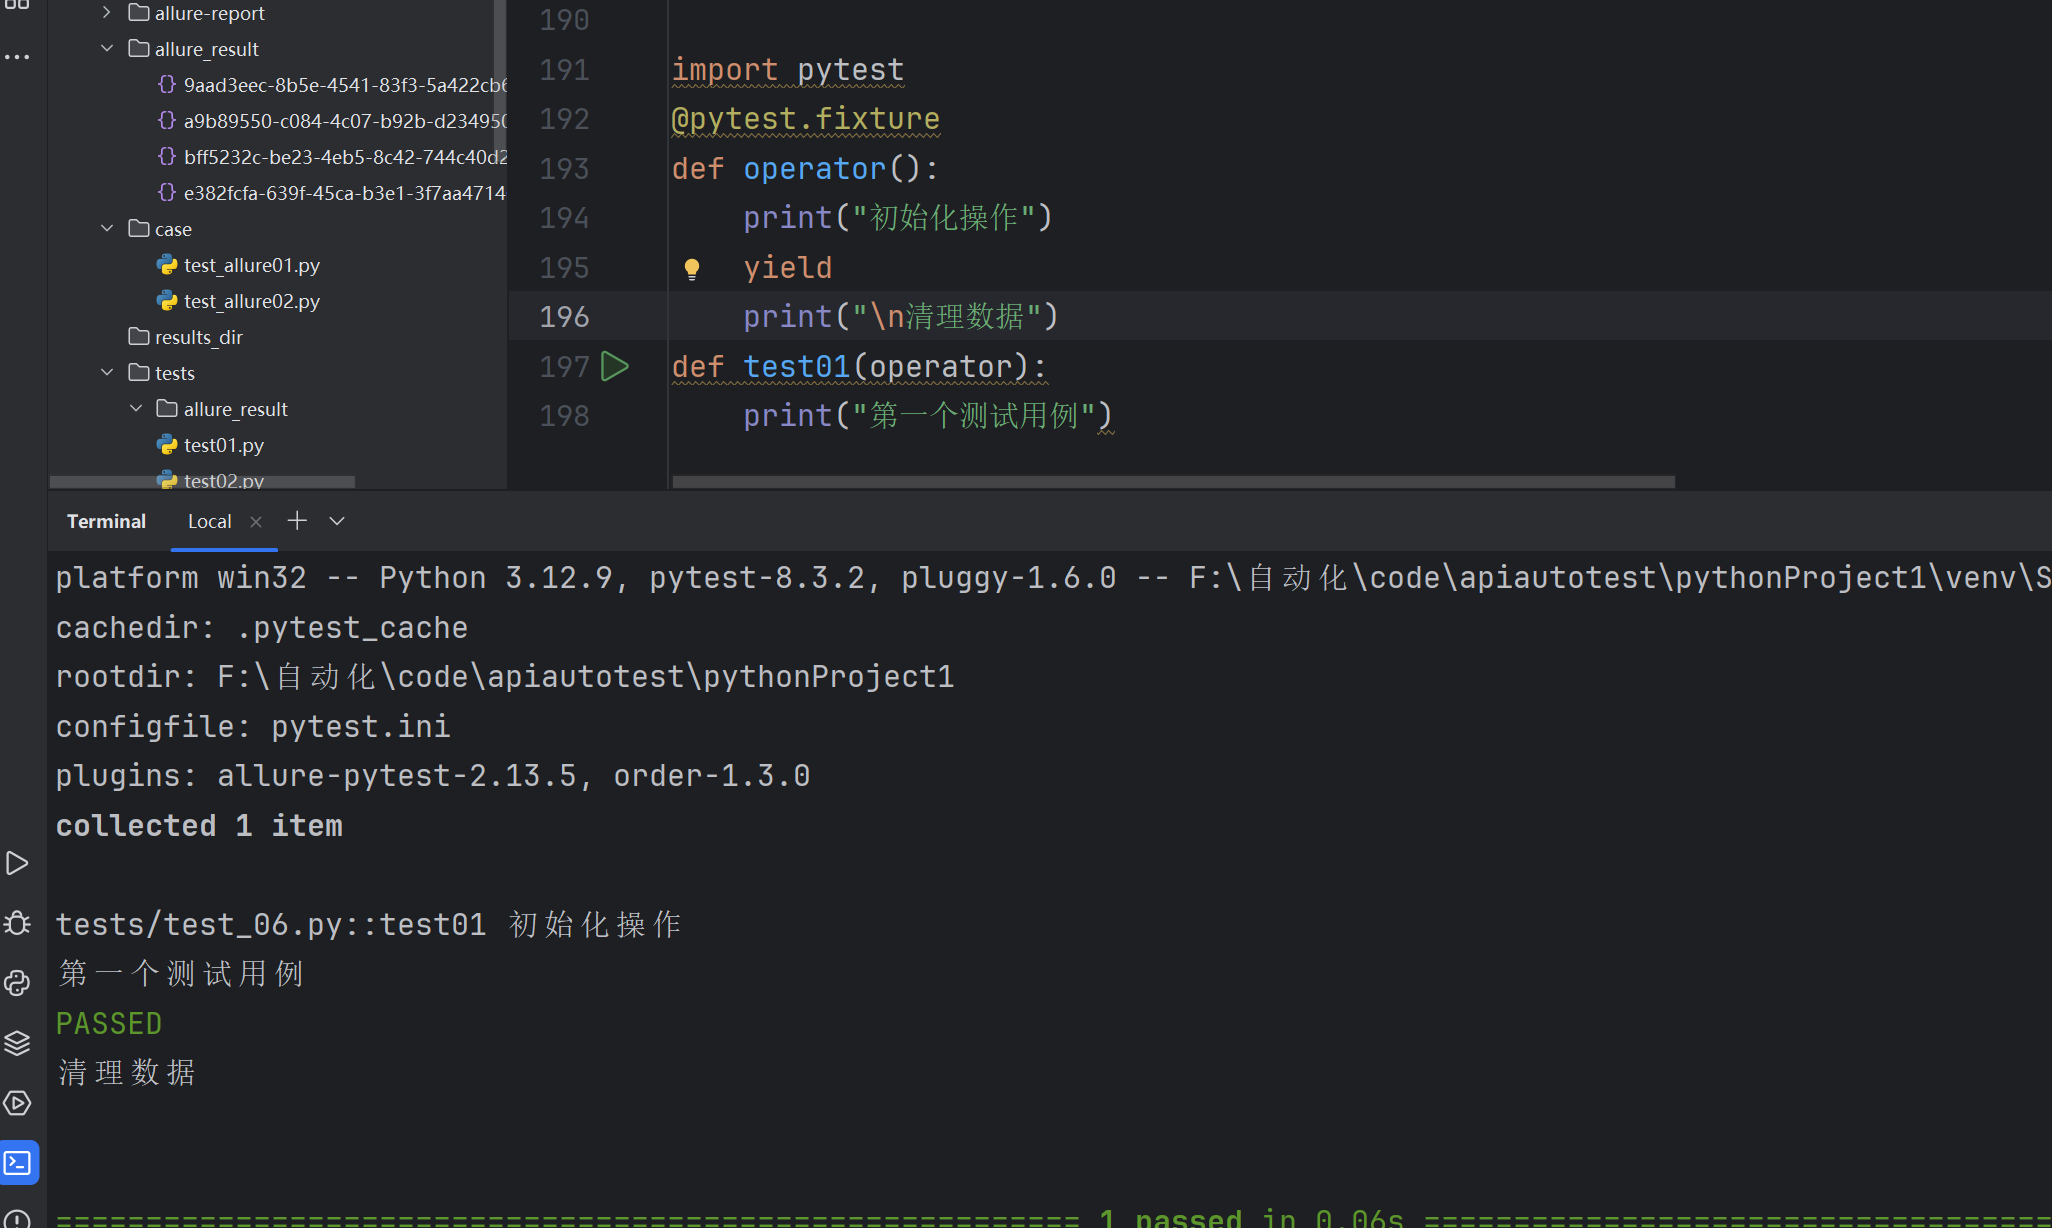
返回数据
import pytest
@pytest.fixture
def operator():print("初始化操作")yield 100print("\n清理数据")
def test01(operator):print(operator+100)assert operator == 100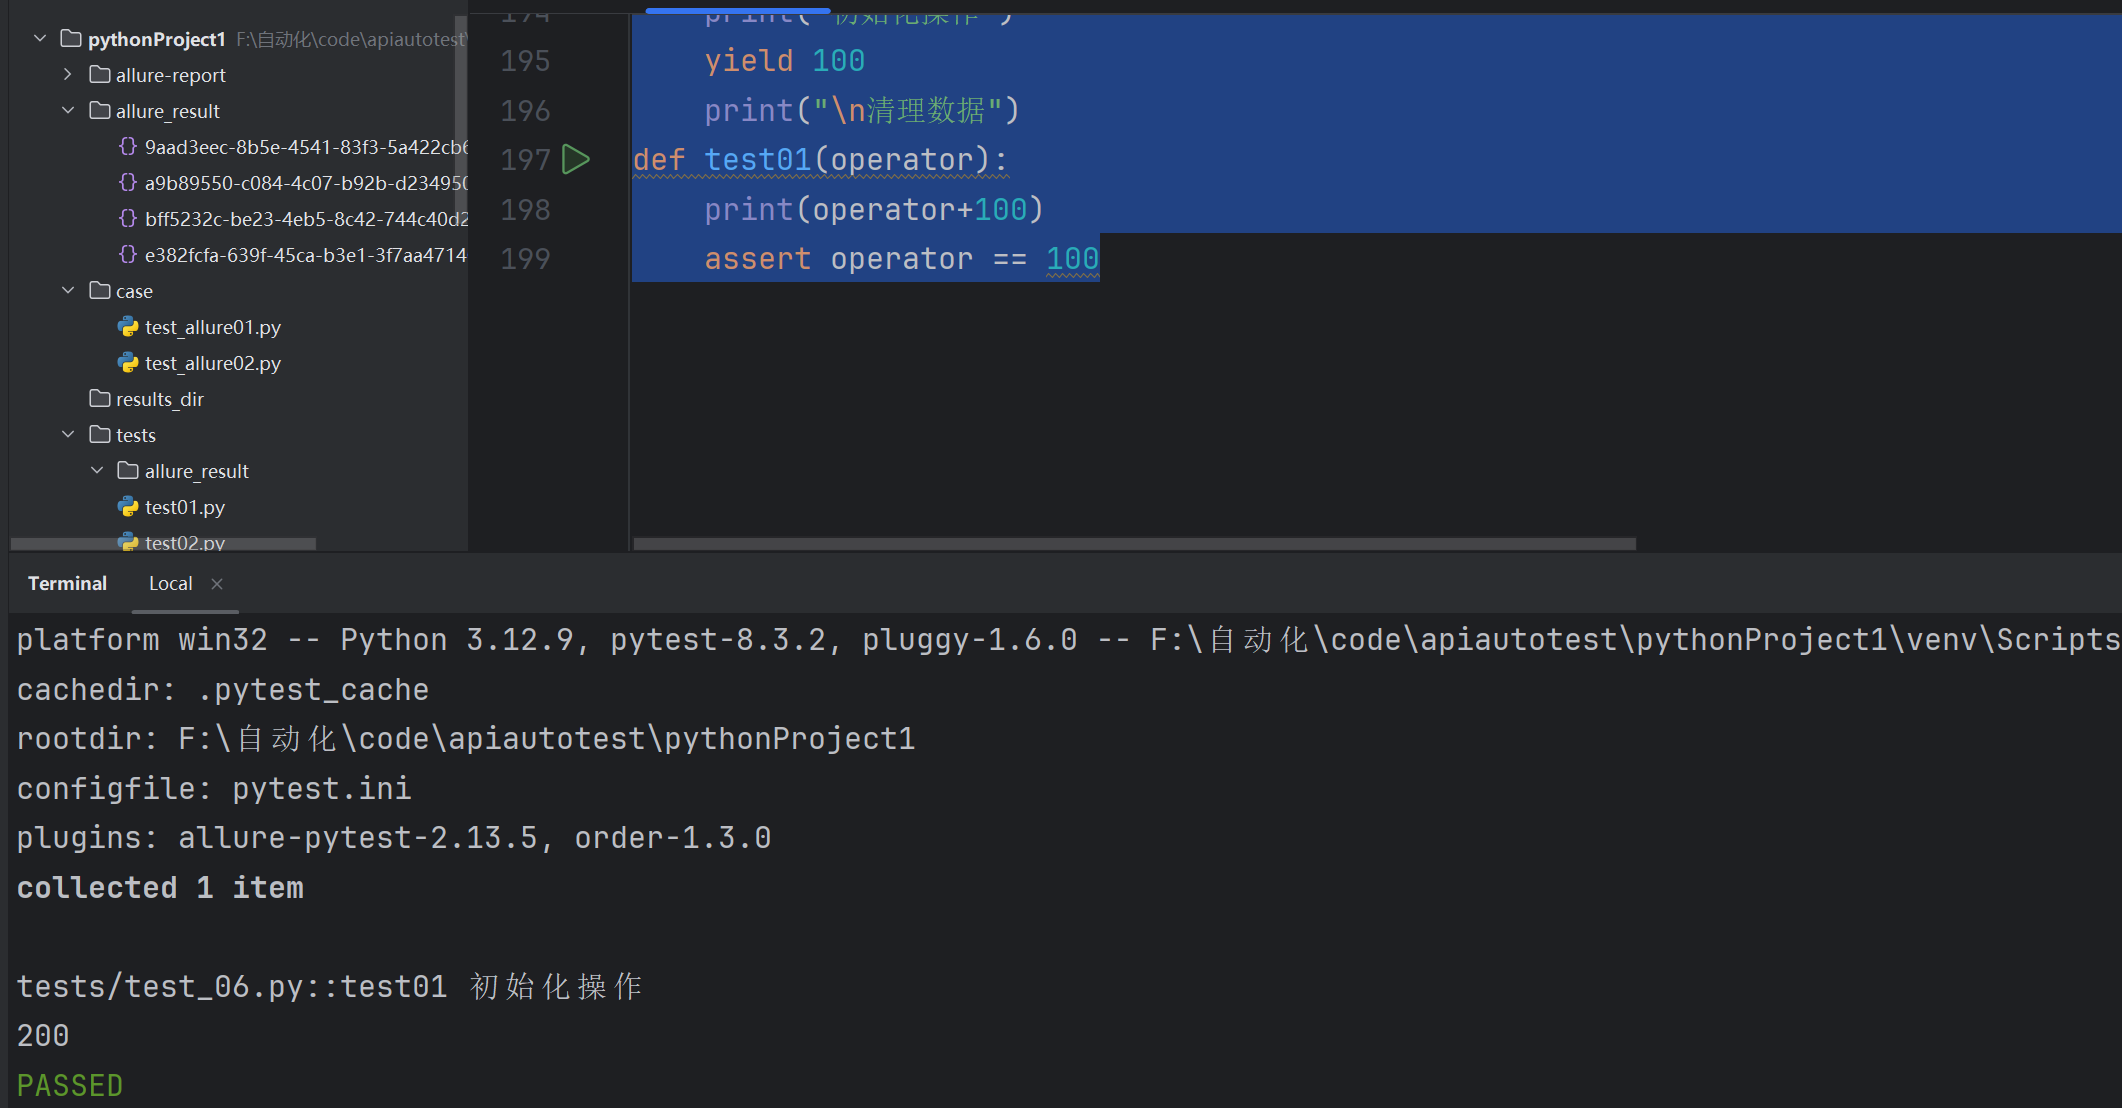
import pytest
@pytest.fixture
def file_read():print("\n打开文件句柄")fo = open("log.txt", "r", encoding="utf-8")yield foprint("关闭文件句柄")fo.close()@pytest.fixture
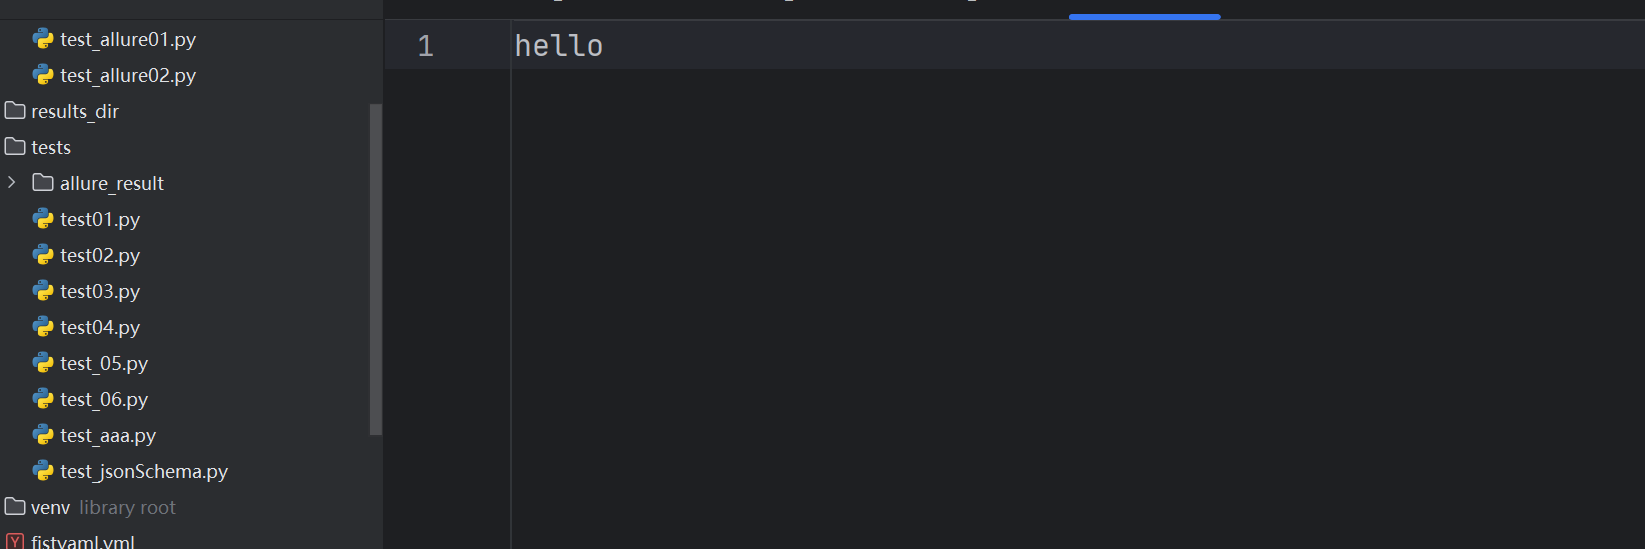
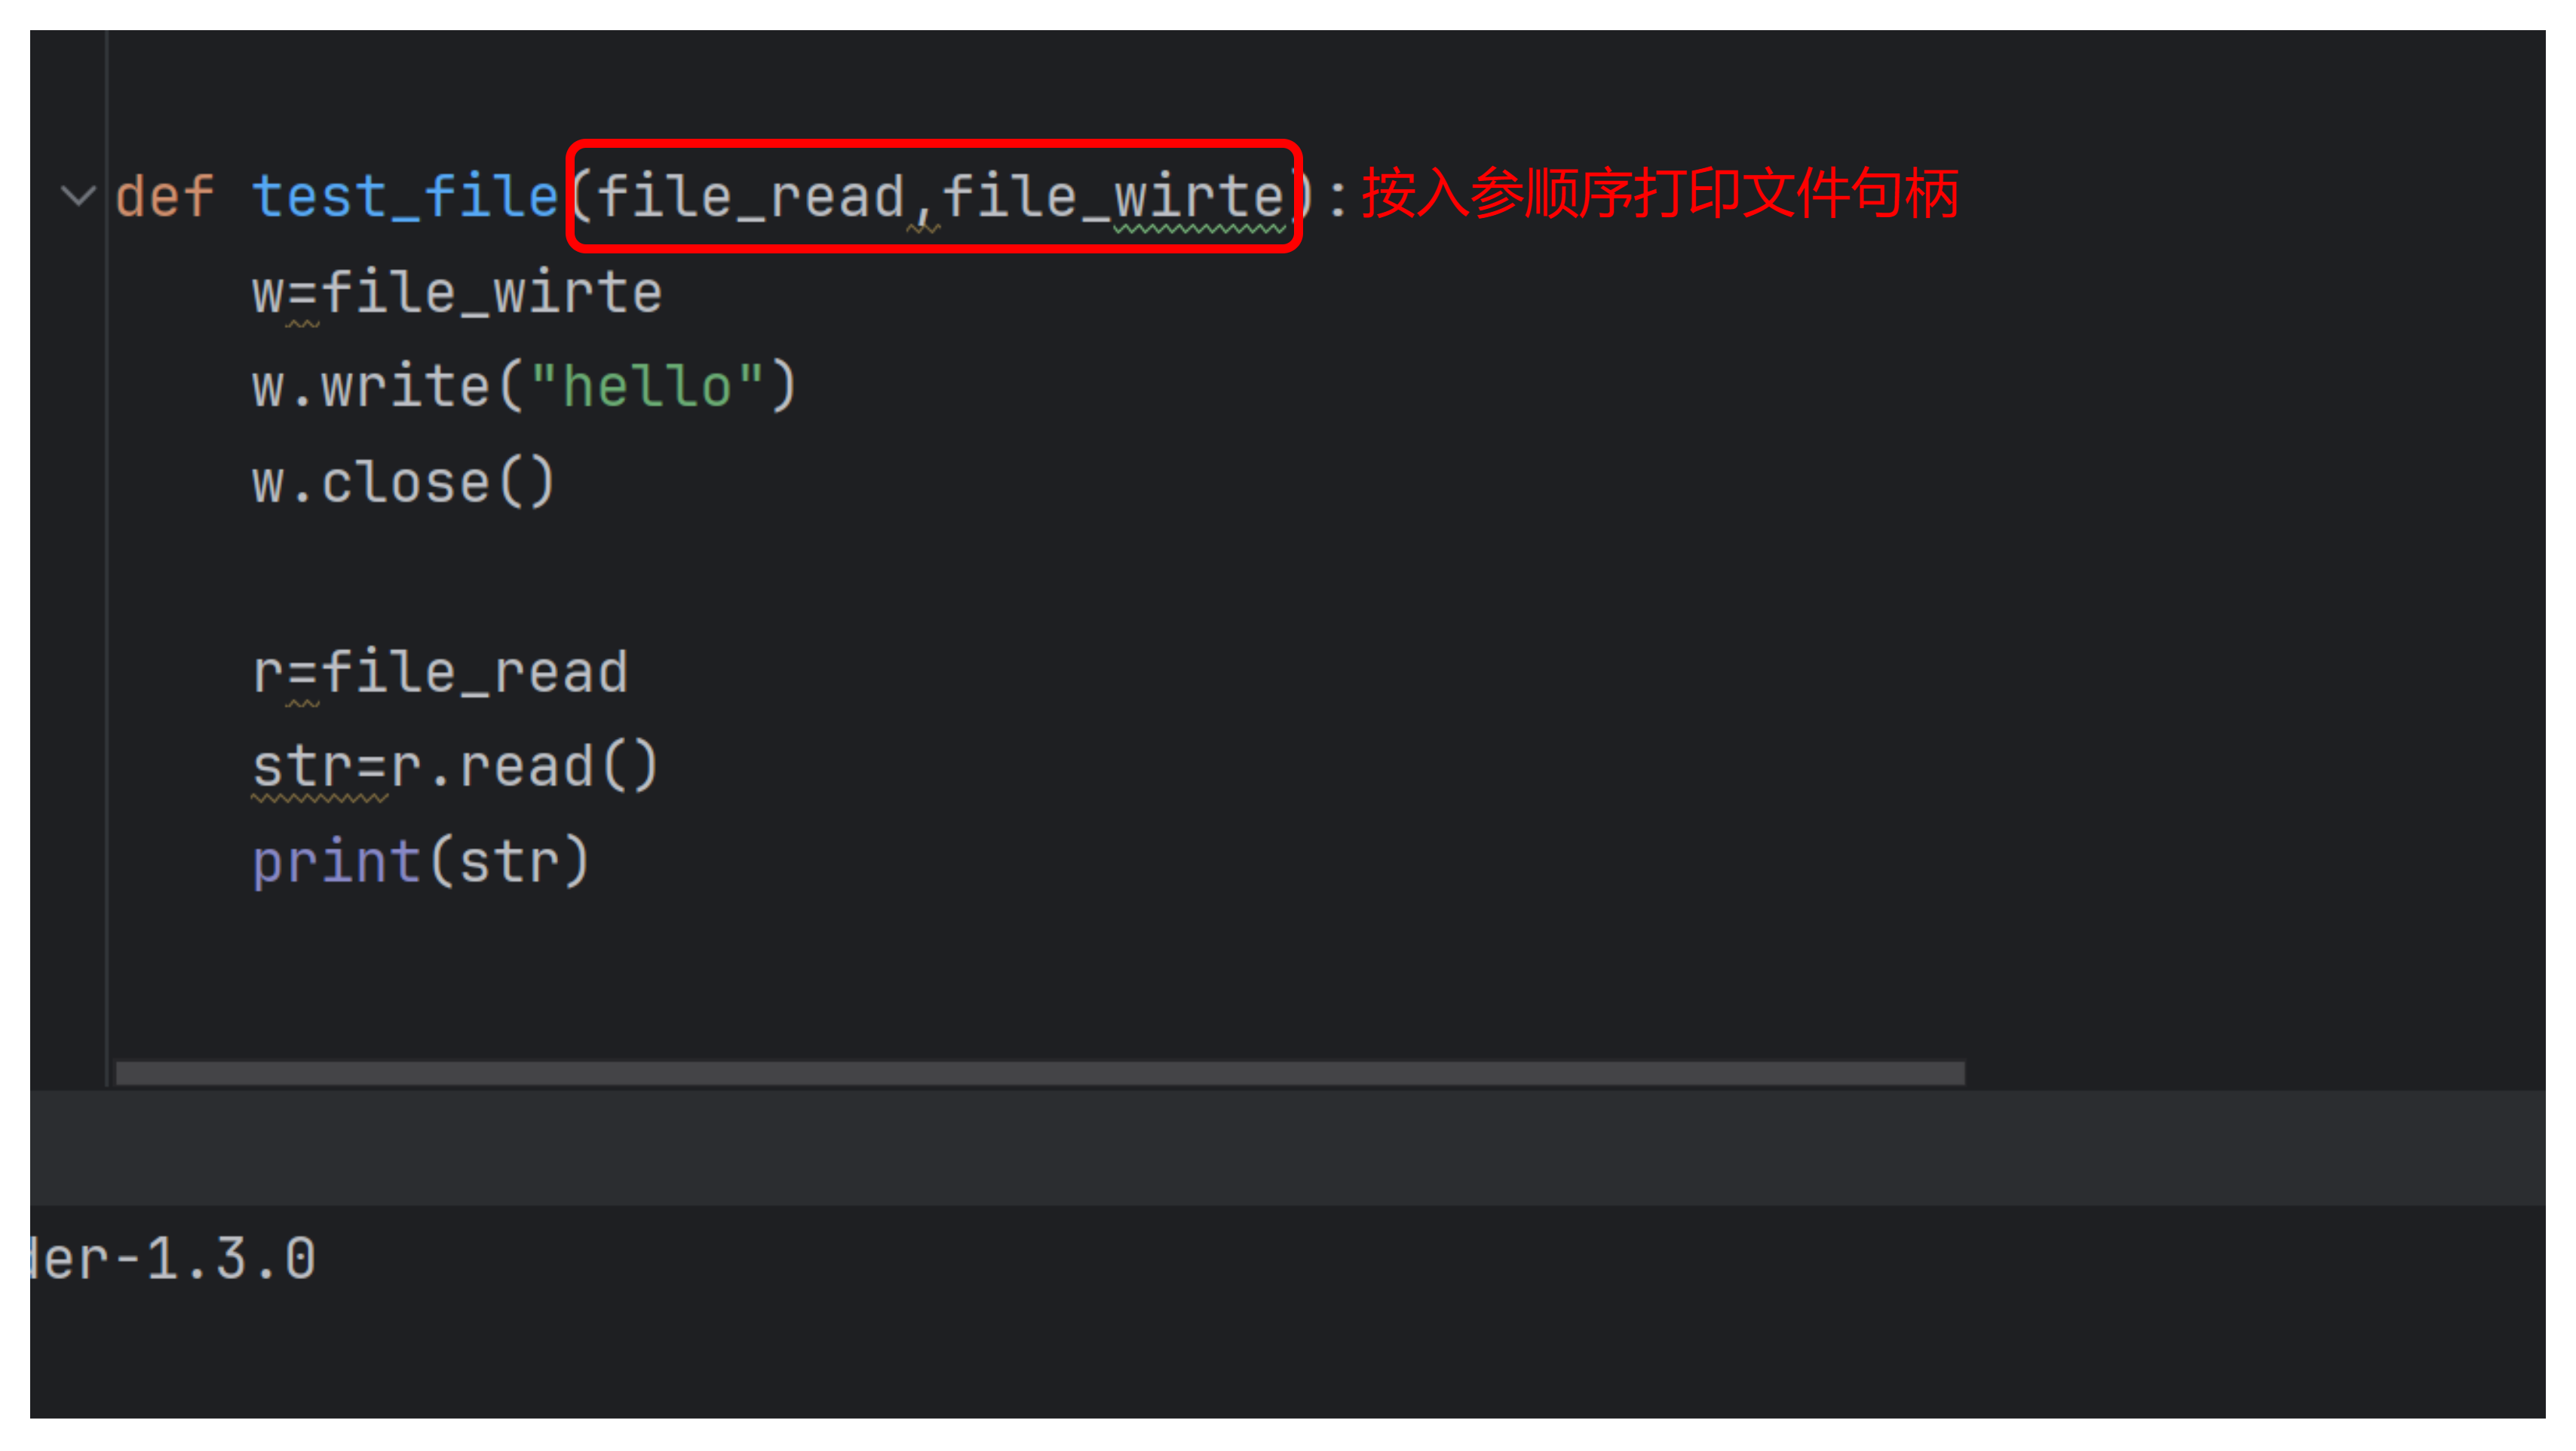
def file_wirte():print("打开文件句柄")fo=open("log.txt","w",encoding="utf-8")yield foprint("\n关闭文件句柄")def test_file(file_read,file_wirte):w=file_wirtew.write("hello")w.close()r=file_readstr=r.read()print(str)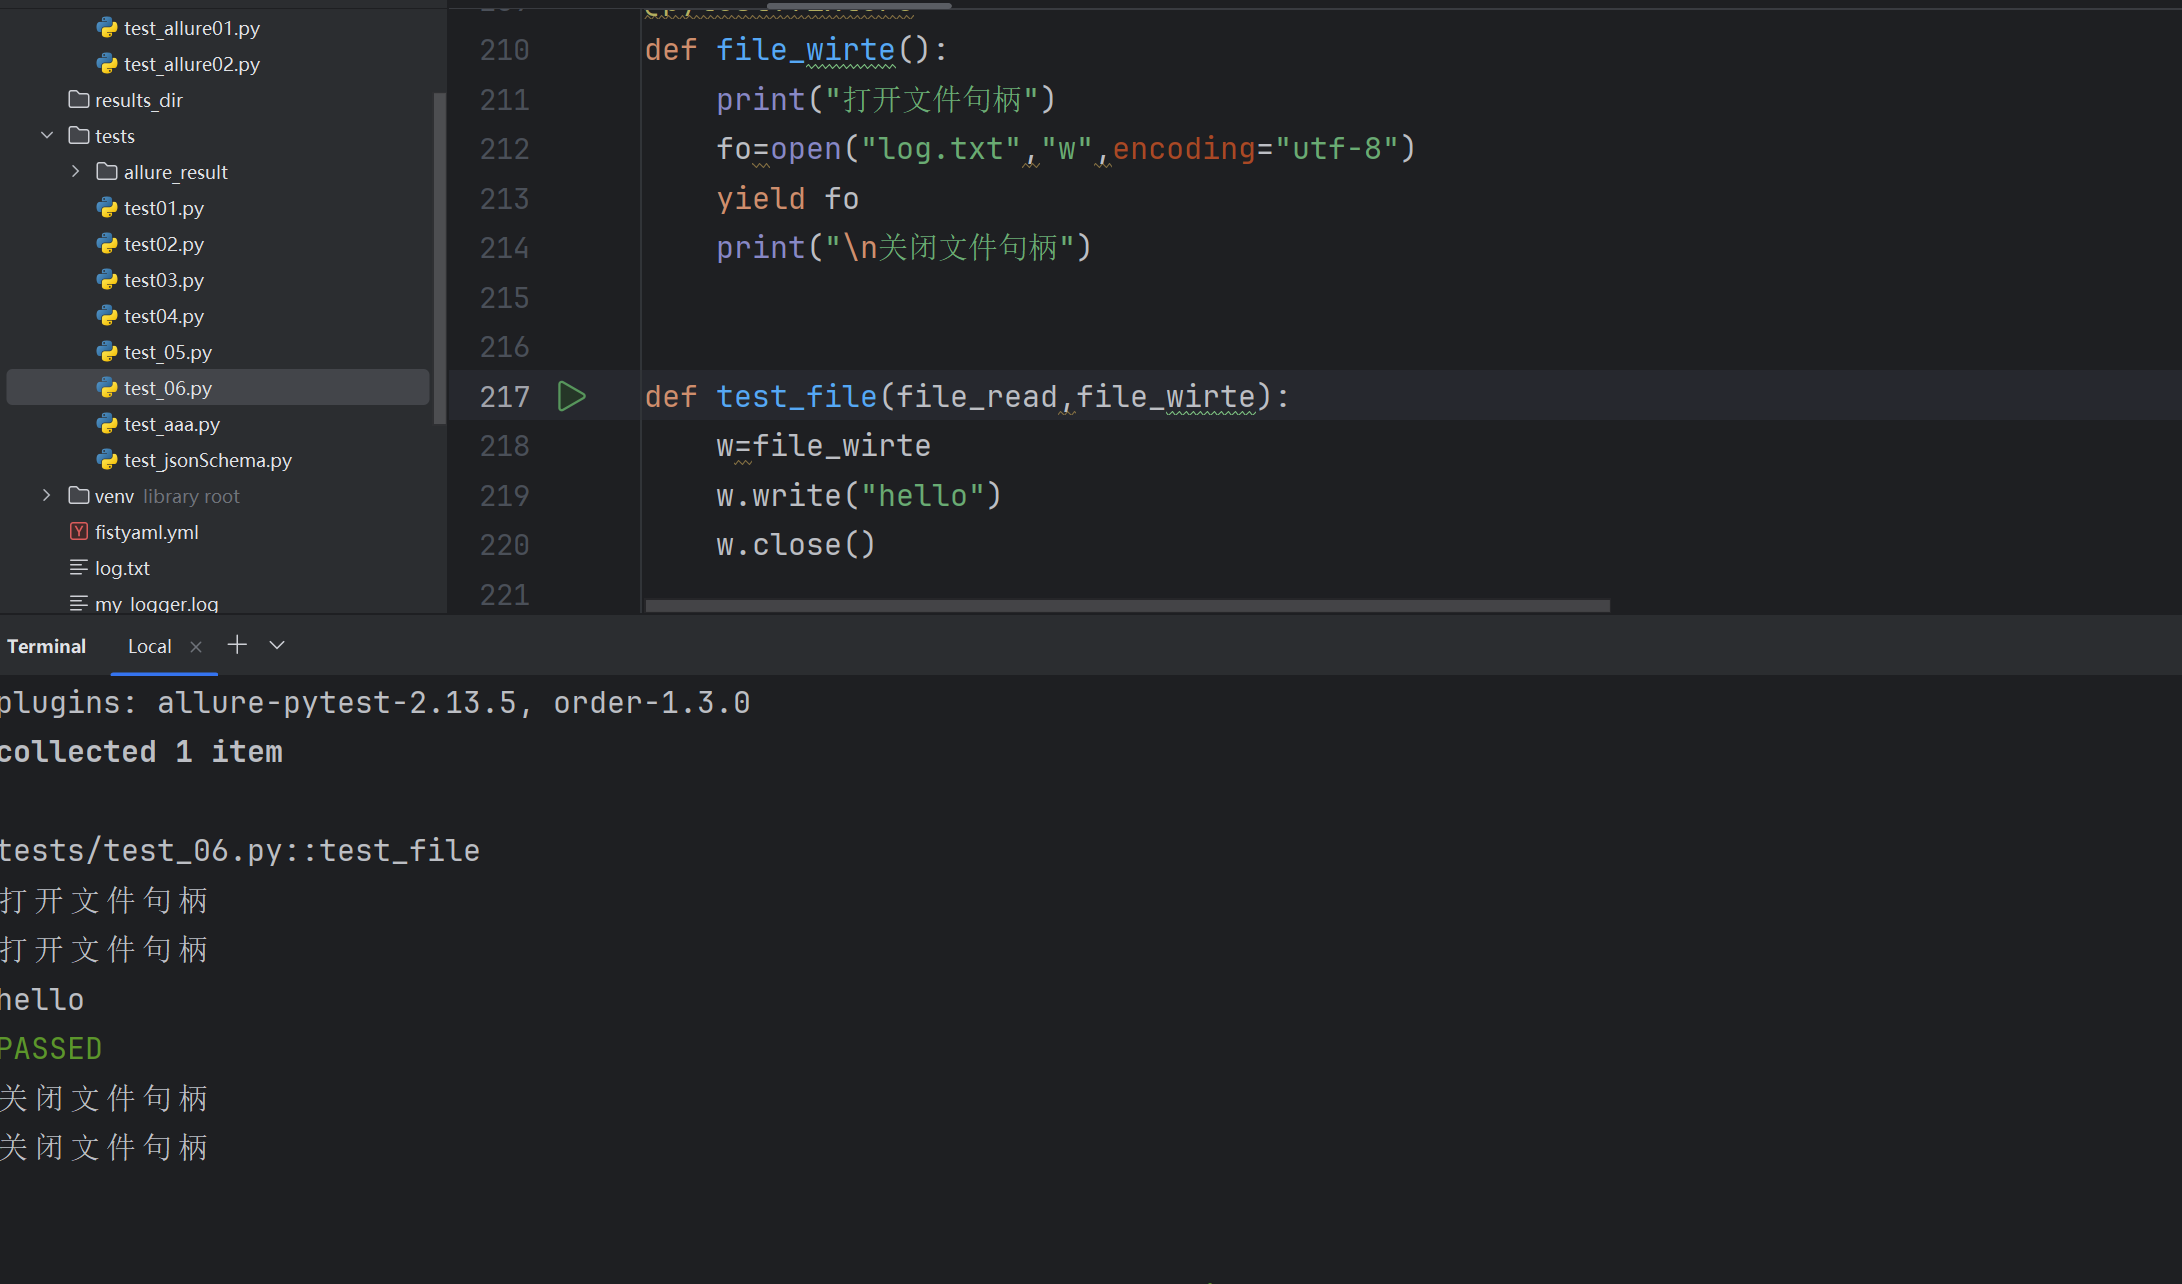
4.11fixtue带参数
pytest.fixture(scope='', params='', autouse='', ids='', name='')scope 参数:用于控制 fixture 的作用范围,决定 fixture 的生命周期。可选值有:
scope 值 说明 function (默认)每个测试函数都会调用一次 fixture。 class 在同一个测试类中共享这个 fixture。 module 在同一个测试模块(一个文件里)中共享这个 fixture。 session 整个测试会话中共享这个 fixture。
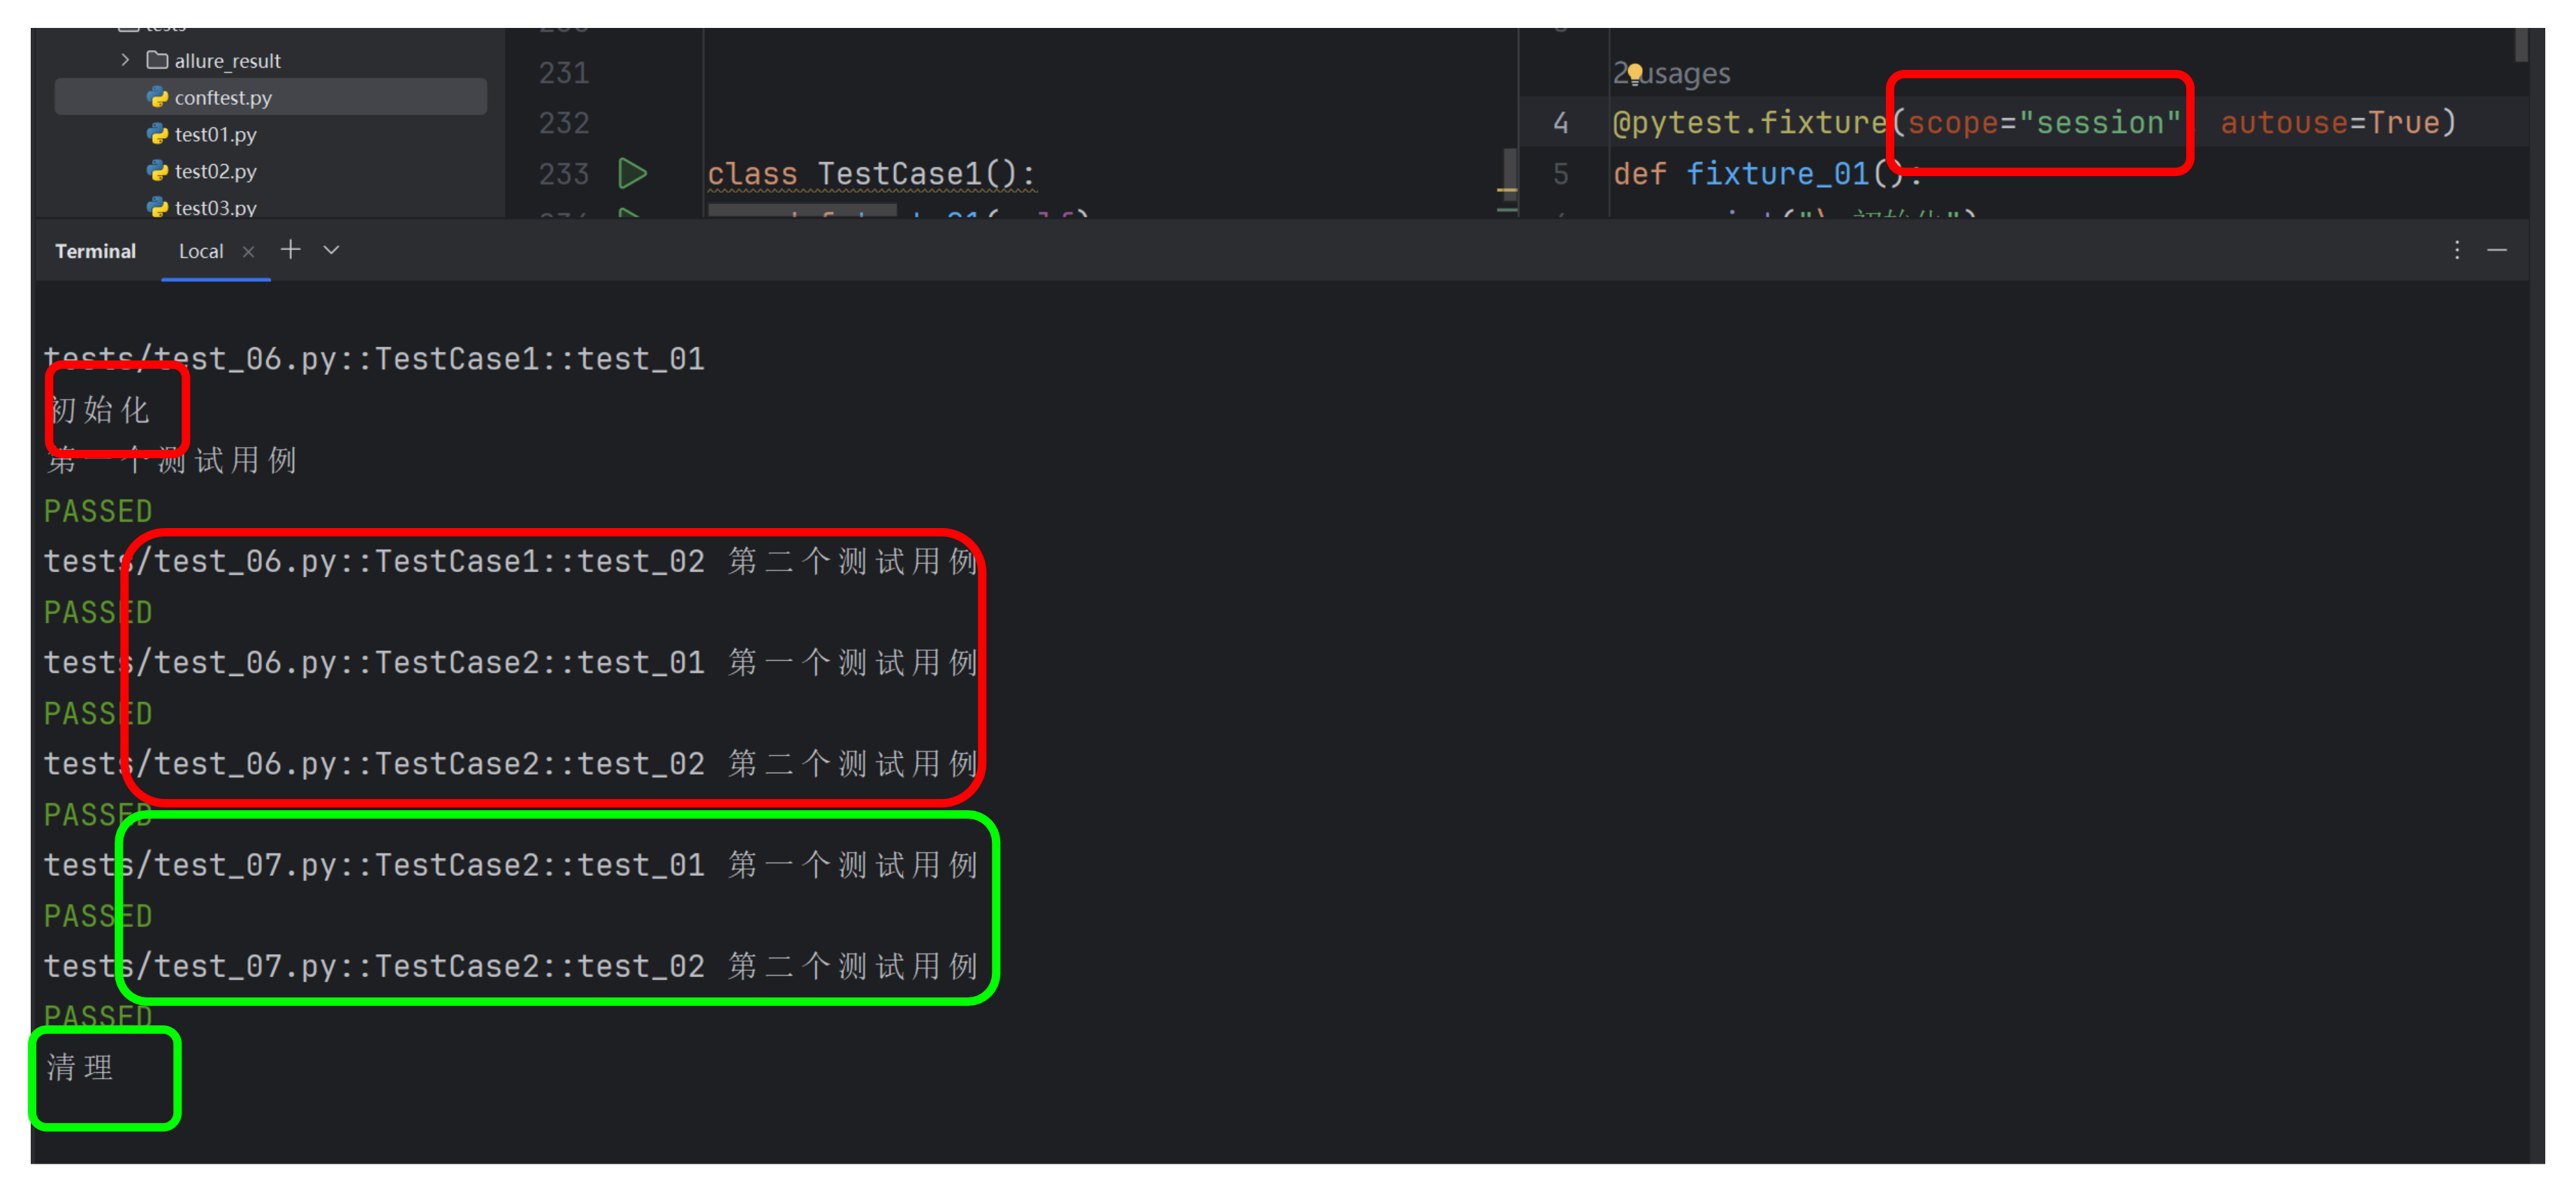
autouse 参数:默认为 False 。若设为 True ,每个测试函数会自动调用该 fixture ,无需显式传参。
params 参数:用于参数化 fixture ,支持列表传入。每个参数值会让 fixture 执行一次,类似 for 循环。
ids 参数:与 params 配合,为每个参数化实例指定可读标识符(给参数取名)。
name 参数:为 fixture 显式设名。若用了 name ,测试函数需用此名称引用 fixture(给 fixture 取名)。
scope="function"
import pytest@pytest.fixture(scope="function")
def fixture_01():print("\n初始化")yieldprint("\n清理")class TestCase():def test_01(self, fixture_01):print("第一个测试用例")def test_02(self, fixture_01):print("第二个测试用例")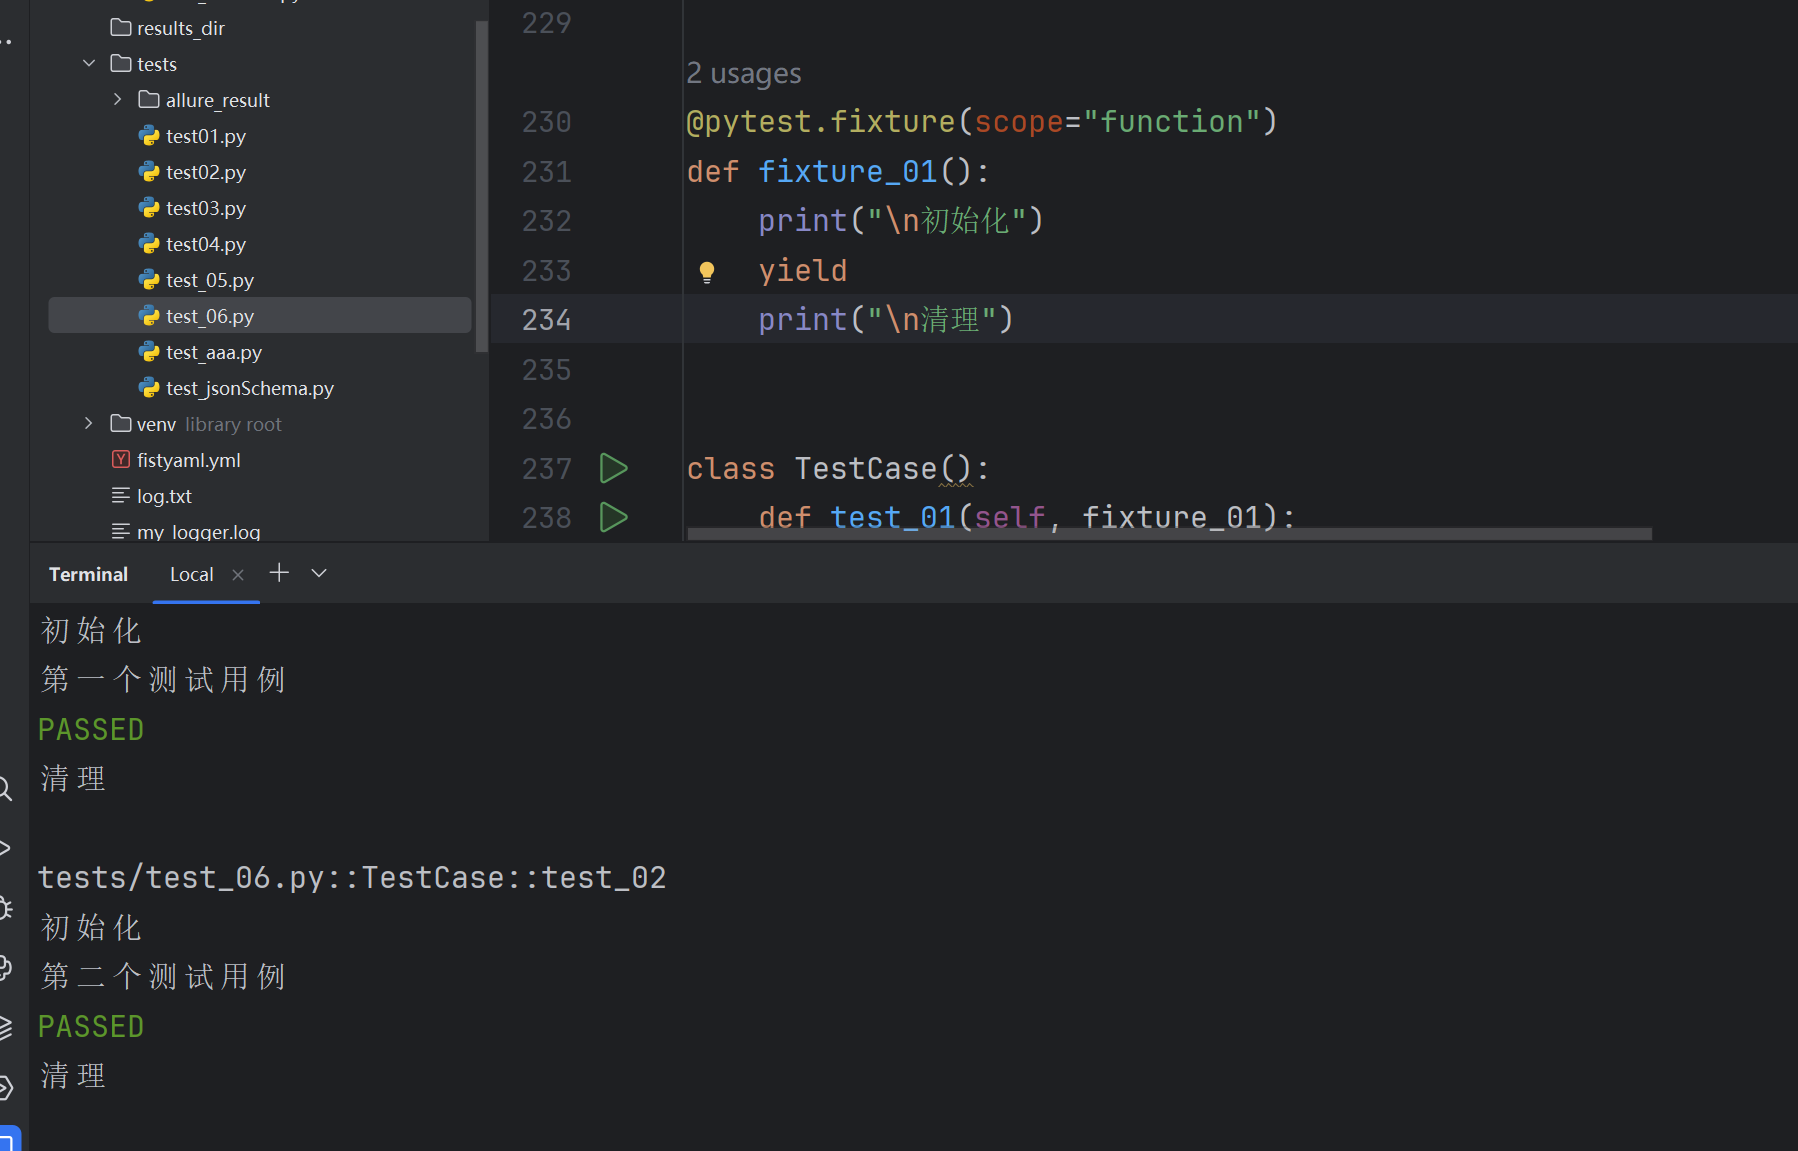
scope="class"
import pytest@pytest.fixture(scope="class")
def fixture_01():print("\n初始化")yieldprint("\n清理")class TestCase1():def test_01(self, fixture_01):print("第一个测试用例")def test_02(self, fixture_01):print("第二个测试用例")class TestCase2():def test_01(self, fixture_01):print("第一个测试用例")def test_02(self, fixture_01):print("第二个测试用例")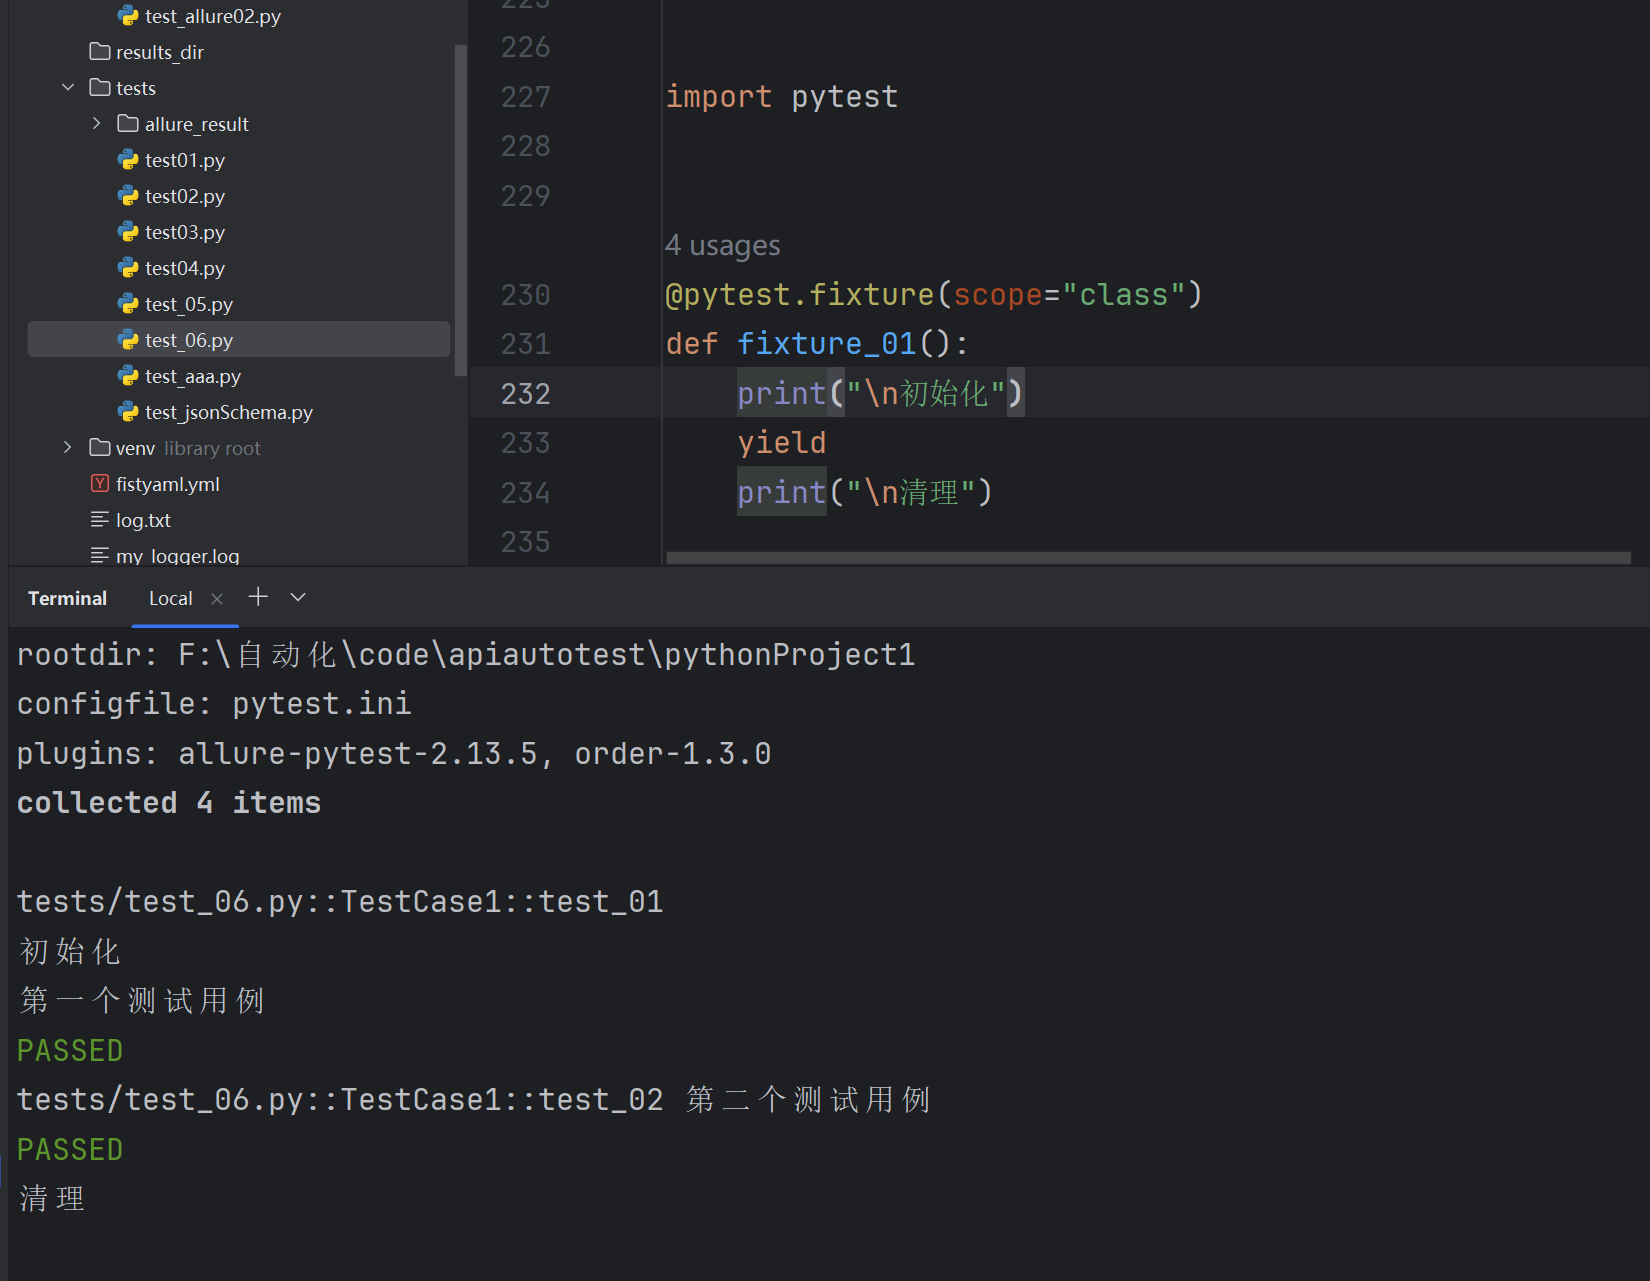
scope="module"
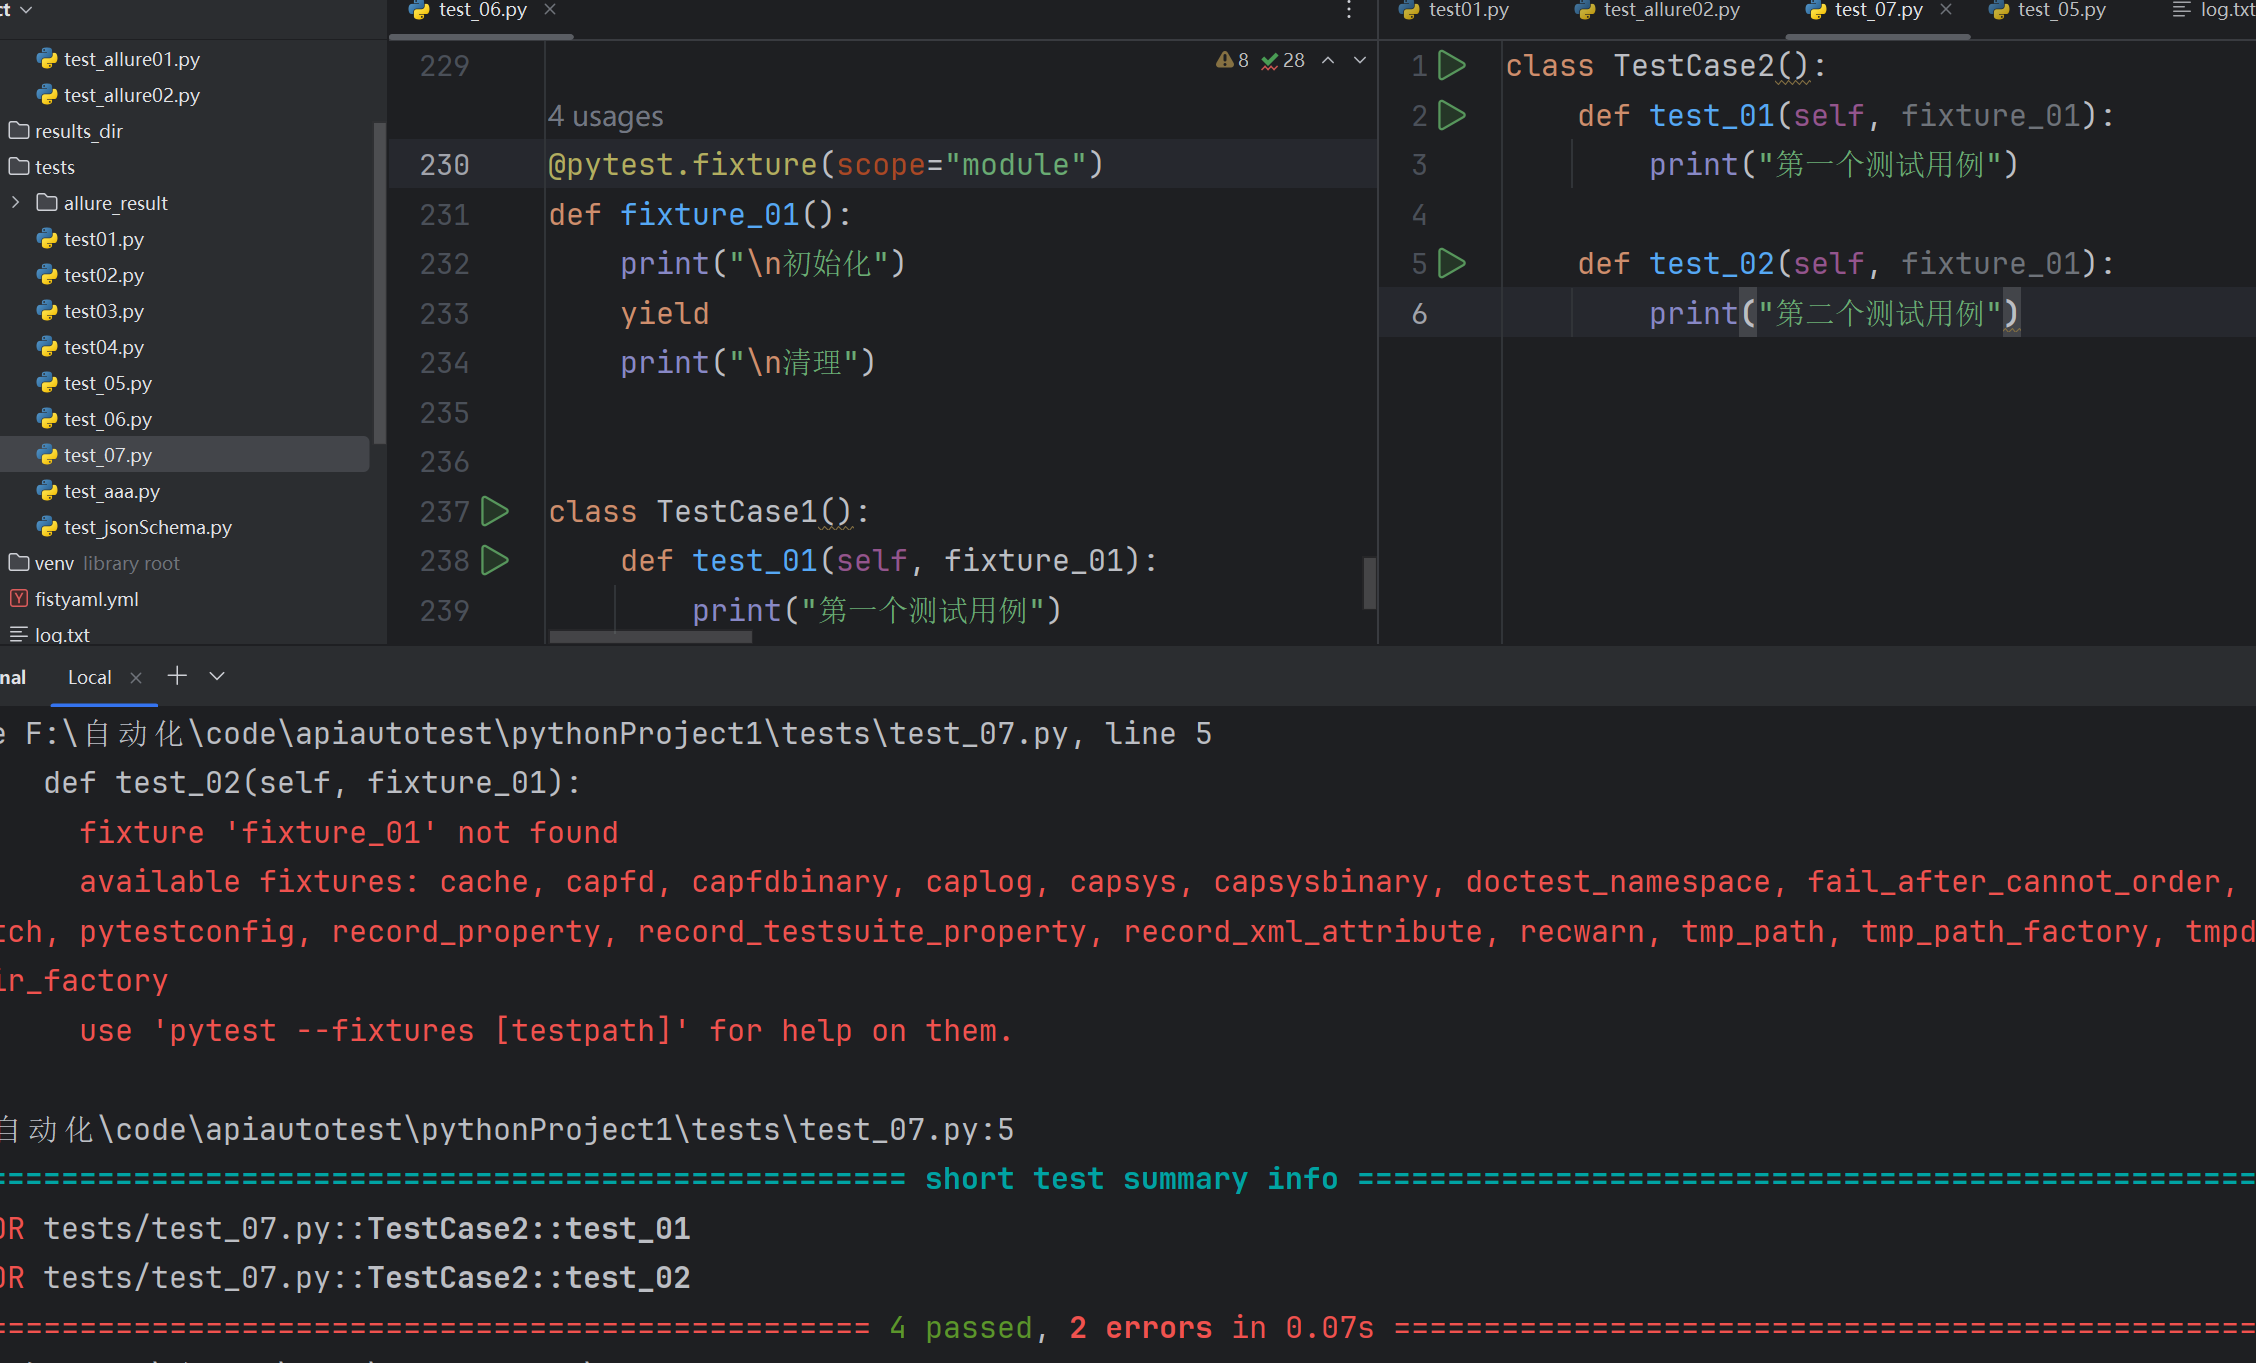
scope 默认为 function,这里的 function 可以省略不写。当 scope="function" 时,每个测试函数都会调用一次 fixture。当 scope="class" 时,在同一个测试类中,fixture 只会在类中的第一个测试函数开始前执行一次,并在类中的最后一个测试函数结束后执行清理。
- 当 scope="module"、scope="session" 时,可用于实现全局的前后置应用,这里需要多个文件配合。
4.11conftest.py 与 @pytest.fixture 结合实现全局前后置应用
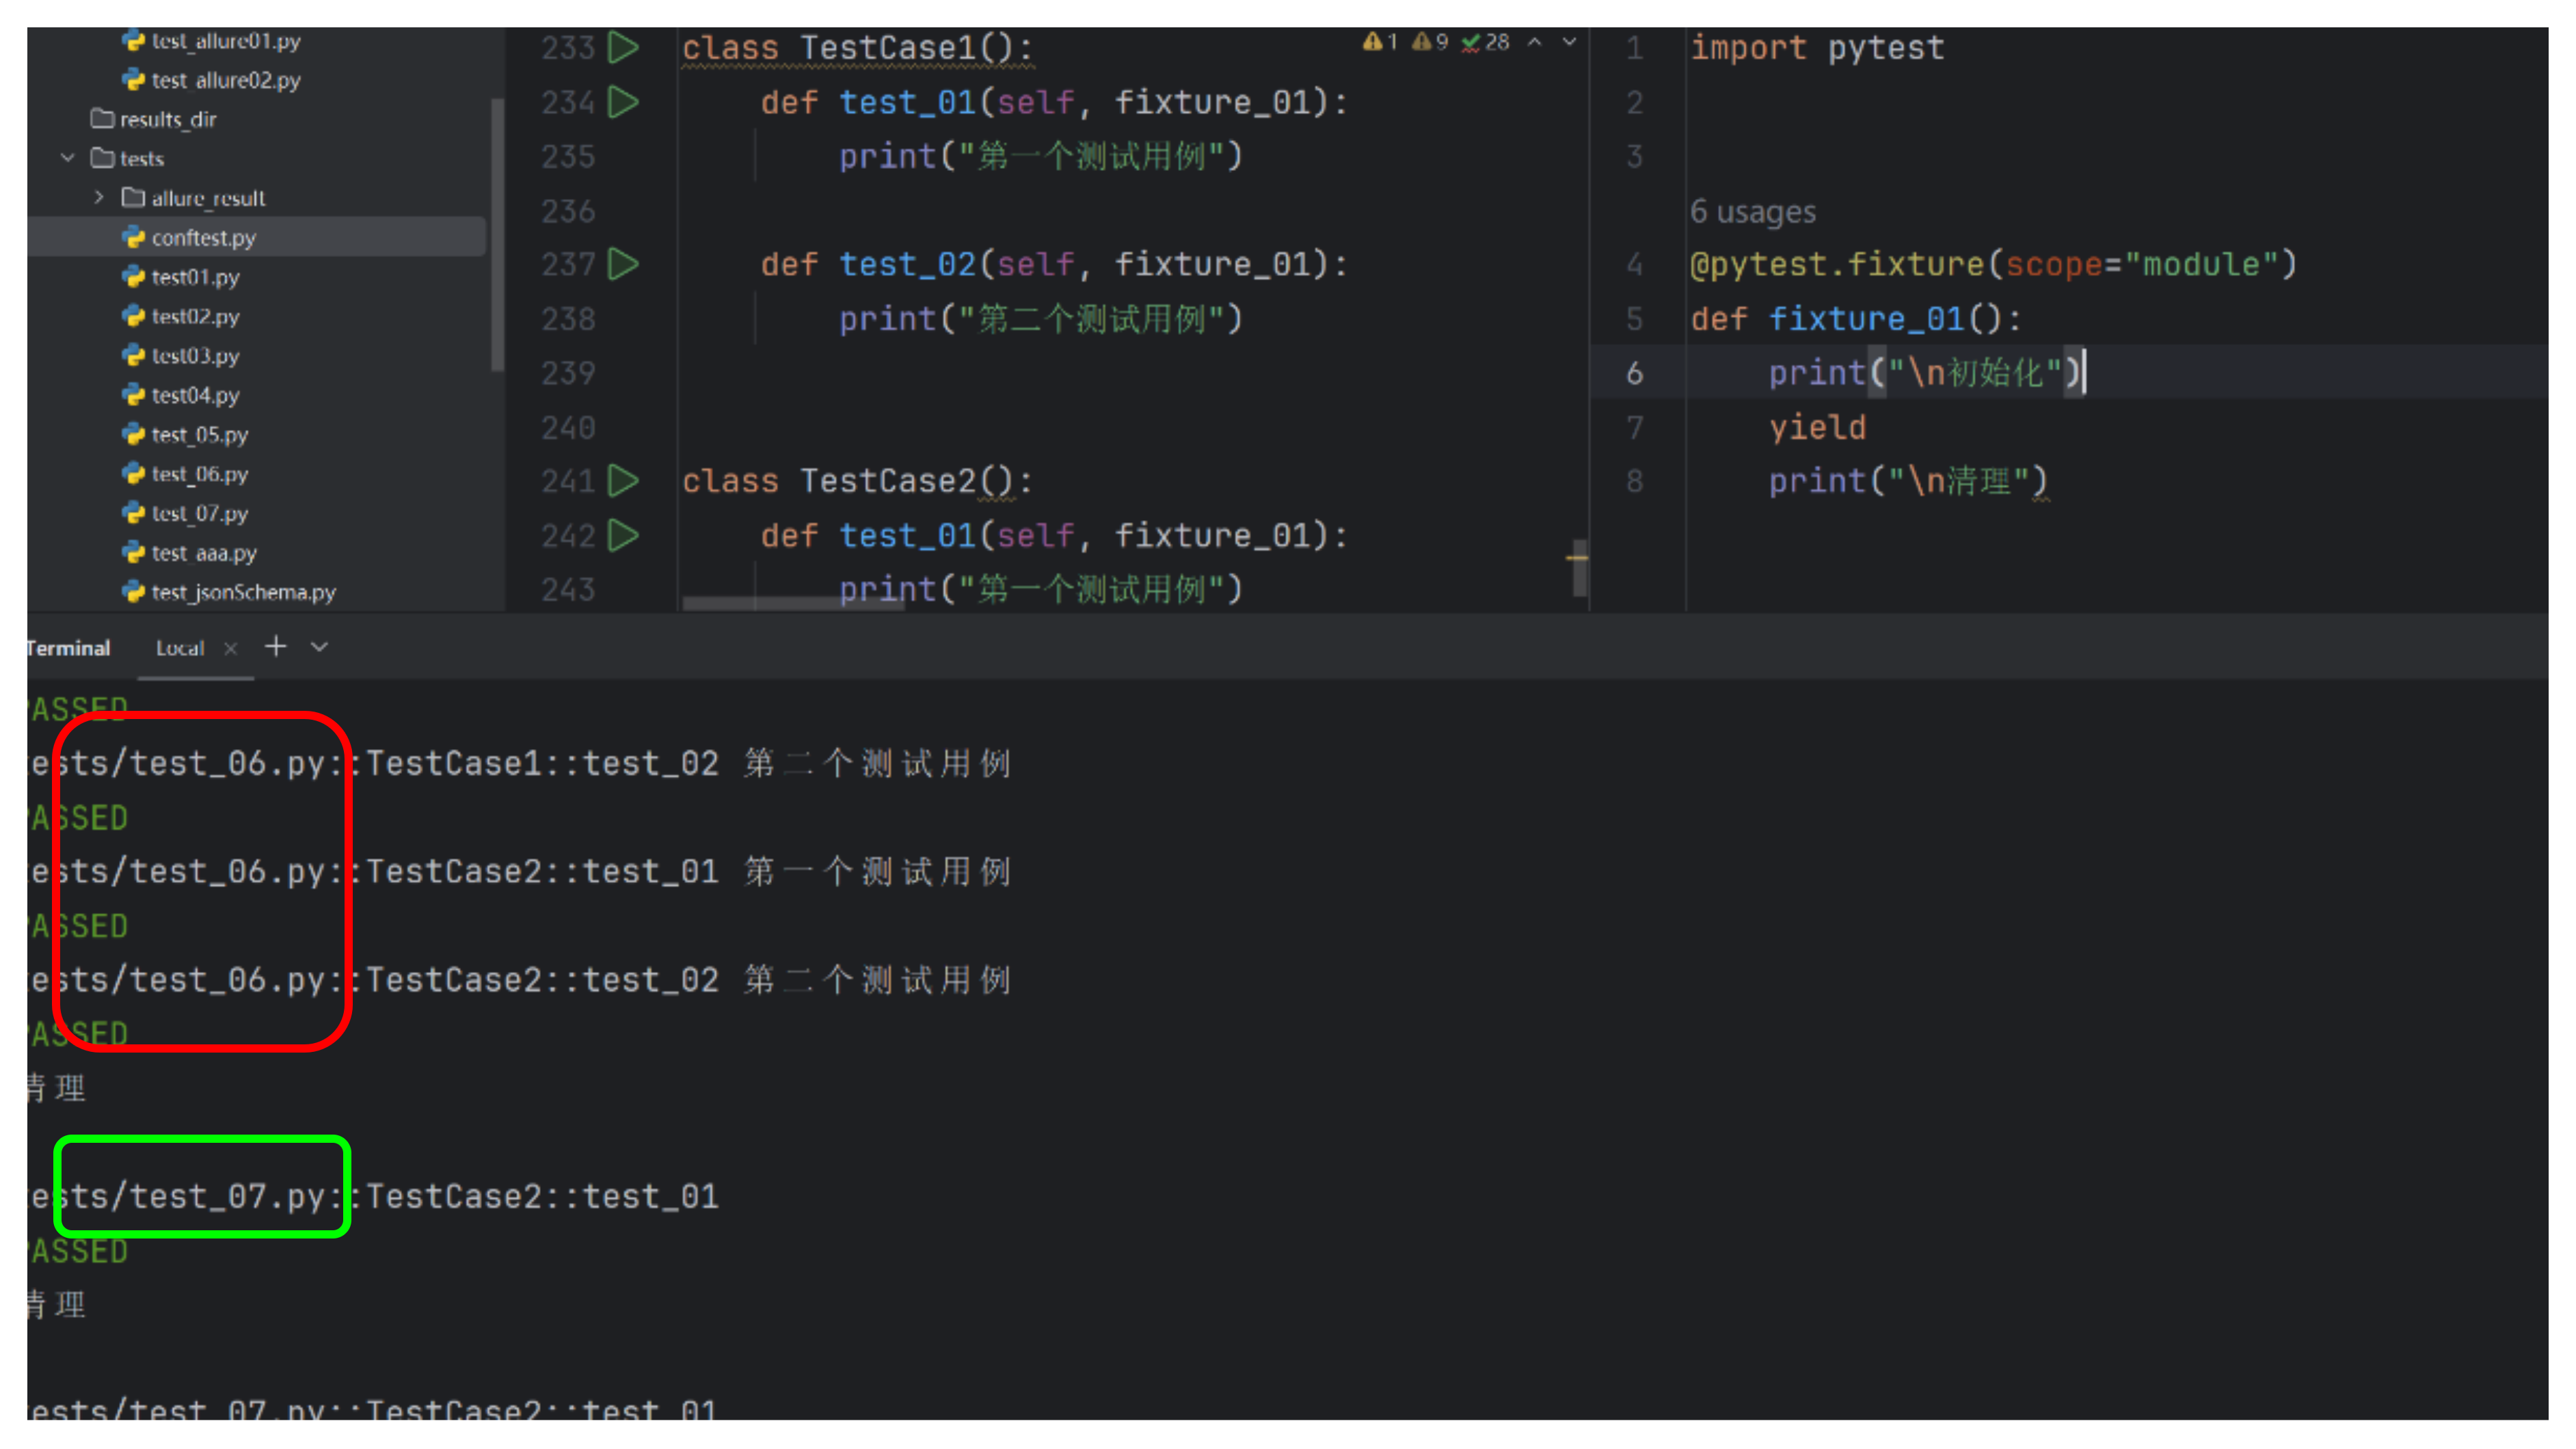
@pytest.fixture 与 conftest.py 文件结合使用,能够在多个测试模块(.py 文件)中共享前后置操作。这种方式可在整个测试项目中定义和维护通用的前后置逻辑,让测试代码更模块化、更易维护。
规则:
- conftest.py 是单独存放夹具配置的文件,名称固定且不可修改。
- 可在项目的不同目录下创建多个 conftest.py 文件,每个文件仅对其所在目录及子目录下的测试模块生效。
- 在不同模块的测试中使用 conftest.py 的前后置功能时,无需进行任何 import 导入操作。
作用:
使不同 .py 文件可以使用同一个 fixture 函数。
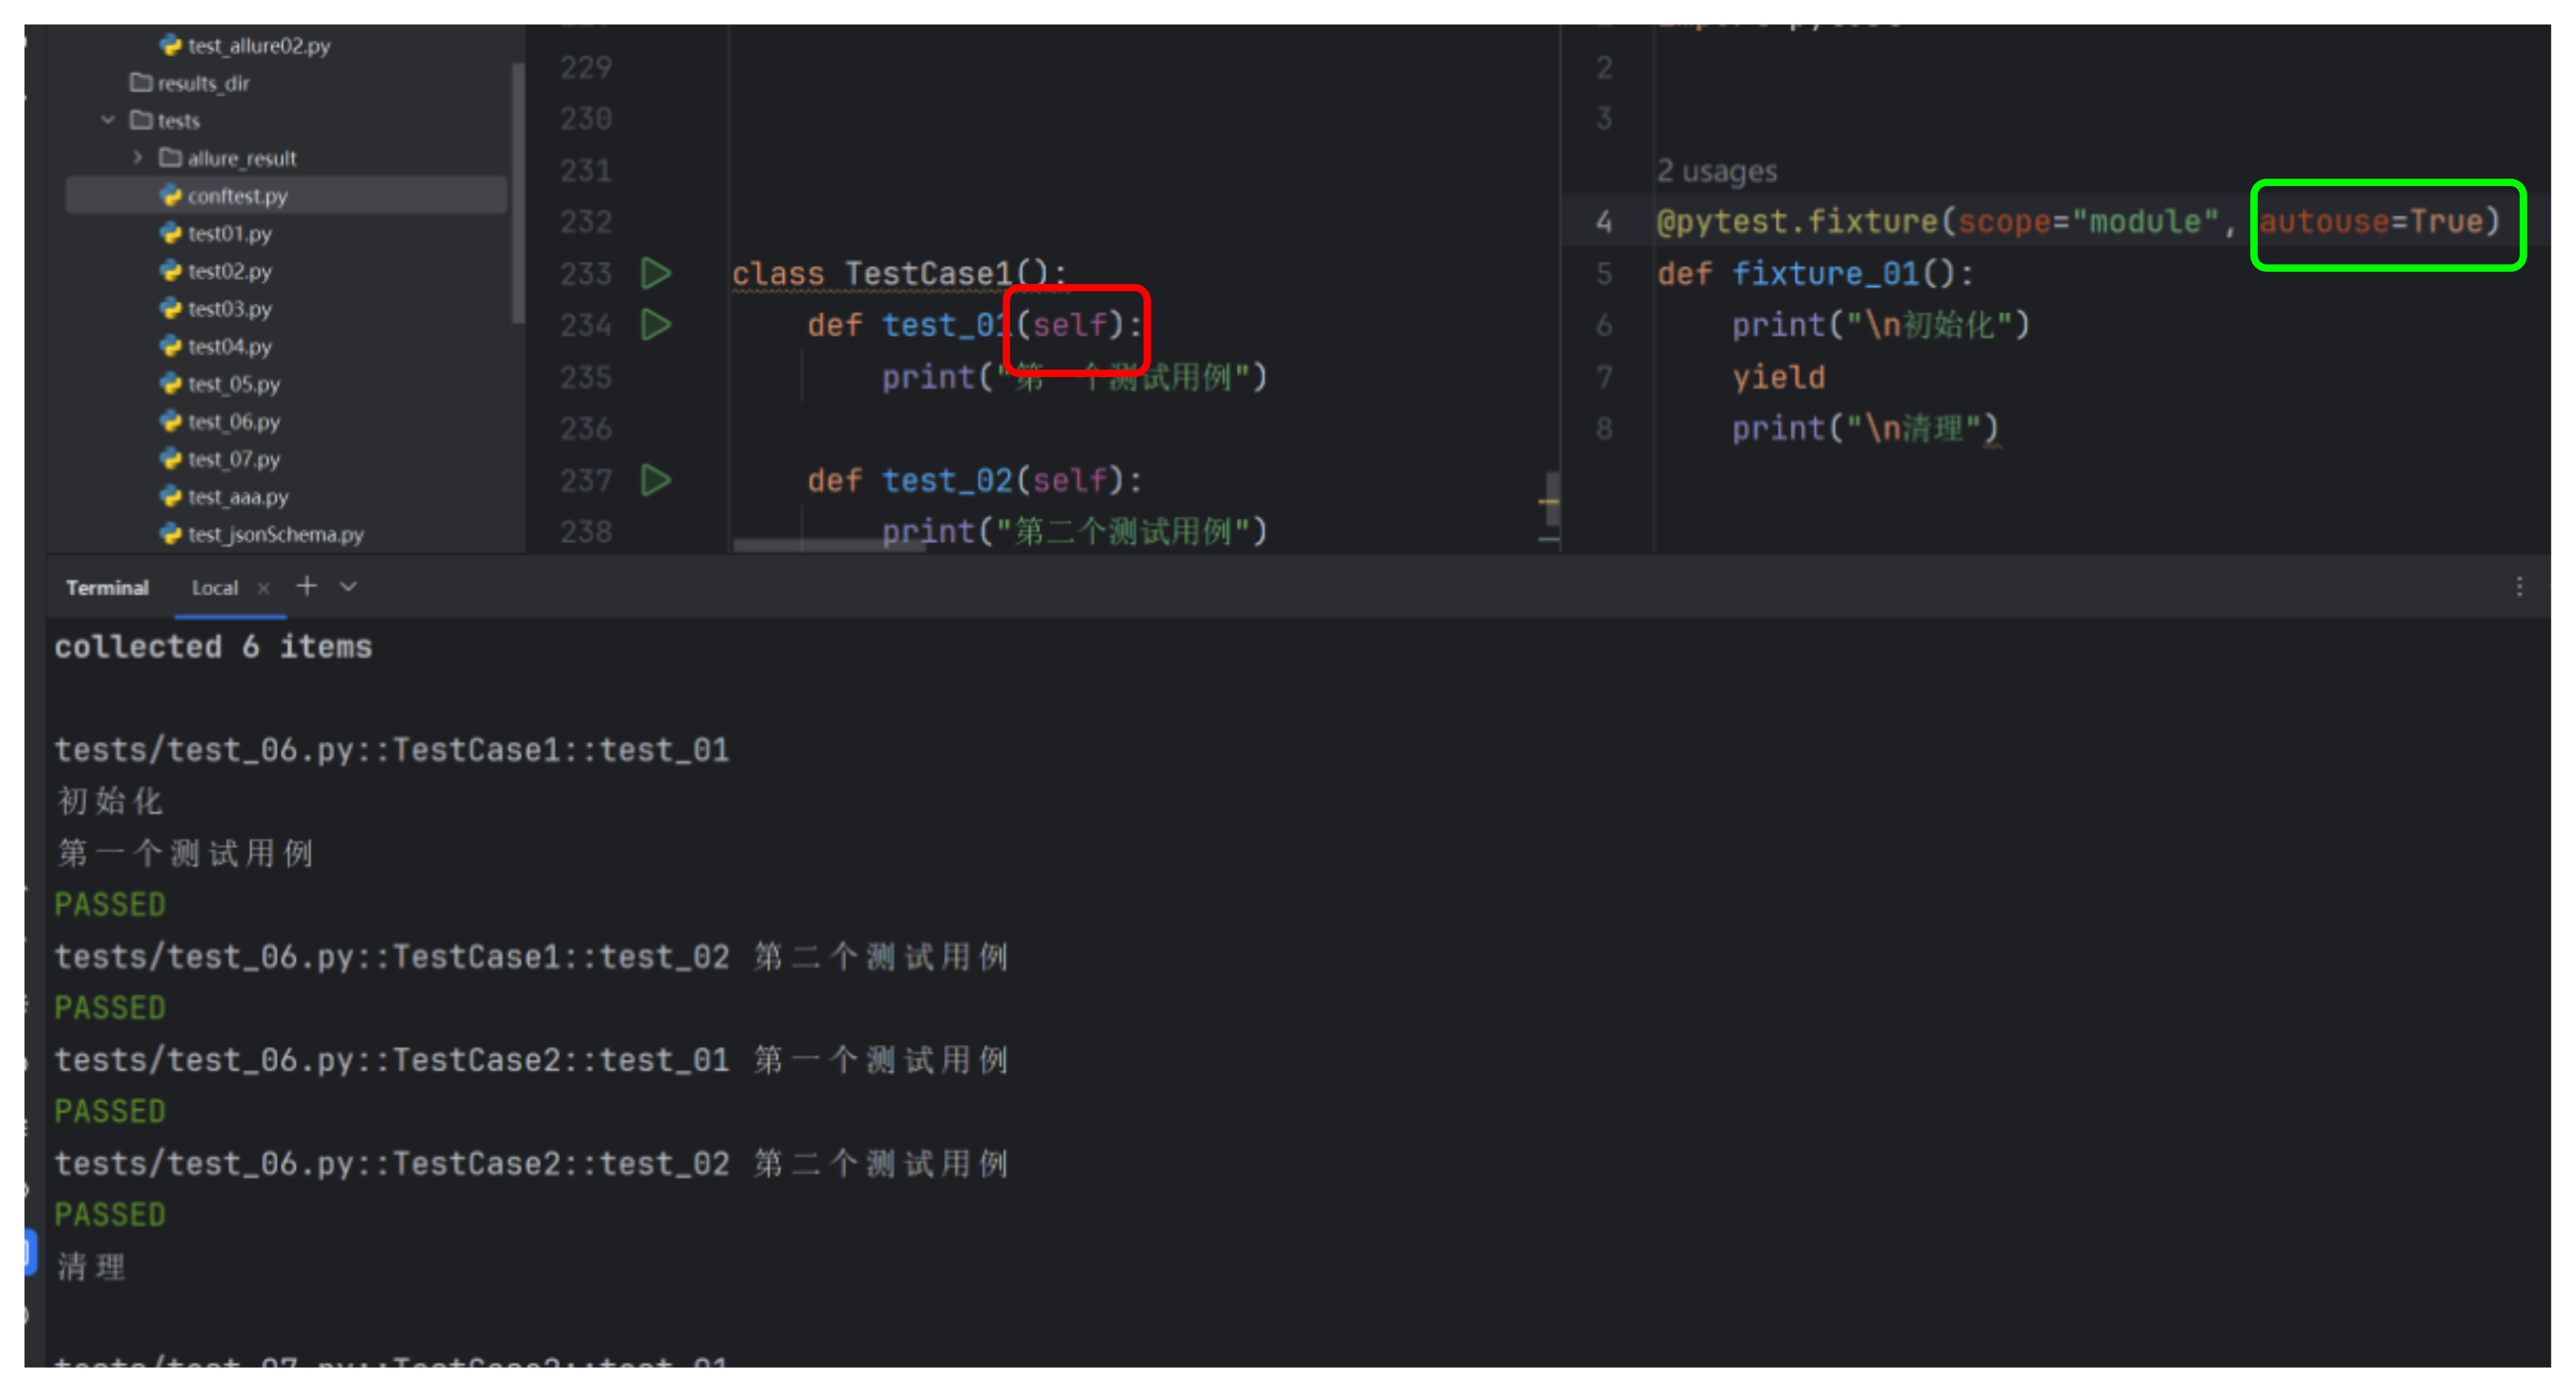
autouse 默认为 False,即当前的 fixture 需要手动显式调用,在该案例之前我们默认使用的都是 autouse=False。
当 autouse=True 时,fixture 会在所有测试函数执行之前自动调用,无论这些测试函数是否显式地引用了该 fixture。
scope="autouse"
4.12通过 params 实现参数化
@pytest.fixture(params=["1","1+2","a","3.14"])
def data_provider(request):return request.paramdef test_data(data_provider):print(data_provider)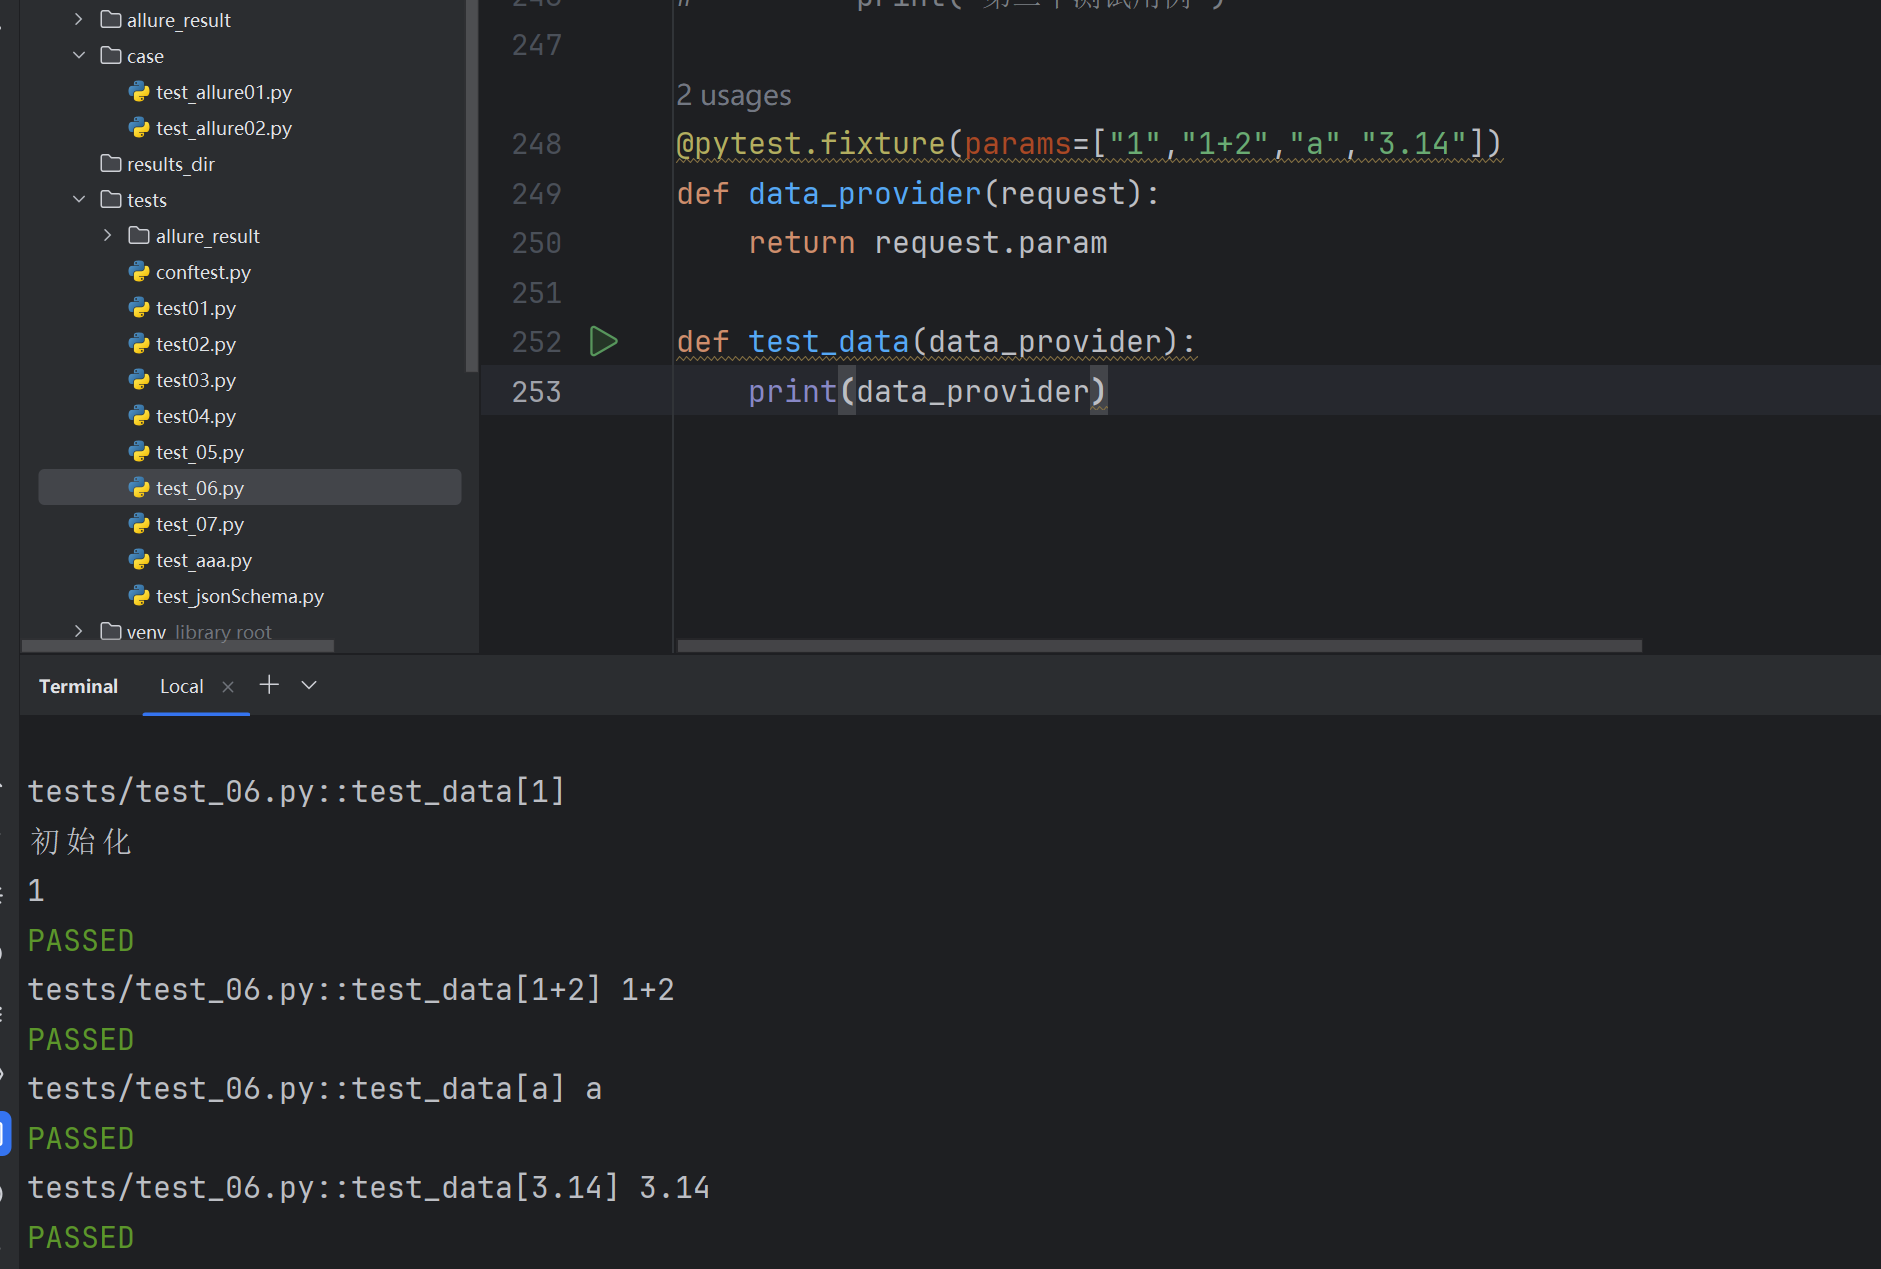
如果测试场景主要涉及简单的参数传递,且不需要复杂的资源管理,建议使用 parametrize,因为它更简单直接;如果测试需要动态加载外部数据,或者需要管理复杂的测试资源(如数据库连接、文件操作等),建议使用 fixture。在某些情况下,也可以结合使用 parametrize 和 fixture,以充分利用两者的优点。
总结来说, parametrize 更适合简单场景,而 fixture 更适合需要动态数据和资源管理的复杂场景。
5.总结
