ubuntu server 工业环境部署手册[2025-08-06]
文章目录
- 1 查看当前OS的版本号:
- 2 开始部署一些常用信息
- 2.1 查看网络信息
- 2.2 安装docker
- 3 安装anaconda
- 3.1 先下载
- 3.2 安装与操作
- 4 安装supervisor
- ✅ 步骤一:安装 Supervisor
- ✅ 步骤二:检查服务状态
- ✅ 步骤三:添加一个进程配置文件
- ✅ 步骤四:重新加载 Supervisor 配置
- ✅ 步骤五:管理进程
- ✅ 查看日志
- 🛠 示例应用:运行一个简单 Python 脚本
ESC 选择 boot 启动,选择启动U盘,安装系统。
如果 ubuntu U盘启动盘不会制作,网上搜索有很多资料。不多说。
安装之后要做几个操作:
设置root用户,并且开启ssh root用户登录的权限,如果不使能这个功能,用ssh链接操作会比较麻烦,有各种各样的问题。
参考以下的链接:
https://blog.csdn.net/kobe_okok/article/details/137868682?ops_request_misc=%257B%2522request%255Fid%2522%253A%25229be26e790e0c268e3a6be1f6edbae0ed%2522%252C%2522scm%2522%253A%252220140713.130102334.pc%255Fblog.%2522%257D&request_id=9be26e790e0c268e3a6be1f6edbae0ed&biz_id=0&utm_medium=distribute.pc_search_result.none-task-blog-2blogfirst_rank_ecpm_v1~rank_v31_ecpm-3-137868682-null-null.nonecase&utm_term=ubuntu&spm=1018.2226.3001.4450
1 查看当前OS的版本号:
root@sunny227:~# lsb_release -aNo LSB modules are available.
Distributor ID: Ubuntu
Description:    Ubuntu 22.04.5 LTS
Release:        22.04
Codename:       jammy
2 开始部署一些常用信息
2.1 查看网络信息
/etc/netplan
yaml 文件进行网络配置,一定要注意缩进,否则会有错误
# This file is generated from information provided by the datasource.  Changes
# to it will not persist across an instance reboot.  To disable cloud-init's
# network configuration capabilities, write a file
# /etc/cloud/cloud.cfg.d/99-disable-network-config.cfg with the following:
# network: {config: disabled}
network:ethernets:enp2s0:dhcp4: trueversion: 2
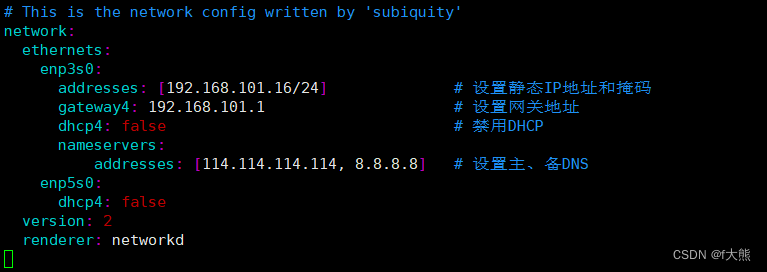
以上是配置静态IP的方式。
使用 netplan apply 生效
2.2 安装docker
安装最新版的docker
这个菜鸟教程做的不错:
https://www.runoob.com/docker/ubuntu-docker-install.html
sudo apt-get remove docker docker-engine docker.io containerd runc
sudo apt-get update
sudo apt-get install     apt-transport-https     ca-certificates     curl     gnupg-agent     software-properties-commoncurl -fsSL https://mirrors.ustc.edu.cn/docker-ce/linux/ubuntu/gpg -o /etc/apt/keyrings/docker.ascecho   "deb [arch=$(dpkg --print-architecture) signed-by=/etc/apt/keyrings/docker.asc] https://mirrors.ustc.edu.cn/docker-ce/linux/ubuntu/ \$(. /etc/os-release && echo "$VERSION_CODENAME") stable" |   sudo tee /etc/apt/sources.list.d/docker.list > /dev/nullsudo apt-get update
sudo apt-get install docker-ce docker-ce-cli containerd.io
sudo apt-get install docker-ce docker-ce-cli containerd.io
docker run hello-world
加入国内的源,要不然docker pull 无法拉取镜像
搜索关键字:
docker 最新国内镜像源
会出现比较新得镜像源:
https://zhuanlan.zhihu.com/p/1914353637645345944
sudo mkdir -p /etc/docker
sudo tee /etc/docker/daemon.json <<EOF
{"registry-mirrors": ["https://docker.1ms.run","https://docker.anyhub.us.kg","https://dockerhub.jobcher.com","https://dockerhub.icu"]
}
EOF
sudo systemctl daemon-reload
sudo systemctl restart docker
这里最好是一个一个命令敲,不要直接一次性输入。
拉取常用的镜像:
docker pull redis:7.4
docker pull nginx:stable-perl
docker pull mysql:lts
docker pull tdengine/tdengine:3.3.6.13
docker pull centos:centos7.9.2009
docker pull bitnami/kafka:4.0.0
docker pull emqx:5.8.7
docker pull node:lts-jod
docker pull python:3.13-bullseye
3 安装anaconda
3.1 先下载
https://www.anaconda.com/download/success
3.2 安装与操作
# 执行操作
bash Miniconda3-latest-Linux-x86_64.sh# 安装时选择默认路径(通常是 ~/miniconda3),并在安装后运行:
~/miniconda3/bin/conda init # 将conda 加入到环境变量
source ~/.bashrc# 创建 Python 3.11 的虚拟环境,名称为 myenv
conda create -n myenv python=3.11conda activate myenvpython --version
# 输出: Python 3.11.x# 在虚拟环境中看安装哪些包
conda install numpy pandas
4 安装supervisor
在 Ubuntu Server(例如 Ubuntu 22.04)上安装并配置 Supervisor 的完整步骤如下。Supervisor 是一个用于管理后台进程的工具,常用于部署 Python、Node.js、Gunicorn、Celery 等服务。
✅ 步骤一:安装 Supervisor
sudo apt update
sudo apt install supervisor -y
安装完成后,Supervisor 会自动以服务形式运行。
✅ 步骤二:检查服务状态
sudo systemctl status supervisor
如果看到 active (running),说明安装成功。
✅ 步骤三:添加一个进程配置文件
Supervisor 的配置文件通常放在:
/etc/supervisor/conf.d/
比如你要管理一个 Python 应用,可以创建一个配置文件:
sudo nano /etc/supervisor/conf.d/myapp.conf
内容示例:
[program:myapp]
command=/home/ubuntu/myapp/venv/bin/python /home/ubuntu/myapp/app.py
directory=/home/ubuntu/myapp
autostart=true
autorestart=true
stderr_logfile=/var/log/myapp.err.log
stdout_logfile=/var/log/myapp.out.log
user=ubuntu
environment=PATH="/home/ubuntu/myapp/venv/bin"
请根据你的实际路径、用户、虚拟环境位置修改。
✅ 步骤四:重新加载 Supervisor 配置
sudo supervisorctl reread
sudo supervisorctl update
✅ 步骤五:管理进程
你可以使用 supervisorctl 管理你的程序:
sudo supervisorctl start myapp
sudo supervisorctl stop myapp
sudo supervisorctl restart myapp
sudo supervisorctl status
✅ 查看日志
tail -f /var/log/myapp.out.log
tail -f /var/log/myapp.err.log
🛠 示例应用:运行一个简单 Python 脚本
创建一个测试脚本:
mkdir ~/testapp
nano ~/testapp/app.py
内容:
import timewhile True:print("App is running...")time.sleep(5)
配置 Supervisor 运行它,方法同上。