本机部署K8S集群
Vagrantfile文件版本如下
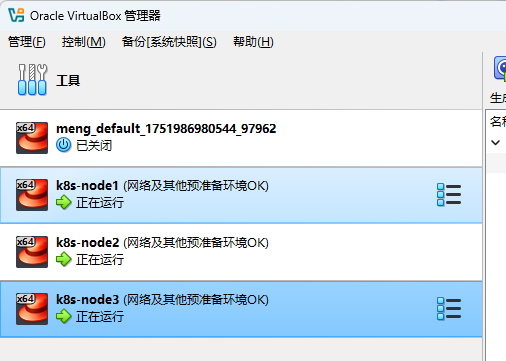
VirtualBox 图形用户界面
版本 7.1.10 r169112 (Qt6.5.3)C:\Users\meng>vagrant --version
Vagrant 2.4.2
一、创建3个虚拟机
vagrant+virtual box 用Vagrantfile文件创建的方式
1、Vagrantfile文件的内容
Vagrant.configure("2") do |config|(1..3).each do |i|config.vm.define "k8s-node#{i}" do |node|# 设置虚拟机的Boxnode.vm.box = "centos/7"# 设置虚拟机的主机名node.vm.hostname="k8s-node#{i}"# 设置虚拟机的IPnode.vm.network "private_network", ip: "192.168.56.#{99+i}", netmask: "255.255.255.0"# 设置主机与虚拟机的共享目录# node.vm.synced_folder "~/Documents/vagrant/share", "/home/vagrant/share"# VirtaulBox相关配置node.vm.provider "virtualbox" do |v|# 设置虚拟机的名称v.name = "k8s-node#{i}"# 设置虚拟机的内存大小v.memory = 4096# 设置虚拟机的CPU个数v.cpus = 4endendend
end
2、Vagrantfile文件必须名为:Vagrantfile,并且放在没有中文和空格的目录
3、在文件所在的位置打开CMD窗口,即你的cmd要进到这个文件的地址
4、使用vagrant up创建出三台虚拟机
5、做完这些就会在virtual box看到新建的三台机器
二、默认ssh连接,改成支持密码登录、远程连接就可以用XSHELL连接了
vagrant ssh k8s-node1
#切换root用户
su root
#密码vagrant
vi /etc/ssh/sshd_config
#将PasswordAuthentication no 改为yes
#保存退出esc :wq
service sshd restart
exit;
exit;
1、还是cmd命令窗口,依次执行以上命令
2、重复上面步骤修改 k8s-node2、k8s-node3
三、设置NAT网络
#显示默认的网卡
ip route show
#查看网卡的地址
ip addr
默认是那个什么端口的网卡,我们改成NAT网卡
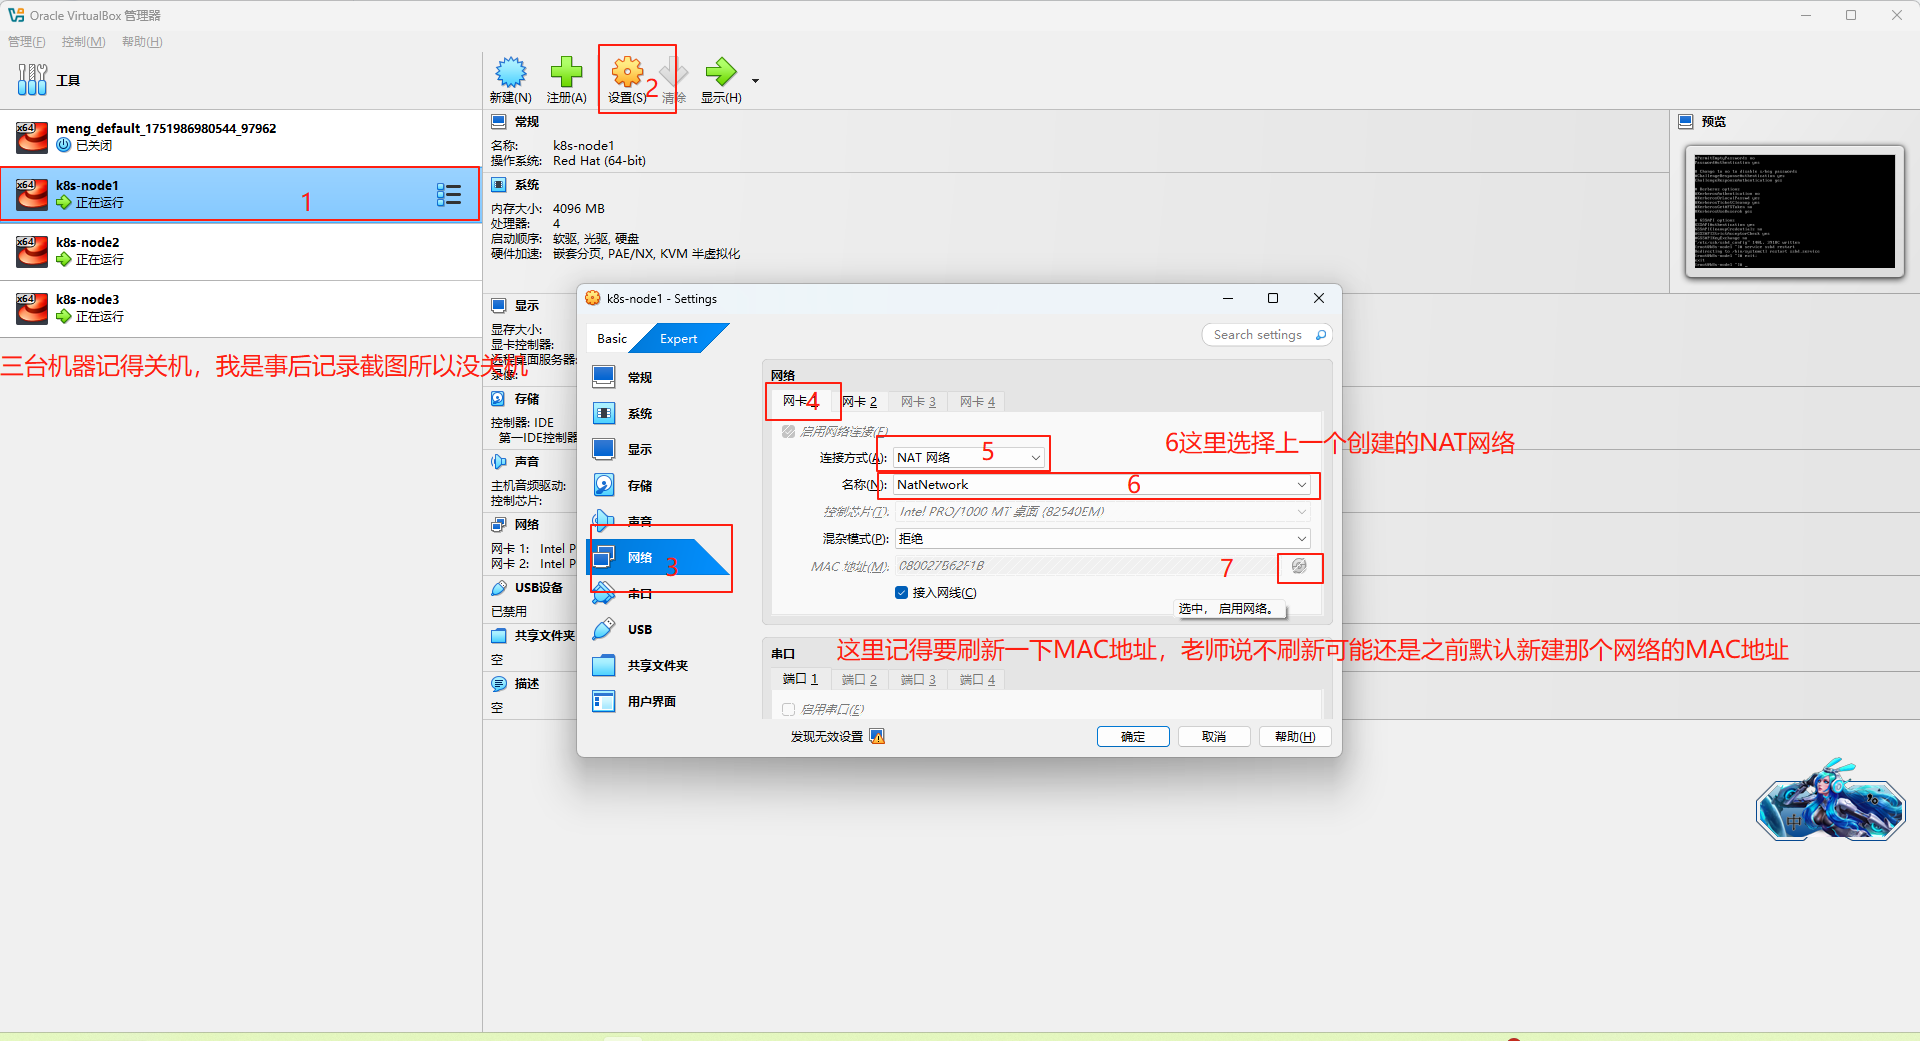
1、三台机器关机
2、添加一个NAT网络 按序依次点击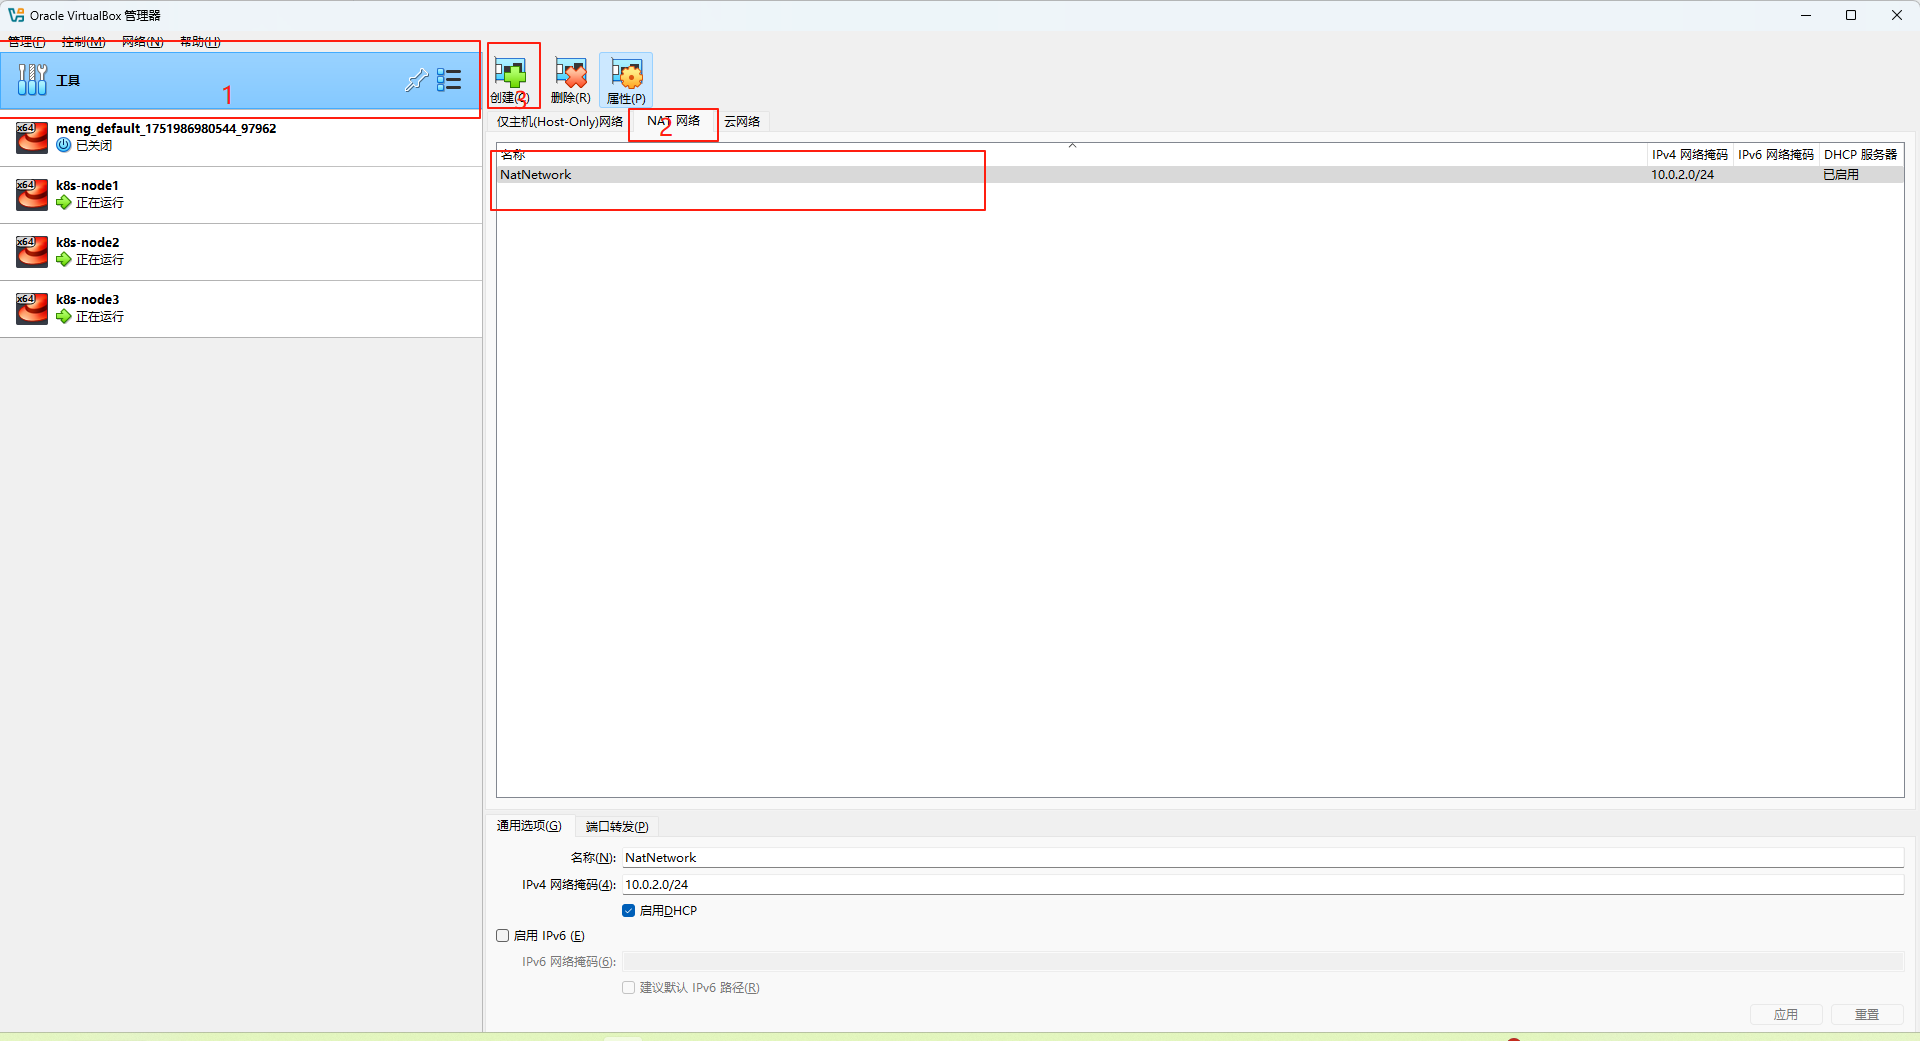
3、 依次按照下面流程设置3个机器的网卡1
4、Xshell连接上三台虚拟机
#显示默认的网卡
ip route show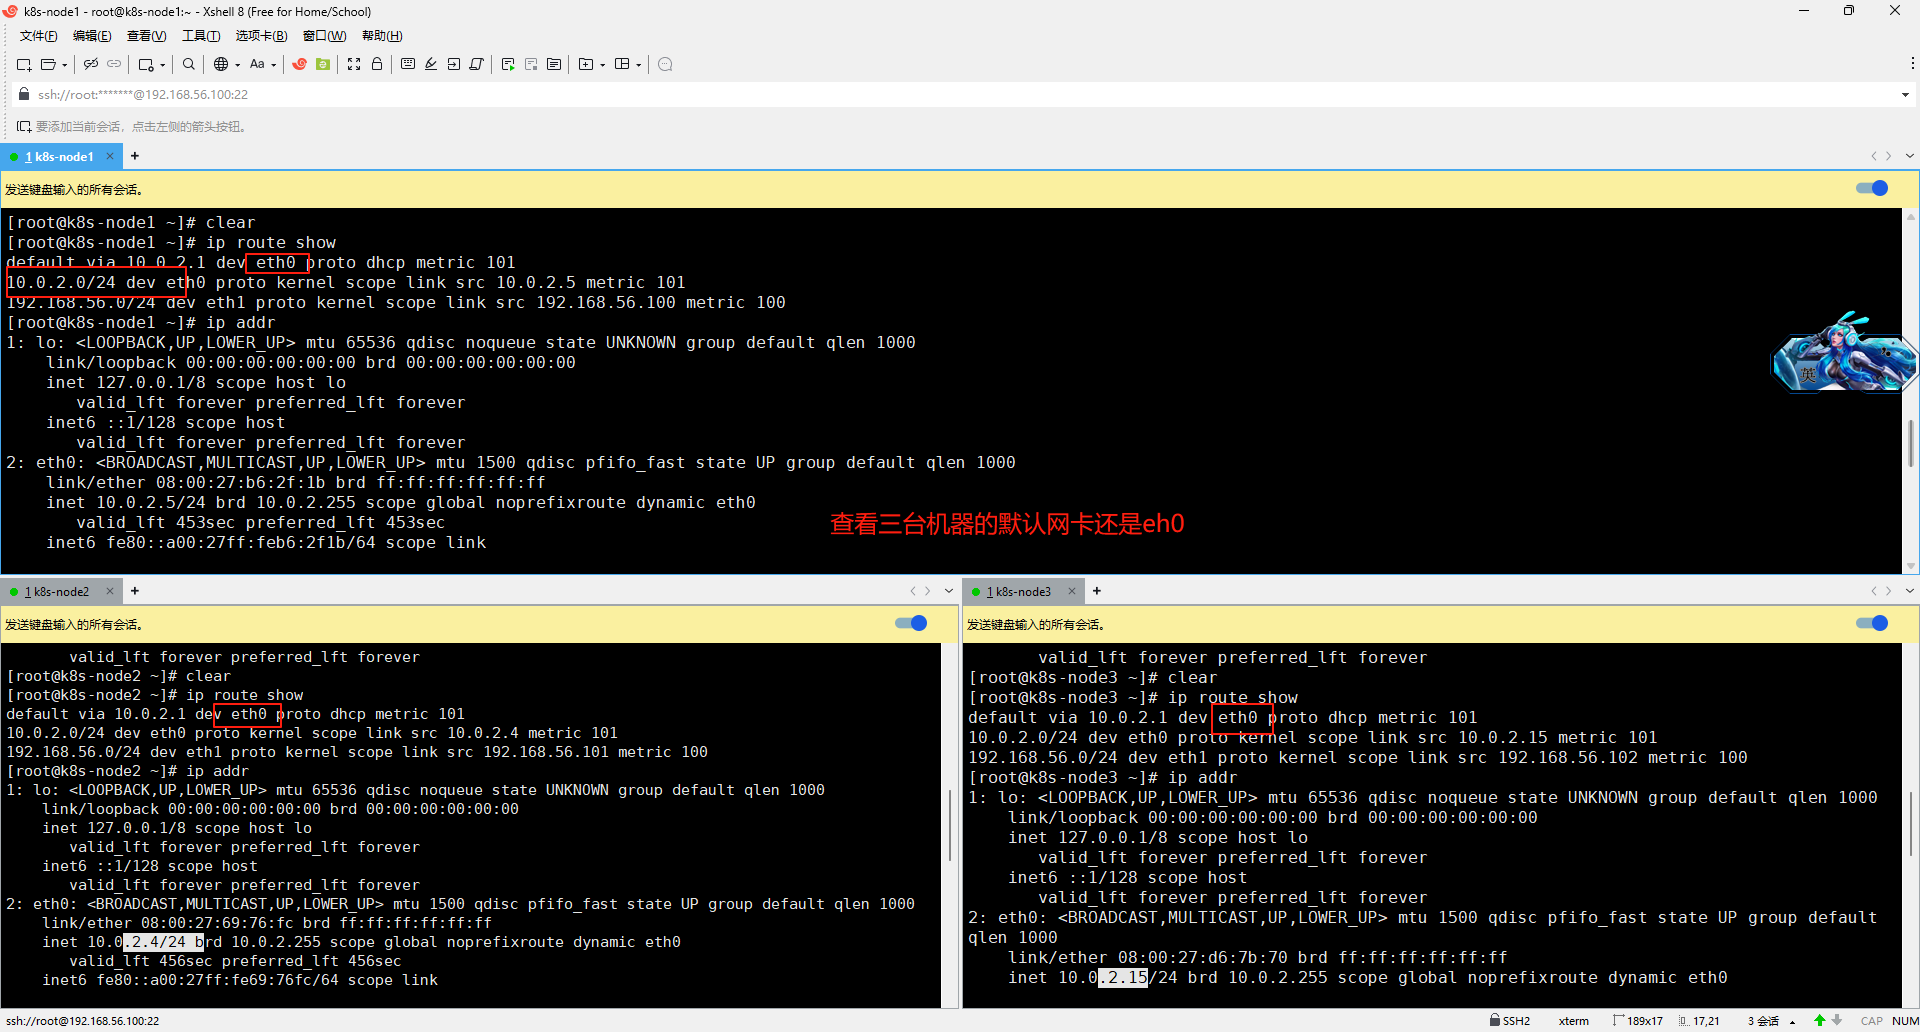
ip addr 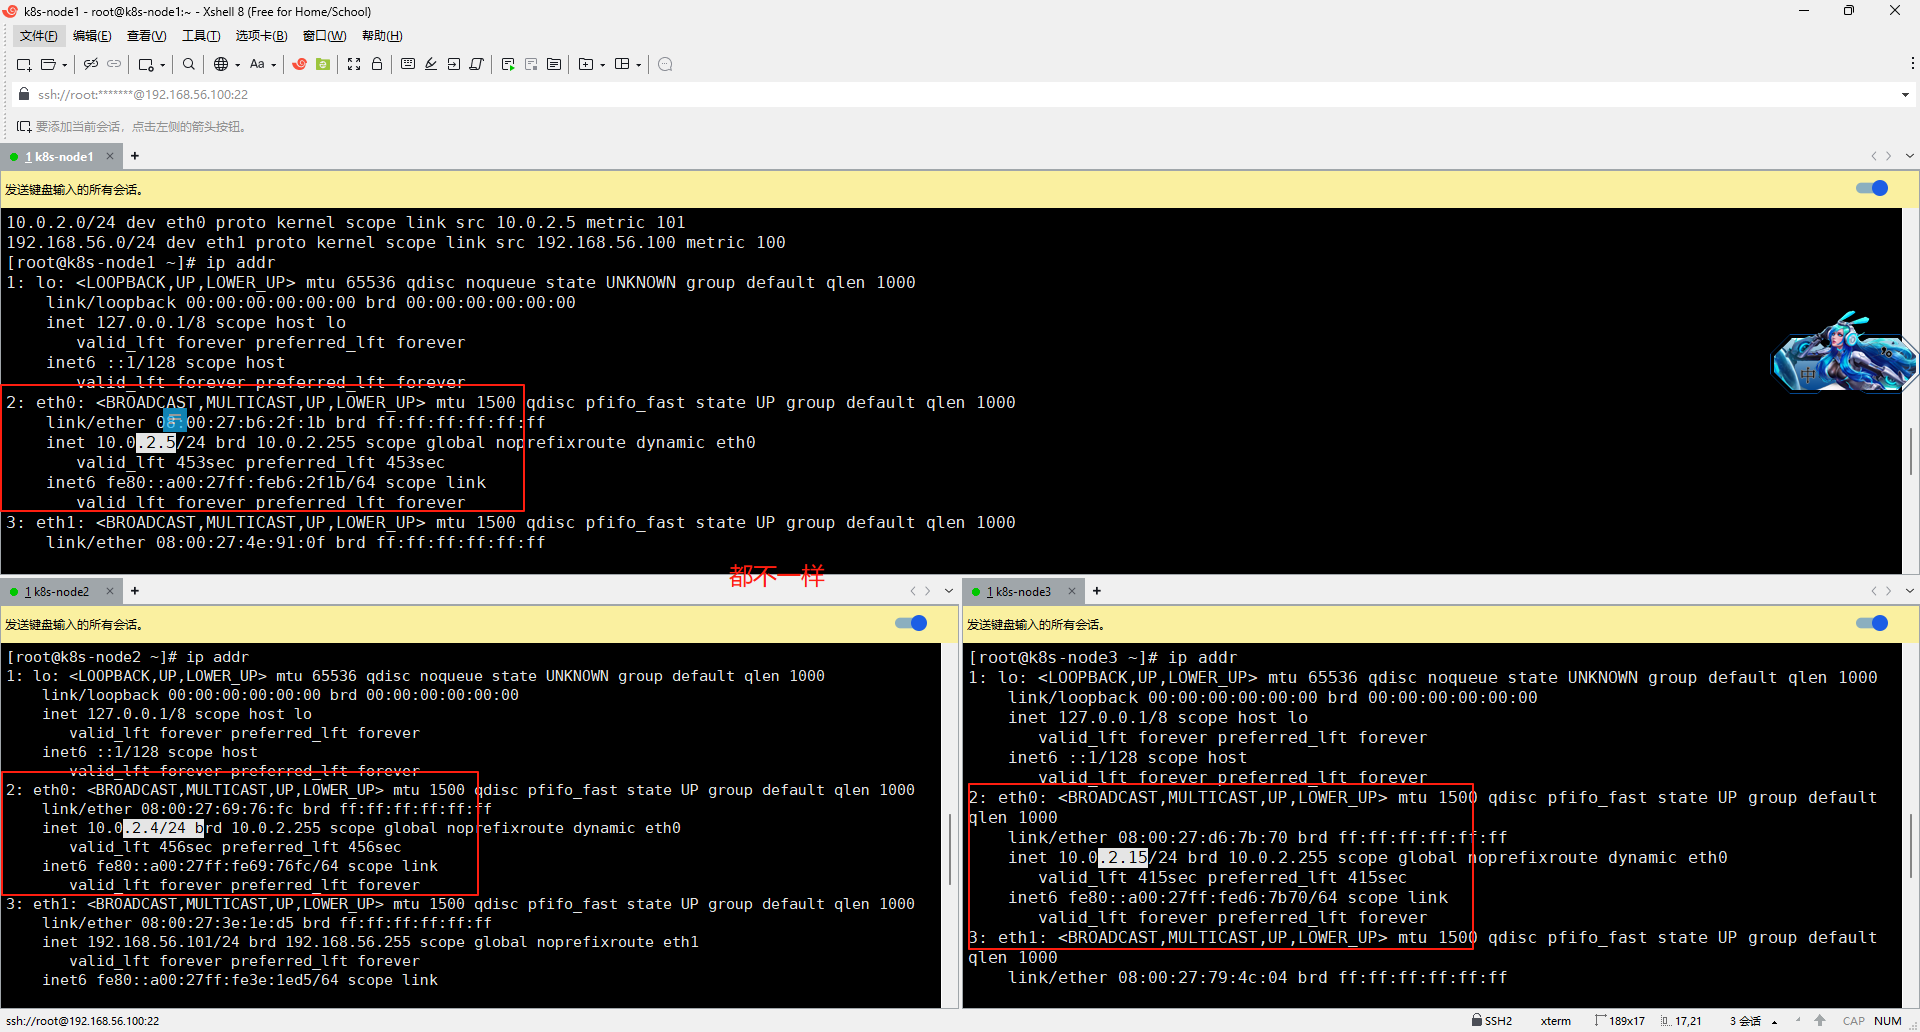
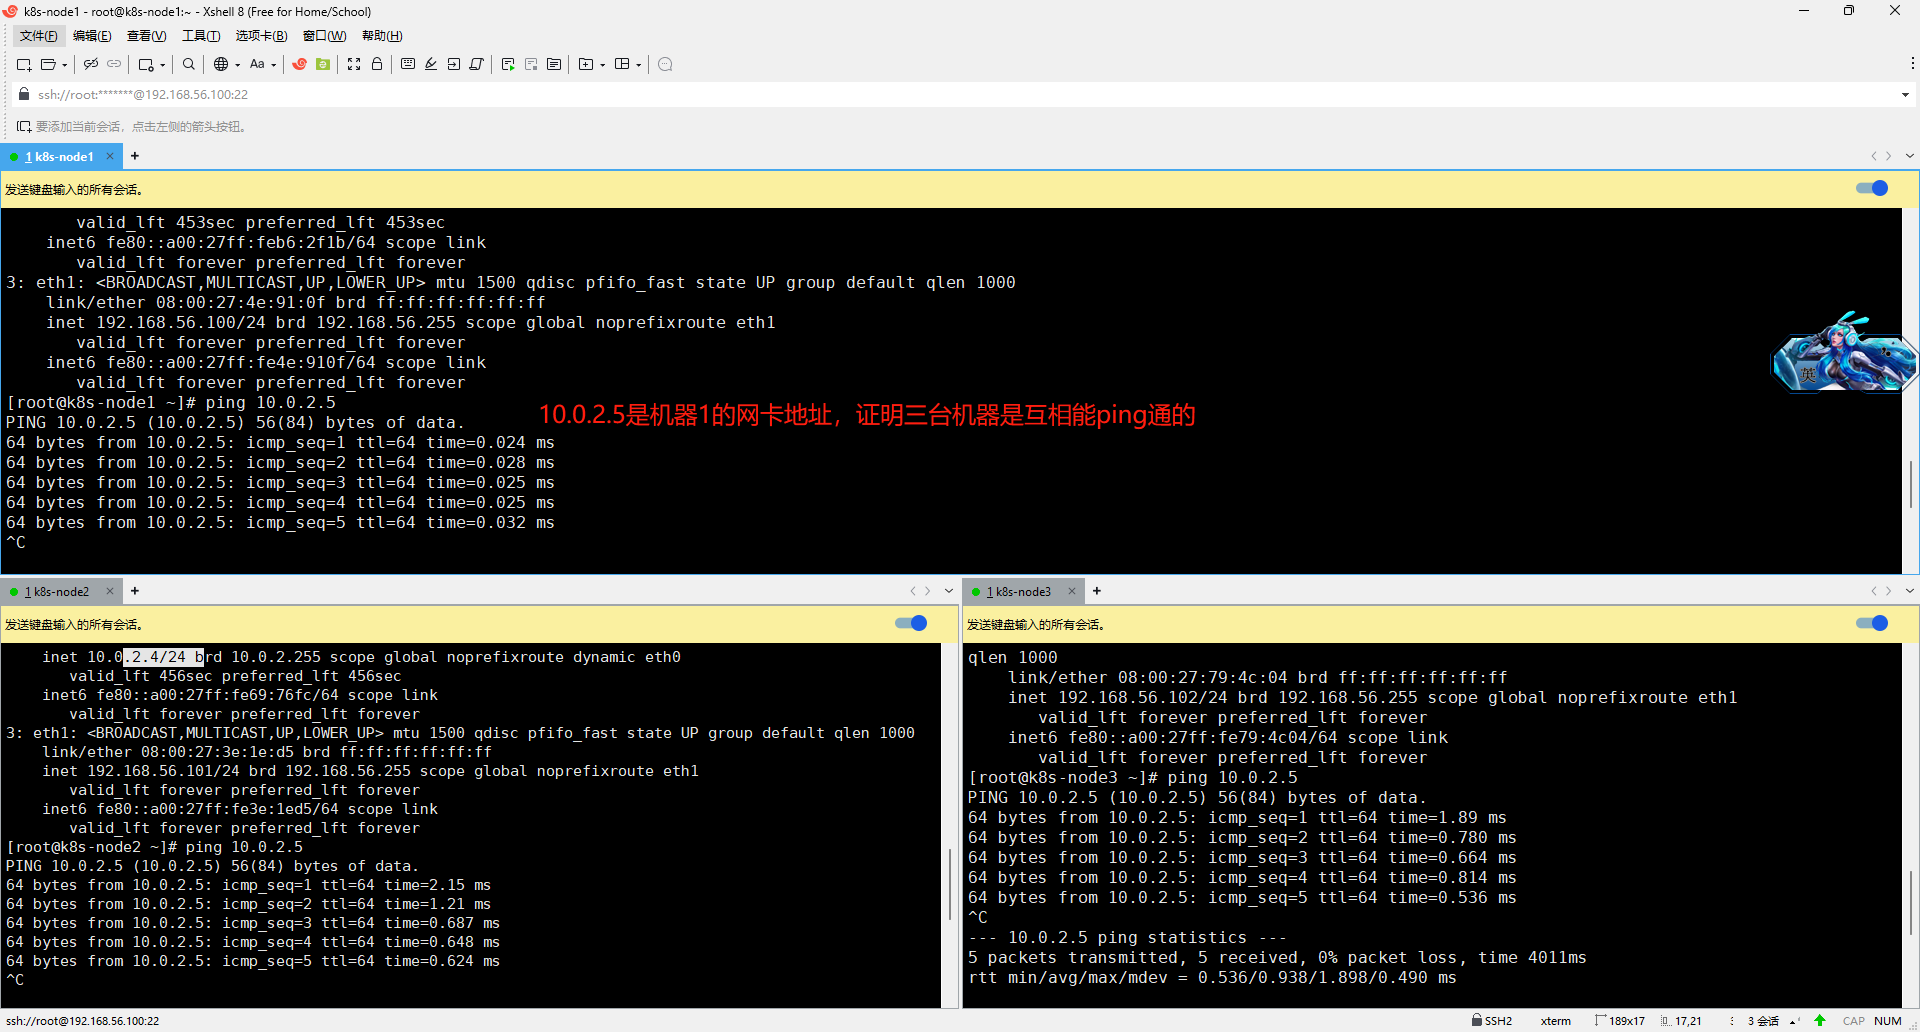
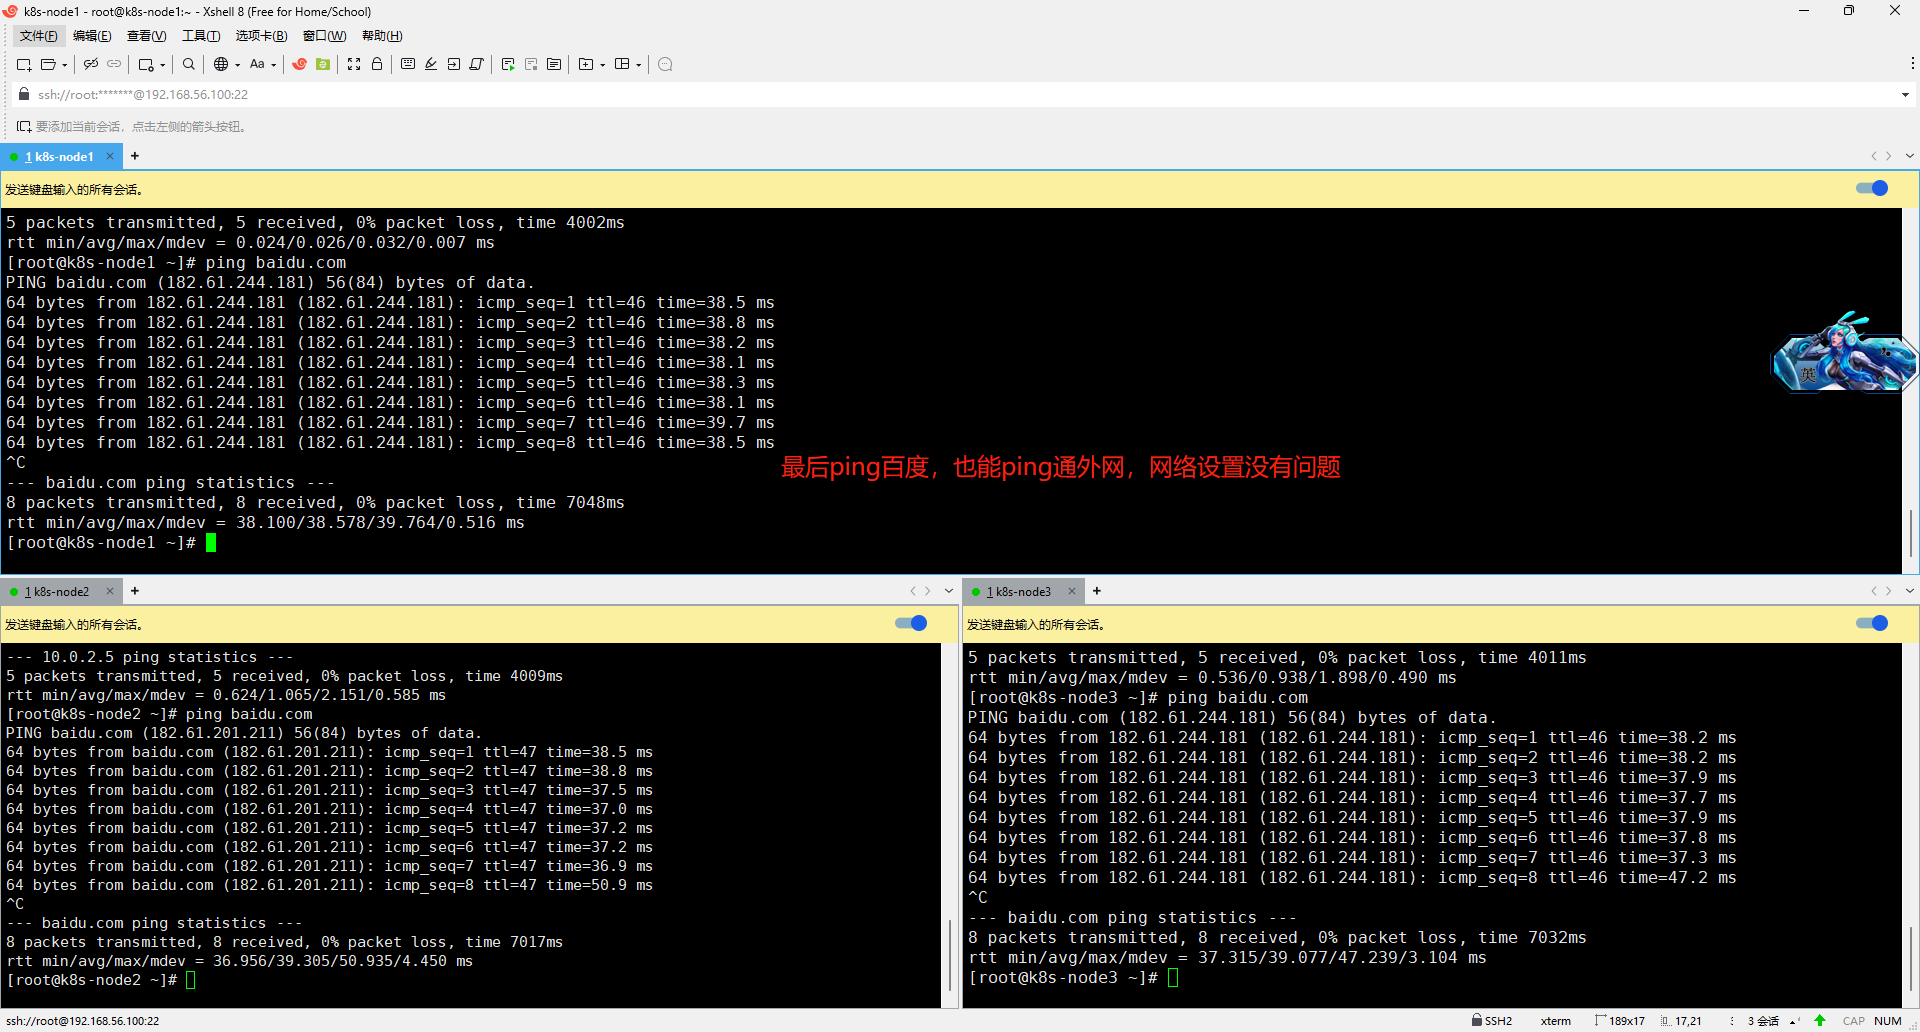
5、测试网络连通性
四、关闭防火墙
1、关闭防火墙
systemctl stop firewalld
systemctl disable firewalld
2、关闭 selinux
sed -i 's/enforcing/disabled/' /etc/selinux/config
setenforce 0
3、关闭selinux -----linux默认的安全策略 参数改成disabled
cat /etc/selinux/config
#当前会话也禁用
setenforce 0

4、关闭 swap
#临时的命令,只是关闭当前会话,机子一开一关就没有了
swapoff -a
#永久关闭
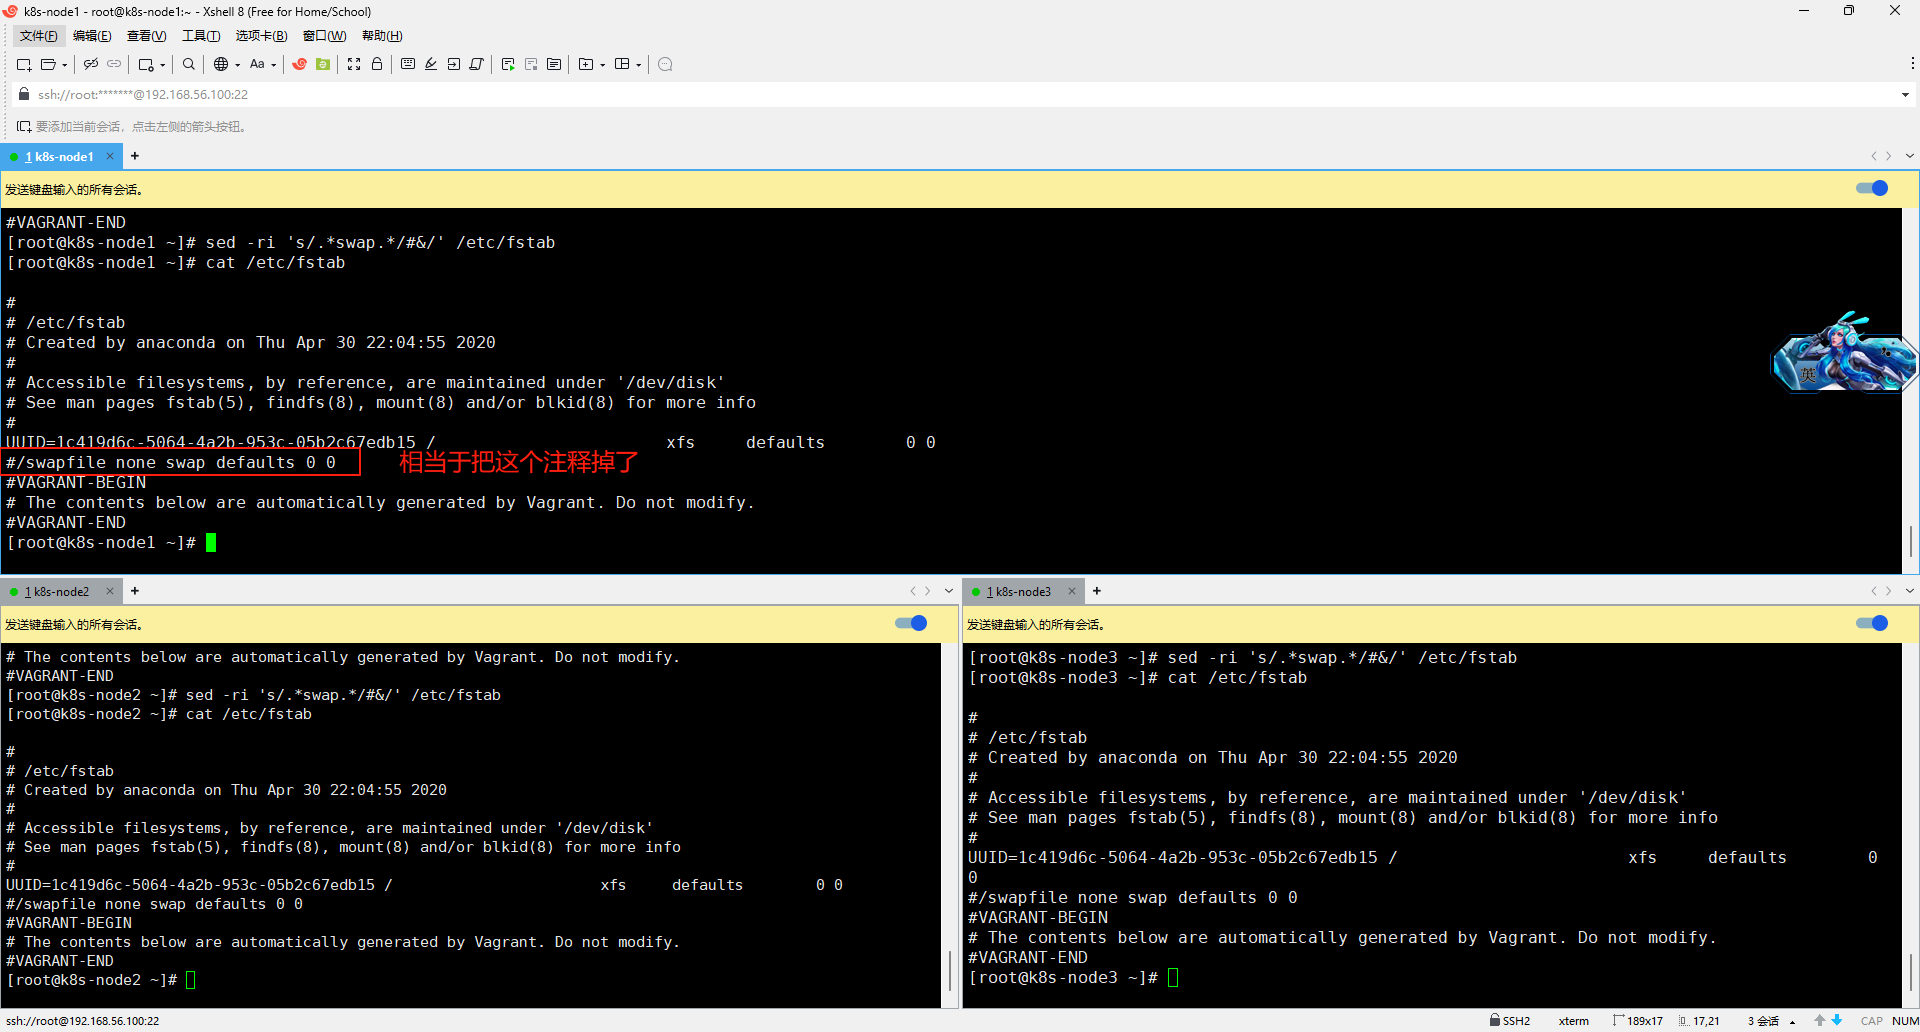
sed -ri 's/.*swap.*/#&/' /etc/fstab
#free -g 验证,swap 必须为 0;一定要关闭内存交换 ,K8S集群会出现很大的性能问题 很多节点都办法工作
改之前可以看一下,其实就是把这里面内存交换那一行注释掉
cat /etc/fstab 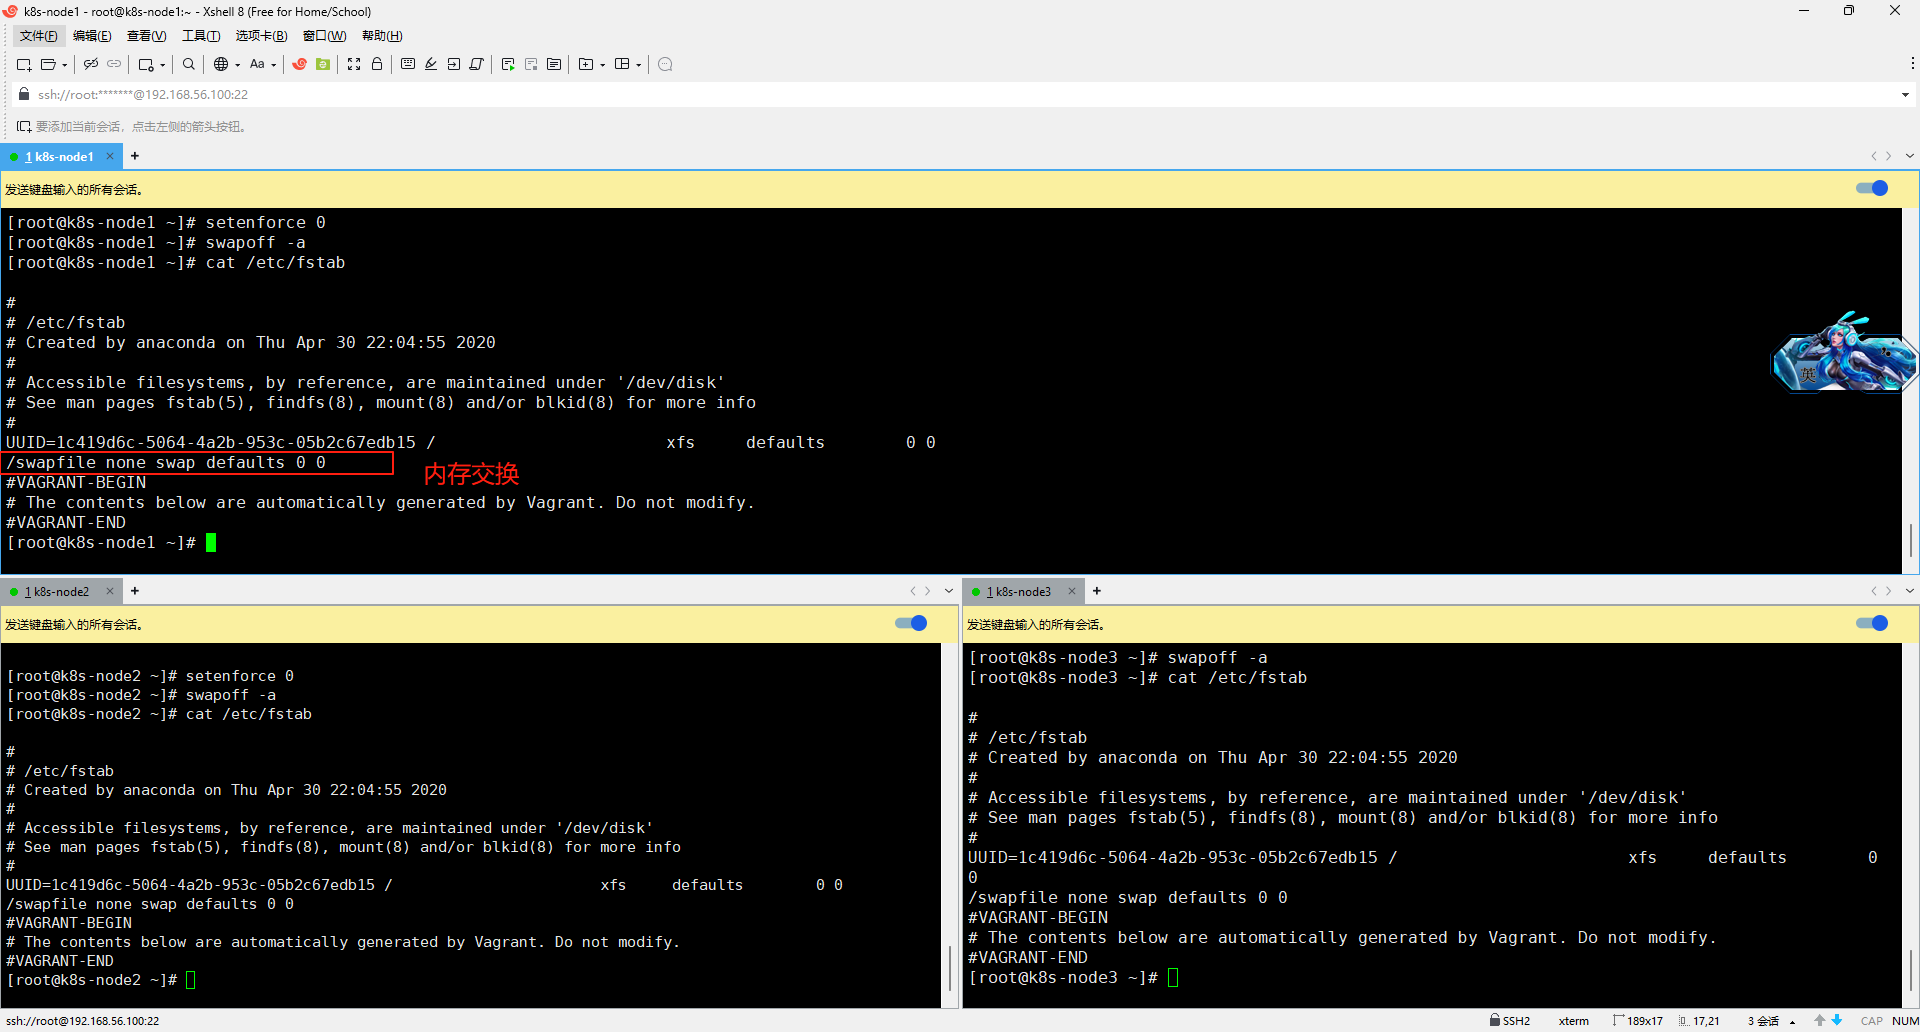
 5、 添加主机名与 IP 对应关系
如果是按照我的file文件创建的,主机名默认已经是这个了
hostname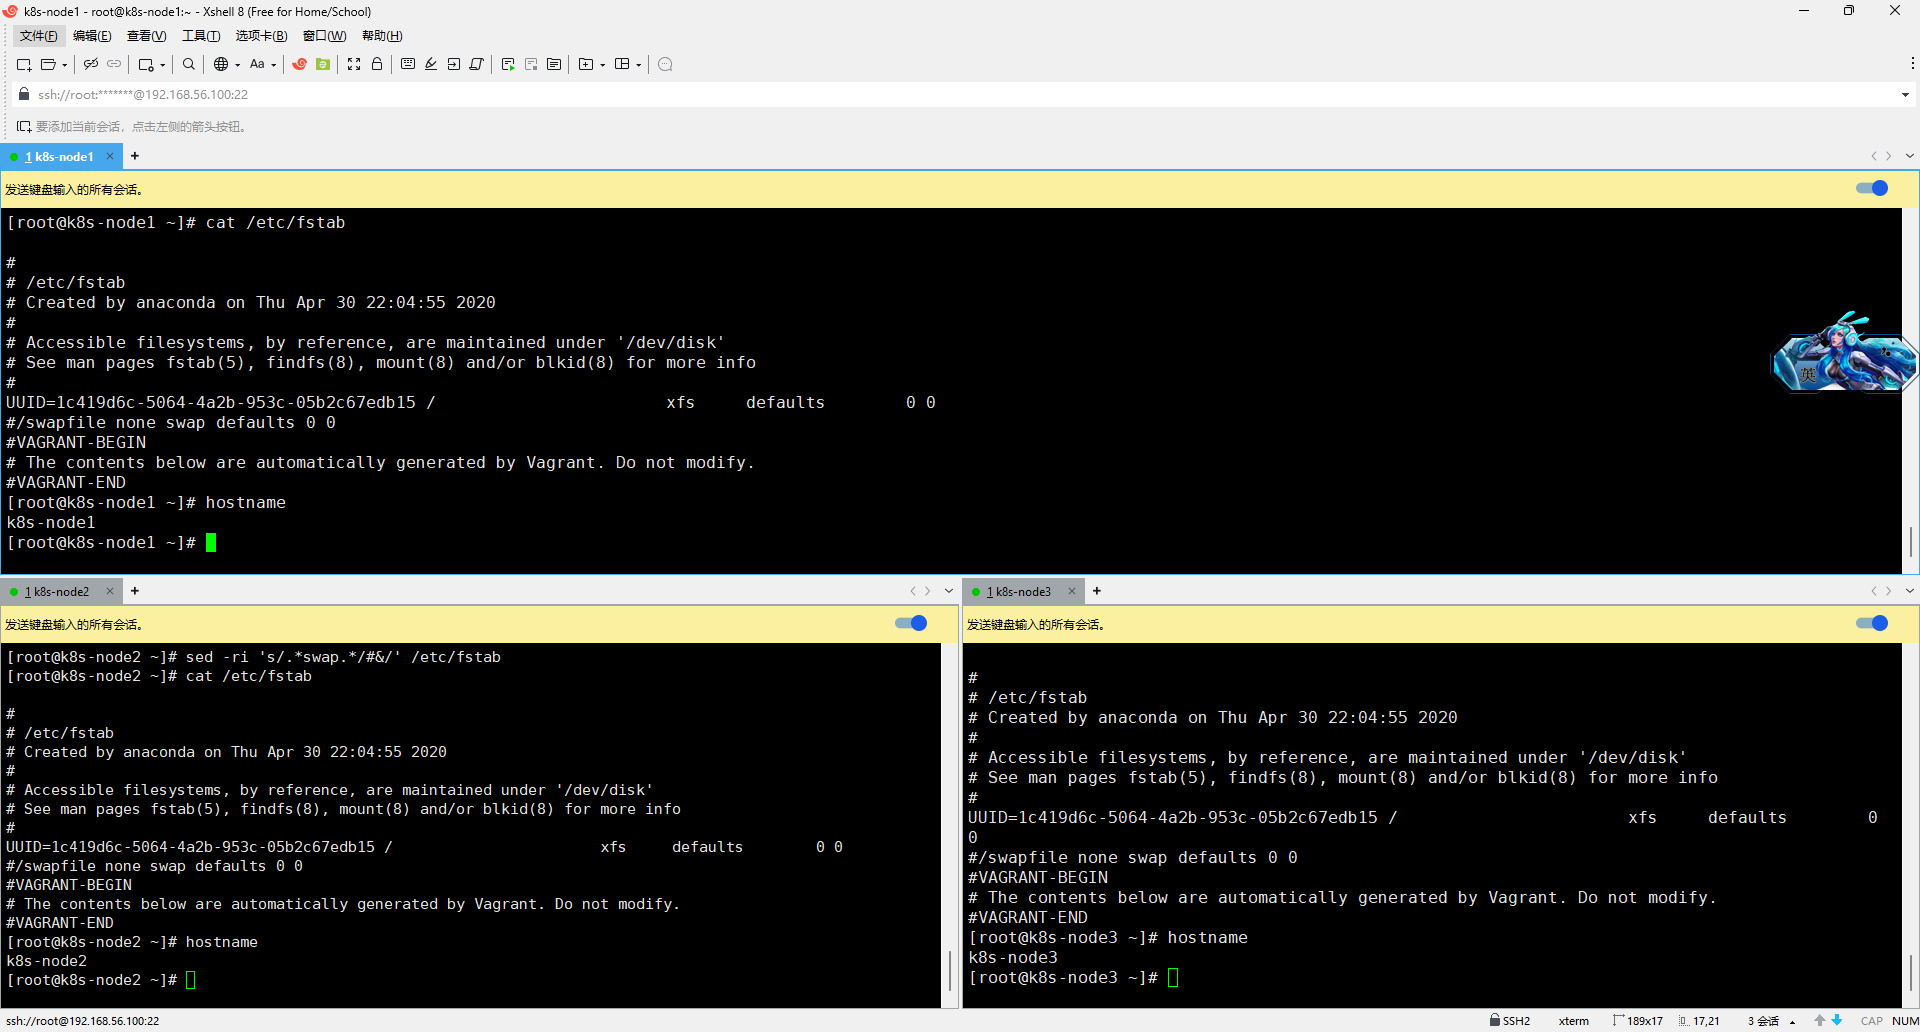
不是就用以下命令修改主机名
hostnamectl set-hostname <newhostname>:指定新的 hostname
su 切换过来
添加对应关系,相当于ping主机名也能ping通,跟windows改host文件是一样的,这里的IP就是三中我们NAT网卡的IP地址
vi /etc/hosts
10.0.2.5 k8s-node1
10.0.2.4 k8s-node2
10.0.2.15 k8s-node3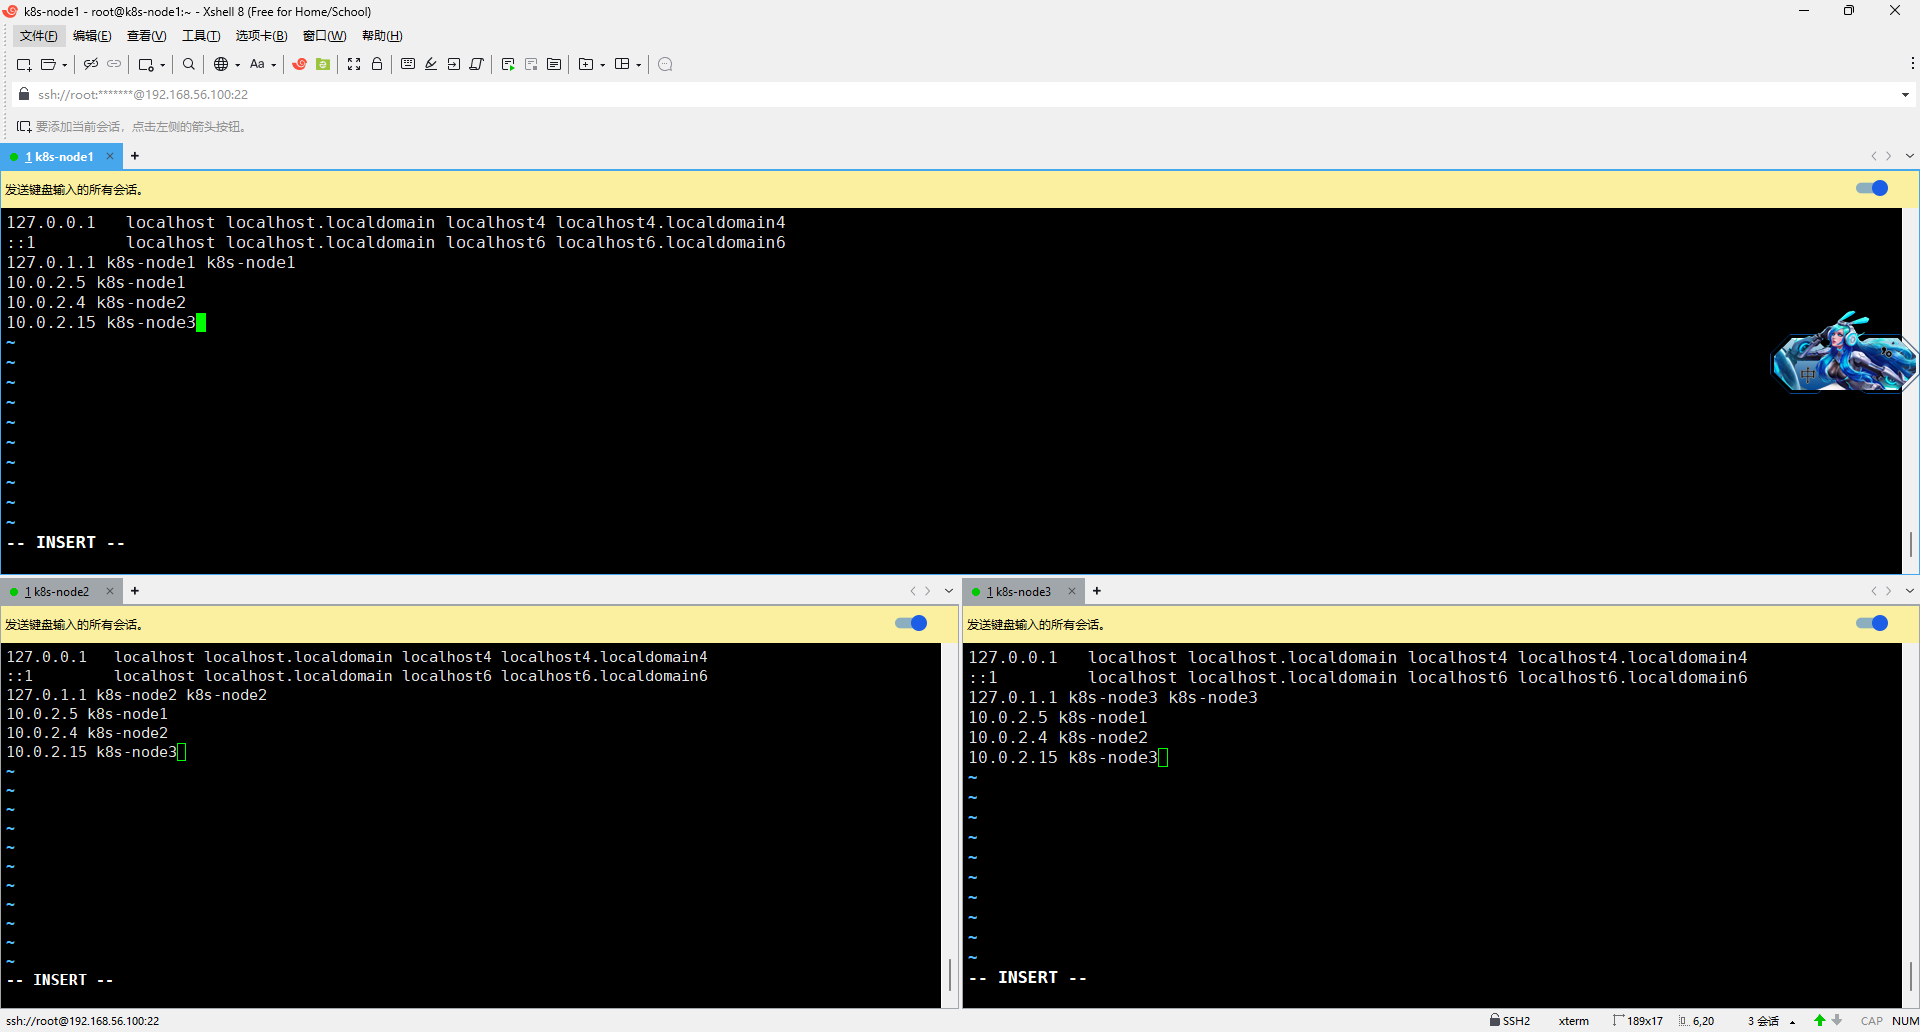
6、将桥接的 IPv4 流量传递到 iptables 的链
会有一些流量统计的指标丢失,为了更精确的统计这个流量指标,加上
cat > /etc/sysctl.d/k8s.conf << EOF
net.bridge.bridge-nf-call-ip6tables = 1
net.bridge.bridge-nf-call-iptables = 1
EOFsysctl --system
到这里三台机器的初始环境已经搭建好了
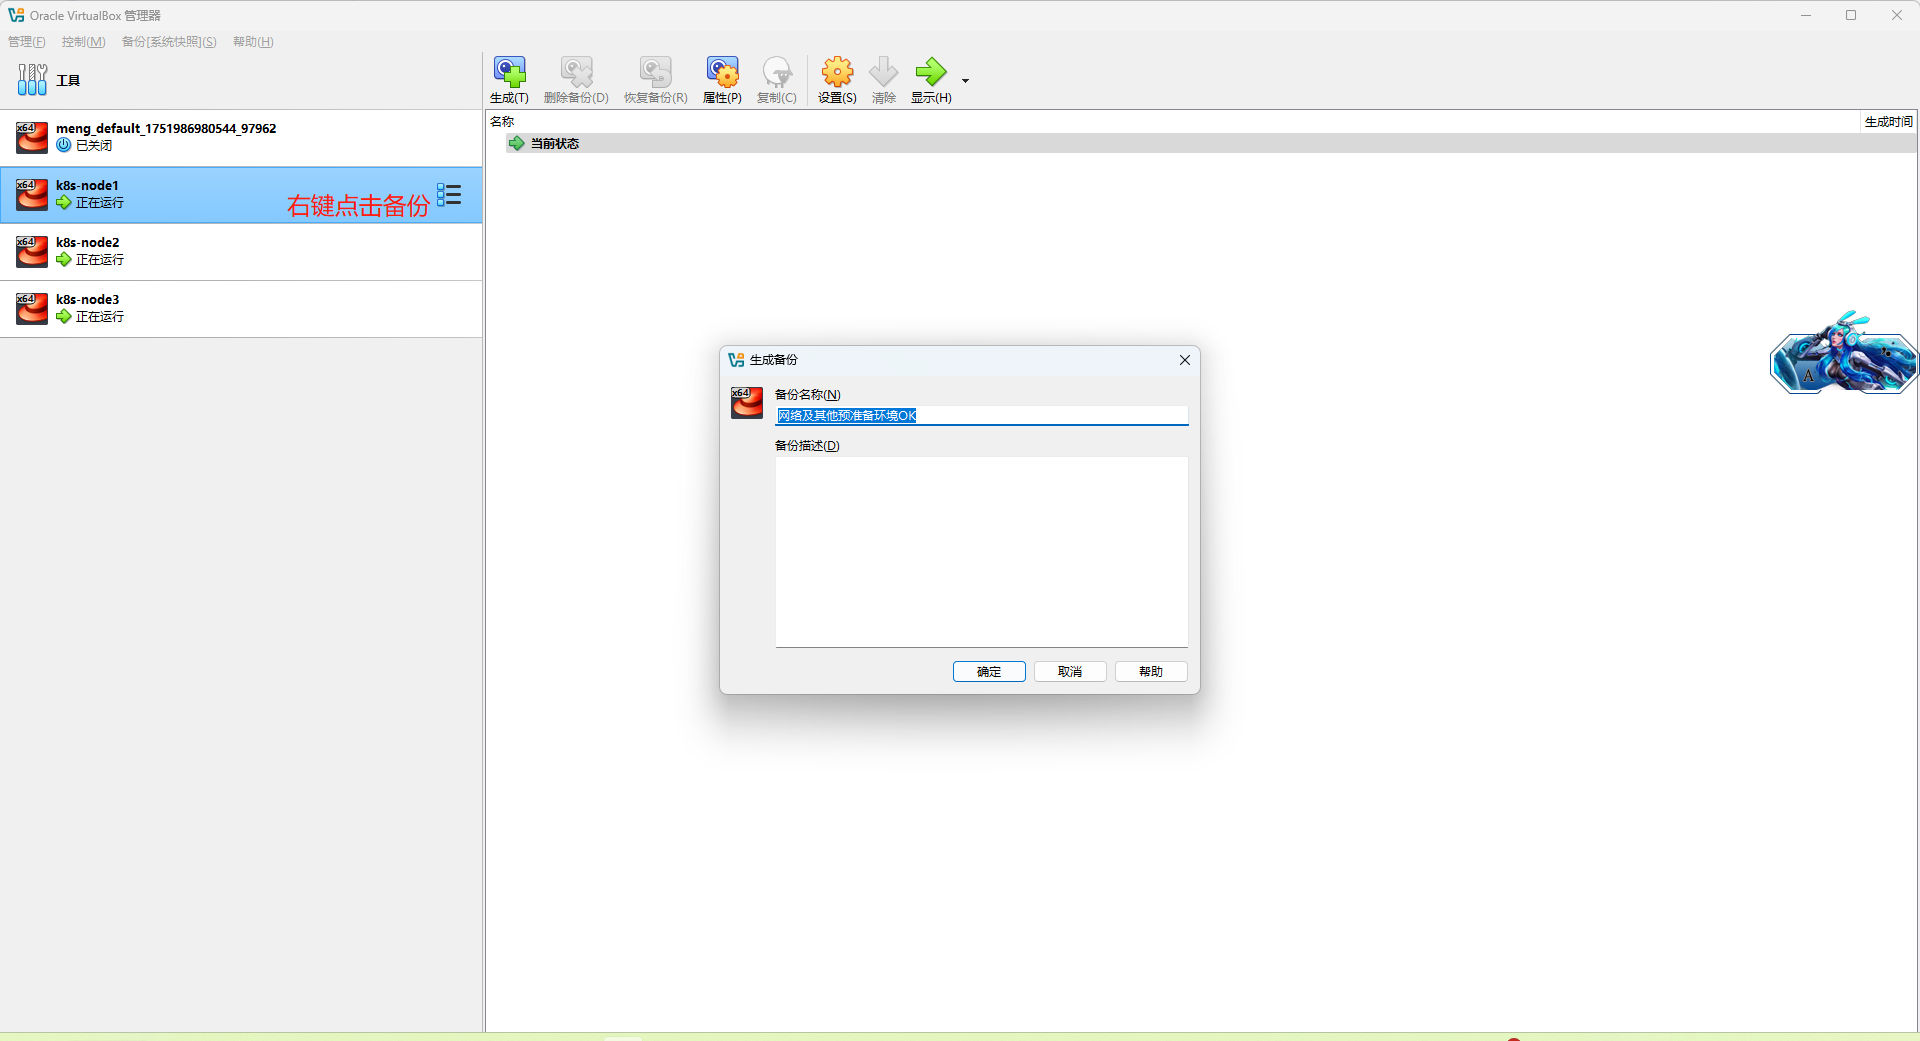
到这里养成备份的好习惯、防止往后继续搭建环境有问题可以回退
7、给三台机器备份(可做可不做)
五、所有节点安装 Docker、kubeadm、kubelet、kubectl
1、卸载系统之前的 docker
yum remove docker \
docker-client \
docker-client-latest \
docker-common \
docker-latest \
docker-latest-logrotate \
docker-logrotate \
docker-engine
2、安装 Docker-CE
安装必须的依赖
yum install -y yum-utils \
device-mapper-persistent-data \
lvm2
这里我报错了
[root@k8s-node1 ~]# yum install -y yum-utils \
> device-mapper-persistent-data \
> lvm2
Loaded plugins: fastestmirror
Loading mirror speeds from cached hostfile
Could not retrieve mirrorlist http://mirrorlist.centos.org/?release=7&arch=x86_64&repo=os&infra=vag error was
14: curl#6 - "Could not resolve host: mirrorlist.centos.org; Unknown error"One of the configured repositories failed (Unknown),and yum doesn't have enough cached data to continue. At this point the onlysafe thing yum can do is fail. There are a few ways to work "fix" this:1. Contact the upstream for the repository and get them to fix the problem.2. Reconfigure the baseurl/etc. for the repository, to point to a workingupstream. This is most often useful if you are using a newerdistribution release than is supported by the repository (and thepackages for the previous distribution release still work).3. Run the command with the repository temporarily disabledyum --disablerepo=<repoid> ...4. Disable the repository permanently, so yum won't use it by default. Yumwill then just ignore the repository until you permanently enable itagain or use --enablerepo for temporary usage:yum-config-manager --disable <repoid>orsubscription-manager repos --disable=<repoid>5. Configure the failing repository to be skipped, if it is unavailable.Note that yum will try to contact the repo. when it runs most commands,so will have to try and fail each time (and thus. yum will be be muchslower). If it is a very temporary problem though, this is often a nicecompromise:yum-config-manager --save --setopt=<repoid>.skip_if_unavailable=trueCannot find a valid baseurl for repo: base/7/x86_64
看报错找不到什么什么,已经习惯了,网络被墙各种原因,就把yum仓库源换成了阿里或国内的源
第一时间修改了dns发现不行,把yum仓库源换成了阿里或国内的源,下载就成功了
vi /etc/resolv.conf#docker pull一失败我就改这个就能成功,所以我第一时间想要去改这个文件
nameserver 8.8.8.8
nameserver 8.8.4.4
nameserver 114.114.114.114
cd /etc/yum.repos.d/
#可以看现在是Centos7的官网源地址,切换为国内镜像阿里源
cat CentOS-Base.repo
#先备份
cp CentOS-Base.repo CentOS-Base.repo.backup
vi CentOS-Base.repo
改为下面的内容
[base]
name=CentOS-$releasever - Base - mirrors.aliyun.com
baseurl=http://mirrors.aliyun.com/centos/$releasever/os/$basearch/
gpgcheck=1
gpgkey=http://mirrors.aliyun.com/centos/RPM-GPG-KEY-CentOS-7[updates]
name=CentOS-$releasever - Updates - mirrors.aliyun.com
baseurl=http://mirrors.aliyun.com/centos/$releasever/updates/$basearch/
gpgcheck=1
gpgkey=http://mirrors.aliyun.com/centos/RPM-GPG-KEY-CentOS-7[extras]
name=CentOS-$releasever - Extras - mirrors.aliyun.com
baseurl=http://mirrors.aliyun.com/centos/$releasever/extras/$basearch/
gpgcheck=1
gpgkey=http://mirrors.aliyun.com/centos/RPM-GPG-KEY-CentOS-7[centosplus]
name=CentOS-$releasever - Plus - mirrors.aliyun.com
baseurl=http://mirrors.aliyun.com/centos/$releasever/centosplus/$basearch/
gpgcheck=1
enabled=0
gpgkey=http://mirrors.aliyun.com/centos/RPM-GPG-KEY-CentOS-7
#清理并重建缓存
yum clean all
yum makecache
yum update参考博客:已解决centos7 yum报错:cannot find a valid baseurl for repo:base/7/x86_64的解决方案_cannot find a valid baseurl for repo: base-CSDN博客
3、设置 docker repo 的 yum 位置
yum-config-manager \ --add-repo \
https://download.docker.com/linux/centos/docker-ce.repo#推介使用这个,不然下面下载会报错
yum-config-manager --add-repo http://mirrors.aliyun.com/docker-ce/linux/centos/docker-ce.repo4、安装 docker,以及 docker-cli
yum install -y docker-ce docker-ce-cli containerd.io#指定版本,不然下面init会报错
yum install -y docker-ce-19.03.9 docker-ce-cli-19.03.9 containerd.io
我会报错, 所3、的时候我设置的是阿里云的
[root@k8s-node1 yum.repos.d]# yum install -y docker-ce docker-ce-cli containerd.io
Loaded plugins: fastestmirror
Loading mirror speeds from cached hostfile
No package docker-ce available.
No package docker-ce-cli available.
No package containerd.io available.
Error: Nothing to do
5、配置 docker 加速
不知道这个镜像源能不能用,不能后面再改
mkdir -p /etc/docker
tee /etc/docker/daemon.json <<EOF
{"registry-mirrors": ["https://docker.xuanyuan.me"]
}
EOF
systemctl daemon-reload
systemctl restart docker6、启动 docker & 设置 docker 开机自启
systemctl enable docker7、添加阿里云 yum 源
cat > /etc/yum.repos.d/kubernetes.repo << EOF
[kubernetes]
name=Kubernetes
baseurl=https://mirrors.aliyun.com/kubernetes/yum/repos/kubernetes-el7-x86_64
enabled=1
gpgcheck=0
repo_gpgcheck=0
gpgkey=https://mirrors.aliyun.com/kubernetes/yum/doc/yum-key.gpg
https://mirrors.aliyun.com/kubernetes/yum/doc/rpm-package-key.gpg
EOF8、安装 kubeadm,kubelet 和 kubectl
yum install -y kubelet-1.17.3 kubeadm-1.17.3 kubectl-1.17.3我这里指定了版本,要安装最新就不用指定
设置开机启动
systemctl enable kubelet
systemctl start kubelet
#查看运行状态,现在启动不起来,因为还有好多东西没有配置
systemctl status kubelet六、部署 k8s-master(1-2只有node1需要操作,3是node2、node3操作)
1、master 节点初始化
- 创建一个文件 master_images.sh 内容如下
#!/bin/bashimages=(kube-apiserver:v1.17.3kube-proxy:v1.17.3kube-controller-manager:v1.17.3kube-scheduler:v1.17.3coredns:1.6.5etcd:3.4.3-0pause:3.1
)for imageName in ${images[@]} ; dodocker pull registry.cn-hangzhou.aliyuncs.com/google_containers/$imageName
#   docker tag registry.cn-hangzhou.aliyuncs.com/google_containers/$imageName  k8s.gcr.io/$imageName
done- 将这个文件上传到node1服务器中
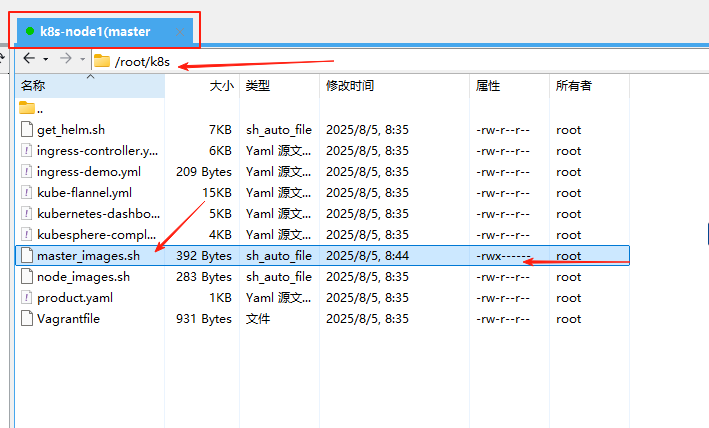
- 添加这个文件的权限
chmod 700 master_images.sh- 执行这个文件去下载镜像
./master_images.sh- 下载成功检查一下镜像内容
docker images
- 初始化一个master
这里 10.0.2.5是我node1默认网卡的地址,必须改成你自己想要成为主节点的默认网卡地址
kubeadm init \
--apiserver-advertise-address=10.0.2.5 \
--image-repository registry.cn-hangzhou.aliyuncs.com/google_containers \
--kubernetes-version v1.17.3 \
--service-cidr=10.96.0.0/16 \
--pod-network-cidr=10.244.0.0/16
这里我运行这个命令的时候一直报以下的超时异常,我在网上查了各种方案都没办法解决,于是我打开了弹幕,弹幕有好心人说是docker版本的原因,于是我将Docker的版本改成了19.03.9的版本,初始化master节点就没有这个问题了。之前我是备份了一下,我直接回到备份的状态重新操作的,所以我的网卡ip是变了
[certs] Generating "etcd/ca" certificate and key
[certs] Generating "etcd/server" certificate and key
[certs] etcd/server serving cert is signed for DNS names [k8s-node1 localhost] and IPs [10.0.2.5 127.0.0.1 ::1]
[certs] Generating "etcd/peer" certificate and key
[certs] etcd/peer serving cert is signed for DNS names [k8s-node1 localhost] and IPs [10.0.2.5 127.0.0.1 ::1]
[certs] Generating "etcd/healthcheck-client" certificate and key
[certs] Generating "apiserver-etcd-client" certificate and key
[certs] Generating "sa" key and public key
[kubeconfig] Using kubeconfig folder "/etc/kubernetes"
[kubeconfig] Writing "admin.conf" kubeconfig file
[kubeconfig] Writing "kubelet.conf" kubeconfig file
[kubeconfig] Writing "controller-manager.conf" kubeconfig file
[kubeconfig] Writing "scheduler.conf" kubeconfig file
[control-plane] Using manifest folder "/etc/kubernetes/manifests"
[control-plane] Creating static Pod manifest for "kube-apiserver"
[control-plane] Creating static Pod manifest for "kube-controller-manager"
W0805 00:52:56.675668    3203 manifests.go:214] the default kube-apiserver authorization-mode is "Node,RBAC"; using "Node,RBAC"
[control-plane] Creating static Pod manifest for "kube-scheduler"
W0805 00:52:56.676361    3203 manifests.go:214] the default kube-apiserver authorization-mode is "Node,RBAC"; using "Node,RBAC"
[etcd] Creating static Pod manifest for local etcd in "/etc/kubernetes/manifests"
[wait-control-plane] Waiting for the kubelet to boot up the control plane as static Pods from directory "/etc/kubernetes/manifests". This can take up to 4m0s
[kubelet-check] Initial timeout of 40s passed.Unfortunately, an error has occurred:timed out waiting for the conditionThis error is likely caused by:- The kubelet is not running- The kubelet is unhealthy due to a misconfiguration of the node in some way (required cgroups disabled)If you are on a systemd-powered system, you can try to troubleshoot the error with the following commands:- 'systemctl status kubelet'- 'journalctl -xeu kubelet'Additionally, a control plane component may have crashed or exited when started by the container runtime.
To troubleshoot, list all containers using your preferred container runtimes CLI, e.g. docker.
Here is one example how you may list all Kubernetes containers running in docker:- 'docker ps -a | grep kube | grep -v pause'Once you have found the failing container, you can inspect its logs with:- 'docker logs CONTAINERID'
error execution phase wait-control-plane: couldn't initialize a Kubernetes cluster
To see the stack trace of this error execute with --v=5 or higher
改了docker版本19.03.9,初始化主节点不报错了,以下的成功的信息非常有用
[bootstrap-token] Configuring bootstrap tokens, cluster-info ConfigMap, RBAC Roles
[bootstrap-token] configured RBAC rules to allow Node Bootstrap tokens to post CSRs in order for nodes to get long term certificate credentials
[bootstrap-token] configured RBAC rules to allow the csrapprover controller automatically approve CSRs from a Node Bootstrap Token
[bootstrap-token] configured RBAC rules to allow certificate rotation for all node client certificates in the cluster
[bootstrap-token] Creating the "cluster-info" ConfigMap in the "kube-public" namespace
[kubelet-finalize] Updating "/etc/kubernetes/kubelet.conf" to point to a rotatable kubelet client certificate and key
[addons] Applied essential addon: CoreDNS
[addons] Applied essential addon: kube-proxyYour Kubernetes control-plane has initialized successfully!To start using your cluster, you need to run the following as a regular user:mkdir -p $HOME/.kubesudo cp -i /etc/kubernetes/admin.conf $HOME/.kube/configsudo chown $(id -u):$(id -g) $HOME/.kube/configYou should now deploy a pod network to the cluster.
Run "kubectl apply -f [podnetwork].yaml" with one of the options listed at:https://kubernetes.io/docs/concepts/cluster-administration/addons/Then you can join any number of worker nodes by running the following on each as root:kubeadm join 10.0.2.6:6443 --token 4vhyc3.6x3preu255cq5o5j \--discovery-token-ca-cert-hash sha256:4bc00186f35018462f18d65e27a1a45550cda8e289d1c008ca5165985e7de2a5 - 测试kubectl(主节点执行)
执行上面成功返回的命令
mkdir -p $HOME/.kube
sudo cp -i /etc/kubernetes/admin.conf $HOME/.kube/config
sudo chown $(id -u):$(id -g) $HOME/.kube/config
2、安装 Pod 网络插件(CNI)
然后执行这个文件 下载网卡(需要你自己上传到虚拟机上)
kubectl apply -f kube-flannel.yml文件内容如下
---
apiVersion: policy/v1beta1
kind: PodSecurityPolicy
metadata:name: psp.flannel.unprivilegedannotations:seccomp.security.alpha.kubernetes.io/allowedProfileNames: docker/defaultseccomp.security.alpha.kubernetes.io/defaultProfileName: docker/defaultapparmor.security.beta.kubernetes.io/allowedProfileNames: runtime/defaultapparmor.security.beta.kubernetes.io/defaultProfileName: runtime/default
spec:privileged: falsevolumes:- configMap- secret- emptyDir- hostPathallowedHostPaths:- pathPrefix: "/etc/cni/net.d"- pathPrefix: "/etc/kube-flannel"- pathPrefix: "/run/flannel"readOnlyRootFilesystem: false# Users and groupsrunAsUser:rule: RunAsAnysupplementalGroups:rule: RunAsAnyfsGroup:rule: RunAsAny# Privilege EscalationallowPrivilegeEscalation: falsedefaultAllowPrivilegeEscalation: false# CapabilitiesallowedCapabilities: ['NET_ADMIN']defaultAddCapabilities: []requiredDropCapabilities: []# Host namespaceshostPID: falsehostIPC: falsehostNetwork: truehostPorts:- min: 0max: 65535# SELinuxseLinux:# SELinux is unused in CaaSPrule: 'RunAsAny'
---
kind: ClusterRole
apiVersion: rbac.authorization.k8s.io/v1beta1
metadata:name: flannel
rules:- apiGroups: ['extensions']resources: ['podsecuritypolicies']verbs: ['use']resourceNames: ['psp.flannel.unprivileged']- apiGroups:- ""resources:- podsverbs:- get- apiGroups:- ""resources:- nodesverbs:- list- watch- apiGroups:- ""resources:- nodes/statusverbs:- patch
---
kind: ClusterRoleBinding
apiVersion: rbac.authorization.k8s.io/v1beta1
metadata:name: flannel
roleRef:apiGroup: rbac.authorization.k8s.iokind: ClusterRolename: flannel
subjects:
- kind: ServiceAccountname: flannelnamespace: kube-system
---
apiVersion: v1
kind: ServiceAccount
metadata:name: flannelnamespace: kube-system
---
kind: ConfigMap
apiVersion: v1
metadata:name: kube-flannel-cfgnamespace: kube-systemlabels:tier: nodeapp: flannel
data:cni-conf.json: |{"name": "cbr0","cniVersion": "0.3.1","plugins": [{"type": "flannel","delegate": {"hairpinMode": true,"isDefaultGateway": true}},{"type": "portmap","capabilities": {"portMappings": true}}]}net-conf.json: |{"Network": "10.244.0.0/16","Backend": {"Type": "vxlan"}}
---
apiVersion: apps/v1
kind: DaemonSet
metadata:name: kube-flannel-ds-amd64namespace: kube-systemlabels:tier: nodeapp: flannel
spec:selector:matchLabels:app: flanneltemplate:metadata:labels:tier: nodeapp: flannelspec:affinity:nodeAffinity:requiredDuringSchedulingIgnoredDuringExecution:nodeSelectorTerms:- matchExpressions:- key: beta.kubernetes.io/osoperator: Invalues:- linux- key: beta.kubernetes.io/archoperator: Invalues:- amd64hostNetwork: truetolerations:- operator: Existseffect: NoScheduleserviceAccountName: flannelinitContainers:- name: install-cniimage: quay.io/coreos/flannel:v0.11.0-amd64command:- cpargs:- -f- /etc/kube-flannel/cni-conf.json- /etc/cni/net.d/10-flannel.conflistvolumeMounts:- name: cnimountPath: /etc/cni/net.d- name: flannel-cfgmountPath: /etc/kube-flannel/containers:- name: kube-flannelimage: quay.io/coreos/flannel:v0.11.0-amd64command:- /opt/bin/flanneldargs:- --ip-masq- --kube-subnet-mgrresources:requests:cpu: "100m"memory: "50Mi"limits:cpu: "100m"memory: "50Mi"securityContext:privileged: falsecapabilities:add: ["NET_ADMIN"]env:- name: POD_NAMEvalueFrom:fieldRef:fieldPath: metadata.name- name: POD_NAMESPACEvalueFrom:fieldRef:fieldPath: metadata.namespacevolumeMounts:- name: runmountPath: /run/flannel- name: flannel-cfgmountPath: /etc/kube-flannel/volumes:- name: runhostPath:path: /run/flannel- name: cnihostPath:path: /etc/cni/net.d- name: flannel-cfgconfigMap:name: kube-flannel-cfg
---
apiVersion: apps/v1
kind: DaemonSet
metadata:name: kube-flannel-ds-arm64namespace: kube-systemlabels:tier: nodeapp: flannel
spec:selector:matchLabels:app: flanneltemplate:metadata:labels:tier: nodeapp: flannelspec:affinity:nodeAffinity:requiredDuringSchedulingIgnoredDuringExecution:nodeSelectorTerms:- matchExpressions:- key: beta.kubernetes.io/osoperator: Invalues:- linux- key: beta.kubernetes.io/archoperator: Invalues:- arm64hostNetwork: truetolerations:- operator: Existseffect: NoScheduleserviceAccountName: flannelinitContainers:- name: install-cniimage: quay.io/coreos/flannel:v0.11.0-arm64command:- cpargs:- -f- /etc/kube-flannel/cni-conf.json- /etc/cni/net.d/10-flannel.conflistvolumeMounts:- name: cnimountPath: /etc/cni/net.d- name: flannel-cfgmountPath: /etc/kube-flannel/containers:- name: kube-flannelimage: quay.io/coreos/flannel:v0.11.0-arm64command:- /opt/bin/flanneldargs:- --ip-masq- --kube-subnet-mgrresources:requests:cpu: "100m"memory: "50Mi"limits:cpu: "100m"memory: "50Mi"securityContext:privileged: falsecapabilities:add: ["NET_ADMIN"]env:- name: POD_NAMEvalueFrom:fieldRef:fieldPath: metadata.name- name: POD_NAMESPACEvalueFrom:fieldRef:fieldPath: metadata.namespacevolumeMounts:- name: runmountPath: /run/flannel- name: flannel-cfgmountPath: /etc/kube-flannel/volumes:- name: runhostPath:path: /run/flannel- name: cnihostPath:path: /etc/cni/net.d- name: flannel-cfgconfigMap:name: kube-flannel-cfg
---
apiVersion: apps/v1
kind: DaemonSet
metadata:name: kube-flannel-ds-armnamespace: kube-systemlabels:tier: nodeapp: flannel
spec:selector:matchLabels:app: flanneltemplate:metadata:labels:tier: nodeapp: flannelspec:affinity:nodeAffinity:requiredDuringSchedulingIgnoredDuringExecution:nodeSelectorTerms:- matchExpressions:- key: beta.kubernetes.io/osoperator: Invalues:- linux- key: beta.kubernetes.io/archoperator: Invalues:- armhostNetwork: truetolerations:- operator: Existseffect: NoScheduleserviceAccountName: flannelinitContainers:- name: install-cniimage: quay.io/coreos/flannel:v0.11.0-armcommand:- cpargs:- -f- /etc/kube-flannel/cni-conf.json- /etc/cni/net.d/10-flannel.conflistvolumeMounts:- name: cnimountPath: /etc/cni/net.d- name: flannel-cfgmountPath: /etc/kube-flannel/containers:- name: kube-flannelimage: quay.io/coreos/flannel:v0.11.0-armcommand:- /opt/bin/flanneldargs:- --ip-masq- --kube-subnet-mgrresources:requests:cpu: "100m"memory: "50Mi"limits:cpu: "100m"memory: "50Mi"securityContext:privileged: falsecapabilities:add: ["NET_ADMIN"]env:- name: POD_NAMEvalueFrom:fieldRef:fieldPath: metadata.name- name: POD_NAMESPACEvalueFrom:fieldRef:fieldPath: metadata.namespacevolumeMounts:- name: runmountPath: /run/flannel- name: flannel-cfgmountPath: /etc/kube-flannel/volumes:- name: runhostPath:path: /run/flannel- name: cnihostPath:path: /etc/cni/net.d- name: flannel-cfgconfigMap:name: kube-flannel-cfg
---
apiVersion: apps/v1
kind: DaemonSet
metadata:name: kube-flannel-ds-ppc64lenamespace: kube-systemlabels:tier: nodeapp: flannel
spec:selector:matchLabels:app: flanneltemplate:metadata:labels:tier: nodeapp: flannelspec:affinity:nodeAffinity:requiredDuringSchedulingIgnoredDuringExecution:nodeSelectorTerms:- matchExpressions:- key: beta.kubernetes.io/osoperator: Invalues:- linux- key: beta.kubernetes.io/archoperator: Invalues:- ppc64lehostNetwork: truetolerations:- operator: Existseffect: NoScheduleserviceAccountName: flannelinitContainers:- name: install-cniimage: quay.io/coreos/flannel:v0.11.0-ppc64lecommand:- cpargs:- -f- /etc/kube-flannel/cni-conf.json- /etc/cni/net.d/10-flannel.conflistvolumeMounts:- name: cnimountPath: /etc/cni/net.d- name: flannel-cfgmountPath: /etc/kube-flannel/containers:- name: kube-flannelimage: quay.io/coreos/flannel:v0.11.0-ppc64lecommand:- /opt/bin/flanneldargs:- --ip-masq- --kube-subnet-mgrresources:requests:cpu: "100m"memory: "50Mi"limits:cpu: "100m"memory: "50Mi"securityContext:privileged: falsecapabilities:add: ["NET_ADMIN"]env:- name: POD_NAMEvalueFrom:fieldRef:fieldPath: metadata.name- name: POD_NAMESPACEvalueFrom:fieldRef:fieldPath: metadata.namespacevolumeMounts:- name: runmountPath: /run/flannel- name: flannel-cfgmountPath: /etc/kube-flannel/volumes:- name: runhostPath:path: /run/flannel- name: cnihostPath:path: /etc/cni/net.d- name: flannel-cfgconfigMap:name: kube-flannel-cfg
---
apiVersion: apps/v1
kind: DaemonSet
metadata:name: kube-flannel-ds-s390xnamespace: kube-systemlabels:tier: nodeapp: flannel
spec:selector:matchLabels:app: flanneltemplate:metadata:labels:tier: nodeapp: flannelspec:affinity:nodeAffinity:requiredDuringSchedulingIgnoredDuringExecution:nodeSelectorTerms:- matchExpressions:- key: beta.kubernetes.io/osoperator: Invalues:- linux- key: beta.kubernetes.io/archoperator: Invalues:- s390xhostNetwork: truetolerations:- operator: Existseffect: NoScheduleserviceAccountName: flannelinitContainers:- name: install-cniimage: quay.io/coreos/flannel:v0.11.0-s390xcommand:- cpargs:- -f- /etc/kube-flannel/cni-conf.json- /etc/cni/net.d/10-flannel.conflistvolumeMounts:- name: cnimountPath: /etc/cni/net.d- name: flannel-cfgmountPath: /etc/kube-flannel/containers:- name: kube-flannelimage: quay.io/coreos/flannel:v0.11.0-s390xcommand:- /opt/bin/flanneldargs:- --ip-masq- --kube-subnet-mgrresources:requests:cpu: "100m"memory: "50Mi"limits:cpu: "100m"memory: "50Mi"securityContext:privileged: falsecapabilities:add: ["NET_ADMIN"]env:- name: POD_NAMEvalueFrom:fieldRef:fieldPath: metadata.name- name: POD_NAMESPACEvalueFrom:fieldRef:fieldPath: metadata.namespacevolumeMounts:- name: runmountPath: /run/flannel- name: flannel-cfgmountPath: /etc/kube-flannel/volumes:- name: runhostPath:path: /run/flannel- name: cnihostPath:path: /etc/cni/net.d- name: flannel-cfgconfigMap:name: kube-flannel-cfg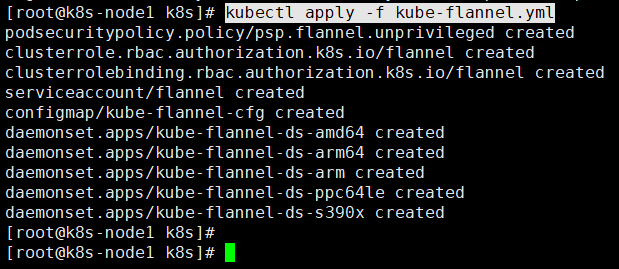
#查看所有名称空间的 pods
kubectl get pods --all-namespaces
保证flannel网卡是running状态的
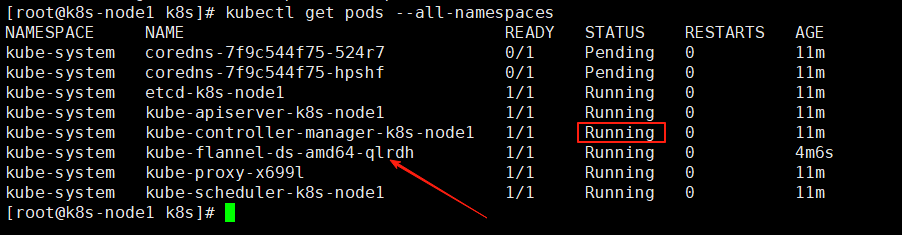
kubectl get nodes必须保证主节点是ready状态的,但是我的出现了问题 NotReady

排查思路:
查看日志
journalctl -u kubelet -f network plugin is not ready: cni config uninitialized
Aug 05 04:03:47 k8s-node1 kubelet[14500]: W0805 04:03:47.440935 14500 cni.go:202] Error validating CNI config list {
Aug 05 04:03:47 k8s-node1 kubelet[14500]: "name": "cbr0",
Aug 05 04:03:47 k8s-node1 kubelet[14500]: "cniVersion": "0.3.1",
Aug 05 04:03:47 k8s-node1 kubelet[14500]: "plugins": [
Aug 05 04:03:47 k8s-node1 kubelet[14500]: {
Aug 05 04:03:47 k8s-node1 kubelet[14500]: "type": "flannel",
Aug 05 04:03:47 k8s-node1 kubelet[14500]: "delegate": {
Aug 05 04:03:47 k8s-node1 kubelet[14500]: "hairpinMode": true,
Aug 05 04:03:47 k8s-node1 kubelet[14500]: "isDefaultGateway": true
Aug 05 04:03:47 k8s-node1 kubelet[14500]: }
Aug 05 04:03:47 k8s-node1 kubelet[14500]: },
Aug 05 04:03:47 k8s-node1 kubelet[14500]: {
Aug 05 04:03:47 k8s-node1 kubelet[14500]: "type": "portmap",
Aug 05 04:03:47 k8s-node1 kubelet[14500]: "capabilities": {
Aug 05 04:03:47 k8s-node1 kubelet[14500]: "portMappings": true
Aug 05 04:03:47 k8s-node1 kubelet[14500]: }
Aug 05 04:03:47 k8s-node1 kubelet[14500]: }
Aug 05 04:03:47 k8s-node1 kubelet[14500]: ]
Aug 05 04:03:47 k8s-node1 kubelet[14500]: }
Aug 05 04:03:47 k8s-node1 kubelet[14500]: : [failed to find plugin "flannel" in path [/opt/cni/bin]]
Aug 05 04:03:47 k8s-node1 kubelet[14500]: W0805 04:03:47.441004 14500 cni.go:237] Unable to update cni config: no valid networks found in /etc/cni/net.d
Aug 05 04:03:52 k8s-node1 kubelet[14500]: E0805 04:03:52.439440 14500 kubelet.go:2183] Container runtime network not ready: NetworkReady=false reason:NetworkPluginNotReady message:docker: network plugin is not ready: cni config uninitialized
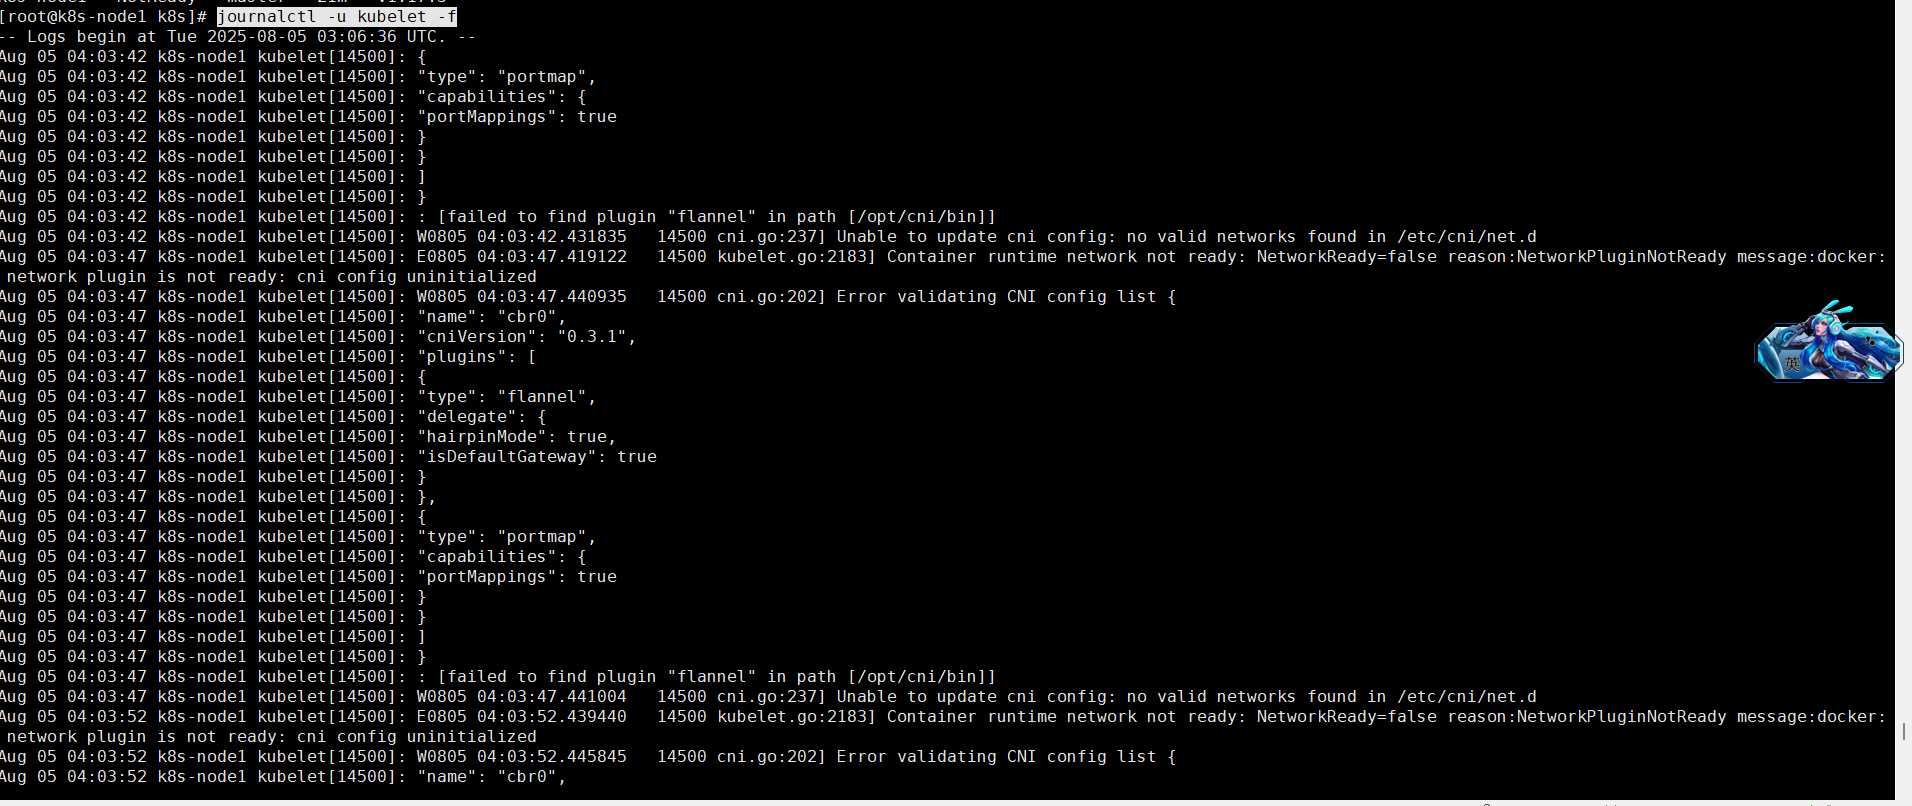
重点信息:[failed to find plugin "flannel" in path [/opt/cni/bin]]
它在 /opt/cni/bin 少了一个flannel插件
于是下载插件 github开了加速器也下的非常慢,我实在等不及找了个gitcode
github地址:https://github.com/containernetworking/plugins/releases/tag/v0.8.6
GitCode - 全球开发者的开源社区,开源代码托管平台
下载后上传到虚拟机解压
tar zxvf cni-plugins-linux-amd64-v0.8.6.tgz
cp flannel /opt/cni/bin/
[root@k8s-node1 home]# ls
cni-plugins-linux-amd64-v0.8.6.tgz vagrant
[root@k8s-node1 home]# tar zxvf cni-plugins-linux-amd64-v0.8.6.tgz
./
./flannel
./ptp
./host-local
./firewall
./portmap
./tuning
./vlan
./host-device
./bandwidth
./sbr
./static
./dhcp
./ipvlan
./macvlan
./loopback
./bridge
[root@k8s-node1 home]# ls
bandwidth dhcp host-device loopback ptp tuning
bridge firewall host-local macvlan sbr vagrant
cni-plugins-linux-amd64-v0.8.6.tgz flannel ipvlan portmap static vlan
[root@k8s-node1 home]# cp flannel /opt/cni/bin/
[root@k8s-node1 home]# kubectl get nodes
NAME STATUS ROLES AGE VERSION
k8s-node1 Ready master 33m v1.17.3
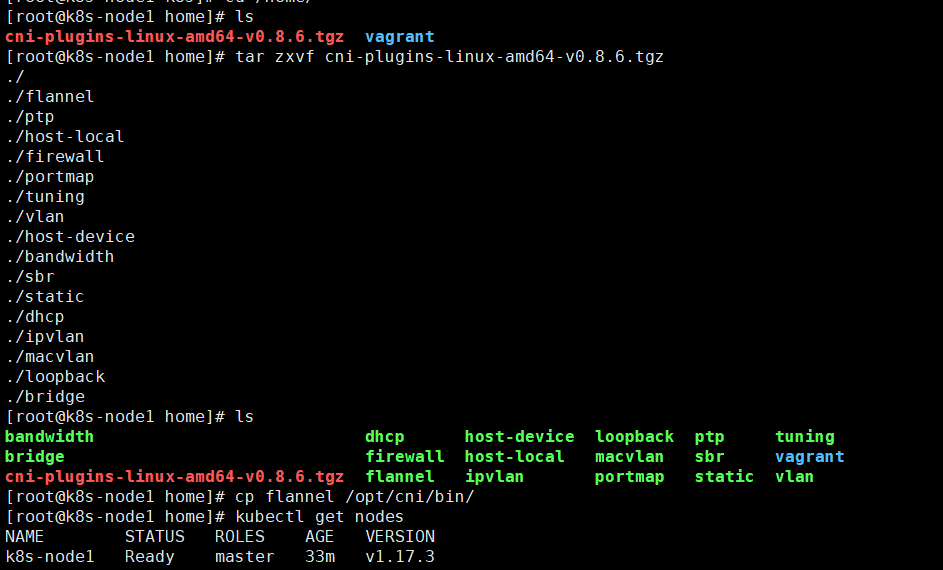
这时候再去看主节点也是Ready状态了
参考的博客:failed to find plugin “flannel” in path [/opt/cni/bin],k8sNotReady解决方案_error validating cni config & {cbr} failed to find-CSDN博客
3、加入 Kubernetes Node
两个从节点执行加入主节点命令,这个也是我们初始化主节点的时候返回回来的
kubeadm join 10.0.2.6:6443 --token 4vhyc3.6x3preu255cq5o5j \
>     --discovery-token-ca-cert-hash sha256:4bc00186f35018462f18d65e27a1a45550cda8e289d1c008ca5165985e7de2a5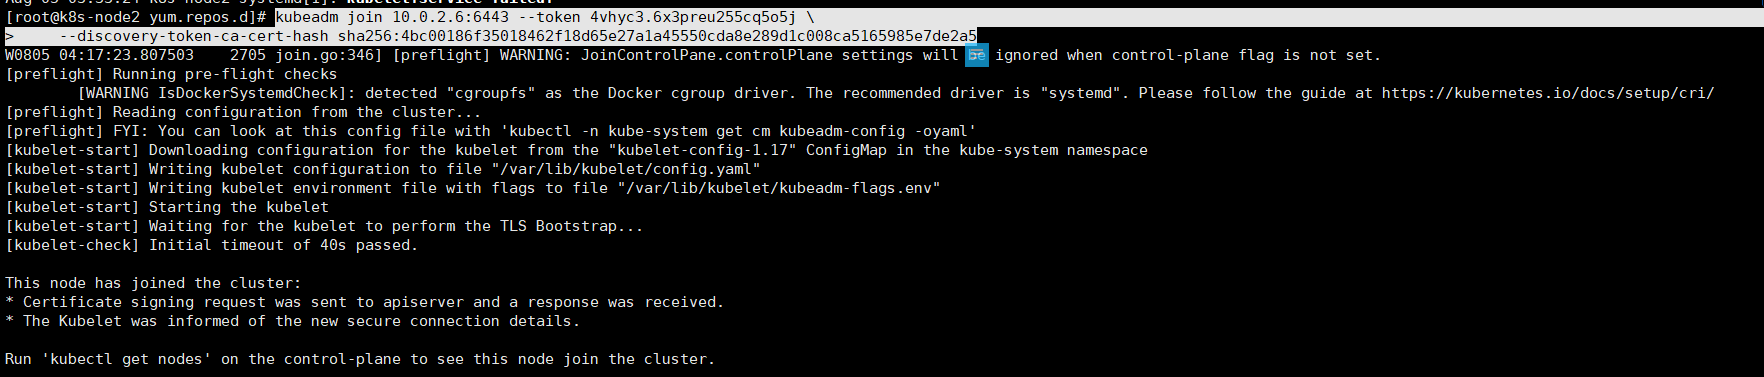
都加入成功后去主节点查看所有的node状态是ready就是成功,这里notready,就要重复上面主节点复制这个插件到 /opt/cni/bin/
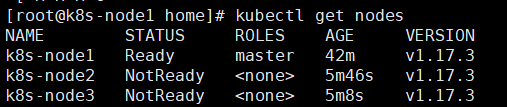

到此集群安装完毕