昇思学习营-开发版-模型推理和性能优化
模型推理:
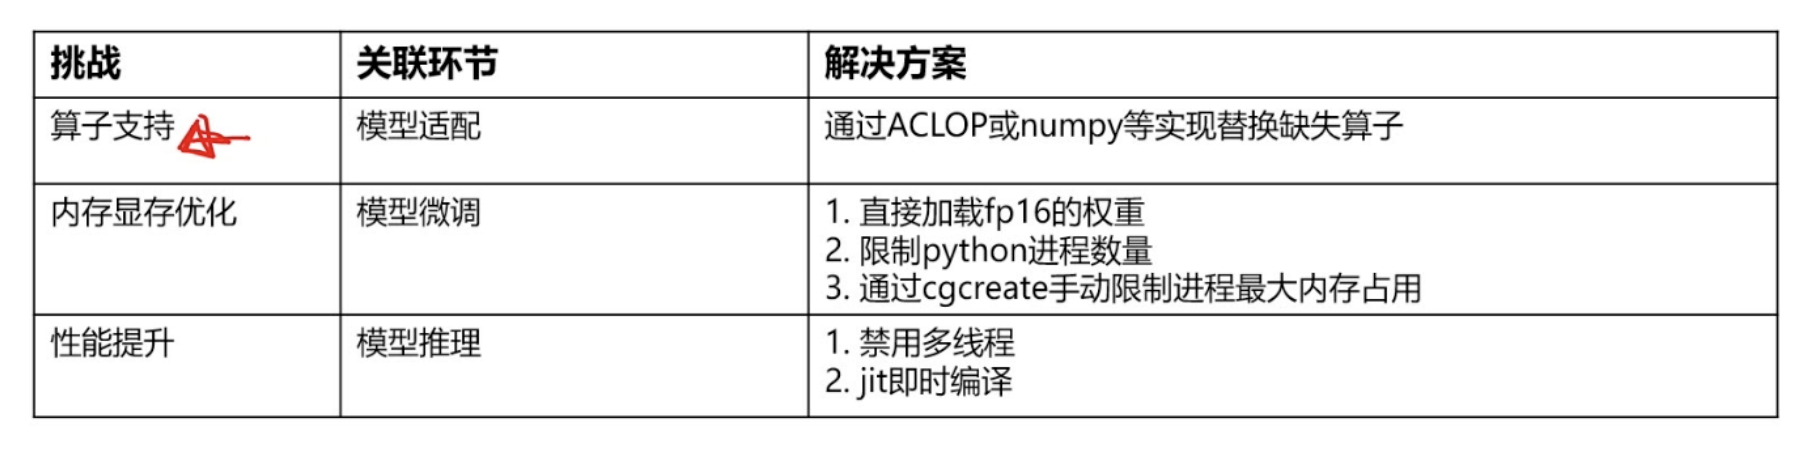
性能测试中,可以通过export INFERNCE_TIME_RECORD=True获取每个token的推理时长和平均时长。
模型推理
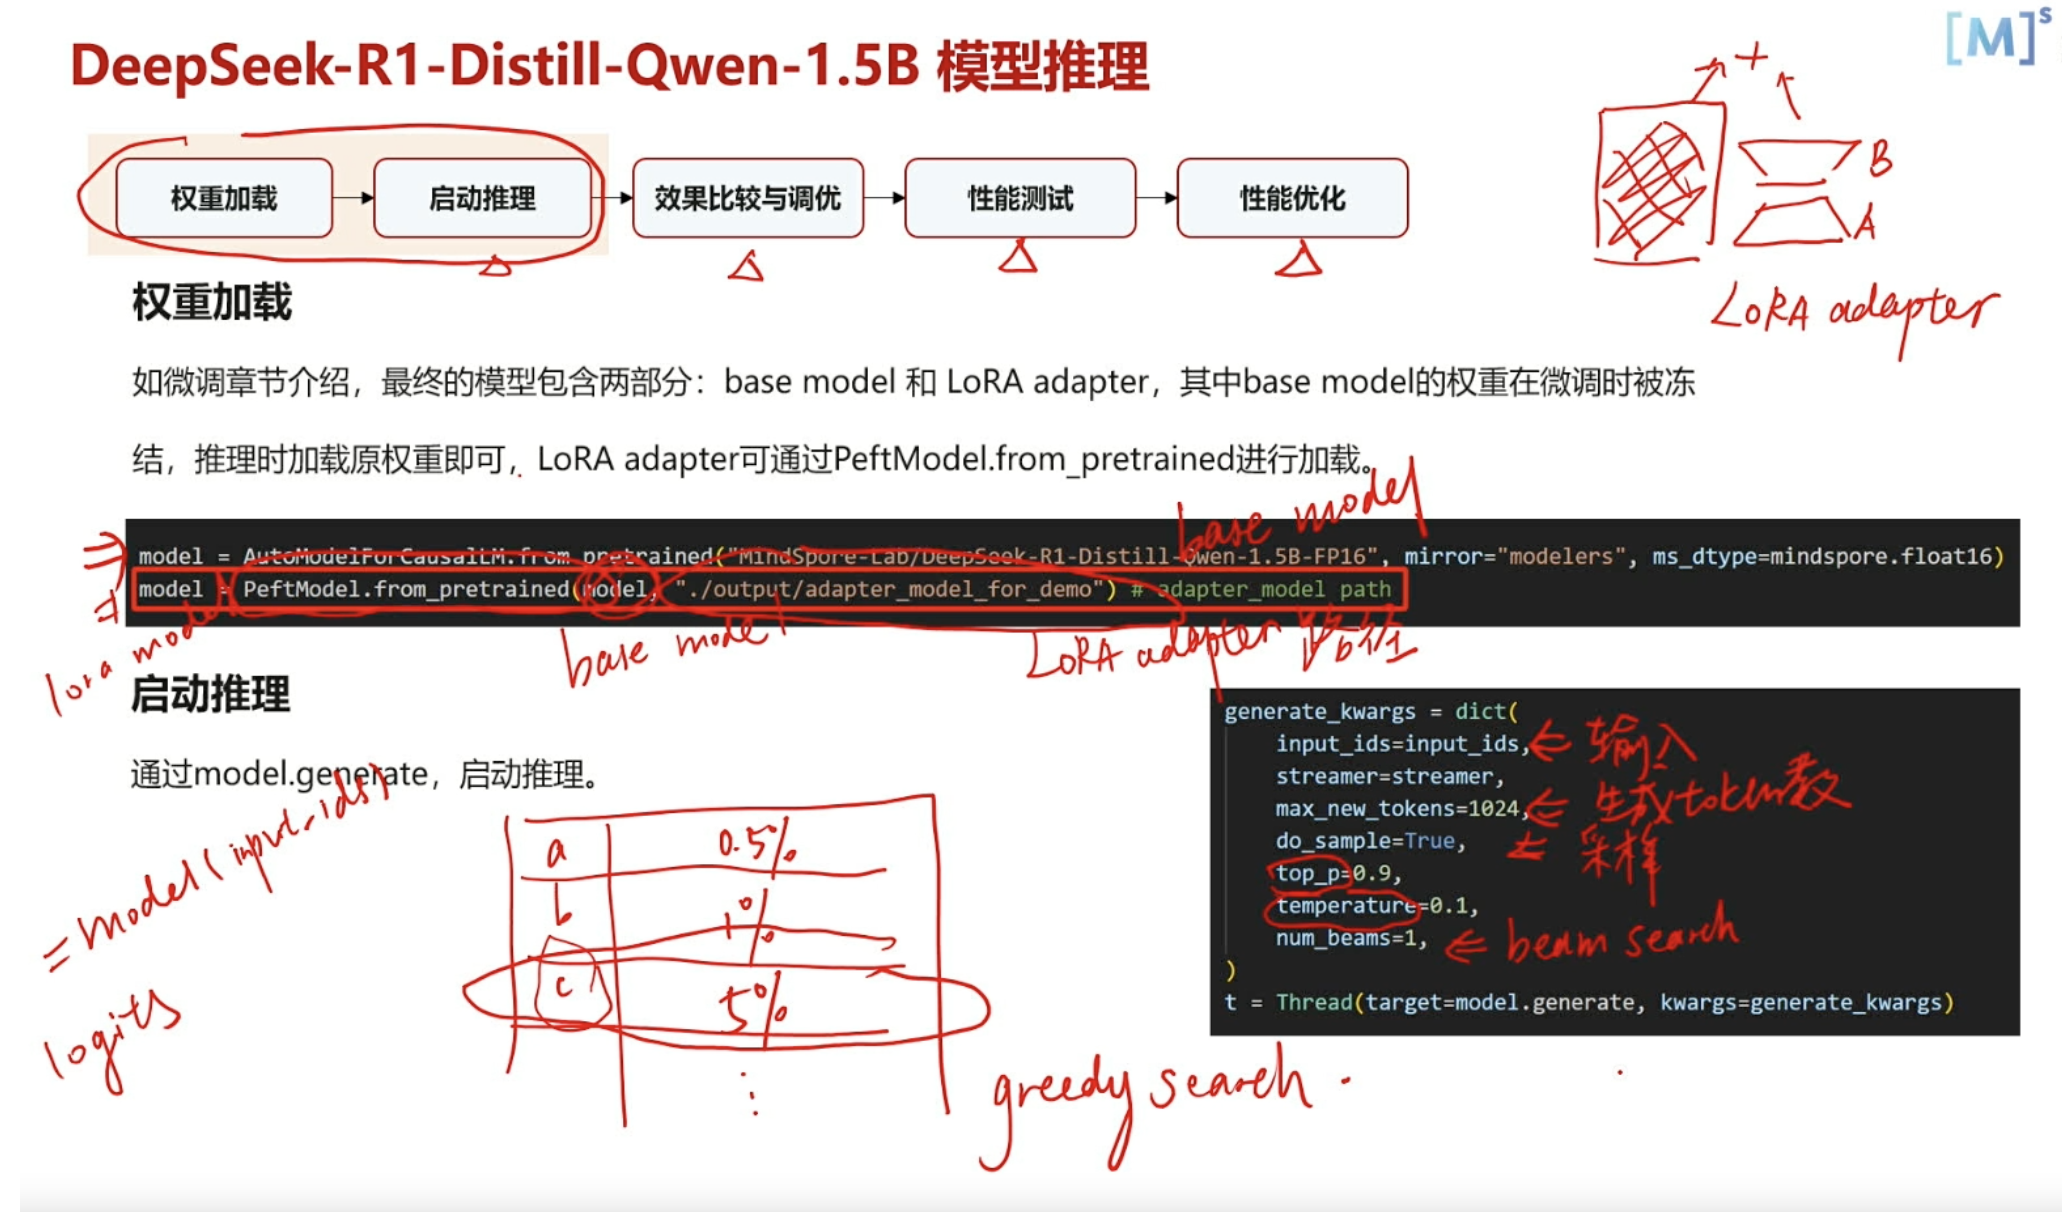
本章节将介绍如何对 DeepSeek-R1-Distill-Qwen-1.5B 模型进行推理部署,并构建一个可交互的对话机器人,以提升模型的应用性与用户体验。
%%capture captured_output
# 实验环境已经预装了mindspore==2.6.0,如需更换mindspore版本,可更改下面 MINDSPORE_VERSION 变量
!pip uninstall mindspore -y
%env MINDSPORE_VERSION=2.6.0
!pip install https://ms-release.obs.cn-north-4.myhuaweicloud.com/${MINDSPORE_VERSION}/MindSpore/unified/aarch64/mindspore-${MINDSPORE_VERSION}-cp39-cp39-linux_aarch64.whl --trusted-host ms-release.obs.cn-north-4.myhuaweicloud.com -i https://pypi.tuna.tsinghua.edu.cn/simple# 查看当前 mindspore 版本
!pip show mindspore%%capture captured_output
# 安装mindnlp 0.4.1 版本
!pip uninstall mindnlp -y
!pip install https://xihe.mindspore.cn/coderepo/web/v1/file/MindSpore/mindnlp/main/media/mindnlp-0.4.1-py3-none-any.whl
from mindnlp.transformers import AutoModelForCausalLM, AutoTokenizer
from mindnlp.transformers import TextIteratorStreamer
from mindnlp.peft import PeftModel
from threading import Thread# 开启同步,在出现报错,定位问题时开启
# mindspore.set_context(pynative_synchronize=True)# Loading the tokenizer and model from Modelers's model hub.
tokenizer = AutoTokenizer.from_pretrained("MindSpore-Lab/DeepSeek-R1-Distill-Qwen-1.5B-FP16", mirror="modelers")
# 设置pad_token为eos_token
if tokenizer.pad_token is None:tokenizer.pad_token = tokenizer.eos_token
model = AutoModelForCausalLM.from_pretrained("MindSpore-Lab/DeepSeek-R1-Distill-Qwen-1.5B-FP16", mirror="modelers")
# adapter_model path
# model = PeftModel.from_pretrained(model, "./output/DeepSeek-R1-Distill-Qwen-1.5B/adapter_model_for_demo/")system_prompt = "你是一个智能聊天机器人,以最简单的方式回答用户问题"def build_input_from_chat_history(chat_history, msg: str):messages = [{'role': 'system', 'content': system_prompt}]for info in chat_history:role, content = info['role'], info['content']messages.append({'role': role, 'content': content})messages.append({'role': 'user', 'content': msg})return messagesdef inference(message, history):messages = build_input_from_chat_history(history, message)input_ids = tokenizer.apply_chat_template(messages,add_generation_prompt=True,return_tensors="ms",tokenize=True)streamer = TextIteratorStreamer(tokenizer, timeout=300, skip_prompt=True, skip_special_tokens=True)generate_kwargs = dict(input_ids=input_ids,streamer=streamer,max_new_tokens=1024,use_cache=True,)t = Thread(target=model.generate, kwargs=generate_kwargs)t.start() # Starting the generation in a separate thread.partial_message = ""for new_token in streamer:partial_message += new_tokenprint(new_token, end="", flush=True)messages.append({'role': 'assistant', 'content': partial_message})return messages[1:]import os
import platformos_name = platform.system()
clear_command = 'cls' if os_name == 'Windows' else 'clear'
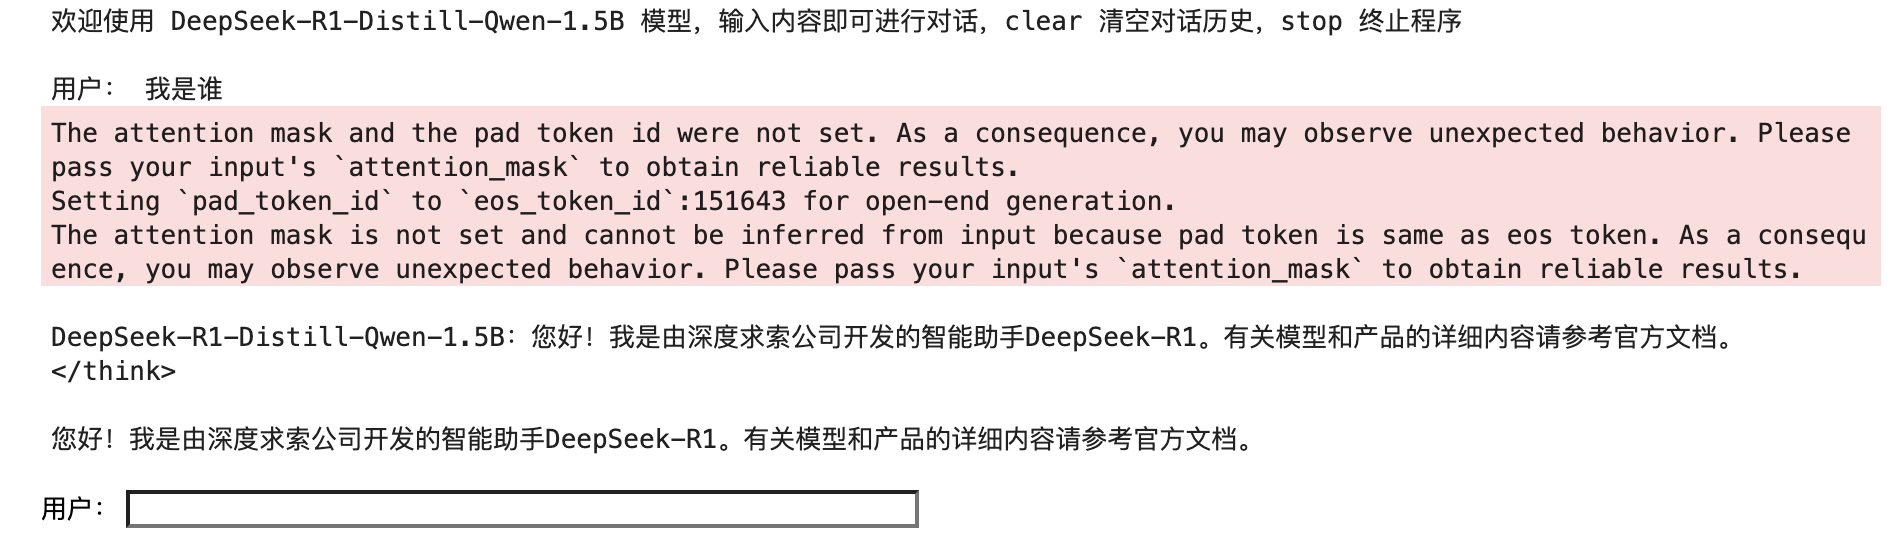
welcome_prompt = '欢迎使用 DeepSeek-R1-Distill-Qwen-1.5B 模型,输入内容即可进行对话,clear 清空对话历史,stop 终止程序'
print(welcome_prompt)
history = []
while True:query = input("\n用户:")if query.strip() == "stop":breakif query.strip() == "clear":os.system(clear_command)print(welcome_prompt)continueprint("\nDeepSeek-R1-Distill-Qwen-1.5B:", end="")history = inference(query, history)print("")运行结果为:

推理JIT优化
本节介绍如何利用 MindSpore 的 JIT(Just-In-Time)编译技术,对 DeepSeek-R1-Distill-Qwen-1.5B 模型进行推理优化。通过开启 JIT 编译,降低单次推理耗时,从而提升对话响应速度与用户体验。 优化实践可参考示例代码:deepseek-r1-distill-qwen-1.5b-jit.py
%%capture captured_output
# 实验环境已经预装了mindspore==2.6.0,如需更换mindspore版本,可更改下面 MINDSPORE_VERSION 变量
!pip uninstall mindspore -y
%env MINDSPORE_VERSION=2.6.0
!pip install https://ms-release.obs.cn-north-4.myhuaweicloud.com/${MINDSPORE_VERSION}/MindSpore/unified/aarch64/mindspore-${MINDSPORE_VERSION}-cp39-cp39-linux_aarch64.whl --trusted-host ms-release.obs.cn-north-4.myhuaweicloud.com -i https://pypi.tuna.tsinghua.edu.cn/simple# 查看当前 mindspore 版本
!pip show mindspore%%capture captured_output
# 安装mindnlp 0.4.1 版本
!pip uninstall mindnlp -y
!pip install https://xihe.mindspore.cn/coderepo/web/v1/file/MindSpore/mindnlp/main/media/mindnlp-0.4.1-py3-none-any.whl
import mindspore
from mindnlp.transformers import AutoTokenizer, AutoModelForCausalLM, StaticCache
from mindnlp.core import ops
from mindnlp.configs import set_pyboost
import time
import numpy as np# 开启O2级别的jit优化,开启图算融合
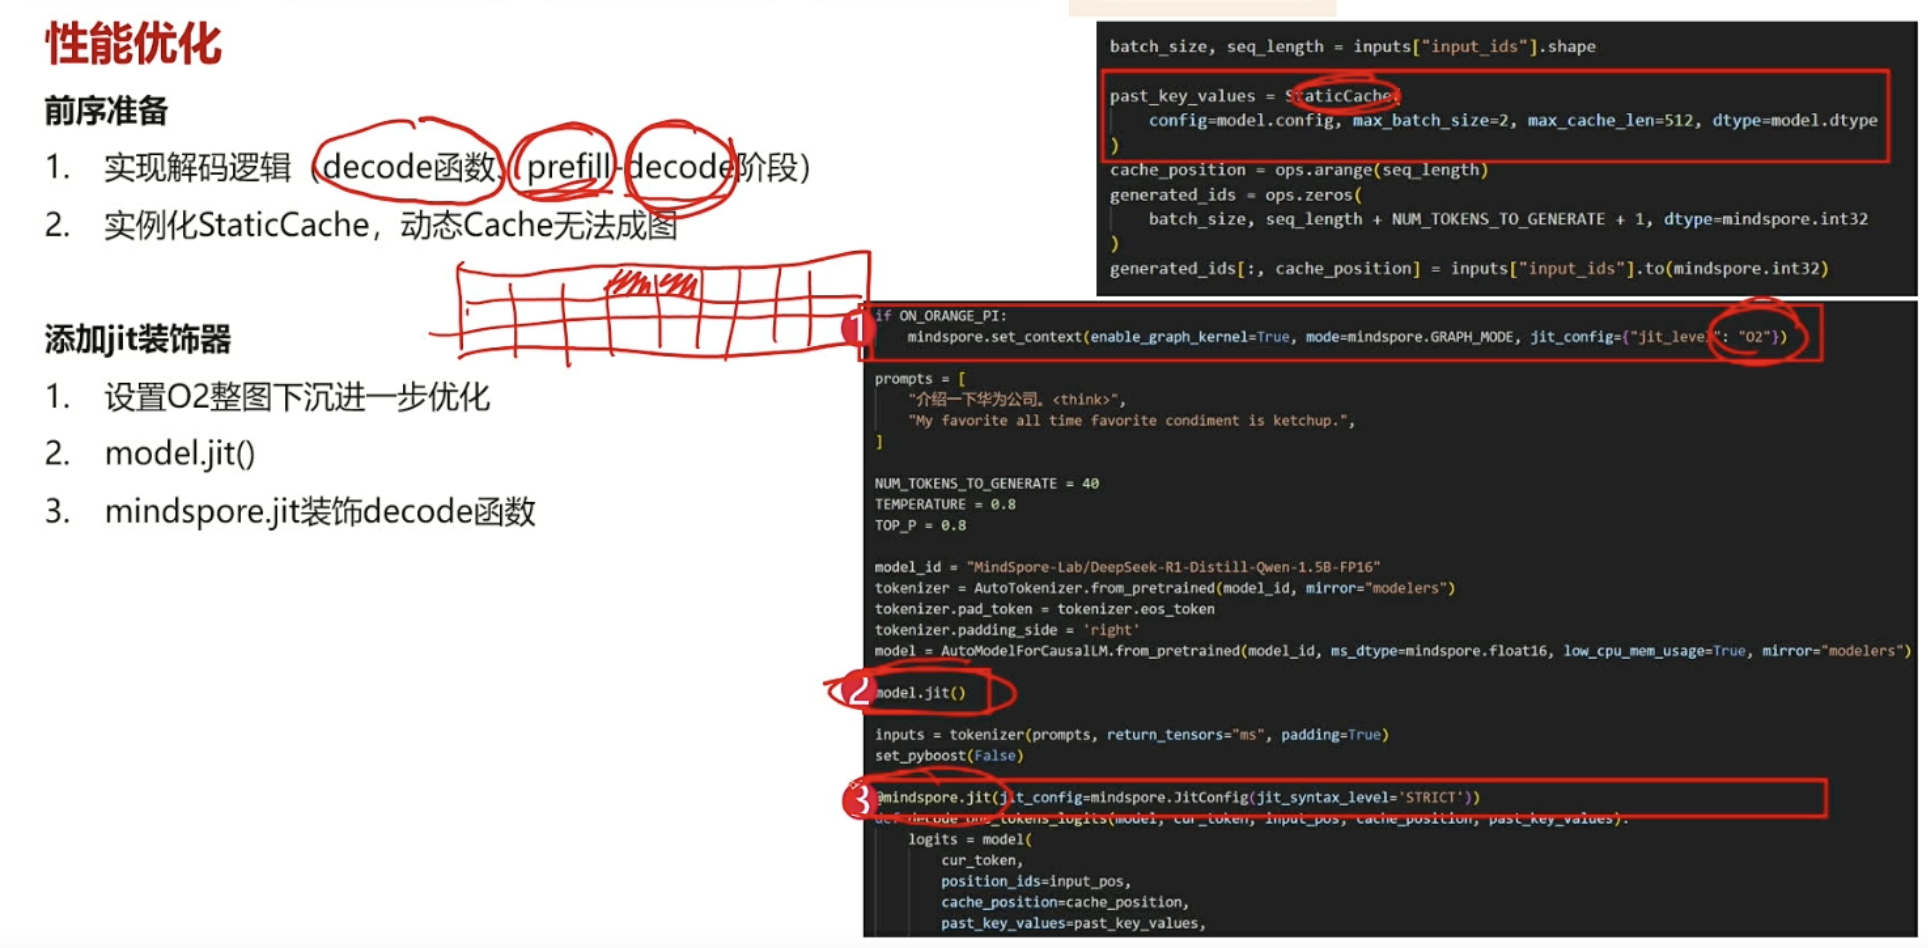
mindspore.set_context(enable_graph_kernel=True,mode=mindspore.GRAPH_MODE,jit_config={"jit_level": "O2",},
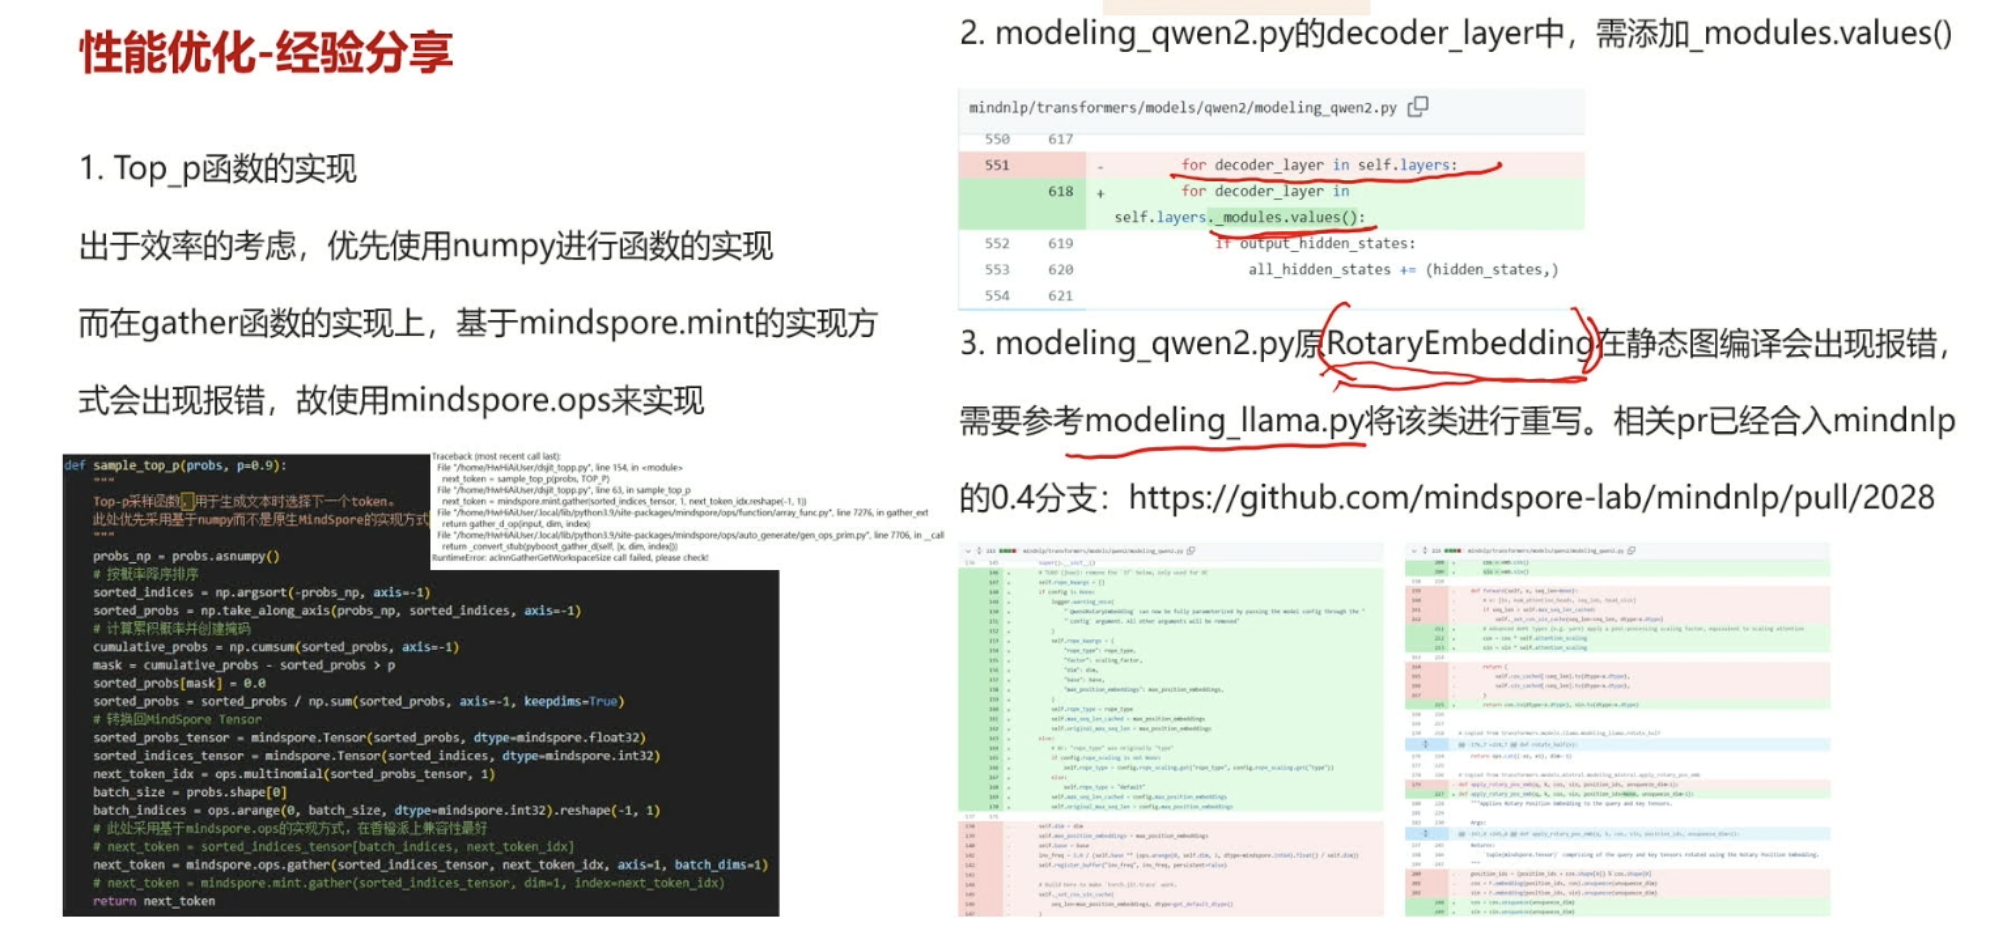
)def sample_top_p(probs, p=0.9):"""Top-p采样函数,用于生成文本时选择下一个token。此处优先采用基于numpy而不是原生MindSpore的实现方式,因为在香橙派上运行效率更高"""probs_np = probs.asnumpy()# 按概率降序排序sorted_indices = np.argsort(-probs_np, axis=-1)sorted_probs = np.take_along_axis(probs_np, sorted_indices, axis=-1)# 计算累积概率并创建掩码cumulative_probs = np.cumsum(sorted_probs, axis=-1)mask = cumulative_probs - sorted_probs > psorted_probs[mask] = 0.0sorted_probs = sorted_probs / np.sum(sorted_probs, axis=-1, keepdims=True)# 转换回MindSpore Tensorsorted_probs_tensor = mindspore.Tensor(sorted_probs, dtype=mindspore.float32)sorted_indices_tensor = mindspore.Tensor(sorted_indices, dtype=mindspore.int32)next_token_idx = ops.multinomial(sorted_probs_tensor, 1)batch_size = probs.shape[0]batch_indices = ops.arange(0, batch_size, dtype=mindspore.int32).reshape(-1, 1)# 此处采用基于mindspore.ops的实现方式,在香橙派上兼容性最好# next_token = sorted_indices_tensor[batch_indices, next_token_idx]next_token = mindspore.ops.gather(sorted_indices_tensor, next_token_idx, axis=1, batch_dims=1)# next_token = mindspore.mint.gather(sorted_indices_tensor, dim=1, index=next_token_idx)return next_token# 该任务将使用DeepSeek-R1-Distill-Qwen-1.5B模型,对给定的prompt进行补齐
prompts = ["请介绍一下自己。<think>","My favorite all time favorite condiment is ketchup.",
]# 生成参数配置
NUM_TOKENS_TO_GENERATE = 40 # 每个输入要生成的token数量
TEMPERATURE = 0.8 # 温度参数(控制生成多样性)
TOP_P = 0.8 # Top-p采样阈值model_id = "MindSpore-Lab/DeepSeek-R1-Distill-Qwen-1.5B-FP16"
tokenizer = AutoTokenizer.from_pretrained(model_id, mirror="modelers")
model = AutoModelForCausalLM.from_pretrained(model_id, low_cpu_mem_usage=True, mirror="modelers")# 使用model.jit()将全图静态图化
model.jit()inputs = tokenizer(prompts, return_tensors="ms", padding=True)
set_pyboost(False)# 使用@mindspore.jit装饰器封装模型推理函数
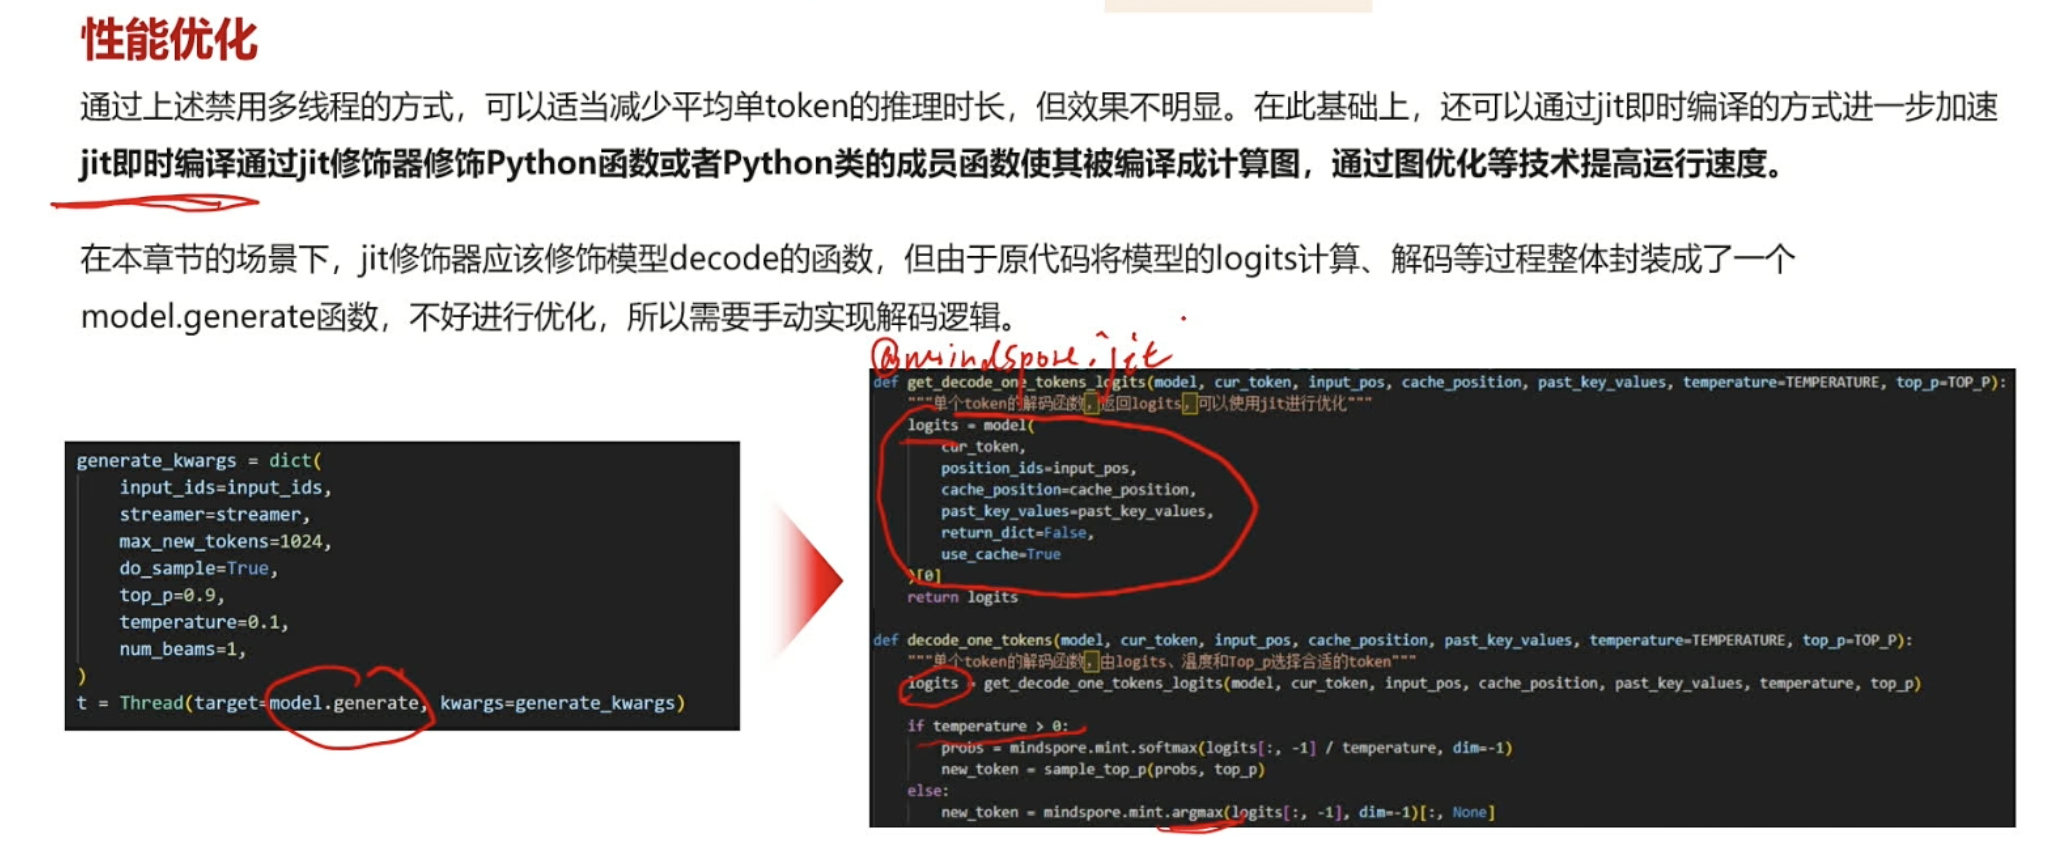
@mindspore.jit(jit_config=mindspore.JitConfig(jit_syntax_level='STRICT'))
def get_decode_one_tokens_logits(model, cur_token, input_pos, cache_position, past_key_values, temperature=TEMPERATURE, top_p=TOP_P):"""单个token的解码函数,返回logits,可以使用jit进行优化"""logits = model(cur_token,position_ids=input_pos,cache_position=cache_position,past_key_values=past_key_values,return_dict=False,use_cache=True)[0]return logitsdef decode_one_tokens(model, cur_token, input_pos, cache_position, past_key_values, temperature=TEMPERATURE, top_p=TOP_P):"""单个token的解码函数,由logits、温度和Top_p选择合适的token"""logits = get_decode_one_tokens_logits(model, cur_token, input_pos, cache_position, past_key_values, temperature, top_p)if temperature > 0:probs = mindspore.mint.softmax(logits[:, -1] / temperature, dim=-1)new_token = sample_top_p(probs, top_p)else:new_token = mindspore.mint.argmax(logits[:, -1], dim=-1)[:, None]return new_tokenbatch_size, seq_length = inputs["input_ids"].shape# 创建静态缓存(用于加速自回归生成)
past_key_values = StaticCache(config=model.config, max_batch_size=2, max_cache_len=512, dtype=model.dtype
)
cache_position = ops.arange(seq_length)
generated_ids = ops.zeros(batch_size, seq_length + NUM_TOKENS_TO_GENERATE + 1, dtype=mindspore.int32
)
generated_ids[:, cache_position] = inputs["input_ids"].to(mindspore.int32)# 初始前向传播获取首个logits
logits = model(**inputs, cache_position=cache_position, past_key_values=past_key_values,return_dict=False, use_cache=True
)[0]# 生成第一个新token
if TEMPERATURE > 0:probs = mindspore.mint.softmax(logits[:, -1] / TEMPERATURE, dim=-1)next_token = sample_top_p(probs, TOP_P)
else:next_token = mindspore.mint.argmax(logits[:, -1], dim=-1)[:, None]generated_ids[:, seq_length] = next_token[:, 0]# 自回归生成循环
cache_position = mindspore.tensor([seq_length + 1])
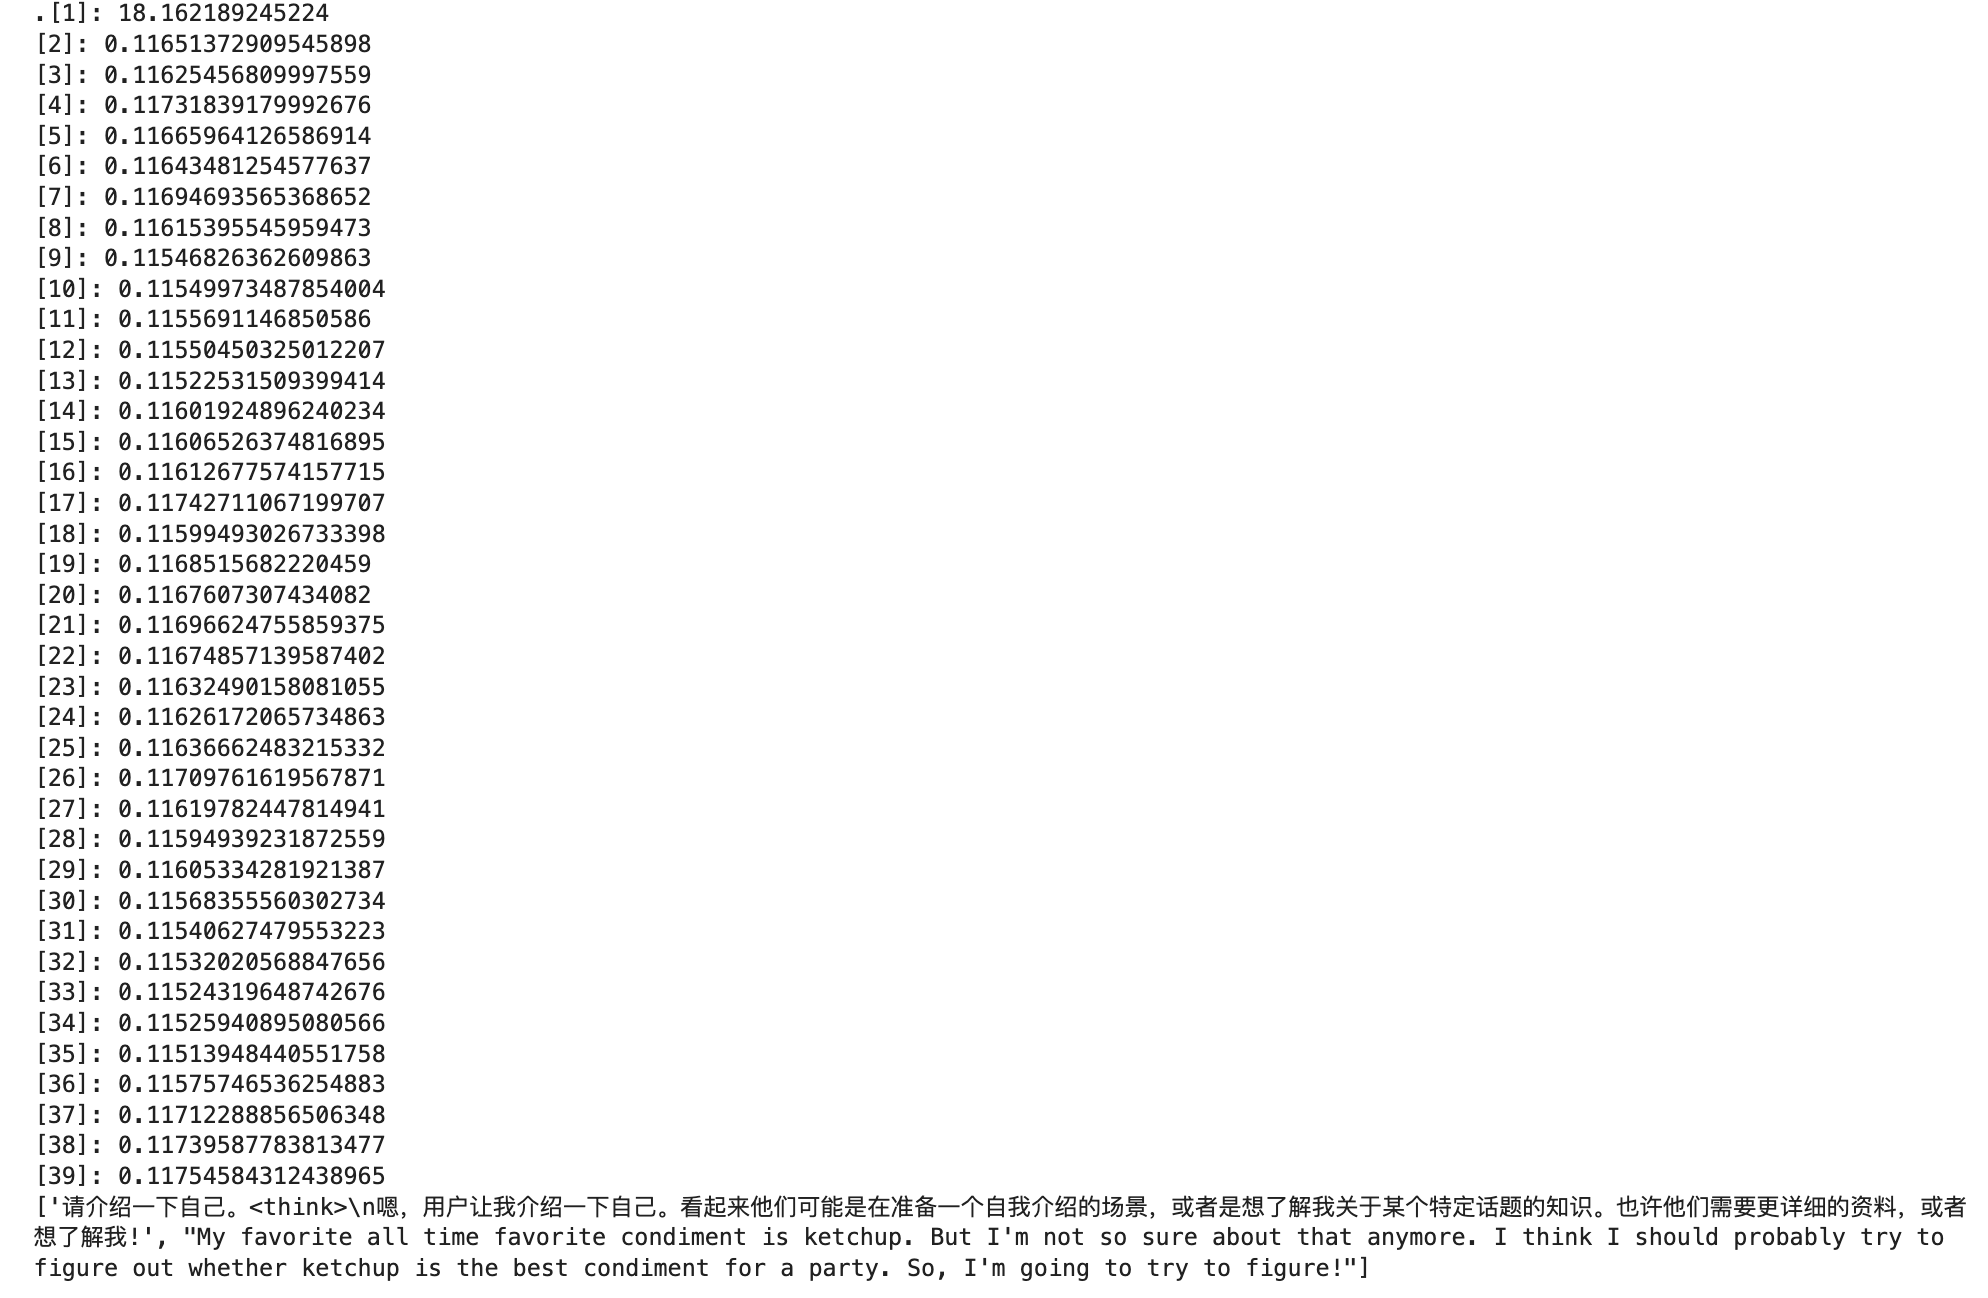
for i in range(1, NUM_TOKENS_TO_GENERATE):s = time.time()next_token = decode_one_tokens(model, next_token, None, cache_position, past_key_values)generated_ids[:, cache_position] = next_token.int()cache_position += 1t = time.time()# 打印单步生成耗时print("[%d]:" % i, t - s)text = tokenizer.batch_decode(generated_ids, skip_special_tokens=True)
print(text)运行结果为:

总结: