c++ nlohmann/json读写json文件
文章目录
- 前言
- 一、源码下载与主要用法
- 1.1 创建json对象
- 1.2 读取json元素
- 1.3 从文件读取
- 1.4 保存到文件
- 二、使用演示
- 2.1 vs2017新建控制台项目
- 2.2 要生成的json数据
- 2.3 创建json对象并写入到文件
- 2.4 从文件读入数据并显示
前言
c++ 读写json数据的开源库有很多,如jsoncpp,rapidjson,gason,yyjson。
网上有比较->查看c++json库比较。
本文介绍nlohmann/json,使用简单,支持单头文件引用。
一、源码下载与主要用法
github地址:nlohmann/json
下载后文件很多,我们只需要一个头文件:single_include/nlohmann/json.hpp
github上有非常详细的使用例子:github Examples
1.1 创建json对象
假设要创建的json对象:
{"pi": 3.141,"happy": true,"name": "Niels","nothing": null,"answer": {"everything": 42},"list": [1, 0, 2],"object": {"currency": "USD","value": 42.99}
}
使用nlohmann/json库创建如下:
方法一
// create an empty structure (null)
json j;// add a number stored as double (note the implicit conversion of j to an object)
j["pi"] = 3.141;// add a Boolean stored as bool
j["happy"] = true;// add a string stored as std::string
j["name"] = "Niels";// add another null object by passing nullptr
j["nothing"] = nullptr;// add an object inside the object
j["answer"]["everything"] = 42;// add an array stored as std::vector (using an initializer list)
j["list"] = { 1, 0, 2 };// add another object (using an initializer list of pairs)
j["object"] = { {"currency", "USD"}, {"value", 42.99} };
方法二:
json j2 = {{"pi", 3.141},{"happy", true},{"name", "Niels"},{"nothing", nullptr},{"answer", {{"everything", 42}}},{"list", {1, 0, 2}},{"object", {{"currency", "USD"},{"value", 42.99}}}
};
1.2 读取json元素
// at 和 [] 等价
float pi = j.at("pi");  // 隐式转换
bool happy = j.at("happy").template get<bool>(); // 显示转换
std::string name = j["name"];
std::string nothing = j["nothing"].dump();
int everything = j.at("answer").at("everything");std::cout << "pi:" << pi << "\thappy:" << happy<< "\tname:" << name << "\tnothing:" << nothing << "\teverything:"<< everything << std::endl;
// 输出: pi:3.141        happy:1 name:Niels      nothing:null    everything:42// 打印"list"数组  输出 list:[1,0,2]
json list = j["list"];
std::cout << "list:[";
for (int i = 0; i < list.size(); i++) {std::cout << j["list"][i];if (i < list.size()-1) std::cout << ",";
}
std::cout << "]" << std::endl;// 打印"object"对象中的元素
std::cout << j["object"]["currency"] << std::endl; // 输出: "USD"
std::cout << j.at("object").at("value") << std::endl; // 输出: 42.99
1.3 从文件读取
#include <fstream>
#include <nlohmann/json.hpp>
using json = nlohmann::json;// ...std::ifstream f("example.json");
json data = json::parse(f);
1.4 保存到文件
// write prettified JSON to another file
std::ofstream o("example.json");
o << std::setw(4) << j << std::endl;
二、使用演示
本文演示把json数据写入文件,再从文件中读取出来显示到控制台
2.1 vs2017新建控制台项目
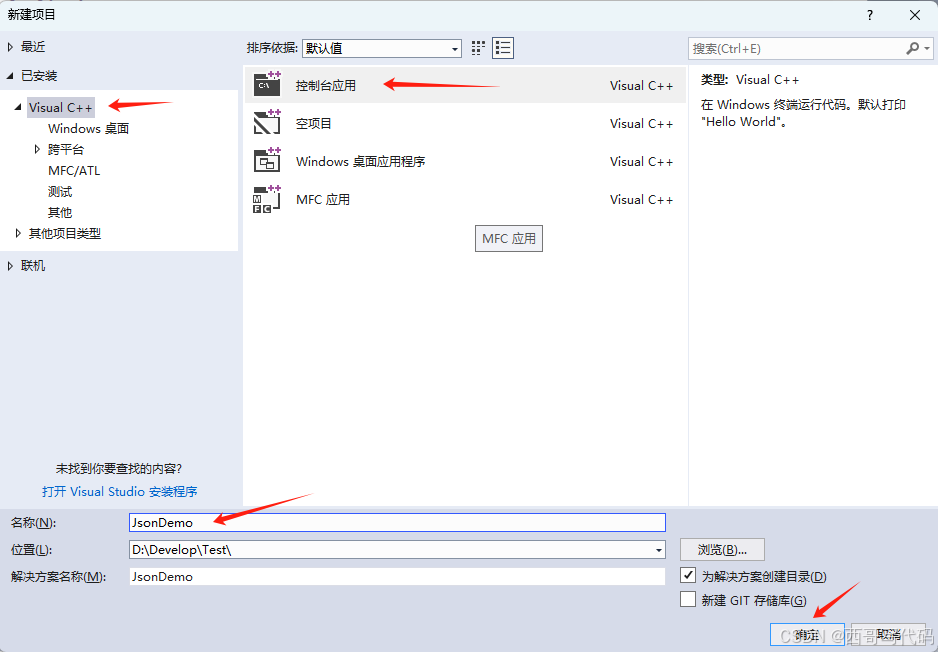
- vs2017中依次点击菜单 文件->新建->项目,打开新建项目对话框,选择"Visual C++“->“控制台应用”,填写名称"JsonDemo”,再点击"确定"
- 把下载的json.hpp直接拷贝到程序目录,在main.cpp中输入 #include “json.hpp”
main.cpp
#include <iostream>#include "json.hpp"
using json = nlohmann::json;int main()
{return 0;
}
2.2 要生成的json数据
// 对象数组
[{"age": "46Y","examItem" : "胸部X线计算机体层(CT)平扫","gender" : "男","modality" : "CT","patName" : "测试患者1","regDate" : "2025-07-29 08:01:01","studyId" : 1},{"age": "75Y","examItem" : "颅脑X线计算机体层(CT)平扫","gender" : "男","modality" : "CT","patName" : "张三json","regDate" : "2025-07-29 09:01:01","studyId" : 2},{"age": "66Y","examItem" : "胸部X线计算机体层(CT)平扫","gender" : "女","modality" : "CT","patName" : "jsonName3","regDate" : "2025-07-29 10:01:01","studyId" : 3}
]
2.3 创建json对象并写入到文件
注意:nlohmann/json字符编码为UTF-8,如果有中文且字符编码不是UTF-8,会崩溃
json j1, j2, j3, j_data;// json对象1j1 = { {"studyId", 1}, {"patName", u8"测试患者1"}, {"gender", u8"男"}, {"age", "46Y"}, {"regDate", "2025-07-29 08:01:01"}, {"modality", "CT"}, {"examItem", u8"胸部X线计算机体层(CT)平扫"} };// json对象2j2 = { {"studyId", 2}, {"patName", u8"张三json"}, {"gender", u8"男"}, {"age", "75Y"}, {"regDate", "2025-07-29 09:01:01"}, {"modality", "CT"}, {"examItem", u8"颅脑X线计算机体层(CT)平扫"} };// json对象3j3 = { {"studyId", 3}, {"patName", "jsonName3"}, {"gender", u8"女"}, {"age", "66Y"}, {"regDate", "2025-07-29 10:01:01"}, {"modality", "CT"}, {"examItem", u8"胸部X线计算机体层(CT)平扫"} };// json对象数组j_data = {j1, j2, j3};std::string appDir = GetAppPath();std::string fn = appDir + "wl.json";std::ofstream out(fn);out << j_data.dump(4) << std::endl;out.close();
2.4 从文件读入数据并显示
// 从json文件中读取数据std::ifstream in(fn);nlohmann::json j_data2 = nlohmann::json::parse(in);if (!j_data2.is_array()) {return 0;}std::cout << "检查号\t" << "姓名\t" << "性别\t" << "年龄\t" << "日期\t" << "设备\t" << "检查项目" << std::endl;for (const auto& item : j_data2) {std::cout << item["studyId"] << "\t";std::cout << UTF8toA(item["patName"]) << "\t";std::cout << UTF8toA(item["gender"]) << "\t";std::cout << UTF8toA(item["age"]) << "\t";std::cout << item["regDate"] << "\t";std::cout << UTF8toA(item["modality"]) << "\t";std::cout << UTF8toA(item["examItem"]) << "\t";std::cout << std::endl;}
打印结果 :
