Linux:线程同步与线程互斥
线程互斥
竞态条件
当多个线程(或进程)并发访问和操作同一个共享资源(如变量、文件、数据库记录等)时,最终的结果依赖于这些线程执行的相对时序(即谁在什么时候执行了哪条指令)。 由于操作系统调度线程执行的顺序具有不确定性,这种依赖时序的行为会导致程序的行为变得不可预测、不一致,甚至完全错误。这种情形叫竞态条件(Race Condition)
为了避免这种情况,需要让线程互斥地访问共享资源。
为此,引入了以下概念:
临界资源:多线程执行流共享的资源就叫做临界资源
临界区:每个线程内部,访问临界资源的代码,就叫做临界区
互斥:任何时刻,互斥保证有且只有一个执行流进入临界区,访问临界资源,通常对临界资源起保护作用
原子性:不会被任何调度机制打断的操作,该操作只有两态,要么完成,要么未完成。单独的一句汇编语句被认为是原子性的。
互斥量mutex
局部变量在线程的线程栈上,无法被其他线程直接访问,因此不会产生竞态条件,而全局变量被所有线程共享,因此会产生竞态条件,我们以一个抢票程序为例,展示通过互斥量来实现线程互斥:
五个线程对共享资源ticket进行--操作,当ticket==0时停止(模拟抢票)
#include<unistd.h>
#include<pthread.h>
#include<stdio.h>int ticket=50;void* GetTicket(void* arg)
{while(true){if(ticket>0){usleep(800);printf("第%lld号线程抢到到第%d张票\n",(long long)arg,ticket);--ticket;}else{break;}}return 0;
}int main()
{pthread_t t1,t2,t3,t4,t5; pthread_create(&t1,NULL,GetTicket,(void*)1);pthread_create(&t2,NULL,GetTicket,(void*)2);pthread_create(&t3,NULL,GetTicket,(void*)3);pthread_create(&t4,NULL,GetTicket,(void*)4);pthread_create(&t5,NULL,GetTicket,(void*)5);pthread_join(t1,NULL);pthread_join(t2,NULL);pthread_join(t3,NULL);pthread_join(t4,NULL);pthread_join(t5,NULL);return 0;
}
可以看到运行结果并不理想:当ticket小于0时还在输出
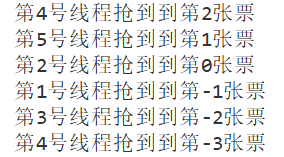
其原因在于,if(ticket>0)到打印ticket的值这一段并不是一个原子性操作,当线程在ticket>0时进行了if判断,随后可能切换到其他线程执行--ticket操作,等到线程切换回来时就会打印出负数。
概括的讲,ticket全局变量作为线程间的共享资源,线程应该互斥地对其进行修改(或者说线程间对其进行的修改操作应该是原子性的),否则就会因代码执行顺序造成各种问题
为了解决这个问题,我们使用互斥量mutex实现线程互斥:
#include<unistd.h>
#include<pthread.h>
#include<stdio.h>int ticket=50;
pthread_mutex_t mutex=PTHREAD_MUTEX_INITIALIZER;void* GetTicket(void* arg)
{while(true){pthread_mutex_lock(&mutex);if(ticket>0){printf("第%lld号线程抢到到第%d张票\n",(long long)arg,ticket);--ticket;pthread_mutex_unlock(&mutex);}else{pthread_mutex_unlock(&mutex);break;}usleep(1000);}return 0;
}int main()
{pthread_t t1,t2,t3,t4,t5; pthread_create(&t1,NULL,GetTicket,(void*)1);pthread_create(&t2,NULL,GetTicket,(void*)2);pthread_create(&t3,NULL,GetTicket,(void*)3);pthread_create(&t4,NULL,GetTicket,(void*)4);pthread_create(&t5,NULL,GetTicket,(void*)5);pthread_join(t1,NULL);pthread_join(t2,NULL);pthread_join(t3,NULL);pthread_join(t4,NULL);pthread_join(t5,NULL);return 0;
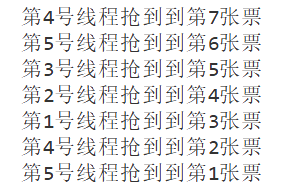
}抢票程序运行结果正确:
下面正式解释mutex相关接口和实现原理:
相关接口
Linux下mutex的数据类型为pthread_mutex_t,使用前需要初始化,使用完毕需要销毁
初始化:
两种方式:
定义时初始化:
pthread_mutex_t mutex = PTHREAD_MUTEX_INITIALIZER调用函数完成初始化:
int pthread_mutex_init(pthread_mutex_t *restrict mutex, const
pthread_mutexattr_t *restrict attr);
mutex:要初始化的互斥量
attr:设为NULL即可
销毁:
int pthread_mutex_destroy(pthread_mutex_t *mutex);
注意:
使⽤ PTHREAD_ MUTEX_ INITIALIZER 初始化的互斥量不需要销毁
不要销毁⼀个已经加锁的互斥量
已经销毁的互斥量,要确保后⾯不会有线程再尝试加锁
互斥量加锁和解锁
int pthread_mutex_lock(pthread_mutex_t *mutex);
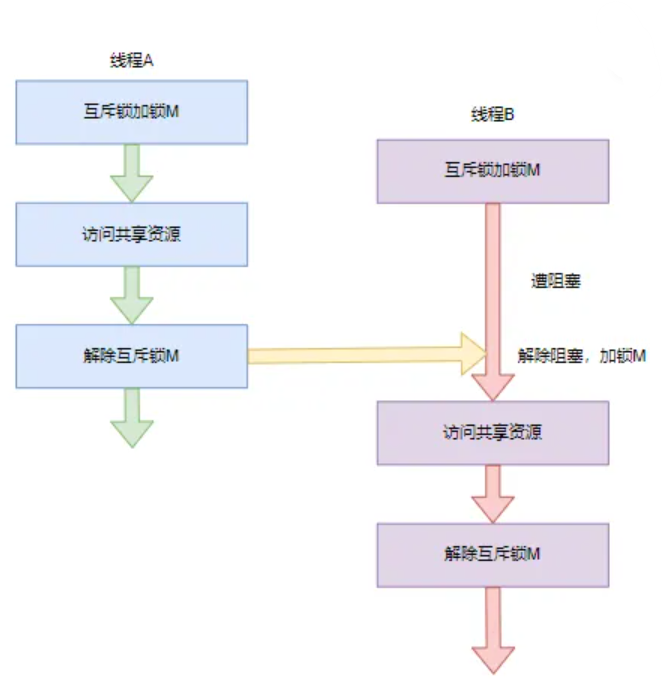
int pthread_mutex_unlock(pthread_mutex_t *mutex);调⽤ pthread_ lock 时,可能有以下两种情况:
情况1:互斥量处于未锁状态,该函数会将互斥量锁定,继续执行后面的代码
情况2:其他线程已经锁定互斥量,或者存在其他线程同时申请互斥量,但没有竞争到互斥量,那么线程会陷⼊阻塞状态,等待互斥量解锁后再次试图申请互斥量。
总结使用mutex的方法:
首先定义一个能被多线程共享的mutex变量(全局变量或静态变量),当访问共享资源时加锁,访问结束后解锁
实现原理
了解了mutex的使用方法后,容易产生一个疑惑,对于全局变量这种线程间共享资源,我们需要定义一个mutex对其进行保护,实现原子性的访问,可是mutex本身同样是一个全局变量,多线程同样要对其进行共享访问,这就意味着其加锁解锁操作本身也必须是原子性的(不会被操作系统的调度机制打断),而这又是怎么实现的?
这就需要探究其实现原理:
可以看到,lock函数首先将0赋值给了一个寄存器,该寄存器内容属于线程上下文,不会被其他线程访问到,随后执行xchgb操作,该操作是一个硬件指令,含义为交换后面的两个操作数,也就是交换寄存器中的值(0)和mutex(mutex是一个共享内容),若寄存器中的内容>0则执行完毕,否则将线程挂起等待,到被唤醒时再次回到lock开头。
整个lock函数每次执行只访问了一次mutex,因此是原子性的。
同理unlock中也只访问了一次mutex,因此是原子性的
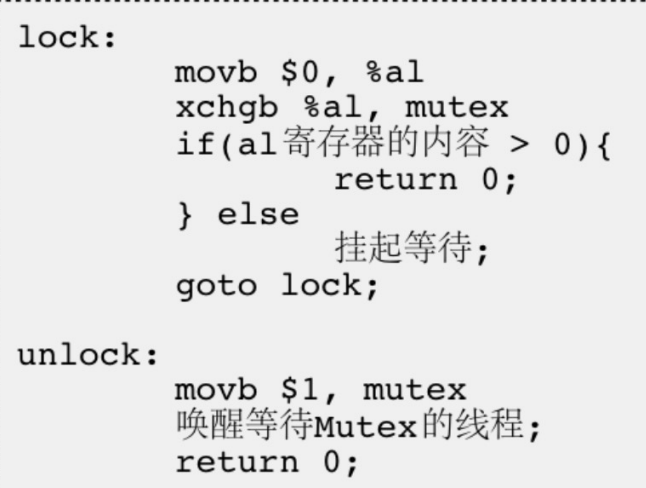
总的来说,lock和unlock的实现思路就是只访问一次内存中的mutex变量,其余操作(如判断)则通过寄存器进行,而寄存器属于线程上下文,不会受到线程调度的影响,因此整体来看lock和unlock函数是原子性的
而从线程lock函数后到unlock函数之前,这期间该线程不会访问mutex,此时当其他线程执行lock函数时,只能将其赋值为0(此前mutex已经是0),相当于其他线程对mutex是只读不写的,这样总体看来,在一个线程执行lock函数到unlock函数期间,没有任何一个线程对mutex进行修改操作,这样整个操作就是原子性的了
RALL风格的锁
在理解了mutex的原理后,我们在使用锁时可能会觉得操作太繁琐,要手动的初始化,销毁,加锁,解锁。有没有一种方式,使得我们不用手动的初始化和销毁;只需要手动加锁,即可自动解锁呢。
这就不得不提的RAII风格(获取即是初始化)了。其实现思路在于通过管理对象的生命周期来完成相应的操作。
这里给出RAII风格的互斥锁的实现:
LockGuard.h
#pragma once
#include<pthread.h>class Mutex
{
public:Mutex(const Mutex&)=delete;const Mutex& operator=(const Mutex&)=delete;Mutex(){pthread_mutex_init(&_mutex,NULL);}~Mutex(){pthread_mutex_destroy(&_mutex);}void Lock(){pthread_mutex_lock(&_mutex);}void Unlock(){pthread_mutex_unlock(&_mutex);}pthread_mutex_t* GetMutex(){return &_mutex;}
private:pthread_mutex_t _mutex;
};class LockGuard
{
public:LockGuard(Mutex& mutex):_mutex(mutex){_mutex.Lock();}~LockGuard(){_mutex.Unlock();}
private:Mutex& _mutex;
};
使用时,先定义mutex,加锁时定义Lockguard对象,该对象析构时解锁
线程同步
我们已经了解了线程如何互斥地运行,但很多时候,线程的运行不仅应该是互斥地,还应符合一定的先后顺序,这就是线程同步。
实现线程同步有两种方式:使用条件变量/信号量,为了更好的展示其作用,我们稍后会引入一个具体场景
条件变量cond
条件变量的数据类型为pthread_cond_t,与mutex一样需要进行初始化和销毁
初始化:
pthread_cond_t cond = PTHREAD_COND_INITIALIZER;或者:
int pthread_cond_init(pthread_cond_t *restrict cond,const pthread_condattr_t
*restrict attr);
cond:要初始化的条件变量
attr:设为NULL即可
销毁:
int pthread_cond_destroy(pthread_cond_t *cond)等待:
int pthread_cond_wait(pthread_cond_t *restrict cond,pthread_mutex_t *restrict
mutex);
cond:要在这个条件变量上等待
mutex:等待期间释放该互斥量,恢复后尝试获取该互斥量
调用该函数会释放指定的互斥锁,并使当前线程阻塞,直到其他线程通过 pthread_cond_signal 或pthread_cond_broadcast函数唤醒。当线程唤醒后,pthread_cond_wait函数会再次获取互斥锁。
唤醒该条件变量上的所有线程/一个线程:
int pthread_cond_broadcast(pthread_cond_t *cond);
int pthread_cond_signal(pthread_cond_t *cond);
条件变量简单封装
#pragma once
#include"LockGuard.h"class Cond
{
public:Cond(){pthread_cond_init(&_cond,NULL);}~Cond(){pthread_cond_destroy(&_cond);}void Wait(Mutex& mutex){pthread_cond_wait(&_cond,mutex.GetMutex());}void Notify(){pthread_cond_signal(&_cond);}void NotifyAll(){pthread_cond_broadcast(&_cond);}
private:pthread_cond_t _cond;
};
信号量
依赖头文件:
#include<semaphore.h>信号量数据类型为sem_t,同样需要初始化和销毁:
初始化
int sem_init(sem_t *sem, int pshared, unsigned int value);pshared:0表⽰线程间共享,⾮零表⽰进程间共享
value:信号量初始值
销毁
int sem_destroy(sem_t *sem);等待信号量,会将信号量的值减1当信号量为0时陷入阻塞状态,直到信号量大于0时恢复并再次尝试对信号量减一
int sem_wait(sem_t *sem); 发布信号量,将信号量值加1。
int sem_post(sem_t *sem);生产者与消费者模型
生产者消费者模式是通过一个容器来解决生产者和消费者的强耦合问题。生产者和消费者彼此之间不直接通讯,而通过阻塞队列来进行通讯,所以生产者生产完数据之后不用等待消费者处理,直接扔给阻塞队列,消费者不找生产者要数据,而是直接从阻塞队列里取,阻塞队列就相当于一个缓冲区,缓解了生产者和消费者忙先不均的问题,具体规则如下:
生产者向阻塞队列里放数据,消费者从阻塞队列中取数据
如果缓冲区已经满了,则生产者线程阻塞;
如果缓冲区为空,那么消费者线程阻塞。
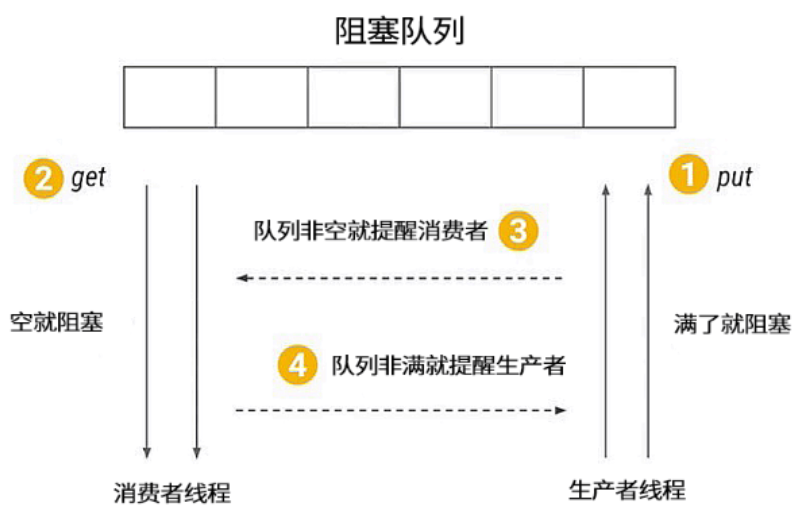
思考一下,阻塞队列作为一个临界资源,被生产者线程和消费者线程共享,因此需要互斥访问,但同时消费者和生产者还需要按照一定的顺序来访问:队列为空则只能生产者访问,队列未满则只能消费者访问,这就需要线程同步了。
下面我们分别用条件变量和信号量来实现生产者消费者模型:
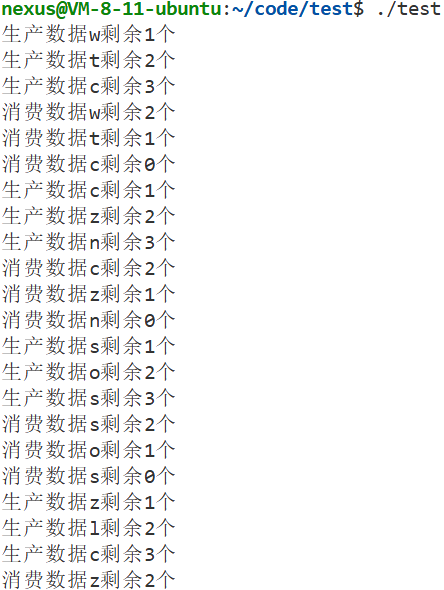
条件变量+互斥锁
#include<pthread.h>
#include<unistd.h>
#include<stdlib.h>
#include<stdio.h>
#include<queue>int count=0;template<class T>
class BlockQueue
{
private:BlockQueue(int cap=defaultnum):_cap(cap){pthread_mutex_init(&mutex,NULL);pthread_cond_init(&cond_c,NULL);pthread_cond_init(&cond_p,NULL);}
public:~BlockQueue(){pthread_mutex_destroy(&mutex);pthread_cond_destroy(&cond_c);pthread_cond_destroy(&cond_p);}static BlockQueue& instance(){static BlockQueue bq;return bq;}void Push(const T& in){pthread_mutex_lock(&mutex);while(isfull()){pthread_cond_wait(&cond_p,&mutex);}_q.emplace(in);printf("生产数据%c剩余%ld个\n",in,_q.size());pthread_cond_broadcast(&cond_c);  pthread_mutex_unlock(&mutex); }void Pop(T& out){pthread_mutex_lock(&mutex);while(isempty()){pthread_cond_wait(&cond_c,&mutex);}out=_q.front();_q.pop();printf("消费数据%c剩余%ld个\n",out,_q.size());pthread_cond_broadcast(&cond_p);pthread_mutex_unlock(&mutex); }bool isfull()const {return _q.size()>=_cap;}bool isempty()const {return _q.size()<=0;}
private:static const int defaultnum=10;std::queue<T> _q;int _cap;pthread_mutex_t mutex;pthread_cond_t cond_c;pthread_cond_t cond_p;
};#define Instance() BlockQueue<char>::instance()void* Producer(void* arg)
{while(1){Instance().Push((char)(rand()%26+'a'));sleep(1);}return nullptr;
}void* Consumer(void* arg)
{while(1){char tmp;Instance().Pop(tmp);sleep(2);}return nullptr;
}int main()
{srand(time(NULL));pthread_t p[3],c[5];for(int i=0;i<3;++i){pthread_create(p+i,NULL,Producer,NULL);}for(int i=0;i<5;++i){pthread_create(c+i,NULL,Consumer,NULL);}for(int i=0;i<3;++i){pthread_join(p[i],NULL);}for(int i=0;i<5;++i){pthread_join(c[i],NULL);}return 0;
}
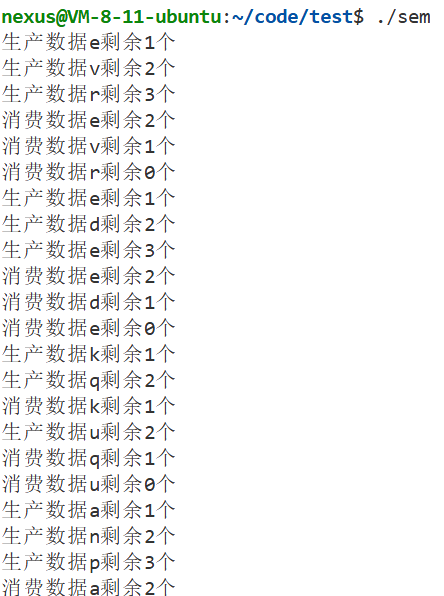
信号量+互斥锁
#include<pthread.h>
#include<semaphore.h>
#include<unistd.h>
#include<stdlib.h>
#include<stdio.h>
#include<queue>int count=0;template<class T>
class BlockQueue
{
private:BlockQueue(int cap=defaultnum):_cap(cap){pthread_mutex_init(&mutex,NULL);sem_init(&full,0,0);sem_init(&empty,0,10);}
public:~BlockQueue(){pthread_mutex_destroy(&mutex);sem_destroy(&full);sem_destroy(&empty);}static BlockQueue& instance(){static BlockQueue bq;return bq;}void Push(const T& in){sem_wait(&empty);pthread_mutex_lock(&mutex);_q.emplace(in);printf("生产数据%c剩余%ld个\n",in,_q.size()); pthread_mutex_unlock(&mutex); sem_post(&full);}void Pop(T& out){sem_wait(&full);pthread_mutex_lock(&mutex);out=_q.front();_q.pop();printf("消费数据%c剩余%ld个\n",out,_q.size());pthread_mutex_unlock(&mutex); sem_post(&empty);}bool isfull()const {return _q.size()>=_cap;}bool isempty()const {return _q.size()<=0;}
private:static const int defaultnum=10;std::queue<T> _q;int _cap;pthread_mutex_t mutex;sem_t full;sem_t empty;
};#define Instance() BlockQueue<char>::instance()void* Producer(void* arg)
{while(1){Instance().Push((char)(rand()%26+'a'));sleep(1);}return nullptr;
}void* Consumer(void* arg)
{while(1){char tmp;Instance().Pop(tmp);sleep(2);}return nullptr;
}int main()
{srand(time(NULL));pthread_t p[3],c[5];for(int i=0;i<3;++i){pthread_create(p+i,NULL,Producer,NULL);}for(int i=0;i<5;++i){pthread_create(c+i,NULL,Consumer,NULL);}for(int i=0;i<3;++i){pthread_join(p[i],NULL);}for(int i=0;i<5;++i){pthread_join(c[i],NULL);}return 0;
}
线程池
进行了线程互斥和线程同步的基本实践后,我们接下来设计一个线程池
该线程池支持日志,工作模式为:向任务队列注入任务->唤醒线程池中的线程->执行任务
(其实也是一个生产者消费者模型),下面进行分段设计,并引入一些设计模式
日志
计算机中的日志是记录系统和软件运行中发生事件的文件,主要作用是监控运行状态、记录一场信息,帮助快速定位问题并支持程序员进行问题修复。它是系统维护、故障排查和安全管理的重要工具。
日志内容包括:
时间戳
日志等级
日志内容
文件名行号
进程,线程相关id信息等。
这里,我们规定日志格式为:
[时间戳][日志等级][进程id][文件名][行号]-支持可变参数的消息内容
同时,我们还希望提供两种输出日志的方案:向控制台输出和向指定文件输出
对此我们通过策略模式来实现:
创建一个策略基类,并基于此创建策略派生类,当要调用指定策略的接口时,就用智能指针创建该对象并调用相应接口
Log.h:
#pragma once
#include<unistd.h>
#include<ctime>
#include<string>
#include<memory>
#include<filesystem>
#include<fstream>
#include<iostream>
#include"LockGuard.h"enum class LogLevel
{DEBUG,INFO,WARNING,ERROR,FATAL,
};class LogStrategy
{
public:LogStrategy()=default;virtual ~LogStrategy()=default;virtual void SyncLog(const std::string &message)=0;
};class ConsoleLogStrategy:public LogStrategy
{
public:~ConsoleLogStrategy(){}void SyncLog(const std::string &message){std::cerr<<message<<'\n';}
};class FileLogStrategy:public LogStrategy
{
public:FileLogStrategy(const std::string& dir,const std::string& filename):_dir_path_name(dir),_file_name(filename){try{std::filesystem::create_directory(_dir_path_name);}catch(const std::exception& e){std::cerr << e.what() << '\n';}}~FileLogStrategy(){}void SyncLog(const std::string &message){std::string target=_dir_path_name+'/'+_file_name;std::ofstream out(target.c_str(),std::ios::app);if(!out.is_open())return;out<<message<<'\n';out.close();}
private:std::string _dir_path_name;std::string _file_name;
};class Logger
{
private:class LogMessage{public:LogMessage(LogLevel type,const std::string& file_name,int line,Logger& logger):_current_time(GetCurrentTime()),_type(type),_pid(getpid()),_file_name(file_name),_line(line),_logger(logger){std::stringstream stringbuffer;stringbuffer<<"["<<_current_time<<"]"<<"["<<LogLevelToString(_type)<<"]"<<"["<<_pid<<"]"<<"["<<_file_name<<"]"<<"["<<_line<<"]"<<"-";_loginfo=stringbuffer.str();}~LogMessage(){LockGuard lockguard(_logger._sync_lock);if(_logger._strategy)_logger._strategy->SyncLog(_loginfo);}template<class T>LogMessage& operator<<(const T& info){std::stringstream stringbuffer;stringbuffer<<info;_loginfo+=stringbuffer.str();return *this;}private:std::string _current_time;LogLevel _type;pid_t _pid;std::string _file_name;int _line;std::string _loginfo;Logger& _logger;};
public:Logger()=default;~Logger()=default;void UseConsoleLogStrategy(){if(dynamic_cast<ConsoleLogStrategy*>(_strategy.get())!=nullptr)return;_strategy=std::make_unique<ConsoleLogStrategy>();}void UseFileLogStrategy(const std::string& dir,const std::string& file_name){if(dynamic_cast<FileLogStrategy*>(_strategy.get())!=nullptr)return;_strategy=std::make_unique<FileLogStrategy>(dir,file_name);}LogMessage operator()(LogLevel type,const std::string& file_name,int line){return LogMessage(type,file_name,line,*this);}
private:static std::string LogLevelToString(LogLevel level){switch(level){case LogLevel::DEBUG:return "Debug";case LogLevel::INFO:return "Info";case LogLevel::WARNING:return "Warning";case LogLevel::ERROR:return "Error";case LogLevel::FATAL:return "Fatal";default:return "None";}}static std::string GetCurrentTime(){time_t current_time=time(NULL);struct tm current_tm;localtime_r(¤t_time,¤t_tm);char timebuffer[64];snprintf(timebuffer,sizeof(timebuffer),"%4d-%02d-%02d-%02d-%02d-%02d",current_tm.tm_year+1900,current_tm.tm_mon+1,current_tm.tm_mday,current_tm.tm_hour,current_tm.tm_min,current_tm.tm_sec);return timebuffer;}
private:std::unique_ptr<LogStrategy> _strategy=std::make_unique<ConsoleLogStrategy>();Mutex _sync_lock;
};static Logger logger;#define LOG(type) logger(type,__FILE__,__LINE__)
inline void ENABLE_CONSOLE_LOG_STRATEGY()
{logger.UseConsoleLogStrategy();
}
inline void ENABLE_FILE_LOG_STRATEGY(const std::string& dir=std::filesystem::current_path(),const std::string& file_name="log.txt")
{logger.UseFileLogStrategy(dir,file_name);
}执行测试程序,得到结果:
#include"Log.h"int main()
{LOG(LogLevel::INFO)<<"hello,world"<<'-'<<123456<<'-'<<3.14<<'\n';return 0;
}![]()
单例模式
下面我们正式设计线程池,为了方便线程池接口的调用,我们提供了一个接口,返回一个静态线程池对象的引用:
static ThreadPool& instance(){static ThreadPool instance;return instance;}同时,将线程池的构造函数设为private,这样就不能外部构造线程池对象了,确保一个进程最多只有一个线程池对象,当然单例模式还有其他实现方式,比如这种:
class ThreadPool
{
private:static ThreadPool* p;
public:static ThreadPool* GetInstance() {if(p==nullptr)p=new ThreadPool();return p;}
};
但这种实现存在严重的线程安全问题,简单的来说就是,线程池指针本身也是一个共享资源,如果不加锁保护,可能new多个threadpool对象,造成内存泄漏,当然可以直接加锁解决,但由于调用任何线程池的接口都要先调用该接口获取线程池对象,因此该接口应设计的尽可能高效,由此得到以下版本:
只需在第一次判断指针为空时加锁new线程池对象,其余时刻只需一次判断,无需加锁。
class ThreadPool
{
private:static ThreadPool* inst;static std::mutex lock;
public:static ThreadPool* GetInstance() {if (inst == NULL) {lock.lock();if (inst == NULL) {inst = new ThreadPool();}lock.unlock();}return inst;}
};
看起来十分美好,但实际上由于编译器优化原因,很多时候编译结果并不是所见即所得,对于inst这种频繁访问的指针,在编译器优化时可能会将其放在寄存器中,每次直接从寄存器中读取,而不是内存。
而由于寄存器属于线程上下文,一个线程new了一个对象,修改了寄存器,并不会影响其他线程,这样其他线程也会new对象,造成内存泄漏。
为了解决此问题,我们又不得不用volatile关键字来禁止编译器对该变量进行优化,然而我们即使避开了寄存器,还有高速缓存造成的缓存一致性问题,这个问题与上述问题类似,同样是不太好解决的,事实上,这种双重检定的模式(DCLP)无论如何都存在安全风险,已经被淘汰使用。对于实践而言,用第一种实现是最好的。
class ThreadPool
{
private:volatile static ThreadPool* inst;static std::mutex lock;
public:static ThreadPool* GetInstance() {if (inst == NULL) {lock.lock();if (inst == NULL) {inst = new ThreadPool();}lock.unlock();}return inst;}
};最后我们给出线程池的全部代码:
Thread.h
#pragma once
#include<unistd.h>
#include<pthread.h>
#include<functional>
#include"LockGuard.h"using thread_func=std::function<void()>;std::uint32_t thread_name_count=0;
Mutex _thread_name_count_lock;class Thread
{
private:enum class ThreadStatus{THREAD_NEW,THREAD_RUNNING,THREAD_STOP};public:Thread(thread_func func):_func(func){SetName();}~Thread()=default;void SetISDetached(bool flag){is_detached=_status==ThreadStatus::THREAD_NEW&&flag;}bool Start(){int ret=pthread_create(&_id,NULL,run,this);return ret==0;}bool Join(){int ret=pthread_join(_id,NULL);return !is_detached&&ret==0;}
private:static void* run(void *obj){auto self=static_cast<Thread*>(obj);self->_status=ThreadStatus::THREAD_RUNNING;pthread_setname_np(pthread_self(),self->_name.c_str());if(self->is_detached)pthread_detach(pthread_self());if(self->_func)self->_func();return nullptr;}void SetName(){LockGuard lockguard(_thread_name_count_lock);_name="Thread-"+std::to_string(++thread_name_count);}
private:std::string _name;pthread_t _id;ThreadStatus _status=ThreadStatus::THREAD_NEW;thread_func _func=nullptr;bool is_detached=false;
};
Thread_Pool.h
#pragma once
#include<vector>
#include<queue>
#include"Log.h"
#include"Thread.h"
#include"Cond.h"using Task=std::function<void()>;class ThreadPool
{
public:static ThreadPool& instance(){static ThreadPool instance;return instance;}void Start(){is_running=true;for(auto& thread:_threads){thread.Start();LOG(LogLevel::INFO)<<"thread start";}}void Stop(){LockGuard lockguard(_mutex);is_running=false;_cond.NotifyAll();}void Wait(){for(auto& thread:_threads){thread.Join();LOG(LogLevel::INFO)<<"thread quit";}}bool Enqueue(const Task &task){bool ret=false;LockGuard lockguard(_mutex);if(is_running){_task_queue.emplace(task);if(_wait_num>0)_cond.Notify();ret=true;LOG(LogLevel::INFO)<<"添加任务";}return ret;}
private:ThreadPool(int thread_num=5):_thread_num(thread_num){for(int i=0;i<_thread_num;++i){_threads.emplace_back([this](){//线程池不运行且无任务->直接结束//线程池不运行且有任务->完成剩余任务后结束//线程池运行且无任务->休眠//线程池运行且有任务->做任务while(true){_mutex.Lock();while(is_running&&_task_queue.empty()){++_wait_num;_cond.Wait(_mutex);--_wait_num;}if(!is_running&&_task_queue.empty()){_mutex.Unlock();break;}Task task=_task_queue.front();_task_queue.pop();_mutex.Unlock();task();}});}}ThreadPool(const ThreadPool&)=delete;ThreadPool operator=(const ThreadPool&)=delete;~ThreadPool()=default;
private:int _wait_num=0;bool is_running=false;int _thread_num;std::vector<Thread> _threads;std::queue<Task> _task_queue;Mutex _mutex;//让线程有序访问任务队列Cond _cond;//任务条件变量
};#define  Instance() ThreadPool::instance()
测试程序:
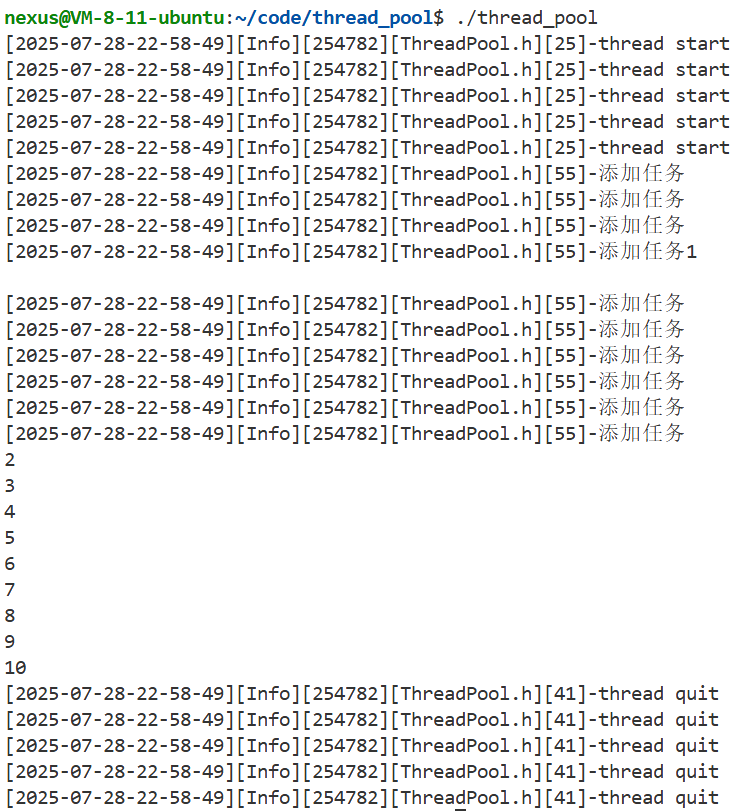
打印1到10
#include"Log.h"
#include"ThreadPool.h"Mutex mutex;
int main()
{Instance().Start();for(int i=0;i<10;++i){Instance().Enqueue([](){LockGuard lockguard(mutex);static int count=1;std::cout<<count<<'\n';++count;});}Instance().Stop();Instance().Wait();return 0;
}
执行结果: