Spring Boot 整合 MyBatis 与 Druid 数据源全流程
引言:为什么选择 Spring Boot+MyBatis+Druid?
在现代 Java 开发中,Spring Boot 以其 "约定大于配置" 的理念简化了项目搭建,MyBatis 作为轻量级 ORM 框架灵活处理数据库交互,而 Druid 作为高性能数据源提供了完善的监控和连接池管理能力。三者结合既能享受 Spring Boot 的自动配置便利,又能通过 MyBatis 灵活操作数据库,同时借助 Druid 保障数据访问的稳定性与可监控性。
一、项目初始化与依赖配置
1.1 项目结构设计
首先明确项目目录结构,遵循 Spring Boot 与 MyBatis 的最佳实践:
src/
├── main/
│   ├── java/com/qcby/springbootmybatis/
│   │   ├── config/           # 配置类(Druid、MyBatis等)
│   │   ├── entity/           # 实体类(与数据库表映射)
│   │   ├── mapper/           # MyBatis映射接口
│   │   └── SpringbootMybatisApplication.java  # 启动类
│   ├── resources/
│   │   ├── application.yaml  # 主配置文件
│   │   ├── mybatis/
│   │   │   ├── sqlMapConfig.xml  # MyBatis核心配置
│   │   │   └── mapper/        # MyBatis映射文件目录
│   │   └── static/            # 静态资源(可选)
└── test/                      # 单元测试目录
1.2 核心依赖配置(pom.xml)
Spring Boot 项目的依赖管理通过pom.xml实现,需引入以下关键依赖:
<!-- 父工程依赖,统一管理版本 -->
<parent><groupId>org.springframework.boot</groupId><artifactId>spring-boot-starter-parent</artifactId><version>2.7.18</version>
</parent><dependencies><!-- Spring Boot核心启动器 --><dependency><groupId>org.springframework.boot</groupId><artifactId>spring-boot-starter-web</artifactId></dependency><!-- MyBatis整合Spring Boot --><dependency><groupId>org.mybatis.spring.boot</groupId><artifactId>mybatis-spring-boot-starter</artifactId><version>1.3.1</version></dependency><!-- Druid数据源 --><dependency><groupId>com.alibaba</groupId><artifactId>druid</artifactId><version>1.2.20</version></dependency><!-- MySQL驱动(适配8.x版本) --><dependency><groupId>mysql</groupId><artifactId>mysql-connector-java</artifactId><scope>runtime</scope></dependency><!-- 测试依赖 --><dependency><groupId>org.springframework.boot</groupId><artifactId>spring-boot-starter-test</artifactId><scope>test</scope></dependency>
</dependencies>
依赖说明:
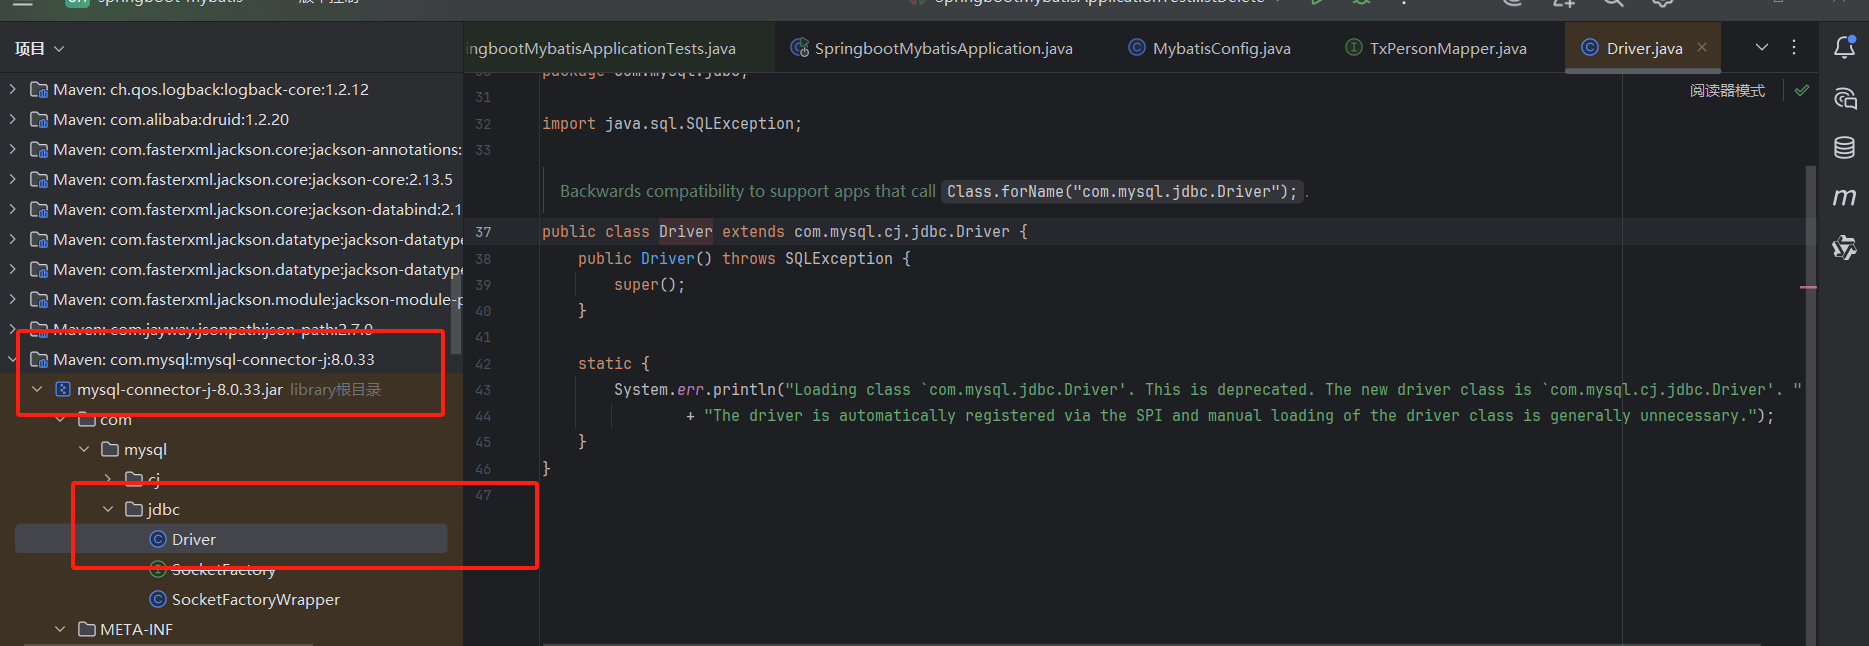
spring-boot-starter-web:提供 Spring MVC 与 Web 容器支持;mybatis-spring-boot-starter:实现 MyBatis 与 Spring Boot 的自动整合;druid:阿里巴巴开源数据源,支持连接池、监控等高级功能;mysql-connector-java:MySQL 数据库驱动,注意与数据库版本匹配(8.x 需用com.mysql.cj.jdbc.Driver)。
二、数据源配置:Druid 深度整合
2.1 Druid 数据源配置类
Druid 需要手动配置才能启用其监控、连接池等功能,创建DruidConfig.java:
package com.qcby.springbootmybatis.config;import com.alibaba.druid.pool.DruidDataSource;
import com.alibaba.druid.support.http.StatViewServlet;
import com.alibaba.druid.support.http.WebStatFilter;
import org.springframework.boot.context.properties.ConfigurationProperties;
import org.springframework.boot.web.servlet.FilterRegistrationBean;
import org.springframework.boot.web.servlet.ServletRegistrationBean;
import org.springframework.context.annotation.Bean;
import org.springframework.context.annotation.Configuration;import javax.sql.DataSource;
import java.util.HashMap;
import java.util.Map;@Configuration
public class DruidConfig {// 绑定配置文件中的数据源属性@Bean@ConfigurationProperties(prefix = "spring.datasource")public DataSource dataSource() {return new DruidDataSource();}// 配置Druid监控Servlet@Beanpublic ServletRegistrationBean<StatViewServlet> statViewServlet() {ServletRegistrationBean<StatViewServlet> bean = new ServletRegistrationBean<>(new StatViewServlet(), "/druid/*");// 监控页登录配置Map<String, String> initParams = new HashMap<>();initParams.put("loginUsername", "root");  // 监控页登录账号initParams.put("loginPassword", "root");  // 监控页登录密码initParams.put("allow", "");  // 允许所有IP访问(生产环境需限制IP)initParams.put("deny", "192.168.43.195");  // 禁止该IP访问bean.setInitParameters(initParams);return bean;}// 配置Druid监控过滤器@Beanpublic FilterRegistrationBean<WebStatFilter> webStatFilter() {FilterRegistrationBean<WebStatFilter> bean = new FilterRegistrationBean<>(new WebStatFilter());// 过滤规则:排除静态资源与监控页Map<String, String> initParams = new HashMap<>();initParams.put("exclusions", "*.js,*.css,/druid/*");bean.setInitParameters(initParams);bean.setUrlPatterns(Arrays.asList("/*"));  // 监控所有请求return bean;}
}
核心功能:
- 通过
@ConfigurationProperties绑定配置文件中的 Druid 属性; - 注册
StatViewServlet:提供/druid路径的监控页面,支持登录验证、IP 黑白名单; - 注册
WebStatFilter:监控所有请求,排除静态资源与监控页自身请求。
把 DruidDataSource 实例注册成 Spring 应用上下文中的一个 Bean,这样一来,其他组件就能够通过依赖注入的方式获取这个数据源,进而进行数据库操作。
依赖注入:
传统的方式是在对象内部创建依赖对象,而依赖注入则是将依赖对象的创建和管理交给外部容器,由容器将依赖对象注入到需要的对象中。常用的依赖注入的方式有构造函数的方法和通过setter方法注入,这里明显使用的是构造函数的方法注入依赖。
在配置类这里配置更灵活(在yml文件里配了为什么还要在配置类配置)。
2.2 数据源配置文件(application.yaml)
在application.yaml中配置 Druid 数据源参数与 MyBatis 路径:
不同的数据库有不同的驱动程序,每个驱动程序都有对应的类名,而 driver-class-name 就是用来指定使用哪个数据库驱动类的。
如果Hikari可用, Springboot将使用它。
如果Commons DBCP2可用, 我们将使用它。
三种数据库,dbcp,hikari(默认的),druid,任选其一即可。
我们可以自己指定数据源配置,通过type来选取使用哪种数据源(数据库连接池)
spring:datasource:username: root               # 数据库用户名password: root               # 数据库密码# MySQL连接地址(适配8.x版本,指定时区)url: jdbc:mysql://localhost:3306/boot_demo?useUnicode=true&characterEncoding=utf8&serverTimezone=Asia/Shanghaidriver-class-name: com.mysql.cj.jdbc.Driver  # 8.x驱动类type: com.alibaba.druid.pool.DruidDataSource  # 指定Druid数据源# Druid连接池参数initialSize: 5               # 初始化连接数minIdle: 5                   # 最小空闲连接数maxActive: 20                # 最大活跃连接数maxWait: 60000               # 获取连接的最大等待时间(毫秒)timeBetweenEvictionRunsMillis: 60000  # 连接检测间隔(毫秒)minEvictableIdleTimeMillis: 300000    # 连接最小空闲时间(毫秒)validationQuery: SELECT 1 FROM DUAL   # 连接校验SQLtestWhileIdle: true          # 空闲时检测连接有效性testOnBorrow: false          # 借出连接时不检测(提升性能)testOnReturn: false          # 归还连接时不检测(提升性能)# Druid监控参数filters: stat,wall,slf4j     # 启用监控、防火墙、日志connectionProperties: druid.stat.mergeSql=true;druid.stat.slowSqlMillis=500  # 慢SQL阈值(500ms)# MyBatis配置
mybatis:config-location: classpath:mybatis/sqlMapConfig.xml  # 核心配置文件路径mapper-locations: classpath:mybatis/mapper/*.xml     # 映射文件路径type-aliases-package: com.qcby.springbootmybatis.entity  # 实体类别名包
关键配置说明:
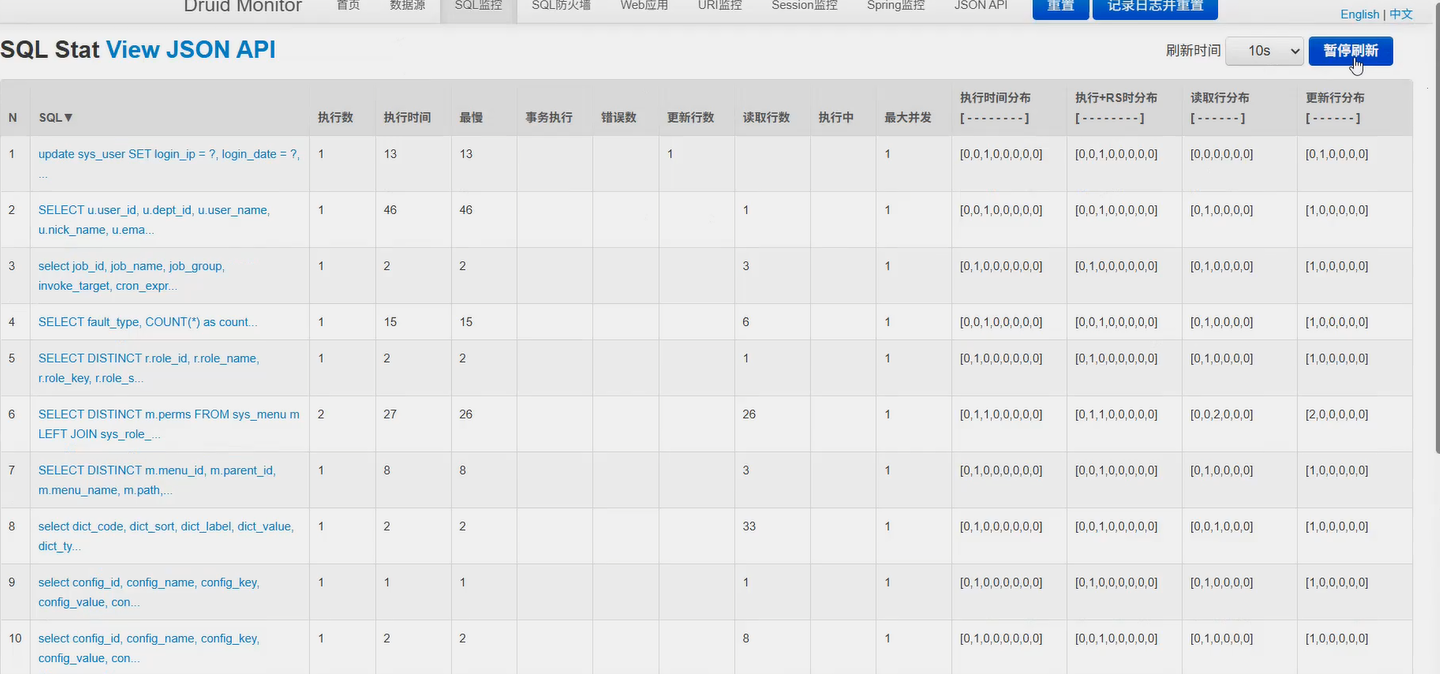
driver-class-name:MySQL 8.x 需使用com.mysql.cj.jdbc.Driver,并指定serverTimezone;filters: stat,wall:启用 SQL 监控(stat)和防火墙(wall),防止 SQL 注入;slowSqlMillis=500:慢 SQL 阈值,超过 500ms 的 SQL 会被标记为慢查询。- initialSize: 5: 该配置指定了连接池在初始化时创建的连接数量。设置为 5 意味着在应用启动时,Druid 连接池会创建 5 个数据库连接并放入连接池中。
- minIdle: 5:它表示连接池保持的最小空闲连接数。即使在没有数据库操作时,连接池也会确保至少有 5 个连接处于空闲状态,这样可以避免在有新的数据库请求时频繁创建连接,提高响应速度。
- maxActive: 20:此配置定义了连接池允许的最大活动连接数。当有数据库请求时,连接池最多可以同时提供 20 个连接给应用程序使用。如果达到这个上限,新的请求将等待,直到有连接被释放。
- maxWait: 60000:单位为毫秒,指的是当连接池中的连接都被占用时,新的请求等待获取连接的最大时间。这里设置为 60000 毫秒(即 60 秒),如果在 60 秒内没有可用连接,请求将抛出异常。
- timeBetweenEvictionRunsMillis: 60000:单位为毫秒,它表示连接池进行空闲连接检查的时间间隔。每隔 60000 毫秒(即 60 秒),连接池会执行一次空闲连接的检查操作。
- minEvictableIdleTimeMillis: 300000:单位为毫秒,该配置规定了连接在连接池中保持空闲状态的最小时间,超过这个时间的空闲连接可能会被移除。这里设置为 300000 毫秒(即 5 分钟),意味着空闲时间超过 5 分钟的连接可能会被清理。
- validationQuery: SELECT 1 FROM DUAL:这是一个用于验证连接是否有效的 SQL 查询语句。对于不同的数据库,该语句可能不同,例如在 MySQL 中可以使用 SELECT 1。连接池会执行这个查询来检查连接是否正常。
- testWhileIdle: true:当设置为 true 时,连接池在进行空闲连接检查时,会使用 validationQuery 来验证连接的有效性。如果连接无效,会将其从连接池中移除。
- testOnBorrow: false:若设置为 true,在从连接池获取连接时,会先使用 validationQuery 验证连接的有效性,确保获取到的连接是可用的。这里设置为 false,表示不进行此验证。
- testOnReturn: false:当设置为 true 时,在将连接归还到连接池时,会使用 validationQuery 验证连接的有效性。这里设置为 false,表示不进行此验证。
- poolPreparedStatements: true:当设置为 true 时,连接池会开启预编译语句缓存功能,这样可以提高预编译语句的执行效率,避免重复编译相同的 SQL 语句。
- maxPoolPreparedStatementPerConnectionSize: 20:该配置指定了每个连接最多可以缓存的预编译语句数量。这里设置为 20,表示每个连接最多可以缓存 20 条预编译语句。
- filters: stat,wall,log4j:此配置指定了连接池使用的过滤器。stat 过滤器用于统计 SQL 执行的性能信息,wall 过滤器用于防止 SQL 注入攻击,log4j 过滤器用于将相关信息记录到日志中。
- useGlobalDataSourceStat: true:当设置为 true 时,会使用全局的数据源统计信息,方便对整个应用的数据库连接和 SQL 执行情况进行统一监控。
- connectionProperties: druid.stat.mergeSql=true;druid.stat.slowSqlMillis=500:druid.stat.mergeSql=true 表示合并相同的 SQL 语句进行统计,这样可以减少统计数据的数量,提高统计效率。
- druid.stat.slowSqlMillis=500 表示将执行时间超过 500 毫秒的 SQL 语句标记为慢 SQL,并记录相关信息,方便后续进行性能优化。
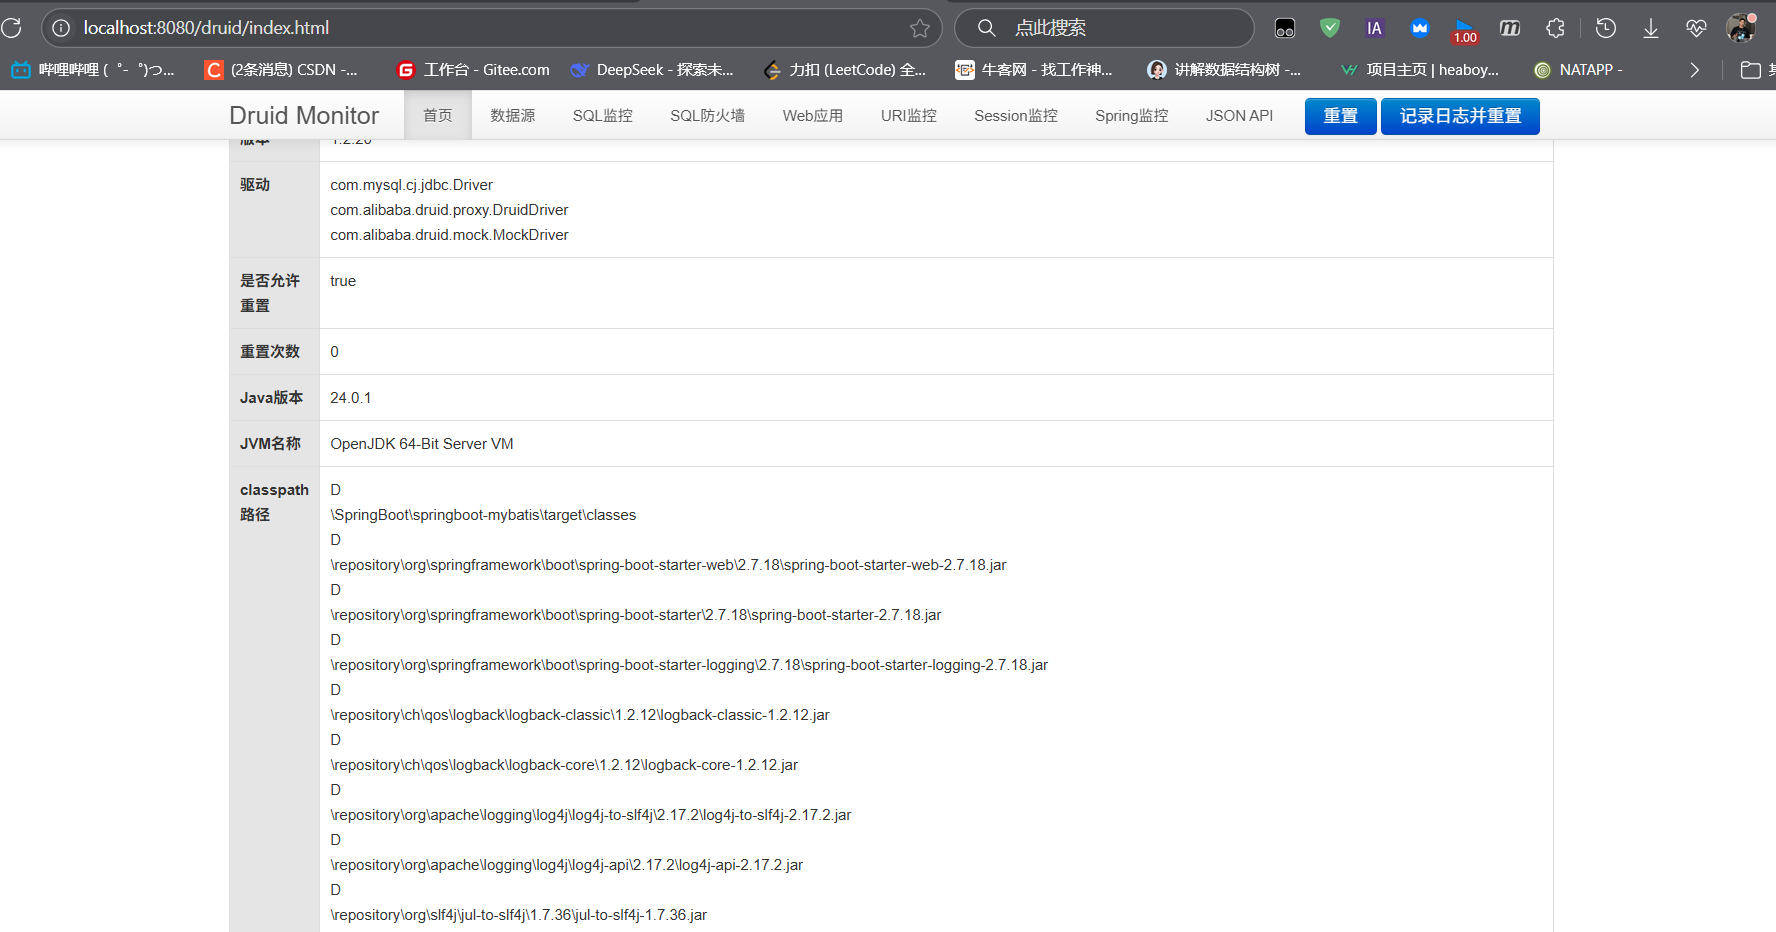
在默认情况下, 数据库连接可以使用DataSource池进行自动配置
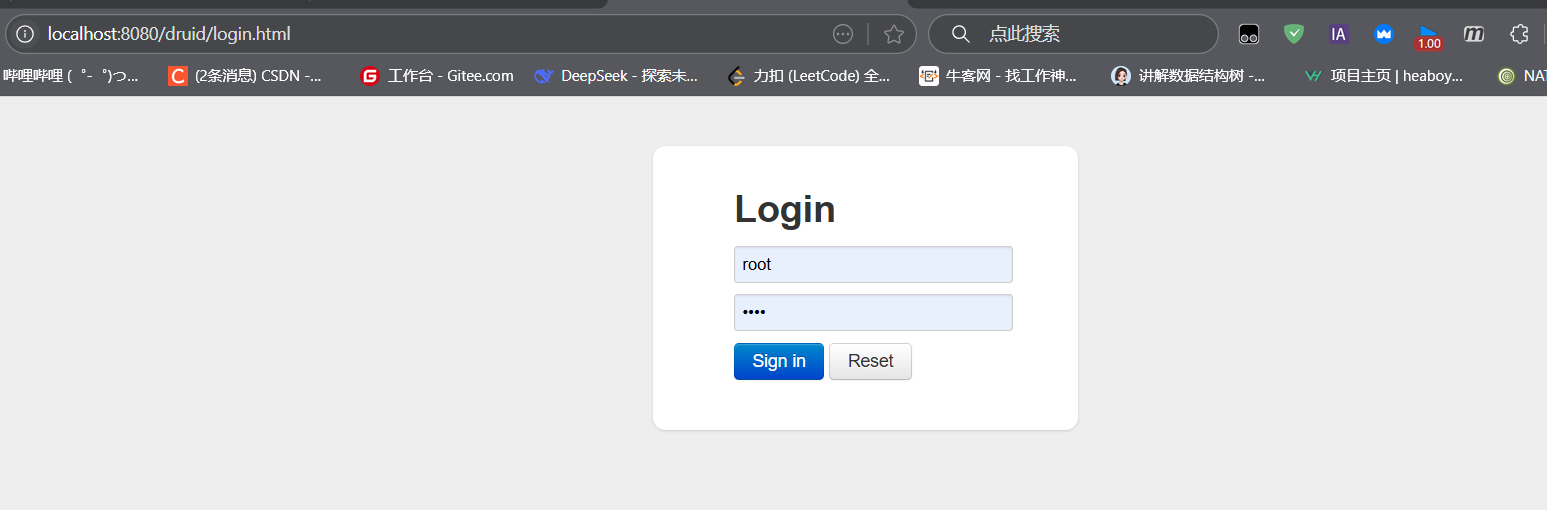
打开监控页面
http://localhost:8080/druid
三、 SpringBoot整合jdbcTemplate
什么是 JdbcTemplate
JdbcTemplate 是 Spring 框架提供的一个核心类,它对 JDBC 进行了封装,简化了 Java 代码与数据库的交互过程。作为 Spring 生态的一部分,JdbcTemplate 与 Spring Boot 有着天然的整合优势,能够帮助开发者快速实现数据库操作。
JdbcTemplate 的特点
-
速度快:相对于 ORM 框架,基于 JDBC 的方式性能更优,减少了对象映射的开销
-
配置简单:Spring 封装的模板类,除了数据库连接之外,几乎没有额外的配置
-
使用方便:类似 DBUtils 工具类,只需注入 JdbcTemplate 对象即可快速使用
-
功能强大:提供了丰富、实用的方法,主要分为以下几类:
- execute 方法:可执行任何 SQL 语句,一般用于执行 DDL 语句
- update、batchUpdate 方法:用于执行新增、修改与删除等语句
- query 和 queryForXXX 方法:用于执行查询相关的语句
- call 方法:用于执行数据库存储过程和函数相关的语句
总的来说,新增、删除与修改操作主要使用 update 和 batchUpdate 方法;查询功能主要通过 query 和 queryForObject 方法完成;execute 方法可执行任意 SQL;call 方法用于调用存储过程。
Spring Boot 整合 JdbcTemplate 实战
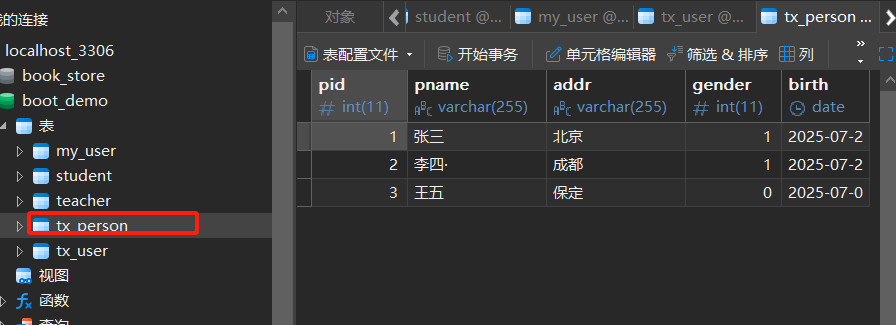
3.1 数据库表设计
首先在数据库中创建所需的数据表,这里以tx_user表为例:
SET FOREIGN_KEY_CHECKS=0;-- ----------------------------
-- Table structure for tx_user
-- ----------------------------
DROP TABLE IF EXISTS `tx_user`;
CREATE TABLE `tx_user` (`username` varchar(10) DEFAULT NULL,`userId` int(10) NOT NULL,`password` varchar(10) DEFAULT NULL,PRIMARY KEY (`userId`)
) ENGINE=InnoDB DEFAULT CHARSET=utf8;
可以插入一些测试数据:
INSERT INTO `tx_user` VALUES ('张三', 1, '123456');
INSERT INTO `tx_user` VALUES ('李四', 2, '654321');
3.2 项目依赖配置
在 Spring Boot 项目的pom.xml中添加必要的依赖:
<parent><groupId>org.springframework.boot</groupId><artifactId>spring-boot-starter-parent</artifactId><version>3.2.8</version><relativePath/>
</parent><dependencies><!-- Spring Boot Web依赖 --><dependency><groupId>org.springframework.boot</groupId><artifactId>spring-boot-starter-web</artifactId></dependency><!-- JdbcTemplate依赖 --><dependency><groupId>org.springframework.boot</groupId><artifactId>spring-boot-starter-jdbc</artifactId></dependency><!-- MySQL驱动 --><dependency><groupId>com.mysql</groupId><artifactId>mysql-connector-j</artifactId><scope>runtime</scope></dependency><!-- 测试依赖 --><dependency><groupId>org.springframework.boot</groupId><artifactId>spring-boot-starter-test</artifactId><scope>test</scope></dependency>
</dependencies>
3.3 数据源配置
在application.yaml(或application.properties)中配置数据库连接信息:
spring:datasource:driver-class-name: com.mysql.cj.jdbc.Driverurl: jdbc:mysql://localhost:3306/your_database_name?useUnicode=true&characterEncoding=utf8&serverTimezone=Asia/Shanghaiusername: rootpassword: your_password
3.4 创建 Controller 实现数据库操作
创建一个 Controller 类,注入 JdbcTemplate 并实现基本的查询功能:
package com.qcby.springbootmybatis.controller;import org.springframework.beans.factory.annotation.Autowired;
import org.springframework.jdbc.core.JdbcTemplate;
import org.springframework.stereotype.Controller;
import org.springframework.web.bind.annotation.RequestMapping;
import org.springframework.web.bind.annotation.ResponseBody;import java.util.List;
import java.util.Map;@Controller
public class TestController {@AutowiredJdbcTemplate jdbcTemplate;@ResponseBody@RequestMapping("/query")public List<Map<String, Object>> query(){List<Map<String, Object>> maps = jdbcTemplate.queryForList("SELECT * FROM tx_user");return maps;}
}
启动springboot访问
http://localhost:8080/query
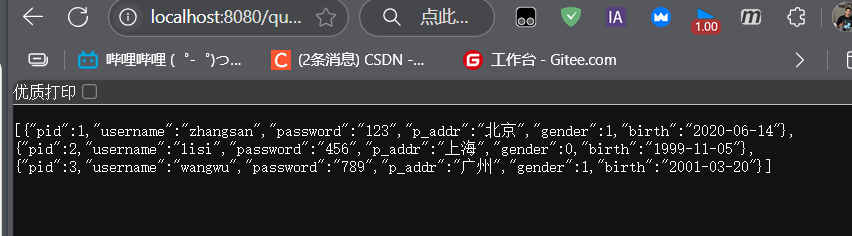
四、MyBatis 整合MyBatis配置文件
4.1 MyBatis 核心配置
创建 MyBatis 全局配置文件mybatis/sqlMapConfig.xml(可扩展插件、别名等):
<?xml version="1.0" encoding="UTF-8" ?>
<!DOCTYPE configurationPUBLIC "-//mybatis.org//DTD Config 3.0//EN""http://mybatis.org/dtd/mybatis-3-config.dtd"><configuration><!-- 可添加全局配置,如缓存、插件等 -->
</configuration>
4.2 映射文件与接口
MyBatis 支持注解与 XML 两种映射方式,本文采用 "注解 + XML" 混合模式:
(1)实体类(TxPerson.java)
package com.qcby.springbootmybatis.entity;import java.util.Date;public class TxPerson {private Integer pid;        // 主键(自增)private String pname;       // 姓名private String addr;        // 地址private Integer gender;     // 性别(0-女,1-男)private Date birth;         // 生日// Getter、Setter与toStringpublic Integer getPid() { return pid; }public void setPid(Integer pid) { this.pid = pid; }public String getPname() { return pname; }public void setPname(String pname) { this.pname = pname; }public String getAddr() { return addr; }public void setAddr(String addr) { this.addr = addr; }public Integer getGender() { return gender; }public void setGender(Integer gender) { this.gender = gender; }public Date getBirth() { return birth; }public void setBirth(Date birth) { this.birth = birth; }@Overridepublic String toString() {return "TxPerson{" +"pid=" + pid +", pname='" + pname + '\'' +", addr='" + addr + '\'' +", gender=" + gender +", birth=" + birth +'}';}
}
(2)Mapper 接口(TxPersonMapper.java)
package com.qcby.springbootmybatis.mapper;import com.qcby.springbootmybatis.entity.TxPerson;
import org.apache.ibatis.annotations.*;
import java.util.List;@Mapper  // 标记为MyBatis映射接口
public interface TxPersonMapper {// 注解方式:查询单条记录@Select("select * from tx_person where pid = #{id}")TxPerson getPersonById(Integer id);// XML方式:查询所有记录(映射文件中实现)List<TxPerson> getPersons();// 注解方式:插入记录(自增主键)@Options(useGeneratedKeys = true, keyProperty = "pid")  // 自动生成主键并回写@Insert("insert into tx_person(pname, addr, gender, birth) values(#{pname}, #{addr}, #{gender}, #{birth})")void insert(TxPerson person);// 注解方式:删除记录(注意方法名与SQL语义一致,此处update为笔误,实际是delete)@Delete("delete from tx_person where pid = #{id}")void delete(Integer id);
}
(3)XML 映射文件(MyBatis/Mapper/TxPersonMapper.xml)
<?xml version="1.0" encoding="UTF-8" ?>
<!DOCTYPE mapperPUBLIC "-//mybatis.org//DTD Mapper 3.0//EN""http://mybatis.org/dtd/mybatis-3-mapper.dtd"><!-- 命名空间与Mapper接口对应 -->
<mapper namespace="com.qcby.springbootmybatis.mapper.TxPersonMapper"><!-- XML方式实现查询所有记录 --><select id="getPersons" resultType="TxPerson">select * from tx_person</select>
</mapper>
4.3 MyBatis 配置类(解决驼峰映射)
数据库表字段若为下划线命名(如p_name),实体类为驼峰命名(pname),需配置驼峰映射:
package com.qcby.springbootmybatis.config;import org.mybatis.spring.boot.autoconfigure.ConfigurationCustomizer;
import org.springframework.context.annotation.Bean;
import org.springframework.context.annotation.Configuration;@Configuration
public class MyBatisConfig {// 开启MyBatis驼峰命名映射(下划线转驼峰)@Beanpublic ConfigurationCustomizer configurationCustomizer() {return configuration -> configuration.setMapUnderscoreToCamelCase(true);}
}
五、单元测试验证
5.1 测试类编写
创建SpringbootMybatisApplicationTests.java,验证数据源与 MyBatis 功能:
package com.qcby.springbootmybatis;import com.qcby.springbootmybatis.entity.TxPerson;
import com.qcby.springbootmybatis.mapper.TxPersonMapper;
import org.junit.jupiter.api.Test;
import org.springframework.beans.factory.annotation.Autowired;
import org.springframework.boot.test.context.SpringBootTest;import javax.sql.DataSource;
import java.sql.SQLException;
import java.util.Date;
import java.util.List;@SpringBootTest
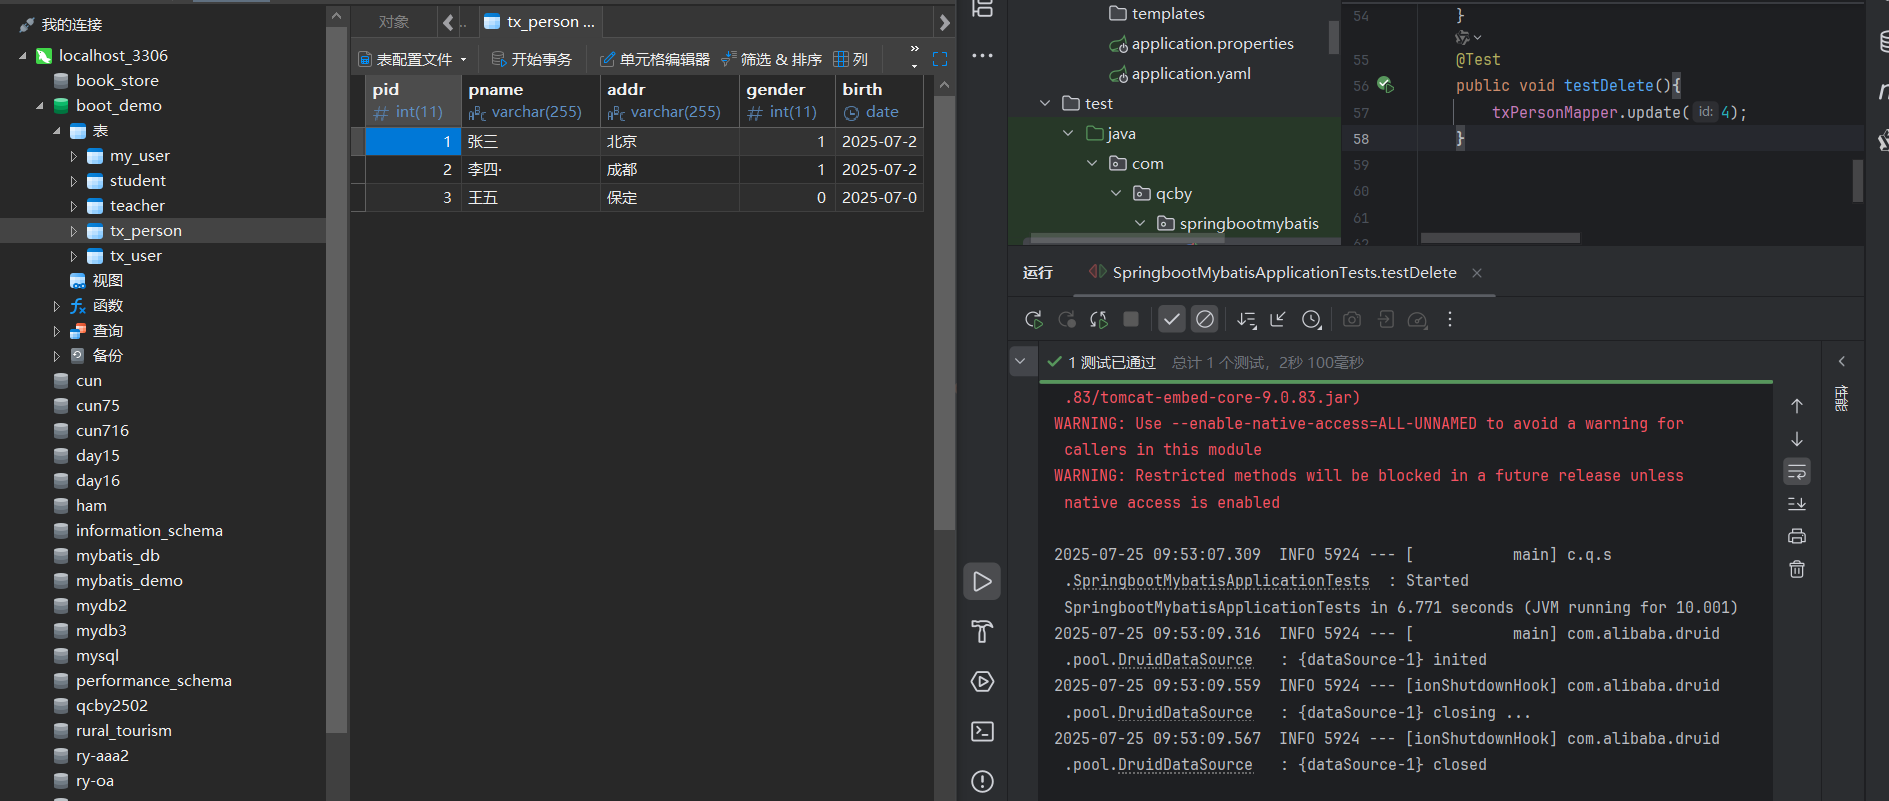
public class SpringbootMybatisApplicationTests {@Autowiredprivate TxPersonMapper txPersonMapper;@Autowiredprivate DataSource dataSource;// 验证数据源是否正确初始化@Testpublic void testDataSource() throws SQLException {System.out.println("数据源类型:" + dataSource.getClass().getName()); // 应输出com.alibaba.druid.pool.DruidDataSource}// 测试查询单条记录@Testpublic void testGetPersonById() {TxPerson person = txPersonMapper.getPersonById(1); // 假设存在ID=1的记录System.out.println("查询结果:" + person);}// 测试查询所有记录@Testpublic void testGetAllPersons() {List<TxPerson> persons = txPersonMapper.getPersons();System.out.println("总记录数:" + persons.size());persons.forEach(System.out::println);}// 测试插入记录@Testpublic void testInsert() {TxPerson person = new TxPerson();person.setPname("测试用户");person.setAddr("北京");person.setGender(1);person.setBirth(new Date());txPersonMapper.insert(person);System.out.println("插入成功,自增ID:" + person.getPid()); // 验证主键回写}// 测试删除记录@Testpublic void testDelete() {txPersonMapper.delete(5); // 假设存在ID=5的记录System.out.println("删除成功");}
}
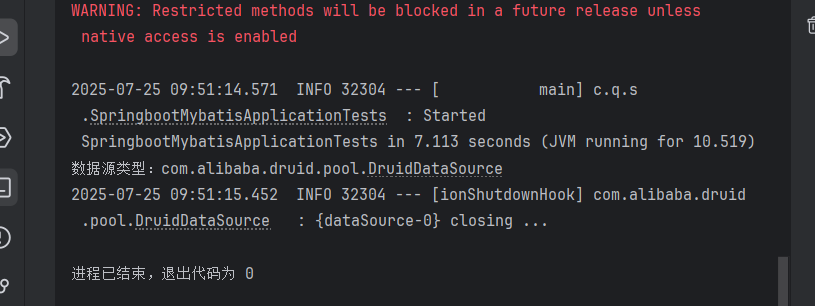
5.2 测试结果分析
- 数据源测试:输出
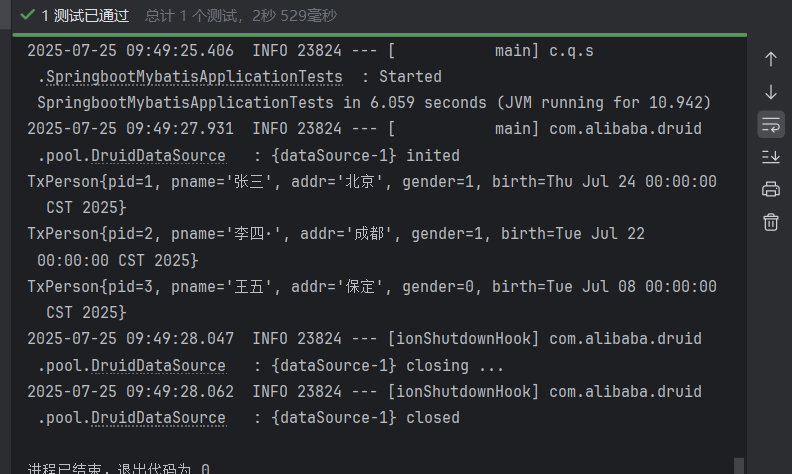
com.alibaba.druid.pool.DruidDataSource,证明 Druid 已生效; - 查询测试:成功打印数据库中的
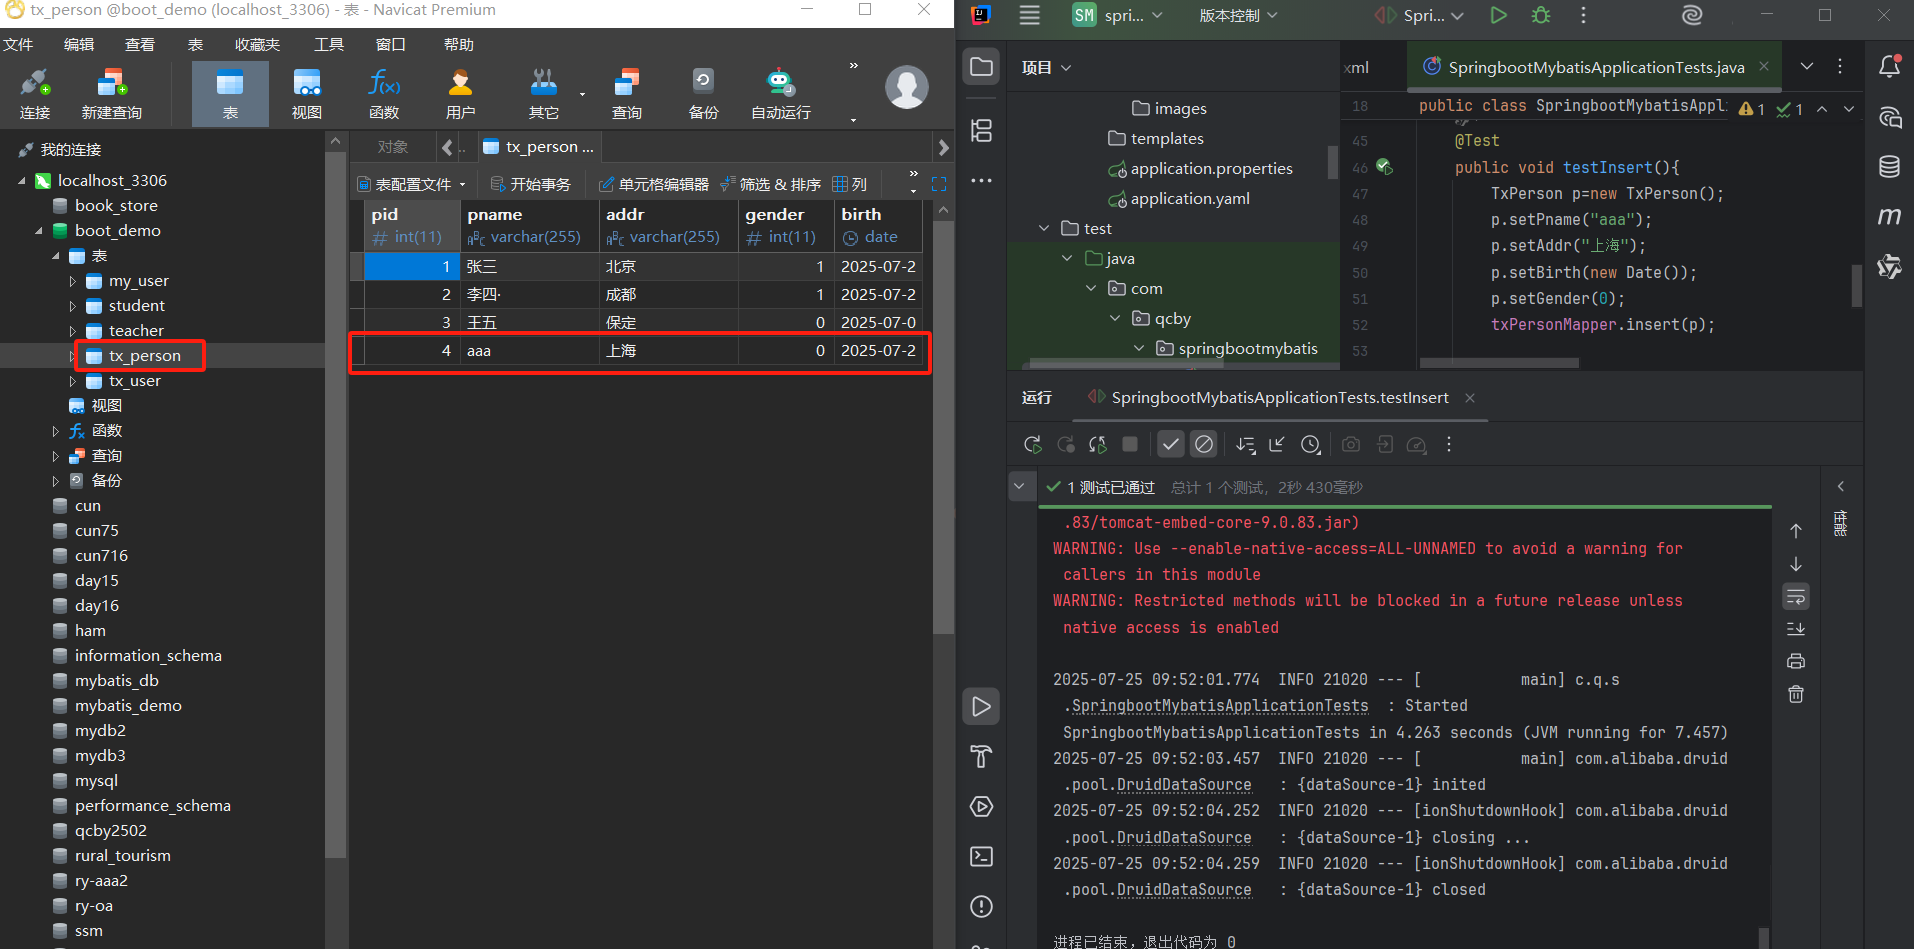
TxPerson记录,说明 MyBatis 映射正确; - 插入测试:通过
useGeneratedKeys自动生成主键并回写,验证自增功能; - 删除测试:执行后数据库中对应 ID 的记录被删除,SQL 执行正常。
六、 Springboot整合Mybatis注解版
<dependency><groupId>org.mybatis.spring.boot</groupId><artifactId>mybatis-spring-boot-starter</artifactId><version>1.3.1</version>
</dependency>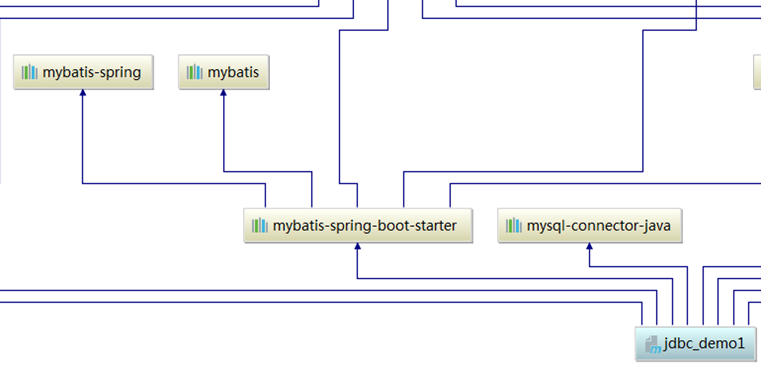

6.1 配置数据源相关属性
6.2 给数据库建表
6.3 创建javabean
package com.qcby.entity;
import java.util.Date;public class TxPerson {private int pid;private String pname;private String addr;private int gender;private Date birth;public TxPerson() {}public TxPerson(int pid, String pname, String addr, int gender, Date birth) {this.pid = pid;this.pname = pname;this.addr = addr;this.gender = gender;this.birth = birth;}@Overridepublic String toString() {return "TxPerson{" +"pid=" + pid +", pname='" + pname + '\'' +", addr='" + addr + '\'' +", gender=" + gender +", birth=" + birth +'}';}public int getPid() {return pid;}public void setPid(int pid) {this.pid = pid;}public String getPname() {return pname;}public void setPname(String pname) {this.pname = pname;}public String getAddr() {return addr;}public void setAddr(String addr) {this.addr = addr;}public int getGender() {return gender;}public void setGender(int gender) {this.gender = gender;}public Date getBirth() {return birth;}public void setBirth(Date birth) {this.birth = birth;}
}
6.4 创建Mapper
package com.qcby.mapper;import com.qcby.entity.TxPerson;
import org.apache.ibatis.annotations.*;
import java.util.List;@Mapper
public interface TxPersonMapper {@Select("select * from tx_person")public List<TxPerson> getPersons();@Select("select * from tx_person t where t.pid = #{id}")public TxPerson getPersonById(int id);@Options(useGeneratedKeys =true, keyProperty = "pid")@Insert("insert into tx_person(pid, pname, addr,gender, birth)" +" values(#{pid}, #{pname}, #{addr},#{gender}, #{birth})")public void insert(TxPerson person);@Delete("delete from tx_person where pid = #{id}")public void update(int id);
}- 当 useGeneratedKeys 设为 true 时,MyBatis 会在执行插入操作之后,获取数据库自动生成的主键值。
- keyProperty = "pid" MyBatis 获取到数据库自动生成的主键值后,会把这个值赋给 Java 对象的 pid 属性。
6.5 测试
package com.qcby.springbootmybatis;import com.qcby.springbootmybatis.entity.TxPerson;
import com.qcby.springbootmybatis.mapper.TxPersonMapper;
import org.junit.jupiter.api.Test;
import org.springframework.beans.factory.annotation.Autowired;
import org.springframework.boot.test.context.SpringBootTest;
import org.springframework.test.context.ContextConfiguration;import javax.sql.DataSource;
import java.sql.SQLException;
import java.util.Date;
import java.util.List;@ContextConfiguration(classes = SpringbootMybatisApplication.class)
@SpringBootTest
public class SpringbootMybatisApplicationTests {@Autowiredprivate TxPersonMapper txPersonMapper;@Autowiredprivate DataSource dataSource;@Testpublic void testDataSource() throws SQLException {System.out.println("数据源类型:" + dataSource.getClass().getName());  // 应输出com.alibaba.druid.pool.DruidDataSource}@Testpublic void testGetPerson() {TxPerson person = txPersonMapper.getPersonById(1); // 假设存在 id 为 1 的记录// 进行断言if (person != null) {System.out.println(person);}}@Testpublic void testGetperson(){List<TxPerson> persons = txPersonMapper.getPersons();for(TxPerson p: persons){System.out.println( p);}}@Testpublic void testInsert(){TxPerson p=new TxPerson();p.setPname("aaa");p.setAddr("上海");p.setBirth(new Date());p.setGender(0);txPersonMapper.insert(p);}@Testpublic void testDelete(){txPersonMapper.update(4);}}
七、常见问题与解决方案
-
数据库连接失败
- 检查
url中的数据库名、端口是否正确; - 确认 MySQL 服务已启动,用户名密码无误;
- MySQL 8.x 需指定
serverTimezone=Asia/Shanghai。
- 检查
-
MyBatis 映射错误
- 检查
mapper-locations路径是否正确(需与 XML 文件位置匹配); - 确保
type-aliases-package指向实体类包,否则resultType="TxPerson"会报错。
- 检查
-
Druid 监控页面无法访问
- 检查
filters是否包含stat,并确保StatViewServlet配置正确; - 访问路径为
http://localhost:8080/druid,使用配置的loginUsername和loginPassword登录。
- 检查
-
驼峰命名映射失败
- 确认
MyBatisConfig中已开启setMapUnderscoreToCamelCase(true); - 数据库字段
p_name需对应实体类pname,而非pName(严格驼峰规则)。
- 确认