黑马头条项目详解
模块一:验证码登录
步骤:
STEP1:在 utils/request.js 配置 axios 请求基地址
作用:提取公共前缀地址,配置后 axios 请求时都会 baseURL + url

STEP2:使用 form-serialize 插件收集手机号和验证码数据
STEP3:基于 axios 调用验证码登录接口
STEP4:使用 Bootstrap 的 Alert 警告框反馈结果给用户
document.querySelector('.btn').addEventListener('click', () => {const form = document.querySelector('.login-form')const data = serialize(form, { hash: true, empty: true })// console.log(data)axios({url: '/v1_0/authorizations',method: 'post',data}).then(result => {myAlert(true, '登录成功')//console.log(result)}).catch(error => {myAlert(false, error.response.data.message)//console.dir(error.response.data.message)})
})
注意:console.dir()打印错误详细信息,重点就是边写代码边打印,对比验证所得到的数据哪些是我们所需要的再复制路径获取信息
要求:只有登录状态,才可以访问内容页面
补充:token的使用
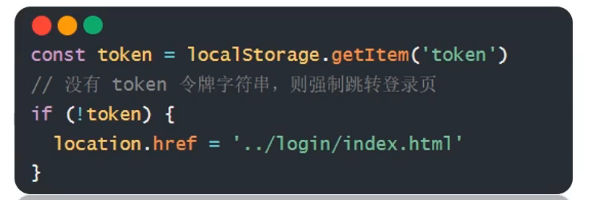
1. 在 utils/auth.js 中判断,若无 token 令牌字符串,则强制跳转到登录页(手动修改地址栏测试)
2. 在登录成功后,保存 token 令牌字符串到本地存储,这里考虑到用户体验,可以用定时器停留大概1.5s的间隙待alert警告框显示后再跳转到首页 (手动修改地址栏测试)
document.querySelector('.btn').addEventListener('click', () => {const form = document.querySelector('.login-form')const data = serialize(form, { hash: true, empty: true })// console.log(data)axios({url: '/v1_0/authorizations',method: 'post',data}).then(result => {myAlert(true, '登录成功')console.log(result)//登录成功后,保存token令牌字符串到本地,并跳转到内容列表页面localStorage.setItem('token', result.data.data.token)setTimeout(() => {//延迟跳转,让alert警告框停留一会location.href = '../content/index.html'}, 1500)}).catch(error => {myAlert(false, error.response.data.message)console.dir(error.response.data.message)})
})
模块二:设置个人信息
axios 请求拦截器
axios 请求拦截器:发起请求之前,触发的配置函数,对请求参数进行额外配置
当有公共配置和设置时,统一设置在请求拦截器中
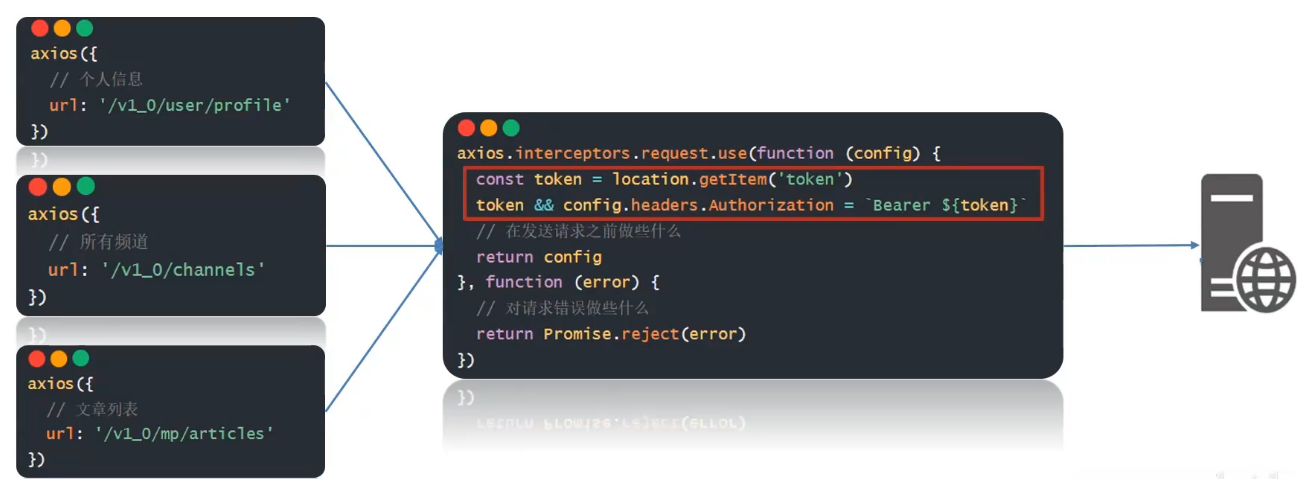
//添加请求拦截器
axios.interceptors.request.use(function (config) {const token = localStorage.getItem('token')token && (config.headers.Authorization = `Bearer ${token}`)return config
}, function (error) {return Promise.reject(error)
});
修改昵称:
axios({url: '/v1_0/user/profile'
}).then(result => {// console.log(result)const username = result.data.data.namedocument.querySelector('.nick-name').innerHTML = username
})
axios 响应拦截器
axios 响应拦截器:响应回到 then/catch 之前,触发的拦截函数,对响应结果统一处理
例如:身份验证失败,统一判断并做处理
状态为 2xx 触发成功回调,其他则触发失败的回调函数
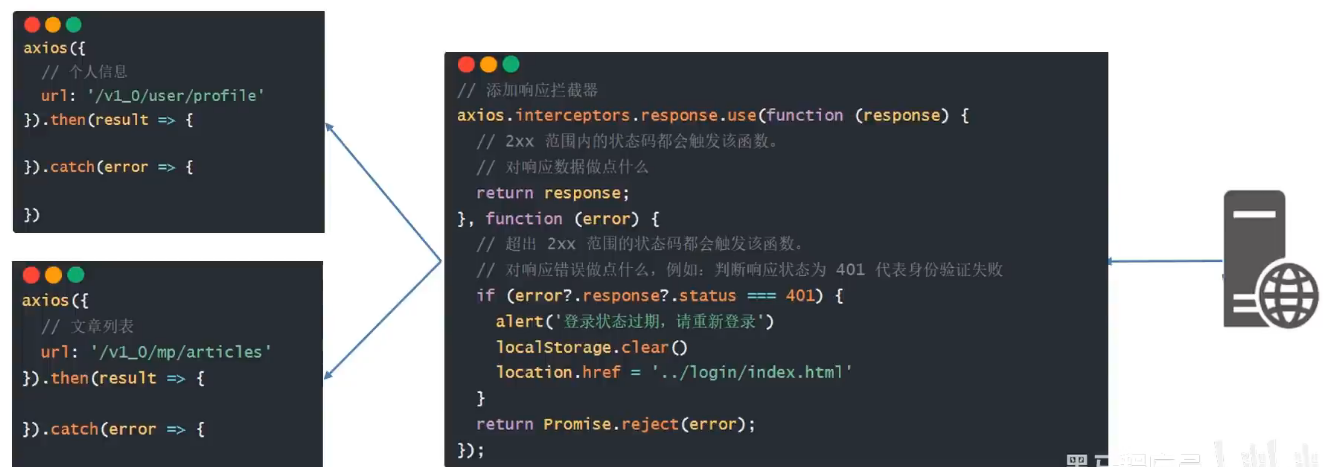
// 添加响应拦截器
axios.interceptors.response.use(function (response) {// 2xx 范围内的状态码都会触发该函数。// 对响应数据做点什么,例如:直接返回服务器的响应结果对象const result = response.datareturn result;
}, function (error) {// 超出 2xx 范围的状态码都会触发该函数。// 对响应错误做点什么,例如:统一对 401 身份验证失败情况做出处理//console.dir(error)if (error?.response?.status === 401) {alert('身份验证失败,请重新登录')localStorage.clear()location.href = '../login/index.html'}return Promise.reject(error);
});
注意:
当相应拦截器获取401信息身份验证失败时,我们不仅需要弹框告知用户,还需要清除本地存储信息并且强制将用户踢回登录页面
优化axios响应结果,我们可以直接返回服务器的响应结果对象,操作之后还要到项目的其他JS代码中修改变量名,将原先的result.data.data.name改为result.data.name,起到简化代码的作用
模块三:发布文章内容
频道设置
async function setChannelList() {const res = await axios({url: '/v1_0/channels'})// console.log(res)const htmlStr = '<option value="" selected="">请选择文章频道</option>' + res.data.channels.map(item => {return `<option value="${item.id}">${item.name}</option>`}).join('')document.querySelector('.form-select').innerHTML = htmlStr
}
setChannelList()
频道设置需要多次调用因此直接封装函数,然后直接上套路用map()方法处理返回带标签的模板字符串,再用join('')转换成空字符串,最后装到相应表单内部,千万注意写完函数之后记得调用它才会执行
文章封面设置
document.querySelector('.img-file').addEventListener('change', async e => {const file = e.target.files[0]const fd = new FormData()fd.append('image', file)const res = await axios({url: '/v1_0/upload',method: 'post',data: fd})// console.log(res)const imgUrl = res.data.urldocument.querySelector('.rounded').src = imgUrldocument.querySelector('.rounded').classList.add('show')document.querySelector('.place').classList.add('hide')
})//优化:点击img可以重新切换封面
document.querySelector('.rounded').addEventListener('click',e=>{document.querySelector('.img-file').click()
})
文章封面设置部分主要使用了AJAX部分图片上传的知识,基本套路需要多敲几遍熟悉才能做到直接上手,然后将服务器返回的图片url赋给对应img 标签的scr,并切换 img 标签展示(隐藏 + 号上传标签)
注意:这里优化部分有点难理解
监听img的点击事件,用JS方式触发文件选择元素click事件方法(注意此处click作为一种DOM方法),相当于
调用文件输入框的click()方法→ 打开文件选择框→ 用户选新图→ 文件输入框的change事件触发
发布文章保存
document.querySelector('.send').addEventListener('click', e => {const form = document.querySelector('.art-form')const data = serialize(form, { hash: true, empty: true })// console.log(data)//发布文章的时候不需要id属性,所以可以删除掉(id为了后续做编辑使用)delete data.id//console.log(data)data.cover = {type: 1,images: [document.querySelector('.rounded').src]}axios({url: '/v1_0/mp/articles',method: 'post',data}).then(result => {myAlert(true, '发布成功')form.reset()//封面需要手动重置document.querySelector('.rounded').src = ''document.querySelector('.rounded').classList.remove('show')document.querySelector('.place').classList.remove('hide')//富文本编辑器重置editor.setHtml('')setTimeout(() => {location.href = '../content/index.html'}, 1500)}).catch(error => {myAlert(false, error.response.data.message)})
})
发布文章保存主要复习使用form-serialize 插件快速收集表单元素的值,因为发布文章的时候不需要id属性,所以可以删除掉(id为了后续做编辑使用),再结合接口需要的参数进行修改data。当发布成功后,需要重置表单,但是在此处封面和富文本编辑器都需要自己重置,除此之外,为了加强用户体验,可以用定时器停留大概1.5s的间隙待alert警告框显示后再跳转到内容管理页面
模块四:内容管理
文章列表展示
const queryObj = {status: '',channel_id: '',page: 1,per_page: 2
}
async function setArtileList() {const res = await axios({url: '/v1_0/mp/articles',params: queryObj})// console.log(res)const htmlStr = res.data.results.map(item => {return `<td><img src="${item.cover.type === 0 ? `https://img2.baidu.com/it/u=2640406343,1419332367&fm=253&fmt=auto&app=138&f=JPEG?w=708&h=500` : item.cover.images[0]}" alt=""></td><td>${item.title}</td><td>${item.status === 1 ? `<span class="badge text-bg-primary">待审核</span>` : `<span class="badge text-bg-success">审核通过</span>`}</td><td><span>${item.pubdate}</span></td><td><span>${item.read_count}</span></td><td><span>${item.comment_count}</span></td><td><span>${item.like_count}</span></td><td><i class="bi bi-pencil-square edit"></i><i class="bi bi-trash3 del"></i></td>`}).join('')//console.log(htmlStr)document.querySelector('.art-list').innerHTML = htmlStr
}
setArtileList()注意:此次获取数据需要携带查询参数对象,所以我们需要提前准备
筛选功能
async function setChannelList() {const res = await axios({url: '/v1_0/channels'})// console.log(res)const htmlStr = '<option value="" selected="">请选择文章频道</option>' + res.data.channels.map(item => {return `<option value="${item.id}">${item.name}</option>`}).join('')document.querySelector('.form-select').innerHTML = htmlStr
}
setChannelList()
//筛选状态
document.querySelectorAll('.form-check-input').forEach(radio => {radio.addEventListener('change', e => {queryObj.status = e.target.value})
})
//筛选频道
document.querySelector('.form-select').addEventListener('change', e => {queryObj.channel_id = e.target.value
})
document.querySelector('.sel-btn').addEventListener('click', () => {setArtileList()
})
分页功能
document.querySelector('.next').addEventListener('click', e => {if (queryObj.page < Math.ceil(totalCount / queryObj.per_name)) {queryObj.page++document.querySelector('.page-now').innerHTML = `第${queryObj.page}页`setArtileList()}
})
document.querySelector('.last').addEventListener('click', e => {if (queryObj.page > 1) {queryObj.page--document.querySelector('.page-now').innerHTML = `第${queryObj.page}页`setArtileList()}
})
注意:无论点击上一页还是下一页,都得做临界值判断。我们需要保存并设置文章总条数,以便做点击下一页时的临界值判断使用
删除功能
document.querySelector('.art-list').addEventListener('click', async e => {if (e.target.classList.contains('del')) {const delId = e.target.parentNode.dataset.idconst res = await axios({url: `/v1_0/mp/articles/${delId}`,method: 'delete'})const children = document.querySelector('.art-list').childrenif (children.length === 1 && queryObj.page !== 1) {queryObj.page--document.querySelector('.page-now').innerHTML = `第${queryObj.page}页`}// console.log(res)setArtileList()}
})
注意:
1.事件委托到tbody绑定点击事件
2.在删除最后一页,最后一条时有 Bug
① 删除成功时,判断 DOM 元素只剩一条,让当前页码 page--
② 注意,当前页码为 1 时不能继续向前翻页
③ 重新设置页码数,获取最新列表展示
编辑文章
页面跳转传参(URL 查询参数方式)
// 点击编辑时,获取文章 id,跳转到发布文章页面传递文章 id 过去
document.querySelector('.art-list').addEventListener('click', e => {if (e.target.classList.contains('edit')) {const artId = e.target.parentNode.dataset.idlocation.href = `../publish/index.html?id=${artId}`}
})
注意这种跨页面传参方法
; (function () {const paramStr = location.searchconst param = new URLSearchParams(paramStr)param.forEach(async (value, key) => {//说明当前有要编辑的文章id被传过来if (key === 'id') {document.querySelector('.title span').innerHTML = '修改文章'document.querySelector('.send').innerHTML = '修改'const res = await axios({url: `/v1_0/mp/articles/${value}`})//console.log(res)//仅仅组织我所需要的数据对象,为后续遍历回显到页面上做铺垫const dataObj = {channel_id: res.data.channel_id,title: res.data.title,rounded: res.data.cover.images[0],content: res.data.content,id: res.data.id}Object.keys(dataObj).forEach(key => {if (key === 'rounded') {if (dataObj[key]) {document.querySelector('.rounded').src = dataObj[key]document.querySelector('.rounded').classList.add('show')document.querySelector('.place').classList.add('hide')}} else if (key === 'content') {editor.setHtml(dataObj[key])} else {document.querySelector(`[name = ${key}]`).value = dataObj[key]}})}})})();注意:
1.使用立即执行函数避免全局变量间的污染
2.location对象的search 属性获取地址中携带的参数,符号?后面部分
3.当获取的数据比我们回显时用到的数据要多时,我们可以自己重新组织一个对象
4.用URLSearchParams把查询参数格式化为查询参数对象
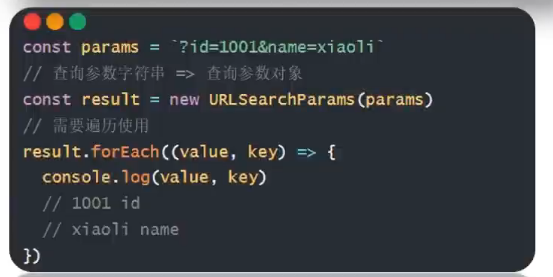
5.遍历对象属性映射到页面元素上快速赋值(常用)
document.querySelector('.send').addEventListener('click', async e => {if (e.target.innerHTML !== '修改') returnconst form = document.querySelector('.art-form')const data = serialize(form, { hash: true, empty: true })try {const res = await axios({url: `/v1_0/mp/articles/${data.id}`,method: 'put',data: {...data,cover: {type: document.querySelector('.rounded').src ? 1 : 0,images: [document.querySelector('.rounded').src]}}})// console.log(res)myAlert(true, '修改文章成功')} catch (error) {myAlert(flase, error.response.data.message)}
})
注意:
1.一定要判断按钮文字,区分业务(因为共用一套表单)
2.传递参数时还可以先展开原来的对象再补进新的元素
模块五:退出登录
明确需求退出登录时需要清空本地缓存,跳转到登录页面即可
document.querySelector('.quit').addEventListener('click',e=>{localStorage.clear()location.href = '../login/index.html'
})