【Vue】tailwindcss + ant-design-vue + vue-cropper 图片裁剪功能(解决遇到的坑)
1.安装 vue-cropper
pnpm add vue-cropper@1.1.1
2.使用 vue-cropper
<template><div class="user-info-head" @click="editCropper()"><img :src="options.img" title="点击上传头像" class="img-circle" /><a-modal:title="title"v-model:open="open"width="800px"@cancel="closeDialog":footer="null"destroyOnClose><a-row><a-col :xs="24" :md="12" style="height: 350px"><vue-cropperref="cropper":img="options.img":info="true":autoCrop="options.autoCrop":autoCropWidth="options.autoCropWidth":autoCropHeight="options.autoCropHeight":fixedBox="options.fixedBox":outputType="options.outputType":canScale="options.canScale":infoTrue="options.infoTrue":enlarge="options.enlarge":high="options.high"@realTime="realTime"v-if="visible"/></a-col><a-col :xs="24" :md="12" style="height: 350px"><div class="avatar-upload-preview"><img:src="options.previews.url":style="options.previews.img"class="imgs"/></div></a-col></a-row><br /><a-row :gutter="8"><a-col :span="4"><a-upload:customRequest="requestUpload":showUploadList="false":accept="accept":beforeUpload="beforeUpload"><a-button> 选择 </a-button></a-upload></a-col><a-col :span="2"><a-button @click="changeScale(1)">放大</a-button></a-col><a-col :span="2"><a-button @click="changeScale(-1)">缩小</a-button></a-col><a-col :span="2"><a-button @click="rotateLeft">左旋</a-button></a-col><a-col :span="2"><a-button @click="rotateRight">右旋</a-button></a-col><a-col :span="6" :offset="6"><a-button type="primary" @click="uploadImg">提交</a-button></a-col></a-row></a-modal></div>
</template><script setup>
import "vue-cropper/dist/index.css";
import { VueCropper } from "vue-cropper";
import { message } from "ant-design-vue";
import { useUserStore } from "@/stores";
import { ref, reactive, getCurrentInstance } from "vue";const userStore = useUserStore();
const { proxy } = getCurrentInstance();const open = ref(false);
const visible = ref(false);
const title = ref("修改头像");
const accept = ref("image/png, image/jpeg, image/jpg");// 确保从 userStore 中正确获取头像
const options = reactive({img: userStore.userInfo?.avatar || "", // 从 userStore.userInfo 中获取 avatarautoCrop: true, // 是否默认生成截图框autoCropWidth: 200, // 默认生成截图框宽度autoCropHeight: 200, // 默认生成截图框高度fixedBox: true, // 固定截图框大小 不允许改变outputType: "png", // 默认生成截图为PNG格式filename: "avatar", // 文件名称previews: {}, //预览数据canScale: true, // 图片是否允许滚轮缩放infoTrue: true, // 是否显示真实的裁剪宽高enlarge: 1.5, // 图片根据截图框输出比例倍数high: true, // 是否按照设备的dpr 输出等比例图片
});// 打开裁剪弹窗
function editCropper() {open.value = true;visible.value = true;
}// 左旋
function rotateLeft() {proxy.$refs.cropper.rotateLeft();
}// 右旋
function rotateRight() {proxy.$refs.cropper.rotateRight();
}// 缩放
function changeScale(num) {num = num || 1;proxy.$refs.cropper.changeScale(num);
}/*** 图片上传前的校验* @param {File} file - 要上传的文件* @returns {boolean | Promise<any>} - 返回false或Promise.reject表示校验不通过*/
function beforeUpload(file) {// 严格校验图片类型const acceptedTypes = ["image/png", "image/jpg", "image/jpeg"];const isAcceptedType = acceptedTypes.includes(file.type);if (!isAcceptedType) {message.error("只能上传JPG/PNG/JPEG格式的图片!");return false;}// 校验图片大小const isLt2M = file.size / 1024 / 1024 < 2;if (!isLt2M) {message.error("图片大小不能超过2MB!");return false;}return true;
}/*** 处理图片文件* @param {File} file - 图片文件*/
function handleImageFile(file) {// 再次校验,确保安全if (!beforeUpload(file)) {return;}const reader = new FileReader(); // 创建一个FileReader对象reader.readAsDataURL(file); // 将图片文件读取为 base64 格式的 URLreader.onload = () => {// 读取成功后,将图片的DataURL赋值给options.imgoptions.img = reader.result;options.filename = file.name; // 设置文件名};// 读取失败时,显示错误信息reader.onerror = () => {message.error("图片读取失败,请重试");};
}// 处理图片上传
function requestUpload({ file }) {handleImageFile(file);
}// 上传图片
function uploadImg() {// 获取裁剪后的图片,并上传到服务器proxy.$refs.cropper.getCropBlob(async (data) => {let formData = new FormData();formData.append("file", data, options.filename); // 将裁剪后的图片添加到FormData中try {const res = await proxy?.$api.user.uploadAvatar(formData); // 调用上传图片的接口open.value = false; // 关闭裁剪弹窗visible.value = false;options.img = res.data; // 设置头像图片的URL// 更新 userStore 中的头像if (userStore.userInfo) {userStore.setUserInfo({...userStore.userInfo,avatar: options.img,});}message.success(`修改成功`);} catch (error) {message.error(`上传失败:${error.message || "未知错误"}`);}});
}// 实时预览
function realTime(data) {options.previews = data;
}// 关闭裁剪弹窗
function closeDialog() {options.img = userStore.userInfo?.avatar || "";visible.value = false;
}
</script><style lang="scss" scoped>
.user-info-head {position: relative;display: inline-block;height: 120px;
}.user-info-head:hover:after {content: "+";position: absolute;left: 0;right: 0;top: 0;bottom: 0;color: #eee;background: rgba(0, 0, 0, 0.5);font-size: 24px;font-style: normal;-webkit-font-smoothing: antialiased;-moz-osx-font-smoothing: grayscale;cursor: pointer;line-height: 110px;border-radius: 50%;
}.img-circle {border-radius: 50%;object-fit: cover; /* 确保图片填充整个元素而不变形 */width: 120px;height: 120px;
}.avatar-upload-preview {position: absolute;top: 50%;transform: translate(50%, -50%);width: 200px !important;height: 200px !important;border-radius: 50%;box-shadow: 0 0 4px #ccc;overflow: hidden;
}</style>
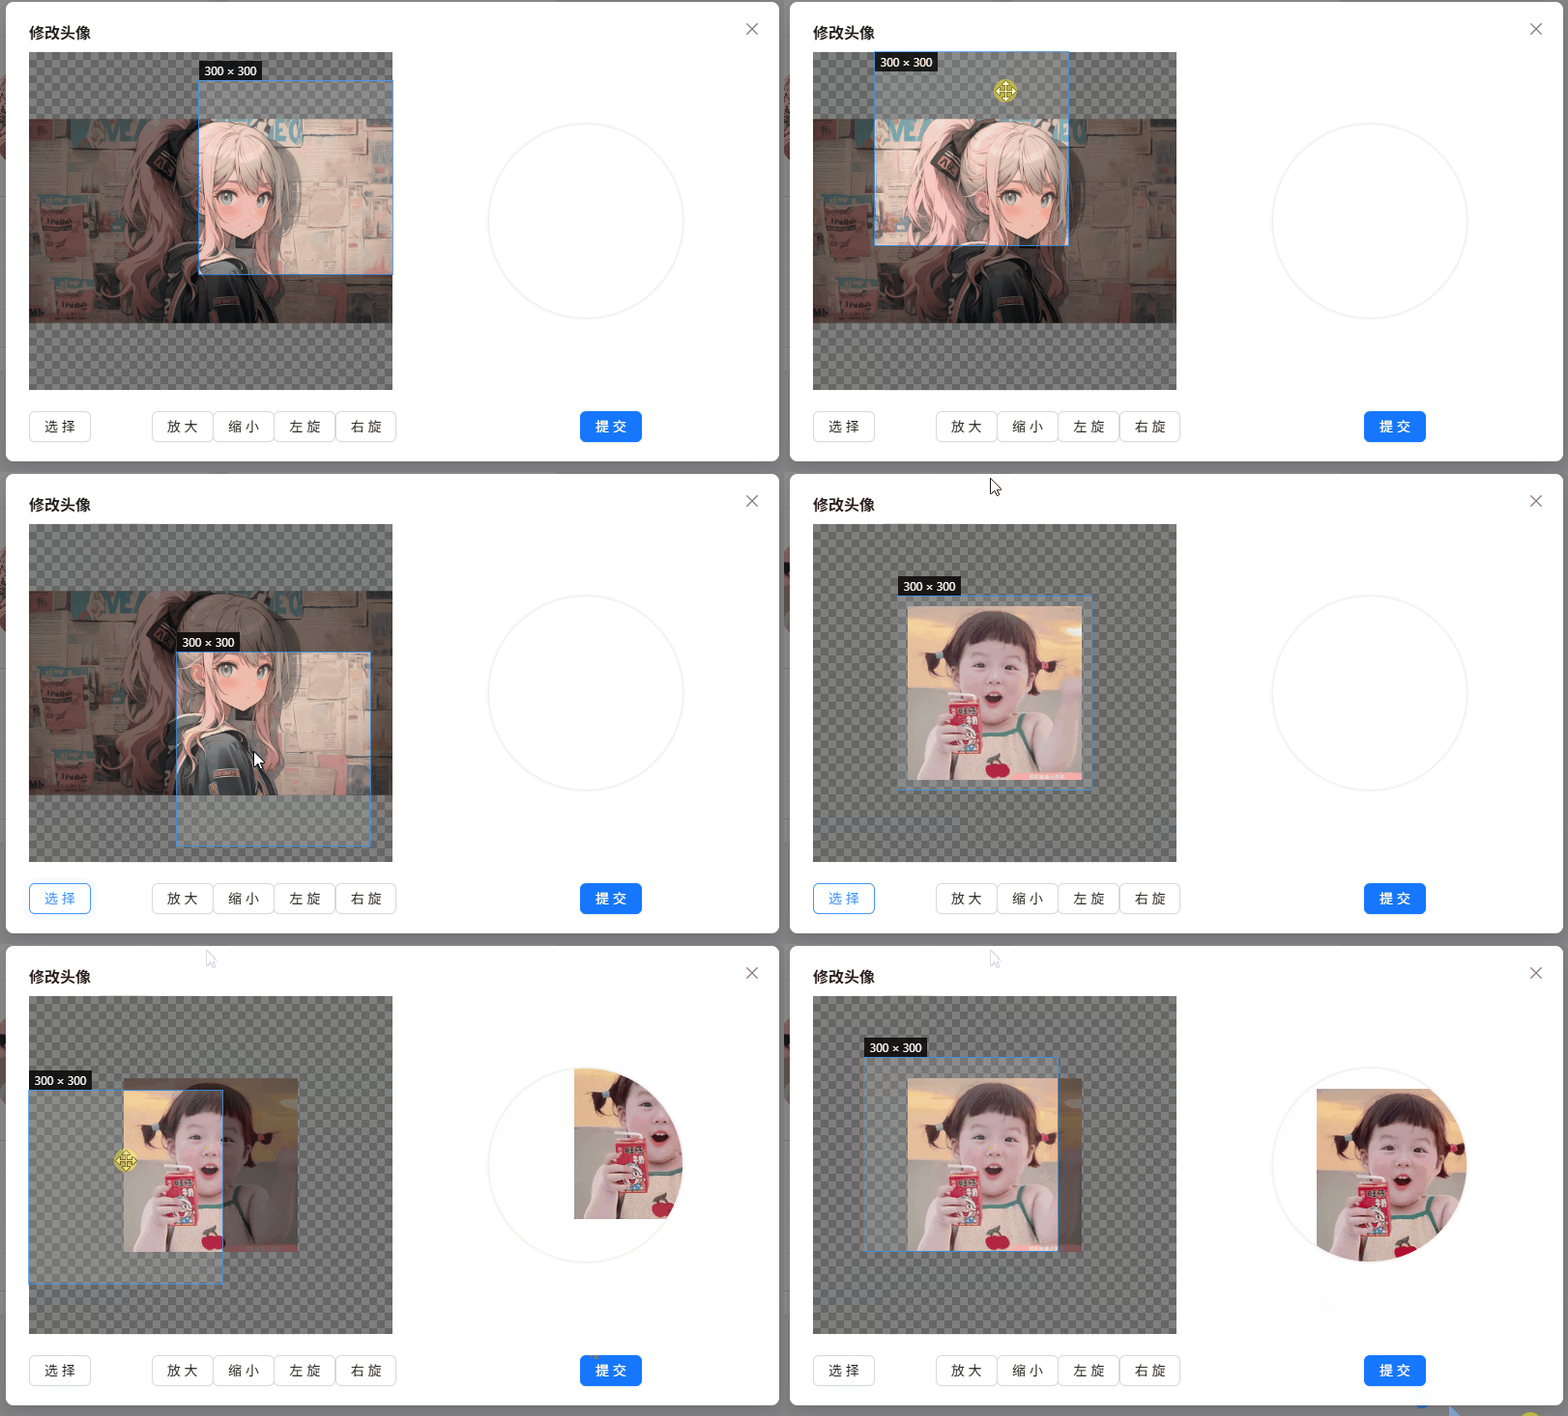
效果如下:

可以看到,对大图不生效,对小图是生效的,原因在于,我在项目中引入了tailwindcss,而tailwindcss中将 img 的样式设置为 max-width:100%
为什么 Tailwind CSS 限制 max-width 为 100% 会导致左侧圆形区域显示不了图片?
当 vue-cropper组件生成预览数据时,它通常会返回如下格式的数据:
options.previews.url- 预览图片的URLoptions.previews.img- 预览图片的样式,包含以下属性:
width- 通常比容器宽度大
height- 通常比容器高度大
scale- 缩放比例
x/y- 平移坐标
rotate- 旋转角度
问题在于:- 当图片的实际宽度大于容器宽度时,
Tailwind CSS的max-width: 100%会强制将图片缩小到容器宽度。
裁剪算法期望图片保持原始尺寸(通常大于容器),然后通过CSS transform来实现缩放、平移和旋转效果,从而在圆形区域内显示裁剪后的正确部分。 - 当
max-width被限制为100%时:
图片被强制缩小
计算好的transform参数(scale、translate)不再适用于缩小后的图片
导致图片定位错误,圆形区域内看不到正确的预览
3.解决办法
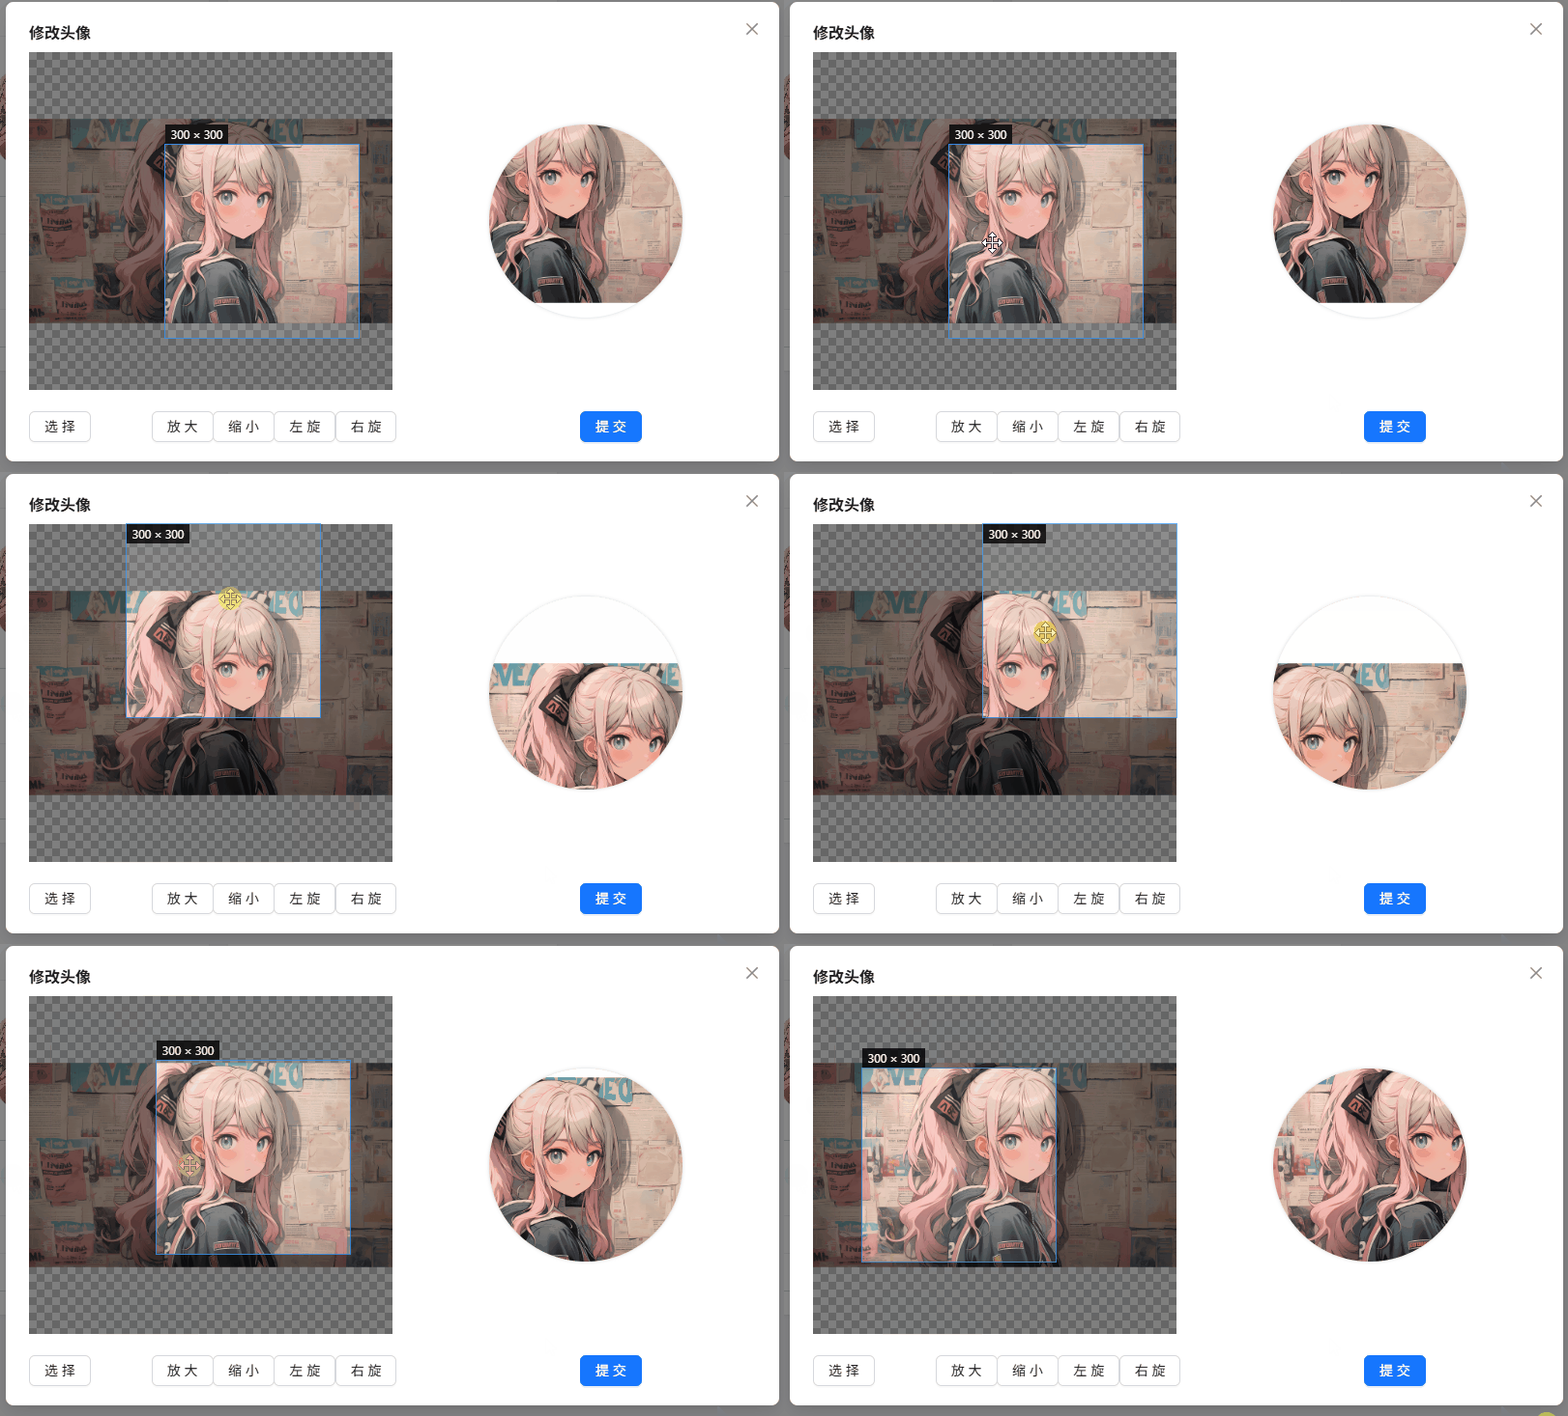
移除了 Tailwindcss 的 max-width 限制,以允许图片保持原始尺寸,添加如下样式:
/* 确保预览图正确显示 (tailwindcss 限制了 max-width 为 100%)*/
.imgs {max-width: none !important;
}

