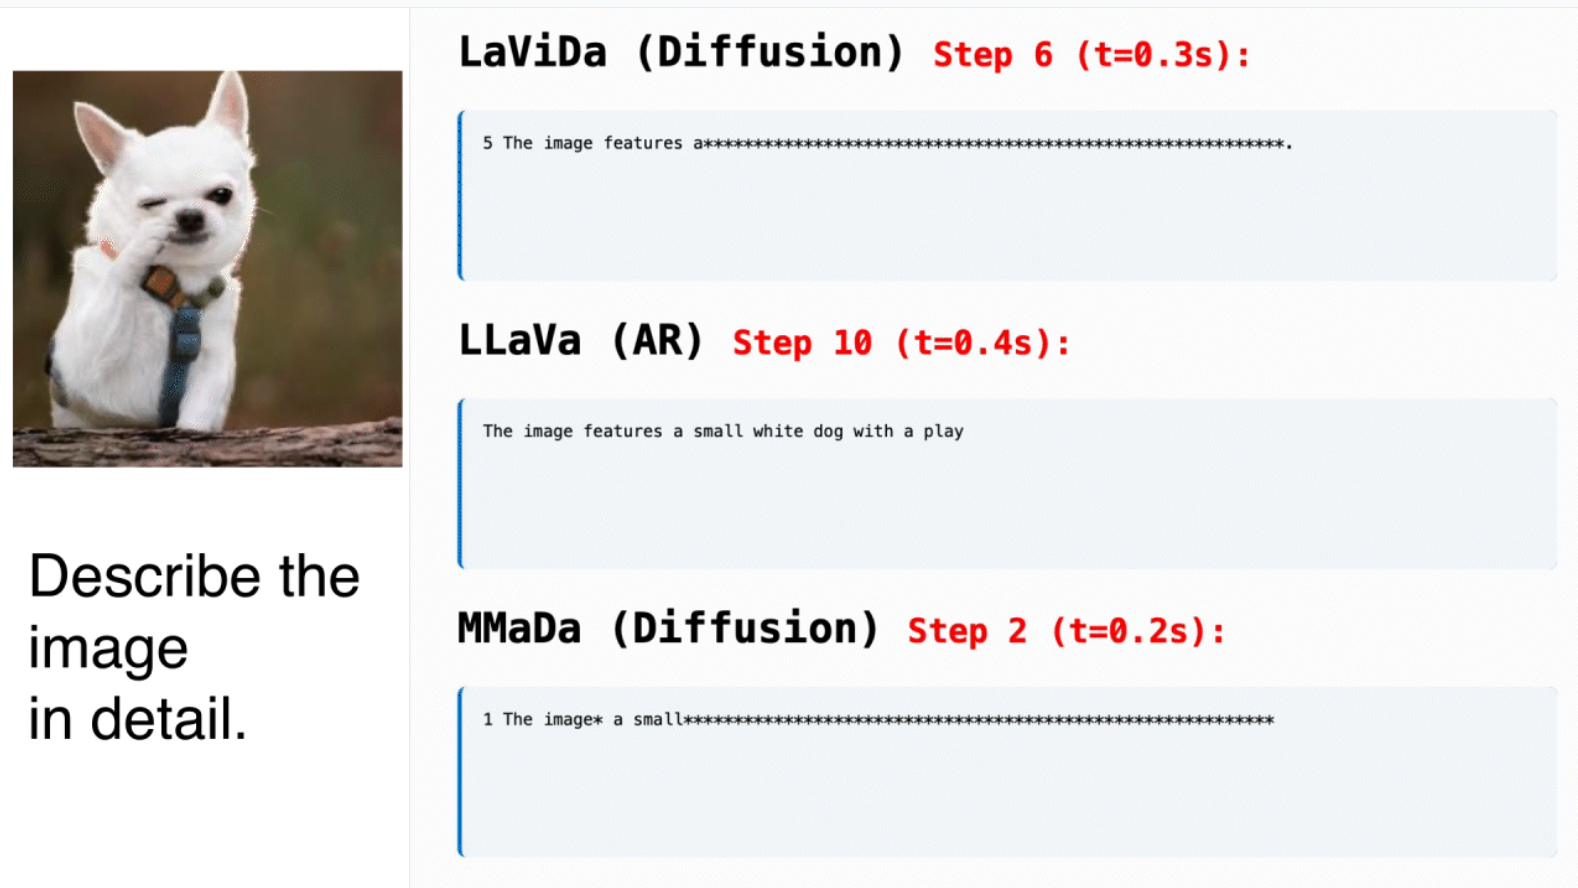
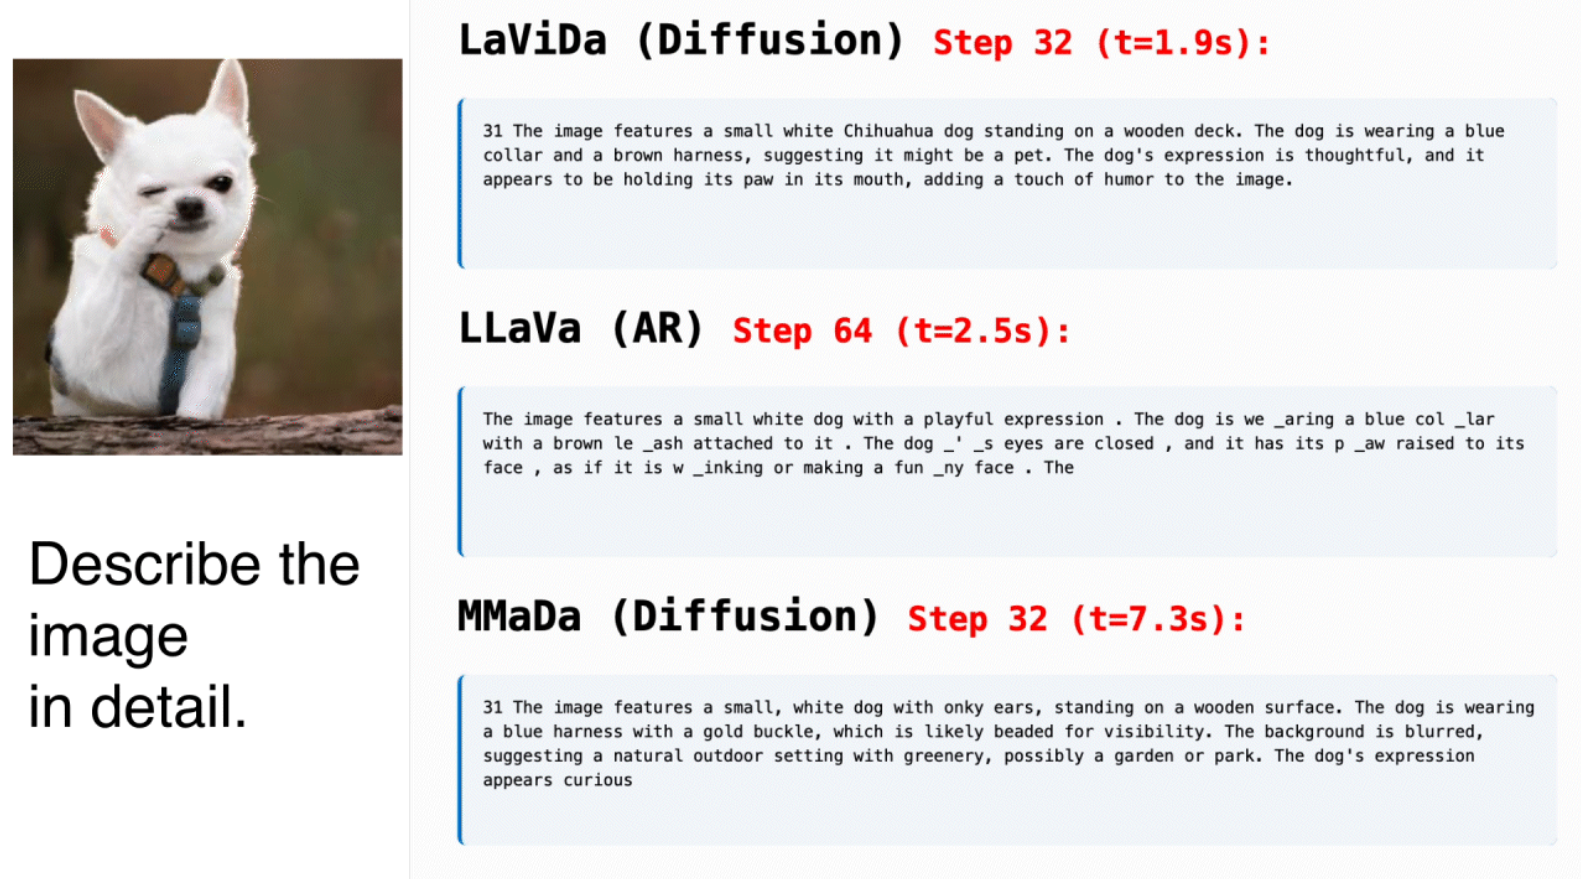
LaViDa:基于扩散模型的多模态大模型,速度超越next-token范式
1.简介
视觉语言模型(VLMs)在众多领域展现出了显著的实用性,从面向终端用户的应用(如虚拟助手)到研究任务(如科学图像描述和文档理解)。然而目前几乎所有流行的视觉语言模型都是基于大型语言模型(LLMs)构建的,这些模型以自回归(AR)的方式生成文本,即以从左到右的顺序逐个生成标记。
最近,离散扩散模型(DMs)作为一种有前景的替代方案,逐渐崭露头角。与自回归语言模型不同,扩散模型将文本生成视为一个在离散标记上的扩散过程。正向过程会逐渐将离散文本标记序列腐蚀为掩码标记序列。在推理阶段,模型从掩码标记序列开始,并通过学习到的逆向过程逐步将其转换为有意义的文本标记序列。
这篇文章提出了一个类似于LLaVA的多模态扩散大语言模型——LaViDa。通过广泛的实验,LaViDa在多个视觉理解基准测试中取得了优异的成绩,尤其是在需要双向上下文和结构化输出的任务中表现突出。这些成果不仅证明了LaViDa作为一种强大的多模态理解工具的潜力,也为未来基于扩散模型的视觉语言研究提供了新的方向和思路。
-
生成过程对比:
- diffusion大模型:从全乱码开始,不断去噪,生成干净的文字
- AR(auto regressive)大模型(next-token范式):逐词预测,依照上文预测下文
github地址:https://github.com/jacklishufan/LaViDa
-
-
2.论文详解
简介
视觉语言模型(VLMs)在众多领域展现出了显著的实用性,从面向终端用户的应用(如虚拟助手)到研究任务(如科学图像描述和文档理解)。然而目前几乎所有流行的视觉语言模型都是基于大型语言模型(LLMs)构建的,这些模型以自回归(AR)的方式生成文本,即以从左到右的顺序逐个生成标记。
尽管这些模型在许多任务中表现出色,但它们也存在一些关键限制。首先,它们的序列化生成过程本质上难以并行化,导致推理速度较慢。更重要的是,它们的从左到右的生成方式使得处理受益于双向上下文或结构约束的任务变得困难——例如文本填充。例如,生成一首每行都以特定音节开头的诗歌,或者从图像中提取预定义的 JSON 格式的结构化信息,通常需要模型在序列中填充或协调内容。即使使用精心设计的提示和示例,自回归模型仍然难以持续满足此类约束。
最近,离散扩散模型(DMs)作为一种有前景的替代方案,逐渐崭露头角。最引人注目的是,LLaDA 和 Dream 在多样化的语言任务中取得了与自回归语言模型相当的结果。与自回归语言模型不同,扩散模型将文本生成视为一个在离散标记上的扩散过程。正向过程会逐渐将离散文本标记序列腐蚀为掩码标记序列。在推理阶段,模型从掩码标记序列开始,并通过学习到的逆向过程逐步将其转换为有意义的文本标记序列。
与自回归语言模型相比,扩散模型在理论上具有多项优势,能够直接解决自回归生成的局限性。自回归语言模型每次只能生成一个标记,其吞吐量是固定的,而扩散模型则可以通过调整扩散步骤的数量灵活控制速度与质量的权衡。此外,扩散模型能够建模双向上下文,这使得它们非常适合执行文本填充等任务,能够更有效地实现受约束的生成和结构化输出格式化——这些能力在视觉语言场景中尤其宝贵,因为输出可能需要遵循特定的模式。
-
方法
模型架构
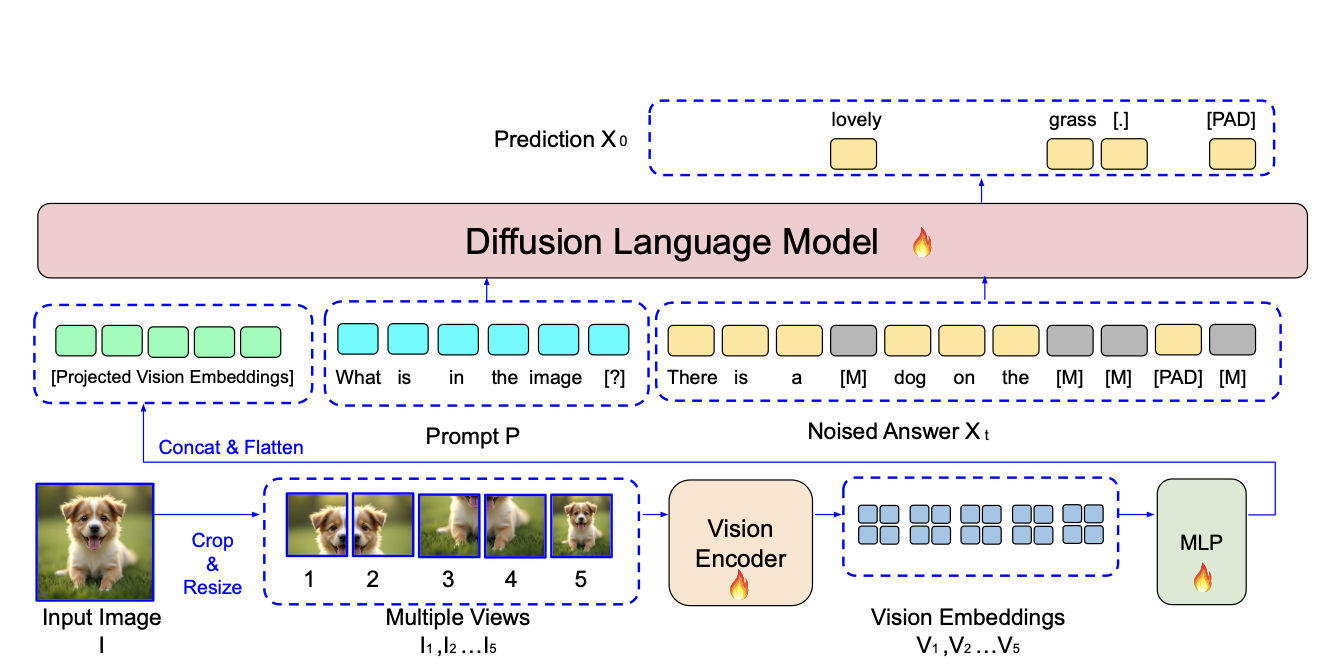
LaViDa 的模型架构遵循与常见的自回归视觉语言模型(如 LLaVa)相似的设计,由视觉编码器和扩散语言模型组成。这两部分通过一个多层感知机(MLP)投影网络连接。整体设计如图 2 所示。
视觉编码器:给定输入图像 I 和文本提示 P,作者首先将图像调整为 的大小,并将其划分为四个不重叠的
视图,记作
。此外,作者还将原始图像调整为
的大小,以获得第五个视图
。这五个视图分别通过视觉编码器(SigLIP-400M)进行编码,每个视图生成
个嵌入向量,记作
。总共每个图像生成 3645 个嵌入向量。
为了减少序列长度以提高训练效率,作者对每个视图应用 的平均池化操作,将每个视图的嵌入向量数量减少到
个,总计 980 个。这五个视图的嵌入向量被展平并拼接成一个一维序列,然后通过投影网络处理以获得扩散语言模型的最终视觉上下文。这一过程与自回归语言模型中的视觉编码过程类似,如图 2 的下半部分所示。
扩散语言模型:扩散语言模型是一个多层 Transformer,其架构与语言模型类似。唯一的重大区别在于其注意力掩码是非因果的,并且它使用扩散语言建模目标,而不是自回归模型中使用的下一个标记预测(next-token predict)。
扩散语言模型的输入包括投影后的视觉嵌入向量、提示 P 和部分掩码的响应 。最后一层 Transformer 的输出通过一个最终的线性层,以获得未掩码响应
的逐标记对数概率
。
模型的推理过程如下:
- 基于next-token范式的大模型(如GPT、qwen):根据上文所有token,预测下一个token,即所谓逐词预测
- 基于扩散的大模型(如LLaDA、Dream):从乱码开始,所有位置同时预测,逐步去噪,然后生成流畅度语句。
模型架构如下:
训练目标
每个训练样本包括一张图像 I 、文本提示 P 和来自训练数据的干净文本答案 。对于多轮对话,作者随机选择其中一轮作为“答案”,并将之前的对话历史视为“提示”。
作者首先采样一个时间步 和一个部分掩码的答案
。随后,LaViDa 进行去噪过程
,将掩码的token恢复如初。
经典的扩散视觉语言建模目标可以表述为:,其中
可分解为
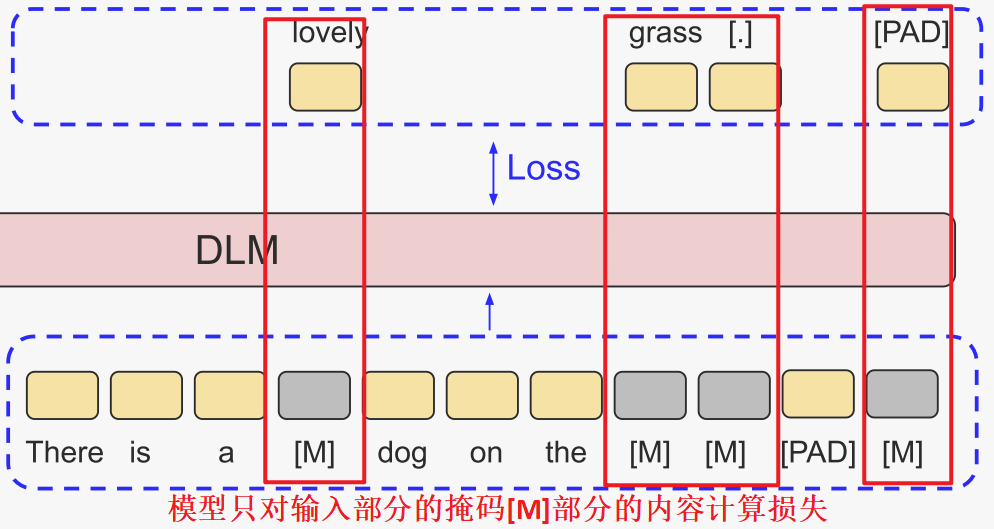
。值得注意的是,损失仅在掩码标记上计算,未掩码token不计算损失,即
,因为当
时,
不依赖于
。
-
互补掩码:先前的扩散语言模型应用随机估计器,即损失只在掩码的部位进行计算。然而,对于视觉语言任务,这导致了效率低下:
- 平均只有大约 50% 的token对损失有贡献(因为未掩码的token不计算损失)
- 关键答案标记可能没有被掩码,导致视觉编码器的梯度不对齐。例如,在 "The answer is dog." 中,关键标记 "dog" 可能在
中未被掩码,因此在损失计算中被忽略。
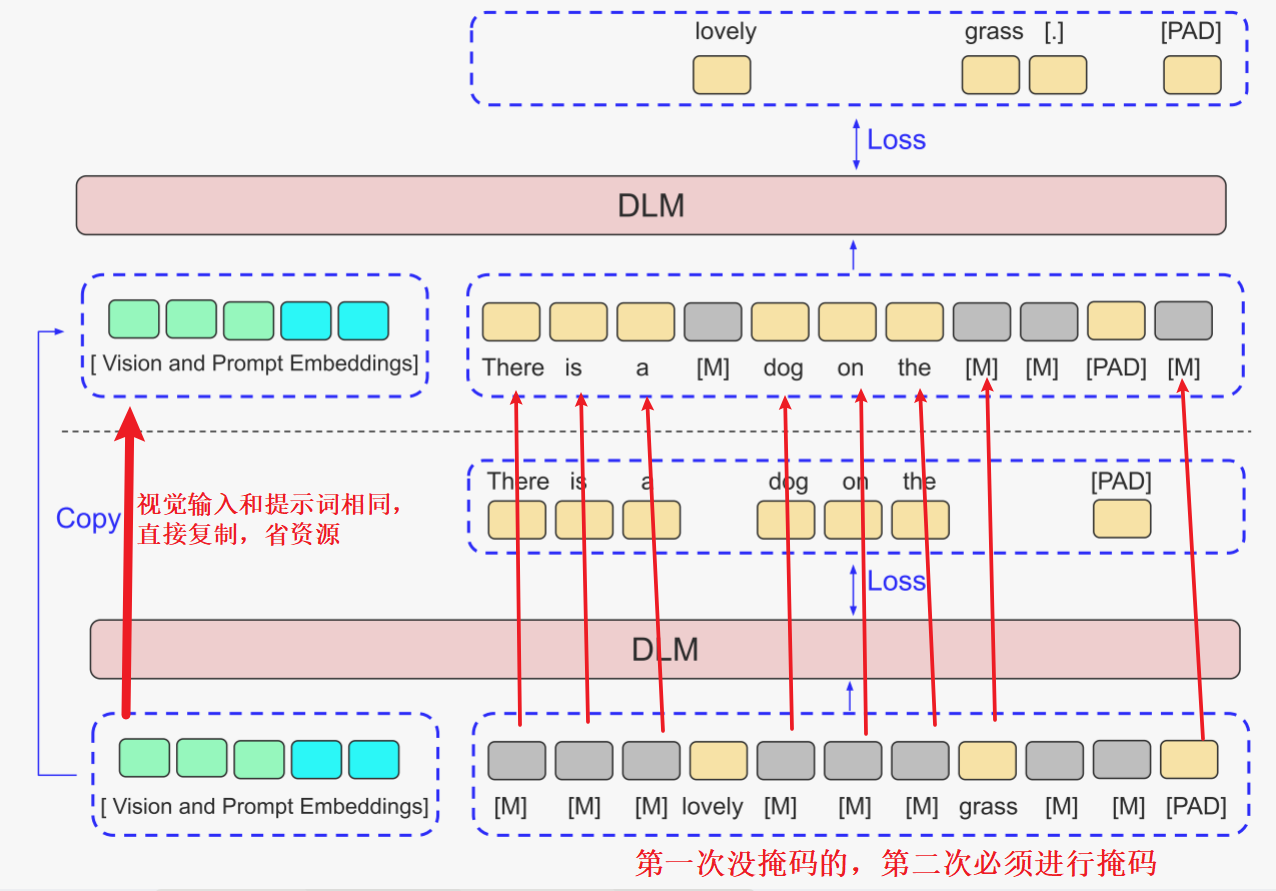
为了解决这个问题,作者引入了互补掩码:对于每个样本,作者生成两个掩码版本 和
,二者的掩码部分不相交(例如,一个掩码 "The [M] [M] dog .",另一个 "[M] answer is [M] [M]"),分别进行两次训练,这样就确保所有标记最终都用于训练,提高样本效率和梯度流。
在计算 和
上的损失时,LaViDa复制视觉嵌入以进一步提高训练效率(图中的Vision and Prompt Embeddings)。这一过程如图 3a 所示。
-
推理
在推理时,作者首先创建一个由 L 个掩码标记组成的序列 ,其中 L 是响应生成的长度。然后,作者通过 K 个离散的时间戳
逐渐解除这些掩码,其中
且
,直到作者得到一个干净、无掩码的序列
。(初始是全是*的序列,不断去噪,得到正确的文本token)
此外,作者定义 为“功能评估(NFE)的分数”来衡量样本效率。例如,当 NFE = 100% 时,扩散模型每个前向传递生成一个标记;在 NFE = 50% 时,它平均每个前向传递生成两个标记。
-
总的来说,LaViDa 的推理过程与之前的扩散模型(如 LLaDA)相似,但有两个关键区别:
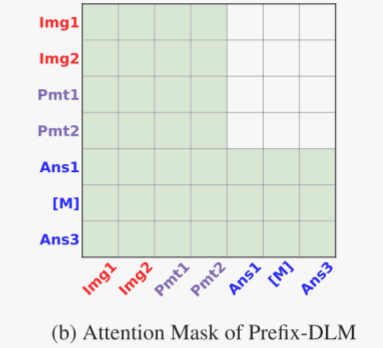
Prefix-DLM。虽然扩散模型在理论上在推理时提供更优的速度-质量权衡,但实际上它们通常比自回归模型慢,因为它们无法利用 KV 缓存,作者提出了一种受自回归前缀语言模型启发的新型 Prefix-DLM 方案。Prefix-DLM 采用一种特殊的注意力掩码,其中视觉和提示标记只能关注其他视觉和提示标记,而答案标记可以关注所有标记。图 3b 说明了这种设置。通过这种设计,模型可以缓存视觉和提示标记的键和值。实证结果表明,这在 COCO 图像描述任务中最高可加速 3.9 倍。
时间表偏移:扩散语言模型(DLMs)允许通过离散化步骤数 K 在速度和质量之间进行权衡(去噪步数越大,质量越高,速度越慢,可进行调整以权衡速度和质量)。像 LLaDA 和 Dream 这样的先前模型使用线性时间表,即在 范围内均匀地每步解除
个标记的掩码。然而,作者发现这在采样步骤较少时会导致性能下降。
受 SD3 的启发,作者采用了一种时间表偏移策略:。这里,
是一个单调映射,其中
,
。当
(作者使用
)时,该时间表是凸的——导致更多标记在早期被解除掩码。作者发现这种设置优于其他选择。
值得注意的是,这一结论与连续扩散模型如 SD3 和先前的图像生成掩码扩散模型的结论不同,后者表明凹形时间表()更可取。作者确保每一步至少有一个标记被解除掩码。
-
实验
总体而言,LaViDa 采用了一个两阶段的训练过程。
- 在预训练阶段(阶段1),仅更新投影器以使视觉嵌入与扩散语言模型(DLM)的潜在空间对齐。
- 在微调阶段(阶段2),作者联合训练所有组件以实现指令遵循。此外,作者进一步对阶段2模型进行额外步骤的微调,以获得两个专门用于推理和文本填充任务的模型(LaViDa-Reason 和 LaViDa-FIM)。
作者使用 558K 图像-文本对作为阶段1的数据,以及 1M 视觉指令遵循示例作为阶段2的数据。
主要结果
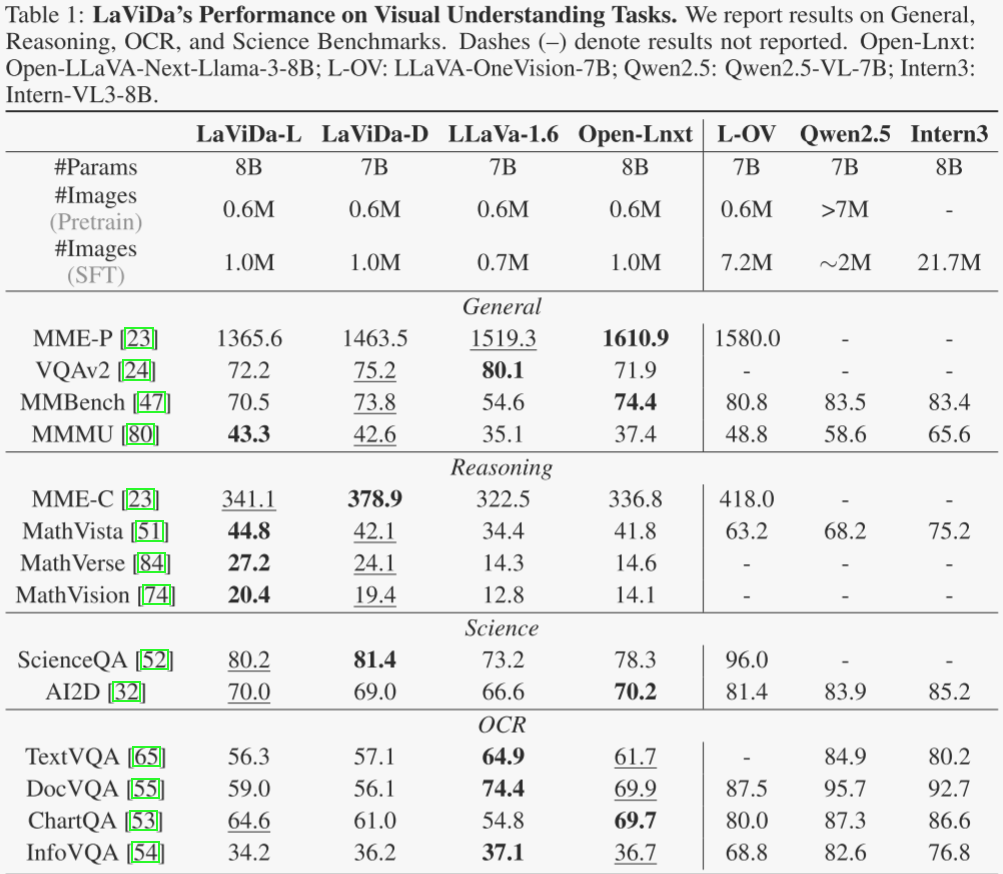
表 1 报告了作者使用 LLaDA-8B(LaViDa-L)和 Dream-7B(LaViDa-D)作为语言主干在视觉理解任务上的结果。作者与几个开源、开放数据的模型进行比较,这些模型具有相似的数据规模和参数数量:LLaVa-1.6-7B 和 OpenLLaVa-Next-Llama3-8B。作者还包括与前沿开源模型的比较,这些模型大小相似,但在更大的数据集上训练,即 LLaVa-OneVision-7B,Qwen2.5-VL-7B 和 InternVL-38B。LaViDa 在广泛的任务中表现出竞争力,这些任务跨越了通用、推理、OCR 和科学类别。
-
在一般视觉语言理解方面,LaViDa-L 在 MMMU 上取得了最高分(43.3),超过了所有可比模型。LaViDa-D 也在这一类别的多个基准测试中排名第二。对于推理任务,两个模型在数学繁重和空间基础的基准测试上超越了规模相似的基线。在科学领域,LaViDa 在 ScienceQA 上取得了最佳和次佳成绩(分别为 81.4 和 80.2),同时在基于复杂图表的基准测试 AI2D 上与 Open-Llava-Next 表现相当。最后,在 OCR 方面,LaViDa 表现出竞争力,但落后于一些最新的 AR 模型。这一差距主要是由于作者使用平均池化进行视觉标记压缩,导致细粒度空间信息的丢失。虽然考虑到作者有限的计算预算,这是必要的权衡,但它对需要精确文本识别和布局理解的任务提出了挑战。这些结果突显了 LaViDa 的优势,证明了基于扩散的方法可以与 AR 模型竞争性地扩展,同时在广泛的视觉语言任务中实现强大的性能。
推理蒸馏
先前的工作已经使用长链思考(CoT)数据对大型语言模型(LLMs)和视觉语言模型(VLMs)进行了知识蒸馏,以激发强大的推理能力。本着同样的精神,作者通过使用从强大的推理模型 VLRethinker-7B 中提取的 19.2K 个 CoT 示例进行额外的阶段3训练,来研究 LaViDa 的推理能力。作者将微调后的模型称为 LaViDa-Reason。
作者在 MathVista、MathVerse 和 MathVision 上对其进行评估,使用 CoT 生成,并与没有 CoT 的阶段2结果进行比较。作者将这些任务的最大生成长度 L 设置为 1024。作者在表 2a 中报告了这些结果。作者发现 LaViDa-Reason 在所有基准测试中都优于 LaViDa,在最具挑战性的 MathVision 推理数据集上观察到了最显著的性能提升(相对提高了 18%)。
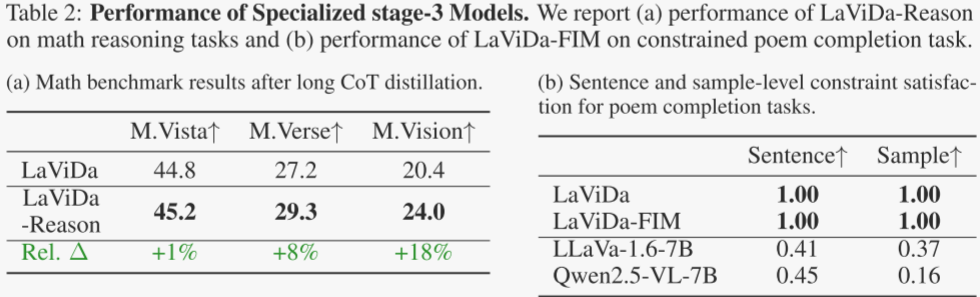
文本填充
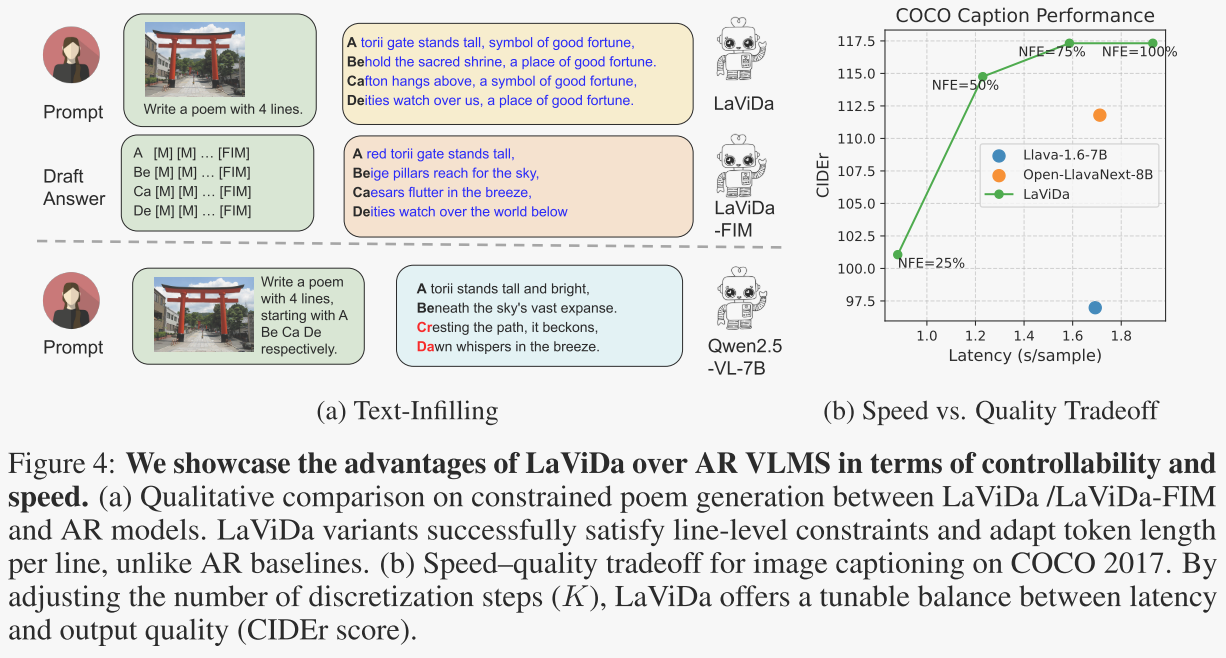
LaViDa在文本填空任务中表现出色,能够根据给定的提示和视觉输入生成符合特定格式或约束的文本。例如,在受约束的诗歌生成任务中,LaViDa能够成功满足每行的特定起始音节约束,并根据需要调整每行的标记数量。图 4a 显示了在受限诗歌生成上的定性结果,模型生成描述图像的诗歌,每行以特定的音节开头。LaViDa 和 LaViDa-FIM 都成功完成了任务,而自回归模型则不然。
速度与质量的权衡
LaViDa 提供了一种通过控制离散化步骤数 K 来实现速度与质量权衡的便捷方式。作者在 COCO 2017 验证数据集的 500 张图像上比较了不同 K 值的图像描述性能。作者将最大生成长度设置为 32,并尝试了 ,或者等效地,NFE ∈ {100%,75%,50%,25%}。作者在单个 A5000 GPU 上测量了每张图像的平均延迟,并在图 4b 中报告了 CIDEr 分数。在 NFE=100% 时,LaViDa 比自回归基线实现了更高的 CIDEr 分数,但速度稍慢。在 NFE=75% 和 NFE=50% 时,LaViDa 比自回归基线更快,并且实现了更好的质量。在 NFE=25% 时,它的速度显著更快,但在性能上落后。这表明 LaViDa 可以根据应用需求灵活调整其推理速度——允许用户根据其具体需求在生成延迟和输出质量之间进行权衡。
-
-
3.代码详解
环境配置
下载siglip:https://huggingface.co/google/siglip-so400m-patch14-384/tree/main
下载lavida-llada-v1.0-instruct:https://huggingface.co/jacklishufan/lavida-llada-v1.0-instruct/tree/main
其他版本:https://huggingface.co/collections/jacklishufan/lavida-10-682ecf5a5fa8c5df85c61ded
首先推荐使用Python3.13环境(亲测3.11可用),然后在主目录下依次安装如下包:
pip install -e .[train]
cd eval
pip install -e .
cd ../
pip install trl==0.17.0
-
predict.py
predict.py实现了一个基于图像生成文本描述的流程。
- 构建提示词模板:使用预定义对话模板构造包含图像标记的问题提示prompt_question。
- 加载模型与配置
- 处理输入图像:读取图片并使用图像处理器process_images()处理图像。
- 文本编码与预热:将提示词转为 token ID,并通过一次预热生成避免首次推理延迟。
- 图像描述生成:调用模型接口生成对图像的详细描述文本并输出结果。
完整代码如下:
# 生成提示词
conv_template = "llada"
question = DEFAULT_IMAGE_TOKEN + "\nDescribe the image in detail."      # '<image>\nDescribe the image in detail.'
conv = copy.deepcopy(conv_templates[conv_template])
conv.append_message(conv.roles[0], question)
conv.append_message(conv.roles[1], None)
prompt_question = conv.get_prompt()
print(prompt_question)# 加载模型
vision_kwargs = None
vision_kwargs = dict(mm_vision_tower="google/siglip-so400m-patch14-384",mm_resampler_type=None,mm_projector_type='mlp2x_gelu',mm_hidden_size=1152,use_mm_proj=True
)
tokenizer, model, image_processor, max_length = load_pretrained_model(pretrained, None, model_name, device_map=device_map,vision_kwargs=vision_kwargs,torch_dtype='bfloat16') # Add any other thing you want to pass in llava_model_argsmodel.eval()
model.tie_weights()         # 将模型中某些层的权重进行绑定(共享)    将输入词嵌入矩阵与最终输出的全连接层权重共享,以减少参数量并提升训练效率。
model.to(torch.bfloat16)# 加载图片
image = Image.open('images/dog.png').convert('RGB')
image_tensor = process_images([image], image_processor, model.config)       #切成4部分并保留原图的压缩版(共5份) [b,5,c,h,w]=[b,5,3,384,384]
image_tensor = [_image.to(dtype=torch.bfloat16, device=device) for _image in image_tensor]# 将输入文本转为 tokens ID
input_ids = tokenizer_image_token(prompt_question, tokenizer, IMAGE_TOKEN_INDEX, return_tensors="pt").unsqueeze(0).to(device)
image_sizes = [image.size]# warmup     目的是让模型在正式使用前完成初始化和缓存构建,以避免首次推理时的性能抖动。
_ = model.generate(input_ids,images=image_tensor,image_sizes=image_sizes,do_sample=False,temperature=0,max_new_tokens=64,block_length=64,step_ratio=1.0, # 32 stepstokenizer=tokenizer,prefix_lm=True,verbose=True,
)# 生成
t0 = time.time()
cont,hist = model.generate(     # cont最后一次的结果 [b,block_length]=[1,64]   hist:使用结果的缓存记录input_ids,images=image_tensor,image_sizes=image_sizes,do_sample=False,temperature=0.1,max_new_tokens=64,block_length=64,step_ratio=0.5, # 32 stepstokenizer=tokenizer,prefix_lm=True,verbose=True,schedule='shift',
)
t1 = time.time()
text_outputs = tokenizer.batch_decode(cont, skip_special_tokens=True)       # 解码为文本text_outputs = [text_output.lstrip('!') for text_output in text_outputs]
print(text_outputs)# 输出缓存记录
print('---------hist-------')       # 输出缓存记录
for i, v in enumerate(hist):        # 对缓存记录进行解码print(i,tokenizer.batch_decode(v, skip_special_tokens=False)[0].lstrip('!').replace("<|mdm_mask|>",'*'))
接下来我们一步步进行讲解
-
输入处理
# 生成提示词
conv_template = "llada"
question = DEFAULT_IMAGE_TOKEN + "\nDescribe the image in detail."      # '<image>\nDescribe the image in detail.'
conv = copy.deepcopy(conv_templates[conv_template])
conv.append_message(conv.roles[0], question)
conv.append_message(conv.roles[1], None)
prompt_question = conv.get_prompt()
print(prompt_question)
prompt_question如下:
<|startoftext|><|start_header_id|>system<|end_header_id|>
You are a helpful language and vision assistant. You are able to understand the visual content that the user provides, and assist the user with a variety of tasks using natural language.<|eot_id|><|start_header_id|>user<|end_header_id|>
<image>
Describe the image in detail.<|eot_id|><|start_header_id|>assistant<|end_header_id|>
# 加载图片
image = Image.open('images/dog.png').convert('RGB')
image_tensor = process_images([image], image_processor, model.config) #切成4部分并保留原图的压缩版(共5份) [b,5,c,h,w]=[b,5,3,384,384]
image_tensor = [_image.to(dtype=torch.bfloat16, device=device) for _image in image_tensor]# 将输入文本转为 tokens ID
input_ids = tokenizer_image_token(prompt_question, tokenizer, IMAGE_TOKEN_INDEX, return_tensors="pt").unsqueeze(0).to(device)
image_sizes = [image.size]其中process_images()的核心代码为process_anyres_image(),其用于将图片切分为4块,并将原图压缩至指定大小,然后返回5张图片,核心部分如下,位于llava/mm_utils.py第279行左右。
image_padded = resize_and_pad_image(image, best_resolution) # 原图压缩patches = divide_to_patches(image_padded, processor.crop_size["height"]) # 切分为4块...else:image_original_resize = image.resize((shortest_edge, shortest_edge))image_patches = [image_original_resize] + patchesimage_patches = [processor.preprocess(image_patch, return_tensors="pt")["pixel_values"][0] for image_patch in image_patches] # 处理图像return torch.stack(image_patches, dim=0)其中resize_and_pad_image()如下,该函数将输入图像按目标分辨率缩放并填充,保持原始宽高比。
def resize_and_pad_image(image, target_resolution):"""Resize and pad an image to a target resolution while maintaining aspect ratio.Args:image (PIL.Image.Image): The input image.target_resolution (tuple): The target resolution (width, height) of the image.Returns:PIL.Image.Image: The resized and padded image."""original_width, original_height = image.sizetarget_width, target_height = target_resolution# 计算宽度和高度的缩放比例 Determine which dimension (width or height) to fillscale_w = target_width / original_widthscale_h = target_height / original_heightif scale_w < scale_h: # 选择较小的缩放比例以保证图像不被拉伸# Width will be filled completelynew_width = target_widthnew_height = min(math.ceil(original_height * scale_w), target_height)else:# Height will be filled completelynew_height = target_heightnew_width = min(math.ceil(original_width * scale_h), target_width)# 将图像缩放到新尺寸 Resize the imageresized_image = image.resize((new_width, new_height))# 创建指定大小的黑色背景图像,并将缩放后的图像居中粘贴上去 Create a new image with the target size and paste the resized image onto itnew_image = Image.new("RGB", (target_width, target_height), (0, 0, 0))paste_x = (target_width - new_width) // 2paste_y = (target_height - new_height) // 2new_image.paste(resized_image, (paste_x, paste_y))return new_image其中divide_to_patches()如下,该函数将输入图像分割为指定大小的图块。
def divide_to_patches(image, patch_size):"""Divides an image into patches of a specified size.Args:image (PIL.Image.Image): The input image.patch_size (int): The size of each patch.Returns:list: A list of PIL.Image.Image objects representing the patches."""patches = []width, height = image.sizefor i in range(0, height, patch_size):for j in range(0, width, patch_size): # 按照 patch_size 步长遍历图像的每一行和每一列box = (j, i, j + patch_size, i + patch_size) patch = image.crop(box) # 对每个位置裁剪出一个子图像(patch)patches.append(patch)return patches其中tokenizer_image_token()如下,用于将文本转化为token ids:
def tokenizer_image_token(prompt, tokenizer, image_token_index=IMAGE_TOKEN_INDEX, return_tensors=None):# 将包含 <image> 标记的文本提示(prompt)转换为 token ID 序列,其中图像位置插入指定的图像 token IDprompt_chunks = [tokenizer(chunk).input_ids for chunk in prompt.split("<image>")] # 将 prompt 按 <image> 分块,并对每块进行 tokenizationdef insert_separator(X, sep): # 在每个分块后插入图像 tokenreturn [ele for sublist in zip(X, [sep] * len(X)) for ele in sublist][:-1]input_ids = []offset = 0if len(prompt_chunks) > 0 and len(prompt_chunks[0]) > 0 and prompt_chunks[0][0] == tokenizer.bos_token_id:offset = 1 # 若起始 token存在则单独保留并设置偏移input_ids.append(prompt_chunks[0][0])for x in insert_separator(prompt_chunks, [image_token_index] * (offset + 1)):input_ids.extend(x[offset:]) # 跳过每个分块前的起始 tokenif return_tensors is not None:if return_tensors == "pt":return torch.tensor(input_ids, dtype=torch.long) # 根据参数 return_tensors 决定是否返回 torch 张量raise ValueError(f"Unsupported tensor type: {return_tensors}")return input_ids-
generate()
这个函数主体包括两个部分:
- prepare_inputs_labels_for_multimodal():用于将图片和文本分别经过编码器,然后拼接在一起
- llada_generate():传入LLaDA,开始生成。
class LlavaLladaForMaskedDiffusion(LLaDAModelLM,LlavaMetaForCausalLM):@torch.no_grad()def generate(...) -> Union[GenerateOutput, torch.LongTensor]:...if images is not None:(inputs, position_ids, attention_mask, _, inputs_embeds, _) = self.prepare_inputs_labels_for_multimodal(inputs, position_ids, attention_mask, None, None, images, modalities, image_sizes=image_sizes)return llada_generate(self.get_model(),inputs_embeds=inputs_embeds,position_ids=position_ids,attention_mask=attention_mask,**kwargs)-
prepare_inputs_labels_for_multimodal()
该函数的主要功能是处理多模态输入(如图像、视频)并将其与文本输入融合,以供后续模型使用。
该函数太长,因此我们分段解释:
下面这部分是图像/视频特征编码:将输入的图像或视频进行拼接、编码,并根据配置对特征进行池化或空间合并。代码如下:
# 编码图像特征
concat_images = torch.cat([image for image in images_list], dim=0)      # [5b,c,h,w]=[5,3,384,384]
split_sizes = [image.shape[0] for image in images_list]         # 一张图片被切分的 patch 个数4+总图1  =[5]
encoded_image_features = self.encode_images(concat_images)      # [5b,729,4096]
# image_features,all_faster_video_features = self.encode_multimodals(concat_images, video_idx_in_batch, split_sizes)...for idx, image_feat in enumerate(encoded_image_features):if idx in video_idx_in_batch or ALWASY_DO_2DPOOL:image_features.append(self.get_2dPool(image_feat))      # [5b,num_tokens,d]=[5b,196,4096]else:image_features.append(image_feat)...elif mm_patch_merge_type.startswith("spatial"):new_image_features = []for image_idx, image_feature in enumerate(image_features):# 对多模态模型中的图像特征进行处理,适配不同的图像/视频输入情况。  FIXME: now assume the image is square, and split to 2x2 patches...elif image_feature.shape[0] > 1:  # 对图像特征进行处理,根据不同的图像比例和合并方式调整特征形状。 multi patches and multi images operations# rank0_print("Single-images")base_image_feature = image_feature[0]       # 完整图的压缩版image_feature = image_feature[1:]           # 四张patch图height = width = int(np.sqrt(base_image_feature.shape[0]))  #self.get_vision_tower().num_patches_per_sideassert height * width == base_image_feature.shape[0]...if image_aspect_ratio == "anyres" or "anyres_max" in image_aspect_ratio:...num_patch_width, num_patch_height = get_anyres_image_grid_shape(image_sizes[image_idx], self.config.image_grid_pinpoints, vision_tower_image_size)image_feature = image_feature.view(num_patch_height, num_patch_width, height, width, -1)    # [4,14,14,4096]->[2,2,14,14,4096]...elif "unpad" in mm_patch_merge_type:image_feature = image_feature.permute(4, 0, 2, 1, 3).contiguous()image_feature = image_feature.flatten(1, 2).flatten(2, 3)       # [4096,28,28]image_feature = unpad_image(image_feature, image_sizes[image_idx])image_feature = torch.cat((image_feature, self.model.image_newline[:, None, None].expand(*image_feature.shape[:-1], 1).to(image_feature.device)), dim=-1)       # 拼接新行  [4096,28,29]image_feature = image_feature.flatten(1, 2).transpose(0, 1)     # [812,4096]...else:image_feature = torch.cat((base_image_feature, image_feature), dim=0)       # [1008,4096]new_image_features.append(image_feature)...image_features = new_image_features...else:image_features = self.encode_images(images)
其中get_2dPool()如下,用于对输入的图像特征进行 2D 池化或插值操作,以降低空间维度。
class LlavaMetaForCausalLM(ABC):def get_2dPool(self, image_feature, stride=2):height = width = self.get_vision_tower().num_patches_per_sidenum_frames, num_tokens, num_dim = image_feature.shapeimage_feature = image_feature.view(num_frames, height, width, -1) # [5,729,4096]->[5,27,27,4096]image_feature = image_feature.permute(0, 3, 1, 2).contiguous() # [5,4096,27,27]# image_feature = nn.functional.max_pool2d(image_feature, self.config.mm_spatial_pool_stride)# breakpoint()if self.config.mm_spatial_pool_mode == "average":image_feature = nn.functional.avg_pool2d(image_feature, stride)elif self.config.mm_spatial_pool_mode == "max":image_feature = nn.functional.max_pool2d(image_feature, stride)elif self.config.mm_spatial_pool_mode == "bilinear":height, width = image_feature.shape[2:]scaled_shape = [math.ceil(height / stride), math.ceil(width / stride)] # [14,14]image_feature = nn.functional.interpolate(image_feature, size=scaled_shape, mode='bilinear') # 池化 [5,4096,14,14]else:raise ValueError(f"Unexpected mm_spatial_pool_mode: {self.config.mm_spatial_pool_mode}")image_feature = image_feature.permute(0, 2, 3, 1)image_feature = image_feature.view(num_frames, -1, num_dim) # [5,196,4096]return image_feature下面这部分是图像特征与文本嵌入融合:将编码后的图像特征插入到文本嵌入中,替换对应的图像 token。 代码如下:
# 过滤有效token     remove the padding using attention_mask -- FIXME
_input_ids = input_ids
input_ids = [cur_input_ids[cur_attention_mask] for cur_input_ids, cur_attention_mask in zip(input_ids, attention_mask)]
labels = [cur_labels[cur_attention_mask] for cur_labels, cur_attention_mask in zip(labels, attention_mask)]new_input_embeds = []
new_labels = []
new_input_ids = []
cur_image_idx = 0for batch_idx, cur_input_ids in enumerate(input_ids):num_images = (cur_input_ids == IMAGE_TOKEN_INDEX).sum()# rank0_print(num_images)if num_images == 0:cur_image_features = image_features[cur_image_idx]cur_input_embeds_1 = self.get_model().embed_tokens(cur_input_ids)cur_input_embeds = torch.cat([cur_input_embeds_1, cur_image_features[0:0]], dim=0)new_input_embeds.append(cur_input_embeds)new_labels.append(labels[batch_idx])new_input_ids.append(cur_input_ids)cur_image_idx += 1continueimage_token_indices = [-1] + torch.where(cur_input_ids == IMAGE_TOKEN_INDEX)[0].tolist() + [cur_input_ids.shape[0]]     # 将文本按图像token分割cur_input_ids_noim = []cur_labels = labels[batch_idx]cur_labels_noim = []for i in range(len(image_token_indices) - 1):cur_input_ids_noim.append(cur_input_ids[image_token_indices[i] + 1 : image_token_indices[i + 1]])   # [47] 将文本id按图像token分割cur_labels_noim.append(cur_labels[image_token_indices[i] + 1 : image_token_indices[i + 1]])         # [13] 将标签id按图像token分割split_sizes = [x.shape[0] for x in cur_labels_noim]cur_input_embeds = self.get_model().embed_tokens(torch.cat(cur_input_ids_noim))     # [len,d]=[60,4096]cur_input_embeds_no_im = torch.split(cur_input_embeds, split_sizes, dim=0)          # [[47,4096], [13,4096]]cur_new_input_embeds = []cur_new_labels = []cur_input_ids = []for i in range(num_images + 1):         # 每处理完一个文本片段后(共 num_images + 1 次),插入对应图像特征及其占位符标签和输入IDcur_new_input_embeds.append(cur_input_embeds_no_im[i])cur_new_labels.append(cur_labels_noim[i])cur_input_ids.append(cur_input_ids_noim[i])if i < num_images:try:cur_image_features = image_features[cur_image_idx]except IndexError:breakpoint()cur_image_features = image_features[cur_image_idx - 1]cur_image_idx += 1cur_new_input_embeds.append(cur_image_features)cur_new_labels.append(torch.full((cur_image_features.shape[0],), IGNORE_INDEX, device=cur_labels.device, dtype=cur_labels.dtype))cur_input_ids.append(torch.full((cur_image_features.shape[0],), IMAGE_TOKEN_INDEX, device=cur_labels.device, dtype=cur_labels.dtype))cur_new_input_embeds = [x.to(self.device) for x in cur_new_input_embeds]cur_new_input_embeds = torch.cat(cur_new_input_embeds)      # 拼接最终输入    [1068,4096]cur_new_labels = torch.cat(cur_new_labels)cur_input_ids =  torch.cat(cur_input_ids)new_input_embeds.append(cur_new_input_embeds)new_labels.append(cur_new_labels)new_input_ids.append(cur_input_ids)# 截断处理:防止总长度超过模型最大限制    Truncate sequences to max length as image embeddings can make the sequence longer
tokenizer_model_max_length = getattr(self.config, "tokenizer_model_max_length", None)new_input_embeds = [x[:tokenizer_model_max_length] for x, modality in zip(new_input_embeds, modalities)]
new_labels = [x[:tokenizer_model_max_length] for x, modality in zip(new_labels, modalities)]
new_input_ids = [x[:tokenizer_model_max_length] for x, modality in zip(new_input_ids,modalities)]new_input_embeds_padded = []
new_labels_padded = torch.full((batch_size, max_len), IGNORE_INDEX, dtype=new_labels[0].dtype, device=new_labels[0].device)
new_input_ids_padded = torch.full((batch_size, max_len), IGNORE_INDEX, dtype=new_labels[0].dtype, device=new_labels[0].device)
attention_mask = torch.zeros((batch_size, max_len), dtype=attention_mask.dtype, device=attention_mask.device)
position_ids = torch.zeros((batch_size, max_len), dtype=position_ids.dtype, device=position_ids.device)# 对输入的嵌入(embeddings)、标签(labels)和输入ID(input_ids)进行填充(padding)处理,以适配最大长度 max_len
for i, (cur_new_embed, cur_new_labels,curr_new_input_ids) in enumerate(zip(new_input_embeds, new_labels,new_input_ids)):cur_len = cur_new_embed.shape[0]if getattr(self.config, "tokenizer_padding_side", "right") == "left":new_input_embeds_padded.append(torch.cat((torch.zeros((max_len - cur_len, cur_new_embed.shape[1]), dtype=cur_new_embed.dtype, device=cur_new_embed.device), cur_new_embed), dim=0))if cur_len > 0:new_labels_padded[i, -cur_len:] = cur_new_labelsnew_input_ids_padded[i, -cur_len:] = curr_new_input_idsattention_mask[i, -cur_len:] = Trueposition_ids[i, -cur_len:] = torch.arange(0, cur_len, dtype=position_ids.dtype, device=position_ids.device)else:new_input_embeds_padded.append(torch.cat((cur_new_embed, torch.zeros((max_len - cur_len, cur_new_embed.shape[1]), dtype=cur_new_embed.dtype, device=cur_new_embed.device)), dim=0))if cur_len > 0:new_labels_padded[i, :cur_len] = cur_new_labelsnew_input_ids_padded[i, :cur_len] = curr_new_input_idsattention_mask[i, :cur_len] = Trueposition_ids[i, :cur_len] = torch.arange(0, cur_len, dtype=position_ids.dtype, device=position_ids.device)
-
llada_generate()
代码的原理实际上是不断预测每一个位置的概率logits(未归一化),然后归一化并取最大值得到概率最大值对应的token id列表x0及概率分布x0_p,每次选择topk个置信度最大的进行保留,然后将他们保留到x里面,其他的掩码掉;循环step次,最终返回x。
其余如分块处理、添加Gumbel噪声等就不多赘述,请读者自行查看,代码如下:
@ torch.no_grad()
def generate(...):steps = min(steps,max_new_tokens)       # 计算步长gen_length = max_new_tokens     # 计算生成的长度...if prefix_lm:past_key_values = model(None,input_embeddings=inputs_embeds,use_cache=True).attn_key_values     # warmup的缓存x = torch.full((1, gen_length), mask_id, dtype=torch.long).to(model.device)     #全*的初始文本串 [1,  gen_length]=[1,64]prompt = torch.full((bsz, 0), 0, dtype=torch.long).to(model.device)...num_blocks = gen_length // block_length     # 将生成过程划分为多个block,每个block独立进行masking和生成。steps = steps // num_blocksif step_per_block:steps = min(step_per_block,block_length)if step_ratio:steps = int(steps*step_ratio)if verbose:history = []for num_block in range(num_blocks):     # 分块生成block_mask_index = (x[:, prompt.shape[1] + num_block * block_length: prompt.shape[1] + (num_block + 1) * block_length:] == mask_id)num_transfer_tokens = get_num_transfer_tokens_sch(block_mask_index, steps,schedule=schedule,schedule_kwargs=schedule_kwargs)        # 为每一步预计算需要替换的 token 数量,控制生成节奏。if DEBUG_PRINT_OUTPUT:print(f"Block: {num_block + 1}/{num_blocks}, Steps per Block: {steps}, Block Length: {block_length}")print(f"Tokens generated per step {num_transfer_tokens[0]}")for i in range(steps):      # 块内多步生成mask_index = (x == mask_id)     # 是否还是*,即mask_idif mask_index.sum() == 0:continue...else:inputs_embeds_curr = model.transformer.wte(x)       #embedding [b,len,c]=[1, 64, 4096]if prefix_lm:logits = model(None,input_embeddings=inputs_embeds_curr,past_key_values=past_key_values).logits     # 模型推理与logits预测 [b, len, c]=[1, 64, 126464]else:if inputs_embeds is not None:inputs_embeds_curr[:,:inputs_embeds.shape[1]] = inputs_embedslogits = model(None,input_embeddings=inputs_embeds_curr).logitslogits_with_noise = add_gumbel_noise(logits, temperature=temperature)       # 通过add_gumbel_noise提升采样质量  [b, len, c]=[1, 64, 126464]x0 = torch.argmax(logits_with_noise, dim=-1)    # 选择每个位置的最大概率的token ids  [b, len]=[1, 64]if remasking == 'low_confidence':       # 计算每个位置的置信度p = F.softmax(logits.to(torch.float64), dim=-1)     # 将logits转换为概率分布x0_p = torch.squeeze(       # 去除多余维度,得到每个token的置信度张量x0_ptorch.gather(p, dim=-1, index=torch.unsqueeze(x0, -1)), -1)     # b, l  提取每个位置上实际预测token的概率;elif remasking == 'random':x0_p = torch.rand((x0.shape[0], x0.shape[1]), device=x0.device)elif remasking == 'entrophy':epsilon = 1e-10probs = F.softmax(logits.to(torch.float64), dim=-1)log_probs = torch.log(probs + epsilon)x0_p = torch.sum(probs * log_probs, dim=-1)elif remasking == 'margin':## similar to margin algo in Dreamp = F.softmax(logits.to(torch.float64), dim=-1)sorted_probs, _ = torch.sort(p, dim=-1, descending=True)top1_probs = sorted_probs[:, :, 0]top2_probs = sorted_probs[:, :, 1]x0_p = top1_probs - top2_probselse:raise NotImplementedError(remasking)x0_p[:, prompt.shape[1] + (num_block + 1) * block_length:] = -np.inf        # 分块生成时,非当前块的文本进行掩码x0 = torch.where(mask_index, x0, x)     # 保留未掩码位置的真实 token,保留已填充(非 mask)位置的原始 tokenconfidence = torch.where(mask_index, x0_p, -np.inf)     # 仅保留 mask 位置的置信度,其余设为 -inf。transfer_index = torch.zeros_like(x0, dtype=torch.bool, device=x0.device)for j in range(confidence.shape[0]):_, select_index = torch.topk(confidence[j], k=num_transfer_tokens[j, i])        # 选择高置信度位置进行更新transfer_index[j, select_index] = Truex[transfer_index] = x0[transfer_index]      # 当前步生成结果替换最终结果if verbose:     # 记录生成历史history.append(x.clone().cpu())if verbose:return x,historyreturn x
其中核心部分的详解如下:
首先遮掩其他block的数据,然后根据调度策略(如 constant、linear、cosine 等),为每个 step 预计算要替换多少 token。
for num_block in range(num_blocks):block_mask_index = (x[:, prompt.shape[1] + num_block * block_length : prompt.shape[1] + (num_block + 1) * block_length] == mask_id)num_transfer_tokens = get_num_transfer_tokens_sch(..., schedule=schedule, ...)其中get_num_transfer_tokens_sch()函数根据指定的调度策略(如logit_normal、shift、cosine等)计算每一步需要转移的token数量,以实现非均匀噪声调度下的扩散模型逆过程。
def get_num_transfer_tokens_sch(mask_index, steps,schedule=None,schedule_kwargs=None):...mask_num = mask_index.sum(dim=1, keepdim=True)steps = int(min(steps,mask_num[0]))t = torch.linspace(0, 1, steps+1)# at least one sample per stepif schedule =='logit_normal':sigmas = sigmoid_normal_cdf(t) elif schedule =='shift':sigmas = logit_normal_schedule(schedule_kwargs.get('shift',3),t) # 根据调度类型生成对应的噪声调度曲线(sigmas)。elif schedule == 'cosine':sigmas = cosine_schedule(t)else:sigmas = tsigmas = sigmas.to(mask_num.device)num_transfer_tokens = torch.zeros(mask_num.size(0), steps, device=mask_index.device, dtype=torch.int64)for i in range(mask_num.size(0)):# print(sigmas.shape)sigmas_sample = (sigmas*mask_num[i]).to(torch.int64) # 对每个样本计算各步的token转移总数量 [steps+1]=[33]# print(sigmas_sample)sigmas_sample = sigmas_sample[1:]-sigmas_sample[:-1] # 获取各步的token转移数量# print(sigmas_sample)# fix detalsigmas_sample = torch.clamp(sigmas_sample,1,None) # 删除为0的 should only increasedelta = sigmas_sample.sum() - mask_num[i]# breakpoint()assert delta>=0j = 0while delta > 0:j = j % len(sigmas_sample)if sigmas_sample[j] == 1:j += 1continuedelta -= 1sigmas_sample[j] -= 1j += 1# breakpoint()assert sigmas_sample.sum()==mask_num[i]num_transfer_tokens[i] = sigmas_sample#.to(torch.int64)return num_transfer_tokens.flip(-1)块内多步迭代生成
for i in range(steps): # 块内多步生成mask_index = (x == mask_id) # 是否还是*,即mask_idif mask_index.sum() == 0:continue获取嵌入并推理 :将当前 token ID 转为嵌入,输入模型推理,输出 logits(下一个 token 的概率分布);
inputs_embeds_curr = model.transformer.wte(x)
logits = model(None, input_embeddings=inputs_embeds_curr, past_key_values=past_key_values).logits
加入 Gumbel Noise 提升采样质量
logits_with_noise = add_gumbel_noise(logits, temperature=temperature)
x0 = torch.argmax(logits_with_noise, dim=-1)
其中add_gumbel_noise()函数向输入的 logits 添加 Gumbel 噪声,用于实现 Gumbel-Softmax 技巧,从而在离散采样过程中保持梯度可导。
def add_gumbel_noise(logits, temperature):if temperature == 0:return logitslogits = logits.to(torch.float64)noise = torch.rand_like(logits, dtype=torch.float64)gumbel_noise = (- torch.log(noise)) ** temperature # 向输入的 logits 添加 Gumbel 噪声return logits.exp() / gumbel_noise计算置信度(Confidence)
p: softmax 后的概率分布;x0_p: 每个位置上当前预测 token 的概率(即置信度);
p = F.softmax(logits.to(torch.float64), dim=-1)
x0_p = torch.squeeze(torch.gather(p, dim=-1, index=torch.unsqueeze(x0, -1)), -1
)
屏蔽非当前块的置信度:只允许当前 block 中的 token 被更新,后面的 token 不允许提前生成(防止错误传播)。
x0_p[:, prompt.shape[1] + (num_block + 1) * block_length:] = -np.inf构造最终预测结果
x0 = torch.where(mask_index, x0, x)     # 保留已填充位置不变
confidence = torch.where(mask_index, x0_p, -np.inf)
选择高置信度位置更新:使用 torch.topk 选取置信度最高的 k 个位置,将这些位置从 mask 替换为实际预测 token。
transfer_index = torch.zeros_like(x0, dtype=torch.bool, device=x0.device)
for j in range(confidence.shape[0]):_, select_index = torch.topk(confidence[j], k=num_transfer_tokens[j, i])transfer_index[j, select_index] = True
x[transfer_index] = x0[transfer_index]
-
缓存解码
为了方便理解,作者在predict.py的最后还提供了一个示例,用于将每一步的缓存进行解码:
# 输出缓存记录
print('---------hist-------')       # 输出缓存记录
for i, v in enumerate(hist):        # 对缓存记录进行解码print(i,tokenizer.batch_decode(v, skip_special_tokens=False)[0].lstrip('!').replace("<|mdm_mask|>",'*'))
hist的输出结果如下:
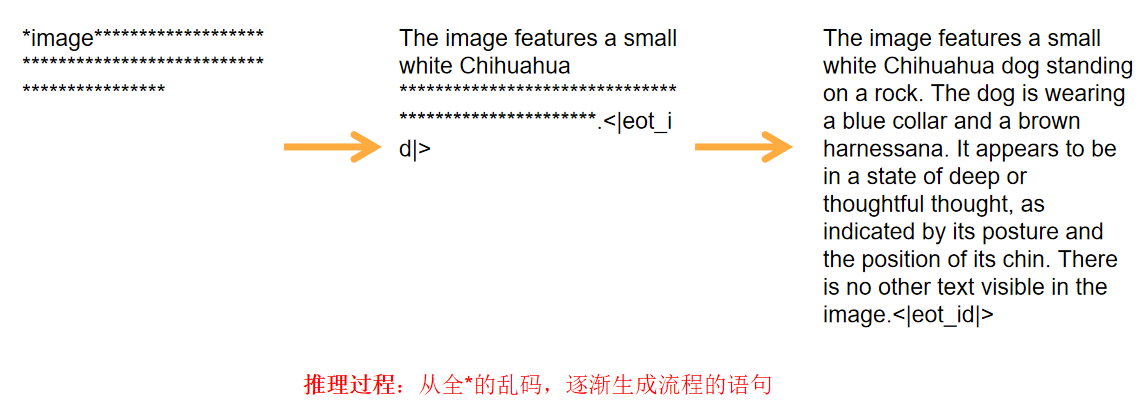
---------hist-------
0 * image**************************************************************
1 The image**************************************************************
2 The image* a************************************************************
3 The image* a***********************************************************<|eot_id|>
4 The image* a**********************************************************.<|eot_id|>
5 The image features a**********************************************************.<|eot_id|>
6 The image features a small*********************************************************.<|eot_id|>
7 The image features a small white********************************************************.<|eot_id|>
8 The image features a small white*ihu******************************************************.<|eot_id|>
9 The image features a small white*ihuahua*****************************************************.<|eot_id|>
10 The image features a small white Chihuahua*****************************************************.<|eot_id|>
11 The image features a small white Chihuahua dog****************************************************.<|eot_id|>
12 The image features a small white Chihuahua dog* on**************************************************.<|eot_id|>
13 The image features a small white Chihuahua dog* on a rock************************************************.<|eot_id|>
14 The image features a small white Chihuahua dog* on a rock** dog*********************************************.<|eot_id|>
15 The image features a small white Chihuahua dog* on a rock* The dog*********************************************.<|eot_id|>
16 The image features a small white Chihuahua dog* on a rock. The dog is********************************************.<|eot_id|>
17 The image features a small white Chihuahua dog standing on a rock. The dog is wearing*******************************************.<|eot_id|>
18 The image features a small white Chihuahua dog standing on a rock. The dog is wearing a******************************************.<|eot_id|>
19 The image features a small white Chihuahua dog standing on a rock. The dog is wearing a blue collar****************************************.<|eot_id|>
20 The image features a small white Chihuahua dog standing on a rock. The dog is wearing a blue collar and a**************************************.<|eot_id|>
21 The image features a small white Chihuahua dog standing on a rock. The dog is wearing a blue collar and a* harnessana********************************* the*.<|eot_id|>
22 The image features a small white Chihuahua dog standing on a rock. The dog is wearing a blue collar and a* harnessana.******************************** the image.<|eot_id|>
23 The image features a small white Chihuahua dog standing on a rock. The dog is wearing a blue collar and a* harnessana. It****************************** in the image.<|eot_id|>
24 The image features a small white Chihuahua dog standing on a rock. The dog is wearing a blue collar and a* harnessana. It appears to be*************************** in the image.<|eot_id|>
25 The image features a small white Chihuahua dog standing on a rock. The dog is wearing a blue collar and a brown harnessana. It appears to be in************************* visible in the image.<|eot_id|>
26 The image features a small white Chihuahua dog standing on a rock. The dog is wearing a blue collar and a brown harnessana. It appears to be in a* of******************** other text visible in the image.<|eot_id|>
27 The image features a small white Chihuahua dog standing on a rock. The dog is wearing a blue collar and a brown harnessana. It appears to be in a state of****************.** no other text visible in the image.<|eot_id|>
28 The image features a small white Chihuahua dog standing on a rock. The dog is wearing a blue collar and a brown harnessana. It appears to be in a state of deep or**************. There is no other text visible in the image.<|eot_id|>
29 The image features a small white Chihuahua dog standing on a rock. The dog is wearing a blue collar and a brown harnessana. It appears to be in a state of deep or thoughtful thought, as* by********. There is no other text visible in the image.<|eot_id|>
30 The image features a small white Chihuahua dog standing on a rock. The dog is wearing a blue collar and a brown harnessana. It appears to be in a state of deep or thoughtful thought, as indicated by its* and the** its*. There is no other text visible in the image.<|eot_id|>
31 The image features a small white Chihuahua dog standing on a rock. The dog is wearing a blue collar and a brown harnessana. It appears to be in a state of deep or thoughtful thought, as indicated by its posture and the position of its chin. There is no other text visible in the image.<|eot_id|>
-
模型架构
模型的架构如下:
- transformer:LLaDA模型,即主干大模型,由32个LLaDALlamaBlock组成,每个Block其实都是一个注意力层
- vision_tower:siglip
- mm_projector:线性层,用于将图像数据转换到大模型的空间。
LlavaLladaForMaskedDiffusion((model): LlavaLladaModel((transformer): ModuleDict((wte): Embedding(126349, 4096)(emb_drop): Dropout(p=0.0, inplace=False)(ln_f): RMSLayerNorm()(blocks): ModuleList((0-31): 32 x LLaDALlamaBlock((dropout): Dropout(p=0.0, inplace=False)(act): SiLU()(attn_out): Linear(in_features=4096, out_features=4096, bias=False)(ff_out): Linear(in_features=12288, out_features=4096, bias=False)(rotary_emb): RotaryEmbedding()(attn_norm): RMSLayerNorm()(ff_norm): RMSLayerNorm()(q_proj): Linear(in_features=4096, out_features=4096, bias=False)(k_proj): Linear(in_features=4096, out_features=4096, bias=False)(v_proj): Linear(in_features=4096, out_features=4096, bias=False)(ff_proj): Linear(in_features=4096, out_features=12288, bias=False)(up_proj): Linear(in_features=4096, out_features=12288, bias=False)))(ff_out): Linear(in_features=4096, out_features=126464, bias=False))(vision_tower): SigLipVisionTower((vision_tower): SigLipVisionModel((vision_model): SigLipVisionTransformer((embeddings): SigLipVisionEmbeddings((patch_embedding): Conv2d(3, 1152, kernel_size=(14, 14), stride=(14, 14), padding=valid)(position_embedding): Embedding(729, 1152))(encoder): SigLipEncoder((layers): ModuleList((0-25): 26 x SigLipEncoderLayer((self_attn): SigLipAttention((k_proj): Linear(in_features=1152, out_features=1152, bias=True)(v_proj): Linear(in_features=1152, out_features=1152, bias=True)(q_proj): Linear(in_features=1152, out_features=1152, bias=True)(out_proj): Linear(in_features=1152, out_features=1152, bias=True))(layer_norm1): LayerNorm((1152,), eps=1e-06, elementwise_affine=True)(mlp): SigLipMLP((activation_fn): PytorchGELUTanh()(fc1): Linear(in_features=1152, out_features=4304, bias=True)(fc2): Linear(in_features=4304, out_features=1152, bias=True))(layer_norm2): LayerNorm((1152,), eps=1e-06, elementwise_affine=True))))(post_layernorm): LayerNorm((1152,), eps=1e-06, elementwise_affine=True)(head): Identity())))(vision_resampler): IdentityMap()(mm_projector): Sequential((0): Linear(in_features=1152, out_features=4096, bias=True)(1): GELU(approximate='none')(2): Linear(in_features=4096, out_features=4096, bias=True)))
)
该函数是LLaDA模型的前向传播逻辑,主要功能如下:
- 输入处理:接受token ID或预计算的嵌入、注意力掩码、偏置等;
- 词嵌入与位置编码:将输入转换为嵌入向量,并加上位置信息;
- Transformer层处理:依次通过各层进行前向传播,支持缓存和激活检查点优化内存;
- 输出处理:应用最终归一化、生成logits并返回结果。
class LLaDAModel(nn.Module):def forward(... ) -> LLaDAOutput:...# 1.输入处理:接受token ID或预计算的嵌入、注意力掩码、偏置等;if past_key_values is None:past_length = 0else:past_length = past_key_values[0][0].size(-2)x = self.transformer.wte(input_ids) if input_embeddings is None else input_embeddings # 将输入转换为嵌入向量 [b,block_len,d]=[1,64,4096] type: ignoreif self.config.input_emb_norm: # 可选地对嵌入向量进行缩放,类似于原始 Transformer 中的做法。x = x * (self.config.d_model**0.5)if not (self.config.alibi or self.config.rope):pos = torch.arange(past_length, past_length + seq_len, dtype=torch.long, device=x.device).unsqueeze(0) # 根据当前序列的位置(考虑之前的历史长度 past_length)生成位置编码。pos_emb = self.transformer.wpe(pos) # type: ignorex = pos_emb + xx = self.transformer.emb_drop(x) # type: ignoreif attention_mask is not None and (attention_mask==0).sum()>0: # 处理注意力掩码,将无效 token(mask=0)设为极小值(负无穷),以屏蔽它们在注意力机制中的影响。attention_mask = attention_mask.to(dtype=torch.float).view(batch_size, -1)[:, None, None, :]attention_mask = (1.0 - attention_mask) * torch.finfo(attention_mask.dtype).minelse:attention_mask = Noneif ( # 偏置attention_bias is not Noneor attention_mask is not Noneor self.config.alibior past_key_values is not None):if attention_bias is None and self.config.alibi:attention_bias = get_causal_attention_bias(self.__cache, past_length + seq_len, x.device) + self.get_alibi_attention_bias(past_length + seq_len, x.device)elif attention_bias is None:attention_bias = get_causal_attention_bias(self.__cache, past_length + seq_len, x.device)elif attention_bias.dtype in (torch.int8, torch.bool):attention_bias = attention_bias.to(dtype=torch.float)attention_bias.masked_fill_(attention_bias == 0.0, torch.finfo(attention_bias.dtype).min)# Transform to the right shape and data type.mask_len = seq_lenif attention_mask is not None:mask_len = attention_mask.shape[-1]elif past_key_values is not None:mask_len = past_key_values[0][0].shape[-2] + seq_len # 1068+64=1132attention_bias = attention_bias[:, :, :mask_len, :mask_len].to(dtype=torch.float) # [1,1,mask_len, mask_len]=[1,1,1132,1132]# 添加注意力掩码 Add in the masking bias.if attention_mask is not None:attention_bias = attention_bias + attention_maskensure_finite_(attention_bias, check_neg_inf=True, check_pos_inf=False)attn_key_values: Optional[List[Tuple[torch.Tensor, torch.Tensor]]] = [] if use_cache else Noneall_hidden_states = []# 2.词嵌入与位置编码:将输入转换为嵌入向量,并加上位置信息;if prefix_length is not None:_bsz,_seq_len = x.shape[0], x.shape[1]prefix_length = prefix_length.reshape(-1).to(torch.int32).to(x.device)prefix_length.requires_grad = Falseif past_key_values is not None:past_len = past_key_values[0][0].shape[-2]def prefix_lm_dllm(b, h, q_idx, kv_idx):return (kv_idx < prefix_length[b])| (q_idx >= prefix_length[b])block_mask = create_block_mask(prefix_lm_dllm, B=_bsz, H=None, Q_LEN=_seq_len, KV_LEN=_seq_len+past_len)else:def prefix_lm_dllm(b, h, q_idx, kv_idx):q_idx_real = q_idx + past_lengthreturn (kv_idx < prefix_length[b])| (q_idx_real >= prefix_length[b])# breakpoint()block_mask = create_block_mask(prefix_lm_dllm, B=_bsz, H=None, Q_LEN=_seq_len, KV_LEN=_seq_len)else:block_mask = None# 3.Transformer层处理if self.config.block_group_size == 1:for block_idx, block in enumerate(self.transformer.blocks):if output_hidden_states:# add hidden statesall_hidden_states.append(x)layer_past = None if past_key_values is None else past_key_values[block_idx] # 缓存if ((self.activation_checkpointing_strategy == ActivationCheckpointingStrategy.whole_layer)or (self.activation_checkpointing_strategy == ActivationCheckpointingStrategy.one_in_twoand block_idx % 2 == 0)or (self.activation_checkpointing_strategy == ActivationCheckpointingStrategy.one_in_threeand block_idx % 3 == 0)or (self.activation_checkpointing_strategy == ActivationCheckpointingStrategy.one_in_fourand block_idx % 4 == 0)):x, cache = self._activation_checkpoint_fn( # Transformer层处理block, x, attention_bias, layer_past, use_cache,block_mask)else:x, cache = block(x, attention_bias=attention_bias, layer_past=layer_past, use_cache=use_cache,block_mask=block_mask)if attn_key_values is not None:assert cache is not Noneattn_key_values.append(cache)else:raise NotImplementedError("Block group size > 1 is not yet supported in LLaDA")for group_idx, block_group in enumerate(self.transformer.block_groups):if output_hidden_states:# add hidden statesall_hidden_states.append(x)layers_past = (Noneif past_key_values is Noneelse past_key_values[group_idx * self.config.block_group_size : (group_idx + 1) * self.config.block_group_size])x, cache = block_group(x, attention_bias=attention_bias, layers_past=layers_past, use_cache=use_cache,block_mask=block_mask)if attn_key_values is not None:assert cache is not Noneattn_key_values.extend(cache)if last_logits_only:x = x[:, -1, :].unsqueeze(1)# 输出处理:应用最终归一化、生成logits并返回结果。 Apply final layer norm.x = self.transformer.ln_f(x) # 应用最终归一化 [b,len,d]=[1,64,4096] type: ignoreif output_hidden_states:# add final hidden state post-final-layernorm, following HuggingFace's conventionall_hidden_states.append(x)# Get logits.if self.config.weight_tying:logits = F.linear(x, self.transformer.wte.weight, None) # type: ignoreelse:logits = self.transformer.ff_out(x) # [1,64,4096]->[1,64,126464] type: ignoreif self.config.scale_logits:logits.mul_(1 / math.sqrt(self.config.d_model))return LLaDAOutput(logits=logits, attn_key_values=attn_key_values, hidden_states=tuple(all_hidden_states) if output_hidden_states else None) # type: ignore[arg-type]
-
训练
预训练
下载预训练数据:https://huggingface.co/datasets/liuhaotian/LLaVA-Pretrain/tree/main
然后放入data/pretrain下
文件夹格式如下:
<repo root>
--data--pretrain # LCS-558K-- images-- blip_laion_cc_sbu_558k.json--Open-LLaVA-NeXT--infovqa-v1--VQAv2_train
然后运行:
scripts/train/exps/cluster/pretrain_llada.sh
或
scripts/train/exps/cluster/pretrain_dream.sh
上面的是基于LLaDA的模型,而下面是基于Dream的模型,任选一个即可。
-
Finetune
下载数据Open-LLaVa-Next:https://github.com/xiaoachen98/Open-LLaVA-NeXT/blob/master/docs/Data.md
然后放入data/Open-LLaVa-Next
下载https://huggingface.co/datasets/jacklishufan/lavida-train/tree/main
将infovqa-v1放入data/
将VQAv2_train放入data/
将open-llava-next放入data/Open-LLaVa-Next
文件夹格式如下:
<repo root>
--data--pretrain # LCS-558K--Open-LLaVA-NeXT-- ai2d-- ...-- open-llava-next --infovqa-v1--VQAv2_train
然后运行:
scripts/train/exps/cluster/llada-hd-llada-s2.sh
scripts/train/exps/cluster/llada-hd-dream-s2.sh
上面的是基于LLaDA的模型,而下面是基于Dream的模型
-
-
4.总结
这篇文章提出了一种基于离散扩散模型(DMs)的新型视觉语言模型(VLM),LaViDa,旨在解决现有自回归(AR)VLMs在推理速度和可控生成方面的局限性。文章详细介绍了LaViDa的设计、训练和推理过程,并通过一系列实验验证了其在多模态任务中的性能和优势。
LaViDa的核心思想是将视觉特征与扩散语言模型相结合,通过视觉编码器将图像信息融入模型的扩散主干网络。这种设计不仅保留了扩散模型在文本生成中的独特优势,如并行解码和双向上下文建模,还通过两阶段训练流程(预训练和监督微调)实现了对多模态任务的有效适应。在预训练阶段,LaViDa通过图像-文本对对齐视觉和语言特征;在微调阶段,模型则通过监督学习进一步优化其在特定多模态任务上的表现。
文章还介绍了LaViDa在训练和推理过程中采用的多种创新技术。例如,互补掩码策略通过确保每个标记都参与训练,提高了数据效率;前缀KV缓存技术则通过缓存视觉和提示标记的键值对,显著加速了推理速度;时间步偏移策略则通过调整每一步解码的标记数量,优化了生成质量。这些技术的结合使得LaViDa在保持高质量生成的同时,能够实现更快的推理速度和更灵活的生成控制。
在实验部分,LaViDa在多个视觉理解基准测试中展现了与自回归VLMs相当甚至更优的性能。特别是在需要双向上下文和结构化输出的任务中,LaViDa的优势更为明显。例如,在COCO图像描述任务中,LaViDa不仅实现了比现有模型更高的CIDEr分数,还通过减少扩散步骤数量实现了显著的推理加速。此外,LaViDa在文本填空任务中也表现出色,能够根据给定的提示和视觉输入生成符合特定格式或约束的文本。
文章的结论强调了LaViDa作为一种基于扩散模型的视觉语言模型的潜力。它不仅在性能上与现有的自回归VLMs相当,还在推理速度、可控生成和双向推理方面具有独特的优势。这些优势使得LaViDa能够适应不同的应用场景和需求,为多模态理解领域提供了一种新的有力工具。此外,文章还提出了未来研究的方向,包括进一步探索扩散模型在更多类型的多模态任务中的应用,以及开发更高效的训练和推理算法。