RabbitMQ可靠和延迟队列
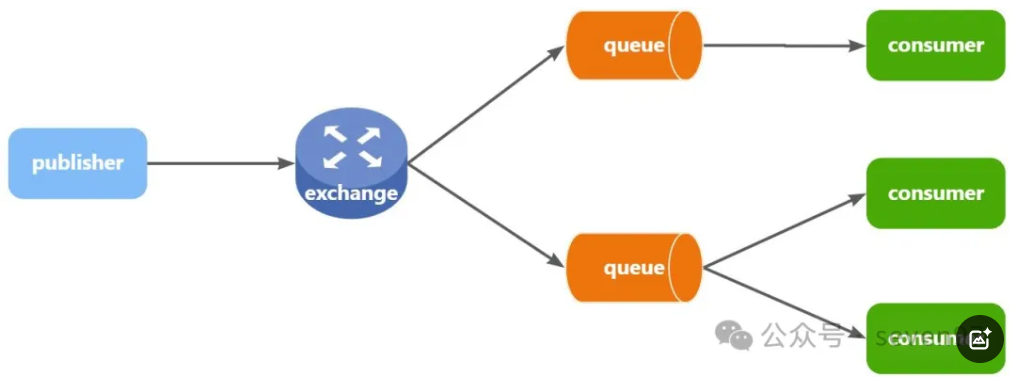
核心配置类
@Configuration
public class RabbitMQConfig{//通知队列private static final String NOTIFICATION_QUEUE = "notification_queue"; //直接交换机private static final String DIRECT_EXCHANGE = "direct_exchange";//路由键private static final String ROUTING_KEY = "notify.routing.key"; // 创建队列  (控制台Durable参数表示持久化)@Bean  public Queue notificationQueue() {  // 持久化队列(消息可靠性基础)  return new Queue(NOTIFICATION_QUEUE, true);  }  // 创建交换器  (控制台Durability表示持久化)@Bean  public DirectExchange directExchange() {  return new DirectExchange(DIRECT_EXCHANGE, true, false);  }  // 绑定队列与交换器  @Bean  public Binding queueBinding() {  return BindingBuilder.bind(notificationQueue())  .to(directExchange())  .with(ROUTING_KEY);  }  //创建Topic交换器@Beanpublic TopicExchange topicExchange(){return new TopicExchange("topic_exchange",true,false);}//绑定队列@Beanpublic Binding smsBinding(){return BindingBuilder.bind(smsQueue()).to(topicExchange()).with("notify.sms.*");}@Bean  public Binding emailBinding() {  return BindingBuilder.bind(emailQueue()).to(topicExchange()).with("notify.email.#");  }  //创建惰性队列@Beanpublic Queue lazyQueue(){return QueueBuilder.durable("lazy.queue").lazy() //开启lazy模式.build()}//开启生产者确认机制@Beanpublic RabbitTemplate rabbitTemplate(ConnectionFactory connectionFactory){RabbitTemplate remplate = new RabbitTemplate(connectionFactory);template.setConfirmCallback((correlationData,ack,cause)->{if(ack){System.out.println("消息发送成功:" + correlationData.getId());}else{System.out.println("消息发送失败:" + cause)//这里可实现重试或日志记录}});return template;}//配置死信队列@Beanpublic Queue deadLetterQueue(){return new Queue("dead_letter_queue",true);}@Beanpublic DirectExchange deadLetterExchange(){return new DirectExchange("dead_letter_exchange",true,false);}//主队列绑定死信交换器@Beanpublic Queue notificationQueue(){Map<String,Object> args = new HashMap<>();//设置死信交换器和路由键args.put("x-dead-letter-exchange", "dead_letter_exchange");  args.put("x-dead-letter-routing-key", "dead.routing.key"); return new Queue(NOTIFICATION_QUEUE, true, false, false, args);}/**配置失败消息的交换机和队列*/@Beanpublic DirectExchange errorMessageExchange(){return new DirectExchange("error.dierect");}@Beanpublic Queue errorQueue(){return new Queue("error.queue",true);}@Beanpublic Binding errorBinding(Queue errorQueue,DirectExchange errorMessageExchange){return BindingBuilder.build(errorQueue).to(errorMessageExchange).with("error");}@Beanpublic MessageRecoverer republishMessageRecoverer(RabbitTemplate rabbitTemplate){returnnew RepublishMessageRecoverer(rabbitTemplate, "error.direct", "error");}
}
消息生产者
- 生产者发送消息时连接MQ失败
- 生产者发送消息到达MQ后未找到Exchange
- 生产者发送消息到达MQ的Exchange后,未找到合适的Queue
- 消息到达MQ后,处理消息的进程发生异常
配置文件中开启重试机制
spring:rabbitmq:publisher-confirm-type: correlated #开启publisher confirm机制,并设置MQ异步回调返回回执 simple表示同步阻塞等待MQ的回执publisher-returns: true #开启publisher return 机制connection-timeout: 1s# 设置MQ的连接超时时间template:retry:enabled: true# 开启超时重试机制(阻塞式,虽然提高了消息发送成功率,但消耗性能)initial-interval: 1000ms# 失败后的初始等待时间multiplier: 1# 失败后下次的等待时长倍数,下次等待时长 = initial-interval * multipliermax-attempts: 3# 最大重试次数生产者消息确认机制(默认是关闭的,需要通过配置文件开启)
- Publisher Confirm
- Publisher Return
MQ会根据消息处理的情况返回不同的回执:
- 当消息投递到MQ,但是路由失败时,通过Publisher Return返回异常信息,同时返回ack的确认信息,代表投递成功
- 临时消息投递到了MQ,并且入队成功,返回ACK,告知投递成功
- 持久消息投递到了MQ,并且入队完成持久化,返回ACK ,告知投递成功
- 其它情况都会返回NACK,告知投递失败
/**定义ReturnCallback
*/
@Slf4j
@AllArgsConstructor
@Configuration
public class MqConfig {private final RabbitTemplate rabbitTemplate;@PostConstructpublic void init(){rabbitTemplate.setReturnsCallback(new RabbitTemplate.ReturnsCallback() {@Overridepublic void returnedMessage(ReturnedMessage returned) {log.error("触发return callback,");log.debug("exchange: {}", returned.getExchange());log.debug("routingKey: {}", returned.getRoutingKey());log.debug("message: {}", returned.getMessage());log.debug("replyCode: {}", returned.getReplyCode());log.debug("replyText: {}", returned.getReplyText());}});}
}
@Component
public class NotificationProducer {  private final RabbitTemplate rabbitTemplate;  private static final String EXCHANGE_NAME = "direct_exchange";  private static final String ROUTING_KEY = "notify.routing.key";  public NotificationProducer(RabbitTemplate rabbitTemplate) {  this.rabbitTemplate = rabbitTemplate;  }  // 发送通知消息(支持JSON格式)  public void sendNotification(String message) {  rabbitTemplate.convertAndSend(EXCHANGE_NAME, ROUTING_KEY, message);  System.out.println("发送通知消息:" + message);  } //发送短信通知(路由键:notify.sms.10086) public void sendNotification(String message,String routKey){}/**定义ConfirmCallback*/CorrelationData cd = new CorrelationData();cd.getFuture().addCallback(new ListenableFutureCallback<CorrelationData.confirm>(){@Overridepublic void onFailure(Throwable ex){//Future发生异常时的处理逻辑,基本不会触发log.error("send message fail",ex);}@Overridepublic void onsuccess(CorrelationData.Confirm result){//Future 接收到回执的处理逻辑,参数中的result就是回执内容if(result.isAck()){log.debug("发送消息成功,收到ack!");}else{log.error("发送消息失败,收到nack,reson:{}",result.getReason());}}});rabbitTemplate.convertAndSend("hmall.direct","q","hello",cd);
}
消息积压问题:
- 消费者宕机或出现网络故障
- 消息发送量激增,超过了消费者处理速度
- 消费者处理业务发生阻塞
出现消息堆积问题,RabbitMQ的内存占用就会越来越高,直到触发内存预警上限。此时RabbitMQ会将内存消息刷到磁盘上,这个行为成为PageOut. PageOut会耗费一段时间,并且会阻塞队列进程。因此在这个过程中RabbitMQ不会再处理新的消息,生产者的所有请求都会被阻塞。
RabbitMQ的3.6.0版本开始,就增加了Lazy Queues的模式,也就是惰性队列。
- 接收到消息后直接存入磁盘而非内存
- 消费者要消费消息时才会从磁盘中读取并加载到内存(也就是懒加载)
- 支持数百万条的消息存储
在3.12版本之后,LazyQueue已经成为所有队列的默认格式。因此官方推荐升级MQ为3.12版本或者所有队列都设置为LazyQueue模式。
- 添加x-queue-mod=lazy参数即可设置队列为Lazy模式
- 配置文件中可以通过@Bean创建设置lazy方法设置Lazy模式

消息消费者
- 消息接收后尚未处理突然宕机
- 消息接收后处理过程中抛出异常
消费者确认机制三种回执:
- ack 成功处理消息,RabbitMQ从队列中删除消息
- nack 消息处理失败,RabbitMQ需要再次投递消息
- reject 消息处理失败并拒绝该消息,RabbitMQ从队列中删除该消息
# 配置多线程并发数
spring:  rabbitmq:  listener:  simple:  concurrency: 10  # 最小并发数  max-concurrency: 20 # 最大并发数  acknowledge-mode: none # 不做处理   manual 手动模式,需要在业务中调用api发送ack或reject  auto 自动模式业务异常会自动返回nack,正常返回ackretry:enable: true #开启消费者失败重试initial-interval: 1000s #初始的失败等待时长为1秒multiplier: 1 # 败的等待时长倍数,下次等待时长 = multiplier * last-intervalmax-attempts: 3 #最大重试次数stateless: true# true无状态;false有状态。如果业务中包含事务,这里改为false
@Component
public class NotificationConsumer {  @RabbitListener(queues = "notification_queue")  public void processNotification(Channel channel,String message) throw Exception{  try{String content = new String(message.getBody(),"UTF-8");// 这里添加具体通知逻辑(异步执行,不阻塞队列)}catch(Exception e){//处理失败,拒绝消息并放入死信队列channel.basicReject(message.getMessageProperties().getDeliveryTag(), false);}}  //监听lazy队列@RabbitListener(queuesToDeclare = @Queue(name = "lazy.queue",durable = "true",arguments = @Argument(name = "x-queue-mode",value = "lazy")))public void listenLazyQueue(String msg){log.info("接收到lazy.queue的消息:{}",msg);}@RabbitListener(queues = "simple.queue")public void listenSimpleQueueMessage(String msg)throws InterruptedException{log.info("spring 消费者收到的消息:" + msg);if(true){throw new MessageConversionException("故意的")}log.info("消息处理完成");}
}
失败处理策略
业务Controller接口
@RestController
@RequestMapping("/notify")
public class NotificationController {  private final NotificationProducer producer;  public NotificationController(NotificationProducer producer) {  this.producer = producer;  }  // 接收通知请求,异步发送消息  @PostMapping  public String triggerNotification(@RequestBody String content) {  producer.sendNotification(content);  return "通知已提交(异步处理中)";  }
}
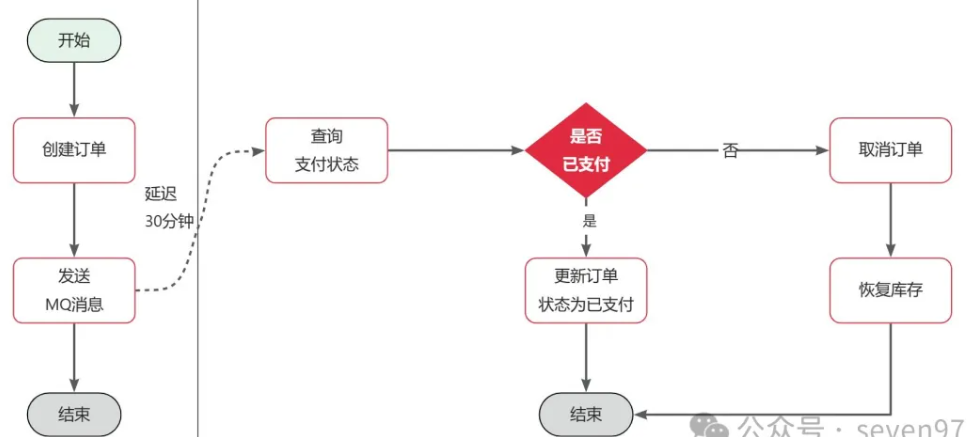
延迟消息
订单支付超时时间为30分钟,则我们应该在用户下单后的第30分钟检查订单支付状态,如果发现未支付,应该立刻取消订单,释放库存。
实现延迟消息也有两种方案:
- 死信交换机+TTL
- 延迟消息插件
当一个队列中的消息满足下列情况之一时,可以成为死信(dead letter):
- 消费者使用basic.reject或 basic.nack声明消费失败,并且消息的requeue参数设置为false
- 消息是一个过期消息,超时无人消费
- 要投递的队列消息满了,无法投递
如果一个队列中的消息已经成为死信,并且这个队列通过dead-letter-exchange属性指定了一个交换机,那么队列中的死信就会投递到这个交换机中,而这个交换机就称为死信交换机(Dead Letter Exchange)。而此时加入有队列与死信交换机绑定,则最终死信就会被投递到这个队列中。
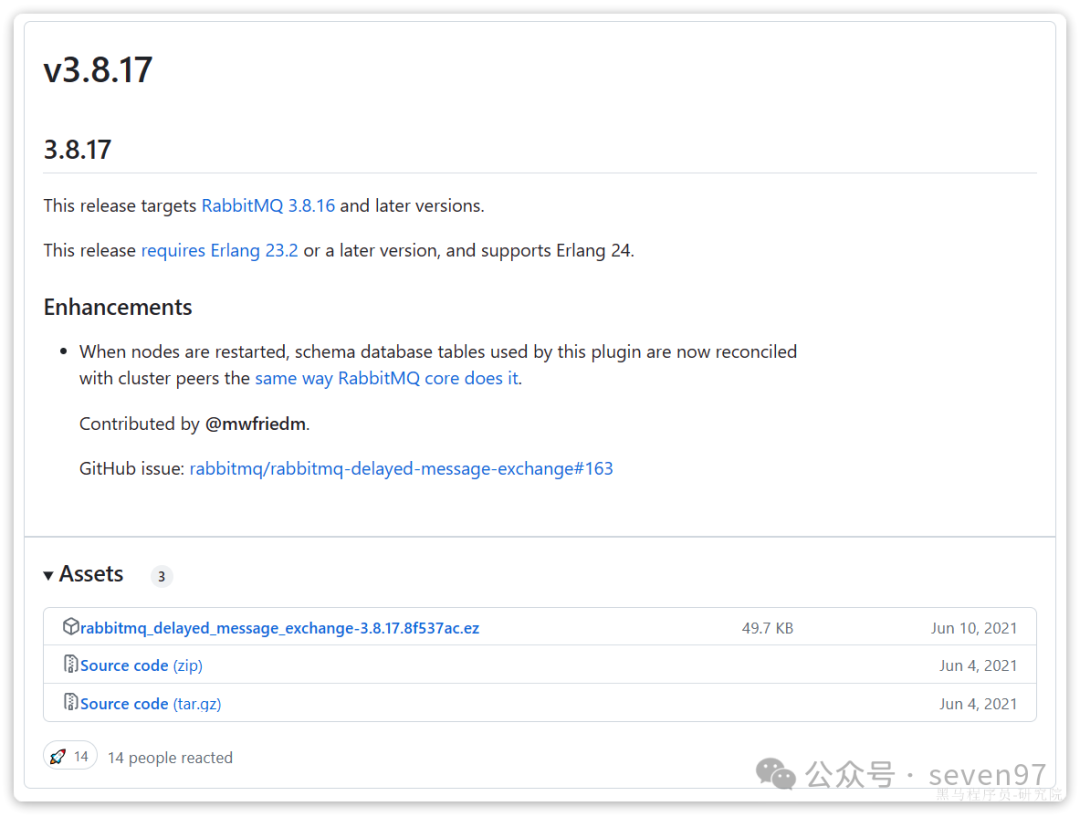
DelayExchange插件
基于死信队列虽然可以实现延迟消息,但是太麻烦了。因此RabbitMQ社区提供了一个延迟消息插件来实现相同的效果。
插件下载地址:GitHub - rabbitmq/rabbitmq-delayed-message-exchange: Delayed Messaging for RabbitMQ
基于Docker安装
docker volume inspect mq-plugins #先查看RabbitMQ的插件目录对应的数据卷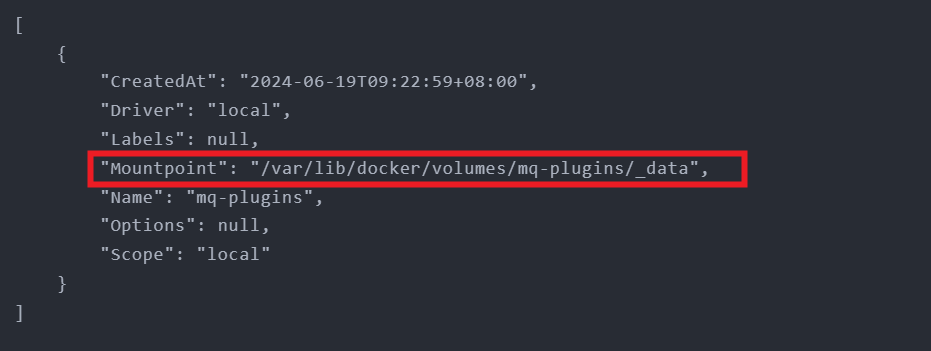
插件目录被挂载到了/var/lib/docker/volumes/mq-plugins/_data这个目录,我们上传插件到该目录下。
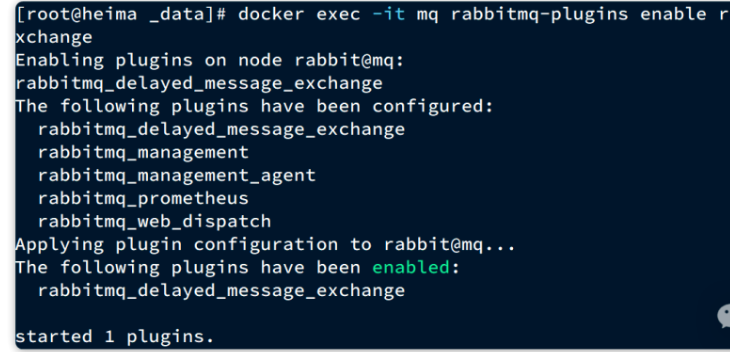
接下来执行命令,安装插件:
docker exec -it mq rabbitmq-plugins enable rabbitmq_delayed_message_exchange
运行结果如下:
//基于注解的方式声明延迟交换机
@RabbitListener(bindings = @QueueBinding(value = @Queue(name = "delay.queue",durable = "true"),exchange = @Exchange(name = "delay.direct",delayed = "true"),key = "delay"
))
public void listenDelayMessage(String msg){log.info("接收到delay.queue的延迟消息:{}",msg);
}
/**基于配置文件的方式
*/
@Slf4j
@Configuration
publicclass DelayExchangeConfig {@Beanpublic DirectExchange delayExchange(){return ExchangeBuilder.directExchange("delay.direct") // 指定交换机类型和名称.delayed() // 设置delay的属性为true.durable(true) // 持久化.build();}@Beanpublic Queue delayedQueue(){returnnew Queue("delay.queue");}@Beanpublic Binding delayQueueBinding(){return BindingBuilder.bind(delayedQueue()).to(delayExchange()).with("delay");}
}
发送延迟消息,必须通过x-delay属性设定延迟时间
@Test
void testPublisherDelayMessage() {// 1.创建消息String message = "hello, delayed message";// 2.发送消息,利用消息后置处理器添加消息头rabbitTemplate.convertAndSend("delay.direct", "delay", message, new MessagePostProcessor() {@Overridepublic Message postProcessMessage(Message message) throws AmqpException {// 添加延迟消息属性message.getMessageProperties().setDelay(5000);return message;}});
}
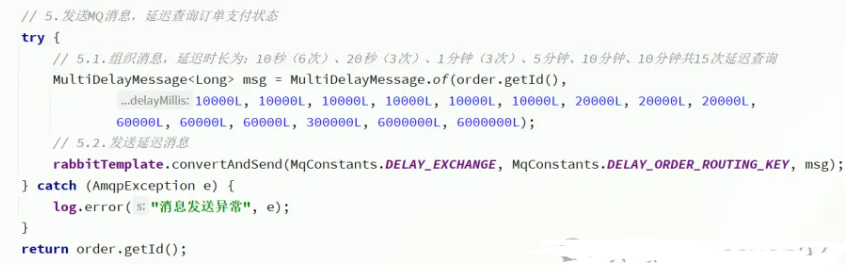
①、common模块中创建一个记录消息延迟时间的消息体
@Data
publicclass MultiDelayMessage<T> {/*** 消息体*/private T data;/*** 记录延迟时间的集合*/private List<Long> delayMillis;public MultiDelayMessage(T data, List<Long> delayMillis) {this.data = data;this.delayMillis = delayMillis;}publicstatic <T> MultiDelayMessage<T> of(T data, Long ... delayMillis){returnnew MultiDelayMessage<>(data, CollUtils.newArrayList(delayMillis));}/*** 获取并移除下一个延迟时间* @return 队列中的第一个延迟时间*/public Long removeNextDelay(){return delayMillis.remove(0);}/*** 是否还有下一个延迟时间*/public boolean hasNextDelay(){return !delayMillis.isEmpty();}
}
②、trade-service中定义一个常量类
public interface MqConstants {String DELAY_EXCHANGE = "trade.delay.topic";String DELAY_ORDER_QUEUE = "trade.order.delay.queue";String DELAY_ORDER_ROUTING_KEY = "order.query";
}
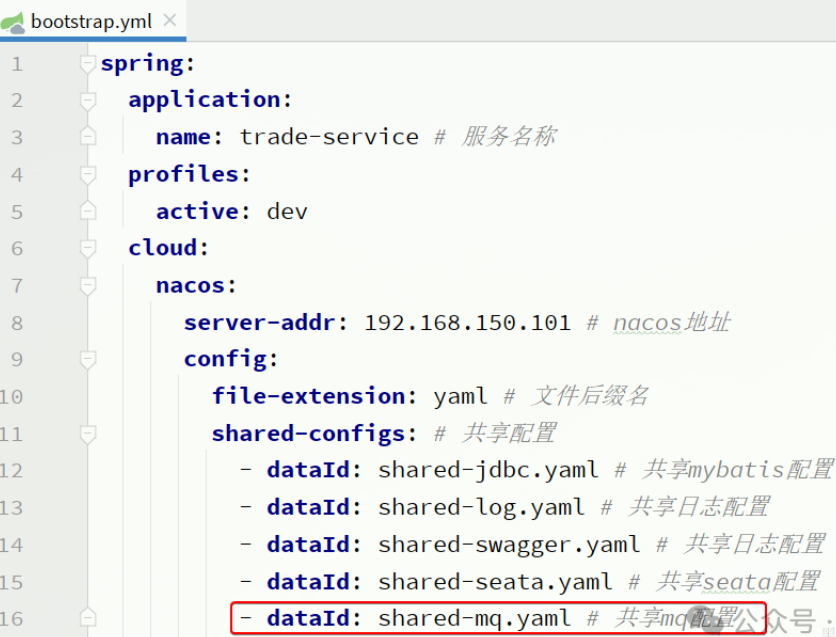
③、nacos中抽取一个共享配置shared-mq.xml
spring:rabbitmq:host: ${hm.mq.host:192.168.150.101}# 主机名port: ${hm.mq.port:5672}# 端口virtual-host: ${hm.mq.vhost:/hmall}# 虚拟主机username: ${hm.mq.un:hmall}# 用户名password: ${hm.mq.pw:123}# 密码listener:simple:prefetch: 1# 每次只能获取一条消息,处理完成才能获取下一个消息
trade-service模块添加共享配置
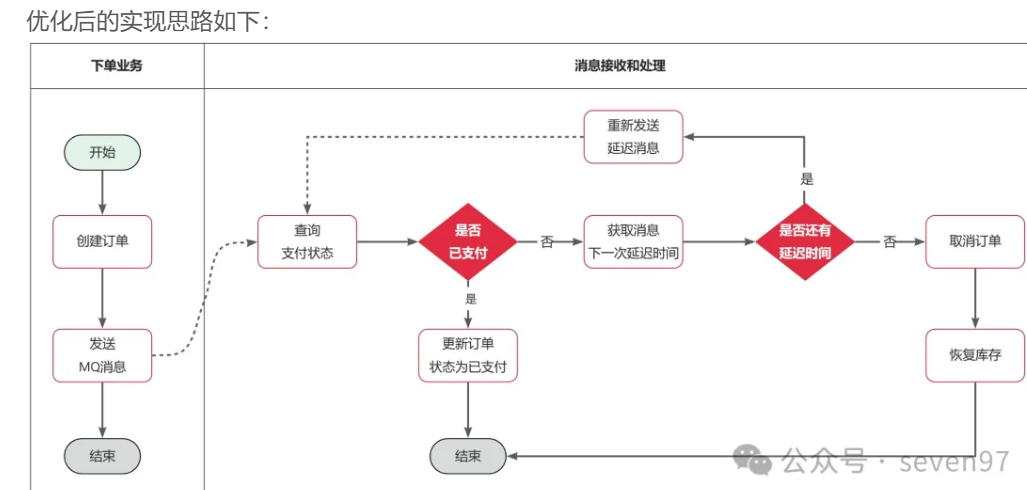
④、trade-service下单任务
⑤、消息监听
@Slf4j
@Component
@RequiredArgsConstructor
publicclass OrderStatusListener {privatefinal IOrderService orderService;privatefinal PayClient payClient;privatefinal RabbitTemplate rabbitTemplate;@RabbitListener(bindings = @QueueBinding(value = @Queue(name = MqConstants.DELAY_ORDER_QUEUE, durable = "true"),exchange = @Exchange(name = MqConstants.DELAY_EXCHANGE, type = ExchangeTypes.TOPIC),key = MqConstants.DELAY_ORDER_ROUTING_KEY))public void listenOrderCheckDelayMessage(MultiDelayMessage<Long> msg) {// 1.获取消息中的订单idLong orderId = msg.getData();// 2.查询订单,判断状态:1是未支付,大于1则是已支付或已关闭Order order = orderService.getById(orderId);if (order == null || order.getStatus() > 1) {// 订单不存在或交易已经结束,放弃处理return;}// 3.可能是未支付,查询支付服务PayOrderDTO payOrder = payClient.queryPayOrderByBizOrderNo(orderId);if (payOrder != null && payOrder.getStatus() == 3) {// 支付成功,更新订单状态orderService.markOrderPaySuccess(orderId);return;}// 4.确定未支付,判断是否还有剩余延迟时间if (msg.hasNextDelay()) {// 4.1.有延迟时间,需要重发延迟消息,先获取延迟时间的int值int delayVal = msg.removeNextDelay().intValue();// 4.2.发送延迟消息rabbitTemplate.convertAndSend(MqConstants.DELAY_EXCHANGE, MqConstants.DELAY_ORDER_ROUTING_KEY, msg,message -> {message.getMessageProperties().setDelay(delayVal);return message;});return;}// 5.没有剩余延迟时间了,说明订单超时未支付,需要取消订单orderService.cancelOrder(orderId);}
}